

Page 1
INSTRUCTION MANUAL
COPY
E
The “Software Start Guide” is included at the end of this manual.
E
INSTRUCTION
MANUAL
Page 2

Introduction
COPY
The EOS-1D X is the top-of-the-line EOS DIGITAL high-performance
digital single-lens reflex camera featuring a full-frame (approx. 36 x 24
mm) CMOS sensor with approx. 18.1 effective megapixels, Dual DIGIC
5+, normal ISO speed range of ISO 100 - 51200, approx. 100%
viewfinder coverage, high-precision and high-speed 61-point AF,
approx. 12 fps high-speed continuous shooting, RGB metering sensor,
3.2-inch LCD monitor, Live View shooting, and Full High-Definition (Full
HD) movie shooting.
The camera is highly responsive to any shooting situation, provides
many features for demanding shots, is highly reliable even in harsh
environments, and is compatible with a wide range of accessories that
expand shooting possibilities.
Refer to This Manual while Using the Camera to Further
Familiarize Yourself with the Camera
With a digital camera, you can immediately view the image you have
captured. While reading this manual, take a few test shots and see how
they come out. You can then better understand the camera.
To avoid botched pictures and accidents, first read the “Safety
Warnings” (p.400, 401) and “Handling Precautions” (p.14, 15).
Testing the Camera Before Use and Liability
After shooting, play images back and check whether they have been
properly recorded. If the camera or memory card is faulty and the
images cannot be recorded or downloaded to a computer, Canon
cannot be held liable for any loss or inconvenience caused.
Copyrights
Copyright laws in your country may prohibit the use of your recorded
images of people and certain subjects for anything but private
enjoyment. Also be aware that certain public performances, exhibitions,
etc., may prohibit photography even for private enjoyment.
CF Card
In this manual, “card” refers to a CF card. The CF card (for recording
images) is not included. Please purchase it separately.
2
Page 3
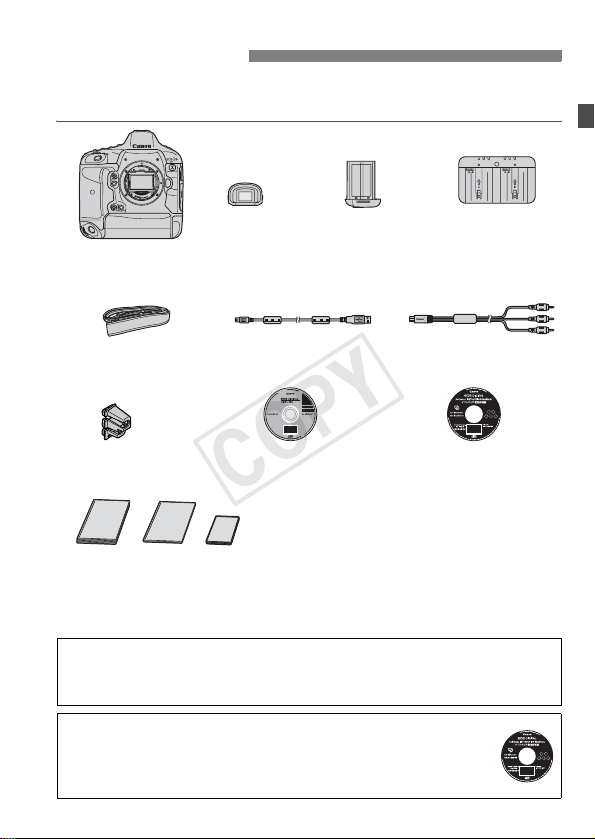
Item Check List
COPY
Before starting, check that all the following items have been included
with your camera. If anything is missing, contact your dealer.
Camera
(with body cap and
battery compartment cap)
Wide Strap L7
Cable Protector
Eyecup Eg
Interface Cable
EOS DIGITAL Solution Disk
(Software)
Battery Pack
LP-E4N
(with protective cover)
IFC-200U
Battery Charger
LC-E4N
(with protective covers)
Stereo AV Cable
AVC -D
C400ST
Software Instruction
Manuals
(1) Camera Instruction Manual (this booklet)
(2) Wired LAN Instruction Manual
(1) (3)
* Attach Eyecup Eg to the viewfinder eyepiece.
* Be careful not to lose any of the above items.
(2)
Wired LAN
To set up a wired LAN using the Ethernet RJ-45 terminal (p.21), refer to the
separate “Wired LAN Instruction Manual.”
Software Instruction Manuals
The Software Instruction Manuals are included on the CD-ROM as
PDF files. See page 409 for instructions to look up information in the
Software Instruction Manuals.
(3) Pocket Guide
3
Page 4

Conventions Used in this Manual
COPY
Icons in this Manual
<6> : Indicates the Main Dial.
<5> : Indicates the Quick Control Dial.
<9> : Indicates the Multi-controller.
<0> : Indicates the Setting button.
0, 9, 7, 8 : Indicates that the corresponding function remains
* In this manual, the icons and markings indicating the camera’s buttons, dials,
and settings correspond to the icons and markings on the camera and on the
LCD monitor.
3 : Indicates a function that can be changed by pressing the
<M> button and changing the setting.
(p.**) : Reference page numbers for more information.
: Warning to prevent shooting problems.
: Supplemental information.
: Tips or advice for better shooting.
: Problem-solving advice.
Basic Assumptions
All operations explained in this manual assume that the power switch
is already set to <1> (p.38).
It is assumed that all the menu settings and Custom Functions are
set to their defaults.
The illustrations in this manual show the camera attached with the
EF50mm f/1.4 USM lens as an example.
active for 4 sec., 6 sec., 10 sec., or 16 sec.
respectively after you let go of the button.
4
Page 5

Chapters
1
4
6
1011
121314
COPY
Introduction
Getting Started
Setting the AF and Drive Modes
2
Image Settings
3
Exposure Control
Flash Photography
5
Shooting with the LCD Monitor (Live View Shooting)
Shooting Movies
7
Image Playback
8
Post-Processing Images
9
Sensor Cleaning
Printing Images and Transferring Images to a Computer
Customizing the Camera
2
29
65
113
163
189
199
219
245
285
293
299
317
Reference
Software Start Guide
353
409
5
Page 6

Contents
COPY
Introduction 2
Item Check List................................................................................. 3
Conventions Used in this Manual..................................................... 4
Chapters........................................................................................... 5
Index to Features ........................................................................... 12
Handling Precautions ..................................................................... 14
Quick Start Guide ........................................................................... 16
Nomenclature ................................................................................. 18
Getting Started 29
1
Charging the Battery ...................................................................... 30
Installing and Removing the Battery............................................... 34
Installing and Removing the Card .................................................. 35
Turning on the Power ..................................................................... 38
Setting the Date, Time, and Zone .................................................. 40
Selecting the Interface Language................................................... 42
Attaching and Detaching a Lens .................................................... 43
Basic Operation.............................................................................. 45
Q Quick Control for Shooting Functions ....................................... 51
3 Menu Operations.................................................................. 53
Before You Start............................................................................. 55
Formatting the Card..................................................................... 55
Setting the Power-off Time/Auto Power Off................................. 57
Setting the Image Review Time................................................... 57
Reverting the Camera to the Default Settings ............................. 58
Displaying the Grid and Electronic Level........................................ 61
Feature Guide............................................................................ 63
6
Page 7

Setting the AF and Drive Modes 65
COPY
2
2: Selecting the AF Mode............................................................66
S Selecting the AF Area............................................................... 69
AF Area Selection Modes ...............................................................72
About the AF Sensor....................................................................... 75
Lenses and Usable AF Points......................................................... 76
Selecting AI Servo AF Characteristics (For a Subject) ...................82
Customizing AF Functions .............................................................. 91
Fine Adjustment of AF’s Point of Focus (AF Microadjustment) ....102
When Autofocus Fails ................................................................... 108
MF: Manual Focusing................................................................. 109
R: Selecting the Drive Mode...................................................110
j Using the Self-timer .................................................................112
Image Settings 113
3
Selecting the Card for Recording and Playback ...........................114
Setting the Image-Recording Quality ............................................ 117
i: Setting the ISO Speed ......................................................... 124
Selecting a Picture Style ............................................................... 129
Customizing a Picture Style .......................................................... 132
Registering a Picture Style............................................................ 135
B: Setting the White Balance.................................................... 137
O Custom White Balance...........................................................138
P Setting the Color Temperature............................................... 143
u White Balance Correction ........................................................144
Correcting the Brightness and Contrast Automatically (Auto Lighting Optimizer)
Noise Reduction Settings.............................................................. 147
Highlight Tone Priority................................................................... 150
Lens Peripheral Illumination / Chromatic Aberration Correction ... 151
Contents
..146
7
Page 8

Contents
COPY
Creating and Selecting a Folder................................................... 154
Changing the File Name............................................................... 156
File Numbering Methods .............................................................. 158
Setting Copyright Information....................................................... 160
Setting the Color Space ............................................................... 162
Exposure Control 163
4
d: Program AE............................................................................. 164
s: Shutter-Priority AE ................................................................ 167
f: Aperture-Priority AE ............................................................. 169
Depth of Field Preview............................................................... 170
a: Manual Exposure ................................................................... 171
q Selecting the Metering Mode.................................................. 173
O Setting Exposure Compensation............................................. 175
h Auto Exposure Bracketing (AEB)........................................... 176
A AE Lock................................................................................... 177
Bulb Exposures ............................................................................ 178
P Multiple Exposures ................................................................. 180
2 Mirror Lockup ........................................................................ 187
Flash Photography 189
5
D Flash Photography ................................................................... 190
Setting the Flash .......................................................................... 193
Shooting with the LCD Monitor (Live View Shooting) 199
6
A Preparing for Live View Shooting........................................... 200
A Shooting with the LCD Monitor .............................................. 201
Shooting Function Settings .......................................................... 205
Menu Function Settings................................................................ 206
8
Page 9

Using AF to Focus ........................................................................209
COPY
Focusing Manually ........................................................................ 216
Shooting Movies 219
7
k Preparing to Shoot Movies .....................................................220
k Shooting Movies .....................................................................221
Autoexposure Shooting..............................................................221
Shutter-priority AE......................................................................222
Aperture-priority AE.................................................................... 223
Manual Exposure Shooting ........................................................ 225
Shooting Still Photos .................................................................. 230
Shooting Function Settings ........................................................... 232
Setting the Movie-Recording Size................................................. 233
Setting the Sound Recording ........................................................ 236
Silent Control ................................................................................238
Setting the Time Code ..................................................................239
Menu Function Settings ................................................................241
Image Playback 245
8
x Image Playback ...................................................................... 246
B: Shooting Information Display .............................................. 248
HI Searching for Images Quickly............................................. 251
u Magnified View ........................................................................ 253
b Rotating the Image ..................................................................255
Setting Ratings.............................................................................. 256
Q Quick Control During Playback ...............................................258
k Enjoying Movies...................................................................... 260
k Playing Movies........................................................................ 262
X Editing the Movie’s First and Last Scenes...............................264
Slide Show (Auto Playback).......................................................... 266
Contents
9
Page 10

Contents
COPY
Viewing the Images on TV ........................................................... 269
J Protecting Images................................................................... 273
K Recording and Playing Voice Memos ..................................... 275
a Copying Images ...................................................................... 277
L Erasing Images........................................................................ 280
Changing Image Playback Settings ............................................. 282
Adjusting the LCD Monitor Brightness....................................... 282
Auto Rotation of Vertical Images ............................................... 283
Post-Processing Images 285
9
R Processing RAW Images with the Camera .......................... 286
S Resize..................................................................................... 291
Sensor Cleaning 293
10
f Automatic Sensor Cleaning .................................................. 294
Appending Dust Delete Data........................................................ 295
Manual Sensor Cleaning .............................................................. 297
Printing Images and Transferring Images to a Computer
11
Preparing to Print ......................................................................... 300
wPrinting.................................................................................... 302
Trimming the Image................................................................... 307
W Digital Print Order Format (DPOF) ......................................... 309
W Direct Printing with DPOF....................................................... 312
d Transferring Images to a Personal Computer........................ 313
299
Customizing the Camera 317
12
Custom Functions ........................................................................ 318
10
Page 11

Custom Function Settings.............................................................320
COPY
C.Fn1: Exposure ........................................................................320
C.Fn2: Exposure ........................................................................323
C.Fn3: Drive ............................................................................... 326
C.Fn4: Disp./Operation ..............................................................327
C.Fn5: Operation........................................................................ 329
C.Fn6: Others............................................................................. 331
85: Custom Controls ..................................................................333
Registering My Menu .................................................................... 346
Saving and Loading Camera Settings ..........................................347
w: Registering Custom Shooting Modes ...................................... 350
Reference 353
13
Function Availability Table According to Shooting Mode .............. 354
System Map ..................................................................................356
B Button Functions .................................................................. 358
Checking the Battery Information.................................................. 360
Using a Household Power Outlet..................................................361
Replacing the Date/Time Battery .................................................. 362
Menu Settings ............................................................................... 363
Troubleshooting Guide.................................................................. 372
System Status Display .................................................................. 385
Error Codes................................................................................... 388
Specifications................................................................................389
Safety Warnings............................................................................ 400
Contents
Software Start Guide 409
14
Software Start Guide..................................................................... 410
Index .............................................................................................413
11
Page 12

Index to Features
COPY
Power
Charging the battery Î p.30
Battery check Î p.39
Battery information check
Power outlet Î p.361
Auto power off Î p.57
Î p.360
Card
Format Î p.55
Select card Î p.114
Release shutter without card
Î p.36
Lens
Attaching/Detaching Î p.43
Basic Settings
Language Î p.42
Date/Time/Zone Î p.40
Beeper Î p.364
Copyright information Î p.160
Clear all camera settings Î p.58
Viewfinder
Dioptric adjustment Î p.45
Eyepiece shutter Î p.179
Grid display Î p.61
Electronic level Î p.61
Focusing Screen Î p.327
LCD monitor
Brightness adjustment Î p.282
Electronic level Î p.62
Feature guide Î p.63
AF
AF mode Î p.66
AF area selection mode Î p.69
12
AF point selection Î p.71
AI Servo AF characteristics
Auto AF point selection:
EOS iTR AF Î p.95
AF Custom Functions Î p.91
AF Microadjustment Î p.102
Manual focusing Î p.109
Î p.82
Metering
Metering mode Î p.173
Multi-spot metering Î p.174
Drive
Drive mode Î p.110
Self-timer Î p.112
Maximum burst Î p.122
Recording Images
Record func. Î p.114
Create/select a folder Î p.154
File name Î p.156
File numbering Î p.158
Image Quality
Image size Î p.117
JPEG quality (Compression rate)
ISO speed Î p.124
Picture Style Î p.129
White balance Î p.137
Auto Lighting Optimizer Î p.146
Noise reduction for high ISO speeds
Noise reduction for long exposures
Highlight tone priority Î p.150
Peripheral illumination correction
Chromatic aberration correction
Color space Î p.162
Î p.123
Î p.147
Î p.148
Î p.151
Î p.152
Page 13

Index to Features
COPY
Shooting
Shooting mode Î p.24
Multiple exposures Î p.180
Mirror lockup Î p.187
Depth-of-field preview Î p.170
Remote Switch Î p.179
Quick Control Î p.51
Exposure Adjustment
Exposure compensation Î p.175
AEB Î p.176
AE lock Î p.177
Safety shift Î p.322
Flash
External flash Î p.189
External flash function
settings Î p.193
External Speedlite
Custom Functions Î p.198
Live View shooting
Live View shooting Î p.199
Focusing Î p.209
Movie Shooting
Movie shooting Î p.219
Movie recording size Î p.233
Sound recording Î p.236
Time code Î p.239
Still photo shooting Î p.230
Playback
Image review time Î p.57
Single-image display Î p.246
Shooting information display
Index display Î p.251
Î p.248
Image browsing (Jump display)
Magnified view Î p.253
Image rotate Î p.255
Rating Î p.256
Movie playback Î p.262
Slide show Î p.266
Viewing images on TV Î p.269
Protect Î p.273
Voi ce mem o Î p.275
Copying Î p.277
Erase Î p.280
Î p.252
Image Editing
RAW image processing Î p.286
Resize Î p.291
Printing and Transferring Images
PictBridge Î p.300
Print Order (DPOF) Î p.309
Image transfer Î p.313
Wired LAN
Wired LAN Î Separate booklet
Customization
Custom Functions (C.Fn) Î p.318
Custom Controls Î p.333
My Menu Î p.346
Saving camera settings Î p.347
Custom shooting mode Î p.350
Sensor Cleaning and Dust Reduction
Sensor cleaning Î p.294
Append Dust Delete Data Î p.295
Error and Caution Messages
System status display Î p.385
13
Page 14

Handling Precautions
COPY
Camera Care
This camera is a precision instrument. Do not drop it or subject it to physical
shock.
The camera is not waterproof and cannot be used underwater. If you
accidentally drop the camera into water, promptly consult your nearest
Canon Service Center. Wipe off any water droplets with a dry cloth. If the
camera has been exposed to salty air, wipe it with a well-wrung wet cloth.
Never leave the camera near anything having a strong magnetic field such
as a magnet or electric motor. Also avoid using or leaving the camera near
anything emitting strong radio waves such as a large antenna. Strong
magnetic fields can cause camera misoperation or destroy image data.
Do not leave the camera in excessive heat such as in a car in direct sunlight.
High temperatures can cause the camera to malfunction.
The camera contains precision electronic circuitry. Never attempt to
disassemble the camera yourself.
Do not block the mirror operation with your finger, etc. Doing so may cause a
malfunction.
Use a blower to blow away dust on the lens, viewfinder, reflex mirror, and
focusing screen. Do not use cleaners that contain organic solvents to clean
the camera body or lens. For stubborn dirt, take the camera to the nearest
Canon Service Center.
Do not touch the camera’s electrical contacts with your fingers. This is to
prevent the contacts from corroding. Corroded contacts can cause camera
misoperation.
If the camera is suddenly brought in from the cold into a warm room,
condensation may form on the camera and internal parts. To prevent
condensation, first put the camera in a sealed plastic bag and let it adjust to
the warmer temperature before taking it out of the bag.
If condensation forms on the camera, do not use the camera. This is to avoid
damaging the camera. If there is condensation, remove the lens, card and
battery from the camera, and wait until the condensation has evaporated
before using the camera.
If the camera will not be used for an extended period, remove the battery
and store the camera in a cool, dry, well-ventilated location. Even while the
camera is in storage, press the shutter button a few times once in a while to
check that the camera is still working.
Avoid storing the camera where there are corrosive chemicals such as a
darkroom or chemical lab.
If the camera has not been used for an extended period, test all its functions
before using it. If you have not used the camera for some time or if there is
an important shoot coming up, have the camera checked by your Canon
dealer or check the camera yourself and make sure it is working properly.
14
Page 15
Handling Precautions
COPY
LCD Panel and LCD Monitor
Although the LCD monitor is manufactured with very high precision
technology with over 99.99% effective pixels, there may be a few dead pixels
among the remaining 0.01% or less pixels. Dead pixels displaying only black
or red, etc., are not a malfunction. They do not affect the images recorded.
If the LCD monitor is left on for a prolonged period, screen burn-in may occur
where you see remnants of what was displayed. However, this is only
temporary and will disappear when the camera is left unused for a few days.
In low or high temperatures, the LCD monitor display may seem slow or it
may look black. It will return to normal at room temperature.
Cards
To protect the card and its recorded data, note the following:
Do not drop, bend, or wet the card. Do not subject it to excessive force,
physical shock, or vibration.
Do not store or use the card near anything having a strong magnetic field
such as a TV set, speakers, or magnet. Also avoid places prone to having
static electricity.
Do not leave the card in direct sunlight or near a heat source.
Store the card in a case.
Do not store the card in hot, dusty, or humid locations.
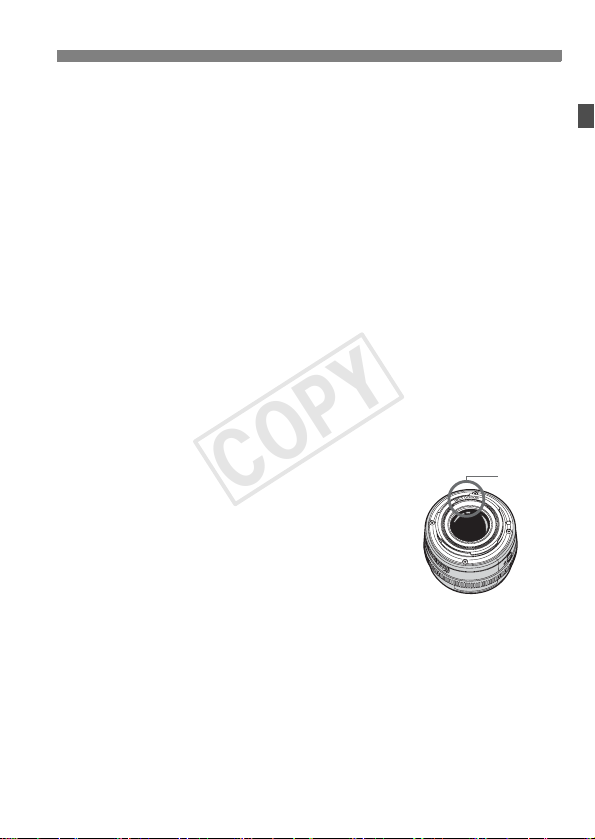
Lens
After detaching the lens from the camera, attach the lens
caps and put down the lens with the rear end up to avoid
scratching the lens surface and electrical contacts.
Cautions During Prolonged Use
If you use continuous shooting, Live View shooting, or movie shooting for a
prolonged period, the camera may become hot. Although this is not a
malfunction, holding the hot camera for a long period can cause slight skin
burns.
Contacts
15
Page 16
Quick Start Guide
COPY
1
2
3
4
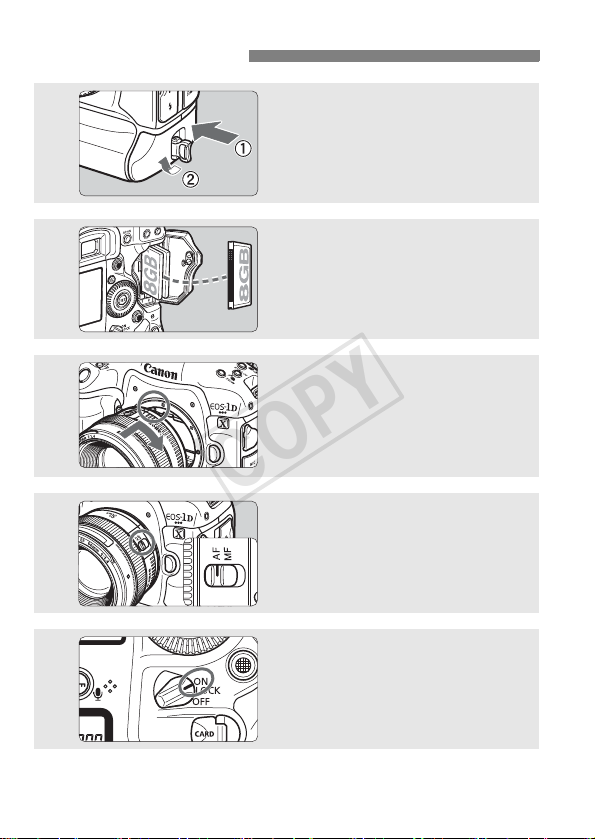
Insert the battery (p.34).
To charge the battery, see page 30.
Insert a card (p.35).
Two cards can be inserted.
Attach the lens (p.43).
Align it with the red dot.
Set the lens focus mode switch
to <f> (p.43).
16
5
Set the power switch to <1>
(p.38).
Page 17
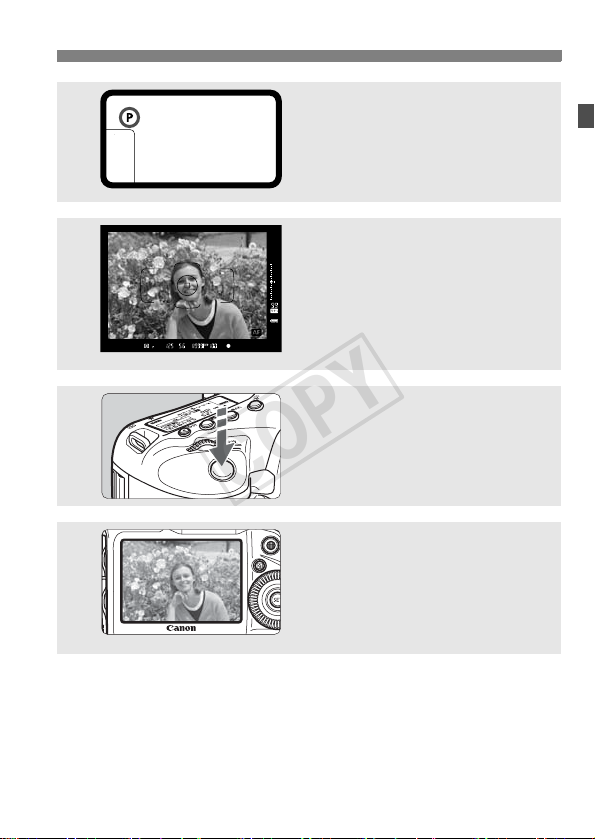
6
COPY
7
8
9
Quick Start Guide
Set the shooting mode to <d>
(p.164).
Press the <W> button.
Look at the top LCD panel and turn
the <6/5> dial to select <d>.
Focus the subject (p.46).
Look through the viewfinder and
aim the viewfinder center over the
subject.
Press the shutter button halfway,
and the camera will focus the
subject.
Take the picture (p.46).
Press the shutter button completely
to take the picture.
Review the picture (p.57).
The captured image will be
displayed for 2 sec. on the LCD
monitor.
To display the image again, press
the <x> button (p.246).
To shoot while looking at the LCD monitor, see “Live View
Shooting” (p.199).
To view the images captured so far, see “Image Playback” (p.246).
To delete an image, see “Erasing Images” (p.280).
17
Page 18
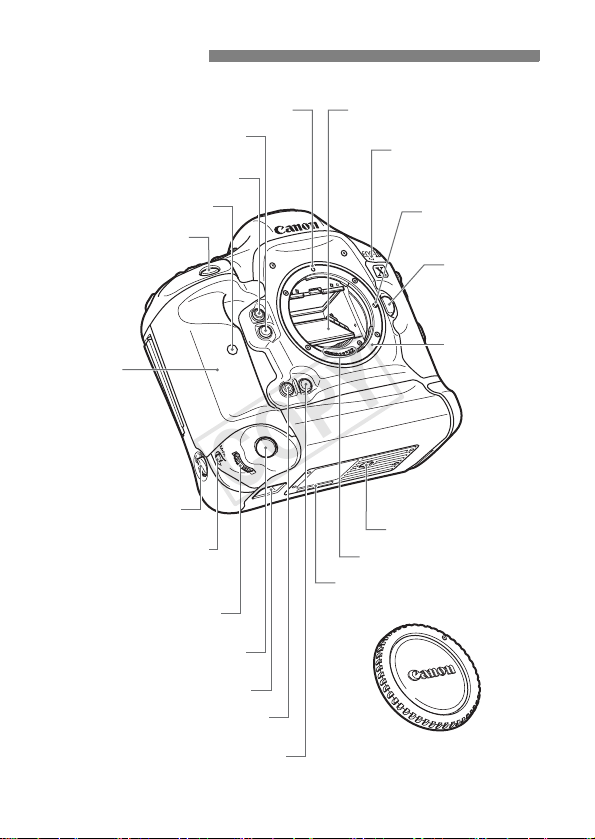
Nomenclature
COPY
Lens mount index (p.43) Mirror (p.187, 297)
Depth-of-field preview button
(p.170)
Multi-function button 2 (p.335)
Self-timer lamp (p.112)
Shutter button (p.46)
Grip
Movie microphone
(p.236)
Lens lock pin
Lens release
button (p.43)
Lens mount
Vertical-grip
switch (p.49)
<B> Vertical-grip AF area
selection mode/Multi-function/
Multi-spot metering button
(p.49, 70/190/174)
on/off
Vertical-grip Main Dial
(p.49, 47)
Vertical-grip shutter button
(p.49, 46)
Hand strap mount (p.356)
Vertical-grip Multi-function
button 2 (p.49, 335)
Vertical-grip depth-of-field
preview button (p.170)
18
Tripod socket
Contacts (p.15)
Body number
Body cap (p.43)
Page 19
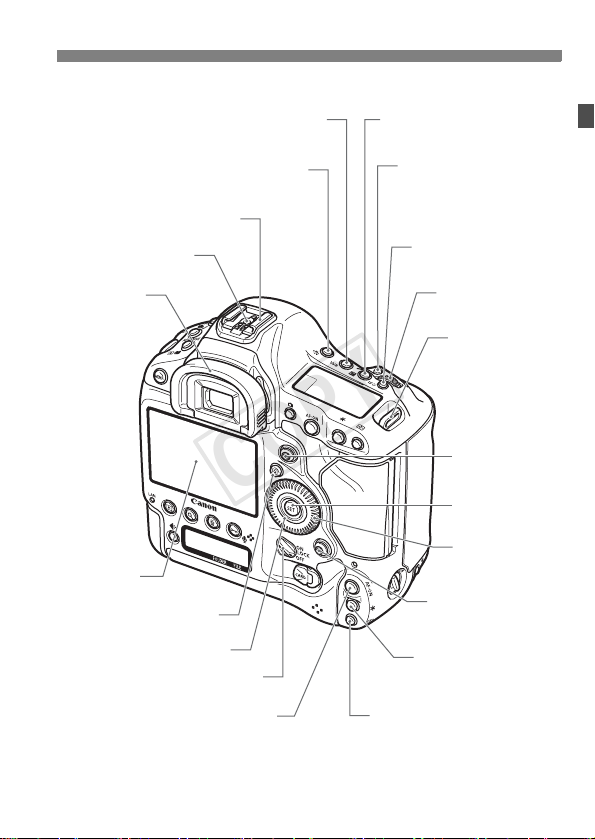
Nomenclature
/
COPY
<B> White balance selection
button (p.137)
<U> LCD panel illumination
button (p.50)
Hot shoe
Flash-sync contacts
Eyecup
(p.45)
LCD monitor
(p.282)
<Q> Quick Control button
(p.51)
Touch pad (p.48)
Power/Multi function lock
switch (p.38)
<p> Vertical-grip AF start button
(p.46, 49, 67, 68, 202, 228)
<O> Exposure compensation
Aperture button (p.175/171)
<B> AF area selection
mode/Multi-function/
Multi-spot metering button
(p.70/190/174)
<S> Vertical-grip
AF point selection button
(p.49, 70, 71)
<i> ISO speed
setting button (p.124)
<6> Main Dial
(p.47)
Strap mount
(p.29)
<9>
Multi-controller
(p.49)
<0> Setting
button (p.53)
<5> Quick
Control Dial
(p.48)
<9> Vertical-grip
Multi-controller (p.49)
<A> Vertical-grip
AE lock button
(p.49, 177)
19
Page 20
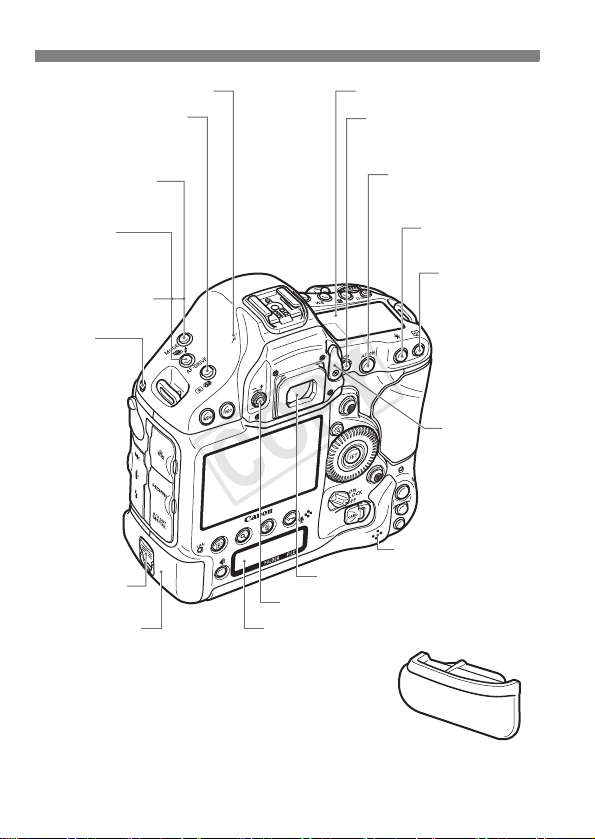
Nomenclature
COPY
<V> Focal plane mark
<Q> Metering mode
selection/Flash exposure
compensation button
(p.173/190)
<W> Shooting
mode selection button
(p.164, 201, 221, 222)
<
o
>
AF mode selection/
Drive mode selection
button (p.66/110)
<h> AEB setting
button (p.176)
System
extension
mounting hole
Battery release
handle (p.34, 361)
Battery (p.30, 34)
Top LCD panel (p.24, 25)
<A> Live View shooting/
Movie shooting button
(p.200/220)
Viewfinder eyepiece
Dioptric adjustment knob (p.45)
Rear LCD panel (p.26)
<p>
AF start button
(p.46, 67, 68, 202, 228)
<A> AE lock
button (p.177)
<S> AF point
selection button
(p.70, 71)
Eyepiece
shutter lever
(p.179)
Speaker (p.262, 276)
20
Battery compartment
cap (p.34)
Page 21
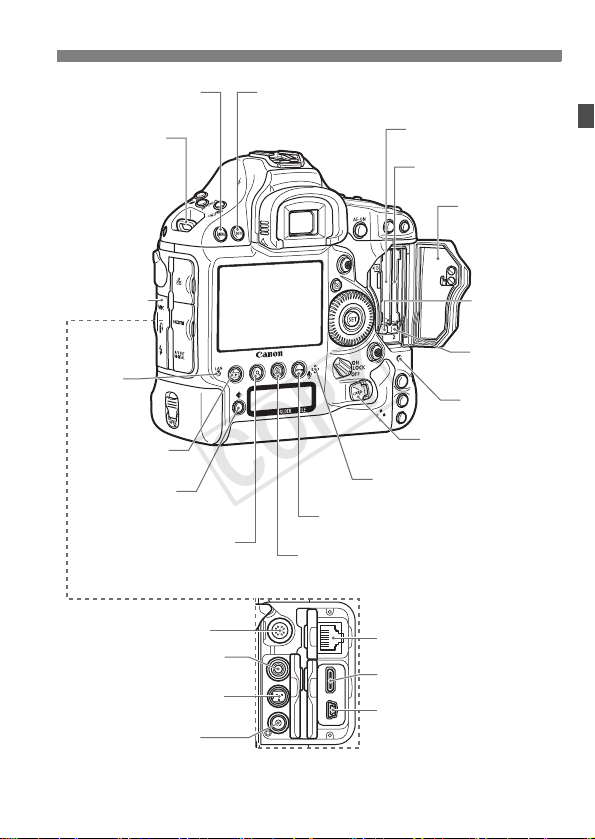
Nomenclature
COPY
<M> Menu
button (p.53)
Strap mount
(p.29)
Terminal cover
<Y>
Network
lamp
(9 Separate
booklet)
<x> Playback
button (p.246)
<H> Card/
Image size selection
button (p.116/117)
<u> Index/Magnify/
Reduce button
(p.251/253)
System extension terminal
<Y> External microphone
IN terminal (p.237)
<F> Remote control terminal
(N3 type) (p.179)
<D> PC terminal (p.191)
<B> Info button
(p.203, 227, 246, 248, 358)
<J/K> Protect/Voice memo button
(p.273/275)
<L> Erase button (p.280)
Card slot 1
(p.35)
Voice memo microphone
(p.275)
<F> Ethernet RJ-45
terminal (9 Separate booklet)
<
Z> HDMI mini OUT
terminal (p.269)
<q/C>
Audio/video OUT/
Digital terminal (p.272/300, 313)
* Instructions for using the Cable Protector are on page 353.
Card slot 2
(p.35)
Card slot cover
(p.35)
Card 1 eject
button (p.37)
Card 2 eject
button (p.37)
Access lamp
(p.37)
Card slot cover
release handle (p.35)
21
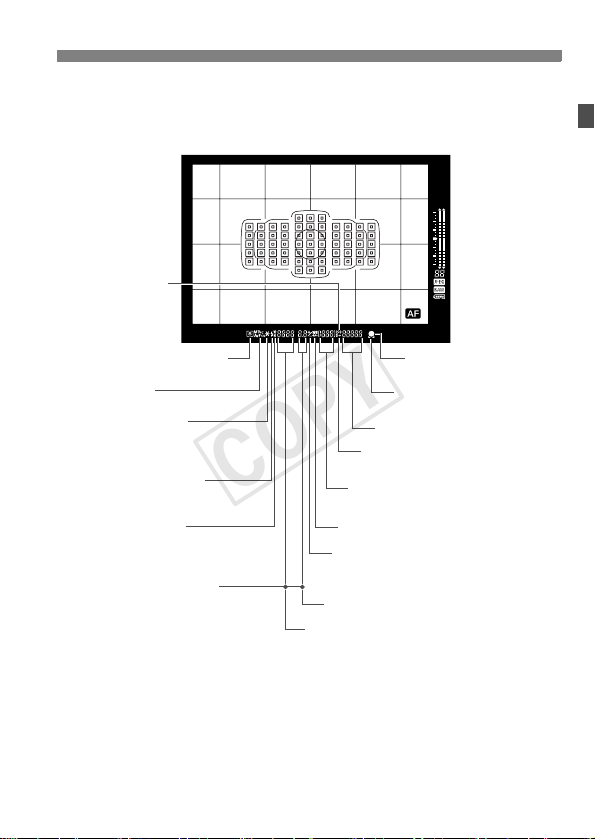
Page 22

Nomenclature
COPY
Viewfinder Information
Spot metering circle (p.173)
Focusing screen (p.327)
Grid (p.61)
Area AF frame (p.70)
<i> AF status indicator (p.68)
<z> Battery check (p.39)
<S> Single AF point
<O> Spot AF
(single point)
(p.72)
Exposure
level indicator
Max. burst
(p.122)
Remaining number
of exposures
(p.182)
<p> JPEG icon
(p.121)
<1> RAW icon
(p.121)
Standard exposure index
Exposure level scale
: 1 stop
: 1/3 stop
Overexposure
Flash overexposure
Exposure level
Flash exposure
level
Flash underexposure
Underexposure
The display will show only the settings currently applied.
22
Page 23
<g> ISO speed
COPY
(p.124)
Nomenclature
<q> Metering mode (p.173)
Shooting mode
<A> AE lock (p.177)
AEB in-progress (p.176)
Multi-spot metering (p.174)
<D> Flash-ready (p.190)
Improper FE lock warning
<d> FE lock (p.190)
FEB in-progress (p.197)
<e> High-speed sync (p.196)
AF point selection
--
[ ]
( AF, SEL [ ], SEL AF)
--
AF point registration
--
[ ]
( HP, SEL [ ], SEL HP)
--
Card warning (Card 1/2/1.2)
<A> Highlight tone priority
Possible shots
Card full warning (Full)
<u> White balance correction (p.144)
<y> Exposure compensation (p.175)
Flash exposure compensation
(p.190)
Aperture (p.169)
Shutter speed (p.167)
Bulb (buLb) (p.178)
FE lock
Busy (buSY)
Multi function lock warning (L)
<o> Focus confirmation
light (p.164)
<e> AF status indicator
(p.101)
ISO speed (p.124)
(p.150)
23
Page 24
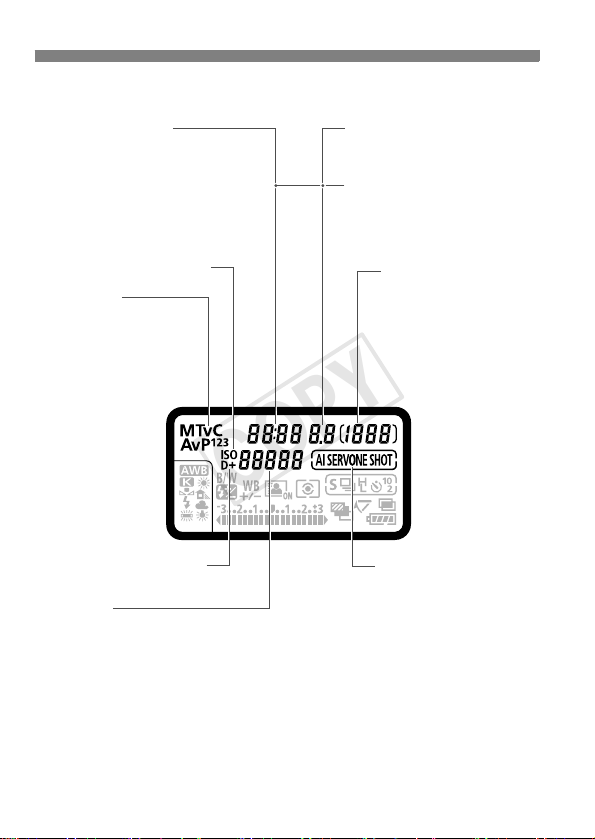
Nomenclature
COPY
Top LCD Panel
Shutter speed
Bulb (buLb)
Bulb exposure time (min.:sec.)
FE lock (FEL)
Busy (buSY)
Multi function lock warning (L)
No card warning (Card)
Error code (Err)
Cleaning image sensor (CLn)
<g> ISO speed (p.124)
Shooting mode
d : Program AE (p.164)
f : Aperture-priority AE
(p.169)
a : Manual exposure (p.171)
s : Shutter-priority AE
(p.167)
w : Custom shooting mode
(p.350)
<A> Highlight tone priority
(p.150)
ISO speed
Color temperature
Custom white balance number
Personal white balance
Dust Delete Data acquisition (
----
)
Aperture
AEB amount
Dust Delete Data acquisition (
AF point selection
--
[ ]
( AF, SEL [ ], SEL AF)
--
AF point registration
--
[ ]
( HP, SEL [ ], SEL HP)
--
Card warning (Card 1/2/1.2)
Possible shots
Self-timer countdown
Bulb exposure time (Hours)
Custom white balance
acquisition display ([ * ])
Card full warning (Full)
Card error warning (Err)
Error number
Remaining images to record
AF mode (p.66)
X : One-Shot AF
Z : AI Servo AF
- -
)
The display will show only the settings currently applied.
24
Page 25
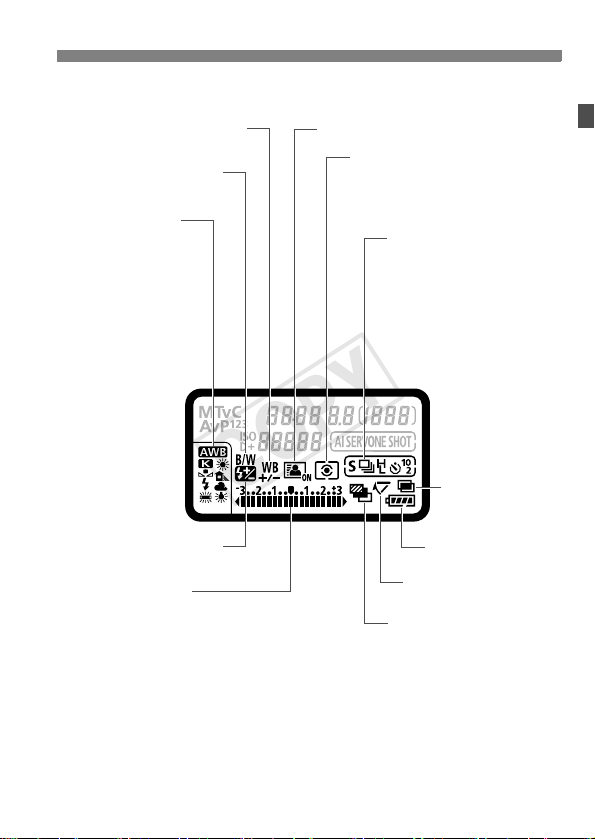
Nomenclature
COPY
<u> White balance correction
(p.144)
<0> Monochrome shooting
(p.130)
White balance (p.137)
Q Auto
W Daylight
E Shade
R Cloudy
Y Tungsten light
U
White fluorescent light
I Flash
O Custom
P Color temperature
<y> Flash exposure
compensation (p.190)
Exposure level indicator
Exposure compensation amount (p.175)
AEB range (p.176)
Flash exposure compensation amount (p.190)
<N> Auto Lighting Optimizer (p.146)
Metering mode (p.173)
q Evaluative metering
w Partial metering
r Spot metering
e Center-weighted average metering
Drive mode (p.110)
u Single shooting
o High-speed
continuous shooting
p Low-speed
continuous shooting
k 10-sec. self-timer
l 2-sec. self-timer
6 Single: Silent shooting
K Super high-speed
continuous shooting
<P>
Multiple-exposure
shooting (p.180)
Battery check (p.39)
<2> Mirror lockup (p.187)
<h> AEB (p.176)
25
Page 26
Nomenclature
COPY
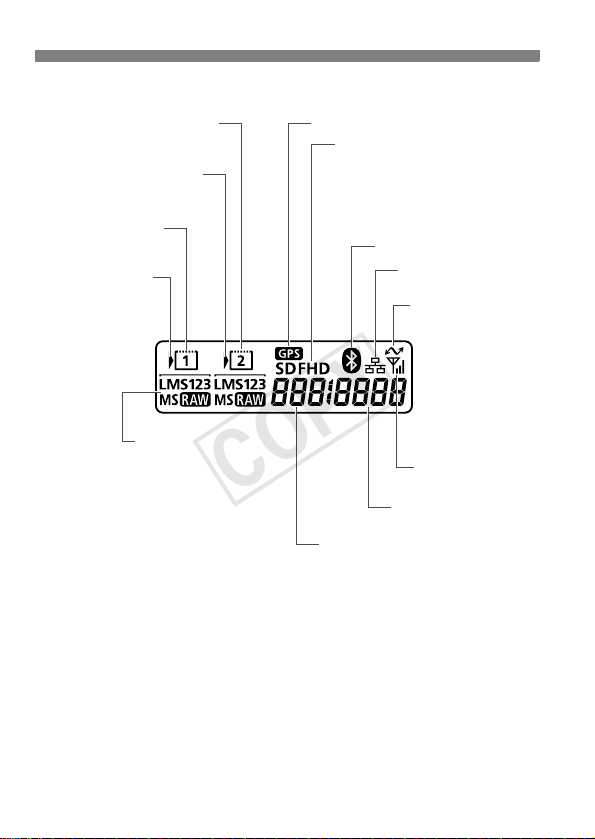
Rear LCD panel
<g> Card 2 indicator
(p.36)
<J> Card 2 selection
icon (p.36)
<f> Card 1 indicator
(p.36)
<J> Card 1 selection
icon (p.36)
Image size (p.117)
3 Large
4 Medium1
5 Medium2
6 Small
1 RAW
41 Medium RAW
Small RAW
61
<r> GPS device connection*
Movie-recording size (p.233)
L : Full High-Definition recording
quality
K : High-Definition recording
quality
J : Standard-definition recording
quality
<s> Bluetooth connection*
<F> Wired LAN
connection*
<J> Data transfer
icon*
<D> Wireless LAN
connection*
File number (p.158)
Folder number (p.154)
*1 : Displayed when GPS Receiver GP-E1/GP-E2 is attached to the camera or
when a commercially-available Bluetooth GPS device is attached to Wireless
File Transmitter WFT-E6.
*2 : Displayed when a commercially-available Bluetooth GPS device is attached
to Wireless File Transmitter WFT-E6.
*3 : Displayed when the camera is connected to a wired LAN.
*4 : Displayed when the camera is connected to a personal computer or
PictBridge printer.
*5 : Displayed when the camera is connected to a wireless LAN via Wireless File
Transmitter WFT-E6.
The display will show only the settings currently applied.
1
3
4
5
26
2
Page 27
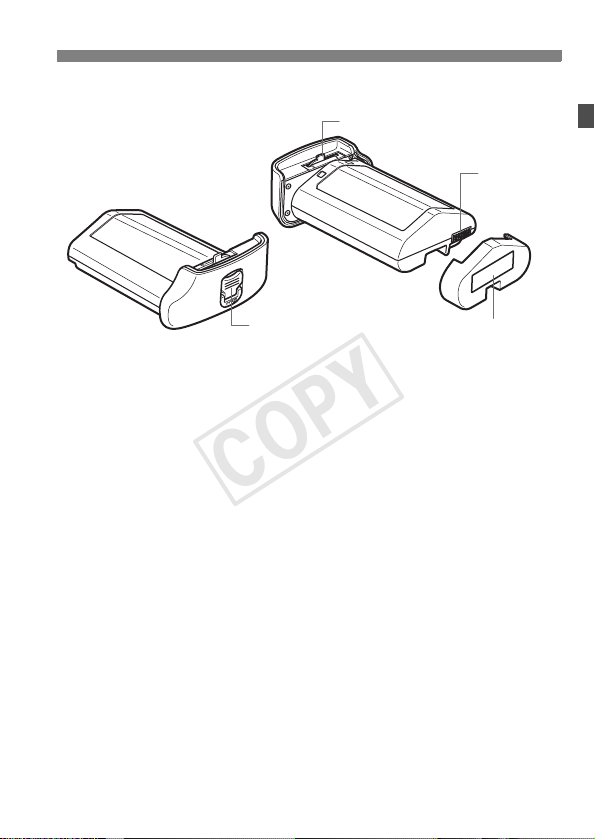
Battery Pack LP-E4N
COPY
Nomenclature
Lock lever
Contacts
Battery release handle
Protective cover
27
Page 28
Nomenclature
COPY
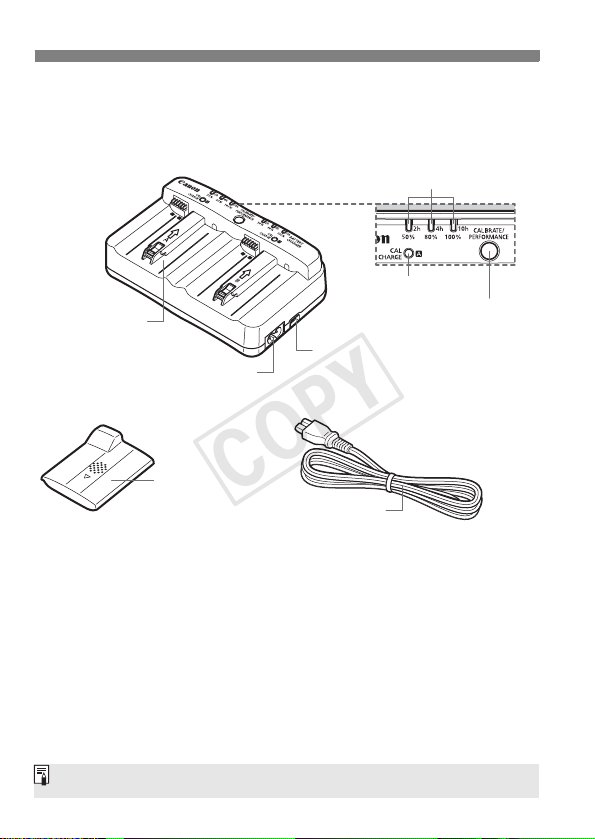
Battery Charger LC-E4N
Charger for Battery Pack LP-E4N (p.30).
Battery pack slot
Charge level/Calibration (Discharge) status indicator/
Power cord socket
Protective
covers (2)
Performance check lamp
Charge lamp
Calibration/Performance
check button
Car battery cable socket
Power cord
The charger can also recharge the Battery Pack LP-E4.
28
Page 29

Getting Started
COPY
This chapter explains preparatory steps before you start
shooting and basic camera operations.
Attaching the Strap
Pass the end of the strap through the camera’s strap mount
eyelet from the bottom. Then pass it through the strap’s buckle
as shown in the illustration. Pull the strap to take up any slack
and make sure the strap will not loosen from the buckle.
29
Page 30
Charging the Battery
COPY
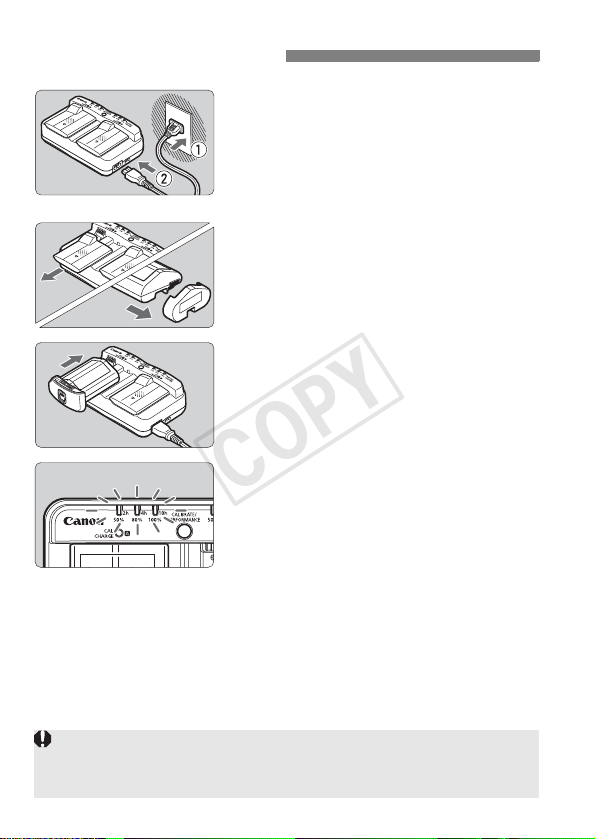
Connect the charger to a power outlet.
1
Connect the power plug to a power
outlet, and connect the power cord to
the charger.
When no battery is attached, all the
indicator lamps will be off.
Remove the protective covers.
2
As shown in the illustration, detach
the charger’s protective cover
(provided) and the battery’s protective
cover (provided).
Recharge the battery.
3
Slide the battery into the charger’s
slot as shown by the arrow, and make
sure it is securely attached.
You can attach the battery to slot A or B.
X The battery will start recharging and
the green status lamp will blink.
X When the battery is fully charged, all
three Charge level indicators will light
up (50%/80%/100%).
It takes approx. 130 min. for LP-E4N and approx. 120 min. for LPE4 to fully recharge a completely exhausted battery at 23°C/73°F.
The time required to recharge the battery will vary greatly
depending on the ambient temperature and the battery’s
remaining capacity.
The LC-E4N charger cannot charge any battery other than the Battery
Pack LP-E4N/LP-E4.
Depending on the battery’s condition, charge may not reach 100%.
30
Page 31

Charging the Battery
COPY
Tips for Using the Battery and Charger
Upon purchase, the battery is not fully charged.
Recharge the battery before using.
Recharge the battery on the day before or on the day it is to be used.
Even during storage, a charged battery will gradually drain and lose its capacity.
After recharging the battery, detach it and disconnect the
charger from the power outlet.
When not using the battery and charger, attach the protective covers provided.
Use the battery in an ambient temperature range of 0°C - 45°C / 32°F - 113°F.
To attain best battery performance, an ambient temperature of 10°C -
°C
/ 50°F - 86°F is recommended. In cold locations such as snowy
30
areas, battery performance and operation time may temporarily decrease.
When not using the camera, remove the battery.
If the battery is left in the camera for a prolonged period, a small amount
of power current is released, resulting in excess discharge and shorter
battery life. Store the battery with the protective cover attached. Storing
the battery when it is fully charged may lower the battery’s performance.
The battery charger can also be used in foreign countries.
The battery charger is compatible with a 100 V AC to 240 V AC 50/60 Hz
power source. If necessary, attach a commercially-available plug adapter for
the respective country or region. Do not attach any portable voltage
transformer to the battery charger. Doing so can damage the battery charger.
Check the battery performance.
While the battery is recharging, press the charger’s
<PERFORMANCE> button to check the battery’s performance level
indicated by the Charge level indicator.
(Green) : Battery’s recharge performance is fine.
(Green) : Battery’s recharge performance is slightly degraded.
(Red) : Purchasing a new battery is recommended.
If the battery becomes exhausted quickly even after being fully
charged, the battery has reached the end of its service life.
Check the battery’s recharge performance (p.360) and purchase a
new battery.
31
Page 32

Charging the Battery
COPY
Use a Car’s Cigarette Lighter Socket to Recharge the Battery
With Car Battery Cable CB-570 (sold separately), you can connect the
charger’s car battery cable socket (<DC IN> terminal) to your car’s
cigarette lighter socket.
When recharging the battery this way, be sure that the car’s engine
is running. Disconnect the car battery cable from the cigarette lighter
socket when the car engine is off. If you leave the car battery cable
connected to the cigarette lighter socket, it may drain the car battery.
Do not use a transformer for the car with the battery charger.
Battery charging from a car battery is possible only with a 12 V DC
or 24 V DC car battery in a minus-grounded car. The shape or
dimensions of the cigarette lighter socket in certain cars might not be
compatible with the car battery cable.
The <CAL/CHARGE> Lamp Blinks in Red
This indicates that you should calibrate the battery so that the correct
battery level is detected and the camera’s battery level indicator can
display the correct battery level. Calibration is not a required
operation. If you just want to recharge the battery, you can let the
battery start recharging automatically after approx. 10 sec. If you want
to perform calibration, press the
<CAL/CHARGE>
will blink in red and calibration (power discharge) will start.
After calibration is complete, the battery will start recharging
automatically. Note that the less depleted the battery is the longer
calibration will take. The
the Charge level indicator indicate the approximate time it will take to
complete calibration (power discharge). If the
red, it will take approx. 10 hours.
After calibration is complete and the battery is totally drained, it will
take a further 2 hours to recharge the battery fully. If you want to stop
calibration before it is completed and start recharging the battery,
remove the battery from the charger and attach it again.
lamp is blinking in red. The Charge level indicator
<CALIBRATE> button while the
<2h>, <4h>, and <10h>
<10h>
figures on the side of
indicator blinks in
32
Page 33

Charging the Battery
COPY
None of the Charger’s Status Lamps Light Up
If the <CAL/CHARGE> lamp lights up but none of the status lamps
do, the battery’s internal temperature is outside the required 0°C 40°C / 32°F - 104°F temperature range. The battery will start
recharging when the internal temperature is within 0°C - 40°C / 32°F
- 104°F.
All Three Charge Level Indicators Blink
If any of the following occurs, remove the battery from the charger
and consult your dealer or nearest Canon Service Center: All the
Charge level lamps blink in green, all the Calibration (Discharge)
status indicator lamps blink in red, or the indicators blink alternately
in red and green (including the <CAL/CHARGE> lamp).
Also, if a battery other than the Battery Pack LP-E4N/LP-E4 is
attached to the charger, the indicators will blink in red and green
(including the <CAL/CHARGE> lamp) and the battery cannot be
recharged.
The charger cannot charge any battery other than the Battery Pack LP-E4N/
LP-E4.
When two battery packs are attached to the charger, the battery attached
first will be charged first, then the other battery will be charged. Although
one battery can be recharged and another calibrated at the same time,
two batteries cannot be recharged or calibrated at the same time.
It is best to perform battery calibration when the battery is nearly
exhausted. If you try to calibrate the battery while it is fully charged, it can
take as long as approx. 15 hours to calibrate and then fully charge the
battery.
33
Page 34

Installing and Removing the Battery
COPY
Load a fully charged Battery Pack LP-E4N/LP-E4 into the camera. The
camera’s viewfinder becomes bright when a battery is installed,
and darkens when the battery is removed.
Installing the Battery
Remove the battery compartment
1
cap.
Insert the battery.
2
Insert the battery firmly all the way,
and turn the release handle as shown
by the arrow.
Removing the Battery
Only the Battery Pack LP-E4N/LP-E4 can be used.
If the battery’s rubber lining (to repel water) is dirty, use a
moist cotton swab to wipe it clean.
34
Turn the battery release handle
and take out the battery.
Check if the power switch is set to
2
> (p.38).
<
Flip out the battery release handle,
turn it as shown by the arrow, and pull.
To prevent short circuiting of the
battery contacts, be sure to attach the
protective cover (provided, p.27) to
the battery.
When not using the camera, attach
the battery compartment cap (p.20).
Rubber lining
Page 35

Installing and Removing the Card
COPY
You can insert up to two cards. Images can be recorded when at
least one card is installed in either slot in the camera.
If you insert two cards, you can select which card to record images to or
record images simultaneously on both cards (p.114, 116).
Installing the Card
Open the cover.
1
Flip out and turn the cover release
handle, and open the cover as shown
by the arrows.
Card 1
Card 2
Insert the card.
2
The card inserted in the left slot will
be f, and the card inserted in the
right slot will be g.
As shown by the illustration, face
the label side toward you and
insert the end with the small holes
into the camera.
If the card is inserted in the wrong
way, it may damage the camera.
X The card ejection button will stick out.
Close the cover.
3
Press the cover until it snaps shut.
35
Page 36

Installing and Removing the Card
COPY
Possible shots
Card selection icon
Card 1 indicator
Card 2 indicator
Set the power switch to <1>
4
(p.38).
X The number of possible shots will be
displayed on the top LCD panel and
in the viewfinder.
X The rear LCD panel will indicate
which card(s) has been inserted.
The images will be recorded to the
card with the < > icon next to the
respective card’s indicator.
Hard disk-type cards cannot be used with this camera.
Although the two types of CF (CompactFlash) cards have different
thicknesses, either type can be inserted into the camera.
Ultra DMA (UDMA) CF cards can also be used with the camera. UDMA
CF cards enable faster data writing.
The number of possible shots depends on the remaining capacity of the
card, image-recording quality, ISO speed, etc.
Setting [z3: Release shutter without card] to [Disable] will prevent
you from forgetting to insert a card (p.364).
36
Page 37

Installing and Removing the Card
COPY
Removing the Card
Open the cover.
1
Set the power switch to <2>.
Make sure the access lamp is off,
then open the cover.
If [Recording...] is displayed, close
Access lamp
the cover.
Remove the card.
2
Push the eject button to eject the
card.
Pull the card straight out, then close
the cover.
When the access lamp is lit or blinking, it indicates that images are
being written to or read by the card, being erased, or data is being
transferred. Do not open the card slot cover during this time. Also,
never do any of the following while the access lamp is lit or
blinking. Otherwise, it can damage the image data, card, or camera.
• Removing the card.
• Removing the battery.
• Shaking or banging the camera around.
If the card already contains recorded images, the image number may not
start from 0001 (p.158).
If a card-related error message is displayed on the LCD monitor, remove
and reinsert the card. If the error persists, use a different card. If you can
transfer all the images on the card to a computer, transfer all the images
and then format the card with the camera (p.55). The card may then
return to normal.
37
Page 38

Turning on the Power
COPY
If you turn on the power switch and the Date/Time/Zone setting
screen appears, see page 40 to set the Date/Time/Zone.
<1> : The camera turns on.
<R>: The camera turns on. The
<2>:
About the Automatic Self-Cleaning Sensor
Whenever you set the power switch
You can still shoot during sensor
If you repeatedly turn the power switch <1/R>/<2> at a
short interval, the <f> icon may not be displayed. This is normal
and not a problem.
3 About Auto Power Off
To save battery power, the camera turns off automatically after 1
minute of non-operation. To turn on the camera again, just press the
shutter button halfway (p.46).
You can change the auto power-off time with
Multi-function lock will take
effect (p.50).
The camera is turned off and does
not operate. Set to this position
when not using the camera.
to <1/R> or <2>, sensor
cleaning will be executed
automatically. (A small sound may be
heard.) During the sensor cleaning,
the LCD monitor will display <f>.
cleaning by pressing the shutter
button halfway (p.46) to stop the
sensor cleaning and take a picture.
[52: Auto power off]
(p.57).
If you set the power switch to <2> while an image is being recorded to
the card, [Recording...] will be displayed and the power will turn off after the
card finishes recording the image.
38
Page 39

Turning on the Power
COPY
z Checking the Battery Level
When the power switch is set to <1>, the battery level will be
indicated in one of six levels.
Icon
Level (%)
100 - 70
z
69 - 50 Battery level exceeds 50%
x
49 - 20 Battery level below 50%
c
19 - 10 Battery level is low
m
b
n
Battery Life [Approx. number of shots]
Tem per atu re At 23°C / 73°F At 0°C / 32°F
Possible shots 112 0 860
The figures above are based on a fully-charged Battery Pack LP-E4N, no Live
View shooting, and CIPA (Camera & Imaging Products Association) testing
standards.
The number of possible shots will decrease with any of the following
operations:
• Pressing the shutter button halfway for a prolonged period.
• Activating the AF frequently without taking a picture.
• Using the lens Image Stabilizer.
• Using the LCD monitor often.
The number of possible shots may decrease depending on the actual
shooting conditions.
The lens operation is powered by the camera’s battery. Depending on
the lens used, the number of possible shots may be lower.
Regarding the number of possible shots with Live View shooting, see
page 202.
See [53: Battery info.] to check the battery’s condition in detail (p.360).
9 - 1
0 Recharge the battery
Indication
Sufficient battery level
Battery will be exhausted soon
39
Page 40

3 Setting the Date, Time, and Zone
COPY
When you turn on the power for the first time or if the date/time has
been reset, the Date/Time/Zone setting screen will appear. Follow steps
3 to 6 to set the current date, time, and time zone.
Note that the date/time appended to recorded images will be based
on this date/time setting. Be sure to set the correct date/time.
You can also set the time zone of your current address. Then if you
travel to another time zone, you can simply set your destination’s time
zone so that the correct date/time is recorded.
Display the menu screen.
1
Press the <M> button to display
the menu screen.
Under the [52] tab, select [Date/
2
Time/Zone].
Press the <Q> button and select the
[5] tab.
Turn the <6> dial to select the [52]
tab.
Turn the <5> dial to select [Date/
Time/Zone], then press <0>.
Set the time zone.
3
[London] is set by default.
Turn the <5> dial to select [Time
zone].
Press <0> so <r> is displayed.
Turn the <5> dial to select the time
zone, then press <0>.
40
Page 41

3 Setting the Date, Time, and Zone
COPY
Set the date and time.
4
Turn the <5> dial to select the
number.
Press <0> so <r> is displayed.
Turn the <5> dial to select the
desired setting, then press <0>
(Returns to <s>).
Set the daylight saving time.
5
Set it if necessary.
Turn the <5> dial to select [Y].
Press <0> so <r> is displayed.
Turn the <5> dial to select [Z], then
press <0>.
When the daylight saving time is set
to [Z], the time set in step 3 will
advance by 1 hour. If [Y] is set, the
daylight saving time will be canceled
and the time will go back by 1 hour.
Exit the setting.
6
Turn the <5> dial to select [OK],
then press <0>.
X The Date/Time/Zone will be set and
the menu will reappear.
The menu setting procedure is explained on pages 53-54.
The date/time that was set will start from when you press
In step 3, the time displayed on the upper right is the time difference
compared with Coordinated Universal Time (UTC). If you do not see your
time zone, set the time zone while referring to the difference with UTC.
To sync the time between two cameras with [Sync time between
cameras] (Multi Camera Time Sync Function), use the [Communication
settings] menu. For details, refer to the separate Wired LAN Instruction
Manual.
<0>
in step 6.
41
Page 42

3 Selecting the Interface Language
COPY
Display the menu screen.
1
Press the <M> button to display
the menu screen.
Under the [52] tab, select
2
[LanguageK].
Press the <Q> button and select the
[5] tab.
Turn the <6> dial to select the [52]
tab.
Turn the <5> dial to select
[LanguageK] (the fourth item from
the top), then press <0>.
Set the desired language.
3
Turn the <5> dial to select the
language, then press <0>.
X The interface language will change.
42
Page 43

Attaching and Detaching a Lens
COPY
The camera is compatible with all Canon EF lenses. The camera
cannot be used with EF-S lenses.
Remove the caps.
1
Remove the rear lens cap and the
body cap by turning them as shown
by the arrows.
Attach the lens.
2
Align the red dots on the lens and
camera and turn the lens as shown by
the arrow until it clicks in place.
Set the lens focus mode switch to
3
<AF>.
<AF> stands for Autofocus.
If it is set to <MF> (manual focus),
autofocus will not operate.
Remove the front lens cap.
4
Do not look at the sun directly through any lens. Doing so may cause
loss of vision.
If the front part (focusing ring) of the lens rotates during autofocusing, do
not touch the rotating part.
43
Page 44

Attaching and Detaching a Lens
COPY
Minimizing Dust
When changing lenses, do it quickly in a place with minimal dust.
When storing the camera without a lens attached, be sure to attach the
body cap to the camera.
Remove dust on the body cap before attaching it.
Detaching the Lens
While pressing the lens release
button, turn the lens as shown by
the arrow.
Turn the lens until it stops, then
detach it.
Attach the rear lens cap to the
detached lens.
44
Page 45

Basic Operation
COPY
Adjusting the Viewfinder Clarity
Remove the eyecup.
1
While grasping both sides of the
eyecup, slide it upward to remove.
Make the adjustment.
2
Turn the knob left or right so that the
AF points in the viewfinder look sharp.
Attach the eyecup.
If the camera’s dioptric adjustment still cannot provide a sharp viewfinder image,
using Eg-series Dioptric Adjustment Lenses (sold separately) is recommended.
Holding the Camera
To obtain sharp images, hold the
camera still to minimize camera
shake.
Horizontal shooting
1. Wrap your right hand around the camera grip firmly.
2. Hold the lens bottom with your left hand.
3. Rest your hand’s right index finger lightly on the shutter button.
4. Press your arms and elbows lightly against the front of your body.
To maintain a stable stance, place one foot slightly ahead of the other.
5.
6. Press the camera against your face and look through the viewfinder.
To shoot while looking at the LCD monitor, see page 199.
Vertical shooting
45
Page 46

Basic Operation
COPY
Shutter Button
The shutter button has two steps. You can press the shutter button
halfway. Then you can further press the shutter button completely.
Pressing halfway
This activates autofocusing and the
automatic exposure system that sets the
shutter speed and aperture.
The exposure setting (shutter speed and
aperture) is displayed in the viewfinder
and on the top LCD panel (9).
Pressing completely
This releases the shutter and takes the
picture.
Preventing Camera Shake
Hand-held camera movement during the moment of exposure is called
camera shake. It can cause blurred pictures. To prevent camera shake,
note the following:
• Hold and steady the camera as shown on the preceding page.
• Press the shutter button halfway to autofocus, then slowly press the
shutter button completely.
Pressing the <p> button will execute the same operation as
pressing the shutter button halfway.
If you press the shutter button completely without pressing it halfway first
or if you press the shutter button halfway and then press it completely
immediately, the camera will take a moment before it takes the picture.
Even during menu display, image playback, or image recording, you can
instantly go back to shooting-ready by pressing the shutter button
halfway.
46
Page 47

6 Main Dial
COPY
After pressing a button, turn the
(1)
<6> dial.
When you press a button such as
<W>, <o>, <Q>, or
<i>, the respective function remains
selected for 6 seconds (9). During this
time, you can turn the <6> dial to set
the desired setting.
When the function selection timer ends,
or if you press the shutter button halfway,
the camera will be ready to shoot.
Use this dial to select or set the
shooting mode, AF mode, metering
mode, AF point, ISO speed, exposure
compensation (when the <O> button
is pressed), card, etc.
Tur n the <6> dial only.
(2)
While looking at the viewfinder or top
LCD panel, turn the <6> dial to set the
desired setting.
Use this dial to set the shutter speed,
aperture, etc.
Basic Operation
The operations in (1) are possible even when the power switch is set to
<R> (Multi function lock, p.50).
47
Page 48

Basic Operation
COPY
5 Quick Control Dial
(1)
After pressing a button, turn the
<5> dial.
When you press a button such as
<W>, <o>, <Q>, or
<i>, the respective function remains
selected for 6 seconds (9). During this
time, you can turn the <5> dial to set
the desired setting.
When the function selection timer ends
or if you press the shutter button halfway,
the camera will be ready to shoot.
Use this dial to select or set the
shooting mode, drive mode, flash
exposure compensation, AF point,
ISO speed, exposure compensation
(when the <O> button is pressed),
white balance, image size, etc.
(2)
Tur n the <5> dial only.
While looking at the viewfinder or top
LCD panel, turn the <5> dial to set the
desired setting.
Use this dial to set the exposure
compensation amount, the aperture
setting for manual exposures, etc.
The operations in (1) are possible even when the power switch is set to
<R> (Multi function lock, p.50).
h Touch Pad
During movie shooting, the touch pad provides a quiet way to adjust the
shutter speed, aperture, ISO speed, exposure compensation, and
sound recording level (p.238). This function takes effect when [z5:
Silent Control] is set to [Enable h].
48
Page 49

Basic Operation
COPY
After pressing the <Q> button,
tap the <5> dial’s inner ring at
the top, bottom, left, or right.
9 Multi-controller
The <9> consists of an eight-direction key and a button at the center.
Use it to select the AF point, correct
the white balance, move the AF point
or magnifying frame during Live View
shooting, scroll around magnified
images during playback, operate the
Quick Control screen, etc.
You can also use it to select or set
menu options (except [31: Erase
images] and [51: Format card]).
For menus and the Quick Control
screen, the Multi-controller works
only in the vertical and horizontal
directions. It does not work in
diagonal directions.
Vertical Shooting
The camera bottom has vertical-grip buttons and a dial (p.18, 19).
Before using the vertical grip’s
buttons and dial, set the vertical-grip
ON/OFF switch to <1>.
When not using the vertical shooting
controls, set the switch to <2> to
prevent accidental operation.
The vertical grip’s Multi-function button 2 and depth-of-field preview button
(p.18) will function even when the Vertical-grip ON/OFF switch is set to <
2
>.
49
Page 50

Basic Operation
COPY
R: Multi function lock
With [85: Multi function lock] set (p.329) and the power switch set to
<R>
accidental movement of the Main Dial, Quick Control Dial, or Multi-controller.
U LCD Panel Illumination
Displaying Shooting Settings
, you can prevent the current settings from changing due to
If the power switch is set to <R> and you try to use one of the locked
camera controls, <L> will be displayed in the viewfinder and on the top LCD
panel. [LOCK] will also be displayed on the shooting functions’ setting
screen.
Press the <U> button to turn the top
and rear LCD panel illumination on (9)
or off. During a bulb exposure, pressing
the shutter button completely will turn off
the LCD panel illumination.
If you press the <B> button a number
of times, the shooting settings will be
displayed.
Pressing the <Q> button enables Quick
Control of the shooting settings (p.51).
Press the <B> button again to turn off
the display.
50
Page 51

Q Quick Control for Shooting Functions
COPY
You can directly select and set the shooting functions displayed on the
LCD monitor. This is called the Quick Control screen.
Press the <Q> button.
1
X The Quick Control screen will appear
(7).
Set the desired function.
2
Use <9> to select a function.
X The setting of the selected function is
displayed at the bottom.
X Turn the <5> or <6> dial to
change the setting.
Take the picture.
3
Press the shutter button completely to
take the picture.
X The captured image will be displayed.
Function Setting Screen
Select the desired function and press
<0>. The function’s setting screen
will appear.
Turn the <5> or <6> dial to
change the setting. There are also
functions that are set by pressing the
Ð
<0>
<B> button.
Press <0> to finalize the setting and
return to the Quick Control screen.
When you select < > (Custom
Controls, p.333) and press the
<M> button, the shooting settings
display will reappear.
51
Page 52

Q Quick Control for Shooting Functions
COPY
Settable Functions on Quick Control Screen
AE lock* (p.177)
White balance (p.137)
Aperture (p.169)
Shutter speed (p.167)
Shooting mode* (p.24)
Flash exposure
compensation (p.190)
Highlight tone priority* (p.150)
Exposure compensation/
AEB setting (p.175, 176)
ISO speed (p.124)
Auto Lighting Optimizer
(p.146)
AF mode (p.66)
Picture Style (p.129)
Metering mode (p.173)
Drive mode (p.110)
Custom Controls (p.333)
White balance correction (p.144)
Asterisked functions cannot be set with the Quick Control screen.
52
Page 53

3 Menu Operations
COPY
You can set various settings with the menus such as the beeper, date/
time, etc. While looking at the LCD monitor, use the <M> and <Q>
buttons on the back of the camera and the <6> <5> dials.
<M> button
LCD monitor
<Q> button
z: Shooting
Secondary tabs
Menu items
3: Playback
2: AF
<6> Main Dial
<5> Quick Control Dial
<0> button
5: Set-up
8: Custom Functions
9: My Menu
Main tabs
Menu settings
53
Page 54

3 Menu Operations
COPY
Menu Setting Procedure
2
3
4
5
6
Display the menu screen.
1
Press the <M> button to display
the menu screen.
Select a tab.
Each time you press the <Q> button,
the main tab will switch.
Turn the <6> dial to select a
secondary tab.
For example, the [z4] tab refers to
the screen displayed when the z
(Shooting) tab’s fourth dot from the
left is selected.
Select the desired item.
Turn the <5> dial to select the item,
then press <0>.
Select the setting.
Turn the <5> dial to select the
desired setting.
The current setting is indicated in blue.
Set the desired setting.
Press <0> to set it.
Exit the setting.
Press the <
menu and return to shooting-ready state.
M
> button to exit the
The explanation of menu functions hereinafter assumes that you have
pressed the <M> button to display the menu screen.
You can also use <9> to set menu functions. (Except [31: Erase
images] and [51: Format card].)
To cancel, press the <M> button.
For details about each menu item, see page 363.
54
Page 55

Before You Start
COPY
3 Formatting the Card
If the card is new or was previously formatted by another camera or
computer, format the card with the camera.
When the card is formatted, all images and data in the card will
be erased. As even protected images will be erased, make
sure there is nothing you need to keep. If necessary, transfer
the images to a personal computer, etc., before formatting the
card.
Select [Format card].
1
Under the [51] tab, select [Format
card], then press <0>.
Select the card.
2
[f] is Card 1, and [g] is Card 2.
Turn the <5> dial to select a card,
then press <0>.
Select [OK].
3
Select [OK], then press <0>.
X The card will be formatted.
X When the formatting is completed,
the menu will reappear.
55
Page 56

Before You Start
COPY
Format the card in the following cases:
The card is new.
The card was formatted by a different camera or a computer.
The card is full with images or data.
A card-related error is displayed (p.388).
Cards with 128 GB or lower capacity will be formatted in FAT format.
Cards with a capacity over 128 GB will be formatted in exFAT format. If
you format a card with a capacity over 128 GB with this camera and then
insert it into another camera, an error may be displayed and the card
may become impossible to use. Depending on the personal computer’s
OS or card reader, it may not recognize a card formatted in exFAT
format.
When the card is formatted or data is erased, only the file management
information is changed. The actual data is not completely erased. Be
aware of this when selling or discarding the card. When discarding the
card, destroy the card physically to prevent personal data from being
leaked.
The card capacity displayed on the card format screen may be smaller
than the capacity indicated on the card.
This device incorporates exFAT technology licensed from Microsoft.
56
Page 57

Before You Start
COPY
3 Setting the Power-off Time/Auto Power Off
To save battery power, the camera turns off automatically after a set
time of idle operation elapses. If you do not want the camera to turn off
automatically, set this to [Disable]. After the power turns off, you can
turn on the camera again by pressing the shutter button or other
buttons.
Select [Auto power off].
1
Under the [52] tab, select [Auto
power off], then press <0>.
Set the desired time.
2
Select the desired setting, then press
<0>.
Even if [Disable] is set, the LCD monitor will turn off automatically after 30
min. to save power. (The camera’s power does not turn off.)
3 Setting the Image Review Time
You can set how long the image is displayed on the LCD monitor
immediately after capture. To keep the image displayed, set [Hold]. To
not have the image displayed, set [Off].
If [Hold] is set, the image will be displayed until the auto power off time
elapses.
Select [Image review].
1
Under the [z3] tab, select [Image
review], then press <0>.
Set the desired time.
2
Select the desired setting, then press
<0>.
57
Page 58

Before You Start
COPY
3 Reverting the Camera to the Default Settings
The camera’s shooting settings and menu settings can be reverted to
their defaults.
Select [Clear all camera settings].
1
Under the [54] tab, select [Clear all
camera settings], then press <0>.
Select [OK].
2
Select [OK], then press <0>.
X Setting [Clear all camera settings]
will reset the camera to the following
default settings:
Shooting Settings
Shooting mode d (Program AE) Drive mode u
AF mode One-Shot AF
AF area selection
mode
AF point selection Center
Registered AF
point
Metering mode
ISO speed Auto
ISO speed range
Auto ISO range
ISO Auto minimum
shutter speed
Single-point AF
(Manual selection)
Canceled
q
(Evaluative metering)
Minimum: 100
Maximum: 51200
Minimum: 100
Maximum: 25600
Auto
Exposure
compensation
AEB Canceled
Flash exposure
compensation
Multiple exposure Disable
Mirror lockup Disable
Custom Functions Unchanged
Flash function
settings
(Single shooting)
Canceled
0 (Zero)
Unchanged
58
Page 59

Image-recording Settings AF Settings
COPY
Image type/size 3 (Large)
JPEG quality 8
Picture Style Standard
Auto Lighting Optimizer
Peripheral illumination
correction
Chromatic aberration
correction
White balance Q (Auto)
Custom WB data
Personal WB
White balance
correction
White balance
bracketing
Color space sRGB
Long exposure noise
reduction
High ISO speed noise
reduction
Highlight tone priority
Record function Standard
File numbering Continuous
File name Preset code
Auto cleaning Enable
Dust Delete Data Erase
Standard
Enable/Correction
data retained
Enable/Correction
data retained
Registered
setting retained
Registered
setting retained
Canceled
Canceled
Disable
Standard
Disable
Case 1 - 6*
AI Servo 1st image
priority
AI Servo 2nd image priority
USM lens electronic MFEnable after
AF-assist beam firing
One-Shot AF release
priority
Auto AF point
selection: EOS iTR AF
Lens drive when AF
impossible
Selectable AF point 61 points
Select AF area
selection mode
AF area selection
method
Orientation linked AF
point
Manual AF point
selection pattern
AF point display
during focus
VF display
illumination
AF status in
viewfinder
AF Microadjustment Disable
* The default settings are shown on pages
83 to 86.
Before You Start
Case1/Parameter
settings of all
cases cleared
Equal priority
Equal priority
One-Shot AF
Enable
Focus priority
Enable
Continue focus
search
All modes
selected
B button
Same for both
vertical/horizontal
Stops at AF area
edges
Selected
(constant)
Auto
Show in field of
view
59
Page 60

Before You Start
COPY
Camera Settings Live View Shooting Settings
Auto power off 1 min. LV z/k setting Stills
Beep Enable AF mode Live mode
Release shutter
without card
Image review 2 sec.
Highlight alert Disable Metering timer 16 sec.
AF point display Disable
Histogram display Brightness
Playback grid Off LV z/k setting Stills
Magnification
(Approx.)
Image jump with 6 e (10 images) Movie recording size 1920x1080/IPB
Auto rotate OnzD Sound recording Auto
Movie playback count
LCD brightness Metering timer 16 sec.
Date/Time/Zone Unchanged Time code
Language Unchanged Count up Unchanged
Video system Unchanged Start time setting Unchanged
z button display
options
VF grid display Disable
Communication settings
Custom shooting modes
Copyright information
Control over HDMI Disable
System status display Setting retained
My Menu settings Unchanged
Display from My Menu
Enable
2x
Unchanged Silent LV shooting Mode 1
All items
selected
Unchanged
Unchanged Drop Frame Unchanged
Unchanged Silent Control Disable
Disable
Grid display Off
Exposure simulation Enable
Silent LV shooting
Mode 1
Movie Shooting Settings
AF mode Live mode
Grid display Off
Movie recording
count
Movie playback
count
Movie shooting
button
Unchanged
Unchanged
B button
For WFT and GPS settings, refer to the respective device’s instruction
manual.
60
Page 61

Displaying the Grid and Electronic Level
COPY
You can display a grid and electronic level in the viewfinder and on the
LCD monitor to help correct camera tilt.
Displaying the Grid in the Viewfinder
Select [VF grid display].
1
Under the [52] tab, select [VF grid
display], then press <0>.
Select [Enable].
2
Turn the <5> dial to select [Enable],
then press <0>.
The grid will be displayed in the
viewfinder.
Displaying the Electronic Level in the Viewfinder
The viewfinder can display an electronic level using the AF points. For
details, see Custom Controls (p.333).
A grid can also be displayed on the LCD monitor during Live View shooting
and movie shooting (p.206, 241).
61
Page 62

Displaying the Grid and Electronic Level
COPY
Displaying the Electronic Level on the LCD Monitor
Press the <B> button.
1
Each time you press the <B>
button, the screen display will
change.
Display the electronic level.
If the electronic level does not
appear, set [52: z button
display options] so that the
electronic level can be displayed
(p.358).
Check the camera’s tilt.
2
The horizontal and vertical tilt are
displayed in 1° increments.
Vertical level
Horizontal level
Even when the tilt is corrected, there may be a margin of error of ±1°.
If the camera is very tilted, the electronic level’s margin of error will be bigger.
You can also use the procedure above to display the electronic level during
Live View shooting and before shooting a movie (p.203, 227). Note that the
electronic level cannot be displayed during movie shooting. (The electronic
level will disappear when you start shooting a movie.)
62
When the red line turns green, it
indicates that the tilt is corrected.
Page 63

Feature Guide
COPY
When [zHelp] is displayed at the bottom of the menu screen, the
Feature guide, offering explanations of menu options, can be displayed.
The Feature guide is displayed while you hold down the <B> button.
If it fills two or more screens, a scroll bar will appear on the right edge.
To scroll, hold down the <B> button and turn the <5> dial.
Example: [21] tab [Case 2]
B
Î
Scroll bar
Example: [23] tab [AF-assist beam firing]
B
Î
Example: [85] tab [Multi function lock]
B
Î
63
Page 64

COPY
Page 65

Setting the AF and
COPY
Drive Modes
The 61 AF points in the viewfinder
make AF shooting suitable for a
wide variety of subjects and
scenes.
You can also select the AF mode and drive mode that
best match the shooting conditions and subject.
<AF> stands for autofocus. <MF> stands for manual focus.
65
Page 66

2: Selecting the AF Mode
COPY
You can select the AF mode to suit the shooting conditions or subject.
On the lens, set the focus mode
1
switch to <AF>.
Press the <o> button. (9)
2
Select the AF mode.
3
While looking at the top LCD panel,
turn the <6> dial.
X : One-Shot AF
Z : AI Servo AF
When the AF area selection mode is set to 61-point automatic selection AF
(p.74) or Zone AF (p.73), AF is possible while using the subject’s color and
face detection information (p.95).
66
Page 67

2: Selecting the AF Mode
COPY
One-Shot AF for Still Subjects
Suited for still subjects. When you
press the shutter button halfway, the
camera will focus only once.
When focus is achieved, the AF point
that achieved focus will be displayed,
and the focus confirmation light <o>
AF point
Focus confirmation light
in the viewfinder will also light up.
With evaluative metering, the
exposure setting will be set at the
same time focus is achieved.
While you hold down the shutter
button halfway, the focus will be
locked. You can then recompose the
shot if desired.
AF is also possible by pressing the
<p> button.
If focus cannot be achieved, the focus confirmation light <o> in the
viewfinder will blink. If this occurs, the picture cannot be taken even if the
shutter button is pressed completely. Recompose the picture and try to
focus again. Or see “When Autofocus Fails” (p.108).
If [z3: Beep] is set to [Disable], the beeper will not sound when focus
is achieved.
Focus Lock
After achieving focus with One-Shot AF, you can lock the focus on a subject
and recompose the shot. This is called “focus lock”. This is convenient when
you want to focus a subject not covered by the Area AF frame.
67
Page 68

2: Selecting the AF Mode
COPY
AI Servo AF for Moving Subjects
This AF mode is suited for moving
subjects when the focusing distance
keeps changing. While you hold down
the shutter button halfway, the
subject will be focused continuously.
The exposure is set at the moment
the picture is taken.
AF is also possible by pressing the
<p> button.
Focus Tracking with AI Servo AF
If the subject approaches or moves away from the camera at a constant
rate, the camera tracks the subject and predicts the focusing distance
immediately before the picture is taken. This is for obtaining correct
focus at the moment of exposure.
When the AF area selection mode is set to 61-point automatic selection (p.69),
the camera first uses the manually-selected AF point to focus. During
autofocusing, if the subject moves away from the manually-selected AF point,
focus tracking continues as long as the subject is covered by the Area AF frame.
With AI Servo AF, the beeper will not sound even when focus is achieved.
Also, the focus confirmation light
<o> in the viewfinder will not light up.
AF Status Indicator
When you press the shutter button
halfway and the camera is focusing with
AF, the <i> icon will appear on the
lower right of the viewfinder.
In the One-Shot AF mode, the icon also
appears after focus is achieved when
you press the shutter button halfway.
The AF status indicator can be displayed outside the viewfinder’s image
area (p.101).
68
Page 69

S Selecting the AF Area
COPY
61 AF points are provided for AF. You can select the AF point(s) suiting
the scene or subject.
Depending on the lens attached to the camera, the number of
usable AF points and AF point patterns will differ. For details,
see “Lenses and Usable AF Points” on page 76.
AF Area Selection Mode
You can select one of six AF area selection modes. See the next page
for the selection procedure.
Single-point Spot AF (Manual
selection)
For pinpoint focusing.
Single-point AF (Manual
selection)
Select one AF point to focus.
AF point expansion (Manual
selection )
The manually-selected AF point <S>
and the surrounding AF points <w>
(above, below, on the left and on the
right) are used to focus.
69
Page 70

S Selecting the AF Area
COPY
AF point expansion (Manual
selection, surrounding points)
The manually-selected AF point <S>
and the surrounding AF points <w> are
used to focus.
Zone AF (Manual selection of
zone)
The 61 AF points are divided into nine
zones for focusing.
61-point automatic selection AF
All the AF points are used to focus.
Select the AF Area Selection Mode
Select the AF area selection
mode.
Press the <S> button.
Look through the viewfinder and
press the <B> button.
X Press the <B> button to switch
the AF area selection mode.
With [24: Select AF area selec. mode], you can limit the selectable
AF area selection modes (p.97).
If you set [24: AF area selection method] to [ →Main Dial], you can
select the AF area selection mode by pressing the <S> button, then
turning the <6> dial (p.98).
70
Page 71

S Selecting the AF Area
COPY
Selecting the AF Point Manually
You can manually select the AF point or zone. With 61-point automatic
selection AF, you can set the starting AF point for AI Servo AF.
Press the <S> button.
1
X The AF points will be displayed in the
viewfinder.
In AF point expansion modes, effective
adjacent AF points will also be displayed.
In the Zone AF mode, the selected
zone will be displayed.
Select an AF point.
2
The AF point selection will change in the
direction you tilt the
9
> straight down, the center AF point
<
(or center Zone) will be selected.
You can also select AF points in the
vertical direction with <6> and in
the horizontal direction with <5>.
In the Zone AF mode, turning the
<6> or <5> dial will change the
Zone in a looping sequence.
<9>. If you press
AF Point Display Indications
Pressing the <S> button lights up the AF points that are cross-type AF
points for high-precision autofocusing. The blinking AF points are
horizontal-line sensitive. For details, see page 75.
When you press the
• 61-point automatic selection AF and Zone AF (manual selection of
zone): AF
• Single-point Spot AF, Single-point AF, and AF point expansion:
SEL (Center)/SEL AF (Off-center)
With [25: Manual AF pt. selec. pattern], you can set either [Stops at
AF area edges] or [Continuous] (p.99).
<S>
button, the top LCD panel displays the following:
71
Page 72

AF Area Selection Modes
COPY
Single-point Spot AF (Manual selection)
Although this is the same as Single-point AF, the
selected AF point <O> covers a smaller area to
focus. Effective for pinpoint focusing of
overlapping subjects such as an animal in a cage.
Since Spot AF covers a very small area, focusing
may be difficult during hand-held shooting or for a
moving subject.
Single-point AF (Manual selection)
Select one AF point <S> to be used for focusing.
AF point expansion (Manual selection )
The manually-selected AF point <S> and adjacent AF points <w>
(above, below, on the left and on the right) are used to focus. Effective
when it is difficult to track a moving subject with just one AF point.
With AI Servo AF, the manually-selected AF point <S> must focustrack the subject first. However, it is easier to focus the target subject
than with Zone AF.
With One-Shot AF, when focus is achieved with an expanded AF point,
the expanded AF point <S> will also be displayed along with the
manually-selected AF point <S>.
72
Page 73

AF Area Selection Modes
COPY
AF point expansion (Manual selection, surrounding points)
The manually-selected AF point <S> and adjacent AF points <w> are
used to focus. The AF point expansion is larger than with AF point
expansion (Manual selection ), so the focusing is executed over a
wider area. Effective when it is difficult to track a moving subject with
just one AF point.
AI Servo AF and One-Shot AF work in the same way as with AF point
expansion (Manual selection ) mode (p.72).
Zone AF (Manual selection of zone)
The 61 AF points are divided into nine zones for focusing. All the AF
points in the selected zone are used to automatically select the point of
focus. It makes achieving focus easier than with Single-point AF or AF
point expansion and it is effective for moving subjects.
However, since it is inclined to focus the nearest subject, focusing a
specific target is harder than with Single-point AF or AF point
expansion.
The AF point(s) achieving focus is displayed as <S>.
73
Page 74

AF Area Selection Modes
COPY
61-point automatic selection AF
All the AF points are used to focus.
With One-Shot AF, pressing the shutter button
halfway will display the AF point(s) <S> that
achieved focus. If multiple AF points are displayed,
it means they all have achieved focus. This mode
tends to focus the nearest subject.
With AI Servo AF, the manually-selected (p.71) AF
point <S> is used first to achieve focus. The AF
point(s) achieving focus is displayed as <S>.
With 61-point automatic selection AF or Zone AF, the active AF point
<S> will keep switching to track the subject in AI Servo AF mode.
However, under certain shooting conditions (such as when the subject is
small), it may not be able to track the subject. Also, in low temperatures,
the tracking response is slower.
With Single-point Spot AF, focusing with the Speedlite’s AF-assist beam
may be difficult.
If the camera cannot focus with the EOS-dedicated Speedlite’s AF-assist
beam, set the AF area selection mode to Single-point AF (Manual
selection) and select the center AF point to focus.
When the AF point(s) lights up, part or all of the viewfinder may light up in
red. This is a characteristic of AF point display (using liquid crystal).
In low temperatures, the AF point’s blinking (p.71) may be difficult to see.
This is a characteristic of AF point display (using liquid crystal).
If you set [24: Orientation linked AF point] to [ Select separate
AF points], you can set the AF area selection mode and manually-
selected AF point (or Zone) separately for vertical and horizontal
shooting (p.98).
With [24: Selectable AF point], you can change the number of
manually selectable AF points (p.96).
74
Page 75

About the AF Sensor
l
COPY
The camera’s AF sensor has 61 AF points. The illustration below shows
the AF sensor pattern corresponding to each AF point. With f/2.8 or
larger maximum aperture lenses, high-precision AF is possible at the
viewfinder center.
Depending on the lens attached to the camera, the number of
usable AF points and AF pattern will differ. For details, see pages
76 to 81.
Diagram
Cross-type focusing: f/4 horizontal + f/5.6 vertical
Cross-type focusing:
f/5.6 vertical + f/5.6 horizontal
f/5.6 vertical
focusing
These focusing sensors are geared to achieve higher
precision focusing with f/2.8 or larger maximum aperture
lenses. A diagonal cross pattern makes it easier to focus
subjects that may be difficult to focus. They cover the five
vertical AF points at the center.
These focusing sensors are geared to achieve highprecision focusing with f/4 or larger maximum aperture
lenses. Since they have a horizontal pattern, they can
detect vertical lines.
These focusing sensors are geared for f/5.6 or larger
maximum aperture lenses. Since they have a horizontal
pattern, they can detect vertical lines. They cover the three
columns of AF points at the viewfinder’s center.
These focusing sensors are geared for f/5.6 or larger
maximum aperture lenses. They can detect horizontal lines
and cover all 61 AF points in a vertical pattern.
Dual cross-type focusing:
f/2.8 right diagonal + f/2.8 left diagona
f/5.6 vertical + f/5.6 horizontal
75
Page 76

Lenses and Usable AF Points
COPY
Although the camera has 61 AF points, the number of usable AF
points and focusing patterns will differ depending on the lens. The
lenses are thereby classified into eight groups from A to H. Check
which group your lens belongs to.
When using a lens from groups F to H, fewer AF points will be usable.
When you press the <S> button, the AF points indicated by the mark
will blink. (The / / AF points will stay lit.)
“Extender EF1.4x” and “Extender EF2x” apply to all the I/II/III models.
Regarding new lenses marketed after the EOS-1D X, check Canon’s
Web site to see which group they belong to.
Some lenses may not be available in certain countries or regions.
Group A
Autofocusing with 61 points is possible. All of the AF area selection
modes are selectable.
: Dual cross-type AF point. Subject
tracking is superior and the focusing
precision is higher than with other AF
points.
: Cross-type AF point. Subject
tracking is superior and highprecision focusing is achieved.
: AF points sensitive to horizontal
lines.
EF24mm f/1.4L USM EF50mm f/1.8 II
EF24mm f/1.4L II USM EF85mm f/1.2L USM EF200mm f/2L IS USM
EF28mm f/1.8 USM EF85mm f/1.2L II USM
EF35mm f/1.4L USM EF85mm f/1.8 USM EF200mm f/2.8L USM
EF35mm f/2 EF100mm f/2 USM EF200mm f/2.8L II USM
EF50mm f/1.0L USM EF135mm f/2L USM EF300mm f/2.8L USM
EF50mm f/1.2L USM
EF50mm f/1.4 USM EF135mm f/2.8 (Softfocus) EF300mm f/2.8L IS II USM
EF50mm f/1.8 EF200mm f/1.8L USM EF400mm f/2.8L USM
EF135mm f/2L USM
+ Extender EF1.4x
EF200mm f/1.8L USM
+ Extender EF1.4x
EF200mm f/2L IS USM
+ Extender EF1.4x
EF300mm f/2.8L IS USM
76
Page 77

Lenses and Usable AF Points
COPY
EF400mm f/2.8L II USM EF16-35mm f/2.8L USM EF28-70mm f/2.8L USM
EF400mm f/2.8L IS USM EF16-35mm f/2.8L II USM EF70-200mm f/2.8L USM
EF400mm f/2.8L IS II USM EF17-35mm f/2.8L USM EF70-200mm f/2.8L IS USM
TS-E45mm f/2.8* EF20-35mm f/2.8L EF70-200mm f/2.8L IS II USM
TS-E90mm f/2.8* EF24-70mm f/2.8L II USM EF80-200mm f/2.8L
* Manual focus without tilt/shift.
Group B
Autofocusing with 61 points is possible. All of the AF area selection
modes are selectable.
: Dual cross-type AF point. Subject
tracking is superior and the focusing
precision is higher than with other AF
points.
: Cross-type AF point. Subject
tracking is superior and highprecision focusing is achieved.
: AF points sensitive to horizontal
lines.
EF14mm f/2.8L USM EF20mm f/2.8 USM EF28mm f/2.8 IS USM
EF14mm f/2.8L II USM EF24mm f/2.8 EF24-70mm f/2.8L USM
EF15mm f/2.8 Fisheye EF24mm f/2.8 IS USM
Group C
Autofocusing with 61 points is possible. All of the AF area selection
modes are selectable.
: Cross-type AF point. Subject
tracking is superior and highprecision focusing is achieved.
: AF points sensitive to horizontal
lines.
77
Page 78

Lenses and Usable AF Points
COPY
EF50mm f/2.5 Compact Macro TS-E24mm f/3.5L*
EF100mm f/2.8 Macro TS-E24mm f/3.5L II*
EF100mm f/2.8L Macro IS USM
EF300mm f/4L USM
EF300mm f/4L IS USM
EF400mm f/4 DO IS USM
EF500mm f/4L IS USM
EF500mm f/4L IS II USM
EF600mm f/4L USM
EF600mm f/4L IS USM
EF600mm f/4L IS II USM
TS-E17mm f/4L*
EF200mm f/2.8L USM
+ Extender EF1.4x
EF200mm f/2.8L II USM
+ Extender EF1.4x
EF300mm f/2.8L USM
+ Extender EF1.4x
EF300mm f/2.8L IS USM
+ Extender EF1.4x
EF300mm f/2.8L IS II USM
+ Extender EF1.4x
EF400mm f/2.8L USM
+ Extender EF1.4x
EF400mm f/2.8L II USM
+ Extender EF1.4x
EF400mm f/2.8L IS USM
+ Extender EF1.4x
EF400mm f/2.8L IS II USM
+ Extender EF1.4x
EF135mm f/2L USM
+ Extender EF2x
EF200mm f/1.8L USM
+ Extender EF2x
EF200mm f/2L IS USM
+ Extender EF2x
EF8-15mm f/4L Fisheye USM
EF17-40mm f/4L USM
EF24-105mm f/4L IS USM
EF28-80mm f/2.8-4L USM
EF70-210mm f/4
EF70-200mm f/4L USM
EF70-200mm f/4L IS USM
EF70-200mm f/2.8L USM
+ Extender EF1.4x
EF70-200mm f/2.8L IS USM
+ Extender EF1.4x
EF70-200mm f/2.8L IS II USM
+ Extender EF1.4x
* Manual focus without tilt/shift.
Group D
Autofocusing with 61 points is possible. All of the AF area selection
modes are selectable.
: Dual cross-type AF point. Subject
tracking is superior and the focusing
precision is higher than with other AF
points.
: Cross-type AF point. Subject
tracking is superior and highprecision focusing is achieved.
: AF points sensitive to horizontal
lines.
EF28mm f/2.8
78
Page 79

Lenses and Usable AF Points
COPY
Group E
Autofocusing with 61 points is possible. All of the AF area selection
modes are selectable.
: Cross-type AF point. Subject
tracking is superior and highprecision focusing is achieved.
: AF points sensitive to horizontal
lines.
EF50mm f/2.5 Compact Macro
+ LIFE SIZE Converter
EF100mm f/2.8 Macro USM
EF400mm f/5.6L USM
EF500mm f/4.5L USM
EF300mm f/4L USM
+ Extender EF1.4x
EF300mm f/4L IS USM
+ Extender EF1.4x
EF400mm f/4 DO IS USM
+ Extender EF1.4x
EF500mm f/4L IS USM
+ Extender EF1.4x
EF600mm f/4L USM
+ Extender EF1.4x
EF600mm f/4L IS USM
+ Extender EF1.4x
EF200mm f/2.8L USM
+ Extender EF2x
EF200mm f/2.8L II USM
+ Extender EF2x
EF300mm f/2.8L USM
+ Extender EF2x
EF300mm f/2.8L IS USM
+ Extender EF2x
EF300mm f/2.8L IS II USM
+ Extender EF2x
EF400mm f/2.8L USM
+ Extender EF2x
EF400mm f/2.8L II USM
+ Extender EF2x
EF400mm f/2.8L IS USM
+ Extender EF2x
EF400mm f/2.8L IS II USM
+ Extender EF2x
EF500mm f/4L IS II USM
+ Extender EF1.4x
EF600mm f/4L IS II USM
+ Extender EF1.4x
EF20-35mm f/3.5-4.5 USM EF35-135mm f/3.5-4.5
EF24-85mm f/3.5-4.5 USM EF35-135mm f/4-5.6 USM
EF28-90mm f/4-5.6 EF38-76mm f/4.5-5.6
EF28-90mm f/4-5.6 USM EF50-200mm f/3.5-4.5
EF28-90mm f/4-5.6 II EF50-200mm f/3.5-4.5L
EF28-90mm f/4-5.6 II USM EF55-200mm f/4.5-5.6 USM
EF28-90mm f/4-5.6 III EF55-200mm f/4.5-5.6 II USM
EF28-105mm f/3.5-4.5 USM
EF28-105mm f/3.5-4.5 II USM
EF28-135mm f/3.5-5.6 IS USM
EF28-200mm f/3.5-5.6
EF28-200mm f/3.5-5.6 USM
EF28-300mm f/3.5-5.6L IS USM
EF35-105mm f/3.5-4.5
79
Page 80

Lenses and Usable AF Points
COPY
EF70-200mm f/2.8L USM
+ Extender EF2x
EF70-200mm f/2.8L IS USM
+ Extender EF2x
EF70-200mm f/2.8L IS II USM
+ Extender EF2x
EF70-200mm f/4L USM
+ Extender EF1.4x
EF70-200mm f/4L IS USM
+ Extender EF1.4x
EF70-210mm f/3.5-4.5 USM EF75-300mm f/4-5.6 III EF100-300mm f/5.6
EF70-300mm f/4-5.6 IS USM EF75-300mm f/4-5.6 III USM EF100-300mm f/5.6L
EF70-300mm f/4-5.6L IS USM EF75-300mm f/4-5.6 IS USM
EF70-300mm f/4.5-5.6 DO IS USM
EF75-300mm f/4-5.6 EF90-300mm f/4.5-5.6
EF75-300mm f/4-5.6 USM EF90-300mm f/4.5-5.6 USM
EF75-300mm f/4-5.6 II EF100-200mm f/4.5A
EF75-300mm f/4-5.6 II USM EF100-300mm f/4.5-5.6 USM
EF80-200mm f/4.5-5.6
EF100-400mm f/4.5-5.6L IS USM
Group F
Only 47 of the 61 AF points can be used for autofocusing. All of the AF
area selection modes are selectable. During automatic AF point
selection, the outer frame marking the AF area (Area AF frame) will be
different from 61-point automatic selection AF.
: Cross-type AF point. Subject
tracking is superior and highprecision focusing is achieved.
: AF points sensitive to horizontal
lines.
: Disabled AF points (not displayed).
EF800mm f/5.6L IS USM EF28-80mm f/3.5-5.6 III USM EF35-80mm f/4-5.6 II
EF22-55mm f/4-5.6 USM EF28-80mm f/3.5-5.6 IV USM EF35-80mm f/4-5.6 III
EF28-70mm f/3.5-4.5 EF28-80mm f/3.5-5.6 V USM EF35-80mm f/4-5.6 PZ
EF28-70mm f/3.5-4.5 II EF28-105mm f/4-5.6 EF35-80mm f/4-5.6 USM
EF28-80mm f/3.5-5.6 EF28-105mm f/4-5.6 USM EF35-350mm f/3.5-5.6L USM
EF28-80mm f/3.5-5.6 USM EF35-70mm f/3.5-4.5 EF80-200mm f/4.5-5.6 II
EF28-80mm f/3.5-5.6 II EF35-70mm f/3.5-4.5A EF80-200mm f/4.5-5.6 USM
EF28-80mm f/3.5-5.6 II USM EF35-80mm f/4-5.6
80
Page 81

Lenses and Usable AF Points
COPY
Group G
Only 33 of the 61 AF points can be used for autofocusing. All of the AF
area selection modes are selectable. During automatic AF point
selection, the outer frame marking the AF area (Area AF frame) will be
different from 61-point automatic selection AF.
: Cross-type AF point. Subject
tracking is superior and highprecision focusing is achieved.
: AF points sensitive to horizontal
lines.
: Disabled AF points (not displayed).
EF180mm f/3.5L Macro USM
EF180mm f/3.5L Macro USM
+ Extender EF1.4x
EF1200mm f/5.6L USM
Group H
Only the AF point at the center of the viewfinder can be used for
autofocusing. Only the following AF area selection modes are
selectable: Single-point AF (Manual selection) and Single-point Spot AF
(Manual selection).
EF35-105mm f/4.5-5.6 EF35-105mm f/4.5-5.6 USM
With lenses whose maximum aperture is smaller than f/5.6, AF is not
possible during viewfinder shooting. Also, AF with f is not possible
during Live View shooting and movie shooting.
: Cross-type AF point. Subject
tracking is superior and highprecision focusing is achieved.
: Disabled AF points (not displayed).
81
Page 82

3 Selecting AI Servo AF Characteristics (For a Subject)
COPY
You can easily fine-tune AI Servo AF to suit a particular subject or
scene just by selecting a case from 1 to 6. This feature is called the “AF
Configuration Tool”.
Select the [21] tab.
1
Select a case.
2
Turn the <5> dial to select a case
icon, then press <0>.
X The selected case will be set. The
selected case is indicated in blue.
About Cases 1 to 6
As explained on pages 87 to 89, cases 1 to 6 are six combinations of
subject-tracking sensitivity, acceleration/deceleration tracking, and AF
point auto switching settings. Refer to the table below to select the case
applicable to the subject or scene.
Case Icon Description Applicable Subjects Page
Case 1
Case 2
Case 3
Case 4
Case 5
Case 6
Versatile multi purpose
setting
Continue to track the
subjects, ignoring possible
obstacles
Instantly focus on subjects
suddenly entering AF
points
For subjects that accelerate
or decelerate quickly
For erratic subjects moving
quickly in any direction
For subjects that change
speed and move erratically
For any moving subject. 83
Tennis players, butterfly
swimmers, freestyle skiers,
etc.
Starting line of a bicycle
race, alpine downhill skiers,
etc.
Soccer, motor sports,
basketball, etc.
Figure skaters, etc. 85
Rhythm gymnastics, etc. 86
83
84
84
82
Page 83

3 Selecting AI Servo AF Characteristics (For a Subject)
COPY
Case 1: Versatile multi purpose setting
Standard setting suited for any moving
subject. Works with many subjects and
scenes.
Select [Case 2] to [Case 6] in the
following cases: when obstacles enter
AF points, when the subject tends to
Default settings
• Tracking sensitivity: [0]
• Accel./decel. tracking: [0]
• AF pt auto switching: [0]
stray from AF points, when you want to
focus a subject that suddenly appears, or
when the subject moves dramatically up,
down, left, or right.
Case 2:
Default settings
• Tracking sensitivity:
[Locked on: -1]
• Accel./decel. tracking: [0]
• AF pt auto switching: [0]
Continue to track subjects, ignoring possible obstacles
The camera will try to continue focusing
the subject even if an obstacle enters the
AF points or if the subject strays from the
AF points. Effective when there may be
an obstacle blocking the subject or when
you do not want to focus the
background.
If an obstacle gets in the way or if the subject moves away from the AF
points for a prolonged period and the focus on the target subject is lost with
the default setting, setting [Tracking sensitivity] to [Locked on: -2] may
give better results (p.87).
83
Page 84

3 Selecting AI Servo AF Characteristics (For a Subject)
COPY
Case 3:
Default settings
• Tracking sensitivity:
• Accel./decel. tracking: [+1]
• AF pt auto switching: [0]
Instantly focus on subjects suddenly entering AF points
Once an AF point starts tracking the
subject, this setting enables the camera
to focus consecutive subjects at different
distances. If a new subject appears in
front of the target subject, the camera will
start focusing the new subject. Also
effective when you want to always focus
on the closest subject.
[Responsive: +1]
If you want to quickly focus a subject appearing suddenly, setting [Tracking
sensitivity] to [+2] may give better results (p.87).
Case 4: For subjects that accelerate or decelerate quickly
Geared for tracking moving subjects
prone to sudden, dramatic changes in
speed.
Effective for subjects with sudden
movements, sudden acceleration/
deceleration, or sudden stops.
Default settings
• Tracking sensitivity: [0]
• Accel./decel. tracking: [+1]
• AF pt auto switching: [0]
If the subject is in motion, and prone to sudden, dramatic changes in speed,
setting [Accel./decel. tracking] to [+2] may give better results (p.88).
84
Page 85

3 Selecting AI Servo AF Characteristics (For a Subject)
COPY
Case 5: For erratic subjects moving quickly in any direction
Even if the target subject moves
dramatically up, down, left, or right, the
AF point will switch automatically to
focus-track the subject. Effective for
shooting subjects that move dramatically
up, down, left, or right. This setting takes
Default settings
• Tracking sensitivity: [0]
• Accel./decel. tracking: [0]
• AF pt auto switching: [+1]
effect when the following AF area
selection modes are set: AF point
expansion (Manual selection ), AF
point expansion (Manual selection,
surrounding points), Zone AF (Manual
selection), 61-point automatic selection
AF.
This setting is not available with the
Single-point Spot AF (Manual
selection) and Single-point AF
(Manual selection) modes.
If the subject is prone to sudden, erratic movements up, down, left or right,
setting [AF pt auto switching] to [+2] may give better results (p.89).
85
Page 86

3 Selecting AI Servo AF Characteristics (For a Subject)
COPY
Case 6:
Default settings
• Tracking sensitivity: [0]
• Accel./decel. tracking: [+1]
• AF pt auto switching: [+1]
For subjects that change speed and move erratically
Geared for tracking moving subjects
whose speed can change dramatically
and suddenly. Also, if the target subject
moves dramatically up, down, left or right
and it is difficult to focus, the AF point
switches automatically to track the
subject.
This setting takes effect when the
following AF area selection modes are
set: AF point expansion (Manual
selection ), AF point expansion
(Manual selection, surrounding points),
Zone AF (Manual selection), 61-point
automatic selection AF.
This setting is not available with the
Single-point Spot AF (Manual
selection) and Single-point AF
(Manual selection) modes.
If the speed of the moving subject suddenly changes greatly, setting
[Accel./decel. tracking] to [+2] may give better results (p.88).
If the subject moves suddenly and erratically up, down, left, or right,
setting [AF pt auto switching] to [+2] may give better results (p.89).
86
Page 87

3 Selecting AI Servo AF Characteristics (For a Subject)
COPY
About the Parameters
Tracking sensitivity
Sets the subject-tracking sensitivity
during AI Servo AF when an obstacle
enters the AF points or when the AF
points stray from the subject.
[0]
Standard setting suited for most moving subjects.
[Locked on: -2 / Locked on: -1]
The camera will try to continue focusing the subject even if an
obstacle enters the AF points or if the subject strays from the AF
points. The -2 setting makes the camera track the target subject
longer than with the -1 setting.
However, if the camera focuses the wrong subject, it may take slightly
longer to switch subjects and refocus the target subject.
[Responsive: +2 / Responsive:+1]
Once an AF point tracks a subject, the camera can focus consecutive
subjects at different distances. Also effective when you want to
always focus on the closest subject. The +2 setting makes it quicker
to focus the next consecutive subject than with +1.
However, the camera will be more prone to focus on the wrong
subject.
[Tracking sensitivity] is the parameter named [AI Servo tracking
sensitivity] in the EOS-1D Mark III/IV, EOS-1Ds Mark III, and EOS 7D.
87
Page 88

3 Selecting AI Servo AF Characteristics (For a Subject)
COPY
Acceleration/deceleration tracking
This sets the tracking sensitivity for
moving subjects whose speed can
suddenly change dramatically by starting
or stopping suddenly, etc.
[0]
Suited for subjects that move at a fixed speed.
[+2 / +1]
Effective for subjects having sudden movements, sudden
acceleration/deceleration, or sudden stops. Even if the moving
subject’s speed suddenly changes dramatically, the camera
continues to focus the target subject. For example, for an
approaching subject, the camera becomes less prone to focus
behind it, which would result in a blurred subject. For a subject
stopping suddenly, the camera becomes less prone to focus in front
of it. Setting +2 can track dramatic changes in the moving subject’s
speed better than with +1.
However, since the camera will be sensitive to even slight
movements of the subject, the focusing may be unstable
momentarily.
88
Page 89

3 Selecting AI Servo AF Characteristics (For a Subject)
COPY
AF point auto switching
This sets the switching sensitivity of the
AF points as they track a subject that
moves dramatically up, down, left, or
right.
This setting takes effect in the following
AF area selection modes: AF point
expansion (Manual selection ), AF
point expansion (Manual selection,
surrounding points), Zone AF (Manual
selection), 61-point automatic selection
AF.
[0]
Standard setting for gradual AF point switching.
[+2 / +1]
Even if the target subject moves dramatically up, down, left, or right
and moves away from the AF point, the AF point switches to another
one to continue focusing the subject. The camera switches to the AF
point deemed most likely to focus the subject based on the subject’s
continual movement, contrast, etc. Setting +2 makes the camera
more prone to switch the AF point than with +1.
However, with a wide-angle lens having a wide depth of field or if the
subject is too small in the frame, the camera may focus with the
wrong AF point.
89
Page 90

3 Selecting AI Servo AF Characteristics (For a Subject)
COPY
Changing Cases’ Parameter Settings
You can adjust each case’s three parameters (1. Tracking sensitivity, 2.
Accel./decel. tracking, and 3. AF pt auto switching) as desired.
Select a case.
1
Turn the <5> dial to select the icon
of the case you want to adjust.
Press the <J/K> button.
2
The selected parameter will have a
purple frame.
Select the desired item.
3
Turn the <5> dial to select a
parameter, then press <0>.
When Tracking sensitivity is selected,
the setting screen will appear.
Make the adjustment.
4
Turn the <5> dial to adjust the
parameter as desired, then press
<0>.
X The adjustment is saved.
The default setting is indicated by the
light gray [C] mark.
Exit the setting.
5
To return to the screen in step 1,
press the <
J> button.
In step 2, pressing the <L> button will reset the respective case’s three
parameters to their default settings.
You can also register each of the three parameter settings to My Menu
(p.346). Doing so will change the selected case’s settings.
When shooting with a case whose parameters you adjusted, select the
adjusted case and then take the picture.
90
Page 91

3 Customizing AF Functions
COPY
With the [22] to [25] menu tabs, you
can set AF functions to suit your
shooting style or subject.
22: AI Servo
AI Servo 1st image priority
You can set the AF operation characteristics and shutter-release timing
for the first shot during continuous shooting with AI Servo AF.
: Equal priority
Equal priority is given to focusing and
shutter release.
: Release priority
Pressing the shutter button takes the
picture immediately even if focus has not
been achieved. This gives priority to
getting the shot rather than achieving
correct focus.
: Focus priority
Pressing the shutter button does not take the picture until focus has
been achieved. Effective when you want to achieve focus before
capturing the shot.
91
Page 92

3 Customizing AF Functions
COPY
AI Servo 2nd image priority
You can set the AF operation characteristics and shutter-release timing
for subsequent shots during continuous shooting with AI Servo AF.
: Equal priority
Equal priority is given to focusing and
continuous shooting speed. In low light
or with low-contrast subjects, shooting
speed may slow down.
: Shooting speed priority
Priority is given to the continuous shooting speed instead of achieving
focus. The continuous shooting speed does not slow down. Convenient
when you want to maintain the continuous shooting speed.
: Focus priority
Priority is given to achieving focus instead of the continuous shooting
speed. The picture is not taken until focus is achieved. Effective when
you want to achieve focus before capturing the shot.
92
Page 93

3 Customizing AF Functions
COPY
23: One Shot
USM lens electronic MF
You can set whether and how to use the electronic focusing ring when
using one of the electronic focusing ring-equipped lenses below.
EF50mm f/1.0L USM EF300mm f/2.8L USM EF600mm f/4L USM
EF85mm f/1.2L USM EF400mm f/2.8L USM EF1200mm f/5.6L USM
EF85mm f/1.2L II USM EF400mm f/2.8L II USM EF28-80mm f/2.8-4L USM
EF200mm f/1.8L USM EF500mm f/4.5L USM
: Enable after One-Shot AF
If you keep pressing the shutter button
halfway after AF operation, you can
focus manually.
: Disable after One-Shot AF
Manual focusing is disabled after AF
operation.
OFF: Disable in AF mode
When the lens’ focus mode switch is set to [AF], manual focusing is
disabled.
93
Page 94

3 Customizing AF Functions
COPY
AF-assist beam firing
Enables or disables the EOS-dedicated Speedlite’s AF-assist beam.
ON: Enable
The external Speedlite emits the AFassist beam when necessary.
OFF: Disable
The external Speedlite will not emit the
AF-assist beam. This prevents the AFassist beam from disturbing others.
IR: IR AF assist beam only
Only external Speedlite models that have an infrared AF-assist beam
will emit the AF-assist beam. Set this if you do not want the AF assist
using small flashes to be emitted.
If the external Speedlite’s Custom Function [AF-assist beam firing] is set to
[Disable], the AF-assist beam will not be emitted, regardless of this
function’s setting.
One-Shot AF release priority
You can set the AF operation characteristics and shutter-release timing
for One-Shot AF.
: Focus priority
The picture is not taken until focus is
achieved. Effective when you want to
achieve focus before capturing the shot.
: Release priority
Priority is given to taking the picture
instead of achieving focus. This gives
priority to getting the shot.
Note that the picture will be taken
even if focus has not been achieved.
94
Page 95

3 Customizing AF Functions
COPY
24
Auto AF point selection: EOS iTR AF
When the AF area selection mode is set to 61-point automatic selection
AF or Zone AF, AF is possible while using the subject’s color or face
detection information.
Using this function makes it easier to continue focusing a moving
subject with AI Servo AF. Using this function also makes it easier to
focus human subjects in One-Shot AF mode.
ON: Enable
The AF point is automatically selected
based on the AF information combined
with the color and facial information of
the subject. With AI Servo AF, the color
of the area where focus is initially
The camera then tracks that color by switching AF points. If a human
face is detected, the AF tracking and AF point switching switch to this
face. With 61-point automatic selection AF and AI Servo AF, you can
manually select the initial AF point to be used to focus. If multiple faces
are detected, the camera focuses using the AF point on the optimum
face given current conditions.
With One-Shot AF, the camera selects the AF point based on face position
information, and you can give priority to composition when taking the picture.
achieved is recorded.
OFF: Disable
The AF point is selected automatically based only on the AF information.
When [Auto AF pt sel: EOS iTR AF] is set to [Enable], focus will take
slightly longer than with [Disable].
Even if you set [Enable], the desired result may not be obtained
depending on the shooting conditions and subject.
Under low-light conditions when the flash emits the AF-assist beam
automatically, the AF point is selected automatically based only on the
AF information. (The AF does not use facial information.)
Face detection may not work if the face is small or in low-light condition.
95
Page 96

3 Customizing AF Functions
COPY
Lens drive when AF impossible
If focus cannot be achieved with autofocus, you can have the camera
keep searching for the correct focus or have it stop searching.
ON: Continue focus search
If focus cannot be achieved with
autofocus, the lens is driven to search for
the correct focus.
OFF: Stop focus search
If autofocus starts and the focus is far off
or if focus cannot be achieved, the lens
drive stops. This prevents the lens from
becoming grossly out of focus due to
focus searching.
Super telephoto lenses can become grossly out of focus during continuous
focus search, taking more time to achieve focus the next time. Therefore,
setting [Stop focus search] is recommended for super telephoto lenses.
Selectable AF point
You can change the number of manually selectable AF points. With
automatic AF point selection, all 61 AF points will remain active
regardless of this setting.
: 61 points
All 61 AF points will be manually
selectable.
: Only cross-type AF points
Only cross-type AF points will be
manually selectable. The number of
selectable cross-type AF points will differ
depending on the lens.
96
Page 97

3 Customizing AF Functions
COPY
: 15 points
Fifteen main AF points will be manually selectable.
: 9 points
Nine main AF points will be manually selectable.
With a lens from groups F to H (p.80, 81), the number of manually
selectable AF points will be fewer.
Even with settings other than [61 points], AF point expansion (Manual
selection ), AF point expansion (Manual selection, surrounding points),
and Zone AF (manual selection of Zone) are still possible.
When you press the <S> button, the AF points that are not manually
selectable will not be displayed.
Select AF area selection mode
You can limit the selectable AF area selection modes to suit your
shooting preferences. Turn the <5> dial to select a selection mode,
then press <0> to append a checkmark <X>. Then select [OK] to
register the setting.
: Manual select.:Spot AF
For pinpoint focusing with a narrower AF
point than Single-point AF.
: Manual selection:1 pt AF
One of the AF points set by [Selectable
AF point] setting can be selected.
: Expand AF area:
The camera will focus with the manually-selected AF point and the
adjacent AF points (above, below, left and right).
: Expand AF area:Surround
The camera will focus with the manually-selected AF point and the
surrounding AF points.
97
Page 98

3 Customizing AF Functions
COPY
: Manual select.:Zone AF
The 61 AF points are divided into nine zones for focusing.
: Auto selection: 61 pt AF
All of the AF points are used for focusing.
The <X> mark cannot be deleted from [Manual selection:1 pt AF].
If the attached lens belongs to group H (p.81), you can only select
[Manual select.:Spot AF] and [Manual selection:1 pt AF].
AF area selection method
You can set the method for changing the AF area selection mode.
→ M-Fn button
After you press the <S> button, the AF
area selection mode changes each time
you press the <B> button.
→ Main Dial
After you press the <S> button, turning
the <6> dial changes the AF area
selection mode.
When [ → Main Dial] is set, use the <9> to move the AF point
horizontally.
Orientation linked AF point
You can set the AF area selection mode and manually-selected AF
point separately for vertical shooting and horizontal shooting.
: Same for both vert/horiz
The same AF area selection mode and
manually-selected AF point (or Zone) are
used for both vertical shooting and
horizontal shooting.
98
Page 99

3 Customizing AF Functions
COPY
: Select separate AF points
The AF area selection mode and manually-selected AF point (or Zone)
can be set separately for each camera orientation (1. Horizontal, 2.
Vertical with the camera grip at the top, 3. Vertical with the camera grip
at the bottom). Convenient when, for instance, you want to keep using
the right AF point during all camera orientations.
When you manually select the AF area selection mode and AF point (or
Zone with Zone AF) for each of the three camera orientations, they will
be set for the respective orientation. Whenever you change the camera
orientation, the camera will switch to the AF area selection mode and
manually-selected AF point (or Zone) set for that orientation.
If you clear the camera settings to their defaults (p.58), the setting will be
[Same for both vert/horiz]. Also, your settings for the three camera
orientations will be cleared and all settings will revert to Single-point AF
(Manual selection) with the center AF point selected.
25
Manual AF point selection pattern
During manual AF point selection, the selection can either stop at the
outer edge of the area AF frame or it can move to the opposite AF point.
This function works in AF area selection modes other than 61-point
automatic selection AF and Zone AF. (It takes effect in 61-point
automatic selection AF only with AI Servo AF.)
: Stops at AF area edges
Convenient if you often use an AF point
along the edge.
: Continuous
Instead of stopping at the outer edge, the
selected AF point continues to the
opposite side of the area AF frame.
99
Page 100

3 Customizing AF Functions
COPY
AF point display during focus
You can set whether or not to display the AF point(s) in the following
cases: 1. When selecting the AF point(s), 2. When the camera is ready
to shoot (before AF operation), 3. During AF operation, and 4. When
focus is achieved.
: Selected (constant)
The selected AF point(s) is always
displayed.
: All (constant)
All 61 AF points are always displayed.
: Selected (pre-AF, focused)
The selected AF point(s) is displayed for 1, 2, and 4.
: Selected (focused)
The selected AF point(s) is displayed for 1 and 4.
OFF: Disable display
For 2, 3, and 4, the selected AF point(s) will not be displayed.
If [Selected (pre-AF, focused)] or [Selected (focused)] is set, the AF point
will not be displayed even when focus is achieved with AI Servo AF.
100
 Loading...