

Page 1
C
J
C
GETTING THE MOST
FROM YOUR EOS-1
CLASS DIGITAL SLR
TIPS AND TECHNIQUES:
CAMERA HANDLING
& MAXIMUM IMAGE
QUALITY
Page 2

OVERVIEW
Canon’s EOS-1 class digital SLRs (EOS-1D, EOS-1Ds, EOS-1D Mark II and EOS-1Ds Mark
II) are clearly the company’s highest quality and most powerful digital SLRs to date.
Thanks to their key attributes of EF Lens compatibility, Canon CMOS sensor technology
and DIGIC/DIGIC II Image Processors, EOS-1 class digital SLRs produce images with
exceptionally low noise, excellent detail and superb color.
As with any professional camera system, there are numerous variables in camera
operation, lens selection and image quality optimization that must be clearly
understood and mastered by the user in order to achieve the best possible results.
The purpose of this document is to identify the factors that affect the autofocus (AF)
performance and image quality aspects of EOS-1 class digital SLRs, and provide tips
and techniques on getting the most out of this powerful camera and lens system.
We have intentionally provided detailed explanations to clarify the reasoning behind our
recommendations, but at the beginning of the document there is also a brief summary
of the main points for your convenience. Thank you for using Canon products! We want
you to know that we sincerely appreciate your patronage.
OVERVIEW 2
Page 3

QUICK REFERENCE GUIDE
Camera Operation Tips Select focusing points manually:
Selecting the focusing point manually speeds up the autofocus system because the
camera does not have to decide which focus point or points to use. Manual focusing point
selection also allows you to control exactly where the camera is focusing. If you would like
to select two focusing points at once, you can shift the focusing point up or down one row.
Use Custom Functions to improve AF control and speed up camera operation:
• C.Fn 4 operates AF and shutter release separately for greater control.
• C.Fn 13 speeds up focusing point selection by reducing the number of manually
selectable focusing points.
• C.Fn 17 expands the active area around manually selected focusing points.
(For maximum control, use C.Fn 17-0 to disable focusing point expansion.)
• C.Fn 19 adds AF control features to compatible EF lenses.
• C.Fn 20 provides more control over AI Servo focusing sensitivity.
• C.Fn 21 controls the priority of framing rate over predictive AF.
Custom Functions can be combined to optimize camera operation according to various
applications such as Action Photography and Event Imaging. Groups of Custom
Functions can be saved in the camera and selected quickly when needed.
to find a point on
Try
A contrasty subject is easier to focus on. This is particularly important in low light. If
your subject is low in contrast, try focusing on its edge rather than in the middle.
Avoid recomposing after focus lock during portraiture or close-up photography:
Thi
s technique can cause focusing errors when shooting subjects within 15 feet of the
camera, especially when using large apertures to reduce depth of field. Instead, select
an off-center focusing point or focus manually.
For maximum AF Speed, use current USM lenses and avoid Extenders:
Current USM lenses such as the IS super-telephoto series are optimized for maximum AF
speed when used with EOS-1 class digital SLRs. In exchange for increasing focal length,
EF Extenders reduce lens drive speed and maximum apertures.
Practice your shutter release technique:
Pressing the shutter button halfway prior to shutter release improves AF tracking
accuracy and shutter button response, especially in AI Servo AF with moving subjects.
It can also reduce the potential of camera shake.
your sub
ject with a high degree of contrast:
QUICK REFERENCE GUIDE 3
Page 4

void unintentional motion blur:
A
suming an accurately focused subject, you can maximize image quality by eliminating
As
nwanted motion blur. To reduce the effects of camera shake, use a tripod when possible.
u
se an Image Stabilizer lens for handheld photography. To eliminate unwanted blur
U
aused by subject movement, use faster shutter speeds or electronic flash.
c
Avoid inadvertent camera or subject movement after focus lock:
If you are using One-Shot AF, do not move the camera towards or away from the subject
after locking focus, especially for subjects within 15 feet of the camera.
Avoid the use of small apertures with wide-angle or wide zoom lenses:
Small apertures can cause sharpness-degrading diffraction when using wide-angle or
wide zoom lenses.
Image Quality
Optimization Tips
Consider the use of in-camera sharpening:
If you shoot JPEGs and you wish to reduce or eliminate the need for post-processing in
order to speed up your workflow, you may find that increasing the level of in-camera
sharpening is effective.
Apply post-process sharpening effectively:
Canon EOS digital cameras have an anti-aliasing filter installed on the image sensor.
This filter improves color rendition and practically eliminates moiré. The liability is a
slight reduction of sharpness. To reduce the softening effect of the anti-aliasing filter we
®
recommend applying an unsharp mask to the image in Adobe
Photoshop®. Although
there is no such thing as a “best” setting for all applications, we suggest the following
as a starting point:
Amount: 300%
Radius: 0.3 pixels
Threshold: 0 pixels
Under
stand that image magnification affects perceived sharpness:
When viewing images at 100% magnification, the actual image size can be as large as
4 x 6 FEET depending on the resolution of the camera. If your images are regularly
printed at 8.5" x 11" or less, the equivalent magnification with EOS-1D Mark II would be
approximately 33%, or 25% with an EOS-1Ds. Try printing your images to evaluate
sharpness.
QUICK REFERENCE GUIDE 4
Page 5

CONTENTS
I CAMERA FEATURES AND OPERATION 6
The 45-point AREA AF Sensor 6
The Evolution of AF Speed & Predictive AF Control 7
AF Modes 8
AF Point Selection Methods 8
AF Performance According to Subject Contrast & Detail 9
AF Performance According to Light Levels 9
Shutter Release Techniques: Half-Press vs. Mash 10
Autofocusing Techniques: Off-Center Focusing Points vs. 11
“Focus Lock and Recompose”
Fine-Tuning Your Camera With Custom and Personal Functions 11
Combining Custom Functions: Advanced Operations 16
II LENS ISSUES 23
AF Speed According to EF Lens Vintage 23
EF
Extender Is
sues 23
III IMAGE QUALITY SETTINGS 24
RAW vs. JPEG 24
G Quality 24
JPE
Sharpnes
amera
In-C
IV SHARPNESS EVALUATION 28
Reviewing Images on the Camera’s LCD Monitor 28
Monitor Evaluation vs. Printed Output 28
Motion Blur
Camera or Subject Movement After Focus Lock 29
Diffraction 29
V SHARPENING METHODS IN POST PROCESSING 30
Adobe Photoshop’s Unsharp Mask Filter 30
3rd Party Sharpening Software 31
RAW Converters 32
VI EQUIPMENT CALIBRATION ISSUES 33
AF System Calibration 33
Lens Calibration 33
Testing Your Own Cameras & Lenses 33
s, Contra
st, Saturation & Color Tone Control 25
29
CONTENTS 5
Page 6
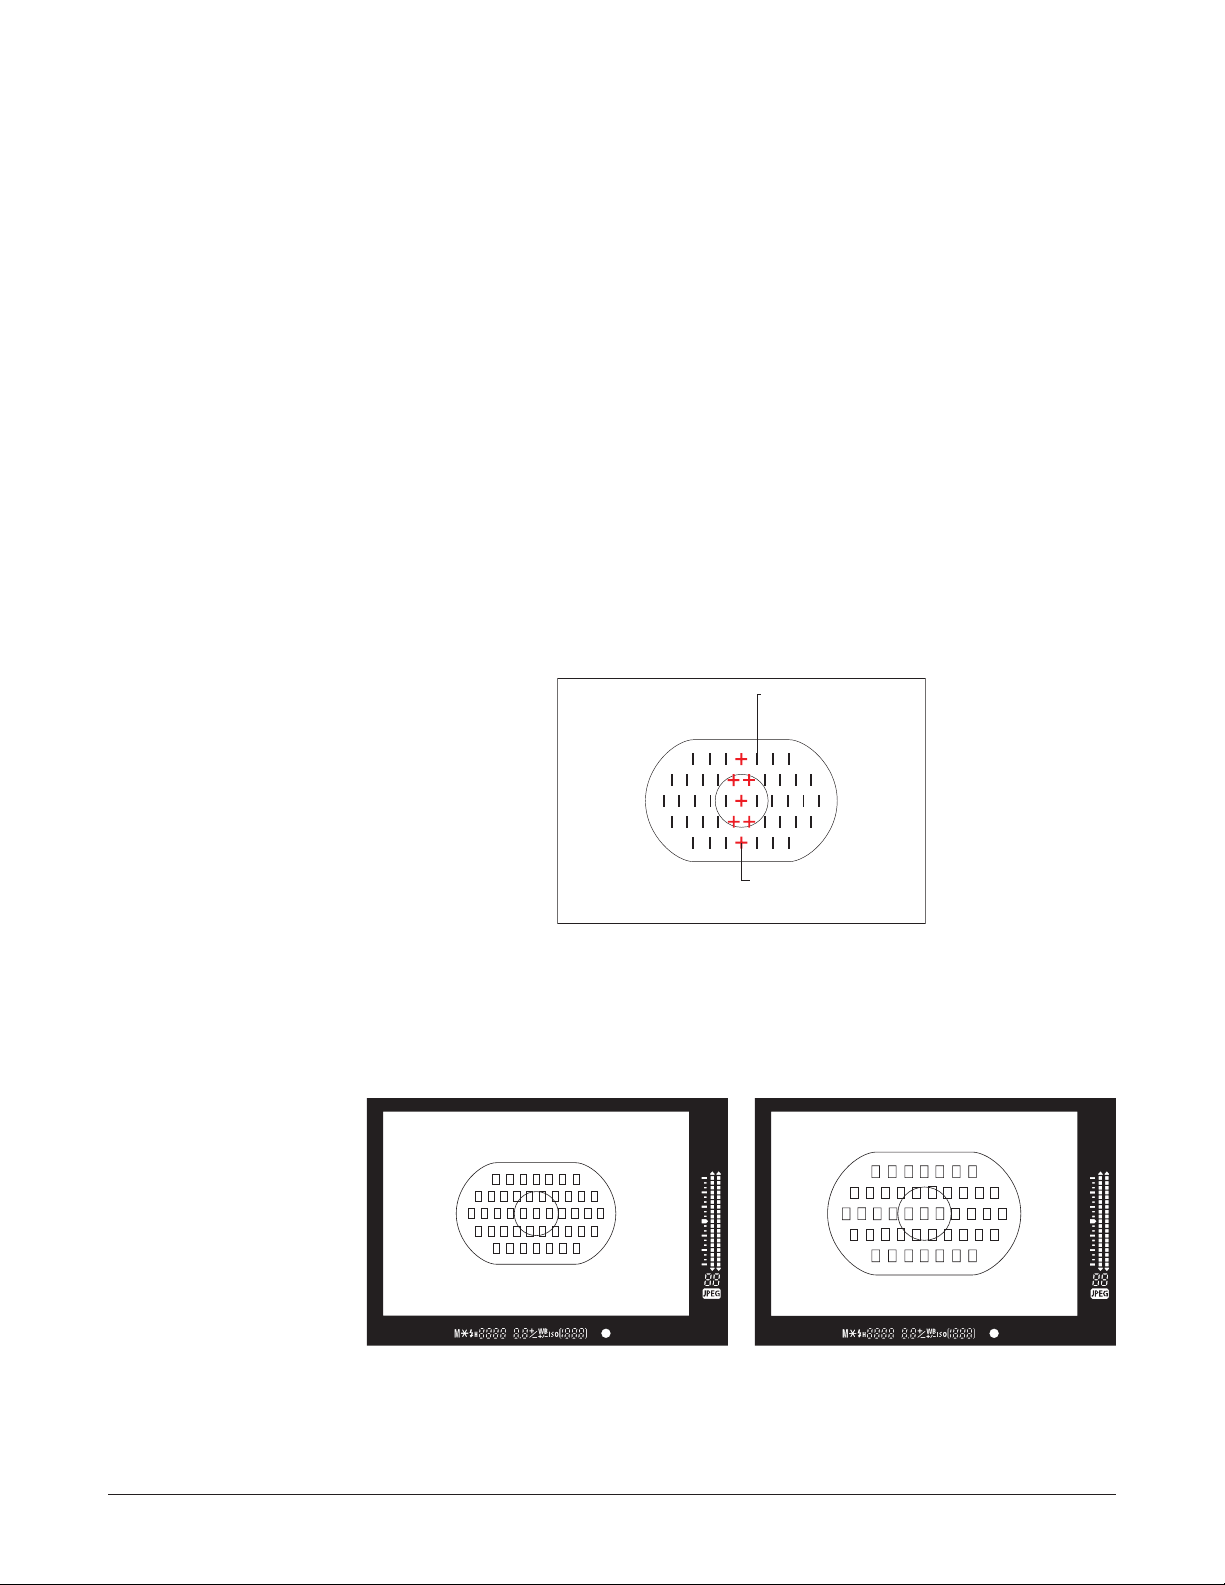
I. CAMERA FEATURES
EOS 1Ds Mark II EOS 1D Mark II
Black: Horizontal line detection
sensors operational with
f/5.6 or faster lens.
Red: Vertical line detection sensors
operational with f/2.8 or
faster lens.
AF F
rame
AND OPERATION
45-point Area AF Sensor
EOS-1 class digital SLRs use an improved version of the 45-point Area AF CMOS sensor
unit that was originally introduced in 1998 with the EOS-3. The pixel density and layout
of sensor elements together with the patented design of the camera’s sub-mirror and
separator lenses gave rise to the name “Area AF” and resulted in a coverage area of 8 x
15mm with 45 selectable focusing points. (Previous EOS AF designs had 5 points or
fewer, all in a single line.) When the camera is oriented horizontally, all 45 points are
sensitive to horizontal or diagonal subject contrast with lenses featuring maximum
apertures as small as f/5.6. Six of the central-area focusing points become highprecision cross-type sensors when the lens has a maximum aperture of f/2.8 or larger.
The central focusing point is high-precision cross-type with f/4 or faster lenses, and can
maintain single-line autofocus with maximum apertures as small as f/8. These factors
can come into play when choosing lenses and extenders for maximum AF performance.
The focusing area is 8 x 15mm regardless of the camera’s imaging format.
Consequently, AF coverage is proportionately larger with the EOS-1D and EOS-1D Mark II
with their 19.1 x 28.7mm imaging format than it is with the EOS-1Ds Mark II, EOS-1Ds,
E
OS-1v or EOS-3 which feature 24 x 36mm coverage.
I. CAMERA FEATURES AND OPERATION 6
Page 7
10 feet
6 feet
250mph 185 12562 303mph
6
20 feet
33 feet
66 feet
98 feet
400km/h30020010050105km/h
1m
2m
3m
6m
10m
20m
30m
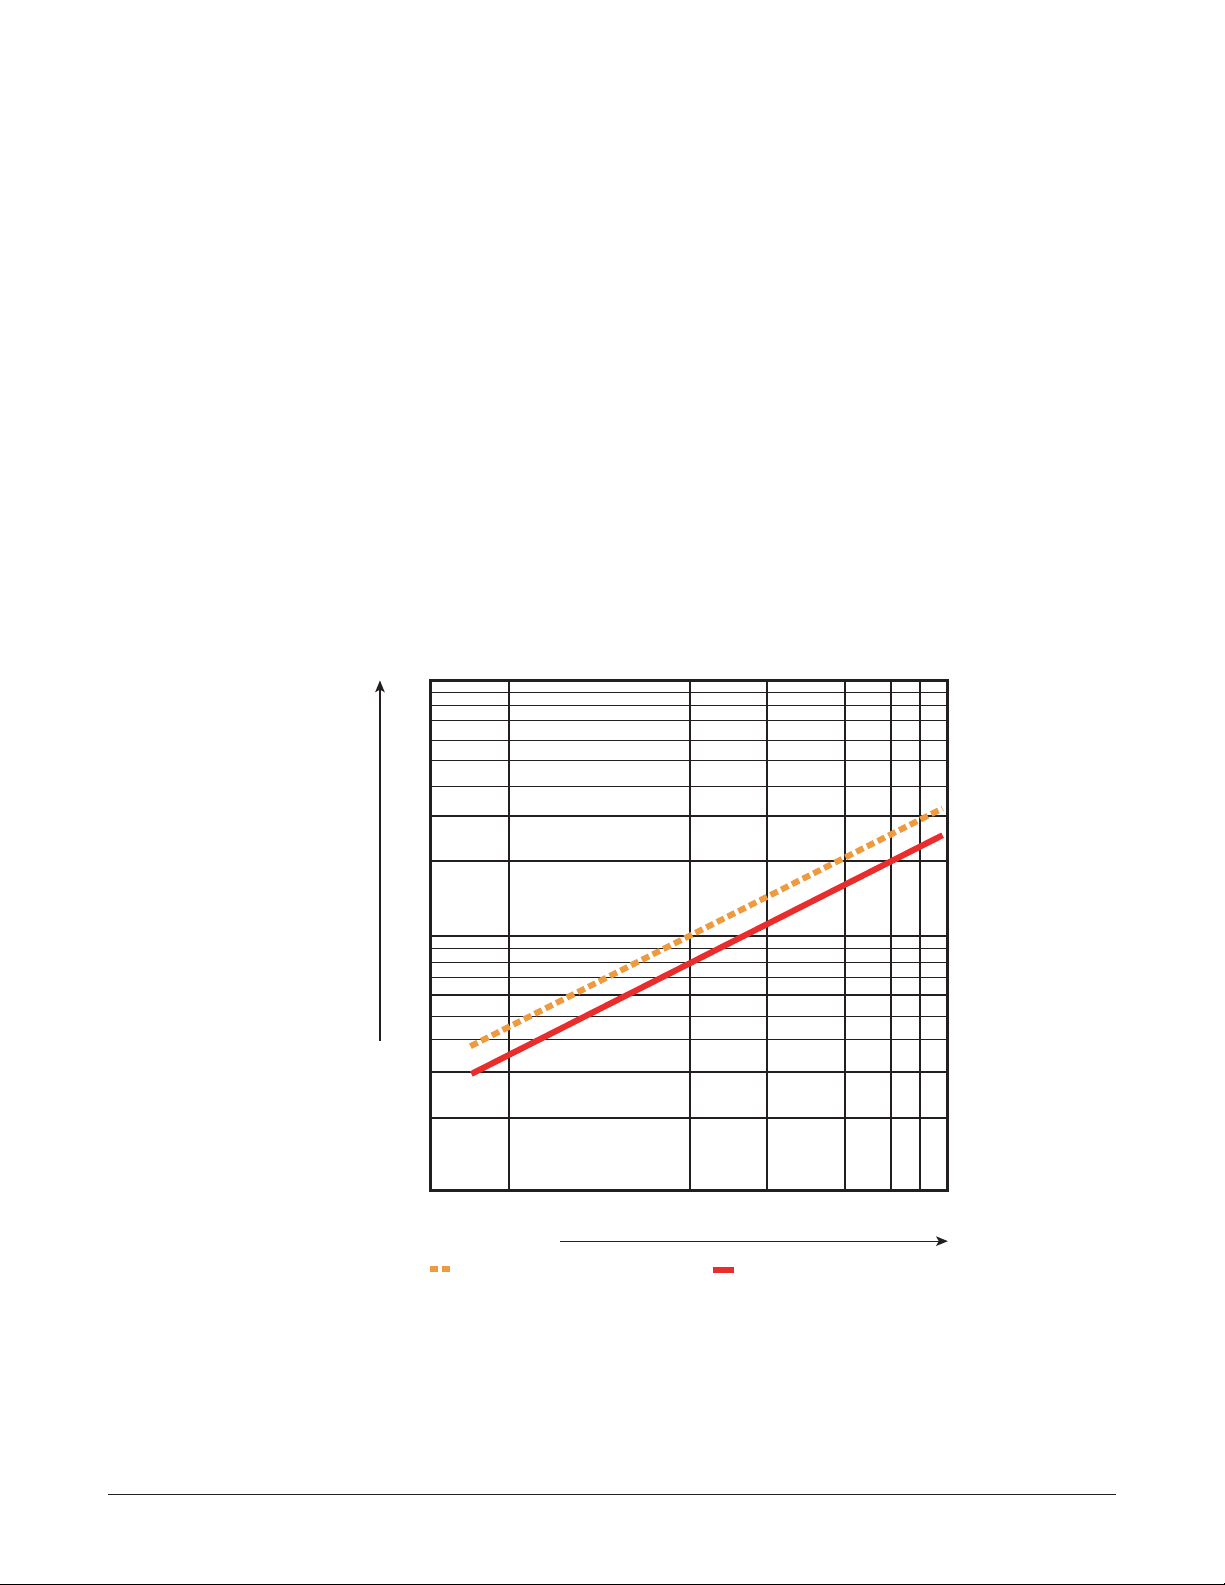
Predictive AI Servo AF Performance
How close can the camera track a moving subject with an EF300mm f/2.8L IS Lens
Subject Speed
EOS-1: 5 fps (with Power Drive Booster E1) EOS-1D Mark II: 8.5 fps
Subject Distance
volution of AF Speed
The E
edictive AF Control
& Pr
OS-1D and EOS-1Ds had the fastest AF systems available among EOS SLRs when
The E
were introduced, but the EOS-1D Mark II now has the most powerful AF system of
they
y EOS camera released to date (2004). The EOS-1D Mark II was the first Canon camera
an
o feature two dedicated CPUs for AF: one for detection and calculation, and another to
t
ontrol lens drive. EOS-1 class cameras prior to the 1D Mark II used a single dedicated
c
or all AF operations.
CPU f
All EOS-1 class digital SLRs feature RISC (Reduced Instruction Set Computing)
processors so that multiple operations can be performed simultaneously. The extra
speed created through this method has made it possible to increase the power and
sophistication of the algorithms employed for predictive AF. Using an EF 300mm f/2.8L
IS USM lens and a fully charged battery pack, the original EOS-1 with Power Drive
Booster PB-E1 could track a subject moving at 300 kph/186 mph as close as 26
meters/85 ft. Using an EF 300mm f/2.8L IS USM lens and a fully charged battery pack,
an EOS-1D Mark II or EOS-1Ds Mark II can track a subject moving at 300 kph/186 mph
as close as 20 meters/66 ft.
I. CAMERA FEATURES AND OPERATION 7
Page 8

AF
Modes
Shot AF:
One-
ompletion of lens drive, allowing the photographer to recompose if desired. One-Shot
c
is also recommended for maximum performance in extreme low-light situations.
AF
s mode is intended for use with stationary subjects. It locks focus upon
Thi
AF Point Selection
Methods
Servo AF:
AI
ontinuously up to the instant of exposure, and it also operates between exposures in
c
urst mode shooting.
b
s mode is intended for use with moving subjects. It operates
Thi
In AI Servo AF, you can tell whether the AF system is tracking the subject by observing
the focus indicator in the viewfinder below the picture area. If the focus indicator does
not light, the system is tracking. If it is blinking rapidly, the system is not tracking.
Please note that this is slightly different from the camera's behavior in One-Shot AF. In
One-Shot, the focus indicator still blinks when the subject can't be focused, but it lights
up continuously when focus has locked.
Canon provides two AF point selection methods: Automatic and Manual. The details of
each method are described below.
Automatic Focusing Point Selection (AFPS): The camera selects a focusing point for
you, choosing from all 45 points. AFPS behavior varies according to your choice of
focusing modes:
• When
One-Shot AF is combined with AFPS, the camera typically selects the closest
subject with readable contrast. Since the subject may be large enough to cover several
focusing points simultaneously, the viewfinder’s focusing point display may illuminate
as many as 13 points simultaneously. If focus cannot be achieved, the in-focus
indicator below the picture area blinks.
• When
AI Servo AF is combined with AFPS, the camera shuts off all focusing points
except the central one until the subject has been identified. Once the camera has
started to track the subject with the center point, all 45 points are activated and the
c
amera is able to track movement not only towards or away from the camera, but
anywhere the subject moves within the 45-point coverage area.
Manual Focusing Point Selection (MFPS): The photographer selects the desired
focusing point. When the camera is set to its defaults, only one or two focusing points
are used. (To select 2 focusing points at once manually, use the Quick Control Dial to
scroll up or down from the currently selected manual focusing point. When 2 focusing
points are active, the camera evaluates both and selects the one with the most
reliable subject data. This can come in handy when photographing moving subjects.)
The active area around a manually selected focusing point can also be expanded in two
stages via Custom Function 17. See Custom Functions for details.
I. CAMERA FEATURES AND OPERATION 8
Page 9

When the c
viewfinder display when the shutter button is pressed halfway. This occurs in both
the
One-
ustom Function 10.
C
amera is set for MFPS, the manually selected focusing point illuminates in
Shot AF and AI Servo AF. The illumination can be turned off or made brighter with
AF Performance According
to Subject Contrast &
Detail
The AF
th
system tends to work slightly faster when the focusing point is manually selected
an during AFPS, but there is a trade-off between the wider coverage area of AFPS and
the comparatively narrow coverage area of MFPS. Choosing between the two is largely
based on subject matter, lens selection and personal preference.
The 45-point AF sensor used in current EOS-1 class cameras has been engineered to
perform as well as possible with low-contrast subjects. However, the sensor is part of a
passive AF system that requires certain levels of light and subject contrast or detail in
order to function at all. For example, the camera will not focus in complete darkness or
on a blank wall or sheet of paper unless it has the benefit of an AF-Assist beam to
project a striped pattern on the subject. (When you’re using Speedlite Transmitter
ST-E2 or an EX Speedlite, be sure to set the camera to One-Shot AF to activate the
AF-Assist beam.)
Low-contrast subjects are not limited to blank walls and sheets of paper. Typically, you
will find subject matter such as human skin and various types of single-color clothing to
be low in contrast as well. Additionally, the veiling glare sometimes encountered when
photographing backlit subjects can degrade subject contrast when it is being evaluated
by the camera’s AF sensor. In such cases, we suggest that you try to focus on the edge
of the subject rather than in the middle of it.
AF Performance According
to Light Levels
As a photographer you will not always have complete control over your shooting
position, lighting direction or the detail and contrast in your subject matter.
Nevertheless, you need to be aware that AF performance is affected by the contrast
levels presented to the focusing sensor.
Assuming adequate subject contrast, autofocusing speed in the EOS System is largely
dependent on the following factors:
Light Levels: The darker it gets, the longer it takes for the AF system to lock on to the
•
subject, regardless of the lens in use.
• Maximum Aperture: In low light conditions, the faster the lens, the faster the AF,
generally speaking. For instance, in low light, an EF 35mm f/1.4L USM will autofocus
faster than an EF 28-135mm f/3.5-5.6 IS USM lens.
• Focal Length: Longer focal length lenses like the EF 70-200mm f/2.8L USM have a
much greater range of defocus than standard or wide-angle lenses. In other words,
when an image goes out of focus on a fast telephoto lens, it really goes out of focus.
This can cause delays or sometimes even failures in low-light AF. As a workaround,
I. CAMERA FEATURES AND OPERATION 9
Page 10

ocus manually until you are “in the ballpark,” then try using AF for fine-tuning.
f
ditionally, this is an instance where the distance range selector switch on “white”
Ad
enses like the EF 70-200mm f/2.8L USM can reduce the length of time the AF system
l
pends hunting for focus, if your subject distance happens to be beyond the range
s
tated on the lens switchboard.
s
In One-
Shot AF
can take as long as a full second or more for the camera to achieve
, it
focus completion in extremely low light without a focusing aid. Even with a Speedlite
featuring an AF-Assist beam, low-light AF will be slower than bright-light AF. This is not a
design flaw or manufacturing defect; it’s related to the sensitivity of the AF sensor.
Remember that the AF system is always passive, even when using an AF-Assist beam;
AF search in low light can be faster with an AF Assist beam than without one, but bright
light AF speed will always be faster with a readable subject.
In AI Servo AF, the camera samples the AF detection data at varying rates of frequency
depending on the light level. The brighter it gets, the higher the sampling rate and
therefore AF performance improves. But as light levels drop off, the sampling rate
decreases and a point is reached where the tracking ability of the AF system is
diminished. In other words, it’s unrealistic to expect AI Servo AF to track fast-moving
subjects as well in low light as it does in bright light.
Again, you may not always have control over lighting conditions, but it is important to
understand that there are limitations to AF performance according to the level of
available light.
Shutter Release
Techniques:
Half-Press vs. Mash
Another factor that has a lot to do with AF performance is shutter release technique. In
order to achieve the greatest possible performance from your EOS camera, it is essential
to press the shutter button halfway and hold it there until the instant you are ready to
shoot, especially in AI Servo AF with moving subjects. No other way is nearly as effective
in terms of maximizing AF performance.
Ther
e are two issues at stake here: the first is focus tracking and the second is a
phenomenon known as “release-time lag” or “shutter lag.” In One-Shot AF, pressing the
shutter button halfway locks the focus. When the camera is set for AI Servo AF and the
shutter button is pressed halfway, the AF system begins tracking the subject. If you
simply press the shutter button down without waiting for the AF to function, the shutter
release might lock up or be delayed in One-Shot AF. Under the same conditions, the
shutter will release without focusing in AI Servo AF. This is true with or without the use
of an AF-Assist beam. Conversely, pressing the shutter button halfway and holding it
there until you are ready to shoot allows the focusing system to lock focus in One-Shot
AF or start tracking the subject in AI Servo AF. Pressing the shutter button down all the
way once focusing has been established will release the shutter in the shortest possible
time, thereby increasing the odds of capturing “the decisive moment.”
I. CAMERA FEATURES AND OPERATION 10
Page 11

Some might
time, b
een power consumption and AF performance is to anticipate picture-taking
betw
portunities and do not press the shutter button halfway until just a second or two
op
ore pressing all the way for the shot.
bef
think that it’s a good idea to keep the shutter button half-pressed all the
ut battery life will be shortened significantly by that technique. The best balance
Autofocusing Techniques:
Off-Center Focusing Points vs.
“Focus Lock and
Recompose”
Fine-Tuning Your Camera
with Custom and
Personal Functions
The 45-point Area AF sensor covers a significant portion of the picture area, especially
with the original EOS-1D and EOS-1D Mark II. However, many photographers never use
the off-center focusing points, preferring the old-fashioned method of locking focus with
the center point and then recomposing for the actual image. Before multi-point AF
cameras were available, “Focus Lock and Recompose” (FLR) or manual focus were the
only choices available. That’s no longer the case.
FLR is sufficiently accurate for photographing distant subjects, but it can cause focusing
errors, especially backfocus, when photographing subjects within about 15 feet of the
camera. This is often the case during portraiture. For optimum focusing performance
with close subjects, we recommend avoiding the FLR technique. Instead, use an offcenter focusing point or focus manually.
EOS-1 class digital SLRs are equipped with an extensive variety of Custom Functions
(C.Fn) and Personal Functions (P.Fn) that allow photographers to tailor many aspects of
camera operation according to personal preferences. Although there are minor
differences in the quantity and variety of C.Fns and P.Fns according to individual camera
models, most of them are consistent across the product line. For the purposes of this
document, we will concentrate on C.Fns and P.Fns that affect AF performance with EOS-1
class digital SLRs.
Custom Function 4 allows the photographer to control which button on the camera is
used to start or stop AF. It also ties in with AE Lock when the camera is set to an AE
mode.
• C.Fn 4-0 (the default setting) starts AF and AE when the shutter button is pressed
halfway. AE Locks automatically upon focus completion when the camera is set for the
combination of One-Shot AF and Evaluative Metering. With other AF modes or metering
patterns, AE Lock can be initiated manually by pressing the AE Lock button on the
back of the camera.
• C.Fn 4-1 switches AF start to the AE Lock button, and starts AE Lock in AE modes with
any metering pattern when the shutter button is pressed halfway. This mode is
popular with sports photographers and some photojournalists, especially those who
originally learned photography with manual focus SLRs. It works particularly well with
USM lenses that have distance scales, because such lenses feature full-time manual
focusing even when the lens is set for AF. With C.Fn 4-1, the photographer can
manually focus such a lens at any time, and then start or stop AF independently from
I. CAMERA FEATURES AND OPERATION 11
Page 12

er release simply by pressing or lifting the thumb off the AE Lock button.
shutt
C.Fn 4-2 keeps AF start on the shutter button, but allows the photographer to stop AF
•
emporarily by pressing the AE Lock button. AE Lock is unavailable in this mode, but it
t
sn’t make any difference when the camera is set for manual exposure as it often is
doe
or professional sports photography.
f
C.Fn 4-3 is almost the same as C.Fn 4-1, except that there is no AE Lock. This mode is
•
seful when shooting sports photography in changing light situations, because it
u
updates the exposure automatically in AE modes as the subject moves from shadow
areas to sunlit areas or vice versa.
Custom Function 11 allows the photographer to control which buttons and dials are
used to select the focusing points.
• C.Fn 11-0 (the default) initiates focusing point selection mode when the focusing
point selector button is pressed. Focusing points can be scrolled horizontally with the
main input dial, or vertically with the quick control dial.
• C.Fn 11-1 reverses the functions of the focusing point selector button and the
exposure compensation (+/-) button on top of the camera. In other words, the
exposure compensation (+/-) button initiates focusing point selection mode, and the
main and quick control dials scroll the focusing points horizontally and vertically,
respectively. During photography, C.Fn 11-1 makes it quick and easy to adjust
exposure compensation by rotating the main dial while pressing the focusing point
selector button.
• C.Fn 11-2 also reverses the functions of the focusing point selector button and the
exposure compensation button, but during photography it allows you to use the Quick
Control Dial to scroll focusing points horizontally. Focusing points can be scrolled
vertically by turning the Main Dial while pressing the Assist Button. AFPS is
unavailable in this mode, except when P.Fn-18 is activated.
• C.Fn 11-3 reverses the functions of the focusing point selector button and the FEL
button. In this mode, the FEL button initiates focusing point selection mode, and the
main and quick control dials scroll the focusing points horizontally and vertically,
respectively. The focusing point selector button initiates the FEL preflash. With or
w
ithout flash, C.Fn 11-3 allows ambient exposure compensation to be adjusted with
the Quick Control dial during photography. C.Fn 11-3 is popular with photographers
who use FEL extensively.
Custom Function 13 controls the number of manually selectable focusing points, and it
also allows the photographer to link spot metering to an off-center focusing point.
• C.Fn 13-0 provides access to manual selection of all 45 focusing points and fixes spot
metering at the center of the picture area, as marked by the circle at the center of the
focusing screen.
• C.Fn 13-1 reduces the number of manually selectable focusing points to 11; 3 in the
top row, 5 in the middle row, and 3 more in the bottom row. Spot metering and Flash
Exposure Lock are linked to the manually selected focusing point in this mode. Fewer
I. CAMERA FEATURES AND OPERATION 12
Page 13

ocusing points results in faster manual selection, and linking spot metering to the
f
anually selected focusing point comes in handy under certain circumstances,
m
articularly with off-center subjects.
p
C.Fn 13-2 also reduces the number of manually selectable focusing points to 11, just
•
e C.Fn 13-1, except that spot metering is fixed at the center of the frame. Locking
lik
pot metering at the center can be desirable, especially in Manual exposure mode,
s
ause it allows the separation of focusing and metering.
bec
• C.Fn 13-3 reduces the number of manually selectable focusing points to 9; 8 around
the periphery of the Area AF ellipse plus the center focusing point. This is a useful
option for sports photographers, because the peripheral focusing points can be
selected rapidly via the Quick Control Dial.
Custom Function 17 allows the photographer to create a cluster of active focusing
points during manual focusing point selection.
• C.Fn 17-0 forces the camera to evaluate only the manually selected focusing point or
points. This is often the best choice when working with average subjects.
• C.Fn 17-1 expands the active focusing area by a radius of 1 point around the manually
selected focusing point, creating up to 7 active focusing points. The camera always
tries to use the manually selected focusing point, but when it can’t, it can choose one
of the other 6 active focusing points if there is readable subject detail under one of
them. This option is intended to increase the odds of getting sharp photos with small,
fast moving subjects such as birds in flight. However, it can sometimes cause critical
focus to shift slightly ahead of or behind relatively large 3-dimensional subjects like
human beings. We suggest practicing with C.Fn 17-1 repeatedly until you get a feel for
what it can and cannot do in your specific applications.
• C.Fn 17-2 performs a little differently according to the camera model. With the original
EOS-1D and EOS-1Ds, the camera decides whether or not to expand the focusing area
by a radius of 1 or 2 focusing points around the manually selected focusing point
based on the focal length of the lens in use as well as the subject’s degree of
movement. The photographer has no control over it other than lens selection. With the
Mark II cameras, on the other hand, C.Fn 17-2 expands the active focusing area by a
r
adius of 1 point around the manually selected focusing point at focal lengths up to
200mm, or by a radius of 2 points when the focal length is greater than 200mm,
regardless of the degree of subject movement.
Note: In theory, Custom Function 17-1 or 17-2 slightly reduces AF speed because of the
extra calculations involved. However, expanding the active focusing area often
increases the odds of finding a readable subject when subject size is small, or low in
contrast. We encourage you to experiment with all C.Fn 17 settings to determine which
setting is best for your specific needs.
Custom Function 18 programs the functions of the Assist Button near the eyepiece of
the camera.
I. CAMERA FEATURES AND OPERATION 13
Page 14

C.Fn 18-0 is the default setting. The camera can “register” (memorize) a user-specified
•
ocusing point or even automatic focusing point selection, then switch immediately to
f
egistered focusing point by pressing the focusing point selector button and the
the r
sist Button.
As
C.Fn 18-1 lets users switch to the registered focusing point simply by pressing the
•
sist Button.
As
C.Fn 18-2 switches to the registered focusing point only while the Assist Button is
•
pressed. Releasing the button causes the camera to revert to the previously selected
focusing point. This is useful for switching quickly between user-selected and
pre-registered focusing points. For example, if you register the center focusing point
and then set the camera for AFPS, you can switch between the two focusing point
selection methods at will.
Custom Function 19 programs the functions of the AF Stop buttons on a select group of
Image Stabilizer super-telephoto lenses including the EF 300mm f/2.8L IS USM, EF
400mm f/2.8L IS USM, EF 400mm f/4 DO IS USM, EF 500mm f/4L IS USM, and EF
600mm f/4L IS USM. It has no effect with other lenses.
• C.Fn 19-0 is the default setting. Autofocus is suspended when one of the AF Stop
buttons is pressed. AF resumes when the AF Stop button is released. This is useful for
sports or nature photography if an obstacle is temporarily blocking the main subject.
• In C.Fn 19-1, AF operates only when the AF Stop button is pressed. While the button is
pressed, AF operation from the camera is disabled. This can be beneficial because it
lets your left hand control AF operation, thereby freeing up your right hand to do other
things like selecting a new focusing point.
• In C.Fn 19-2, if the AF Stop button is pressed while the exposure metering system is
active, AE Lock takes effect in AE modes. This can be convenient when you want to
focus and meter separately. In this mode, AF is activated from the camera.
• In C.Fn 19-3, if the camera is set for MFPS, pressing one of the AF Stop buttons
instantly switches the camera to AFPS. This can be effective in AI Servo AF if it
becomes difficult to track a moving subject with a single focusing point.
• In C.Fn 19-4, if the camera is set for One-Shot AF, pressing one of the AF Stop buttons
t
emporarily toggles it to AI Servo AF, and vice versa. This can be effective when
working with a subject that stops and moves frequently.
• In C.Fn 19-5, if the lens’ IS switch is on, the Image Stabilizer operates only when you
press one of the AF Stop buttons. Autofocusing must be initiated from the camera
body. This option is somewhat similar to C.Fn 19-1 because it lets you concentrate on
selecting focusing points and operating the shutter release with your right hand while
controlling IS with your left hand.
Custom Function 20 controls the degree of focusing “sensitivity” in AI Servo AF. This is
not the same as AF calculation speed, which is always done as quickly as possible.
Instead, what is being adjusted is the length of time that the AF system is programmed
to stay at the most recently focused distance when the original subject is no longer
being tracked by the active focusing point. This can frequently happen in sports
I. CAMERA FEATURES AND OPERATION 14
Page 15

ography when another subject or obstacle temporarily blocks the original subject.
phot
The def
f
•
ault setting is 0.5 seconds, but with this Custom Function it can be tweaked
aster or slower according to the photographer’s personal preference.
C.Fn 20-0 is the camera’s standard setting. It programs the AF to remain at the most
ecently focused distance for up to 0.5 seconds while an obstacle is blocking the
r
al subject.
origin
• C.Fn 20-1 (“Slow”) programs the AF to remain at the most recently focused distance
for up to 1 second while an obstacle is blocking the original subject.
• C.Fn 20-2 (“Moderately Slow”) programs the AF remain at the most recently focused
distance for up to 0.75 seconds while an obstacle is blocking the original subject.
• C.Fn 20-3 (“Moderately Fast”) programs the AF to refocus on a new subject
approximately 0.25 seconds after the original subject is no longer being tracked.
• C.Fn 20-4 (“Fast”) programs the AF to refocus on a new subject approximately 0.125
seconds after the original subject is no longer being tracked.
In C.Fn 20-3 and 20-4, the lens focusing motor may seem more “jittery” than usual as it
constantly refocuses the lens. This is normal.
Custom Function 21 first appeared with the EOS-1D Mark II. It is the same as Personal
Function 13 from the EOS-1D and EOS-1Ds. The purpose of this setting is to control the
camera’s shutter release timing during continuous bursts in AI Servo AF. In all cases,
release timing for the first shot is controlled by the photographer, and the camera will
fire whether or not the subject is in focus. This is called “Release Priority,” as opposed
to “Focus Priority,” in which the camera does not fire until the AF system has confirmed
that the subject is in focus.
*
• C.Fn 21-0: Focus Priority within a prescribed time limit
for the second and
subsequent shots in a continuous burst with AI Servo AF.
The shutter will release at the framing rate set by the photographer, as long as lens drive can be completed
*
w
ithin a prescribed time limit. The shutter releases at the end of the prescribed time limit, even if focus has
not been achieved.
• C.Fn 21-1: Release Priority for the second and subsequent shots in a continuous burst
with AI Servo AF.
Some photographers prefer C.Fn 21-1 because it ensures that the camera will fire at a
consistent framing rate, even though it means that the subject may not be accurately
ocused. However, this is clearly a “use at your own risk” scenario, because there is no
f
way to be sure that your photos will be sharp.
Personal Function 14 disables focus detection (“hunting”) by the lens drive. This can
save time in low light or low contrast situations, especially when working with a USM
lens equipped with a distance scale. Such lenses can be focused manually even when
set to their AF mode.
I. CAMERA FEATURES AND OPERATION 15
Page 16

ersonal Function 15
P
s can be helpful when working with other photographers, to prevent your AF-Assist
Thi
am from appearing in their photos. The downside is that you lose the benefits of the
be
sist beam for your own photos.
AF-As
ersonal Function 16allows the camera to fire automatically when autofocus is
P
hieved and the shutter button is fully depressed. This can be effective for handheld
ac
sables the AF-Assist beam of compatible EX-series Speedlites.
di
macro photography or when the camera is set for remote operation and waiting for the
subject to come into the field of view. Remote operation can be achieved by using
Remote Switch RS-80N3 or Timer Remote Controller TC-80N3 with or without one or more
Extension Cord ET-1000N3 sets to release the shutter.
Personal Function 17 disables AFPS. This function can be convenient when you are
manually selecting focusing points near the edge of the Area AF ellipse but don’t want
the camera to switch to Automatic Focus Point Selection mode.
Personal Function 18 enables AFPS when C.Fn 11-2 has been set. (AFPS is normally
disabled in C.Fn 11-2 as mentioned earlier.)
Combining
Custom Functions:
Advanced Operations
As you can see from reading the section on Custom Functions, there are a great many
C.Fns that relate to the navigation of the EOS-1 class 45-point Area AF sensor. Used
individually they can go a long way towards simplifying and easing the operation of the
camera. As an example, C.Fn 4-1 (or, 4-3), where the rear (*) button is used to activate
the focusing system, is almost universally accepted by professional photographers as
the best way to shoot sports. But by combining this function with C.Fn 18-2 and
registering a Home Position (HP) with the Assist Button, it can be a much more valuable
and versatile tool.
We will look at a few combinations and how they relate to different types of
photography. A combination that’s useful for sports may be frustrating for shooting a
wedding or event, whereas a different combination might be ideal for those
ap
plications. Some combinations lend themselves better to photographers who shoot
in AI Servo AF, but others make more sense for One-Shot AF. We will begin by covering
the Assist Button.
Assist Button
Out of the box, the Assist Button really doesn’t do much and is often overlooked or not
recognized as the very functional tool that it is. The key feature of the Assist Button is
that you can register it to do something (with Personal Function 6, for example, you can
use it to toggle back and forth between a pre-registered shooting mode and metering
pattern that are different than the settings you are currently using). Here we will be
using it to pre-register either individual focusing points or AFPS. This pre-registered
focusing point (or AFPS) is called the Home Position (HP).
Assigning the Home Position (HP)
I. CAMERA FEATURES AND OPERATION 16
Page 17

se the normal method for choosing either a specific focusing point or AFPS. When
U
ou’ve made your selection, hold in the Assist Button and simultaneously press the FEL
y
utton near the Shutter Release. The LCD panel on the top of the camera should now
b
onfirm the registration of that focusing point by displaying the letters HP until you’ve
c
aken your finger off the FEL button.
t
sing the Assist Button
U
C.Fn 18-1 and 18-2 make it easier to recall the registered focusing point(s) via the Assist
Button. When C.Fn 18-1 is set, the HP focusing point can be recalled simply by pressing
the Assist Button. When C.Fn 18-2 is set, you can toggle back and forth between the
currently selected focusing point(s) and the HP focusing point(s).
Combinations
These sample combinations are named only for the sake of clarity. There is no reason that
the “Action Combo” couldn’t be used during an event (e.g., the bride walking down the
aisle at a wedding), or the “Event Combo” at a football game to shoot crowds or sideline
images. The idea is to choose a combination, or invent your own combination, that allows
the camera to become such an extension of you that your interaction with it becomes
transparent. You want to be concentrating on your subject, not on your camera controls.
Event Combo
This is probably the most useful combination of Custom Functions for wedding and
event photographers. Where this method makes the most sense is when you are
shooting in crowds where a lot of people are interacting – conversation groups, tables,
and parties. This is a versatile combination that allows the photographer a great deal
of flexibility and decision-making ability on-the-fly without taking the eye from the
viewfinder. Along with this versatility comes a small level of complexity, but this
complexity falls mainly in the explanation of how to use it, rather than in its actual use.
Shooting
Sit
uation
Examples
Weddings,
r
eceptions,
events,
parties,
portraits,
scenery,
nature, etc.
AF Mode
Focus
Activation
button
One-Shot
F
ocus
Activation
with Shutter
release button
C.Fn Set
11-2
13-3
17-1
(optional)
Function
Swaps functions of Quick Control Dial (QCD)
w
ith that of the AF Point Selection Button.
Limits AF point selection to 9 (8 peripheral
AF points, and the center AF point).
This expands the AF activation area if
needed in lowered contrast situations.
18-1
This activates the Assist Button and
pre-assigns the Center AF point as the HP.
I. CAMERA FEATURES AND OPERATION 17
Page 18

ackground
B
raditionally photographers have used the FLR (focus, lock, recompose) method when
T
erfacing with their camera and their subject. This is how it had to be done with
int
anual focus cameras and the early auto-focus models with a single focusing point.
m
lmost everyone knows how to use FLR, but it can cause problems. First, it’s not nearly
A
s fast as some of the methods we’ll discuss here. Metering is less precise, particularly
a
ash metering. Additionally, it can lead to backfocusing problems when shooting at
fl
wider apertures within 15 feet of the subject.
The fastest and most accurate way to work is to compose first and then use the benefits
of the 45-point Area AF sensor to get your focusing and metering settings.
By using this Event combination, the photographer obtains many focusing options, all
without having to take attention away from the subject. It also allows the scene to be
composed in the viewfinder prior to choosing a focusing point. This is helpful because
in shooting these types of events, people are unpredictable in their movements and
with a quick flick of the thumb the photographer can be ready for any rapidly changing
shot without having to lock focus and recompose. Compose the shot, and then just pick
the point that works best.
Another advantage is that when using this combination of settings with Evaluative
Metering, the camera will give more precise metering for your intended subject and do a
better job of automatically compensating for backlighting and unevenly lit scenes.
For EOS-1D and EOS-1Ds cameras that use E-TTL (not the newer E-TTL II), this
combination will also give you much more reliable flash exposures when you’ve chosen
a focusing point that lands on your subject, rather than using FLR.
It will take some practice to break the habit of FLR, but once you learn how to use the
45-point AF system effectively, it can really improve your performance as a
photographer.
Oper
ation
Turn the QCD on the back of the camera to “roll” from AF point to AF point along the
outer periphery of the AF Area ellipse. Tap the Assist Button to immediately go to the
center AF point (this combination has automatically assigned the center point as the
HP). To get off the center point and back to an outer AF point, simply use the QCD again.
This combination affects the focus point selection method only, not the focus activation.
Actual focusing is done by pressing the shutter release halfway.
Hidden Feature: To get back to AFPS immediately… while holding the shutter release in
the halfway position (SW-1), tap the AF Point Selection Button and release. The camera
will stay on AFPS until you either use the QCD or tap the Assist Button. This is useful
because generally, in well over 50% of shots in a wedding or event type environment,
I. CAMERA FEATURES AND OPERATION 18
Page 19

ain subject is the closest and most prominent object in the frame and, in
the m
Shot, this is where AFPS works best.
One-
Action Combo
The Bonu
xposure control. The exposure controls are relocated to the AF Point Selection Button.
e
Ho
xposure compensation in AE modes, or f/stops in Manual mode. The disadvantage of
e
s Feature is that the QCD is now part of your focusing system rather than your
ld the selection button in and turn the Main Dial on top of the camera to adjust
having these exposure features on the QCD was that it made it very easy to change
exposure settings accidentally. Now, it’s just as fast to adjust your exposure settings,
and you are far less likely to change them accidentally.
This combination is most useful for sports and wildlife photographers. Like the Event
Combo, it provides a great deal of versatility and on-the-fly decision-making ability for
photographers, especially for those who shoot rapidly moving subjects in AI Servo AF.
Shooting
Situation
Examples
Sports,
Wildlife,
Birds
Single AF
Point –
Football,
Soccer,
Hockey,
Wildlife
AFPS –
AF Mode
Focus
Activation
button
AI Servo
Rear Button
AE Lock (*)
focus
activation –
and Assist
Button
C.Fn Set
4-1 or 4-3
Function
Moves focus activation from the Shutter
release’s halfway position (SW-1) to the
camera’s rear AE Lock button (*).
C.Fn 4-3 is probably a bit better in rapidly
changing shooting situations like this
because it takes the meter reading in
real-time at the moment of exposure and
can adjust when a subject moves from one
lighting condition to another (e.g., a player
ade into the sun). Each
om sh
g fr
nnin
ru
image in a sequence is metered separately.
Baseball,
sin
d
ir
b
flight,
wildlife in
the open
n 4-1 w
C.F
to the setting used for the first image in the
sequence when using continuous drive. This
u
s
i
ll lock the metering for all shots
i
seful if you’re shooting a sequence in
even lighting where multiple images may be
printed or shown together.
17-1
(optional)
18-2
This expands the AF activation area if
needed in lowered contrast situations.
Activates the Assist Button as a focus
activation button using the photographer
registered HP.
I. CAMERA FEATURES AND OPERATION 19
Page 20

ackground
B
Both AFP
be
lik
AFP
ee of a large pack and the main scene is composed of only one or two players.
fr
S and Single Point AF are useful in shooting sports. A single point is generally
st in team sports like football, basketball, soccer, and hockey. AFPS is good for sports
e baseball, some track and field, and many individual sports like skiing, skating, etc.
S is also useful in team sports like football or soccer where the player has broken
Like sports, wildlife photography has situations where different focusing methods are
helpful. AFPS for birds in flight, single running animals in the open; and Single Point AF
for birds in a tree or nest, or animals lurking in woods or tall plants.
The idea here is that the photographer can make that call on-the-fly while shooting,
rather than trying to anticipate prior to bringing the camera to the eye what method
would be best.
Most sports shooters prefer to use a rear button on the camera for focusing rather
than using the shutter in its halfway position. There are several advantages to working
this way.
• The photographer can capture focus on the subject well in advance of shooting the
image without worrying about pre-metering or accidentally firing a shot.
• The camera can stay in focus on a single subject for longer periods of time (e.g.,
waiting for a batter to swing) and when ready, the photographer can shoot with better
camera responsiveness.
• While pressing the AE Lock button in this mode, you have AI Servo tracking focus. Let
go of the button and you are now locked at that distance (as if you were in One-Shot).
And with Canon EF lenses that have Full-Time Manual focusing, including all USM
lenses with distance scales, you now have manual focus… all three focusing options
available without having to take your eye from the finder.
Operation
Assign AFPS as your Home Position (HP). Then go back and set any single or double
focusing point with the AF Point Selection Button. Most photographers would probably
set
the center point depending on what they’re shooting, but any focusing point can be
selected if it’s compositionally more pleasing.
Now you have two buttons on the back of the camera that activate focus. When you look
into the finder you will see the single or double AF point you’ve chosen. Hold in the AE
Lock (*) button with your thumb and the camera will servo focus at that point. Or, hold
in the Assist Button and the camera will servo focus using AFPS (see information on
AFPS with AI Servo earlier in this document). Or, focus the lens manually at any time.
In this way, you can choose, while looking at your subject through the viewfinder, which
method is more effective or appropriate to that subject without the distraction of taking
your eye off the subject.
I. CAMERA FEATURES AND OPERATION 20
Page 21

al Purpose Combo
Gener
This isn’t really a combination, except that we included C.Fn 17-1 as an option so it’s
a little more reliable when you’re using a single focusing point in poor lighting.
But, it is a very useful combination of settings because it gives more versatility to the
photographer.
Shootin
g
Situation
Examples
General
photography
Mode
AF
Focus
Activation
button
AI Servo or
One-Shot
C.F
18-2
n Set
unction
F
While being pressed, changes the focusing
points or pattern that the camera uses to the
HP setting. Release and the camera defaults
Focus
Activation
with Shutter
release button
17-1
(optional)
to the method chosen by the photographer.
This expands the AF activation area if
needed in lowered contrast situations.
Background
Many photographers are more comfortable using the shutter release to initiate
autofocus, but some still want the ability to change focusing methods quickly.
This is very much like the Action Combo, but it’s probably better suited to all-purpose
shooting; and it also lends itself to both One-Shot and AI Servo AF settings.
Operation
Decide how you will most often choose the focusing points (AFPS or Single Point AF).
Whichever method you will use less often, assign to the Assist Button as a HP. Then set
the more often used method using the AF Point Selection Button.
Photographers who use AFPS most of the time can set the HP to a single point (center
for those who might shoot some action, or off-center for those who shoot occasional
vertical portraits). Sports shooters could use a single point most of the time and register
AFPS as their HP for an alternative.
Shoot normally with your chosen focusing point selection method. While holding in the
Assist Button, you will have your pre-registered focusing point or AFPS. Let go and you’re
back to your normal method.
Summary
Practice with these three combinations to get a feel for them. Trying these Custom
Function combinations will give you an idea of what some of the settings are capable of
I. CAMERA FEATURES AND OPERATION 21
Page 22

et you experiment knowledgeably with other combinations that might be better
and l
uited to your specific needs.
s
Personal Function 00
e you get a combination of Custom Functions that works best for you, it can then
Onc
be saved (along with any other C.Fns you use) as a Custom Function Group by
registering it with Personal Function 00. P.Fn 00 has the ability to register up to three
different groups of Custom Functions, so you can have one group for sports, one
group for events, and another for everyday shooting. This allows you to quickly switch
from combination to combination based on what you’re shooting without having to
remember what C.Fn numbers need to be set. P.Fn 00 can be set in-camera, without
having to be tethered to the computer like the other P.Fns.
To use P.Fn 00, locate the Custom Functions/Personal Functions menu on the LCD
monitor. (It’s the last tab on the right.) Scroll down to Personal Functions and let go of
the Select button. If necessary, press the Select button again and rotate the QCD until
you reach P.Fn 00. You will then have the option of registering the currently selected
group of custom functions or applying a group of C.Fns that have already been registered.
I. CAMERA FEATURES AND OPERATION 22
Page 23

II. LENS ISSUES
AF Speed According to
EF Lens Vintage
Just as EOS cameras have improved over time in terms of AF calculation speed, EF
lenses have improved in terms of lens drive speed. Although most if not all EF lenses
regardless of vintage autofocus quickly enough to satisfy the needs of photographers
who specialize in stationary subjects, there is a significant improvement in lens drive
speed for fast-moving applications such as sports photography when the newer lenses
are used with newer cameras like the EOS-1 class digital SLRs.
Generally speaking, all USM lenses introduced since 1999, starting with the first 4
models in the IS (Image Stabilizer) super-telephoto series (300mm f/2.8L IS, 400mm
f/2.8L IS, 500mm f/4L IS and 600mm f/4L IS), autofocus noticeably faster than the
non-IS versions they replaced when used with an EOS-1 class digital SLR. Therefore, if
you want to experience the maximum performance of your EOS-1 class digital SLR in
terms of AF speed, you must use a recent lens.
The technical reason behind the improved performance lies in new programming on the
circuit board in the lens that supplies an initial burst of electrical power to the USM
motor that’s twice as high compared to the older lenses. The USM motor takes
advantage of this extra power to focus the lens faster.
EF Extender Issues
All single focal length L-series lenses from 135mm to 1200mm plus several L-series
telephoto zooms are compatible with Canon’s 1.4x and 2x EF Extenders. These
accessories are understandably popular among professional and advanced amateur
photographers because of the extra value they offer in terms of increased focal length
without forcing the photographer to invest in longer prime lenses.
Of course, there are trade-offs for this convenience. The 1.4x and 2x Extenders cost 1 or 2
f/stops respectively. This means, for example, that a 300mm f/2.8 lens when used with a
2x extender becomes a 600mm f/5.6. Additionally, EF Extenders reduce lens drive speed.
As noted in the instruction sheets supplied with the Extenders, the EF 1.4x or 1.4x II
reduces lens drive speed by approximately 50~67% depending on the lens in use. The EF
2x or 2x II reduces lens drive speed by up to approximately 75%. This speed reduction
gives the AF system more time to detect focus. This is helpful since the depth of focus is
reduced with the longer effective focal length and the chance of defocus increases.
However, the reduced tracking speed and smaller maximum apertures (that sometimes
result in the loss of cross-type sensor focus detection as mentioned in the description of
the 45-point Area AF Sensor at the beginning of this document) caused by the use of
Extenders can be a disadvantage with fast moving subjects, particularly in low light.
II. LENS ISSUES 23
Page 24

III. IMAGE QUALITY SETTINGS
RAW vs. JPEG
EOS-1 class digital SLRs allow photographers to shoot RAW files, in-camera JPEGs, or
RAW plus JPEG simultaneously. The RAW file setting records image data directly from the
image sensor at maximum resolution without JPEG compression artifacts, thus resulting
in maximum image quality at the expense of relatively large file sizes on the memory
card. In-camera JPEGs are smaller on the memory card and they can be captured at
either full resolution or various lower resolution settings.
There are several other important differences between RAW files and in-camera JPEGs.
Images originally shot as JPEGs are essentially “processed” in the camera as 24-bit color
files according to the various camera settings for ISO speed, exposure, white balance,
color space, tone curve, sharpness, contrast, saturation and color tone. With the
exception of ISO speed, virtually all of the other settings listed above, including bit
depth, can be adjusted during post-processing with RAW files. RAW files, therefore, offer
far greater flexibility and produce image quality equal or superior to JPEGs in any
reasonable comparison.
For most photographers, the choice between shooting RAW or JPEG lies in the trade-off
between image quality and convenience. In-camera JPEGs are often completely
sufficient in image quality for a tremendous variety of imaging applications. When the
desired camera settings are made ahead of time, JPEGs can really speed up your
workflow. However, RAW files preserve the highest possible image quality, and they
offer a far greater degree of flexibility in terms of image manipulation.
JPEG Quality
For those who can’t decide between RAW and JPEG, or who may need both for their
workflow, Canon EOS-1 class Digital SLRs also feature a RAW+JPEG simultaneous
c
apture capability that gives you the best of both worlds, JPEGs for immediate use and a
RAW file for archiving and further manipulation.
JPEG quality, which is Canon’s way of referring to compression settings, can be adjusted
from 1 (maximum compression, minimum image quality) to 10 (minimum compression,
maximum image quality) in 1-step increments. The default JPEG quality setting for EOS-1
class digital SLRs is Level 8. In the case of the original EOS-1D and EOS-1Ds, JPEG
quality adjustment is programmed in your computer and uploaded to the camera via
dedicated software and the IEEE 1394 interface. With the Mark II cameras, JPEG quality
can be adjusted at each of the 4 different resolution settings on the built-in LCD
monitor.
III. IMAGE QUALITY SETTINGS 24
Page 25

evel 10 setting for JPEG quality produces the highest image quality level for
The L
amera JPEGs, while Level 1 yields the highest compression ratio. The higher the
in-c
ompression ratio, the greater the potential for image quality degradation, and vice
c
ersa. Therefore, when preservation of fine detail is important, we recommend shooting
v
W files or high-quality JPEGs. The camera’s default setting for JPEG quality is more
RA
an adequate for most applications, but we suggest that you try some of the other
th
gs to determine your “comfort level.”
settin
Another aspect of selecting JPEG quality settings is their effect on the maximum number
of shots that can be taken in a continuous burst. With the Mark II cameras in particular,
buffer performance improves substantially at lower JPEG quality settings due to smaller
file sizes.
In-Camera Sharpness,
Contrast, Saturation &
Color Tone Control
EOS-1 class digital SLRs have additional image quality settings including sharpness,
contrast, saturation and color tone, which can be applied to all images. In the case of
RAW files, these settings can be overridden in post-processing. However, it is very
important to understand that sharpness settings in particular can have a significant
effect on the appearance of in-camera JPEGs, i.e., images that are shot as JPEGs in the
camera as opposed to RAW files that have been converted to JPEGs in your computer.
Before getting into a detailed discussion of sharpening in-camera or on a computer, it’s
important to realize that pictures taken on overcast days or taken indoors with only
natural light look softer than pictures taken on sunny days or indoors with direct flash.
Why? Because overcast day/indoor natural light pictures have less contrast than the
sunny day/direct flash pictures, and pictures with less contrast look softer than
pictures with more contrast. Knowing that, the contrast of a somewhat softer image can
be boosted in-camera or in an image-editing program, giving the appearance of a
sharper picture.
Speaking of soft images, lens flare can cause even a picture taken on a sunny day to
look soft. Another cause of an apparently soft image (or more commonly a soft area of a
pict
ure in this case) is over-saturation. When an image or image area is over-saturated,
it loses detail and looks soft. This can often be corrected by reducing the saturation
in-camera or in an image-editing program.
Sharpness: To satisfy a wide range of photographers, EOS Digital SLRs vary significantly
in terms of range and default settings for sharpness, which is more correctly referred to
as in-camera sharpening. Entry-level and advanced amateur models such as the EOS
Digital Rebel, 10D and 20D use a 5-step sharpness scale from -2 to +2, with default
settings typically at 0 (mid-scale) or +1. This is a noticeably higher level of in-camera
sharpening than the default settings for EOS-1 class Digital SLRs, and may cause some
concern for photographers who use both cameras. On the other hand, the default
setting for sharpness level on EOS-1 class Digital SLRs is 0 on a scale from 0 to 5. This
lack of in-camera sharpening was intentionally chosen by Canon to preserve as much
III. IMAGE QUALITY SETTINGS 25
Page 26

age detail as possible with in-camera JPEGs. (In-camera sharpness settings do not
Professional Beginners
Contrast
Sharpness
Color Saturation
Color Tone
Stronger
Stronger
Higher
Redder
Weaker
Weaker
Lower
Natural
Emphasis on “Raw Material”. Nice at first glance.
Standard
Standard
Parameter
2
Parameter
1
Standard
Modification Range
EOS 1Ds Mark II
EOS 1D Mark II
EOS 1Ds
EOS 1D
EOS 10D
EOS 20D
EOS Digital Rebel
Compact
Digital Camera
Image-Making Concept for EOS Digital/Compact Digital Cameras
EOS DIGITAL
• Faithful image reproduction
Neutral image geared for post-processing
• Suited for diverse user requirements
Image flexible enough to suit diverse printing
and viewing formats
• Soft-looking images
Geared for post-processing, the image has
rich gradation and natural colors.
COMPACT DIGITAL CAMERA
• Provides the “Final” image
Geared for home printing/viewing not requiring
post-processing
• Favored for general users
Great-looking image at first glance
• Sharp and vivid images
Intended to be used as is, image looks great at
first glance. The image is sharp with good contrast
and vivid colors.
im
ply to RAW files because they can be overridden during conversion.) The default “no
ap
arpening” setting allows maximum latitude for post-processing. In commercial
sh
g for example, sharpening is best applied after the image is converted to CMYK.
printin
wever, photographers who wish to reduce the need for post-processing of in-camera
Ho
Gs should explore the use of higher in-camera sharpness settings.
JPE
Please review the chart below to see how EOS-1D Mark II sharpness settings should be
sel
ected to match the default sharpness settings for the original EOS-1D and EOS-1Ds.
We will have further discussions on image sharpening in the Post-Processing section of
this document. For now, as mentioned previously, please note that your choice of
in-camera sharpness settings can make a big difference in the appearance of your
images, especially if you shoot in-camera JPEGs.
Desired Effect with 1D Mark II Sharpness Contrast Color Matrix
Same sharpness as EOS-1D/1Ds 1 0 1-Standard
Sharp & Crisp Image 5 +2 1-Standard
Sharp, Crisp & Vivid Image 5 +2 3-High-Sat.
It should be understood that even the Level 5 setting for in-camera sharpening might
not be strong enough for some applications. In those cases, it’s usually better to leave
III. IMAGE QUALITY SETTINGS 26
Page 27

the in-c
c
C
a
A
v
amera setting at Level 0 and apply sharpening during post-processing in a
omputer. See Un
sharp Mask.
ontrast & Saturation:With EOS-1 class digital SLRs, Contrast and Saturation can be
djusted on a 5 step scale from -2 to +2, with the default setting at 0 (mid-scale).
lthough neither of these settings directly affects the sharpness of an image, they can
ery significantly affect its apparent sharpness and overall appearance. The camera’s
default settings are usually satisfactory for most shots, but higher or lower settings may
be preferable according to differences in personal taste, subject matter and lighting
conditions.
Color Tone: This is another setting that does not directly affect sharpness, but the color
tone setting can significantly affect the appearance of your digital images, especially if
they contain skin tones. Lower settings produce reddish tones, while higher settings
produce yellowish tones.
III. IMAGE QUALITY SETTINGS 27
Page 28

IV. SHARPNESS EVALUATION
Reviewing Images on the
Camera’s LCD Monitor
Monitor Evaluation Vs.
Printed Output
The first step in evaluating image quality for most EOS Digital SLR users is checking the
LCD monitor during Review or Playback. The Mark II cameras are equipped with a zoom
function that magnifies captured images up to 10x with a scrolling function to examine
specific details. It’s important to understand that the image used for reviewing purposes
is actually a small JPEG (approximately 1,536 x 1,024 pixels) that’s embedded into the
file specifically for this purpose. This method drastically speeds up the review process
compared to reading the full resolution file. The trade-off is that the level of detail is
limited. There’s enough data in the embedded JPEG to see (for instance) whether a
subject’s eyes were open or closed, or to get a rough idea of focusing accuracy, but not
enough to read extremely fine detail. In other words, it’s not possible to determine the
actual sharpness of the image by looking at the camera’s LCD monitor only. The next
step towards evaluating image quality is downloading your images to a personal
computer to view or print.
Most experts suggest that the best way to evaluate the quality of a digital image is to
view it at 100% magnification on a high-quality monitor. When the objective is image
editing, this is good advice. These same experts also point out that average human
vision cannot resolve more than 300 ppi (pixels per inch) for printed output. Using these
specifications, please review the following chart:
age Dimensions @ 72 dpi
Camera Model
EOS-1D
EOS-1D Mark II
EOS-1Ds
EOS-1Ds Mark II
Clearly, there is a tremendous difference between image dimensions on screen at 100%
magnification and image dimensions at 300 ppi. EOS-1 class digital SLRs produce
images so large that viewing them at 100% magnification is like viewing a poster-sized
print. Also, keep in mind that most people view their monitors at much closer range
than the normal viewing distances for prints. Under these conditions, the image is
IV. SHARPNESS EVALUATION 28
Max. Resolution
4.1MP
(2464 x 1648)
8.2MP
(3504 x 2336)
11.1MP
(4064 x 2704)
16.7MP
(4992 x 3328)
Im
34.2
48.7
56.4
69.3
esolution)
een r
r
(Sc
X 22.9 inches
(2.8 x 1.9 ft.)
32.4 inc
x
(4.1 x 2.7 ft.)
37.6 inc
x
(4.7 x 3.1 ft.)
46.2 inc
x
(5.8 x 3.9 ft.)
he
hes
hes
s
age Dimensions @ 300 ppi
Im
solution)
e
g r
(Printin
8.2 x 5.5 inches
11.7 x 7.8 inches
13.5 x 9.0 inches
16.6 x 11.1 inches
Page 29

nd to look softer than it would at greater viewing distances or lower magnification.
bou
efore, if printed output, especially at 8.5" x 11" or less, is the final objective, it’s
Ther
st not to rely completely on monitors to judge image quality. To prove this point, we
be
ourage you to compare your printed images to the on-screen versions.
enc
Motion Blur
Camera or Subject
Movement After
Focus Lock
When high-r
esolution images are enlarged to 100% magnification on screen, image
defects of any kind are accentuated. One such defect that is often mistaken for
inaccurate focusing when viewed at smaller magnifications is motion blur. This can be
caused by subject movement and/or camera movement, and is especially likely to occur
at relatively slow shutter speeds. Remedies include shooting with a tripod to eliminate
camera movement, using an Image Stabilizer lens during hand-held photography to
minimize the effects of camera movement, and using either high shutter speeds or
electronic flash to freeze subject movement. Secondary “ghost” images in flash photos
can be minimized or eliminated by using faster sync speeds and/or lower ISO speeds or
smaller apertures to reduce the effect of ambient light.
The closer the subject, the more critical accurate focusing becomes. One potential
problem to avoid is camera or subject movement after focus lock. This can happen more
easily than one might think, especially during hand-held photography when the camera
is set for One-Shot AF. Even slight camera movement or subject movement after focus
lock can result in soft images, particularly when shooting at wide apertures with narrow
depth of field.
Diffraction
Diffraction is an optical phenomenon in which light waves pass around the edges of an
†
object and enter the shadowed area of that object
. In photography, diffraction flare
often occurs when images are shot at small apertures with short focal length lenses. The
visual effect is a softening of fine detail that cannot be corrected in post-processing. If
you are concerned about this optical phenomenon, we recommend avoiding apertures
smaller than f/16 with wide-angle lenses and wide-angle zooms.
†
Work III
s
en
L
EF
IV. SHARPNESS EVALUATION 29
Page 30

V. SHARPENING METHODS IN
POST-PROCESSING
Adobe Photoshop’s
Unsharp Mask Filter
If little or no in-camera sharpening has been applied prior to viewing an EOS-1 class
Digital SLR image at 100% magnification, especially with the EOS-1D Mark II, most
photographers will agree that the image looks soft, even if it has been properly focused
and exposed. This is mostly due to the detail-softening effect of the camera’s
anti-aliasing (AA) filter, which is permanently mounted in front of the image sensor. The
AA filter plays an important role in reducing or eliminating false colors and moiré, but
the trade-off is that images must be sharpened either in the camera or in the computer
prior to final usage.
There are dozens of sharpening techniques, but the Unsharp Mask filter in Adobe
Photoshop®is one of the best-known methods. Some photographers prefer to sharpen
only once prior to printing. Others apply Unsharp Mask twice: once to eliminate the
softening effect of the camera's AA filter prior to editing for contrast and color balance,
and again to compensate for the softening effects of various output methods prior to
printing.
Also, many skilled photographers don’t sharpen the entire image in post-processing.
Rather, they apply sharpness only to appropriate areas. For example, they might
sharpen the foreground in a landscape photograph and not sharpen the sky. This
selective sharpening technique is easily accomplished with layers or masks.
®
Unsharp Mask offers 3 settings: Amount, Radius and Threshold. Radius and Threshold
determine which pixels and which areas around them are affected by the Amount
adjustment. As Adobe says, “The effects of the Unsharp Mask filter are more
pronounced on-screen than in high-resolution output. If your final destination is print,
e
xperiment to determine which settings work best for your image.” The difference is
attributed to the screen’s resolution being different from the printer’s resolution.
If you haven’t worked with Unsharp Mask, try the following settings as a very rough
guideline for high quality inkjet printed output at A4 or Letter size:
Amount: 300%
Radius: 0.3 pixels
Threshold: 0 pixels
You’ll find that small adjustments to Radius and Threshold have a much stronger effect
than small adjustments to Amount. Also, sharpness preferences vary according to
subject matter (human subjects often look better with less sharpening, whereas
V. SHARPENING METHODS IN POST-PROCESSING 30
Page 31

-detailed landscapes and architecture, etc. usually need more sharpening) and
finely
se levels. (Sharpening accentuates noise, especially in shadow areas.) There are
noi
any other Unsharp Mask “tricks” such as applying sharpening in the Lightness
m
hannel in the LAB mode in Photoshop rather than the entire image in RGB.
c
e is no “right answer” for sharpening. What looks great for one viewer may seem
Ther
xcessive to another, and vice versa. Optimum sharpening levels also depend on output
e
size, viewing distance and printing methods. For instance, many professional wedding
photo labs request their customers to send in unsharpened files so that the lab can
apply their own unique custom sharpening algorithms, which often vary according to
print size.
In fact, generally speaking it’s a good idea to save an unsharpened version of each
image file so that you’re always working from a “clean slate” so to speak, should there
ever be a need or desire to apply a different sharpening technique at a later date or for
another application. (This is one of the best reasons for shooting RAW files.) Remember
that sharpening an image is like using permanent ink: it’s easy to apply, but difficult if
not impossible to remove.
3rd Party Sharpening
Software
The necessity of sharpening digital images prior to printed output has resulted in a wide
variety of 3rd-party sharpening filters and plug-ins. Some of these, such as nik
multimedia’s Sharpener Pro, operate within Photoshop and other plug-in compatible
programs. Others, such as Digital Domain’s popular Qimage software are standalone
applications. Although Canon does not officially endorse 3rd-party products, we
encourage users to explore the available options in image sharpening software. Here is
a partial list of current sharpening filters and applications:
Vendor: nik multimedia, inc.
Software Title: Sharpener Pro
Web Page: http://www.nikmultimedia.com/sharpenerpro/usa/entry.php
V
endor:
Digit
al Domain, Inc.
Software Title: Qimage
Web Page: http://www.ddisoftware.com/qimage/
Vendor: Fred Miranda
Software Title: Intellisharpen II
Web Page: http://www.fredmiranda.com/software/
Vendor: Jonathan Wienke
Software Title: Sharpening Actions
Web Page: http://visual-vacations.com/Photography/SharpeningActions.htm
V. SHARPENING METHODS IN POST-PROCESSING 31
Page 32

endor:
V
tware Title:
Sof
eb Page:
W
Carboni
Noel
dSLR Fr
actal Sharpening
http://actions.home.att.net/dSLR_Fractal_Sharpen.html
RAW Converters
endor:
V
tware Title: FocalBlade
Sof
eb Page:
W
.thepluginsite.com
www
http://www.thepluginsite.com/products/photowiz/focalblade/
There are almost as many RAW converters on the market as there are 3rd-party
sharpening filters. Some RAW converters provide sharpening adjustments prior to
conversion. Here’s a partial list of popular RAW converters that work with EOS RAW files:
Vendor: Canon
Software Title: Digital Photo Professional 1.5
Web Page: TBD (Supplied with all EOS-1Ds Mark II, EOS-1D Mark II and EOS 20D as of
November, 2004)
Vendor: Canon
Software Title: EOS Viewer Utility
Web Page: http://consumer.usa.canon.com/ir/controller?act=DownloadIndexAct
Vendor: Adobe
Software Title: Camera Raw
Web Page: http://www.ado
be.com/pr
oducts/photoshop/c
ameraraw.html
Vendor: Bibble Labs
Software Title: Bibble
Web Page: http://www.bibblelabs.com/
Vendor: Breeze Systems
Software Title: BreezeBrowser
W
eb Page:
http://www
.breezesys.com/BreezeBrowser/index.htm
Vendor: PhaseOne
Software Title: C1 Pro
Web Page: http://www.phaseone.com/
Of course, RAW converters can have a dramatic effect on many aspects of image quality
other than sharpening, such as highlight/shadow transitions (tone curves), color rendition,
noise levels, and so forth. RAW converters also vary significantly in conversion speed, color
management capabilities and other workflow-related issues. We encourage you to explore
the various offerings to find your own favorites. Canon offers a detailed, animated Web
tutorial on Digital Photo Professional (DPP) from well-known photographer and Photoshop
expert Eddie Tapp here: http://www.photoworkshop.com/canon/dpp/index.html
V. SHARPENING METHODS IN POST-PROCESSING 32
Page 33

VI. EQUIPMENT CALIBRATION
ISSUES
AF System Calibration
Lens Calibration
If the camera and lens are being operated correctly, but images remain consistently out
of focus, there is always the possibility that the camera or lens is not performing
according to factory specifications. EOS cameras and EF lenses are precision
instruments, and as such they require precision adjustments to perform at peak
efficiency. Although Canon makes every effort to calibrate the AF systems of EOS
cameras in the manufacturing process, a small percentage of cameras require
calibration adjustments at the Factory Service Center (FSC) after sale.
AF system calibration at the FSC involves a series of tests to determine the positioning
accuracy of mechanical components such as the image sensor and reflex mirror
assemblies. Once these potential problem issues have been eliminated, test images are
taken using a “tool lens” with known performance characteristics. The testing method
enables technicians to ensure that the camera is performing well within tolerances for
AF accuracy. Once this has been done with the tool lens, it becomes possible to check
the performance of other lenses the customer may have.
Because each autofocus lens contains its own microcomputer and many other internal
devices such as focusing motors and diaphragm actuators, lenses occasionally require
calibration. If a focusing error is detected, the circuitry of the lens itself can be adjusted
to ensure that it is operating according to design specs. Calibrating a lens does not
compromise its performance with other camera bodies because the calibration
standards for the lens are independent from the calibration standards for the body.
Testing Your Own Cameras
& Lenses
Please keep in mind that we do not recommend sending equipment to the Factory
Ser
vice Center unless you are sure that the source of your image quality problems is not
one of the issues we have already discussed in this document.
Although photographers in the field cannot duplicate the testing capabilities of a Canon
Factory Service Center, it is certainly possible to test cameras and lenses at home or in a
studio to check their performance. The following procedure may help you determine
whether your camera equipment is in need of calibration.
1. Perform your focusing test at a reasonable light level (office lighting or brighter) to
ensure optimum results.
2. Place the camera on a sturdy tripod and use a remote switch when firing the shutter.
For maximum quality, consider the use of mirror lock. (C.Fn 12 on EOS-1 class Digital
VI. EQUIPMENT CALIBRATION ISSUES 33
Page 34

s.) If you are using an IS Lens, turn off the Image Stabilizer.
SLR
Select a focusing target with adequate detail from center to edge. A newspaper page
3.
s a good choice.
i
Make sure that the target is totally flat and as parallel as possible to the camera.
4.
Set the camera to One-Shot AF and manually select the center focusing point.
5.
Compose the picture so that the test target fills the frame from edge to edge.
6.
For each of your lenses, make one exposure at the maximum aperture of the lens and
7.
another at f/8, varying the shutter speed if necessary to adjust the exposure level as
indicated by the histogram on the camera’s LCD monitor.
Evaluation Method A: Use EOS Capture or RemoteCapture software to analyze your
images as soon as they have been transferred to your computer. RemoteCapture has a
100% magnification viewing option. (If you are using EOS Capture, you can use EOS
Viewer Utility or Digital Photo Professional to enlarge the images.)
Evaluation Method B: Open the images in your computer and make two copies of them:
one “as is” and another with a liberal amount of unsharp mask applied. Here are some
recommended settings: Amount, 300%; Radius, 0.3 pixels; Threshold 0 pixels.
Make letter-size prints on a high-quality inkjet printer using photo paper and photo ink.
Compare the results. If the camera has a consistent focusing problem with several
different lenses, then it’s reasonable to assume the camera needs an adjustment. If you
are getting sharp results from most lenses but not all, then it’s reasonable to assume
that the lens in question may need an adjustment.
VI. EQUIPMENT CALIBRATION ISSUES 34
Page 35

anon, EOS and DIGIC are trademarks of Canon Inc.
C
Adobe Photoshop is a registered trademark of Adobe Systems Incorporated and its subsidiaries in each country.
The other product and brand names appearing in this document are trademarks or registered trademarks of
their respective owners.
This document was prepared by:
Technical Marketing Dept.
Camera Division/Consumer Imaging Group
Canon U.S.A., Inc.
Copyright 2004, All Rights Reserved
We are pleased to acknowledge significant contributions to this material from Canon Inc.'s Image
Communications Product Group as well as Canon U.S.A. Professional Markets Group management and staff,
including Dave Metz, Erik Allin, David Sparer, Beth Pratt, Brian Matsumoto, David Carlson and Tom Bullington.
We also received welcome comments and feedback from two members of Canon U.S.A.'s Explorers of Light
program: Rick Sammon and Denis Reggie, as well as digital imaging expert Rob Galbraith. We're grateful for
proofreading and style points from Canon U.S.A. Public Relations Manager Deborah Szajngarten and freelance
writer/photographer Howard Wallach. Last but not least, we acknowledge Hitoshi Doi, Peter Tvarkunas,
Kelly Blok and Rudy Winston from Canon U.S.A.’s Technical Marketing Dept. as well as S-Plus Inc. and
PhotoWorkshop.com for their assistance in getting this document formatted appropriately and posted online.
Chuck Westfall
Director/Technical Marketing Dept.
Camera Division/Consumer Imaging Group
Canon U.S.A., Inc.
October 19th, 2004
35
 Loading...