

Page 1
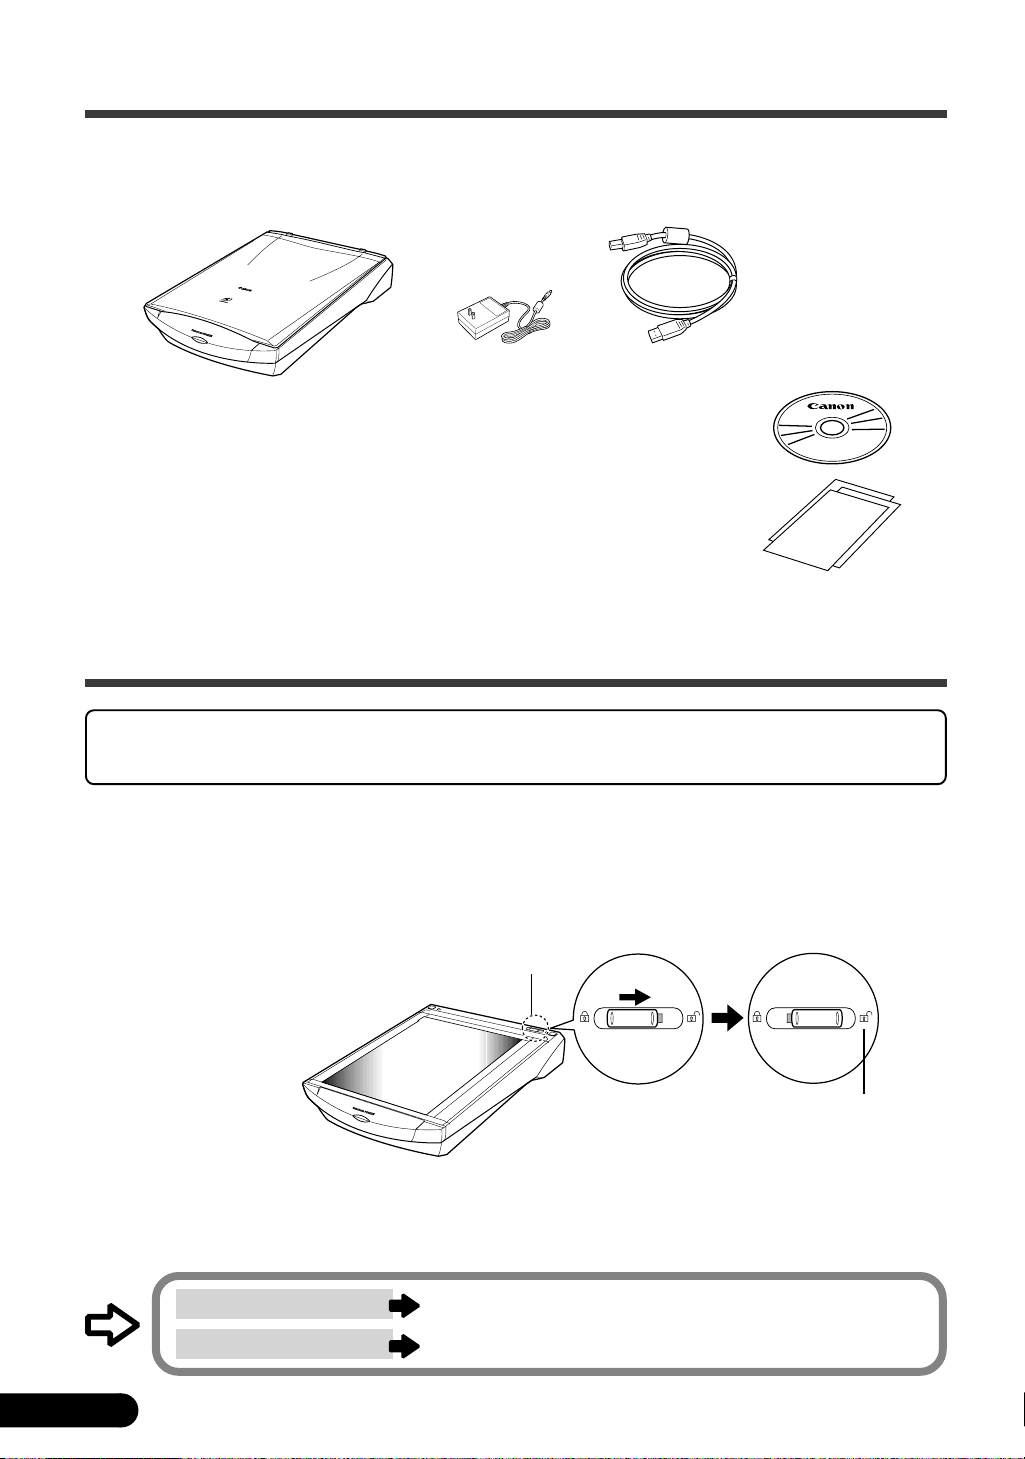
1. Check the Package Contents
Scanner Unit and Accessories
CanoScan D1230U / CanoScan D2400U
Scanner Unit
AC Adapter
USB Interface Cable
Software and Documents
• CanoScan Setup Utility CD-ROM
Contains software programs, PDF manuals, troubleshooting guide, etc.
• Quick Start Guide (this guide)
• Additional documents
* For the model with Film Adapter Unit preinstalled, additional accessories and document are in the package.
2. Unlock the Scanning Unit
Unlock the scanner before plugging in the AC adapter. If it is left locked, a malfunction or
problems may occur.
1. Peel the seals off the scanner.
2. Remove the document cover.
3. Push the lock switch toward the unlock mark.
4. Attach the document cover again.
• Windows users follow the procedures from the next page.
• Macintosh users
1
D1230U/D2400U Quick Start Guide
follow the procedures from page 9.
Lock Switch
Unlock Mark
Page 2
Using the Windows Platform
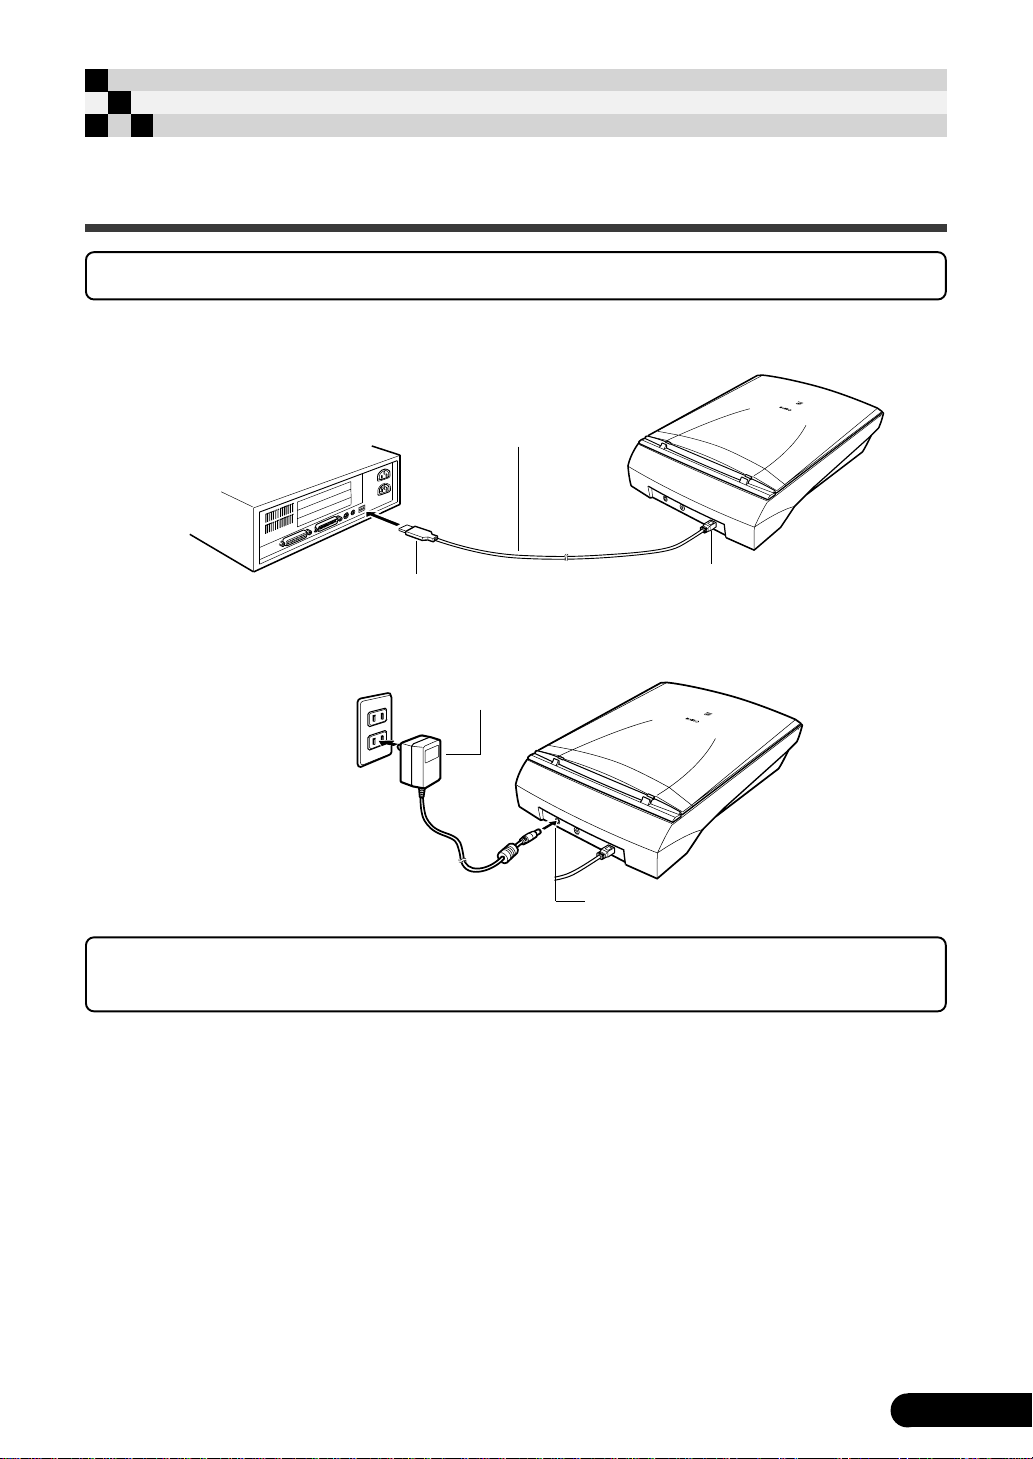
3. Connect the Scanner
Confirm that the power switches for the computer and other connected devices are off.
1. Connect the scanner to the computer with the
supplied USB interface cable.
USB Interface Cable
Wide Flat Connector
2. Connect the AC adapter to the scanner.
AC Adapter
Power Terminal
Only use the AC adapter provided with the scanner. Use of other AC adapters may lead to
a malfunction.
• The scanner does not have a power switch. The power is activated as soon as the AC adapter is plugged in.
• If you wish to use a Film Adapter Unit (FAU), set the FAU on the scanner unit and connect the FAU
cable to the FAU connector before Step 2. Refer to “Scanning Film” manual.
Small Square Connector
D1230U/D2400U Quick Start Guide
2
Page 3
4. Install the Driver Software
Windows Millennium Edition
1. Turn the computer on.
2. The [Add New Hardware Wizard] will appear.
Confirm that [Automatic search for a better driver
(Recommended)] is selected.
3. Place the CanoScan Setup CD-ROM in the drive.
4. Wait for 10 seconds, then click [Next].
The driver will begin to install.
5. When [Windows has finished installing the new
hardware device.] appears, click [Finish].
3
D1230U/D2400U Quick Start Guide
Page 4
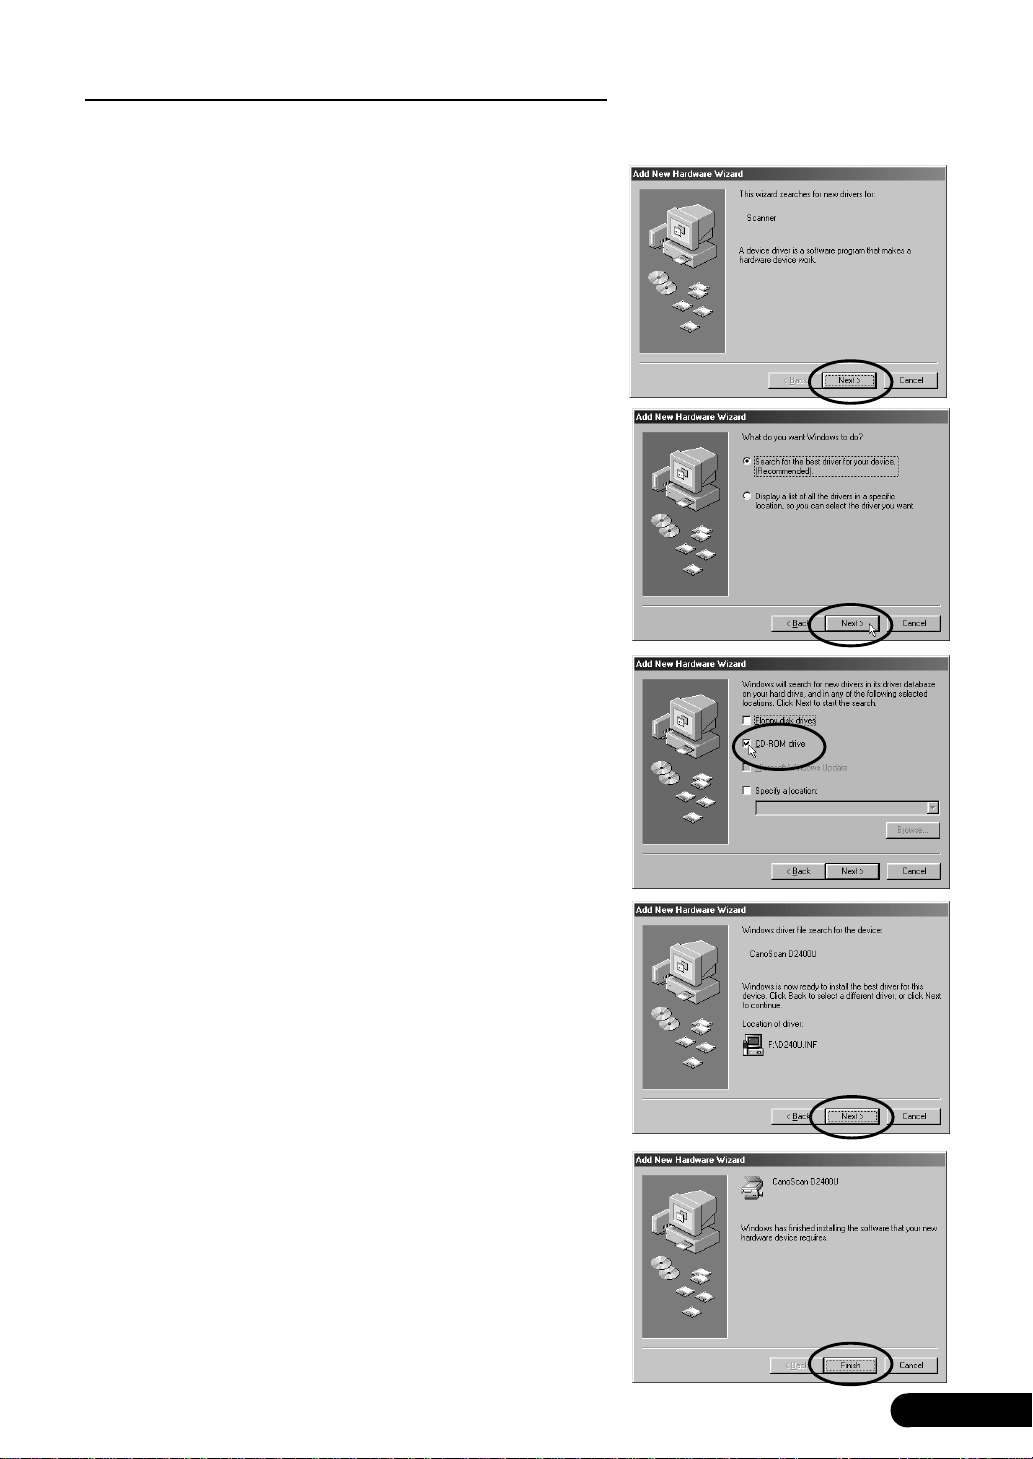
Windows 98 / 2000
The screen shots in this section are from Windows 98.
1. Tur n the computer on.
2. When [Add New Hardware Wizard] appears,
click [Next].
3. Confirm that [Search for the best driver for
your device. (Recommended)] is selected and
click [Next].
4. Place the CanoScan Setup Utility CD-ROM in the
drive.
5. Confirm that [CD-ROM drive] is selected, wait
for 10 seconds, and then click [Next].
If [Driver Not Found] appears, click [Back] and repeat
Step 5.
6. When [CanoScan D1230U] or [CanoScan
D2400U] appears, click [Next].
The driver will begin to install.
If you are prompted to insert the Windows 98 CD-ROM,
follow the instructions below.
a. Click [OK].
b. Click [Browse].
c. Select the CD-ROM drive and click [OK].
d. Click [OK].
With Windows 2000 Professional, it may appear
massage box [The software you are about to install
does not contain a Microsoft digital signature.].
Continue installation clicking [Yes].
7. Click [Finish].
D1230U/D2400U Quick Start Guide
4
Page 5

5. Install the Application Software
List of Software to be Installed (approx. total of 201MB)
• ScanGear Toolbox (5 MB) -Scanning Utility Program
• Adobe Photoshop LE (40 MB) -Image Editing Program
• ArcSoft PhotoBase (50 MB) -Album Program
• Canon PhotoRecord (50 MB) -Photo Printing Program
• ScanSoft OmniPage Pro (46 MB) -OCR (Optical Character Recognition) Program
• Adobe Acrobat Reader (10 MB) -PDF Reader
Installation Procedures
1. Eject the CanoScan Setup Utility CD-ROM and
re-insert it.
The CanoScan Setup Utility main menu will appear.
2. Click [Install the Software].
[Software User License Agreement] is confirmed. Click
[Yes] if you have no problem.
The install window will display.
3. Click [Start Installation].
[Starts the Adobe Photoshop 5.0 LE installer?] appears.
Click [Yes].
The serial number notification appears. Click [Next].
4. The Adobe Photoshop LE installation starts.
In the series of dialogs, select the appropriate option(s)
and click [Next] or [Accept]. When you are prompted to
enter the serial number, refer to the number on the
CD-ROM envelope to enter it.
5
D1230U/D2400U Quick Start Guide
Page 6

5. When the Adobe Photoshop LE installation
completes, click [Finish].
6. Click [Next] to start installation of other
bundled application programs.
Follow the message prompts, select the appropriate
option(s), and click [Yes] or [Next] to continue the
installation.
7. When the installation is complete, click [Yes].
The computer will restart.
8. After Windows restarts, remove the CD-ROM
from the drive and store it in a safe place.
D1230U/D2400U Quick Start Guide
6
Page 7

6. Try Scanning
1. Place your item (photo or picture) on the
glass.
Place the item face down and align its top edge with
the alignment mark at the back corner of the glass.
2. Click the [Start] menu and select [Programs],
[Adobe], [Photoshop 5.0 Limited Edition] and
[Photoshop 5.0 Limited Edition].
Photoshop LE will start.
Top
Bottom
Alignment Mark
< If you install another scanner or a digital camera, select this scanner. >
a. Click the [File] menu and select [Import] and
[Select TWAIN_32 Source].
b. Highlight [CanoScan D1230U] or [CanoScan
D2400U] and click [Select].
3. Click the [File] menu and select [Import] and
[Select TWAIN_32].
ScanGear CS-U will start.
4. Click [Preview].
After calibration, the preview scan will start and
gradually display the image.
7
D1230U/D2400U Quick Start Guide
Page 8

5. Drag the mouse diagonally to select the area
you want to scan.
6. Click [Scan].
After calibration, the final scan will start.
7. Click in the ScanGear CS-U window to close
it.
The scanned image will appear in the Photoshop LE
window.
8. Save the scaned image.
Click the [File] menu and select [Save As...]. Enter the
folder where you wish to store the image file, enter a
file name and file type, and click [Save].
9. Click in the Photoshop LE window to close it.
You have now confirmed the scanner operation.
You should now be ready to explore the possibilities of the bundled software.
For details about the bundled software, read the Product Guide or user’s guide for
each software program, which contained on the CanoScan Setup Utility CD-ROM as
PDF manuals.
If the scanner does not perform as described above, read the [Troubleshooting]
section of the CanoScan Setup Utility CD-ROM.
D1230U/D2400U Quick Start Guide
8
Page 9

Using the Macintosh Platform
3. Install the Software
List of Software to be Installed (approx. total of 110MB)
• Canon Plug-in Module CS-U (10 MB) -Plug-in Module
• CanoScan Toolbox (5 MB) -Scanning Utility Program
• Adobe Photoshop LE (40 MB) -Image Editing Program
• ArcSoft PhotoBase (2 MB) -Album Program
• Canon ImageBrowser (15 MB) -Photo Printing Program
• ScanSoft OmniPage SE (30 MB) -OCR (Optical Character Recognition) Pr ogram
• Adobe Acrobat Reader (8 MB) -PDF Reader
Installation Procedures
Ensure that the scanner is NOT CONNECTED to the computer.
1. Tur n the computer on.
2. Place the CanoScan Setup Utility CD-ROM in the
drive.
The CanoScan Setup Utility main menu will appear.
Note: If no window displays, double-click the CD-ROM
icon, then the Setup icon.
3. Click [Install the Software].
[Software User License Agreement] is confirmed. Click
[Yes] if you have no problem.
4. In the [Would you like to install Adobe
Photoshop 5.0 LE?] dialog, click [Yes].
In the dialogs for serial number and restart notification,
click [Next].
9
D1230U/D2400U Quick Start Guide
Page 10

5. The Adobe Photoshop LE installation starts.
In the series of dialogs, select the appropriate option(s)
and click [Next] or [Accept]. When you are prompted to
enter the serial number, refer to the number on the
CD-ROM envelope to enter it.
6. When the Photoshop LE installation is complete,
click [Restart].
The Macintosh will restart and the CanoScan Setup
Utility main menu will appear again.
7. Click [Install the Software].
[Software User Licence Agreement] is confirmed again.
Click [Yes].
8. In the [Would you like to install Adobe
Photoshop 5.0 LE?] dialog, click [No].
The install window will display.
9. Click [Start Installation].
10. Click [Yes] to start installaion of other bundled
application programs.
Follow the message prompts, select the appropriate
option(s), and click [Yes], [Next], [OK] or such to
continue the installation.
11. When the installation is complete, click [Yes].
The computer will restart.
12. After restart, close the CanoScan Setup window,
then eject the CD-ROM by dragging its icon to
the Trash and store it in a safe place.
D1230U/D2400U Quick Start Guide
10
Page 11

4. Connect the Computer
1. Connect the scanner to the computer with the
supplied USB interface cable.
Wide Flat Connector
USB Interface Cable
Small Square Connector
2. Connect the AC adapter to the scanner.
AC Adapter
Power Terminal
Only use the AC adapter provided with the scanner. Use of other AC adapters may lead to
a malfunction.
• The scanner does not have a power switch. The power is activated as soon as the AC adapter is plugged in.
• If you wish to use a Film Adapter Unit (FAU), set the FAU on the scanner unit and connect the FAU cable
to the FAU connector before Step 2. Refer to “Sanning Film” manual.
5. Try Scanning
1. Place your item (photo or picture) on the
glass.
Place the item face down and align its top edge
with the alignment mark at the back corner of the
glass.
2. Open the [Adobe Photoshop 5.0 LE] folder and
double-click the [Adobe Photoshop 5.0 LE] icon.
Photoshop LE will start.
11
D1230U/D2400U Quick Start Guide
Bottom
Top
Alignment Mark
Page 12

3. Click the [File] menu and select [Import] and
[Canon PI CS-U 4.1.0...].
Canon Plug-in Module CS-U will
start.
4. Click [Preview].
After calibration, the preview scan will start and
gradually display the scanned image.
5. Drag the mouse diagonally to select the area
you want to scan.
6. Click [Scan].
After calibration, the final scan will start.
7. Click (close box) in the Canon Plug-in Module
CS-U window to close it.
The scanned image is displayed in a Photoshop LE
window as “Untitled”.
8. Save the scanned image.
Click the [File] menu and select [Save As...].
Enter the folder where you wish to store the image file,
enter a file name and format, and click [Save].
9. Click the [File] menu and select [Quit].
Photoshop LE will close.
You have now confirmed the scanner operation.
You should now be ready to explore the possibilities of the bundled software.
For details about the bundled software, read the Product Guide or user’s guide for each
software program, which contained on the CanoScan Setup Utility CD-ROM as PDF
manuals.
If the scanner does not perform as described above, read the [Troubleshooting] section of
the CanoScan Setup Utility CD-ROM.
D1230U/D2400U Quick Start Guide
12
 Loading...