

Page 1
r
Canon
^ " SURE SHOT
= ÙJ.
I, SURE SHOT
i
ap
PRIMA
li
gì CT1-7325-000‘.L:J^^T^::,',-:
H - - ' ■’>>
INSTRUCTIONS
English Edition
©CANON INC, 1994
MODE D’EMPLOI
Edition Française
INSTRUÇÇIONeS
Edicion Española
PRINTED IN HONG KONG
Page 2
Thank you for purchasing this Canon camera.
In order to use this camera correctly, please read
through these instructions carefully and practice
using this camera.
This is a fully-automatic 35mm compact camera
with a variety of automated functions including film
advance, film rewind, and flash firing.
• Features
1. Autofocus (AF) and Programmed AE
2. Large viewfinder
3. Focusing range from 0.8m/2.6ft. to infinity
4. Red-eye reduction function
5. 3 flash modes: AUTO, ON, OFF
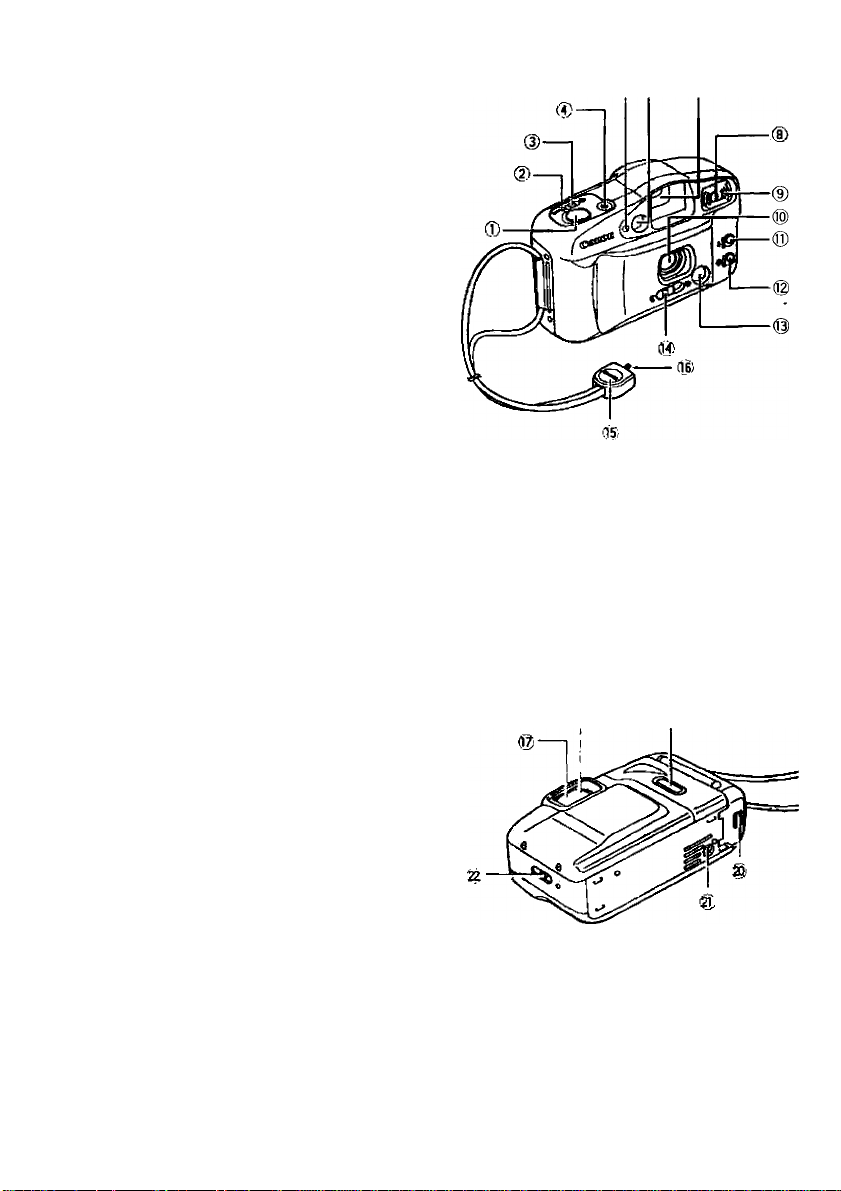
Nomenclature
Shutter Button
O'
Mid-roll Rewind Button
(?'-
Self-timer Button
(V
(Aj
Frame Counter
AE Light Receptor
ci
AF Light Emitter
®
Viewtinder Window
Flash
¡9;
Red-eye Reduction/Self-timer Lamp
Lens
iO'
Flash ON Button
®
Flash OFF Button
AF Light Receptor
©
Lens Cover Open/Close Latch (Main Switch)
Strap Fixture
©
Tip of strap fixture
©
Viewfinder
Green Lamp
Film Check Window
Battery Cover
Tripod Socket
Back Cover Opening Latch
©
® ® ®
18
Page 3
B
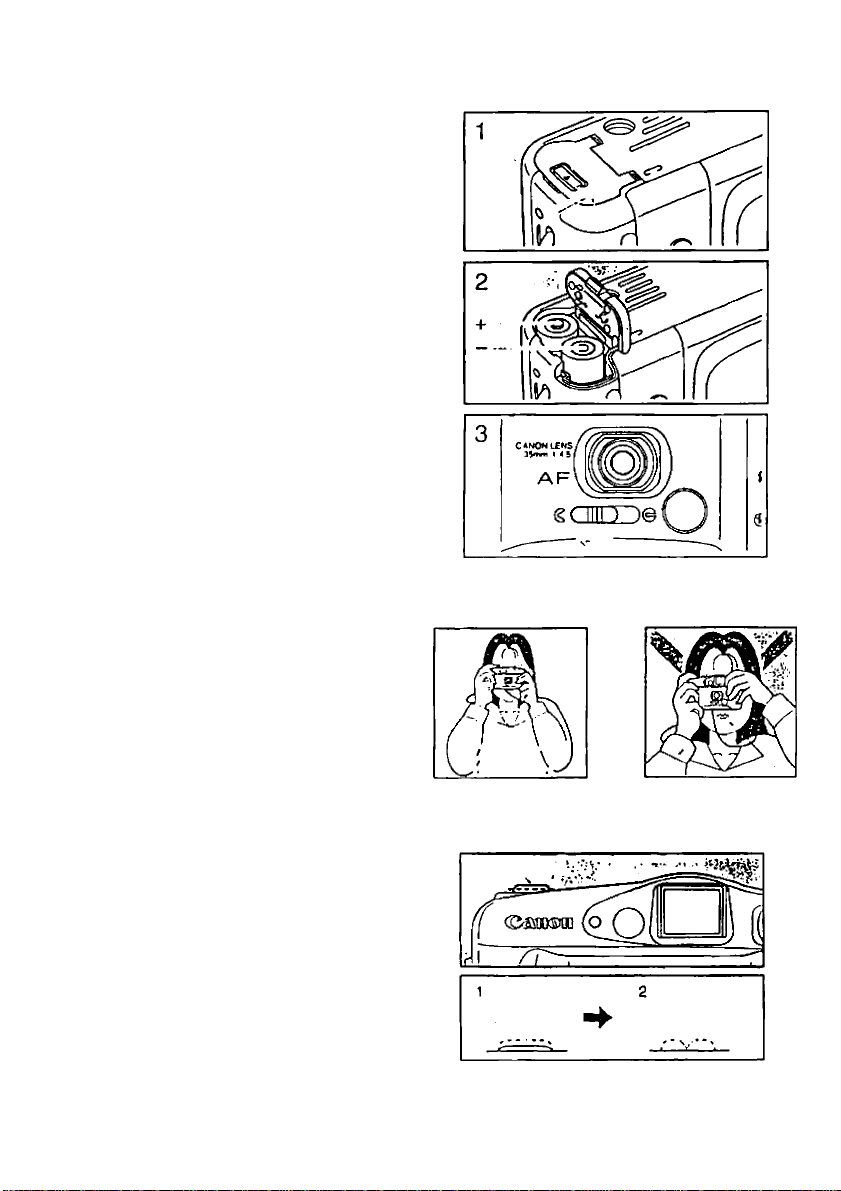
1. Loading and Checking the Batteries
This camera uses two LR6 AA-size batteries.
1. Open the battery cover.
2. Load the batteries so the - terminals point in
the direction shown in the illustration. Then,
close the battery cover until it clicks.
3. Check the batteries by opening the lens cover
and pressing the shutter button lightly. If the
green lamp lights or (lashes before lighting up
Steadily, (he batteries are charged.
• Do not use Nickel-Cadmium or lithium batteries.
• When you intend to take many pictures, such as on a
trip or a wedding, be sure to lake spare batteries.
• Replace both batteries at the same lime.
• II you are not planning to use the camera lor an
extended period, remove the batteries. It batteries are
lell in the camera (or an extended period, they may
leak.
2. Holding the Camera
Hold the camera in Ihe (ollowing way to ensure
sharp pictures.
1. Hold Ihe camera with both hands
2. Keep your elbows close to your body.
3. Hold the camera lightly against your nose and
look through the viewfinder.
• When you hold Ihe camera, be carelul to keep hair and
lingers from blocking: Ihe lens. Ihe AF light emitter. Ihe
AF light receptor, Ihe AE light receptor, and Ihe Hash.
Shutter Button Action
1. Pre'ss the shutter button lightly to focus.
2. Press it all the way down to lake Ihe picture.
The film automatically advances alter taking
the picture.
• Shutter button action plays and important pari in taking
pictures. A quick stroke with Ihe tip ol your linger or
lingernail may cause unnecessary camera movemeni
called 'camera shake'.
Q>
Page 4

B
3. Loading the Film
Use only DX-coded (ilm wlih lilm speed ol ISO
100, 200 and 400. When you load the (ilm, Ihe
camera automatically sets the film speed.
1. Open Ihe lens cover to turn Ihe camera on.
2. Slide Ihe back cover latch down lo open Ihe
back cover.
3. Insert the lilm in the lilm insertion area, then
carelully pull Ihe lilm lip across until II reaches
the lilm lip position mark. Make sure the lilm is
positioned between the lilm guides.
4. Close the back cover. The lilm automatically
advances lo Ihe lirsi Irame and the Irame
counter displays "1". Reload Ihe lilm il “1" does
not appear in the Irame counter.
4. Taking Pictures (Flash AUTO)
Open the lens cover to turn the camera on. The
camera will automatically be set lo Flash AUTO
with Red-eye Reduction
1. Compose the picture in the nearly center ol Ihe
viewlinder.
2. Press Ihe shutter button lightly lo locus Ihe
subject in Ihe Irame. The green lamp lights up
steadily when Ihe camera is ready to shoot.
• Pictures taken closer than 0.8m/2.6li will be
out ol locus.
• In dark conditions, it may take a lew seconds
belore Ihe green lamp lights up, in order lo
charge the Hash.
3. Gently press Ihe shutter button all ihc way
down lo take the picture.
• For best results, avoid jabbing Ihe shutter
button all the way down without wailing lor Ihe
green lamp.
• To shoot a picture through a window, leave! a camera-
lo-window distance ol less than tOcm/O 3li
Page 5

’ When you have finished shooting pictures, close the
lens cover to protect the lens from dirt and dust. This
also prevents pictures from being taken by accidentally
pressing the shutter button.
Green Lamp Operation
(When you press the shutter button lightly)
a. Lights up:
Ready to shoot pictures.
b. Flashes rapidly (8 times/sec.);
The red-eye reduction lamp is on.
• For best results, wait until the green lamp lights steadily
before pressing the shutter button all the way.
Page 6

m
<§> Flash Shooting with Red-eye
Reduction
When you use the (lash in darl< places, the
subject’s eyes may appear red in (he photograph.
This phenomenon is called "red-eye". Red-eye ’’
can be minimized by illuminaling (he subjeci with
the red-eye reduction lamp belore the the Hash
(ires.
1. Press the shutter button lightly. The green lamp
Hashes rapidly (8 limes/sec.) for about 1
second.
2. Alter the green lamp lights up steadily, then
press the shutter button all the way down.
• If you press the shutter button all Ihe way
belore Ihe green lamp lights up, the exposure
will be correct but red-eye reduction will not
work elleclively.
• For best results, have Ihe subjeci look al Ihe rod-eye
reduction lamp while it is lil.
5. Removing the Film
The (ilm rewinds automatically al Ihe end o( Ihe
roll.
1, The (rame counter counts down while the (ilm is
rewinding. Rewinding slops aulomalically when
the (ilm has been completely rewound and the
Irame counter displays "S".
2. Slide Ihe back cover latch down to open ihe
back cover and remove the (ilm.
• II you shol more (rames than Ihe number spcciliod on
Ihe roll. Ihe last Irame may be cul during Ihe Irlm
doveloomeni
J-f
r
Rewinding the Film in Mid-roll
To rewind the lilm in mid-roll, press the mid-roll
rewind bullón using Ihe lip o( Ihe strap lixiure.
Page 7

B
6.. i Flash ON Mode
It you use this mode, the (lash will always lire
regardless of the lighting. Use this setting lor lill-in
flash to sollen shadows on people or objccis.
Press the shutter button while pressing the 1
Flash ON button.
7, ® Flash OFF Mode
Use this mode in places where Hash use is
prohibited, for night views, and for available-light
photography.
Press the shutter button while pressing the
Flash OFF button,
Page 8

8. Self-Timer Shooting
The sell-timer function releases iho shutter alter a
10 second delay, alllowing you lo include yourself
in the picture.
1. Compose the picture using the viewfinder and
the frame.
2. Press the ci) self-timer button. The sell-timer
sequence starts the moment the green lamp is
on.
3. The red-eye reduction/self-timcr lamp flashes
slowly lor 8 seconds and rapidly lor 2 seconds
then the picture is taken.
• In low light, the red-eye reduction lamp is illuminalod
steadily lor the last 2 seconds betöre the picture is
taken.
To cancel the sell-timer mode:
Press the sell-timer button again or close the lens cover.
• When you are using the sell-timer lunction. place the
camera qn a stable support such as a Iripod.
• Oo not stand in front of the camera when pressing the
sell-timer button or improper locus and exposure may
occur.
Handling Precautions
1. This camera is not resistant to water, and should not be
used outdoors II it is raining or snowing II it Is accidentally
dropped In water, contact an authorized Canon service
facility. Keep the camera out of salt spray and excessive
liumidity. If used at the beach, clean it ilioroughiy allorward
with a dry cloth.
2. Store the camora In a cool, dry, dusMreo place Oo sure to
keep Iho camera out o( direct sunlight, and away from 'hot
spots' such as the trunk or rear window shell of a car.
Avoid places whore mothballs are used, and use a
desiccant in excessive humidity.
3. Oo not attempt lo disassenible the camera yourself, since
there Is high-voltage circuitry Inside
4. The batteries may explode or cause bums it disassembled,
recharged, shorted, exposed to high lompcralurcs. or
disposed of in a tire.
5. Use a blower brush lo remove dust and sand from the ions
and inside the camora. Oo not apply any fluids lo the Ions
or body. Take the camera to an authorized Canon service
facility for a more thorough cleaning if necessary.
6. Film passing through X-ray examinations at an airport may
be exposed and ruined even when loaded in the camera.
Request a diltereni method of Inspection to avoid damage.
7. Color reproduction may be adversely aticeted if the film Is
left in the camera for a long lime. Always develop exposed
(ilm promptly.
€
Page 9

m
Specifications
Type: 35mm fully automatic lens-shuller camera
Display Size: 24 x 36mm (standard size)
Lens: Canon 35mm 1/4.5
Lens Cover: Shuller release enabled when opened,
locked when closed
AF Control: Active Autolocus system
Shooting Distance Range: O.Bm/2.6lt. to inlinity
Shutter: Electromagnetically-driven shuller with
comblnable programs
Viewfinder. Inverted Galilean Under
Viewfinder Magnification: 0.68x
Loading: Automatic (automatic blank film advance)
Film Winding: Automalic
Film Rewinding: Automatic at end ol Him; Mid-roll rowind
possible
Frame Counter; Counts up during film winding and
counts down during rewinding
Film Chock: Film check window at back ol Ihe camera
Film Speed Setting: OX-coded Him aulomalically set lo
ISO 100/200 or 400
(0.95 X 1.42 In.)
This device complies with Part 15 ol Iho FCC Rules. Operation is
subieci lo Ihe lollowing two conditions: (1) This device may not
cause harmful inierlerence, and (2) this device must accept any
interference received, including Inierlerence that 'may causé
undesired operation.
Oo not make any changes or modificalions to ihe equipmertt
unless oihcrwise specified in the instructions. M such char>ges or
rrx)diiicaiions should be made, you could required to slop
operalion of the equipment.
This equipment has been tested and found lo comply with Ihe
limits for a class 6 digital device, pursuant lo part IS of Ihe FCC
Rules. These limils are designed lo provide reasortable
protection against harmful inierlerence in a residenlial
insiaiiaiion. This oquipmeni goneroles, usos artd can radíalo
radio frequency energy and. H rK>l instatled ar>d used In
accordance with ihe inslruclions. may cause harmful interference
to radio communicalions.
However, there is no guarantee that Inierlerence will not occur in
parficwinr insinllolion. M this equipmont does cause harmful
inicilcrencc lo radio or television reception, which can be
determined by turning the equipment off and on, the user is
encouraged to try lo correct the inlerference by one or more ol
the following measures:
■ Reorient or relocate Ihe receiving antenna.
* Increase the separation between Ihe equipment and leceiver.
* Consult the dealer or an experienced radio/TV technician lor
help
SelMimer: Electronically-controlled 10 second delay
timer activated by pressing the self-timer button. The
red-eye reduction/seU-timer lamp blinks during
operalion.
Metering Range: (al ISO 100)
Flash AUTO/Flash ON mode;
1/100 1/4.5-1/180 1/11 (EV10.5-16)
Flash OFF mode;
1/70 (/4.5-1/180 f/11 (EVlO.5-16)
Built-In Flash; Built-in Hash, automatically (lashes in low
light; Forced ON/OFF possible: Coupled with red-eye
reduction lamp
Flash Shooting Distance Range:
ISO 100/200: 0.8-3.4m (2.6-11.2IL)
ISO 400: O.8-6.0m (2.6-22,4ft.)
Flash Recycling Time: Approx. 5 sec.
Power Supply: Two LR6 AA-size batteries, Ni-Cadmium
and lithium batteries cannot be used
Shooting Capacity: Approx. 47 rolls of 24-exp. film
Dimensions: 123 (W) x 76 (H) x 47.5 (D)mm
Weight: 250g/6.8oz. (without batteries (or the camera)
• All data are based on Canon's Standard Test Method.
• Subject lo change without notice.
4-*^/i6 X 3 X 1-^/8 in.
Thi$ digital apparatus does not exceed the Class B limits for
radio noise emissions from digital apparatus as sel out In ihe
iniorference-causing equipment standard entitled 'Digital
Apparatus". ICES-003 of Ihe Industry and Science Canada.
Cci up|i;ircil miii)crii|uc respecte tes limilcï Je bruits radioélectriques
jppliL-jhles aux appareils iiuntcriqucs de Classe B prescrites dans la
nortiie Mtr le inaiêricl brouilleur: ’‘Appurcils Numériques**, NMB-003
cJicice par l'InJusirie ci Sciences Canada.
 Loading...