


English

Thank you for purchasing a Canon product.
The Canon Speedlite 430EX is a multi-feature flash unit for Canon EOS
cameras. It works automatically with E-TTL II, E-TTL, and TTL
autoflash systems. It can be used as an on-camera flash or as part of a
wireless flash system.
Read this instruction manual while also referring to your
camera’s instruction manual.
Before using the Speedlite, read this instruction manual and your camera’s
instruction manual to familairize yourself with the Speedlite operations.
The basic operation is the same as with normal AE shooting.
When the 430EX is attached to an EOS camera, almost all automatic
exposure control for flash photography is handled by the camera.
Although the 430EX is an external flash unit, it works automatically and
seamlessly like the camera’s built-in flash.
It is automatically compatible with the camera’s flash metering
mode (E-TTL ll, E-TTL, and TTL).
The camera controls the Speedlite automatically in the following flash metering
modes:
1. E-TTL II autoflash (evaluative flash metering with preflash reading/lens
distance information)
2. E-TTL autoflash (evaluative flash metering with preflash reading)
3. TTL autoflash (off-the-film metering for real-time flash metering)
Regarding the camera’s available flash metering modes, refer to the
“External Speedlite” specification in the “Specifications” of your
camera’s instruction manual. The Speedlite’s major specifications are
listed in “External Flash Items.”
The camera instruction manual’s chapter on flash photography will refer
to cameras having 1 and 2 as a Type-A camera (compatible with ETTL II or E-TTL). And cameras having 3 (compatible with only TTL) are
called Type-B cameras.
* This instruction manual assume that you are using the 430EX with a Type-A
camera.
For Type-B cameras, see page 35.
2
Contents
Getting Started and Basic Operation................................. 7
1
2 Using Flash ........................................................................ 13
3 Wireless Flash ................................................................... 23
Reference ............................................................................ 30
Conventions Used in this Manual
9
8
The operation procedures in this instruction manual assume that both
the camera and Speedlite’s power switches are ON.
Icons are used in the text to indicate the respective buttons, dials,
and settings. They match the same icons found on the camera and
Speedlite.
The (1) / (2) icons indicate that the respective function remains
in effect for 8 sec. or 12 sec.
Reference page numbers are indicated by (p.**).
This instruction manual uses the following alert symbols:
: The Caution symbol indicates a warning to prevent shooting
: The Note symbol gives supplemental information.
The <9> symbol in the text refers to the +/– button.
The <8> symbol in the text refers to the Select/Set
button.
problems.
3

Nomenclature
Flash head
Wireless sensor
Built-in wide panel
(retracted) (p.18)
Bracket fitting
AF-assist beam emitter
(p.22)
Mounting foot (p.9)
Mini stand pocket
4
Locking ring (p.9)
Locking pin (p.9)
Contacts
Case Mini stand
Bracket mount
cover
Shoe
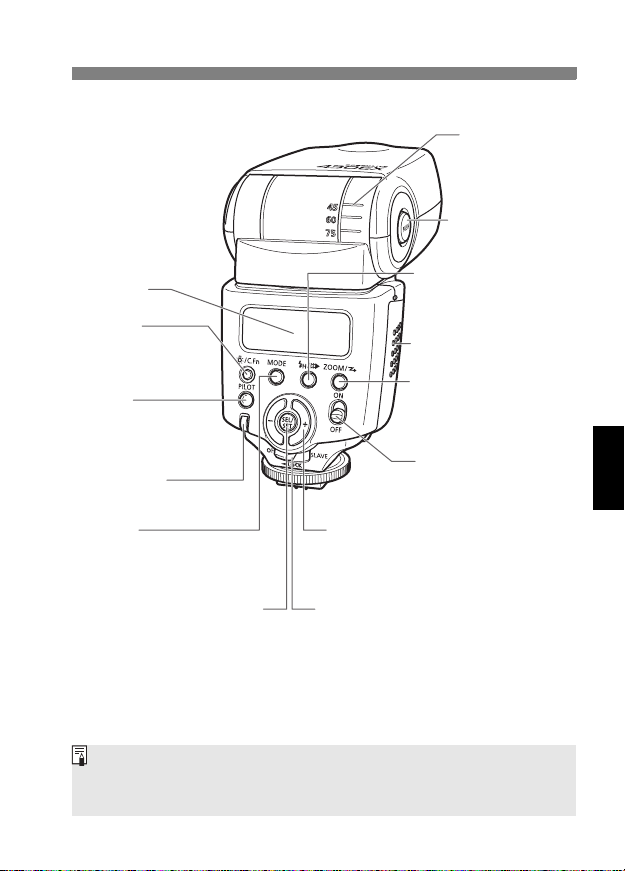
LCD panel
* <A>
LCD panel illumination/
Custom Function
setting button (p.6/20)
<J>
Pilot lamp/Test firing/
Wireless slave auto power
off cancel button (p.10/25)
Flash exposure
confirmation lamp (p.11)
Bounce angle index
<z>
Bounce lock release
button (p.17)
<E>
High-speed sync (FP flash)/
Shutter curtain
synchronization button (p.16)
Battery compartment cover
(p.8)
<G>
Zoom button/
Wireless set button
(p.18/27, 28)
Power switch (p.10)
<L> : Power off
<K> : Power on
<D>
Flash mode/Slave setting button
(p.11, 19/29)
* <8> Select/Set button
<9> +/– button
Wireless selector (p.9, 24)
<L> :
<N> : Slave unit
Wireless off (for on-camera flash)
Asterisked buttons have a timer that keep the button’s function active for 8
sec. (1) after you let go of the button. The <B> illumination lasts for 12
sec.
5
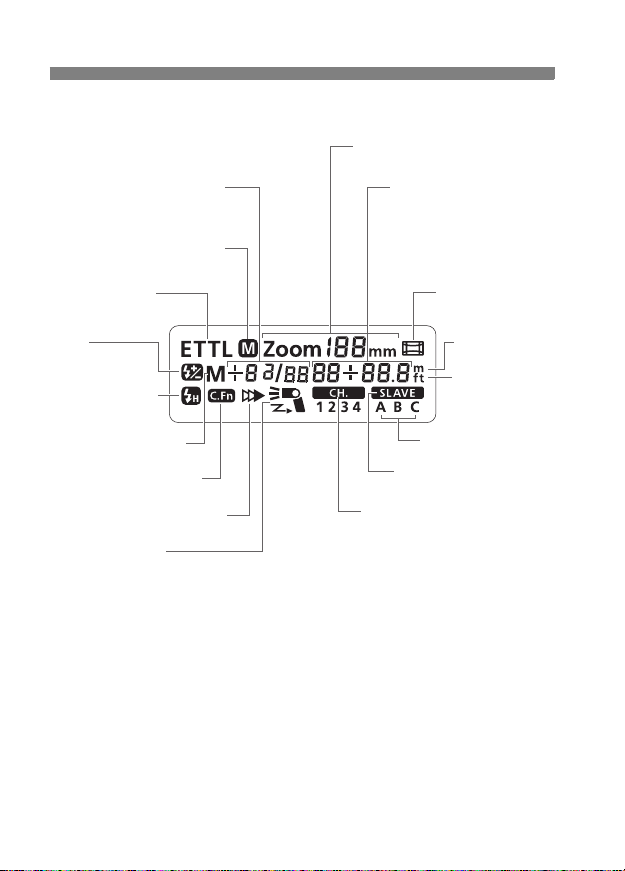
LCD Panel
Zoom focal length
Manual flash output level
Flash exposure compensation
amount
<d> Manual zoom
<a/b>
E-TTL (ll)/TTL autoflash
<f>
Flash exposure
compensation
<c> High-speed
sync (FP flash)
<q> Manual flash
<u> Custom Function
<r> Second-curtain sync
Firing mode
Slave flash :
X
Aperture
Max. flash range
Custom Function No.
Custom Function setting
<s> Auto zoom
for image size
Indicator (meters)
Indicator (feet)
Slave ID
<x> Slave
<w> Channel
To illuminate the LCD panel, press the <B> button.
The items actually displayed depend on the current settings.
6

Getting Started and
Basic Operation
Installing Batteries .................................................. 8
Attaching to the Camera......................................... 9
Turn on the Power Switch .................................... 10
Fully Automatic Flash Shooting............................. 11
Using E-TTL II and E-TTL Autoflash in the
Shooting Modes.................................................... 12
To avoid overheating and deteriorating the flash head, do not fire
rapid bursts of more than 20 continuous flashes. After 20
continuous flashes, allow a rest time of at least 10 min.
7

Installing Batteries
Install four size-AA batteries.
Open the cover.
1
Slide the battery compartment cover
as shown by the arrow and open it.
Install the batteries.
2
Make sure the + and – battery
contacts are correctly oriented as
shown in the battery compartment.
Close the cover.
3
Close the battery compartment cover
and slide it as shown by the arrow.
Recycling Time and Flash Count (with size-AA alkaline batteries)
Recycling Time (Approx.)
Normal Flash
0.1 - 3.7 sec. 200 - 1400
Based on new size-AA alkarine batteries and Canon’s testing standards.
Flash Count (Approx.)
Since the shape of their contacts is not standardized, using non-alkaline
size-AA batteries may result in faulty battery connection.
Use four new batteries of the same brand and type. Do not mix battery
types. When replacing batteries, replace all four batteries at the same time.
Size-AA Ni-MH or lithium batteries can also be used.
8
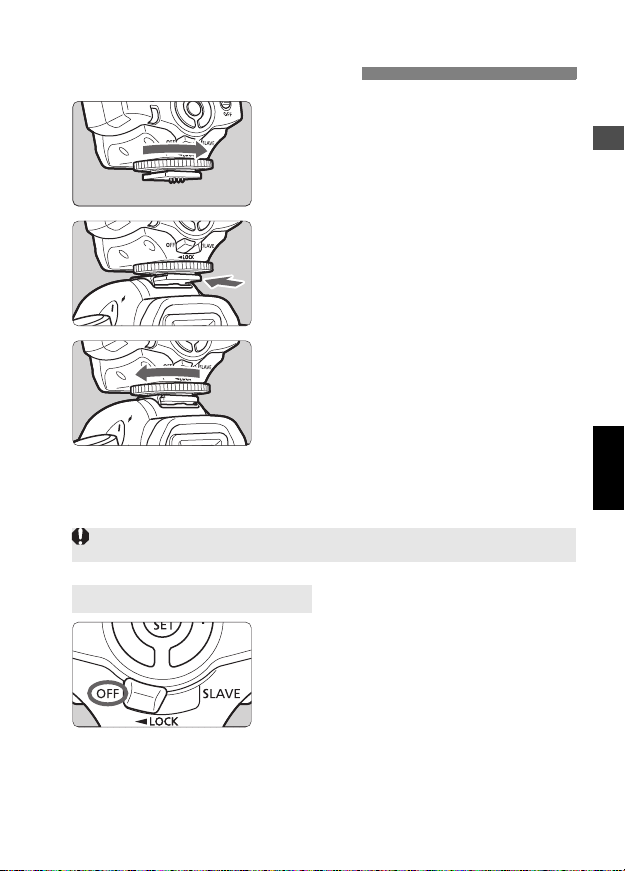
Attaching to the Camera
Loosen the locking ring.
1
Turn the locking ring as shown by the
arrow to loosen it.
Attach it to the camera.
2
Slip the Speedlite’s mounting foot all
the way into the hot shoe.
Tighten.
3
Turn the locking ring as shown by the
arrow. The locking pin will protrude
from the mounting foot to further
secure the attachment.
To detach the Speedlite, loosen the
locking ring until the locking pin
disengages. Then slip the Speedlite
out of the hot shoe.
Before attaching or detaching the Speedlite, be sure to turn off the Speedlite.
Wireless Selector Settings
The wireless selector is for switching
between normal flash shooting and
wireless flash shooting.
For normal flash shooting, be sure to set
the wireless selector to <L>.
9

Turn on the Power Switch
Set the power switch to <K>.
1
X The flash will start recycling.
Check that the flash is ready.
2
When the pilot lamp lights in red, the
flash is ready to fire.
To fire a test flash, press the pilot
lamp.
About Auto Power Off
To save battery power, the power will turn off automatically after 90 sec.
of idle use. To turn on the Speedlite again, press the shutter button
halfway. Or press the Speedlite’s test firing button.
A test firing cannot be fired while the camera’s operation timer 4 or 0
is active.
The Speedlite’s settings will be retained in memory even after the power
is turned off. To retain the Speedlite’s settings when you replace the
batteries, replace the batteries within 1 minute after turning off the power.
10

Fully Automatic Flash Shooting
When you set the camera’s shooting mode to <V> (Program AE) or
<U> (Full Auto), E-TTL II/E-TTL fully automatic flash will make it as
easy as normal AE shooting.
Set the Speedlite to <a>.
1
Press the <D> button so that
<a> is displayed.
Focus the subject.
2
Press the shutter button halfway to focus.
X The shutter speed and aperture will
be set as displayed in the viewfinder.
Check that the <Q> icon is lit in the
viewfinder.
Take the picture.
3
Take the picture.
X
A preflash is fired right before the shot
is taken, then the main flash is fired.
X
If a standard flash exposure was
obtained, the flash exposure confirmation
lamp will light for about 3 sec.
If the lens focal length blinks on the LCD panel, the periphery of the flash
picture may turn out dark. Use the built-in wide panel (p.18).
<a> will be displayed on the LCD panel even if the camera is
compatible with E-TTL II.
If the flash exposure confirmation lamp does not light, move closer to the
subject and take the picture again. With a digital camera, you can also
increase the camera’s ISO speed.
11
Using E-TTL II and E-TTL Autoflash in the Shooting Modes
Just set the camera’s shooting mode to <W> (aperture-priority AE),
<X> (shutter-priority AE), or <q> (manual) and you can use E-TTL
II/E-TTL autoflash.
Select this mode when you want to set the shutter speed manually.
The camera will then automatically set the aperture matching the shutter
speed to obtain a standard exposure.
X
If the aperture display blinks, it means that the background exposure will
be underexposed or overexposed. Adjust the shutter speed until the
aperture display stops blinking.
Select this mode when you want to set the aperture manually.
The camera will then automatically set the shutter speed matching the
aperture to obtain a standard exposure.
If the background is dark like a night scene, a slow sync speed will be used
to obtain a standard exposure of both the main subject and background.
Standard exposure of the main subject is obtained with the flash, while a
W
standard exposure of the background is obtained with a slow shutter speed.
Since a slow shutter speed will be used for low-light scenes, using a
tripod is recommended.
If the shutter speed display blinks, it means that the background
exposure will be underexposed or overexposed. Adjust the aperture until
the shutter speed display stops blinking.
Select this mode when you want to set both the shutter speed and aperture
manually.
Standard exposure of the main subject is obtained with the flash. The
q
exposure of the background is obtained with the shutter speed and aperture
combination you set.
If you use the <Z> or <Y> shooting mode, the result will be the same as
using the <V> (Program AE) mode.
Flash Sync Speeds and Apertures Used
Shutter Speed Setting Aperture Setting
V Automatic (1/60 sec. - 1/X sec.) Automatic
X Manual (30 sec. - 1/X sec.) Automatic
W Automatic (30 sec. - 1/X sec.) Manual
q Manual (buLb, 30 sec. - 1/X sec.) Manual
1/X sec. is the camera’s maximum flash sync speed.
12
 Loading...