

Page 1

GB INSTRUCTIONS FOR USE AND INSTALLATION
~~~
TRIO 501/1 UK
41022811
1
Page 2
This appliance is marked according to the European directive 2002/96/
EC on Waste Electrical and Electronic Equipment (WEEE).
By ensuring this product is disposed of correctly, you will help prevent
potential negative consequences for the environment and human health,
which could otherwise be caused by inappropriate waste handling of this
product.
The symbol on the product indicates that this product may not be treated
as household waste. Instead it shall be handed over to the applicable
collection point for the recycling of electrical and electronic equipment
Disposal must be carried out in accordance with local environmental regulations for waste
disposal.
For more detailed information about treatment, recovery and recycling of this product, please
contact your local city office, your household waste disposal service or the shop where you
purchased the product.
SUMMARY
Unpacking the appliance........................................................................... 3
RECOMMENDATIONS - SAFETY ADVICES ........................................ 3-4
INSTALLATION
• Safety...................................................................................................... 5
• GAS CONNECTION ............................................................................ 6-7
• ELECTRICAL CONNECTION................................................................. 8
• If modifying gas setting, set the iddle flame............................................ 8
TECHNICAL DATA ................................................................................... 9
USE
• THE HOB
The gas burner........................................................................................ 10
• THE OVEN
Oven equipment...................................................................................... 11
Use..................................................................................................... 11-12
Cooking advices................................................................................. 13-14
• THE DISHWASHER
The controls - The Programmes - Use ............................................... 15-16
Filters - Loading dishes ........................................................................... 17
Loading detergent - Rinse aid -Salt.................................................... 18-20
Programmes selection ............................................................................ 21
Some hints .............................................................................................. 22
Water connection - water drainage .................................................... 23-24
Identifying minor faults ....................................................................... 25-26
CLEANING.............................................................................................. 27
2
Page 3
UNPACKING THE APPLIANCE
Inside the appliance, you will find the booklet and a bag containing :
- if you have to change the type of gas: new jets for the gas modifications, Butane Gas G30
28-30 mbar or Propane Gas G31-37 mbar,
- for connection by soft rubber tube, an end piece for Natural Gas and an end piece for
Butane or Propane gas with seal.
RECOMMENDATIONS
READ THE INSTRUCTIONS CAREFULLY TO MAKE THE MOST OF YOUR APPLIANCE.
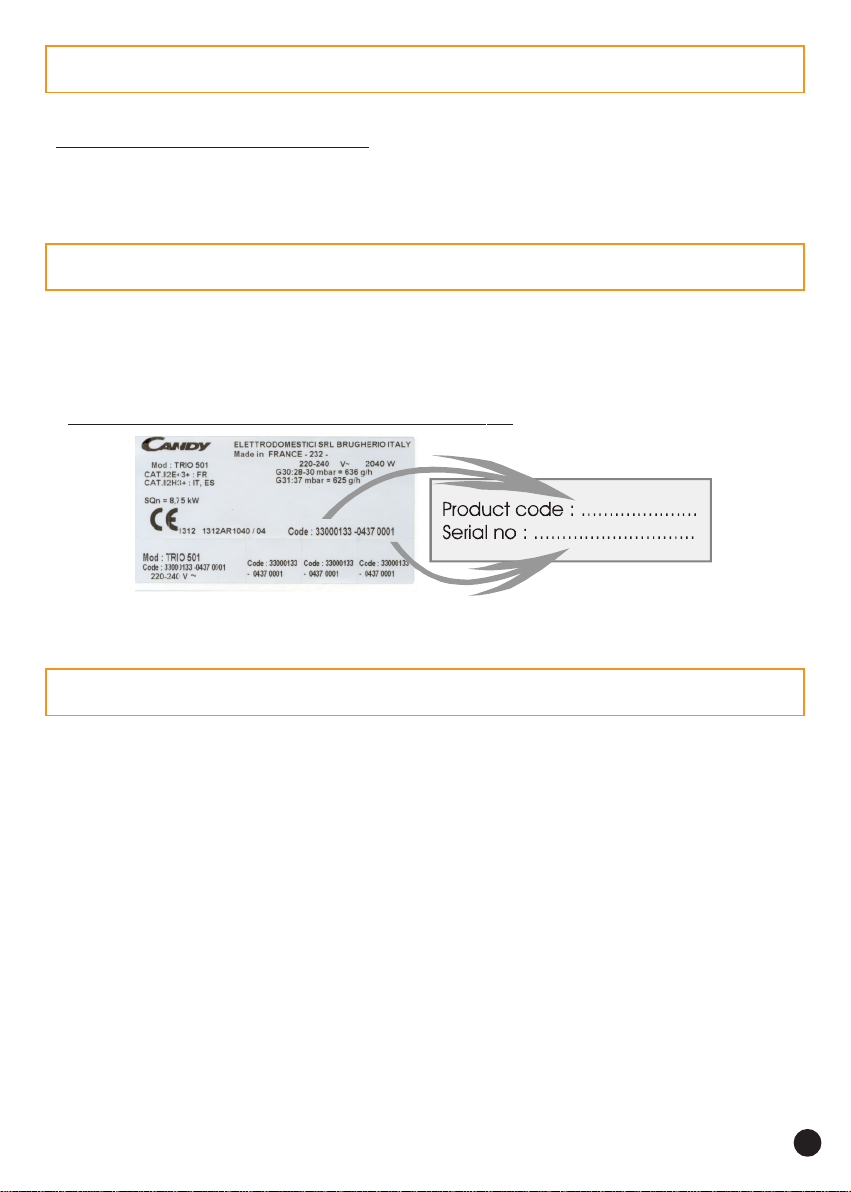
We recommend you keep the instructions for installation and use for later reference, and
before installing the appliance, note its serial number below in case you need to get help
from the after sales service.
. Identification plate is located at the back of the Trio.
THE COMP ANY SHALL NOT BE LIABLE IF THE INSTRUCTIONS PROVIDED IN
THIS DOCUMENT ARE NOT COMPLIED WITH.
SAFETY INSTRUCTIONS
• You should entrust the gas installation of your appliance and its electrical connection
to an approved installer or technician with similar qualifications.
• The Trio consists of three elements, a hob, an oven and a diswasher. For safety reasons
under no circumstances should any modifications be carried out to this appliance.
• This appliance is designed for domestic use only.
• If the Trio shows even the smallest defect, do not connect it. Disconnect from the power
supply and immediately contact an approved service agent.
• There are certain basic safety rules which are valid for any domestic appliance. They are
the following :
- Never touch the appliance when your hands or feet are wet or damp.
- Do not use it when your feet are bare.
- Do not remove the plug from the mains supply socket by pulling the mains cable or the
machine itself.
- Do not leave the appliance exposed to the elements (rain, sun etc...).
- Do not let children (or others incapable of operating it) use the machine without
supervision.
- Do not lean on the doors or not allow children to do so.
3
Page 4

• All accessible parts are hot when the Trio is in operation. Take care to not touche these
elements and keep young children away from the Trio when in use, or just after the use.
• Af ter each use we recommend that some cleaning of the Trio is undertaken. This prevents
the accumulation of dirt or grease which gets re-cooked and burns, generating unpleasant
smells and smoke.
• Never use a steam or high pressure spray to clean the appliance.
• Do not store flammable products in the Trio as they can catch fire if the appliance is
inadvertlanty switched on.
• Use oven gloves when placing or removing a dish from the oven.
• Do not line the oven walls with aluminium foil or single-use oven protectors available from
some stores. Aluminium or any other protection, in direct contact with the hot enamel,
risks melting the enamel or causing deterioration to the inside.
• When cooking with fats or oils, always take care to watch the cooking process as heated
fats and oils can catch fire rapidly.
• The dishwasher is designed for normal kitchen utensils. Objects that have been
contamined by petrol, paint, traces of steel or iron, corrosive chemicals, acids or alkalis must
not be washed in the dishwasher.
• There should not be water left in the machine or on the dishes at the end of the wash
programme.
• If you wish to dispose of an old dishwasher be careful to remove the door to eleminate the
risk of children becoming trapped inside it.
• The dishwasher has been made from materials which can be recycled so that it can be
disposed of in an environmentally friendly way.
• Ensure that the dishwasher does not crush power cables.
• It is not advisable to use adaptors, multiple plugs and/or extension cables.
• Any queries regarding the power supply cord should be referred to After Sales Service or a
qualified technician.
Any failure to follow the above advice may have serious consequences for the
safety of the appliance.
4
Page 5

INSTALLATION
Installing a domestic appliance can be a complicated operation which if not carried out
correctly, can seriously affect consumer safety.
It is for this reason that a professionally qualified person should undertake the task who will
carry it out in accordance with the technical regulations in force.
In the event that this advice is ignored and the installation is carried out by an unqualified
person, CANDY declines all responsibility for any technical failure of the product whether
or not it results in damage to goods or injury to individuals.
--------------------------------------------------------------------------------------------------------------------------INST ALLATION
---------------------------------------------------------------------------------------------------------------------------
• Before installing the appliance, the technician must :
- Check the compatibility between the Trio and the gas installation.
The T rio is factory set for use with the gas type as stated on the p ackaging and repeated on
the rating plate affixed to the cooker.
Natural gas G 20-20 mbar / G 25-25 mbar : main gas
- If necessary, change the gas.
To adapt the gas burners cooker fit suitable jets that provide the nominal flow rate go to
page 6.
• For installation the technician must :
The Trio is Class2 - Sub class 1 ; furniture adjacent to the unit must not be higher than the
top of the appliance.
- The cooker has adjustable feet for perfect levelling on the floor.
- Make the gas connection to the installation according to the gas supply, page 7.
- Connect the cooker electrically in compliance with the information given on page 8.
- If the gas type has been changed, adjust the minimum flow of each gas burner on page 8.
- Connect the Trio to the water supply and the water drainage (see pages 23-24).
ANY MODIFICATION MADE TO THE GAS SETTING SHOULD BE NOTED ON THE
RA TING PLATE AFFIXED TO THE COOKER.
When the appliance is located on a carpet floor, attention must be paid to ensure that
there is no obstructions to the bottom vents.
5
Page 6
INSTALLA TION: GAS
1,00
1,75
2,50
3,50
1,20
2,00
2,80
4,00
1,00
1,75
2,50
3,50
0,90
1,60
2,25
3,20
3
II
2H3B/P
XXX
X
XXX
XXX
II
2ELs3B/P
XXX
GAZ/Pression (mbar)
CAT. PAYS G20/20 G20/25 G25/25 G30/29 G30/36 G31/30 G31/37 G350/1
II
2E+3+
II
2H3+
I
2E
II
2H3B/P
II
2L3B/P
X Gas setting possible according to installation Butane gas G30-29 mbar or Propane gas G 31-37 mbar
CHANGING THE GAS TYPE :
the calorific capacity and pressure of the gas vary according to the type of gas.
When changing the gas, the technician should successively : change the jets, make
the gas connection to the installation and set the minimum flow of all the gas
burner tap.
FR, BE
CH , ES, GB , GR, IE, IT, PT
CZ, A T, DK, FI, NO, SE
DE
HU
NL
PL
¤ Factory setting : Natural gas = G20-20 mbar/G25-25 mbar
XXX X
XXX
CHANGING THE JETS OF THE GAS BURNERS
Hob burner jets
To gain access to the jets :
. lift the hob lid,
. remove the top, grills, caps and heads of all burners,
. use a tube spanner (7) inside the burner,
. according to the information given in the table,
install jets suitable for the burner type and gas type supplied.
For reinstallation, fit the heads, burner and top grills.
Each jet is identified with a mark.
AUXILIARY SEMI-RAPID RAPID
BURNER
front right rear left front left rear right
Jet
kW
Jet
G20 20 mbar
G20 25 mbar
76 101 118 144
G25 25 mbar 0,90 1,60 2,30 3,20
G30 29 mbar
G31 30 mbar
50 66 80 94
G31 37 mbar 1,00 1,75 2,50 3,50
6
kW
Jet
kW
JET
ULTRA-RAPID
Jet
kW
Page 7
GAS CONNECTION
This must be done in compliance with the regulations in force in the installation country. In
all cases, on the gas feed pipe provide a stopcock, a regulator or regulator release device
for propane gas. Only use valves, regulators ends and flexible tubes, regulators with the
official mark of the installation country.
Gas connection according to installation :
Natural Rigid, Flexible hose with mechanical fittings (1) - Soft rubber tube (3)
Butane Rigid, Flexible hose with mechanical fittings (1) - Soft rubber tube (2)
Propane Rigid, Flexible hose with mechanical fittings (1) - Soft rubber tube (2-3)
1 - provided the flexible hose can be inspected for its entire length.
2 - provided the soft rubber tube can be inspected for its entire length, its length does not
exceed 1.5 metres and it is fitted with suitable clamps at the ends.
1, 2 - soft tubes and flexible hoses with mechancial fittings must be arrange to be away
from any flames, and not deteriorated by the combustion gases, hot cooker parts or by
any spills of hot food.
THREE CONNECTION OPTIONS :
• RIGID PIPE CONNECTION
Connect directly to the manifold fittings.
• CONNECTION BY FLEXIBLE HOSE WITH MECHANICAL FITTINGS
We recommend this type of connection.
Screw the hose nuts directly onto the manifold fitting on the one hand and onto the stop
cock of the piping on the other hand.
• CONNECTION BY SOFT RUBBER
We do not recommend this type of connection.
To be reserved solely for old installations not enabling any other option.
Screw the compliant end piece
(2) Butane/Propane gas
Fit the soft tube to the end
piece on the one hand and
to the regulator or to the valve Natural gas
outlet on the other hand.
(2) In all cases, make sure the seal is fitted. Following the connection operations, test
the leak tightness using soapy water, testing by flame is strictly prohibited.
7
Page 8
INSTALLATION - ELECTRICAL CONNECTION
"The installation must conform to the standard directives".
CANDY declines all responsibility for any damage that may be caused by unsuitable or
unreasonable use.
Warning :
• Always check before any electrical operation, the supply tension shown on the electricity
meter, the adjustment of the circuit-breaker, the continuity of the connection to earth to
the installation and that the fuse is suitable.
• The electrical connection to the installation should be made via a socket with a plug
with earth, or via an omni pole cut-out switch with an opening gap of at least 3 mm.
If the appliance has a socket outlet, it must be installed so that the socket outlet is
accessible.
CANDY cannot be held responsible for any accidents resulting from the use of an
appliance which is not connected to earth, or with a faulty earth connection continuity.
• Any queries regarding the power supply cord should be referred to After Sales
Service or a qualified technician.
Warning! This appliance must be earthed. In the absence of adequate earthing you
will notice that when touching the metal parts of your appliance an electrical
dispersion can be felt due to the presence of a radio interference suppressor.
A power cord with a plug are supplied with the Trio which allow it to be connected only to a
power supply of 220-240 V between phases, or between phase and neutral.
SETTING THE IDDLE FLAME
If the gas type has been altered, the stability of the flame in the minimum flow must be
checked and set by adjusting the by-pass screw.
To access the top burner by-pass screw, remove the control panel knobs. At first, pull the
disc to the front and remove the combined control knob.
a) Butane- propane gas : the setting is done by screwing right in (without forcing) the
by-pass screw whose calibrated hole provides the minimum flow.
b) Natural gas :
. unscrew the by-pass screw one turn,
. replace the combined control-knob, light the burner and set to low flame,
. remove the combined control-knob again, screw the by-pass screw until a reduced flame is
obtained, staying stable when going from high to low position.
. replace the combined control-knob.
Warning : Never loosen the others screws !
8
Page 9

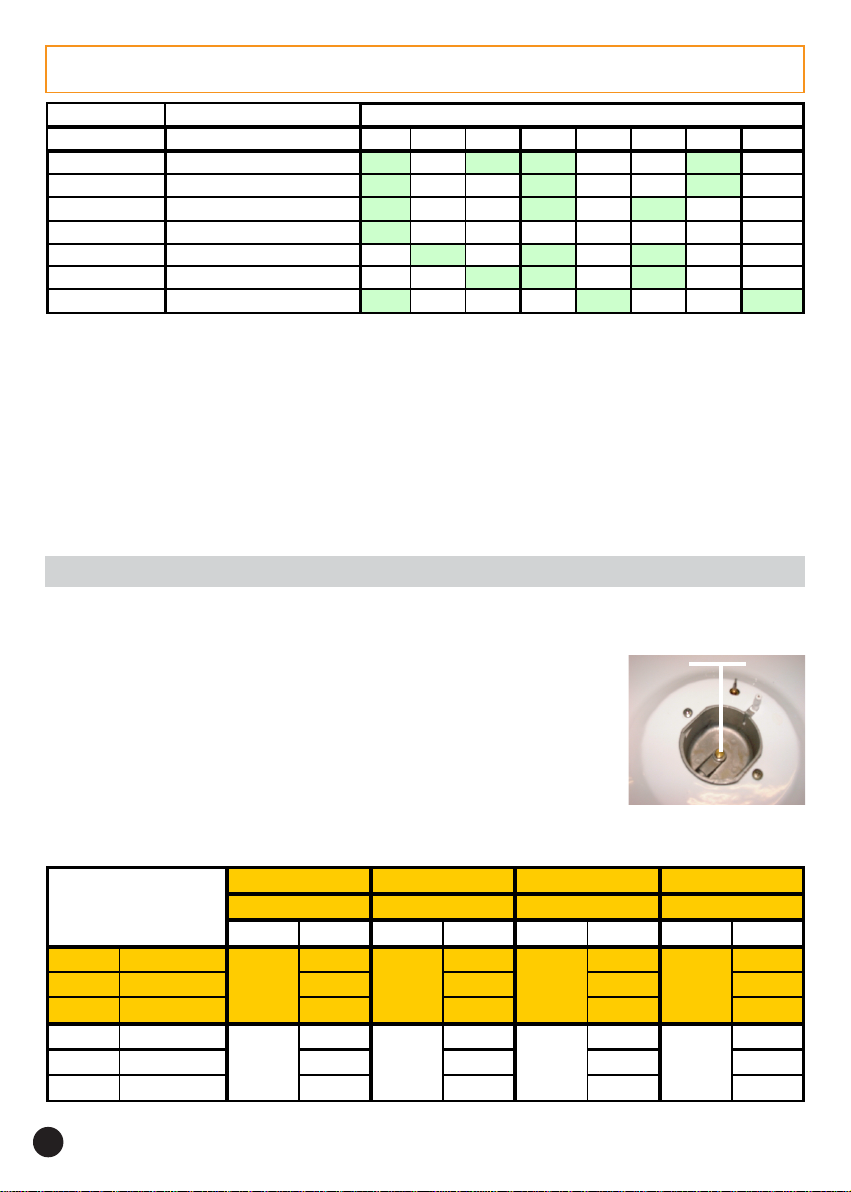
TECHNICAL DA T A
In order to improve the quality of the products, CANDY may carry out modifications
linked to technical improvements.
Appliance meeting with the standard 89/336/CEE, 73/23/CEE and 90/396/CEE.
rerutcafunaM
ledoM
)mc(snoisnemidecnailppA 5,78-5,68thgieHX06htpeDx6,95htdiW
)mc(denepodilhtiw mc341-241
BOHEHT
thgirtnorF
thgirraeR
tfeltnorF
tfelraeR
NEVOEHT
mroN
NE
40305
noitcnufgnitaeHlanoitnevnoC
noitcevnoc
emulovelbasUserti
erom(AssalcycneiciffeygrenE
)tneiciffessel(Got)tneiciffe
l
anoitnevnochtiwnoitpmusnocygrenEhWk87,0
riadecrofhtiwnoitpmusnocygrenE
YDNAC
KU1/105OIRT
g4
sa
Wk1esorojimyrailixuA
Wk5,3dipar-artlU
Wk05,2dipaR
Wk57,1dipar-imeS
A
hWk59,0
l93
)nevoehtfoezis(ecnailppafoepyTemulovmuideM
daoldradnatsnodesabkoocotemiTnim5,93
oaeraehT²mc0521
rewopboH+nevOixaM W0702
REHSAWHSIDEHT
noitpmusnocygrenEhWk57,0
ssalcycneiciffeygrenEB
ygrenEB
ssalcyrd
sgnittesecalP6
noitpmusnocretaW9
teehsgnikabtsegralehtf
9
Page 10

THE GAS BURNER
SOME TIPS ....
• Pans with curved, ridged or warped bottoms are not recommended.
• Avoid boiling food too intensely. Food is not cooked any more quickly this way. In fact, it is
subjected to severe agitation, which may cause the food to lose some of its flavour.
• To save gas, make sure that the flames do not overlap the bottom of the pan.
• Do not use the gas burner with an empty pan.
Caution : when the burners are not in service, the general gas supply tap should always be
turned off.
The various burners : the hob has burners of different dimensions. Y ou should be aware of
the differences in power of each burner.
• use the powerful burner to bring to boil, to fry meat, and in general for any food that should
be cooked quickly.
• use the semi-rapid for slow cooking or for sauces.
• use the small burner for small pans and also for slow cooking.
For a proper use of the burners, choose pans that match the dimensions given below:
ultra-rapid Ø22 cm, semi-rapid Ø12 cm, rapid Ø16 cm, auxiliary mijorose Ø10 cm.
USE : each burner is fitted with a thermocouple fast safety. It is a device allowing the automatic
cut-out of the gas supplying on the burner, in case the flame dies out accidentally.
• Turn on the gas tap,
• A symbol next to each control knob indicates which burner is lit.
• Press and turn the knob to position keeping it pressed
to produce sparks which in turn ignite the burner. Keep the
pressure on the control knob a few seconds to permit the
releasing of the safety device.
• Set the flame according to your cooking requirements. Intermediate positions are available
between the two positions and settings on the control knob.
• To turn the flame out, turn the control knob back to stop position.
Please note : if there is a power cut, the burner can be ignited by pressing and turning the
knob to position and holding a naked flame to the burner.
10
Page 11

OVEN EQUIPMENT
It is necessary to do an initial cleaning of the equipment before the first use of each of
them. Wash them with a sponge. Rinse and dry off.
• THE SHELF : it is for holding dishes, plates, and meat
joints when cooking with the grill. It is fitted with rails
which enables the drip tray to be slid into.
Thanks to its special shape, the shelf always remains horizontal, even when pulled to its fullest
extent towards the front of the oven, thus avoiding the risk of dishes sliding off or tipping over.
• THE DRIP TRAY : collects meat and grilling juices during
grilling. It can be put on the shelf, or slid under it.
Unless used with the grill, the drip tray must not be stored in
the oven while in use.
Never use the drip tray as a roasting tray. This would cause smoke to be produced, fat to be
splashed and the oven would become rapidly stained.
• THE PASTRY TRAY must be placed on the shelf. It is
for cooking small pastries like choux, biscuits, meringues,
etc...
Never place the pastry tray directly on the oven bottom.
When the oven is in use, any unused accessories should be removed.
• THE CIRCUIT-BREAKER TIMER
It takes in charge the functioning of the oven, for between 1 and 120
minutes, with immediate start and automatic stop. When the time is
up, the timer automatically cuts off the power supply to the oven.
However, the oven could be used without programming. In this case,
turn the control knob to the Hand position .
Nota : to set a time, turn the control knob clockwise up to the 120 minutes mark and then turn
it back to the required time.
THE OVEN "Use"
VERY IMPORTANT : the oven and the dishwaher cannot be used at the same time.
To use the oven, you have to close the dishwasher.
IMPORTANT : always keep small children away from the Trio while it is in use.
If the Trio is fitted with a lid, lift it up before use.
11
Page 12

THE COOKING METHODS
• Conventional cooking : the top and bottom heating elements are used together.
This method is ideal for all traditional roasting and baking, for sealing red meats, roast beef,
leg of lamb, bread, flaky pastry . Preheat the oven for about ten minutes and place the cooking
meat in the mid shelf position.
• Grill : using the top heating element. Success is guaranteed for mixed grills, kebabs and
"gratin dishes". Five minutes preheating is required to get the element hot.
• Fan assisted grill : using the top heating element with the fan circulating the air inside
the oven. Ideal for cooking thick food items, whole pieces such as roast pork, poultry etc..
Preheating is necessary for red meats but not for white meats. Slide the drip tray under the
shelf to collect juices. Make sure that the food is not too close to the grill. Turn the food over
halfway through cooking.
• Fan cooking : both top and bottom heating elements are used with the fan circulating
the air inside the oven. We recommend you use this method for poultry, pastries, fish and
vegetables.. heat penetrates into the food better and both the cooking and preheating times
are reduced.
USE :
• Turn the control knob on the requesting
cooking method and set a temperature :
Conventional cooking Temperature from 65°C to 230°C
Grill Temperature 230°C
Fan assisted grill Temperature from 190°C to 210°C
Fan cooking Temperature from 65°C to 210°C
• Turn the control knob of the circuit-breaker timer to the Hand position or on a programming
duration.
• The regulator indicator light indicates that the thermostat is working. It goes
on and off regularly during the cooking time.
12
Page 13

COOKING ADVICES
MEAT :
It is better not to salt meats until after cooking as salt encourages the meat to splatter fat.
This will dirty the oven and make a lot of smoke.
Joints of white meat, pork, veal, lamb and fish can be put into the oven cold. The cooking
time is longer than in a preheated oven, but it cooks through to the centre better as the heat
has more time to penetrate the joint.
CORRECT PRE-HEA TING IS THE BASIS OF SUCCESSFUL RED MEAT COOKERY.
CAKE - PASTRIES AND BISCUITS :
Avoid using shiny moulds because they reflect heat and can spoil your cakes. If your cakes
brown too quickly, cover them with greaseproof paper or aluminium foil.
Caution : the correct way to use foil is with the shiny side inwards. If not the heat is reflected
by the shiny surface and does not penetrate the cake.
Avoid opening the door during the first 20 to 25 minutes of cooking : sponge cake, soufflés,
brioche, etc., will tend to fall.
You can check if cakes are done, by pricking the centre with a knife blade or metal knitting
needle. If the blade comes out nice and dry, your cake is ready, and you can stop the
cooking. If the blade comes out moist or with bits of cake attached, continue baking but
slightly lower the thermostat so that it finished off without burning.
The following instructions are for guidance only . Y ou may wish to alter them according
to your own experience or your personal taste.
Pre-heating times :
. 20 minutes between 210 and 230°C
. 15 minutes between 140 and 190°C
. 10 minutes between 65 and 115°C
13
Page 14

YTITNAUQDOOF
nevO
erutarepmet
C°ni
HSIF
tuorT0021 52/51
noitisopflehS
mottobehtmorf
emitgnikooC
setunimni
gk1gnitihW09
gK5,1-1feeb-tsaoR091109
gk1laevtsaoR061/0511051/021
gk2laevfoetteuqnalB091/071109/06
gk5,1-1bmalfogeL061/051157/06
gk5,1-1nottumfogeL061/051106/05
gk2snoegiP061/051154
gk4esooG0611 072/042
gk5,2-2kcuD5711 051/09
gk5,1-1nekcihC0711 08/06
-engasaL
inollennaC
sélffuoS002102
rettirF002102
1105
TAEM
YRTLUOP
SUOIRAV
002104
14
azziP002102
YRTSAP
ekactaehwkcuB5711 05/04
stiurfhtiwtraT091/0
nevael(tiucsiB
)hguod
eugnireM001109
yrtsapffuP002102
81103/02
0611 54/04
Page 15

THE DISHWASHER
Technical data :
Place load EN50242 6 Drainage pump power 30 W
Capacity with pans & dishes 4 persons Max power absorbed 2050 W
Water supply pressure (litres) 3 Water pressure mini 0,08 - max 0,8 MPa
Power 1900 W Fuse (amp) 10 A
Wash pump power 150 W
DISHWASHER CONTROLS
A B C D
A Programme selection indicator lights C Programme description
B Programme selection button D On/off button
SELECTING THE PROGRAMMES AND SPECIAL FUNCTIONS
The dishwasher and the oven cannot be used simultaneously.
Setting a programme
Open the door and press the On/off button ; the 4 Program selection LEDs start flashing.
- Set the required programme by pressing Programme selection button, LED of the chosen
programme will turn on (2 LEDs for COLD RINSE programme).
- Close the door (after audible signal), the chosen programme will start automatically.
USE THE DISHWASHER
Opening the door
Grip the handle in the front panel and pull forward. If the machine comes open while it
is working, an electrical safety device automatically switches everything off. For the
machine to work properly, the door should not be opened while it is in operation.
Closing the door
Place the basket in the dishwasher. Make sure that the spray arm is free to rotate and is
not obstructed by cutlery, crockery or pans. Close the door, pressing on it to make sure
it is firmly shut.
Interrupting a programme
lt is not recommended that the door be opened while a programme is running, and especially
not during the main wash phase and final drying.
However, the appliance stops automatically when the door is opened.
When the door is closed again, the programme continues automatically.
15
Page 16

If you wish to change or cancel a programme that is running, carry out the following procedure:
. open the door, keeping the Programme selection button "P" pressed in until all 4 indicator
lights are flashing. The current programme is cancelled. A new setting can now be made.
Before starting a new programme, you should check that there is still detergent in the
dispenser. If necessary, top up the dispenser.
WARNING: if the door is opened during the drying phase, an intermittent audible signal is
activated to advise that the cycle is not yet completed.
End of programme
The end of the programme is indicated by an audible signal. When the door is opened the
programme selection indicator lights start flashing. Release the On/off button.
Deactivating the audible signal
The audible function can be deactivated in the following way:
- press the On / Off button
- wait till the programme LEDs blink
- within 2 minutes, press and keep pressed for at least 30 seconds the Programme Selection
button (the programme LEDs will still blink and an intermittent audible signal is heard).
- Once the first two LEDs on the left are illuminated without blinking and the audible signal is
off, release the button (the audible signal function is active).
- Press again the Programme Selection button, the first two LEDs on the left will go off and
the other two LEDs will turn on (the audible signal function is deactivated)
- An audible signal will confirm that the setting is completed
- To set again the audible signal function repeat the whole procedure.
Attention - The dishwasher is equipped with an anti-overflow safety device which in the
event of anomaly intervenes by evacuating water in excess.
Fault Signals
If malfunctions or faults occur when a program is running, the LED that corresponds to the
selected cycle (2 LEDS for COLD RINSE programme) will blink rapidly and an audible signal
will be activated.
In this case, turn the dishwasher off by pressing the On / Off button. After checking to make
sure the water inlet hose tap is open, that the drain hose is not bent and that the siphon or
filters are not clogged, re-start the selected program. If the anomaly persists, contact
Customer Service.
Important !
To ensure the correct operation of the anti-overflow safety device, it is recommended
not to move or to tilt the dishwasher during operation.
If it is necessary to move or to tilt the dishwaher, first make sure the washing cyle is
finished and that no water is left in the tank.
16
Page 17

PRELIMINARY OPERATIONS AND CLEANING THE FILTER UNIT
The filtering system is composed of :
- a central filter cup which traps the largest food particles.
- a flat filter which continuously filters the washing water.
- the micro filter, situated under the flat filter, which traps the
smallest food particles ensuring a perfect rinse.
For best results, the filter unit should be checked and cleaned after each wash.
To remove the filter unit, simply grip the handle and lift the whole unit out.
The central cup is just resting on top for easy cleaning.
The dishwasher is fitted with a self cleaning micro filter, which only requires checking about
once every 15 days.
However, it is advisable to check after every wash, that the central cup and the flat filter
are not clogged.
NB : After cleaning the filters, make sure that they are correctly reassembled, one inside
the other, and that the flat filter is properly positioned at the bottom of the dishwasher.
A poor seating of the filter unit could have an adverse effect on the efficiency of the
appliance.
Important : Never use the dishwasher without filter.
LOADING DISHES
The basket has been carefully designed to make loading easy.
For good wash performance, remove any debris from the dishes (bones, tooth picks, the
remains of meat and vegetables) to avoid blocking the filters, water outlet and washing
arm nozzle and, as a result, reducing washing efficiency.
Warning ! to avoid any injury from cutlery with blades or sharp points, they can be placed
with the handles upwards.
LOADING A 6 PLACES SETTING (EN 50242)
A - 6 glasses F - 6 flat plates
B- 6 dessert plates G- 6 deep plates
C- 6 saucers H- Medium bowl
D- Small bowl I - Serving dish
E - 6 tea or coffee cups L - Cutlery
LOADING 4 PLACE SETTINGS PLUS CASSEROLES
Casseroles, salad bowls, soup pans, lids etc., can be loaded
on the basket.
It is advisable to arrange the cutlery in the basket provided
for that purpose. If there is any cutlery with narrow handles,
it should be placed with handles upwards, to avoid falling
through the bottom of the basket and blocking the washing
arm. Do not put wooden handled lids in the basket, or any
whose lids are bonded with resin.
17
Page 18

LOADING THE DETERGENT
It is essential to use a detergent that is specifically designed for dishwashers either
in powder, liquid or tablet form.
Unsuitable detergents, (like those for washing up by hand) do not contain the proper
ingredients for use in a dishwasher and impede the efficient functioning.
Normal wash
The detergent dispenser is inside the door. The dispenser
lid should be closed before every wash.To open it, simply
press the catch. At the end of each wash cycle the lid is
always open and ready for the next time the dishwasher is
used.
The amount of detergent to be used varies according to
how dirty the dishes are and the type of wash. A 15g
dose is normally recommended. If the water is hard or the
dishes are exceptionally dirty, 25g of detergent should be
loaded. After pooring the detergent into the dispenser,
close the lid, since not all detergents are the same and the
instructions on the boxes of detergent can vary.
We should just like to remind users that too little detergent
does not clean the dishes properly whilst too much
detergent not only does not produce better results but is
also a waste. Do not use an excessive amout of detergent
and help limit damage to the environment at the same time.
Intensive washing
When using the intensive wash programme, add a second
dose of detergent of about 15g (1 soup spoonful).
This extra dose should be put in the curved part of the
dispenser when it is closed (see diagram).
FILLING THE RINSE AID DISPENSER
The rinse aid dispenser "B" is to the right of the detergent
dispenser and has a capacity of about 130 ml.
Open the lid and pour in enough liquid, which will last
several washes. Try to avoid overloading. Close the lid.
This additive, which is automatically released during
the last rinse cycle, helps the dishes to dry quickly and
prevents spots and stains forming. It is always advisable
to use rinse aid.
Check the rinse aid level through the indicator eye "A"
which is situated in the centre of the dispensers.
FULL - Dark EMPTY - Bright
18
Page 19

REGULATING THE RINSE AID (from 1 to 6).
The regulator control "B" is below the indicator and can be turned with the finger, the
recommended position is "3".
The hardness of the water can be judged by incrustation or by the level of dryness.
It is therefore important that the correct dosage of Rinse Aid is regulated to give the best
results.
After the wash,
. if streaks occur on the dishes, decrease the amount by one position.
. if whitish spots occur, increase the amount by one position.
LOADING THE SALT
The dishwasher is fitted with a softener that clears the water of lime which could cause scale
and damage the dishwasher.
On the bottom of the diswasher there is a salt dispenser for regenerating the softener.
The filter element of the softener unit should be recharged with a salt specially produced for
dishwashers. This salt can be bought either as tablets or as granules.
To add salt, unscrew the cap of the salt dispenser on
the bottom and refill the dispenser.
During this operation a little water will overflow but keep
adding salt until the dispenser is fill, clean the thread of
salt residue and retighten the cap.
If the dishwasher is not required straightaway, set
the programme Cold rinse ("Eco+Rapid, 2 Leds")
so that the salt solution which has overflowed is
discharged from the washing tank.
The salt dispenser has a capacity of between 1.5 kg for
efficient use of the appliance, it should be refilled from
time to time according to the regulation of the water
softener unit.
NB: it is necessary to add water until the dispenser overflows. Only install the dishwasher
completely filling the salt dispenser.
19
Page 20

Regulating the water softener with electronic programmer
Level
regenerating
indic ato r lig h t N.1
indic ato r lig h t N.1
indic ato r lig h t N.2
indic ato r lig h t N.3
indic ato r lig h t N.4
The water softener can treat water with a hardness level of up to 60°Fh (French grading) or
33°Dh (German grading) through 5 settings.
The settings are listed in the panel below:
Water
hardness
Water
hardness
Use of
Water
softener
°fH
(French)
-
21
31
41
8
0
-
20
-
-
0
1
230
340
460
°dH
(German)
salt
no
yes
yes
yes
yes
setting
The softener unit is set in the factory at level 3 (indicator light N.3) as this is suitable for the
majority of users.
Regulate the setting of your water softener unit according to the degree of hardness of your
water as follows: Open the door, press On / Off button, within 2 minutes press and keep
pressed for at least 10 seconds the Programme Selection button; the first three LEDs on the
left turn on for 3 seconds.
The LED associated with the set water softener starts flashing; successive button pushing will
set the water hardness levels (see table).
P1
P5
N°1P2N°2P3N°3P4N°4
LEDS
PR.
PROGRAMME SELECTION BUTTON
P1 P2 P3 P4 P5
Information for the test laboratories
General programme comparison
Ref. EN 50242 standards:
1) Normal load
2) Shine setting: "4"
3) Amount of detergent: 18gr. for wash
20
Page 21

Durat
ion
Detergent for
soakingDetergent for
washingClean filter
Check rinse aid
dispenser
Check salt
dispenser
Hot pre-was
h
Cold Pre-wash
Main wash
First rinse
Second rinse cold
Rinse with rinse ai
d
With cold water
75°C9
0
Once a day - for normal soiled pans and any other items that have been left all day for washing
65°C8
0
45°C120
be
50°C3
2
re
re
6
Programme content
s
Check lis
t
Once a day - for heavily soiled pans and any other items that have been left all day for washing.
Energy Saving Programme suitable for normal soiled items. Using
detergents with enzyme.
Quick wash for dishes which are to
washed immediately after the meal. Wash load of 4/6 persons.
Short cold pre-wash for items that a
stored in the dishwasher until you a
ready to wash a full l oad.
Normal
Intensive
Eco
Rapid 32 '
Cold
pre-wash
Programme Description
21
Page 22

SOME PRACTICAL HINTS .... To carry out a wash programme with a full load of dishes
load the machine correctly after each meal and do a cold pre-wash between each load
to get rid of stains and remove the larger residues of food.
HOW TO GET GOOD WASH RESULTS
1) Place the dishes face downwards.
2) Try to place the dishes in such a way that they are not touching one another. If they are
loaded properly you will get better results.
3) Before placing the dishes in the dishwasher remove any remaining food (bones,
shells, pieces of meat or vegetables, coffee grounds, skin of fruit, cigarette ash etc. that
could clog up the outflow and the washing arm jets.
4) After loading the dishes, check that the washing arm can rotate freely.
5) Pans and other dishes that have particularly stubborn food particles or remnants of
burnt food should be left to soak in water with dishwasher detergent.
6) To wash silver properly:
a) - rinse the silver immediately after use especially if it has been used for
mayonnaise, eggs, fish etc.
b) - do not sprinkle detergent onto it.
c) - keep it seperate from other metals.
WHAT TO DO IF ... You want to stop the dishwasher to put in more dishes whilst it is in
the middle of a wash. Open the door, put in the dishes, and close the door, the machine
will start up again automatically.
WHAT NOT TO WASH ...
It should also be remembered that not all dishes are suitable for washing in a dishwasher.
We advise again using the dishwasher to wash items in thermoplastic, cutlery with wooden
or plastic handles, saucepans with wooden handles, items in aluminium, crystal, leaded
glass unless otherwise stated.
Certain decorations may fade. It is therefore a good idea before loading the whole batch
to wash just one of the items first so as to be sure that others like it will not fade.
It is also a good idea not to put silver cultery with non-stainless steel handles into the
dishwasher as there could be a chemical reaction between them.
NB : when buying new crockery or cutlery always make sure that they are suitable for
washing in a dishwasher.
AFTER USE - After each wash, close the tap which supplies the water to the dishwasher and
press the On/Off button to the Off position.
If the dishwasher is not going to be used for some time, the following precautions are
advisable:
1 - carry out a wash programme, but with no dishes, to degrease the machine,
2 - pull the plug out,
3 - turn off the water supply tap,
4 - fill the rinse aid dispenser,
5 - leave the door slightly ajar,
6 - leave the inside of the machine clean,
7 - if the machine is to be left in a place where the temperature is below 0°C, the water left
in the dispenser could freeze.
Therefore, it is advisable to raise the temperature above 0°C, approximately 24 hours
before using the machine again.
22
Page 23

WATER CONNECTION - WATER DRAINAGE
WATER CONNECTION :
The inlet and drain hoses can be directed to left or right.
The dishwasher can be connected to either cold or hot water, as long as it is no hotter than
60°C.
Water pressure mut be between 0,08 MPa and 0,8 MPa. If the pressure is below the
minimum consult the service department for advice.
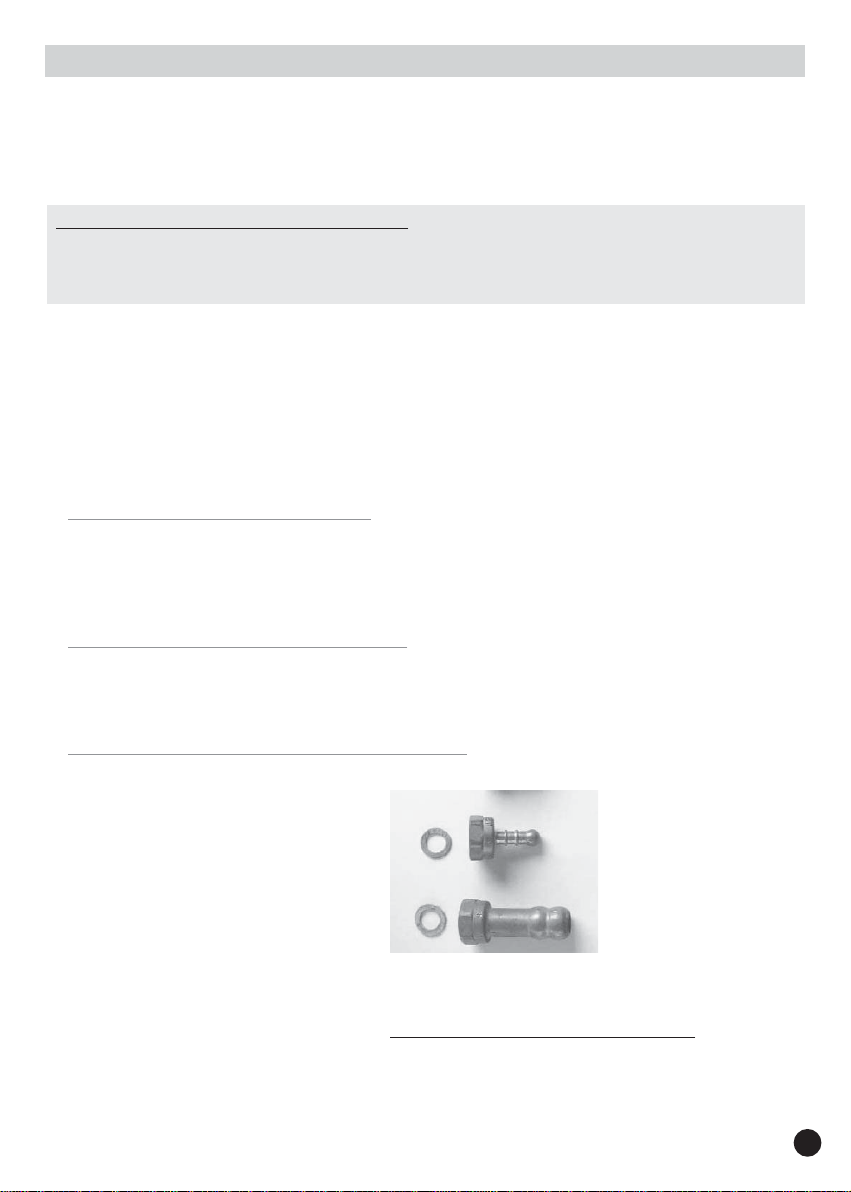
The inlet hose must be connected to a tap so that the water supply can be cut off when the
machine is not in use (fig.1). The dishwasher inlet hose is fitted with a 3/4" threaded connector
(fig.2). The inlet hose "A" should be tightly connected to a 3/4" tap "B".
The water connection of the dishwasher must be done exclusively with the pipe supplied. Do
not use an old pipe.
If lime scale deposits or sand are present in the water, it is advisable to obtain the appropriate
filter, art. 9226085, from the Service Centre (fig.3). The filter "D" must be inserted between the
tap "B" and the inlet hose "A", remembering to fit the washer "C".
If the machine is connected to new pipes or to pipes which have not been in use for long
time, run water through for a few minutes before connecting the inlet hose. In this way no
deposits of sand or rust will clog up the water inflow filter.
WATER DRAINAGE :
Take care not to bend or kink the drain hose when connecting it to the machine so that the
water can drain freely from it (fig.4y).
The drain hose must be at least 40 cm above floor level and it must have an internal diameter
of at least 4 cm. It is advisable to fit an anti-odour air trap (fig.4x).
If necessary, the outlet hose can be extended up to 2,6 m, provided that it is kept at a
maximum height of 85 cm above floor level. For this, contact Customer Service.
23
Page 24

The hose can be hooked over the side of the sink (it must not be immersed in water, in
order to prevent water from being siphoned back to the machine when this is in operation).
Check that there are no kinks in the inlet and outlet hoses. To extend, if necessary the intlet
hose, contact the Customer Service.
24
Page 25

IDENTIFYING MINOR FAULTS
REMEMBER! the oven and the dishwasher cannot be used in the same time.
Should the dishwasher fail to operate, before contacting the Service Centre, make the
following checks:
FAULT CAUSE REMEDY
Plug is not connected correctly Connect electric plug
1 - Machine completely dead
2 - Machine does not draw
water
O/I button has not been pressed Press button
No electricity Check the electricity supply
Door is open Close door
See causes for No 1 Check
Wat er tap is turned off Turn wate r tap on
Programme selector is not at
correct position
The inlet hose is bent Eliminate the bends in the hose
The inlet hose filter is blocked
Filter is dirty Clean filter
Outlet hose is kinked Straighten outlet hose
Turn programme selector to correct
position
Clean the filter at the end of the
hose
3 - Machine does not discharge
water
4 - Machine discharges water
continuously
5 - Spray arm is not heard to
rotate
6 - On electronic appliance
without a display: "Eco"
indicator light and indicator
light "No 1", with audible signal
The out let hose extension is not
correctly connected
The outlet connection on the wall is
pointing downwards not upwards
Position of outlet hose is too low
Excessive amount of detergent Reduce amount of detergent
Item prevents arm from rotating Check
Plate and cup filter very dirty Clean plate and cup filter
Water inlet tap turned off
Follow the instructions for
connecting the outlet hose carefully
Call a qualified technician
Lift outlet hose to at least 40 cm
above floor level
Switch off the appliance - Turn on
the tap - Re-set the cycle
25
Page 26

FAULT CAUSE REMEDY
The wash programme is not thorough
See causes for No 5 Check
Bottom of saucepans have not been
washed well
Edge of saucepans have not been
washed well
Burnt on food remains must be
soaked before putting pans in
dishwasher
Reposition saucepans
Remove spray arm by unscrewing
Spray arm is blocked
ring nut clockwise and wash under
running water
7 - Load of dishes is only
part ially washed
8 - Presence of white spots on
dishes
9 - Noise during wash
The dishes have not been properly
loaded
The end of the outlet hose is in the
water
The incorrect amount of detergent
has been measured out; the
detergent is old and hard
The tap of the salt dispenser is not
closed very well
enough
Water is too hard
The dishes knock against one
another
The revolving arm knock against the
dishes
Do not place the dishes too closely
together
The end of the outlet hose must not
com e into contact with the outflow
water
Increase the measure according to
how dirty the dishes are and change
detergent
Tighten it fully.
Choose a more vigorous programme
Check salt and rinse aid level and
regulate amount. Should the fault
persist, contact Service Centre
Load dishes better onto the basket
Load dishes better
10 - The dishes are not
completely dry
26
Inadequate air flow
Leave the dishwasher door ajar at
the end of wash program to allow
dishes to dry naturally
Page 27

CLEANING
Before carrying out any cleaning, you must :
• Disconnect the appliance from the electrical supply and wait for all the hot parts to cool.
• Never use abrasive cleaners, wire wool or sharp objects to clean the appliance.
• THE ENAMELLED PARTS : never use abrasives, scouring pads or sharp objects, as this
will cause irreparable damage to the enamel. Once the appliance has cooled down, simply
clean with soapy water and dry with a clean cloth.
• GAS BURNERS : for cleaning, it is recommended to remove all greasy or burnt deposits
with ammonia based products or usual cleaning products. Do not immerse the burner caps
in cold water immediately after use, to avoid cracking the enamel from the thermal shock. If
the holes become clogged, brush them with soapy water and dry with a cloth.
When re-assembling the burners, make sure that the burner caps and the burners themselves
are dry and after, seat them correctly.
•
Caution : Be careful not to let any water get into the burners.
• LID : once the Trio has cooled down, simply clean with soapy water and dry with a clean
cloth. Before lifting the lid, make sure that anything that might spill over has been removed.
• OVEN LIGHTING - The bulb and its cover are made of material resistant to high
temperatures: 230 V~ - E 14 base - 15 W - Temperature 300°C mini.
Replacing the bulb : disconnect the power supply from the oven before attempting to
replace the lamp. Wait for the oven to cool down before doing any operation.
To change a defective bulb, just unscrew the glass cover, unscrew the bulb, replace it with
the same type, after replacing the defective bulb, screw back the protective glass cover.
• THE ACCESSORIES -
The oven shelf : do not clean the oven shelf with harsh abrasives. Simply use a cloth wrung
out in hot soapy water. Rinse with clean water and then dry.
The drip tray : after grilling, remove the drip tray from the oven and pour the grease into a
container. Wash and rinse the drip tray in very hot water, using a sponge and washing
powder. If still stained withs sticky food, immerse in soapy water. The drip tray can be clean
in the dishwasher. Never put the drip tray back in the oven if still dirty.
• THE OVEN DOOR GLASS -
It is recommended to wipe the oven door glass with absorbent paper after each cooking
cycle. If there is heavy staining, the glass can be cleaned with a sponge-cleaning agent.
Never use abrasive cleaners, wire wool or sharp objects to clean the glass oven door.
• OVEN DOOR : it is possible to clean the oven door while in position or after removal.
To remove the door, carry out the following :
. open the door fully,
. release the hooks,
. pull the door upwards, closing it partially, until it is free.
To refit it, make sure you reposition the hinges carefully ; a notch located below them lets
you fit he hinges correctly.
After the door is put back on its supports, fit the hinges in their initial position.
27
 Loading...