

Page 1
USER INSTRUCTIONS
OVENS
MANUALE D’ISTRUZIONI
FORNO
CANDY HOOVER GROUP S.R.L. • Via Comolli 16 • 20861 Brugherio (MB) - Italy
EN
IT
02
12
Page 2

Safety Indications
• During cooking, moisture may condense inside the oven cavity or on
the glass of the door. This is a normal condition. To reduce this effect,
wait 10-15 minutes after turning on the power before putting food
inside the oven. In any case, the condensation disappears when the
ovenreachesthe cooking temperature.
• Cook the vegetables in a containerwitha lid instead of an open tray.
• Avoid leaving food inside the oven after cooking for more than 15/20
minutes.
• WARNING:the appliance and accessiblepartsbecomehot during use.
Be carefulnot to touch any hot parts.
•WARNING: the accessible parts can become hot when the oven is in
use. Children must be kept at a safe distance.
•WARNING: ensure that the appliance is switched off before replacing
the bulb, to avoid the possibility of electricshocks.
•WARNING:beforeinitiatingthe automatic cleaning cycle:
- Clean the oven door;
- Remove large or coarse food residues from the inside oftheovenusing
a damp sponge. Do not usedetergents;
- Removeall accessories and the sliding rack kit (where present);
- Do not place tea towels
• In ovens with meat probe it is necessary, before making the cleaning
cycle, close the hole with the nut provided. Always close the hole with
the nut when the meat probe is not used.
•Children under 8 must be kept at a safe distance from the appliance if
not continuously supervised.
•Children must not play with the appliance. The appliance can be used
by those aged 8 or over and by those with limited physical, sensorial or
mental capacities, without experience or knowledge of the product,
only if supervised or provided with instruction as to the operationof the
appliance, in a safe way with awarenessof the possible risks.
•Cleaning and maintenance should not be carried out by unsupervised
children.
•Do not use rough or abrasive materials or sharp metal scrapers to
clean the oven door glasses, as they can scratch the surface and cause
the glass to shatter.
•The oven must be switched off before removing the removable parts
and, after cleaning, reassemble them according the instructions.
•Only use the meat probe recommended for this oven.
EN 02
Page 3

• Do not use asteam cleaner for cleaning operations.
• Connect a plug to the supply cable that is able to bear the voltage,
current and load indicated on the tag and having the earth contact. The
socket must be suitable for the load indicated on the tag and must be
having the earth contact connected and in operation. The earth
conductor is yellow-green in colour. This operation should be carried out
by a suitably qualified professional. In case of incompatibility between
the socket and the appliance plug, aska qualifiedelectrician to substitute
the socket with another suitable type. The plug and the socket must be
conformed to the current norms of the installation country. Connection
to the power source can also be made by placing an omnipolar breaker
between the appliance and the power source that can bear the
maximum connected load and that is in line with current legislation. The
yellow-green earth cable should not be interrupted by the breaker. The
socket or omnipolar breaker used for the connection should be easily
accessible when theappliance is installed.
• The disconnection may be achieved by having the plug accessible or
by incorporating a switch in the fixed wiring in accordance with the
wiring rules.
• If the power cable is damaged, it must be substituted with a cable or
special bundle available from the manufacturer or by contacting the
customerservice department.
• The type of power cable must be H05V2V2-F.
• Failure to comply with the above can compromise the safety of the
appliance and invalidatetheguarantee.
• Any excessofspilled material should be removed beforecleaning.
• During the pyrolytic cleaningprocess, surfaces can heat up more than
usual, children must therefore be kept at a safe distance.
• The appliance must not be installed behind a decorative doorin order
toavoidoverheating.
• When you place the shelf inside, make sure that the stop is directed
upwardsand inthe back of the cavity.
The shelf must be inserted completely into the cavity
• WARNING: Do not line theoven walls withaluminum foil or single-use
protectionavailablefrom stores.Aluminum foil or any other protection,
in direct contactwith the hotenamel, risk meltingand deteriorating the
enamel of the insides.
• WARNING:Neverremovethe oven door seal.
• No additional operation/setting is required in order to operate the
appliance at the rated frequencies.
EN 03
Page 4

Summary
General Instructions
5
Product Description
7
Use of the Oven
8
Oven Cleaning and Maintenance
9
1.1 Safety indications
1.2 Electrical safety
1.3 Recommendations
1.4 Installation
1.5 Waste management
1.6 Conformity declaration
2.1 Overview
2.2 Accessories
2.3 First use
3.1 Display description
3.2 Cooking modes
3.3 Using the minute timer
4.1 General notes on cleaning
4.2 Maintenance
• Removal of the oven window
• Removal and cleaning of the glass
door
• Changing the bulb
Troubleshooting
11
5.1 F.A.Q.
EN 04
Page 5
1. General Instructions
We thank you for choosing one of our products. For the
best results with your oven, you should read this
manual carefully and retain it for future reference.
Before installing the oven, take note of the serial
number so that you can give it to customerservice staff
if any repairs are required. Having removed the oven
from itspackaging, check thatit has notbeen damaged
during transportation. If you have doubts, do not use
the oven and refer to a qualified technician for advice.
Keep all of the packaging material (plastic bags,
polystyrene, nails) out of the reach of children. When
the oven is switched on for the first time, strong
smelling smoke candevelop, whichis caused by the glueon the insulation panels surrounding theoven
heating for the first time. This is absolutely normal and, if it occurs, you should wait for the smoke to
dissipate before putting food in the oven. The manufacturer accepts no responsibility in cases where
the instructions contained in thisdocument are not observed.
NOTE: the oven functions, properties and accessories cited in this manual will vary, depending on the
model you have purchased.
1.1 Safety Indications
Only use the oven for its intended purpose, that is only for the cooking of foods; any other use, for
example as a heat source, is considered improper and therefore dangerous. The manufacturer cannot
be held responsibleforany damage resulting from improper, incorrector unreasonable usage.
The use ofany electrical applianceimplies theobservance ofsome fundamentalrules:
- do notpull onthe powercable to disconnectthe plug fromthe socket;
- do nottouch the appliancewith wetor damphands orfeet;
- in generalthe use ofadaptors,multiple sockets and extensioncables is notrecommended;
- in caseof malfunction and/orpoor operation, switch offthe applianceand donot tamperwith it.
1.2 Electrical Safety
ENSURE THAT AN ELECTRICIAN OR QUALIFIED TECHNICIAN MAKES THE ELECTRICAL CONNECTIONS.
The powersupply to which the ovenis connected must conform with the lawsin forcein the country of
installation.The manufactureraccepts noresponsibility for any damage caused by thefailure to observe
these instructions. The oven must be connected toan electrical supply with an earthed wall outlet ora
disconnector with multiple poles, depending on the laws in force in the country of installation. The
electrical supply should be protected with suitable fuses and the cables used must have a transverse
section that canensurecorrect supplyto theoven.
CONNECTION
The ovenis supplied with a powercable thatshould only be connected toan electricalsupply with 220240 Vac 50 Hz power between the phases or between the phase and neutral. Before the oven is
connectedto theelectrical supply,it isimportantto check:
- power voltage indicated onthe gauge;
- the settingof the disconnector.
The groundingwire connectedto the oven's earth terminal mustbe connected to the earthterminal of
the power supply.
WARNING
Beforeconnecting the ovento thepowersupply,ask aqualified electrician tocheck thecontinuity of the
power supply's earth terminal. The manufacturer accepts no responsibility for any accidents or other
problems caused byfailure to connectthe oven tothe earthterminal or by an earth connection that has
defectivecontinuity.
EN 05
Page 6
NOTE: as the oven couldrequire maintenance work,it isadvisable tokeep another wall socket available
so that the oven can be connected to this if it is removed from the space in which it is installed. The
power cable must only be substituted by technical service staff or by technicians with equivalent
qualifications.
1.3 Recommendations
Aftereach useof the oven,a minimumof cleaningwill helpkeepthe oven perfectly clean.
Do not line the ovenwalls withaluminium foil orsingle-use protection availablefrom stores. Aluminium
foil or any other protection, in direct contact with the hot enamel, risks melting and deteriorating the
enamel of the insides. In order to prevent excessive dirtying of your oven and the resulting strong
smokey smells, we recommend not using the oven at very high temperature. It is better to extend the
cooking time and lower the temperature a little. In addition tothe accessories supplied withthe oven,
weadvise youonly use dishesand bakingmoulds resistant to veryhigh temperatures.
1.4 Installation
The manufacturers have noobligationto carrythis out.If theassistance of themanufacturer isrequired
to rectify faults arising from incorrect installation, this assistance is not covered by the guarantee. The
installation instructions for professionally qualified personnel must be followed. Incorrect installation
may cause harm or injury to people, animals or belongings. The manufacturer cannot be held
responsiblefor such harmor injury.
The oven can be located high in a column or under a worktop. Before fixing, you must ensure good
ventilation in the oven space to allow proper circulation of the fresh air required for cooling and
protectingthe internal parts. Makethe openings specifiedon last page accordingto the typeof fitting.
1.5 Waste management and environmental protection
This appliance is labelled in accordance with European Directive 2012/19/EU regarding
electric and electronic appliances (WEEE). The WEEE contain both polluting substances
(that can have a negative effect on the environment) and base elements (that can be
reused). It isimportant that theWEEE undergospecific treatments tocorrectly remove and
dispose of the pollutants and recover all the materials. Individuals can play an important
role in ensuring that the WEEE do not become an environmental problem; it is essential to
followa few basic rules:
- the WEEEshould notbe treatedas domestic waste;
- the WEEE should be taken to dedicated collection areasmanaged by the town council or a registered
company.
In many countries, domestic collections may be available for large WEEEs. When you buy a new
appliance, the old one can be returned tothe vendor whomust accept it free of charge as aone-off, as
long as theappliance isof anequivalent type andhas thesame functionsas thepurchasedappliance.
SAVINGAND RESPECTINGTHE ENVIRONMENT
Where possible,avoid pre-heating theoven and always try to fill it. Open the oven door as infrequently
as possible, because heat from the cavity disperses every time it is opened. For a significant energy
saving, switch offthe oven between 5 and10 minutes before the planned end ofthe cooking time, and
use the residualheat that theoven continues togenerate.Keep the sealsclean andin order,to avoid any
heat dispersal outside of the cavity. If you have an electric contract with an hourly tariff, the "delayed
cooking" programme makes energy saving more simple, moving the cooking process to start at the
reducedtariff time slot.
1.6 Declaration of compliance
The parts ofthis appliancethat may comeintocontact with foodstuffs comply withthe provisions ofEEC
Directive89/109.
By placing the mark on thisproduct, we are confirming compliance toall relevant European safety,
health and environmental requirements which areapplicable in legislationfor this product.
EN 06
Page 7
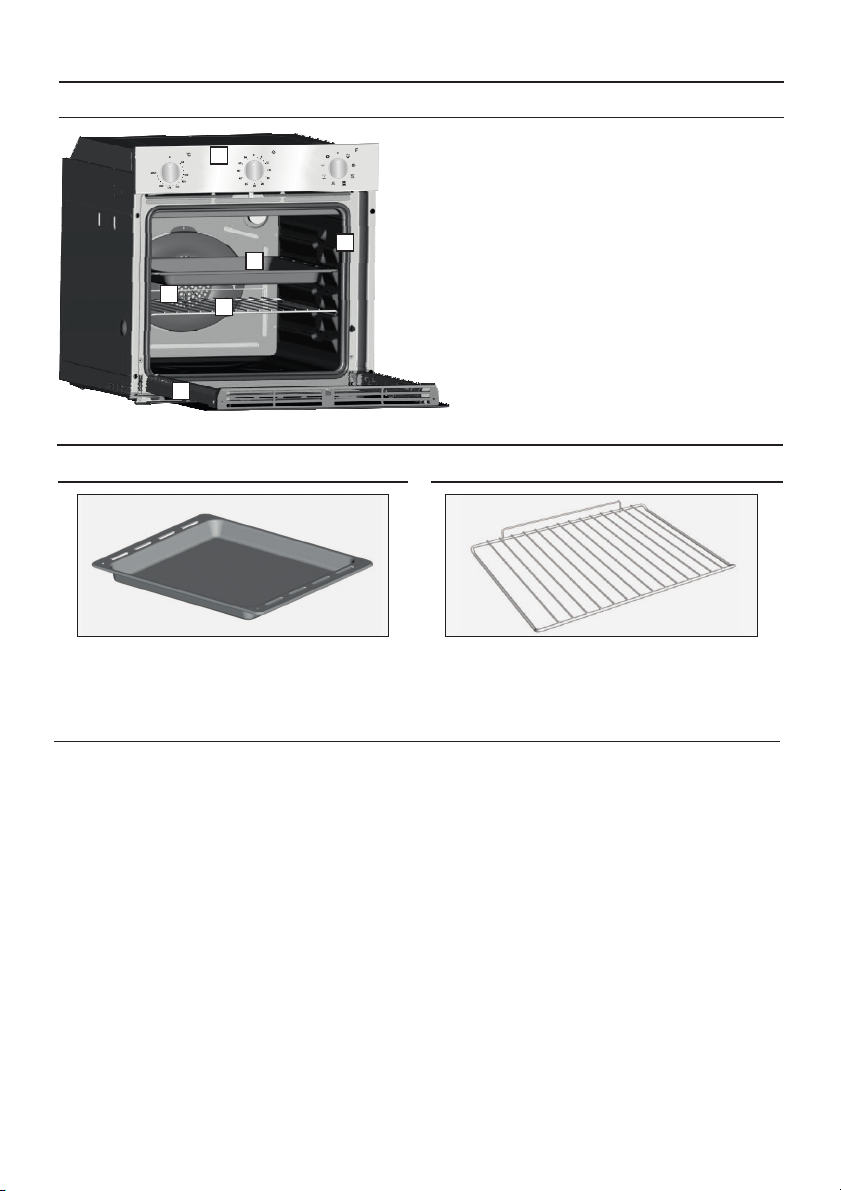
2. Product Description
2.1 Overview
1
4
5
3
6
2
1. Control panel
2. Shelf positions
(lateral wire grid if included)
3. Metal grill
4. Drip pan
5. Fan (behind the steel plate)
6. Oven door
2.2 Accessories
Drip pan
1
Collects the residuesthat drip duringthe cooking
of foods onthe grills.
Metal grill
2
Holds baking trays and plates.
2.3 First Use
PRELIMINARYCLEANING
Clean theoven before usingfor thefirst time. Wipe over externalsurfaces witha dampsoft cloth.Wash
all accessories and wipe inside the oven with a solution of hot water and washing up liquid. Set the
empty ovento the maximum temperature and leave on for about1 hour, thiswill remove any lingering
smells of newness.
EN 07
Page 8

3. Use of the Oven
3.1 Display description
3.2 Cooking Modes
Function
Dial
T °C
range
LAMP: Turns on the oven light.
Function (Depends on the oven model)
40 ÷ 40
200
50 ÷ 230
190
180 ÷ 200
50 ÷ 230
*
50 ÷ 280
L1 ÷ L5
DEFROST: When the dial is set to this position. The fan circulates air at room
temperature around the frozen food so that it defrosts in a few minutes without the
proteincontentof thefood beingchanged or altered.
FAN COOKING: We recommend you use this method for poultry, pastries, fish and
vegetables. Heat penetrates into the food better and both the cooking and preheating
times are reduced. You can cook different foods at the same time with or without the
same preparation in one or more positions. This cooking method gives even heat
distributionand thesmells arenot mixed.
Allow about tenminutes extrawhen cookingfoods at thesame time.
The function allows you to cook in a healthier way, by reducing the"COOK LIGHT"
amount of fat or oil required. Thanks to the use of the grill and fan combined with a
pulsating cycle of air, it will retain the moisture content of the food, grilling the surface
and using ashorter cooking time,without compromisingon taste.
It is particularly suitable for cooking meat, roasted vegetables and omelettes. The cycle
of pulsed air keeps the humidity inside the oven and the moisture content of the food,
preserving the nutritionalvalues andensuring arapid uniformcooking process.
Try all your recipes and reduce the amount of dressing you usually use and experience
the lightness ofthis newfunction!
FAN + LOWER ELEMENT: circulating theair inside the oven.This method is idealfor juicy fruit
flans, tarts, quiches and pâté. It prevents food from drying and encourages rising in cakes,
bread doughand other bottom-cooked food.Place the shelfin the bottomposition.
CONVENTIONAL COOKING: Both top and bottom heating elements are used. Preheat the
oven for about ten minutes. This method is ideal for all traditional roasting and baking. For
seizing red meats,roast beef, leg of lamb,game, bread, foilwrapped food (papillotes),flaky
pastry.Place the foodand itsdish ona shelf inmid position.
GRILL: use the grill withthe doorclosed.
The top heating element is used alone and you can adjust the temperature. Five minutes
preheating isrequired to get the elements red-hot. Success isguaranteed forgrills, kebabs
and gratindishes. White meats shouldbe put at adistance from the grill; the cookingtime
is longer,but the meatwill betastier. You canput redmeats andfish fillets onthe shelf with
the driptray underneath.The ovenhas twogrill positions:
Grill: 2140W Barbecue: 3340W
Grill functionMUST be performedat 200°C maximum
50 ÷ MAX
*Tested in accordance with the CENELEC EN 60350-1 used for definition of energy class.
Funzione pizza: This function with hot air circulated in the oven ensure perfect reslt for
dishes suchas pizzaor focaccia.
EN 08
Page 9

3.3 Using the minute timer
To set the cooking time, turn dial one complete revolutionand then position
the indexto the required time. When thetime has lapsed, the signal will ring
fora few seconds.
4. Oven cleaning and maintenance
4.1 General notes on cleaning
The lifecycle ofthe appliancecan beextended throughregular cleaning.Waitfor the ovento cool before
carrying out manual cleaning operations.Never useabrasive detergents, steel woolor sharpobjects for
cleaning, so as to not irreparably damage the enamelled parts. Use only water, soap or bleach-based
detergents(ammonia).
GLASS PARTS
It is advisable to clean the glass window with absorbent kitchen towel after every use of the oven. To
remove more obstinatestains, you can use a detergent-soaked sponge,well wrung out, and then rinse
with water.
OVEN WINDOW SEAL
If dirty,the sealcan be cleanedwith a slightlydamp sponge.
ACCESSORIES
Clean accessories with a wet, soapy sponge before rinsing and drying them: avoid using abrasive
detergents.
DRIP PAN
After using thegrill, removethe pan fromthe oven.Pour the hotfat into acontainer and washthe panin
hot water,using asponge andwashing-up liquid.
If greasy residuesremain, immerse thepan in water and detergent. Alternatively,you canwash the pan
in the dishwasheror use acommercial oven detergent. Never puta dirtypan backinto the oven.
4.2 Maintenance
REMOVALOF THE OVEN WINDOW
1. Open thefront window.
2. Openthe clamps of the hingehousing on the right andleft side of the front window by pushing them
downwards.
3. Replace thewindow by carryingout the procedurein reverse.
EN 09
Page 10

LOW-E
REMOVALAND CLEANINGOF THEGLASS DOOR
1. Open theoven door.
2.3.4. Lock thehinges, remove thescrewsand remove theupper metalcover by pullingit upwards.
5.6. Remove the glass, carefully extracting it from the oven door (NB: in pyrolytic ovens, also remove
the second andthird glass (ifpresent)).
7. At theend of cleaningor substitution, reassemble theparts in reverseorder.
On all glass, the indication"Pyro" must belegible andpositioned on the leftside ofthe door,close tothe
left-handlateral hinge. Inthis way, the printedlabel of thefirst glass willbe insidethe door.
1.
2.
3.
5.
6.
1
2
3
7.
4.
EN 10
Page 11

CHANGING THE BULB
1. Disconnect theoven from themains supply.
2. Undo theglass cover, unscrew thebulb andreplace itwith a newbulb ofthe same type.
3. Once thedefectivebulb isreplaced,replace theglass cover.
5. Troubleshooting
5.1 FAQ
PROBLEM POSSIBLE CAUSE SOLUTION
The oven does not heat up
A cooking function and
temperature has not been set
EN 11
Ensure that the necessary
settings are correct
Page 12

Indicazioni di Sicurezza
• Durante la cottura l'umidità puòcondensarsi all'interno della cavità o sul
vetro della porta. È normale. Per ridurre questo effetto, attendere 10-15
minuti dopo l'accensione prima di mettere il cibo all'interno del forno. In
ogni caso, la condensa scompare quando il forno raggiunge la temperatura
di cottura.
• Cuocere le verdure in un contenitore con un coperchio invece di un
vassoioaperto.
• Evitare di lasciare il cibo all'interno del forno dopo la cottura per un
periodo superiore a 15/20 minuti.
• ATTENZIONE: l'apparecchio e le parti accessibili diventano calde durante
l'uso. Prestare attenzionea non toccareleparti calde.
• ATTENZIONE: le parti accessibili possono diventare molto calde quando
si utilizzail forno.I bambini devono essere tenutia distanzadi sicurezza.
• L'apparecchio può essere usato da bambini dagli 8 anni in su e persone
con ridotte capacità fisiche, sensoriali o mentali o senza esperienza e
conoscenza del prodotto se supervisionate o dando loro istruzioni
riguardo al funzionamento dell'apparecchio in maniera sicura e coscente
del rischio possibile.
• I bambini non dovrebbero giocareconl'apparecchio.
• La pulizia e la manutenzione non dovrebbero essere fatte da bambini
senzasupervisione
• Durante l’uso l’apparecchio diventa molto caldo. Si dovrebbe fare
attenzionea nontoccare gli elementi riscaldanti all’internodelforno.
• ATTENZIONE: Le partiaccessibili possonodiventare molto calde durante
l’uso.Ibambini dovrebberoessere tenuti a distanza.
• Non usare per la pulizia materiali ruvidi abrasivi o raschietti metallici
affilati per pulire le porte di vetro del forno dato che possono graffiare la
superficie e causare la frantumazionedel vetro.
• Spegnere ilforno prima di rimuovere loschermo di protezione e, dopola
pulizia, rimontarlosecondoleistruzioni.
• Usare solo la sonda termica raccomandataper questo forno.
• Non utilizzareun pulitoreavapore.
• Collegare al cavo di alimentazione una spina dimensionata per la
tensione, la corrente e la potenza indicate nella targhetta e dotata del
contatto di terra.La presa deveesseredimensionataper lapotenza
IT 12
Page 13

indicata sulla targhetta e deve avere il contatto di terra collegato e
funzionante. Il conduttore di terra è giallo-verde. Questa operazione deve
essere eseguita solo da un tecnico adeguatamente addestrato. In caso di
incompatibilità tra presa e spina dell'elettrodomestico, richiedere ad un
tecnico specializzato di sostituire la presa con un'altra di tipo compatibile.
La spina e lapresa devono essere conformi alle normative attuali del paese
di installazione. Il collegamento alla rete di alimentazione può essere
effettuato anche collocando un interruttore automatico onnipolare tra
l'elettrodomestico e la rete di alimentazione, in grado di supportare il
carico massimo collegato, in linea con la legislazione corrente. Il cavo di
terra giallo-verde non deve essere interrotto dall'interruttore automatico.
La presa o l'interruttore automatico onnipolare utilizzati per il
collegamento devono essere facilmente accessibili al momento del
montaggiodell'elettrodomestico.
• La disconnessione può essere eseguita con la spina accessibile o
aggiungendo un interruttore sul cablaggio fisso, nel rispetto delle
normativerelativeai cablaggi.
• Se il cavo di alimentazione si danneggia, deve essere sostituito con un
cavo o uno speciale fascio di cavi disponibile presso il produttore o
contattando il repartoassistenzaal cliente.
• Il cavodi alimentazionedeveessere di tipoH05V2V2-F.
• Il mancato rispetto di quanto indicato sopra può compromettere la
sicurezzadell'elettrodomesticoerenderenulla lagaranzia.
• Qualsiasi materiale fuoriuscito in eccesso deve essere tolto prima della
pulizia.
• Durante il processo di pulizia pirolitico,le superfici possono surriscaldarsi
più del normale: mantenere semprei bambini a distanzadisicurezza;
•L’elettrodomestico non deve essere installato dietro a una porta a scopo
ornamentaleper evitarneil surriscaldamento.
• Quando si posiziona uno scaffale all’interno, accertarsi che il blocco sia
rivoltoversol’altoe nella parte posterioredellaguida.
Lo scaffaledeve essere inserito completamentenellaguida
• AVVERTENZA: Non coprire le pareti del forno con fogli di alluminio o
protezioni monouso disponibili in commercio. I fogli di alluminio o le altre
protezioni,se a diretto contatto con lo smalto caldo, rischiano difondersi e
di danneggiare lo smalto interno stesso.
• AVVERTENZA:Non togliere mai la guarnizione della porta del forno.
• Il funzionamento dell'elettrodomestico alle frequenze nominali non
richiede alcuna operazione o impostazione.
IT 13
Page 14

Riassunto
Avvertenze Generali
15
Descrizione del Prodotto
17
Utilizzo del Forno
18
Pulizia e Manutenzione del Forno
19
1.1 Suggerimenti sulla sicurezza
1.2 Sicurezza elettrica
1.3 Raccomandazioni
1.4 Installazione
1.5 Gestione dei rifiuti
1.6 Dichiarazione di conformità
2.1 Panoramica
2.2 Accessori
2.3 Primo utilizzo
3.1 Descrizione del display
3.2 Modalità di cottura
3.3 Uso del contaminuti
4.1.Note generiche di pulizia
4.2 Manutenzione
• Rimozione dello sportello del forno
• Rimozione e pulizia della porta in
vetro
• Sostituzione della lampadina
Risoluzione dei problemi
21
Garanzie
21
5.1 F.A.Q.
IT 14
Page 15

1. liIndicazioni generali
Vi ringraziamo per aver scelto uno dei nostri prodotti.
Per utilizzare il forno in modo ottimale è consigliabile
leggere con attenzione questo manuale e conservarlo
con cura per ogni ulteriore consultazione. Prima di
installare il forno, prendere nota del numero di serie in
modo da poterlocomunicare al personaledel servizio di
assistenza in caso di richiesta di intervento. Dopo aver
rimosso il forno dall’imballaggio, verificare che non
abbia subito danni durante il trasporto. In caso di
dubbi, non utilizzare il forno e richiedere l’assistenza di
un tecnico qualificato. Tenere tutto il materiale da
imballaggio (sacchetti di plastica, polistirolo, chiodi)
fuori dalla portata dei bambini. Alla prima accensione del forno può svilupparsi fumo di odore acre,
causatodal primo riscaldamento delcollante dei pannelli d’isolamento avvolgentiil forno: sitrattadi un
fenomeno assolutamente normale e, in caso si verificasse, occorre attendere la cessazione del fumo
prima di introdurre le vivande. Il produttore declina ogni responsabilità in caso di mancata osservanza
delle istruzioni contenute in questodocumento.
NOTA: le funzioni, le proprietà e gli accessori dei forni citati in questo manuale possono variare a
secondadei modelli.
1.1 SicurezzaAvvertenze di
Utilizzare il forno solo per lo scopo per cui è stato progettato, ossia solo per la cottura di alimenti;
qualsiasi altro utilizzo, ad esempio come fonte di riscaldamento, è considerato improprio e quindi
pericoloso. Il costruttore non può essere considerato responsabile per eventuali danni derivanti da usi
impropri,erronei ed irragionevoli.
L’uso di unqualsiasi apparecchio elettrico comportal’osservanzadi alcuneregole fondamentali:
- non tirareil cavodi alimentazioneper staccare laspina dellapresa di corrente;
- non toccarel’apparecchiocon manio piedibagnati oumidi;
- in generaleè sconsigliabile l’usodi adattatori, prese multiplee prolunghe;
- in casodi guasto e/ocattivofunzionamentodell’apparecchio,spegnerlo enon manometterlo.
1.2 Sicurezza Elettrica
ACCERTARSI CHE I COLLEGAMENTI ELETTRICI SIANO EFFETTUATI DA UN ELETTRICISTA O DA UN
TECNICO QUALIFICATO.
La rete di alimentazione alla quale si collega il forno deve rispettare le leggi in vigore nello stato in cui
viene installato. Il produttore non si assume responsabilità per danni causati dal mancato rispetto di
queste istruzioni. Il forno deve essere collegato ad una rete di alimentazione elettrica, con un'uscita a
parete con messa a terraoppure uninterruttore automatico multipolare,a secondadelle leggi in vigore
nello stato in cui vieneinstallato. L'alimentazione elettricadeve essere protetta tramite appositi fusibili;
i cavi utilizzati devono avere una sezione trasversale in grado di garantire un'alimentazione corretta al
forno.
COLLEGAMENTO
Il forno è alimentato da un cavo che deve essere collegato unicamente ad una rete di alimentazione
elettrica da 220-240 Vac, 50 Hz tra le fasi o tra fase e neutro. Prima di collegare il forno alla rete di
alimentazioneelettrica, è importantecontrollare quanto segue:
- tensione dialimentazione riportata sull'indicatore;
- impostazione dell'interruttore automatico. Il cavo dimessa a terra collegato al morsetto di terra del
fornodeve essere a suavolta collegato al morsettodi terradella rete dialimentazione.
ATTENZIONE
Prima di collegare il forno alla rete di alimentazione, chiedere ad un tecnico qualificato di controllare la
continuità del morsetto di terra della rete di alimentazione. Il produttore non si assume responsabilità
per incidenti o altri problemi causati dal mancato collegamento del forno al morsetto di terra o da un
IT 15
Page 16

collegamentodi terra concontinuità difettosa.
NOTA: considerando che il forno potrebbe richiedere attività di manutenzione, si consiglia di tenere a
disposizione un'altra presa a parete in modo da potere collegare a questa il forno se viene tolto dallo
spazio nel quale è montato. Il cavo di alimentazione deve essere sostituito unicamente da personale di
assistenzatecnico o datecnici con qualificheequivalenti.
1.3 Consigli
Dopo ogni utilizzo del forno, si consiglia di effettuare una rapida pulizia per mantenerlo sempre in
condizioni ottimali. Non rivestire le pareti del forno con pellicola di alluminio o protezione monouso
disponibili neisupermercati. La pellicola di alluminio ole eventualialtre protezioni, trovandosi a diretto
contattocon losmalto caldo,rischiano di fondersi e di danneggiare losmalto che si trova all'interno del
forno. Per evitare di sporcare eccessivamente il forno e causare odore di fumo acre, si consiglia di non
utilizzare il forno a temperature molto elevate. È meglio prolungare il tempo di cottura e abbassare
leggermente latemperatura. Oltre agli accessoriforniti conil forno,si consiglia di utilizzare solo piatti e
stampidi cottura resistenti alle temperature elevate.
1.4 Installazione
Il produttore non è obbligato ad effettuarla. Se è necessaria l'assistenza del produttore per correggere
errori dovuti ad un'installazione non corretta, questo intervento in assistenza non è coperto da
garanzia. Le istruzioni di installazione destinate al personale professionalmente qualificato devono
essere rispettate. Un'installazione non corretta può causare lesioni o dannialle persone, agli animali o
alle cose. Ilproduttorenon si assumela responsabilità per talilesioni o danni.
Il forno può essere posizionato in alto all'interno di una colonna o sotto un piano di lavoro. Prima del
fissaggio, è necessario garantire una corretta ventilazione nella zona del forno per permettere la
corretta circolazione dell'aria fresca necessaria per raffreddare e proteggere i componenti interni.
Praticarele aperturespecificate all'ultima paginaa seconda deltipo diinserimento.
1.5 Gestione dei rifiuti e rispetto dell’ambiente
Questo elettrodomestico dispone di contrassegno ai sensi della direttiva europea
2012/19/CE in materia di apparecchi elettrici ed elettronici (RAEE). I RAEE contengono sia
sostanze inquinanti (che possono avere un effetto negativo sull'ambiente) sia elementi
base (che possono essere riutilizzati). È importante che i RAEE siano sottoposti a
trattamenti specifici in modo da togliere e smaltire in modo corretto gli inquinanti e
recuperare tutti i materiali. Spetta ai singoli individui garantire che i RAEE non diventi un
problemaa livelloambientale. Esistonoalcune regolespecifiche da rispettare:
- i RAEEnon devono essere trattati come rifiutidomestici;
- i RAEE devono essere portati nelle aree di smaltimento specifiche, gestite dai comuni o da società
autorizzate.
In molti stati, nel caso di RAEE di grandi dimensioni sono disponibili servizi di prelievo a domicilio.
Durante l'acquisto di un nuovoelettrodomestico, quellovecchio può essere restituito al venditore che
lo deve accettare gratuitamente in un'unica soluzione, a condizione che l'elettrodomestico sia di tipo
simile ed abbiale stesse funzioni diquello acquistato.
SALVATAGGIO E RISPETTODELL'AMBIENTE
Cercare per quanto possibile di evitare il preriscaldamento ecercare diriempire sempreil forno.Aprire
la porta del forno il meno possibile, in quanto il calore del vano di cottura si disperde ogni volta che la
porta viene aperta. Per un buon risparmio di energia, spegnere il forno 5 e 10 minuti prima del tempo
previsto di cottura; utilizzare il calore residuo che il forno continua a generare. Mantenere pulite e in
buone condizioni le guarnizioni, per evitare di disperdere il calore all'esterno del vano di cottura. Se si
dispone di un contratto di fornitura di elettricità con tariffa oraria, il programma "cottura ritardata"
semplificail risparmioenergetico,facendoiniziare ilprocesso dicotturanel periodoa tariffaridotta.
IT 16
Page 17

1.6 Dichiarazione di conformità
I componenti di questo elettrodomestico che possono entrare in contatto con sostanze alimentari
devonorispettare le disposizionidella direttiva CEE89/109.
Apponendo il marchio su questo prodotto, confermiamo la conformità a tutti i requisiti di legge
europeiin materia disicurezza, salute e tutelaambientale applicabili perlegge a questoprodotto.
2. Descrizione del Prodotto
2.1 Panoramica
1
1. Pannello comandi
2. Posizioni ripiani
4
5
3
6
2
2.2 Accessori )(a seconda del modello
Griglia metallica
1
(griglia laterale a rete se in dotazione)
3. Griglia metallica
4. Vaschetta raccogligocce
5. Ventola (dietro alla piastra in acciaio)
Porta forno6.
2
Vaschetta raccogligocce
Supporta vassoi e piastre di cottura.
Raccoglie i residui che gocciolano durante la
cottura del cibo sulle griglie.
2.3 Primo utilizzo
PULIZIA PRELIMINARE
Prima del primo utilizzo, pulire il forno. Ripulire le superfici esterne con un panno morbido e umido.
Lavare tutti gli accessori e ripulire l'interno del forno con una soluzione di acqua calda e liquido
detergente. Impostare il forno (vuoto) alla temperatura massima e lasciarlo in questa posizione per
circa1 ora, pertogliere qualsiasiodorepungente di prodottonuovo.
IT 17
Page 18

3. Utilizzo del Forno
3.1 Descrizione del display
3.2 Modalità di cottura
Manopola
commuta-
tore
Intervallo
di T°
40 ÷ 40
LAMPADA: accende la luce interna.
Scongelamento Questa posizione permette di far circolare l’aria a temperatura
ambiente intorno al cibo surgelato facendolo così scongelare in pochi minuti senza
modificare od alterare il contenuto proteico.
Funzione (a seconda del modello)
200
50 ÷ 230
190
180 ÷ 200
160
50 ÷ 220
*
* Programma di prova secondo CENELEC EN 60350-1 utilizzato per la definizione della classe energetica.
50 ÷ 280
L1 ÷ L5
50 ÷ MAX
Forno ventilato L’aria calda, viene ripartita sui diversi ripiani; è l’ideale per cuocere
contemporaneament e diversi tipi di cibo (carne, pesce), senza miscelare sapori e odori.
Cottura delicata - indicata per pan di Spagna, torte Margherita, pasta sfoglia, ecc...
La funzione consente di cucinare in modo leggero riducendo l'utilizzo dei“COOK LIGHT”
grassi. Graziead una combinazione delgrill e della ventola,associate ad unciclo di pulsazione
dell'aria, è possibile conservare l'umidità deicibi, grigliare la superficiee garantireuna cottura
rapida dellepietanze utilizzandopochi condimenti,senza rinunciare alsapore.
È particolarmente indicata per verdure, frittate e carni. Il ciclo di aria pulsata mantiene
l'umidità dei cibi, ne conserva le proprietà nutritive e garantisce una cottura rapida e
omogenea.
Provate tutte le vostre ricette riducendo la quantità di condimento che di solito utilizzate e
provatela leggerezza diquesta nuova funzione!
Suola ventilataAdatta percotture delicate (torte-soufflè).
CONVEZIONE NATURALE: sono infunzione le resistenze superiore e inferiore. È la
cottura tradizionale, ottima per arrostire cosciotti, selvaggina, ideale per biscotti,
mele al fornoe perrendere i cibimolto croccanti.
GRILL: Grigliatura tradizionale a porta chiusa: con questa funzione viene inserita la
resistenza del grill. Ottima nella cottura di carni di medio e piccolo spessore
(salsicce, costine, bacon).
La funzione Grilldeve essre eseguitamassimo a 200°C
Funzione pizza: Il calore avvolgente in questa funzione ricrea un ambiente simile a
quello deiforni alegna dipizzeria.
IT 18
Page 19

3.3 Uso del contaminuti
Per selezionare il tempo prescelto,ruotare la manopola di un girocompleto,
quindi ritornare con l’indice nella posizione corrispondente al tempo
desiderato. Allo scadere del tempo, entrerà in azione la suoneria per alcuni
secondi.
4. Pulizia e manutenzione del forno
4.1 Note generiche di pulizia
La vita di servizio dell’apparecchio si allungase questoviene pulito adintervalli regolari. Attendere cheil
forno si raffreddi prima di effettuare le operazioni di pulizia manuali. Non utilizzare mai detergenti
abrasivi, pagliette diferro o oggetti appuntiti per lapulizia, per nondanneggiare inmodo irreparabile le
parti smaltate.Utilizzaresolo acqua,sapone odetergenti a basedi candeggina (ammoniaca).
PARTI INVETRO
E’ consigliabile pulire lo sportello in vetro con carta assorbente da cucina dopo ogni utilizzo del forno.
Per rimuovere le macchie più ostinate, è possibile anche utilizzare una spugna imbevuta di detergente
ben strizzata e sciacquarecon acqua.
GUARNIZIONE DELLO SPORTELLO DELFORNO
Se sporca, laguarnizione può esserepulitacon unaspugna leggermente inumidita.
ACCESSORI
Pulire gli accessori con una spugna imbevuta con acqua e sapone, sciacquarli e asciugarli : evitare di
usaredetergenti abrasivi.
VASCHETTA DI GOCCIOLAMENTO
Dopo l’uso delgrill, rimuovere lavaschetta dal forno.Versareil grassocaldo inun contenitore elavare la
vaschettain acqua calda,utilizzando una spugnae deldetergente per piatti.
Se rimangono dei residui di grasso, immergere la vaschetta in acqua e detergente. In alternativa, è
possibile anche lavare la vaschetta nella lavastoviglie oppure utilizzare un detergente per forni di tipo
commerciale.Non reinserire mai unavaschettasporca nel forno.
4.2 Manutenzione
RIMOZIONE DELLO SPORTELLO DEL FORNO
1. Aprire losportello anteriore.
2. Aprire i morsetti dell’alloggiamentodella cerniera sul lato destro e sinistro dello sportello anteriore,
premendoliverso il basso.
3. Installare nuovamente losportello eseguendola procedura all’inverso.
IT 19
Page 20

RIMOZIONE E PULIZIADELLA PORTA IN VETRO
LOW-E
1. Aprile laporta del forno.
2.3.4. Bloccare le cerniere, rimuovere le viti e rimuovere la copertura metallica superiore tirandola
versol’alto.
5.6. Rimuovere il vetro, estraendolo conmolta cura, dalla controporta delforno (NB: nei forni pirolitici,
rimuovereanche ilsecondo eterzo vetro (sepresente)).
7. Al terminedella pulizia osostituzione riassemblare le partinell’ordineoppostoalla rimozione.
Su tutti i vetri, l’indicazione ”Low-E”deve essere correttamente leggibile e posizionata sul lato sinistro
della porta, vicino alla cerniera laterale sinistra. In questo modo, l’etichetta stampata del primo vetro
rimarràinterna alla porta.
1.
5.
2.
3.
4.
6.
1
2
3
7.
IT 20
Page 21

SOSTITUZIONE DELLA LAMPADINA
1. Scollegare il fornoalla rete.
2. Allentare lacopertura invetro,svitarela lampadinae sostituirlacon unanuova dello stesso modello.
3. Una voltasostituitala lampadinadifettosa, riavvitare lacopertura invetro.
5. Risoluzione dei Problemi
5.1 FAQ
PROBLEMA POSSIBILE CAUSA SOLUZIONE
Il forno non si scalda
Le regolazioni necessarie
non sono impostate
Assicurarsi che le impostazioni
necessarie siano corrette
6 Garanzie.
Il prodotto è garantito, oltre che ai sensi di legge, alle condizioni e nei termini riportati sul certificato di
garanziaconvenzionale inserito nel prodotto. Ilcertificato dovrà essereconservato e mostratoal nostro
Centro di Assistenza Tecnica Autorizzato, in caso di necessità, insieme allo scontrino comprovante
l'acquisto dell'elettrodomestico. Puoi consultarele condizionidi garanzia anchesul nostro sito internet.
Per ottenere assistenza compila l'apposito form on-line oppure contattaci al numero che trovi indicato
nella pagina diassistenzadel nostro sito internet.
IT 21
Page 22

INSTALLATION
EN
ITINSTALLAZIONE
560 mm
560 mm
590 mm
560 mm x 45 mm
Se il montaggio del plinto non consente la
IT
A
circolazione dell'aria, per ottenere le massime
prestazioni del forno è necessario creare un'apertura
di 500x10mmo lastessa superficiein 5.000mm .
If the mounting of the plinth does not allow air
EN
A
circulation, to obtain the maximum performance of
the oven it is necessary to create an opening of
500x10mm orthe samesurface in5.000 mm
IT
Se il forno non dispone di una ventola di raffreddamento,
lasciare uno spazio 460 mm x 15 mm
EN
If the oven does not have a cooling fan, create an opening
460 mm x 15 mm
Opening/Apertura
460 mm x 15 mm
A
2
2
560 mm
580 mm
546 mm
IT
Se il mobile ha un fondo posteriore, praticare un foro per il
passaggio del cavo di alimentazione.
EN
If the furniture is coverage with a bottom at the back part,
provide an opening for thepower supply cable.
22 mm
mm
600
595 mm
mm
560
560
595 mm
mm
Opening/Apertura
560 mm x 45 mm
A
EN
The manufacturer will notbe responsibleforany inaccuracy resultingfrom printingor transcripterrors containedin thisbrochure. We
reserve theright tocarry out modificationsto productsas required,including the interestsof consumption, withoutprejudice tothe
characteristicsrelating tosafetyor function.
IT
Il produttore declina ogniresponsabilità perinesattezze contenute nel documento stampato per errori di trascrizionecontenuti ino
questa brochure. Inoltre, si riserva il diritto di apportare modifiche al prodotto, nell'interesse dei consumatori, senza alcun
pregiudizioper lasua sicurezza funzionalità.o
42823154 • 55 gr - A5 • 11.2018 • Rev_C
 Loading...