

Page 1
User instructions
GO W 485 D
GO W 485 DS
Page 2

目录
内 容: 页 数
指 引 1
主要 技 术 参 数 1
安 全 须 知 2
装 箱 单 3
安 装 4
控 制 面 板 8
程 序 表 16
程 序 简 介
给用 户的 建议
洗 涤 剂 抽 屉 21
操 作 说 明
清 洁 和 日 常 保 养
异常情况 检 查 28
售
后服务和 保 修 30
20
18
21
27
在使用洗衣机前,请确保 洗衣机已经正确安
装(如第4页所示)
运输包装已经拆除和
Page 3
指引
请仔细阅读下面的使用指引和其他附带的有关洗衣机的信息。由于不
遵守该使用及安装说明书中规定的注意事项,所引起的任何异常情况
和损失均不在厂家的保修范围内,厂家亦不承担任何相关责任。
如有疑问,请与本公司的客户服务中心或特约经销商联系。
请妥善保管好所有的文件,用作将来参考或为其他用户提供参考。
注意: 本洗衣机 商 、工业和其它用
专为家庭使用所设计,请勿用于 业
途。只有适宜机洗的衣物面料才可进行洗涤,请参考衣物标签说明。
弃置须知:
本机所用的包装材料为环保型和可回收的,请用环保的方法处理。
废
旧洗衣机包含可再利用的有用材料,请协助正确处理或回收利用,为
保护环境作出贡献。
注意: 请 把 废 旧 洗 衣 机 上 的 插 头 拔 出 , 把 电 源 线 剪 断 , 与 插 头 一 起 弃
置。为了防止小孩子玩耍的时候把自己锁在洗衣机里面,在
废置洗衣
机时必须确保门锁已经被拆除。
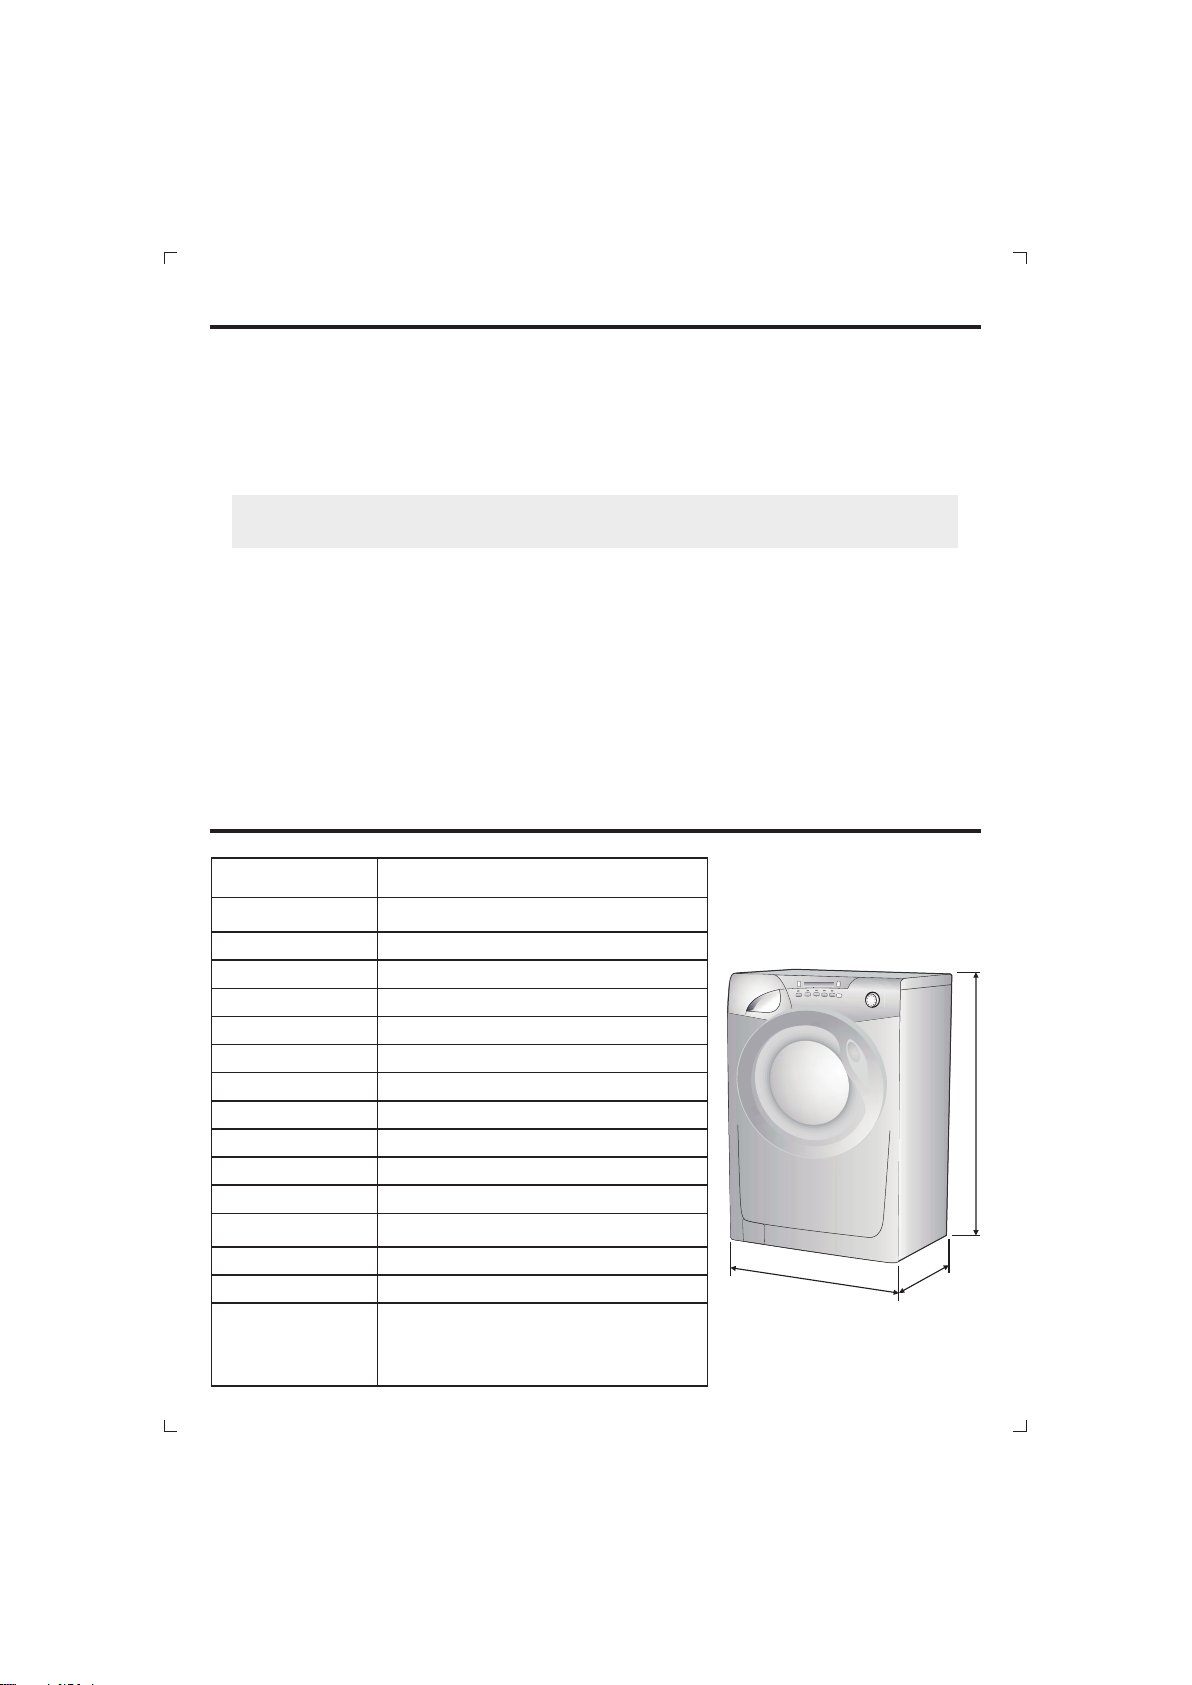
主要技术参数
型号
额定电压
额定频率
额定洗涤 脱 水容量
额定烘干 容 量
额定洗涤 输 入功率
额定脱水 输 入功率
加热功率
最大功率
最高脱水 转 速
额定用水 量
整机净重
噪声(分贝)
水压要求
外形尺寸
采用标准
GO 485D / W GO W 485DS
220-240V~
50Hz
8.0kg
5.0kg
200W
250W
1950W
2150W
1400 转/分钟
115L(洗衣+干衣)
68kg
0 / 71 / 61(洗衣/脱水/干衣)
6
0.05 ~0.8MPaMPa
600mmX540mmX850mm
GB4706.1-20 05 GB4706.24-2 008
GB4706.26-2 008 GB/T4288-20 08
GB4343.1-20 03 GB17625.1-2 003
GB19606-200 4 GB12021.4-2 004
600
540
850
1
Page 4
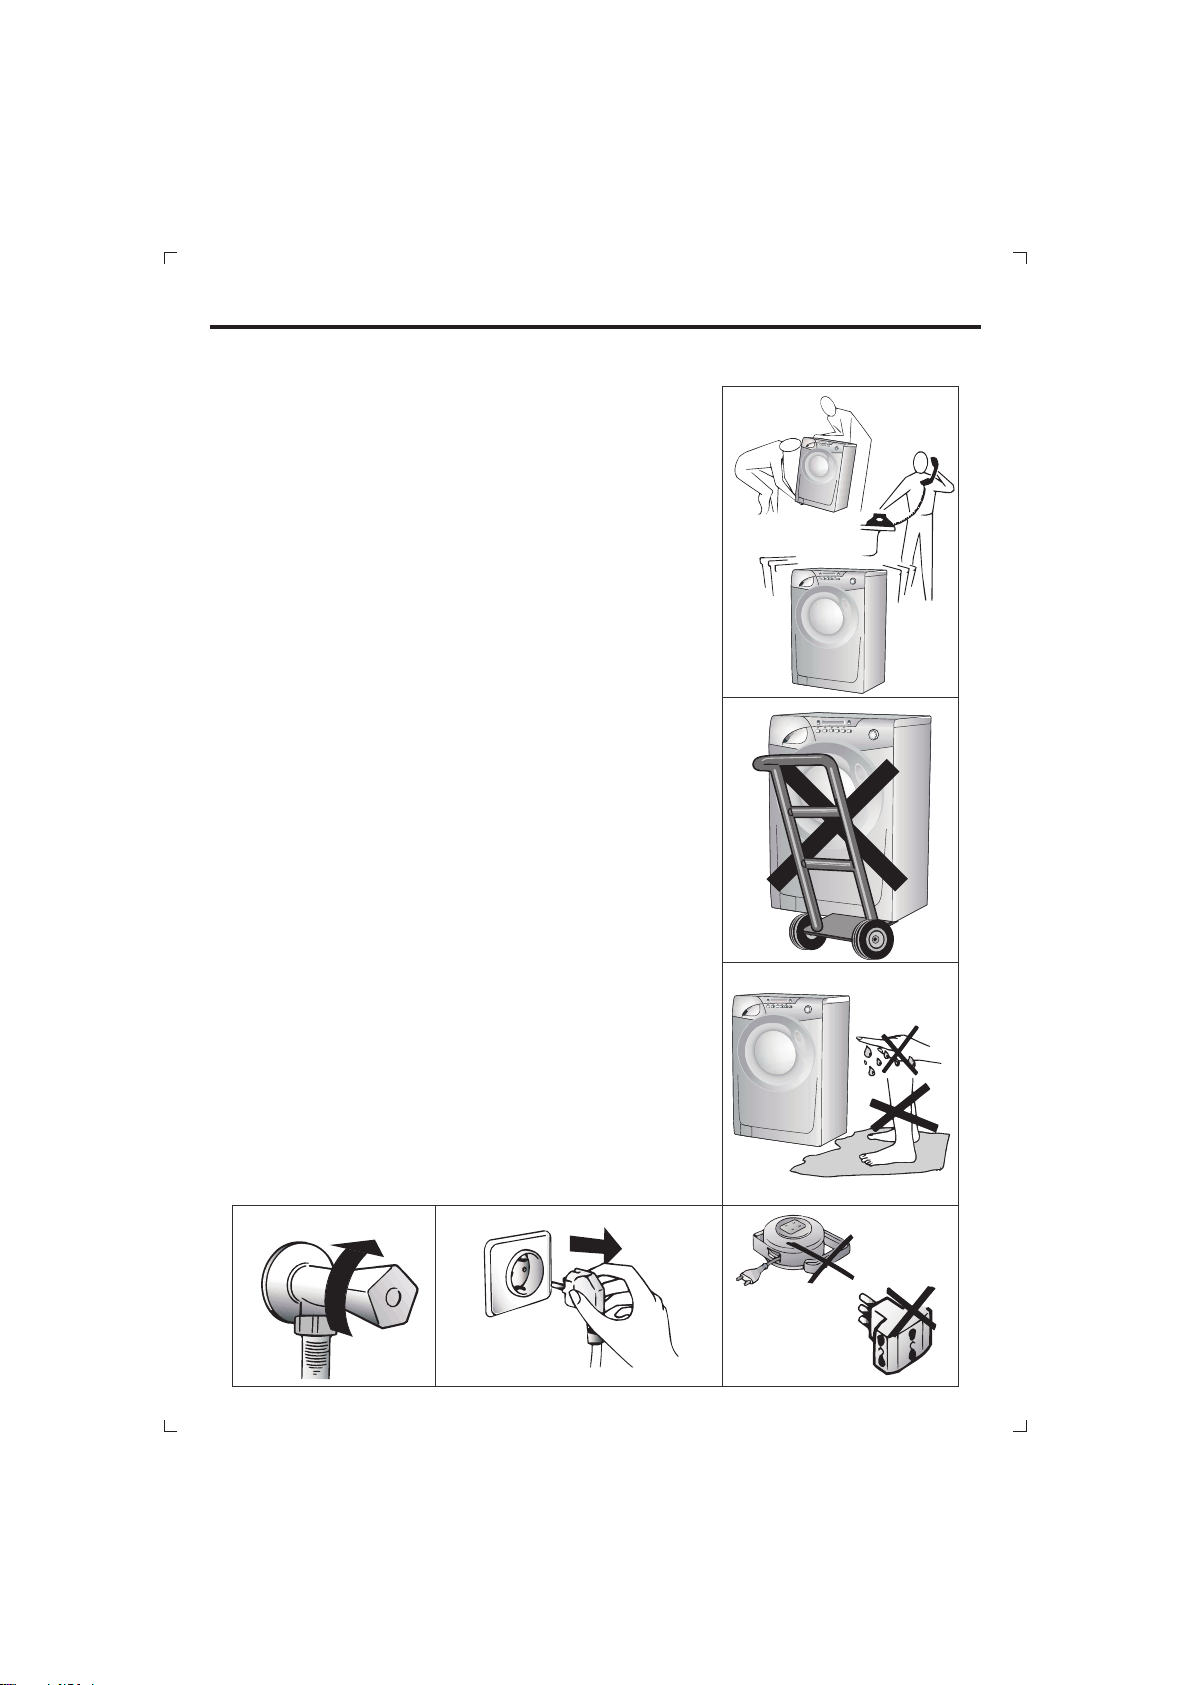
安全须知
注意:
1.洗 衣 机 必 需 由 专 业 人 员 进 行 安 装 及 维 修
否 则 可 能 会 产 生 严 重 后 果 ; 若 有 疑 问 请 咨
询本公司客户服务中 心 。
如 果 机 器 运 作 异 常 或 者 坏 掉 了 , 请 关 掉 洗
2.
衣 机 和 水 龙 头 , 不 要 胡 乱 摆 弄 它 , 咨 询 有
关 技 术 服 务 商 , 等 待 他 们 来 修 理 , 并 要 求
他 们 用 原 装 的 备 用 部 件 , 以 上 的 故 障 可 能
会危及洗衣机的安全 。
3.如 果 洗 衣 机 的 电 源 线 需 要 更 换 , 请 跟 授 权
的技术服务商联系。
4.
当搬 动 洗 衣 机 时,不要把洗衣 机 突 出 部 分作
为 用 力 点 , 机 门 不 能 用 作 搬 运 时 的 把 手 。
在 运 输 时 , 不 要 让 机 门 靠 着 运 输 车 辆 或 者
在拆除了包装底座的 情 况 下 运 输 。
5.不 能 把 洗 衣 机 直 接 暴 露 在 受 到 日 晒 雨 淋 的
地方。
在 没 有 人 监 督 的 情 况 下 , 不 要 允 许 小 孩 子
6.
或者没有经过同意的 人 使 用 洗 衣 机 。
,
7.在 手 或 者 脚 湿 的 情 况 下 , 请 不 要 触 摸 洗 衣
机,请不要赤脚时使 用 洗 衣 机 。
请 勿 使 用 电 源 适 配 器 、 多 用 插 座 或 延 长 插
8.
座给洗衣机供电。
9.使 用 完 毕 请 关 闭 水龙头,拔出电源线插头。
。
2
Page 5
安全须知
警告:
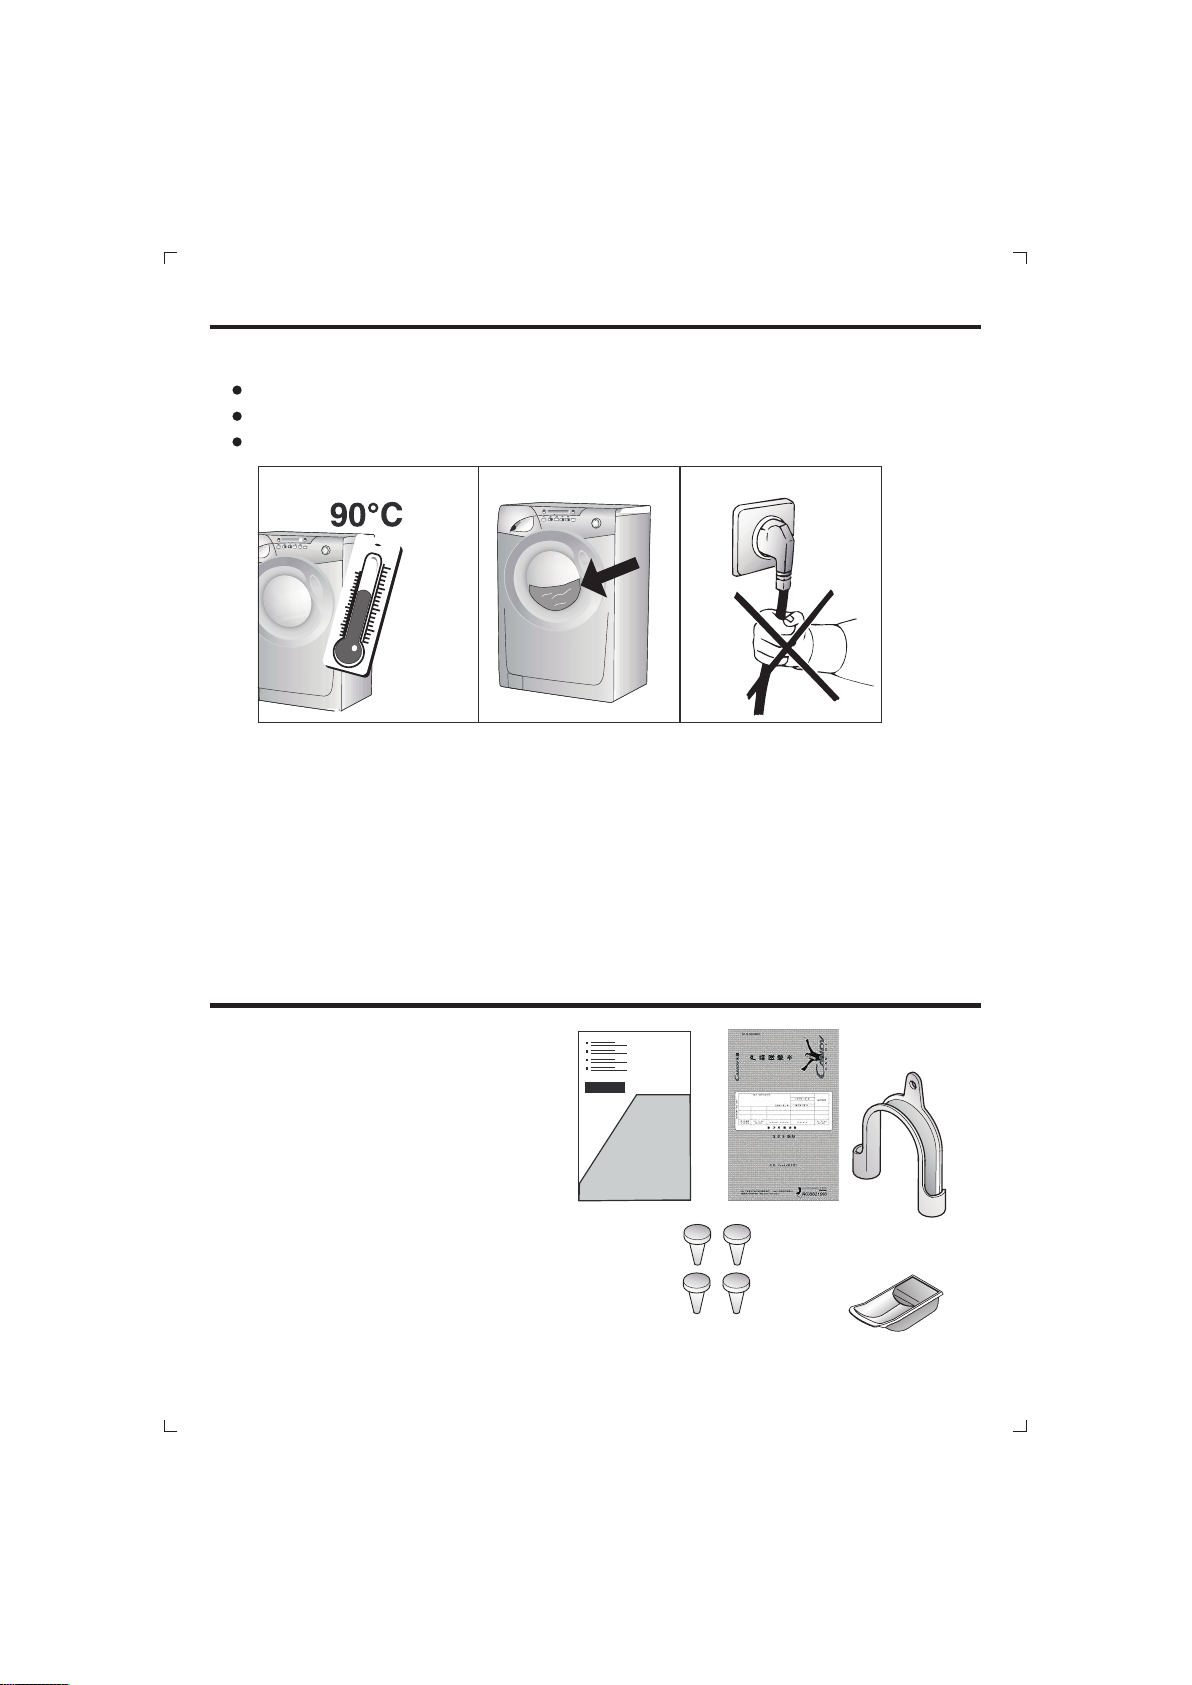
在洗衣过程中,水温可以达到90℃。
打开门时请确保洗衣筒里没有水。
严禁 。通过拉扯电源线来把插头从插座上拔出
装箱单
洗衣机交付使用时,请检查洗
衣机是否具有以下物品:
A
) 使 用 说 明 书
)保 修 卡
B
)封 盖
C
)排 水 管 固 定 架
D
)液 体 洗 涤 剂 或 者 液 体 漂 白 剂
E
容器
请检查以上物品是否齐备或损坏,如有错漏或损坏,请致电本公司的
客户服务中心或本产品经销商派人进行更换。
3
A B
C
D
E
Page 6
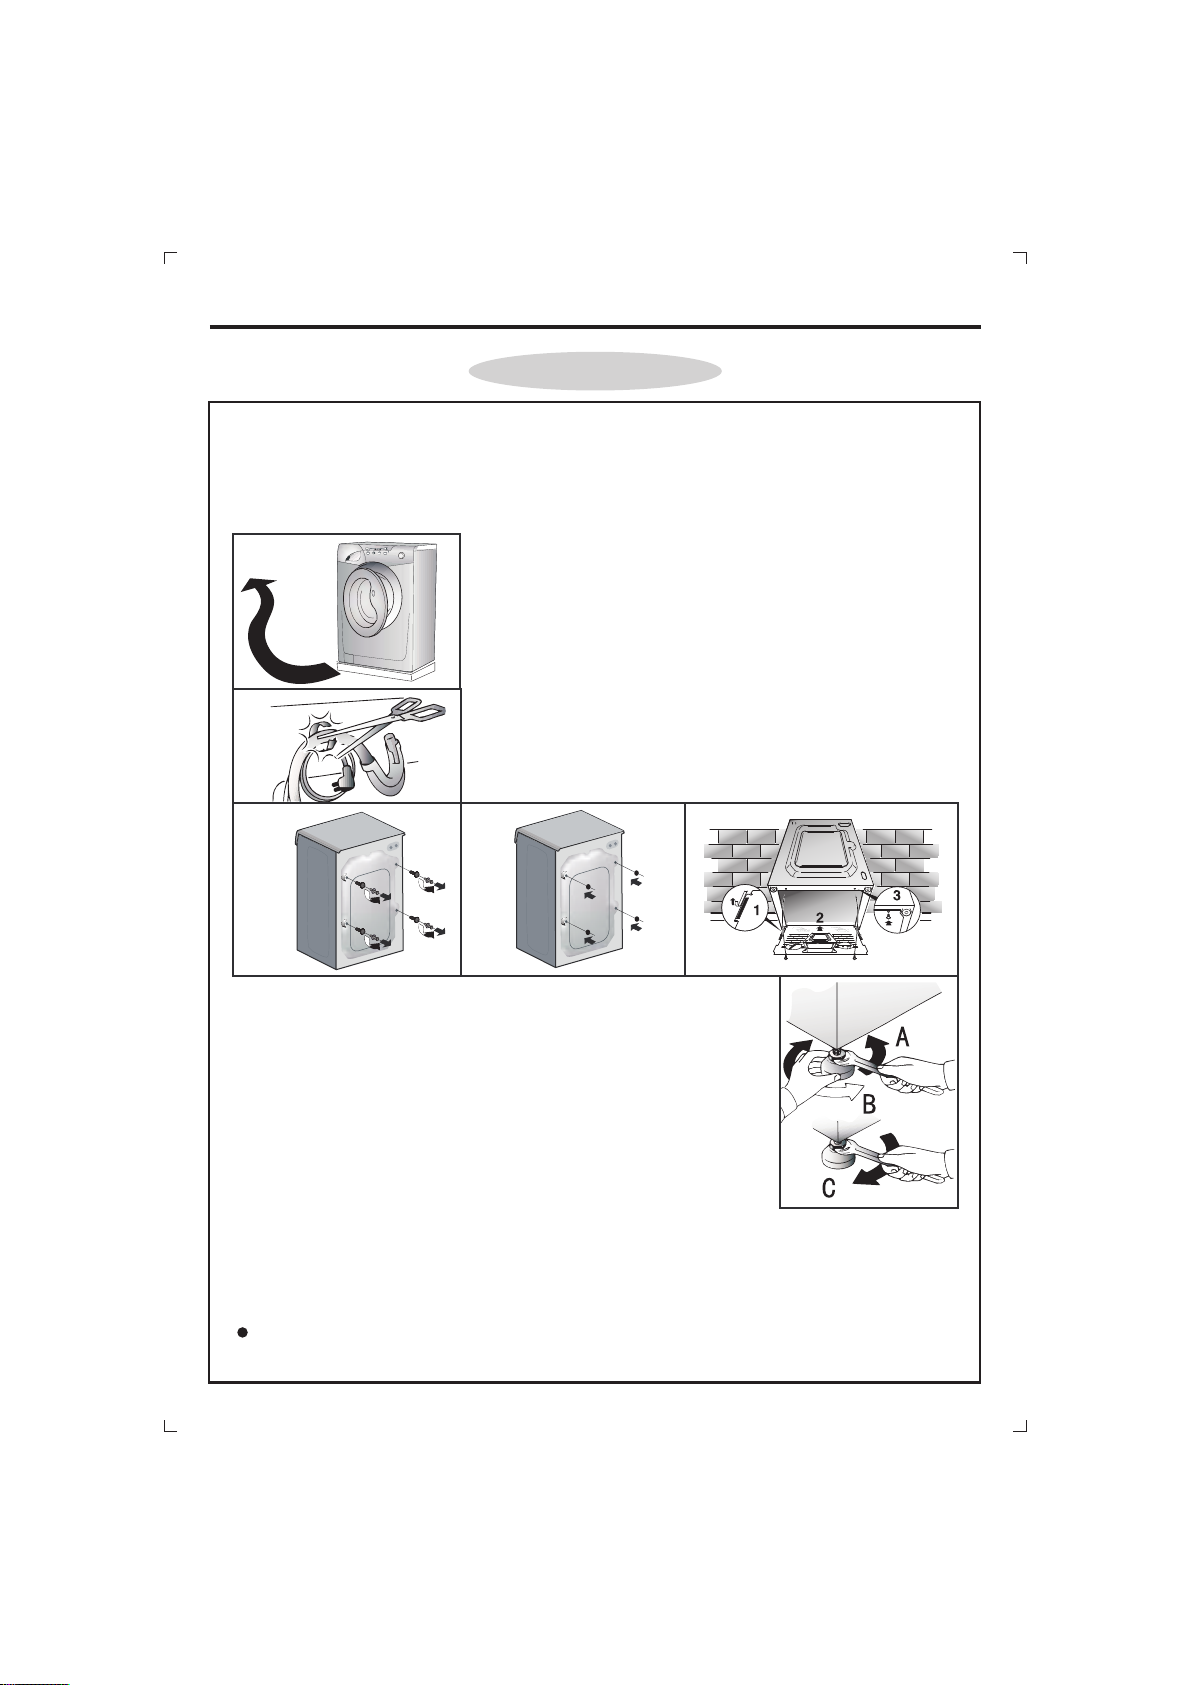
安装
安装
洗衣机的安装工作必须由专业技术人员根据厂商的说明来完成;
不正确的安装可能导致人员受伤或损坏洗衣机;
洗 衣 机 可 放 置 在 气 温 不 低 于3℃的环 境 中 , 并 确 保 其 背 面 的 电 线 及 进
排水管不受挤压。
1
1.拆 开包 装 , 把 洗衣 机 的 包 装底 座 拆 掉,然 后
把洗衣机移到需要安装的位置上。
2.小 心 地 剪断 扎 紧 电 源 线 和 排 水 软 管 的 塑 料
扎带。
3.拆 下 如 图 所 示 的4颗 固 定 螺 钉 和4条塑 料 固
定棒。
4.用 附 件 袋 里 提 供 的 封 盖 把4个 孔 封 上 。
5.按 图 所 示 , 把 底 板 固 定 在 洗 衣 机 底 部 。
2
A
B
A
B
A
B
A
B
3
4
5
6.使 用 四 个 支 撑 脚 把 洗 衣 机 调 整 到 水 平 位 置 。
1) 把 支 撑 脚 上 的 螺 钉 按 顺 时 针 方 向 拧 松
。
2) 升高或 者 降 低 支 撑 脚 的 高 度 , 让 洗 衣 机 平 稳
地固 定 在 平 整、 坚 固 的 地面 上 。 切 勿将 洗 衣
机 安 放 在 地 毯 或 木 质 地 板 上,请 确 保 洗 衣 机
没有紧靠在墙壁上。
3) 逆时针方 向 拧 紧螺 钉 , 直到 接 触 到 洗 衣 机 的
底部。
6
注意:
请 把 包 装 材 料 收 藏 好 , 以 备 将 来 搬 运 洗 衣 机 的 时 候 用 到 。 对于 不 按
指示操作而导致洗衣机有损坏的情况,生产厂家不负任何责任。
警告:
不要把包装材料放到小孩子可以接触到的地方,以免造成危险。
4
Page 7
安装
连接进水管
在连接进水管之前,应先将水龙头中存有杂质的水放掉,尤其是新安
装或长时间不使用的水龙头。
自来水龙头
本洗衣机最适合用圆口的普通
水龙头。因旋转式水龙头容易
漏水,所以不建议使用。水龙
头口端面必须平整,如不平整
可用锉刀锉平。
10mm以 上 是 必
要 的 ,如 尺 寸 短
了,无法安装。
从此处有漏
水可能。
进水管的安装和连接
(一)水龙头侧
1.进水管接头分固定接座和活络接头
两部分,使用前按下活络接头上的卡
环,用力拔出固定接座(如图)。
2.固定接座分A、B两部分(如图),
A、B两部分之间用螺纹连接,安装
前须将A、B两部分旋松至4mm。
3.旋松A部四个螺钉,将A部水平地套
在水龙头口上,并用力向上推,使橡
胶垫圈紧贴在水龙头口端面上,然后
逐个均匀旋紧四个螺钉,保持水龙头
在中心位置。
4.将B部按箭头方向旋紧,使橡胶垫
圈紧压在水龙头口上,密封不漏水为
止。
5.连接进水接头
按下活络接头上的卡环(必须露出四
个小钢球)后,插入固定接座内。放
松卡环向上推,直到活络接头和固定
接座连接可靠为止。
水龙头的口径大
时,请取下A部
内塑料套环。
水龙头
螺钉
A
B
活络接头
小钢球
固定接座
活络接头
卡环
进水管
1
2
A
约4mm
B
固定接座
橡胶垫圈
固定接座
卡环
3
5
Page 8
安装
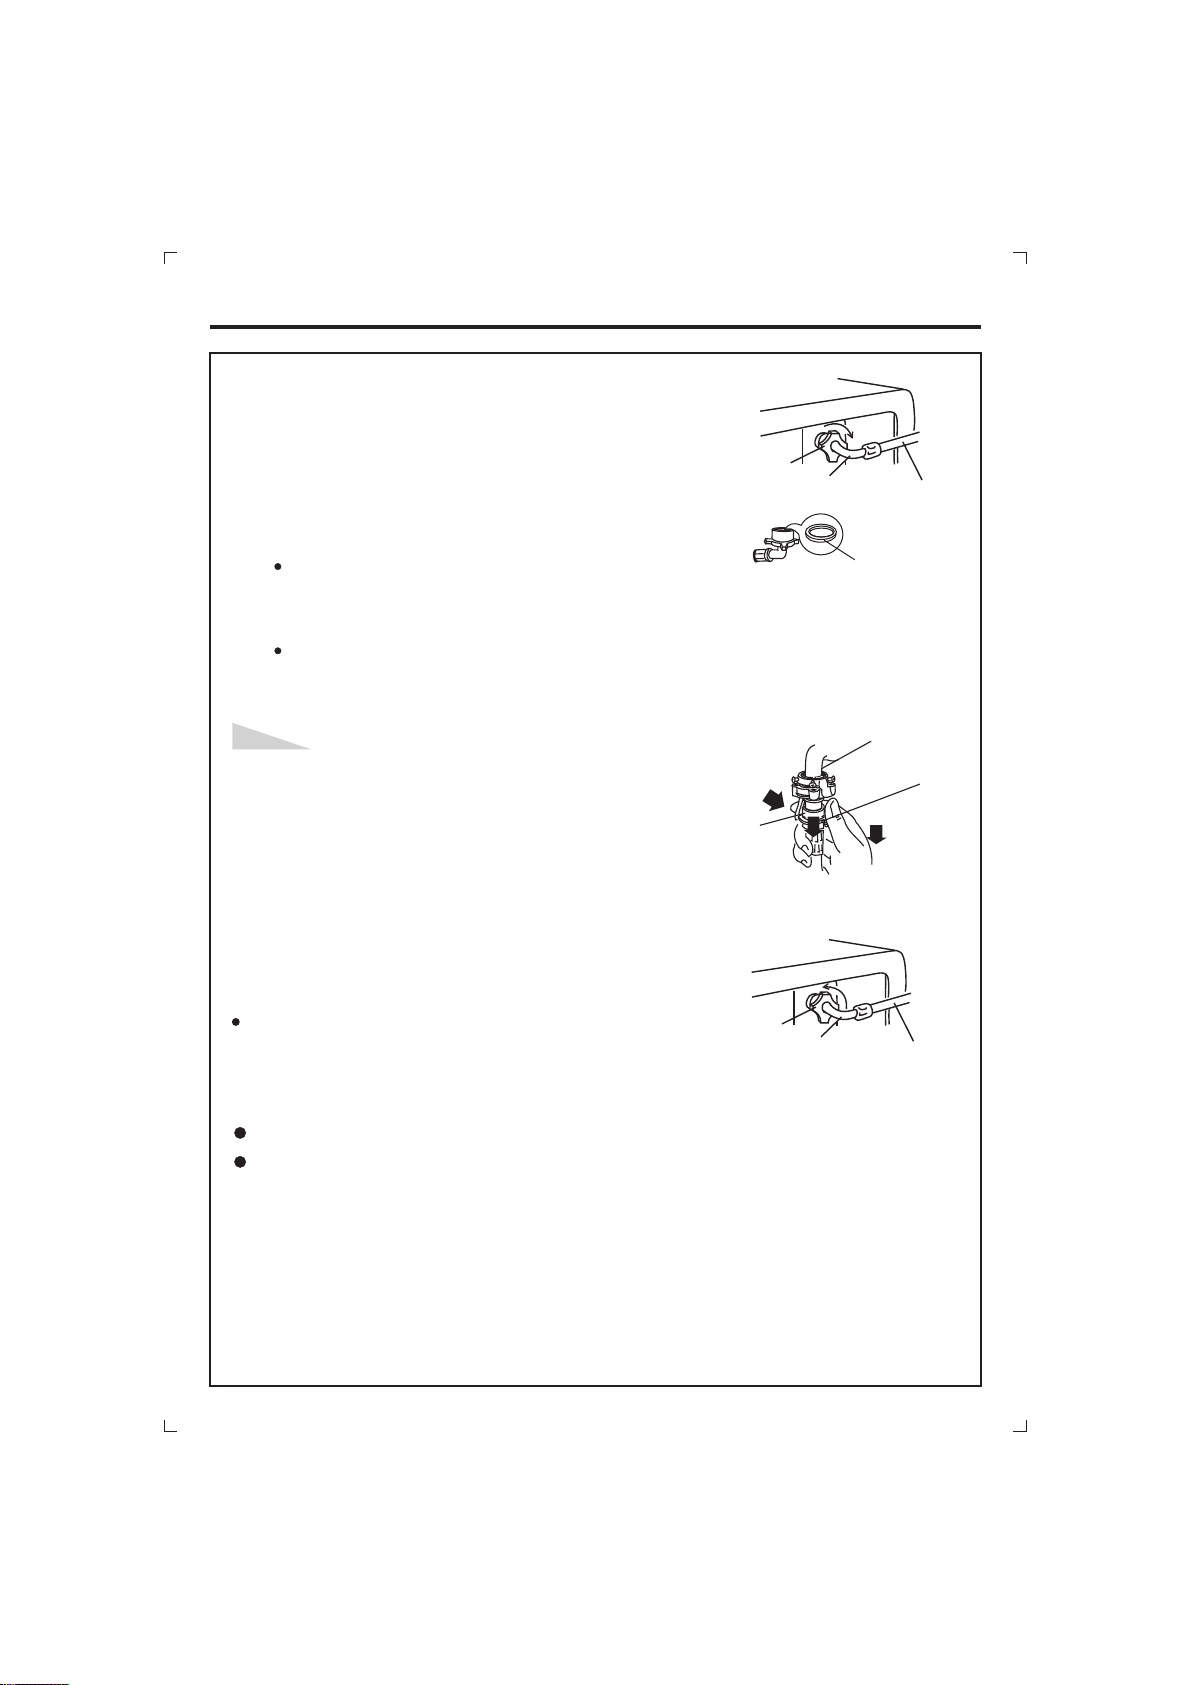
(二)洗衣机侧
在进水管另一端的弯头上的螺帽内垫入橡胶密封
圈后,再套在洗衣机背面的进水口上,并按右图
所示旋紧。
注意:
旋紧 螺 帽 时 用 力 要 均 匀 , 且不 能 扭 动 进
水管 , 以 防 进 水 管 的 弯 头 断裂 , 同 时 应
避免进水管过度弯曲,以免损伤。
若出 现 漏 水 , 应 检 查 螺 帽 内是 否 有 橡 胶
密封圈,密封圈是否有损伤。
螺帽
弯头
橡胶密封圈
进水管
进水管的卸除方法
即使已经关闭水龙头,因进水管内的水压还很高,
直接卸除进水管会有水飞溅出,所以请按以下
顺序取下进水管:
1
活络接头
2
固定接座
卡环
3
1.关上水龙头。
2.接通电源,运行洗衣程序,使之工作约5秒
钟,然后切断电源。
3.在水龙头一侧,按下活络接头上卡环,拔下
进水管,在洗衣机一侧旋松弯头上的螺帽。
如果经常使用洗衣机,可不卸下进水管接头,
避免固定螺钉损伤。
螺帽
弯头
进水管
注意:
洗 衣 机 必 须 用 新 的 进 水 软 管 来 连 接 , 旧 的 进 水 软 管 不 能 再 使 用
。
在 连 接 新 的 进 水 管 或 长 久 未 使 用 的 进 水 管 前 , 请 用 水 清 洗 , 以 祛
除管中可能积留的残渣。
提示:
洗衣机 只 需 使 用冷 水 所 以 只需 要 一 根 进水管 连 接 冷 水接 口 即 可 不
要把接 口 接 到 热水 口 去 。 当 洗涤 程 序 要 求使用 热 水 时 ,洗 衣 机 会 自 动
加热冷 水 , 消 除因 热 水 通 过 进水 管 从 水 箱或者 加 热 器 流到 洗 衣 机 的 过
程中因为散热而造成的热损失。
, 。
6
Page 9
安装
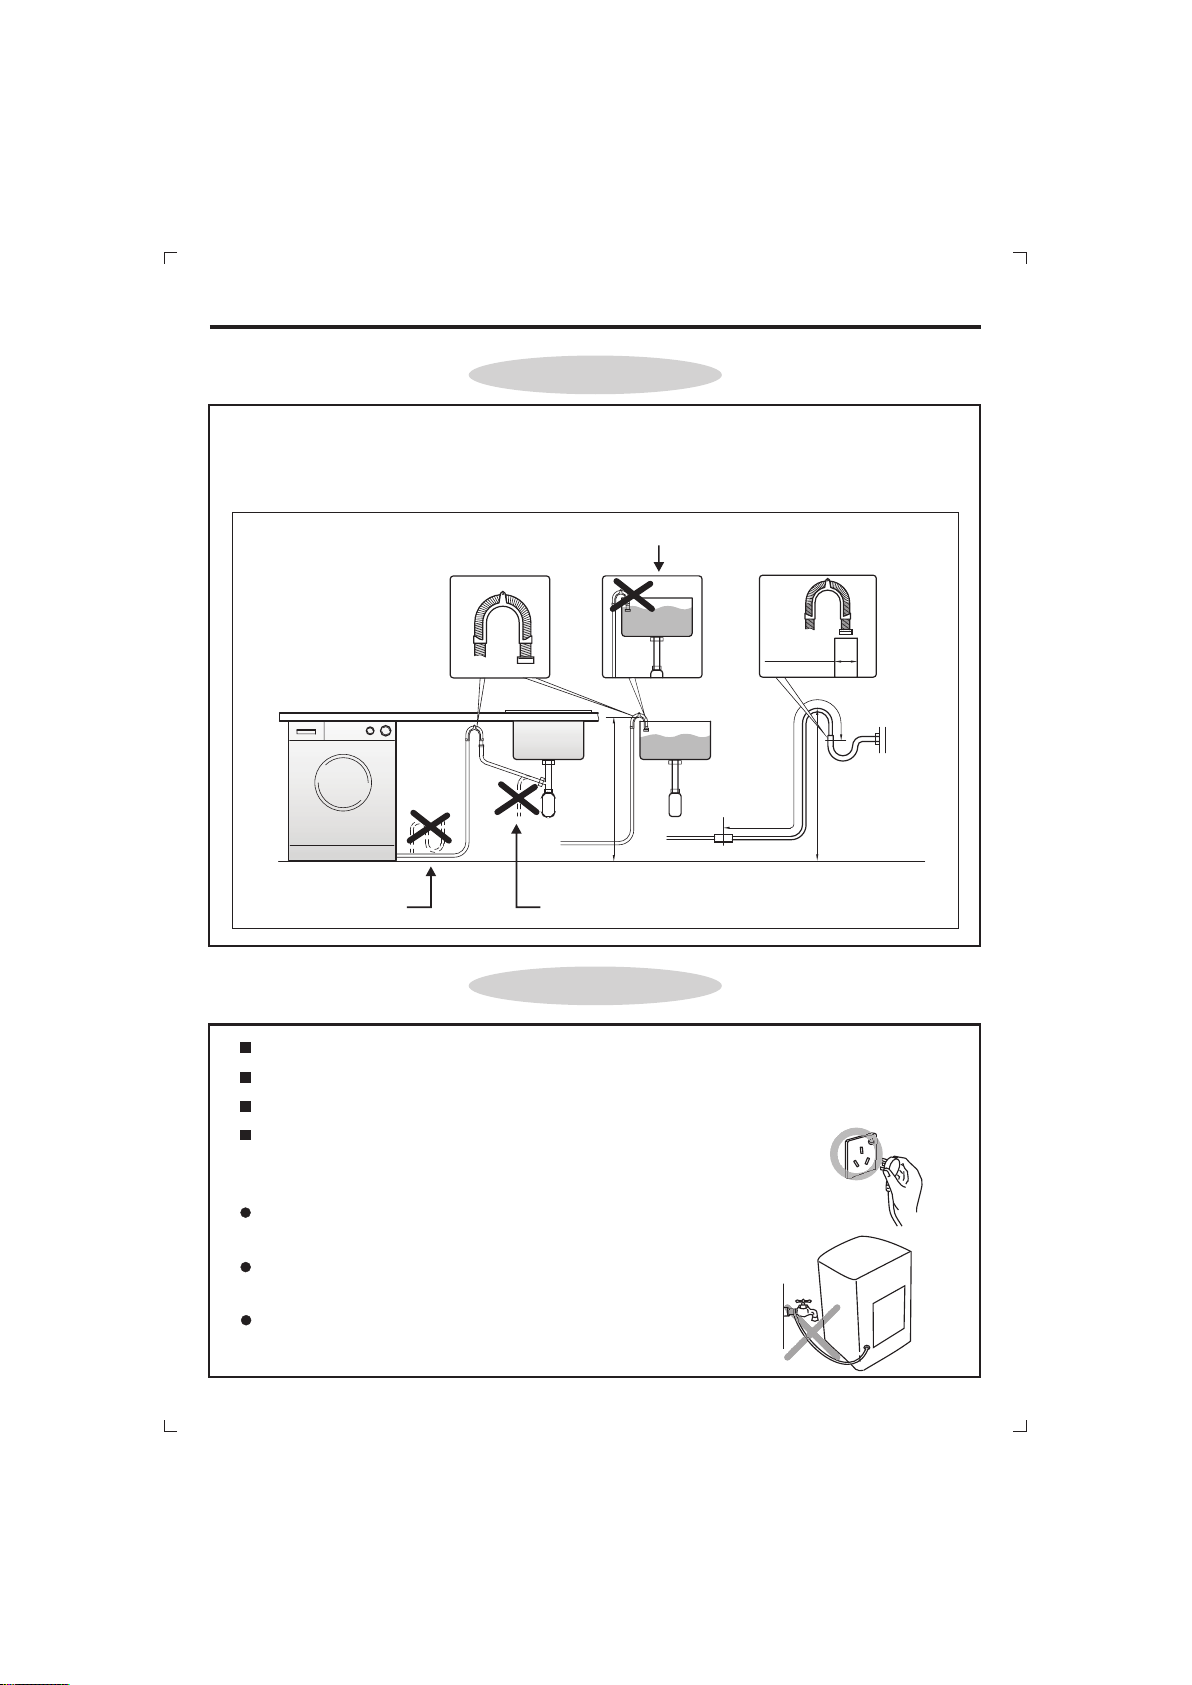
连接排水 管
注意:
为了让洗衣机运转正常,下水道的入口宽度不小于4厘米;
排水管出水高度必须在一定的范围内,具体情况参考下图。
排水管末端不能泡在水里
最小4厘米
最高1米
最多延长2.6米
最低 50厘米
最高 85厘米
排水管末端不能接在此位置排水管不能折弯
连接电源线
洗衣机接地线装在电源线插头上,不允许擅改插头。
必须使用有可靠接地线的三插孔电源插座。
未有接地插座的用户,务必请专业人员安装接地插座后再使用本洗衣机。
供本机使用的电源插座必须安装10A的保险管。
注意事项:
绝 对 不 可 将 地 线 接 到 煤 气 管 、 自 来 水 管 、 电
话线或避雷针的接地线上。
如 果 电 源 线 及 其 插 头 有 损 伤 , 绝 对 禁 止 使
用,以防发生漏电事故及引发火灾。
如 果 电 源 软 线 损 坏 , 为 避 免 危 险 , 必 须 由 制
造厂或其维修部或类似的专职人员来更换。
7
Page 10
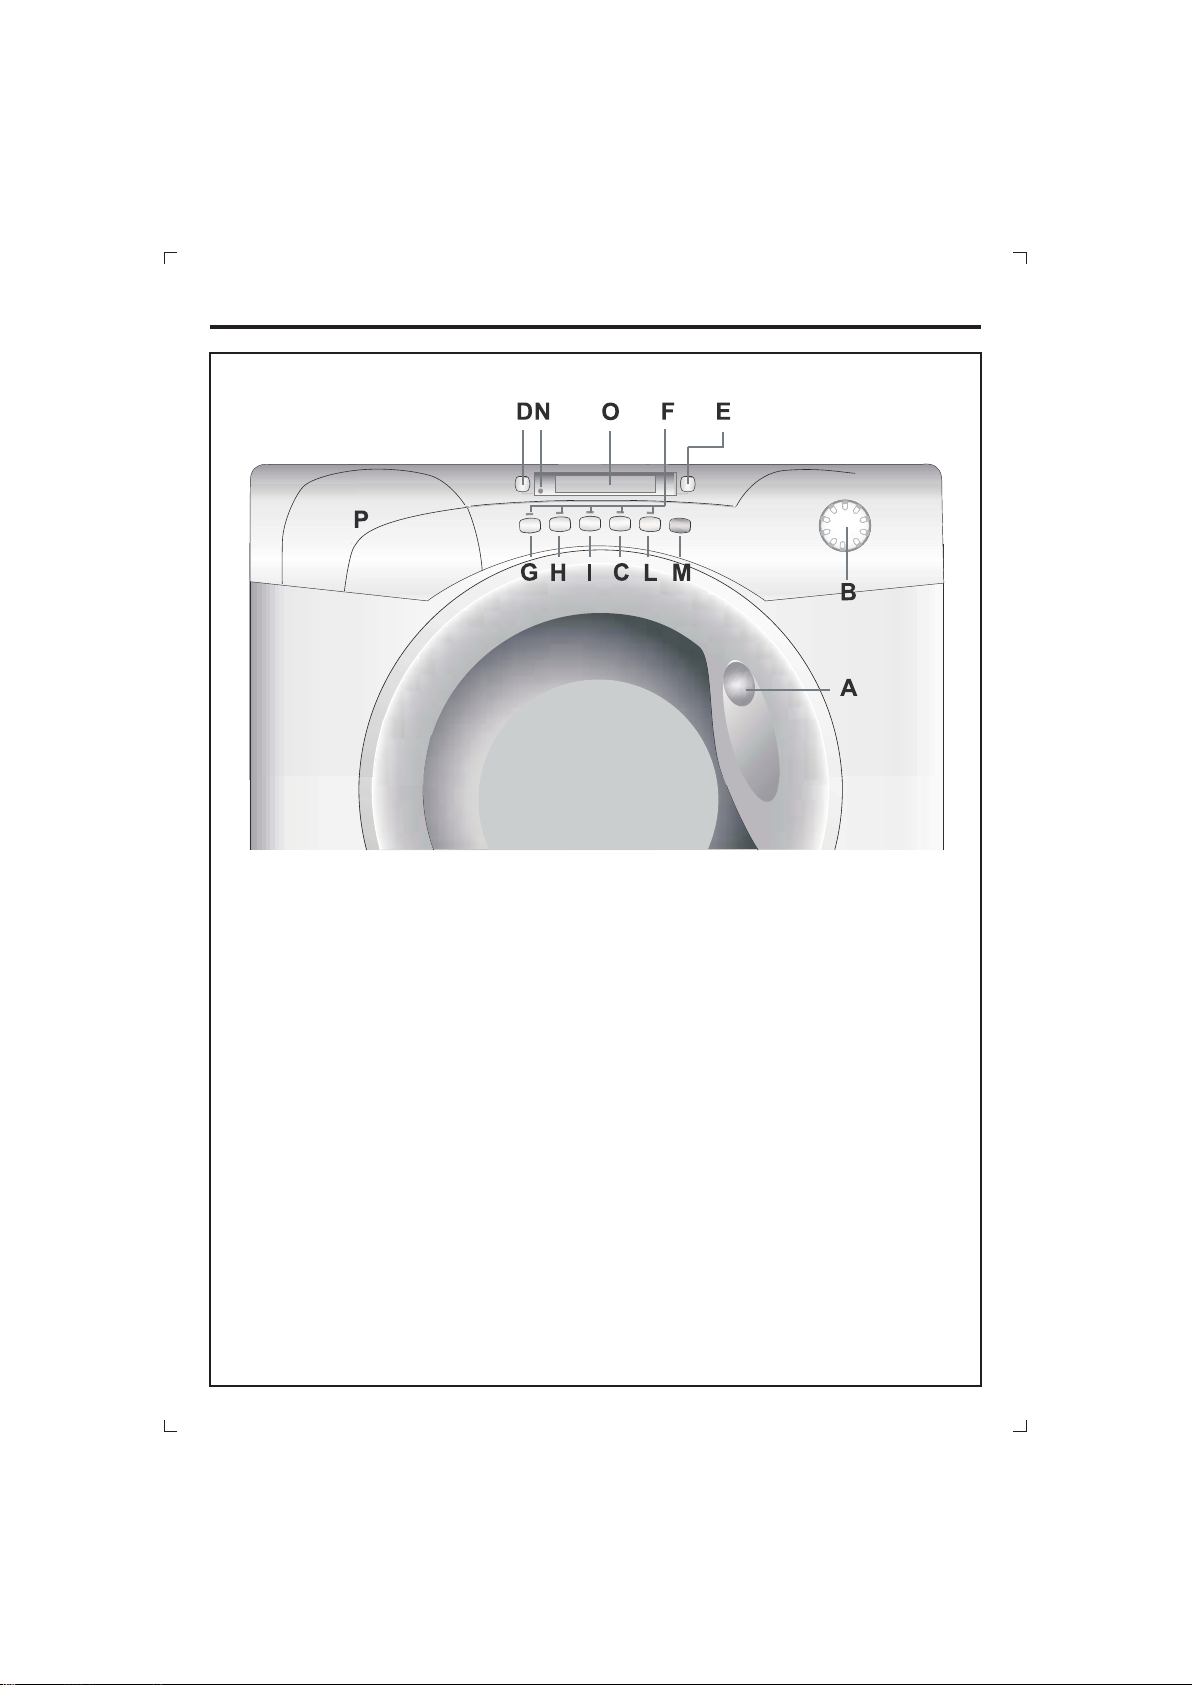
控制面板
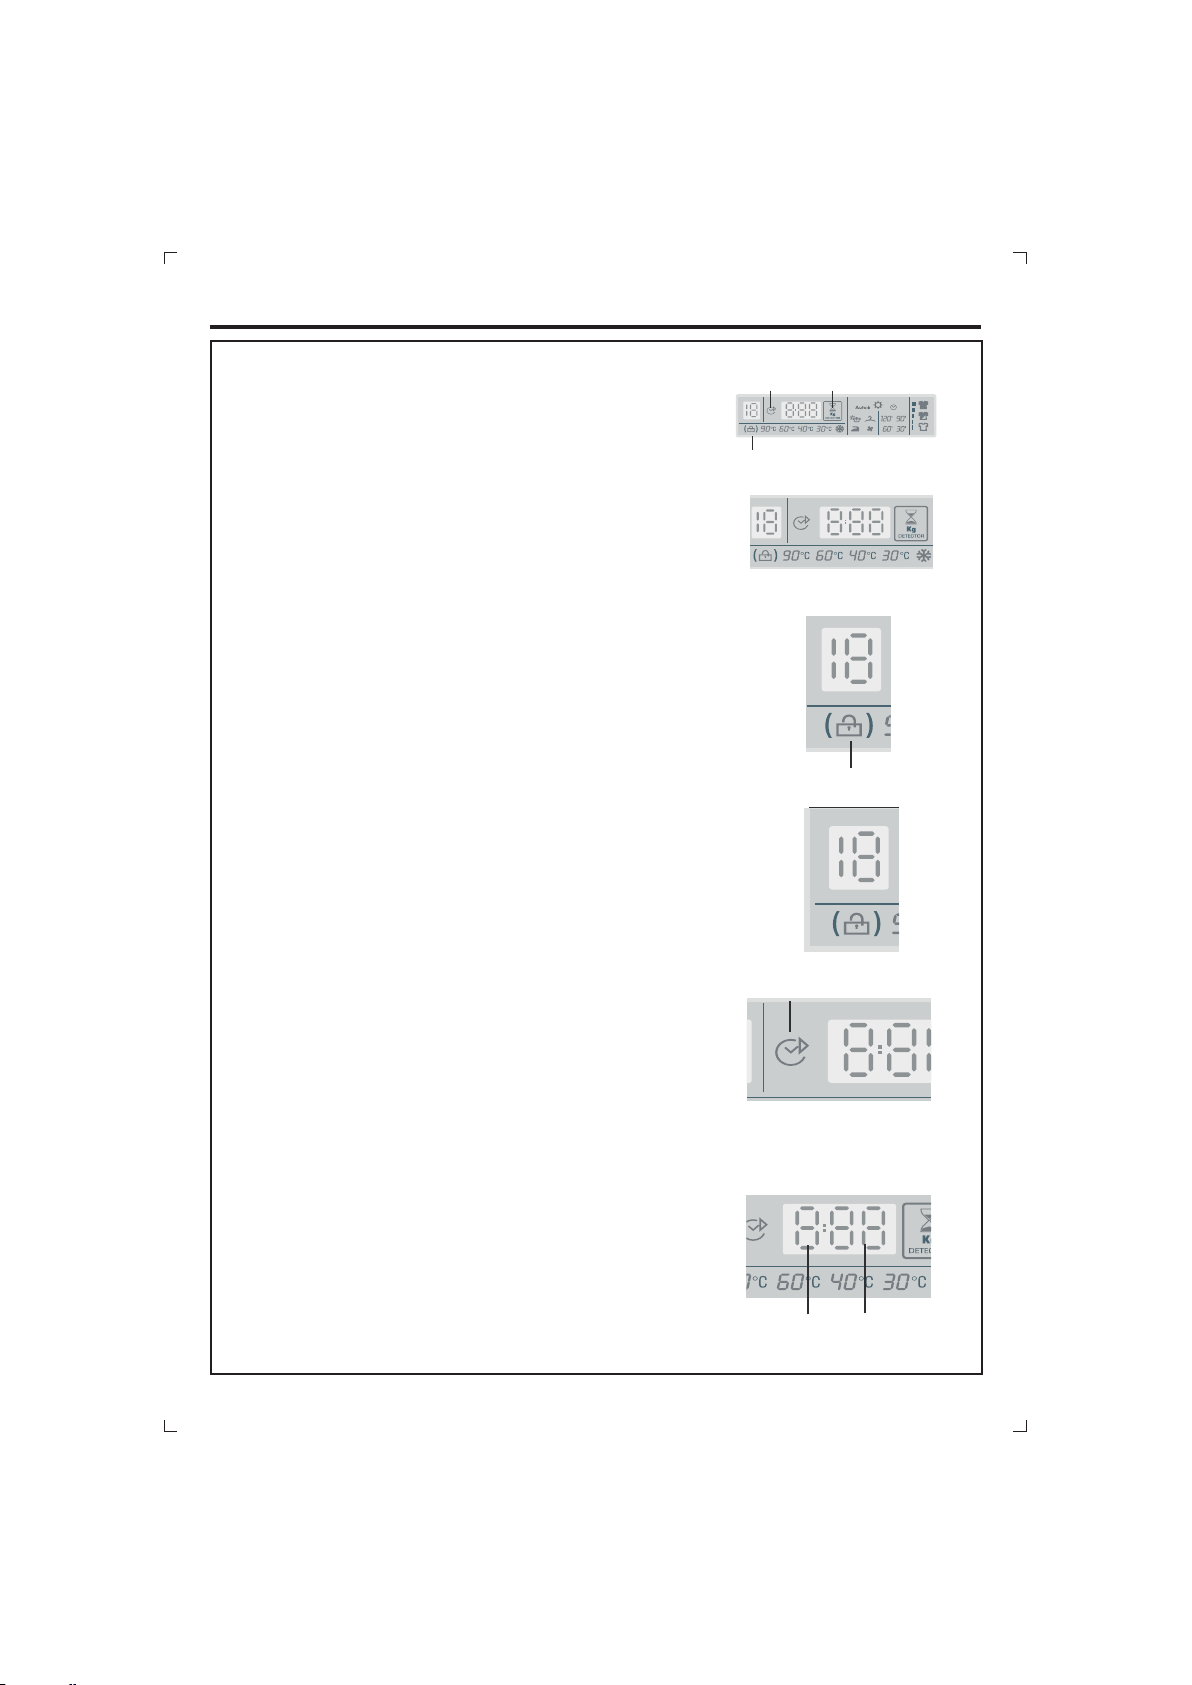
A
A -门把手
B - 程序选择旋钮
C -“ 温度选择”键
D -“ ”键
转速选择
E -“强力模式”键
F - 功能 指 示 灯
G-
“强力去污”键
H -
“超净洗涤”
I -
“预约”键
L - “烘干模式”键
M - 开始/暂停”
“ 键
N - “门锁保护”指示灯
O - 显示屏
P -洗涤剂抽屉
8
Page 11
控制面板
A-门 把 手
将手伸进“门把手”里,然后拉开机门。
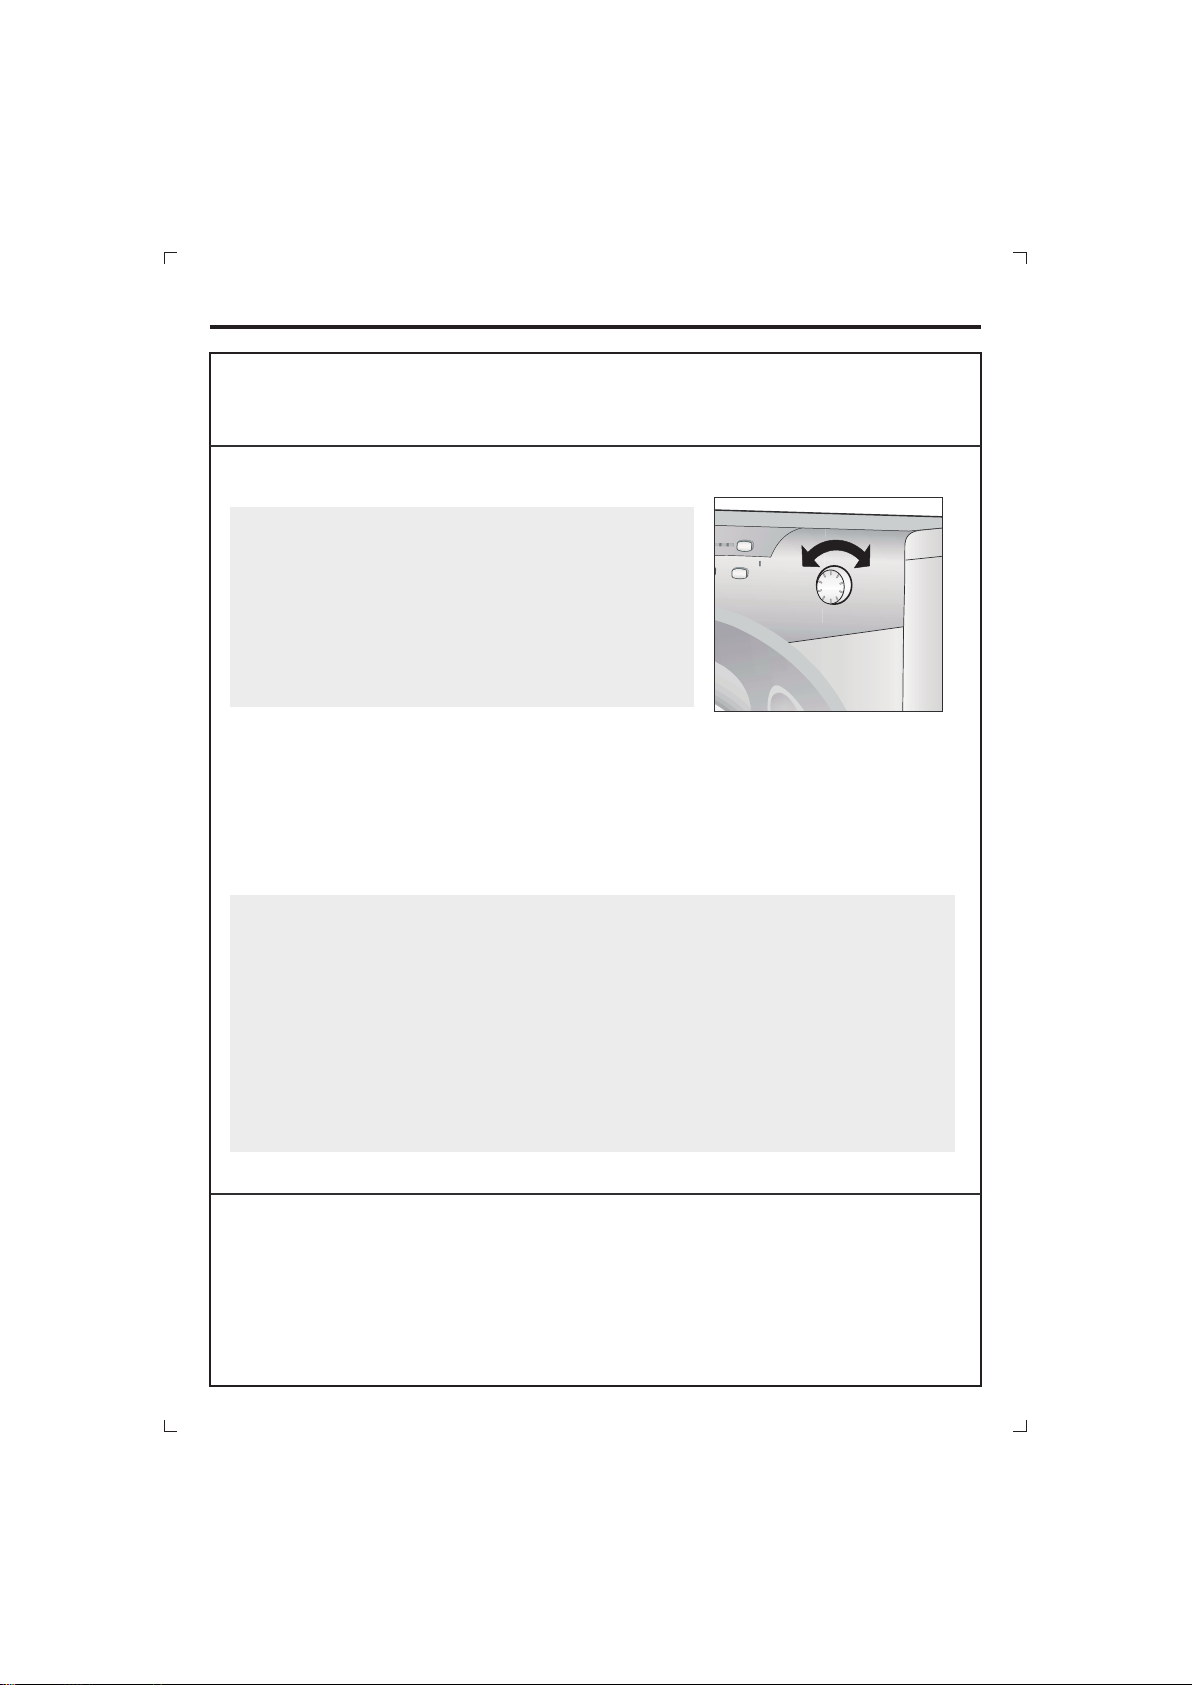
B- 程 序 选 择 旋 钮
“ 程 序 选 择 旋 钮 ” 可
需 的 程 序 。 当 转 动 旋 钮 选 择 程 序 时, 显
示屏显示所选程序的基本运行参数。
关机:
“ 程 序 选 择 旋 钮 ”
把 旋 至 “ 关 ” 的 位
置,关闭洗衣机。
选择程序后请按下“开始/暂停”键,启动洗衣机。
当一个程序被选定后, 须停留在选定程序对应
的位置上,直到该程序结束为止。
注意:
当 每 一 个 程 序 结 束 后,或 者 是 开 始 选 择 一 个 新 的 程 序 之 前,都必 须
把程序选择旋钮旋到“关”的位置上。
目前 , 很 多 洗 涤 剂 在 较低 温 度 下 也 能 达 到 不错 的 洗 涤 效 果 , 鉴 于
此 , 我 们 已 经 将 每 一 个 程 序 的 默 认 温 度 设 得 较 低,以节 省 能 源 和
减少 二 氧 化 碳 排 放 。 您可 以 通 过 “ 温 度 选 择” 按 键 将 所 选 程 序 的
洗涤 温 度 调 高 。 ( 请 参照 程 序 表 中 指 引 的 各程 序 的 可 设 最 高 洗 涤
温度)
双 向 旋 转 来 选 择 所
“程序选择旋钮”
C-“
温度选择
选择了程序之后, 相 应 的 洗 涤 温 度 指 示 灯 亮 起 , 显示该程序推荐
的洗涤温度
通过按“ ”键 可 升 高 或 者 降 低 程 序 所 设 定 的 洗 涤 温 度 。
每按一次该键,相应的洗涤温度指示灯会亮起。
”键
。
温度选择
9
Page 12
控制面板
D-“转速选择”键
脱水阶段最重要的是:
衣物里的水分。你可根据需要调整脱水转 速,以达 到最佳的 脱水效
果。
通过该键可以降低转速,也可以取消脱水。
为不损伤衣物,不可设置脱水转速高于所选定程序的默认最高脱
水转速。
调整脱水转速前无需暂停洗衣机运行。
如想恢复需要的脱水转速,要一直按动该键,直至达到需要的转
速为止。
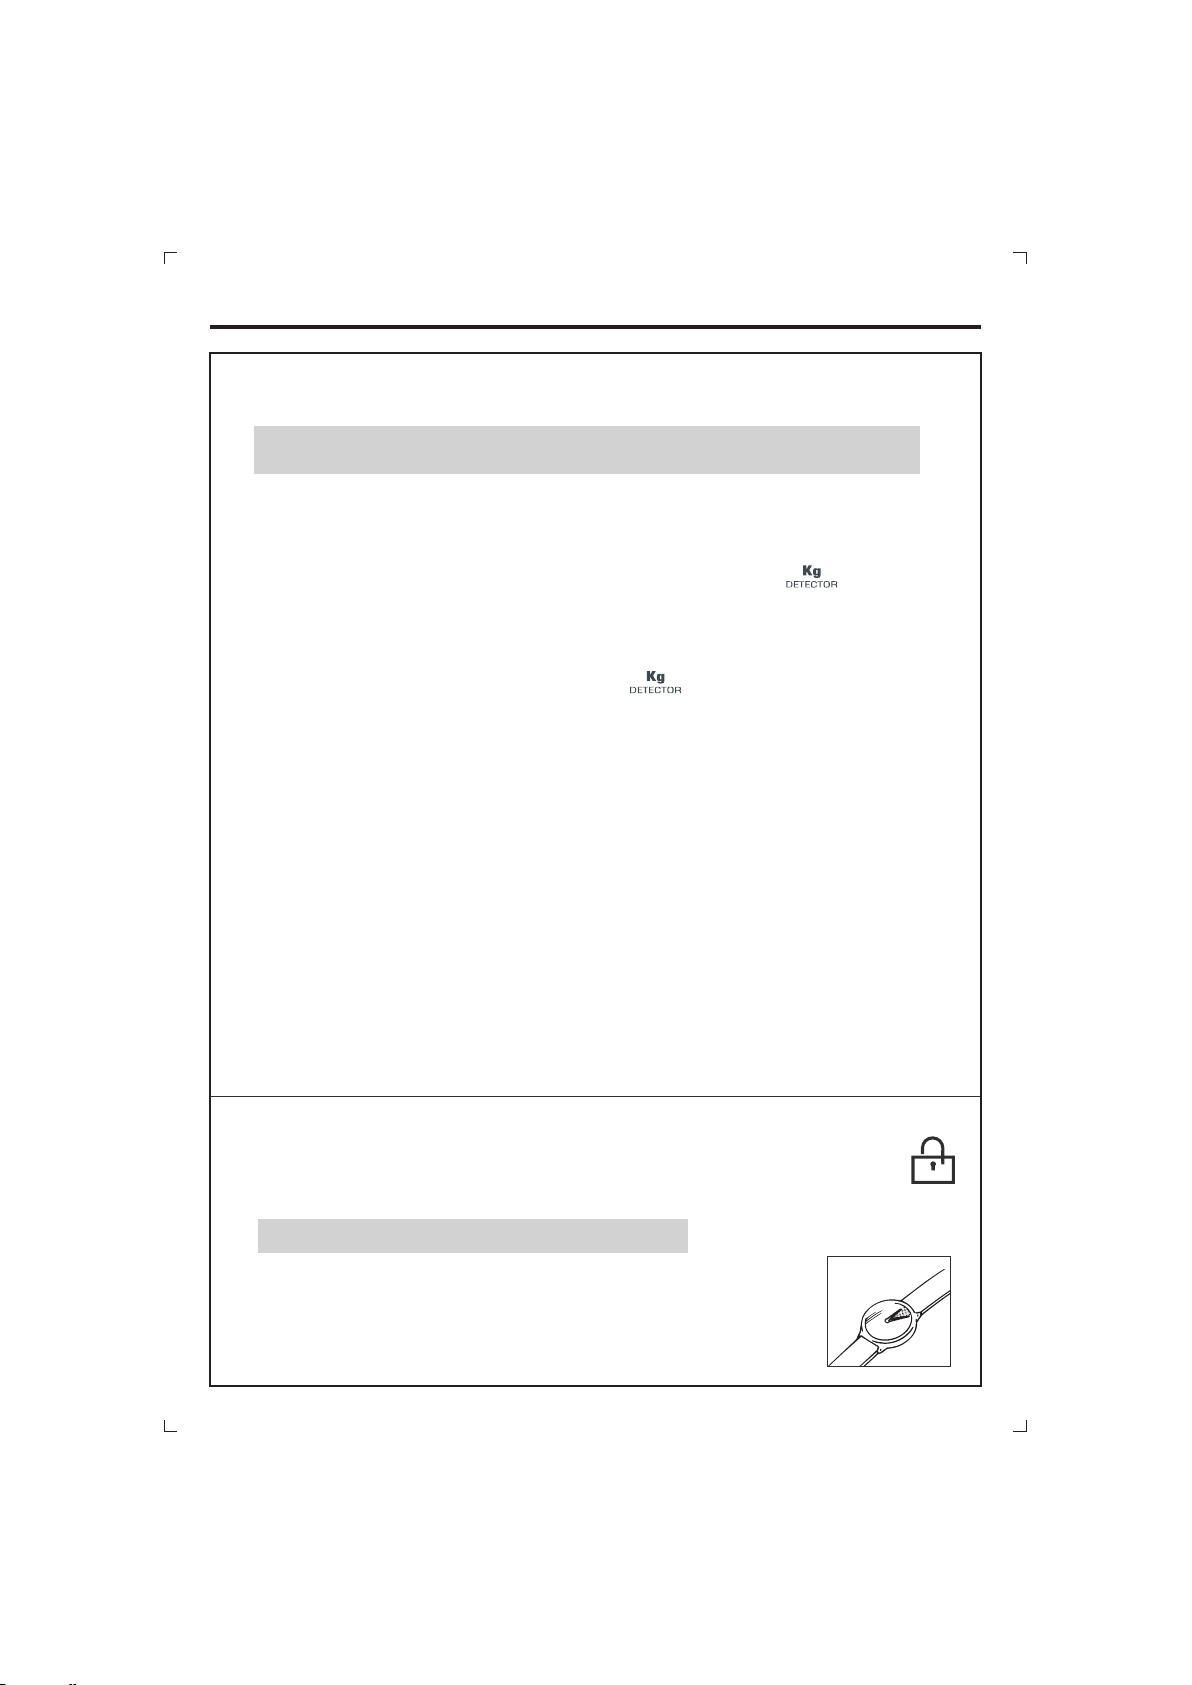
提示: 洗衣机 里 有 一 个 特 殊 的 电 子 装 置,这 个 电 子 装置是为了防 止
衣 物 在 脱 水 阶 段 不 平 衡 所 设 的。 这个装 置 大 大 地 降 低 了 洗 衣 机 的
噪音和震动,延长了洗衣机的寿命。
强力模式”键
E-“
该功能只能 应 用于棉麻和混合 /化纤程序。 可以有三种 不 同模式选
择,应用于不同脏污程度的衣物。
当选择了程序和洗涤温度后,洗衣机就会自动把模式调到默认最低,
可 按动“ ”键调整。调整模式后,洗涤过程所需要的时间会
强力模式
相应变化。
例如:通过选择衣物的脏污程度配合快洗 程序, 可以得到14分钟,
30分钟和44分钟三种快洗程序。(请参考程序表: )
如何在不损伤衣物的情况下,尽可能多的去除
30’-
14’-
44’
F-功 能指示灯
选定了某一个功能的时候,其对应的指示灯就会亮起。
如果所选择的功能跟已选择的程序不能搭配使用,该 功 能 相 应 的 指
示灯会先闪烁然后熄灭。
10
Page 13

控制面板
G-“ 强 力 去 污 ” 键
该功能只能应用于棉麻程序。选用该功能后,全新的传感系统作用,
在洗涤过程中,保持所选择的洗涤温度,并通过改变洗衣筒转动的频
率来达到改变机械作用力的目的。洗衣筒的转动频率在不同的洗涤阶
段有所变化。在洗涤初期,洗衣筒保持在能让洗涤剂渗透衣物纤维的
频率,在洗涤中后期和脱水阶段,转速和频率会加快,以保证最佳的
洗涤效果。
全新的传感装置保证了在不延长洗涤时间的情况下,达到更佳的洗涤
效果。
H-“ 超 净 洗 涤 ” 键
适用于棉麻和混合/化纤程序, 全新的传感系统系统更 能 精 心 呵 护
衣物和穿着这些衣物的人的皮肤。
在洗 涤 过 程 中 , 将 添 加 更 多 水 , 结 合 洗 衣筒 独 特 的 旋 转 方 式 , 让
衣 物 达 到 最 佳 的 清 洁 和 漂 洗 效 果;在 漂 洗 过 程 中 , 水 量 也 相 应 增
加, 充 分 清 除 残 留 在 衣 服 纤 维 里的 洗 涤 剂。 这 个功 能 不 但专 为 皮
肤 敏 感 脆 弱 的 人 士 设 计 , 也 为 即 使 穿 着 带 有 少 量 残 留 洗 涤 剂 的 衣
物也会过敏的人带来方便。
我 们 建 议 在 洗 涤 小 孩 子 的 衣 服 和精 细 织 物 , 或 者 清 洗 那 些 会 吸 收
较多洗涤剂的衣服时使用该功能。
I-“预约
”键
利用这个键进行设定24
按以下步骤操作可以设定预约时间:
1.选择一个洗涤程序;
2.按下 键, 这时显示屏上会出现 “h00”字样 第一
3.选 择 好 需 要 预 约 的 时 间 , 按 下 “ 开 始 /暂 停 键 , 预 约 时
用以下方法可以取消预约洗涤:
1.按住“预约”键约5秒钟, 直至“ 预约” 指示灯熄灭,显示屏显
2.选择需要的程序,按下“ 开始/暂停”键来启动洗衣机或者把选
“预约 ” ( ),
次按的时候,显 示 屏 上 就会出现“h01”字样。 每 多 按 一 下,
预约的时 间就会增加一 个小时,一直 累计到显示 屏 显示24小时
为止。 当预 约的时间到达24小时后再按这个键 ,预约的时间就
会重新回到0;
间就开始倒数,倒数完毕后,洗衣机会自动启动洗涤程序。
示原所选程序对应的参数;
择旋钮旋到“关”位置上,再重新选择另外一个程序。
小时内的预约洗涤时间。
”
11
Page 14
控制面板
L-“
烘干模式”键
当“程序选择旋钮”没有处于“关”位置上时,按下“烘干模式”键
可选择所需要的烘干模式;每按一次,烘干模式相应的指示灯亮起。
在程序开始之前取消所选择的干衣程序:
重复按“烘干模式”键,直到所有烘干模式的指示灯全部熄灭,
或者直接将“程序选择旋钮”旋回到“关”的位置。
在程序进行中取消所选择的干衣程序:
按住“烘干模式”键两秒钟,直到冷却程序指示灯 亮起,
冷却程序运作。 等冷
“关”的位置,打开机门,取出衣物。
为了防止高温造成的伤害,请执行完整的冷却程序。
注意:
请勿对未经洗涤的衣物进行烘干。
清洗带有油污、丙酮、酒精、汽油、煤油、除斑剂、松脂、蜡和
除蜡剂等污渍的衣物时,请用热水洗涤,并增加洗涤剂的用量。
只有在彻底清除上述污渍后,才能对衣物进行烘干。
却程序结束后,将“程序选择旋钮”旋回到
泡沫乳胶、塑胶浴帽、防水织物、橡胶类物品、带有泡沫乳胶的
枕头或衣物,都不能使用洗衣干衣机进行烘干。
使用衣物柔顺剂或者同类产品的时候,请 按 照 产 品 说 明 书 的 指 引
进行使用。
干衣的最后阶段是冷却,这样既能保证衣物不会受损,同时也保
证了使用安全。
警告:
除非能快 速 的将衣物 全 部 取出,并 把 衣物展开 , 以 散掉热量 ; 否则,请 勿 在 未
完成烘干 程 序的情况 下 关 掉机器。
12
Page 15
控制面板
M— 开始/暂 停 ” 键“
选择某程序后,按“开始/暂停”键启动所选择的程序。
注意:
当按下“开始/暂停”键后,洗衣机需要几秒钟才会启动。
在洗涤程序开始之后的4分钟内,“洗涤容量检测 ”(只适
用于棉麻,混合/化纤程序)功能运行,自动检测洗衣筒内衣服的
重量,程序持续时间指示灯每隔5秒钟就会更新一次洗涤所需要的
时间,4分钟后,该次洗涤需要的真实时间就会显示在显示屏上。
当该功能运行时,“洗涤容量检测 ”灯亮。
程序运行过程中改变所选程序的设置(暂停):
1) 按住“ 开 始/暂 停 ” 键 大 约 两 秒 钟 后 , 可 以 在程 序 运 行 中 的 任 何
时 间 内 暂 停 所 选 择 的 程 序 。(当机器 处 于 暂 停 状 态 时 , 剩 余 时 间 指
示灯及功能指示灯都会闪烁)
2) 根 据 需 要 更 改 程 序 设 置 。
3) 再 按 一 下 “ 开 始/暂 停 ” 键 , 再 次 启 动 洗 衣 机 。
在 洗 涤 过 程 中 如 需 添 加 或 减 少 衣 物 , 可 按 下 “ 开 始/暂停 ” 键 , 等
待两分钟,“门锁保护”松开后,放入或者取出衣服, 关 上 机 门 ,
再 次 按 下 “ 开 始/暂 停 ” 键 , 洗 衣 机 会 沿 着 原 来 程 序 的 进 度 继 续 运
行下去。
取消程序
如需取消程序,请把 旋至“关”的位置。“
N–“门锁保护”指示灯
当 机 门 完 全 被 关 上 , 并 且 洗 衣 机 开 始 运 转 时 , “ 门 锁 保
护 ” 指 示 灯 亮 起 。 当 关 上机 门 , 按 下 “ 开 始/暂 停 ” 键 后,
指示灯由闪烁变为持续长亮。
如果门还没有关好,指示灯会不停地闪烁
特 殊 的 安 全 装 置 , 可 防 止 机 门 在 洗 涤 程 序 结 束 后 就
被马 上 打 开 。 需 在 洗 涤 程 序 结 束约 两 分钟 后 , “ 门
锁保护”指示灯熄灭,才可以打开机门。
在 洗 涤 程 序 结 束 后 , 请 把 “ 程 序 选 择 旋 钮 ” 旋 至
“关”位置。
程序选择旋钮”
2 分钟
13
Page 16
控制面板
O
- 显示屏
显示屏显示洗衣机所处的状态。
1) 洗涤温度
当选择了一个程序之后,洗衣机会根据所选
择的程序自动调整所适用的洗涤温度。
“ ”键可
通过 温度选择 调整洗涤温度,相应
的指示灯会亮起。
2) “门锁保护”指示灯
按下“ 开始/暂 停”键之后,“ 门锁保护 ”
指示灯先闪烁然后长亮,直到洗衣结束。
洗衣程序结束两分钟后,“门锁保护”指示
灯自动熄灭,方可打开机门。
3) 转速
当选定了一个程序之后,该程序默认的最高
转速就会 显示在显示屏 。 可 以通过“转速
选择”键来调整转速,每按一下转速就会升
高或者降低100rpm。最低的转速是400rpm,
或者通过反复的按这个按键来取消脱水。
6
{
2
{
1
8
{
7
{
{
54
3
{
1
2
3
{
4) 预约指示灯
当设置了预约之后,预约指示灯闪烁。
5) 程序持续时间
当选定了某程序后,该程序所需要的基本时
间就会自动在显示屏上显示。可以通过更改
设置来改变该程序所需要的时间。程度启动
后,显示屏会持续更新程序的剩余时间。
程序所需要的时间是在满负载洗涤的基础上
进行计
洗涤容量的不同调整真正洗涤需要的时间。
如果选择了自动洗衣/干衣程序 ,在洗衣 程
序结束后,干衣程序所需要的时间会在显示
屏显示出来。
算的,洗衣机能够智能根据每次真实
14
4
{
h
5
mm
Page 17

{
8
Page 18
Page 19
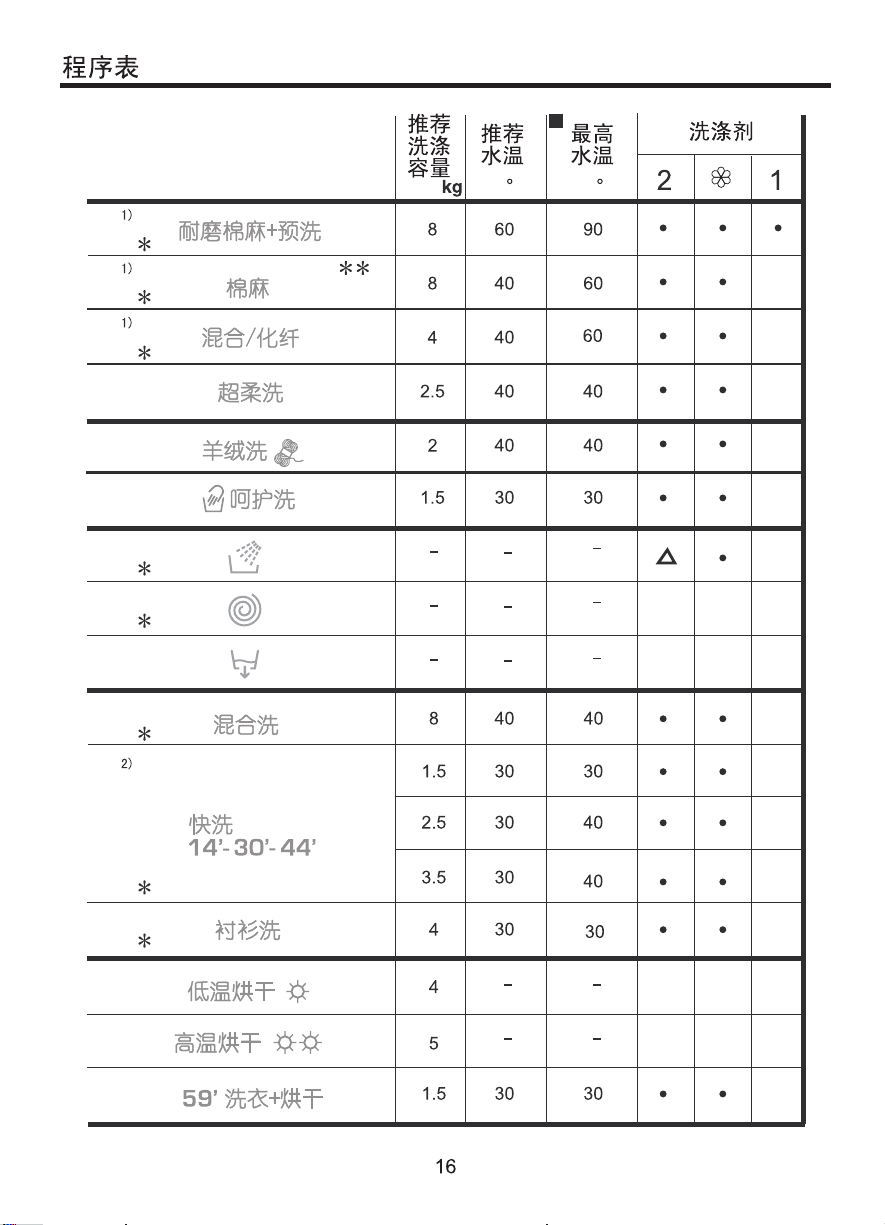
程序表
请详细阅读以下使用建议:
当洗涤非常脏的衣物时, 我们推荐洗涤容量为4
kg。
可以 参 照 衣物 洗 涤 标 签 的 建议, 通 过“ 转 速 选 择 ” 键降 低 转 速, 或 者
在洗涤精细衣物时, 取消脱水。
通 过 “ 温 度 选 择 ” 键 , 可 以 选 择 比 允 许 的 最 高 洗 涤 温 度 较 低 的 温
度,以保护衣物。
*
这些程序可应用自动烘干程序。
1) 通过按“强力模式”键可以改变这些程序的持续时间;
2) 对 于 程 序 , 通 过 按 “ 强 力 模 式 ” 键 , 可 得 到 三 种 快 洗 程
序,分别为
**
该程序(“棉麻” 程 序)作 为 按 国家标准GB12021 .4-2004进行能 效 等 级 测
试的程序:测 试 时 , 洗 涤温度设为60
高脱水转速。
30’-
14’-
44’
14’, 30 ’和 44’。
°C,“强力模式 ” 选 择 最 高,并选择最
需 要 洗 涤 的 衣 物 当 中 , 如 果 只 有 部 分 是 含 有 污 渍 而 需 要 使 用 液 体
漂白剂处理时,可利用洗衣机预先把这些衣物中的污渍祛除:
把 漂 白 剂 倒 入 专 用 容 器 里 , 然 后 把 该 容 器 放 入 洗 涤 剂 抽 屉 中 标 有
“
2”的隔槽里,再运行“单漂洗 ”程序。
当漂 洗 程 序 结 束 后, 把“ 程 序 选 择 旋 钮 ” 旋 回 “关”的位 置, 把剩余
的衣物放入洗衣机, 再选择需要的洗涤程序。
17
Page 20
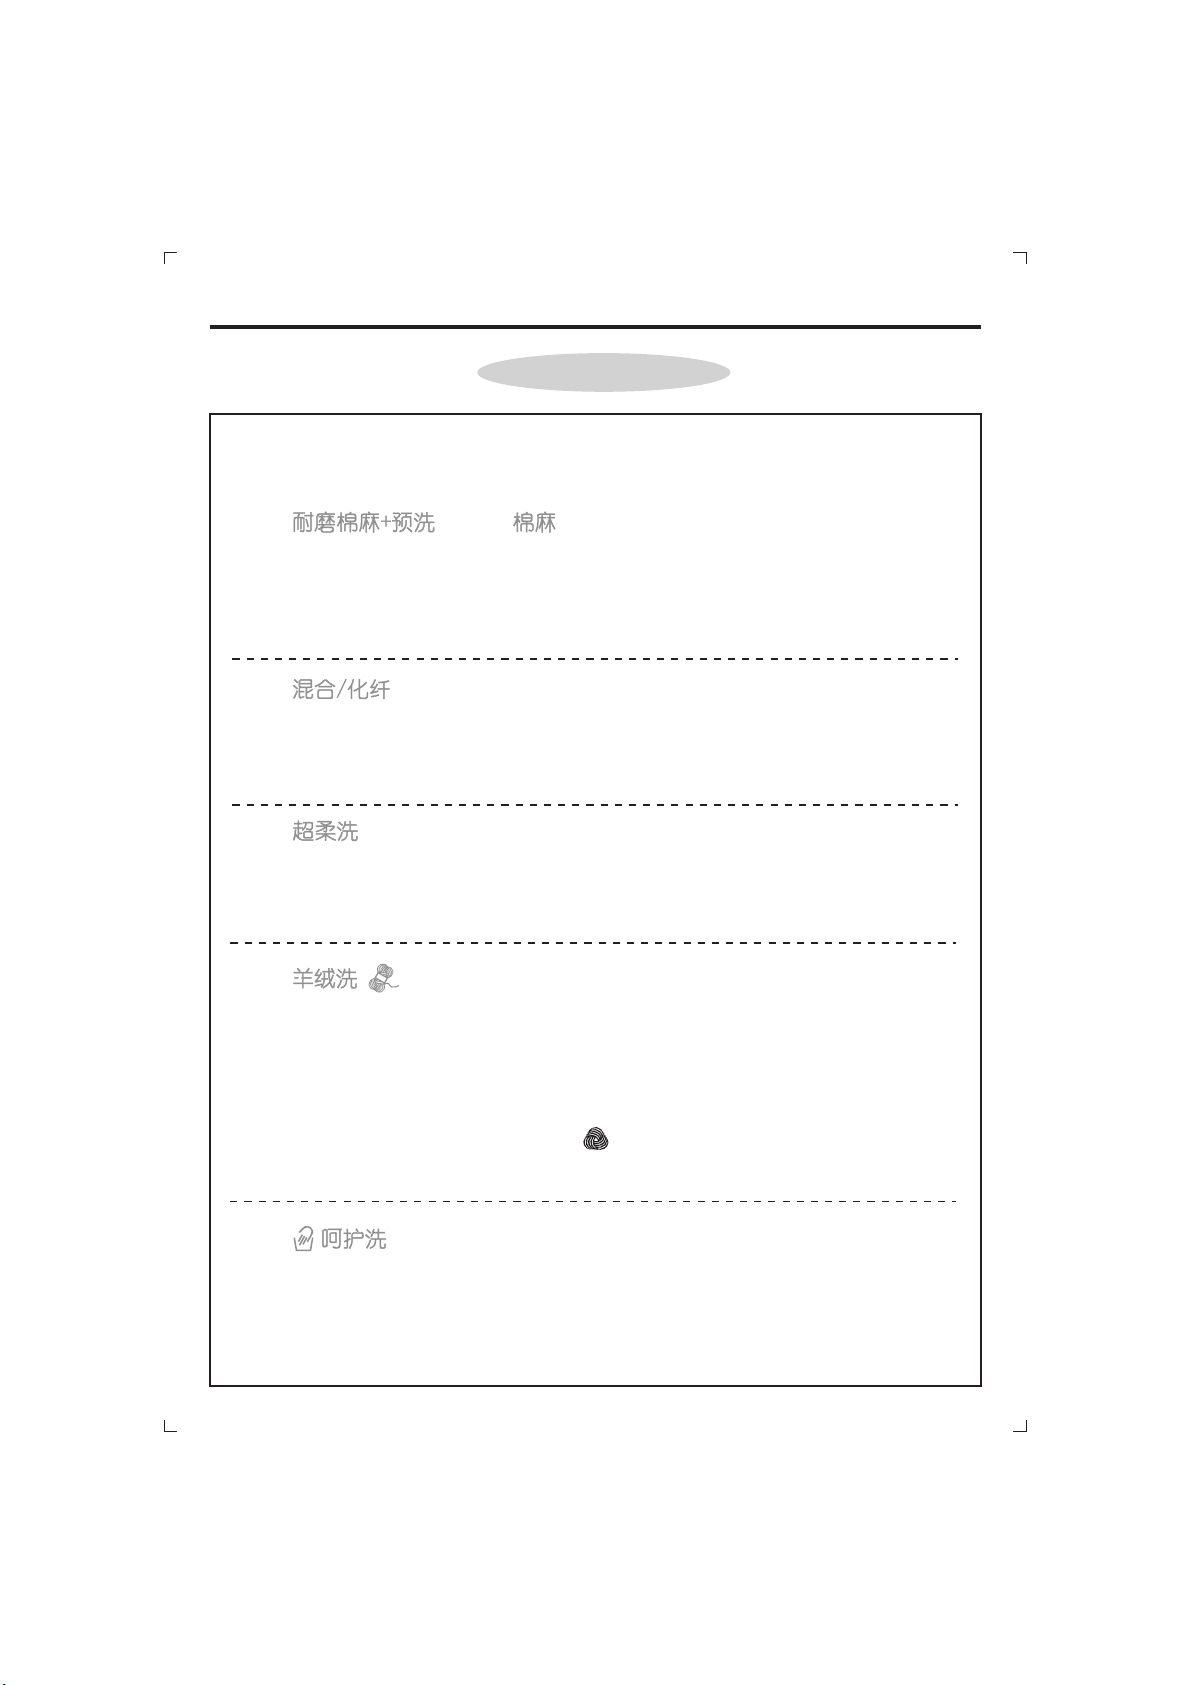
程序简介
程序简介
为适应不同面料, 不 同 脏 污 程 序 的 衣 物 , 本 洗 衣 干衣机制定了以下
序供选择(请参照程序表):
1.
这两个程序是为最大洗涤容量设计的。
通 过 间 隔 脱 水 , 保 证 了 最 佳 的 漂 洗 效 果 。 而 漂 洗 完 后 的 最 后 一 次
脱水,可以让衣物得到最佳的脱水效果。
2.
独特的洗衣筒转动节奏和水位,使洗涤和漂洗达到最好的效果。
轻柔脱水更有效防止皱褶的产生。
3.
这是一个专为精细衣物设计的新洗衣程序。
洗涤和浸泡在高水位中交替进行,以保证最佳的洗涤效果。
4.
由 国 际 羊 毛 合 格 标 记 认 证 的 程 序 , 可 以 彻 底 的 清 洗 羊 毛 衣 物 而 不
对衣物造成任何的损害。
40 , 包 含 了 三
这个程序的洗涤和浸泡交替进行,洗涤温度最高是
次漂洗和一次短暂的脱水。
°C
程
衣 物 标 签 上 标 有 纯 新 羊 毛 标 志 的 衣 物 , 只 有 在 其 同 时 标 有
结或可机洗标志时才可使用“ 程序 来 洗 涤。
5.
这个程序能模拟
能 为 在 衣 物 洗 涤 标 签 中 注 明 “ 只 能 手 洗 ” 的 衣 物 提 供 一 个 完 整 的
洗涤过程。这个程序的洗涤温度是
低转速的脱水。
轻柔的手洗效果。
羊绒洗”
°C
30 , 包 含 了 三 次 漂 洗 和 一 次 较
18
不 纠
Page 21

程序简介
6. 单漂洗程 序 :
这 个 程 序 带 有 三 次 漂 洗 和 一 次 中 等 速 度 的 脱 水 ( 脱 水 转 速 可 以 通
过“转速选择”键调整),该程序可应用于任何面料的衣物。
应用举例:可以在手洗衣物之后,选择这个漂洗程序。
该程序也可以用作漂白程序(请参照程序表)。
7. 单脱水程 序 :
这 个 程 序 会 以 最 高 转 速 进 行 脱 水 ( 转 速 可 以 通 过 “ 转 速 选 择 ” 键
调整)。
8. 单排水程 序 :
这个程序用于排出洗衣机里面的水。
9.
混合洗
这个是
1)可 以 同 时 洗 涤 不 同 布 料的 不 脱 色 衣 物 , 例 如 : 棉 麻 和合 成 纤 维
Cand y独有的洗涤程序, 为用户提供了两大好处:
的衣物
2)可以节省能耗
混 合 洗 的 洗 涤 温 度 为40 , 分 为 动 态 洗 涤 阶 段 ( 内 筒 转 动 ) 和 静
态洗 涤 阶 段 ( 浸 泡 阶 段 ) , 整 个 过 程 大 概需 要
850W h。
°C
2小时 , 用 电 量 只 有
重要提示:
有颜色的新衣物在第一次洗涤的时候,必 须 分 开 洗 涤
●
●
任何情况下,都 不 要 把 容 易 掉 色 的 衣 物 混 在 一 起 洗 涤
10.
14’-
30’-
44’
只 需14分 钟 , 就 可 以 完 成 一 个 洗 涤 过 程 , 适 用 于 洗 涤 轻 度 脏 污 的
衣物。
通过按“强力 模 式 ” 键 , 可 得 到 不 同 的 快 洗 程 序:
或
44’快洗。
14’快洗,30’快 洗
在 使 用 快 洗 程 序 的 时 候 , 我 们 推 荐 洗 涤 剂 用 量 只 需 要 为 洗 涤 剂 包
装建议用量的
20%就足够了。
19
Page 22
Page 23

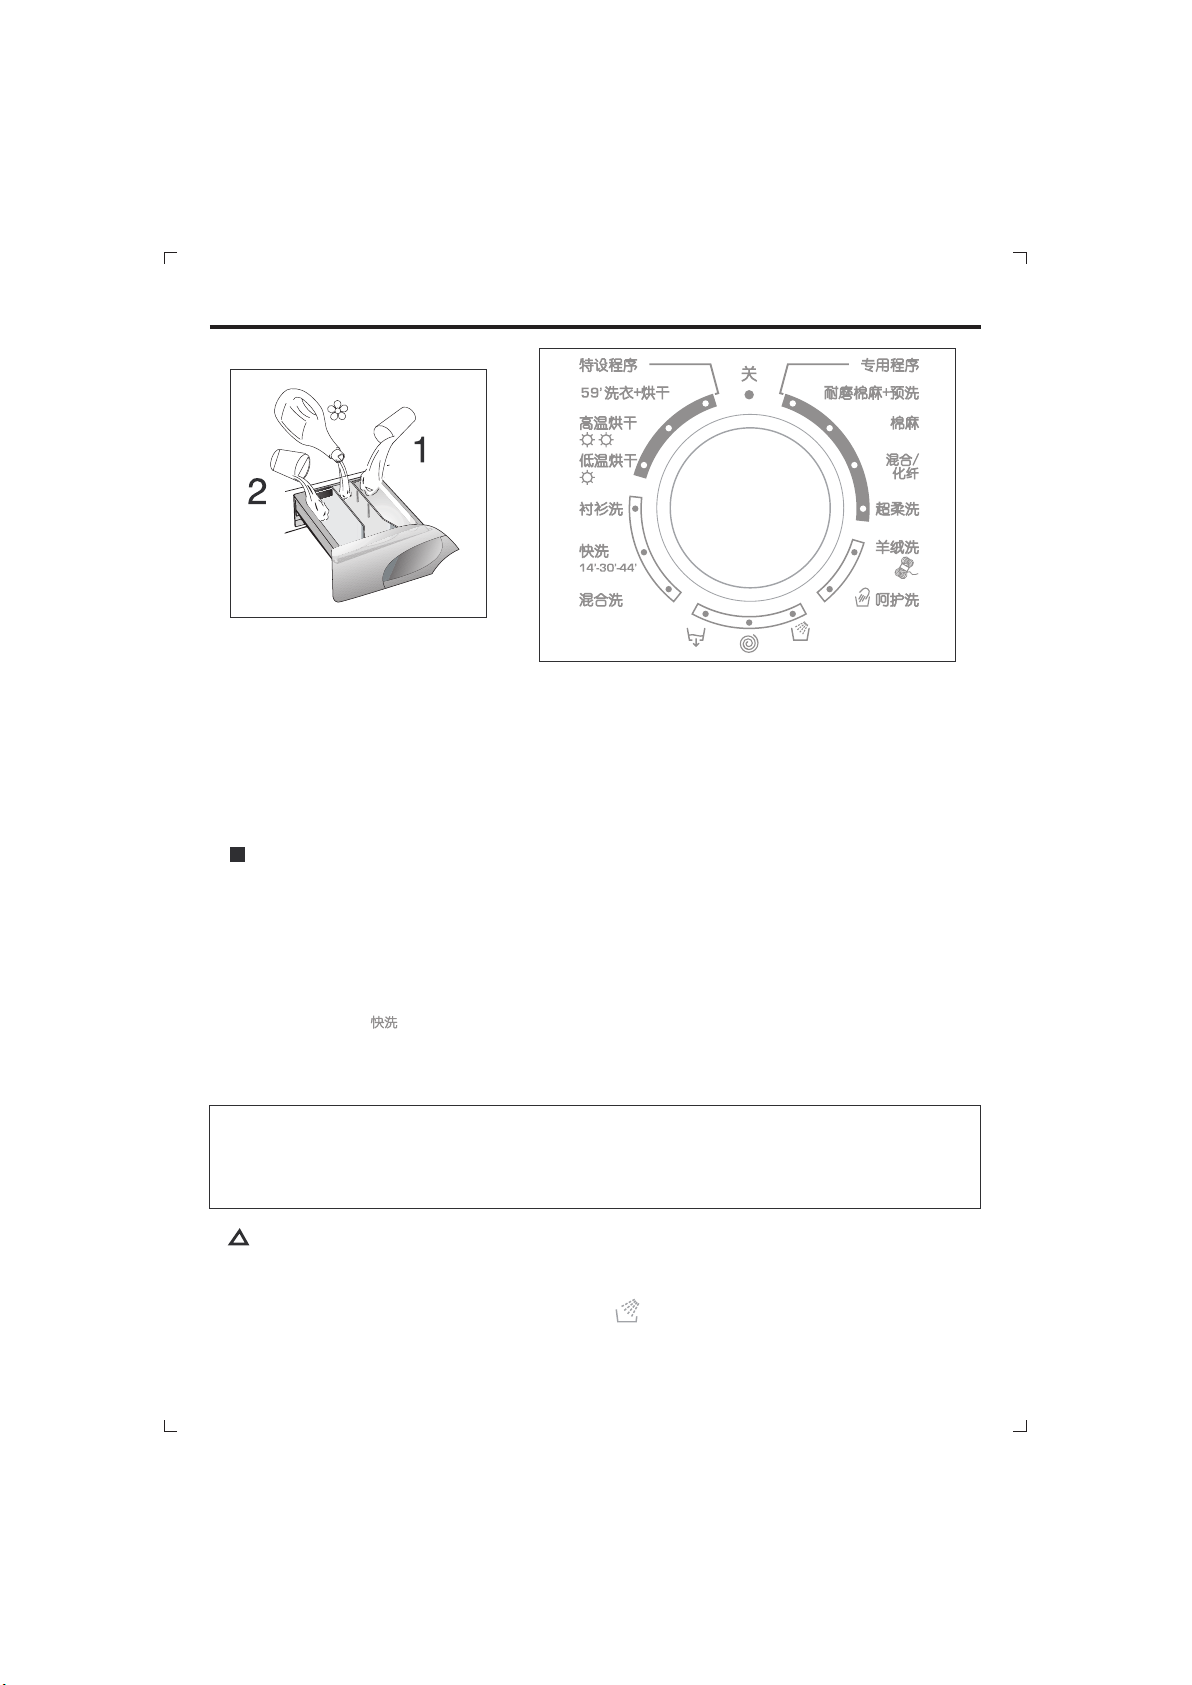
洗涤剂抽屉
洗涤剂抽 屉
洗涤剂抽屉由三个格槽组成的:
标有“1”的格槽用于装预洗的洗涤剂。
标有“ ”的格槽用于装辅助洗涤剂。
标 有 “2” 的 格 槽 用 于 装 主 要 洗 涤 程 序 用
的洗涤剂。
假如 使 用 液 体 洗 涤 剂 , 请 把 液 体洗 涤 剂 放
入 洗 衣 粉 盒 里 标 有 “2”的 里 面 的 专
用容 器 里 , 这 样 做 是 为 了 保 证 洗涤 剂 可 以
在适当的时候被释放到洗衣筒里面。
在选 择 漂 洗 程 序 作 为 漂 白 用 途 的时 候 , 也
需 要 把 该 专 用 容 器 放 进 洗 衣 粉 盒 标 有
的 里。
“2” 格槽
格 槽
标 有 “ ”的 格 槽 , 只 可 放 体 类 辅 助 , 洗 衣 机 在 洗 涤 的
过程中的适当阶段会自动使用这个格槽上的洗涤剂。
液 洗 涤 剂
操作说明
洗衣操作 说 明
一、洗涤分类
建议进行衣物分类,只 洗 涤 可 机 洗 衣 物 、 非干洗衣物。
请务必依照衣物上的洗涤说明标签来选择洗涤温度。
当进行衣物分类的时候请注意:
不 要 将 白 色 和 易 褪 色 衣 物 放 在 一 起 洗 , 以 免
使白色衣物染色。
网 状 窗 帘 、 内 衣 裤 和 紧 身 衣 ,
建议放进洗衣网或者洗衣袋里来洗涤。
确 保 待 洗 的 衣 物 无 遗 留 的 金 属 物 件(如: 发
夹、别针、大头针和硬币等等)。
扣 好 拉 上 衣 物
枕 头 套, 拉 链 、 钩 子 ; 缝 牢 或
取下衣物上松动的纽扣,系好衣物带子等。
小 件 衣 物 如
21
Page 24

操作说明
二、洗衣前的准备
1.选 出 需 要 洗 涤 的 衣 物 。
2. 把衣 物均匀 放 进 洗 衣
打开机 门
筒里 , 关 紧 机 门 , 确 保 没有 衣
物卡在门上。
3.拉 出
洗 涤 剂 抽 屉,根 据 需 要 和 洗 涤 剂
生 产 厂 家 的 建 议 , 选 择 适 量 的 洗 涤
剂,放入相应的格槽 里(如 有 需 要 , 请
参 考 第21页), 然 后 轻 轻 合 上 洗 涤 剂
抽屉。
2
1
三、选择 洗 涤 程 序
1. 请参 考 程 序 表 及 程 序 简 介 , 选 择 最 适 合 的 洗 涤 程 序 , 把
选 择 旋 钮 ” 旋 到 所 需 要 的 程 序 上 ; 显 示 屏 会 显 示 该 程 序 的 基 本
运行参数。
如有需要 还可以选择其他附加功能(参考功能键介绍)。,
请检查水龙头是否已经打开 排水管是否已经正确放置好。,
2. 按 下 “ 开 始/暂 停 ” 键
当按下“开始/暂停”键后,洗衣机就开始工作。
当 某 个 程 序 被 选 定 后 , “ 程 序 选 择 旋 钮 ” 须 停 留 在 选 定 程 序 对
应的位置上,直到洗衣程序结束为止。
警告:
如 果 洗 涤 程 序 因 为 外 部
在 运 行 过 程 中 洗 衣 机 电 源 突 然 断 开 而 中
断 , 洗 衣 机 会 记 录 程 序 中 断 时 的 状 态 , 当 电 源 恢 复 后 , 洗 衣 机 就
会从程序中断的地方继续运行下去。
“ 程 序
四、洗涤程序结束之后
洗 涤 程 序 结 束 后, ,门 锁 保 护 解 除 后 门 锁 保
护”指示灯会熄灭(大概是在程序结束后两分钟)。
把 “ 程 序 选 择 旋 钮 ” 旋 到 “ 关 ” 的 位 置 , 关 闭 洗 衣 机。打开 门 把
衣物取出来,关闭水龙头,拔出电源线插头。
显 示 屏 显 示"End" , “
22
Page 25

操作说明
干衣操作 说 明
一、本洗干衣机提供以下两种烘干方式:
1. 棉 、 厚 毛 巾 、 亚 麻 布 、 纤 维 等 适 用 ;
重要提醒:
在 干 衣 程 序 运 行 过 程 中 , 内 筒 会 加 速 到 较 高 转
速,让衣物均匀分布,优化烘干效果。
2. 混 合 织 物 ( 化 纤/棉 ) 、 化 纤 织 物 等 适 用 。
请不要烘干海绵乳胶或者易燃材料。
重要提醒:
该烘干功能只能用于经过洗涤和脱水的衣物。
警告:
指引 只 适 用 于 一 般烘 干 程 序 。 为 达到 最 佳 的 烘 干
效 果 , 需 要 用 户 自 己 实 践 操 作 。 当 第 一 次 使 用
时, 我 们 建 议 把 烘干 时 间 设 定 比 指引 的 时 间 短 一
些。
我 们 建 议 不 要 烘 干 那 些 易 磨 损 的 衣 物 , 例 如 地
毯,厚实衣物等,以免堵塞管道。
重要提醒:
请勿在烘 干 程 序 结 束 之 后 就马上打 开 机 门 , 需 要
等 待 冷 却 程 序 结 束 后 才 能 打 开 。 为 冷 却 程 序
指示灯。
23
Page 26

Page 27

操作说明
5.按 下 “ 开 始/暂 停 ” 键 。
“ 程 序 选 择 旋 钮 ” 须 一 直 停 留 在 所 选 择 的
干程序处直至结束。
程序结束的时候,“End”显示在显示屏上
等 待 门 锁 保 护 解 除 ( 大 概 是 在 程 序 结 束 后 两
分钟), “门锁保护”指示灯熄灭。
6.把 旋 至 “ 关 ” , 关 掉 机 器“ 程 序 选 择 旋 钮 ” 。
7.打 开 机 门 , 取 出 衣 物 。
每次使用完后,请把水龙头关上
自动洗衣/干衣
警告:
最大烘干容量为
一、洗衣操作
5kg, 如 放 入 过 量 的 衣 物 , 则 会 影 响 烘 干 效 果 。
烘
打开洗涤剂抽屉,放入适量的洗涤剂及辅助剂
参考程序表,选择最适合的程序
转动程序选择旋钮,选择需要的程序
显示屏显示所选择的程序的设置
根据需要调整洗涤温度
根据需要选择附加功能
检查水龙头是否打开,排水管是否已经放置好
25
Page 28

Page 29

清洁和日常保养
清洁和日常保养
不要使用有机溶剂 如 酒 精 、 消 毒 液 等 来 清 洗 洗 衣 机的表面 只需用 湿
布擦拭就可以,本洗衣机不需要太多的日常保养。
1.清洗洗涤剂抽屉:
非 强 制 性 清 洗 但 是 经 常 的 清 洗 一 下 会
让你的洗涤效果更出色。
1) 平 稳 地 把 洗 涤 剂 抽 屉 拉 出 来;
2) 用 水 冲 刷 洗 涤 剂 抽 屉 的 每 一 个 格 槽;
3) 把 洗 涤 剂 抽 屉 放 回 去 。
2.清洗过滤器:
该 过 滤 器 是 用 来 过 滤 那 些 会 堵 塞排 水 口
的 大 件 物 品 的 , 例 如 是 硬 币 和 钮 扣 等
等 , 也 为 你 重 新 找 回 这 些 物 品 提供 了 方
便。
建议一个月清洗一次过滤器。
清洗过程如下:
,
,
1) 打 开 封 盖
2) 对于某些 型 号 的洗 衣 机 ,把 里 面 的 胶
管拿 出 来 , 取出 塞 子 , 然后 把 管 里 面
排出 的 水 装 到一 个 容 器 里, 再 把 塞 子
塞好并把胶管放回去。
3) 在拔出过 滤 器 之前 , 把 一条 吸 水 力 强
的毛 巾 放 到 封盖 下 面 , 用来 吸 收 残 留
在排水泵里面少量的水。
4) 把过滤器 逆 时 针方 向 旋 转直 到 可 以 拿
出来 为 止 , 把它 拿 出 来 ,然 后 清 洗 干
净。
5) 清洗完之后, 把 过 滤 器重 新 安 装 好 ,
顺时针方向拧紧,并且把封盖合上。
。
27
Page 30

清洁和日常保养
3.清 洁 机 门:
机门要经常用湿布清洁。 因为累积起来
的水垢和污渍有可能导致机门漏水。
不要用带磨砂功能的清洁器具清洁机
门,因为这样会刮花机门玻璃表面。
4. 运 输 机 器 或 者 长 时 间 不 使 用 机 器 时 :
如 果 要 运 输 洗 衣 机 或 者 长 时 间 把 洗 衣 机
放 在 阴 凉 地 方 不 使 用 , 请 把 洗 衣 机 里 的
水通过排水口排干净。
请确 保 洗 衣 机 已 经 断 开 电 源 , 然 后 把 排
水管 放 下 , 让 排 水 口 向 下 直 到 所 有 的 水
都排干净。
排干水后,重新将排水管连接好。
异常情况检查
危险:
只 有 专 业 维 修 人 员 才 能 对 电 器 用 具 进 行 维 修 , 其 它 人 员 未 经 许 可
不得擅动,以免造成严重后果。
如果按照下表的提示,仍不能将某一异常现象排除时,请:
1.关掉机器。
2.拔出电源线插头。
3.关闭水龙头。
4.拨打客户服务中心电话以便获得支援。
28
Page 31

异常情况检查
异常情况 可能原因
插头松开了
1.不 启 动
没有开机
电源异常情况
保险丝烧掉了
机门开着
请看可能原因1
水龙头关上了
2.不 进 水
程序选择旋钮器位置不
正确
排水管纠结或堵塞
3.不 排 水
4.洗 衣 机 附 近
地面有水
5.不 脱 水
6.脱 水 时 洗 衣
机过分震动
过滤器有异物
水龙头和进水口之间漏水
水还没有排干净
没有选择脱水程序
放洗衣机的地面不平
运输托架没有拆掉
衣物分布不均匀
处理方法
把插头插好
开机
检查
检查
关好机门
检查
打开水龙头
把程序选择旋钮拧到正确
位置
摆直排水管、清除异物
检查过滤器(第 7页)2
把水龙头和进水口之间的
接口拧紧
等待洗衣机排完水
按下脱水键
调整洗衣机可调整的支脚
拆除运输包装
整理里面的衣物
7.显 示 屏 显 示:
0,1,5,7,8,9
8.显 示 屏 显 示:
2
9.显 示 屏 显 示:
3
10.显示屏
显示:4
不进水
不排水
不停进水
-
呼叫服务
请看处理方法2
请看处理方法3
关掉水龙头,呼叫服务
29
Page 32

EN
OUR COMPLIMENTS
With the purchase of this Candy household appliance, you
have shown that you will not accept compromises: you want
only the best.
Candy is happy to present their new washing machine,the
result of years of research and market experience through
direct contact with Consumers.You have chosen the quality,
durability and high performance that this washing machine
offers.
Candy is also able to offer a vast range of other household
appliances: washing machines, dishwashers, washer-dryers,
cookers, microwave ovens. Traditional ovens and hobs,
refrigerators and freezers.
Ask your local retailer for the complete catalogue of Candy
products.
Please read this booklet carefully as it provides important
guide lines for safe installation,use and maintenance and
some useful advise for best results when using your washing
machine.
Keep this booklet in a safe place for further consultation.
When contacting Candy
or a Customer Services Centre always refer to the Model,
No., and G number (if applicable of the appliance see
panel).
32
Page 33

INDEX
Introduction
EN
CHAPTER
General points on delivery
Guarantee
Safety Measures
Technical Data
Setting up and Installation
Control Description
Table of Programmes
Selection
Detergent drawer
The Product
Washing
Drying cycle
1
2
3
4
5
6
7
8
9
10
11
12
Automatic washing/Drying cycle
Cleaning and routine maintenance
Faults Search
13
14
15
33
Page 34

EN
CHAPTER 1
GENERAL POINTS ON DELIVER
On delivery, check that the following are included with the
machine:
A) INSTRUCTION MANUAL
B) CUSTOMER SERVICE ADDRESSES
C) GUARANTEE CERTIFICATES
D) CAPS
E) BEND FOR OUTLET TUBE
F) LIQUID DETERGENT OR LIQUID BLEACH
COMPARTMENT (CONTAINER)
KEEP THEM IN A SAFE PLACE
Y
Check that the machine has not incurred damage during
transport. If this is the case, contact your nearest Candy
Centre.
EN
CHAPTER 2
GUARANTEE
The appliance is supplied with a guarantee certificate
which allows free use of the Technical Assistance Service.
34
D
F
AB
C
E
Page 35

EN
Appliance complies with European Directives
CHAPTER 3
SAFETY MEASURES
IMPORTANT:
FOR ALL CLEANING AND MAINTENANCE WORK
● Remove the plug
● Turn off the water inlet tap.
● All Candy appliances are earthed. Ensure that the main
electricity circuit is earthed. Contact a qualified electrician
if this is not the case.
Appliance complies with European Directives
73/23/EEC and 89/336/EEC, replaced by 2006/95/EC and
2004/108/EC, and subsequent amendments.
● Do not touch the appliance with wet or damp hands or
feet.
● Do not use the appliance when bare-footed.
● Extreme care should be taken if extension leads are used
in bathrooms or shower rooms.Avoid this where possible.
WARNING:
DURING THE WASHING CYCLE, THE WATER CAN
REACH A TEMPERATURE OF 90°C.
● Before opening the washing machine door, ensure that
there is no water in the drum.
35
Page 36

EN
● Do not use adaptors or multiple plugs.
● This appliance is not intended for use by persons (including
children) with reduced physical,sensory or mental
capabilities, or lack of experience and knowledge,unless
they have been given supervision or instruction concerning
use of the appliance by a person responsible for their safety.
Children should be supervised to ensure that they do not
play with the appliance.
● Do not pull the mains lead or the appliance itself to
remove the plug from the socket.
● Do not leave the appliance exposed to atmospheric
agents (rain,sun etc.)
● In the case of removal,never lift the appliance by the
knobs or detersive drawer.
● During transportation
do not lean the door against the trolley.
Important!
When the appliance location is on carpet floors, attention
must be paid so as to ensure that there is no obstruction to
the bottom vents.
● Lift the appliance in pairs as illustrated in the diagram.
● In the case of failure
and/or incorrect operation,turn the washing machine off,
close the water inlet tap and do not tamper with the
appliance. Contact a Candy Technical Assistance Centre for
any repairs and ask for original Candy spare parts.
Avoidance of these norms may compromise the safety of the
appliance.
● Should the supply cord (mains cable) be demaged,this is
to be replaced by a specific cable available from the after
sales service centre.
36
Page 37

CHAPTER 4
85
cm
EN
60 cm
TECHNICAL DATA
MAXIMUM WASH
LOAD DRY
NORMAL WATER LEVEL
POWER INPUT
ENERGY CONSUMPTION
(PROG.90°C)
POWER CURRENT FUSE
AMP
SPIN
r.p.m.
WATER PRESSURE
SUPPLY VOLTAGE
54 cm
Washing Drying
kg 5
l
W
kWh
A
SEE RATING PLATE
MPa
V
8
6÷15
2150
1,8
10
min. 0,05
max. 0,8
220 - 240
37
Page 38

EN
CHAPTER 5
SETTING UP INSTALLATION
Move the machine near its permanent position without the
packaging base.
Carefully cut the securing strap that holds the main cord and
the drain hose.
Remove the 3 fixing screws marked (A) and remove the 3
spacers marked (B)
Remove the screw (C).
A spacer will fall inside the machine.
By tilting the machine,remove the above mentioned spacer.
Cover the 4 holes using the caps provided in the instruction
booklet pack.
WARNING:
DO NOT LEAVE THE PACKAGING IN THE REACH OF
CHILDREN AS IT IS A POTENTIAL SOURCE OF DANGER.
38
Page 39

EN
Fix the sheet of corrugated material on the bottom as shown
in picture.
Connect the fill hose
to the tap.
The appliance must be connected to the water mains using
new hose-sets.The old hose-sets should not be reused.
IMPORTANT:
DO NOT TURN THE TAP ON AT THIS TIME.
Position the washing machine next to the wall.Hook the
outlet tube to the edge of the bath tub, paying attention
that there are no bends or contractions along the tube.
It is better to connect the discharge hose to a fixed outlet of
a diameter greater than that of the outlet tube and at a
height of min. 50 cm. If is necessary to use the plastic sleeve
supplied.
The appliance must not be installed behind a lockable door,
a sliding door or a door with a hinge on the opposite side to
that of the washer dryer.
max 100 cm
min 4 cm
+2,6 mt max
min 50 cm
max 85 cm
39
Page 40

EN
Use the 4 feet to level the machine with the floor:
a) Turn the nut clockwise to release the screw adjuster of
the foot.
b) Rotate foot to raise or lower it until it stands firmly on the
ground.
c) Lock the foot in position by turning the nut anti-clockwise
until it comes up against the bottom of the machine.
Ensure that the knob is on the “OFF” position and the load
door is closed
A
B
C
Insert the plug.
ATTENTION:
should it be necessary to replace the supply cord, connect
the wire in accordance with the following colours/codes:
BLUE - NEUTRAL (N)
BROWN - LIVE (L)
YELLOW-GREEN - EARTH ( )
After installation, the appliance must be positioned so that
the plug is accessible.
40
Page 41

EN
CHAPTER 6
DN F
P
G H I C L M
CONTROLS
Door handle
Timer knob for wash programmes with OFF position
Wash Temperature button
Spin Speed button
O
E
B
A
A
B
C
D
Degree of soiling button
Buttons indicator light
Intensive button
Aquaplus button
Start Delay button
Drying programme selection button
Start button
Door locked indicator light
Digital Display
Detergent drawer
E
F
G
H
I
L
M
N
O
P
41
Page 42

EN
DESCRIPTION OF CONTROL
“Kg DETECTOR”
(Function active only on Cotton and Synthetics programmes)
Through every wash phase “Kg DETECTOR” allows to monitor
information on
the wash load in the drum.
So, as soon as the “Kg DETECTOR” is set in motion, in the first 4
minutes of the wash,it:
- adjusts the amount of water required
- determines the length of the wash cycle
- controls rinsing
according to the type of fabric selected to be washed it:
- adjusts the rhythm of drum rotation for the type of fabric
being washed
- recognises the presence of lather,increasing,if necessary, the
amount of water during
rinsing
- adjusts the spin speed according to the load, thus avoiding
any imbalance.
In this way “Kg DETECTOR” is able to decide,by itself,the most
suitable programme for each individual wash from the
hundreds of possible wash combinations.
“Kg DETECTOR” meets the need for easy use by permitting a
simplified programme selection.In
fact,the user need only tell the machine the type of fabric in
the drum and the degree of soiling, to obtain a perfect wash
with the highest
level of drying possible with a spin which really cares for your
clothes.
DOOR HANDLE
Press the finger-bar inside
the door handle to open the door
42
A
Page 43

EN
PROGRAMME SELECTOR WITH OFF POSITION
WHEN THE PROGRAMME SELECTOR IS TURNED THE DISPLAY
LIGHTS UP TO SHOW THE SETTINGS FOR THE PROGRAMME
SELECTED. TODAY, MOST DETERGENTS HAVE BEEN IMPROVED TO
WASH EFFICIENTLY AT LOWER TEMPERATURES, THEREFORE WE
HAVE SET THE DEFAULT TEMPERATURE SETTINGS OF EACH
PROGRAMME TO A LOWER LEVEL, SAVING ELECTRICITY AND
REDUCING THE CARBON FOOTPRINT OF YOUR MACHINE.
YOU CAN SELECT AN HIGH TEMPERATURE BY PRESSING THE
TEMPERATURE BUTTON. PLEASE REFER TO THE PROGRAMME
GUIDE FOR THE MAXIMUM TEMPERATURE TO WHICH EACH
PROGRAMME CAN BE SET.
N.B. TO SWITCH THE MACHINE OFF,TURN THE PROGRAMME
SELECTOR TO THE “OFF” POSITION.
Press the "Start/Pause" button to start the selected cycle.
The programme carries out with the programme selector
stationary on the selected programme till cycle ends.
Switch off the washing machine by turning the selector to OFF.
:
NOTE
THE PROGRAMME SELECTOR MUST BE RETURN TO THE
OFF POSITION AT THE END OF EACH CYCLE OR WHEN
STARTING A SUBSEQUENT WASH CYCLE PRIOR TO THE
NEXT PROGRAMME BEING SELECTED AND STARTED.
B
“WASH TEMPERATURE” BUTTON
When a programme is selected the relevant indicator will light
up to show the recommended wash temperature.
The Temperature button can be used to decrease or increase
the temperature of your chosen wash cycle.
Each time the button is pressed, the new temperature level is
shown on the Wash Temperature Indicator.
“SPIN SPEED” BUTTON
The spin cycle is very important to remove as much water as
possible from the laundry without damaging the fabrics.You
can adjust the spin speed of the machine to suit your needs.
By pressing this button, it is possible to reduce the maximum
speed, and if you wish, the spin cycle can be cancelled.
To reactivate the spin cycle is enough to press the button until
you reach the spin speed you would like to set.
For not damage the fabrics, it is not possible to increase the
speed over that automatically suitable during the selection of
the program.
It is possible to modify the spin speed in any moment, also
without to pause the machine.
NOTE:
THE MACHINE IS FITTED WITH A SPECIAL ELECTRONIC DEVICE,
WHICH PREVENTS THE SPIN CYCLE SHOULD THE LOAD BE
UNBALANCED. THIS REDUCES THE NOISE AND VIBRATION IN
THE MACHINE AND SO PROLONGS THE LIFE OF YOUR
MACHINE.
C
D
43
Page 44

EN
“DEGREE OF SOILING” BUTTON
By selecting this button (active only on COTTON and MIXED
FIBRES programmes) there is a choice of 3 levels of wash
intensity, depending on how much the fabrics are soiled.
Once the programme has been selected the indicator light
will automatically show the minimum level required for that
programme.Pressing the button increases the duration of the
wash cycle,and adjusts the wash settings accordingly. For
example: Using this button on the Rapid Wash cycle will
enable you to select either a 14, 30 or 44 minute wash cycle.
E
BUTTONS INDICATOR LIGHT
These light up when the relevant buttons are pressed.
If an option is selected that is not compatible with the
selected programme then the light on the button first flashes
and then goes off.
The option buttons should be selected before pressing the START
button
INTENSIVE BUTTON
By pressing this button a sensors system come into operation.
They affect both the selected temperature, keeping it at a
constant level throughout the wash cycle, and the
mechanical function of the drum.
The drum is made to turn at two different speeds at crucial
moments. When the detergent enters the garments, the
drum rotates in such a way that the detergent is distributed
in a uniform manner; during the wash and rinse procedures,
however,the speed increases in order to maximise the
cleaning action.Thanks to this special system, the efficiency
of the wash procedure is improved WITHOUT ANY INCREASE
IN THE LENGTH OF THE PROGRAM.
F
G
44
Page 45

EN
“AQUAPLUS” BUTTON
By pressing this button you can activate a special new
wash cycle in the Colourfast and Mixed Fabrics programs,
thanks to the new Sensor System.This option treats with
care the fibres of garments and the delicate skin of those
who wear them.
The load is washed in a much larger quantity of water and
this, together with the new combined action of the drum
rotation cycles,where water is filled and emptied,will give
you garments which have been cleaned and rinsed to
perfection.The amount of water in the wash is increased so
that the detergent dissolves perfectly,ensuring an efficient
cleaning action.The amount of water is also increased
during the rinse procedure so as to remove all traces of
detergent from the fibres.
This function has been specifically designed for people with
delicate and sensitive skin,for whom even a very small
amount of detergent can cause irritation or allergy.
You are advised to also use this function for children’s
clothing and for delicate fabrics in general,or when
washing garments made of towelling,where the fibres tend
to absorb a greater quantity of detergent.
To ensure the best performance for your wash, this function
is always activated on the Delicates and
Woollens/Handwash programs.
“DELAY START” BUTTON
This button allows you to pre-programme the wash cycle to
delay the start of the cycle for up to 24 hours.
To delay the start use the following procedure:
Set the required programme.
Press the button once to activate it (h00 appears on the
display) and then press it again to set a 1 hour delay (h01
appears on the display); the pre-set delay increases by 1
hour each time the button is pressed, until h24 appears on
the display, at which point pressing the button again will
reset the delay start to zero.
Confirm by pressing the “START/PAUSE” button (the light on
the display starts to flash). The countdown will begin and
when it has finished the programme will start automatically.
It is possible to cancel the delay start by taking the following
action:
Press and hold the button for 5 seconds until the display will
show the settings for the programme selected.
At this stage it is possible to start the programme previously
selected by pressing the “START/PAUSE” button or to cancel
the process by setting the selector to the OFF position and
then selecting another programme.
H
I
45
Page 46

EN
DRYING PROGRAMME SELECTION BUTTON
With the programme selector not in the OFF position,press the
button to select the required drying programme; an indicator
will light to display the drying result selected each time you
press the button.
To cancel the selection before the start of a drying programme,
press the button repeatedly until the indicators go out or return
the programme selector to the OFF position.
To cancel the cycle during the drying phase,hold the button
down for 2 seconds until the cooling indicator lights up; given
the high temperature inside the drum, we recommend that you
allow the dryer to complete the cool down period before
returning the programme selector to the OFF position and
removing the laundry.
NOTE:
Do not dry unwashed items in the washer dryer.
Items that have been soiled with substances such as cooking
oil, acetone, alcohol, petrol, kerosene, spot removers, turpentine,
waxes and wax removers should be washed in hot water with
an extra amount of detergent before being dried in the washer
dryer.
Items such as foam rubber (latex foam),shower caps,
waterproof textiles, rubber backed articles and clothes or
pillows fitted with foam rubber pads should not be dried in the
washer dryer.
Fabric softeners, or similar products,should be used as specified
by the fabric softener instructions.
The final part of a washer dryer cycle occurs without heat (cool
down cycle) to ensure that the items are left at a temperature
that ensures that the items will not be damaged.
WARNING:
Never stop a washer dryer before the end of the drying cycle
unless all items are quickly removed and spread out so that the
heat is dissipated.
L
46
Page 47

EN
START BUTTON
Press to start the selected cycle.
NOTE:
FEW SECONDS AFTER THE START THE WASH CYCLE WILL
BEGIN. DURING THE FIRST 4 MINUTES OF THE WASH
CYCLE, THE KG DETECTOR (ACTIVE ONLY ON COTTON
AND SYNTHETICS PROGRAMMES) WILL WEIGH THE
CLOTHES AND UPDATE THE MAXIMUM WASH TIME
REMAINING ON THE DISPLAY EVERY FIVE SECONDS
UNTIL THE WEIGHT HAS BEEN DETERMINED.
WHILE THIS FUNCTION IS OPERATING THE “Kg
DETECTOR” INDICATOR IS ON.
CHANGING THE SETTINGS AFTER THE PROGRAMMES HAS STARTED
(PAUSE)
Press and hold the “START/PAUSE” button for about 2 seconds,
the flashing lights on the options buttons and time remaining
indicator will show that the machine has been paused,adjust
as required and press the “START/PAUSE” button again to
cancel the flashing lights.
If you wish to add or remove items during washing, wait 2
minutes until the safety device unlocks the door.
When you have carried out the manoeuvre,close the door,
press START button and the appliance will continue working
where it left off.
CANCELLING THE PROGRAMME
To cancel the programme, set the selector to the OFF position.
Select a different programme.
Re-set the programme selector to the OFF position.
M
DOOR LOCKED INDICATOR
The “Door Locked”indicator light is illuminated when the door is
fully closed and the machine is ON.
When START is pressed on the machine with the door closed the
indicator will flash momentarily and then illuminate.
If the door is not closed the indicator will continue to flash.
A special safety device prevents the door from being opened
immediately after the end of the cycle.Wait for 2 minutes after
the wash cycle has finished and the Door Locked light has
gone out before opening the door.At the end of cycle turn the
programme selector to OFF .
N
47
Page 48

EN
“DIGITAL” DISPLAY
The display’s indicator system allows you to be constantly
informed about the status of the machine:
1) WASH TEMPERATURE
When a programme is selected the relevant indicator will
light up to show the recommended wash temperature.The
Temperature button can be used to decrease or increase
the temperature of your chosen wash cycle. Each time the
button is pressed, the new temperature level is shown on the
Wash Temperature Indicator.
2) DOOR LIGHT
Once the START/PAUSE button has been pressed the light first
flashes then stops flashing and remains on until the end of
the wash.
2 minutes after the end of the wash the light goes off to
show that the door can now be opened.
3) SPIN SPEED
Once the programme has been selected,the maximum spin
speed allowed for that programme appears on the display.
Pressing the spin button will reduce the speed by 100 rpm
each time the button is pressed. The minimum speed
allowed is 400 rpm,or it is possible to omit the spin by
pressing the spin button repeatedly.
O
{
6
{
1
2
8
{
7
{
{
5
4
3
{
2
1
3
{
4) DELAY START LIGHT
This flashes when delay start has been set.
5) CYCLE DURATION
When a programme is selected the display automatically
shows the cycle duration,which can vary, depending on the
options selected.
Once the programme has started you will be kept informed
constantly of the time remaining to the end of the wash.
The appliance calculates the time to the end of the selected
programme based
upon a standard loading, during the cycle, the appliance
corrects the time to that applicable to the
size and composition of the load.
If is selected the automatic washing/drying cycle,at the end
of the wash phase,the drying time remaining to the end will
be shown on the display.
48
4
{
5
mm
h
Page 49

EN
6)Kg DETECTOR Indicator
Available on Cotton and Synthetic cycles, during the first 4
minutes of the cycle the intelligent sensor will weigh the
laundry and adjust the cycle time, water and electricity
consumption accordingly.
7) DEGREE OF SOILING
When a programme is selected the relevant indicator will
light up to show the minimum possible degree of soiling.
Selecting a greater degree of soiling using the special
button will cause the corresponding indicator to light up.
8) DRYING PROGRAMME INDICATORS
The indicators display the type of the drying programme:
atic Programmes
utom
A
automatic programmes,the washer-dryer will calculate the
time needed for drying and the residual dampness
required, according to the load and drying type selected.
After pressing the START button,the display will shown the
drying time remaining.
The appliance calculates the time to the end of the
selected programme based
upon a standard loading, during the cycle, the appliance
corrects the time to that applicable to the
size and composition of the load.
: By selecting one of these 3
{
8
6
7
}
for towels,bathrobes and bulky loads)
USEFUL TIPS:
The 30 minute drying programme is recommended for small
loads (less than 1 kg) or slightly damp loads.
Your washer-dryer ends the cycle automatically when it
reaches the drying level selected.
For the correct operation of the appliance, it is preferable
not to interrupt the drying phase unless it is really necessary.
T
imed programmes:
120 minutes – 90 minutes – 60 minutes – 30 minutes:
They may be used to select timed drying programmes.
Cool down phase :
Switched on during the final cool down period, in the last 10
minutes of each drying phase.
= Extra dry drying programme (recommended
= Cupboard dry drying programme
= Iron dry drying programme
49
Page 50

EN
CHAPTER 7
PROGRAM FOR:
Resistant fabrics
Cotton, linen
with Prewash
Cotton, mixed
resistant,
Coloureds
Mixed fabrics and synthetics
Cotton, mixed fabrics, synthetics
Very delicate fabrics
“MACHINE WASHABLE”
woollens
Hand wash
Rinse
Fast spin
Drain only
TABLE OF PROGRAMMES
PROGRAMME
SELECTOR ON:
1)
WEIGHT
MAX
kg
8
*
1)
*
1)
**
8
4
*
2,5
2
1,5
-
*
-
*
-
RECOMMENDED
TEMP.
°C
60°
40°
40°
40°
40°
30°
-
-
-
MAX TEMP.
°C
Up to:
90°
Up to:
60°
Up to:
60°
Up to:
40°
Up to:
40°
Up to:
30°
-
-
-
CHARGE DETERGENT
21
●●●
●●
●●
●●
●●
●●
●
Mix & Wash
system programme
Resistant fabrics
Mixed fabrics and synthetics
Rapid 14 minute
Resistant fabrics
Mixed fabrics and synthetics
Rapid 30 minute
Resistant fabrics
Mixed fabrics and synthetics
Rapid 44 minute
Mixed, delicate
synthetics
Mixed - Drying
Cotton - Drying
Cotton - Mixed
50
8
*
2)
1,5
2,5
3,5
40°
30°
30°
30°
Up to:
40°
Up to:
30°
Up to:
40°
Up to:
40°
●●
●●
●●
●●
*
4
30°
*
4
5
1,5
-
-
30°
Up to:
30°
-
-
Up to:
30°
●●
●●
Page 51

Please read these notes
When washing heavily soiled laundry it is recommended the load is reduced to 4 kg maximum.
Information for the test laboratories
(Ref. EN 50229 Standards)
Washing
Use the programme ** with the maximum degree of soiling selected,maximum spin speed
and a temperature of 60°C.
Programme recommended also for test with a lower temperature.
Drying
First drying with 5kg (the load consist: pillowcases and hand-towels) selecting the cotton
drying programme ( ) cupboard dry ( ).
Second drying with 3kg (the load consist: 3 sheets and hand towels) selecting the cotton
drying programme ( ) 120 minutes (120’).
The spin speed may also be reduced,to match any guidelines suggested on the fabric label,or
for very delicate fabrics cancel the spin completely this option is available with a spin speed
button.
Pressing the wash temperature button makes it possible to wash at any temperature below
the maximum allowed.
* Programmes for automatic drying.
1) For the programmes shown you can adjust the duration and intensity of the wash
using the degree of soiling button.
2) Using the Degree of soiling button on the Rapid cycle will enable you to select either a
14, 30 or 44 minute wash cycle.
When only a limited number of articles have stains which require treatment with liquid
bleaching agents, preliminary removal of stain can be carried out in the washing machine.
Pour the bleach into the liquid bleach container, inserted into the compartment marked "2"
in the detergent drawer,and set the special programme "RINSE" .
When this phase has terminated, turn the programme selector on the "OFF" position, add
the rest of the fabrics and proceed with a normal wash on the most suitable programme.
51
Page 52

EN
CHAPTER 8
SELECTION
For the various types of fabrics and various degrees of dirt
the washing machine has different programme bands
according to: wash cycle,temperature and lenght of cycle
(see table of washing cycle programmes).
RESISTANTS FABRICS
The programmes have been designed for a maximum wash
and the rinses, with spin intervals,ensure perfect rinsing.
The final spin gives more efficient removal of water.
MIXED AND SYNTHETIC FABRICS
The main wash and the rinse gives best results thanks to the
rotation rhythms of the drum and to the water levels.
A gentle spin will mean that the fabrics become less
creased.
SPECIAL DELICATE FIBRES
This is a new wash cycle which alternates washing and
soaking and is particularly recommended for very delicate
fabrics.
The wash cycle and rinses are carried out with high water
levels to ensure best results.
WOOLMARK PROGRAMME
The special cycle,enables to thoroughly wash garments
without damaging them.
The cycle comprises of alternate periods of activity and
pauses with a maximum temperature of 40°C and concludes
with 3 rinses and a short spin.
52
Page 53

EN
SPECIAL “HAND WASH”
This washing machine also has a gentle Hand Wash
programme cycle.This programme allows a complete
washing cycle for garments specified as “Hand Wash only”
on the fabric care label. The programme has a temperature
of 30°C and concludes with 3 rinses and a slow spin.
SPECIAL “RINSE” PROGRAMME
This programme carries out three rinses with a intermediate
spin (which can be reduced or excluded by using the
correct button). It can be used for rinsing any type of fabric,
eg. use after hand-washing.
This program can be also used as cycle of Bleaching (see
table of washing cycle programmes).
SPECIAL “FAST SPIN” PROGRAMME
Programme “FAST SPIN” carries out a maximum spin (which
can be reduced by using the correct button).
DRAIN ONLY
This programme drains out the water.
“MIX & WASH SYSTEM” PROGRAMME
This is an exclusive Candy system and involves 2 great
advantages for the consumer:
• to be able to wash together different type of fabrics (e.g.
cotton + synthetic etc…) FAST COLOUREDS;
•to wash with a considerable energy saving.
The "Mix & Wash" programme has a temperature of 40°C
and alternate dynamic phases (the basket that turns) to
static phases (fabrics in soak in phase of rest) with a
duration programme that almost reaching the 2 hours.
The energy consumption for the complete cycle is only 850
W/h.
Important:
•the first washing of new coloureds fabrics must be done
separately;
• in every case, never mix NON-FAST COLOUREDS fabrics.
53
Page 54

EN
RAPID PROGRAMME
The Rapid programme allows a washing cycle to be
completed in just 14 minutes! This programme is particularly
suited to slightly dirty cottons and mixed fabrics.
Using the Degree of soiling button on the Rapid cycle will
enable you to select either a 14, 30 or 44 minute wash cycle.
When selecting the rapid programme,please note that we
recommend you use only 20% of the recommended
quantities shown on the detergent pack.
For information about these programmes please refer to the
programmes table.
“SHIRTS” PROGRAMME
This programme allows a complete washing cycle for shirts.
The main wash and the rinse gives best results thanks to the
rotation rhythms of the drum and to the water levels.
The programme has a maximum temperature of 30°C and
concludes with 3 rinses and a short spin.
SYNTHETICS DRYING
Mixed fabrics (synthetics/cotton), synthetic fabrics.
COTTON DRYING
Cotton, terry towelling, linen,hemp fabrics,etc...
RAPID 59’
A complete express washing and drying cycle lasting only
59'.This is an ideal program for having dry,refreshed and
ready-to-wear clothes as soon as the cycle is finished.
- Maximum load: 1,5 kg (4 shirts for example)
- Lightly soiled fabrics (cotton and mixed fabrics)
With this program we recommend that you reduce the
detergent loading dose (compared to the normal one), in
order to avoid detergent waste.
54
Page 55

EN
CHAPTER 9
DETERGENT DRA
The detergent draw is split into 3 compartments:
- the compartment labelled "1" is for prewash detergent;
- the compartment
labelled “
fragrances,starch, brighteners etc;
- the compartment labelled "2" is for main wash detergent.
If liquid detergents are used, please insert the special
container supplied into the compartment marked “2” in the
detergent drawer.This ensures that the liquid detergent
enters the drum at the right stage of the wash cycle.
This special container must be inserted into the
compartment marked "2" in the detergent drawer, also
when you wish to use the "RINSE" programme as BLEACHING
cycle.
✿” is for special additives, fabric softeners,
WER
NOTE: SOME DETERGENTS ARE DIFFICULT TO REMOVE.
FOR THESE, WE RECOMMEND YOU USE THE SPECIAL
DISPENSER WHICH IS PLACED IN THE DRUM.
NOTE: ONLY PUT LIQUID PRODUCTS IN THE
COMPARTMENT
LABELLED “
AUTOMATICALLY TAKE UP ADDITIVES DURING THE
FINAL RINSE STAGE FOR ALL WASH CYCLES.
✿”. THE MACHINE IS PROGRAMMED TO
55
Page 56

EN
CHAPTER 10
THE PRODUCT
IMPORTANT:
When washing heavy rugs, bed spreads and other heavy
articles, it is advisable not to spin.
To be machine-washed, woollen garments and other articles
in wool must bear the “Machine Washable Label”.
IMPORTANT:
When sorting articles ensure that:
- there are no metal objects in the washing (e.g.brooches,
safety pins, pins, coins etc.).
- cushion covers are buttoned,zips and hooks are closed,
loose belts and long tapes on dressing gowns are
knotted.
- runners from curtains are removed.
- attention is paid to garment labels.
- when sorting, any tough stains should be removed prior to
washing using stain removers only recommended on
label.
56
Page 57

EN
CHAPTER 11
OMER AW
CUST
A guide environmentally friendly and economic use of your
appliance.
MAXIMISE THE LOAD SIZE
Achieve the best use of energy,water, detergent and time by
using the recommended maximum load size.
Save up to 50% energy by washing a full load instead of 2 half
loads.
DO YOU NEED TO PRE-WASH?
For heavily soiled laundry only!
SAVE detergent, time, water and between 5 to 15% energy
consumption by NOT selecting Prewash for slight to normally
soiled laundry.
IS A HOT WASH REQUIRED?
Pretreat stains with stain remover or soak dried in stains in
water before washing to reduce the necessity of a hot wash
programme.
Save up to 50% energy by using a 60°C wash programme.
ARENESS
BEFORE USING A DRYING PROGRAMME...
SAVE energy and time by selecting a high spin speed to
reduce the water content in laundry before using a drying
programme.
57
Page 58

EN
WASHING
VARIABLE CAPACITY
This washing machine automatically adapts the level of the
water to the type and quantity of washing.In this way it is also
possible to obtain a “personalized” wash from an energy saving
point of view.
This system gives a decrease in energy consumption and a
sensible reduction in washing times.
EXAMPLE:
A net bag should be used for particularly delicate fabrics.
Let us suppose that the washing consists of HEAVILY SOILED
COTTON (tough stains should be removed with suitable
stain removal).
It is advisable not to wash a load made up entirely of
articles in towelling fabric which absorb a lot of water and
become too heavy.
● Open the detergent drawer (P).
● Put 120 g in the main wash compartment marked 2.
● Put 50 ml of the desired additive in the additives
compartment
● Close the detergent drawer (P).
● Ensure that the water inlet tap is turned on.
● And that the discharge tube is in place.
PROGRAMME SELECTION
Refer to the programme guide to select the most suitable
programme.
Turning the selector knob required programme is activate.
The display will show the settings for the programme selected.
Adjust the wash temperature if necessary.
Press the option buttons (if required)
Then press the START button.
When the START button is pressed the machine sets the working
sequence in motion.
The programme carries out with the programme selector
stationary on the selected programme till cycle ends.
58
✿
.
Page 59

EN
Warning: If there is any break in the power supply while the
machine is operating,a special memory stores the selected
programme and,when the power is restored,it continues where it
left off.
● When the programme has ended the word “End”will appear
on the display
● Wait for the door lock to be released (about 2 minutes after the
programme has finished).
● Switch off the machine by turning the programme selector to
the “OFF” position.
● Open the door and remove the laundry.
● Turn off the water supply after every use.
FOR ALL TYPES OF WASH CONSULT THE PROGRAMME
TABLE AND FOLLOW THE OPERATIONS IN THE ORDER
INDICATED.
59
Page 60

EN
CHAPTER 12
DRYING
DON’T DRY GARMENTS MADE FROM FOAM RUBBER
OR FLAMMABLE MATERIALS.
IMPORTANT:
THIS DRYER CAN ONLY BE USED FOR LAUNDRY
WHICH HAS BEEN WASHED AND SPIN DRIED.
WARNING:
Indications given are general,therefore some practice is
needed for the best drying results. We recommend setting a
lower drying time than indicated, when first using, so as to
establish the degree of dryness required. We recommend not
to dry fabrics that fray easily, such as rugs or garments with a
deep pile, to avoid air duct clogging.
The water is then conveyed to the drain circuit,wich is sealed
and therefore,no steam can be released outside.
IMPORTANT
NEVER OPEN THE DOOR AFTER THE DRYING CYCLE
HAS BEGUN - WAIT UNTIL THE COOL DOWN PERIOD
PROVIDED FOR BY THE CYCLE.
Only dry pre-spun laundry
The washer/dryer can perform two types of drying:
1 Cotton, terry towelling, linen,hemp fabrics,etc...
Advisory note
During drying phase the drum will accelerate to a higher
speed to
distribute the load and to optimize the drying performance
2 Mixed fabrics (synthetics/cotton), synthetic fabrics.
60
Page 61

EN
DRYING CYCLE
● Open door.
● Fill with up to 5 kg - in case of large items (e.g. sheets) or
very absorbent items (e.g. towels or jeans), it is a good idea
to reduce the load.
● Close door.
● Turn programme dial to cotton.
● Select the degree of dryness that you require.
This ranges from Extra Dry ( ) for bath towels and
bathrobes, through Cupboard Dry ( ) for items that will
be put away without ironing,to iron dry ( ) that leaves
the laundry suitable for ironing.
If you wish to select a timed drying cycle, press the “drying
programme selection”button until the required time
indicator lights up.
DOUBLE-SKIN DOOR
The appliance door is fitted with a protective shield to
prevent contact with the glass door which can reach high
temperatures, during the drying cycle.
MAX
5 kg
WARNING: DO NOT TOUCH DOOR FOR ANY REASON.
● Make sure water inlet valve is open.
● Make sure water drain is correctly positioned.
WARNING:
DO NOT DRY WOOLLEN GARMENTS OR ARTICLES WITH
SPECIAL PADDING, (E.G. QUILTS, QUILTED ANORAKS,
ETC.).
DELICATE FABRICS IF GARMENTS ARE DRIP/DRY, LOAD
LESS ITEMS AO AS TO PREVENT CREASING.
61
Page 62

EN
● Press the START button.
● The drying phase will begin with the programme dial fixed
on the symbol until the end of drying.
● The drying programme indicator will be on until the cool
down phase will begin and the indicator ( ) will go on.
At the end of the programme the word “END” will appear on
the display.
● Wait for the door lock to be released (about 2 minutes after
the programme has finished).
The "Door Security" indicator light will go out.
● Switch off the machine by turning the programme selector
on the “OFF”position.
● Open the door and remove the laundry.
● Turn off the water supply after every use.
62
Page 63

EN
CHAPTER 13
AUTOMATIC WASHING/DRYING
WARNING: ONLY A MAXIMUM 5 KG OF DRY LAUNDRY
CAN BE LOADED OTHERWISE THE DRIED LAUNDRY WILL
BE NOT SATISFACTORY.
Washing:
Open the drawer, choose the detergent and put in the
correct amount.
Refer to the list of washing programmes according to fabrics
to be washed (e.g.very dirty cotton) and without pressing
Start button, prepare wash as described:
Turning the selector knob,the required programme is
activated.
The display will show the settings for the programme selected.
Adjust the wash temperature if necessary.
Press the option buttons (if required)
Check that the tap is turned on and that the discharge hose
is positioned correctly.
Drying:
Select the degree of dryness that you require.
This ranges from Extra Dry
( ) for bath towels and bathrobes, through Cupboard Dry
( ) for items that will be put away without ironing, to iron
dry ( ) that leaves the laundry suitable for ironing.
If you wish to select a timed drying cycle, press the “drying
programme selection”button until the required time
indicator lights up.
Press the "Start/Pause" button.
The programme carries out with the programme selector
stationary on the selected programme till cycle ends.
At the end of the wash phase the display will shown the
drying time remaining.
The washer-dryer will then complete the entire drying
programme.
The drying programme indicator will be on until the cool
down phase will begin and the indicator ( ) will go on.
At the end of the programme the word “END” will appear on
the display.
Wait for the door lock to be released (about 2 minutes after
the programme has finished).
The "Door Security" indicator light will go out.
Switch off the machine by turning the programme selector
on the “OFF” position.
Open the door and remove the laundry.
Turn off the water supply after every use.
63
Page 64

EN
TABLE OF DRYING TIMES (IN MINUTES):
PROGRAMME
Extra
Cupboard
Iron
The appliance calculates the time to the end of the selected programme based
upon a standard loading, during the cycle, the appliance corrects the time to that
applicable to the size and composition of the load.
COTTON MIXED
Min 1 Kg
from 30’
from 30’
from 30’
Max 5 Kg
to 230’
to 220’
to 170’
Min 1 Kg
from 30’
from 30’
from 30’
Max 4 Kg
to 170’
to 150’
to 80’
64
Page 65

EN
CHAPTER 14
CLEANING AND ROUTINE MAINTENANCE
Do not use abrasives, spirits and/or diluents on the exterior of
the appliance. It is sufficient to use a damp cloth.
The washing machine requires very little maintenance:
● Cleaning of drawer compartments.
● Filter cleaning
● Removals or long periods when the machine is left
standing.
CLEANING OF DRAWER COMPARTMENTS
Although not strictly necessary,it is advisable to clean the
detergent, bleach and additives compartments
occasionally.
Remove the compartments by pulling gently.
Clean with water.
Put the compartments back into place
65
Page 66

EN
FILTER CLEANING
The washing-machine is equipped with a special filter to
retain large foreign matter which could clog up the drain,
such as coins, buttons, etc.These can,therefore,easily be
recovered.The procedures for cleaning the filter are as
follows:
● Open the flap
● Only available on certain models:
Pull out the corrugated hose, remove the stopper and drain
the water into a container.
● Before removing the filter,place an absorbent towel below
the filter
cap to collect the small amount of water likely to be inside
the pump
● Turn the filter anticlockwise till it stops in vertical position.
● Remove and clean.
● After cleaning, replace by turning the notch on the end of
the filter clockwise.Then follow all procedures described
above in reverse order.
66
Page 67

EN
REMOVALS OR LONG PERIODS WHEN THE MACHINE IS LEFT
STANDING
For eventual removals or when the machine is left standing
for long periods in unheated rooms,the drain hose should be
emptied of all remaining water.
The appliance must be switched off and unplugged.A bowl
is needed. Detach the drainage hose from the clamp and
lower it over the bowl until all the water is removed.
Repeat the same operation with the water inlet hose.
67
Page 68

CHAPTER 15
EN
FAULT
1. Does not function
on any
programme
2. Does not load
water
3. Does not
discharge water
4. Water on floor
around washing
machine
5. Does not spin
6. Strong vibrations
during spin
7. Display reads error
0, 1, 5, 7,8, 9
8. Display reads
error 2
9. Display reads
error 3
10.Display reads
error 4
CAUSE
Mains plug not plugged in
Mains switch not on
No power
Electric circuit fuses failure
Load door open
See cause 1
Inlet tap turned off
Timer not set correctly
Discharge tube bent
Odd material blocking filter
Leak from the washer between the tap
and inlet tube
The washing machine has not
discharged water
“No spin” setting (some models only)
Washing machine not perfectly level
Transport bracket not removed
Washing load not evenly distributed
–
No water fill.
No pump out.
Machine overfilled with water.
Insert plug
Turn on mains switch
Check
Check
Close load door
Check
Turn on water inlet tap
Set timer on correct position
Straighten discharge tube
Check filter
Replace washer and tighten the tube
on the tap
Wait a few minutes until the machine
discharges water
Turn the programme dial onto spin
setting
Adjust special feet
Remove transport bracket
Distribute the washing evenly
Call service.
Check water supplies are on.
Check drain is clear.
Check drain hose is not kinked.
Turn off water supply to machine.
Call service.
REMEDY
Advisory note
During drying phase the drum will accelerate to a higher speed to distribute the load and to
optimize the drying performance
68
Page 69

If the fault should persist,contact a Candy Technical Assistance Centre. For prompt servicing, give
the model of the washing machine,to be found on the label placed on the cabinet inside of the
porthole or on the guarantee certificate.
Important
1The use of environment friendly detersives without phosphates may produce the following
effects:
- The discharge rinse water may result cloudier due to the presence of zeolites in suspension.
This does not compromise the efficiency of the rinses.
- The presence of white powder (zeolites) on the washing at the end of the washing cycle. This
does not remain incorporated in the fabric and does not alter the colour.
- The presence of foam in the last rinse water which is not necessarily a sign of inadequate
rinsing.
- The non-ionic surface-active agents present in the composition of washing machine
detersives are often difficult to remove from the washing itself and, even in small quantities,
may produce visible signs of the formation of foam.
- Carrying out further rinses, in cases such as this, is not useful.
2 If your washing machine fails to function,carry out the above-mentioned checks before calling
the Candy Technical Assistance Service.
69
Page 70

Page 71

This appliance is marked according to the European directive 2002/96/EC on Waste Electrical and Electronic
Equipment (WEEE).
By ensuring this product is disposed of correctly, you will help prevent potential negative consequences for the
environment and human health, which could otherwise be caused by inappropriate waste handling of this product.
The symbol on the product indicates that this product may not be treated as household waste. Instead it shall be
handed over to the applicable collection point for the recycling of electrical and electronic equipment
Disposal must be carried out in accordance with local environmental regulations for waste disposal.
For more detailed information about treatment, recovery and recycling of this product, please contact your local city
office, your household waste disposal service or the shop where you purchased the product.
The manufacturer declines all responsibility in the event of any printing mistakes in
this booklet. The manufacturer also reserves the right to make appropriate
modifications to its products without changing the essential characteristics.
Page 72

CN
EN
10.12 - 41033337 - www.graficaestampa.it - Printed in Italy - Imprimé en Italie
 Loading...