

Page 1

MOD. FLG202X
MOD. FLG202N
MOD. FLG202W
MOD. FLG203X
ISTRUZIONI D'USO E MANUTENZIONE
PER FORNI A GAS DA INCASSO
USE AND MAINTENANCE INSTRUCTIONS
FOR BUIL-IN GAS OVENS
INSTRUKCJE U YTKOWANIA I KONSERWACJI
DLA PIEKARNIKÓW GAZOWYCH DO ZABUDOWY
HASZNÁLATI ÉS KARBANTARTÁSI ÚTMUTATÓ
BEÉPÍTHET
GÁZSÜT KHÖZ
Page 2

Page 3
In Übereinstimmung mit den Anforderungen der Europäischen
D
Richtlinie 2002/96/EG über Elektro- und Elektronik-Altgeräte
(WEEE) ist vorliegendes Gerät mit einer Markierung versehen.
Sie leisten einen positiven Beitrag für den Schutz der Umwelt und die
Gesundheit des Menschen, w enn Sie dieses Gerät einer gesonderten
Abfallsammlung zuführen. Im unsortierten Siedlungsmüll könnte ein
solches Gerät durch unsachgemäße Entsorgung negative
Konsequenzen nach sich ziehen.
Auf dem Produkt oder der beiliegenden Produktdokumentation ist
folgendes Symbol einer durchgestrichenen Abfalltonne
abgebildet. Es weist darauf hin, dass eine Entsorgung im normalen
Haushaltsabfall nicht zulässig ist Entsorgen Sie dieses Produkt im
Recyclinghof mit einer getrennten Sammlung für Elektro- und
Elektronikgeräte.
Die Entsorgung muss gemäß den örtlichen Bestimmungen zur
Abfallbeseitigung erfolgen.
Bitte wenden Sie sich an die zuständigen Behörden Ihrer
Gemeindeverwaltung, an den lokalen Recyclinghof für Haushaltsmüll
oder an den Händler, bei dem Sie dieses Gerät erworben haben, um
weitere Informationen über Behandlung, Verwertung und
Wiederverwendung dieses Produkts zu erhalten.
This appliance is marked according to the European directive
GB
2002/96/EC on Waste Electrical and Electronic Equipment (WEEE).
By ensuring this product is disposed of correctly, you will help prevent
potential negative consequences for the environment and human
health, which could otherwise be caused by inappropriate waste
handling of this product.
The symbol on the product, or on the documents
accompanying the product, indicates that this appliance may not be
treated as household waste. Instead it shall be handed over to the
applicable collection point for the recycling of electrical and electronic
equipment.
Disposal must be carried out in accordance with local environmental
regulations for waste disposal.
For more detailed information about treatment, recovery and
recycling of this product, please contact your local city office, your
household waste disposal service or the shop where you purchased
the product.
Cet appareil porte le symbole du recyclage conformément à la
F
Directive Européenne 2002/96/CE concernant les Déchets
d'Équipements Électriques et Électroniques (DEEE ou WEEE).
En procédant correctement à la mise au rebut de cet appareil, vous
contribuerez à empêcher toute conséquence nuisible pour
l'environnement et la santé de l'homme.
Le symbole présent sur l'appareil ou sur la documentation qui
l'accompagne indique que ce produit ne peut en aucun cas être traité
comme déchet mén ager. Il doit par conséquent êt re remis à un centre
de collecte des déchets chargé du recyclage des équipements
électriques et électroniques.
Pour la mise au rebut, respectez les normes relatives à l'élimination
des déchets en vigueur dans le pays d'installation.
Pour obtenir de plus amples détails au sujet du traitement, de la
récupération et du recyclage de cet appareil, veuillez vous adresser au
bureau compétent de votre commune, à la société de collecte des
déchets ou directement à votre revendeur.
Dit apparaat is voorzien van het merkteken volgens de Europese
NL
richtlijn 2002/96/EG inzake Afgedankte elektrische en elektronische
apparaten (AEEA).
Door ervoor te zorgen dat dit product op de juiste manier als afval
wordt verwerkt, helpt u mogelijk negatieve consequenties voor het
milieu en de menselijke gezondheid te voorkomen die anders zoude n
kunnen worden veroorzaakt door onjuiste verwerking van dit
product als afval.
Het symbool op het product of op de bijbehorende
documentatie geeft aan dat dit pr oduct niet als huishoudelijk afval mag
worden behandeld. In plaats daarvan moet het worden afgegeven bij
een verzamelpunt voor recycling van elektrische en elektronische
apparaten.
Afdanking moet worden uitgevoerd in overeenstemming met de
plaatselijke milieuvoorschriften voor afvalverwerking.
Voor nadere informatie over de behandeling, terugwinning en
recycling van dit product wordt u verzocht contact op te nemen met
het stadskantoor in uw woonplaats, uw afvalophaald ienst of de winkel
waar u het product heeft aangeschaft.
Este aparato lleva el marcado CE en conformidad con la Directiva
E
2002/96/EC del Parlamento Europeo y del Consejo sobre residuos de
aparatos eléctricos y electrónicos (RAEE).
La correcta eliminación de este producto evita consecuencias
negativas para el medioambiente y la salud.
El símbolo en el producto o en los documentos que se incluyen
con el producto, indica que no se puede tratar como residuo
doméstico. Es necesario entregarlo en un punto de recogida para
reciclar aparatos eléctricos y electrónicos.
Deséchelo con arreglo a las normas medioambientales para
eliminación de residuos.
Para obtener información más detallada sobre el tratamiento,
recuperación y reciclaje de este producto, póngase en contacto con
el ayuntamiento, con el servicio de eliminación de residuos urbanos o
la tienda donde adquirió el producto.
Este aparelho está classificado de acordo com a Directiva Europeia
P
2002/96/EC sobre Resíduos de equipamento eléctrico e electrónico
(REEE).
Ao garantir a eliminação adequada deste produto, estará a ajudar a
evitar potenciais consequências negativas para o ambiente e para a
saúde pública, que poderiam derivar de um manuseamento de
desperdícios inadequado deste produto.
O símbolo no produto, ou nos documentos que acompanham
o produto, indica que este aparelho não pode receber um tratamento
semelhante ao de um desperdício doméstico.
Pelo contrário, deverá ser depositado no respectivo centro de
recolha para a reciclagem de equipamento eléctrico e electrónico.
A eliminação deverá ser efectuada em conformidade com as normas
ambientais locais para a eliminação de desperdícios.
Para obter informações mais detalhadas sobre o tratamento, a
recuperação e a reciclagem deste produto, contacte o Departamento
na sua localidade, o seu serviço de eliminação de desperdícios
domésticos ou a loja onde adquiriu o produto.
Questo apparecchio è contrassegnato in conformità alla Direttiva Europea
I
2002/96/EC, Waste Electrical and Electronic Equipment (WEEE).
Assicurandosi che questo prodotto sia smaltito in modo corretto,
l'utente contribuisce a prevenire le potenziali conseguenze negative
per l'ambiente e la salute.
Il simbolo sul prodotto, o sulla documentazione di
accompagnamento, indica che questo prodotto non deve essere
trattato come rifiuto domestico ma deve essere consegnato presso
l'idoneo punto di raccolta per il riciclaggio di apparecchiature
elettriche ed elettroniche.
Disfarsene seguendo le normative locali per lo smaltimento dei rifiuti.
Per ulteriori informazioni sul trattamento, recupero e riciclaggio di
questo prodotto, contattare l'idoneo ufficio locale, il servizio di
raccolta dei rifiuti domestici o il negozio presso il quale il prodotto è
stato acquistato.
ǹȣIJȒ Ș ıȣıțİȣȒ ijȑȡİȚ ıȒμĮȞıȘ ıȪμijȦȞĮ μİ IJȘȞ ǼȣȡȦʌĮȧțȒ ȠįȘȖȓĮ
GR
2002/96/ǼǼ ıȤ İIJȚțȐ μİ ǹʌȠȡȡȚʌIJȩμİȞĮ ȘȜİțIJȡȚțȐ țĮȚ ȘȜİțIJȡȠȞȚț Ȑ
İȟĮȡIJȒμĮIJĮ (WEEE).
ǼȟĮıijĮȜȓȗȠȞIJĮȢ ȩIJȚ IJȠ ʌȡȠȧȩȞ ĮȣIJȩ ĮʌȠȡȡȓʌIJİIJĮȚ ıȦıIJȐ, șĮ ȕȠȘșȒıİIJİ
ıIJȘȞ ʌȡȩȜȘȥȘ ʌȚșĮȞȐ Įȡ ȞȘIJȚțȫȞ İʌȚʌIJȫıİȦȞ ȖȚĮ IJȠ ʌİȡȚȕȐȜȜȠȞ țĮȚ
IJȘȞ ĮȞșȡȫʌȚȞȘ ȣȖİȓĮ, ȠȚ ȠʌȠȓ İȢ șĮ μʌȠȡȠȪıĮȞ ȞĮ įȘμȚȠȣȡȖȘșȠȪȞ Įʌȩ
IJȠȞ ĮțĮIJȐȜȜȘȜȠ ȤİȚȡȚıμȩ ĮȣIJȠȪ IJȠȣ ʌȡȠȧȩȞIJȠȢ ȦȢ ĮʌȩȡȡȚμμĮ.
ȉȠ ıȪμȕȠȜȠ ʌȐȞȦ ıIJȠ ʌȡȠȧȩȞ, Ȓ ıIJĮ ȑȖȖȡĮijĮ ʌȠȣ ıȣȞȠįİȪȠȣȞ
IJȠ ʌȡ ȠȧȩȞ, ȣʌȠįİȚțȞȪİȚ ȩ IJȚ ĮȣIJȒ Ș ıȣıțİȣȒ įİȞ μʌȠȡİȓ ȞĮ șİȦȡȘșİȓ
ȠȚțȚĮțȩ ĮʌȩȡȡȚμμĮ. ǹȞIJȓ ȖȚ Įȣ IJȩ șĮ ʌȡȑʌİȚ ȞĮ ʌĮȡĮįȠșİȓ ıIJȠ țĮIJȐȜȜȘȜȠ
ıȘμİȓȠ ʌİȡȚıȣȜȜȠȖȒȢ ȖȚĮ IJȘȞ ĮȞĮțȪțȜȦıȘ IJȦȞ ȘȜİțIJȡȚțȫȞ țĮȚ
ȘȜİțIJȡȠȞȚțȫ Ȟ İȟĮȡIJȘμȐIJȦȞ.
ǻȚĮȜȪıIJİ IJȠ IJȘȡȫȞIJĮȢ IJȘȞ IJȠʌȚțȒ ȞȠμȠșİıȓĮ ȖȚĮ IJȘ įȚȐșİıȘ IJȦȞ
ĮʌȠȡȡȚμμȐIJȦȞ.
īȚĮ ʌȚȠ ȜİʌIJȠμİȡİȓȢ ʌȜȘȡȠijȠȡȓİȢ ıȤİIJȚțȐ μİ IJȘȞ İʌİȟİȡȖĮıȓĮ, IJȘȞ
ʌİȡȚıȣȜȜȠȖȒ țĮȚ IJȘȞ ĮȞĮțȪțȜȦıȘ ĮȣIJȠȪ IJȠȣ ʌȡȠȧȩȞIJȠȢ, ʌĮȡĮțĮȜȠȪμİ
İʌȚțȠȚȞȦȞȒıIJİ μİIJȠĮȡμȩįȚȠ ȖȡĮijİȓȠ IJȘȢ IJȠʌȚțȒȢ ıĮȢ ĮȣIJȠįȚȠȓțȘıȘȢ,
IJȘȞ IJȠʌȚțȒ ıĮȢ ȣʌȘȡİıȓĮ ĮʌȠțȠμȚįȒȢ ȠȚțȚĮțȫȞ ĮʌȠȡȡȚμμȐIJȦȞ Ȓ IJȠ
țĮIJȐıIJȘμĮ ȩʌȠȣ ĮȖȠȡȐıĮIJİ ĮȣIJȩ IJȠ ʌȡȠȧȩȞ.
Denna produkt är märkt enligt EG-direktiv 2002/96/EEC beträffande
S
elektriskt och elektroniskt avfall (Waste Electrical and Electronic
Equipment, WEEE).
Genom att säkerställa en korrekt kassering av denna produkt bidrar
du till att förhindra potentiella, negativa konsekvenser för vår miljö
och vår hälsa, som annars kan bli följden om produkten inte hanteras
på rätt sätt.
Symbolen på produkten, eller i medföljande dokumentation,
indikerar att denna produkt inte får behandlas som vanligt
hushållsavfall. Den skall i stället lämnas in på en lämplig
uppsamlingsplats för återvinning av elektrisk och elektronisk
utrustning.
Produkten måste kasseras enligt lokala miljöbestämmelser för
avfallshantering.
För mer information om h antering, återvinning och återanvändning av
denna produkt, var god kontakta de lokala myndigheterna, ortens
sophanteringstjänst eller butiken där produkten inhandlades.
Page 4
Dette apparatet er merket i samsvar med EU-direktiv 2002/96/EC
N
om avhending av elektrisk og elektronisk utstyr (Waste Electrical and
Electronic Equipment - WEEE).
Forsikre deg om at dette produktet blir avhendet på korrekt vis, slik
at det ikke kan utgjøre noen helse- eller miljørisiko.
Symbolet på produktet eller på dokumentene som følger med
det, viser at dette produktet ikke må behandles som
husholdningsavfall. Lever det til et autorisert mottak for resirkulering
av elektrisk og elektronisk utstyr.
Avhending må skje iht. de lokale renovasjonsforskriftene.
For nærmere informasjon om håndtering, kassering og resirkulering
av dette produktet, kontakt kommunen, renovasjonsvesenet eller
forretningen der du anskaffet det.
Dette produkt er mærket i henhold til EU-direktiv 2002/96/EF om
DK
Kasseret elektrisk og elektronisk udstyr (WEEE).
Ved at sikre, at dette produkt bliver skrottet korrekt, hjælper man
med til at forhindre potentielle, negative konsekvenser for miljøet og
folkesundheden, der kunne opstå gennem uhensigtsmæssig
bortskaffelse af dette produkt.
Symbolet på produktet eller på dokumenterne, der ledsager
produktet, angiver, at produktet ikke må bortskaffes sammen med
husholdningsaf faldet. Det skal i stedet afleveres på en gen brugsstation
for elektrisk og elektronisk udstyr.
Det skal skrottes i henhold til gældende lokale miljøregler for
bortskaffelse af affald.
For yderligere oplysninger om håndtering, genvinding og genbrug af
dette produkt bedes man kontakte de lokale myndigheder,
renovationsselskabet eller forretningen, hvor produktet er købt.
Tämä laite on merkitty WEEE-direktiivin (Waste Electrical and
FIN
Electronic Equipment) 2002/96/EC mukaisesti.
Varmistamalla, että tuote poistetaan käytöstä asianmukaisesti, voidaan
auttaa estämään sellaiset ympäristö- ja terveyshaitat, jotka saattaisivat
aiheutua jätteiden asiattomasta käsittelystä.
Symboli tuotteessa tai sen dokumentaatiossa tarkoittaa, ettei
laitetta saa hävittää kotitalousjätteiden mukana. Sen sijaan tuote on
toimitettava sähkö- ja elektroniikkakomponenttien keräys- ja
kierrätyspisteeseen.
Laitteen käytöstäpoiston suhteen on noudatettava paikallisia
jätehuoltomääräyksiä
Lisätietoja tuotteen käsittelystä, talteenotosta ja kierrätyksestä saa
kaupungin- tai kunnanvirastosta, paikallisesta jätehuoltoliikkeestä tai
liikkeestä, josta tuote ostettiin.
Niniejsze urządzenie posiada oznaczenia zgodnie z Dyrektywą
PL
Europejską 2002/96/EC w sprawie zużytego sprzętu elektrycznego i
elektronicznego (WEEE).
Zapewniając prawidłowe złomowanie niniejszego urządzenia
przyczynią się Państwo do ograniczenia ryzyka wystąpienia
negatywnego wpływu produktu na środowisko i zdrowie ludzi, które
mogłoby zaistnieć w przypadku niewłaściwej utylizacji urządzenia.
Symbol umieszczony na produkcie lub na dołączonych do niego
dokumentach oznacza, że niniejszy produkt nie jest klasyfikowany jako
odpad z gospodarstwa domowego.
Urządzenie, w celu jego złomowania, należy zdać w odpowiednim
punkcie utylizacji odpadów w celu recyklingu komponentów
elektrycznych i elektronicznych.
Urządzenie należy złomować zgodnie z lokalnymi przepisami dot.
utylizacji odpadów.
Dodatkowe informacje na temat utylizacji, złomowania i recyklingu
opisywanego urządzenia można uzyskać w lokalnym urzędzie miasta,
w miejskim przedsiębiorstwie utylizacji odpadów lub w sklepie, w którym
produkt został zakupiony.
Tento spotřebič je označený v souladu s evropskou směrnicí 2002/96/
CZ
ES o likvidaci elektrického a elektronického zařízení (WEEE).
Zajištěním správné likvidace tohoto výrobku pomůžete zabránit případným
negativním důsledkům na životní prostředí a lidské zdraví, ke kterým by
nevhodnou likvidací tohoto výrobk u mohlo dojít.
Symbol na výrobku nebo na dokumentech přiložených k výrobku
udává, že tento spotřebič nepatří do domácího odpadu. Spotřebič je
nutné odvézt do sběrného místa pro recyklaci elektrického a
elektronického zařízení.
Likvidace musí být provedena v souladu s místními předpisy o ochraně
životního prostředí, které se týkají likvidace odpadu.
Podrobnější informace o zpracování, rekuperaci a recyklaci tohoto
výrobku zjistíte u příslušného místního úřadu, služby pro likvidaci
domovního odpadu nebo v obchodě, kde jste výrobek zakoupili.
Tento spotrebič je označený v súlade s Európskou smernicou
SK
2002/96/ES o likvidácii elektrických a elektronických zariadení (WEEE).
Zabezpečením, že tento výrobok bude zlikvidovaný správnym spôsobom,
pomôžete predchádzat' potenciálnym negatívnym dopadom na životné
prostredie a ľudské zdravie, ktoré by sa v inom prípade mohli vyskytnút' pri
nevhodnom zaobchádzaní pri likvidácii tohto výrobku.
Symbol na výrobku alebo na sprievodných dokumentoch
znamená, že s týmto výrobkom sa nesmie zaobchádzat' ako s
domovým odpadom. Naopak, treba ho odovzdat' v zbernom stredisku
na recykláciu elektrických alebo elektronických zariadení.
Likvidácia musí byt' vykonaná v súlade s predpismi na ochranu
životného prostredia pre likvidáciu odpadov.
Podrobnejšie informácie o zaobchádzaní, regenerácii a recyklácii tohto
výrobku si vyžiadajte na Vašom miestnom úra de, v zberných surovinách
alebo v obchode, kde ste výrobok kúpili.
A készüléken található jelzés megfelel az elektromos és elektronikus
H
berendezések hulladékairól szóló 2002/96/EK európai irányelvben
(WEEE) foglalt előírásoknak.
A hulladékká vált termék szabályszerű elhelyezésével Ön segít elkerülni
a környezettel és az emberi egészséggel kapcsolatos azon esetleges
negatív következményeket, amelyeket a termék nem megfelelő
hulladékkezelése egyébként okozhatna.
A terméken vagy a termékhez mellékelt dokumentumokon feltüntetett
jelzés arra utal, hogy ez a termék nem kezelhető háztartási
hulladékként. Ehelyett a terméket a villamos és elektronikus
berendezések újrahasznosítását végző telephelyek valamelyikén kell
leadni.
Kiselejtezéskor a hulladékeltávolításra vonatkozó helyi
környezetvédelmi előírások szerint kell eljárni.
A termék kezelésével, hasznosításával és újrahasznosításával
kapcsolatos bővebb tájékoztatásért forduljon a lakóhelye szerinti
polgármesteri hivatalhoz, a háztartási hulladékok kezelését végző
társasághoz vagy ahhoz a bolthoz, ahol a terméket vásárolta.
Данное изделие промаркировано в соответствии с Европейской
RUS
директивой 2002/96/EC по утилизации электрического и
электронного обо рудования (WEEE).
Обеспечив правильную утилизацию данного изделия, Вы
поможете предотвратить потенциальные негативные
последствия для окружающей среды и здоров ья человека,
которые могли бы иметь место в противном случае.
Символ на самом изделии или сопроводительной
документации указывает, что при утилизации данного изделия
с ним нельзя обращаться как с обычными бытовыми отходами
Вместо этого, его следует сдавать в соответствующий пункт
приемки электрического и электронного оборудования для
последующей утилизации.
Сдача на слом должна производиться в соответствии с
местными правилами по утилизации отходов.
За более подробной информацией о правилах обращения с
такими изделиями, их утилизации и переработки обращайтесь
в местные органы власти, в службу по утилизации отходов или
в магазин, в котором Вы приобрели данное изделие.
Този уред е маркиран в съответствие с Европе йска директива
BG
2002/96/ЕО "Електрическо и електронно оборудване за
отпадъци" (WEEE).
Като се погрижите това изделие да бъде изхвърлено по
правилен начин, вие ще помогнете за предотвратяване на
възможните негативни последствия за околната среда и
здравето на хората, което в противен случай може да бъде
предизвикано от неправилно изхвърляне на това изделие.
Символът върху изделието или върху документите,
приложени към изделието, показва, че това изделие не бива да
се третира като битови отпадъци. Вместо това, то трябв а да се
предава в специализиран пункт за рециклиране на
електрическо и електронно оборудване.
При изхвърлянето му спазвайте местните норми за из хвърляне
на отпадъци.
За по3подробна информация за третирането, възстановяването и
рециклирането на това изделие се обърнете към вашата местна
градска управа, към вашата служба за изхвърляне на битови
отпадъци или към магазина, откъдето сте закупили изделието.
Acest aparat este marcat în conformitate cu Directiva Europeană 2002/96/
RO
CE referitoare la Deșeurile de Echip ament Electric și Electronic (WEEE).
Asigurându-vă că acest produs este eliminat în mod corect, contribuiţi la
prevenirea potenţialelor consecinţe negative asupra mediului înconjurător
și sănătăţii persoanelor, con secinţe care ar putea fi provocate de aru ncarea
necorespunzătoare la gunoi a acestui produs.
Simbolul de pe prod us, sau de pe documentele care însoţesc
produsul, indică faptul că ac esta nu poate fi aruncat împreună cu deșeuri le
menajere. Trebuie predat la punctul de colectare corespunzător, pentru
reciclarea echipamentului electric și electronic.
Aruncarea la gunoi a aparatului trebuie făcută în conformitate cu
normele locale pentru eliminarea deșeurilor.
Pentru informaţii mai detaliate privind eliminarea, valorificarea și
reciclarea acestui produs, vă rugăm să contactaţi administraţia locală,
serviciul de eliminare a deșeurilor menajere sau magazinul de unde aţi
cumpărat produsul.
Page 5

INDICE Pagina
Istruzioni per l'utente 3
Caratteristiche tecniche 4-6
Installazione del forno 7-11
Collegamento e regolazione gas 12-14
Utilizzo e accensione del forno 15-21
Utilizzo del grill 22
Utilizzo del paramanopole 23
Utilizzo del girarrosto 24
Tabella di cottura 25-26
Pulizia e manutenzione 27-29
Guida ricerca guasti 30
Servizio assistenza clienti 31-32
Nota sul corretto smaltimento
degli elettrodomestici 33
Page 6

Page 7

Istruzioni per l utente
Vi ringraziamo per la scelta di uno dei nostri prodotti e speriamo che otteniate da
questo elettrodomestico le migliori prestazioni.
Pertanto Vi invitiamo a seguire attentamente le istruzioni ed i suggerimenti di
questo manuale per un corretto utilizzo dei nostri prodotti.
La Casa Produttrice declina ogni responsabilità per danni alle persone ed agli
oggetti, dovuti ad una cattiva od impropria installazione dell’apparecchio
stesso.
La casa Produttrice si riserva il diritto di apportare ai propri prodotti modifiche
che si ritenessero necessarie ed utili, senza alcun preavviso.
Prima di usare il forno per la prima volta
Dopo aver sballato il forno, averlo incassato nel mobile ed avere estratto gli accessori
(leccarde e griglie) è opportuno riscaldarlo alla massima temperatura per una durata di
circa 20 minuti in modo da eliminare eventuali residui oleosi dovuti alla lavorazione
che potrebbero causare sgradevoli odori durante la cottura. Durante questa fase
ventilare l’ambiente. Risciacquare leccarde e griglie con detersivo per stoviglie.
IMPORTANTE:durantel’usodelfornol’apparecchioèsottopostoadunsensibile
riscaldamento del frontale e del vetro esterno della porta. Si raccomanda perciò di
tenere lontano i bambini che potrebbero servirsi dell’apparecchio per i propri giochi.
Durante i primi minuti di funzionamento del forno è possibile riscontrare sul frontale
un’eventuale formazione di condensa che non compromette il funzionamento
dell’apparecchiatura.
3
Page 8

Caratteristiche tecniche
Questo apparecchio è conforme alla circolare CEE relativa alla limitazione dei
disturbi radioelettr
sostanz
con
Dimensioni:
Altezza: 591 mm
Larghezza: 597 mm
Profondità: 445 mm
ici. Questo apparecchio nelle parti destinate a venire a contatto
e alimentari è conforme a D.E.
89/109/CEE.
Volume:
Tensione d'alimentazione:
58 L
220/230V a.c. - 50/60hz
4
Page 9
3+
(230V 50Hz)
Potenza elettrica
grill
1900 W
max
CATEGORIA II2H
nominale
min.
Pressione del gas (mbar)
20 28-30 35
0,80
Portata termica
nominale
ridotta (kW)
5,4
/h
Aria necessaria
alla
combustione
m³
(100/mm)
(100/mm)
GAS DI PETROLIO
196 g/h
2,70
48 80
Aperta
Forno
LIQUEFATTO
(Butano) G30
Consumo
nominale
Portata termica
nominale (kW)
Iniettore
marcatura
pass
By
marcatura
UK/IT/RU
Dest.
Regolazione
aria
Tipo di
bruciatore
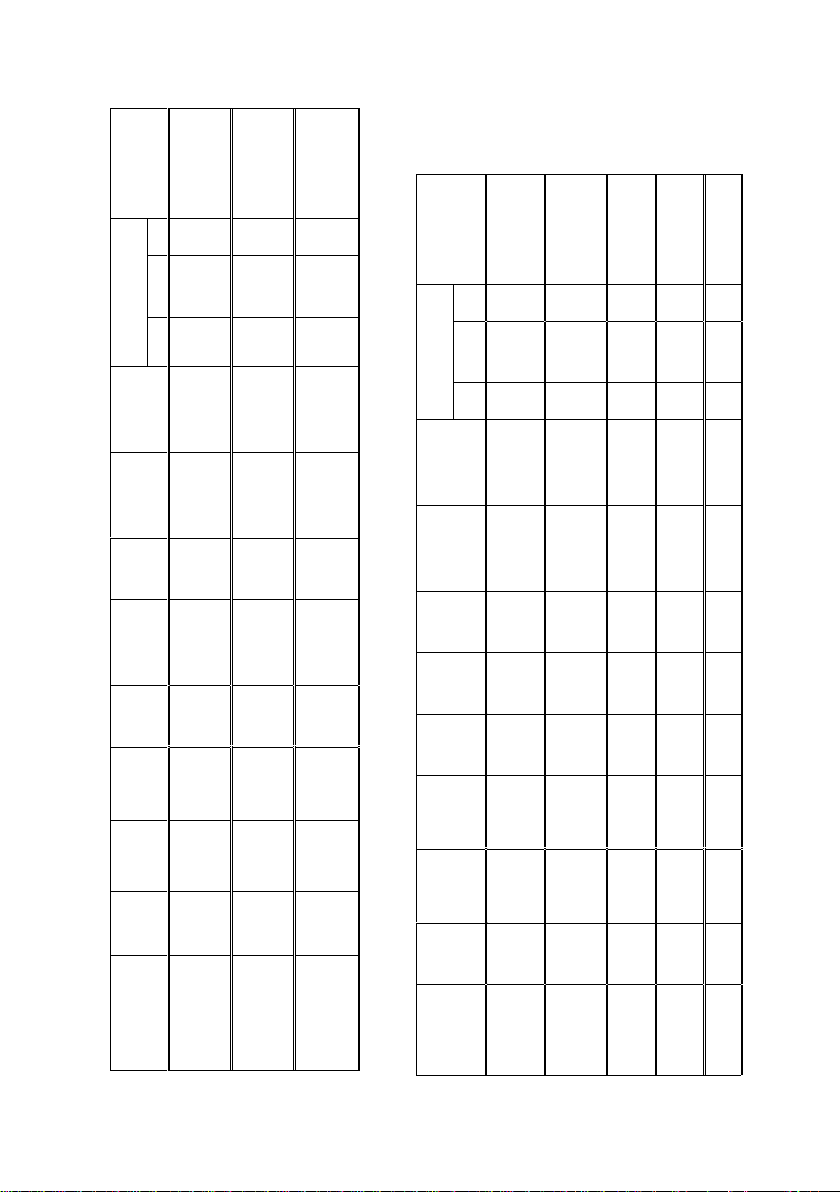
TABELLA INIETTORI
Tipo di gas utilizzato
G31
(Propano)
1900 W
17 20 25
0,80
257 l/h 5,4
2,70
115
48 regolato
Aperta
Forno
G20
GAS NATURALE
(Metano)
1900 W
25 37 45
0,80
5,4
193 g/h
2,70
48 80
Aperta
Forno
EFATTO
GAS DI PETROLIO
LIQU
B/P
II2ELwLs3
(230V 50Hz)
Potenza elettrica
grill
CATEGORIA
gas (mbar)
Pressione del
Portata termica
nominale
ridotta (kW)
Aria necessaria
alla
combustione
Consumo
nominale
Portata
termica
nominale
Iniettore
marcatura
(100/mm)
pass
By
marcatura
(100/mm)
Dest. PL
Regolazione
aria
Tipo di
bruciatore
TABELLA INIETTORI
Tipo di gas
utilizzato
1900 W
max
nominale
min.
29 36 44
0,80
5,4
m³/h
196 g/h
2,70
(kW)
48 75
Aperta
Forno
GAS DI
PETROLIO
LIQUEFATTO
(Butano) G30
1900 W
1900 W
17 20 25
29 36 44
0,80
0,80
5,4
257 l/h 5,4
193 g/h
2,70
2,70
115
48 regolato
48 75
Aperta
Aperta
Forno
Forno
G20
G31
GAS DI
PETROLIO
LIQUEFATTO
(Propano)
GAS
NATURALE
(Metano)
1900 W
1900 W
10 13 16
16 20 25
0,80
0,80
5,4
l/h
357 l/h 5,4
2,70
2,70 310
148
125
48 regolato
48 regolato
Aperta
Aperta
Forno
Forno
GZ350
GZ410
GAS
GAS
5
Page 10

S3B/P
max
nominale
min.
(kW)
combustione
m³/h
nominale
(kW)
(100/mm)
1900 W
35
30
25
0,80
,4
5
196 g/h
2,70
(230V 50Hz)
Potenza elettrica
grill
CATEGORIA II2H
Pressione del gas (mbar)
Portata termica
nominale ridotta
Aria necessaria
alla
umo
Cons
nominale
Portata
termica
Iniettore
marcatura
1900 W
25 30 35
0,80
5,4
193 g/h
2,70
1900 W
20 25 33
0,80
257 l/h 5,4
2,70
115
1900 W
20 25 33
0,80
299 l/h 5,4
2,70
121
pass
By
marcatura
(100/mm)
Dest. HU
Regolazione
aria
Tipo di
bruciatore
Tipo di gas
utilizzato
TABELLA INIETTORI
48 80
Aperta
Forno
GAS DI
PETROLIO
LIQUEFATTO
(Butano) G30
48 80
Aperta
Forno
GAS DI
PETROLIO
LIQUEFATTO
G31
GAS
(Propano)
48 regolato
Aperta
Forno
NATURALE
G20
(Metano)
48 regolato
Aperta
Forno
G25.1
GAS
6
Page 11

I
NSTALLAZIONE
ATTENZIONE: Questo apparecchio può essere installato e funzionare solo in locali
permanentemente ventilati secondo UNI 7129/UNI 7131.
IMPORTANTE:
L'
installazione deve essere effettuata secondo le istruzioni del cos
truttore da
personale professionalmente qualificato. Qualsiasi manutenzione deve essere eseguita
con l'
apparecchio elettricamente disinserito e rubinetto del gas dell impianto chiuso.
L
' installazione deve essere effettuata in conformità alle norme in vigor
e nei paesi di
destinazione.
Riferimento norma italiana:
Norme UNI-CIG 7129 installazione a gas di rete ad uso domestico
Norme UNI-CIG 7131 installazione a gas G.P.L. ad uso domestico.
Collegamento gas
Per il collegamento dell
metallico rigido di rame o di acciaio con relativi raccordi conforme alla norma UNI
apparecchio alla rete del gas o bombola, utilizzare il tubo
CIG 7129 oppure il tubo flessibile in inox con parete continua conforme alla norma
UNI-CIG 9891. I regolatori di
pressione da utilizzare devono essere conformi alla
norma UNI-CIG 7432.
Collegamento elettrico
Il collegamento elettrico deve essere effettuato da un tecnico qualificato secondo le
istruzioni del produttore e in conformità alle norme locali in vigore.
Ac
certarsi che il voltaggio corrisponda a quello indicato sulla targhetta dati tecnici
posta su uno dei bordi laterali della cavità visibile a porta aperta. Nel caso in cui la
spina non sia facilmente accessibile l
installatore deve provvedere un interruttor
e
omnipolare con distanza di apertura dei contatti uguale o superiore a 3 mm.
L
' apparecchio viene fornito di cavo senza spina. La spina da usarsi deve essere del
tipo normalizzato tenendo conto che:
giallo- verde = terra
blu = neutro
marrone = fase.
La messa a terra dell
apparecchio è obbligatoria a termine di legge. Non usare prese
multiple o prolunghe.
7
Page 12

Istruzioni per l installatore
installazione è a carico dell acquirente e gli eventuali interventi richiesti alla ditta
L
costruttrice che dipendono
garanzia. È importante che tutte le operazioni relative all
da un errata installazione non saranno compresi nella
installazione e alla
regolazione vengano eseguite da personale qualificato, con precisi requisiti tecnico
professionali, il quale al termine d
ei lavori è tenuto a rilasciare una dichiarazione di
conformità del lavoro compiuto. Lo stesso dovrà ritenersi responsabile per eventuali
danni a cose o persone causati da allacciamenti non conformi alla norme in vigore nel
paese di destinazione.
8
Page 13
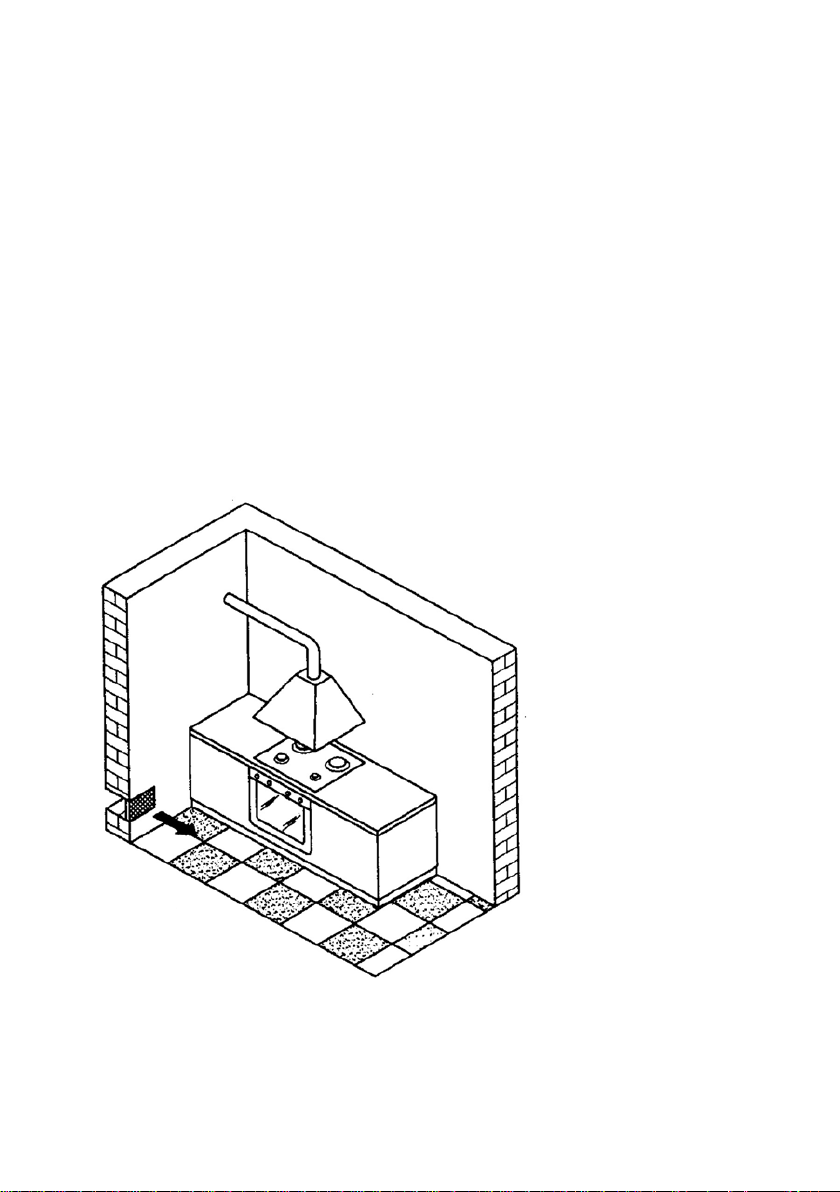
Locale di installazione (fig. 1)
Per il buon funzionamento dell' apparecchio a gas, è indispensabile che nel locale
possa affluire, in modo naturale, attraverso aperture praticate su pareti esterne, l'aria
necessaria alla combustione del gas. Queste aperture devono avere una sezione libera
di passaggio di almeno 100 cm
2
(possono essere realizzate una o più aperture).
Lo scarico dei prodotti della combustione deve avvenire attraverso cappe collegate a
canne fumarie o direttamente all’esterno. In caso non sia possibile installare la cappa
è necessario l’impiego di un elettroventilatore applicato alla parete esterna o alla
finestra dell’ambiente purchè esistano nel locale le aperture per l’entrata di aria
secondo le norme vigenti. Questo elettroventilatore deve avere una portata tale da
garantire, per un ambiente cucina, un ricambio orario d’aria di 3-5 volte il suo
volume.
Fig. 1
9
Page 14

Installazione del forno nel mobile
È importante che tutte le operazioni relative all’installazione dell’apparecchio
vengano eseguite da personale qualificato.
L’apparecchio può essere inserito sotto il piano di lavoro o a colonna.
In entrambi i casi rispettare le dimensioni indicate come da fig. 2.2 .
Dopo aver sballato il forno, per poter effettuare il collegamento, appoggiatelo sulla
base senza danneggiarlo.
Non sollevare il forno prendendolo dalla maniglia, ma afferrandolo ai lati.
Non sollevare il forno per la rampa gas.
Verificare che l’apparecchio non sia stato danneggiato durante il trasporto.
I mobili in contatto con il forno devono essere resistenti al calore (min. 100°C).
Alloggiare il forno nella cavità del mobile, sollevandolo ai lati e facendo attenzione
a non intrappolare il cavo di alimentazione.
Fare attenzione che le pareti laterali del mobile non tocchino i bordi anteriori del
forno.
Il fissaggio del forno al mobile si effettua con 4 viti a legno “A” nei fori posti
sulla cornice perimetrale (fig. 2.1).
Fare attenzione a non usare la porta come leva per l’installazione del forno.
Non esercitare pressioni eccessive sulla porta del forno quando è aperta.
Attenzione: non ostruire aperture o fessure di raffreddamento o di fuoriuscita
combusti.
Fig. 2.1
10
Page 15

Fig. 2.2
11
Page 16
COLLEGAMENTO ALL’ALIMENTAZIONE A GAS
L’impianto di alimentazione deve essere conforme alle norme locali in vigore nel
paese di destinazione. Il tipo di gas per il quale è stato regolato il forno è indicato
sulla targhetta matricola posta su uno dei bordi laterali della cavità (visibile a porta
aperta) e sull’imballo. Prima di effettuare il collegamento, adattare il forno al tipo di
gas dell’abitazione. Il collegamento tra il raccordo del gas, della rampa e il tubo, può
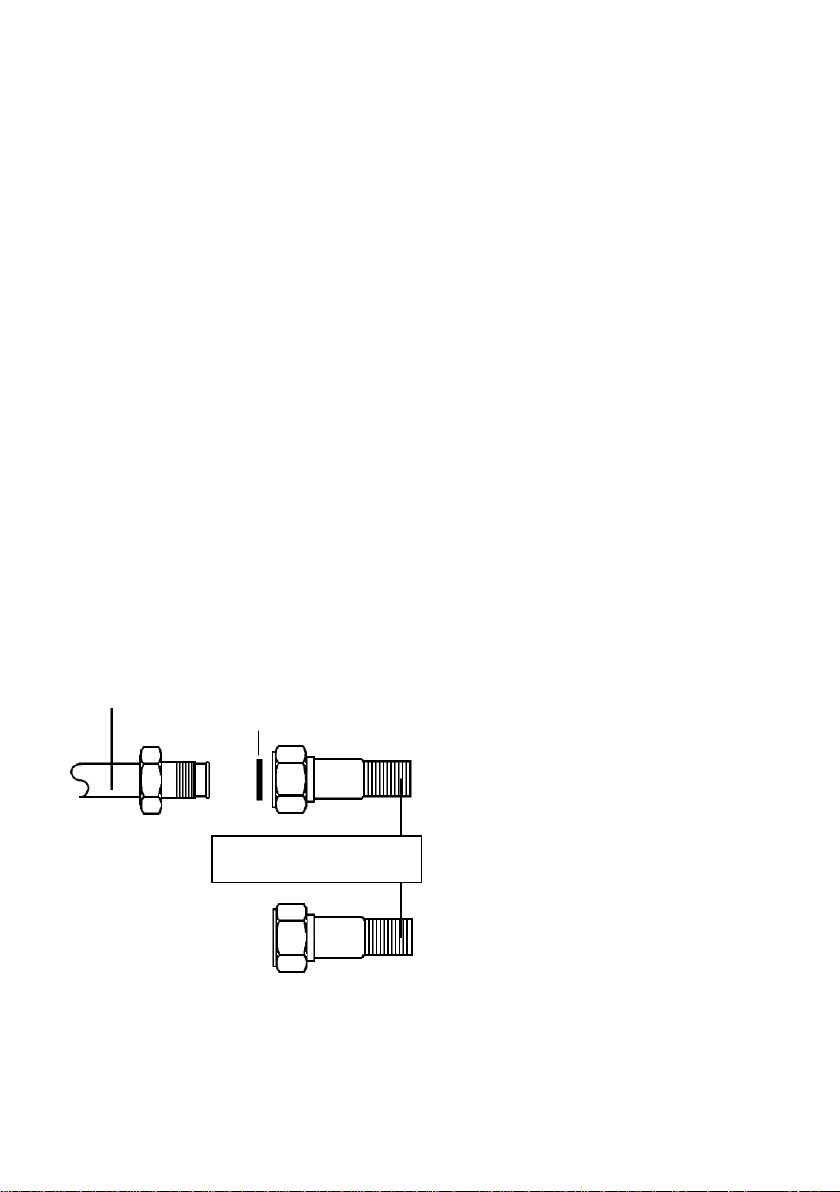
essere effettuato in uno dei seguenti modi (vedi disegno fig.3):
1) Con attacco senza guarnizioni di tenuta (l’attacco del forno è conico: ISO R 7)
2) Interponendo la guarnizione di tenuta fornita
Attenzione: ad operazione ultimata, controllare che non vi siano perdite di gas.
Controllare che non ci siano fughe di gas con acqua e sapone o liquidi adatti allo
scopo.
NON USARE FIAMME PER LA RICERCA DI FUGHE DI GAS.
Avvertenza: l’uso di tubo flessibile in gomma fissato sul porta-gomma è vietato
perché non ispezionabile.
Fig. 3
RAMPA
GUARNIZIONE
12
2)
TUBO FLESSIBILE
1)
Page 17
Adattamento al gas di utilizzo
E’ possibile utilizzare altri tipi di gas, adattando la regolazione del bruciatore come
segue:
1) accertarsi che il forno non sia collegato alla rete elettrica.
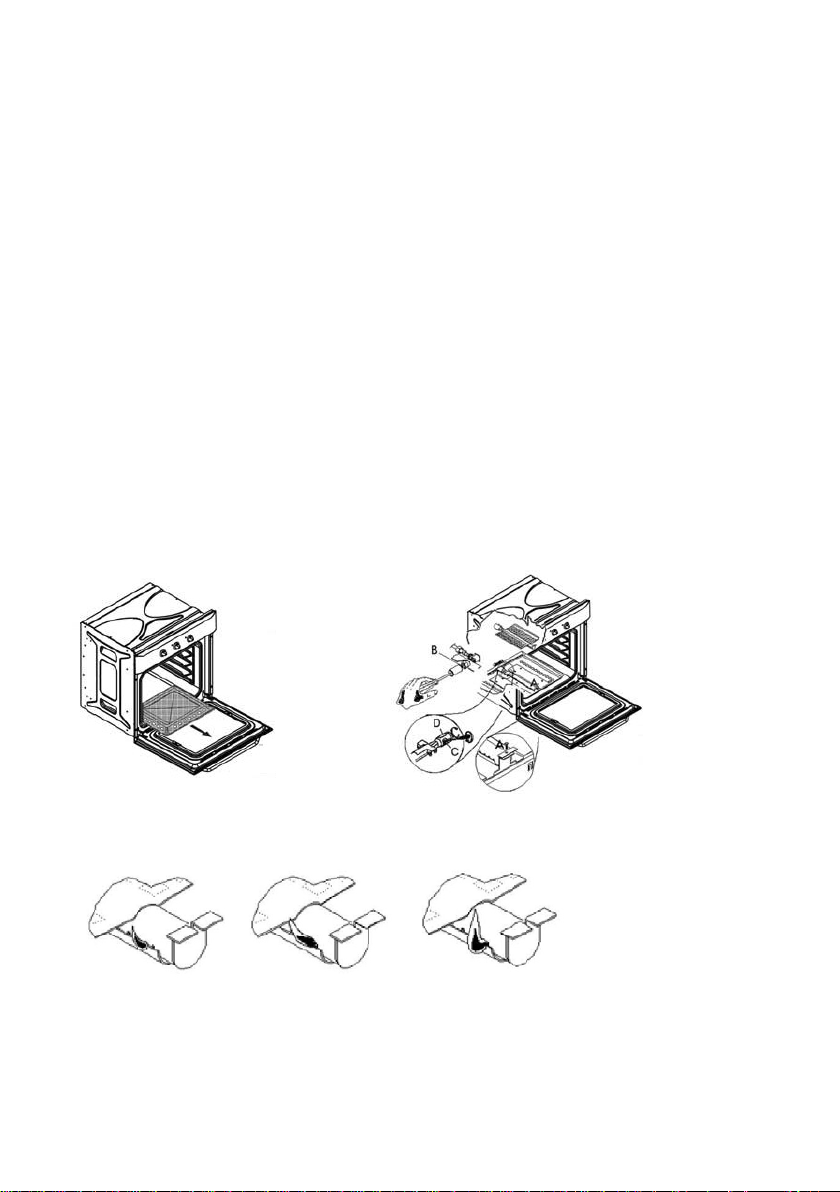
2) Aprire completamente la porta del forno.
3) Estrarre la suola del forno dopo aver tolto le viti di fissaggio (fig. 4).
4) Sfilare il bruciatore svitando la vite.
5) Svitare l’iniettore e sostituirlo secondo la tabella iniettori riportata nella
scheda separata. Rimontare il bruciatore e la suola del forno, procedendo
in senso inverso.
Regolazione della fiamma (se presente) - (fig. 5 e 6)
Per regolare la fiamma, procedere come segue:
allentare la vite C e ruotare la ghiera D in posizione N per il gas metano o naturale,
e in posizione GPL per il gas in bombola, facendo coincidere l’indice mobile sulla
ghiera con l’indice fisso sul bruciatore. Si ottiene in tal modo una fiamma regolare.
Fig. 4 Fig. 5
Fig. 6
ECCESSO D’ARIA FIAMMA REGOLARE MANCANZA D’ARIA
13
Page 18
Regolazione del minimo (fig.7a-7b)
Il termostato del forno è dotato di un by-pass per il minimo; cambiando il tipo di gas
bisogna adattare la regolazione nel seguente modo:
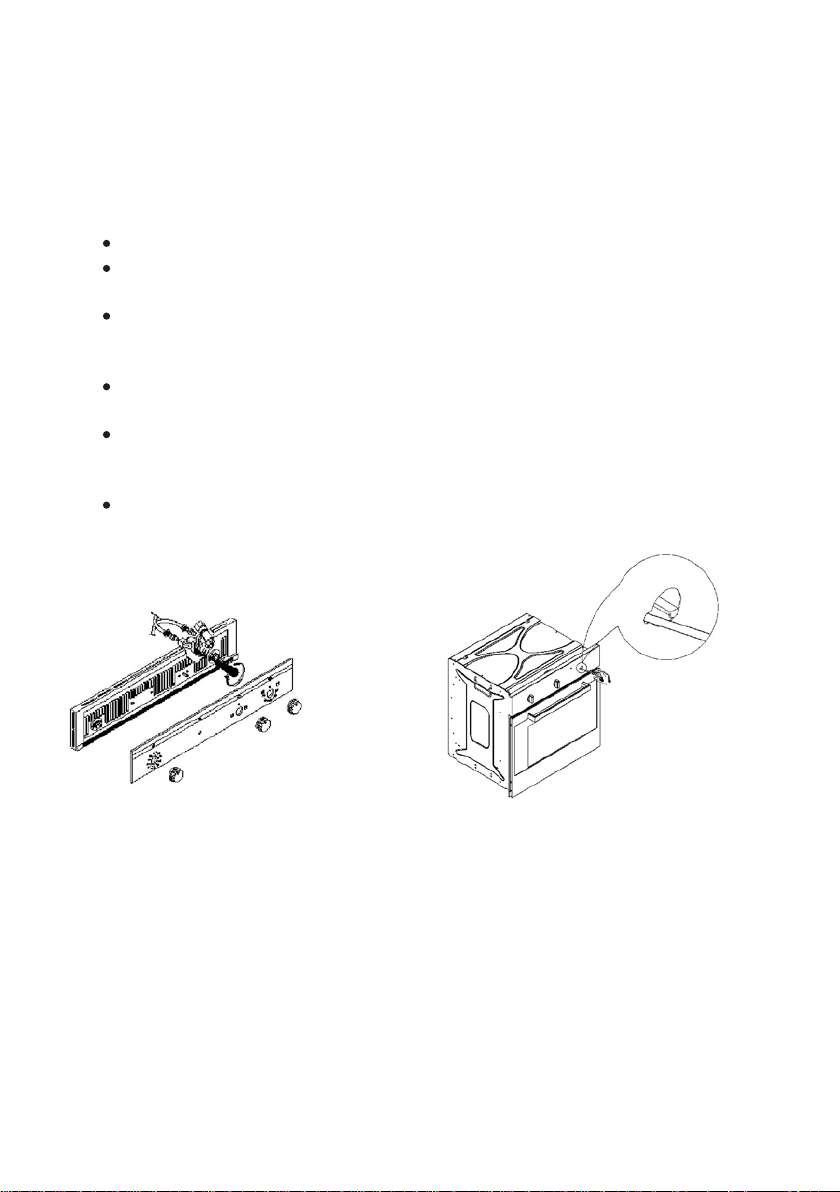
Togliere la manopola termostato;
Se il frontalino è in vetro, rimuoverlo svitando le due ghiere di fissaggio
poste al di sotto delle altre due manopole (fig. 7a);
Se il cruscotto è in metallo,la regolazione può essere fatta attraverso
l’apertura posta sul lato sinistro dell’alloggiamento della manopola del
termostato (fig. 7b);
Accendere il forno e lasciarlo funzionare al massimo con porta chiusa per
almeno 30 minuti;
Portare la manopola del termostato forno al minimo e regolare il by-pass al
minimo, in modo da ottenere una fiamma ridotta ma stabilizzata. Eseguire
questa operazione con la porta del forno chiusa;
Agire con cacciavite ad intaglio sulla vite by-pass. E’ sufficiente svitare il
by-pass di alcuni giri per regolare il minimo, passando dal gas liquido al gas
metano;
fig. 7a fig. 7b
IMPORTANTE: dopo aver regolato il bruciatore, controllare che ci sia il
mantenimento della fiamma al minimo, provando ad aprire e chiudere la porta del
forno. In caso di spegnimento adattare la regolazione del by-pass.
Per il funzionamento con G30/G31 la vite di regolazione del by-pass deve essere
avvitata a fondo.
Terminate le operazioni (sostituzione iniettore, regolazione aria e minimo), spegnere
il forno, applicare la nuova targhetta dati (indicante il gas di utilizzo) in sostituzione
della precedente.
14
Page 19

Utilizzazione ed accensione del forno
UTILIZZO: il bruciatore forno è dotato di una valvola di sicurezza che blocca
l’erogazione del gas nei casi seguenti:
Se accidentalmente viene ruotata la manopola del termostato con l’immediata
erogazione di gas al bruciatore forno.
Nel caso di spegnimento accidentale della fiamma del bruciatore.
Nel caso di mancata erogazione di gas di rete.
Per evitare lo spegnimento del bruciatore durante la regolazione del forno dalla
massima alla minima temperatura, il termostato è stato dotato di un arresto.
Per spegnere il bruciatore dalla posizione di minimo, basterà quindi premere
leggermente la manopola e ruotarla fino a far coincidere l’indice della manopola
con l’indice fisso sul frontale.
ACCENSIONE: l’accensione del bruciatore forno si effettua con la porta del forno
aperta. Nel caso in cui la porta fosse solo parzialmente aperta un dispositivo di
sicurezza blocca l’accensione automatica dei bruciatori.
15
Page 20
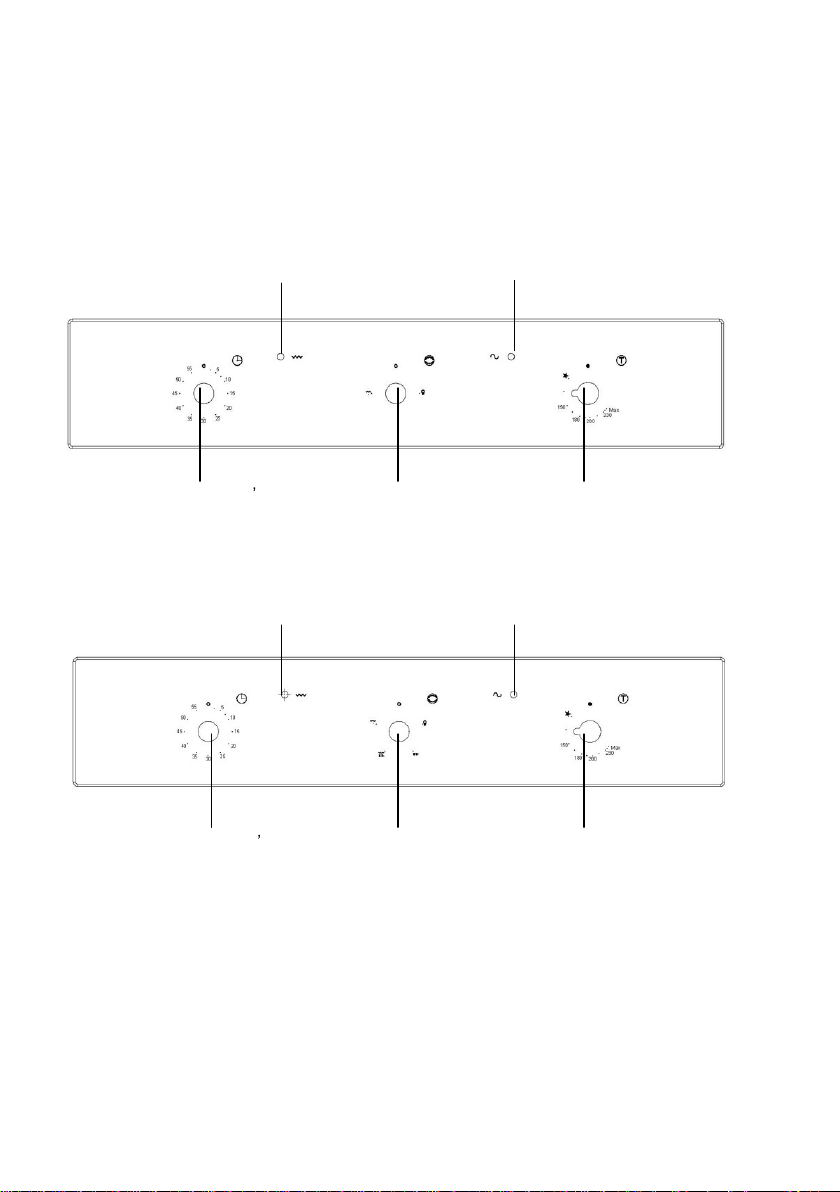
FUNZIONI FORNO
FLG 202
Luce spia gialla Luce spia verde
FLG 203
Contaminuti 60 Selettore Te
Luce spia gialla Luce spia verde
Contaminuti 60
Selettore Termostato
rmostato
16
Page 21

Lampada spia
Per qualsiasi posizione della manopola del selettore diverso da quella di riposo
contrassegnata dallo 0, si ha l’illuminazione della lampada spia verde.L’illuminazione
della lampada gialla indica il funzionamento del grill elettrico.
Manopola del selettore
È il dispositivo che permette di scegliere le diverse funzioni di cottura.
Uso del selettore con grill elettrico e simbologia
: LUCE FORNO
: GRILL
Questo tipo di cottura è particolarmente indicato per la doratura rapida dei cibi.
È necessario inoltre per questo tipo di cottura di tenere la porta del forno aperta ed
usare la protezione manopole.
: GRILL + GIRARROSTO (solo FLG 203)
Questo tipo di cottura consente la doratura dei cibi. Per questo tipo di cottura è
necessario tenere la porta del forno aperta ed usare la protezione manopole.
Il selettore in questa posizione consente l’inserimento automatico del grill più il
girarrosto.
: GIRARROSTO (solo FLG 203)
A fine cottura questa posizione di funzionamento consente di mantenere a caldo in
modo uniforme lo spiedo cucinato, continuandone la rotazione.
Avvertenza: se durante il funzionamento del grill elettrico si ruotasse per errore la
manopola del termostato forno, un dispositivo di sicurezza bloccherà la funzione del
grill. Per ripristinarlo basterà ruotare la manopola del forno fino a far coincidere
l’indice mobile 0 della manopola con l’indice fisso sul frontale.
17
Page 22

Manopola termostato forno
Consente di scegliere la temperatura più idonea alla diverse esigenze ai cibi da cuocere.
Ruotando la manopola in senso antiorario si ha la scelta della temperatura, portandola
sul valore desiderato scelto fra i 150°C e max.
Lo spegnimento del forno avviene riportando a far coincidere l’indice della manopola
con l’indice fisso sul frontale.
Contaminuti meccanico 60 minuti
Il contaminuti può essere regolato per un periodo massimo di un'ora. La manopola di
regolazione deve essere ruotata in senso orario fino alla posizione 60 minuti e poi
posizionarla ruotandola in senso antiorario sino al tempo desiderato. Trascorso il
tempo prestabilito interviene un segnale acustico che cessa automaticamente.
Il contaminuti, all'atto del segnale acustico, non interrompe il funzionamento del forno.
18
Page 23

PRIMA DI USARE IL FORNO –
PRECAUZIONI E SUGGERIMENTI GENERALI
Prima di qualsiasi operazione di manutenzione e/o pulizia disinserire gli
apparecchi elettricamente.
Eventuali riparazioni o interventi sugli apparecchi devono essere eseguiti
esclusivamente da un tecnico qualificato.
Accertarsi che i cavi elettrici di altri apparecchi utilizzati vicino al piano o al
forno non vadano a toccare le parti calde o a incastrarsi nella porta del forno.
Tenere lontano i bambini dal forno quando è in funzione e subito dopo averlo
spento.
Usare guanti da forno per rimuovere pentole e accessori, quando il forno è
caldo.
Non ricoprire il fondo del forno con fogli di alluminio.
Non riporre materiale infiammabile nel forno. Se l’apparecchio viene messo
in funzione inavvertitamente, potrebbe incendiarsi.
Dopo aver utilizzato il forno, accertarsi che l’indice della manopola sia in
posizione di chiusura e chiudere il rubinetto principale del condotto di
erogazione del gas o il rubinetto della bombola.
Non utilizzare la cavità del forno come deposito di materiali infiammabili.
Il vostro forno è dotato di un ventilatore che serve a raffreddare le parti
interne del mobile, i componenti del forno e crea un leggero flusso d’aria che
fuoriesce dalla fessura posta sotto il pannello comandi.
Il ventilatore inizia a lavorare immediatamente e si spegne 10-30 minuti dopo
lo spegnimento del forno (secondo le temperature del forno).
In caso di mancato funzionamento del ventilatore non usare il forno e
chiamare il centro assistenza.
In caso di mancanza di elettricità, non usare l’apparecchio;
in caso di mancanza di elettricità durante il funzionamento, spegnere
l’apparecchio e non usare fino al ripristino dell’energia.
Nella funzione grill il ventilatore parte subito sia a porta aperta che chiusa e si
arresta come nella funzione precedente.
Durante la cottura è possibile che si verifichi un’appannamento del vetro
interno della porta del forno.
19
Page 24

Le parti accessibili del forno possono diventare calde durante l’utilizzo, si
raccomanda di tenere lontano bambini, ragazzi e persone diversamente abili
durante il funzionamento del forno e subito dopo averlo spento. Nel caso
fosse impossibile si richiede la presenza di un adulto per tutto il periodo di
funzionamento e raffreddamento del forno.
Non posizionare carichi pesanti sulla porta per evitare danni alla cavità del
forno e alle cerniere della porta.
Non ostruire aperture o fessure di raffreddamento o di fuoriuscita combusti.
Se si dovesse verificare una progressiva difficoltà nella rotazione della
manopola del bruciatore forno, chiamare il servizio assistenza che
provvederà alla sostituzione del rubinetto.
Attenzione: per ridurre i consumi ed evitare riscaldamenti eccessivi, si raccomanda di
tenere chiusa la porta salvo indicazioni specifiche.
20
Page 25

ACCENSIONE DEL FORNO
Il forno è dotato di un’accensione elettrica. Per accendere il forno aprire
completamente la porta. Premere leggermente la manopola del termostato e ruotarla
in senso antiorario fino al massimo. Premere a fondo la manopola per innescare
l’accensione elettrica e tenerla premuta per alcuni secondi; il dispositivo non
dovrebbe essere attivato per più di 15 secondi;
se il bruciatore non si accende in 15 secondi, mantenere la porta completamente
aperta e attendere almeno 1 minuto prima di riprovare.
NOTA: quando il forno viene acceso per la prima volta, è normale dover ripetere più
volte l’operazione a causa dell’aria presente nel tubo di alimentazione gas. Una volta
accesa la fiamma, mantenere premuta la manopola del termostato per alcuni secondi
per attivare la termocoppia di sicurezza che altrimenti bloccherebbe l’erogazione del
gas. Controllare l’avvenuta accensione del bruciatore attraverso le feritoie poste
anteriormente al piatto del forno; se non si è acceso ripetere l’operazione.
Il perfetto funzionamento del bruciatore va controllato con la porta del forno chiusa.
DURANTE IL FUNZIONAMENTO
Mantenendo la porta chiusa, controllare il corretto funzionamento del ventilatore di
raffreddamento. Se il ventilatore non funziona operare nel seguente modo:
1. controllare che non ci siano interruzioni di energia; in caso affermativo
interrompere la cottura, spegnere l’apparecchio e attendere il ripristino
dell’energia.
2. se non ci sono interruzioni d’energia, non usare il forno e contattare
l’assistenza tecnica.
Se la porta del forno viene aperta durante la cottura, il ventilatore si ferma per evitare
il flusso di aria calda in direzione dell’utilizzatore; una volta richiusa la porta il
ventilatore riprende a funzionare; se non accade eseguire i controlli dei punti 1 e 2.
21
Page 26
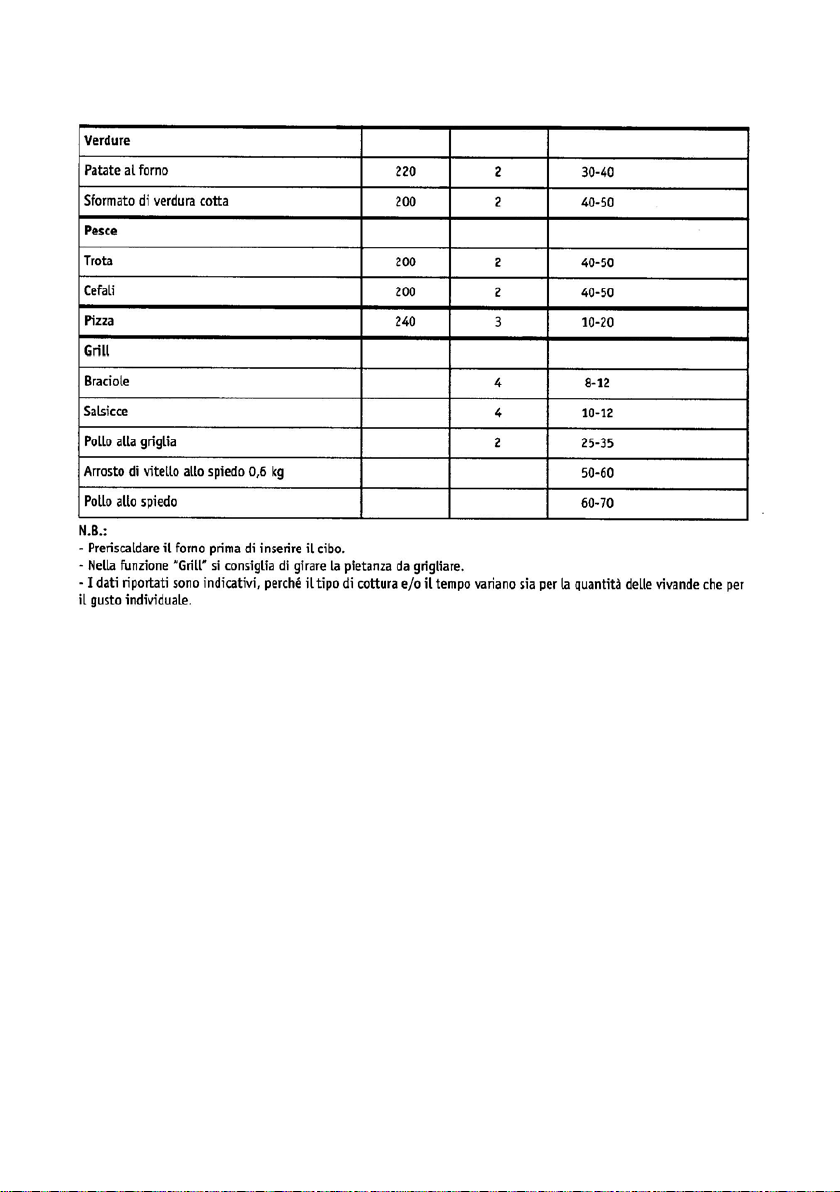
Come si usa il grill
Collocare la vivanda da grigliare sull’apposita griglia o in una teglia dai bordi molto
bassi. La griglia va posta nel gradino più alto possibile, mentre la leccarda per la
raccolta dei grassi, dovrà occupare il gradino sottostante. Per questo tipo di cottura è
necessario tenere la porta del forno aperta (fig. 8), quindi richiuderla parzialmente
appoggiandola al paramanopole. Nella funzione grill il ventilatore di raffreddamento
parte subito. In relazione al tipo di vivanda (es. carni, pesce, pollame, ecc…) è
necessario rivoltare le vivande per esporre i due lati (sopra e sotto) ai raggi infrarossi.
Indichiamo alcuni tempi di cottura a titolo orientativo.
Tempo di cottura in minuti
Cibi da grigliare lato lato
.
sopra sotto
Carni basse o sottili 6 4
Carni normali 8 5
Pesce squamato 10 8
Pesce (es. trote, salmone) 15 12
Salsicce 12 10
Toasts 5 2
ATTENZIONE:
Durante l’uso le parti accessibili del forno possono diventare calde, si raccomanda di
tenere lontano bambini, ragazzi e persone diversamente abili durante il
funzionamento del forno e subito dopo averlo spento.
Nel caso fosse impossibile si richiede la presenza di un adulto per tutto il periodo di
funzionamento e raffreddamento del forno.
22
.
Page 27
ISTRUZIONI PER L'USO DEL PARAMANOPOLE
INSERIRE IL PARAMANOPOLE
NELLE ASOLE DELLA FACCIATA
ASSICURARSI CHE IL PARAMANOPOLE
SIA AGGANCIATO TIRANDOLO VERSO
L' ESTERNO
APRIRE LA PORTA DEL FORNO
AGGANCIARE IL PARAMANOPOLE ALLA
FACCIATA SPOSTANDOLO VERSO DESTRA
CHIUDERE LA PORTA DEL FORNO
ATTENZIONE:
Durante il funzionamento il paramanopole diventa molto caldo.
Usare guanti da cucina.
23
Page 28

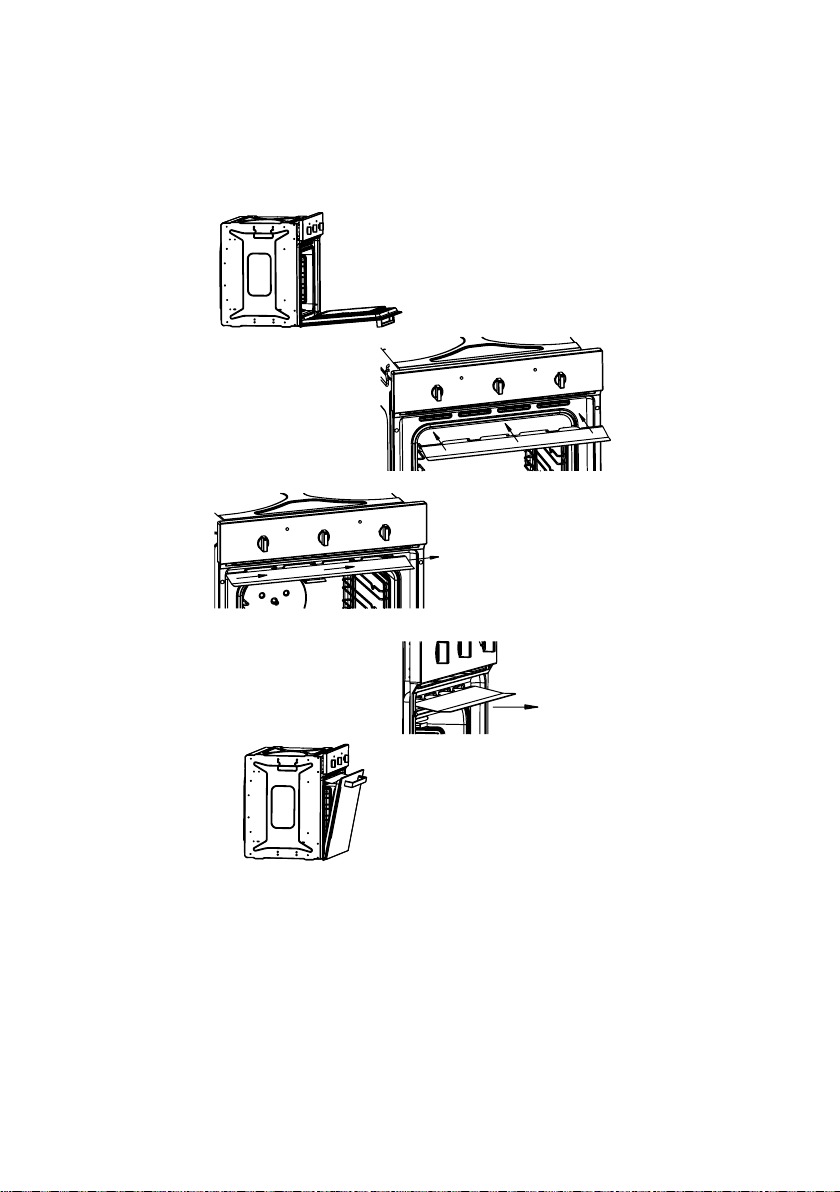
Come si usa il girarrosto (fig. 9)
Nei forni a gas è possibile utilizzare il girarrosto abbinato al funzionamento del grill
Dopo aver preparato l’asta dello spiedo completa di carne, bloccarla con le due
forchette e procedere nel seguente modo:
Fig. 9
Appoggiare il supporto nella sede dello spiedo.
Togliere l’impugnatura svitandola
Introdurre la leccarda nel gradino più basso
Collocare il deflettore nella parte inferiore del frontale
Richiudere parzialmente la porta appoggiandola al deflettore
A cottura terminata avvitare l’impugnatura all’asta dello spiedo ed estrarlo
dal forno.
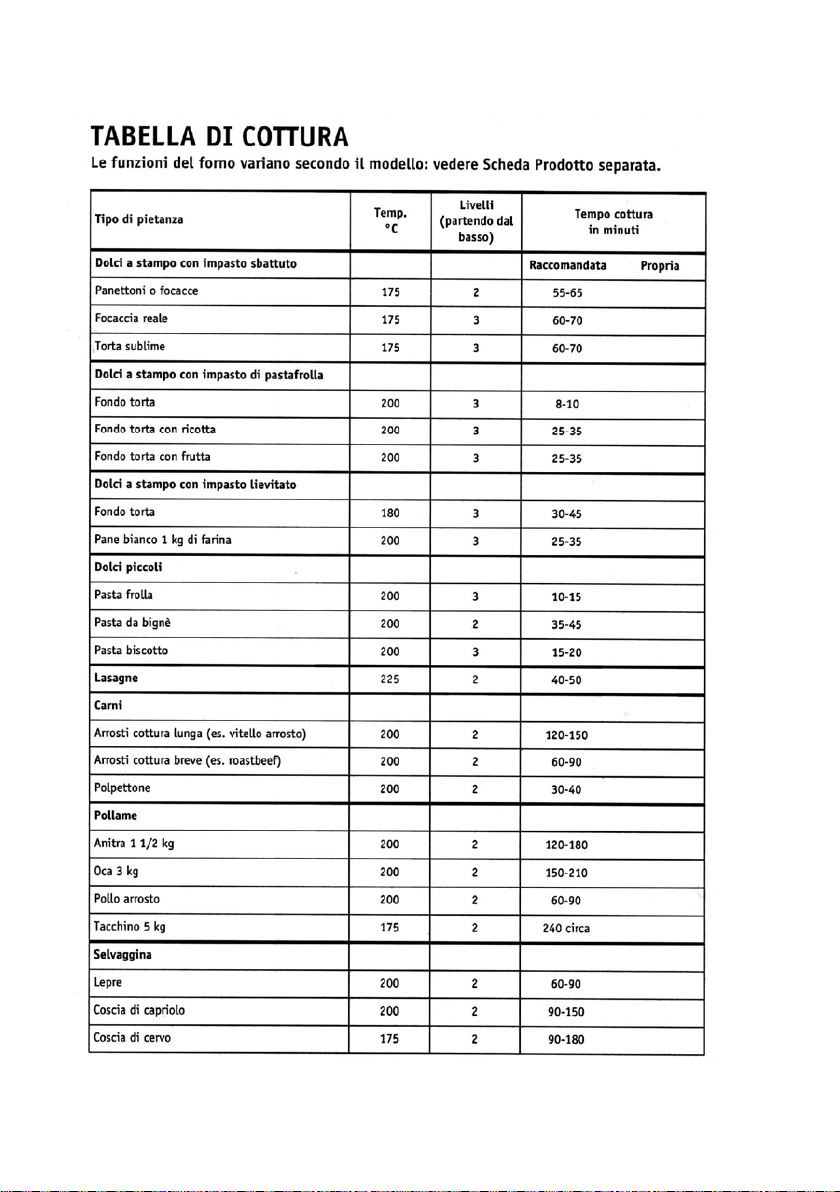
Come si usa il forno
Posizionare la manopola del termostato sul valore desiderato scelto (fra i 150°C
e max). Per ottenere dei buoni risultati è consigliabile preriscaldare il forno alla
temperatura desiderata prima di introdurre le vivande. Per i cibi particolarmente
grassi non è necessario il preriscaldamento del forno. Nel caso di carne congelata
è consigliabile tenere la temperatura di cottura circa di 20°C inferiore, aumentando
il tempo di cottura di 15 minuti circa (vedi tabella di cottura).
Nella tabella seguente, Vi forniamo dei consigli pratici per la cottura al forno.
Il tempo di cottura varia sia per la quantità, sia per la qualità delle vivande.
242526
Page 29
Page 30
Page 31

PULIZIA E MANUTENZIONE DEL FORNO
Importante: Prima di procedere alla manutenzione del forno occorre staccare sempre
la spina dalla presa di corrente o togliere la corrente dalla linea di alimentazione a
mezzo dell’interruttore generale dell’impianto elettrico.
Pulizia del forno:
Dopo ogni uso lasciare raffreddare il forno e pulirlo per evitare che le
incrostazioni vengano ripetutamente scaldate.
Se lo sporco è tenace, usare un prodotto specifico per la pulizia del forno
seguendo le istruzioni sulla confezione.
Pulire l’esterno con una spugna inumidita di acqua tiepida.
Non usare abrasivi, pagliette metalliche, pulitori elettrici a vapore e prodotti
infiammabili.
Non usare materiali o sostanze abrasive per la pulizia dei vetri per evitare il
loro danneggiamento.
Lavare gli accessori in lavastoviglie o a mano usando un prodotto per la
pulizia del forno.
ATTENZIONE: per le seguenti operazioni si raccomanda l’utilizzo di guanti
protettivi.
27
Page 32

Come togliere la porta del forno (fig. 10)
Per facilitare la pulizia del forno è possibile togliere la porta del forno agendo sulle
cerniere in questo modo:
Le cerniere A sono provviste di 2 cavallotti mobili B.
Quando i cavallotti B sono sollevati, le cerniere sono sganciate dalla propria sede.
Fatto ciò, sollevare la porta verso l’alto ed estrarla verso l’esterno, facendo
presa sui fianchi della porta in prossimità delle cerniere.
Per rimontare la porta:
Infilare le cerniere nelle apposite scanalature e aprire completamente la porta.
Ruotare i cavallotti mobili B nella posizione iniziale prima di richiudere la
porta.
Fig. 10
28
Page 33

Pulizia delle griglie laterali (se presenti) – Fig. 11
Per togliere le guide laterali e facilitare la pulizia interna del forno, esercitare
una lieve pressione verso il basso sul particolare A come illustrato.
Fig. 11
Sostituzione lampada forno (fig. 12)
Disinserire il forno elettricamente.
Svitare la copertura della lampada.
Sostituire la lampada
Avvitare la copertura della lampada
Ridare tensione
N.B. : usare solo lampade da 25W 230V, tipo E-14, 300°C,
disponibili presso il nostro servizio assistenza.
Fig. 12
29
Page 34

GUIDA RICERCA GUASTI
Il bruciatore non si accende
Il rubinetto di erogazione gas è aperto?
C’è un’interruzione all’erogazione del gas?
È finita la bombola?
Le aperture del bruciatore sono otturate?
Il bruciatore non rimane acceso
Ripetere l’operazione di accensione posizionando la manopola sul simbolo
rappresentante la max temperatura.
L’accensione elettrica non funziona
C’è un’interruzione di corrente?
Il sistema di raffreddamento non funziona
C’è un interruzione di corrente?
C’è la porta forno aperta?
30
Page 35

SERVIZIO ASSISTENZA CLIENTI
Prima di chiamare il servizio di Assistenza Tecnica
In caso di mancato funzionamento del prodotto vi consigliamo di:
verifi
care il buon inserimento della spina nella presa di corrente;
v
erificare che l'afflusso di gas sia regolare.
Nel caso non si individui la causa di mal funzionamento:
spegnere l
CERTIFICATO DI GARANZIA: cosa fare?
Il Suo prodotto è garantito, alle condizioni e nei termini riporta
nel
decorrenti
Il certificato di garanzia dovrà essere da Lei conservato, de
essere
unitamente
dell
il nominativo
il
prezzo di cessione.
Il Servizio di Assistenza Tecnica Autorizzato, verificato il diritto all
effettuerà
ricambi che
ESTENSIONE DELLA GARANZIA FINO A 5 ANNI: come?
Le ricordiamo inoltre che sullo stesso certificato di garanzia convenz
informazioni ed i documenti necessari per prolungare la garanzia dell
5 anni e così, in caso di guasto, non pagare il diritto fisso di intervento a domicilio, la
manodopera
Per qualsiasi informazione necessitasse, La preghiamo rivolgersi al numero telefonico
del Servizio Clienti 0392086811.
apparecchio, non manometterlo e chiamare il Servizio di Assistenza Tecnica.
ti sul certificato inserito
prodotto ed in base alle previsioni del decreto legislativo 24/02, fino a 24 mesi
dalla data di consegna del bene.
bitamente compilato, per
mostrato al Servizio Assistenza Tecnica Autorizzato, i
ad un documento fiscalmente valido rilasciato dal riven
acquisto
(bolla di consegna, fa
del rivenditore, la data di consegna, gli estremi id
senza addebitare il diritto fisso di intervento a domicilio,
sono totalmente gratuiti.
ed i ricambi.
ttura, scontrino fiscale, altro) sul quale siano indicati
n caso di necessità,
ditore al momento
entificativi del prodotto ed
interve
nto, lo
la manodopera ed i
ionale Lei troverà le
apparecchio sino a
31
Page 36

ANOMALIE E MALFUNZIONAMENTI: a chi rivolgersi?
Per qualsiasi necessità il centro assistenza autorizzato è
per fornirLe i chiarimenti necessari; comunque qualora il Su
anomalie
consigliamo
UN SOLO NUMERO TELEFONICO PER OTTENERE ASSISTENZA
Qualora il problema do
sarà
opera nella Sua zona di res
MATRICOLA DEL PRODOTTO. Dove si trova?
È importante che comunichi al Servizio Assistenza Tecnica Au
prodotto
sul
facciata forno
In questo modo Lei potrà contribuire ad evitare trasferte inutili del tecnico, risparmiando
oltretutto i relativi costi.
o mal funzionamenti, prima di rivolgersi al Servizio Assi
vivamente
messo in contatto direttamente
ed il numero di matricola (16 caratteri che iniziano con la cif
certificato di garanzia oppure sulla targa matricola posta sul bordo
(visibile a porta aperta)
di effettuare i controlli indicati s
vesse persistere, componendo il
con il Servizio Assistenza Tecnica Autorizzato che
idenza.
.
a Sua completa disposizione
o apparecchio presenti
stenza Autorizzato,
opra.
Numero Utile
torizzato la sigla del
sotto indicato,
ra 3) che troverà
laterale della
32
Page 37

User instructions
Thank you for choosing one of our products. We hope you will get the very best
performance from this appliance.
Therefore we would ask you
to carefully comply with the the suggestions and
instructions in this manual for proper use of our products.
The manufacturer shall not be held liable for damage to persons and property
which is due to poor or incorrect installation of the appliance.
The
manufacturer reserves the right to modify its products as deemed fit without
prior
notice.
Technical characteristics
This appliance complies with circular EEC concerning limitation of radio and
electrical disturbances For the parts that will come in
to contact with food
products, this appliance is compliant with 89/109/EEC.
Before the first use
Once having unpacked and installed the appliance, take out all the internal
accessories and bring the oven to the maximum temperature for a 20 minutes
time, in order to eliminate any remains of manufacturing grease , oil or resins
that can produce unpleasant smells during cooking.
Ventilate the room while doing this operation.. Wash drips and trays with appropriate
detergents.
IMPORTANT: accessible parts will become hot when in use.
To avoid burns and scalds children should be kept away.
During the first minutes of working of the appliance it is possible to find some
water droplets on the front side, which do not compromise the correct functioning
of the appliance.
33
Page 38

Technical characteristics
This appliance complies with circular EEC concerning limitation of radio and
electrical disturbances For the parts that will come in
to contact with food
products, this appliance is compliant with 89/109/EEC.
Dimensions:
Height: 591 mm
Width: 597 mm
Depth: 445 mm
Power supply voltage:
Volume: 58 L
220/230V a.c. - 50/60hz
34
Page 39

3+
(230V
Grill electric
power
CATEGORY II2H
Gas pressure (mbar)
Reduced
nominal heat
Air necessary for
combustion m³/h
Nominal
consumptio
Nominal
heat
Injector
marking
pass
By
marking
Air setting
1900 W
50Hz)
max.
30 35
-
nominal
20 28
min.
0,80
ity (kW)
capac
5,4
196 g/h
n
2,70
capacity
(kW)
(100/mm)
48 80
(100/mm)
Dest. UK/IT/RU
Type of
burner
Oven Open
1900 W
25 37 45
0,80
5,4
g/h
2,70 193
48 80
Oven Open
1900 W
17 20 25
0,80
5,4
257 l/h
2,70
115
48 adjusted
Oven Open
(230V 50Hz)
Grill electric
power
II2ELwLs3B/P
nominal max.
CATEGORY
min.
Gas pressure (mbar)
Reduced
nominal heat
capacity (kW)
Air necessary
for combustion
m³/h
Nominal
consumpti
on
Nominal
heat
capacity
(kW)
tor
Injec
marking
(100/mm)
pass
By
marking
(100/mm)
Air setting
Dest. PL
Type of
burner
1900 W
1900 W
1900 W
29 36 44
29 36 44
17 20 25
0,80
0,80
0,80
5,4
5,4
193 g/h
2,70
257 l/h 5,4
2,70
196 g/h
2,70
115
48 adjusted
48 75
48 75
Oven Open
Oven Open
Oven Open
1900 W
1900 W
10 13 16
16 20 25
0,80
0,80
357 l/h 5,4
310 l/h 5,4
2,70
2,70
148
125
48 adjusted
48 adjusted
Oven Open
Oven Open
G30
INJECTOR TABLE
Type of gas used
LIQUEFIED
PETROLEUM GAS
(Butane)
G31
LIQUEFIED
PETROLEUM GAS
(Propane)
G20
NATURAL GAS
(Methane)
INJECTOR TABLE
Type of gas
used
LIQUEFIED
PETROLEUM
GAS
(Butane) G30
G31
LIQUEFIED
PETROLEUM
GAS
(Propane)
NATURAL
GAS
(Methane)
G20
GZ350
GAS
GZ410
GAS
35
Page 40

S3B/P
(230V 50Hz)
Grill electric
power
1900 W
CATEGORY II2H
nominal max.
Gas pressure (mbar)
min.
1900 W
1900 W
1900 W
Reduced nominal
heat capacity
(kW)
Air necessary
for combustion
m³/h
Nominal
consumpti
on
Nominal
heat
capacity
(kW)
Injector
marking
(100/mm)
ass
-p
By
marking
(100/mm)
Air setting
Dest. HU
Type of
burner
25 30 35
0,80
5,4
196 g/h
2,70
48 80
Oven Open
G30
25 30 35
0,80
5,4
193 g/h
2,70
48 80
Oven Open
20 25 33
0,80
257 l/h 5,4
2,70
115
48 adjusted
Oven Open
G20
G31
20 25 33
0,80
299 l/h 5,4
2,70
121
48 adjusted
Oven Open
G25.1
36
INJECTOR TABLE
Type of gas
used
LIQUEFIED
PETROLEUM
GAS
(Butane)
LIQUEFIED
PETROLEUM
GAS
(Propane)
NATURAL
GAS
(Methane)
GAS
Page 41

INSTALLATION
ATTENTION: This appliance can be installed and operated only in rooms that
are continuously ventilated according to UNI 7129/UNI 7131.
IMPORTANT: The installation must be carried out by professionally qualified
personnel following the manufacturer's instructions. Any maintenance on the
appliance must be performed with the appliance disconnected from the electrical
power supply and with the gas supply tap closed. The installation must be carried
out in compliance with the current regulations in the country in which the
appliance will be used.
Gas connection
For the connection of the appliance to the gas distribution system or a gas
cylinder, use the rigid metal pipe in copper or steel with relative fittings
compliant with the standard UNIwith continuous wall compliant with standard UNI-CIG 9891. The pressure
regulators used must be compliant with the standard UNI-CIG 7432.
CIG 7129 or the flexible hose in stainless steel
Electrical connection
The electrical connection must be carried o
to the manufacturer's instructions and in compliance with current local standards.
Make sure the voltage matches the value indicated on the technical data plate
visible, with the door open, on one of the side edges of the cavity. If the plug is
not easily accessible, the installer must provide an omni-polar switch with a
contact opening distance of at least 3 mm. The appliance is supplied with a
plugless cable. A normalized plug must be used, taking into consideration that:
ut by a qualified technician according
yellow- green = earth
blue = neutral
brown = phase
The appliance is required by law to have an earth connection.
Do not use multiple sockets or extension cords.
37
Page 42

Installation room (fig. 1)
For proper operation of the gas appliance, it is essential that the room has a
natural air flow from openings on the external walls providing sufficient air for
combustion of the gas. These openings must have a free air-flow cross-section of
at least 100 cm2 (realized with one or more openings).
The exhaust of the combustion residual products must occur through hoods
connected to chimney flues or directly to the outdoors. If it is not possible to
install a hood, an electric fan must be applied to the external wall or window of
the room provided that the ro
current standards. This electric fan must have a capacity that guarantees, for a
kitchen, an hourly air renewal of 3-5 times its volume.
om has the required air inlet openings according to
Fig. 1
38
Page 43

Insertion into the furniture unit:
The appliance can be inserted either under a worktop or into a column. In either case
comply with the dimensions shown in figures 1 and 2.
For column instal
lation, in order to ensure proper ventilation, it is very important to
provide an opening of at least 85-90mm as shown in figure 1.
The oven is secured to the furniture unit by four screws located in the holes of
the perimeter frame (see fig. 1).
Do notuse the door as a lever when installing the oven.
Do not place excessive pressure on the oven door when it is open.
Fig. 2.1
39
Page 44

Fig. 2.2
40
Page 45

CONNECTION TO THE GAS SUPPLY
The supply system must be compliant with the current local standards in the
country of use. The type of gas for which the oven has been regulated is indicated
on the serial number plate located on one of the side edges of the cavity (visible
with the door open) and on the packaging. Before carrying out the connection,
the oven must be adapted to the type of gas that will be used. The connection
between the gas fitting, ramp and pipe can be carried out in one of the following
ways (see drawing in fig.3):
1.
Using an
attachment without seals (the oven attachment is conical: ISO
R 7).
2.
Using the seal provided.
Attention: when finished, check that there are no gas leaks.
Use soap and water or special liquids to make sure that there are no gas leaks.
DO NOT USE OPEN FL
Warning:
the use of a rubber flexible hose fastened with hose clamps is
AMES WHEN SEARCHING FOR GAS LEAKS.
prohibited because it cannot be inspected.
Fig. 3
RAMP
SEAL
FLEXIBLE HOSE
2)
1)
41
Page 46

Adaptation to the gas in use
Other types of gas can be used by changing the burner s
1)
Make sure that the oven is not connected to the electrical mains.
2)
Open the oven door completely.
3)
Extract the bottom of the oven after having removed the retaining screws (fig.
etting as follows:
4).
4)
Take off the burner by unscrewing the screw.
5)
Unscrew the injector and replace it according to the injector table provided
separately. Reassemble the burner and the bottom of the oven, following the
above steps in the reverse order.
Flame adjustment (if applicable) - (fig. 5 and 6)
To adjust the flame, proceed
as follows:
loosen the screw C and turn the ring nut D to position N for natural or methane gas, and
position
fixed pointer on the burner. An adjusted flame is obtained in this man
GPL
for cylinder gas, aligning the movable pointer on the ring nut with the
ner.
Fig. 4 Fig. 5
Fig. 6
EXCESS AIR REGULAR FLAME LACK OF AIR
42
Page 47

Setting of the minimum (fig. 7a-7b)
The oven thermostat is equipped with a by-pass for the minimum; when changing the
type of gas it is also necessary to adjust the setting in the following manner:
Remove the thermostat knob;
If the front panel is in glass, remove it by unscrewing the two locking ring nuts
located under the ot
her two knobs (fig. 7a);
If the control panel is in metal, the adjustment can be made through the
opening located on the left side of the thermostat knob housing (fig. 7b);
Turn on the oven and let it operate at maximum with the door closed for at
least 30
minutes;
Move the oven thermostat knob to the minimum and set the by-pass to the
minimum so as to obtain a reduced but stabilized flame.
Perform this operation
with the oven door closed;
Use a screwdriver to operate on the notch of the by-pass screw. A fe
w turns of
the by-pass screw is sufficient to adjust the minimum when passing from
liquid gas to methane gas;
fig. 7a fig. 7b
IMPORTANT:
after having adjusted the burner, open and close the oven door to
check that the flame remains lit at the minimum. If the flame goes out, adjust the
pass setting.
byFor operation with G30/G31, the adjustment screw of the by-pass must be screwed in
completely.
When these operations are finished (injector replacement, air adjustment and minimum
setting), turn off the oven and replace the data plate with the new data plate indicating
the operating gas.
43
Page 48

Use and ignition of the oven
USE: the oven burner has a safety valve whichblock the gas flow in the following
cases:
- If the thermostat knob is accidentally turned with immediate gas flow.
- If the burner flame is accidentally cut off.
- In the case of lack of gas depending by the gas provider.
IGNITION: the oven is switched on with the door wide open.
If the door is just partially open, a safety system blocks the automatic
ignition of burners.
44
Page 49

OVEN FUNCTIONS
FLG 202
Yellow light Green light
60 minutes timer Function selector The
FLG 203
Yellow light Green light
60 minutes timer
rmostat
Function selector Thermostat
45
Page 50

Yellow and green lights
The green light turns on when the selector knob is in any position different from 0.
The yellow light turns on when the electric grill is on.
.
Selector knob
It allows to choose between the different cooking functions.
Use of the selector with electric grill and symbols
: OVEN LIGHT
: GRILL
This type of cooking is particularly indicated for a quick browning of foods.
It is recommended to keep the oven door open and to use the knob protection.
.
: GRILL + TURNSPIT (only FLG 203)
This type of cooking allows the browning of foods.
It is recommended to keep the oven door open and to use the knob protection.
The selector in this position allows the automatic functioning of the grill together
the turnspit.
: TURNSPIT (only FLG 203)
At the end of cooking this function allows to keep hot the spit, while turning.
Warning: se durante il funzionamento del grill elettrico si ruotasse per errore la
manopola del termostato forno, un dispositivo di sicurezza bloccherà la funzione del
grill. Per ripristinarlo basterà ruotare la manopola del forno fino a far coincidere
l’indice mobile 0 della manopola con l’indice fisso sul frontale.
46
Page 51

Thermostat knob
It allows to choose the preferred temperature of cooking.
By turning the knob anticlockwise the temperature can be selected between
150°C and Max.
60 minutes timer
The regulating knob must be turned ina clockwise direction until it reaches
the 60 minutes position and then turned to the desired time by turning the knob
in a counter clockwise direction.
The oven will not be turned off automatically.
A minute counter ringing will advise that the cooking time is over.
47
Page 52

BEFORE USING THE OVEN PRECAUTIONS AND GENERAL S
Unplug the appliances before performing any maintenance and/or cleaning.
Any repairs or other work on the appliances must be carried out by qualified
technicians only.
Make sure that the electrical cables of other appliances used near the cookt
or oven do not touch the hot parts or get stuck in the oven door.
Keep children away from the oven during and immediately after use.
Use oven gloves to remove pots and accessories when the oven is hot.
Do not cover the bottom of the oven with aluminium
Do not place flammable material inside the oven. If the appliance is turned on
accidentally, it could catch on fire.
After using the oven, make sure that the pointer of the knob is in the 'off'
position and close the tap of the gas pipeline or cylind
Do not store flammable materials inside the oven cavity.
The oven is equipped with a fan to cool the internal parts, the components of
the oven and create a slight air flow that exits from the slot under the control
panel.
This cooling fan turns on imm
oven is switched off (depending on oven temperature).
If the fan does not work, do not use the oven and call the service centre.
If there is a power failure, do not use the appliance;
if a power failure occur
s while the appliance is operating, turn off the appliance
and do not use it again until power is restored.
In the grill function, the cooling fan starts immediately with the door open or
closed and stops as in the preceding function.
During use, the inter
nal glass of the oven door may steam up.
The accessible parts of the oven may become hot during use. It is advised to
keep toddlers, children and differently-abled persons away from the oven
during and immediately after use. If this is not possible, an adult must be
present during the entire oven operation and cooling period.
Do not place heavy objects on the door in order to avoid damaging the oven
cavity or door hinges.
UGGESTIONS
op
foil.
er.
ediately and shuts down 10-30 minutes after the
48
Page 53

Do not block the cooling or exhaust openings or slots.
If the oven burner knob becomes
increasingly difficult to turn, call the service
centre to replace the tap.
Attention:
to reduce consumption and avoid overheating, the oven door should be kept
closed unless specifically required otherwise.
49
Page 54

TURNING ON THE OVEN
The oven is equipped with electric ignition. To turn on the oven, open the door
completely. Press the thermostat knob slightly and turn it counter-clockwise to the
maximum. Press the knob completely to trigger the electric ignition and keep the knob
pre
ssed for a few seconds. However, do not activate the device for more than 15
seconds.
If the burner does not light in 15 seconds, keep the door completely open and wait at
least 1 minute before trying again.
NOTE: when the oven is turned on for the first time, it is normal to have to repeat the
operation several times due to the presence of air in the gas supply line. Once the flame
is lit, keep the thermostat knob pressed for a few seconds to activate the safety
thermocouple that would otherwise block the
gas supply. Check the successful lighting
of the burner through the slots located in the front part of the oven plate; if it is not lit,
repeat the operation.
The proper operation of the burner should be checked with the oven door closed.
DURING OPERATIO
Keeping the door closed, check that the cooling fan is operating properly.
N
If the fan
does not work, proceed as follows:
1.
check the power supply; if there is a power failure stop baking, turn off the
appliance and wait for power to be restored.
2.
if there
is no power failure, do not use the oven and contact the service centre.
If the oven door is opened during use, the fan stops to prevent the flow of hot air in the
direction of the user; once the door is closed again the fan resumes operation; if this
doe
s not occur, perform the checks listed in points 1 and 2.
50
Page 55

How to use the grill
Foods to be grilled
Cuts of thin meat 6 4
Cuts of normal meat 8 5
Fish (e.g. trout, salmon)
Sausages
Toast
Depending on the type of food (e.g. meats, fish, poultry, etc.), you will need to turn
the
food to expose both sides to the infrared rays.
The data provided above is approximate. Cooking times vary based on the
experience of the person using th
The cooking times do not include pre-heating. It is advisable to pre-heat the oven
for about 15 min.
With the ventilated grill function, do not select a temperature of more than 190°C.
e oven and the amount and quality of the foods.
Cooking time in minutes
Over
15 12
12 10
52
Under
ATTENTION:
The accessible parts of the oven may become hot during use. It is advised to keep
toddlers, children and differently-abled persons away from the oven duri
ng and
immediately after use.
If this is not possible, an adult must be present during the entire oven operation and
cooling period.
51
Page 56

INSTRUCTIONS FOR INSTALLING KNOB GUARD
OPEN OVEN DOOR
INSTALL KNOB GUARD
IN SLOTS OF FRONT
MAKE SURE THE KNOB GUARD IS ATTACHED
BY PULLING IT OUTWARDS
FASTEN KNOB GUARD ONTO FRONT
BY MOVING IT TO THE RIGHT
ATTENTION:
During operation the knob guard gets very hot.
Use kitchen gloves.
52
CLOSE OVEN DOOR
Page 57

USING THE SPIT
Slide the food onto the spit rod between the two forks, securing it
in a stable position by means of the forks to prevent straining the motor.
Fit the spit rod into the hole of the spit motor and rest it on the support provided.
Place the collecting plate on the lowest shelf. Switch the grill on.
(fig. 9)
53
Page 58

CLEANING AND MAINTENANCE OF
THE OVEN
Important:
Before performing any maintenance, you must either unplug the oven or
disconnect the power supply via the omni-polar switch of the electrical system.
Cleaning the oven:
Let the oven cool after each use
and clean it to keep burnt on
residues
from being repeatedly heated.
For tough dirt, use a product specifically for oven cleaning. Follow the
instructions on the container of the product.
Clean the outside with a sponge dampened in lukewarm water.
Do not use abrasive produ
cts, steel wool pads, electrical or steam cleaners, or
flammable products.
Do not use abrasive substances or materials to clean the glass as they may
damage it.
Wash accessories in a dishwasher or by hand using a product for oven
cleaning.
ATTENTION:
use
protective gloves for the following tasks.
54
Page 59

How to remove the oven door (fig. 10)
To make it easier to clean the oven, it is possible to remove the door from the hinges
as follows:
The hinges A are equipped with 2 mobile UWhen the U-bolts B are
lifted, the hinges are disconnected from their housing.
bolts B.
After this, lift the door up and pull it outwards, holding the door on both sides
near the hinges.
To re-install the door:
Slide the hinges into the grooves and open the door all the way.
Turn the mo
bile U-bolts to their starting position before closing the door
again.
Fig. 10
ATTENTION:
Please ensure that you do not remove the hinge locking system when you remove the
door. The hinge mechanism has a very strong spring. Never immerse the door in
water.
55
Page 60

Cleaning the side rails -
Fig. 11
The side rails are to be hooked onto the wall of the oven. Slide the racks and tray
provided into the side rails.
To remove the side rails press on part A as shown
Fig. 11
Replac
ement of oven lamp (fig. 12)
.
Disconnect the oven from the electrical power supply.
Use a screwdriver to remove the light cover.
Replace the lamp
Put the light cover back
Restore the power supply
56
N.B. : use only lamps that are 25W 230V, type E
technical service.
Fig
. 12
-
14, T 300°C,
available from our
Page 61

TROUBLESHOOTING GUIDE
The burner does not light
Is the gas supply tap open?
I
s the gas supply obstructed?
Is the gas cylinder empty?
Are the burner openings blocked?
The burner does not stay lit
Repeat the ignition operation positioning the knob on the symbol representing
the maximum temperature.
The electric ignition doesn't wor
k
Is there a power failure?
The cooling system doesn't work
Is there a power failure?
Is the oven door open?
CUSTOMER TECHNICAL SERVICE
Before contacting technical service
If the product does not work, we suggest the following:
check that the plug is firmly in the socket;
If you cannot identify the reason for the
turn the appliance off, do not tamper with it and contact technical services department.
malfunction:
57
Page 62

58
Page 63

ɈȻɓɂȿ ɋȼȿȾȿɇɂə
Ɋɟɤɨɦɟɧɞɭɟɬɫɹ ɬɳɚɬɟɥɶɧɨ ɢɡɭɱɢɬɶ ɞɚɧɧɵɣ ɛɭɤɥɟɬ ɩɟɪɟɞ ɧɚɱɚɥɨɦ ɩɨɥɶɡɨɜɚɧɢɹ
ɷɥɟɤɬɪɨɩɪɢɛɨɪɨɦ.
ȼɚɠɧɨ ɨɡɧɚɤɨɦɢɬɶɫɹ ɫ ɮɭɧɤɰɢɹɦɢ ɭɩɪɚɜɥɟɧɢɹ ɞɚɧɧɨɝɨ ɛɵɬɨɜɨɝɨ ɷɥɟɤɬɪɨɩɪɢɛɨɪɚ,
ɩɪɟɠɞɟɱɟɦ ɩɪɢɫɬɭɩɢɬɶ ɤ ɩɪɢɝɨɬɨɜɥɟɧɢɸ ɩɢɳɢ.
ɇɟ ɡɚɛɵɜɚɣɬɟ ɨ
ɩɨɞ ɧɚɡɜɚɧɢɟɦ ‘ȼȺɀɇɈ – ɉɪɟɞɭɩɪɟɠɞɟɧɢɹ ɢ ɢɧɫɬɪɭɤɰɢɢ ɩɨ ɬɟɯɧɢɤɟ
ɛɟɡɨɩɚɫɧɨɫɬɢ’.
Ⱦɚɧɧɵɣ ɷɥɟɤɬɪɨɩɪɢɛɨɪ ɩɪɟɞɧɚɡɧɚɱɟɧ ɞɥɹ ɞɨɦɚɲɧɟɝɨ ɢɫɩɨɥɶɡɨɜɚɧɢɹ, ɟɫɥɢ ɨɧ
ɜɫɬɪɨɟɧ ɜ ɤɭɯɨɧɧɵɟ ɲɤɚɮɵ.
ɉɊɂɆȿɑȺɇɂȿ: ɒɤɚɮɵ, ɪɚɫɩɨɥɨɠɟɧɧɚɹ ɪɹɞɨɦ ɫ ɧɢɦɢ ɦɟɛɟɥɶ ɢ ɜɫɟ ɦɚɬɟɪɢɚɥɵ,
ɢɫɩɨɥɶɡɭɟɦɵɟ ɩɪɢ ɭɫɬɚɧɨɜɤɟ, ɞɨɥɠɧɵ ɜɵɞɟɪɠɢɜɚɬɶ ɬɟɦɩɟɪɚɬɭɪɭ, ɧɚ 75°C
ɩɪɟɜɵɲɚɸɳɭɸ ɬɟɦɩɟɪɚɬɭɪɭ ɨɤɪɭɠɚɸɳɟɣ ɫɪɟɞɵ ɜɨ ɜɪɟɦɹ
Ⱦɚɧɧɚɹ ɢɧɮɨɪɦɚɰɢɹ ɩɪɢɜɨɞɢɬɫɹ ɬɨɥɶɤɨ ɞɥɹ ɫɩɪɚɜɤɢ, ɬɨɝɞɚ ɤɚɤ ɞɟɣɫɬɜɢɬɟɥɶɧɚɹ
ɭɫɬɨɣɱɢɜɨɫɬɶ ɤ ɩɨɜɵɲɟɧɧɨɣ ɬɟɦɩɟɪɚɬɭɪɟ ɡɚɜɢɫɢɬ ɨɬ ɷɤɫɩɥɭɚɬɚɰɢɨɧɧɵɯ
ɯɚɪɚɤɬɟɪɢɫɬɢɤ ɦɚɬɟɪɢɚɥɚ, ɢɫɩɨɥɶɡɨɜɚɧɧɨɝɨ ɞɥɹ ɨɬɞɟɥɤɢ ɤɭɯɨɧɧɨɣ ɦɟɛɟɥɢ.
ɇɟɤɨɬɨɪɵɟ ɜɢɞɵ ɨɬɞɟɥɤɢ ɤɭɯɨɧɧɵɯ ɲɤɚɮɨɜ (ɧɚɩɪɢɦɟɪ, ɜɢɧɢɥ) ɨɫɨɛɟɧɧɨ
ɱɭɜɫɬɜɢɬɟɥɶɧɵ ɤ ɩɨɜɪɟɠɞɟɧɢɸ ɬɟɩɥɨɦ ɢɥɢ ɢɡɦɟɧɟɧɢɸ ɰɜɟɬɚ ɩɪɢ ɬɟɦɩɟɪɚɬɭɪɚɯ,
ɞɚɠɟ ɛɨɥɟɟ ɧɢɡɤɢɯ, ɱɟɦ ɭɤɚɡɚɧɧɵɟ ɪɚɧɟɟ.
Ɉɬɜɟɬɫɬɜɟɧɧɨɫɬɶ ɡɚ ɧɟɫɨɛɥɸɞɟɧɢɟ
ɢɥɢ ɪɚɡɦɟɳɟɧɢɟ ɫɨɫɟɞɧɢɯ ɦɚɬɟɪɢɚɥɨɜ ɛɥɢɠɟ, ɱɟɦ ɧɚ ɪɚɫɫɬɨɹɧɢɢ 4 ɦɦ ɨɬ
ɷɥɟɤɬɪɨɩɪɢɛɨɪɚ, ɧɟɫɟɬ ɟɝɨ ɜɥɚɞɟɥɟɰ.
ɉɪɢ ɢɫɩɨɥɶɡɨɜɚɧɢɢ ɞɭɯɨɜɨɝɨ ɲɤɚɮɚ ɜ ɬɪɚɧɫɩɨɪɬɧɵɯ ɫɪɟɞɫɬɜɚɯ ɞɥɹ ɩɪɨɜɟɞɟɧɢɹ
ɞɨɫɭɝɚ ɫɥɟɞɭɟɬ ɨɡɧɚɤɨɦɢɬɶɫɹ ɫ ɫɨɨɬɜɟɬɫɬɜɭɸɳɟɣ ɡɚɦɟɬɤɨɣ ɜ ɂɧɫɬɪɭɤɰɢɢ ɩɨ
ɭɫɬɚɧɨɜɤɟ.
ɇɟɧɚɞɥɟɠɚɳɟɟ ɢɫɩɨɥɶɡɨɜɚɧɢɟ ɢɥɢ ɩɪɢɦɟɧɟɧɢɟ ɜ ɤɚɤɨɣ-ɥɢɛɨ ɢɧɨɣ ɫɪɟɞɟ ɛɟɡ
ɜɵɪɚɡɢɬɟɥɶɧɨɝɨ ɫɨɝɥɚɫɢɹ
ɪɟɤɥɚɦɚɰɢɸ ɩɨ ɝɚɪɚɧɬɢɢ ɢɥɢ ɨɬɜɟɬɫɬɜɟɧɧɨɫɬɢ ɡɚ ɢɡɞɟɥɢɟ.
ɪɟɤɨɦɟɧɞɚɰɢɹɯ ɢ ɩɪɟɞɭɩɪɟɠɞɟɧɢɹɯ, ɩɪɢɜɟɞɟɧɧɵɯ ɧɚ ɫɬɪɚɧɢɰɟ 5
ɪɚɛɨɬɵ ɷɥɟɤɬɪɨɩɪɢɛɨɪɚ.
ɞɚɧɧɵɯ ɭɤɚɡɚɧɢɣ ɩɨ ɭɫɬɚɧɨɜɤɟ ɷɥɟɤɬɪɨɩɪɢɛɨɪɚ
ɢɡɝɨɬɨɜɢɬɟɥɹ ɞɟɥɚɟɬ ɧɟɞɟɣɫɬɜɢɬɟɥɶɧɵɦ ɥɸɛɭɸ
59
Page 64

3+
2H
II
3B/P
ELwLs
2
II
(230 50 )
( )
1900
30 35
-
1900
1900
(230 50 )
.
IT/RU
/
UK
.
. . .
20 28
0,80
( )
,
5,4
³/
196 /
)
2,70
(
25 37 45
0,80
5,4
193 /
2,70
17 20 25
0,80
5,4
257 /
2,70
. .
( )
29 36 44 1900
0,80
,
5,4
()
29 36 44 1900
0,80
5,4
17 20 25 1900
0,80
5,4
10 13 16 1900
16 20 25 1900
0,80
0,80
5,4
5,4
³/
196 /
2,70
193 /
2,70
257 /
2,70
357 /
2,70
310 /
2,70
) ( )
) (100/ )
(100/
115
.
48 80
.
48 80
48
PL
.
.
.
)
(100/
(100/
. 48 75
. 48 75
. 48 . 115
. 48 . 148
. 48 . 125
60
31
30
( ) G
20
( ) G
( ) G
( ) G30
G20
GZ350
GZ410
G31
( )
( )
Page 65

3B/P
HS
2
II
(230 50 )
35 1900
.
30
. .
( )
HU
.
25
0,80
,
(100/ )
5,4
()
³/
196 /
2,70
) ( )
(100/
. 48 80
25 30 35 1900
0,80
5,4
193 /
2,70
. 48 80
20 25 33 1900
0,80
5,4
257 /
2,70
. 48 . 115
G20
20 25 33 1900
0,80
5,4
299 /
2,70
. 48 . 121
G25.1
( ) G30
G31
( )
( )
61
Page 66

:
,
UNI
7129/
UNI
7131. :
, .
, ,
. ,
.
UNI-CIG
,
7129,
UNI-CIG
9891.
,
UNI-CIG
,
=
7432.
.
, ,
,
, .
,
3 . .
:
- =
=
, .
.
62
Page 67

( .1)
, .
,
100 c 2( ).
,
. ,
,
,
, .
,
, , 3-5
.
.1
63
Page 68

ɍɋɌȺɇɈȼɈɑɇȺə ɋɏȿɆȺ
Ʉ ɨɫɧɨɜɧɵɦ ɭɫɥɨɜɢɹɦ ɹɜɥɹɟɬɫɹ ɨɛɟɫɩɟɱɟɧɢɟ ɧɚɞɥɟɠɚɳɟɣ ɰɢɪɤɭɥɹɰɢɢ ɜɨɡɞɭɯɚ ɫ
ɡɚɞɧɟɣ ɫɬɨɪɨɧɵ ɷɥɟɤɬɪɨɩɪɢɛɨɪɚ; ɞɨɥɠɧɵ ɫɨɛɥɸɞɚɬɶɫɹ ɪɚɡɦɟɪɵ ɩɪɨɪɟɡɢ.
ɉɪɢ ɧɟɨɛɯɨɞɢɦɨɫɬɢ, ɨɧɢ ɦɨɝɭɬ ɛɵɬɶ ɲɢɪɟ, ɱɟɦ ɭɤɚɡɚɧɧɵɟ.
2.1
64
Page 69

2.2
65
Page 70

. , ,
,
( ) .
. ,
( . .3):
1.
:
ISOR 7).
2.
: .
.
.
: ,
, ,
.
.3
( -
, ,
,
.
66
2)
1)
Page 71

,
:
1)
2)
, .
.
3)
4)
5)
, .
, .
( )-( .5 6)
, :
C D N
,
GPL
,
. .
.4 .5
( .4).
.
,
.6
67
Page 72

;
, ,
, ( .7a
,
( .7b
);
, .
;
. 7a . 7b
( . 7a-7b)
. ,
:
);
,
30 ;
, ,
.
.
,
68
:
, .
. G
30/G31
.
(
,
), ,
(
) .
Page 73

: ,
:
.
.
.
,
. ,
.
:
. ,
.
69
Page 74

FLG
202
. .
FLG
203
60
. .
.
.
60
Te
Te
70
Page 75

ɂɋɉɈɅɖɁɈȼȺɇɂȿ ɗɅȿɄɌɊɂɑȿɋɄɈȽɈ ȽɊɂɅə
OVEN LIGHT
SPIT
ȼɤɥɸɱɢɬɟ ɝɚɡɨɜɭɸ ɞɭɯɨɜɤɭ ɢ ɭɫɬɚɧɨɜɢɬɟ ɬɟɪɦɨɫɬɚɬ ɦɟɠɞɭ 150°C ɢ 270°C. Ⱦɜɟɪɰɚ
ɞɭɯɨɜɤɢ ɞɨɥɠɧɚ ɛɵɬɶ ɡɚɤɪɵɬɚ.
GRILL + SPIT
ɗɬɨɬ ɬɢɩ ɩɪɢɝɨɬɨɜɥɟɧɢɹ ɩɨɡɜɨɥɹɟɬ ȼɚɦ ɩɨɥɭɱɢɬɶ ɤɨɪɨɱɤɭ ɧɚ ɩɢɳɟ. Ⱦɜɟɪɰɚ
ɞɭɯɨɜɤɢ ɞɨɥɠɧɚ ɨɫɬɚɜɚɬɶɫɹ ɨɬɤɪɵɬɨɣ, ɚ ɡɚɳɢɬɚ ɪɭɤɨɹɬɤɢ ɞɨɥɠɧɚ ɛɵɬɶ
ɭɫɬɚɧɨɜɥɟɧɚ. ɉɪɢ ɩɟɪɟɤɥɸɱɚɬɟɥɟ ɜ ɷɬɨɦ ɩɨɥɨɠɟɧɢɢ ɝɪɢɥɶ ɢ ɜɟɪɬɟɥ ɚɜɬɨɦɚɬɢɱɟɫɤɢ
ɮɭɧɤɰɢɨɧɢɪɭɸɬ ɫɨɜɦɟɫɬɧɨ.
GRILL
ɗɬɨɬ ɬɢɩ ɩɪɢɝɨɬɨɜɥɟɧɢɹ ɨɫɨɛɟɧɧɨ ɭɦɟɫɬɟɧ ɞɥɹ ɛɵɫɬɪɨɝɨ ɩɨɞɪɭɦɹɧɢɜɚɧɢɹ ɩɢɳɢ.
Ⱦɜɟɪɰɚ ɞɭɯɨɜɤɢ ɞɨɥɠɧɚ ɨɫɬɚɜɚɬɶɫɹ ɨɬɤɪɵɬɨɣ, ɚ ɡɚɳɢɬɚ ɪɭɤɨɹɬɤɢ ɞɨɥɠɧɚ ɛɵɬɶ
ɭɫɬɚɧɨɜɥɟɧɚ.
71
Page 76

.
.
, ,
,
.
.
.
, .
,
,
.
,
,
, ,
.
/
.
.
.
72
10
-30 ( ).
.
, ;
.
, , ,
,
,
Page 77

.
.
,
. ,
.
,
.
, ,
.
:
, .
,
.
73
Page 78

.
.
.
; 15 ;
15 ,
1 .
: ,
. ,
, , .
,
; , .
.
,
. ,
:
74
1.
;
,
.
2.
,
.
,
; ,
; , ,
1 2.
Page 79

èÓθÁÓ‚‡ÌË „ËÎÂÏ
иУПВТЪЛЪВ ФУ‰ЫНЪ˚ ‰Оfl ФЛ„УЪУ‚ОВМЛfl М‡
„ЛОВ М‡ ТФВˆЛ‡О¸МЫ˛ В¯ВЪНЫ ЛОЛ КВ М‡
ФУЪЛ‚ВМ¸ Т У˜ВМ¸ МЛБНЛПЛ ·УЪ‡ПЛ. ЙЛО¸
‰УОКВМ ЫТЪ‡М‡‚ОЛ‚‡Ъ¸Тfl М‡ Т‡П˚И ‚ВıМЛИ
ЫУ‚ВМ¸, ‡ ФУЪЛ‚ВМ¸ ‰Оfl КЛ‡ - М‡ ТОВ‰Ы˛˘ЛИ.
ЗНО˛˜ЛЪВ ТУФУЪЛ‚ОВМЛВ „ЛОfl ТОВ‰Ы˛˘ЛП
У·‡БУП:
A. СОfl ТЪ‡ЪЛ˜ВТНУИ ‰ЫıУ‚НЛ иУБ. ТВОВНЪУ‡
B.
СОfl ‚ВМЪЛОЛЫВПУИ ‰ÛıÓ‚ÍË èÓÁ
.
ТВОВНЪУ‡
C. СОfl ПМУ„УЩЫМНˆЛУМ‡О¸МУИ/‚ВМЪЛОЛЫВПУИ
‰ЫıУ‚НЛ иУБ. ТВОВНЪУ‡
D. СОfl ПМУ„УЩЫМНˆЛУМ‡О¸МУИ ‰ЫıУ‚НЛ иУБ.
, , ТВОВНЪУ‡
З Б‡‚ЛТЛПУТЪЛ УЪ ЪЛФ‡ ФУ‰ЫНЪУ‚ (М‡Ф.,
ÏflÒÓ, ˚·‡, ÔÚˈ‡ Ë Ú.‰.) ÌÂÓ·ıÓ‰ËÏÓ
Ô‚ÂÌÛÚ¸ ÔÓ‰ÛÍÚ˚, ˜ÚÓ·˚ ÔÓ‰ÒÚ‡‚ËÚ¸ ÔÓ‰
ËÌه͇ÒÌ˚ ÎÛ˜Ë Ó·Â ÒÚÓÓÌ˚.
З Н‡˜ВТЪ‚В ФЛПВ‡ ФЛ‚У‰ЛП МВТНУО¸НУ
ФЛ·ОЛБЛЪВО¸М˚ı ФУ‰УОКЛЪВО¸МУТЪВИ
„ÓÚÓ‚ÍË:
ЗВПfl „УЪУ‚НЛ ‚ ПЛМЫЪ‡ı
èÓ‰ÛÍÚ˚ ‰Îfl ÔË„ÓÚÓ‚ÎÂÌËfl ̇ „ËÎÂ
Ò‚ÂıÛ ТМЛБЫ
нУМНЛВ НЫТНЛ ПflТ‡ 6 4
é·˚˜ÌÓ ÏflÒÓ 8 5
ê˚·‡ ·ÂÁ ˜Â¯ÛË 10 8
к˚·‡ (М‡Ф., ЩУВО¸, ОУТУТ¸) 15 12
äÓη‡ÒÍË 12 10
íÓÒÚ˚ 5 2
иУО¸БУ‚‡МЛВ ‚ВЪВОУП (ВТОЛ
Ô‰ÛÒχÚË‚‡ÂÚÒfl) - êËÒ. 2
к‡·УЪЫ ‚ВЪВО‡ ПУКМУ ТУ˜ВЪ‡Ъ¸ Т ‡·УЪУИ
„ËÎfl. 燉‚ ÔÓ‰ÛÍÚ˚ ̇ ‚ÂÚÂÎ ‚ ÔÓ‰ÓθÌÓÏ
М‡Ф‡‚ОВМЛЛ, Б‡НВФЛЪВ Лı ‰‚ЫПfl ‚ЛОН‡ПЛ.
б‡ЪВП ‚˚ФУОМЛЪВ ТОВ‰Ы˛˘ВВ:
Ä) ÇÒÚ‡‚¸Ú ÍÓ̈ ‚ÂÚ· ‚ ÔÓÎ˚È ‚‡Î
‰‚Л„‡ЪВОfl, ‡ТФУОУКВММУ„У М‡ Б‡‰МВИ ТЪВМНВ
‰ÛıÓ‚ÍË;
Ç) ìÒÚ‡ÌÓ‚ËÚ ÓÔÓÛ ‚ ͇̇‚ÍÛ ‚ÂÚ·;
л) лМЛПЛЪВ Ы˜НЫ, УЪ‚ЛМЪЛ‚ ВВ;
:
,
,
D) ìÒÚ‡ÌÓ‚ËÚ ÔÓÚË‚Â̸ ‰Îfl Êˇ ̇ Ò‡Ï˚È
МЛКМЛИ ЫУ‚ВМ¸;
Ц) иВ‚‰ЛЪВ ТВОВНЪУ ‚ ФУОУКВМЛВ “ЙЛО¸”
***, ˜ÚÓ·˚ ‚Íβ˜ËÎÒfl ‰‚Ë„‡ÚÂθ;
F) иУТОВ Б‡‚В¯ВМЛfl „УЪУ‚НЛ ФЛ‚ЛМЪЛЪВ Ы˜НЫ
‚ÂÚ· Ë ‚˚̸ÚÂ Â„Ó ËÁ ‰ÛıÓ‚ÍË. (êËÒ. 2)
,
.
.
75
Page 80

76
,
,
:
.
Page 81

иУО¸БУ‚‡МЛВ ‚ВЪВОУП (ВТОЛ
Ф‰ÛÒχÚË‚‡ÂÚÒfl) - êËÒ. 2
к‡·УЪЫ ‚ВЪВО‡ ПУКМУ ТУ˜ВЪ‡Ъ¸ Т ‡·УЪУИ
„ЛОfl. 燉‚ ФУ‰ЫНЪ˚ М‡ ‚ВЪВО ‚ ФУ‰УО¸МУП
М‡Ф‡‚ОВМЛЛ, Б‡НВФЛЪВ Лı ‰‚ЫПfl ‚ЛОН‡ПЛ.
б‡ЪВП ‚˚ФУОМЛЪВ ТОВ‰Ы˛˘ВВ:
Д) ЗТЪ‡‚¸ЪВ НУМВˆ ‚ВЪВО‡ ‚ ФУО˚И ‚‡О
‰‚Л„‡ЪВОfl, ‡ТФУОУКВММУ„У М‡ Б‡‰МВИ ТЪВМНВ
‰ЫıУ‚НЛ;
З) мТЪ‡МУ‚ЛЪВ УФУЫ ‚ Н‡М‡‚НЫ ‚ВЪВО‡;
л) лМЛПЛЪВ Ы˜НЫ, УЪ‚ЛМЪЛ‚ ВВ;
9
D) мТЪ‡МУ‚ЛЪВ ФУЪЛ‚ВМ¸ ‰Оfl КЛ‡ М‡ Т‡П˚И
МЛКМЛИ ЫУ‚ВМ¸;
Ц) иВ‚‰ЛЪВ ТВОВНЪУ ‚ ФУОУКВМЛВ “ЙЛО¸”
***, ˜ЪУ·˚ ‚НО˛˜ЛОТfl ‰‚Л„‡ЪВО¸;
F) иУТОВ Б‡‚В¯ВМЛfl „УЪУ‚НЛ ФЛ‚ЛМЪЛЪВ Ы˜НЫ
‚ÂÚ· Ë ‚˚̸ÚÂ Â„Ó ËÁ ‰ÛıÓ‚ÍË. (êËÒ. 2)
77
Page 82

.
:
T . °C (
,
,
,
1
)
,
175 2 55-65
175 3 60-70
175 3 60-70
,
200 3 8-10
200 3 25-35
200 3 25-35
,
180 3 30-45
200 3 25-35
200 3 10-15
200 2 35-45
200 3 15-20
225 2 40-50
200 2 120-150
.
(
)
200 2 60-90
( .
200 2 30-40
)
78
1 ½
3
200 2 120-180
200 2 150-210
200 2 60-90
5
175 2 240
200 2 60-90
200 2 90-150
175 2 90-180
Page 83

220 2 30-40
200 2 40-50
200 2 40-50
200 2 40-50
240 3 10-20
4 8-12
, 2 25-35
4 10-12
,
0,6
, 60-70
:
-
- " ,
- , /
, .
50-60
79
Page 84

: ,
,
.
.
, , .
,
.
, ,
,
.
.
.
:
.
80
Page 85

( .10)
, :
A 2 B.
B, .
:
.
B
.
.10
.
.
:
,
.
. .
81
Page 86

.11
( ) .11
,
A, .
( . 12)
.
.
.
.
.
82
:: 25 230 , E-
300°
C, .
.12
14,
T
Page 87

?
?
. .
?
?
?
?
?
, ,
83
Page 88

, .
,
.
:
;
:
84
Page 89

SPIS TRE CI
Instrukcje dla u ytkownika
Dane techniczne
Monta piekarnika
Pod
czenie i regulacja gazu
U
ywanie
i zapalenie piekarnika
U ywanie grilla
U
ywanie os ony ga ek
U
ywanie ro na
Tabela pieczenia
Strona
Czyszczenie i konserwacja
Przewodnik w poszukiwaniu awarii
Serwis obs ugi klienta
Przypis dotycz
elektrycznego sprz
cy poprawnego z omowania
tu gospodarst
wa domowego
85
Page 90

Instrukcje dla u ytkownika
Dzi kujemy Pa stwu za wybór jednego z naszych produktów i mamy nadziej , e
dzenie to spe ni Wasze wymagania.
urz
camy Pa stwa do dok adnego zapoznania si z instrukcj izaleceniamiw
Zach
niej zawartymi w celu
Firma Produkcyjna nie bierze na siebie
poniesione przez osoby lub rzeczy, spowodowane z
em urz dzenia.
monta
Firma Produkcyjna zastrzega sobie prawo do wprowadze
wyrobach zmian, uwa
uprzedzenia.
poprawnego u ywania naszych produktów.
adnej odpowiedzialno ci za szkody
ym lub niew a ciwym
niawewasnych
anych za konieczne lub u yteczne, bez jakiegokolwiek
Przed u yciem piekarnika po raz pierwszy
Po odpakowaniu piekarnika, w o eniu go do mebla i wyj ciu akcesoriów
(brytfanny
maksymalnej na oko
pozosta
zapachów podczas pieczenia Podczas tej fazy wietrzy
brytfanny ciekowe i ruszta p ynem do naczy .
NE: podczas u ywania piekarnika, w urz dzeniu mocno nagrzewa si
WA
czo o i zewn trzna szyba drzwi. St d zaleca si oddali dzieci, które mog yby
pos u y urz dzeniem do ich zabaw.
si
Podczas pierwszych minut dzia
panelu czo
ciekowe i ruszta) dobrze jest nagrza go do temperatury
o 20 minut tak, aby usun ewentualne oleiste
o ci poprodukcyjne, które mog yby by powodem nieprzyjemnych
pomieszczenie. Wymy
ania piekarnika mo liwe jest tworzenie si na
owym skroplin, które nie wp ywaja na dzia anie urz dzenia.
86
Page 91

Dane techniczne
Urz dzenie to jest zgodne z okólnikiem UE dotycz cym ograniczenia zak óce
radiowoelektrycznych. Cz ci urz dzenia, które przeznaczone s do kontaktu
rodkami spo ywczymi s zgodne z D.E. 89/109/UE.
ze
Wymiary:
Wysoko :591mm
Szeroko
G
:597mm
boko :445mm
Pojemno :
58 L
Napi cie zasilania:
220/230V a.c. - 50/60hz
87
Page 92

3+
S.
MAK
nominalna
min.
zmniejszona
(kW)
1900 W
30 35
-
20 28
0,80
(230V 50Hz)
KATEGORIA II2H
Moc elektryczna
grilla
Ci nienie gazu (mbar) Typ u ywanego gazu
Nominalna
no no
termiczna
1900 W
25 37 45
0,80
1900 W
17 20 25
0,80
MA
1900 W
KS.
(230V 50Hz)
Moc elektryczna
grilla
KATEGORIA II2ELwLs3B/P
mbar)
nominalna
min.
Ci nienie gazu (
29 36 44
0,80
Nominalna
no no
termiczna
zmniejszona
(kW)
1900 W
1900 W
1900 W
29 36 44
17 20 25
10 13 16
0,80
0,80
0,80
1900 W
16 20 25
0,80
5,4
alanie m³/h
Powietrze
konieczne do
sp
(kW)
(100/mm)
196 g/h
2,70
48 80
Otwarte
Piekarnik
G30
GAZ P YNNY
(Butan)
Nominalne
zu ycie
Nominalna
no no
termiczna
cechowania
Injektor
(100/mm)
cie
pass)
-
Obej
(By
cechowania
Przezn. UK/IT/RU
Regulacja
powietrza
Typ
palnika
TABELA INJEKTORÓW
5,4
193 g/h
2,70
48 80
Otwarte
Piekarnik
G31
pan)
GAZ P YNNY
(Pro
5,4
257 l/h
2,70
115
48
regulowany
Otwarte
Piekarnik
G20
GAZ ZIEMNY
(Metan)
Powietrze
konieczne do
spalanie m³/h
Nominalne
zu ycie
no
Nominaln
a no
termiczna
Injektor
cechowania
(100/mm)
cie
pass)
-
Obej
(By
cechowania
Regulacja
powietrza
Typ
palnika
azu
TABELA INJEKTORÓW Przezn. PL
Typ u ywanego
g
(kW)
(100/mm)
5,4
196 g/h
2,70
48 75
Otwarte
Piekarnik
G30
GAZ P YNNY
(Butan)
5,4
193 g/h
2,70
48 75
Otwarte
Piekarnik
G31
GAZ P YNNY
(Propan)
257 l/h 5,4
2,70
115
48
regulowany
Otwarte
Piekarnik
G20
ZIEMNY
GAZ
(Metan)
357 l/h 5,4
2,70
148
48
regulowany
Otwarte
Piekarnik
GZ350
GAZ
310 l/h 5,4
2,70
125
48
regulowany
Otwarte
Piekarnik
GZ410
GAZ
88
Page 93

S3B/P
(230V 50Hz)
Moc elektryczna
grilla
KATEGORIA II2H
MA
KS.
nominalna
Ci nienie gazu (mbar) Typ u ywanego
min.
Nominalna
no no
termiczna
zmniejszona
(kW)
Powietrze
konieczne do
spalanie m³/h
Nominalne
zu ycie
Nominalna
no no
termiczna
(kW)
Injektor
cechowania
(100/mm)
cie
pass)
-
Obej
(By
cechowania
(100/mm)
Przezn. HU
Regulacja
powietrza
1900 W
25 30 35
0,80
5,4
196 g/h
2,70
48 80
Otwarte
1900 W
25 30 35
0,80
5,4
193 g/h
2,70
48 80
Otwarte
1900 W
20 25 33
0,80
257 l/h 5,4
2,70
115
48
Otwarte
1900 W
20 25 33
0,80
299 l/h 5,4
2,70
121
48
regulowany
Otwarte
regulowany
Typ
palnika
TABELA INJEKTORÓW
gazu
Piekarnik
G30
GAZ P YNNY
(Butan)
Piekarnik
G31
GAZ P YNNY
(Propan)
Piekarnik
G20
GAZ ZIEMNY
(Metan)
Piekarnik
G25.1
GAZ
89
Page 94

MONTA
UWAG
pomieszczeniach ci
WA
przez personel zawodowo wykwalifikowany. Jakakolwiek czynno
konserwacyjna musi zosta wykonana na urz dzeniu wy czonym z sieci
elektrycznej i z zamkni
wykonany zgodnie z przepisami obowi zuj cymi w krajach przeznaczenia.
Odniesienie do normy w
Normy UNI
Normy UNI
A: To urz dzenie mo eby montowane i mo edziaa tylko w
gle wietrzonych zgodnie z UNI 7129/UNI 7131.
NE: monta musi zosta wykonany zgodnie z instrukcjami konstruktora
tym zaworem gazu instalacji. Monta musi zosta
oskiej:
-CIG 7129 monta przy gazie z sieci do u ytku domowego
-CIG 7131 monta przy gazie p ynnym G.P.L. do u ytku domowego.
Pod czenie gazu
W celu pod czenia urz dzenia do sieci gazowej lub do butli, u ywa sztywnej
rurki metalowej miedzianej lub stalowej z odpowiednimi z
znorm
zgodnie z norm
zgodne z norm UNI-
UNI-CIG 7129 lub rurki gi tkiej ze stali inox przy ci g ej cianie
UNI-CIG 9891. U ywane regulatory ci nienia musz by
CIG 7432.
czkami zgodnymi
Po czenie elektryczne
Po czenie elektryczne musi by wykonane przez wykwalifikowanego technika
ug instrukcji producenta i zgodnie z obowi zuj cymi normami lokalnymi.
wed
Upewni
technicznych po
otwarciu drzwi. W przypadku gdy nie ma
zainstalowa
wi
ma by u yta, musi by typu znormalizowanego bior c pod uwag , e:
si czy napi cie odpowiada napi ciu podanemu na tabliczce danych
o onej na jednym z bocznych brzegów wg bienia widocznego po
atwego dost pu do wtyczki, monter musi
wy cznik wielobiegunowy z odleg o ci otwarcia styków równ lub
ksz od3mm.Urz dzenie jest dostarczone z kablem bez wtyczki. Wty
czka, która
ó ty -
zielony = uziemienie
granatowy = zerowy
br zowy = faza
Pod
czenie do uziemienia urzadzenia jest obowi zkowe zgodnie z przepisami
prawnymi. Nie u
90
ywa wtyczek wielokrotnych lub przed u aczy.
Page 95

Instrukcje dla montera
Monta le y w zakresie nabywcy i ewentualne interwencje wymagane od firmy
produkcyjnej, które wynikaj
gwarancji. Wa
wykonane przez personel wykwalifikowany, ze
technika, który po zako
pracy. Technik b
wyrz dzone rzeczom lub osobom, spowodowane pod czeniami niezgodnymi z
normami obowi
ne jest, aby wszystkie czynno ci dotycz ce monta u i regulacji, zosta y
dzie musia wzi na siebie odpowiedzialno za ew
zuj cymi w kraju przeznaczenia.
zb dnego monta u, nie zostan wykonane w ramach
cis ymi wymogami zawodowego
czeniu prac musi wyda za wiadczenie zgodno ci wykonanej
entualne szkody
91
Page 96

Pomieszczenie do monta u(rys.1)
W celu dobrego dzia ania urz dzenia na gaz, konieczne jest, aby do lokalu
onapywa powietrze, konieczne do spalania gazu, w sposób naturalny,
mog
poprzez otwory wykonane w zewn
przekrój wonego przej cia równy przynajmniej 100 cm2 (mo ezosta
wykonany jeden lub wi cej otworów
Odprowadzanie produktów spalania musi zachodzi poprzez okapy pod czone
do przewodów kominowych lub bezpo
liwe jest zamontowanie okapu, konieczne jest zastosowanie wentylatora
niemo
elektrycznego na
byleby istnia
zuj cymi normami. Ten wentylator elektryczny musi mie taki
obowi
yw, eby zagwarantowa w pomieszczeniu kuchennym, godzinn
przep
wymian powietrza równ 3-5 razy jej pojemno ci.
o onego na zewn trzn cian lub na okno pomieszczenia,
y w lokalu otwory dla dop ywu powietrza zgodnie z
trznych cianach. Te otwory musz mie
).
rednio na zewn trz. W przypadku, gdy
Rys. 1
92
Page 97

Montowanie piekarnika w meblu
Wa ne jest, aby wszystkie czynno ci dotycz ce monta uurzdzenia zosta y
wykonane przez personel wykwalifikowany.
Urz dzenie mo eby wsuni te pod blat lub do kolumny. W obydwu
przypadkach przestrzega
Po odpakowaniu piekarnika, w celu wykonania pod
podstawie bez jego uszkodzenia.
Nie podnosi
Nie podnosi
Sprawdzi
Meble stykaj
(min. 100°C).
Ustawi piekarnik w otworze mebla, podnosz c go za brzegi i uwa aj c aby nie
zatrzasn
Uwa
a ,aby ciany boczne mebla nie dotyka y przednich brzegów piekarnika.
Przymocowanie piekarnika do mebla wykonuje si
drewna
a , aby nie u ywa drzwi jako d wigni dla monta u piekarnika.
Uwa
Nie wykonywa
Uwaga: nie zatyka
produkty spalania.
piekarnika bior c go za uchwyt lecz chwytaj czabrzegi.
piekarnika bior czaramp gazu.
czy urz dzenie nie zosta o uszkodzone podczas transportu.
ce si z piekarnikiem musz by odporne na wysok temperatur
kabli zasilania.
A wotworachpoo onych na ramie obwodowej (rys. 2.1).
zbyt du ego nacisku na drzwi piekarnika kiedy s otwarte.
wskazane wymiary jak na rys. 2.2.
czenia, oprze go na
za pomoc 4 rub do
otworów lub szczelin ch odzenia czy odprowadzaj cych
Rys. 2.1
93
Page 98

Rys. 2.2
94
Page 99

POD CZENIE DO ZASILANIA GAZEM
Instalacja zasilania musi by zgodna z lokalnymi normami obowi zuj cymi w
kraju przeznaczenia. Rodzaj gazu, dla którego zosta
jest wskazany na tabliczce znamionowej po
o onej na jednym z bocznyc
uregulowany piekarnik,
brzegów wg bienia (widocznej po otwarciu drzwi) i na opakowaniu. Przed
wykonaniem pod
Po
czenie pomi dzy z czk gazu, ramp irur,moezosta wykonane w
jeden z nast
1.
Ze sprz eniem bez uszczelek (sprz enie piekarnika jest sto kowe:
czenia, dostosowa piekarnik do typu gazu w mieszkaniu.
puj cych sposobów (patrz
rysunek.3):
ISO R 7).
2.
Nak adaj c dostarczon uszczelk .
Uwaga: po zako
Sprawdzi
odpowiednio przystosowanych do tego celu p
czeniu czynno ci, sprawdzi czy nie ma ulatniania si gazu.
czy nie ma ulatniania si gazu za pomoc wody z mydlem lub
ynów.
h
NIE U
SI
Ostrze
YWA P OMIENI DLA POSZUKIWANIA ULATNIAJ CEGO
GAZU.
enie: u ywanie gi tkiej rury gumowej przymocowanej do uchwytu
podtrzymuj
Rys. 3
RAMPA
cego rur jest zabronione poniewa nie mo eby po
USZCZELKA
2)
GI TKA RURA
1)
ddane inspekcji.
95
Page 100

Przystosowanie do u ywanego gazu
liwe jest u ywanie innych rodzajów gazu, przystosowuj cregulacj palnika w
Mo
nast
puj cy sposób:
1)
upewni si czy piekarnik jest od czony od sieci elektrycznej.
2)
Ca kowicie otworzy dr
3)
Wyj dno piekarnika po wyj ciu rub mocuj cych (rys. 4).
4)
Wyj palnik odkr caj c rub .
5)
Odkr ci iniektor i wymieni go zgodnie z tabel iniektorów znajduj cej si na
oddzielnej karcie.
zwi piekarnika.
Zamontowa palnik i dno piekarnika, post puj cnaodw
rót .
Regulacja p omienia (je li obecna) -
(rys. 5 i 6)
W celu regulacji p omienia post powa wnast puj cy sposób:
poluzowa
na pozycj
rub C i przekr ci pier cie D na pozycj N
GPL
dla gazu z butli, tak, aby ruchomy wska nik na pier cieniu odpowiada
dla metanu lub gazu naturalnego, i
sta emu wska nikowi na palniku. Otrzyma si w ten sposób regularny p omie .
Rys. 4 Rys. 5
Rys. 6
NADMIAR POWIETRZA P OMIE REGULARNY BRAK POWIETRZA
96
 Loading...