

USER INSTRUCTIONS
OVENS
NOTICE D'EMPLOI ET D'INSTALLATION
DES FOURS ENCASTRABLES
MANUALE D’ISTRUZIONI
FORNO
INSTRUCCIONES DE USO
HORNOS EMPOTRABLES
CANDY HOOVER GROUP S.R.L. • Via Comolli 16 • 20861 Brugherio (MB) - Italy
EN
FR
IT
ES
02
12
23
33

Safety Indications
• During cooking, moisture may condense inside the oven cavity or on the
glass of the door. This is a normal condition. To reduce this effect, wait 1015 minutesafter turningon the power before putting food inside the oven.
In any case, the condensation disappears when the oven reaches the
cooking temperature.
• Cookthe vegetables in a container witha lid insteadof anopen tray.
• Avoid leaving food inside the oven after cooking for more than 15/20
minutes.
• WARNING: the appliance and accessible parts become hot during use.
Be careful not to touch any hotparts.
•WARNING: the accessible parts can become hot when the oven is in use.
Childrenmustbekeptatasafedistance.
•WARNING: ensure that the appliance is switched off before replacing the
bulb, to avoid the possibility ofelectric shocks.
•WARNING:before initiatingthe automatic cleaningcycle:
- Cleanthe oven door;
- Remove large or coarse food residues from the inside of the oven using a
damp sponge. Do not use detergents;
- Remove allaccessories and the sliding rackkit (where present);
- Donot placetea towels
• In ovens with meat probe it is necessary, before making the cleaning
cycle, close the hole with the nut provided. Always close the hole with the
nut whenthe meat probe is not used.
•Children under 8 must be kept at a safe distance from the appliance if not
continuously supervised.
•Children must not play with the appliance. The appliance can be used by
those aged 8 or over and by those with limited physical, sensorial or
mental capacities, without experience or knowledge of the product, only if
supervised or provided with instruction as to the operation of the
appliance, ina safe way with awarenessof thepossible risks.
•Cleaning and maintenance should not be carried out by unsupervised
children.
•Do not use rough or abrasive materials or sharp metal scrapers to clean
the oven door glasses, as they can scratch the surface and cause the glass
to shatter.
•The ovenmust be switched off before removing the removable parts and,
after cleaning, reassemble them accordingthe instructions.
•Only usethe meat proberecommended for this oven.
•Do notuse asteam cleaner for cleaningoperations.
EN 02

• Connect a plug to the supply cable that is able to bear the voltage,
current and load indicated on the tag and having the earth contact. The
socket must be suitable for the load indicated on the tag and must be
having the earth contact connected and in operation. The earth conductor
is yellow-green in colour. This operation should be carried out by a suitably
qualified professional. In case of incompatibility between the socket and
the appliance plug, ask a qualified electrician to substitute the socket with
another suitable type. The plug and the socket must be conformed to the
current norms of the installation country. Connection to the power source
can also be made by placing an omnipolar breaker between the appliance
and the power source that can bear the maximum connected load and
that is in line with current legislation. The yellow-green earth cable should
not be interrupted by the breaker. The socket or omnipolar breaker used
for the connection should be easily accessible when the appliance is
installed.
•The disconnection may be achieved by having the plug accessible or by
incorporating a switch in the fixed wiring in accordance with the wiring
rules.
•If the power cable is damaged, it must be substituted with a cable or
special bundle available from the manufacturer or by contacting the
customer service department.
•The typeof power cablemust be H05V2V2-F.
•Failure to comply with the above can compromise the safety of the
appliance andinvalidate the guarantee.
•Any excess of spilled material shouldbe removed before cleaning.
•During the pyrolytic cleaning process, surfaces can heat up more than
usual, children musttherefore be kept at asafe distance.
•The appliance must not be installed behind a decorative door in order to
avoid overheating.
•When you place the shelf inside, make sure that the stop is directed
upwards and in the backof thecavity.
The shelfmust be inserted completely into the cavity
• WARNING: Do not line the oven walls with aluminum foil or single-use
protection available from stores. Aluminum foil or any other protection, in
direct contact with the hot enamel, risk melting and deteriorating the
enamel ofthe insides.
• WARNING: Never remove the oven doorseal.
• No additional operation/setting is required in order to operate the
appliance at the rated frequencies
EN 03

Summary
General Instructions
5
Product Description
7
Use of the Oven
8
Oven Cleaning and Maintenance
9
1.1 Safety indications
1.2 Electrical safety
1.3 Recommendations
1.4 Installation
1.5 Waste management
1.6 Conformity declaration
2.1 Overview
2.2 Accessories
2.3 First use
3.1 Display description
3.2 Cooking modes
4.1 General notes on cleaning
4.2 Maintenance
• Removal of the oven window
• Removal and cleaning of the glass
door
• Changing the bulb
Troubleshooting
11
5.1 F.A.Q.
EN 04

1. General Instructions
We thank you for choosing one of our products. For the
best results with your oven, you should read this
manual carefully and retain it for future reference.
Before installing the oven, take note of the serial
number so that you can give it to customerservice staff
if any repairs are required. Having removed the oven
from itspackaging, check thatit has notbeen damaged
during transportation. If you have doubts, do not use
the oven and refer to a qualified technician for advice.
Keep all of the packaging material (plastic bags,
polystyrene, nails) out of the reach of children. When
the oven is switched on for the first time, strong
smelling smoke candevelop, whichis caused by the glueon the insulation panels surrounding theoven
heating for the first time. This is absolutely normal and, if it occurs, you should wait for the smoke to
dissipate before putting food in the oven. The manufacturer accepts no responsibility in cases where
the instructions contained in thisdocument are notobserved.
NOTE: the oven functions, properties and accessories cited in this manual will vary, depending on the
model you have purchased.
1.1 Safety Indications
Only use the oven for its intended purpose, that is only for the cooking of foods; any other use, for
example as a heat source, is considered improper and therefore dangerous. The manufacturer cannot
be held responsibleforany damage resulting from improper,incorrector unreasonableusage.
The use ofany electrical applianceimplies theobservance ofsome fundamentalrules:
- do notpull onthe powercable to disconnectthe plug fromthe socket;
- do nottouch the appliancewith wetor damphands orfeet;
- in generalthe use ofadaptors,multiple sockets andextension cablesis not recommended;
- in caseof malfunction and/orpoor operation, switch offthe applianceand donot tamper withit.
1.2 Electrical Safety
ENSURE THAT ANELECTRICIAN OR QUALIFIED TECHNICIANMAKES THE ELECTRICAL CONNECTIONS.
The powersupply to which the ovenis connected must conform with the lawsin forcein the country of
installation.The manufacturer accepts noresponsibility for anydamage causedby the failureto observe
these instructions. The oven must be connected toan electrical supply with an earthed wall outlet ora
disconnector with multiple poles, depending on the laws in force in the country of installation. The
electrical supply should be protected with suitable fuses and the cables used must have a transverse
section that canensurecorrect supplyto theoven.
CONNECTION
The ovenis supplied with a powercable thatshould only be connected toan electricalsupply with 220240 Vac 50 Hz power between the phases or between the phase and neutral. Before the oven is
connectedto theelectrical supply, it isimportantto check:
- power voltage indicated on thegauge;
- the settingof the disconnector.
The groundingwire connectedto the oven's earth terminal must be connected to the earthterminal of
the power supply.
WARNING
Beforeconnecting the ovento thepowersupply,ask aqualified electrician tocheck thecontinuity of the
power supply's earth terminal. The manufacturer accepts no responsibility for any accidents or other
problems caused byfailure to connectthe oven tothe earthterminal orby anearth connection thathas
defectivecontinuity.
EN 05

NOTE: as the oven couldrequire maintenancework, it is advisableto keep another wall socket available
so that the oven can be connected to this if it is removed from the space in which it is installed. The
power cable must only be substituted by technical service staff or by technicians with equivalent
qualifications.
1.3 Recommendations
Aftereach useof the oven,a minimumof cleaningwill helpkeepthe oven perfectlyclean.
Do not line the ovenwalls withaluminium foil orsingle-use protection available from stores.Aluminium
foil or any other protection, in direct contact with the hot enamel, risks melting and deteriorating the
enamel of the insides. In order to prevent excessive dirtying of your oven and the resulting strong
smokey smells, we recommend not using the oven at very high temperature. It is better to extend the
cooking time and lower the temperature a little. In addition to the accessories supplied with the oven,
we advise youonly use dishesand bakingmoulds resistant tovery hightemperatures.
1.4 Installation
The manufacturers have noobligationto carrythis out.If theassistance of the manufacturer isrequired
to rectify faults arising from incorrect installation, this assistance is not covered by the guarantee. The
installation instructions for professionally qualified personnel must be followed. Incorrect installation
may cause harm or injury to people, animals or belongings. The manufacturer cannot be held
responsiblefor such harmor injury.
The oven can be located high in a column or under a worktop. Before fixing, you must ensure good
ventilation in the oven space to allow proper circulation of the fresh air required for cooling and
protectingthe internal parts. Makethe openings specifiedon last page according to thetype offitting.
1.5 Waste management and environmental protection
This appliance is labelled in accordance with European Directive 2012/19/EU regarding
electric and electronic appliances (WEEE). The WEEE contain both polluting substances
(that can have a negative effect on the environment) and base elements (that can be
reused). Itis important thatthe WEEEundergospecific treatmentsto correctlyremove and
dispose of the pollutants and recover all the materials. Individuals can play an important
role in ensuring that the WEEE do not become an environmental problem; it is essential to
followa few basic rules:
- the WEEEshould notbe treatedas domestic waste;
- the WEEE should be taken to dedicated collection areasmanaged by the town council or a registered
company.
In many countries, domestic collections may be available for large WEEEs. When you buy a new
appliance, the old one can be returned tothe vendor whomust accept it free of charge as aone-off, as
long as theappliance isof anequivalent type andhas thesame functionsas thepurchasedappliance.
SAVINGAND RESPECTINGTHE ENVIRONMENT
Where possible,avoid pre-heating theoven and always try to fill it.Open the oven door asinfrequently
as possible, because heat from the cavity disperses every time it is opened. For a significant energy
saving, switch offthe oven between 5 and10 minutes before the planned end ofthe cooking time, and
use the residualheat that theoven continues togenerate.Keep the sealsclean andin order,to avoid any
heat dispersal outside of the cavity. If you have an electric contract with an hourly tariff, the "delayed
cooking" programme makes energy saving more simple, moving the cooking process to start at the
reducedtariff time slot.
1.6 Declaration of compliance
The parts ofthis appliancethat may comeintocontact with foodstuffs comply withthe provisionsof EEC
Directive89/109.
By placing the mark on thisproduct, we are confirming compliance toall relevantEuropeansafety,
health and environmental requirements whichare applicablein legislation forthis product.
EN 06

2. Product Description
2.1 Overview
4
3
5
2.2 Accessories
1
1. Control panel
2. Shelf positions
2
(lateral wire grid if included)
3. Metal grill
4. Drip pan
5. Oven door
Drip pan
1
Collects the residues that drip during the cooking
of foods onthe grills.
Metal grill
2
Holds baking trays and plates.
2.3 First Use
PRELIMINARYCLEANING
Clean theoven before usingfor thefirst time. Wipe over externalsurfaces witha dampsoft cloth.Wash
all accessories and wipe inside the oven with a solution of hot water and washing up liquid. Set the
empty ovento the maximum temperature and leave on for about1 hour, this will remove any lingering
smells of newness.
EN 07
3. Use of the Oven
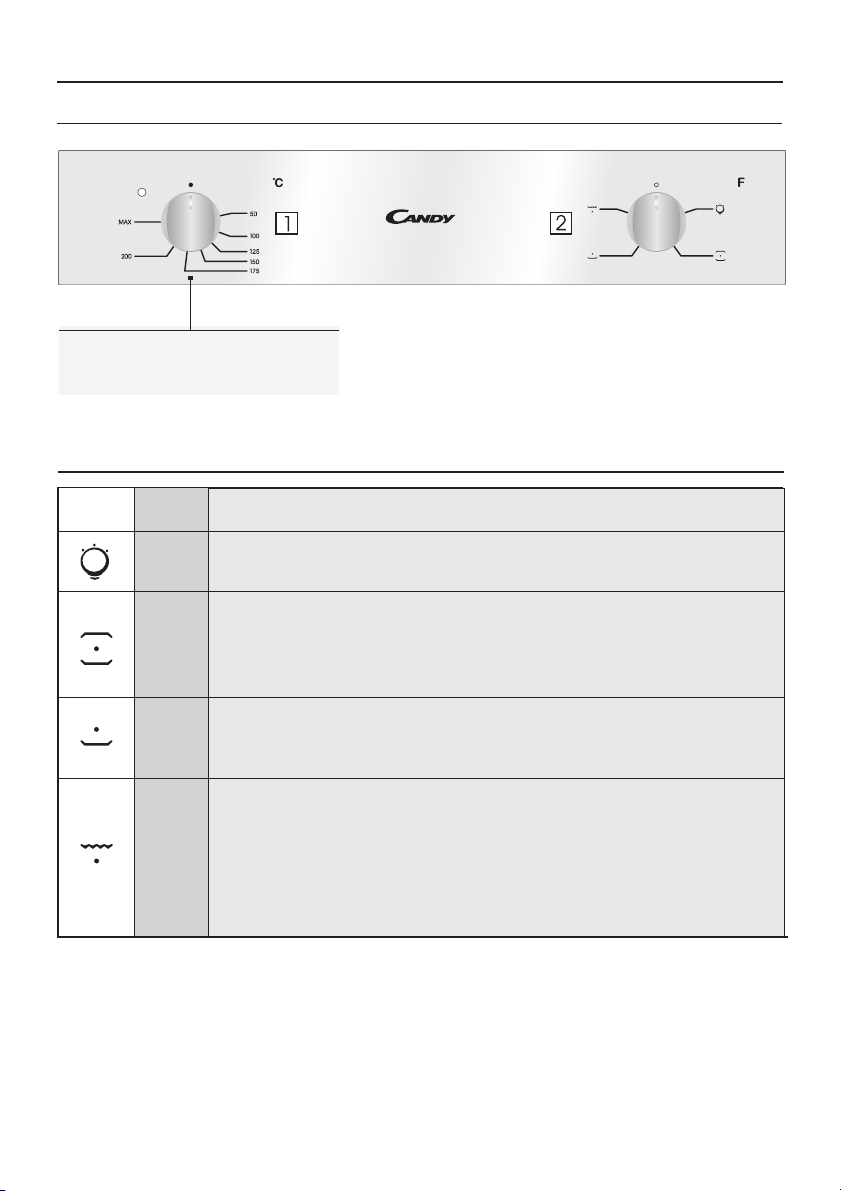
3.1 Display description
1. Thermostat selector knob
2. Function selector knob
3.2 Cooking Modes
Function
Dial
*
*Tested in accordance with the CENELEC EN 60350-1 used for definition of energy class.
T °C
range
50 ÷ 280
50 ÷ 230
L1 ÷ L5
Function (Depends on the oven model)
LAMP: Turns on the oven light.
CONVENTIONAL COOKING: Bothtop andbottom heatingelements are used.Preheatthe
oven for aboutten minutes. Thismethod isideal for alltraditional roasting andbaking. For
seizing red meats, roast beef, leg of lamb, game, bread, foil wrapped food (papillotes),
flaky pastry.Place thefood andits dishon ashelf inmid position.
BOTTOM: Usingthe lower element.Ideal for cooking all pastrybased dishes. Use this for
flans, quiches, tarts,pate andanycooking thatneeds moreheat from below.
GRILL: use thegrill with the doorclosed.
The top heating element is used alone and you can adjust the temperature. Five minutes
preheating isrequired toget the elements red-hot. Successis guaranteedfor grills,kebabs and
gratin dishes.White meats shouldbe put at a distance fromthe grill; the cooking timeis longer,
but the meat will betastier. You can putred meats and fish fillets on the shelf with the drip tray
underneath.The ovenhas twogrill positions:
Grill: 2140 W Barbecue: 3340 W
EN 08

4. Oven cleaning and maintenance
4.1 General notes on cleaning
The lifecycle ofthe appliancecan beextended throughregular cleaning.Waitfor the ovento cool before
carrying out manual cleaning operations.Never useabrasive detergents, steel woolor sharpobjects for
cleaning, so as to not irreparably damage the enamelled parts. Use only water, soap or bleach-based
detergents(ammonia).
GLASS PARTS
It is advisable to clean the glass window with absorbent kitchen towel after every use of the oven. To
remove more obstinatestains, you can usea detergent-soaked sponge,well wrung out, and then rinse
with water.
OVENWINDOW SEAL
If dirty,the sealcan be cleanedwith aslightly dampsponge.
ACCESSORIES
Clean accessories with a wet, soapy sponge before rinsing and drying them: avoid using abrasive
detergents.
DRIP PAN
After using thegrill, removethe pan fromthe oven.Pour the hotfat into acontainer and washthe panin
hot water,using asponge andwashing-up liquid.
If greasy residuesremain, immerse the pan in water anddetergent. Alternatively,you can wash the pan
in the dishwasheror use acommercial oven detergent. Never puta dirtypan backinto the oven.
4.2 Maintenance
REMOVALOF THEOVEN WINDOW
1. Open thefront window.
2. Openthe clamps of the hingehousing on the right andleft side of the front window by pushing them
downwards.
3. Replace thewindow by carryingout the procedurein reverse.
EN 09

REMOVALAND CLEANINGOF THEGLASS DOOR
LOW-E
1. Open theoven door.
2.3.4. Lock thehinges, removethe screws andremovethe uppermetal cover bypulling itupwards.
5.6. Remove the glass, carefully extracting it from the oven door (NB: in pyrolytic ovens, also remove
the second andthird glass (ifpresent)).
7. At theend of cleaningor substitution, reassemble theparts inreverse order.
On all glass, the indication"Pyro" must belegible andpositioned onthe leftside ofthe door,close tothe
left-handlateralhinge. Inthis way,the printed label ofthe first glass willbe insidethe door.
1.
2.
3.
5.
6.
1
2
3
7.
4.
EN 10
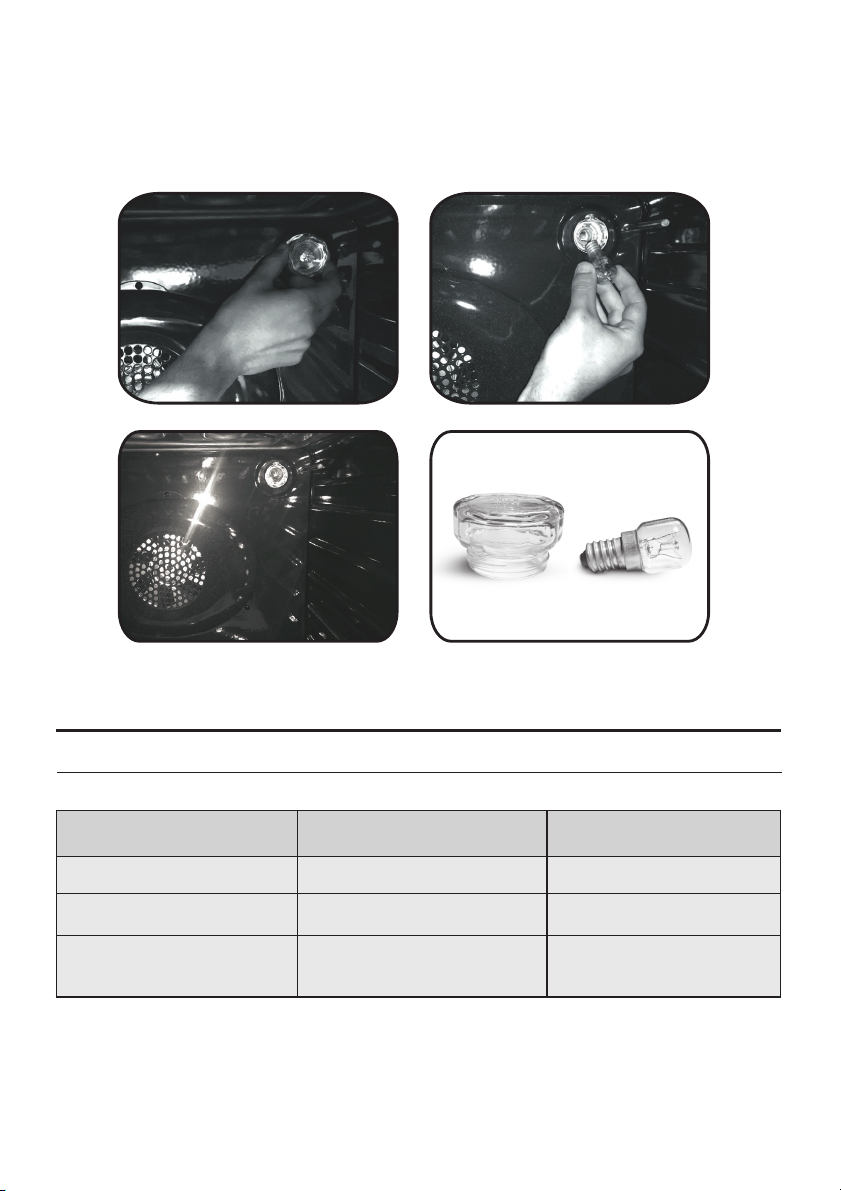
CHANGING THE BULB
1. Disconnect theoven from themains supply.
2. Undo theglass cover, unscrew the bulband replaceit witha newbulb ofthe sametype.
3. Once thedefectivebulb isreplaced,replace theglass cover.
5. Troubleshooting
5.1 FAQ
PROBLEM POSSIBLE CAUSE SOLUTION
The oven does not heat up
The oven does not heat up
The oven does not heat up
The clock is not set Set the clock
The child lock is on
A cooking function and
temperature has not been set
Deactivate the child lock
Ensure that the necessary
settings are correct
EN 11

Conseils De Securite
• Pendant la cuisson de l’humidité peut se créer dans la cavité ou sur la
surface de laporte. Le casdécrit est normal. Si onveut reduire cet effet,
il faut laisser réchauffer le four 10-15 minutes avant d’introduire les
aliments. L’humidité va disparaître grâce à la juste température de
cuisson
• Nous vous conseillons de faire la cuisson des légumes dans un
récipientaveccouvercle pas sur unplateau
• Une fois que la cuisson est terminée, nous vous conseillons de ne pas
laisser les aliments à l’intériorde la cavitépour plus de 15/20minutes
• AVERTISSEMENT: L'appareil et les parties accessibles deviennent
chauds pendant l'utilisation. Des précautions doivent être prises pour
éviterde toucher les éléments chauffants.
• ATTENTION : les parties accessibles peuvent devenir très chaudes
quand le four est en marche. Les enfants doivent être tenus à une
distancedesécurité.
• Cet appareil n'est pas destiné à être utilisé par des personnes (y
compris les enfants) dont les capacités physiques, sensorielles ou
mentales sont réduites, ou ayant un manque d'expérience et de
connaissances, à moins qu'elles n'aient été formées à l'utilisation de
l'appareil,par une personne responsable de leur sécurité.
• Les enfants ne doivent jouer avec l'appareil.
• Le nettoyage et l'entretien par l'utilisateurne doit pas être fait par des
enfantssans surveillance.
• En cours d'utilisation l'appareil devient chaud. Des précautions
doivent être prises pour éviter de toucher les éléments chauds à
l'intérieurdu four.
AVERTISSEMENT: Les parties accessibles peuvent devenir chaudes
pendantl'utilisation. Les jeunes enfants doivent être tenus à l'écart.
• Ne pas utiliser de nettoyants abrasifs ou de racloirs métalliques
tranchantspournettoyerla vitre de la porte du four car ilspeuventrayer
la surface, entrainantdes risquesd'explosion.
•Le four doit être éteint avant d'enlever la protection et après le
nettoyage, la protection doit être replacé enrespectant les instructions.
• Utiliser seulement la sonde de température recommandée pour ce
four.
• Ne pas utiliser denettoyantsvapeurpour le nettoyage.
• Brancher le câble d’alimentation sur une prise de courant qui
supporte le voltage ; lecourantet la chargesont indiqués sur l’étiquette
; vérifier la présence d’une mise à la terre. La prise d’alimentation doit
FR 12

supporterla charge indiquée sur l’étiquette et être dotée d’une mise àla
terre en état de fonctionnement. Le conducteur de mise à la terre est
jaune et vert. Cette opération doit être exécutée par du personnel
qualifié. En cas d’incompatibilité entre la prise d’alimentation et la fiche
du câble de l’appareil, demander à un électricien professionnel de
remplacer la prise d’alimentation par un dispositif compatible. La fiche
du câble d’alimentation et la prise d’alimentation doivent être
conformes aux normes en vigueur dans le pays d’installation. Il est
possible de brancher l’appareil à la prise d’alimentation en installant un
disjoncteur multipolaire qui supporte la charge électrique maximale,
conformément aux lois en vigueur, entre l’appareil et la prise
d’alimentation.Le conducteur jaune et vertde miseà laterre ne doit pas
être bloqué par le disjoncteur. La prise d’alimentation ou le disjoncteur
multipolaire utilisé pour le branchement doit rester à tout moment
accessible lors de l’installationde l’appareil.
•Le débranchement doit se faire en accédant à la prise d’alimentation
ou en prévoyant un interrupteur sur le circuit électrique fixe, conforme
aux normes électriques.
•Si le câble d’alimentation est endommagé, il doit être remplacé par un
câble ou un faisceau de câbles spécial disponible auprès du fabriquant
ou en contactantleservice après-vente.
•Le câble d’alimentationrequisestle H05V2V2-F.
•Le non-respect des consignes ci-dessus peutcompromettrela sécurité
de l’appareil et annuler la garantie.
•Toutproduitdéverséen quantitédoit être éliminéavant le nettoyage.
•Pendant le nettoyage à pyrolyse, les surfaces peuvent devenir
beaucoup plus chaude que d’habitude, les enfants doivent donc être
tenusà une distance de sécurité.
•Ne pas installer l’appareil derrière une porte décorative, pour éviter la
surchauffe.
•En introduisant le plateau dans le four, s’assurer que le stop est dirigé
verslehaut et au fond de la cavité.
Le plateau doit complètement être inséré dans la cavité
• AVERTISSEMENT : Ne tapissez pas les parois du four avec du papier
aluminium ou un autre matériau de protection jetable en vente dans le
commerce. Tout papier aluminium ou autre matériau de protection qui
entrerait au contact direct de l'émail chaud risquerait de fondre et de
détériorerl'émail intérieur du four.
• AVERTISSEMENT: Neretirez jamais le jointde laporte du four.
• Aucun réglage/opération supplémentaire n’est requis pour faire
fonctionnerl’appareilaux fréquences nominales
FR 13

SOMMAIRE
Instructions Générales
15
Description du produit
17
Utilisation du Four
18
Nettoyage du four et
maintenance
20
1.1 Indications de sécurité
1.2 Sécurité électrique
1.3 Recommandations
1.4 Installation
1.5 La gestion des déchets et la
protection de l'environnement
1.6 Déclaration de conformité
2.1 Vue d'ensemble
2.2 Accessoires
2.3 Première utilisation
3.1 Description de l'affichage
3.2 Mode de cuisson
4.1 Remarques générales concernant
le nettoyage
4.2 Entretien
• Retrait de la porte du four
• Retrait et nettoyage des vitres
• Remplacement de l'ampoule
Dépannage
22
5.1 F.A.Q.
FR 14

1. Instructions générales
Nous vous remercions d'avoir choisiun denos produits.
Pourobtenir lesmeilleurs résultats avec votre four, vous
devezlire attentivementce manuelet leconserver pour
toute consultation ultérieure. Avant d'installer le four,
notez le numéro de série, il vous sera demandé par le
support technique si des réparations sont nécessaires.
Après avoir enlevé le four de son emballage, vérifiez
qu'il n'a pas été endommagé pendant le transport. Si
vous avez des doutes, ne pas utiliser lefour etse référer
à un technicien qualifié pour obtenir des conseils.
Conservez tous les matériaux d'emballage (sacs en
plastique, polystyrène, clous) hors de la portée des
enfants.Lors de la première utilisation du four, il peut se produire un dégagement de fumée âcre
provoqué par le premier échauffement de la colle des panneaux d’isolation enveloppant le four. Ce
phénomène estnormal. Attendezque la fuméecesse avantde cuire desaliments. Le fabricantdécline
toute responsabilité dans les cas où les instructions contenues dans le présent document ne sont pas
respectées.
REMARQUE: lesfonctions dufour, lespropriétés etles accessoirescités dans ce manuel peuvent varier
selon les modèles.
1.1 Indications de sécurité
Utilisez uniquement lefour àsa destination, quiest seulementpour lacuisson desaliments; toute autre
utilisation, par exemple comme une source de chaleur, est considérée comme impropre et donc
dangereuse. Le fabricantne peutêtre tenu responsablede toutdommage liéà unemauvaise utilisation
ou a desmodifications techniques duproduit.
L'utilisationde toutappareilélectrique impliquele respect decertaines règles fondamentales:
- Ne pastirer sur lefil électriquepour débrancher laprise.
- Ne pastoucher l'appareil avecles mainsou lespieds mouillés ouhumides;
- En générall'utilisationd'adaptateurs,de prisesmultiples et derallonges est déconseillé;
- En cas de dysfonctionnement et / ou de mauvais fonctionnement, éteindre l'appareil et ne pas y
toucher.
1.2 Sécurité électrique
LE BRANCHEMENT ELECTRIQUE DOIT ÊTRE REALISE PAR UN INSTALLATEUR AGREE OU UN
TECHNICIENDE E.QUALIFICATION SIMILAIR
L'alimentation électrique à laquelle le four est connecté doit être conforme aux lois en vigueur dans le
pays d'installation. Le fabricant décline toute responsabilité pour tout dommage causé par le non
respect deces instructions. Le four doit être raccordéà l'alimentation électrique avec uneprise murale
reliée à la terre ou par l'intermédiaire d'un dispositif à coupure omnipolaire, selon les lois en vigueur
dans le paysd'installation.L'alimentation électrique doitêtre protégée par desfusibles appropriéset les
câblesutilisés doiventavoir unesection transversale qui peutassurer une alimentationnormale dufour.
CONNEXION
Le four est livré avec un câble d’alimentation permettant le raccordement sous une tension électrique
de 230 V entre les phases ou entre phase et neutre. Le raccordement devra être effectué après avoir
vérifié:
- La tensiond'alimentationindiquée surle compteur;
- Le réglagedu disjoncteur.
Le fil de protection du cordon (vert/jaune) relié à la Borne Terre de l’appareil doit être relié à la Borne
Terre de l’installation.
FR 15

ATTENTION
Faire vérifier la continuité de la terre de l’installation avant de procéder au raccordement. Le fabricant
décline toute responsabilitéen cas d'accidents ou d'autres problèmesqui pourraient survenir à l'usage
d'un appareil nonrelié à laterre, ou reliéà une terredontla continuité serait défectueuse.
REMARQUE: Le four peut nécessiter une opération de S.A.V. Aussi,placez laprise decourant defaçon à
pouvoir brancher le four une fois sorti de sa niche. Câble d'alimentation: si le changement du câble
d'alimentations'avère nécessaire,nous vousdemandons defaire réaliser cetteopération par le service
après-venteou une personnede qualification similaire.
1.3 Recommandations
Après chaque utilisation du four, réaliser un petit entretien qui favorisera le nettoyage parfait du four.
Ne pas tapisser les parois du four avec des feuilles en aluminium ou des protections jetables du
commerce. La feuille d'aluminium ou toute autre protection, en contact direct avec l'émail chauffé,
risque de fondre et de détériorer l'émail du moufle. Avant installation de l'appareil, il faut relever le
numérode sérieet le noterci-dessous encas d'éventuelledemande d'intervention.
Afin d'éviter les salissures excessives de votre four ainsi que les fortes odeurs de fumée pouvant en
résulter,nous recommandons dene pasutiliser lefourà trop forte température. Il estpréférablede
rallonger letemps de cuisson et de baisser la température. Nous vous conseillons de n'utiliser que des
plats,des moulesà pâtisserie résistants à detrès hautes températures.
1.4 Installation
La mise en service de l’appareil est à la charge de l’acheteur, le constructeur est dégagé de ce service.
Les pannes liées à une mauvaise installation ne seront pas couvertes par la garantie. Une mauvaise
installation peut provoquer des dommages aux personnes, aux animaux domestiques; dans ce cas la
responsabilité du constructeur ne peut être engagée. L'installation du four doit être réalisée par un
installateur agréé ou un technicien de qualification similaire. Le four peut être placé en hauteur dans
une colonne ou enchâssé sous un plan de travail. Avant sa fixation: il est indispensable d'assurer une
bonne aération dans la niche d'encastrement afin de permettre la bonne circulation de l'air frais
nécessaire au refroidissement et à la protection des organes intérieurs. Pour cela, réaliser les
ouverturesspécifiées selonle type d'encastrement (dernière page).
1.5 La gestion des déchets et la protection de l'environnement
Le présent appareil est marqué conformément à la directive 2012/19/UE relative aux
déchets d'équipements électriqueset électroniques
(DEEE). Les DEEE contiennent à la fois des substances polluantes (qui peuvent avoir des
conséquences négatives sur l'environnement) etdes élémentsde base (réutilisables). Il est
important de soumettre les DEEE à des traitements spécifiques, en vue d'extraire et
d'éliminer de façon appropriée toutes les substances polluantes, puis de récupérer et
recyclertous lesmatériaux.
Chacun peut jouer un rôle important quant à la protection de l'environnement contre les DEEE. Pour
atteindrecet objectif, il estimpératifde suivrequelques règlesélémentaires:
• Les DEEEne doivent pas êtretraités comme desdéchets ménagers.
• Ils doivent être remis aux points de collecte appropriés gérés par la municipalité ou par des sociétés
immatriculées.Dans plusieurspays, ilestpossible decollecter à domicileles DEEEvolumineux.
• Lorsque vous achetez un nouvel appareil, vous devez retourner l'ancien au vendeur qui le récupère
gratuitement, au cas par cas, à condition que l'équipement soit de type équivalent et possède les
mêmes fonctions quecelui fourni.
FR 16

ÉCONOMIE ET RESPECT DE L'ENVIRONNEMENT
Lorsque cela est possible, éviter le préchauffage du four et éviter de le faire tourner à vide. N'ouvrez la
porte du fourque lorsque celaest nécessaire, car ily a des déperditions dechaleur àchaque foisqu'il est
ouvert. Pour une économie d'énergie significative, éteindre le four entre 5 et10 minutes avant la fin de
cuisson prévue, et utiliser la chaleur que le fourcontinue degénérer.Gardez lesjoints propres et en bon
état, pour éviter toute déperdition d'énergie. Si vous avez un contrat électrique avec un tarif heure
creuse, le programme"cuisson différée" peut vousfaire réaliser des économies d'énergie en déplaçant
le début duprogrammeà unintervallede tempsà tarifréduit.
1.6 Declaration De Conformité
Les parties de cet appareil pouvant être en contact avecdes substances alimentaires sontconformes à
la prescription dela Dir.CEE 89/109.
En utilisant lesymbol sur ce produit,nous déclaronssur notre propre responsabilité quece produit
estconforme à toutesles normes Européennesrelativesà lasécurité, la santéet à l’environnement.
2. Description du produit
2.1. Vue d'ensemble
1
4
2
3
5
1. Panneau de commande
2. Positions des gradins
(gradins fils si inclus)
3. Grille métalique
4. Léchefrite
5. Porte du four
FR 17

2.2. Accessories
1
Léchefrite
Grille métalique
2
Recueille le jus des grillades. Le lèche frite ne doit
pas être utilisé pour les cuissons autres que Grill
et grill pulsé (Il va provoquer un écran de
température entre le bas et le haut de la cavité).
Rien ne doitêtre posésur lasole dufour(risque de
déformation de l’émail). En cas de non respect de
ces conseils, nous ne pourrons être tenu pour
responsable.
La grille métalique sert de support aux plats.
2.3 Première Utilisation
UN PREMIER NETTOYAGE doit être réalisé avant la première utilisation passer un chiffon doux et
humide sur les surfaces extérieures de l'appareil. Nettoyer avec une éponge additionnée de produit
lessiviel, les accessoires et l'intérieur du four. Rincer et sécher. Faire chauffer le four à vide une bonne
heure à la température maximale pour faire disparaîtrel'odeur du neuf. Pendant cette opération, bien
aérerla pièce.
3. Utilisation du Four
3.1 Description de l'affichage
1- Manette de température
2- Manette des fonctions
FR 18

3.2 Mode de cuisson
Bouton de
sélection
*
* Programme testé selon le CENELEC, norme européenne EN 60350-1 qui définit la classe énergétique.
T °C
range
50 ÷ 280
50 ÷ 230
L1 ÷ L5
Fonction (selon modèle)
L'ampoule: Allumage de l’éclairage du four
Convectionnaturelle: utilisation simultanéede larésistancede soleet devoûte.
Préchaufferle fourune dizainede minutes.Idéale pourtoutes lescuissons à l'ancienne,
pour saisir les viandes rouges, les rosbifs, gigots, gibiers, le pain, les papillotes, les
feuilletages.Placer lemets àcuire àun niveaude gradinmoyen.
Sole- Utilisation de la resistance de sole. Ideale pour la cuisson de tartes, de creme
caramel, flans, terrine, toutes preparations qui necessitent une cuisson par le dessous
(cocottes: poulet, boeuf)
Gril: l'utilisationdu grilloir sefait portefermée. Unpréchauffage de 5 minsest nécessaire
pour le rougissement de la résistance. Succès assuré pour les grillades, les brochettes et
les gratins. Lesviandes blanches doivent êtreécartées dugrilloir ;le temps decuisson sera
alors plus long, mais la viande sera plus savoureuse. Les viandes rouges et filets de
poissons peuvent être placéssur lagrille avec leplat récoltesauce glissédessous.
Le four adeux positionsde gril:
Gril: 2140 W Barbecue: 3340W
FR 19

4. Nettoyage du four et maintenance
4.1 Remarques générales sur le nettoyage
Le cyclede viede l'appareil peut être étendu grâce à un nettoyage régulier.Attendez le refroidissement
du four avant de procéder à des opérations de nettoyage manuel. Ne jamais utiliser de détergents
abrasifs, de laine d'acier ou d'objets pointus pour le nettoyage, l'émail serait irrémédiablementabîmé.
Utilisezuniquement del'eau, du savonou desdétergents à based'eau deJavel (ammoniac).
PARTIE VITREE
Il est conseillé de nettoyer la vitre avec du papier absorbant après chaque utilisation du four. Pour
enlever les taches plus tenaces, vous pouvez utiliser une éponge imbibée de détergent, puis rincer à
l'eau.
JOINT DE LAPORTE
Si elle estsale, le jointpeut être nettoyéavec uneéponge légèrementhumide.
ACCESSOIRES
Nettoyer les accessoires avec une éponge et de l'eau savonneuse puis rincer. Eviter d'utiliser des
détergentsabrasifs.
LECHEFRITE
Après l'utilisation de la grille, retirez le du four. Prendre soin de reverser les graisses (tièdes)lêchefrite
dans l’évier. Laver et rincer le plat récolte-sauce dans de l’eau chaude, avec une éponge imbibée de
produit lessiviel. Si les résidus restent collés, le faire tremper dans de l’eau et un produit détergent. Il
peut aussi êtrenettoyédans unlave-vaisselle ou avecun produit ducommerce.
Ne jamais replacerle plat récolte-sauceencrassé dansun four.
4.2 Entretien
RETRAIT DE LAPORTE DUFOUR
1. Ouvrez laporte.
2. Ouvrez les pinces du boîtier de charnière sur le côté droit et gauche de la fenêtre avant en les
poussantvers le bas.
3. Replacez laporte enprocédant en sensinverse.
FR 20

LOW-E
RETRAIT ET NETTOYAGE DES VITRES
1. Ouvrez laportedu four.
2.3.4. Bloquerles charnières,enlever lesvis et retirez lecouvercle métallique supérieuren le tirant vers
le haut.
5.6. Retirez leverre, soigneusement dela portedu four(NB: dans les foursde pyrolyse,retirezl'extraire
égalementles deuxièmeet troisièmeverre (le caséchéant)).
7. A lafin dunettoyage Remonter lespièces dansl'ordre inverse.
Sur toutes les vitres, l'indication "Pyro" doit être lisible et positionné sur le côté gauche de la porte, à
proximitéde lacharnière latérale gauche. De cette manière,l'étiquette imprimée du premier verresera
à l'intérieur dela porte.
1.
5.
2.
3.
4.
6.
1
2
3
7.
FR 21

REMPLACEMENTDE L'AMPOULE
1. Débranchez lefour dela prise.
2. Défaire le couvercleen verre, dévisserl'ampoule et laremplacer par uneampoule dumême modèle.
3. Une foisl'ampoule remplacée, remettre le couvercleen verre.
5. Dépannage
5.1 FAQ
PROBLEMES CAUSE POSSIBLE SOLUTION
Le four ne chauffe pas
Le four ne chauffe pas
Le four ne chauffe pas
L'horloge n'est pas réglée
La sécurité enfant est
activée
Les réglages nécessaires
ne sont pas imposés
FR 22
Réglez l'horloge
Désactiver la sécurité enfant
Assurez-vous que les
paramètres nécessaires
sont corrects

Indicazioni di Sicurezza
• Durante la cottura l'umidità può condensarsi all'interno della cavità o sul
vetro della porta. È normale. Per ridurre questo effetto, attendere 10-15
minuti dopo l'accensione prima di mettere il cibo all'interno del forno. In
ogni caso, la condensa scomparequando il forno raggiunge la temperatura
di cottura.
• Cuocere le verdure in un contenitore con un coperchio invece di un
vassoio aperto.
• Evitare di lasciare il cibo all'interno del forno dopo la cottura per un
periodo superiore a15/20 minuti.
• ATTENZIONE: l'apparecchio e le parti accessibili diventano calde durante
l'uso. Prestareattenzionea nontoccarele particalde.
• ATTENZIONE: le parti accessibili possono diventare molto calde quando
si utilizza ilforno. I bambini devono essere tenutia distanza di sicurezza.
• L'apparecchio può essere usato da bambini dagli 8 anni in su e persone
con ridotte capacità fisiche, sensoriali o mentali o senza esperienza e
conoscenza del prodotto sesupervisionate odando loro istruzioni riguardo
al funzionamento dell'apparecchio in maniera sicura e coscente del rischio
possibile.
• Ibambini nondovrebberogiocare con l'apparecchio.
• La pulizia e la manutenzione non dovrebbero essere fatte da bambini
senza supervisione
• Durante l’uso l’apparecchio diventa molto caldo. Si dovrebbe fare
attenzionea nontoccaregli elementiriscaldanti all’interno del forno.
• ATTENZIONE: Le parti accessibili possono diventare molto calde durante
l’uso. I bambini dovrebbero essere tenutia distanza.
• Non usare per la pulizia materiali ruvidi abrasivi o raschietti metallici
affilati per pulire le porte di vetro del forno dato che possono graffiare la
superficie ecausare la frantumazione delvetro.
• Spegnere il forno prima di rimuovere lo schermo di protezione e, dopo la
pulizia, rimontarlo secondo le istruzioni.
• Usare solola sondatermica raccomandata per questo forno.
• Nonutilizzareun pulitore avapore.
• Collegare al cavo di alimentazione una spina dimensionata per la
tensione, la corrente e la potenza indicate nella targhetta e dotata del
contatto di terra. La presa deve essere dimensionata per la potenza
indicata sulla targhetta e deve avere il contatto di terra collegato e
funzionante. Il conduttore di terra è giallo-verde. Questa operazione deve
IT 23

essere eseguita solo da un tecnico adeguatamente addestrato. In caso di
incompatibilità tra presa e spina dell'elettrodomestico, richiedere ad un
tecnico specializzato di sostituire la presa con un'altra di tipo compatibile.
La spina e la presa devono essere conformi alle normative attuali del paese
di installazione. Il collegamento alla rete di alimentazione può essere
effettuato anche collocando un interruttore automatico onnipolare tra
l'elettrodomestico e la rete di alimentazione, in grado di supportare il
carico massimo collegato, in linea con la legislazione corrente. Il cavo di
terra giallo-verde non deve essere interrotto dall'interruttore automatico.
La presa o l'interruttore automatico onnipolare utilizzati per il
collegamento devono essere facilmente accessibili al momento del
montaggio dell'elettrodomestico.
• La disconnessione può essere eseguita con la spina accessibile o
aggiungendo un interruttore sul cablaggio fisso, nel rispetto delle
normative relative ai cablaggi.
• Se il cavo di alimentazione si danneggia, deve essere sostituito con un
cavo o uno speciale fascio di cavi disponibile presso il produttore o
contattando ilrepartoassistenzaal cliente.
• Ilcavodi alimentazione deve esseredi tipoH05V2V2-F.
• Il mancato rispetto di quanto indicato sopra può compromettere la
sicurezzadell'elettrodomestico e rendere nulla la garanzia.
• Qualsiasi materiale fuoriuscito in eccesso deve essere tolto prima della
pulizia.
• Durante il processo di pulizia pirolitico, le superfici possono surriscaldarsi
più delnormale: mantenere sempre ibambini adistanzadi sicurezza;
•L’elettrodomestico non deve essere installato dietro a una porta a scopo
ornamentale per evitarneil surriscaldamento.
• Quando si posiziona uno scaffale all’interno, accertarsi che il blocco sia
rivolto verso l’alto e nella parteposterioredella guida.
Lo scaffale deve essereinserito completamente nella guida
• AVVERTENZA: Non coprire le pareti del forno con fogli di alluminio o
protezioni monouso disponibili in commercio. I fogli di alluminio o le altre
protezioni, se a diretto contatto con lo smalto caldo, rischiano di fondersi e
di danneggiarelo smalto internostesso.
• AVVERTENZA: Non toglieremai laguarnizione della porta del forno.
• Il funzionamento dell'elettrodomestico alle frequenze nominali non
richiede alcunaoperazione o impostazione.
IT 24

Sommario
Avvertenze Generali
26
Descrizione del Prodotto
28
Utilizzo del Forno
29
Pulizia e Manutenzione del Forno
30
1.1 Suggerimenti sulla sicurezza
1.2 Sicurezza elettrica
1.3 Raccomandazioni
1.4 Installazione
1.5 Gestione dei rifiuti
1.6 Dichiarazione di conformità
2.1 Panoramica
2.2 Accessori
2.3 Primo utilizzo
3.1 Descrizione del display
3.2 Modalità di cottura
4.1.Note generiche di pulizia
4.2 Manutenzione
• Rimozione dello sportello del forno
• Rimozione e pulizia della porta in
vetro
• Sostituzione della lampadina
Risoluzione dei problemi
32
Garanzie
32
5.1 F.A.Q.
IT 25

1. Avvertenze Generali
Vi ringraziamo per aver scelto uno dei nostri prodotti.
Per utilizzare il forno in modo ottimale è consigliabile
leggere con attenzione questo manuale e conservarlo
con cura per ogni ulteriore consultazione. Prima di
installare il forno, prendere nota del numerodi serie in
modo da poterlocomunicare al personaledel servizio di
assistenza in caso di richiesta di intervento. Dopo aver
rimosso il forno dall’imballaggio, verificare che non
abbia subito danni durante il trasporto. In caso di
dubbi, non utilizzareil forno erichiedere l’assistenza di
un tecnico qualificato. Tenere tutto il materiale da
imballaggio (sacchetti di plastica, polistirolo, chiodi)
fuori dalla portata dei bambini. Alla prima accensione del forno può svilupparsi fumo di odore acre,
causatodal primo riscaldamento delcollante dei pannelli d’isolamento avvolgentiil forno: sitrattadi un
fenomeno assolutamente normale e, in caso si verificasse, occorre attendere la cessazione del fumo
prima di introdurre le vivande. Il produttore declina ogni responsabilità in caso di mancata osservanza
delle istruzioni contenute in questodocumento.
NOTA: le funzioni, le proprietà e gli accessori dei forni citati in questo manuale possono variare a
secondadei modelli.
1.1 Suggerimenti sulla Sicurezza
Utilizzare il forno solo per lo scopo per cui è stato progettato, ossia solo per la cottura di alimenti;
qualsiasi altro utilizzo, ad esempio come fonte di riscaldamento, è considerato improprio e quindi
pericoloso. Il costruttore non può essere considerato responsabile pereventuali danni derivantida usi
impropri,erronei ed irragionevoli.
L’uso di unqualsiasi apparecchio elettrico comporta l’osservanzadi alcune regolefondamentali:
- non tirareil cavodi alimentazione perstaccare laspina dellapresa di corrente;
- non toccarel’apparecchiocon manio piedibagnati oumidi;
- in generaleè sconsigliabile l’usodi adattatori, prese multiplee prolunghe;
- in casodi guasto e/ocattivofunzionamento dell’apparecchio,spegnerlo enon manometterlo.
1.2 Sicurezza Elettrica
FAREEFFETTUARE I COLLEGAMENTIELETTRICI ADUN’ELETTRICISTA OTECNICO QUALIFICATO.
La rete di alimentazione a cui viene collegato il forno deve essere conforme con le normative in vigore
nel paese di installazione. Il produttore declina ogni responsabilità per eventuali danni derivanti dalla
mancata osservanza di tali disposizioni. Il forno deve essere collegato alla rete elettrica tramite una
presa a muro con messa a terra o tramite un sezionatore con più poli, a seconda delle disposizioni in
vigorenel paesedi installazione. La reteelettrica deve essereprotetta mediante fusibili idoneie devono
essere utilizzati cavi con una sezione trasversale idonea a garantire una corretta alimentazione del
forno.
COLLEGAMENTO
Il forno vienefornitocon uncavodi alimentazioneche deve esserecollegatosolo auna rete elettricacon
una tensionedi 230VCA tra le fasi o tra la fase eil neutro.Prima dicollegare ilforno alla rete elettrica, è
indispensabile controllare:
- la tensionedi alimentazione indicata sulmisuratore;
- l’impostazione delsezionatore.
Il filo di messa a terra collegato al morsetto di terra del forno deve essere collegato al morsetto di terra
della rete elettrica.
ATTENZIONE
Prima di collegare il forno alla rete elettrica, far controllare la continuità della messa a terra della rete
elettrica ad un elettricista qualificato. Il produttore declinaogni responsabilità pereventuali incidenti o
altri problemi derivanti dal mancato collegamento a terra del forno o dal suo collegamento ad una
IT 26

messa a terracon unacontinuità difettosa.
NOTA: poiché il forno potrebbe richiedere interventi di assistenza, è consigliabile prevedere la
disponibilità di un’ulteriore presa amuro a cui collegare ilfornodopo cheè stato rimossodallo spazioin
cui è stato installato. Il cavo di alimentazione deve essere sostituito solo dal personale dell’assistenza
tecnicao datecnici con qualificheanaloghe.
1.3 Raccomandazioni
Dopo l’uso sono sufficienti alcune semplici operazioni di pulizia per mantenere il forno perfettamente
pulito. Non rivestire le pareti del forno con fogli d’alluminio da cucina o fogli monouso commerciali,
perché potrebbero fondersi a contatto con le superfici in smalto caldo e danneggiare le superfici in
smalto all’internodel forno. Per evitaredi sporcare eccessivamente il forno e prevenire la diffusionedi
fumo maleodorante, è consigliabile non utilizzare il forno a temperature molto alte. E’ generalmente
preferibile imposta- re un tempodi cotturapiù lungo e utilizzare una temperatura piùbassa. Oltre agli
accessori forniti conil forno,è consigliabileutilizzarepiatti e teglieresistentialle altetemperature.
1.4 Installazione
Il produttore non è obbligato ad occuparsi dell’installazione. Gli eventuali interventi di assistenza,
necessari per correggere problemi dovuti ad un’errata installazione, non sono coperti da garanzia.
L’installazione deve essere effettuata da un tecnico qualificato e in conformità con queste istruzio- ni.
Un’installazione impropria potrebbe causare infortunialle persone, agli animali domesticio danni alle
attrezzature. Il produttore declina ogni responsabilità per eventuali lesioni o danni dovuti ad un’errata
installazione.
Il forno puòessere installato sopra unacolonna osotto a un piano di lavoro. Prima difissare inposizione
il forno, verificare che lo spazioattorno allostesso sia sufficiente a garantire lacircolazione del flusso di
aria fresco necessario a garantire il raffreddamento del forno e la sicurezza dei componenti interni.
Realizzarele aperture indicate nell’ultima pagina delmanuale, aseconda del tipo diinstallazione.
1.5 Gestione dei rifiuti e rispetto dell’ambiente
Questo apparecchio è contrassegnato in conformità alla Direttiva europea 2012/19/EU
sulle apparecchiatureelettriche ed elettroniche (WEEE). I WEEE contengono sia sostanze
inquinanti (che possono provocare conseguenze negative sull’ambiente) checomponenti
di base (che possono essere riutilizzati). E’ importante che i WEEE siano soggetti a
trattamenti specifici per rimuovere e smaltire correttamente tutti gli inquinanti e
recuperare tutti i materiali. I singoli possono giocare un ruolo importante nell’assicurare
base:
- i WEEEnon devono essere trattati come rifiutidomestici;
- i WEEEdevono essere portatiai puntidi raccolta appositi gestitidal comuneo dasocietà registrate.
In molti paesi, per i WEEE di grandi dimensioni, potrebbe essere presente la raccolta domestica.
Quando si acquista un nuovoapparecchio, quello vecchio potrebbe essere restituito al rivenditore che
deve acquisirlo gratuitamente su base singola, sempre che l’apparecchio sia del tipo equivalente e
abbia le stessefunzioni di quelloacquistato.
che i WEEE non diventino un problema ambientale; è essenziale seguire alcune regole di
RISPARMIARE ERISPETTAREL’AMBIENTE
Ove possibile, evitare di pre-riscaldare il forno e cercare sempre di riempirlo. Aprire la porta del forno
quanto necessario, perché vi sono dispersioni di calore ogni volta che viene aperta. Per risparmiare
molta energia sarà sufficiente spegnere il forno dai5 ai 10minuti prima dellafine del tempo dicottura
pianificato,e servirsidel caloreche ilforno continuaa generare. Tenerele guarnizionipulite ein ordine,
per evitare eventuali dispersioni di energia. Se si dispone di un contratto di energia elettrica a tariffa
oraria, il programma “cottura ritardata” renderà più semplice il risparmio spostando l’avvio del
programmanegli orari atariffaridotta.
IT 27

1.6 Dichiarazione di conformità
Tutti i componenti di questo elettrodomestico destinati a venire a contatto con gli alimenti sono
conformicon le disposizionidella Direttiva CEE 89/109.
Apponendo la marcatura su questo prodotto, dichiariamo, sotto la nostra responsabilità, di
ottemperare a tutti i requisiti relativi alla tutela di sicurezza, salute e ambiente previsti dalla
legislazione europea inessereper questoprodotto.
2. Descrizione del Prodotto
2.1 Panoramica
1
1. Pannello di controllo
4
2
3
2. Posizioni ripiani
(castelletto se previsto)
3. Griglia metallica
4. Leccarda
5. Porta forno
5
2.2 Accessori
1
Leccarda
Raccoglie i residui che gocciolano durante la
cotturadi alimenti coni grill.
Griglia metallica
2
Sostiene teglie e piatti.
IT 28

2.3 Primo utilizzo
PULIZIA PRELIMINARE
Pulire sempre il forno prima di utilizzarlo per la prima volta. Pulire le superfici esterne con un panno
morbido leggermenteinumidito.
Lavare tutti gli accessori e pulire l’interno del forno con del detergente per piatti ed acqua calda.
Verificareche il forno siavuoto,impostare la temperatura massimae lasciarloacceso per almeno 1 ora,
cosìda rimuovere tuttigli odorinormalmente presenti neiforninuovi.
3. Utilizzo del Forno
3.1 Descrizione del display
1- Manopola del termostato
2- Manopola del selettore di funzione
3.2 Modalità di cottura
Manopola
commutatore
*
* Programma di prova secondo CENELEC EN 60350-1 utilizzato per la definizione della classe energetica.
Intervallo
di T°
50 ÷ 280
50 ÷ 230
L1 ÷ L5
Funzione (a seconda del modello)
LAMPADA: accende la luce interna.
CONVEZIONE NATURALE: sono in funzione le resistenze superiore e inferiore. È la
cotturatradizionale,ottima perarrostire cosciotti, selvaggina, idealeper biscotti,mele
al forno eper renderei cibimolto croccanti.
ELEMENTO RISCALDANTE INFERIORE: Ideale per la cottura di tutti i piatti a base di
pasta. Utilizzare questa funzione per crostate, torte salate, torte, paté e qualsiasi
cotturache ha bisognodi più caloree radiazionidal basso.
GRILL: Grigliatura tradizionale a porta chiusa: con questa funzione viene inserita la
resistenza del grill. Ottima nella cottura dicarni di medio e piccolo spessore (salsicce,
costine,bacon).
IT 29

4. Pulizia e manutenzione del forno
4.1 Note generiche di pulizia
La vita di servizio dell’apparecchio si allungase questoviene pulitoad intervalli regolari. Attendere cheil
forno si raffreddi prima di effettuare le operazioni di pulizia manuali. Non utilizzare mai detergenti
abrasivi, pagliette diferro o oggetti appuntitiper lapulizia,per non danneggiare in modo irreparabilele
parti smaltate.Utilizzaresolo acqua,sapone odetergenti a basedi candeggina (ammoniaca).
PARTI INVETRO
E’ consigliabile pulire lo sportello in vetro con carta assorbente da cucina dopo ogni utilizzo del forno.
Per rimuovere le macchie più ostinate, è possibile anche utilizzare una spugna imbevuta di detergente
ben strizzata e sciacquarecon acqua.
GUARNIZIONEDELLO SPORTELLO DELFORNO
Se sporca, laguarnizione può esserepulitacon unaspugna leggermente inumidita.
ACCESSORI
Pulire gli accessori con una spugna imbevuta con acqua e sapone, sciacquarli e asciugarli : evitare di
usaredetergenti abrasivi.
VASCHETTADI GOCCIOLAMENTO
Dopo l’uso delgrill, rimuovere lavaschetta dal forno. Versare il grassocaldo inun contenitore elavare la
vaschettain acqua calda,utilizzando una spugnae deldetergente per piatti.
Se rimangono dei residui di grasso, immergere la vaschetta in acqua e detergente. In alternativa, è
possibile anche lavare la vaschetta nella lavastoviglie oppure utilizzare un detergente per forni di tipo
commerciale.Non reinserire mai unavaschettasporca nelforno.
4.2 Manutenzione
RIMOZIONEDELLO SPORTELLO DEL FORNO
1. Aprire losportello anteriore.
2. Aprire i morsetti dell’alloggiamento della cerniera sul lato destro e sinistro dello sportello anteriore,
premendoliverso il basso.
3. Installare nuovamente losportello eseguendola procedura all’inverso.
IT 30

RIMOZIONEE PULIZIADELLA PORTAIN VETRO
LOW-E
1. Aprile laporta del forno.
2.3.4. Bloccare le cerniere, rimuovere le viti e rimuovere la copertura metallica superiore tirandola
versol’alto.
5.6. Rimuovere il vetro, estraendolo con molta cura, dallacontroporta delforno (NB: neiforni pirolitici,
rimuovereanche ilsecondo eterzo vetro (sepresente)).
7. Al terminedella pulizia osostituzione riassemblare le partinell’ordineoppostoalla rimozione.
Su tutti i vetri, l’indicazione ”Low-E” deve essere correttamente leggibile e posizionata sul lato sinistro
della porta, vicino alla cerniera laterale sinistra. In questo modo, l’etichetta stampata del primo vetro
rimarràinterna alla porta.
1.
5.
2.
3.
4.
6.
1
2
3
7.
IT 31

SOSTITUZIONEDELLA LAMPADINA
1. Scollegare il fornoalla rete.
2. Allentare lacopertura invetro,svitarela lampadinae sostituirlacon una nuovadello stesso modello.
3. Una voltasostituitala lampadinadifettosa, riavvitare lacopertura invetro.
5. Risoluzione dei Problemi
5.1 FAQ
PROBLEMA POSSIBILE CAUSA SOLUZIONE
Il forno non si scalda
Il forno non si scalda
Il forno non si scalda
L’orologio non è impostato
Il blocco bambini è attivo
Le regolazioni necessarie
non sono impostate
Impostare l’orologio
Disattivare il blocco bambini
Assicurarsi che le impostazioni
necessarie siano corrette
6 Garanzie.
Il prodotto è garantito, oltre che ai sensidi legge, alle condizionie nei termini riportati sul certificato di
garanziaconvenzionale inserito nel prodotto. Ilcertificato dovrà essereconservato e mostratoal nostro
Centro di Assistenza Tecnica Autorizzato, in caso di necessità, insieme allo scontrino comprovante
l'acquisto dell'elettrodomestico. Puoi consultarele condizionidi garanzia anchesul nostro sito internet.
Per ottenere assistenza compila l'appositoform on-line oppurecontattaci alnumero che troviindicato
nella pagina diassistenzadel nostro sito internet.
IT 32

Indicaciones de seguridad
• Durante la cocción, podría condensarse humedad dentro de la cavidad
del horno o en el cristal de la puerta. Esto es normal. Para reducir este
efecto, espere de 10 a 15 minutos antes de introducir alimentos en el
horno una vez que lo encienda. De todos modos, la condensación
desaparece cuando el horno alcanza la temperaturade cocción.
• Para cocinar verduras, póngalas en un recipiente con una tapa en lugar
de utilizar unabandeja sincubrir.
• Evite dejar los alimentos en el horno más de 15/20 minutos después de
cocinarlos
• ADVERTENCIA: El aparato y sus componentes accesibles se calientan
durante el uso. Se debe tener cuidado de no tocar los elementos
calefactores.
• ADVERTENCIA: Las partes accesibles pueden estar muy calientes cuando
se utiliza elhorno. Losniños debenmantenersea una distanciasegura.
• Este aparato puede ser usado por niños mayores de 8 años y personas
con capacidades físicas, sensoriales o mentales reducidas o falta de
experiencia y conocimiento siempre y cuando hayan sido supervisadas o
instruidas sobre el uso del aparato de forma segura y del conocimiento de
los riesgosque comporta.
• Losniños nodeben jugar conel aparato.
• La limpieza y el mantenimiento que debe realizar el usuario no será
realizadapor niñossin supervisión.
• Durante el uso, se calienta el aparato. Se debe tener cuidado de no tocar
los elementos calefactoresdel
interior del horno.
ADVERTENCIA: Las partes accesibles pueden calentarse durante el uso. Los
niños debenpermanecer alejados.
• No utilizar limpiadores abrasivos o rascadores metálicos afilados para
limpiar el cristal de la puerta del horno ya que pueden rayar la superficie,
pudiendo comportar laroturadel cristal.
• Se debe apagar el horno antes de retirar la pantalla, después de la
limpieza, se debecolocar según las instrucciones.
• Usesolamente el sensor de temperatura recomendado para este horno.
• Noutilice limpiadores devapor para lalimpieza del aparato.
• Conecte un enchufe en el cable que transporta la tensión, la corriente y la
carga indicadas en la etiqueta y que tiene el contacto de masa. La toma de
corriente debe adecuarse a la carga indicada en la etiqueta y disponer de
un contacto de masa conectado y operativo. El conductor de tierra es de
ES 33

color amarillo verdoso. Esta operación debe realizarla un profesional
debidamente cualificado. Si la toma de corriente es incompatible con el
enchufe del electrodoméstico, pida a un electricista profesional que
sustituya la toma por otra adecuada. El enchufe y la toma deben cumplir
las normas actuales del país donde se instala el electrodoméstico. En la
conexión con la fuente de alimentación también puede utilizarse un
contactor omnipolar entre la fuente y el electrodoméstico. Este debe
soportar la carga conectada máxima y cumplir la legislación vigente. El
contactor no debe interrumpir el cable de tierra de color amarillo verdoso.
La toma de corriente o el contactor omnipolar empleados deben estar
fácilmenteaccesibles cuandose instala elelectrodoméstico.
•La desconexión puede realizarse mediante el enchufe accesible o
mediante la incorporación de un interruptor enel cableadofijo conarreglo
a lasnormativas de cableado.
•Si el cable de alimentación está dañado, debe sustituirse por un cable o
un haz de cables especial comercializado por el fabricante; también puede
ponerse en contacto con el departamento de atenciónal cliente.
• Elcable de alimentacióndebe serde tipo H05V2V2-F.
•El incumplimiento de lo anterior puede poner en peligro la seguridad del
electrodomésticoy anularla garantía.
•Cualquier vertido de material excesivo debe eliminarse ante de la
limpieza.
•Durante la limpieza pirolítica, las superficies pueden calentarse más de lo
habitual, por lo que los niños deben mantenerse a una distancia de
seguridad.
•El electrodoméstico no debe instalarse detrás de una puerta decorativa
para evitar quese caliente enexceso.
•Cuando coloque la bandeja interior, asegúrese de dirigir el tope hacia
arriba enla parte trasera dela cavidad.
La bandejadebe introducirse por completo en la cavidad.
• ADVERTENCIA: No forre las paredes del horno con papel de aluminio ni
utilice las protecciones desechables que se encuentran disponibles en los
comercios. El papel de aluminio o cualquier otra protección que entre en
contacto directo con el esmalte caliente puede derretirse y dañar el
esmalte del interior.
• ADVERTENCIA: Nunca quite la junta de estanqueidad de la puerta del
horno.
• No se requiere ninguna operación/ajuste adicional para hacer funcionar
el aparato a las frecuencias nominales.
ES 34

Resumen
Advertencias generales
36
Descripción del producto
38
Utilización del horno
39
Limpieza y mantenimiento
del horno
40
1.1 Recomendaciones de seguridad
1.2 Seguridad eléctrica
1.3 Recomendaciones
1.4 Instalación
1.5 Gestión de residuos
1.6 Declaración de conformidad
2.1 Descripción general
2.2 Accesorios
2.3 Primer uso
3.1 Descripción de la pantalla
3.2 Modalidades de cocción
4.1 Notas genéricas de limpieza
4.2 Mantenimiento
• Extracción de la puerta del horno
• Extracción y limpieza de la puerta
de vidrio
• Sustitución de la bombilla
Solución de problemas
42
5.1 Preguntas más frecuentes
ES 35

1. Advertencias Generales
Le agradecemos que haya elegido uno de nuestros
productos. Para utilizar el horno de forma óptima es
aconsejable leer con atención este manual y
conservarlo para poder consultarlo en el futuro. Antes
de instalar el horno, anote el número de serie para
poder facilitárselo al personal del servicio de asistencia
técnicaen casode solicitar suintervención. Después de
extraer elhorno del embalaje, compruebe que no haya
sufrido daño alguno durante el transporte. En caso de
duda, no utilice el horno y solicite la asistencia de un
técnico cualificado. Conserve todo el material de
embalaje (bolsitas de plástico, poliestireno, clavos)
fuera delalcance de los niños. La primera vez quese enciende el horno puede producirse un humo de
olor acre, causadopor el primercalentamientodel adhesivo delos panelesde aislamiento querecubren
el horno: se trata de un fenómeno absolutamente normal y, en caso de que se produzca, será preciso
esperar a quecese elhumo antesde introducirlos alimentos. Elfabricantedeclina todaresponsabilidad
en caso deno observarlas instruccionescontenidas enestedocumento.
NOTA: las funciones, las propiedades y los accesorios de los hornos citados en este manual pueden
variarsegún losmodelos.
1.1 Recomendaciones de seguridad
Utilice el horno solo con el fin para el que se ha diseñado, es decir: únicamente para cocer alimentos;
cualquier otro uso, por ejemplo como fuente de calefacción, se considera impropio y por lo tanto
peligroso. El fabricante no puede ser considerado responsable de eventualesdaños derivados de usos
impropios,erróneos o irracionales.
El uso decualquier aparato eléctrico comporta laobservación deuna seriede reglasfundamentales:
- no tirardel cable dealimentación para desenchufar el conectorde latoma decorriente;
- no tocarel aparato con lasmanos nilos piesmojados ohúmedos;
- en generalno es aconsejableusar adaptadores, regletas ni alargadores;
- en casode avería omal funcionamiento delaparato,apáguelo y nolo manipule.
1.2 Seguridad eléctrica
CONFÍE LA CONEXIÓNELÉCTRICA A UNELECTRICISTAO AUN TÉCNICO CUALIFICADO.
La red de alimentación a la que se conecte el horno debe cumplir la normativa vigente en el país de
instalación. El fabricante declina toda responsabilidad por eventuales daños derivados de no observar
dicha normativa. Elhorno debeconectarsea lared eléctrica medianteun enchufe depared contoma de
tierra omediante unseccionador con varios polos, segúnla normativa vigente en elpaís de instalación.
La red eléctrica debe estar protegida mediante fusibles adecuados y deben utilizarse cables con una
sección transversalidónea quegaranticeuna correctaalimentación delhorno.
CONEXIÓN
El horno se suministra con un cable de alimentación que debe conectarse únicamente a una red
eléctrica con una tensión de 230 V de CA entre fases o entre la fase y el neutro. Antes de conectar el
horno a lared eléctrica esimprescindible comprobar:
- la tensiónde alimentación indicadapor el medidor;
- la configuracióndel seccionador.
El hilo detoma de tierra conectado al terminal de tierra del hornodebe estar conectado al terminal de
tierrade laredeléctrica.
ATENCIÓN
Antes de conectar el horno a la red eléctrica, confíe la comprobación de la continuidad de la toma de
tierra de la red eléctricaa unelectricista cualificado.El fabricante no se haceresponsable deeventuales
accidentes uotros problemasderivados de no conectar el horno a tierra o deconectarlo a una toma de
tierracon unacontinuidad defectuosa.
ES 36

NOTA: puesto que el horno podría requerir la intervención del servicio de asistencia, es aconsejable
prever la disponibilidad de otro enchufe de pared al que conectar el horno después de extraerlo del
espacio donde se ha instalado. El cable de alimentación debe sustituirse únicamente por personal de
asistenciatécnica o portécnicos con unacualificación análoga.
1.3 Recomendaciones
Una limpieza mínimadespués deutilizar el horno ayudará amantenerlolimpio durante mástiempo. No
forrar las paredes delhorno con aluminio u otrasprotecciones disponiblesen tiendas. El aluminio o los
protectores, en contacto directo con el esmalte caliente puede derretirse y deteriorar el esmalte del
interior. Para evitar un exceso de suciedad en el horno y que pueden derivar en olores y humo en
exceso, recomendamos no utilizar el horno a temperaturas muy elevadas. Es mejor ampliar el tiempo
de cocción ybajar un pocola temperatura.
1.4 Instalación
No es obligación del fabricante instalar el horno. Si se requiere la ayuda del fabricante para subsanar
fallosderivados deuna instalaciónincorrecta,dicha asistencia nola cubrirá lagarantía.
Han de seguirse a rajatabla las instrucciones de instalación para personal cualificado. Una instalación
incorrecta puede provocar daños personales, materiales o en animales. El fabricante no se hace
responsablede esosposibles daños.
El horno se puede colocar encima, en una columna, o debajo de una encimera. Antes de fijar el horno
hayque aseguraruna buenaventilación enel huecodonde sevayaa colocar yque el airenecesario para
enfriar y proteger las piezas internas circula sin problema. Realizar las aperturas especificadas en la
última página segúnel tipode altura.
1.5 Gestión de residuos y respeto por el medio ambiente
Este aparato está certificado conforme a la directiva europea 2012/19/EU sobre aparatos
eléctricos y electrónicos (WEEE). Los dispositivos WEEE contienen sustancias
contaminantes (que pueden provocar consecuencias negativas en el medio ambiente) o
componentes básicos (que pueden reutilizarse). Es importante que dichos dispositivos
estén sujetos a tratamientos específicospara eliminar y desechar correctamente todoslos
contaminantes y recuperar todos los materiales. Cada individuo puede desempeñar un
papel importante a la hora de asegurar que los dispositivos WEEE no se conviertan en un
problemamedioambiental; es esencialseguir algunasreglasbásicas:
- los dispositivosWEEE no debentratarsecomo residuos domésticos;
- los dispositivosWEEE debenllevarsea lospuntos de recogidaespecíficos gestionados porel municipio
o por unasociedad registrada.
En muchos países, para los WEEE de grandes dimensiones, puede haber disponible un servicio de
recogida a domicilio. Cuando se compraun nuevo aparato, el viejo puede entregarse al vendedor, que
debe adquirirlo gratuitamente siempre que el aparato sea de tipo equivalente y tenga las mismas
funciones que elque seha adquirido.
AHORRAR Y RESPETAREL MEDIOAMBIENTE
Siempre que sea posible,evite precalentar el horno e intenteutilizarlo siemprelleno. Abra lapuerta del
horno lo menos posible, ya que se producen dispersiones de calor cada vez que se lleva a cabo esta
operación.Para ahorrar muchaenergía bastaapagar el horno de 5a 10minutos antesdel fin del tiempo
de cocción planificado y servirse del calor que el horno continúa generando. Mantener las juntas
limpias y en buen estado para evitar posiblesdispersiones de energía. Si se dispone deun contratode
energía eléctrica por tarifa horaria,el programa decocción retardada permitirá ahorrarmás fácilmente
retrasandoel encendidodel hornohastael horario detarifa reducida.
ES 37

1.6 Consejos De Cumplimiento
En este equipo, las piezas que se prevé que puedan estar en contacto con los alimentos, cumplen las
regulacionesde laCEE indicadas enla directiva 89/109.
Al mostrar ellogo marcado en este producto, declaramos,bajo nuestra propiaresponsabilidad,
el cumplimiento de todos los requisitos europeos en términos de seguridad, salud y medio ambiente,
establecidosen lalegislación deeste producto.
2. Descripción del producto
2.1 Descripción general
1
1. Panel de control
4
2
3
2. Posiciones de las bandejas
(y del soporte elevado si corresponde)
3. Rejilla metálica
4. Bandeja
5. Puerta del horno
5
2.2 Accesorios
1 Bandeja
Recoge los residuos que gotean durante la
cocciónde alimentoscon lasresistencias.
2 Rejilla metálica
Sostiene fuentes y platos.
ES 38

2.3 Primer uso
LIMPIEZA PRELIMINAR
Limpie el horno antes de utilizarlo por primera vez. Limpie las superficies externas con un pañosuave
levementehumedecido.
Lave todos los accesorios y limpie el interior del horno con detergente lavavajillas y agua caliente.
Compruebe queel horno esté vacío, seleccione la temperaturamáxima y déjeloencendido durante un
mínimo de unahora para eliminartodos los oloresque suele haberpresentesen loshornos nuevos.
3. Uso del horno
3.1 Descripción de la pantalla
1- Selección de temperatura
2- Selección de función
3.2 Modalidades de cocción
Mando
selector
*
* Programa de prueba según CENELEC EN 60350-1 utilizado para la definición de la clase energética.
Rango
de T°C
50 ÷ 280
50 ÷ 230
L1 ÷ L5
FUNCIÓN ( )dependiendo del modelo
LAMPARA: Conecta la luz interior
CONVECCİÓN NATURAL: Funcionan la resistencia inferior y la resistencia superior del
horno. Es la cocción tradicional, ideal para cocinar asados, caza, galletas, manzanas al
horno y paraconseguir alimentoscrujientes.
BASE: Utilizar elelemento inferior. Idealpara todo tipo de reposteria.Utilizar para flanes,
quiches, tartas, pastas yprocesos querequieran mas calor desde abajo.
GRILL: El grill debe utilizarse con la puerta cerrada. Utilización de la resistencia superior
con posibilidad deajustar latemperatura.Es necesario unprecalentamientode 5minutos
para que laresistencia se pongaal rojo.Éxito segurocon lasparrilladas, lasbrochetas ylos
gratinados. Las carnes blancas deben alejarse del grill, porque aunque así se alargará el
tiempo decocción, la carne quedarámás sabrosa. Lascarnes rojas ylos filetesde pescado
se pueden colocarencima dela rejillacolocando debajola grasera.
ES 39

4. Limpieza y mantenimiento del horno
4.1 Notas genéricas de limpieza
La vida útil del aparato se prolonga si se limpia a intervalos regulares. Espere a que el horno se enfríe
antes de llevar a cabo las operaciones de limpieza manuales. No utilice nunca detergentes abrasivos,
estropajosmetálicos niobjetos puntiagudos parala limpieza conel finde nodañar de formairreparable
las piezas esmaltadas. Utiliceúnicamente agua,jabón o detergentes a basede amoniaco.
PIEZASDE VIDRIO
Es aconsejable limpiar la puerta de vidrio con papel absorbente de cocina después de cada uso del
horno. Para eliminar las manchas más persistentes, se puede utilizar también una esponja empapada
en detergente bien escurriday aclarar con agua.
JUNTA DELA PUERTADEL HORNO
Si se ensucia,la junta se puedelimpiar conuna esponjaligeramentehúmeda.
ACCESORIOS
Limpie los accesorios con una esponja empapada en agua y jabón, escúrralos y séquelos: no utilice
detergentesabrasivos.
FUENTE DE GOTEO
Después deusar las resistencias, extraiga lafuente del horno. Vierta la grasa caliente en un recipiente y
lavela fuente con aguacaliente utilizando unaesponja ydetergentelavavajillas.
Si quedanresiduos grasos, sumerja la fuente en agua y detergente.Tambiénse puedelavar lafuente en
el lavavajillas o bien utilizar un detergente comercial para hornos. Nunca vuelva a introducir la fuente
sucia en elhorno.
4.2 Mantenimiento
EXTRACCIÓNDE LAPUERTADEL HORNO
1. Abra lapuertaanterior.
2. Abra las pestañas de alojamiento de la bisagra por el lado derecho e izquierdo de la puerta anterior
presionándolashacia abajo.
3. Vuelva ainstalar lapuertallevando acabo elprocedimientoa lainversa.
ES 40

EXTRACCIÓNY LIMPIEZADE LA PUERTADE VIDRIO
LOW-E
1. Abra lapuertadel horno.
2.3.4. Bloquee las bisagras, desenrosque los tornillos y extraiga la cubierta metálica superior tirando
hacia arriba.
5.6. Extraiga el vidrio con mucho cuidado de la contrapuerta del horno (N. B.: si se trata de un horno
pirolítico,extraigatambién el segundoy eltercer vidriosi los hubiera).
7. Al término de la limpieza o sustitución, vuelva a ensamblar las piezas en el orden opuesto a la
extracción.
En todoslos vidrios, laindicación ”Low-E” debe ser correctamente legibley estar ubicada a laizquierda
de la puerta, cerca de la bisagra lateral izquierda. De este modo, la etiqueta estampada en el primer
vidrio quedará porel interior dela puerta.
1.
5.
2.
3.
4.
6.
1
2
3
7.
ES 41

SUSTITUCIÓNDE LABOMBILLA
1. Desenchufe elhorno dela redeléctrica.
2. Suelte lacubierta de vidrio,desenrosquela bombillay sustitúyala poruna nuevadel mismomodelo.
3. Una vezsustituidala bombilladefectuosa,vuelva a atornillarla cubierta devidrio.
5. Solución de problemas
5.1 Preguntas más frecuentes
PROBLEMA CAUSA POSIBLE SOLUCIÓN
El horno no se calienta
El horno no se calienta
El horno no se calienta
El reloj no está en hora Configure el reloj
El bloqueo infantil está
activado
Los ajustes necesarios no
están configurados
Desactive el bloqueo infantil
Asegúrese de que los ajustes
necesarios sean correctos
ES 42

INSTALLATION
INSTALLATION DU FOUR
560 mm
560 mm
590 mm
EN
FR
Opening/Ouverture/
Apertura
460 mm x 15 mm
INSTALLAZIONE
INSTALACIÓN
560 mm
580 mm
IT
ES
595 mm
EN
If the furniture is coverage with a bottom at the back part,
provide an opening for the power supply cable.
FR
Si le fond du meuble est doté d’un panneau de
fermeture, prévoyez un orifice pour le passage du câble
d’alimentation.
560 mm x 45 mm
A
If the mounting of the plinth does not allow air
EN
A
circulation, to obtain the maximum performance of the
oven it is necessary to create an opening of 500x10mm or
the samesurface in5.000 mm2
Si le montage du socle ne permet pas la circulation
FR
A
d'air, pour obtenir la performance maximale du four, il est
nécessaire de créer une ouverture de 500x10mm ou la
même surface dans5.000 mm2
EN
If the oven does not have a cooling fan, create an opening
IT
Se il mobile ha un fondo posteriore, praticare un foro
per il passaggio del cavo di alimentazione.
ES
Si el mueble tiene panel posterior, haga un orificio para el
cable de alimentación.
A
circolazione dell'aria, per ottenere le massime prestazioni
del fornoè necessario creareun'apertura di500x10mm ola
stessasuperficie in5.000 mm2.
ES
A
aire, para obtener el máximo rendimiento del horno es
necesario crear una abertura de 500x10 mm o la misma
superficie en5.000 mm2.
460 mm x 15 mm
FR
Si le four n’a pas de ventilateur de refroidissement, créer une ouverture
460 mm x 15 mm
IT
Se il forno non dispone di una ventola di raffreddamento, lasciare uno
spazio 460 mm x 15 mm
ES
Si el horno no tiene ventilador de refrigeración, practique una abertura.
460 mm x 15 mm
546 mm
22 mm
Se il montaggio del plinto non consente la
IT
Si el montaje del zócalo no permite la circulación de
595 mm
mm
600
560
mm
560
mm
Opening/Ouverture/Apertura
560 mm x 45 mm
A

EN
The manufacturer willnot beresponsible forany inaccuracyresultingfrom printing ortranscript errorscontained inthis brochure.We
reserve theright tocarry out modificationsto productsas required,including the interestsof consumption, withoutprejudice tothe
characteristicsrelating tosafetyor function.
FR
Le constructeur décline toute responsabilité concernant d'éventuelles Inexacltudes Imputables à des erreurs d'impression ou de
transcriptioncontenue danscette notice. Le constructeurse réserve ledroit de modifier lesproduits encas de nécessité, mêmedans
l'intérêtde l'utilisation,sans causerde préjudicesaux caractéristiquesde fonctionnementde sécuritédes appareils.
IT
Il produttore declina ogniresponsabilità per inesattezze contenute nel documento stampato per erroridi trascrizionecontenuti ino
questa brochure. Inoltre, si riserva il diritto di apportare modifiche al prodotto, nell'interesse dei consumatori, senza alcun
pregiudizioper lasua sicurezza funzionalità.o
ES
El fabricante no se responsabiliza de las inexactitudes debidas a fallos de impresión o transcripción contenidos en este folleto. Nos
reservamos el derecho a modificar los productos como sea necesario, incluidos los intereses de consumo, sin perjuicio de las
característicasrelacionadas conla seguridad o sufuncionamiento.
42822184 • 55 gr- A5 • 11.2018 • Rev_C
 Loading...