

Candy FCP655XL, FCS625WXL User Manual
FORNI
ISTRUZIONI PER L'USO
02
IT
OVENS
USER INSTRUCTIONS
EN
PEĆNICE
KORIŠTENJE PRIRUČNIK
DE
PIEKARNIKI DO ZABUDOWY
INSTRUKJA OBS UGIŁ
PL
TROUBY
NÁVOD K OBSLUZE
CZ
PEČICE
NAVODILA ZA UPORABO
SL
OVEN
GEBRUIKSAANWIJZING
CANDY HOOVER GROUP S.R.L. • Via Privata Eden Fumagalli • 20047 Brugherio Milano Italy
BG
16
28
41
54
67
80

Indicazioni di Sicurezza
• ATTENZIONE: l'apparecchio e le parti accessibili diventano calde
durantel'uso. Prestareattenzionea non toccare le particalde.
• ATTENZIONE: le parti accessibili possono diventare molto calde
quando si utilizza il forno. I bambini devono essere tenuti a distanza di
sicurezza.
• L'apparecchio può essere usato da bambini dagli 8 anni in su e
persone con ridotte capacità fisiche, sensoriali o mentali o senza
esperienza e conoscenza del prodotto se supervisionate o dando loro
istruzioni riguardo alfunzionamento dell'apparecchio in manierasicura
e coscente del rischio possibile.
• I bambininondovrebberogiocare con l'apparecchio.
• La pulizia e la manutenzione non dovrebbero essere fatte da bambini
senzasupervisione
• Durante l’uso l’apparecchio diventa molto caldo. Si dovrebbe fare
attenzionea non toccaregli elementiriscaldanti all’interno del forno.
• ATTENZIONE: Le parti accessibili possono diventare molto calde
durantel’uso.I bambini dovrebbero essere tenuti a distanza.
• Non usare per la pulizia materiali ruvidi abrasivi o raschietti metallici
affilatiper pulire le portedi vetrodel forno dato che possono graffiare la
superficie e causarela frantumazionedel vetro.
• Spegnere il fornoprima di rimuoverelo schermo di protezionee, dopo
la pulizia, rimontarlo secondo le istruzioni.
• Usare solo la sondatermicaraccomandataper questo forno.
• Non utilizzareun pulitore a vapore.
• Collegare al cavo di alimentazione una spina dimensionata per la
tensione, la corrente e la potenza indicate nella targhetta e dotata del
contatto di terra. La presa deve essere dimensionata per la potenza
indicata sulla targhetta e deve avere il contatto di terra collegato e
funzionante. Il conduttore di terra è giallo-verde. Questa operazione
deve essere eseguita solo da un tecnico adeguatamente addestrato. In
caso di incompatibilità tra presa e spina dell'elettrodomestico,
richiedere ad un tecnico specializzato di sostituire la presa con un'altra
di tipo compatibile. La spina e la presa devono essere conformi alle
normative attuali del paese di installazione. Il collegamento alla rete di
IT 02

alimentazione può essere effettuato anche collocando un interruttore
automaticoonnipolare tra l'elettrodomesticoe larete di alimentazione,
in grado di supportare il carico massimo collegato, in linea con la
legislazione corrente. Il cavo di terra giallo-verde non deve essere
interrotto dall'interruttore automatico. La presa o l'interruttore
automatico onnipolare utilizzati per il collegamento devono essere
facilmente accessibili al momento del montaggio
dell'elettrodomestico.
• La disconnessione può essere eseguita con la spina accessibile o
aggiungendo un interruttore sul cablaggio fisso, nel rispetto delle
normativerelativeai cablaggi.
• Se il cavo di alimentazione si danneggia, deve essere sostituito con un
cavo o uno speciale fascio di cavi disponibile presso il produttore o
contattandoil repartoassistenzaal cliente.
• Il cavodi alimentazione deveessere di tipo H05V2V2-F.
• Il mancato rispetto di quanto indicato sopra può compromettere la
sicurezzadell'elettrodomestico e renderenulla la garanzia.
• Qualsiasi materiale fuoriuscito in eccesso deve essere tolto prima
della pulizia.
• Durante il processo di pulizia pirolitico, le superfici possono
surriscaldarsi più del normale: mantenere sempre i bambini a distanza
di sicurezza;
•L’elettrodomestico non deve essere installato dietro a una porta a
scopoornamentale per evitarne il surriscaldamento.
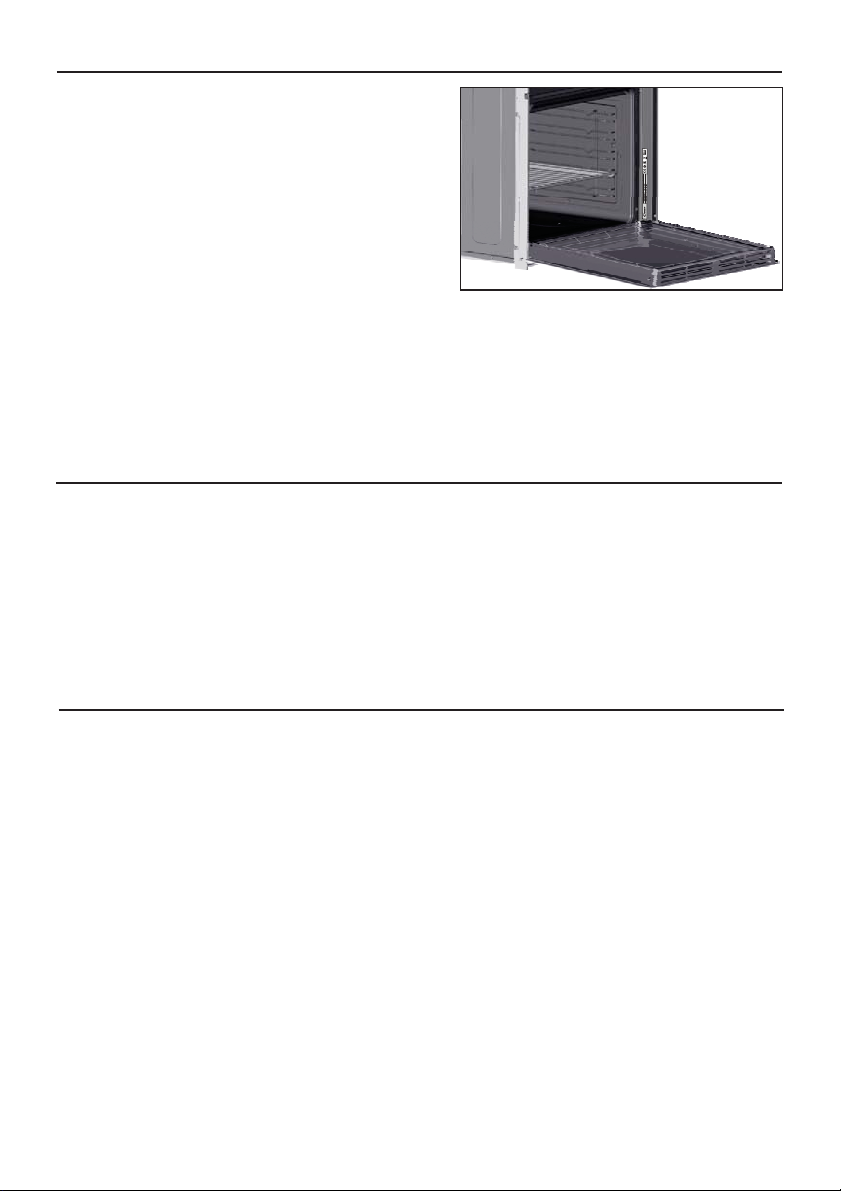
• Quando siposiziona uno scaffaleall’interno,accertarsiche il blocco sia
rivoltoversol’alto e nella parteposteriore della guida.
Lo scaffaledeve essereinserito completamente nella guida
• AVVERTENZA: Non rivestire le pareti del forno con pellicola di
alluminio o protezione monouso disponibili nei supermercati. La
pellicola di alluminio o le eventuali altre protezioni, trovandosi a diretto
contatto con lo smalto caldo, rischiano di fondersi e di danneggiare lo
smaltoche si trovaall'internodel forno.
• AVVERTENZA: Non toglieremai la guarnizione della porta del forno.
IT 03

Sommario
Avvertenze Generali
5
Descrizione del Prodotto
7
Utilizzo del Forno
8
Pulizia e Manutenzione del Forno
11
1.1 Suggerimenti sulla sicurezza
1.2 Sicurezza elettrica
1.3 Raccomandazioni
1.4 Installazione
1.5 Gestione dei rifiuti
1.6 Dichiarazione di conformità
2.1 Panoramica
2.2 Accessori
2.3 Primo utilizzo
3.1 Descrizione del display
3.2 Modalità di cottura
4.1. Note generiche di pulizia
Forno autopulente catalitico
4.2
4.3 Manutenzione
• Rimozione e pulizia delle griglie
• Rimozione dello sportello del forno
• Rimozione e pulizia della porta in
vetro
• Sostituzione della lampadina
Risoluzione dei problemi
15
5.1 F.A.Q.
IT 04
1. Avvertenze Generali
Vi ringraziamo per aver scelto uno dei nostri prodotti.
Per utilizzare il forno in modo ottimale è consigliabile
leggere con attenzione questo manuale e conservarlo
con cura per ogni ulteriore consultazione. Prima di
installare il forno, prendere nota del numero di serie in
modo da poterlo comunicarealpersonaledelserviziodi
assistenza in caso di richiesta di intervento. Dopo aver
rimosso il forno dall’imballaggio, verificare che non
abbia subito danni durante il trasporto. In caso di
dubbi, non utilizzare il fornoe richiederel’assistenzadi
un tecnico qualificato. Tenere tutto il materiale da
imballaggio (sacchetti di plastica, polistirolo, chiodi)
fuori dalla portata dei bambini. Alla prima accensione del forno può svilupparsi fumo di odore acre,
causatodal primo riscaldamento del collante dei pannellid’isolamento avvolgentiil forno: si trattadiun
fenomeno assolutamente normale e, in caso si verificasse, occorre attendere la cessazione del fumo
prima di introdurre le vivande. Il produttore declina ogni responsabilità in caso di mancata osservanza
delle istruzionicontenuteinquesto documento.
NOTA: le funzioni, le proprietà e gli accessori dei forni citati in questo manuale possono variare a
secondadeimodelli.
1.1 Suggerimenti sulla Sicurezza
Utilizzare il forno solo per lo scopo per cui è stato progettato, ossia solo per la cottura di alimenti;
qualsiasi altro utilizzo, ad esempio come fonte di riscaldamento, è considerato improprio e quindi
pericoloso. Il costruttore non può essere considerato responsabile per eventuali danni derivanti da usi
impropri,erroneiedirragionevoli.
L’usodiunqualsiasiapparecchioelettricocomporta l’osservanzadi alcuneregolefondamentali:
- non tirareilcavo di alimentazioneperstaccare la spina dellapresadicorrente;
- non toccarel’apparecchioconmani opiedibagnatioumidi;
- in generaleèsconsigliabilel’usodi adattatori,presemultipleeprolunghe;
- in casodiguastoe/ocattivofunzionamentodell’apparecchio, spegnerloenonmanometterlo.
1.2 Sicurezza Elettrica
FAREEFFETTUAREI COLLEGAMENTIELETTRICIADUN’ELETTRICISTA O TECNICOQUALIFICATO.
La rete di alimentazione a cui viene collegato il forno deve essere conforme con le normative in vigore
nel paese di installazione. Il produttore declina ogni responsabilità per eventuali danni derivanti dalla
mancata osservanza di tali disposizioni. Il forno deve essere collegato alla rete elettrica tramite una
presa a muro con messa a terra o tramite un sezionatore con più poli, a seconda delle disposizioni in
vigorenelpaese di installazione.Lareteelettricadeve essereprotetta mediante fusibili idonei e devono
essere utilizzati cavi con una sezione trasversale idonea a garantire una corretta alimentazione del
forno.
COLLEGAMENTO
Il fornoviene fornitoconuncavodi alimentazionechedeveesserecollegatosoloa una reteelettricacon
una tensionedi230 VCAtrale fasi o trala fase e ilneutro.Prima di collegare il forno alla rete elettrica, è
indispensabile controllare:
- la tensionedialimentazioneindicata sul misuratore;
- l’impostazionedelsezionatore.
Il filo di messa a terra collegato al morsetto di terra del forno deve essere collegato al morsetto di terra
della reteelettrica.
ATTENZIONE
Prima di collegare il forno alla rete elettrica, far controllare la continuità della messa a terra della rete
elettrica ad unelettricista qualificato. Il produttoredeclina ogni responsabilità per eventuali incidenti o
altri problemi derivanti dal mancato collegamento a terra del forno o dal suo collegamento ad una
IT 05
messa a terraconunacontinuità difettosa.
NOTA: poiché il forno potrebbe richiedere interventi di assistenza, è consigliabile prevedere la
disponibilità di un’ulteriorepresaamuroacuicollegareilfornodopocheèstatorimossodallo spazio in
cui è stato installato. Il cavo di alimentazione deve essere sostituito solo dal personale dell’assistenza
tecnicaodatecniciconqualificheanaloghe.
1.3 Raccomandazioni
Dopo l’uso sono sufficienti alcune semplici operazioni di pulizia per mantenere il forno perfettamente
pulito. Non rivestire le pareti del forno con fogli d’alluminio da cucina o fogli monouso commerciali,
perché potrebbero fondersi a contatto con le superfici in smalto caldo e danneggiare le superfici in
smalto all’internodel forno. Perevitare di sporcare eccessivamente il forno e prevenire la diffusione di
fumo maleodorante, è consigliabile non utilizzare il forno a temperature molto alte. E’ generalmente
preferibile imposta- re un tempo dicotturapiù lungoe utilizzare unatemperatura più bassa. Oltreagli
accessori forniticonilforno, è consigliabileutilizzarepiattieteglieresistentialle altetemperature.
1.4 Installazione
Il produttore non è obbligato ad occuparsi dell’installazione. Gli eventuali interventi di assistenza,
necessari per correggere problemi dovuti ad un’errata installazione, non sono coperti da garanzia.
L’installazione deve essere effettuata da un tecnico qualificato e in conformità con queste istruzio- ni.
Un’installazione impropria potrebbe causare infortuni allepersone, agli animali domestici o danni alle
attrezzature. Ilproduttore declinaogni responsabilità pereventuali lesioni odanni dovuti ad un’errata
installazione.
Il forno può essere installatosopraunacolonna o sotto a unpianodilavoro. Prima di fissare in posizione
il forno, verificare chelo spazio attorno allostesso sia sufficientea garantirela circolazione delflusso di
aria fresco necessario a garantire il raffreddamento del forno e la sicurezza dei componenti interni.
Realizzareleapertureindicate nell’ultima paginadelmanuale,asecondadel tipo di installazione.
1.5 Gestione dei rifiuti e rispetto dell’ambiente
Questo apparecchio è contrassegnato in conformità alla Direttiva europea 2012/19/EU
sulle apparecchiature elettriche ed elettroniche (WEEE). I WEEE contengono sia sostanze
inquinanti (che possono provocare conseguenze negative sull’ambiente) che componenti
di base (che possono essere riutilizzati). E’ importante che i WEEE siano soggetti a
trattamenti specifici per rimuovere e smaltire correttamente tutti gli inquinanti e
recuperare tutti i materiali. I singoli possono giocare un ruolo importante nell’assicurare
base:
- i WEEE non devonoesseretrattaticomerifiutidomestici;
- i WEEE devonoessereportatiaipunti diraccolta appositi gestitidalcomuneodasocietàregistrate.
In molti paesi, per i WEEE di grandi dimensioni, potrebbe essere presente la raccolta domestica.
Quando si acquista unnuovo apparecchio, quello vecchio potrebbe essererestituitoal rivenditore che
deve acquisirlo gratuitamente su base singola, sempre che l’apparecchio sia del tipo equivalente e
abbia le stessefunzionidiquelloacquistato.
che i WEEE non diventino un problema ambientale; è essenziale seguire alcune regole di
RISPARMIARE E RISPETTAREL’AMBIENTE
Ove possibile, evitare di pre-riscaldare il forno e cercare sempre di riempirlo. Aprire la porta del forno
quanto necessario, perché vi sono dispersioni di calore ogni volta che viene aperta. Per risparmiare
molta energia sarà sufficientespegnere il forno dai 5 ai10 minutiprima della fine del tempo di cottura
pianificato,e servirsi del calore cheilfornocontinuaa generare.Tenerele guarnizioni pulite einordine,
per evitare eventuali dispersioni di energia. Se si dispone di un contratto di energia elettrica a tariffa
oraria, il programma “cottura ritardata” renderà più semplice il risparmio spostando l’avvio del
programmaneglioraria tariffaridotta.
IT 06
1.6 Dichiarazione di conformità
Tutti i componenti di questo elettrodomestico destinati a venire a contatto con gli alimenti sono
conformiconledisposizionidellaDirettivaCEE89/109.
Apponendo la marcatura su questo prodotto, dichiariamo, sotto la nostra responsabilità, di
ottemperare a tutti i requisiti relativi alla tutela di sicurezza, salute e ambiente previsti dalla
legislazione europeainessereperquestoprodotto.
2. Descrizione del Prodotto
2.1 Panoramica
1
1. Pannello di controllo
2. Posizioni ripiani (castelletto se previsto)
3
5
4
2
3. Griglia metallica
4. Leccarda
5. Ventola (dietro alla piastra di acciaio)
6. Porta forno
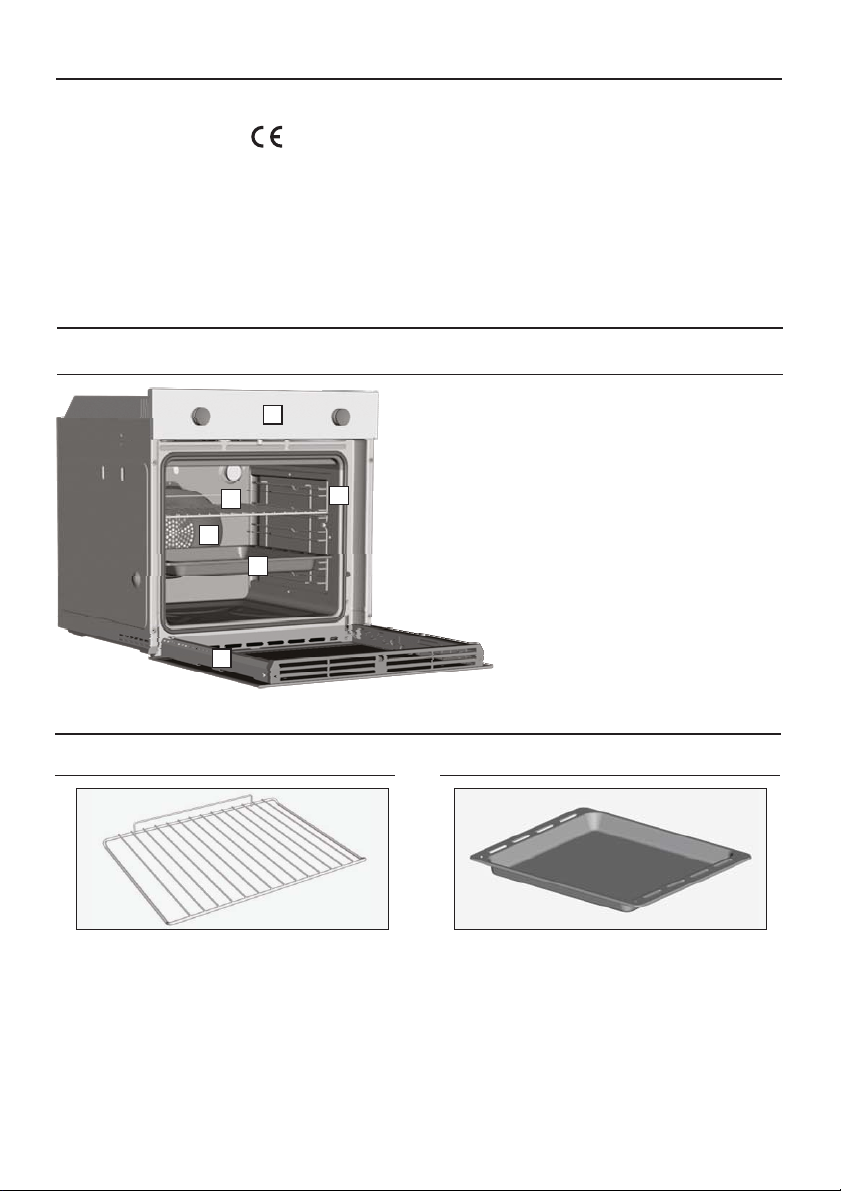
2.2
Griglia metallica
1
Sostiene teglie e piatti.
6
2
Leccarda
Raccoglie i residui che gocciolano durante la
cotturadialimenticoni grill.
IT 07
2.3 Primo utilizzo
PULIZIA PRELIMINARE
Pulire sempre il forno prima di utilizzarlo per la prima volta. Pulire le superfici esterne con un panno
morbido leggermente inumidito.
Lavare tutti gli accessori e pulire l’interno del forno con del detergente per piatti ed acqua calda.
Verificareche il fornosiavuoto,impostare la temperaturamassimaelasciarloaccesoper almeno 1 ora,
cosìdarimuovere tuttigliodorinormalmentepresentinei forninuovi.
3. Utilizzo del Forno
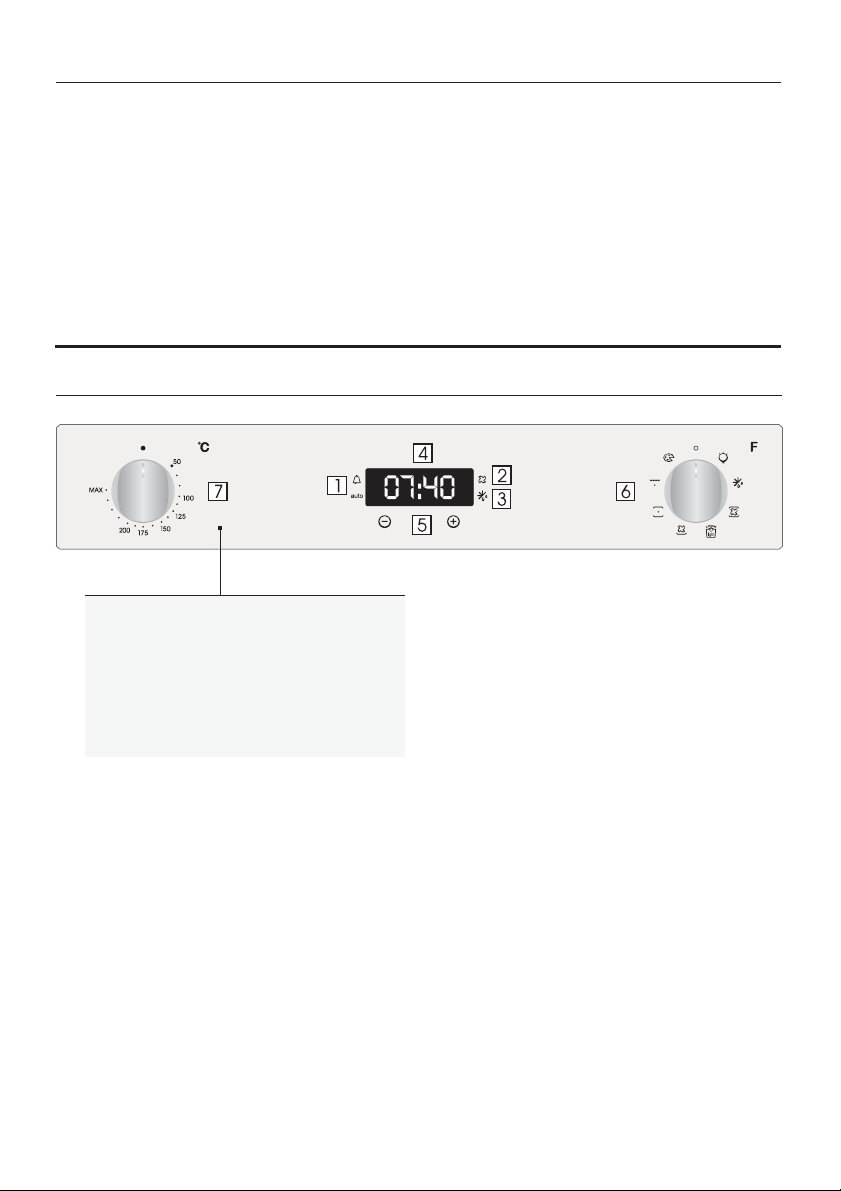
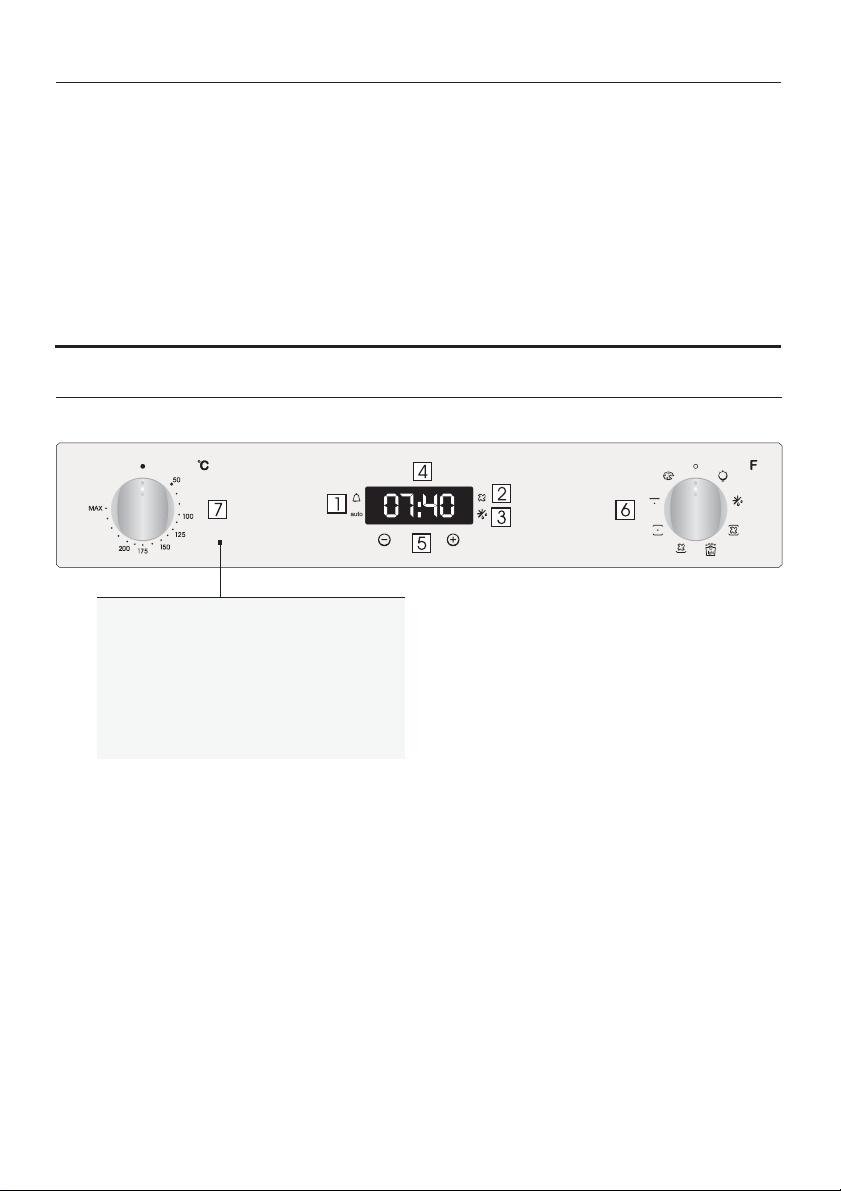
3.1 Descrizione del display
1. Timer/Modalità automatica
2. Funzione con ventola
3. Modalità scongelamento
4. Display per temperatura o orologio
5. Bottoni di regolazione
6. Manopola di selezione funzione
7. Manopola di selezione programmatore
ATTENZIONE!
La prima operazione dafaredopo l’installazione o
dopo l’interruzione di corrente è la regolazione
dell’ora (situazioni di questo tipo possono essere
riconosciute in quanto il display è acceso e
lampeggia 12:00).
200°-> IlLed “°” dellatemperaturalampeggia fino
a quando la temperatura visualizzata non è stata
raggiunta.
HOT -> Quando un programma èfinito, se il forno
è ancora caldo, il display mostra “HOT”, in
alternanza con il tempo, anche se le manopole
sono posizionate su OFF.
IT 08

FUNZIONE
BLOCCO
BAMBINO
CONTAMINUTI
DURATA
COTTURA
FINE
COTTURA
•Tenere premuto per 5
secondi il tasto (+), Da
questo momento lo
schermo visualizza
alternativamente “STOP”
e il tempo preimpostato.
•Premere il tasto
centrale 1 volta.
•Premere i tasti "- " "+"
per regolare la durata
•Lasciare i tasti
•Premere il tasto
centrale 2 volte
•Premere i tasti "- "
"+"per regolare la durata
•Lasciare i tasti
•Selezionare la funzione
di cottura con la
manopola commutatore.
•Premere il tasto
centrale 3 volte
•Premere i tasti "- " "+"
per regolare l’ora di fine
cottura
•Lasciare i tasti
•Selezionare la unzione
di cottura con la
manopola commutatore
COME SI SPEGNE COSA FA A COSA SERVECOME SI ATTIVA
•Tenere premuto per 5
secondi il tasto (+). Da
questo momento tutle le
funzioni sono riabilitate.
•Al termine della durata
impostata la funzione si
spegne da sola ed avvisa
con un segnale sonoro (il
segnale sonoro si ferma
da solo; per fermarlo
subito premere il tasto)
SELECT.
•Al termine della durata
impostata il forno si
spegne da solo; se deve
essere fermato prima si
deve portare la
manopola
commutatore in
posizione O oppure
portare a 0:00 la durata
della cottura (tasti
SELECT e "- " "+")
•All’ora impostata il
forno si spegne da solo;
se deve essere fermato
prima è necessario
portare la manopola
commutatore
in posizione O.
•Da un segnale sonoro al
termine di un tempo
stabilito
•Durante il funzionamento
il display visualizza il
tempo rimanente.
•Permette di impostare la
durata della cottura del
cibo inserito nel forno
•Per visualizzare il tempo
rimanente premere il
tasto SELECT.
•Per modificare il tempo
rimanente premere tasto
SELECT +"- " "+"
•Permette di
memorizzare l’ora di fine
cottura
•Per visualizzare l’ora
programmata premere il
tasto centrale 3 volte
•Per modificare l’ora
programmata premere i
tasti SELECT + "- " "+"
•Permette di utilizzare il
programmatore del forno
come una sveglia (può
essere usato con forno
funzionante o spento.
•Per interrompere il segnale
premere un tasto qualsiasi.
Premere il tasto centrale per
tornare alla funzione
orologio.
•Tipicamente si utilizza
questa funzione con la
funzione DURATA
COTTURA–ad esempio il cibo
esiderato deve cuocere per
45 minuti e desidero che sia
pronto per le ore 12:30; in
tal caso:
•Al termine della durata
impostata il forno si spegne
automaticamente ed avvisa
con un segnale sonoro.
Selezionare la funzione di
cottura desiderata Impostare
la durata cottura a 45 minuti
( "- " "+") Impostare la fine
cottura alle ore 12:30 ( "- "
"+" ) La cottura avrà automaticamente inizio alle
11:45 (12:30 meno 45
minuti), all’ora impostata
come fine cottura il forno si
spegne automaticamente.
ATTENZIONE: impostando
solo la fine cottura e non la
durata della cottura, il forno
si accenderà subito e si
spegnerà all’ora di fine
cottura impostata.
IT 09
3.2 Modalità di cottura
Manopola
commuta-
tore
*
Intervallo
di T°
40 ÷ 40
50 ÷ 240
50 ÷ 240
50 ÷ 230
50 ÷ 230
50 ÷ 280
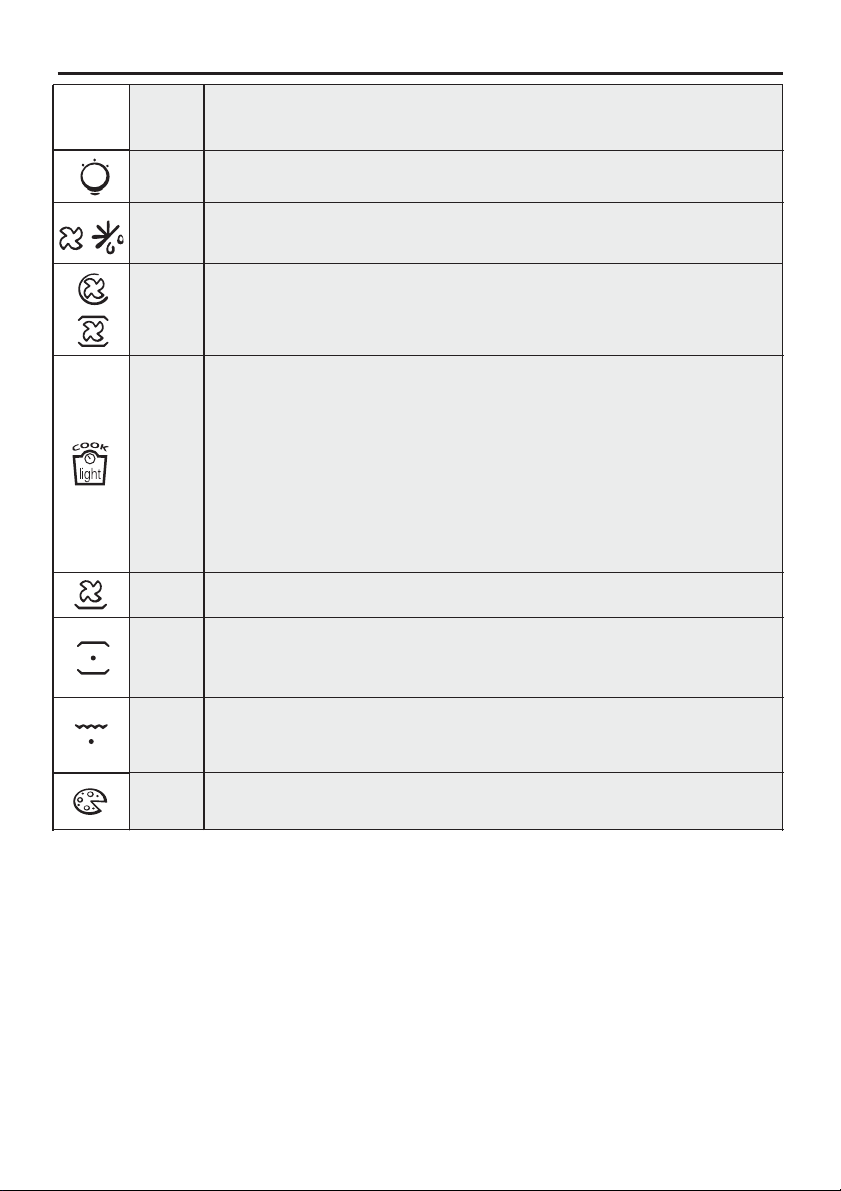
Funzione (a seconda del modello)
LAMPADA: accende la luce interna.
SCONGELAMENTO: questa posizione permette di far circolare l’aria a temperatura
ambiente intorno al cibo surgelato facendolo così scongelare in pochi minuti senza
modificareodalterareilcontenutoproteico.
FORNO VENTILATO: l’aria calda viene ripartita sui diversi ripiani. E’ ideale per cuocere
contemporaneamente diversi tipi di cibo (carne, pesce), senza miscelare sapori e odori.
Cotturadelicata -indicataper pandispagna, torte Margherita,pasta sfoglia,ecc...
La funzione consente di cucinare in modo leggeroriducendo l'utilizzo dei“”COOK LIGHT
grassi. Grazie ad una combinazione del grill e della ventola, associate ad un ciclo di
pulsazione dell'aria, è possibile conservare l'umidità dei cibi, grigliare la superficie e
garantireuna cotturarapida delle pietanzeutilizzando pochicondimenti,senza rinunciare
al sapore.
È particolarmente indicata per verdure, frittate e carni. Il ciclo di aria pulsata mantiene
l'umidità dei cibi, ne conserva le proprietà nutritive e garantisce una cottura rapida e
omogenea.
Provatetuttelevostrericette riducendo la quantitàdicondimentochedi solito utilizzate
e provatela leggerezzadi questanuovafunzione!
SUOLA VENTİLATA: adattaper cotturedelicate (torte-soufflè).
CONVEZIONE NATURALE: sono in funzione leresistenze superioreeinferiore.Èla cottura
tradizionale, ottimaper arrostire cosciotti, selvaggina, idealeper biscotti, mele al fornoe
per rendereicibi moltocroccanti.
GRILL: Grigliatura tradizionale a porta chiusa: con questa funzione viene inserita la
L1 ÷ L5
50 ÷ 230
* Programma di prova secondo CENELEC EN 60350-1
** Programma di prova secondo CENELEC EN 60350-1 utilizzato per la definizione della classe energetica.
resistenza del grill. Ottima nella cottura di carni di medio e piccolo spessore (salsicce,
costine,bacon).
PIZZA: Ilcaloreavvolgente inquestafunzione ricrea un ambiente similea quello deiforni
a legnadipizzeria.
IT 10

4. Pulizia e manutenzione del forno
4.1 Note generiche di pulizia
La vita di serviziodell’apparecchio siallungasequestoviene pulito ad intervalli regolari. Attenderecheil
forno si raffreddi prima di effettuare le operazioni di pulizia manuali. Non utilizzare mai detergenti
abrasivi, pagliette di ferroo oggetti appuntiti per lapulizia,pernon danneggiare in modoirreparabilele
parti smaltate.Utilizzare soloacqua,saponeodetergentia basedicandeggina(ammoniaca).
PARTI IN VETRO
E’ consigliabile pulire lo sportello in vetro con carta assorbente da cucina dopo ogni utilizzo del forno.
Per rimuovere le macchiepiù ostinate, è possibile anche utilizzare una spugna imbevuta di detergente
ben strizzataesciacquare con acqua.
GUARNIZIONEDELLOSPORTELLODEL FORNO
Se sporca,laguarnizionepuòesserepulitacon unaspugnaleggermenteinumidita.
ACCESSORI
Pulire gli accessori con una spugna imbevuta con acqua e sapone, sciacquarli e asciugarli : evitare di
usaredetergenti abrasivi.
VASCHETTA DIGOCCIOLAMENTO
Dopo l’uso del grill,rimuoverelavaschetta dalforno.Versare il grasso caldo in uncontenitore e lavarela
vaschettainacquacalda,utilizzando unaspugnaedeldetergenteperpiatti.
Se rimangono dei residui di grasso, immergere la vaschetta in acqua e detergente. In alternativa, è
possibile anche lavare la vaschetta nella lavastoviglie oppure utilizzare un detergente per forni di tipo
commerciale.Nonreinseriremaiunavaschettasporcanelforno.
4.2 Forno autopulente catalitico
Speciali pannelli autopulenti ricoperti da uno smalto a struttura microporosa, offerti come accessori
opzionalipertuttiimodelli,eliminanolapuliziamanualedelforno.
I grassi proiettati sulle pareti durante la cottura, vengono decomposti dallo smalto, mediante un
processocataliticodi ossidazioneetrasformatiinprodottigassosi.
Schizzi eccessivi di grasso possono ostruire i pori e quindiimpedire l’autopulizia. Tale caratteristica può
essere ripristinata mediante un riscaldamento per circa 10-20 minuti del forno vuoto impostando la
manopola fornoincorrispondenzadella massimatemperatura.
Non usare prodotti abrasivi, pagliette metalliche, oggetti appuntiti, panni ruvidi, prodotti chimici o
detersivichepossonodanneggiareirrimediabilmentelo smalto.
Si consigliainoltre di utilizzare pentole abordi alti nel caso dicotturedi vivande particolarmente grasse
(arrosti,ecc.)ediusarelaleccarda quando si esegue la cotturaalgrill.
Qualora, per particolari condizioni di sporco, non fosse sufficiente l’azione precedente, si consiglia di
intervenireasportandoigrassi conunpannomorbidoodunaspugnainumiditiconacquacalda.
La porositàdellosmaltoèfondamentalepergarantirel’azioneautopulente.
N.B.: Tutti i pannelli autopulenti in commercio hanno un’efficacia di rendimento di circa 300 ore di
funzionamentoforno.Dopotalelimite ipannellidovrebbero esseresostituiti.
IT 11
4.3 Manutenzione
RIMOZIONEEPULIZIADELLEGRIGLIE
1. Svitareinsensoantiorario i dadi zigrinati.
2. Rimuoverelegriglietirandoleverso sestessi.
3. Pulirelegriglielavandolein lavastoviglie o conunaspugnabagnataeasciugandole subito dopo.
4. Dopo averpulitolegriglie,installarlenuovamente, fissandoi dadizigrinati.
A
RIMOZIONEDELLOSPORTELLODELFORNO
1. Aprirelosportelloanteriore.
2. Aprire i morsetti dell’alloggiamento della cernierasul lato destro e sinistro dellosportello anteriore,
premendoliversoilbasso.
3. Installarenuovamentelosportelloeseguendolaproceduraall’inverso.
IT 12
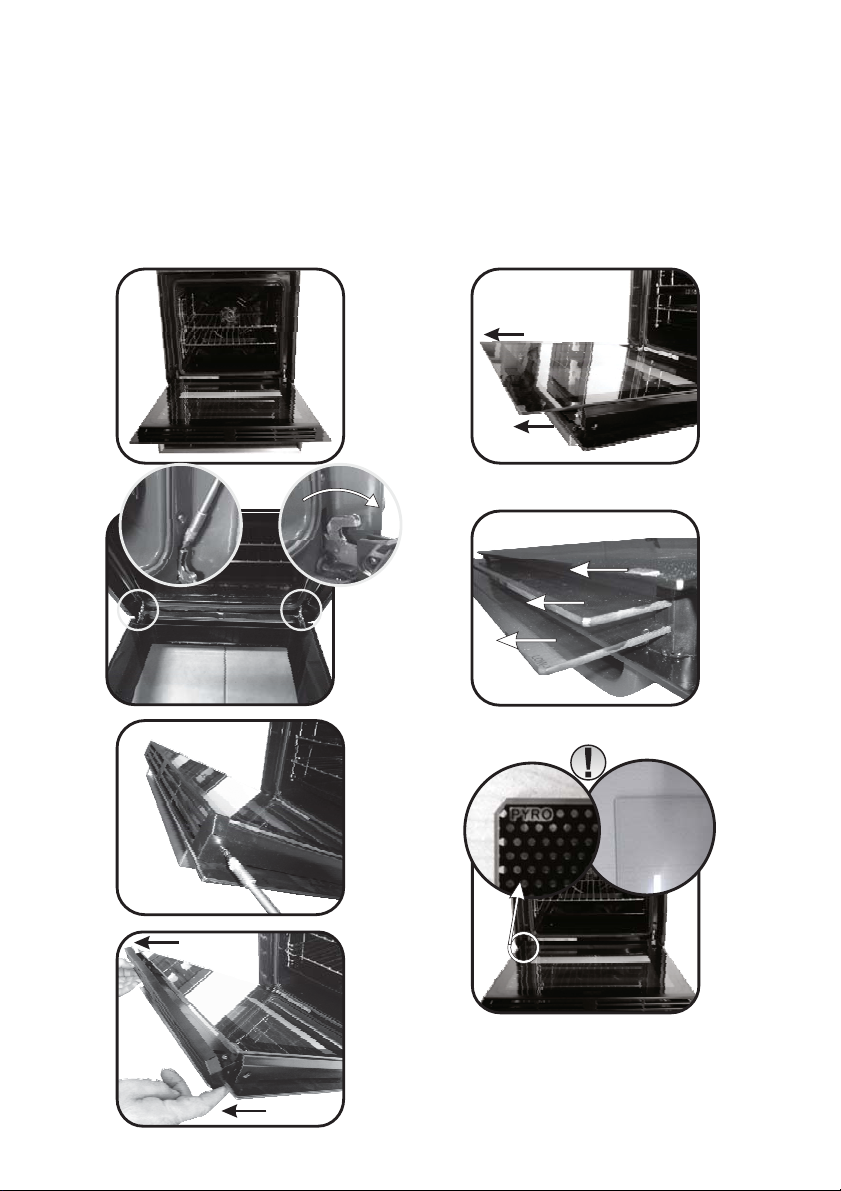
RIMOZIONEEPULIZIADELLAPORTA INVETRO
LOW-E
1. Aprile la portadelforno.
2.3.4. Bloccare le cerniere, rimuovere le viti e rimuovere la copertura metallica superiore tirandola
versol’alto.
5.6. Rimuovere il vetro, estraendolo con moltacura, dalla controporta del forno (NB: nei forni pirolitici,
rimuovereancheilsecondoeterzo vetro(sepresente)).
7. Al terminedellapuliziaosostituzioneriassemblarelepartinell’ordine oppostoalla rimozione.
Su tutti i vetri, l’indicazione ”Low-E” deve essere correttamenteleggibile e posizionata sul lato sinistro
della porta, vicino alla cerniera laterale sinistra. In questo modo, l’etichetta stampata del primo vetro
rimarràinternaallaporta.
1.
5.
2.
3.
4.
6.
1
2
3
7.
IT 13
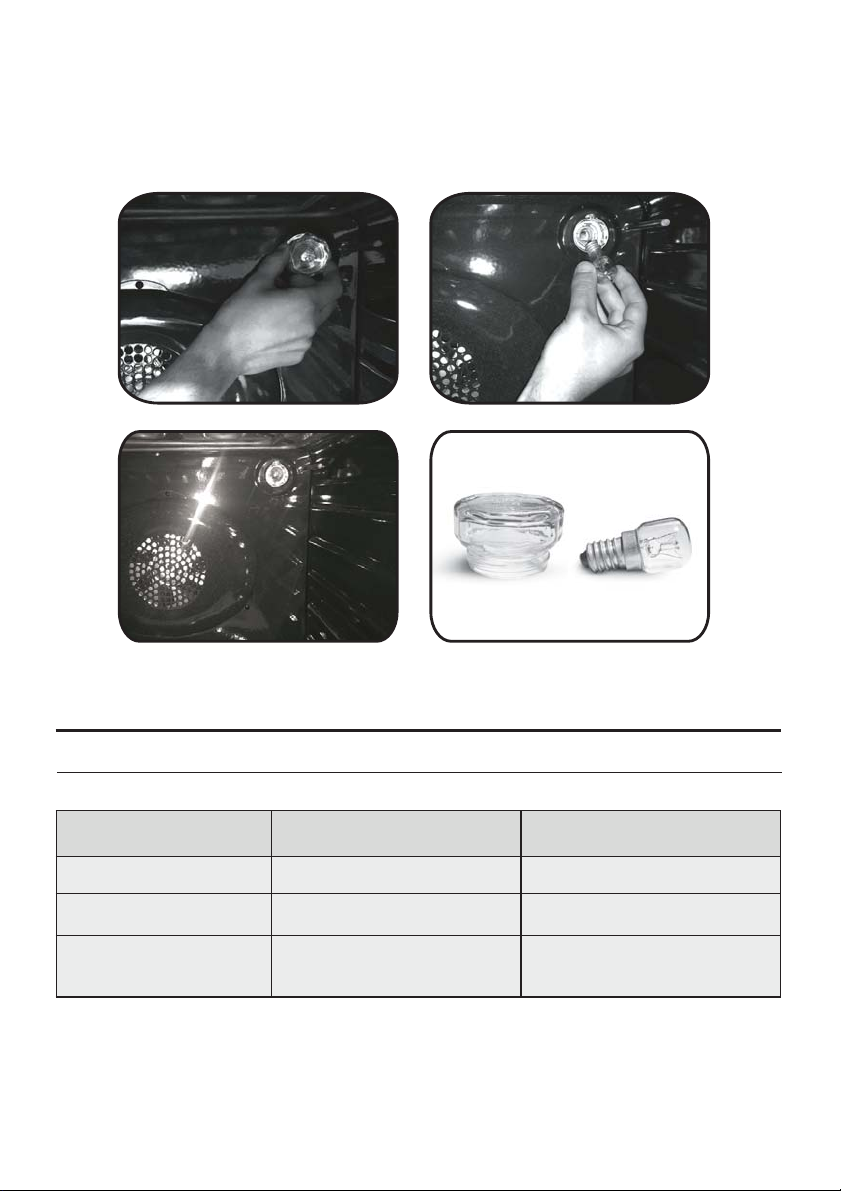
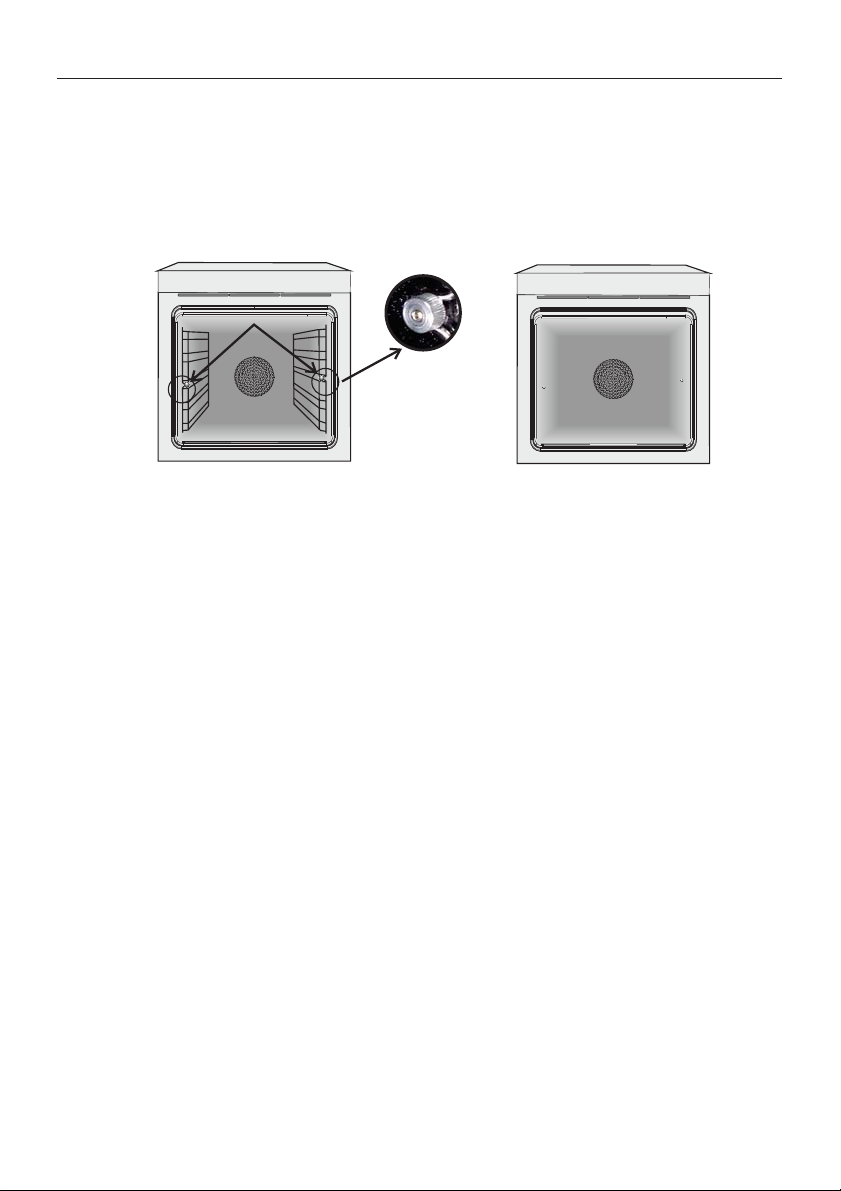
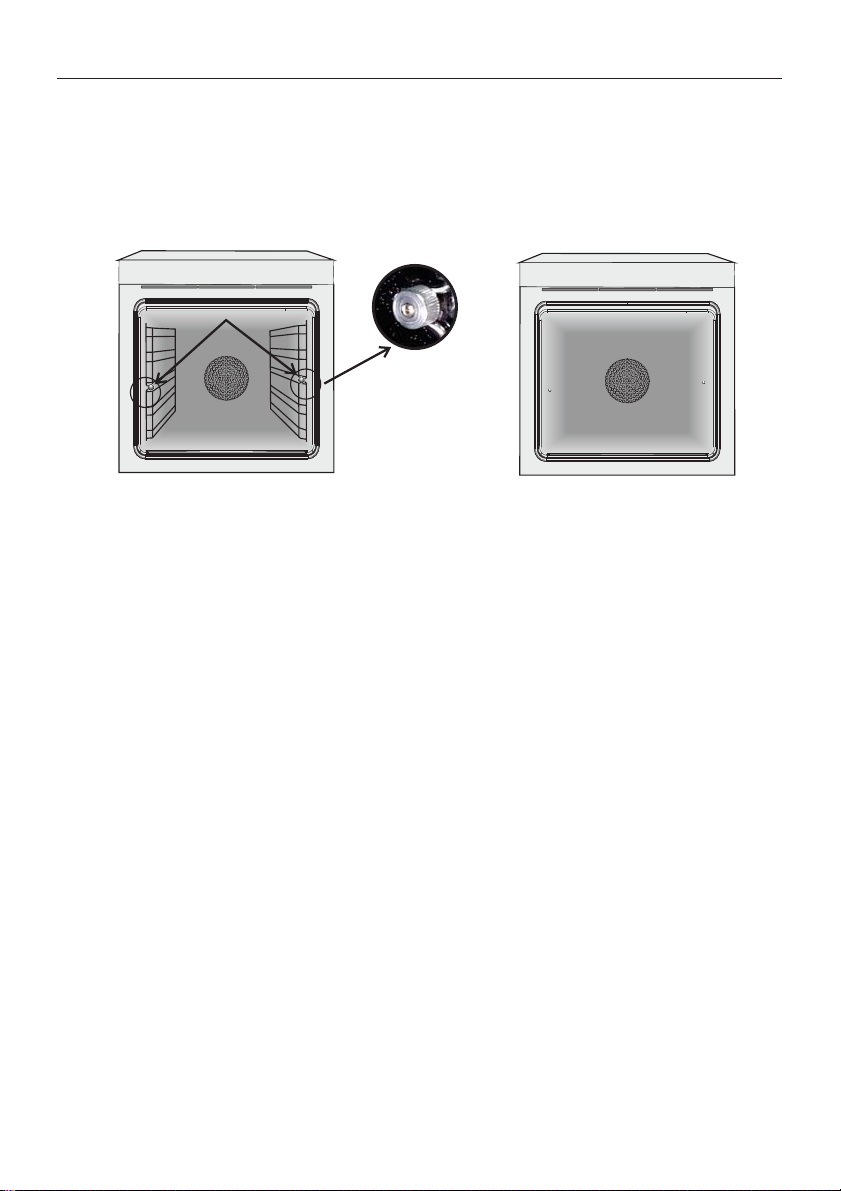
SOSTITUZIONEDELLALAMPADINA
1. Scollegareilfornoalla rete.
2. Allentarelacoperturain vetro, svitarelalampadinaesostituirlacon unanuovadellostesso modello.
3. Una voltasostituitalalampadinadifettosa,riavvitarelacoperturainvetro.
5. Risoluzione dei Problemi
5.1 FAQ
PROBLEMA POSSIBILE CAUSA SOLUZIONE
Il forno non si scalda
Il forno non si scalda
Il forno non si scalda
L’orologio non è impostato
Il blocco bambini è attivo
Le regolazioni necessarie
non sono impostate
IT 14
Impostare l’orologio
Disattivare il blocco bambini
Assicurarsi che le impostazioni
necessarie siano corrette

Safety Indications
• WARNING: the appliance and accessible parts become hot during use.
Be careful not to touch anyhot parts.
•WARNING:the accessible parts canbecome hot whenthe ovenis in use.
Childrenmust be kept at a safedistance.
•WARNING: ensure that the appliance is switched off before replacing
the bulb, to avoid the possibility of electric shocks.
•WARNING:before initiating the automatic cleaning cycle:
- Clean theovendoor;
- Remove largeor coarse food residuesfrom the inside ofthe ovenusing a
damp sponge. Do not usedetergents;
- Remove all accessoriesandthe sliding rack kit (where present);
- Do notplacetea towels
• In ovens with meat probe it is necessary, before making the cleaning
cycle, close thehole with the nutprovided. Always close thehole with the
nut when the meatprobe is notused.
•Children under 8 must be kept at a safe distance from the appliance if
not continuously supervised.
•Children must notplay with theappliance. The appliance can be usedby
those aged 8 or over and by those with limited physical, sensorial or
mental capacities, without experience or knowledge of the product, only
if supervised or provided with instruction as to the operation of the
appliance, in a safewaywith awareness of thepossible risks.
•Cleaning and maintenance should not be carried out by unsupervised
children.
•Do not use rough or abrasive materials or sharp metal scrapers to clean
the oven door glasses, as they can scratchthe surface and cause the glass
toshatter.
•The oven must be switched off before removing the removable parts
and, after cleaning, reassemble them according the instructions.
•Only use themeatprobe recommended for this oven.
•Do not use a steam cleaner forcleaning operations.
• Connect a plug to the supply cable that is able to bear the voltage,
current and load indicated on the tag and having the earth contact. The
socket must be suitable for the load indicated on the tag and must be
EN 15

having the earth contact connected and in operation. The earth
conductor is yellow-green in colour. This operation should be carried out
by a suitably qualified professional.In case of incompatibility betweenthe
socket and the appliance plug, ask a qualified electrician to substitute the
socket with another suitable type. The plug and the socket must be
conformed to the current norms of the installation country. Connection
to the power source can also be made by placing an omnipolar breaker
between the applianceand the powersource that can bear themaximum
connected load and that is in line with current legislation. The yellowgreen earth cable should not be interrupted by the breaker. Thesocket or
omnipolar breaker used for the connection should be easily accessible
when the appliance is installed.
•The disconnection may be achieved by having the plug accessible or by
incorporating a switch in the fixed wiring in accordance with the wiring
rules.
•If the power cable is damaged, it must be substituted with a cable or
special bundle available from the manufacturer or by contacting the
customerservice department.
•The type ofpowercable must be H05V2V2-F.
•Failure to comply with the above can compromise the safety of the
appliance and invalidatethe guarantee.
•Anyexcessof spilled material should be removedbeforecleaning.
•During the pyrolytic cleaning process, surfaces can heat up more than
usual, children mustthereforebe kept at a safe distance.
•The appliance must not beinstalled behind a decorative door inorder to
avoidoverheating.
•When you place the shelf inside, make sure that the stop is directed
upwardsand in thebackof the cavity.
The shelf mustbe inserted completely into the cavity
•WARNING: Do not line the oven walls with aluminum foil or single-use
protection available from stores. Aluminum foil or any other protection,
in direct contact with the hot enamel, risk melting and deteriorating the
enamel of the insides.
•WARNING:Neverremove the oven door seal.
EN 16

Summary
General Instructions
18
Product Description
20
Use of the Oven
21
Oven Cleaning and Maintenance
24
1.1 Safety indications
1.2 Electrical safety
1.3 Recommendations
1.4 Installation
1.5 Waste management
1.6 Conformity declaration
2.1 Overview
2.2 Accessories
2.3 First use
3.1 Display description
3.2 Cooking modes
4.1 General notes on cleaning
4.2 Self-cleaning oven with catalytic
4.3 Maintenance
• Removal and cleaning of grills
• Removal of the oven window
• Removal and cleaning of the glass
door
• Changing the bulb
Troubleshooting
27
5.1 F.A.Q.
EN 17

1. General Instructions
We thank youforchoosing oneof our products.For the
best results with your oven, you should read this
manual carefully and retain it for future reference.
Before installing the oven, take note of the serial
number so that you cangive itto customer servicestaff
if any repairs are required. Having removed the oven
from itspackaging, check that it has not been damaged
during transportation. If you have doubts, do not use
the oven and refer to a qualified technician for advice.
Keep all of the packaging material (plastic bags,
polystyrene, nails) out of the reach of children. When
the oven is switched on for the first time, strong
smelling smoke can develop,which is caused bythe glue onthe insulation panelssurroundingthe oven
heating for the first time. This is absolutely normal and, if it occurs, you should wait for the smoke to
dissipate before putting food in the oven. The manufacturer accepts no responsibility in cases where
the instructionscontainedinthisdocumentare notobserved.
NOTE: the oven functions, properties and accessories cited in this manual will vary, depending on the
model youhavepurchased.
1.1 Safety Indications
Only use the oven for its intended purpose, that is only for the cooking of foods; any other use, for
example as a heat source, is considered improper and therefore dangerous. The manufacturer cannot
be held responsibleforanydamage resultingfromimproper,incorrector unreasonableusage.
The use of anyelectricalapplianceimpliestheobservanceofsomefundamental rules:
- do not pull on the powercabletodisconnecttheplugfrom the socket;
- do not touchtheappliancewithwetordamphandsorfeet;
- in generaltheuseofadaptors,multiple socketsandextension cablesisnotrecommended;
- in caseofmalfunctionand/orpooroperation,switch offtheapplianceanddonot tamperwithit.
1.2 Electrical Safety
ENSURE THAT AN ELECTRICIANOR QUALIFIED TECHNICIANMAKES THE ELECTRICAL CONNECTIONS.
The powersupply to whichthe oven isconnected must conform with thelaws in force inthe country of
installation.Themanufacturer accepts no responsibilityforanydamagecaused bythefailureto observe
these instructions. The ovenmust beconnected to an electrical supply with an earthed wall outlet or a
disconnector with multiple poles, depending on the laws in force in the country of installation. The
electrical supply should be protected with suitable fuses and the cables used must have a transverse
section thatcanensurecorrectsupply totheoven.
CONNECTION
The ovenis supplied witha power cable thatshould only beconnected to an electricalsupply with 220240 Vac 50 Hz power between the phases or between the phase and neutral. Before the oven is
connectedtotheelectricalsupply, itisimportantto check:
- powervoltageindicated on the gauge;
- the settingofthedisconnector.
The groundingwireconnected to theoven's earth terminal mustbe connected to theearth terminal of
the powersupply.
WARNING
Beforeconnectingtheoventothepowersupply, ask a qualified electrician to check the continuity of the
power supply's earth terminal. The manufacturer accepts no responsibility for any accidents or other
problems caused by failure to connect the oven to theearthterminalorby an earth connectionthathas
defectivecontinuity.
EN 18
NOTE: as theovencouldrequiremaintenancework,itis advisable to keep another wall socket available
so that the oven can be connected to this if it is removed from the space in which it is installed. The
power cable must only be substituted by technical service staff or by technicians with equivalent
qualifications.
1.3 Recommendations
Aftereachuseoftheoven,aminimumofcleaningwillhelpkeepthe ovenperfectly clean.
Do not linethe ovenwallswithaluminium foilorsingle-use protectionavailablefromstores.Aluminium
foil or any other protection, in direct contact with the hot enamel, risks melting and deteriorating the
enamel of the insides. In order to prevent excessive dirtying of your oven and the resulting strong
smokey smells, we recommend not using the oven at very high temperature. It is better to extend the
cooking time and lower the temperature a little. In addition to the accessories supplied with the oven,
weadviseyouonlyusedishesandbakingmouldsresistanttoveryhightemperatures.
1.4 Installation
The manufacturershavenoobligationtocarrythisout.If the assistance of the manufactureris required
to rectify faults arising from incorrect installation, this assistance is not covered by the guarantee. The
installation instructions for professionally qualified personnel must be followed. Incorrect installation
may cause harm or injury to people, animals or belongings. The manufacturer cannot be held
responsibleforsuchharmorinjury.
The oven can be located high in a column or under a worktop. Before fixing, you must ensure good
ventilation in the oven space to allow proper circulation of the fresh air required for cooling and
protectingtheinternalparts.Maketheopeningsspecifiedonlastpageaccordingto thetypeoffitting.
1.5 Waste management and environmental protection
This appliance is labelled in accordance with European Directive 2012/19/EU regarding
electric and electronic appliances (WEEE). The WEEE contain both polluting substances
(that can have a negative effect on the environment) and base elements (that can be
reused). It isimportantthattheWEEEundergospecifictreatmentstocorrectly remove and
dispose of the pollutants and recover all the materials. Individuals can play an important
role in ensuring that the WEEE do not become an environmental problem; it is essential to
followafewbasicrules:
- the WEEE should not be treatedasdomesticwaste;
- the WEEE should betaken to dedicated collection areas managedby thetown council or a registered
company.
In many countries, domestic collections may be available for large WEEEs. When you buy a new
appliance, the old one can bereturned to the vendor who must acceptit free of charge asa one-off, as
long as the appliance is of an equivalenttypeandhasthesamefunctionsasthepurchasedappliance.
SAVINGAND RESPECTINGTHEENVIRONMENT
Where possible,avoidpre-heatingthe oven andalwaystry to fillit. Openthe oven dooras infrequently
as possible, because heat from the cavity disperses every time it is opened. For a significant energy
saving, switch offthe oven between5 and 10 minutes before the plannedend ofthe cooking time,and
use the residual heatthattheovencontinuestogenerate.Keepthesealscleanandinorder, toavoidany
heat dispersal outside of the cavity. If you have an electric contract with an hourly tariff, the "delayed
cooking" programme makes energy saving more simple, moving the cooking process to start at the
reducedtarifftimeslot.
1.6 Declaration of compliance
The parts of this appliance that maycomeintocontactwith foodstuffscomplywiththeprovisionsofEEC
Directive89/109.
By placing the mark onthisproduct,weareconfirming compliancetoallrelevant Europeansafety,
health and environmentalrequirements whichare applicableinlegislationfor thisproduct.
EN 19

2. Product Description
2.1 Overview
1
3
5
4
6
2.2 Accessories
Metal grill
1
1. Control panel
2
2. Shelf positions
(lateral wire grid if included)
3. Metal grill
4. Drip pan
5. Fan (behind the steel plate)
6. Oven door
2
Drip pan
Holds baking trays and plates.
Collects the residuesthatdripduringthecooking
of foodsonthegrills.
EN 20
2.3 First Use
PRELIMINARYCLEANING
Clean theovenbefore using for the first time. Wipeoverexternalsurfaceswitha damp soft cloth.Wash
all accessories and wipe inside the oven with a solution of hot water and washing up liquid. Set the
empty ovento the maximumtemperature and leave on forabout 1 hour, this willremove any lingering
smells of newness.
3. Use of the Oven
3.1 Display description
1. Timer/automatic mode
2. Fan function
3. Defrost mode
4. Temperature or clock display
5. LCD display adjustment controls
6. Function selector knob
7. Programme selector knob
WARNING!
The first operation to carry out after installation,
or after a power cut, is to set the time of day (a
power cut has occured if the display is flashing
12:00).
200°-> The temperature LED “°” flashes until the
displayedtemperatureisreached.
HOT -> When a programme finishes, if theoven is
still hot, thedisplayshows"HOT",alternatingwith
the time, eveniftheknobsarepositionedtoOFF.
EN 21
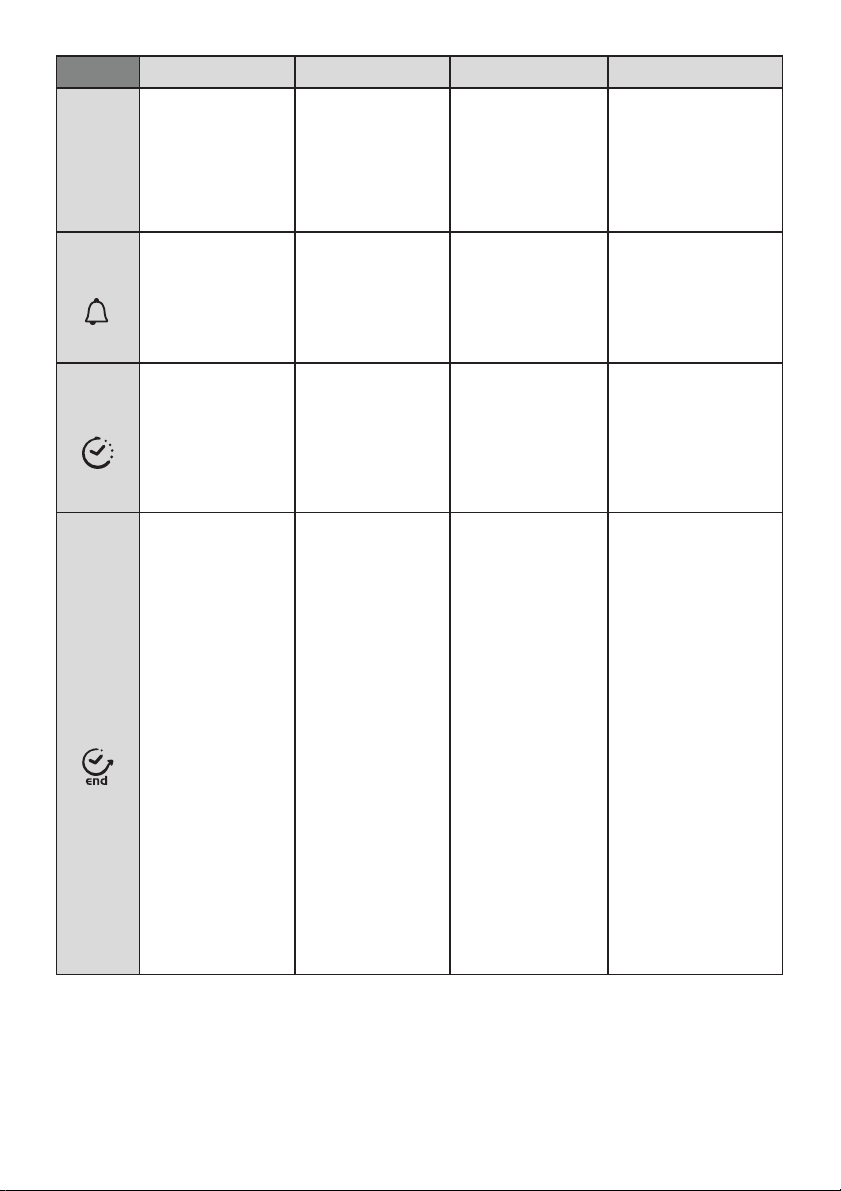
FUNCTION
KEY LOCK
MINUTE
MINDER
COOKING
TIME
END OF
COOKING
•Child Lock function is
activated by touching Set
(+) for a minimum of 5
seconds. From this
moment on all other
function are locked and
the display will flash
STOP and preset time
intermittently.
•Push the central button
1 times
•Press the buttons "-" "+"
to set the required time
•Release all the buttons
• Push the central button
2 times
• Press the buttons "-" or
"+"to set the lenght of
cooking required
• Release all buttons
• Set the cooking
function with the oven
function selector
•Push the central button
3 times •Press the
buttons "-" "+" to set the
time at which you wish
the oven to switch off
•Release the buttons
•Set the cooking function
with the oven function
selector.
HOW TO DEACTIVATE WHAT IT DOES WHY IT IS NEEDEDHOW TO USE
•Child Lock function is
deactivated by touching
touchpad Set (+) again
for a minimum of 5
seconds. From this
moment on all functions
are selectable again.
•When the set time as
elapsed an audible alarm
is activated (this alarm
will stop on its own,
however it can be
stopped immediately by
pressing the button)
SELECT.
•Push any button to
stop the signal. Push the
central button to return
to the clock
function.
•At the time set, the
oven will switch off. To
switch off manually, turn
the oven function
selector to position O.
•Sounds an alarm at the
end of the set time.
•During the process, the
display shows the
remaining time.
• It allows to preset the
cooking time required for
the recipe chosen.
• To check how long is left
to run press the SELECT
button 2 Times.
• To alter/change the
preset time press SELECT
and "-" "+" buttons.
•Enables you to set the
end of cooking time
•To check the preset
time push the central
button 3 times
•To modify the preset
time press buttons
SELECT + "-" "+"
•Allows to use the oven as
alarm clock (could be
activated either with
operating the oven or with
out operating the oven)
•When the time is elapsed
the oven will switch off
automatically.
Should you wish to stop
cooking earlier either turn
the function selector to 0, or
set time to 0:00
(SELECT and "-" "+" buttons)
•This function is typically
used with “cooking time”
function.
For example if the dish has
to be cooked for 45 minutes
and needs to be ready by
12:30, simply select the
required function, set the
cooking time to 45 minutes
and the end of cooking time
to 12:30.
•At the end of the cooking
set time, the oven will
switch off automatically and
an audible alarm will ring.
•Cooking will start
automatically at 11:45
(12:30 minus 45 mins) and
will continue until the preset end-of-cooking-time,
when the oven will switch
itself off automatically.
WARNING.
If the END of cooking is
selected without setting the
length of cooking time, the
oven will start cooking
immediately and it will stop
at the END of cooking time
set.
EN 22

3.2 Cooking Modes
Function
Dial
*
T °C
range
40 ÷ 40
50 ÷ 240
50 ÷ 240
50 ÷ 230
50 ÷ 230
50 ÷ 280
Function (Depens on the oven model)
LAMP: Turns on the oven light.
DEFROST: When the dialis set to this position. The fan circulates air at room temperature
around the frozen food so thatit defrosts in a few minutes without the protein content of
the foodbeingchanged oraltered.
FAN COOKING: We recommend you use this method for poultry, pastries, fish and
vegetables. Heat penetrates into the food better and both the cooking and preheating
times are reduced. You cancookdifferentfoodsatthe same timewith or withoutthe same
preparation in one or more positions. This cooking method gives even heat distribution
and thesmellsarenot mixed.
Allow abouttenminutes extrawhencooking foodsat thesametime.
The functionallows youtocookina healthier way, byreducingtheamount""COOK LIGHT
of fat oroilrequired. Thanks totheuseof the grillandfancombinedwithapulsatingcycle
of air, it willretain themoisture content ofthefood,grillingthesurfaceand using a shorter
cookingtime,withoutcompromisingontaste.
It isparticularly suitable for cookingmeat,roasted vegetables andomelettes. The cycleof
pulsed air keeps the humidity inside the oven and the moisture content of the food,
preserving thenutritionalvaluesand ensuringarapid uniformcooking process.
Tryall your recipesand reduce theamountof dressing youusually use andexperience the
lightnessofthisnewfunction!
FAN +LOWER ELEMENT: The bottom heating element is used with the fancirculating the
air insidetheoven.This methodisidealfor juicyfruitflans, tarts,quichesand pâté.
It prevents food from drying and encourages rising in cakes, bread dough and other
bottom-cookedfood. Placethe shelf inthebottom position.
CONVENTIONAL COOKING:Bothtopand bottom heating elements are used.Preheat the
oven for abouttenminutes.Thismethod is idealforalltraditionalroasting andbaking.For
seizing redmeats,roast beef, leg oflamb,game,bread, foilwrappedfood (papillotes),flaky
pastry.Place thefoodand itsdishon ashelfinmidposition.
GRILL :usethegrill withthedoorclosed.
The top heating element is used alone and you can adjust the temperature. Five minutes
preheating is requiredtogettheelementsred-hot.Successisguaranteedfor grills, kebabs
L1 ÷ L5
50 ÷ 230
*Tested in accordance with the CENELEC EN 60350-1
**Tested in accordance with the CENELEC EN 60350-1 used for definition of energy class.
and gratin dishes.White meats should beputat a distance from thegrill; the cookingtime
is longer, butthemeatwill be tastier. Youcanput red meatsandfishfilletsontheshelfwith
the driptrayunderneath. Theovenhas twogrillpositions:
Grill: 2140W Barbecue: 3340W
PIZZA - Withthis functionhot air circulated in theoven to ensureperfectresult for dishes
such aspizzaor cake.
EN 23

4. Oven cleaning and maintenance
4.1 General notes on cleaning
The lifecycleoftheappliancecanbeextended throughregularcleaning.Wait fortheoventocoolbefore
carrying out manualcleaningoperations.Neveruseabrasivedetergents, steel wool or sharpobjectsfor
cleaning, so as to not irreparably damage the enamelled parts. Use only water, soap or bleach-based
detergents(ammonia).
GLASS PARTS
It is advisable to clean the glass window with absorbent kitchen towel after every use of the oven. To
remove more obstinate stains, youcan usea detergent-soakedsponge, well wrung out, and then rinse
with water.
OVENWINDOWSEAL
If dirty, the seal canbecleanedwithaslightlydampsponge.
ACCESSORIES
Clean accessories with a wet, soapy sponge before rinsing and drying them: avoid using abrasive
detergents.
DRIP PAN
After using the grill, remove the pan from the oven. Pourthe hot fatintoacontainerandwashthepanin
hot water, usingaspongeandwashing-upliquid.
If greasy residues remain, immerse thepan in water and detergent. Alternatively, you can washthepan
in the dishwasheroruseacommercialovendetergent. Never put a dirty pan back intotheoven.
4.2 Self-cleaning oven with catalytic
Special self-cleaning panels covered in a micro-porous coating are available as optional extras for all
models. If they arefitted,theovenno longerneedstobecleanedbyhand.
The fat that is splattered onto the sides of the oven during roasting is eliminated by the microporous
coatingwhichbreaksthefat downbycatalysisand transforms it intogas.
Excessive splattering may nevertheless block the pores and therefore hinder self-cleaning. The selfcleaning capacity may be restored by switching on the empty oven to maximum for about 10-20
minutes.
Do not use abrasive products, metal cleaning wads, sharp objects, rough cloths, or chemical products
and detergentsthatmay permanentlydamagethecatalyticlining.
It is agoodideatousedeep roastingtraystoroast fattyfoodssuchasjointsof meat etc. and to put atray
underneath the grill to catch surplus fat.If the walls of theoven are so thickly coated in grease that the
catalytic lining is no longer effective remove surplus grease with a soft cloth or sponge soaked in hot
water.
The lining mustbeporousforself-cleaning tobeeffective.
N.B.: All catalytic linings currently on the market have a working life of about 300 hours. They should
thereforebe replacedafterabout300hours.
EN 24
4.3 Maintenance
REMOVALAND CLEANINGOFTHESIDERACKS
1. Unscrewtheboltinananti-clockwisedirection.
2. Removethesideracksby pullingthemtowards you.
3. Clean the side racksinadishwasherorwithawetsponge andthendrythemimmediately.
4. Having cleaned the side racks, put them back in and reinsert the bolts, ensuring that they are fully
tightened.
A
REMOVALOF THEOVENWINDOW
1. Open the frontwindow.
2. Openthe clamps ofthe hinge housingon the rightand left sideof the front windowby pushing them
downwards.
3. Replacethewindowbycarryingouttheprocedure in reverse.
EN 25
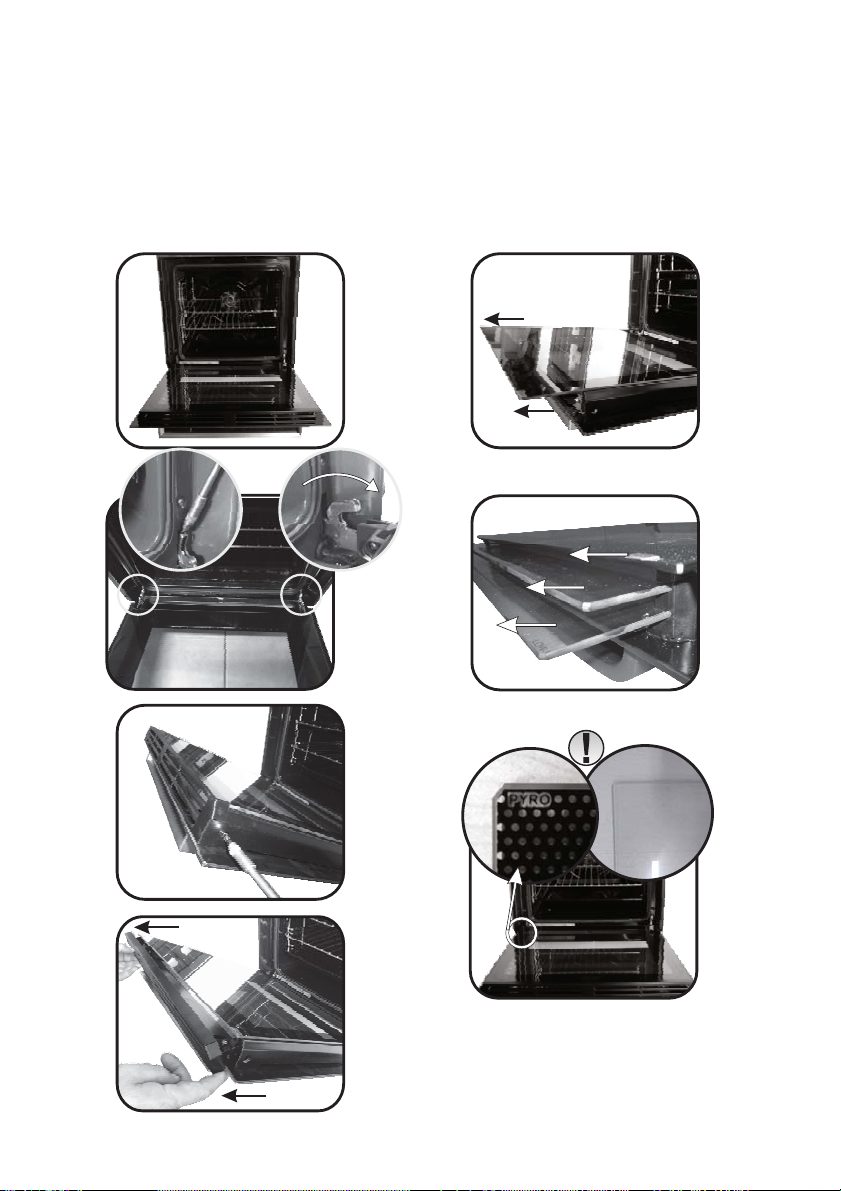
REMOVALAND CLEANINGOFTHEGLASSDOOR
LOW-E
1. Open the ovendoor.
2.3.4. Lock the hinges,removethescrewsand removetheuppermetalcover bypullingitupwards.
5.6. Remove the glass, carefully extracting it from the oven door (NB: in pyrolytic ovens, also remove
the secondandthirdglass(ifpresent)).
7. Attheendofcleaningorsubstitution,reassemblethe partsinreverse order.
On all glass,theindication"Pyro" must be legibleandpositionedonthe left side ofthedoor, closetothe
left-handlateralhinge.In thisway, theprintedlabel ofthefirstglass willbeinsidethedoor.
1.
2.
3.
5.
6.
1
2
3
7.
4.
EN 26

CHANGING THE BULB
1. Disconnecttheovenfromthemainssupply.
2. Undo the glass cover, unscrewthebulbandreplaceit withanewbulbofthesametype.
3. Once the defectivebulbisreplaced,replace theglasscover.
5. Troubleshooting
5.1 FAQ
PROBLEM POSSIBLE CAUSE SOLUTION
The oven does not heat up
The oven does not heat up
The oven does not heat up
The clock is not set Set the clock
The child lock is on
A cooking function and
temperature has not been set
Deactivate the child lock
Ensure that the necessary
settings are correct
EN 27

Sicherheitshinweise
WARNUNG: Das Gerät und die zugänglichen Teile des Gerätes werden
während des Betriebs heiß. Das Berühren der heißen Geräteteile sollte
vermiedenwerden.
•ACHTUNG: Zugängliche Teile können heiß werden, wenn der Ofen in
Betrieb ist. Kinder fernhalten.
• Dieses Gerät ist nicht bestimmt zum Gebrauch durch Personen
(einschließlich Kindern) mit beeinträchtigten körperlichen,
sensorischen oder geistigenFähigkeitenoder durch Personen,die keine
entsprechendenErfahrungen oder Kenntnissebesitzen, es sei denn, sie
werden beaufsichtigt oder angewiesen durch eine Person, die für ihre
Sicherheit verantwortlichist.
• Kinder dürfen nicht mit dem Gerätspielen.
• Die Reinigung und Wartung des Gerätes darf nicht durch Kinder ohne
Aufsichtdurchgeführtwerden.
• Während des Betriebs wird das Gerät heiß. Bitte vermeiden Sie die
Berührung der heißen Geräteteile.
WARNUNG: zugängliche Geräteteile werden während des Betriebs
heiß. Kinder sollten fern gehalten werden.
• Nutzen Sie keine scharfen oder scheuernden Reiniger oder scharfe
Metallreiniger um den Herd und das Glass zu reinigen, da dadurch
Kratzer aufder Oberfläche entstehenkönnen.
• Der Ofen muss ausgeschaltet werden, bevor der Deckel zur Reinigung
entfernt wird. Anschließend den Deckel gemäß der Anweisungen
wieder montieren.
• Nutzen Sie nur die empfohleneTemperatureinstellungfür den Ofen.
• Nutzen Sie kein Dampfreinigungsgerätzur Reinigungdes Ofens.
• An die Zuleitung ist ein Stecker anzuschließen, der für die auf dem
Typenschild aufgeführte Spannung, Stromstärke und Last ausgelegt ist
und über einen Schutzkontakt verfügt. Die Steckdose muss für die auf
dem Typenschild aufgeführte Last ausgelegt und der Schutzkontakt
angeschlossen und in Betrieb sein. Der Schutzleiter ist gelb-grün
gefärbt. Dieser Vorgang darf nur von entsprechend qualifiziertem
Fachpersonal durchgeführt werden. Im Falle einer Inkompatibilität
zwischen Steckdose und Gerätestecker müssen Sie einen qualifizierten
Elektriker bitten, die Steckdose durch eine geeigneten Typ zu ersetzen.
DE 28

Stecker und Buchse müssen zu den im Installationsland geltenden
aktuellen Normen konform sein. Zwischen Gerät und Stromquelle lässt
sich auch ein allpoliger Schutzschalter zwischenschalten, der für die
maximale Anschlussleistung ausgelegt ist und aktuelle gesetzliche
Bestimmungen einhält. Der gelb-grüne Schutzleiter darf durch den
Schutzschalter nicht unterbrochen werden. Bei der Geräteinstallation
ist darauf zu achten, dass die für den Anschluss verwendete Buchse
bzw. der allpolige Schutzschalter leicht zugänglichsind.
•Die Trennung von der Stromversorgung darf durch Herausziehen des
Steckers aus der Steckdose oder Auslösen eines gemäß gängiger
Verkabelungsnormen in die Festverdrahtung zwischengeschalteten
Schutzschalterserfolgen.
• Wenn das Netzkabel beschädigt ist, muss es durch ein Kabel bzw.
Spezialbündel ersetzt werden, das beim Hersteller erhältlich ist.
WendenSie sich dazu an denKundendienst.
•Der Netzkabeltyp muss H05V2V2-F sein.
•Eine Nichteinhaltung der oben genannten Anweisungen kann die
Schutzfunktion des Geräts gefährden und zum Erlöschen der Garantie
führen.
•Überschüssiges verschüttetes Material ist vor dem Reinigen zu
entfernen.
•Während des pyrolytischen Reinigungsvorgangs können sich Flächen
mehr als üblich erwärmen. Deswegen sind Kinder in einem sicheren
Abstandfernzuhalten.
• Zum Vermeiden von Überhitzung darf das Gerät nicht hinter einer
Verkleidungstürinstalliert werden.
•Beim Einschieben des Ofenrostes ist darauf zu achten, dass der
Anschlag nach oben und hinten Richtung Ofenraumzeigt.
Das Rost muss vollständigin den Ofenraum eingeschoben werden.
•WARNUNG:Kleiden Sie die Ofenwände nicht mit Aluminiumfolie oder
Einwegschutz aus dem Einzelhandel aus. Aluminiumfolie oder anderer
Schutz in direktem Kontakt mit der heißen Emaille kann schmelzen und
die Emailleauskleidung im Ofeninnerenbeeinträchtigen.
•WARNUNG:Niemals die Türdichtungdes Ofensentfernen.
DE 29
 Loading...