

Page 1
IT
DE
EN
ES
FR
Page 2

!
2
Grazie per aver scelto questo prodotto.
Siamo orgogliosi di offrirti un prodotto ideale
per te e la miglior gamma completa di
elettrodomestici per la vita di tutti i giorni.
Leggere attentamente le istruzioni
per un corretto funzionamento della
macchina. Questo opuscolo fornisce
importanti linee guida per una
manutenzione, un uso e un'installazione
sicuri. Esso contiene inoltre utili consigli che
consentiranno di sfruttare al meglio le
potenzialità di questa macchina. Conservare
la documentazione in un luogo sicuro per
eventuali riferimenti o per futuri proprietari.
Controllare che al momento della consegna
la macchina sia dotata dei seguenti
componenti:
! Libretto di istruzioni
! Certificato di garanzia
! Etichetta efficienza energetica
Verificare che durante il trasporto la
macchina non abbia subito danni. In caso
contrario, rivolgersi al Centro Assistenza
Tecnica. La mancata osservanza di tale
procedura potrebbe compromettere la
sicurezza dell’apparecchio.
La chiamata può essere soggetta a
pagamento se le cause di
malfunzionamento della macchina sono
attribuibili a un uso improprio o ad una
installazione non corretta.
Nel contattare l'assistenza, comunicare il
"numero di serie" del prodotto, composto da
16 caratteri che si trova nell'adesivo
applicato sull’elettrodomestico (zona oblò) e
che identifica in modo univoco la macchina.
Questo elettrodomestico è marcato
conformemente alla Direttiva Europea
2012/19/UE sui Rifiuti da
Apparecchiature Elettriche ed
Elettroniche (RAEE).
I RAEE contengono sia sostanze inquinanti
(che possono avere un impatto negativo
sull’ambiente) sia materie prime (che possono
essere riutilizzate). E’ perciò necessario
sottoporre i RAEE ad apposite operazioni di
trattamento, per rimuovere e smaltire in modo
sicuro le sostanze inquinanti ed estrarre e
riciclare le materie prime. Ogni cittadino può
giocare un ruolo decisivo nell’assicurare che i
RAEE non diventino un problema ambientale;
basta seguire qualche semplice regola:
! i RAEE non vanno mai buttati nella
spazzatura indifferenziata;
! i RAEE devono essere consegnati ai Centri di
Raccolta (chiamati anche isole ecologiche,
riciclerie, piattaforme ecologiche …) allestiti dai
Comuni o dalle Società di igiene urbana; in
molte località viene anche effettuato il servizio
di ritiro a domicilio dei RAEE ingombranti.
In molte nazioni, quando si acquista una nuova
apparecchiatura, si può consegnare il RAEE al
negoziante, che è tenuto a ritirarlo gratuitamente
(ritiro "uno contro uno") a patto che il nuovo
apparecchio sia dello stesso tipo e svolga le
stesse funzioni di quello reso.
1. NORME GENERALI DI SICUREZZA
2. KIT TUBO DI SCARICO
3. VASCHETTE DELL'ACQUA
4. PORTELLONE E FILTRI
5. CONSIGLI PRATICI
6. CONTROLLO REMOTO (Wi-Fi)
7. GUIDA RAPIDA ALL'USO
8. COMANDI E PROGRAMMI
9.
RISOLUZIONE PROBLEMI E GARANZIA
Indicazioni ambientali
Indice
Page 3
!
IT
3
1. NORME GENERALI DI
SICUREZZA
! Questo apparecchio è destinato
ad uso in ambienti domestici e
simili come per esempio:
− aree di ristoro di negozi, uffici
o altri ambienti di lavoro;
− negli agriturismo;
− dai clienti di hotel, motel o
altre aree residenziali simili;
− nei bed & breakfast.
Un utilizzo diverso da quello
tipico dell’ambiente domestico,
come l’uso professionale da
parte di esperti o di persone
addestrate, è escluso anche
dagli ambienti sopra descritti. Un
utilizzo non coerente con quello
riportato, può ridurre la vita del
prodotto e può
invalidare la
garanzia del costruttore. Qualsiasi
danno all’apparecchio o ad altro,
derivante da un utilizzo diverso da
quello domestico (anche quando
l’apparecchio è installato in un
ambiente domestico) non sarà
ammesso dal costruttore in sede
legale.
!
Questo apparecchio può essere
utilizzato da bambini di 8 anni
e
oltre e da persone con capacità
fisiche, sensoriali o mentali
ridotte o con mancanza di
esperienza e di conoscenza a
patto che siano supervisionate
o che siano date loro istruzioni
in merito all’utilizzo sicuro dell’
apparecchio e che capiscano i
pericoli del suo utilizzo. Evitare
che i bambini giochino con
l'apparecchio o che si occupino
della sua pulizia e manutenzione
senza supervisione.
! I bambini dovrebbero essere
supervisionati per assicurarsi che
non giochino con l'apparecchio.
! I bambini di età inferiore a 3 anni
devono essere tenuti lontano
dalla macchina, a meno che
non vengano continuamente
sorvegliati.
! Questa macchina è prevista
unicamente per uso domestico,
ovvero per l’asciugatura di capi
e indumenti per la casa.
! Prima di attivare la macchina,
accertarsi di avere letto
attentamente e compreso le
istruzioni d’uso e di installazione.
! Non toccare l’asciugatrice con
mani o piedi umidi o bagnati.
! Non appoggiarsi al portellone
per caricare la macchina; non
utilizzare il portellone per sollevare
o spostare la macchina.
ATTENZIONE
L’uso improprio dell’asciugatrice
può provocare rischio di
incendio.
Page 4

!
4
! Se si presume che la macchina
sia guasta, non continuare ad
usarla.
! L'asciugatrice non dev'essere
usata se sono stati usati
prodotti chimici per il lavaggio.
! Evitare che sul pavimento
attorno alla macchina si
raccolgano filacce e pelucchi.
! Prima di pulire la macchina,
staccare sempre la spina.
! Dopo il ciclo di asciugatura,
l’interno del cestello può essere
molto caldo. Prima di estrarre
la biancheria è pertanto opportuno
lasciar raffreddare completamente
la macchina.
! L'ultima parte del ciclo di
asciugatura viene fatta senza
calore (ciclo freddo) per assicurare
che i capi siano lasciati ad una
temperatura che non li danneggi.
ATTENZIONE
Non utilizzare il prodotto se il
filtro antifilacce non è
correttamente posizionato o
risulta danneggiato; il filtro
non è ignifugo.
ATTENZIONE
Se è esposto il simbolo
indicante il riscaldamento
della superficie, quando
l'asciugatrice è in funzione
la temperatura può essere
superiore a 60°C.
ATTENZIONE
Mai fermare un' asciugatrice
prima della fine del ciclo di
asciugatura senza che tutti i
capi siano rimossi velocemente
e separati in modo che il
calore si dissolva.
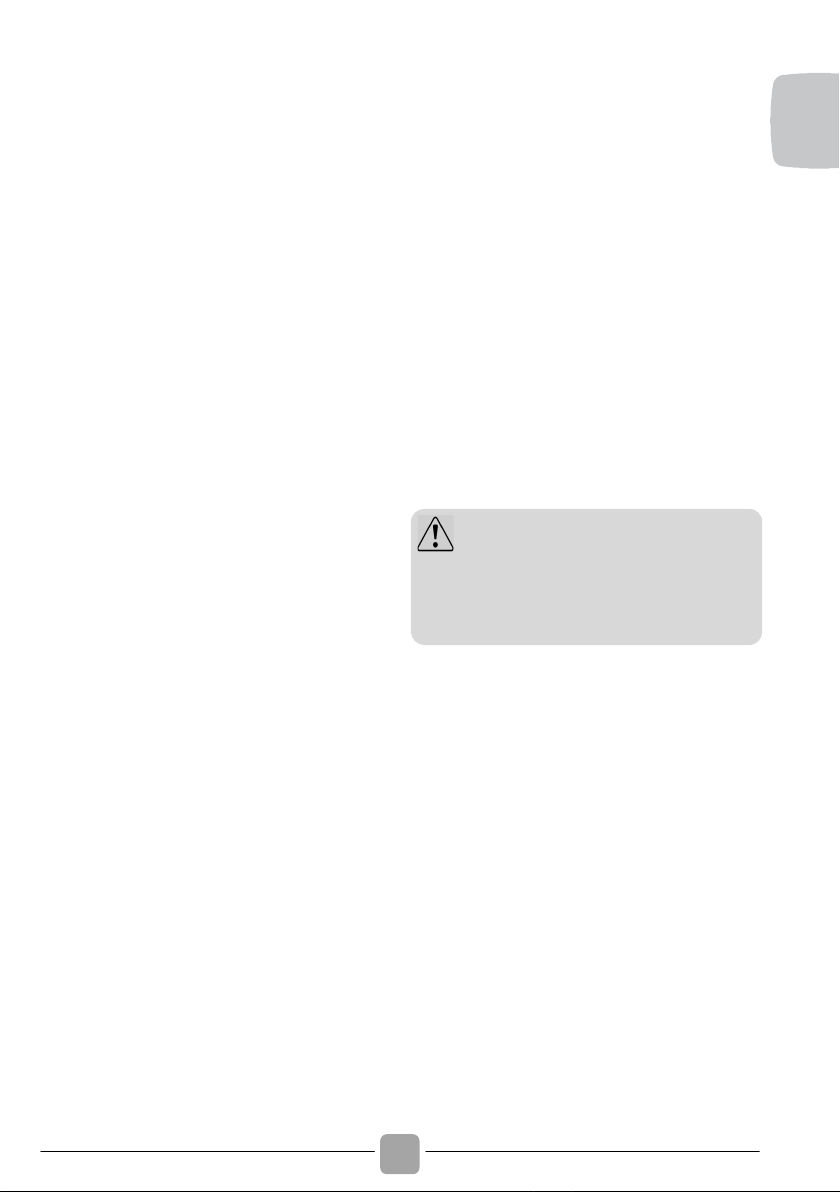
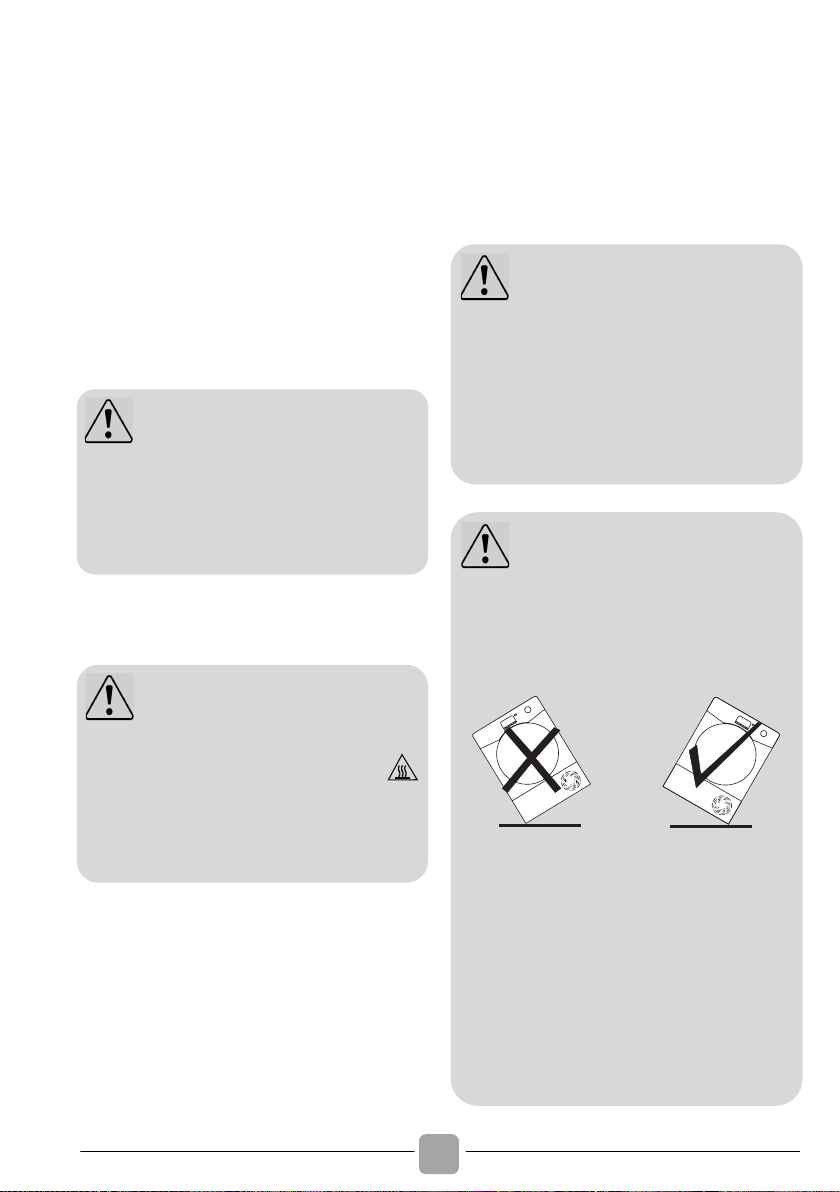
ATTENZIONE
Durante il trasporto
mantenere in posizione
verticale l'asciugabiancheria.
Se necessario ribaltarla
esclusivamente nel lato
indicato in figura.
Se il prodotto è stato
ribaltato non correttamente
prima di avviarlo attendere
almeno 4 ore in modo tale
che l'olio possa scorrere
nuovamente nel compressore.
In caso contrario il compressore
può subire danni.
Page 5

!
IT
5
! Non installare il prodotto in
luoghi freddi o dove vi sia il
rischio di formazione di
ghiaccio. Alla temperatura di
congelamento dell'acqua il
prodotto potrebbe non
funzionare correttamente. Se
l'acqua del circuito idraulico
ghiaccia sono possibili danni a
componenti quali: valvole,
pompe, tubi. Per garantire le
prestazioni del prodotto la
temperatura della stanza deve
essere compresa tra +5°C e
+35°C. Nel caso l'asciugatrice
venga utilizzata in ambienti con
basse temperature (tra +2°C e
+5°C) è possibile che capitino
fenomeni di condensazione e
di piccole perdite d'acqua sul
pavimento.
! Nel caso in cui l'asciugatrice
fosse installata sopra una
lavatrice, dev'essere usato un
accessorio su misura per
separarli a seconda della
configurazione del proprio
apparecchio:
-
Kit misura "standard": per lavatrice
profonda almeno 44 cm;
- Kit misura "slim": per lavatrice
profonda almeno 40 cm.
-
Kit misura "standard" con "ripiano
scorrevole": per lavatrice
profonda almeno 47 cm;
Il kit deve essere uno di quelli
indicati, ottenibile dal nostro
servizio ricambi. Le istruzioni
per l'installazione della macchina
e di tutti gli accessori, sono
fornite con il kit.
! EVITARE ASSOLUTAMENTE
d’installare la macchina vicino
ai tendaggi.
! L'apparecchio non deve essere
installato dietro una porta che
può essere chiusa a chiave,
una porta scorrevole o una
porta i cui cardini siano sul lato
opposto rispetto a quelli
dell'asciugatrice.
! Ai fini della sicurezza
personale è essenziale che
l'asciugatrice venga installata
correttamente. In caso di dubbi
sull'installazione, rivolgersi al
Servizio Assistenza.
! Una volta posizionata la
macchina, si dovrebbe
procedere alla regolazione dei
piedini, per garantire una
perfetta messa in bolla.
Installazione
Page 6

!
6
! I dati elettrici (tensione di
alimentazione e potenza
assorbita) sono riportati nella
targhetta dati apposta sul
prodotto.
! Assicurarsi che l'impianto
elettrico sia provvisto di messa
a terra, che la presa di corrente
sia conforme alle normative
nazionali e che la spina e la
presa di alimentazione
corrispondano.
! Non utilizzare adattatori,
connettori multipli e/o prolunghe.
!
La spina deve essere accessibile
per la disconnessione dopo
l'installazione dell'apparecchio.
! Non inserire la spina nella
presa e non accendere la
macchina finché l'installazione
non sarà stata completata.
! Se il cavo di alimentazione è
danneggiato, deve essere
sostituito dal produttore, da
un tecnico dell'assistenza o
da personale qualificato, per
evitare rischi.
! Il locale in cui viene installata
l’asciugatrice deve essere
adeguatamente ventilato onde
evitare che i gas provenienti da
apparecchiature funzionanti
con altri combustibili, comprese
fiamme libere, siano aspirati
nel locale dove l’asciugatrice è
in funzione.
!
Installare il retro della macchina
vicino al muro o ad una parete
verticale.
! Ci deve essere uno spazio di
almeno 12 mm tra la macchina
e qualsiasi ostruzione. Le
prese di entrata o uscita
dell'aria devono essere tenute
lontane da ostacoli.
! Assicurarsi che nessun tappeto
ostruisca la base della
macchina né i condotti di
ventilazione.
! Rimuovere tempestivamente
eventuali oggetti caduti,
dietro/sotto la macchina in
quanto potrebbero ostruire le
prese e gli sfiati dell’aria.
Collegamento elettrico e
prescrizioni di sicurezza
ATTENZIONE
L'apparecchio non deve
essere
alimentato tramite un
dispositivo di commutazione
esterno, come un
temporizzatore,
o connesso
ad un circuito che viene
regolarmente acceso e
spento.
Ventilazione
Page 7
!
IT
7
! Non scaricare l’aria nella
canna fumaria utilizzata per lo
scarico di fumi provenienti da
attrezzature funzionanti a gas
o altri combustibili.
! Controllare periodicamente che
attorno all’asciugatrice vi sia
una buona circolazione d’aria,
evitando possibili accumuli di
polvere e filacce.
! Controllare frequentemente il
filtro antifilacce e, se
necessario, pulirlo.
* Sfiati dell'aria (a seconda dei
modelli).
!
Leggere attentamente le etichette
con le istruzioni di lavaggio per
conoscere le caratteristiche
dell’asciugatura idonea.
! Gli ammorbidenti o prodotti
simili dovrebbero essere
utilizzati come specificato nelle
rispettive istruzioni.
! Non asciugare capi non lavati
nell'asciugatrice.
! Gli indumenti devono essere
introdotti nell’ asciugatrice solo
dopo essere stati opportunamente
centrifugati in lavatrice o
strizzati a mano.
!
EVITARE di caricare nel cestello
indumenti ancora gocciolanti.
! EVITARE ASSOLUTAMENTE
di asciugare tende in fibra di
vetro. La contaminazione dei
capi con le fibre di vetro può
infatti dar luogo a fenomeni
d’irritazione cutanea.
La Biancheria
ATTENZIONE
In determinate circostanze, i
materiali in gomma possono
essere soggetti ad
autocombustione se
riscaldati. Articoli in
gommapiuma (lattice), cuffie
da doccia, tessuti impermeabili,
articoli in caucciù e vestiti o
cuscini imbottiti con
gommapiuma NON VANNO
asciugati nell'asciugatrice.
ATTENZIONE
Evitare di asciugare articoli
trattati con prodotti di pulizia
a secco.
Page 8

!
8
! I capi che sono stati macchiati
con sostanze come olio da
cucina, acetone, alcol, petrolio,
cherosene, smacchiatori, acquaragia,
cere e sostanze per rimuovere
le cere dovrebbero essere
lavati in acqua calda con una
quantità extra di detergente
prima di essere asciugati
nell'asciugatrice.
! Rimuovere tutti gli oggetti dalle
tasche come accendini e
fiammiferi.
! Controllare accuratamente che
nelle tasche degli indumenti da
asciugare non siano presenti
accendini o fiammiferi ed
EVITARE ASSOLUTAMENTE
l’uso di prodotti infiammabili in
prossimità della macchina.
! Massimo carico di asciugatura:
vedere etichetta energetica.
! Per ulteriori informazioni sul
prodotto o per consultare la
scheda tecnica fare riferimento
al sito internet del produttore.
Page 9

!
IT
9
ATTENZIONE
Rischio di incendio / Materiali
infiammabili.
! L'apparecchio contiene l'R290,
un gas refrigerante eco-sostenibile,
ma infiammabile. Tenere fonti
di ignizione e fiamme libere
lontano dall'apparecchio.
! Controllare che non vi siano
danni visibili sull'apparecchio.
Non mettere in funzione
l'apparecchio se danneggiato.
! Se si dovessero presentare
problemi di qualsiasi tipo,
contattare il proprio rivenditore
specializzato
oppure il nostro
servizio di assistenza
clienti.
ATTENZIONE
Assicurarsi che le aperture
sull'apparecchio e per i modelli
da incasso anche quelle nel
vano di installazione non siano
ostruite.
ATTENZIONE
Non danneggiare il circuito
refrigerante.
!
Qualsiasi riparazione o intervento
sull'apparecchio deve essere
eseguito unicamente da un
servizio di assistenza autorizzato.
! Uno smaltimento scorretto può
provocare incendi o essere
causa di avvelenamenti.
! Smaltire l'apparecchio in modo
corretto e non danneggiare i
tubi per la circolazione del gas
refrigerante.
Page 10
!
10
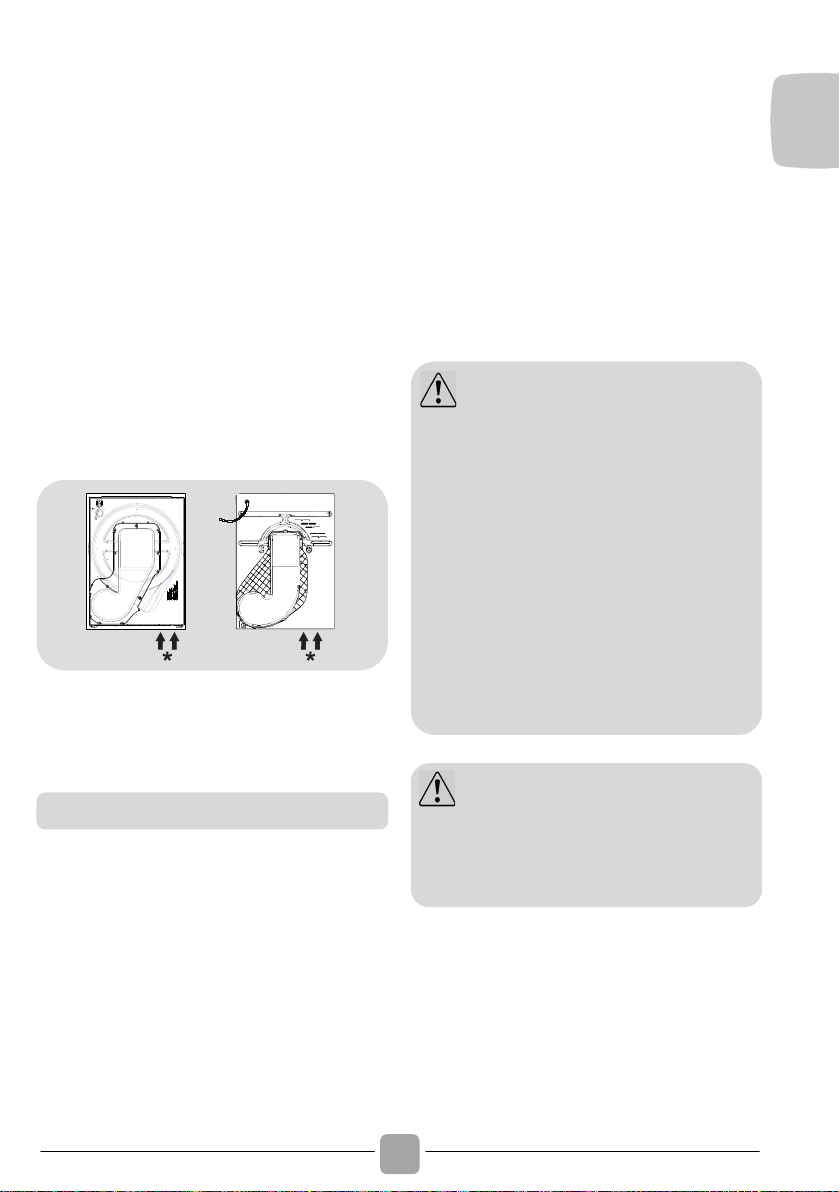
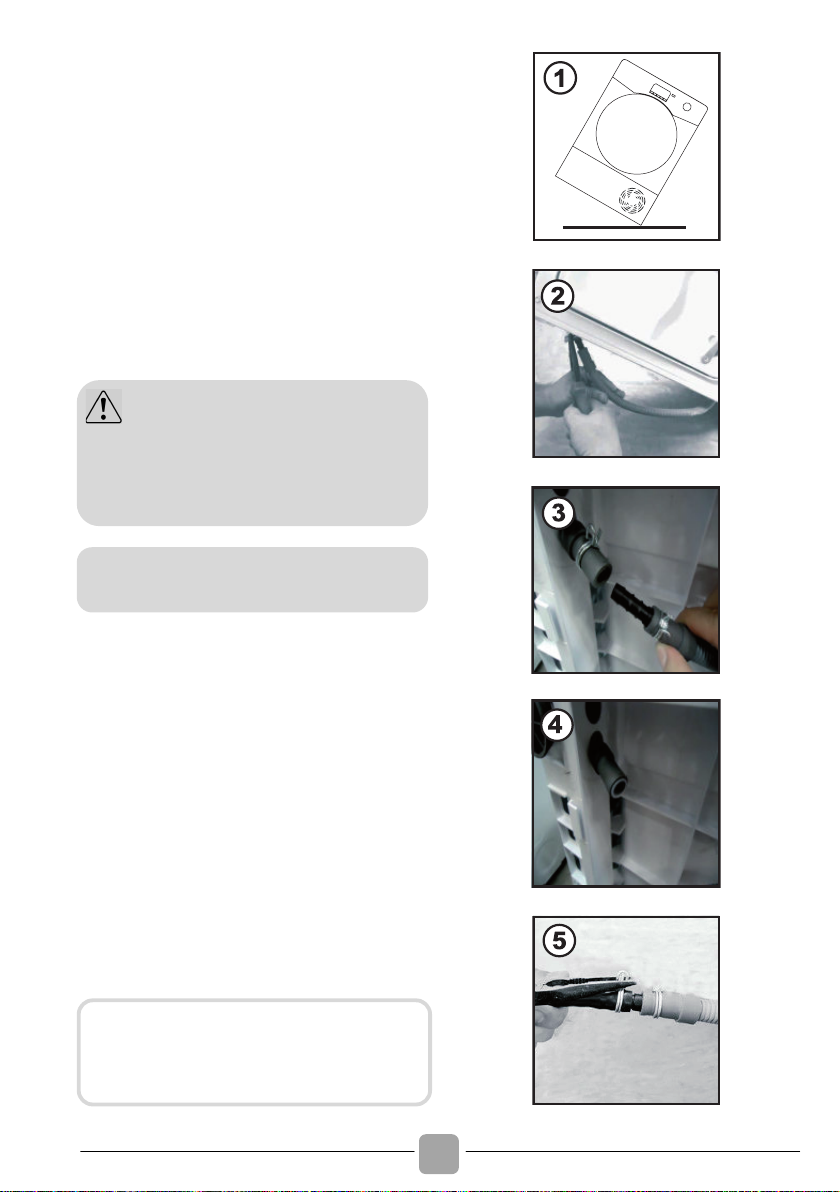
2. KIT TUBO DI SCARICO
Per evitare di dover svuotare il recipiente
dell'acqua al termine di ciascun ciclo di
essicazione, l'acqua normalmente raccolta
può essere scaricata direttamente in un tubo
di scarico dell'acqua di rifiuto (lo stesso
sistema di scarico dei lavandini ad uso
domestico). Le leggi locali sugli impianti idrici
vietano il collegamento ad un sistema di
scarico in superficie. Il sistema con il tubo di
scarico dell'acqua di rifiuto deve essere
situato accanto all'essiccatore a tamburo.
Il kit contiene: 1 tubo flessibile, 1 collare
per tubi.
1. Inclinare lentamente la macchina verso
il lato destro.
2. Il tubo di scarico dell'acqua è situato sul
lato destro della macchina (vedi
immagine). Un tubo grigio è collegato
al raccordo sulla sinistra della macchina.
Usare le pinze per rimuovere la clip di
fissaggio del tubo al raccordo.
3. Estrarre il raccordo dal collegamento a
ponte.
4. Posizionare il rubinetto fornito con il set
per chiudere il raccordo rimanente.
5. Fissare il raccordo nero del set
(utilizzando il connettore e i ganci per
tubi forniti) al raccordo rimosso dal
collegamento a ponte.
ATTENZIONE
Spegnere e togliere la spina
dell'essiccatore dalla presa di
alimentazione elettrica prima di
eseguire qualsiasi operazione.
Montare il kit come Indicato di
seguito
Una volta che la macchina è in
posizione, verificare all'estremità inferiore
che il nuovo raccordo non si attorcigli
quando si riposiziona l'essiccatrice.
Page 11
!
IT
11
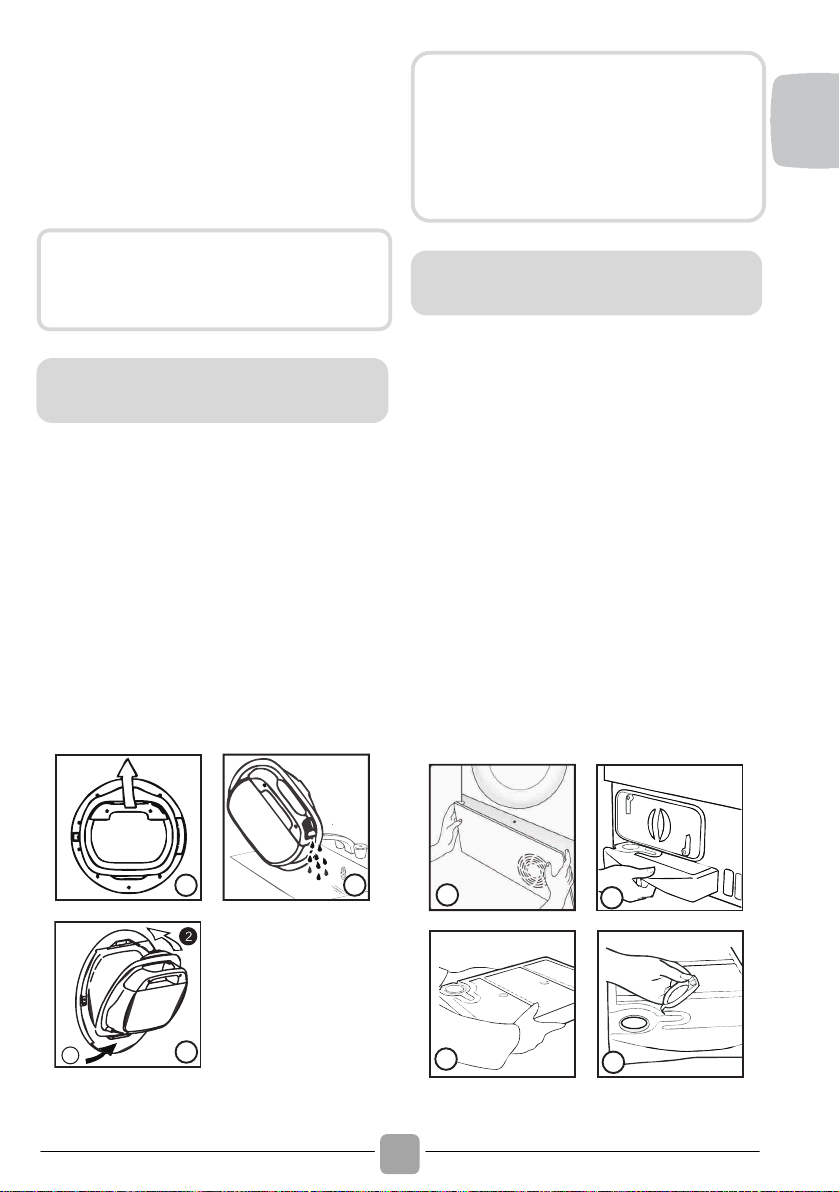
3.
VASCHETTE DELL'ACQUA
L'acqua eliminata dalla biancheria durante il
ciclo di asciugatura viene raccolta in una
vaschetta. Quando la vaschetta è piena si
accende la relativa spia sul pannello dei
comandi, segnalando che si DEVE vuotare
la vaschetta dopo ogni ciclo di asciugatura.
1. Estrarre con delicatezza la vaschetta
afferrandola dalla maniglia (A).
Da piena, la vaschetta dell'acqua pesa
circa 6 kg.
2. Inclinare la vaschetta facendo defluire
l'acqua dal beccuccio (B).
Quando è vuota, riporre la vaschetta
nell'alloggio come indicato (C) prima inserire
la base della vaschetta come mostrato (1)
successivamente premere gentilmente la
parte superiore nell'apposita sede (2).
3. Premere il tasto di avvio programma per
riavviare il ciclo.
A
B
1
C
* A seconda del modello
1. Tirare delicatamente la parte inferiore
dello zoccolo che si sgancia dalla
macchina. A questo punto si può
sbloccare la parte superiore ed estrarre
completamente lo zoccolo (A).
2. Tirare con decisione la maniglia ed
estrarre la vaschetta dell'acqua (B).
Sostenere la vaschetta con entrambe le
mani (C). Da piena la vaschetta dell'acqua
pesa circa 4 kg.
3. Aprire il coperchio sulla vaschetta e
svuotare l'acqua (D).
4. Rimontare il coperchio e reinserire la
vaschetta in sede (D). SPINGERE CON
DECISIONE IN SEDE.
5. Rimontare lo zoccolo agganciando le
cerniere in alto e "facendo scattare" in
sede i dispositivi di bloccaggio inferiori.
A
B
C
D
* A seconda del modello
Nei primi cicli, quando la macchina è
nuova, si raccoglie poca acqua in
quanto si riempie prima il serbatoio
interno.
Per rimuovere la vaschetta dalla
porta *
SOLO PER MODELLI DOTATI DEL KIT
TUBO DI SCARICO
Se c'è uno scarico vicino all'asciugatrice,
si può usare l'apposito kit per far
scaricare costantemente l'acqua raccolta
dalla macchina. Così facendo si eviterà
di svuotare la vaschetta dell'acqua.
Per rimuovere la vaschetta
inferiore dell'acqua *
Page 12
!
12
4. PORTELLONE E FILTRI
! Tirare la maniglia per aprire lo sportello.
! Per avviare la macchina, richiudere il
portellone e premere il tasto di avvio
programma.
Spia di pulizia filtro
Si accende segnalando la necessità di
pulire i filtri (filtro della porta e filtro inferiore).
Controllare ed eventualmente pulire il filtro
principale ed i filtri allocati nella parte
inferiore dell'asciugatrice.
Se la biancheria non si asciuga, verificare
che i filtri non siano intasati.
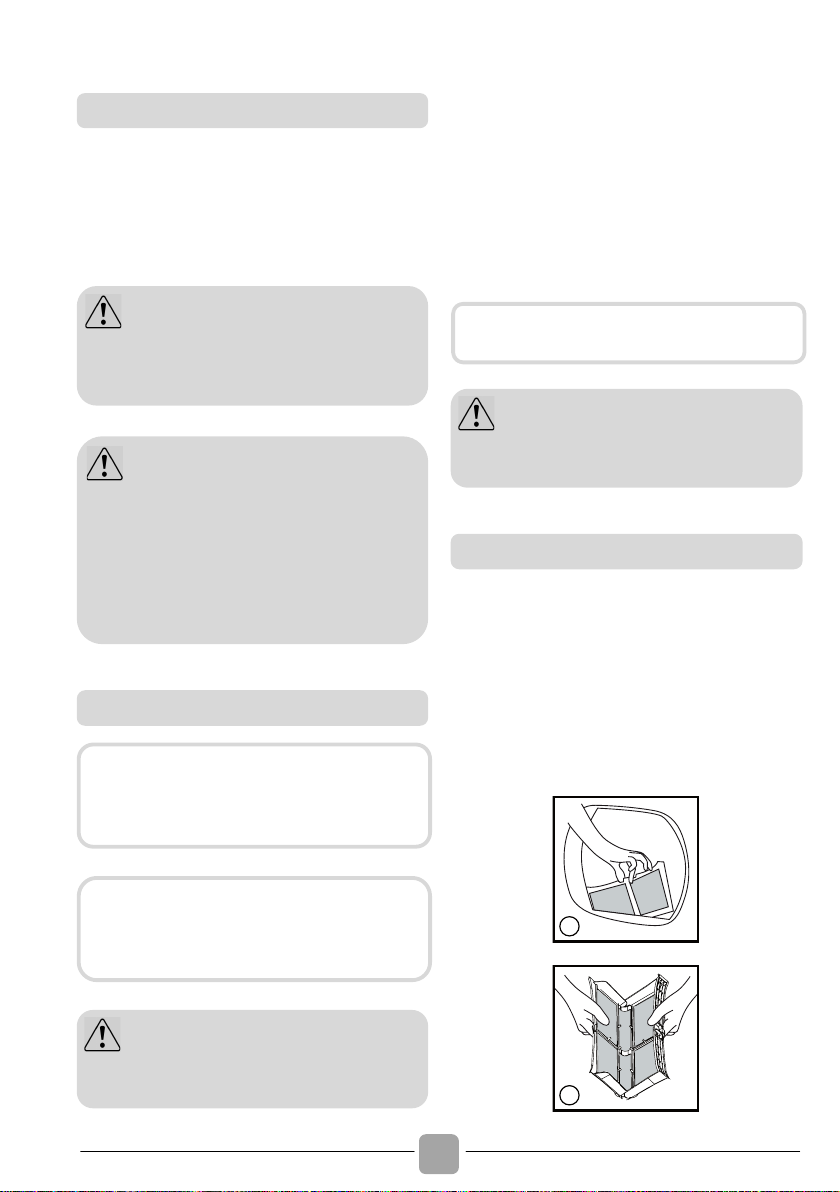
1. Tirare il filtro verso l’alto.
2. Aprire il filtro come illustrato.
3. Rimuovere delicatamente le filacce con
la punta delle dita o aiutandosi con uno
spazzolino morbido.
4. Richiudere il filtro e reinserirlo in sede.
1
2
Portellone
ATTENZIONE
Quando l'asciugatrice è in funzione, il
cestello e il portellone possono essere
MOLTO CALDI.
ATTENZIONE
Se la porta dell'asciugabiancheria viene
aperta durante il ciclo, prima quindi
che sia completata la fase di
raffreddamento, la maniglia della
vaschetta può essere molto calda.
Fare attenzione e usare la massima
cautela se la si vuole svuotare.
Filtri
I filtri intasati possono allungare il
tempo di asciugatura e causare danni
con conseguenti costosi interventi di
pulizia.
Ai fini della massima efficacia della
macchina, prima di ogni ciclo di
asciugatura è essenziale verificare la
pulizia di tutti i filtri.
ATTENZIONE
Non utilizzare l'asciugabiancheria senza
i filtri.
Se si puliscono i filtri sotto l'acqua,
ricordarsi di asciugarli.
ATTENZIONE
Pulire i filtri prima di effettuare ogni
ciclo.
Pulizia del filtro antifilacce
Page 13
!
IT
13
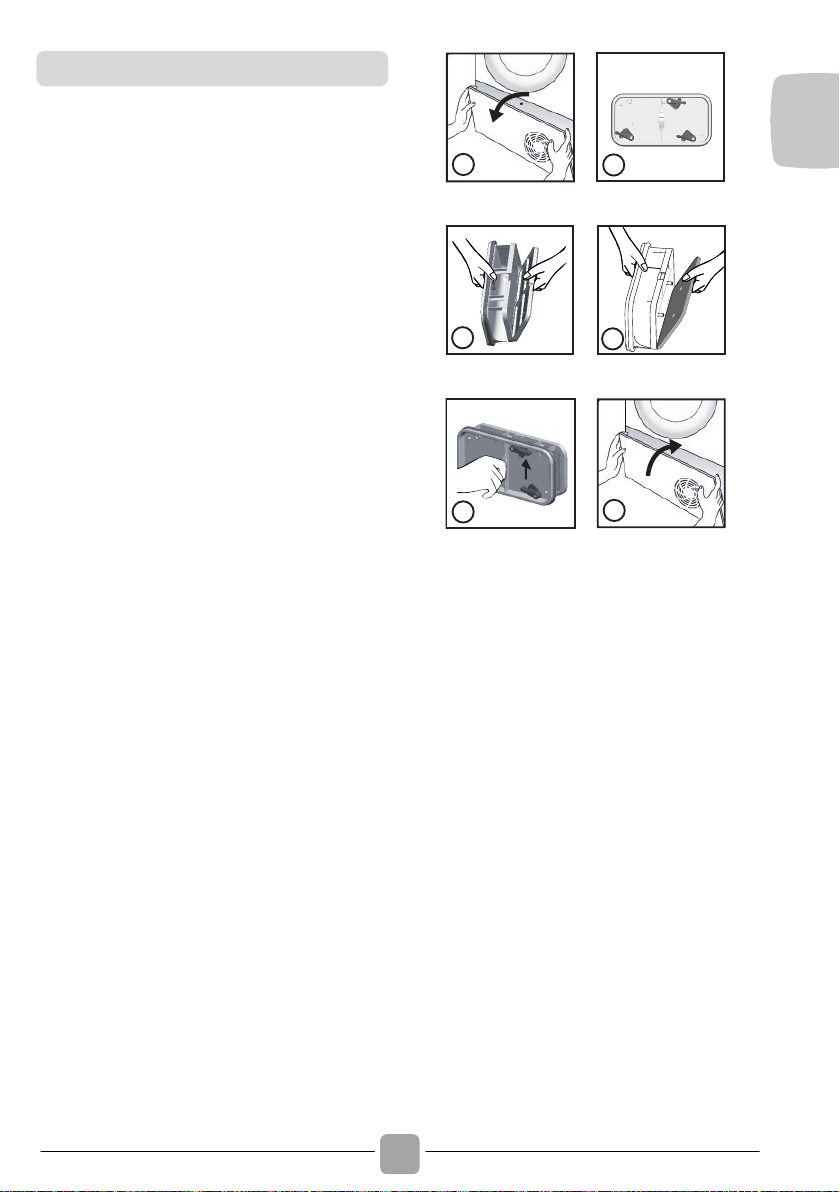
1. Rimuovere lo zoccolo.
2. Girare in senso antiorario i ganci e
rimuovere il coperchio supporto filtri.
3. Rimuovere delicatamente il telaio agendo
sul gancio superiore e pulire la rete
filtrante da residui o depositi. Non usare
l'acqua.
4. Rimuovere delicatamente il filtro a
spugna dalla sede e lavarlo sotto acqua
corrente per rimuovere residui o depositi.
5. Rimontare i filtri e posizionare il coperchio
supporto filtri nella corretta posizione
(come indicato dalla freccia). Bloccare il
coperchio con i ganci.
6. Rimontare lo zoccolo.
1
2
3
4
6
UP
5
Pulizia filtro
Page 14
!
14
5. CONSIGLI PRATICI
Prima di utilizzare l’asciugatrice per la prima
volta:
! Leggere attentamente il presente libretto
d'istruzioni.
! Togliere tutti gli articoli presenti all’interno
del cestello.
! Pulire l’ interno del cestello e il portellone
con un panno umido in modo da
eliminare l’eventuale polvere depositata
durante il trasporto.
Verificare che la biancheria da asciugare
sia idonea per l’asciugatura meccanica,
come indicato dai simboli sull’etichetta di
lavaggio dei vari articoli. Controllare che le
chiusure siano chiuse e le tasche vuote.
Girare i capi con il rovescio all’esterno.
Introdurre i capi nel cestello uno ad uno, in
modo che non si aggroviglino.
Articoli di seta, calze di nylon, ricami
delicati, tessuti con decorazioni metalliche,
indumenti con guarnizioni in PVC o in pelle.
Introdurre nell’asciugatrice solo biancheria
accuratamente strizzata a mano o
centrifugata a macchina. Quanto più
asciutta è la biancheria, tanto più rapido è il
tempo richiesto per l’asciugatura, con
conseguente risparmio di consumo
elettrico.
COSA FARE SEMPRE
! Cercare sempre di far lavorare la
macchina a pieno carico di biancheria: si
risparmia tempo ed elettricità.
! Prima di ogni ciclo di asciugatura
verificare SEMPRE che il filtro sia pulito.
COSA NON FARE MAI
! Non superare mai il peso massimo: si
perde tempo e si consuma più elettricità.
!
Evitare di caricare capi ancora gocciolanti:
si
rischia di rovinare la macchina.
! In base ai simboli delle etichette di
lavaggio
Le etichette di lavaggio sono apposte sul
collo o sulle cuciture interne:
Articolo idoneo per l’asciugatura
meccanica.
Asciugatura ad alta temperatura.
Solo asciugatura a bassa temperatura.
Articolo non idoneo all’asciugatura
meccanica.
Se il capo è sprovvisto di etichetta di
lavaggio, si deve presumere che non sia
idoneo all’asciugatura meccanica.
! In base al quantitativo ed alla
pesantezza
Se il carico è superiore alla capacità della
macchina, separare i capi in base alla
pesantezza (p. es., separare gli asciugamani
dalla biancheria leggera).
! In base al tipo di tessuto
Articoli di cotone/lino: Asciugamani,
jersey di cotone, biancheria da tavola/letto.
Preparazione dei capi
Evitare di asciugare
ATTENZIONE
Evitare di asciugare articoli
preventivamente trattati con prodotti
di pulizia a secco o capi in gomma
(pericolo d’incendio o esplosione).
Durante gli ultimi 15 minuti
(approssimativamente) i capi sono
sempre asciugati con aria fredda.
Risparmio energia
Selezionare la biancheria nel
modo seguente
Page 15
!
IT
15
Articoli sintetici: Camicette, camicie, tute
ecc. in poliestere o poliammide e misti
cotone/sintetici.
! Si consiglia di pulire il filtro e di svuotare
la vaschetta dell’acqua dopo ogni ciclo di
asciugatura.
! Pulire regolarmente il condensatore.
! Dopo l'uso, pulire l'interno del cestello e
lasciare aperto il portellone per un certo
periodo di tempo in modo che circoli aria
e si asciughi.
! Pulire l’esterno della macchina e il
portellone con un panno morbido.
! NON usare spugnette abrasive né
prodotti di pulizia.
! Per evitare che si accumuli della
lanuggine e che l'oblò abbia difficoltà ad
aprirsi/chiudere, a fine di ogni ciclo
d'asciugatura pulire con un panno umido
la parte interna dell'oblò e la guarnizione.
ATTENZIONE
Non sovraccaricare il cestello, in
quanto i capi ingombranti, a caldo,
possono superare il carico massimo
consentito (per esempio sacchi a pelo
e piumoni).
Pulizia dell’asciugatrice
ATTENZIONE
Il cestello, il portellone e il carico
possono essere molto caldi.
ATTENZIONE
Prima di procedere alla pulizia,
disattivare sempre la macchina e
staccare la spina della presa a muro.
ATTENZIONE
Per i dati elettrici vedere la targhetta
dei dati posta sul davanti del mobile
della macchina (con portellone
aperto).
Page 16

!
16
6. CONTROLLO REMOTO (WI-FI)
Questo apparecchio è equipaggiato di
tecnologia Wi-Fi che consente il controllo da
remoto della macchina tramite App.
ARRUOLAMENTO MACCHINA SU APP
! Scaricare l'App Candy simply-Fi sul
proprio dispositivo.
! Aprire l’App, creare il profilo utente (o fare
il login se già creato in precedenza) e
arruolare l'elettrodomestico seguendo le
indicazioni sul display del dispositivo o la
procedura descritta nella "Quick Guide"
allegata alla macchina.
ABILITAZIONE CONTROLLO REMOTO
! Verificare che il router sia acceso e
collegato a Internet.
! Caricare la biancheria, chiudere l'oblò.
! Ruotare la manopola programmi in
posizione CONTROLLO REMOTO (Wi-Fi):
i tasti del pannello comandi vengono
disabilitati.
! Aprire l'App Candy simply-Fi e procedere
con l'avvio del ciclo. Al termine, spegnere
la macchina ruotando la manopola
programmi su OFF.
* CONTROLLO REMOTO (Wi-Fi)
DISABILITAZIONE CONTROLLO REMOTO
! Per uscire dalla modalità CONTROLLO
REMOTO durante un ciclo, ruotare la
manopola programmi in una posizione
differente da CONTROLLO REMOTO
(Wi-Fi). Il pannello comandi dell'apparecchio
torna ad essere operativo.
! Con oblò chiuso, ruotando la manopola in
posizione CONTROLLO REMOTO (Wi-Fi),
si potrà tornare ad avere il controllo della
macchina da App. L'eventuale ciclo in
esecuzione proseguirà.
L’App Candy simply-Fi è disponibile
sia per dispositivi con sistema operativo
Android che per iOS, sia per tablet che
per smartphone.
Per scoprire tutti i dettagli delle
funzioni Wi-Fi, esplora i menu dell'App
accedendo in modalità DEMO.
Con oblò aperto, il CONTROLLO
REMOTO sarà disabilitato. Per
abilitarlo nuovamente, chiudere l'oblò,
ruotare la manopola programmi in
una
posizione differente da CONTROLLO
REMOTO e selezionarlo nuovamente.
Page 17
!
IT
17
7. GUIDA RAPIDA ALL'USO
1. Aprire la porta e caricare la biancheria
nel cesto. Assicurarsi che i capi non si
incastrino nella porta.
2. Chiudere gentilmente la porta fino a
sentire un "click".
3. Ruotare la manopola programmi e
scegliere il programma di asciugatura
desiderato (per dettagli, guardare la
tabella programmi).
4. Premere il tasto di avvio programma
L’asciugabiancheria partirà automaticamente.
5. Se si apre la porta durante il ciclo per
controllare la biancheria, è necessario
successivamente richiudere la porta e
premere il tasto di avvio programma,
il ciclo di asciugatura ricomincerà
nuovamente.
6. Quando il ciclo è prossimo alla fine, inizia
una fase di raffreddamento. I capi
vengono asciugati con aria fredda al fine
di raffreddarli.
7. A seguito della fine del ciclo, il cesto
effettuerà delle rotazioni ad intermittenza
per minimizzare le pieghe. Continuerà
fino a quando l'asciugabiancheria verrà
spenta o la porta verrà aperta.
Potenza Assorbita / Ampere fusibile /
Tensione: vedere targhetta dati.
Carico massimo: vedere etichetta energetica.
Efficienza Energetica: vedere etichetta
energetica.
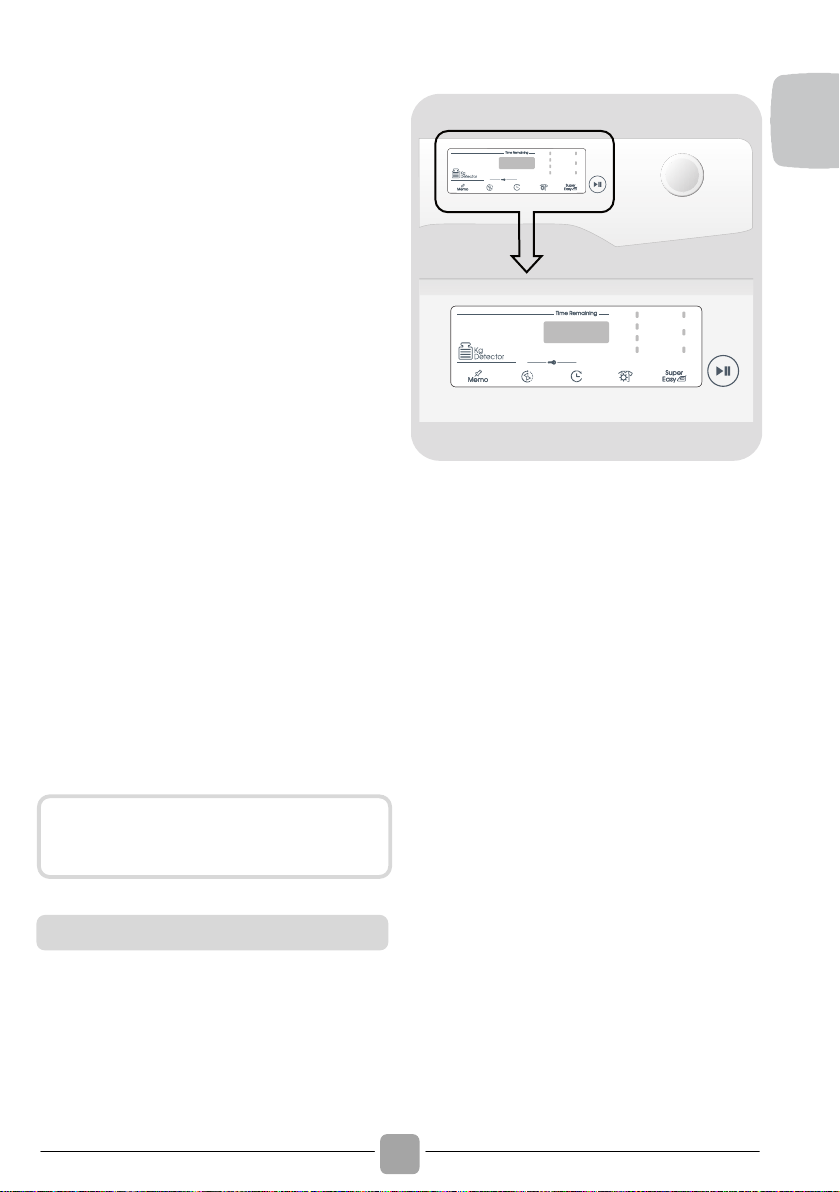
8.
COMANDI E PROGRAMMI
A
FG
C
DEB
H
A
Manopola programmi con
posizione di OFF
B
Tasto AVVIO/PAUSA
C
Tasto PARTENZA DIFFERITA
D
Tasto SELEZIONE TEMPO/RAPIDI
E
Tasto MEMO
F
Tasto SELEZIONE ASCIUGATURA
G
Tasto STIRO FACILE
H
DISPLAY
C+D
PROTEZIONE BAMBINI
Non aprire la porta durante i cicli di
asciugatura automatici per avere
un’asciugatura sempre efficace.
Dati tecnici
Page 18

!
18
! Ruotando la manopola in entrambe le
direzioni è possibile selezionare il
programma di asciugatura desiderato.
! Per annullare il programma selezionato o
spegnere l’asciugatrice, ruotare la manopola
in posizione OFF (ricordarsi anche di togliere
la spina).
- Impostazione lingua
! Dopo aver collegato la macchina alla rete
e averla accesa, premere il tasto "F" o
"G" per visualizzare le lingue disponibili.
ENGLISH è sempre la prima lingua
mostrata.
! Selezionare la lingua desiderata
premendo il tasto AVVIO/PAUSA.
- Modifica lingua impostata
Se si desidera modificare la lingua
impostata, sarà necessario tenere premuto
contemporaneamente i tasti "F" e "G" per
circa 5 secondi. Sul display apparirà la
scritta ENGLISH e sarà possibile scegliere
una nuova lingua.
! Per far partire il ciclo selezionato con i
parametri preimpostati premere il tasto
AVVIO/PAUSA. A programma in corso
verrà visualizzato sul display il tempo
rimanente.
! Se invece si vuole modificare il programma
scelto, premere i tasti delle opzioni
desiderate, modificare i parametri preimpostati
dopodiché premere AVVIO/PAUSA per
iniziare il ciclo.
! Dopo avere avviato l’asciugatrice si dovrà
attendere alcuni secondi affinché la
macchina inizi il programma.
DURATA PROGRAMMA
! Al momento della selezione di un
programma, verrà automaticamente
indicata la durata del ciclo che potrà
variare a seconda delle opzioni che
verranno selezionate.
! Dopo l’avvio del programma il display
terrà costantemente informati sul tempo
restante alla fine del ciclo di asciugatura.
! L’apparecchio calcola tale tempo in base
a un carico standard, ma durante il ciclo
la macchina corregge il tempo a seconda
del livello di umidità del carico.
FINE PROGRAMMA
! Alla fine del programma la scritta "FINE
("End" in alcuni modelli) verrà
visualizzata sul display e sarà possibile
aprire l'oblò.
! A fine ciclo spegnere l’asciugatrice
ruotando la manopola sulla posizione
OFF.
ATTENZIONE
Non toccare i tasti all'inserimento della
spina perché la macchina, nei primi
secondi, effettua un'autocalibrazione
che potrebbe essere interrotta: se ciò
avvenisse la macchina potrebbe non
funzionare in maniera ottimale. In tal
caso, togliere la spina e ripetere
l'operazione.
Manopola programmi con posizione
di OFF
Prima accensione
Tasto AVVIO/PAUSA
Chiudere l'oblò PRIMA di premere il
tasto AVVIO/PAUSA.
Sono selezionabili solo le opzioni
compatibili con il programma scelto.
La manopola deve essere SEMPRE
portata in posizione di OFF alla fine di
un ciclo di asciugatura e prima di
selezionarne uno nuovo.
Page 19

!
IT
19
METTERE LA MACCHINA IN PAUSA
! Tenere premuto il tasto AVVIO/PAUSA
per circa 2 secondi (il nome del
programma e l'indicazione del tempo
residuo lampeggiano quando la macchina
è in pausa).
! Premere nuovamente il tasto AVVIO/
PAUSA per riavviare il programma dal
punto in cui era stato interrotto.
CANCELLAZIONE PROGRAMMA
IMPOSTATO
! Per annullare il programma, ruotare la
manopola sulla posizione OFF.
Se dovesse mancare la corrente durante
il funzionamento dell’ apparecchio, una
speciale memoria conserverà l’impostazione
effettuata e, al ritorno della corrente, la
macchina ripartirà dalla fase del ciclo in
cui si era fermata.
! Questo tasto permette di ritardare la
partenza del ciclo di asciugatura da 30
minuti (1 ora in alcuni modelli) a 24 ore
a intervalli di 30 minuti (1 ora in alcuni
modelli). Il ritardo prescelto compare sul
display.
! Dopo aver premuto il pulsante AVVIO/
PAUSA, il tempo mostrato decresce di
minuto in minuto.
! È possibile trasformare un ciclo da
automatico a programmato, fino a 3
minuti dall'avvio del ciclo.
! La pressione progressiva aumenta il
tempo a intervalli di 10 minuti. Per
tornare al ciclo automatico è necessario
spegnere l'asciugatrice.
! In caso di incompatibilità, tutti i led
lampeggeranno velocemente per 3 volte.
! Se la manopola è posizionata sui
programmi rapidi, la pressione
progressiva del tasto permette di
scegliere la durata del ciclo tra: 30-45-59
minuti.
Questo tasto consente di memorizzare le
opzioni impostate su un ciclo.
MEMORIZZAZIONE:
a ciclo avviato, premere per 3 secondi il
tasto MEMO. La scritta MEMO (tutti i digit in
alcuni modelli) lampeggerà per 2 secondi e
le opzioni impostate collegate al ciclo
prescelto verranno memorizzate.
RICHIAMO:
dopo aver impostato il ciclo prescelto
premere il tasto MEMO per richiamare le
opzioni memorizzate.
! Questo tasto permette di selezionare il
livello di asciugatura desiderato, opzione
modificabile fino a 5 minuti dopo la
partenza del ciclo:
Pronto Stiro: lascia i panni
leggermente umidi, per facilitare la
stiratura.
Asciutto No Stiro: per capi da
appendere direttamente dopo
l’asciugatura, senza stirarli.
Asciutto Armadio: per capi che
possono essere direttamente riposti.
Extra-asciutto: per capi
completamente asciutti, ideale a
pieno carico.
Tasto PARTENZA DIFFERITA
In caso di apertura dell’oblò a partenza
differita attivata è necessario, dopo la
richiusura della porta, premere AVVIO/
PAUSA per riprendere il conteggio.
Tasto SELEZIONE TEMPO/RAPIDI
Tasto MEMO
La funzione partenza differita NON può
essere memorizzata.
Tasto SELEZIONE ASCIUGATURA
Page 20
!
20
!
Questo apparecchio è dotato della funzione
di Drying Manager. Nei cicli automatici,
ogni livello intermedio di asciugatura,
prima di raggiungere il livello selezionato,
viene segnalato con un indicatore luminoso
lampeggiante che corrisponde al grado di
asciugatura raggiunto.
In caso di incompatibilità, tutti i led
lampeggeranno velocemente per 3 volte.
! Durante il ciclo l’opzione imposta movimenti
alternati del cesto per ridurre le pieghe e
imposta automaticamente il livello di
asciugatura su "Pronto Stiro" (il livello di
asciugatura può essere modificato dopo la
selezione delle opzioni). Inoltre, questa
opzione attiva un ciclo anti-piega ad inizio (in
caso di attivazione della partenza differita) e
a fine asciugatura. Utile se non si ha la
possibilità di rimuovere immediatamente il
bucato, consente di mantenere il cesto in
movimento per non far appesantire i panni
asciutti e mantenerli morbidi. Si attiva ogni
10 minuti, fino a 6 ore dal termine del ciclo.
! Per interrompere il ciclo posizionare la
manopola su OFF.
! Le pressione contemporanea dei tasti
"C" e "D" per circa 2 secondi permette
di bloccare i tasti. In questo modo, si può
evitare che vengano effettuate modifiche
indesiderate o accidentali.
! Il blocco tasti può essere annullato,
semplicemente premendo nuovamente i
due tasti di attivazione.
! In caso di apertura oblò con l'opzione
PROTEZIONE BAMBINI attivata, il ciclo
si ferma ma il blocco si conserva: per far
ripartire il ciclo è necessario rimuovere il
blocco e premere di nuovo
AVVIO/PAUSA.
!
L'opzione PROTEZIONE BAMBINI è
modificabile in qualsiasi momento del
ciclo.
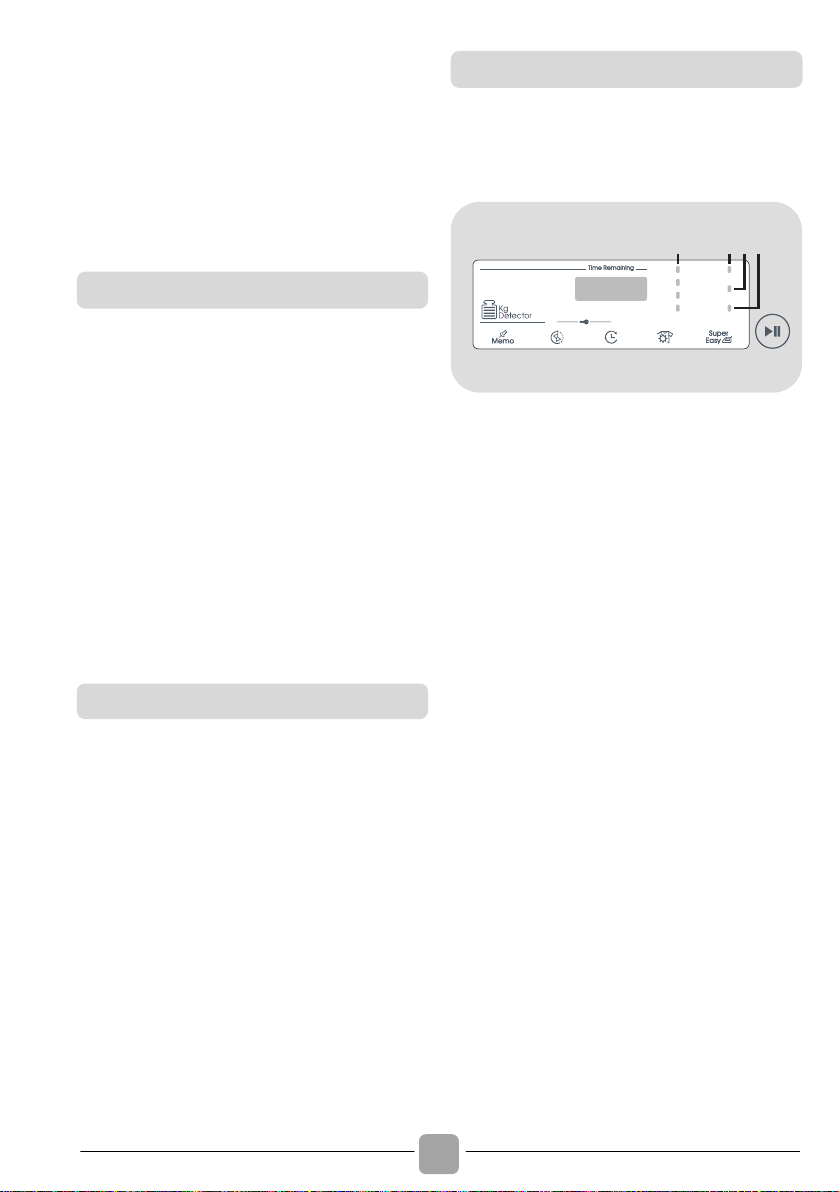
Il display consente di visualizzare il tempo
residuo di asciugatura, il ritardo in caso di
impostazione della partenza differita e altri
messaggi di notifica.
3
21 4
1) SPIE SELEZIONE ASCIUGATURA
Le spie indicano i gradi di asciugatura
selezionabili tramite l'apposito tasto:
2) SPIA TANICA ACQUA
Si accende per ricordare di svuotare la
tanica dell’acqua di condensa.
3) SPIA PULIZIA FILTRO
Si accende quando è necessario pulire i
filtri (filtro della porta e filtro inferiore).
4) SPIA Wi-Fi
! Nei modelli dotati di Wi-Fi, indica lo stato
della connessione. Può essere:
- ACCESA FISSA: controllo remoto attivo.
- LAMPEGGIANTE LENTA: controllo
remoto disattivo.
- LAMPEGGIANTE VELOCE PER 3
SECONDI, POI SPENTA: la macchina non
riesce a connettersi alla rete Wi-Fi
domestica o non è ancora stata arruolata
sull'App.
- LAMPEGGIANTE LENTA PER 3 VOLTE,
POI SPENTA PER 2 SECONDI: reset
della
rete Wi-Fi (durante l'arruolamento sull'App).
- ACCESA PER 1 SECONDO, POI
SPENTA PER 3 SECONDI: l'oblò è aperto.
Non è possibile attivare il controllo remoto.
Tasto STIRO FACILE
PROTEZIONE BAMBINI
Display
Page 21
!
IT
21
! Per tutte le informazioni relative alle
funzionalità e alle istruzioni per una facile
configurazione del Wi-Fi, fare riferimento al
sito: go.candy-group.com/bm-td-ble
Il ciclo standard COTONE ( ) è quello
a maggior efficienza energetica e il più
adatto per un’asciugatura di un normale
bucato bagnato in cotone.
Massima capacità di asciugatura
Cotone
Massima capacità
dichiarata
Sintetici o delicati
Max. 4 kg
EN 61121 - Programmi da usare:
- COTONE ASCIUTTO
- COTONE ASCIUTTO DA STIRARE
(BIANCHI - Pronto Stiro)
- TESSUTI DELICATI - SINTETICI
(SINTETICI - Asciutto No Stiro)
Guida ad una corretta asciugatura
Informazioni per test di laboratorio
ATTENZIONE
Pulire i filtri prima di effettuare ogni
ciclo.
ATTENZIONE
La reale durata del ciclo di asciugatura
dipende dal livello di umidità di
partenza del carico a causa della
velocità di centrifuga, dal tipo e dalla
quantità del carico, dalla pulizia dei
filtri e dalla temperature ambientale.
ATTENZIONE
Solo per asciugabiancheria con
capacità di 10/11 kg dotate di kit tubo
di scarico: collegare il kit per il
recupero dell'acqua di condensa
(secondo le istruzioni riportate nel
capitolo dedicato).
Page 22
!
22
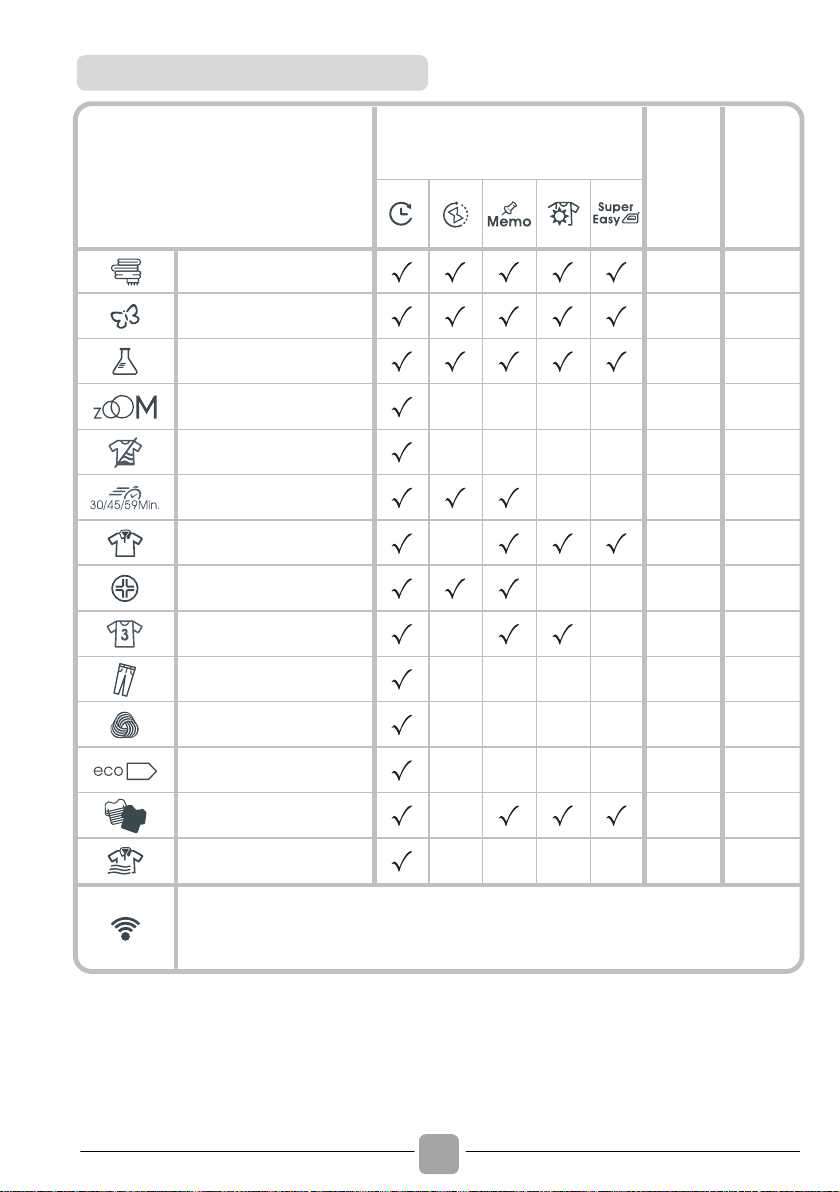
PROGRAMMA
Opzioni selezionabili
CAPACITÀ
(kg)
TEMPO DI
ASCIUGATURA
(min)
BIANCHI
Full
*
DELICATI
4
*
SINTETICI
4
*
ZOOM
-
- - -
3,5
*
RELAX
- - -
-
2,5
12'
RAPIDI 30'/45'/59'
-
-
2,5
*
CAMICIE
-
2,5
*
ANTI ALLERGIA
-
-
4
Max 220'
SPORT PLUS
-
-
4
*
JEANS
- - -
-
4
*
LANA CERTIFICATA
- - -
-
1
70’
COTONE NORMATIVO
- - -
-
Full
*
SCURI & COLORATI
-
4
*
REFRESH
- - -
-
2,5
20'
CONTROLLO REMOTO (Wi-Fi)
Posizione da selezionare per abilitare/disabilitare il controllo da remoto tramite App,
via Wi-Fi.
* La reale durata del ciclo di asciugatura dipende dal livello di umidità di partenza del bucato dovuta
alla velocità di rotazione, tipologia e quantità di carico, pulizia del filtro e temperatura ambientale.
Tabella programmi
Page 23
!
IT
23
Per trattare i vari tipi di tessuto e colori,
l’asciugatrice è dotata di programmi
specifici, adatti ad ogni esigenza di
asciugatura (vedere tabella programmi).
BIANCHI
Ciclo ideale per asciugare capi in cotone,
spugne e asciugamani.
DELICATI
Ciclo studiato per asciugare tessuti delicati.
SINTETICI
Ciclo studiato per asciugare tessuti sintetici.
ZOOM
Zoom è un ciclo esclusivo per asciugare un
carico di biancheria con tessuti differenti
insieme (cotone e sintetici). Se il carico è
minore di quello consigliato o con un basso
livello di umidità residua, il ciclo si accorcia
per non sovra-asciugare i capi.
RELAX
Ciclo a caldo che in 12 minuti consente di
ridurre la formazione di pieghe e facilitare la
stiratura.
RAPIDI 30'/45'/59'
I cicli rapidi ti permettono di avere i capi
pronti in un tempo breve, puoi scegliere se
asciugarli in 30, 45, 59 minuti.
CAMICIE
Programma dedicato all'asciugatura di
camicie, limitando la formazione di pieghe e
grovigli tramite opportune movimentazioni
del cesto. E' consigliabile rimuovere i capi
appena il ciclo di asciugatura è terminato.
ANTI ALLERGIA
Un programma studiato per asciugare e allo
stesso tempo ridurre la presenza di
allergeni come acari della polvere, peli di
animali e pollini.
SPORT PLUS
Ciclo studiato per l'asciugatura di tessuti
tecnici, preservando l'elasticità delle fibre.
JEANS
Un ciclo studiato per asciugare uniformemente
tessuti come jeans o denim. E' consigliato
rovesciare i capi prima dell'asciugatura.
LANA CERTIFICATA
Per capi in lana: il programma può essere
utilizzato per asciugare fino a 1 kg di
biancheria (circa 3 maglioni). Si consiglia di
rovesciare i capi prima di asciugarli. Il
tempo può variare a seconda delle
dimensioni e della densità del carico e della
centrifuga scelta per il lavaggio. A fine ciclo
i capi sono pronti per essere indossati, ma
nel caso di indumenti più pesanti i bordi
potrebbero risultare leggermente umidi: si
suggerisce di farli asciugare naturalmente.
Si consiglia di estrarre subito i capi al
termine del ciclo di asciugatura.
Attenzione: il processo di ristringimento
della lana è irreversibile; asciugare
esclusivamente i capi con simbolo "ok
tumble". Questo programma non è
indicato per capi acrilici.
COTONE NORMATIVO
Programma eco normativo (hang dry)
ideale per capi in cotone. Il più efficiente in
termini di consumo energetico per
l'asciugatura di questi tessuti.
Descrizione programmi
Il programma "ciclo lana” di questa
asciugabiancheria è stato approvato
da The Woolmark Company per
l’asciugatura dei capi in lana
etichettati "lavabili in lavatrice”,
purché capi siano lavati e asciugati
seguendo le istruzioni riportate
sull'etichetta cucita al capo e le
indicazioni fornite dal fabbricante
della macchina M1530.
Nel Regno Unito, nell’Eire, a Hong
Kong e in India il marchio Woolmark
è un marchio certificato.
Page 24

!
24
SCURI & COLORATI
Il ciclo ideale per asciugare capi scuri e
colorati in cotone o sintetici.
REFRESH
Il ciclo ideale per eliminare i cattivi odori dai
capi e ridurre le pieghe.
CONTROLLO REMOTO (Wi-Fi)
Posizione da selezionare per abilitare/
disabilitare il controllo remoto tramite App,
via Wi-Fi. In tal caso, la partenza del ciclo
avverrà mediante i comandi stessi dell'App.
Maggiori dettagli nel capitolo CONTROLLO
REMOTO (Wi-Fi).
Page 25

!
IT
25
9. RISOLUZIONE
PROBLEMI E GARANZIA
Problemi che può risolvere l’utente.
Prima di rivolgersi al Centro Assistenza
consultare la seguente checklist. La
chiamata verrà addebitata all'utente nel
caso in cui risulti che la macchina funziona
o è stata installata o utilizzata in maniera
errata. Se il problema persiste anche dopo
aver eseguito i controlli consigliati, rivolgersi
al servizio di assistenza che sarà a
disposizione per suggerire eventuali
soluzioni per telefono.
Il tempo di asciugatura residuo può variare
durante il ciclo. Il tempo infatti viene
costantemente aggiornato per migliorarne
la
stima. E’ pertanto normale che
durante il ciclo, il tempo mostrato sul
display possa aumentare o diminuire.
Tempo di asciugatura eccessivamente
lungo/capi non sufficientemente asciutti…
! Il programma/tempo di asciugatura
selezionato è corretto?
!
I capi sono stati introdotti eccessivamente
bagnati?
! Si è provveduto a strizzare o centrifugare
adeguatamente i capi prima di introdurli
nella macchina?
! Si deve pulire il filtro?
! Si deve pulire il condensatore?
! L’asciugatrice è stata caricata
eccessivamente?
! Vi sono ostruzioni a livello delle prese,
degli sfiati e della base dell’ asciugatrice?
L’asciugatrice non funziona…
! L’ alimentazione elettrica cui è collegata
la macchina è attiva? Controllare
provando con un altro apparecchio (ad
esempio, lampada da tavolo).
! La spina di alimentazione è stata
collegata correttamente all’ alimentazione
elettrica?
! Manca la corrente?
! Fusibile bruciato?
! Il portellone è stato chiuso perfettamente?
! La macchina è stata opportunamente
attivata (sia collegata all’ alimentazione
sia attivata localmente)?
! È stato selezionato il tempo o il
programma di asciugatura?
! La macchina è stata riattivata dopo aver
aperto il portellone?
! La macchina ha smesso di funzionare
perché la vaschetta dell’ acqua è piena e
deve essere svuotata?
L’asciugatrice fa molto rumore…
! Spegnere l’asciugatrice e rivolgersi al
Servizio Assistenza.
La spia pulizia filtro è accesa…
! Si deve pulire il filtro?
La spia vaschetta dell'acqua è accesa…
! Si deve svuotare la vaschetta dell’acqua?
Se il problema persiste anche dopo aver
effettuato tutti i controlli consigliati, rivolgersi
al Servizio Assistenza. Sarà a disposizione
per suggerire eventuali soluzioni per
telefono o per fissare la visita del tecnico in
base alle condizioni di garanzia. Si ricorda
che l’intervento del tecnico può essere
soggetto a pagamento nel caso la
macchina:
! risulti perfettamente funzionante.
! non sia stata installata secondo quanto
indicato nelle istruzioni d’installazione.
! sia stata utilizzata in modo improprio.
Utilizzare sempre ricambi originali,
disponibili direttamente presso il Servizio
Assistenza.
Quale può essere la causa...
Servizio assistenza clienti
Ricambi
Page 26
!
26
Per assistenza e riparazioni, rivolgersi al
tecnico del Servizio Assistenza più vicino.
Apponendo la marcatura su questo
prodotto, dichiariamo, sotto la nostra
responsabilità, di ottemperare a tutti i
requisiti relativi alla tutela di sicurezza,
salute e ambiente previsti dalla
legislazione europea in essere per
questo prodotto.
Per garantire la sicurezza al momento dello
smaltimento di una asciugatrice, scollegare
la spina dell’alimentazione dalla presa,
tagliare il cavo dell’alimentazione di rete e
distruggerlo insieme alla spina. Per evitare
che i bambini possano rimanere intrappolati
all'interno dell'asciugatrice, rompere i
cardini o la chiusura dell’oblò.
La ditta costruttrice declina ogni
responsabilità per eventuali errori di
stampa contenuti nel libretto presente in
questo prodotto. Si riserva inoltre il diritto
di apportare le modifiche che si renderanno
utili ai proprio prodotti senza compromettere
le caratteristiche essenziali.
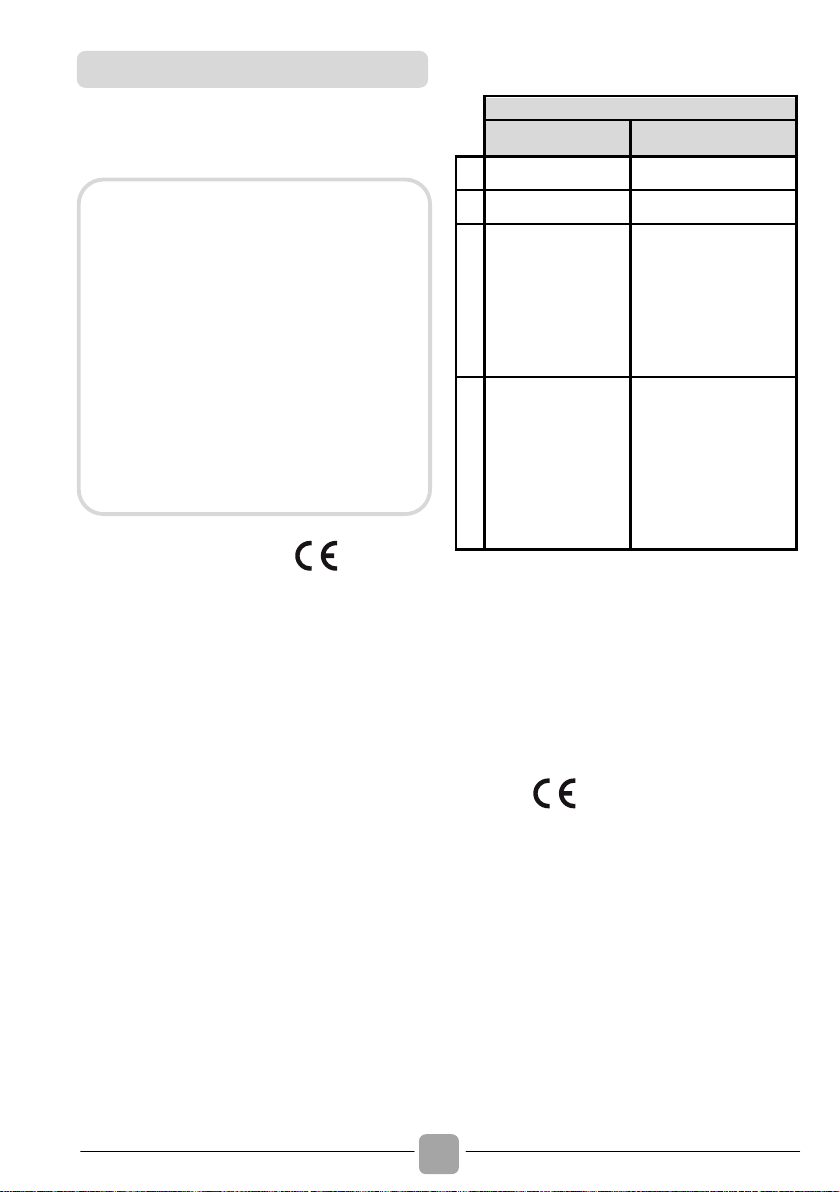
PARAMETRI WIRELESS
Wi-Fi
Specifications
(Wi-Fi)
Specifications
(Bluetooth)
A
802.11 b/g/n
Bluetooth v4.2
B
2,412 GHz. - 2,484
GHz.
2,412 GHz. - 2,484 GHz.
C
802.11b, DSSS 1 Mbps =
+19.5 dBm
802.11b, CCK 11 Mbps =
+18.5 dBm
802.11g, OFDM 54 Mbps =
+18.5 dBm
802.11n, MCS7 =
+14 dBm
Basic data Rate:
RF Transmit Power (Typ):
+4 dBm
Enhanced data Rate:
RF Transmit Power (Typ):
+2 dBm
BLE
RF Transmit Power (Typ):
+7.5 dBm
D
802.11b = 1024 bytes,
-80 dBm
802.11g = 1024 bytes,
-70 dBm
802.11n = 1024 bytes,
-65 dBm
802.11n HT40 = 1024
bytes, -65 dBm
Basic data Rate:
Sensivity @ 0.1% BER:
-98 dBm
Enhanced data Rate:
Sensivity @ 0.01% BER:
-98 dBm
BLE
Sensivity @ 0.1% BER:
-98 dBm
A Standard di trasmissione wireless
B Banda di frequenza
C Massima potenza di trasmissione
D Minima sensibilità in ricezione
Con la presente la Candy Hoover Group
Srl, dichiara che questo apparecchio
marcato è conforme ai requisiti
essenziali dalla Direttiva 2014/53/EU.
Per ricevere copia della dichiarazione di
conformità, contattare il costruttore al
sito: www.candy-group.com
Servizio assistenza tecnica
Garanzia
Il prodotto è garantito, oltre che ai sensi di
legge, alle condizioni e nei termini riportati
sul certificato di garanzia convenzionale
inserito nel prodotto. Il certificato dovrà
essere conservato e mostrato al nostro
Centro di Assistenza Tecnica Autorizzato, in
caso di necessità, insieme allo scontrino
comprovante l’acquisto dell’elettrodomestico.
Puoi consultare le condizioni di garanzia
anche sul nostro sito internet.
Per ottenere assistenza compila l’apposito
form on-line oppure contattaci al numero
che trovi indicato nella pagina di assistenza
del nostro sito internet.
Page 27

!
DE
27
Page 28

!
28
Vielen Dank, dass Sie sich für dieses Produkt
entschieden haben. Wir freuen uns, Ihnen das
ideale Produkt und das bestmögliche,
vollständige Sortiment an Haushaltsgeräten für
Ihren Alltag bieten zu können.
Bitte lesen Sie diese Anleitung
sorgfältig durch und richten Sie sich bei der
Bedienung der Wäschetrockner an die
Anleitung. Dieses Handbuch enthält wichtige
Hinweise für die sichere Installation, Anwendung
und Wartung sowie einige nützliche Hinweise für
optimale Ergebnisse beim Gebrauch Ihrer
Maschine. Heben Sie diese Dokumentation an
einem sicheren Ort auf, um jederzeit wieder
darauf zurückgreifen zu können bzw. um sie an
zukünftige Besitzer weitergeben zu können.
Zum Lieferumfang Ihrer Maschine gehören
folgende Dokumentation und Zusatzteile:
• Bedienungsanleitung
• Garantieschein
• Energieeffizienzklasse
Überprüfen Sie, ob die Maschine während
des Transports nicht beschädigt wurde.
Falls dies so ist, kontaktieren Sie das
Kundendienstzentrum. Die Nichteinhaltung
der oben genannten Anweisungen kann die
Sicherheit des Geräts beeinträchtigen. Falls
ein Problem Ihres Geräts durch
unsachgemäßen Gebrauch oder durch eine
falsche Installation verursacht wurde,
können Ihnen die Kosten für den Besuch
eines Kundendiensttechnikers in Rechnung
gestellt werden. Halten Sie für Ihre
Kontaktaufnahme mit dem Kundendienst
die einmalige, 16-stellige Seriennummer
Ihres Geräts bereit. Diese Nummer ist ein
einmaliger Code für Ihr Produkt und
befindet sich auf dem Aufkleber an der
Innenseite der Türe.
Dieses Gerät ist entsprechend der
europäischen Richtlinie 2012/19/EU
als elektrisches / elektronisches Altgerät
(WEEE) gekennzeichnet.
Elektrische und elektronische Altgeräte
enthalten vielfach noch wertvolle Materialien.
Sie enthalten aber auch schädliche Stoffe,
die für ihre Funktion und Sicherheit
notwendig waren. Im Restmüll oder bei
falscher Behandlung können diese der
menschlichen Gesundheit und der Umwelt
schaden. Es ist daher sehr wichtig, dass
elektrische und elektronische Altgeräte
(WEEE) einer
speziellen Verwertung zugeführt
werden, damit die schädlichen Stoffe ordnungsgemäß
entfernt und entsorgt werden bzw. wertvolle
Rohstoffe der Wiederverwertung zugeführt werden
können. Sie können mit der Beachtung der
folgenden simplen Hinweise einen wichtigen
Beitrag dazu leisten, dass elektrische und
elektronische Altgeräte (WEEE) der menschlichen
Gesundheit und der Umwelt nicht schaden:
! Elektrische- und elektronische Altgeräte
(WEEE) sollten keinesfalls wie Rest- oder
Haushaltsmüll behandelt werden.
! Nutzen Sie stattdessen die an Ihrem Wohnort
eingerichteten kommunalen oder gewerblichen
Sammelstellen zur Rückgabe und Verwertung
elektrischer und elektronischer Altgeräte (WEEE).
Informieren Sie sich, ob ggf. in Ihrem Land bzw.
Ihrer Region für große/sperrige elektrische und
elektronische Altgeräte (WEEE) eine Abholung
angeboten wird. Sorgen Sie in jedem Falle dafür,
dass Ihr Altgerät bis zum Abtransport kindersicher
aufbewahrt wird.
In einigen Ländern sind Händler unterbestimmten
Voraussetzungen beim Geräteneukauf auch zur
Rücknahme des Altgerätes verpflichtet, wenn das
Altgerät dem neuen Fabrikat in der Funktion
entspricht.
1. GENERELLE SICHERHEITSHINWEISE
2. ABLAUFSCHLAUCH-KIT
3. WASSERBEHÄLTER
4. TÜR UND FILTER
5. PRAKTISCHE TIPPS
6. FERNBEDIENUNG (WLAN)
7. KURZANLEITUNG
8. STEUERUNG UND PROGRAMME
9.
PROBLEMLÖSUNGEN UND GARANTIE
Umweltbedingungen
Inhalt
Page 29
!
DE
29
1. GENERELLE
SICHERHEITSHINWEISE
! Dieses Gerät ist ausschließlich
für den Haushaltsgebrauch konzipiert
bzw. für den haushaltsnahen
Gebrauch, wie z.B:
- Teeküchen für das Personal von
Büros, Geschäften oder ähnlichen
Arbeitsbereichen;
- Ferienhäuser;
- Gäste von Hotels, Motels und
anderen Wohneinrichtungen;
- Gäste von Apartments/
Ferienwohnungen, Bed and
Breakfast Einrichtungen
Eine andere Nutzung als die
normale Haushaltsnutzung, wie z.B.
gewerbliche oder professionelle
Nutzung durch Fachpersonal, ist
auch im Falle der oben erwähnten
Einrichtungen ausgeschlossen.
Sollte das Gerät entgegen diesen
Vorschriften betrieben werden,
kann dies die Lebensdauer des
Gerätes beeinträchtigen und den
Garantieanspruch gegenüber dem
Hersteller verwirken. Eventuelle
Schäden am Gerät oder andere
Schäden oder Verluste, die durch
eine nicht haushaltsnahe Nutzung
hervorgerufen werden sollten (selbst
wenn sie in einem Haushalt erfolgen),
werden, so weit vom Gesetz
ermöglicht, vom Hersteller nicht
anerkannt.
!
Kinder unter 8 Jahren sowie
Personen, die aufgrund ihrer
physischen, sensorischen oder
geistigen Fähigkeiten oder ihrer
Unerfahrenheit oder Unkenntnis
nicht in der Lage sind, die
Maschine sicher zu bedienen, dürfen
die Maschine nicht ohne Aufsicht
oder Anweisung durch eine
verantwortliche Person benutzen, sich
in der Nähe aufhalten oder das Gerät
saubermachen. Kinder sollten
nicht mit
dem Gerät spielen. Reinigung und
Benutzerwartung sollten nicht von Kindern
ohne Einführung, ausgeführt werden.
! Kinder sollten über das Gerät
aufgeklärt werden, damit Sie
nicht mit dem Gerät spielen.
! Kinder unter 3 Jahren dürfen sich
nicht unbeaufsichtigt in der Nähe des
Gerätes aufhalten oder spielen.
! Diese Maschine dient als
Haushaltsgerät ausschließlich
zum Trocknen von Haushaltstextilien
und Kleidungsstücken.
! Prüfen Sie vor dem Betrieb des
Geräts, ob die Installationsund Gebrauchsanleitung richtig
verstanden und beachtet wurde.
! Berühren Sie das Gerät nicht
mit feuchten oder nassen
Händen oder Füßen.
WARNUNG
Zweckentfremdung des Trockners
kann zu Brandgefahr
führen.
Page 30
!
30
!
Lehnen Sie sich nicht gegen
die Tür, wenn Sie die Maschine
beladen, und fassen Sie die
Maschine nicht an der Tür,
wenn Sie sie hochheben oder
verschieben
.
! Verwenden Sie die Maschine
bei vermuteten Störungen nicht
weiter.
! Den Trockner nicht einsetzen,
wenn für die Reinigung Chemikalien
verwendet wurden.
! Fusseln und Flusen dürfen sich
nicht auf dem Fußboden im
Bereich um die Maschine ansammeln.
! Ziehen Sie vor der Reinigung
des Geräts immer den Netzstecker.
!
Die Trommel in dem Gerät kann
sehr heiß werden. Lassen Sie
den Trockner stets vollständig
bis zum Ende der Abkühlphase
laufen, bevor Sie die Wäsche
herausnehmen.
! Der letzte Trockendurchgang
erfolgt ohne Hitze (Abkühlen),
um zu gewährleisten, dass die
Wäschestücke am Ende eine
Temperatur haben, die sie
nicht schädigt.
WARNUNG
Verwenden Sie das Produkt nicht,
wenn das Flusensieb nicht richtig
eingebaut oder beschädigt ist;
Flusen könnten Feuer fangen.
WARNUNG
An der Stelle an der sich das
Symbol für heiße Flächen
befindet, kann die Temperatur
während des Trocknerbetriebs
auf über 60°C steigen.
WARNUNG
Den Trockner niemals vor dem
Ende ausschalten; anderenfalls
die Wäschestücke schnell
entnehmen und ausschlagen
oder glattstreichen, damit die
Hitze verfliegen kann.
WARNUNG
Das Gerät soll möglichst stehend
transportiert werden. Bei Bedarf
kann es nur in
die gezeigte
Richtung geneigt
werden.
Wenn das Gerät in eine andere
Lage transportiert wurde, warten
Sie mindestens 4 Stunden,
bevor Sie es einschalten, damit
sich die Flüssigkeit im
Kompressor wieder stabilisieren
kann. Tun Sie es nicht, können
Schäden am Kompressor
die Folge sein.
Page 31

!
DE
31
!
Bitte das Gerät keinesfalls in
einem Raum mit zu niedriger
Raumtemperatur, außerhalb
geschlossener Räume oder
im
Freien in Betrieb nehmen. Bei
diesen Umgebungsbedingungen
ist der ordnungsgemäße Betrieb
des Gerätes nicht gewährleistet
bzw. das Gerät könnte Schaden
nehmen (Flüssigkeiten im
Hydraulikkreislauf können zu
zäh werden oder gar einfrieren
und dadurch Bauteile wie
Ventile oder Schläuche beschädigt
werden).
Die Raumtemperatur
sollte immer im Bereich
zwischen +5°C und + 35°C
liegen. Im Temperaturbereich
zwischen +2°C und +5°C
könnte sich
Kondenswasser am
Gerät oder
im Raum bilden.
! Falls der Wäschetrockner auf
einer Waschmaschine aufgestellt
werden soll, muss ein passender
Aufbaumontagesatz verwendet
werden, der für Ihr Gerät
geeignet ist:
- Aufbaumontagesatz in
der Standardgröße: für
Waschmaschinen mit einer
Mindesttiefe von 44 cm;
-
Aufbaumontagesatz in der Größe
Slim: für Waschmaschinen
mit einer Mindesttiefe von 40
cm.
-
Universal-Stapelkit mit Gleitboden:
für Waschmaschinen mit einer
Mindesttiefe von 47 cm.
Der Aufbaumontagesatz ist über
unseren Ersatzteilservice erhältlich.
Anweisungen zum Aufbau und
zur Befestigung eventueller
Elemente sind im Lieferumfang
des Aufbaumontagesatzes enthalten.
! Stellen sie den Trockner AUF
KEINEN FALL in der Nähe von
Vorhängen oder Gardinen auf.
! Das Gerät darf nicht hinter
einer verschließ baren Tür,
einer Schiebetür oder einer Tür
mit Scharnier an der dem
Trockner entgegen gesetzten
Seite installiert werden.
!
Damit Ihre Sicherheit gewährleistet
werden kann, muss das Gerät
richtig installiert werden. Wenn
Fragen oder Zweifel bezüglich
der Installation bestehen, kontaktieren
Sie den Kundendienst.
! Sobald sich die Maschine am
endgültigen Ort befindet, sollten
die Füße so eingestellt werden,
dass die Maschine eben steht.
Installation
Page 32

!
32
! Die technischen Details
(Versorgungsspannung und
Leistungsaufnahme) sind auf
dem Typenschild angegeben.
! Vergewissern Sie sich, dass die
elektrische Anlage geerdet ist, alle
geltenden Gesetze eingehalten
werden und dass Ihre Steckdose
mit dem Stecker des Gerätes
kompatibel ist. Ansonsten
holen Sie sich bitte qualifizierte
professionelle Unterstützung.
! Verwenden Sie keine Adapter,
Mehrfachsteck dosen und/oder
Verlängerungskabel.
! Der Stecker muss nach der
Installation des Gerätes
zugänglich sein.
!
Gerät erst nach abgeschlossener
Installation in die Steckdose
stecken und einschalten.
!
Sollte das Netzkabel beschädigt
sein, so muss dieses vom Hersteller,
einem seiner Servicetechniker
oder von qualifizierten Personal
ausgetauscht werden, um Risiken
zu vermeiden.
! In dem Raum, in dem sich der
Trockner befindet, muss eine
ausreichende Entlüftung
vorhanden sein, um zu
verhindern, dass Gase aus der
Verbrennung anderer Brennstoffe,
zum Beispiel offene Feuer,
während des Trocknerbetriebs
in den Raum gesogen werden.
! Hinweis zur Aufstellung des Gerätes
an Wänden oder in Nischen.
!
Zwischen Maschine und möglichen
Blockierungen sollte ein mindestens
12 mm breiter Spalt sein. Der
Luftein- und -auslass darf nicht
blockiert werden.
! Falls Sie das Gerät auf einen
Teppich oder Teppichboden
aufstellen, achten Sie darauf,
dass die Unterseite oder
Lufteinlässe am Gerät nicht
blockiert werden.
! Achten Sie darauf, dass keine
Gegenstände zwischen beiden
Seitenteilen und der Rück-seite
des Trockners herunterfallen
und sich dort ansammeln, da
hierdurch die Ansaug- und
Abluftanschlüsse blockiert
werden können.
Elektrische Anschlüsse und
Sicherheitshinweise
WARNUNG
Das Gerät darf nicht mit
einem externen Schaltgerät
wie etwa einem Timer betrieben
werden oder an einen
Stromkreis der regelmäßig
ein- und ausgeschaltet wird
angeschlossen werden.
Entlüftung
Page 33

!
DE
33
! Die Abluft darf nicht in einen
Kaminschacht geleitet werden,
der für das Ableiten von Rauch
aus der Verbrennung von Gas
oder anderen Brennstoffen
verwendet wird.
! Prüfen Sie in regelmäßigen
Abständen, dass die Luftzirkulation
im und um den Trockner nicht
blockiert wird, und verhindern
Sie, dass sich Staub und
Flusen ansammeln.
! Bitte alle Filter regelmäßig
prüfen und ggf. reinigen.
* Luftauslass (je nach Modell).
! Sehen Sie immer auf den
Pflegeetiketten nach, ob das
Material für das Trocknen
geeignet ist.
! Weichspüler oder ähnliche
Produkte sollten wie in
der Gebrauchanleitung des
Weichspülers angegeben
verwendet werden.
!
Trocknen Sie keine ungewaschenen
Gegenstände im Trockner.
! Textilien vor dem Einfüllen in
den Trockner erst schleudern
oder gründlich auswringen.
! Füllen Sie KEINE tropfnassen
Textilien in den Trockner.
! KEINE Vorhänge aus
Glasfasermaterial in die
Maschine füllen. Kommen
andere Textilien mit Glasfasern
in Berührung, so kann dies zu
Hautreizungen führen.
Die Wäsche
WARNUNG
Wenn Schaumgummimaterialien
heiß werden, können sie sich
unter bestimmten Bedingungen
plötzlich entzünden. Gegenstände
wie Schaumgummi (Latex schaumstoff), Duschhauben,
wasserab weisende Textilien,
mit Gummi verstärkte Produkte
sowie Kleidungsst ücke oder
Kissen mit Schaumstoffpolster
sind für den Wäschetrockner
NICHT GEEIGNET.
WARNUNG
AUF KEINEN FALL Stoffe in
der Maschine trocknen,
die
mit chemischen Reinigungs
mitteln behandelt wurden.
Page 34

!
34
!
Gegenstände, die mit Substanzen
wie Speiseöl, Azeton, Alkohol,
Benzin, Kerosin, Fleckenentferner,
Terpentin, Wachsen und
Wachsentferner getränkt sind,
sollten mit einer zusätzlichen
Menge Waschpulver in heißem
Wasser gewaschen werden,
bevor sie im Trockner
getrocknet werden.
!
Entfernen Sie alle Gegenstände,
wie Feuerzeuge und Streichhölzer
aus Ihren Taschen.
! Feuerzeuge und Streichhölzer
unbedingt aus den Taschen
entfernen und AUF KEINEN
FALL mit feuergefährlichen
Flüssigkeiten in der Nähe der
Maschine hantieren.
! Max. füllmenge: s. Energielabel.
!
Für die technischen Daten des
Produktes schauen Sie bitte auf
der Internetseite des Herstellers
nach.
Page 35

!
DE
35
WARNUNG
Brandgefahr/Brennbares Material
! Das Gerät enthält R290, ein
umweltverträgliches Kühlgas,
das brennbar ist. Halten Sie
offenes Feuer und Zündquellen
daher vom Gerät fern.
! Überprüfen Sie das Gerät auf
sichtbare Beschädigungen.
Betreiben Sie das Gerät nicht,
wenn es beschädigt ist.
!
Kontaktieren Sie bei Problemen
Ihren Fachhändler oder eins
unserer Kundendienstzentren.
WARNUNG
Sicherstellen, dass die
Gehäuseöffnungen am Gerät
und die Öffnungen der
Einbauschränke, in die das
Gerät (nur Einbaumodelle)
eingebaut wurde, frei sind.
WARNUNG
Den Kühlkreislauf nicht
beschädigen.
! Alle Reparaturen oder Eingriffe
am Gerät müssen von einem
autorisierten Kundendienst
durchgeführt werden.
! Eine falsche Entsorgung des
Geräts kann Brände verursachen
und zu Umweltverschmutzungen
führen.
! Entsorgen Sie das Gerät
ordnungsgemäß, und achten
Sie darauf, dass die Rohre und
Leitungen mit der Kühlflüssigkeit
nicht beschädigt werden.
Page 36

!
36
2. ABLAUFSCHLAUCH-KIT
Damit der Wasserbehälter nicht nach jedem
Trocknen geleert werden muss, kann ein
Ablaufschlauch angeschlossen werden,
sodass das Wasser direkt in den Abfluss
ablaufen kann. Gemäß der Abwasservorschriften,
darf es nicht in das Oberflächenwasser geleitet
werden. Der Abwasseranschluss sollte sich
in der Nähe des Trockners befinden.
Das Kit enthält Folgendes: 1 Schlauch
und 1 Verschlusszapfen.
1. Maschine vorsichtig auf die rechte Seite
kippen.
2. Der Wasserabfluss befindet sich auf der
rechten Maschinenseite (siehe Bild).
Ein grauer Schlauch ist mit dem
internen Anschluss auf der linken
Geräteseite verbunden. Entfernen Sie
die Schlauchklemme mit einer Zange
vom internen Anschluss.
3. Ziehen Sie den Schlauch vom
Anschluss ab.
4. Verschließen Sie den verbleibenden
Schlauch mit dem im Lieferumfang
enthaltenen Zapfen.
5. Befestigen Sie den im Kit enthaltenen,
schwarzen Schlauch (mit dem mitgelieferten
Anschluss und Schlauchklemmen) am
Schlauch, der vom inneren Anschluss
abgenommen wurde.
WARNUNG
Den Trockner vor der Montage und
allen Wartungsarbeiten ausschalten
und den Netzstecker ziehen.
Den Schlauch wie folgt
anschließen
Wenn die Maschine wieder aufrecht
steht, prüfen Sie, ob der Schlauch
nicht eingeknickt wird, wenn der
Trockner an seinen Platz geschoben
wird.
Page 37

!
DE
37
3. WASSERBEHÄLTER
Das beim Trocknen entwichene Wasser
wird in einem Behälter gesammelt. Wenn
der Behälter voll ist, geht die dazugehörige
Kontrollleuchte auf dem Bedienfeld an und
der Behälter MUSS ausgeleert werden. Es
wird jedoch empfohlen, den Behälter nach
jedem Trocknen auszuleeren.
1.
Ziehen Sie den Wasserbehälter vorsichtig
am Griff heraus (A).
Wenn er voll ist, wiegt er zirka 6 kg.
2. Den Wasserbehälter kippen, sodass das
Wasser aus dem Ausguss ablaufen
kann (B).
Den leeren Behälter wie gezeigt wieder
einsetzen. (C) Platzieren Sie zuerst den
unteren Teil des Behälters wie gezeigt
(1). Schieben Sie dann den oberen Teil
vorsichtig hinein (2).
3. Drücken Sie die Starttaste, um das
Programm wieder aufzunehmen.
A
B
1
C
* je nach Modell
1.
Ziehen Sie die Frontblende unten vorsichtig
heraus, sodass sich ihre Klemmen vom
Trockner lösen. Der obere Teil lässt sich
aushängen, sodass die Frontblende
komplett abgenommen werden kann (A).
2. Den Wasserbehälter fest am Handgriff
aus dem Trockner ziehen (B).
Behälter mit beiden Händen festhalten
(C). Wenn er voll ist, wiegt der
Wasserbehälter zirka 4 kg.
3. Klappe oben auf dem Behälter öffnen
und Wasser ausgießen (D).
4.
Klappe wieder aufsetzen und den Behälter
zurück an Ort und Stelle schieben (D).
VORSICHTIG HINEINSCHIEBEN.
5. Die Frontblende wieder anbringen, indem
die Scharniere oben eingesetzt und die
unteren Clips eingerastet werden.
A
B
C
D
* je nach Modell
Während der allerersten Trockengänge
fließt nur wenig Wasser in den
Sammelbehälter, da zuerst ein internes
Reservoir gefüllt wird.
So entfernen Sie den Wasserbehälter
in der Türschublade *
NUR FÜR MODELLE MIT
ABLAUFSCHLAUCH-KIT
Falls sich in der Nähe des Trockners
ein Abfluss befindet, kann über das
Ablaufschlauch-Kit auch ein dauerhafter
Abfluss für das im Wasserbehälter
gesammelte Wasser hergestellt werden.
Dies bedeutet, dass Sie den Wasserbehälter
nicht mehr ausleeren müssen.
So entfernen Sie den unteren
Wasserbehälter *
Page 38

!
38
4. TÜR UND FILTER
! Die Türe über den Griff aufziehen.
! Um das Gerät zu starten, Türe schließen
und die Starttaste drücken.
Anzeigeleuchte "Filter reinigen"
Die Anzeige leuchtet, wenn die Filter (in der
Türe und unterer Filter) gereinigt werden
müssen.
Prüfen Sie den Hauptfilter und den Filter
unten am Gerät und reinigen Sie sie
gegebenenfalls.
Wenn die Wäsche nicht trocken wird,
überprüfen, ob die Filter verstopft sind.
1. Den Filter nach oben herausziehen.
2. Filter wie gezeigt öffnen.
3. Flusen vorsichtig mit einer weichen
Bürste oder mit den Fingerspitzen
entfernen.
4. Filter zuklappen und wieder einsetzen.
1
2
Türe
WARNUNG
Wenn der Trockner läuft, können
Trommel und Türe SEHR HEISS werden.
WARNUNG
Wenn Sie die Türe mitten im
Trockenvorgang, noch vor der
Abkühlphase, öffnen, kann der Griff
heiß sein. Gehen Sie mit äußerster
Vorsicht vor, wenn Sie den Wasserbehälter
während des Durchgangs ausleeren
müssen.
Filter
Verstopfte Filter können die
Trocknungsdauer erhöhen und das
Gerät beschädigen, sodass es teuer
gereinigt werden muss.
Damit der Trockner weiter effizient
läuft, überprüfen Sie vor jedem
Durchgang, ob alle Filter sauber sind.
WARNUNG
Trockner nicht ohne die Filter laufen
lassen.
Wenn Sie die Filter mit Wasser
reinigen, denken Sie daran, sie richtig
abzutrocknen.
WARNUNG
Filter vor jedem Durchgang reinigen.
So reinigen Sie das Flusensieb
Page 39

!
DE
39
1. Die Blende abnehmen.
2. Verschlusshebel entgegen dem
Uhrzeigersinn herausdrehen und die
vordere Abdeckung herausziehen.
3.
Vorsichtig den Filterrahmen herausnehmen
und Staub oder Flusen mit einem Tuch
vom Filter entfernen. Den Filter nicht mit
Wasser reinigen.
4. Den Schwamm vorsichtig herausnehmen
und dann unter fließendem Wasser
reinigen.
5. Die vordere Abdeckung richtig (siehe
Pfeil) wieder aufsetzen und festdrücken.
Die Verschlusshebel im Uhrzeigersinn
festdrehen.
6. Die Frontblende wieder anbringen.
1
2
3
4
6
UP
5
So reinigen Sie den Kondensfilter
Page 40

!
40
5. PRAKTISCHE TIPPS
Bevor Sie den Trockner das erste Mal
benutzen:
! Lesen Sie die Gebrauchsanleitung bitte
sorgfältig durch!
! Entfernen Sie alle in der Trommel
befindlichen Gegenstände!
! Wischen Sie die Innenseiten der Trommel
und Tür mit einem feuchten Tuch aus, um
den beim Transport eventuell dort
angesammelten Staub zu entfernen.
Vergewissern Sie sich anhand der
Pflegeanleitungssymbole in jedem
Wäschestück, dass die Wäsche, die Sie
trocknen wollen, für eine Trocknung im
Trockner geeignet ist. Überprüfen Sie, ob
alle Verschlüsse zu und die Taschen
entleert sind. Wenden Sie die Innenseiten
der Textilien nach außen. Füllen Sie die
Kleidungsstücke locker in die
Trommel, so
dass diese sich nicht verheddern.
Seide, Nylonstrümpfe, empfindliche
Stickereien, Stoffe mit metallischen
Verzierungen, Kleidungsstücke mit PVC
oder Lederbesätzen.
Füllen Sie nur gründlich ausgewrungene
oder geschleuderte Wäsche in den
Trockner. Je trockener die Wäsche, desto
kürzer ist die Trocknungszeit, was sich
energiesparend auswirkt.
IMMER
! Es ist wirtschaftlicher, IMMER die
maximale Füllmenge zu trocknen.
! Kontrollieren Sie IMMER vor jedem
Trocknungsvorgang, ob das Sieb sauber
ist.
NIE
! Überschreiten Sie NIE die maximale
Füllmenge, denn dies ist zeitaufwendig
und Energieverschwendung.
! Füllen Sie AUF KEINEN FALL tropfnasse
Kleidungsstücke in den Wäschetrockner;
dies kann zu Schäden am Gerät führen.
! Anhand der Pflegeanleitungssymbole
Diese finden Sie am Kragen oder der
Sauminnenseite:
Für Trockner geeignet.
Im Trockner bei hoher Temperatur.
Im Trockner nur bei geringer
Temperatur.
Nicht für den Trockner geeignet.
Falls ein Wäschestück keine Pflegeanleitung
hat, muss angenommen werden, dass es
nicht für das Trocknen im Trockner geeignet
ist.
! Nach Menge und Volumen
Ist die Füllmenge größer als das
Fassungs
vermögen des Trockners,
sortieren Sie die Wäsche nach Stoffdicke
(trennen Sie z.B. Handtücher von dünner
Unterwäsche).
Vorbereitung der Textilien
Nicht für den Trockner geeignet
WARNUNG
Trocknen Sie keine Produkte, die mit
einer chemischen Reinigungs-
flüssigkeit behandelt wurden und
keine Kleidungsstücke aus Gummi
(Gefahr eines Brandes oder einer
Explosion).
Während der letzten 15 Minuten wird
die Wäsche immer mit kalter Luft
getrocknet.
Energiesparen
Sortieren Sie die Füllung
folgendermaßen
Page 41

!
DE
41
! Nach Stoffart
Baumwolle/Leinen: Handtücher, Baumwolljersey,
Bett- und Tischwäsche.
Textilien aus Kunstfaser: Blusen, Hemden,
Overalls, usw. aus Polyester oder Polyamid
und auch Baumwoll/Synthetikgemische.
! Reinigen Sie nach jedem
Trocknungsvorgang das Flusensieb und
leeren Sie den Kondenswasser- Behälter.
! Reinigen Sie alle Filter in regelmäßigen
Abständen.
! Wischen Sie nach jeder Anwendungs-
phase die Innenseite der Trommel aus
und lassen Sie die Tür einige Zeit offen
stehen, damit sie durch die Luftzirkulation
getrocknet wird.
! Reinigen Sie die Außenseite der
Maschine und der Tür mit einem weichen
Tuch.
! AUF KEINEN FALL Scheuerschwämme
oder Scheuermittel benutzen.
! Wir empfehlen, dass Sie die Tür, die
Türdichtung sowie das Geräteäußere
nach jedem Gebrauch kurz mit einem
feuchten Tuch reinigen.
WARNUNG
Überladen Sie die Trommel nicht,
große Teile können, wenn sie nass
sind, die maximal zulässige
Wäscheladung überschreiten (zum
Beispiel Schlafsäcke, Bettdecken).
Reinigung des Trockners
WARNUNG
Trommel, Tür und die Wäsche selbst
können sehr heiß sein.
WARNUNG
Schalten Sie diese Maschine vor dem
Reinigen immer aus und ziehen Sie
den Netzstecker heraus.
WARNUNG
Die Daten für die Elektrik finden Sie
auf dem Typenschild auf der
Vorderseite der Trocknertrommel (bei
geöffneter Tür).
Page 42

!
42
6. FERNBEDIENUNG (WLAN)
Dieses Gerät ist mit WLAN-Technologie
ausgestattet, so dass Sie es über eine App
steuern können.
MASCHINE REGISTRIEREN (BEI DER APP)
! Laden Sie die App Candy simply-Fi auf
Ihr Gerät herunter.
! Starten Sie die App, legen Sie ein
Benutzerprofil an (oder loggen Sie sich ein,
wenn es bereits vorher erstellt worden ist)
und registrieren Sie Ihre Maschine. Folgen
Sie den Anweisungen auf dem Display Ihres
Smartphones oder der „Kurzanleitung“ der
Maschine.
ZUR AKTIVIERUNG DER FERNBEDIENUNG
! Der Router sollte eingeschaltet und mit
dem Internet verbunden sein.
! Beladen Sie die Maschine und schließen
Sie die Tür.
! Drehen Sie den Programmwahlschalter
auf FERNBEDIENUNG (WLAN): das
Bedienfeld deaktiviert.
! Starten Sie den Trockengang über die
Candy simply-Fi-App. Wenn der Trockengang
beendet ist, schalten Sie die Maschine
aus, indem Sie den Programmwahlschalter
auf OFF (AUS) stellen.
* FERNBEDIENUNG (WLAN)
ZUR DEAKTIVIERUNG DER FERNBEDIENUNG
! Wenn der Modus FERNBEDIENUNG
beendet werden soll, während die
Maschine läuft, drehen Sie den
Programmwahlschalter auf eine andere
Position als FERNBEDIENUNG (WLAN).
Jetzt lässt sich das Bedienfeld wieder
bedienen.
! Drehen Sie bei geschlossener Türe den
Schalter auf FERNBEDIENUNG (WLAN),
um das Gerät wieder über die App zu
bedienen. Wenn gerade ein Trockengang
läuft, wird dieser fortgesetzt.
Die App Candy simply-Fi ist für Geräte
mit Android und iOS erhältlich, sowohl
für Tablets als auch für Smartphones.
Informieren Sie sich über alle WLANFunktionen im DEMO-Modus der App.
Bei geöffneter Tür ist die
FERNBEDIENUNG deaktiviert. Um
sie erneut zu aktivieren, schließen
Sie die Türe, schalten Sie die
Programmauswahl auf eine Position
außer FERNBEDIENUNG und wählen
Sie sie dann erneut aus.
Page 43

!
DE
43
7. KURZANLEITUNG
1. Türe öffnen und Wäsche in die Trommel
legen. Darauf achten, dass keine
Wäschestücke das Schließen der Türe
verhindern.
2. Türe vorsichtig zudrücken, bis es klickt.
3.
Die Programmauswahl auf das gewünschte
Trockenprogramm (siehe Programmtabelle)
stellen.
4. Starttaste drücken. Der Trockner startet
automatisch.
5. Wird die Türe während des Programms
geöffnet, um die Wäsche zu überprüfen,
muss das Programm erneut durch
Drücken gestartet werden, nachdem die
Türe wieder geschlossen ist.
6. Wenn sich das Programm dem Ende
nähert, beginnt der Trockner mit der
Abkühlphase, während dessen die
Wäsche in kalter Luft gedreht und
abgekühlt wird.
7. Wenn das Programm fertig ist, dreht sich
die Trommel abwechselnd in jede
Richtung, damit die Wäsche weniger
knittert. Dies geht so lange weiter, bis die
Maschine ausgeschaltet oder die Türe
geöffnet wird.
Leistungsaufnahme/Strom Amp-Sicherung/
Versorgungsspannung: Siehe Typenschild.
Maximale Ladekapazität: siehe Energielabel.
Energieklasse: siehe Energielabel.
8. STEUERUNG UND
PROGRAMME
A
FG
C
DEB
H
A
PROGRAMMAUSWAHL STEHT
AUF AUS
B
Taste START/PAUSE
C
Taste VERZÖGERTER START
D
Taste ZEITAUSWAHL/KURZ
E
MEMO-Taste
F
Taste TROCKENAUSWAHL
G
Taste BÜGELHILFE
H
DISPLAY
C+D
KINDERSICHERUNG
Die Türe während einem automatischen
Programm nicht öffnen, damit die
Wäsche richtig trocken wird.
Technische Daten
Page 44

!
44
! Über die Programmauswahl können in
beiden Richtungen Trockenprogramme
ausgewählt werden.
! Um die Auswahl abzubrechen oder das
Gerät auszuschalten, die Programmauswahl
auf AUS stellen (und den Netzstecker
des Geräts ziehen).
- Spracheinstellung
! Nachdem die Maschine an die
Stromversorgung angeschlossen und
eingeschaltet wurde, die Tasten "F" oder
"G" drücken, damit die verfügbaren
Sprachen angezeigt werden. ENGLISH
ist immer die zuerst angezeigte Sprache.
! Wählen Sie die gewünschte Sprache aus,
indem Sie die Taste START/PAUSE
drücken.
- Sprache ändern
Wenn Sie die Sprache ändern möchten,
drücken Sie die Tasten „F“ und „G“
gleichzeitig zirka 5 Sekunden lang.
ENGLISH wird im Display angezeigt, und
Sie können jetzt eine neue Sprache
auswählen.
! Drücken Sie START/PAUSE, um den
ausgewählten Durchgang mit den
voreingestellten Parametern zu starten.
Wenn das Programm läuft, zeigt das
Display die Zeit bis zum Ende an.
! Wenn Sie das gewünschte Programm
ändern möchten, drücken Sie die
gewünschten Optionstasten, ändern Sie
die Standardparameter und drücken Sie
START/ PAUSE, um das Programm
wieder aufzunehmen.
! Warten Sie nach dem Einschalten des
Geräts einige Sekunden, bis das
Programm startet.
PROGRAMMDAUER
! Wird ein Programm ausgewählt, zeigt das
Display automatisch die Dauer an, die
entsprechend der gewählten Optionen
variieren kann.
! Sobald das Programm gestartet ist,
werden Sie dauerhaft über die
verbleibende Zeit bis zum Ende
informiert.
! Das Gerät berechnet die Zeit bis zum
Ende des ausgewählten Programms auf
der Grundlage einer Standardladung.
Während des Trocknens wird die Zeit
gemäß der verbleibenden Feuchtigkeit
der Wäsche korrigiert.
PROGRAMMENDE
! "ENDE" (bei einigen Modellen "End")
wird bei Programmende im Display
angezeigt. Die Türe kann jetzt geöffnet
werden.
! Schalten Sie das Gerät danach aus,
indem Sie die Programmauswahl auf
AUS stellen
WARNUNG
Berühren beim Einstecken des Geräts
in keinem Fall die Tasten, da sich die
Maschine in den ersten Sekunden
kalibriert. Sollte dies dennoch passieren
,
nehmen Sie das Gerät vom Netz und
wiederholen Sie den Vorgang.
PROGRAMMAUSWAHL STEHT
AUF AUS
Erste Inbetriebnahme
Taste START/PAUSE
Schließen Sie die Gerätetüre, bevor
Sie die Taste START/PAUSE drücken.
Es können nur Optionen ausgewählt
werden, die zum eingestellten
Programm passen.
Page 45

!
DE
45
UNTERBRECHEN DER MASCHINE
! Halten Sie die Taste START/PAUSE
zirka 2 Sekunden gedrückt (der
Programmname und die Restzeitanzeige
blinken, was bedeutet dass die Maschine
unterbrochen wurde).
! Drücken Sie erneut die Taste
START/PAUSE, um das Programm ab
dem Punkt neu zu starten, an dem es
angehalten wurde.
ABBRECHEN DES EINGESTELLTEN
PROGRAMMS
! Brechen Sie das Programm ab, indem
Sie die Programmauswahl auf AUS
stellen.
Fällt der Strom aus, während die
Maschine läuft, nimmt die Maschine das
Programm am unterbrochenen Zeitpunkt
wieder auf, wenn der Strom zurück ist.
! Über diese Taste kann der
Programmstart in 30-Minuten-Intervallen
(bei einigen Modellen 1 Stunde) von 30
Minuten (bei einigen Modellen 1 Stunde)
auf 24 Stunden verzögert werden. Die
ausgewählte Verzögerung wird im
Display angezeigt.
! Nachdem die START/PAUSE-Taste
gedrückt wurde, verringert sich die
angezeigte Zeit jede Minute.
! Bis zu drei Minuten nach dem
Programmstart können automatische
Programme in programmierte geändert
werden.
! Durch jedes weitere Drücken wird die
Trockendauer im 10-Minuten-Intervall
erhöht. Ist diese Auswahl getroffen und
soll die automatische Trocknung wieder
eingestellt werden, muss der Trockner
ausgeschaltet werden.
! Falls etwas nicht stimmt, blinken alle
Anzeigeleuchten dreimal schnell
hintereinander.
! Wird die Programmauswahl auf die
Schnellprogramme gestellt, kann durch
weiteres Drücken der Taste die folgende
Trockendauer ausgewählt werden: 30-45-
59 Minuten.
Über diese Taste können die eingestellten
Trockenoptionen gespeichert werden.
SPEICHER:
Wenn der Trockenvorgang läuft, halten Sie
die Taste MEMO drei Sekunden lang
gedrückt. Die Schrift MEMO (bei einigen
Modellen alle Zeichen) blinkt zwei
Sekunden lang und die mit dem Durchgang
verbundenen Optionen werden festgelegt.
SPEICHERAUFRUF:
Drücken Sie nach der Programmauswahl
die Taste MEMO, um die gespeicherten
Optionen (und nicht das Programm)
aufzurufen.
Die Programmauswahl muss nach dem
Trocknen IMMER auf AUS gestellt
werden, bevor ein neuer Durchgang
ausgewählt werden kann.
Taste VERZÖGERTER START
Wenn die Türe nach einem
verzögerten Start geöffnet wird, nach
dem Schließen erneut „Start“ drücken,
damit der Timer wieder angeht.
Taste ZEITAUSWAHL/KURZ
MEMO-Taste
Die Funktion des verzögerten Starts
kann nicht gespeichert werden.
Page 46

!
46
! Über diese Taste kann der gewünschte
Trockengrad bis zu fünf Minuten nach
dem Programmstart eingestellt werden:
Bügeltrocken: Die Wäsche ist noch
leicht feucht, was das Bügeln
erleichtert.
Aufhängtrocken: Die Wäsche kann
auf einen Bügel gehängt werden.
Schranktrocken: Die Wäsche kann
direkt in den Schrank gelegt werden.
Extratrocken: Die Wäsche ist
vollständig trocken; ideales
Programm für volle Waschladung.
! Dieses Gerät verfügt über eine Drying
Manager-Funktion. Bei automatischen
Trockenvorgängen wird jede
Zwischenstufe vor dem Erreichen des
ausgewählten Trockengrades durch ein
Blinken angezeigt.
Falls etwas nicht stimmt, blinken alle
Anzeigeleuchten dreimal schnell
hintereinander.
! Mit dieser Option wird während des
Durchgangs eine wechselnde Drehung
der Trommel eingeschaltet und der
Trockengrad automatisch auf "Bügeltrocken"
gestellt (der Trockengrad kann nach der
Optionsauswahl geändert werden). Mit
dieser Option wird außerdem bei Auswahl
einer Zeitverzögerung und am Ende des
Trockenvorgangs die Trommel eingeschaltet,
damit die Wäsche knitterfrei bleibt. Sie
wird bis zu sechs Stunden nach Ende des
Trockenvorgangs alle 10 Minuten
eingeschaltet.
! Um die Drehung der Trommel
auszuschalten, stellen Sie die
Programmauswahl auf AUS. Diese
Funktion ist vor allem dann nützlich, wenn
die Wäsche nicht sofort aus dem
Trockner genommen werden kann.
! Drücken Sie gleichzeitig die Tasten "C"
und "D" für ungefähr 2 Sekunden, dann
können die Tasten der Maschine gesperrt
werden. Auf diese Art können Sie
versehentliche oder ungewollte
Änderungen vermeiden, wenn eine Taste
auf der Anzeige während eines
Trockengangs aus Versehen gedrückt
wird.
! Die Tastensperre kann ganz einfach
durch das gleichzeitige Drücken der zwei
Tasten.
! Wird die Türe geöffnet, solange die
KINDERSICHERUNG aktiv ist, hält das
Programm an, aber die Sperre bleibt
weiterhin aktiv: Um den Trockenvorgang
neu zu starten, muss zunächst die Sperre
aufgehoben werden und das Programm
über die Taste START/PAUSE erneut
gestartet werden.
! Die KINDERSICHERUNG kann zu jeder
Zeit während des Trockenvorgangs
geändert werden.
Das Display zeigt die verbleibende Zeit bis
zum Ende des Trockenvorgangs, die
verschobene Zeit bei einem verzögerten
Start und andere Benachrichtigungen an.
3
21 4
1) ANZEIGELEUCHTEN TROCKENGRAD
Die Anzeigeleuchten zeigen den Trockengrad
an, der über die entsprechende Taste
ausgewählt werden kann.
Taste TROCKENAUSWAHL
Taste BÜGELHILFE
KINDERSICHERUNG
Display
Page 47

!
DE
47
2)
ANZEIGELEUCHTE WASSERBEHÄLTER
Anzeige leuchtet, wenn der Wasserbehälter
für das Kondenswasser geleert werden
muss.
3) ANZEIGELEUCHTE FILTER REINIGEN
Die Anzeige leuchtet, wenn die Filter (in der
Türe und unterer Filter) gereinigt werden
müssen.
4) WLAN-ANZEIGE
! Bei Modellen mit WLAN wird hier der
Verbindungszustand angezeigt. Möglich
sind:
- LEUCHTEND: Fernbedienung aktiv.
- LANGSAM BLINKEND: Fernbedienung
inaktiv.
- 3 S SCHNELL BLITZEND, DANN AUS:
Die Maschine kann sich nicht mit dem
vorhandenen WLAN verbinden oder
wurde noch nicht in der App registriert.
- 3 x LANGSAM BLINKEND, DANN 2 S
AUS: WLAN-Reset (bei Registrierung in
der App).
- 1 S EIN, 3 S AUS: Die Luke ist offen.
Die Fernbedienung kann nicht
eingeschaltet werden.
! Mehr zu Funktionen und Anweisungen
zur mühelosen Einstellung des WLANS
im Folgenden:
go.candy-group.com/bm-td-ble
Das Standardprogramm BAUMWOLLE
TROCKNEN ( ) ist das sparsamste im
Energieverbrauch und am besten zum
Trocknen normal nasser Baumwollwäsche
geeignet.
Maximales Trockengewicht
Baumwolle
Angegebenes
Höchstgewicht
Synthetik oder
Feinwäsche
Max. 4 kg
EN 61121 - Zu verwendendes Programm:
-
STANDARDTROCKEN BAUMWOLLE
- MANGELTROCKEN BAUMWOLLE
(WEISS - Bügeltrocken)
- PFLEGELEICHT
(SYNTHETIK - Aufhängtrocken)
Anleitung zum Trocknen
Information für Prüflabor
WARNUNG
Filter vor jedem Durchgang reinigen.
WARNUNG
Die tatsächliche Dauer des
Trockenvorgangs hängt davon ab, wie
nass die Wäsche nach dem Schleudern
ist, um welche Textilien es sich handelt
und wie schwer die Waschladung ist.
Ferner tragen die Sauberkeit der Filter
und die Umgebungstemperatur zur
Programmdauer bei.
WARNUNG
Nur für Wäschetrockner mit 10/11 kg
Kapazität und mit Ablaufschlauch:
Ablaufschlauch zum Ablassen des
Kondenswassers (entsprechend der
Anweisungen im entsprechenden
Kapitel) anschließen.
Page 48

!
48
PROGRAMM
Auswahl-Optionen
KAPAZITÄT
(kg)
TROCKNEN
ZEIT (min)
KOCHWÄSCHE
Voll
*
FEINWÄSCHE
4
*
SYNTHETIK
4
*
ZOOM
-
- - -
3,5
*
KNITTERSCHUTZ
- - -
-
2,5
12'
KURZ 30'/45'/59'
-
-
2,5
*
HEMDEN
-
2,5
*
ALLERGIE
-
-
4
Max 220'
SPORTS
-
-
4
*
JEANS
- - -
-
4
*
WOLLMARK
- - -
-
1
70’
BAUMWOLLE
- - -
-
Voll
*
DUNKLES &
BUNTWÄSCHE
-
4
*
AUFFRISCHEN
- - -
-
2,5
20'
FERNBEDIENUNG (WLAN)
Diesen Punkt müssen Sie zum Einschalten der Fernsteuerung über die App (via
WLAN) auswählen.
* Die tatsächliche Dauer des Trockenvorgangs hängt davon ab, wie nass die Wäsche nach dem
Schleudern ist, um welche Textilien es sich handelt und wie schwer die Waschladung ist. Ferner
tragen die Sauberkeit der Filter und die Umgebungstemperatur zur Programmdauer bei.
Programmtabelle
Page 49

!
DE
49
Der Trockner hat unterschiedliche Programme
für verschiedene Textilien und Farben,
die jeden Trockenbedarf erfüllen (siehe
Programmtabelle).
KOCHWÄSCHE
Das richtige Programm zum Trocknen von
Baumwolle, Schwämmen und Handtüchern.
FEINWÄSCHE
Trocknet empfindliche Textilien, die eine
besondere Pflege erfordern.
SYNTHETIK
Zum Trocknen von Synthetik, da diese
Stoffe eine genaue und spezielle
Behandlung erfordern.
ZOOM
Zoom ist ein exklusives Programm zum
Trocknen von Waschladungen mit
unterschiedlichen Textilien (Baumwolle und
Synthetik). Ist die Waschladung weniger als
empfohlen oder schon relativ trocken wird
der Trockenvorgang verkürzt, damit die
Kleidungsstücke nicht übermäßig
getrocknet werden.
KNITTERSCHUTZ
Ein warmer Trockenvorgang, der Falten in
nur 12 Minuten glättet.
KURZ 30'/45'/59'
Schnellprogramme, bei denen die Wäsche
wahlweise innerhalb von 30, 45, 59 Minuten
getrocknet wird.
HEMDEN
Dies ist ein spezielles Programm zum
Trocknen von Hemden, das mit gezielten
Trommelbewegungen zerknitterte Wäsche
glättet. Die Wäsche sollte sofort nach
Programmende herausgenommen werden.
ALLERGIE
Ein besonderes Trockenprogramm, bei dem
gleichzeitig die wichtigsten Allergene
wie Hausstaubmilben, Pollen und
Waschmittelrückstände reduziert werden.
SPORTS
Geeignet für technische Textilien für Sport
und Fitness; trocknet vorsichtig und
verhindert das Einlaufen und Beschädigen
elastischer Fasern.
JEANS
Trocknet Textilien wie Jeans oder Denim
gleichmäßig. Wäschestücke wenn möglich
vor dem Trocknen auf links drehen.
WOLLMARK
Kleidungsstücke aus Wolle: Mit dem
Programm kann bis zu 1 kg Wäsche (ca. 3
Pullover) getrocknet werden. Kleidungsstücke
vor dem Trocknen auf links drehen.
Aufgrund der beim Schleudergang gewählten
Drehzahl und der Dicke der Wäschestücke
kann die Zeitdauer variieren. Nach dem
Programmende können die Kleidungsstücke
angezogen werden. Wenn der Stoff dicker
ist, können sie an den Bündchen noch
feucht sein; dann sollten sie auf der Leine
zu Ende getrocknet werden. Die Wäsche
sollte nach Programmende direkt aus dem
Trockner genommen werden.
Achtung: Das Einlaufen und Verfilzen von
Wäschestücken aus Wolle kann nicht
rückgängig gemacht werden; trocknen
Sie daher nur Wäsche mit dem Symbol
für "trocknergeeignet". Dieses Programm ist
nicht für Kleidung aus Polyacryl geeignet.
Programmbeschreibungen
Das Trockenprogramm für Wolle
dieses Trockners wurde von der
Woolmark Company für das
Trocknen von maschinenwaschbaren
Wolltextilien genehmigt, vorausgesetzt,
die Textilien werden entsprechend
der Waschanleitung auf dem Etikett
und entsprechend der Anweisungen
des Herstellers dieser Maschine
gewaschen und getrocknet M1530.
In Großbritannien, Irland, Hongkong
und Indien ist das WoolmarkWarenzeichen ein eingetragenes
Prüfsiegel.
Page 50

!
50
BAUMWOLLE
Das Baumwollprogramm (Bügeltrocken)
ist das effizienteste bei niedrigem
Energieverbrauch. Geeignet für Baumwolle
und Leinen.
DUNKLES & BUNTWÄSCHE
Ein Schonprogramm, speziell zum
Trocknen dunkler und farbiger Baumwoll-
und Synthetiktextilien.
AUFFRISCHEN
Programm, das unangenehme Gerüche
entfernt und zerknitterte Wäsche vorbügelt.
FERNBEDIENUNG (WLAN)
Diesen Punkt müssen Sie auswählen, wenn
Sie die Fernsteuerung via WLAN über die
App ein-/ausschalten möchten. In diesem
Fall wird der Trockengang über die App
gestartet. Mehr dazu im Abschnitt
FERNBEDIENUNG (WLAN).
Page 51

!
DE
51
9. PROBLEMLÖSUNGEN
UND GARANTIE
Fehler, die Sie selbst beheben können
Prüfen Sie alle Punkte in der folgenden
Checkliste, bevor Sie sich an den Service
wenden. Sollte die Maschine funktionstüchtig
sein oder unsachgemäß installiert oder
verwendet worden sein, wird Ihnen der
Besuch des Kundendien sttechnikers in
Rechnung gestellt. Wenn das Problem
weiterhin besteht, nachdem Sie
die
Checkliste durchgegangen sind, wenden
Sie
sich bitte an den Service, der Ihnen evtl.
telefonisch weiterhelfen kann.
Die Restzeitanzeige auf dem Display
könnte sich während des Trocknungsgangs
ändern. Die Restzeit wird kontinuierlich
während der Trocknung überprüft und
die Zeit wird angepasst, um eine
bestmögliche Schätzung der Restdauer
zu geben. Es ist daher ganz normal,
dass die angezeigte Restzeit sich
vergrößern oder verkleinern kann.
Die Trocknungszeit ist zu lang/die
Textilien sind nicht trocken genug…
!
Haben Sie die richtige Trocknungszeit/das
richtige Programm gewählt?
! Waren die Textilien zu nass? Wurden die
Textilien sorgfältig ausgewrungen oder
eschleudert?
! Muss das Sieb gereinigt werden?
! Muss der Kondensator gereinigt werden?
! Ist der Trockner überladen?
!
Sind die Luftansaug- und Abluftanschlüsse
sowie die Fläche unter dem Sockel des
Trockners frei?
Der Trockner funktioniert nicht…
! Ist der elektrische Netzanschluss für den
Trockner in Ordnung? Kontrollieren Sie
diesen mit einem anderen Gerät, wie z.B.
einer Tischlampe.
! Befindet sich der Stecker korrekt in der
Steckdose?
! Gibt es einen Stromausfall?
! Ist die Sicherung herausgesprungen?
! Ist die Tür richtig geschlossen?
!
Ist der Trockner sowohl am Netzanschluss
als auch an der Maschine angestellt?
! Ist die Trocknungszeit oder das
Programm gewählt worden?
! Ist die Maschine nach dem Türöffnen
wieder angestellt worden?
! Hat der Trockner den Betrieb eingestellt,
weil der Kondenswasser-Behälter voll ist
und entleert werden muss?
Der Trockner ist zu laut…
! Schalten Sie den Trockner aus und
wenden Sie sich an den Service.
Die Anzeige Filterpflege leuchtet…
! Muss das Sieb gereinigt werden?
! Muss der Kondensator gereinigt werden?
Die Anzeige Wasserbehälter leuchtet…
! Muss der Kondenswasser-Behälter
geleert werden?
Sollten trotz obengenannter Kontrollen
weiterhin Störungen bei Ihrem Trockner
auftreten, wenden Sie sich bitte an den
Service, der Sie beraten kann. Der Kunden
dienst kann Sie möglicherweise telefonisch
beraten oder mit Ihnen einen geeigneten
Termin für einem Techniker im Rahmen der
Garantie vereinbaren. Ihnen wird jedoch
eventuell eine Gebühr berechnet, wenn sich
herausstellt, dass Ihre Maschine:
! funktionsfähig ist.
! Nicht gemäß der Installationsanweisung
installiert worden ist.
! unsachgemäß benutzt wurde.
Mögliche Ursache/Fehler...
Kundendienst
Page 52

!
52
Verwenden Sie immer Original-Ersatzteile,
die Sie direkt beim Service erhalten.
Wenden Sie sich für Wartungs und
Reparaturarbeiten an Ihren Servicetechniker.
Mit der Anbringung des -Zeichens
am Gerät zeigen wir an, dass wir
sämtliche für dieses Produkt geltenden
und notwendigen europäischen Sicherheits-,
Gesundheits- und Umweltstandards
einhalten und hierfür haftbar sind.
Ziehen Sie den Stecker aus der Steckdose,
zerschneiden Sie das Netzkabel und werfen
Sie Netzkabel und Netzstecker getrennt in
den Müll, bevor Sie Ihren alten Trockner
entsorgen. Zerstören Sie Scharniere und
die Türverriegelung, damit sich Kinder nicht
versehentlich in der Maschine einsperren
können.
Wir schließen die Haftung für alle evtl.
Druckfehler aus. Kleinere Änderungen
und technische Weiterentwicklungen im
Detail vorbehalten.
WLAN-PARAMETER:
Wi-Fi
Specifications
(Wi-Fi)
Specifications
(Bluetooth)
A
802.11 b/g/n
Bluetooth v4.2
B
2,412 GHz. - 2,484
GHz.
2,412 GHz. - 2,484 GHz.
C
802.11b, DSSS 1 Mbps =
+19.5 dBm
802.11b, CCK 11 Mbps =
+18.5 dBm
802.11g, OFDM 54 Mbps =
+18.5 dBm
802.11n, MCS7 =
+14 dBm
Basic data Rate:
RF Transmit Power (Typ):
+4 dBm
Enhanced data Rate:
RF Transmit Power (Typ):
+2 dBm
BLE
RF Transmit Power (Typ):
+7.5 dBm
D
802.11b = 1024 bytes,
-80 dBm
802.11g = 1024 bytes,
-70 dBm
802.11n = 1024 bytes,
-65 dBm
802.11n HT40 = 1024
bytes, -65 dBm
Basic data Rate:
Sensivity @ 0.1% BER:
-98 dBm
Enhanced data Rate:
Sensivity @ 0.01% BER:
-98 dBm
BLE
Sensivity @ 0.1% BER:
-98 dBm
A WLAN-Standard
B Frequenz-bereich
C Maximale Sendeleistung
D Minimale Empfangsempfindlichkeit
Hiermit erklärt Candy Hoover Group Srl,
dass dieses mit gekennzeichnete
Gerät die grundlegenden Anforderungen
der Richtlinie 2014/53/EU erfüllt. Für
eine Kopie der Konformitätserklärung
wenden Sie sich an den Hersteller:
www.candy-group.com
Ersatzteile
Technischer Kundendienst
Garantie
Die Garantiezeit des Gerätes entspricht
den jeweiligen gesetzlichen Vorschriften.
Nähere Angaben zu Art und Umfang
der Garantiebedingungen finden
Sie im Garantieheft. Bitte das
Original der Kaufrechnung für die
Garantieersatzansprüche aufbewahren,
um diese im Bedarfsfall unserem
Werkskundendienst vorzulegen. Ohne
diese Nachweise können wir und unser
Werkskundendienst den Anspruch nicht
anerkennen.
Page 53

!
EN
53
Page 54

!
54
Thank you for choosing this product.
We are proud to offer the ideal product for
you and the best complete range of home
appliances for your daily routine.
Please read and follow these
instructions carefully and operate the
machine accordingly. This booklet provides
important guidelines for safe use,
installation, maintenance and some useful
advice for best results when using your
machine. Keep all documentation in a safe
place for future reference or for any future
owners.
Please check that the following items are
delivered with the appliance:
• Instruction manual
• Guarantee card
• Energy label
Check that no damage has occurred to the
machine during transit. If it as, call for
service by Customer Service Centre.
Failure to comply with the above can
compromise the safety of the appliance.
You may be charged for a service call if a
problem with your machine is caused by
misuse or by incorrect installation.
To contact the Service, ensure that you
have the unique 16-character code
available, also called the "serial number".
This code is a unique code for your
product, printed on the sticker that can be
found inside the door opening.
WEEE contains both polluting substances (which
can cause negative consequences for the
environment) and basic components (which can
be re-used). It is important to have WEEE
subjected to specific treatments, in order to
remove and dispose properly all pollutants, and
recover and recycle all materials. Individuals can
play an important role in ensuring that WEEE
does not become an environmental issue; it is
essential to follow some basic rules:
! WEEE should not be treated as household
waste;
! WEEE should be handed over to the relevant
collection points managed by the municipality or
by registered companies. In many countries, for
large WEEE, home collection could be present.
In many countries, when you buy a new
appliance, the old one may be returned to the
retailer who has to collect it free of charge on a
one-to-one basis, as long as the equipment is of
equivalent type and has the same functions as
the supplied equipment.
1. GENERAL SAFETY RULES
2. DRAIN HOSE KIT
3. WATER CONTAINERS
4. DOOR AND FILTERS
5. PRACTICAL HINTS
6. REMOTE CONTROL (WI-FI)
7. QUICK USER GUIDE
8. CONTROLS AND PROGRAMMES
9.
TROUBLESHOOTING AND WARRANTY
This appliance is marked according to
the European directive 2012/19/EU
on Waste Electrical and Electronic
Equipment (WEEE).
Contents
Environmental conditions
Page 55

!
EN
55
1. GENERAL SAFETY
RULES
! This appliance is intended to
be used in household and
similar applications such as:
- Staff kitchen areas in shops, offices
and other working environments;
- Farm houses;
- By clients in hotels, motels and
other residential type environments;
- Bed and breakfast type environments.
A different use of this appliance
from household environment
or from typical housekeeping
functions, as commercial use by
expert or trained users, is excluded
even in the above applications. If
the appliance is used in a manner
inconsistent with this it may reduce
the life of the appliance and may
void the manufacturer’s warranty.
Any damage to the appliance or
other damage or loss arising
through use that is not consistent
with domestic or household use
(even if located in a domestic or
household environment) shall not
be accepted by the manufacturer to
the fullest extent permitted by law.
! This appliance can be used by
children aged from 8 years and
above and persons with reduced
physical, sensory or mental
capabilities or lack of experience
and knowledge if they have been
given supervision or instruction
concerning use of the appliance
in a safe way and understand the
hazards involved.
Children shall not play with the
appliance. Cleaning and user
maintenance shall not be made
by children without supervision.
! Children should be supervised
to ensure that they do not play
with the appliance.
! Children of less than 3 years
should be kept away unless
continuously supervised.
! This machine is solely for
domestic use, i.e. to dry
household textiles and garments.
! Ensure that the instructions for
installation and use are fully
understood before operating
the appliance.
! Do not touch the appliance
when hands or feet are damp
or wet.
! Do not lean on the door when
loading the machine or use the
door to lift or move the machine.
! Do not continue to use this
machine if it appears to be faulty.
WARNING
Misuse of a tumble dryer may
create a fire hazard.
Page 56

!
56
! The tumble dryer is not to be
used if industrial chemicals
have been used for cleaning.
!
Lint and fluff must not be allowed
to collect on the floor around the
outside of the machine.
! Always remove the plug before
cleaning the appliance.
! The drum inside may be very
hot. Always allow the dryer to
complete the cool down period
before removing the laundry.
! The final part of a tumble dryer
cycle occurs without heat (cool
down cycle) to ensure that the
items are left at a temperature
that ensures that the items will
not be damaged.
WARNING
Do not use the product if the
fluff filter is not in position or
is damaged; fluff could be
ignited.
WARNING:
Where the hot surface
symbol is located the
temperature rise during
operation of the tumble
dryer may be in excess of 60
degrees C.
WARNING
Never stop a tumble dryer
before the end of the drying
cycle unless all items are
quickly removed and spread
out so that the heat is
dissipated.
WARNING
During transport ensure
that
the dryer is in an upright
position, if it's necessary
you can only flip in the side
shown.
If the product is in different
side, wait at least 4 hours
before switching on so that
the oil can flow back into the
compressor. Failure to do
this could result in damage
to the compressor.
Page 57

!
EN
57
! Do not install the product in a
low temperature room or in a
room where there is a risk of
frost occurring. At temperature
around freezing point the
product may not be able to
operate properly: there is a risk
of damage if the water is
allowed to freeze in the
hydraulic circuit (valves, hoses,
pumps). For a better product
performance the ambient room
temperature must be between
5-35°C. Please note that
operating in cold condition
(between +2 and +5°C) might
simply some water condensation
and water drops on floor.
! In cases where the dryer is
installed on top of a washing
machine, a suitable stacking kit
must be used according to the
configuration of your appliance:
- Stacking kit "standard size":
for
washing machine with
minimum depth of 44 cm;
- Stacking kit "slim size": for
washing machine with
minimum depth of 40 cm.
- Universal stacking kit with
sliding: for washing machine
with minimum depth of
47 cm.
The stacking kit shall be
obtainable from service. The
instructions for installation and
any fixing attachments, are
provided with the stacking kit.
! NEVER install the dryer up
near curtains.
! The appliance must not be
installed behind a lockable
door, a sliding door or a door
with a hinge on the opposite
side to that of the tumble dryer.
! For your safety, the appliance
must be correctly installed. If
there is any doubt about installation,
call Service for advice.
! Once the machine is in place
the feet should be adjusted to
ensure that the machine is
level.
! The technical details (supply
voltage and power input) are
indicated on the product rating
plate.
Installation
Electrical connections and
safety instructions
Page 58

!
58
! Make sure that the electrical
system is earthed, complies
with all applicable law and that
the (electricity) socket is
compatible with the plug of the
appliance. Otherwise, seek
qualified professional assistance.
! Do not use adapters, multiple
connectors and/or extensions.
! The plug should be accessible
for disconnection after the
appliance has been installed.
! Do not plug the machine in and
switch it on at the mains until
the installation is completed.
! If the supply cord is damaged,
it must be replaced
by the
manufacturer, its service
agent
or similarly qualified persons in
order to avoid a hazard.
! Adequate ventilation must be
provided in the room where the
tumble dryer is located to
prevent gases from appliances
burning other fuels, including
open fires, being drawn into
the room during operation of
the tumble dryer.
! Install the rear of the appliance
close to a wall or vertical surface.
! There should be a gap of at
least 12 mm between the
machine and any obstrubtions.
The inlet and outlet air should
be kept clear of obstruction.
! Make sure carpets or rugs
do not obstruct the base or any
of the ventilation openings.
! Prevent items from falling or
collecting behind the dryer as
these may obstruct the air inlet
and outlet.
! Exhaust air must not be
discharged into a flue which is
used for exhausting fumes
from appliances burning gas or
other fuels.
! Check regularly that the air
flowing around the dryer is not
restricted, avoiding accumulation
of dust and lint.
WARNING
The appliance must not be
supplied through an external
switching device, such as a
timer, or connected to a circuit
that is regularly switched on
and off by a utility.
Ventilation
Page 59

!
EN
59
! Check frequently the fluff filter
after use, and clean, if necessary.
* Air outlet (depending on the
model).
! Always refer to the laundry
care labels for directions on
suitability for drying.
! Fabric softeners, or similar
products, should be used as
specified by the fabric softener
instructions.
! Do not dry unwashed items in
the tumble dryer.
! Clothes should be spin dried or
thoroughly wrung before they
are put into the tumble dryer.
! Clothes that are dripping wet
should not be put into the dryer.
! Glass fibre curtains should
NEVER be put in this machine.
Skin irritation may occur if
other
garments are contaminated
with
the glass fibres.
! Items that have been soiled
with substances such as cooking
oil, acetone, alcohol, petrol,
kerosene, spot removers,
turpentine, waxes and wax
removers should be washed in
hot water with an extra amount
of detergent before being dried
in the tumble dryer.
The Laundry
WARNING
Foam rubber materials can
,
under certain circumstances,
when heated become ignited
by spontaneous combustion.
Items such as foam rubber
(latex foam), shower caps,
waterproof textiles, rubber
backed articles and clothes
or pillows fitted with foam
rubber pads MUST NOT be
dried in the tumble dryer.
WARNING
Do not tumble dry fabrics
treated with dry cleaning
fluids.
Page 60

!
60
!
Remove all objects from pockets
such as lighters and matches.
! Lighters and matches must not
be left in pockets and NEVER
use flammable liquids near the
machine.
! Maximum load drying weight:
see energy label.
!
To consult the product technical
specification please refer to the
manufacturer website.
Page 61

!
EN
61
WARNING
Fire hazard / Flammable
materials.
! The appliance contains R290,
an eco-sustainable refrigerating
gas that is flammable. Keep
open flames and sources of
ignition away from the appliance.
! Check there is no visible
damage on the appliance. Do
not use the appliance if it is
damaged.
! Should there be any kind of
problem, please contact your
specialised retailer or one of
our customer support centres.
WARNING
Ensure that the openings on
the appliance and the openings
of the compartment the appliance
is fitted in (for built-in models)
are clear of obstructions.
WARNING
Do not damage the refrigerating
circuit.
! Any repairs or interventions on
the appliance must be carried
out only by an authorised
assistance service.
! Disposing of the device
incorrectly could cause fires or
poisoning.
! Dispose of the device correctly
and do not damage the pipes
used for the circulation of the
refrigerating fluid.
Page 62

!
62
2. DRAIN HOSE KIT
To avoid emptying the water container after
each drying cycle, the water can be
discharged directly to a waste water drain
pipe. Water Bye-Laws prohibit connection
to a surface water drain. The waste water
drain pipe should be located adjacent to the
tumble dryer.
The kit consists of: 1 hose and 1 bung.
1. Tilt the machine slowly to the right side.
2. The waste water pipe is situated at the
right-hand side of the machine (see
the picture). A grey hose connects to
the in line connector at the left hand side
of the machine. Using pliers, remove
the pipe retaining clip from the in line
connector.
3. Pull the hose off the in line connection.
4. Place the bung supplied by the kit to
close the remaining hose.
5. Attach the black hose from the kit (using
the connector and pipe clips supplied)
to the hose removed from the in line
connection.
WARNING
Switch off and remove the tumble
dryer plug from the electricity supply
before carrying out any work.
Fit the hose as follows
Once the machine is in place, check
the bottom to ensure that the new
hose does not kink when pushing the
tumble dryer into position.
Page 63

!
EN
63
3. WATER CONTAINERS
The water removed from the laundry during
the drying cycle is collected in a container.
When the container is full the relevant
indicator light on the control panel will light,
and the container MUST be emptied.
However, we recommend that the container is
emptied after each drying cycle.
1. Gently pull out the water container
holding the handle (A).
When it is full the water container will
weigh about 6 kg.
2. Tilt the water container to empty the
water out through the spout (B).
When empty, replace the water container
back as shown; (C) first insert the base of
the container into position as shown (1)
then gentle push the top into position (2).
3. Press the programme start button to
restart the cycle.
A
B
1
C
*Depending on model
1. Gently pull the bottom of the kickplate so
that it unclips from the dryer. The top
section can then be unhinged allowing
the kickplate to be completely removed (A).
2. Pull firmly on the handgrip and slide the
water container out of the dryer (B).
Support the container with both hands
(C). When full, the water container will
weigh about 4 kg.
3. Open the lid located on the top of the
container and empty the water (D).
4. Refit the lid and slide the water container
back into position (D). PUSH FIRMLY
INTO PLACE.
5. Refit the kickplate by engaging the
hinges at the top and 'snapping' the lower
clips into place.
A
B
C
D
*Depending on model
Very little water will collect during the
first few cycles of a new machine as an
internal reservoir is filled first.
To remove the container tank in
door drawer *
ONLY FOR MODELS WITH DRAIN
HOSE KIT
If you have the option of drainage
near to the dryer you can use the
discharge kit to provide a permanent
drainage for the water collected in the
container of the dryer. This means
that you don't have to empty the water
container.
To remove the container bottom
water drawer *
Page 64

!
64
4. DOOR AND FILTERS
! Pull on handle to open the door.
! To restart the appliance, close the door
and press the programme start button.
Filter cleaning indicator light
It lights up when the cleaning of the filters is
requested (the door and the lower filter).
Check and eventually clean the main filter
and the lower one on the bottom of the
appliance.
If the laundry is not drying check that the
filters are not clogged.
1. Pull the filter upwards.
2. Open filter as shown.
3. Gently remove lint using a soft brush or
your fingertips.
4. Snap the filter together and push back
into place.
1
2
Door
WARNING
When the tumble dryer is in use the
drum and door may be VERY HOT.
WARNING
If you open the door mid cycle, before
the cool-down cycle has completed,
the handle may be hot. Please use
extreme caution when attempting to
empty the water reservoir during the
cycle.
Filters
Clogged filters could increase the
drying time and cause damages and
expensive cleaning operation.
To maintain the efficiency of the dryer
check that all filters are clean before
each drying cycle.
WARNING
Do not use the tumble dryer without
the filters.
If you clean filters under water, remember
to dry them.
WARNING
Clean the filters before every cycle.
To clean the lint filter
Page 65

!
EN
65
1. Remove the kickplate.
2. Turn the locking levers anti-clockwise
and pull out the front cover.
3. Gently remove the filter frame and clean
any dust or fluff with a cloth from the
filter. Do not use water to clean the filter.
4. Remove the sponge gently from its place
and then wash the sponge by holding it
under a running tap turning it so to remove
any dust or fluff.
5. Refit the front cover ensuring it is in the
correct way (as indicated by the arrow)
and pushed firmly into place. Lock the
levers by turning them clockwise.
6. Refit the kickplate.
1
2
3
4
6
UP
5
To clean the condenser filter
Page 66

!
66
5. PRACTICAL HINTS
Before using the tumble dryer for the first
time:
! Please read this instruction book
thoroughly.
! Remove all items packed inside drum.
! Wipe the inside of the drum and door with
a damp cloth to remove any dust which
may have settled in transit.
Make sure that the laundry you are going to
dry is suitable for drying in a tumble dryer,
as shown by the care symbols on each
item. Check that all fastenings are closed
and that pockets are empty. Turn the
articles inside out. Place clothes loosely in
the drum to make sure that they don't get
tangled.
Silk, nylon stockings, delicate embroidery,
fabrics with metallic decorations, garments
with PVC or leather trimmings.
Only put into the tumble dryer laundry which
has been thoroughly wrung or spin-dried.
The drier the laundry the shorter the drying
time thus saving electricity.
ALWAYS
! Check that the filter is clean before every
drying cycle.
NEVER
! Put dripping wet items into the tumble
dryer, this may damage the appliance.
! By care symbols
These can be found on the collar or inside
seam:
Suitable for tumble drying.
Tumble drying at high temperature.
Tumble drying at low temperature
only.
Do not tumble dry.
If the item does not have a care label it
must be assumed that it is not suitable for
tumble drying.
! By amount and thickness
Whenever the load is bigger than the dryer
capacity, separate clothes according to
thickness (e.g. towels from thin underwear).
! By type of fabric
Cottons/linen: Towels, cotton jersey, bed
and table linen.
Synthetics: Blouses, shirts, overalls, etc.
made of polyester or polyamid, as well as
for cotton/synthetic mixes.
Clothes preparation
Do not tumble dry
WARNING
Do not dry articles which have been
treated with a dry cleaning fluid or
rubber clothes (danger of fire or
explosion).
During the last 15 minutes the load is
always tumbled in cool air.
Energy saving
Sort the load as follows
WARNING
Do not overload the drum, large items
when wet exceed the maximum
admissible clothes load (for example:
sleeping bags, duvets).
Page 67

!
EN
67
! Clean the filter and empty the water
container after every drying cycle.
! Regularly clean the condenser.
! After each period of use, wipe the inside
of the drum and leave the door open for a
while to allow circulation of air to dry it.
! Wipe the outside of the machine and the
door with a soft cloth.
! DO NOT use abrasive pads or cleaning
agents.
! To prevent the door sticking or the
buildup of fluff clean the inner door and
gasket
with a damp cloth after every drying
cycle.
Cleaning the dryer
WARNING
The drum, door and load may be very
hot.
WARNING
Always switch off and remove the plug
from the electricity supply before
cleaning this appliance.
WARNING
For electrical data refer to the rating
label on the front of the dryer cabinet
(with the door open).
Page 68

!
68
6. REMOTE CONTROL (WI-FI)
This appliance is equipped with Wi-Fi
technology that allows you to control it
remotely via App.
MACHINE ENROLLMENT (ON APP)
! Download the Candy simply-Fi App on
your device.
! Open the App, create the user profile
(or log-in if it is already created previously)
and enroll the appliance following the
instructions on the device display or the
"Quick Guide" attached on the machine.
TO ENABLE REMOTE CONTROL
! Check that the router is switched on and
connected to the Internet.
! Load the laundry and close the door.
! Turn the programme selector to the
REMOTE CONTROL (Wi-Fi) position: the
controls on the control panel will be
disabled.
! Start the cycle using the Candy simply-Fi
app. When the cycle has been completed,
turn off the machine by turning the
programme selector to the OFF position.
* REMOTE CONTROL (Wi-Fi)
TO DISABLE REMOTE CONTROL
! To exit REMOTE CONTROL mode while
a cycle is underway, turn the programme
selector to any position other than
REMOTE CONTROL (Wi-Fi). The control
panel on the appliance will be operative
once again.
! With the door closed, turn the programme
selector to the REMOTE CONTROL (Wi-
Fi) position to control the appliance using
the app once again. If there is a cycle
underway, it will continue.
The Candy simply-Fi App is available
for devices running both Android and
iOS, both for tablets and for
smartphones.
Get all the details of the Wi-Fi
functions by browsing the App in
DEMO mode.
With the door opened, the REMOTE
CONTROL will be disabled. To enable
it again, close the door, turn the
programme selector to any position
other than REMOTE CONTROL and
then select it again.
Page 69

!
EN
69
7. QUICK USER GUIDE
1. Open the door and load the drum with
laundry. Ensure that garments do not
hinder closure of the door.
2. Gently close the door pushing it slowly
until you hear the door 'click' shut.
3. Turn the Programme Selector dial to
select the required drying programme
(see the table of programmes).
4. Press the programme start button. The
dryer will start automatically.
5. If the door is opened during the
programme to check the laundry, it is
necessary to press programme start
to recommence drying after the door
has been closed.
6. When the cycle is nearing completion
the machine will enter the cool down
phase, the clothes will be tumbled in
cool air allowing the load to cool down.
7. Following the completion of the cycle
the drum will rotate intermittently to
minimize creasing. This will continue
until the machine is switched OFF or the
door is opened.
Power input / Power current fuse amp/
Supply voltage: see rating plate.
Maximum load: see energy label.
Energy class: see energy label.
8. CONTROLS AND
PROGRAMMES
A
FG
C
DEB
H
A
PROGRAMME SELECTOR with
OFF position
B
START/PAUSE button
C
DELAY START button
D
TIME CYCLE SELECTION/RAPIDS
button
E
MEMO button
F
DRYING SELECTION button
G
SUPER EASY IRON button
H
DISPLAY
C+D
CHILD LOCK
Do not open the door during the
automatic programmes in order to
obtain a proper drying.
Technical data
Page 70

!
70
! Rotating the programme selector in both
directions it's possible to select the
desired drying programme.
! To cancel the selections or switch off the
appliance rotate the programme selector
on OFF (remember to unplug the appliance).
- Language setting
! After connecting the machine to the
network and turning it on, press the
button "F" or "G" to see on the display
the available languages. ENGLISH is
always the first language shown.
! Select the desired language pressing the
START/PAUSE button.
- Change the language
If you want to change the setting language
you will have to press simultaneously "F"
and "G" buttons for about 5 seconds.
ENGLISH will appear on the display, and
you will be able to choose a new language.
! To start the selected cycle with the preset
parameters, press START/PAUSE. When
the programme is running, the display will
show the time to elapse.
! Moreover, if you want to modify the
chosen programme, press the desired
options buttons, modify the default
parameters and then press START/
PAUSE button to start the cycle.
! After switching on the appliance, wait a few
seconds for the programme to start running.
PROGRAMME DURATION
! When a programme is selected the
display automatically shows the cycle
duration, which can vary, depending on
the options selected.
! Once the programme has started you will
be kept informed constantly of the time
remaining to the end of the drying cycle.
! The appliance calculates the time to the
end of the selected programme based
upon a standard loading, during the cycle,
the appliance corrects the time to the
humidity level of the load.
PROGRAMME END
! "END" ("End" on some models) will
appear in the display at the end of the
programme, it is now possible to open the
door.
! At the end of the cycle, turn off the
appliance by turning the programme
selector to the OFF position.
WARNING
Don’t touch the buttons while inserting
the plug because the machines
calibrates the systems during the first
seconds: touching the buttons, the
machine couldn’t work property. In
this case, remove the plug and repeat
the operation.
PROGRAMME SELECTOR with
OFF position
First starting
START/PAUSE button
Close the porthole BEFORE pressing
the START/PAUSE button.
Only the options compatible with the
set programme can be selected.
The programme selector must
ALWAYS be put in the OFF position at
the end of the drying cycle before a
new one can be selected.
Page 71

!
EN
71
PAUSING THE MACHINE
! Keep the START/PAUSE button pressed
for about 2 seconds (the name of the
programme and the residual time display
will flash, showing that the machine is
paused).
! Press the START/PAUSE button again to
re-start the programme from the point it
had been paused at.
CANCELLING THE SET PROGRAMME
! To cancel the programme, turn the
programme selector to the OFF position.
If there is a break in the power supply
whilst the machine is operating, when
the power is restored, the machine will
restart from the beginning of the phase it
was in when the power was lost.
! This button allows to delay the start of the
programme from 30 minutes (1 hour on
some models) to 24 hours in 30 minutes
intervals (1 hour on some models).The
delay selected is shown on the display.
! After pressing the START/PAUSE button
the time showed decrease minute after
minute.
! It's possible transform a cycle from
automatic to programmed, up to 3
minutes after the start of the cycle.
! The progressive pressure increases the
time in 10 minute intervals. After this
selection to reset the automatic drying
functioning is necessary to switch off the
dryer.
! In case of incompatibility, all indicator
lights flash quickly for 3 times.
! If the programme selector is positioned on
the rapid programmes, the progressive
pressure of the key allows you to choose
the cycle time between: 30-45-59 minutes.
This button allows you to store the options
set on a cycle.
MEMORY:
when the cycle is running push the button
MEMO for 3 seconds. The writing MEMO
(all the digit on some models) will blink for 2
seconds and the options connected to the
cycle selected will be set.
RECALL:
after the selection of the cycle push the
button MEMO for recall the stored options
(not the cycle).
! This button allows to set the desired
dryness level editable option up to 5
minutes after the starting of the cycle:
Ready to Iron: it leaves the garments
slightly wet to facilitate ironing.
Dry Hanger: to get garment ready to
be hang.
Dry wardrobe: for laundry that can be
directly stored.
Extra-dry: to get completely dry
garments, ideal for full load.
DELAY START button
Opening of the porthole with delayed
start set, after re-closing the porthole,
press start again to resume the counting.
TIME CYCLE SELECTION/RAPIDS
button
MEMO button
The delay start function can't be
memorized.
DRYING SELECTION button
Page 72

!
72
! This appliances is equipped with Drying
Manager function. On automatic cycles,
each level of intermediate drying, prior to
the reaching the selected one, is
indicated by flashing the light indicator
corresponding to the degree of drying
reached.
In case of incompatibility, all indicator
lights flash quickly for 3 times.
! During the cycle the option sets alternate
movements of the drum to reduce the
folds and automatically sets the drying
level to "Ready to Iron" (the drying level
can be changed after selecting the
options). Moreover this option activate an
anti-creases movement of the drum pre
cycle in case of activation of the delay
and at the end of drying cycle. It is
activated every 10 minutes, up to 6 hours
after the end of the drying cycle.
! To stop the movements set the
programme selector to OFF. Useful
when it's not possible to remove
immediately the laundry.
! Pressing simultaneously the buttons "C"
and "D" for about 2 seconds, the
machine allows you to lock the keys. In
this way, you can avoid making accidental
or
unwanted changes if a button on the
display is pressed accidently during a cycle.
! The key lock can be simply cancelled by
pressing the two buttons simultaneously
again.
! In case of opening of porthole with
activated CHILD LOCK, the cycle stops
but the lock is kept: to restart the cycle,
you must remove the lock and press
START/PAUSE again.
! CHILD LOCK can be modified at any
time of the cycle.
The display shows the remaining time for
drying, the postponed time in case of
delayed start selection and other
notifications setting.
3
21 4
1) DRYING SELECTION INDICATOR
LIGHTS
The indicator lights display the degrees
of dryness that can be selected by the
relevant button.
2)
WATER CONTAINER INDICATOR LIGHT
It lights up when it’s necessary to empty the
condensate water tank.
3) FILTER CLEANING INDICATOR LIGHT
It lights up when the cleaning of the filters is
requested (the door and the lower filter).
4) Wi-Fi INDICATOR LIGHT
! On models equipped with Wi-Fi, it
indicates the status of the connection. It
could be:
- FIXED ON: remote control enabled.
- SLOW FLASHING: remote control
disabled.
- QUICK FLASHING FOR 3 SECONDS,
THEN OFF: the machine cannot connect
to the home Wi-Fi network or has not yet
been enrolled on the App.
SUPER EASY IRON button
CHILD LOCK
Display
Page 73

!
EN
73
- SLOW BLINKING FOR 3 TIMES, THEN
OFF FOR 2 SECONDS: reset of the Wi-Fi
network (during enrollment on the App).
- ON FOR 1 SECOND, THEN OFF FOR 3
SECONDS: the door is open. Remote
control cannot be activated.
! For all the information about the
functionality and the instructions for an
easy configuration of the Wi-Fi, please
refer to:
go.candy-group.com/bm-td-ble
The standard cycle COTTON DRY ( )
is the most energy efficient and best suited
for drying normal wet cotton laundry.
Maximum Drying Weight
Cottons
Max. capacity
declared
Synthetics or
Delicates
Max. 4 kg
EN 61121 - Programme To Use
- STANDARD DRY COTTON
- IRON DRY COTTON
(WHITES - Ready to Iron)
- EASY-CARE TEXTILE
(SYNTHETICS - Dry Hanger)
Drying Guide
Information for Test Laboratory
WARNING
Clean the filters before every cycle.
WARNING
The real duration of drying cycle
depends by the starting humidity level
of the laundry due to spin speed, type
and amount of load, cleanliness of
filters and ambient temperature.
WARNING
Only for 10/11 kg capacity Tumble
Dryer supplied with drain hose kit:
connect the drain hose for recovering
the condenser water (according to
instruction in the dedicated chapter).
Page 74

!
74
PROGRAMME
Selectable Options
CAPACITY
(kg)
DRYING
TIME (min)
WHITES
Full
*
DELICATES
4
*
SYNTHETICS
4
*
ZOOM
-
- - -
3,5
*
RELAX
- - -
-
2,5
12'
RAPID 30'/45'/59'
-
-
2,5
*
SHIRTS
-
2,5
*
ANTIALLERGY
-
-
4
Max 220'
SPORT PLUS
-
-
4
*
JEANS
- - -
-
4
*
WOOLMARK
- - -
-
1
70’
ECO COTTON
- - -
-
Full
*
DARKS & COLOURED
-
4
*
REFRESH
- - -
-
2,5
20'
REMOTE CONTROL (Wi-Fi)
Position that you have to select when you want to enable remote control through the
App (via Wi-Fi).
* The real duration of drying cycle depends by the starting humidity level of the laundry due to spin
speed, type and amount of load, cleanliness of filters and ambient temperature.
Table of programmes
Page 75

!
EN
75
To dry different types of fabrics and colors, the
tumble dryer has specific programs to meet
every need of drying (see table of
programmes).
WHITES
The right cycle to dry cottons, sponges and
towels.
DELICATES
To dry delicate fabrics that need an
accurate and specific treatment.
SYNTHETICS
To dry synthetic fabrics that need an accurate
and specific treatment.
ZOOM
Zoom is an exclusive cycle for drying a load
of laundry with different fabrics together
(cotton and synthetic). If the load is less
than the recommended one or with a low
level of residual humidity, the cycle is
shortened for not over-drying the garments.
RELAX
This is a warm cycle that in only 12 minutes
helps to relax folds and creases.
RAPID 30'/45'/59'
Quick Cycles allow you to have items ready
in a short time, you can choose to dry them
in 30, 45, 59 minutes.
SHIRTS
This specifics cycle has been conceived to
dry shirts minimizing tangles and folds
thanks specific movements of the drum. It’s
recommended to take out the linens
immediately after drying cycle.
ANTIALLERGY
One specifics cycle that dry and in the
same time helps to reduce the main
allergens as dust mites, pet hair, pollens
and residual of powder detergents.
SPORT PLUS
Dedicated to technical garments for sport and
fitness, drying gently with special care to avoid
shrinking and deterioration of elastic fibers.
JEANS
Dedicated to dry uniformly fabrics like jeans
or denim. It’s recommended flip over the
garments before drying.
WOOLMARK
Woolen clothes: the program can be used
to dry up to 1 kg of laundry (around 3
jumpers). It is recommended to reverse all
clothes before drying. Timing can change
due to dimensions and thickness of load
and to spinning chosen during washing. At
the end of the cycle, clothes are ready to be
worn, but if they are heavier, edges can be
a big wet: it is suggested to dry them
naturally. It is recommended to unload
clothes at the very end of the cycle.
Attention: felting process of wool is
irreversible; please dry exclusively with
symbol "ok tumble" on the garment
label. This programme is not indicated
for acrylic clothes.
ECO COTTON
The cotton program (hang dry) is the most
efficient program in energy consumption.
Suitable for cottons and linens.
Description of programmes
The wool drying cycle of this
machine has been approved by the
Woolmark Company for the drying of
machine washable wool products
provided that the products are
washed and dried according to the
instructions on the garment label and
those issues by the manufacturer of
this machine M1530.
In UK, Eire, Hong Kong and India the
Woolmark trade mark is a
Certification trade mark.
Page 76

!
76
DARKS & COLOURED
A delicate and specific cycle to dry dark and
coloured cotton or synthetics garments.
REFRESH
The perfect cycle to remove the smells from
the linens smoothing creases.
REMOTE CONTROL (WI-FI)
Position that you have to select when you
want to enable/disable remote control
through the App, via Wi-Fi. In this case, the
start of cycle will take place through the App
commands. More details in the REMOTE
CONTROL (Wi-Fi) section.
Page 77

!
EN
77
9. TROUBLESHOOTING
AND WARRANTY
Defects you can remedy yourself
Before calling Service for technical advice
please run through the following checklist. A
charge will be made if the machine is found
to be working or has been installed
incorrectly or used incorrectly. If the
problem persists after completing the
recommended checks, please call Service,
they may be able to assist you over the
telephone.
Time display to end could change during
drying cycle. The time to end is
continuously checked during the drying
cycle and the time is adjusted to give the
best estimation time. The displayed time
may increase or decrease during the
cycle and this is normal.
Drying time is too long/clothes are not
dry enough…
! Have you selected the correct drying
time/programme?
! Were the clothes too wet? Were the
clothes thoroughly wrung or spindried?
!
Does the filter need cleaning?
! Is the dryer overloaded?
The dryer does not operate…
! Is there a working electricity supply to the
dryer? Check using another appliance
such as a table lamp.
! Is the plug properly connected to the
mains supply?
! Is there a power failure?
! Has the fuse blown?
! Is the door fully closed?
! Is the dryer switched on, both at the
mains supply and at the machine?
! Has the drying time or the programme
been selected?
! Has the machine been switched on again
after opening the door?
The dryer is noisy…
! Switch off the dryer and contact Service
for advice.
The filter cleaning indicator light is on…
! Does the filter need cleaning?
The water container indicator light is
on…
! Does the water container need emptying?
Should there still be a problem with your
dryer after completing all the recommended
checks, please call Service for advice. They
may be able to assist you over the
telephone or arrange for a suitable
appointment for an engineer to call under
the terms of your guarantee. However, a
charge may be made if any of the following
applies to your machine:
! Is found to be in working order.
! Has not been installed in accordance with
the installation instructions.
! Has been used incorrectly.
Always use genuine spares, available direct
from Service.
To ensure the continued safe and efficient
operation of this appliance we recommend
that any servicing or repairs are only carried
out by an Authorised Service engineer.
What might be the cause of...
Customer Service
Spares
Service
Page 78

!
78
By placing the mark on this
product, we are confirming compliance
to all relevant European safety, health
and environmental requirements which
are applicable in legislation for this
product.
To ensure safety when disposing of an old
tumble dryer disconnect the mains plug
from the socket, cut the mains power cable
and destroy this together with the plug. To
prevent children shutting themselves in the
machine break the door hinges or the door
lock.
The manufacturer declines all
responsibility for any printing errors in
the booklet included with this product.
Moreover, it also reserves the right to
make any changes deemed useful to its
products without changing their
essential characteristics.
WIRELESS PARAMETERS
Wi-Fi
Specifications
(Wi-Fi)
Specifications
(Bluetooth)
A
802.11 b/g/n
Bluetooth v4.2
B
2,412 GHz. - 2,484
GHz.
2,412 GHz. - 2,484 GHz.
C
802.11b, DSSS 1 Mbps =
+19.5 dBm
802.11b, CCK 11 Mbps =
+18.5 dBm
802.11g, OFDM 54 Mbps =
+18.5 dBm
802.11n, MCS7 =
+14 dBm
Basic data Rate:
RF Transmit Power (Typ):
+4 dBm
Enhanced data Rate:
RF Transmit Power (Typ):
+2 dBm
BLE
RF Transmit Power (Typ):
+7.5 dBm
D
802.11b = 1024 bytes,
-80 dBm
802.11g = 1024 bytes,
-70 dBm
802.11n = 1024 bytes,
-65 dBm
802.11n HT40 = 1024
bytes, -65 dBm
Basic data Rate:
Sensivity @ 0.1% BER:
-98 dBm
Enhanced data Rate:
Sensivity @ 0.01% BER:
-98 dBm
BLE
Sensivity @ 0.1% BER:
-98 dBm
A Wireless Standard
B Frequency range
C Max Transmit Power
D Minimum Receiving Sensitivity
With this the Candy Hoover Group Srl,
declares that this appliance marked with
complies with the essential
requirements of the Directive
2014/53/EU. To receive a copy of the
declaration of conformity, please contact
the manufacturer at: www.candy-group.com
Warranty
The product is guaranteed under the
terms and conditions stated on the
certificate included with the product. The
certificate has to be stored so as to be
shown to the Authorized Customer
Service Centre in case of need. You can
also check the warranty conditions on
our web site. To obtain assistance,
please fill in the form on-line or contact
us at the number indicated on the
support page of our web site.
Page 79

!
ES
79
Page 80

!
80
Gracias por haber elegido este producto.
Estamos orgullosos de ofrecer el producto
ideal para ti y la mejor gama completa de
electrodomésticos para tu rutina diaria.
Por favor lea cuidadosamente
estas instrucciones y utilice la máquina
según las indicaciones. Este folleto
presenta directrices importantes para el
seguro, la instalación y el mantenimiento
seguros y algunos consejos útiles para
obtener los mejores resultados con su
secadora. Conserve toda la
documentación en un lugar seguro para
referencia futura o para los futuros dueños.
Por favor verifique que los siguientes
artículos hayan sido entregados con el
electrodoméstico:
! Manual de instrucciones
! Tarjeta de garantía
! Etiqueta energética
Comprueba que el electrodoméstico no
haya sufrido ningún daño durante el
transporte. Si así fuera, llama al Servicio de
atención al cliente. No hacerlo puede
comprometer la seguridad del
electrodoméstico. Es posible que se te
cobre por una llamada de servicio si el
problema de tu electrodoméstico se debe a
un uso o instalación incorrectos.
Para ponerte en contacto con el Servicio,
asegúrate de tener el código único de 16
caracteres disponible, también llamado
«número de serie». Este código es un
código único para tu producto, impreso en
la etiqueta que se encuentra dentro de la
abertura de la puerta.
Este dispositivo tiene el distintivo de la
directiva europea 2012/19/UE sobre
Residuos de Aparatos Eléctricos y
Electrónicos (RAEE).
Los RAEE contienen tanto sustancias
contaminantes (que pueden repercutir
negativamente en el medio ambiente) como
componentes básicos (que pueden
reutilizarse). Es importante que los RAEE
se sometan a tratamientos específicos
con el objeto de extraer y eliminar, de
forma adecuada, todos los agentes
contaminantes. Igual de importante es
recuperar y reciclar todo el material posible.
La gente puede desempeñar una función
importante a la hora de asegurarse de que
los RAEE no se convierten en un problema
medioambiental; es crucial seguir algunas
normas básicas:
! Los RAEE no han de tratarse como
residuos domésticos.
! Los RAEE han de depositarse en los
puntos de recogida habilitados para ello
que gestiona el ayuntamiento o empresas
contratadas para ello. En muchos países
se ofrece la posibilidad de recogida a
domicilio de los RAEE de mayor volumen.
En muchos países, cuando la gente compra
un nuevo dispositivo, el antiguo se puede
entregar al vendedor, quien lo recoge de
forma gratuita (un dispositivo antiguo por
cada dispositivo adquirido) siempre que el
equipo entregado sea similar y disponga de
las mismas funciones que el adquirido.
1. NORMAS DE SEGURIDAD
2. KIT DE MANGUERA DE DESAGÜE
3. DEPÓSITOS DE AGUA
4. PUERTA Y FILTROS
5. CONSEJOS PRÁCTICOS
6. CONTROL REMOTO (Wi-Fi)
7. GUÍA RÁPIDA
8. CONTROLES Y PROGRAMAS
9.
DIAGNÓSTICO DE AVERÍAS Y GARANTÍA
Normas ambientales
Índice
Page 81

!
ES
81
1. NORMAS DE
SEGURIDAD
! Este producto es exclusivamente
para uso doméstico o similar:
− zona de cocina para el
personal de tiendas, oficinas y
otros entornos laborales;
− granjas;
− pasajeros de hoteles, moteles
u otros entornos residenciales;
− hostales (B&B).
No se recomienda el uso
de este producto con fines
diferentes del doméstico o
similar, por ejemplo, con fines
comerciales o profesionales. El
empleo de la secadora con
fines no recomendados puede
reducir la vida útil del artefacto
e invalidar la garantía. Todos
los daños, averías o pérdidas
ocasionados por un uso diferente
del doméstico o similar (aunque
ese uso se realice en un entorno
doméstico) no serán reconocidos
por el fabricante en la medida en
que lo permita la ley.
! Este electrodoméstico puede
ser utilizado por niños mayores
de 8
años y por personas con
capacidades físicas, sensoriales o
mentales limitadas o que carezcan
de la experiencia y el conocimiento
necesarios, siempre y cuando
estén supervisadas por una
persona encargada de velar por su
seguridad o hayan sido instruidas
en su utilización de manera
segura.
Los niños no deben jugar con el
electrodoméstico. Los niños no
deben ocuparse del mantenimiento
ni de la limpieza del electrodoméstico,
salvo que estén supervisados una
persona encargada de velar por su
seguridad.
! Vigile a los niños de manera
que se asegure que no juegan
con el aparato.
! Los niños menores de 3 años se
deben mantener lejos a menos que
estén supervisados de forma continua.
! Este electrodoméstico está
destinado únicamente a uso
doméstico, es decir, para secar
prendas y textiles para el hogar.
!
Antes de utilizar el electrodoméstico
asegúrese de haber comprendido
bien las instrucciones de
instalación y uso.
! No toque el electrodoméstico
cuando tenga las manos o los
pies mojados o húmedos.
! No se apoye en la puerta al
cargar la secadora ni utilice la
puerta para levantar o mover la
máquina.
ATENCIÓN
El uso incorrecto de una
secadora puede provocar
riesgo de incendio.
Page 82

!
82
! No siga usando esta máquina
si pareciera tener algún
desperfecto.
! La secadora no debe ser
usada si se han empleado
agentes químicos en el lavado.
! No hay que dejar que se
acumulen lanilla y pelusas en
el suelo alrededor de la
máquina.
!
Antes de limpiar el electrodoméstico
desenchufe siempre la clavija
de la toma de corriente.
! El tambor interior puede
calentarse mucho Antes de
retirar la ropa de la máquina,
siempre deje que ésta termine
de enfriarse.
! La última parte del ciclo de
secado se realiza sin calor
(ciclo frío) para lograr una
temperatura final que no dañe
los tejidos.
ATENCIÓN
No use el producto si el filtro
de pelusa no está en su
lugar o si está dañado, ya
que la pelusa podría arder.
ATENCIÓN
En el lugar donde aparezca
el símbolo de superficie
caliente , el incremento
de temperatura durante la
operación de la secadora
puede exceder los 60 grados
centígrados.
ATENCIÓN
Nunca detenga la secadora
antes del fin de ciclo sin que
los tejidos hayan sido
removidos velozmente y
separados de manera que el
calor se disperse.
ATENCIÓN
Durante el transporte asegúrese
que la secadora este en posición
vertical,
si es necesario puede
girarla por el lado que se
muestra.
Si el producto está en lado
diferente, espere por lo
menos 4 horas antes de
encenderlo
para que el aceite
pueda fluir de nuevo enel
compresor. De no
hacerlo,
podría dañarse el compresor.
Page 83

!
ES
83
! No instalar el producto en una
habitación expuesta a bajas
temperaturas o en la que
exista riesgo de formación de
hielo. A la temperatura de
congelación del agua, el
producto podría no funcionar
correctamente. Si el agua del
circuito hiela, se pueden producir
daños en los componentes
tales como: válvulas, bombas,
tubos. Para garantizar las
prestaciones del producto, la
temperatura de la habitación
debe estar comprendida entre
+5°C y +35°C. Por favor, tenga
en cuenta que el funcionamiento
del aparato en condiciones de
bajas temperaturas (entre +2°C
y
+5°C) podría implicar condensación
de agua y la presencia de
gotas de agua en el suelo.
!
En los casos en que la secadora
esté instalada encima de una
lavadora, se debe usar un kit
de apilado adecuado de
acuerdo con la configuración
de su electrodoméstico:
- Kit de apilado "tamaño
estándar": para lavadoras
con
una profundidad mínima
de 44
cm;
- Kit de apilado "tamaño
pequeño": para lavadoras
con
una profundidad mínima
de 40
cm.
- Kit de apilamiento universal
con estante deslizante: para
lavadoras con una profundidad
mínima de 47 cm.
El kit de apilado se podrá
obtener de nuestro servicio de
repuestos. Las instrucciones
para la instalación y los accesorios
de fijación se proporcionan con
el kit de apilado.
! NUNCA instale la secadora
cerca de cortinas.
! El electrodoméstico no debe
instalarse detrás de una puerta
con cierre, de una puerta
corredera ni de puertas cuyas
bisagras se encuentren en el
lado opuesto del lugar donde
se encuentra la secadora.
! Para su seguridad, el
electrodoméstico se debe
instalar correctamente. Si
tuviera alguna duda acerca de
la instalación, acuda al Servicio
de Asistencia.
! Una vez que la máquina esté
en su sitio, las patas deben
ajustarse para asegurarse de
que estén niveladas.
Instalación
Page 84

!
84
! Los detalles técnicos (suministro
de corriente y entrada de
alimentación) están indicados en
la placa de características del
producto.
! Asegúrate de que el Sistema
eléctrico dispone de conexión
de tierra, de que cumple con
los requisitos legales y de que la
toma de corriente es compatible
con el enchufe. También puede
pedir asistencia profesional
cualificada.
!
No utilice adaptadores, conectores
múltiples y/o alargaderas.
!
El enchufe debe estar accesible
para la desconexión después
de la instalación del dispositivo.
!
No enchufe el electrodoméstico
ni lo encienda hasta que no se
complete su instalación.
!
Si el cable de alimentación
está
dañado, debe ser
reemplazado
por el fabricante
, un técnico de
servicio o personal calificado
para evitar riesgos.
!
Debe asegurarse una ventilación
adecuada en la sala donde
esté ubicada la secadora para
evitar que los gases de aparatos
que quemen otros combustibles,
(incluyendo llamas abiertas)
entren en la sala cuando se
está usando la secadora.
! Instalar la parte trasera del
aparato cerca de un muro o
pared vertical.
! Tiene que haber un espacio
libre de por lo menos 12 mm
entre el electrodoméstico y
cualquier obstrucción. La entrada
y la salida del aire deben estar
libres de obstrucciones.
! Asegúrese de que la base o
cualquier orificio de ventilación
no estén obstruidos por
alfombras ni moquetas.
! Procure que no caigan objetos
ni se acumulen detrás de la
máquina, ya que éstos pueden
obstruir la entrada y salida de
aire.
Conexiones eléctricas e
instrucciones de seguridad
ATENCIÓN
El dispositivo no debe ser
alimentado por un dispositivo
de conmutación externo, como
un temporizador, o conectado
a un circuito que se enciende
y
apaga regularmente.
Ventilación
Page 85

!
ES
85
! El aire extra do no debe
descargarse dentro de un
conducto que sea utilizado
para expulsar humos de
aparatos que quemen gas u
otros combustibles.
! Compruebe con regularidad
que no haya restricciones para
el aire que fluye alrededor de
la secadora, para ello preste
atención a evitar que se
acumulen polvo y pelusas.
! Controlar frecuentemente el
fitro de pelusas despues del
uso y limpiarlo, si fuera
necesario.
*
Salida de aire (según el modelo).
! Consulte siempre las etiquetas
sobre lavado de las prendas
para conocer si se pueden
secar en secadora.
! Los suavizantes de tejidos y
los productos similares pueden
utilizarse siguiendo las instrucciones
del suavizante.
! No utilice la secadora con
prendas que no haya lavado.
! Antes de introducir ropa en la
secadora, esta debe centrifugarse
o escurrirse bien.
! Las prendas que escurren
agua NO deben introducirse en
la secadora.
! No se deben introducir NUNCA
cortinas de fibra de vidrio en
esta máquina. Puede producirse
irritación de la piel si otras
prendas se contaminan con
fibras de vidrio.
La Colada
ATENCIÓN
No debe Los
materiales de
gomaespuma, en algunas
circunstancias, pueden arder
por combustión espontánea
si
se calientan. Los artículos
como gomaespuma (espuma
de látex), los gorros de ducha,
los tejidos impermeables a
base de goma, así como las
almohadas o las NO DEBEN
secarse en la secadora.
ATENCIÓN
No debe usarse
para secar
tejidos tratados con líquidos
para limpieza en seco.
Page 86

!
86
! Las prendas que se hayan
ensuciado con sustancias como
aceite de cocina, acetona, alcohol,
gasolina, queroseno, limpiamanchas,
trementina, ceras y limpiadores
de ceras deben lavarse en
agua caliente con una cantidad
extra de detergente antes de
introducirse en la secadora.
! Quita todos los artículos de los
bolsillos, como encendedores
y cerillas.
!
Deben sacarse de los bolsillos
encendedores y cerillas y no
se deben NUNCA usar líquidos
inflamables cerca de la máquina.
! Máxima capacidad de secado:
ver etiqueta energética.
! Para consultar la ficha del
producto, visitar la web del
fabricante.
Page 87

!
ES
87
ATENCIÓN
Peligro de incendio/Materiales
inflamables.
! El electrodoméstico contiene
R290, un gas refrigerante
ecosostenible que es inflamable.
Mantenga el electrodoméstico
alejado de llamas vivas y
fuentes de ignición.
! Verifique que no haya daños
visibles en el electrodoméstico.
No use el aparato si está
dañado.
! En caso de que surja algún
tipo de problema, póngase en
contacto con su distribuidor
especializado o con uno de
nuestros centros de atención al
cliente.
ATENCIÓN
Asegúrese de que las
aberturas del electrodoméstico
y las aberturas del compartimento
en el que está instalado el
electrodoméstico (para modelos
encastrados) estén libres de
obstrucciones.
ATENCIÓN
No dañe el circuito de
refrigeración.
!
Cualquier reparación o intervención
en el electrodoméstico debe
llevarlo a cabo únicamente un
servicio de asistencia autorizado.
! La eliminación incorrecta del
dispositivo podría provocar
incendios o envenenamiento.
!
Deseche el dispositivo correctamente
y no dañe las tuberías utilizadas
para la circulación del fluido
refrigerante.
Page 88

!
88
2. KIT DE MANGUERA DE
DESAGÜE
Para evitar vaciar el depósito de agua
después de cada ciclo de secado, el agua
puede extraerse directamente por una
tubería de desagüe de aguas residuales.
Las ordenanzas relativas al agua prohíben
la conexión a un desagüe de superficie. La
tubería de desagüe de aguas residuales
debe estar ubicada de forma adyacente a la
secadora.
El kit consta de: 1 manguera y 1 tapón.
1. Incline el electrodoméstico lentamente
hacia el lado derecho.
2. La tubería de aguas residuales está
situada en el lado derecho del
electrodoméstico (vea la imagen). Hay
una manguera gris conectada al
acoplador en línea en el lado izquierdo
del electrodoméstico. Con unos
alicates, retire el clip de retención de la
tubería del acoplador.
3. Saque la manguera del acoplador.
4. Coloque el tapón suministrado en el kit
para cerrar la otra manguera.
5. Conecte la manguera negra del kit
(usando el acoplador y los clips de
tubería suministrados) a la manguera
que se ha sacado del acoplador.
ATENCIÓN
Desenchufe la secadora del suministro
eléctrico antes de realizar cualquier
operación.
Instale la manguera siguiendo
estas instrucciones
Una vez recolocado el electrodoméstico,
revise la parte inferior para asegurarse
de que la nueva manguera no se dobla
al poner la secadora en su sitio.
Page 89

!
ES
89
3. DEPÓSITOS DE AGUA
El agua que sale de la ropa durante el ciclo
de secado se recoge en un depósito.
Cuando el depósito está lleno, se ilumina el
testigo correspondiente del panel de control
y el depósito DEBE vaciarse. Sin embargo,
recomendamos que el depósito se vacíe
después de cada ciclo de secado.
1. Extraiga con cuidado el depósito de agua
sujetando el asa (A).
Cuando esté lleno, el depósito de
agua pesará unos 6 kg.
2. Incline el depósito para vaciar el agua a
través de la boquilla (B).
Cuando esté vacío, vuelva a colocar el
depósito de agua como se muestra en la
imagen; (C) primero inserte la base del
depósito en la posición mostrada (1) y
luego empuje suavemente la parte
superior para colocarlo (2).
3. Pulse el botón de inicio del programa
para reiniciar el ciclo.
A
B
1
C
* Dependiendo del modelo
1. Tire suavemente de la parte inferior de la
chapa de protección para que se suelte
de la secadora. La sección superior se
puede desmontar permitiendo extraer por
completo la chapa de protección (A).
2. Tire firmemente de la empuñadura y
deslice el depósito de agua fuera de la
secadora (B). Sostenga el depósito con
ambas manos (C). Cuando esté lleno,
el depósito de agua pesará unos 4 kg.
3. Abra la tapa ubicada en la parte superior
del depósito y vacíe el agua (D).
4.
Vuelva a colocar la tapa y deslice el depósito
de agua de nuevo en su posición (D).
AJÚSTELO FIRMEMENTE EN SU SITIO.
5. Vuelva a colocar la chapa de protección
encajando las bisagras en la parte
superior y los clips inferiores en su sitio.
A
B
C
D
* Dependiendo del modelo
Se acumulará muy poca agua durante
los primeros ciclos de un nuevo
electrodoméstico, ya que primero se
llena un depósito interno.
Retirar el depósito del cajón de
la puerta *
SOLO PARA MODELOS CON KIT DE
MANGUERA DE DESAGÜE
Si tiene una opción de desagüe cerca
de la secadora, puede usar el kit de
desagüe para proporcionar un drenaje
permanente al agua recolectada en el
depósito de la secadora. Esto
significa que no tendrá que vaciar el
depósito de agua.
Retirar el depósito de agua del
cajón inferior *
Page 90

!
90
4. PUERTA Y FILTROS
! Tire de la manija para abrir la puerta.
! Para reiniciar el electrodoméstico, cierre
la puerta y pulse el botón de inicio del
programa.
Testigo luminoso de limpieza del filtro
Se ilumina cuando se requiere la limpieza
de los filtros (el filtro inferior y el de la
puerta).
Compruebe y, si es necesario, limpie el
filtro principal y el ubicado en la parte
inferior del electrodoméstico.
Si la ropa no se seca bien, compruebe que
los filtros no estén obstruidos.
1. Tire del filtro hacia arriba.
2. Abra el filtro como se muestra en la
imagen.
3. Retire con cuidado la pelusa con un
cepillo suave o con la punta de los
dedos.
4. Encaje el filtro en su sitio y empújelo
para recolocarlo.
1
2
Puerta
ATENCIÓN
Cuando la secadora está en uso, el
tambor y la puerta pueden estar MUY
CALIENTES.
ATENCIÓN
Si abre la puerta a mitad del ciclo,
antes de que finalice el ciclo de
enfriamiento, la manija puede estar
caliente. Tenga mucho cuidado cuando
intente vaciar el depósito de agua
durante el ciclo.
Filtros
Los filtros obstruidos podrían aumentar
el tiempo de secado y causar daños y
costosas operaciones de limpieza.
Para mantener la eficiencia de la
secadora, compruebe que todos los
filtros estén limpios antes de cada
ciclo de secado.
ATENCIÓN
No utilice la secadora sin los filtros.
Si limpia los filtros bajo el agua,
recuerde secarlos.
ATENCIÓN
Limpie los filtros antes de cada ciclo.
Limpiar el filtro de pelusas
Page 91

!
ES
91
1. Retire la chapa de protección.
2. Gire las palancas de bloqueo hacia la
izquierda y extraiga la cubierta frontal.
3. Retire con cuidado el marco del filtro y
limpie el polvo o la pelusa del filtro con
un paño. No use agua para limpiar el filtro.
4. Retire la esponja con cuidado y lávela
sujetándola debajo de un grifo abierto y
girándola para eliminar el polvo o la
pelusa.
5. Vuelva a colocar la cubierta frontal
asegurándose de que está en la posición
correcta (como lo indica la flecha) y
firmemente ajustada en su sitio. Bloquee
las palancas girándolas hacia la derecha.
6. Vuelva a colocar la chapa de protección.
1
2
3
4
6
UP
5
Limpiar el filtro del condensador
Page 92

!
92
5. CONSEJOS PRÁCTICOS
Antes de usar por primera vez la secadora:
! Por favor lea con atención las
instrucciones de este manual.
! Retire todos los artículos que haya
guardado en el interior del tambor.
! Con un trapo húmedo, limpie el interior
del tambor y de la puerta para quitar el
polvo que pueda haberse depositado
durante el traslado.
Compruebe que los artículos que propone
secar sean apropiados para secadora, de
acuerdo a los símbolos sobre cuidado que
lleve cada artículo. Compruebe que todos
los cierres estén cerrados, y que no quede
nada en los bolsillos. Ponga los artículos
del revés. Coloque la ropa en el tambor, sin
presionarla, para asegurar que no se
enrede.
Seda, medias de nailon, bordados delicados,
tejidos con decoraciones metálicas, prendas
con PVC o adornos de piel.
Se deben poner en la secadora solamente
artículos que se hayan escurrido bien o que
se hayan centrifugado. A menos humedad
que tengan las prendas que se han de
secar, más corto será el tiempo de secado,
lo cual ahorrará energía eléctrica.
SIEMPRE
! Procure secar el máximo peso permitido
de prendas, para economizar tiempo y
energía.
! Compruebe que el filtro esté limpio antes
de iniciar el ciclo de secado.
NUNCA
! Debe excederse del peso máximo,
porque de hacerlo malgastaría tiempo y
energía eléctrica.
! Introduzca en la secadora artículos que
chorreen agua, porque se puede dañar el
aparato.
! Según los símbolos de cuidado
Se encuentran en el cuello o en la costura
interior:
Apropiado para secadora.
Usar secadora a alta temperatura.
Usar secadora solamente a baja
temperatura.
No secar en secadora.
Si el artículo no tiene etiqueta de cuidado,
se debe presuponer que no es apropiado
para secadora.
! Según la cantidad y el grosor
Cuando la cantidad del material para secar
sea mayor que la capacidad de la
secadora, separe la ropa de acuerdo a su
espesor (por ej. separe las toallas de la
ropa interior fina).
! Según el tipo de tejido
Algodón/hilo: Toallas, jerseys de algodón,
ropa de cama y mantelería.
Preparación de la ropa
No secar en secadora
ATENCIÓN
No secar prendas que han sido
tratadas con un producto de limpieza
en seco o prendas de goma (peligro
de fuego o explosión).
Durante los últimos 15 minutos la
carga se seca siempre con aire frío.
Ahorro de energía
Clasifique la carga de la siguiente
manera
Page 93

!
ES
93
Fibras sintéticas: Blusas, camisas, monos,
etc. hechos de poliéster o poliamida y
también para mezclas de algodón/fibras
sintéticas.
! Limpie el filtro después de cada ciclo de
secado.
! Limpiar el condensador regularmente.
! Después de usar la secadora pase un
trapo por el interior del tambor y deje la
puerta abierta durante un rato para
permitir que circule el aire para secarla.
! Con un trapo suave, limpie la parte
exterior de la máquina y la puerta.
! NO use almohadillas abrasivas ni
productos de limpieza.
! Para evitar que la puerta se atasque o
que se acumule pelusa, limpie la parte
interna de la puerta y la junta con un
paño húmedo después de cada ciclo de
secado.
ATENCIÓN
No usar la secadora para artículos que
se hayan tratado con líquidos para
limpieza en seco ni para prendas de
goma (peligro de incendio o de
explosión).
Limpieza de la secadora
ATENCIÓN
El tambor, la puerta y las piezas que
se han secado pueden estar muy
calientes.
ATENCIÓN
Apague y desenchufa de la red
eléctrica este aparato siempre antes
de limpiarlo.
ATENCIÓN
Para los datos eléctricos, consulte la
etiqueta en el frontal de la secadora
(con la escotilla abierta).
Page 94

!
94
6. CONTROL REMOTO (WI-FI)
Este electrodoméstico está equipado con
tecnología Wi-Fi que le permite controlarlo
de forma remoto a través de una app.
REGISTRO DE ELECTRODOMÉSTICO
(EN APP)
!
Descargue la aplicación Candy simply-Fi en
su dispositivo.
! Abra la App, cree un perfil de usuario (o
inicie sesión si ya lo ha creado previamente)
y registre el electrodoméstico siguiendo las
instrucciones en la pantalla del dispositivo o
con la «Guía rápida» incluida.
PARA ACTIVAR EL CONTROL REMOTO
! Compruebe que el enrutador esté
encendido y conectado a Internet.
! Cargue la ropa, cierre la puerta.
! Gire el selector de programa hasta la
posición CONTROL REMOTO (Wi-Fi): los
mandos en el panel de control se
desactivarán.
! Empiece el ciclo utilizando la aplicación
Candy simply-Fi. Cuando se ha completado
el ciclo, apague el electrodoméstico girando
el selector de programa hasta la posición
OFF (APAGADO).
* CONTROL REMOTO (Wi-Fi)
PARA DESACTIVAR EL CONTROL
REMOTO
! Para salir del modo de CONTROL
REMOTO mientras se está llevando a
cabo un ciclo, gire el selector de
programa hasta cualquier posición
distinta de CONTROL
REMOTO (Wi-Fi).
El
panel de control del electrodoméstico
volverá a estar operativo.
! Con la puerta cerrada, gire el mando
hasta la posición CONTROL REMOTO
(Wi-Fi)
para controlar de nuevo el
electrodoméstico
utilizando la aplicación. Si
hay un ciclo en curso, seguirá adelante.
La App Candy simply-Fi está disponible
para dispositivos tanto Android como
iOS, así como para tablets y
smartphones.
Para conocer todos los detalles de las
funciones Wi-Fi, explore la App en modo
DEMO
.
Con la puerta abierta, el CONTROL
REMOTO se desactivará. Para volver
a habilitarlo, cierre la puerta, gire el
selector de programas a cualquier
posición que no sea CONTROL
REMOTO y luego vuelva a
seleccionarlo.
Page 95

!
ES
95
7. GUÍA RÁPIDA
1. Abra la puerta y cargue el tambor con
ropa. Asegúrese de que las prendas no
dificulten el cierre de la puerta.
2.
Cierre suavemente la puerta empujándola
lentamente hasta oír el «clic» del cierre.
3. Gire el selector de programa para
seleccionar el programa de secado
requerido (consulte la tabla de programas).
4. Pulse el botón de inicio del programa. La
secadora arrancará automáticamente.
5. Si abre la puerta durante el programa
para revisar la ropa, es necesario volver
a pulsar el botón de inicio para reiniciar
el secado después de cerrar la puerta.
6. Cuando el ciclo está a punto de terminar,
el electrodoméstico entrará en la fase de
enfriamiento y se aplicará aire frío a la
ropa para que la carga se enfríe.
7. Una vez finalizado el ciclo, el tambor
girará de forma intermitente para
minimizar las arrugas. Esto continuará
hasta que se apague el electrodoméstico
o se abra la puerta.
Potencia de entrada / Potencia de fusible
de corriente / Tensión de alimentación:
vea la placa de datos eléctricos.
Carga máxima: ver etiqueta energética.
Clase energética: ver etiqueta energética.
8. CONTROLES Y
PROGRAMAS
A
FG
C
DEB
H
A
SELECTOR DE PROGRAMA
con posición APAGADO
B
Botón de INICIO/PAUSA
C
Botón de INICIO DIFERIDO
D
Botón de SELECCIÓN DE CICLO
DE TIEMPO/RÁPIDOS
E
Botón MEMO
F
Botón de SELECCIÓN DE
SECADO
G
Botón PLANCHADO FÁCIL
H
PANTALLA
C+D
BLOQUEO INFANTIL
Para obtener un secado adecuado, no
abra la puerta durante los programas
automáticos.
Datos técnicos
Page 96

!
96
! Al girar el selector de programa en
ambas
direcciones, es posible seleccionar el
programa de secado deseado.
! Para cancelar las selecciones o apagar el
electrodoméstico, gire el selector de
programa a la posición APAGADO
(recuerde desenchufar el electrodoméstico).
- Configuración de idioma
! Después de enchufar el electrodoméstico
a la red eléctrica y encenderlo, pulse el
botón «F» o «G» para ver en la pantalla
los idiomas disponibles. ENGLISH es
siempre el primer idioma que se muestra.
! Seleccione el idioma deseado pulsando
el botón de INICIO/PAUSA.
- Cambiar de idioma
Si desea cambiar la configuración del
idioma, tendrá que pulsar simultáneamente
los botones «F» y «G» durante unos 5
segundos. En la pantalla aparecerá escrito
«ENGLISH», y se le dará la posibilidad de
elegir otro idioma.
! Para iniciar el ciclo seleccionado con los
parámetros preconfigurados, pulse
INICIO/PAUSA. Cuando el programa se
esté ejecutando, la pantalla mostrará el
tiempo restante.
! Además, si desea modificar el programa
seleccionado, pulse los botones de las
opciones correspondientes, modifique los
parámetros predeterminados y,
seguidamente, pulse el botón de
INICIO/PAUSA para empezar el ciclo.
! Tras encender el electrodoméstico,
espere unos segundos para que se
ponga en marcha el programa.
DURACIÓN DEL PROGRAMA
! Cuando se selecciona un programa, la
pantalla mostrará automáticamente la
duración del ciclo, el cual podrá variar en
función de las opciones seleccionadas.
! Una vez iniciado el programa, se le
informará de manera permanente del
tiempo restante hasta el fin del ciclo de
secado.
! El electrodoméstico calcula el tiempo
hasta el fin del programa seleccionado
sobre la base de una carga estándar;
durante el ciclo, el electrodoméstico
corrige el tiempo en función del nivel de
humedad de la carga.
FIN DE PROGRAMA
! La palabra «FIN» («End» en algunos
modelos) aparecerá en la pantalla al final
del programa: ahora es posible abrir la
puerta.
!
Al final del ciclo, apague el electrodoméstico
colocando el selector de programa en la
posición de APAGADO.
ATENCIÓN
No toque las teclas al enchufar la
clavija en la toma de corriente, ya que
el aparato calibra los sistemas
durante los primeros segundos: si se
tocan las teclas, la máquina podría no
funcionar correctamente. En tal caso,
desenchufe el aparato y repita la
operación.
SELECTOR DE PROGRAMA
con posición APAGADO
Primer uso
Botón de INICIO/PAUSA
Cierre la puerta ANTES de pulsar el
botón de INICIO/PAUSA.
Solo se podrán seleccionar las
opciones compatibles con el
programa ajustado.
Page 97

!
ES
97
PAUSAR EL ELECTRODOMÉSTICO
! Mantenga pulsado el botón de INICIO/
PAUSA durante aproximadamente 2
segundos (el nombre del programa y el
tiempo restante parpadearán en la
pantalla, lo que indica que el
electrodoméstico está en pausa).
! Vuelva a pulsar el botón de
INICIO/PAUSA para reiniciar el programa
desde el punto en que se pausó.
CANCELACIÓN DEL PROGRAMA
AJUSTADO
! Para cancelar el programa, gire el
selector de programa a la posición
APAGADO.
Si se produce una interrupción en la
fuente de alimentación mientras el
electrodoméstico está en funcionamiento,
al restaurarse la alimentación, el
electrodoméstico se reiniciará desde el
comienzo de la fase en la que se
encontraba cuando se produjo el corte.
! Este botón permite retrasar el inicio del
programa de 30 minutos (1 hora en
algunos modelos) a 24 horas en
intervalos de 30 minutos (1 hora en
algunos modelos). El retraso
seleccionado se muestra en la pantalla.
! Después de pulsar el botón de
INICIO/PAUSA, el tiempo mostrado
disminuye minuto a minuto.
! Es posible transformar un ciclo de
automático a programado hasta 3
minutos después del inicio del ciclo.
! Presionar progresivamente el botón
aumenta el tiempo en intervalos de 10
minutos. Después de esta selección,
para restablecer el funcionamiento de
secado automático, es necesario apagar
la secadora.
! En caso de incompatibilidad, todos los
testigos parpadearán rápidamente 3
veces.
! Si el selector de programa está
posicionado en los programas rápidos,
presionar progresivamente el botón le
permite elegir el tiempo del ciclo entre:
30-45-59 minutos.
Este botón le permite guardar las opciones
configuradas en un ciclo.
MEMORIZACIÓN:
cuando el ciclo esté en marcha, presione el
botón MEMO durante 3 segundos. La
palabra MEMO (todos los dígitos en
algunos modelos) parpadeará durante 2
segundos y se configurarán las opciones
conectadas al ciclo seleccionado.
RECUPERACIÓN:
después de seleccionar el ciclo, pulse el
botón MEMO para recuperar las opciones
guardadas (no el ciclo).
El selector de programa SIEMPRE
debe ponerse en la posición de
APAGADO al final del ciclo de secado
antes de poder seleccionar uno
nuevo.
Botón de INICIO DIFERIDO
Si abre la puerta con el inicio diferido
configurado, vuelva a pulsar el botón
de inicio para reanudar el conteo
después de volver a cerrar la puerta.
Botón de SELECCIÓN DE CICLO
DE TIEMPO/RÁPIDOS
Botón MEMO
La función de inicio diferido no se
puede memorizar.
Page 98

!
98
! Este botón permite configurar la opción
editable de nivel de secado deseado
hasta 5 minutos después del inicio del ciclo:
Lista para plancha: deja las
prendas ligeramente húmedas para
facilitar el planchado.
Secado tendal: para que las
prendas estén listas para tenderlas.
Secado guardar: para ropa que se
puede guardar directamente.
Extra seco: para obtener prendas
completamente secas, ideal para
cargas completas.
! Este electrodoméstico está equipado con
la función Gestor de secado. En ciclos
automáticos, cada nivel de secado
intermedio antes de llegar al seleccionado
se
indica mediante el parpadeo del testigo
luminoso correspondiente al grado de
secado alcanzado.
En caso de incompatibilidad, todos los
testigos parpadearán rápidamente 3
veces.
! Durante el ciclo, esta opción establece
movimientos alternativos del tambor para
reducir las arrugas y configura
automáticamente el nivel de secado a
«Lista para plancha» (el nivel de secado
se puede cambiar después de
seleccionar las opciones). Además, esta
opción activa un movimiento antiarrugas
del preciclo del tambor en caso de
activación del inicio diferido y al final del
ciclo de secado. Se activa cada 10
minutos, hasta 6 horas después del final
del ciclo de secado.
! Para detener los movimientos, ponga el
selector de programa en la posición
APAGADO. Resulta útil cuando no es
posible sacar inmediatamente la ropa del
electrodoméstico.
! Pulsando simultáneamente las teclas "C"
y "D" durante 2 segundos, la secadora
permitirá bloquear las teclas. De esta
forma, si pulsas accidentalmente alguna
de las teclas en el display durante un
ciclo, podrás evitar que se cambie el
programa accidentalmente.
! El bloqueo de tecla se desactiva
sencillamente pulsando ambas teclas
de nuevo, o desconectando el
electrodoméstico.
! En caso de apertura de la puerta con el
BLOQUEO INFANTIL activado, el ciclo
se detiene pero se mantiene el bloqueo:
para reiniciar el ciclo, debe desactivar el
bloqueo y pulsar el botón INICIO/PAUSA
de nuevo.
! El BLOQUEO INFANTIL se puede
modificar en cualquier momento del ciclo.
La pantalla muestra el tiempo restante para
completar el secado, el tiempo pospuesto
en caso de selección del inicio diferido y
otras configuraciones de notificaciones.
3
21 4
1)
TESTIGOS LUMINOSOS DE SELECCIÓN
DE SECADO
Los testigos luminosos muestran los niveles
de secado que se pueden seleccionar por
medio del botón correspondiente.
Botón de SELECCIÓN DE
SECADO
Botón PLANCHADO FÁCIL
BLOQUEO INFANTIL
Pantalla
Page 99

!
ES
99
2) TESTIGO LUMINOSO DE DEPÓSITO
DE AGUA
Se ilumina cuando es necesario vaciar el
depósito de agua de condensación.
3) TESTIGO LUMINOSO DE LIMPIEZA
DEL FILTRO
Se ilumina cuando se requiere la limpieza
de los filtros (el filtro inferior y el de la
puerta).
4) INDICADOR Wi-Fi
! En los modelos equipados con Wi-Fi,
indica el estado de la conexión. Puede
presentar los estados siguientes:
- FIJO: control remoto activado.
- PARPADEA LENTAMENTE: control
remoto desactivado.
- PARPADEA RÁPIDAMENTE DURANTE
3 SEGUNDOS Y, SEGUIDAMENTE, SE
APAGA: la secadora no se puede conectar
con la red Wi-Fi doméstica o todavía no
ha sido registrada en la app.
- PARPADEA LENTAMENTE 3 VECES Y
SE APAGA DURANTE 2 SEGUNDOS:
restablecimiento de la red Wi-Fi (durante
registro en la app).
- SE ENCIENDE DURANTE 1 SEGUNDO
Y SE APAGA DURANTE 3 SEGUNDOS:
la puerta está abierta. El control remoto no
se puede activar.
! Para acceder a información completa
sobre todas las funciones y a las
instrucciones de configuración de la
conexión Wi-Fi, consulte:
go.candy-group.com/bm-td-ble
El ciclo estándar SECADO DE ALGODÓN
( ) es el más eficiente en cuanto a
energía y el más adecuado para secar la
ropa húmeda de algodón normal.
Peso máximo de secado
Algodón
Capacidad máx.
declarada
Sintéticos o
Delicados
Máx. 4 kg
Programa EN 61121 para usar:
- SECADO DE ALGODÓN ESTÁNDAR
- SECADO ALGODÓN PARA PLANCHA
(BLANCOS - Lista para plancha)
- TEXTIL CUIDADO FÁCIL
(SINTÉTICOS - Secado tendal)
Guía de secado
Información para los laboratorios
de pruebas
ATENCIÓN
Limpie los filtros antes de cada ciclo.
ATENCIÓN
La duración real del ciclo de secado
depende del nivel de humedad inicial
de la ropa debido a la velocidad de
centrifugado, el tipo y la cantidad de
carga, la limpieza de los filtros y la
temperatura ambiente.
ATENCIÓN
Solo para secadoras de 10/11 kg de
capacidad con kit de manguera de
desagüe: conecta la manguera de
desagüe para recuperar el agua del
condensador (según las instrucciones
del capítulo dedicado a este tema).
Page 100

!
100
PROGRAMA
Opciones seleccionables
CAPACIDAD
(kg)
TIEMPO DE
SECADO (min)
BLANCOS
!
Lleno
*
DELICADOS
4
*
SINTÉTICOS
!
4
*
ZOOM
-!
- - -
3,5
*
ANTI-ARRUGAS
- - -
-
2,5
12'
RÁPIDOS 30'/45'/59'
!
-
-
2,5
*
CAMISAS
-
2,5
*
ANTIALERGIA
!
-!
-!
4
Máx. 220'
DEPORTE
-
-
4
*
VAQUEROS
-!- -!
-!
4
*
LANA
-!- -!
-!
1
70’
ALGODÓN
- - -
-
Lleno
*
OSCURA Y DE COLOR
-
4
*
REFRESCAR
- - -
-
2,5
20'
CONTROL REMOTO (Wi-Fi)
Posición que hay que seleccionar cuando se desee activar/desactivar el control
remoto a través de la aplicación (por Wi-Fi).
* La duración real del ciclo de secado depende del nivel de humedad inicial de la ropa debido a la
velocidad de centrifugado, el tipo y la cantidad de carga, la limpieza de los filtros y la temperatura
ambiente.
Tabla de programas
 Loading...