


TO PREVENT FIRE OR SHOCK HAZARD, DO NOT USE THIS PLUG WITH AN EXTENSION CORD, RECEPTACLE OR OTHER OUTLET UNLESS THE BLADES CAN BE FULLY INSERTED TO PREVENT BLADE EXPOSURE
TO PREVENT FIRE OR SHOCK HAZARD, DO NOT EXPOSE THIS APPLIANCE TO RAIN OR MOISTURE.
The lightning flash with arrowhead symbol, within an equilateral triangle, is intended to alert the user to the presence of uninsulated “dangerous voltage” within the product’s enclosure that may be of sufficient magnitudetoconstituteariskofelectric shock to persons.
CAUTION
RISK OF ELECTRIC SHOCK
DO NOT OPEN
CAUTION:TOREDUCETHERISKOF
ELECTRICSHOCK,DONOTREMOVE COVER (OR BACK). NO USERSERVICEABLE PARTS INSIDE. REFER SERVICING TO QUALIFIED SERVICEPERSONNEL.
The exclamation point within an equilateral triangle, is intended to alert the user to the presence of important operating and maintenance (servicing) instructions in the literature accompanying the appliance.
1)Read these instructions.
2)Keep these instructions.
3)Heed all warnings.
4)Follow all instructions.
5)Do not use this apparatus near water.
6)Clean only with dry cloth.
7)Do not block any ventilation openings. Install in accordance with the manufacturer’s instructions.
8)Do not install near any heat sources such as radiators, heat registers, stoves, or other apparatus (including amplifiers) that produce heat.
9)Do not defeat the safety purpose of the polarized or grounding-type plug. A polarized plug has two blades with one wider than the other. A grounding plug-type plug has two blades and a third grounding prong. The wide blade or the third prong are provided for your safety. If the provided plug does not fit into your outlet, consult an electrician for replacement of the obsolete outlet.
10)Protect the power cord from being walked on or pinched, particularly at plugs, convenience receptacles, and the point where they exit from the apparatus.
11)Only use attachments/accessories specified by the manufacturer.
12)Unplug this apparatus during lightning storms or when unused for long periods of time.
13)Refer all servicing to qualified service personnel. Servicing is required when the apparatus has been damaged in any way, such as when the power-supply cord or plug is damaged, liquid has been spilled or objects have fallen into the apparatus, the apparatus has been exposed to rain or moisture, does not operate normally, or has been dropped.
14)The appliance shall not be exposed to drippng or splashing water and that no object filled with liquid such as vases shall be placed on the apparatus.
HD Radio™ Technology Manufactured Under License From iBiquity Digital Corporation. iBiquity Digital, the HD Radio logo, and the HD logo are registered trademarks of iBiquity Digital Corporation. HD RadioTM is a trademark of iBiquity Digital Corporation. U.S. and Foreign Patents.

Page Index |
|
|
|
Product Carton Contents........................................................................................ |
1 |
|
Initial Setup.............................................................................................................. |
2-3 |
|
Radio Operation......................................................................................................... |
4 |
|
Favorites Organizer Band Operation................................................................... |
5 |
|
Technical Information.............................................................................................. |
6 |
|
Faceplate and Remote Control Quick Reference........................................ |
8-9 |
|
Additional Information |
|
|
Audio Display, Jog Menus, Headphone/Aux Jacks........................ |
10-11 |
|
Alarm Features.......................................................................................................... |
11 |
|
Alarm Operation 1 - Wakeup Settings Adjustment .............................. |
12-15 |
|
Alarm Operation 2 - Alarm Activation.............................................................. |
16 |
Product Carton Contents |
|
|
1) |
SoundWorks Radio 820HD |
|
2) |
FM telescoping whip antenna (packed separately, |
|
|
shown attached to radio) |
|
3) |
AM loop antenna |
|
4) |
FM external wire antenna |
|
5) |
FM external dipole antenna |
|
6) |
Infrared remote control |
|
|
|
-1- |
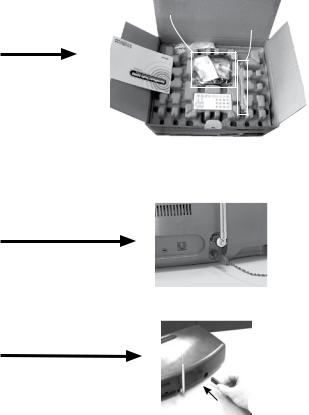
Setup
1)Locate and remove the Antenna Pack and the Whip Antenna from the carton.
Remove the Antenna Connection leaflet, the AM antenna, the FM wire antenna and the FM dipole antenna from the Antenna Pack.
2)Refer to the Antenna Connection leaflet. Choose and connect an FM Antenna. Position the FM antenna.
Connect and position the AM antenna.
3)Insert the AC cord.
Antenna Pack
Whip Antenna
|
OPT DIGITAL |
12VDC |
OUT |
OUT |
|
FIRMLY push the AC cord connector into the back panel socket.
-2-

4)Place the radio in its intended location. Connect the AC plug to a 120 VAC outlet.
5)Press the Power button.
You can now set the date and time.
6)To reach the date and time adjustment screen: First press and hold the JOG button until you see
"HD RADIO & ANALOG" on the display.
Then briefly press the JOG button three more times to reach the "SET CLOCK" screen.
Use the VOLUME control to make an adjustment, then press the JOG button again to reach the next Date and Time value. Repeat this process
for each Date and Time values. |
|
After the last value is set, either wait for the screen |
|
to return to normal radio operation, or press the |
|
JOG button until you see the normal radio display. |
-3- |
|
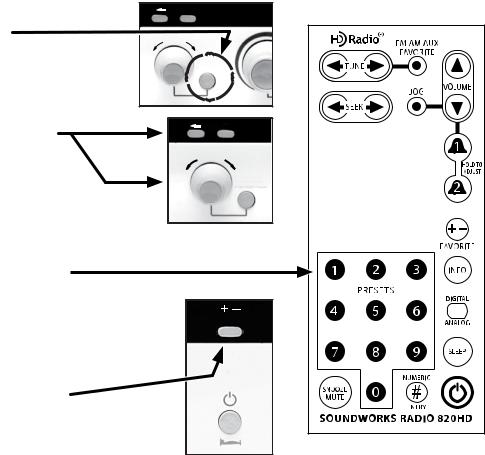
Radio Operation
1) Select the FM or AM band by pressing the AM/FM/Aux button on the front panel
or the remote control.
2)Tune stations using TUNE or SEEK (faceplate or remote). See page 8 for more information.
Numeric Entry Tuning (remote control only)
Press the NUMERIC ENTRY button, then enter the station frequency using the PRESET numbered buttons.
Preset Button Assignment
3)If desired, store ten radio stations (either AM or FM) for immediate recall. While tuned to the station, press and hold down a PRESET button on the remote control for at least two seconds. The display will confirm the station is stored.
Favorite Assignment
4)Besides using the ten PRESET buttons on the remote control, you can assign an additional twenty stations to appear in the FAVORITE organizer band. See the next page for a description of its operation.
-4-
SEEK 
TUNING
FAVORITE
FM AM AUX
SEEK 
TUNING
FAVORITE
FM AM AUX
FAVORITE
Tune & Seek |
Buttons |
Favorite |
Button |
 Loading...