


 Loading...
Contents
Introduction . . . . . . . . . . . . . . . . . . . . . . 2
In Brief . . . . . . . . . . . . . . . . . . . . . . . . . . . 5
Keys, Doors, and Windows . . . . . 27
Seats and Restraints . . . . . . . . . . . 54
Storage . . . . . . . . . . . . . . . . . . . . . . . 110
Instruments and Controls . . . . . . 115
Lighting . . . . . . . . . . . . . . . . . . . . . . . 168
Infotainment System . . . . . . . . . . 177
Climate Controls . . . . . . . . . . . . . . 178
Driving and Operating . . . . . . . . . 186
Vehicle Care . . . . . . . . . . . . . . . . . . 264
Service and Maintenance . . . . . 346
Technical Data . . . . . . . . . . . . . . . . 360
Customer Information . . . . . . . . . 363
Reporting Safety Defects . . . . . . 373
OnStar . . . . . . . . . . . . . . . . . . . . . . . . 376
Index . . . . . . . . . . . . . . . . . . . . 386
2Introduction
Introduction
The names, logos, emblems, slogans, vehicle model names, and vehicle body designs appearing in this manual including, but not limited to, GM, the GM logo, CADILLAC, the CADILLAC Emblem, and ESCALADE are trademarks and/or service marks of General Motors LLC, its subsidiaries, affiliates,
or licensors.
For vehicles first sold in Canada, substitute the name “General Motors of Canada Limited” for Cadillac Motor Division wherever it appears in this manual.
This manual describes features that may or may not be on the vehicle because of optional equipment that
Litho in U.S.A.
Part No. 23133525 A First Printing
was not purchased on the vehicle, model variants, country specifications, features/applications that may not be available in your region, or changes subsequent to the printing of this owner manual.
Refer to the purchase documentation relating to your specific vehicle to confirm the features.
Keep this manual in the vehicle for quick reference.
Canadian Vehicle Owners
Propriétaires Canadiens
A French language manual can be obtained from your dealer, at www.helminc.com, or from:
On peut obtenir un exemplaire de ce guide en français auprès du concessionnaire ou à l'adresse savant:
Helm, Incorporated
Attention: Customer Service
47911 Halyard Drive
Plymouth, MI 48170
Using this Manual
To quickly locate information about the vehicle, use the Index in the back of the manual. It is an alphabetical list of what is in the manual and the page number where it can be found.
Danger, Warning, and
Caution
Warning messages found on vehicle labels and in this manual describe hazards and what to do to avoid or reduce them.
{Danger
Danger indicates a hazard with a high level of risk which will result in serious injury or death.
© 2015 General Motors LLC. All Rights Reserved.

Introduction 3
{Warning
Warning indicates a hazard that could result in injury or death.
Caution
Caution indicates a hazard that could result in property or vehicle damage.
A circle with a slash through it is a safety symbol which means “Do Not,” “Do not do this,” or “Do not let this happen.”
Symbols
The vehicle has components and labels that use symbols instead of text. Symbols are shown along with the text describing the operation or information relating to a specific component, control, message, gauge, or indicator.
M : Shown when the owner manual has additional instructions or information.
* : Shown when the service manual has additional instructions or information.
0 : Shown when there is more information on another page — “see page.”
Vehicle Symbol Chart
Here are some additional symbols that may be found on the vehicle and what they mean. For more information on the symbol, refer to the Index.
0 : Adjustable Pedals
9 : Airbag Readiness Light
! : Antilock Brake System (ABS)
g : Audio Steering Wheel Controls or OnStar® (if equipped)
$ : Brake System Warning Light
" : Charging System
I : Cruise Control
` : Do Not Puncture
^ : Do Not Service
B : Engine Coolant Temperature
O : Exterior Lamps
_ : Flame/Fire Prohibited
. : Fuel Gauge
+ : Fuses
3 : Headlamp High/Low-Beam Changer
( : Heated Steering Wheel
j : LATCH System Child Restraints
* : Malfunction Indicator Lamp
: : Oil Pressure
g : Outside Power Foldaway Mirrors
O : Power
/ : Remote Vehicle Start

4Introduction
> : Safety Belt Reminders
7 : Tire Pressure Monitor
_ : Tow/Haul Mode
d : Traction Control/StabiliTrak®
a : Under Pressure
M : Windshield Washer Fluid

In Brief |
5 |
|
|
In Brief
Instrument Panel
Instrument Panel . . . . . . . . . . . . . . . . 6
Initial Drive Information
Initial Drive Information . . . . . . . . . . 8
Remote Keyless Entry (RKE)
System . . . . . . . . . . . . . . . . . . . . . . . . 8
Remote Vehicle Start . . . . . . . . . . . 9
Door Locks . . . . . . . . . . . . . . . . . . . . . 9
Liftgate . . . . . . . . . . . . . . . . . . . . . . . . 10
Windows . . . . . . . . . . . . . . . . . . . . . . . 10
Seat Adjustment . . . . . . . . . . . . . . . 11
Memory Features . . . . . . . . . . . . . . 13
Second Row Seats . . . . . . . . . . . . 13
Third Row Seats . . . . . . . . . . . . . . . 13
Heated and Cooled Front
Seats . . . . . . . . . . . . . . . . . . . . . . . . . 13
Head Restraint Adjustment . . . . 13
Safety Belts . . . . . . . . . . . . . . . . . . . . 14
Passenger Sensing System . . . 14
Mirror Adjustment . . . . . . . . . . . . . . 14
Steering Wheel Adjustment . . . . 15
Throttle and Brake Pedal
Adjustment . . . . . . . . . . . . . . . . . . . 16
Interior Lighting . . . . . . . . . . . . . . . . 16
Exterior Lighting . . . . . . . . . . . . . . . 17
Windshield Wiper/Washer . . . . . . 17
Climate Controls . . . . . . . . . . . . . . . 18
Transmission . . . . . . . . . . . . . . . . . . 19
Four-Wheel Drive . . . . . . . . . . . . . . 19
Vehicle Features
Infotainment System . . . . . . . . . . . 20
Steering Wheel Controls . . . . . . . 20
Cruise Control . . . . . . . . . . . . . . . . . 20
Driver Information
Center (DIC) . . . . . . . . . . . . . . . . . 21
Forward Collision Alert (FCA)
System . . . . . . . . . . . . . . . . . . . . . . . 21
Front Automatic Braking (FAB)
System . . . . . . . . . . . . . . . . . . . . . . . 21
Lane Keep Assist (LKA) . . . . . . . 22
Lane Change Alert (LCA) . . . . . . 22
Surround Vision . . . . . . . . . . . . . . . 22
Rear Vision Camera (RVC) . . . . 22
Rear Cross Traffic Alert (RCTA)
System . . . . . . . . . . . . . . . . . . . . . . . 22
Parking Assist . . . . . . . . . . . . . . . . . 23
Rear Automatic Braking (RAB)
System . . . . . . . . . . . . . . . . . . . . . . . 23
Power Outlets . . . . . . . . . . . . . . . . . 23
Universal Remote System . . . . . 23
Sunroof . . . . . . . . . . . . . . . . . . . . . . . . 24
Performance and Maintenance
Traction Control/Electronic Stability Control . . . . . . . . . . . . . . 25
Tire Pressure Monitor . . . . . . . . . . 25 Engine Oil Life System . . . . . . . . 25 Driving for Better Fuel
Economy . . . . . . . . . . . . . . . . . . . . . 26 Roadside Service . . . . . . . . . . . . . . 26

6In Brief
Instrument Panel
English Version Shown, Metric Similar

In Brief |
7 |
|
|
1.Air Vents 0 184.
2.Head-Up Display (HUD) 0 142
(If Equipped).
3.Turn Signal Lever. See Turn and Lane-Change Signals 0 172.
Windshield Wiper/Washer 0 117.
Rear Window Wiper/Washer 0 119.
4.Hazard Warning Flashers 0 172.
5.Instrument Cluster 0 125.
6.Shift Lever. See Automatic Transmission 0 211.
Tow/Haul Mode Selector Button. See Tow/Haul Mode 0 216.
Range Selection Mode Buttons (If Equipped). See Manual Mode 0 213.
7.Power Assist Steps 0 43 (If Equipped).
Pedal Adjust Switch (If Equipped). See Adjustable Throttle and Brake Pedal 0 203.
Magnetic Ride Control Button.
See Magnetic Ride Control
0 226.
8.Light Sensor. See Automatic Headlamp System 0 171.
9.Infotainment 0 177.
10.Glove Box Button. See Glove Box 0 110.
Parking Assist Button. See
Assistance Systems for Parking or Backing 0 237.
Lane Keep Assist (LKA) 0 248
(If Equipped).
Traction Control/Electronic Stability Control 0 224.
11.Dual Automatic Climate Control System 0 178.
Instrument Panel Storage 0 110.
12.CD Player. See the infotainment manual.
13.ENGINE START/STOP Button. See Ignition Positions 0 203.
14.Steering Wheel Controls 0 116.
Driver Information Center (DIC) Controls. See Driver Information Center (DIC) 0 140.
15.Horn 0 117.
16.Steering Wheel Adjustment 0 116.
17.Hood Release. See Hood
0 266.
18.Cruise Control 0 227 (If Equipped).
Adaptive Cruise Control 0 229
(If Equipped).
Forward Collision Alert (FCA) System 0 242 (If Equipped).
Heated Steering Wheel 0 116
(If Equipped).
Phone Button. See the infotainment manual.
19.Automatic Transfer Case Knob (If Equipped). See Four-Wheel Drive 0 217.

8In Brief
20.Data Link Connector (DLC) (Out of View). See Malfunction Indicator Lamp (Check Engine Light) 0 131.
21.Electric Parking Brake 0 221 (If Equipped).
22.Exterior Lamp Controls 0 168.
23.Instrument Panel Illumination Control 0 173.
Initial Drive
Information
This section provides a brief overview about some of the important features that may or may not be on your specific vehicle.
For more detailed information, refer to each of the features which can be found later in this owner manual.
Remote Keyless Entry
(RKE) System
The RKE transmitter is used to remotely lock and unlock the doors from up to 60 m (197 ft) away from the vehicle.
K : Press to unlock the driver door. Press K again within three seconds to unlock all remaining doors.
Q : Press to lock all doors.
Lock and unlock feedback can be personalized. See Vehicle Personalization 0 157.
b : Press twice to open or close the liftgate. Press once to stop the liftgate from moving.
c : Press twice to open the liftglass.

In Brief |
9 |
|
|
7 : Press and release to initiate vehicle locate. The turn signal lamps flash and the horn sound three times.
Press 7 and hold for more than three seconds to sound the panic alarm.
Press 7 again to cancel the panic alarm.
See Keys 0 27 and Remote Keyless Entry (RKE) System 0 28.
Remote Vehicle Start
If equipped, the engine can be started from outside of the vehicle.
Starting the Vehicle
1.Press and release Q on the RKE transmitter.
2.Immediately, press and hold / for at least four seconds or until the turn signal lamps flash.
3.Start the vehicle normally after entering.
When the vehicle starts, the parking lamps will turn on.
Remote start can be extended.
Canceling a Remote Start
To cancel a remote start, do one of the following:
.Press and hold / until the parking lamps turn off.
.Turn on the hazard warning flashers.
. Turn the vehicle on and then off.
See Remote Vehicle Start 0 35.
Door Locks
To lock or unlock the doors from inside the vehicle:
.Press Q or K on a power door lock switch.
.Push down the manual lock knob on the driver door to lock all doors. Push down the lock knob on a passenger door to lock that door only.
.Pull the door handle once to unlock that door. Pull the handle again to unlatch it.
To lock or unlock the doors from outside the vehicle press Q or K on the RKE transmitter or use the key in the front doors. The key cylinder is covered by a cap. See Door Locks 0 36. See Remote Keyless Entry (RKE) System Operation 0 28.
Power Door Locks
Q : Press to lock the doors.
K : Press to unlock the doors.
See Door Locks 0 36.
10 In Brief
Keyless Access
The RKE transmitter must be within 1 m (3 ft) of the door being opened. Pressing the button on the driver door handle will unlock the driver door. If the handle button is pressed again within five seconds, the passenger doors and liftgate will unlock. See “Keyless Access Operation” in Remote Keyless Entry (RKE) System Operation 0 28.
Liftgate
To open the liftgate, press K on the
power door lock switch or press K on the Remote Keyless Entry (RKE)
transmitter twice to unlock all doors. Press the touch pad (1) on the underside of the liftgate handle and lift up. See Remote Keyless Entry (RKE) System Operation 0 28.
Use the pull cup to lower and close the liftgate. Do not press the touch pad while closing the liftgate. This will cause the liftgate to be unlatched.
To open the liftglass, press the button (2) above the license plate. Close the liftglass before opening the liftgate to avoid damaging it.
Power Liftgate Operation
If equipped with a power liftgate, the switch is on the overhead console. The vehicle must be in P (Park).
Choose the power liftgate mode selecting MAX or 3/4. Press 8 on the overhead console or on the RKE transmitter press btwice quickly.
Press any liftgate button while the liftgate is moving to stop it. Pressing again reverses the direction.
To close, press lon the bottom of the liftgate next to the latch.
To disable the power liftgate function, select OFF on the liftgate switch. See Liftgate 0 39.
Windows
The power windows work when the ignition is in ON/RUN or ACC/ ACCESSORY, or in Retained Accessory Power (RAP). See
Retained Accessory Power (RAP) 0 207.
In Brief |
11 |
|
|
If equipped, the front and rear windows have an express-down feature. The front windows have an express-up feature. See Windows
0 49 and Power Windows 0 50.
Seat Adjustment
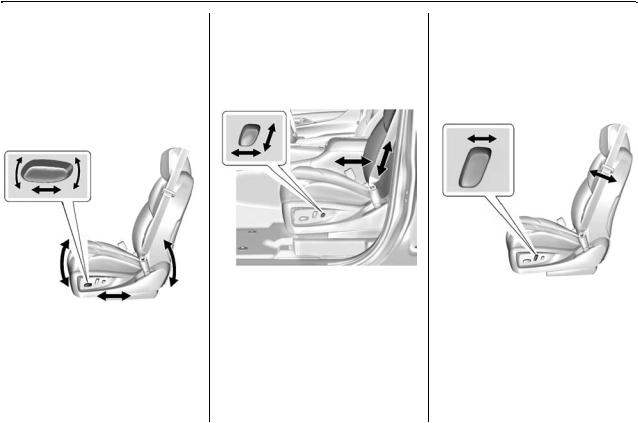
Power Seats
To adjust the seat:
.Move the seat forward or rearward by sliding the control forward or rearward.
.Raise or lower the front part of the seat cushion by moving the front of the control up or down.
.Raise or lower the seat by moving the rear of the control up or down.
See Power Seat Adjustment 0 56.
Lumbar Adjustment
To adjust the lumbar support:
.Press and hold the control forward to increase or rearward to decrease upper and lower lumbar support at the same time.
.Press and hold the control up to increase upper lumbar support and decrease lower lumbar support.
Press and hold the control down to increase lower lumbar support and decrease upper lumbar support.
See Lumbar Adjustment 0 58.
Reclining Seatbacks
To recline the seatback:
.Tilt the top of the control rearward to recline.
.Tilt the top of the control forward to raise.
See Reclining Seatbacks 0 58.
12 In Brief
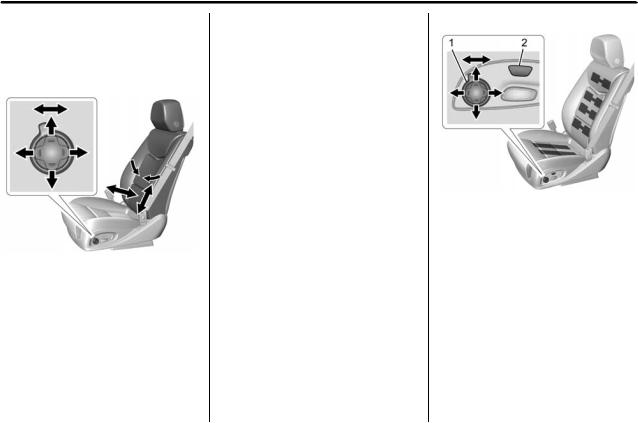
Uplevel Seat Adjustment
If equipped, the ignition must be on to use all uplevel seat features.
Lumbar and Bolster Support
To adjust lumbar support, if equipped:
1.Turn the selection control to view seat options on the center stack display.
2.Select lumbar support.
3.Press forward or rearward to adjust the desired amount of support.
4.Press up or down to adjust the height of the support.
To adjust bolster support, if equipped:
1.Turn the selection control to view seat options on the center stack display.
2.Select bolster support.
3.Press forward or rearward to adjust the amount of bolster support.
See Power Seat Adjustment 0 56.
Massage
Driver Seat Shown, Passenger
Seat Similar
If equipped, the ignition must be on to use the massage feature.
Massage may also be activated and adjusted as follows:
1.Turn the selection control (1) to view massage options on the center stack display.
2.Select massage feature.
3.Press up or down to select massage type.
See Massage 0 60.
In Brief |
13 |
|
|
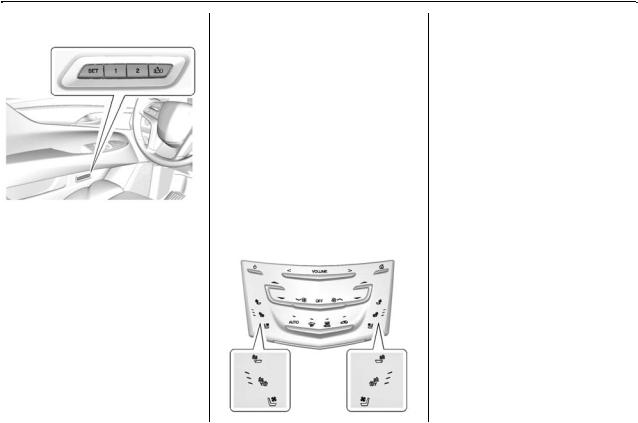
Memory Features
The SET, 1, 2, and B (Exit) buttons on the driver door are used to manually store and recall memory settings for the driver seat, outside mirrors, power tilt and telescoping steering column, adjustable pedals, and massage settings (if equipped).
Automatic Memory Recall and/or Easy Exit Recall features may be enabled in the vehicle personalization menus.
See Memory Seats 0 59 and
Vehicle Personalization 0 157.
Second Row Seats
The second row seatbacks can be folded for additional cargo space, or the seats can be folded and tumbled for easy entry/exit to the third row seats. The seatbacks also recline.
See Second Row Seats 0 63.
Third Row Seats
Third row seatbacks can be folded. See Third Row Seats 0 67.
Heated and Cooled Front
Seats
The buttons are near the climate controls on the center stack. To operate, the engine must be running.
Press I or +to heat the driver or passenger seatback only.
Press J or z to heat the driver or passenger seat cushion and seatback.
Press C or { to cool the driver or passenger seat.
See Heated and Cooled Front Seats 0 61.
Head Restraint
Adjustment
Do not drive until the head restraints for all occupants are installed and adjusted properly.
To achieve a comfortable seating position, change the seatback recline angle as little as necessary while keeping the seat and the head restraint height in the proper position.

14 In Brief
See Head Restraints 0 55 and Power Seat Adjustment 0 56.
Safety Belts
Refer to the following sections for important information on how to use safety belts properly:
.Safety Belts 0 69.
.How to Wear Safety Belts Properly 0 70.
.Lap-Shoulder Belt 0 71.
.Lower Anchors and Tethers for Children (LATCH System) 0 97.
Passenger Sensing
System
United States
Canada and Mexico
The passenger sensing system will turn off the front outboard passenger frontal airbag under certain conditions. No other airbag is affected by the passenger sensing system. See Passenger Sensing System 0 84
The passenger airbag status indicator will light on the overhead console when the vehicle is started. See Passenger Airbag Status Indicator 0 130.
Mirror Adjustment
Interior Mirror
Adjustment
Adjust the rearview mirror for a clear view of the area behind the vehicle.
Automatic Dimming Rearview
Mirror
The mirror automatically dims to reduce the glare of headlamps from behind. The dimming feature comes on when the vehicle is started.
In Brief |
15 |
|
|
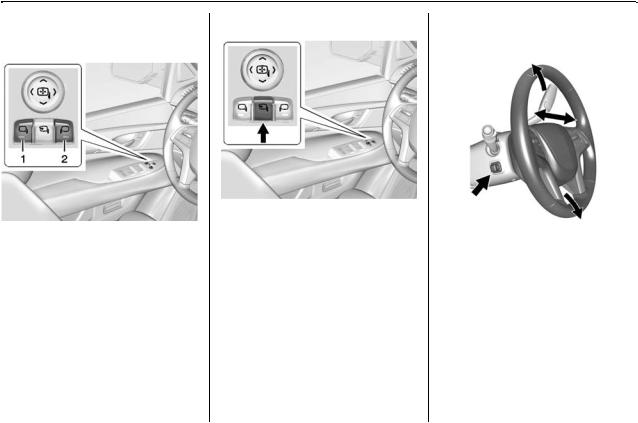
Exterior Mirrors |
Power Folding Mirrors |
Power Mirrors
Steering Wheel
Adjustment
To adjust the mirrors:
1.Press (1) or (2) to select the driver or passenger side mirror.
2.Press the arrows on the control pad to move each mirror in the desired direction.
3.Press either (1) or (2) again to deselect the mirror.
See Power Mirrors 0 47.
The vehicle has power folding mirrors. To adjust:
1.Press { to fold the mirrors inward.
2.Press { again to return the mirrors to the driving position.
Heated Mirrors
If equipped, press 1 to heat the outside mirrors.
See “Rear Window Defogger” under
Dual Automatic Climate Control System 0 178.
To adjust the power tilt and telescoping steering wheel, if equipped:
Press the control to move the steering wheel up and down or forward and rearward.
Do not adjust the steering wheel while driving.
16 In Brief
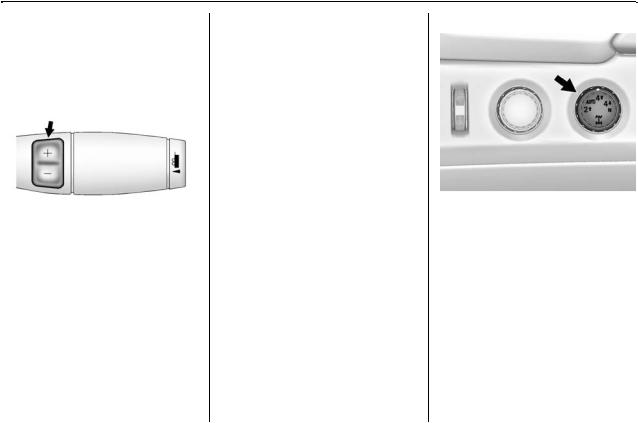
Throttle and Brake Pedal
Adjustment
If equipped, the position of the throttle and brake pedals can be changed.
The switch used to adjust the pedals is on the center stack, to the left of the touch screen.
Press the top of the switch to move the pedals closer to your body. Press the bottom of the switch to move the pedals away.
See Adjustable Throttle and Brake
Pedal 0 203.
The vehicle may have a memory function, which lets pedal settings be saved and recalled. See Memory Seats 0 59.
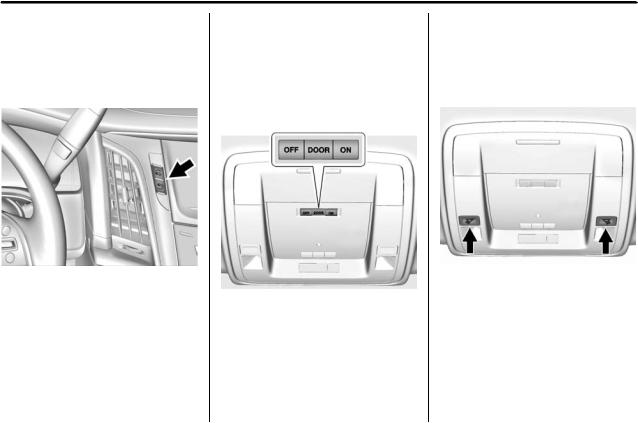
Interior Lighting
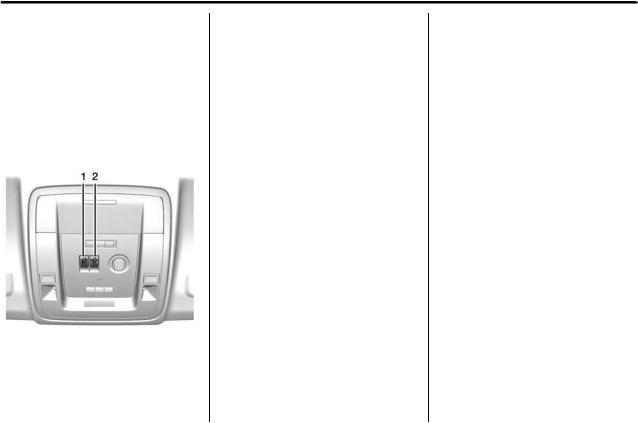
Dome Lamps
There are dome lamps in the overhead console and the headliner, if equipped.
To change the dome lamp settings, press the following:
OFF : Turns the lamps off, even when a door is open.
DOOR : The lamps come on automatically when a door is opened.
ON : Turns all dome lamps on.
Reading Lamps
There are reading lamps in the overhead console and the headliner, if equipped. To operate, the ignition must be in the ACC/ACCESSORY or ON/RUN position or using Retained Accessory Power (RAP).

In Brief |
17 |
|
|
Press m or n next to each reading lamp to turn it on or off.
For more information about interior lighting, see Instrument Panel Illumination Control 0 173.
Exterior Lighting
The exterior lamp control is on the instrument panel to the left of the steering wheel.
P : Turns off the automatic headlamps and Daytime Running Lamps (DRL). Turning the headlamp control to the off position again will turn the automatic headlamps and DRL back on.
For vehicles first sold in Canada, the off position only works when the vehicle is shifted into the P (Park) position.
AUTO : Automatically turns the exterior lamps on and off, depending on outside lighting.
; : Turns on the parking lamps including all lamps, except the headlamps.
5 : Turns on the headlamps together with the parking lamps and instrument panel lights.
See:
.Exterior Lamp Controls 0 168
.Daytime Running Lamps (DRL) 0 170
.Automatic Headlamp System 0 171
Windshield Wiper/Washer
The windshield wiper control is on the turn signal lever.
The windshield wipers are controlled by turning the band with z FRONT on it.
1 : Fast wipes. w: Slow wipes.
3 INT : Use this setting for intermittent wipes or Rainsense™.
For intermittent wipes, turn the z

18 In Brief
FRONT band up for more frequent wipes or down for less frequent wipes.
To turn on Rainsense, press z AUTO on the lever, then turn the z FRONT band on the wiper lever to adjust the sensitivity.
.Turn the band up to a higher INT setting for more sensitivity to moisture.
.Turn the band down to the lower INT setting for less sensitivity to moisture.
Move the band out of the 3 INT position to deactivate Rainsense.
OFF : Turns the windshield wipers off.
8 : For a single wipe, turn to 8, then release. For several wipes,
hold the band on 8 longer.
Lm : Push the paddle at the top of the lever to spray washer fluid on the windshield.
See Windshield Wiper/Washer 0 117.
Climate Controls
The climate control buttons and the touch screen are used to adjust the heating, cooling, and ventilation.
Climate Control Buttons
1.Driver and Passenger Temperature Controls
2.Fan Control
3.OFF (Fan)
4.Driver and Passenger Heated and Cooled Seats (If Equipped)
5.Recirculation
6.Rear Window Defogger
7.Defrost
8. AUTO (Automatic Operation)
Climate Touch Screen Controls
1.Outside Temperature Display
2.Driver and Passenger Temperature Controls
3.Fan Control
4.SYNC (Synchronized Temperature)
5.A/C Mode (Air Conditioning)
6.Climate Control Selection (Application Tray Button)
7.Rear (Rear Climate Control Touch Screen)
8.Air Delivery Mode Control
In Brief |
19 |
|
|
See Dual Automatic Climate Control System 0 178 and Rear Climate Control System 0 182 (If Equipped).
Transmission
Range Selection Mode
The Range Selection Mode switch, if equipped, is on the shift lever.
1.To enable the Range Selection feature, move the shift lever to the M (Manual Mode) position. The current range will appear next to the M. This is the highest attainable range with all lower gears accessible. As an example, when 5 (Fifth) gear is selected, 1 (First) through 5 (Fifth) gears are available.
2.Tap the plus/minus buttons on the shift lever to select the desired range of gears for current driving conditions. See
Manual Mode 0 213.
While using Range Selection Mode, cruise control and the Tow/Haul Mode can be used.
Grade Braking is not available when Range Selection Mode is active. See Tow/Haul Mode 0 216.
Four-Wheel Drive
If equipped, four-wheel drive engages the front axle for extra traction.
Automatic Transfer Case
Two Speed Automatic
Transfer Case
The transfer case knob is to the left of the steering wheel. Use this knob to shift into and out of the different four-wheel drive modes.
2 m : This setting is used for driving in most street and highway situations.
AUTO : This setting is ideal for use when road surface traction conditions are variable.
20 In Brief
4 m : Use the Four-Wheel Drive High position when extra traction is needed, such as on snowy or icy roads or in most off-road situations.
4 n : This setting engages the front axle and delivers extra torque. Choose 4 n if you are driving off-road in deep sand, mud,
or snow, and while climbing or descending steep hills.
N (Neutral) : Shift the transfer case to N (Neutral) only when towing the vehicle. See Recreational Vehicle Towing 0 333 or Towing the Vehicle 0 333.
See Four-Wheel Drive 0 217.
Vehicle Features
Infotainment System
See the infotainment manual for information on the radio, audio players, phone, navigation system, and voice or speech recognition. It also includes information on settings.
Steering Wheel Controls
The infotainment system can be operated by using the steering wheel controls. See "Steering Wheel Controls" in the infotainment manual.
Cruise Control
J : Press to turn the system on and off. A white indicator appears in the instrument cluster when cruise is turned on.
+RES : If there is a set speed in memory, press the control up briefly to resume that speed or press and hold to accelerate. If the cruise control is already active, use to increase vehicle speed.
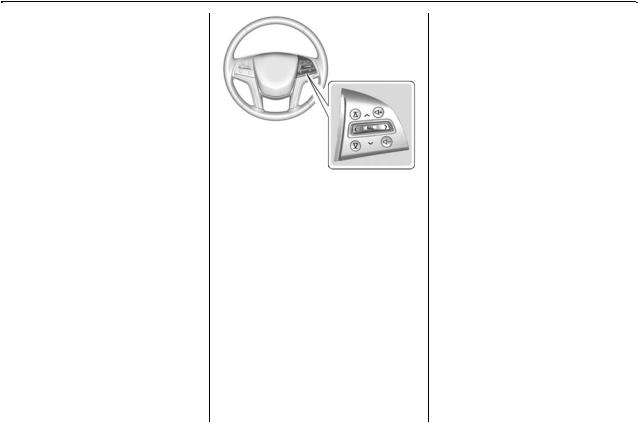
In Brief |
21 |
|
|
SET− : Press the control down briefly to set the speed and activate cruise control. If the cruise control is already active, use to decrease vehicle speed.
* : Press to disengage cruise control without erasing the set speed from memory.
See Cruise Control 0 227 or Adaptive Cruise Control 0 229 (if equipped).
Driver Information
Center (DIC)
The DIC display is in the instrument cluster. It shows the status of many vehicle systems.
y or z : Move SEL up or down to go to the previous or next selection.
S or T: Press to move between the interactive display zones in the
cluster. Press S to go back to the previous menu.
SEL : Press to open a menu or select a menu item. Press and hold to reset values on certain screens.
See Driver Information Center (DIC) 0 140.
Forward Collision Alert
(FCA) System
If equipped, FCA may help avoid or reduce the harm caused by front-end crashes. FCA provides a
green indicator, V, when a vehicle is detected ahead. This indicator displays amber if you follow a vehicle much too closely. When approaching a vehicle ahead too quickly, FCA provides a flashing red alert on the windshield and rapidly beeps or pulses the driver seat.
See Forward Collision Alert (FCA)
System 0 242.
Front Automatic Braking
(FAB) System
If the vehicle has Adaptive Cruise Control (ACC), it also has FAB, which includes Intelligent Brake Assist (IBA). When the system detects a vehicle ahead in your path that is traveling in the same direction that you may be about to crash into, it can provide a boost to braking or automatically brake the

22 In Brief
vehicle. This can help avoid or lessen the severity of crashes when driving in a forward gear.
See Front Automatic Braking (FAB)
System 0 244.
Lane Keep Assist (LKA)
If equipped, LKA may help avoid crashes due to unintentional lane departures. It may assist by gently turning the steering wheel if the vehicle approaches a detected lane marking without using a turn signal in that direction. It may also provide a Lane Departure Warning (LDW) alert as the lane marking is crossed. The system will not assist or alert if it detects that you are actively steering. Override LKA by turning the steering wheel. LKA uses a camera to detect lane markings between 60 km/h (37 mph) and
180 km/h (112 mph).
See Lane Departure Warning (LDW) 0 248 and Lane Keep Assist (LKA) 0 248.
Lane Change Alert (LCA)
If equipped, the LCA system is a lane-changing aid that assists drivers with avoiding lane change crashes that occur with moving vehicles in the side blind zone (or spot) areas or with vehicles rapidly approaching these areas from behind. The LCA warning display will light up in the corresponding outside side mirror and will flash if the turn signal is on. The Side Blind Zone Alert (SBZA) system is included as part of the LCA system.
See Side Blind Zone Alert (SBZA) 0 245 and Lane Change Alert (LCA) 0 246.
Surround Vision
If equipped, views around the vehicle display on the center stack to aid with parking and low-speed maneuvers.
See “Surround Vision” under
Assistance Systems for Parking or Backing 0 237.
Front Vision Camera
If equipped, a view of the area in front of the vehicle displays on the center stack to aid with parking and low-speed maneuvers.
See “Front Vision Camera” under
Assistance Systems for Parking or Backing 0 237.
Rear Vision
Camera (RVC)
If equipped, RVC displays a view of the area behind the vehicle on the center stack display when the vehicle is shifted into R (Reverse) to aid with parking and low-speed backing maneuvers.
See Assistance Systems for Parking or Backing 0 237.
Rear Cross Traffic Alert
(RCTA) System
If equipped, the RCTA system uses a triangle with an arrow displayed on the RVC screen to warn of traffic behind your vehicle that may cross

In Brief |
23 |
|
|
your vehicle's path while in
R (Reverse). In addition, beeps will sound, or the driver seat will pulse.
See Assistance Systems for Parking or Backing 0 237.
Parking Assist
If equipped, Front and Rear Parking Assist (FRPA) uses sensors on the front and rear bumpers to assist with parking and avoiding objects during low speed parking maneuvers. It operates at speeds less than 8 km/h (5 mph). FRPA may display a warning triangle on the Rear Vision Camera screen and a graphic on the instrument cluster to provide the object distance. In addition, multiple beeps or seat pulses may occur if very close to an object.
The vehicle may also have a higher speed Backing Warning System and the Rear Automatic Braking system.
See Driver Assistance Systems 0 236.
Rear Automatic Braking
(RAB) System
If the vehicle has Adaptive Cruise Control (ACC) it also has the RAB system, which is designed to help avoid or reduce the harm caused by backing crashes when the vehicle is shifted into R (Reverse). If the system detects the vehicle is backing too fast to avoid a crash with a detected object behind your vehicle in your path, it may automatically brake hard to a stop.
See Assistance Systems for Parking or Backing 0 237.
Power Outlets
Power Outlets 12 Volt Direct
Current
Accessory power outlets can be used to plug in electrical equipment, such as a cell phone, MP3
player, etc.
The vehicle has five accessory power outlets:
.One near the cupholders on the center console.
.One inside the center console.
.One on the rear of the center console.
.One in the third row seat on the driver side.
.One in the rear cargo area on the passenger side.
Lift the cover to access and replace when not in use.
See Power Outlets 0 121.
Universal Remote System
If equipped with the Universal Remote system, these buttons will be in the front overhead console.
24 In Brief
This system provides a way to replace up to three remote control transmitters used to activate devices such as garage door openers, security systems, and home automation devices.
See Universal Remote System 0 164.
Sunroof
1.Open or Close
2.Vent
On vehicles with a sunroof, the sunroof only operates when the ignition is in ACC/ACCESSORY or ON/RUN, or when Retained Accessory Power (RAP) is active. See Retained Accessory Power (RAP) 0 207.
Vent : From the closed position, press the rear of switch (2) to vent the sunroof.
Open/Close : To open the sunroof, press and hold switch (1) until the sunroof reaches the desired position. Press and hold the front of switch (1) to close it.
Express-Open/Express-Close : To express-open the sunroof, fully press and release the rear of switch (1) until the sunroof reaches the desired position. To express-close the sunroof, fully press and release the front of switch (1). Press the switch again to stop it.
When the sunroof is opened, an air deflector will automatically raise. The air deflector will retract when the sunroof is closed.
The sunroof also has a sunshade which can be pulled forward to block sun rays. The sunshade must be opened and closed manually.
If an object is in the path of the sunroof while it is closing, the anti-pinch feature will detect the object and stop the sunroof.
See Sunroof 0 52.

In Brief |
25 |
|
|
Performance and
Maintenance
Traction Control/
Electronic Stability
Control
The vehicle has a traction control system that limits wheel spin and the StabiliTrak system that assists with directional control of the vehicle in difficult driving conditions. Both systems come on automatically when the vehicle is started and begins to move.
.To turn off traction control, press and release g on the center stack. The traction off light i displays in the instrument cluster. The appropriate Driver Information Center (DIC) message displays. See Ride Control System Messages
0 153.
.To turn off both traction control and StabiliTrak, press and
hold g until i and g illuminate
in the instrument cluster and the appropriate DIC message displays. See Ride Control System Messages 0 153.
.Press and release g again to turn on both systems.
StabiliTrak will automatically turn on if the vehicle exceeds 56 km/h
(35 mph). Traction control will remain off.
See Traction Control/Electronic
Stability Control 0 224.
Tire Pressure Monitor
This vehicle may have a Tire Pressure Monitor System (TPMS).
The low tire pressure warning light alerts to a significant loss in pressure of one of the vehicle's tires. If the warning light comes on, stop as soon as possible and inflate
the tires to the recommended pressure shown on the Tire and Loading Information label. See
Vehicle Load Limits 0 198. The warning light will remain on until the tire pressure is corrected.
The low tire pressure warning light may come on in cool weather when the vehicle is first started, and then turn off as the vehicle is driven. This may be an early indicator that the tire pressures are getting low and the tires need to be inflated to the proper pressure.
The TPMS does not replace normal monthly tire maintenance. Maintain the correct tire pressures.
See Tire Pressure Monitor System 0 308.
Engine Oil Life System
The engine oil life system calculates engine oil life based on vehicle use and displays the CHANGE ENGINE OIL SOON message when it is time to change the engine oil and filter.
The oil life system should be reset to 100% only following an oil change.

26 In Brief
Resetting the Oil Life System
1.Using the DIC controls on the right side of the steering wheel, display OIL LIFE on the DIC. See Driver Information Center (DIC) 0 140. When remaining oil life is low, the CHANGE ENGINE OIL SOON message will appear on the display. See
Engine Oil Messages 0 149.
2.Press SEL on the DIC controls and hold SEL down for a few seconds to clear the CHANGE ENGINE OIL SOON message and reset the oil life at 100%.
Be careful not to reset the oil life display accidentally at any time other than after the oil is changed. It cannot be reset accurately until the next oil change.
The oil life system can also be reset as follows:
1.Turn the ignition on with the engine off.
2.Fully press and release the accelerator pedal three times within five seconds.
If the CHANGE ENGINE OIL SOON message is not on, the system is reset.
See Engine Oil Life System 0 271.
Driving for Better Fuel Economy
Driving habits can affect fuel mileage. Here are some driving tips to get the best fuel economy possible.
.Avoid fast starts and accelerate smoothly.
.Brake gradually and avoid abrupt stops.
.Avoid idling the engine for long periods of time.
.When road and weather conditions are appropriate, use cruise control.
.Always follow posted speed limits or drive more slowly when conditions require.
.Keep vehicle tires properly inflated.
.Combine several trips into a single trip.
.Replace the vehicle's tires with the same TPC Spec number molded into the tire's sidewall near the size.
.Follow recommended scheduled maintenance.
Roadside Service
U.S.: 1-800-224-1400
Canada: 1-800-882-1112
TTY Users (U.S. Only): 1-888-889-2438
New Cadillac owners are automatically enrolled in the Roadside Service Program.
See Roadside Service 0 366.

Keys, Doors, and Windows 27
Keys, Doors, and
Windows
Keys and Locks
Keys . . . . . . . . . . . . . . . . . . . . . . . . . . . 27
Remote Keyless Entry (RKE)
System . . . . . . . . . . . . . . . . . . . . . . . 28
Remote Keyless Entry (RKE)
System Operation . . . . . . . . . . . . 28
Remote Vehicle Start . . . . . . . . . . 35
Door Locks . . . . . . . . . . . . . . . . . . . . 36
Power Door Locks . . . . . . . . . . . . . 37
Delayed Locking . . . . . . . . . . . . . . . 37
Automatic Door Locks . . . . . . . . . 38
Lockout Protection . . . . . . . . . . . . . 38
Safety Locks . . . . . . . . . . . . . . . . . . . 38
Doors
Liftgate . . . . . . . . . . . . . . . . . . . . . . . . 39
Power Assist Steps . . . . . . . . . . . . 43
Vehicle Security
Vehicle Security . . . . . . . . . . . . . . . . 44
Vehicle Alarm System . . . . . . . . . 44
Immobilizer . . . . . . . . . . . . . . . . . . . . 46
Immobilizer Operation . . . . . . . . . 46
Exterior Mirrors
Power Mirrors . . . . . . . . . . . . . . . . . . 47
Folding Mirrors . . . . . . . . . . . . . . . . . 48
Heated Mirrors . . . . . . . . . . . . . . . . . 48
Reverse Tilt Mirrors . . . . . . . . . . . . 48
Interior Mirrors
Interior Rearview Mirrors . . . . . . . 49
Automatic Dimming Rearview
Mirror . . . . . . . . . . . . . . . . . . . . . . . . . 49
Child-View Mirror . . . . . . . . . . . . . . 49
Windows
Windows . . . . . . . . . . . . . . . . . . . . . . . 49
Power Windows . . . . . . . . . . . . . . . 50
Sun Visors . . . . . . . . . . . . . . . . . . . . . 52
Roof
Sunroof . . . . . . . . . . . . . . . . . . . . . . . . 52
Keys and Locks
Keys
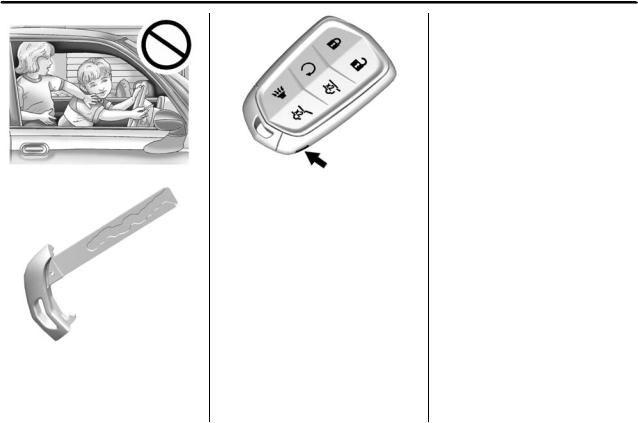
{Warning
Leaving children in a vehicle with a Remote Keyless Entry (RKE) transmitter is dangerous and children or others could be seriously injured or killed. They could operate the power windows or other controls or make the vehicle move. The windows will function with the RKE transmitter in the vehicle, and children or others could be caught in the path of a closing window. Do not leave children in a vehicle with an RKE transmitter.
Convex Mirrors . . . . . . . . . . . . . . . . 47
28 Keys, Doors, and Windows
|
The transmitter has a button on the |
|
side used to remove the key. Do not |
|
pull the key out without pressing the |
|
button. |
|
See your dealer if a replacement |
|
key or additional key is needed. |
|
With an active OnStar subscription, |
|
an OnStar Advisor may remotely |
|
unlock the vehicle. See OnStar |
|
Overview 0 376. |
The key is used for the driver door. |
Remote Keyless Entry |
(RKE) System |
|
|
See Radio Frequency Statement |
|
0 373. |
If there is a decrease in the RKE operating range:
.Check the distance. The transmitter may be too far from the vehicle.
.Check the location. Other vehicles or objects may be blocking the signal.
.Check the transmitter's battery. See “Battery Replacement” later in this section.
.If the transmitter is still not working correctly, see your dealer or a qualified technician for service.
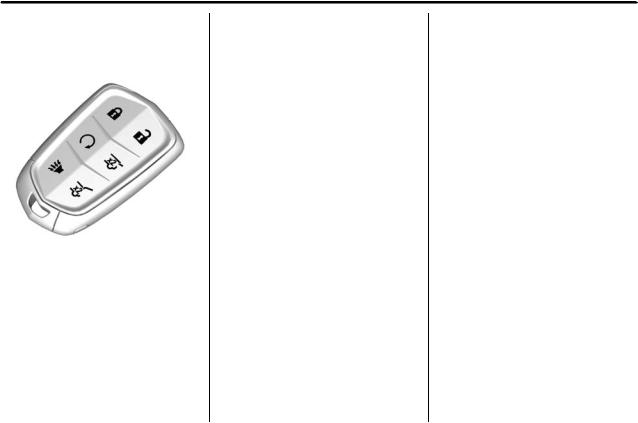
Remote Keyless Entry
(RKE) System Operation
The Keyless Access system allows for vehicle entry when the transmitter is within 1 m (3 ft). See “Keyless Access Operation” later in this section.
The RKE transmitter functions may work up to 60 m (197 ft) away from the vehicle.
Keys, Doors, and Windows 29
Other conditions can affect the performance of the transmitter. See
Remote Keyless Entry (RKE) System 0 28.
/ (Remote Vehicle Start) :
If equipped, press and release Q,
then immediately press and hold / until the turn signals flash or for at least four seconds. The engine may be started from outside the vehicle using the RKE transmitter. See
Remote Vehicle Start 0 35.
Q (Lock) : Press to lock all doors.
If enabled through the Driver Information Center (DIC), the turn signal lamps flash once to indicate locking has occurred. If enabled through the DIC, the horn chirps
when Q is pressed again within three seconds. See Vehicle Personalization 0 157.
If the driver door is open when Q is pressed, all door will lock and then the driver door will immediately unlock, if enabled in Vehicle Personalization. See Vehicle Personalization 0 157. If the
passenger door is open when Q is pressed, all doors lock.
If the passenger door is open when Q is pressed, all doors lock.
Pressing Q arms the alarm system. See Vehicle Alarm System 0 44.
If equipped with auto mirror folding, pressing and holding Q for
one second will fold the mirrors. The auto mirror folding feature will not operate unless it is enabled. See
Vehicle Personalization 0 157.
K (Unlock) : Press once to unlock only the driver door. If K is pressed again within three seconds, all remaining doors unlock. The interior lamps may come on and stay on for 20 seconds or until the ignition is turned on.
If enabled through the DIC, the turn signal lamps flash twice to indicate unlocking has occurred. If enabled through the DIC, the exterior lamps may turn on. See Vehicle Personalization 0 157.
Pressing K on the RKE transmitter disarms the alarm system. See
Vehicle Alarm System 0 44.
If equipped with auto mirror folding, pressing and holding K for
one second will unfold the mirrors. The auto mirror folding feature will not operate unless it is enabled.
See Vehicle Personalization 0 157.
Loading...