


 Loading...

2002 Cadillac Escalade
Owner's Manual
Litho in U.S.A. |
© Copyright General Motors Corporation 2000 |
Part Number S2234 A First Edition |
All Rights Reserved |
i
Table of Contents
Section 1
Section 2
ii
|
Seats and Restraint Systems |
Seats and Seat Controls |
Air Bag Systems |
Safety Belts |
Restraint Systems for Children |
|
Features and Controls |
Windows |
Mirrors |
Keys and Door Locks |
Storage Compartments |
Remote Keyless Entry System |
Convenience Net |
Liftgate |
Accessory Power Outlets |
Automatic Transmission |
OnStar® System (If Equipped) |
Parking Brake |
Sunroof (If Equipped) |
Tilt Wheel |
HomeLink® Transmitter |
Turn Signal/Multifunction Lever |
Instrument Panel, Warning Lights and Gages |
Windshield Wipers |
Secondary Information Center (SIC) |
Cruise Control |
Ultrasonic Rear Parking Assist (URPA) |
Exterior and Interior Lamps |
|
Table of Contents (cont'd)
Section 3
Section 4
Comfort Controls and Audio Systems
Heating and Air Conditioning |
Radio Theft-Deterrent Feature |
Radio/Cassette Player/CD Changer |
Steering Wheel Controls |
|
Your Driving and the Road |
Defensive Driving |
Driving Tips for Various Road Conditions |
Drunken Driving |
Off-Road Driving |
Control of a Vehicle |
Loading Your Vehicle |
Braking |
Towing a Trailer |
Steering |
|
|
|
Problems on the Road |
Section 5 |
Hazard Warning Flashers |
Engine Overheating |
|
Jump Starting |
Changing a Flat Tire |
|
Towing Your Vehicle |
If You're Stuck |
iii
|
Table of Contents (cont'd) |
|
|
|
Service and Appearance Care |
Section 6 |
Fuel |
Windshield Wiper Blade Replacement |
|
Checking Fluids and Lubricants |
Tires and Wheels |
|
GM Oil Life System™ |
Appearance Care |
|
Engine Air Cleaner/Filter |
Electrical System/Fuses and Circuit Breakers |
|
Passenger Compartment Air Filter |
Capacities and Specifications |
|
Brakes |
Normal Maintenance Replacement Parts |
|
Bulb Replacement |
|
|
|
Maintenance Schedule |
Section 7 |
Scheduled Maintenance |
Recommended Fluids and Lubricants |
|
Owner Checks and Services |
Maintenance Records |
|
Periodic Maintenance Inspections |
|
iv
Table of Contents (cont'd)
Section 8
Section 9
Customer Assistance Information
Customer Satisfaction Procedures |
Warranty Information (See Warranty Manual) |
Customer Assistance Offices |
Reporting Safety Defects on page 8-10 |
Roadside Assistance and Courtesy Transportation |
Service Publications |
Index
In the Index you will find an alphabetical listing of almost every subject in this manual. You can use it to quickly find something you want to read.
Please refer to the last page of this manual for your Service Station Guide
v
GENERAL MOTORS, GM and the GM Emblem, CADILLAC, the CADILLAC Crest & Wreath and the name ESCALADE are registered trademarks of General Motors Corporation.
This manual includes the latest information at the time it was printed. We reserve the right to make changes after that time without further notice. For vehicles first sold in Canada, substitute the name ªGeneral Motors of Canada Limitedº for Cadillac Motor Car Division whenever it appears in this manual.
Please keep this manual in your vehicle, so it will be there if you ever need it when you're on the road. If you sell the vehicle, please leave this manual in it so the new owner can use it.
We support voluntary technician certification.
For Canadian Owners Who Prefer a
French Language Manual:
Aux propriétaires canadiens: Vous pouvez vous procurer un exemplaire de ce guide en français chez votre concessionaire ou au:
Helm, Incorporated
P.O. Box 07130
Detroit, MI 48207
vi
How to Use this Manual
Many people read their owner's manual from beginning to end when they first receive their new vehicle. If you do this, it will help you learn about the features and controls for your vehicle. In this manual, you'll find that pictures and words work together to explain
things quickly.
Safety Warnings and Symbols
You will find a number of safety cautions in this book. We use a box and the word CAUTION to tell you about things that could hurt you if you were to ignore the warning.
 CAUTION:
These mean there is something that could hurt you or other people.
In the caution area, we tell you what the hazard is. Then we tell you what to do to help avoid or reduce the hazard. Please read these cautions. If you don't, you or others could be hurt.
You will also find a circle with a slash through it in this book. This safety symbol means ªDon't,º ªDon't do thisº or ªDon't let this happen.º
vii
Vehicle Damage Warnings
Also, in this book you will find these notices:
NOTICE:
These mean there is something that could damage your vehicle.
In the notice area, we tell you about something that can damage your vehicle. Many times, this damage would not be covered by your warranty, and it could be costly. But the notice will tell you what to do to help avoid the damage.
When you read other manuals, you might see CAUTION and NOTICE warnings in different colors or in different words.
You'll also see warning labels on your vehicle. They use the same words, CAUTION or NOTICE.
Vehicle Symbols
Your vehicle may be equipped with components and labels that use symbols instead of text. Symbols, used on your vehicle, are shown along with the text describing the operation or information relating to a specific component, control, message, gage or indicator.
If you need help figuring out a specific name of a component, gage or indicator reference the following topics in the index:
DªEngine Compartment Overviewº
DªInstrument Panelº
DªComfort Controlsº
DªAudio Systemsº
Also see ªWarning Lights and Gagesº in the Index.
Here are some examples of symbols you may find on your vehicle:
viii

ix
Service Station Guide
For
a More
Detailed Look at
What's Under the Hood
See Section 6
Hood Release
See Section 6
Windshield Washer
Fluid
See Section 6
Cooling System |
|
See Section 5 |
Engine Oil Dipstick |
|
See Section 6 |
|
Oil Viscosity |
Battery |
Engine Oil |
See Section 6 |
See Section 6 |
|
Tire Pressure
See Section 6
Spare Tire Pressure
See Section 6
Fuel
Use unleaded only.
See Section 6 for octane ratings.

Section 1 Seats and Restraint Systems
Here you'll find information about the seats in your vehicle and how to use your safety belts properly. You can also learn about some things you should not do with air bags and safety belts.
1-2 |
Seats and Seat Controls |
|
1-40 |
Rear Safety Belt Comfort Guides for Children |
|
||||
1-16 |
Safety Belts: They're for Everyone |
|
|
and Small Adults |
1-21 |
Here Are Questions Many People Ask About |
|
1-43 |
Center Passenger Position |
|
Safety Belts -- and the Answers |
|
1-44 |
Children |
1-22 |
How to Wear Safety Belts Properly |
|
1-48 |
Restraint Systems for Children |
1-22 |
Driver Position |
|
1-64 |
Older Children |
1-28 |
Safety Belt Use During Pregnancy |
|
1-67 |
Safety Belt Extender |
1-29 |
Right Front Passenger Position |
|
1-67 |
Checking Your Restraint Systems |
1-29 |
Supplemental Restraint System (SRS) |
|
1-67 |
Replacing Restraint System Parts |
1-38 |
Rear Seat Passengers |
|
|
After a Crash |
|
|
|
|
|
1-1
Seats and Seat Controls
This section tells you about the seats -- how to adjust them, and fold them up and down. It also tells you about reclining front seatbacks and head restraints.
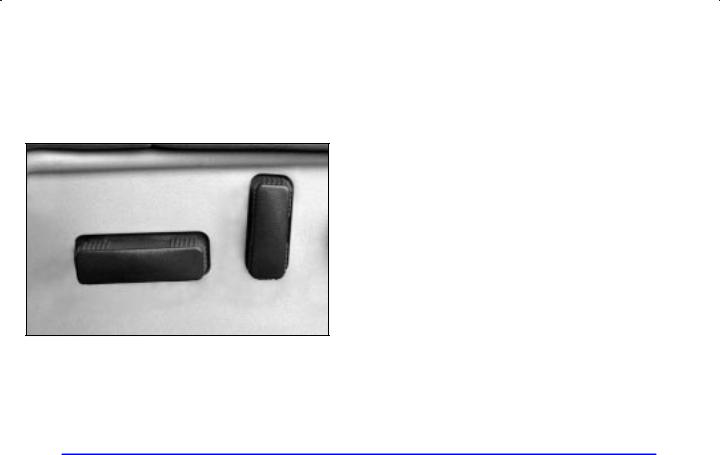
Power Seats
Horizontal Control: Raise or lower the front of the seat cushion by raising or lowering the forward edge of the control. Move the seat forward or rearward by moving the whole control toward the front or rear of the vehicle.
Raise or lower the rear of the seat cushion by raising or lowering the rear edge of the control.
Moving the whole control up or down raises or lowers the entire seat cushion.
Reclining Front Seatbacks
Your vehicle's front seatbacks have a recline feature.
Vertical Control: You can use the vertical control to adjust the angle of the seatback. Move the reclining front seatback forward or rearward by moving the control toward the front or toward the rear of the vehicle. Move the seatback forward by moving the control toward the front of the vehicle. See ªReclining Seatbacksº in the Index for further information.
1-2
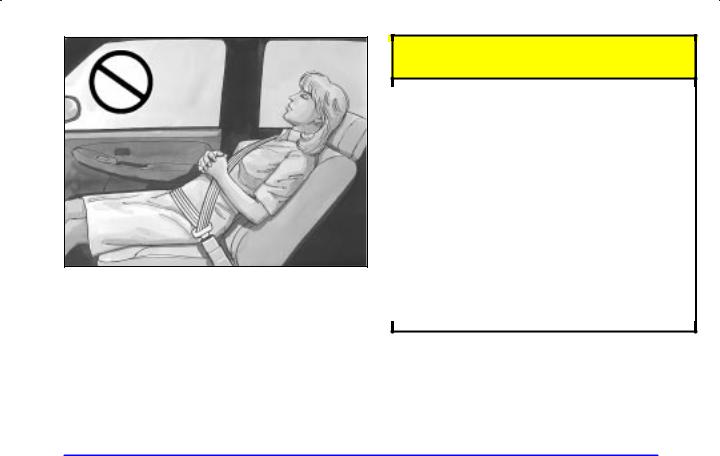
But don't have a seatback reclined if your vehicle is moving.
 CAUTION:
Sitting in a reclined position when your vehicle is in motion can be dangerous. Even if you buckle up, your safety belts can't do their job when you're reclined like this.
The shoulder belt can't do its job. In a crash, you could go into it, receiving neck or other injuries.
The lap belt can't do its job either. In a crash the belt could go up over your abdomen. The belt forces would be there, not at your pelvic bones. This could cause serious internal injuries.
For proper protection when the vehicle is in motion, have the seatback upright. Then sit well back in the seat and wear your safety belt properly.
1-3

Power Lumbar Control
Your vehicle's power lumber controls are located near the power seat controls. You can
increase or decrease lumbar support in an area of the lower seatback with the lumber controls.
To increase support, press and hold the front of the control. To decrease support, press and hold the rear of the control. Let go of the control when the lower seatback reaches the desired level of support.
You can also reshape the side wing area of the lower seatback for more lateral support.
To increase support, press and hold the top of the control. To decrease support, press and hold the bottom of the control. Let go of the control when the lower seatback reaches the desired level of support.
Memory Seat and Memory Mirrors
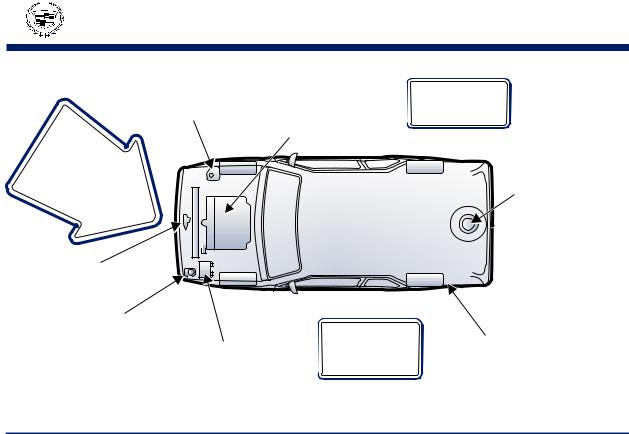
The memory function controls are located on the driver's door trim panel.
For this function to work, it must be enabled/configured in the secondary information center. See ªSecondary Information Centerº in the Index for more information.
These controls are used to program and recall the memory settings for the driver's seat and both the driver's and the passenger's outside mirrors. The seat and mirror
positions can be personalized for both driver 1 and driver 2.
1-4

In addition, you can also store the seat exit position for driver 1 and driver 2. See ªMemory Seat Exitº later in this section for more information.
The memory function does not store the lumbar or the side wing positions.
To store your memory seat and mirror positions, do the following:
1.Adjust the driver's seat and both outside mirrors to your desired position.
2.Press and hold the 1 or 2 (driver 1 or 2) button of the memory control for three seconds. When you hear a chime ring two times, the memory positions are stored.
To do the same thing for a second driver, follow the preceding steps, but press the other number of the memory control. The memory recall feature only works when the transmission is in PARK (P).
To recall memory seat and mirror positions, make sure your vehicle is in PARK (P), then press the 1 or 2 button of the memory control to recall the seat setting. You will hear a chime ring one time to let you know the setting has been selected.
The memory seat and mirror positions can also be programmed to work with the keyless entry system. See ªSecondary Information Centerº in the Index for more information.
Memory Seat Exit
For this function to work, it must be enabled in the secondary information center. See ªSecondary Information Centerº in the Index for more information.
By moving the seats to a stored exit position, the memory seat exit feature can make it easier to leave the vehicle. To store the seat exit position for driver 1 or driver 2, do the following:
1.Select the desired driver number by pressing the 1 or 2 button.
2.Move the seat to the desired position.
3.Press and hold the Exit button of the memory control for three seconds. When you hear a chime ring two times, the exit position is stored for the identified driver (driver 1 or 2).
To use the exit feature, press the Exit button on the memory seat controls. If you have the exit feature enabled in the secondary information center, then removing the key from the ignition will cause the seat to move to the preset exit position without having to press the Exit button. See ªSecondary Information Centerº in the Index for more information.
1-5
Keyless Entry Transmitter Seat and Mirror
Memory Recall
For this function to work, it must be enabled in the secondary information system. See ªSecondary Information Centerº in the Index for more information.
You can program both of your keyless entry transmitters to work the settings you have chosen for driver 1 or driver 2. Once a transmitter is programmed, pressing the UNLOCK button will recall the memory functions chosen for that transmitter. To match a transmitter
do the following:
1.Press and hold the desired number button (1 or 2) on the memory controls until the seat and mirror positions are set. You will hear a chime ring twice. Continue holding the number button.
2.While still holding the memory number button, press UNLOCK on the keyless entry transmitter (within five seconds) that you want to match with the specific memory number button (1 or 2) you pressed in Step 1.
That transmitter will now be matched with the memory number button 1 or 2 and the memory settings that are set for that number.
Heated Front Seats
The button for the driver's side heated seat is located on the driver's side door panel.
The button for the passenger's side heated seat is located on the passenger's side door panel. The ignition must be in RUN for this feature to operate.
To activate the heated seats, press the button once for the HI heat setting. Press the button again for the LO heat setting. To turn off the heated seats, press the button a third time. An indicator light on the button will illuminate for each heat setting anytime the heated seats are operating.
The heated front seats will be canceled after the ignition is turned to OFF. If you still want to use the heated front seat feature after you restart your vehicle, you will need to press the heated seat button again.
1-6

Head Restraints
Slide the head restraint up or down so that the top of the restraint is closest to the top of your head. This position reduces the chance of a neck injury in a crash.
The head restraints tilt forward and rearward also.
The rear seat head restraints in your vehicle are adjustable. Slide an adjustable head restraint up or down so that the top of the restraint is closest to the top of your head. This position reduces the chance of a neck injury in a crash.
To adjust the tilt for either of the front head restraints, pull it toward you until you hear a ªclickº. There are four positions available: initial position, first click, second click and third click. Each position will click into place. After the third position (three clicks) is reached, pulling the restraint farther will release it back to the normal, upright position.
1-7

Rear Seats
Reclining Rear (Second Row) Seats
The seatbacks can be reclined in the second row seats.
To recline the seatback, do the following:
1. Pull the lever located at the base of the seat cushion forward.
2.Release the lever to lock the seatback where you want it. Pull the lever again without pushing on the seatback and the seatback will go to an upright position.
Folding Rear (Second Row) Seats
The rear seat is a 60/40 split seat which may be folded down to give you more cargo space. The rear seatbacks are equipped with rearward folding head restraints. When the seatback is being folded down, the head restraint will automatically fold rearward to allow a flat load floor for cargo or entry to the third row seating.
To fold the rear seat, do the following:
1.Insert the two safety belt buckles into the pocket in the seatback before folding the rear seat on the driver's side.
That way, the buckles will be out of the way when the seat is folded and will be available for passengers to use when the seat is returned to the passenger position. Also, make sure that nothing is under or
in front of the seat
2.Make sure the seatback is in an upright position (unreclined) before folding it.
1-8
3. Pull up on the strap loop located at the rear of the seat cushion and pull the seat cushion up. Then fold it forward.
4.Pull the seatback forward and fold it down until it is flat.
If the seatback cannot fold flat because it interferes with the cushion, try moving the front seat forward and/or bringing the front seatback more upright.
Returning the Seats to an Upright Position
To return the seat to the upright position, do the following:
1.Lift the seatback up and push it rearward all the way.
2.Lower the seat cushion until it latches into position.
3.Pull forward on the seatback and up on the seat cushion to make sure the seat is securely in place.
4.Return the headrest to the upright position by pulling the top of the headrest upwards until you hear a click.
5.Check to see that the safety belt buckles on the driver's side seatback are accessible to the
outboard and center occupants and are not under the seat cushions.
1-9
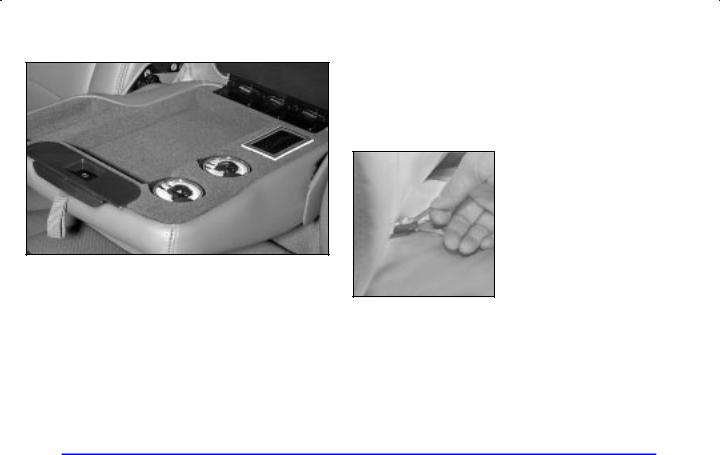
Rear Seat (Second Row) Armrest
The second row seat has a center fold down armrest which contains a storage compartment. To release the armrest, locate the loop attached to the armrest and then pull it up and then down. Within the storage compartment of the armrest you will find two sets of earbud headphones which can be used for the rear seat audio. The headphones plug into the rear seat audio jacks provided in the back of the center console. See ªRear Seat Audioº in the Index for more information.
Entry/Exit to/from the Third Row Seat
To enter or exit the third row seat you must fold
the second row seat down following the instructions given previously.
If you are exiting the third row seat with no assistance, do the following:
1. Reach over the second row seat and pull up on the strap loop and then pull the seat cushion up and push it forward.
2.Next, push the seatback forward until it is flat with the floor.
Be sure to return the seat to the passenger position when you are finished. Pull forward and push rearward on the seatback to make sure it is locked in place.
1-10
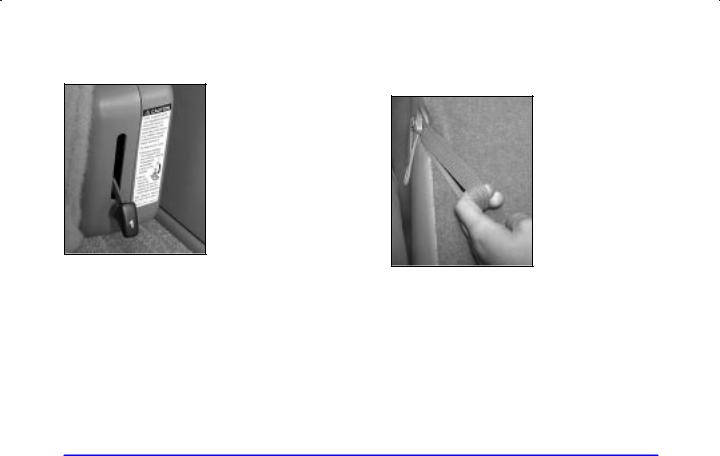
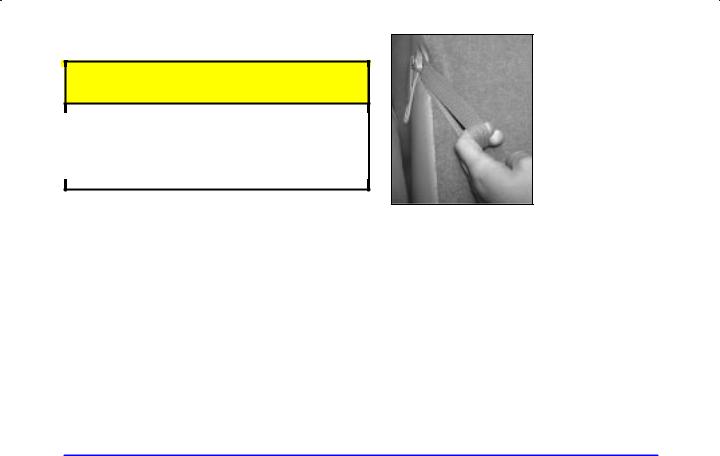
Folding the Third Row Seat
To fold the seatbacks, do the following:
1. Pull up on the release lever, labeled 1, located on the rear of the seatback and push the seatback forward.
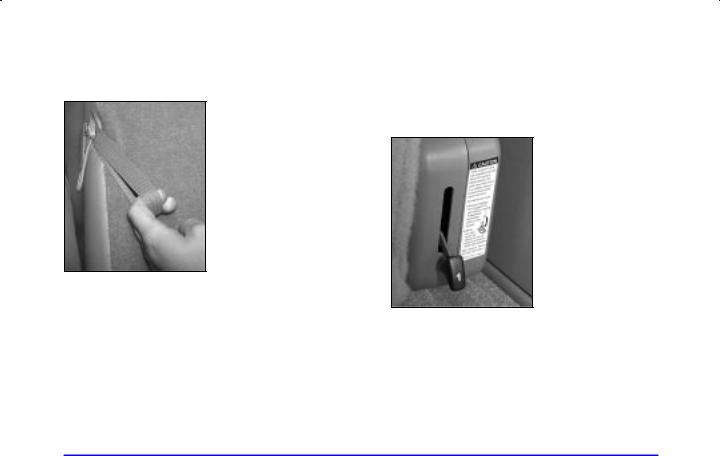
Returning the Seat(s) to an Upright Position
To return the seatback to an upright position, do the following:
1. Pull up on the release lever labeled 1 and then pull up on the seatback or the assist strap located on the outboard side of the seat until the seatback locks into the upright position.
2.Push forward on the seatback to make sure it is locked into position.
1-11

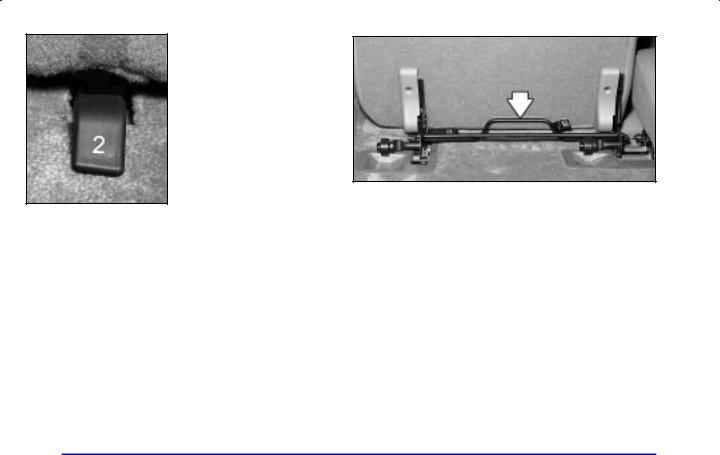
Tilting the Third Row Seat
1.Fold the seatbacks forward using the instructions listed previously.
2.Unlatch the seat from the floor by pulling up on the lever labeled 2, located on the rear of the seat.
3.Lift the rear of the seat up off of the floor and push it forward until it locks into place. You will not be able to unlatch the seat from the floor unless the seatback is folded down.
The seat will now remain locked in the upright position.
1.Pull the lever labeled 3 toward you.
2.While still holding lever 3 toward you, grasp the top of the seat and pull it toward you slightly.
1-12
3.Let go of lever 3 and pull the seat completely down.
4.Push down on the seat firmly. Try pulling it up to be sure it is locked into place.
5.Pull up on the release lever labeled 1 and then pull up on the seatback or the assist strap located on the outboard side of the seat until the seatback locks into the upright position.
Removing the Third Row Seats
Your vehicle's third row seats can be taken out for more cargo space. To remove a rear split bench seat, do the following:
1. Open the liftgate.
2. Pull up on the release lever, labeled 1, located on the rear of the seatback and push the seatback forward.
1-13
3.To unlatch the rear of the seat from the floor, pull up on the release lever labeled 2, at the rear of the seat, and lift the rear of the seat up off of the floor.
4.Squeeze the release handle while pulling the seat out.
5.While holding the rear of the seat up, roll the seat out of the vehicle.
1-14
Replacing the Rear Seats
 CAUTION:
A seat that isn't locked into place properly can move around in a collision or sudden stop. People in the vehicle could be injured. Be sure to lock the seat into place properly when installing it.
To put a seat back in do the following:
1.While holding the rear of the seat up, slide the front wheels into the slots on the floor. The front latches should lock into place. If latches do not lock,
try tilting the rear of the seat upwards.
2. Once the latches are engaged, let the seat drop into place. Release the lever labeled 1 and pull the seatback up using the assist strap on the outboard side of the seat to return it to its upright position.
3.Push and pull on the seat to make sure it is locked into place. The seatback cannot be raised to the upright position unless the seat is secured to
the floor.
1-15
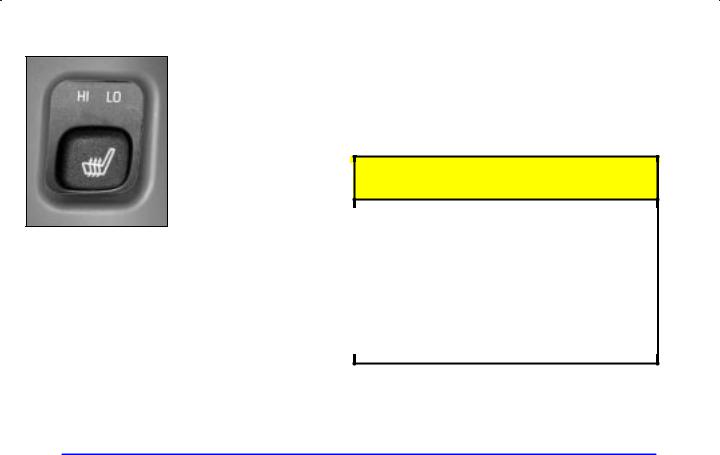
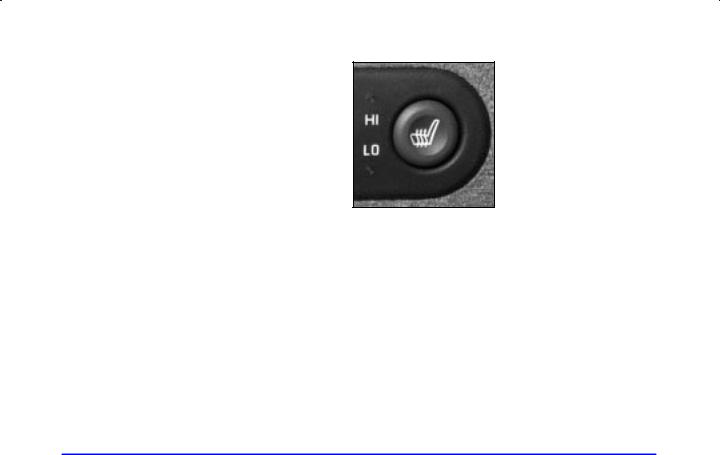
Heated Rear Seats (2nd Row)
The controls are located on the back of the center console.
The ignition must be in RUN for this feature to operate.
To activate the heated seats, press the button once for the HI heat setting. Press the button again for the LO heat setting. To turn off the heated seats, press the button a third time. An indicator light on the button will illuminate for each heat setting anytime the heated seats are operating.
The heated seats will be canceled after the ignition is turned to OFF. If you still want to use the heated seat feature after you restart your vehicle, you will need to press the heated seat button again.
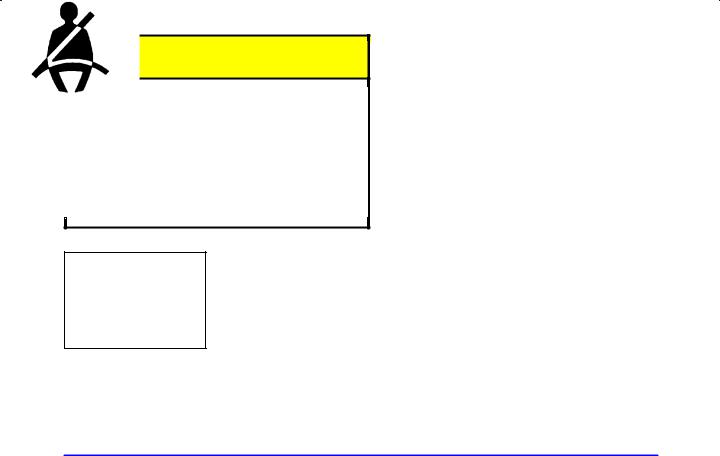
Safety Belts: They're for Everyone
This part of the manual tells you how to use safety belts properly. It also tells you some things you should not do with safety belts.
And it explains the Supplemental Restraint System (SRS), or air bag system.
 CAUTION:
Don't let anyone ride where he or she can't wear a safety belt properly. If you are in a crash and you're not wearing a safety belt, your injuries can be much worse. You can hit things inside the vehicle or be ejected from it. You can be seriously injured or killed. In the same crash, you might not be if you are buckled up. Always fasten your safety belt, and check that your passengers' belts are fastened properly too.
1-16
 CAUTION:
It is extremely dangerous to ride in a cargo area, inside or outside of a vehicle. In a collision, people riding in these areas are more likely to be seriously injured or killed. Do not allow people to ride in any area of your vehicle that is not equipped with seats and safety belts. Be sure everyone in your vehicle is in a seat and using a safety belt properly.
Your vehicle has a light that comes on as a reminder to buckle up. See ªSafety Belt Reminder Lightº in the Index.
In most states and Canadian provinces, the law says to wear safety belts. Here's why: They work.
You never know if you'll be in a crash. If you do have a crash, you don't know if it will be a bad one.
A few crashes are mild, and some crashes can be so serious that even buckled up a person wouldn't survive. But most crashes are in between. In many of them, people who buckle up can survive and sometimes walk away. Without belts they could have been badly hurt
or killed.
After more than 30 years of safety belts in vehicles, the facts are clear. In most crashes buckling up does matter ... a lot!
1-17
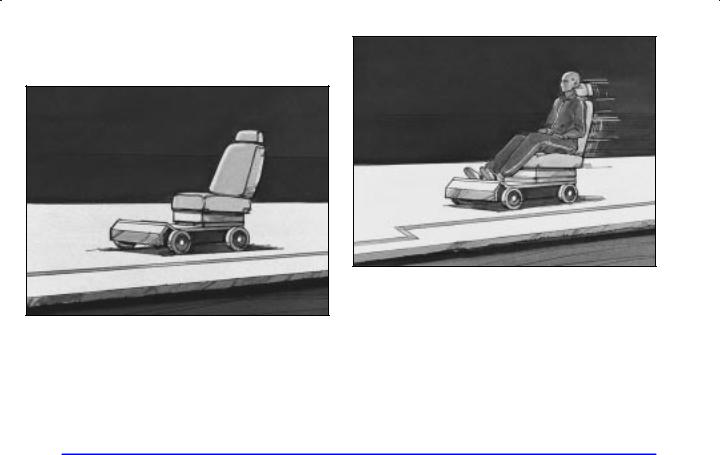
Why Safety Belts Work
When you ride in or on anything, you go as fast as it goes.
Put someone on it.
Take the simplest vehicle. Suppose it's just a seat on wheels.
1-18
Loading...