

Page 1
Riga
notice d’installation
owner’s manual
•
betriebsanleitung
www.cabasse.com
Page 2

f r a n ç a i s e n g l i s h d e u t s c h
Déballage de Riga sur pied
Unpacking of Riga floorstander
Auspacken der Riga Standversion
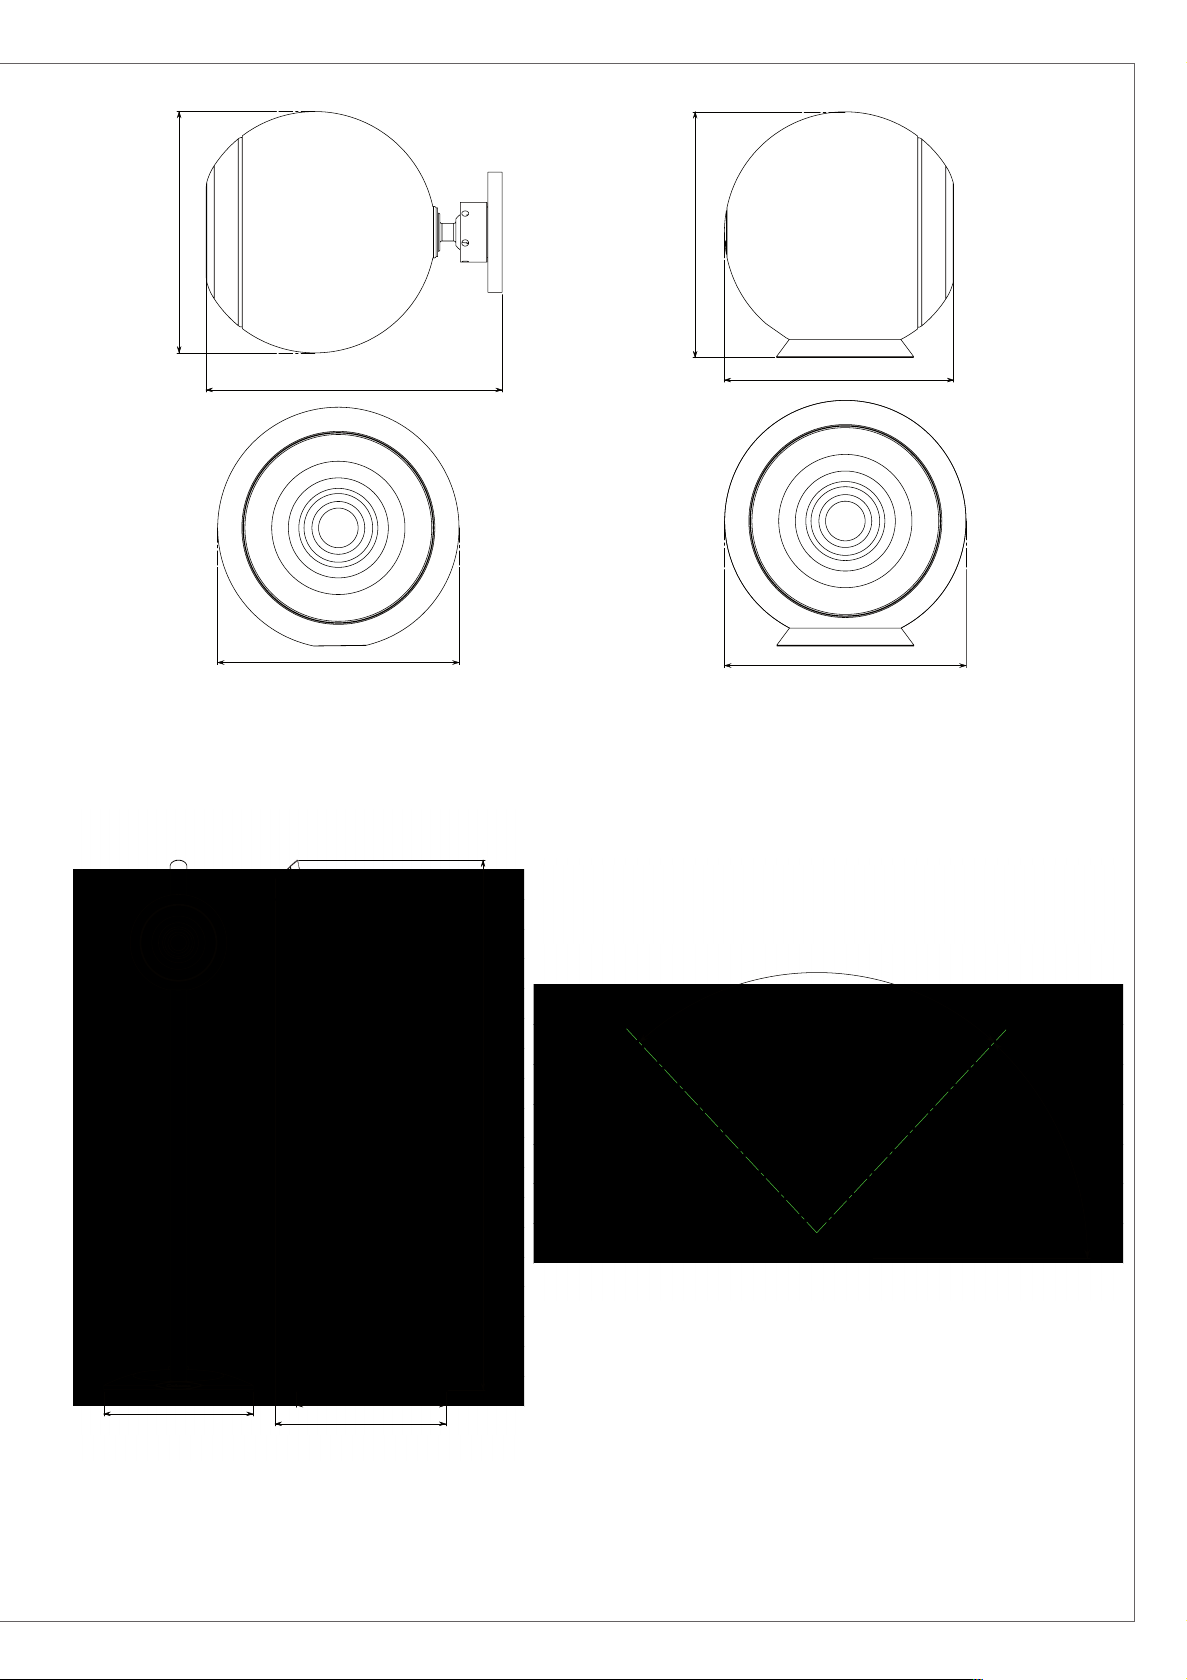
Déballage de Riga centrale et murale
Unpacking Riga on wall and on base
Auspacken der Riga mit wandbefestigung und mit Sockel
Page 3
4
7
°
8
6
°
Riga murale
340
mm / 13.40 in
1207
mm / 47.52 in
340
mm / 13.40 in
389
mm / 15.30 in
269,80
mm / 10.65 in
220
mm / 8.67 in
220
mm / 8.67 in
224
mm / 8.80 in
209
mm / 8.23 in
220
mm / 8.67 in
Riga on wall
Riga mit Wandbefestigung
Riga centrale
Riga on base
Riga mit Sockel
Riga sur pied
Riga floorstander
Riga Standversion
ORIENTATION MURALE
1
DE RIGA
Riga on wall positioning
Ausrichtung des Riga
mit wandbefestigung
Page 4
f r a n ç a i s e n g l i s h d e u t s c h
2
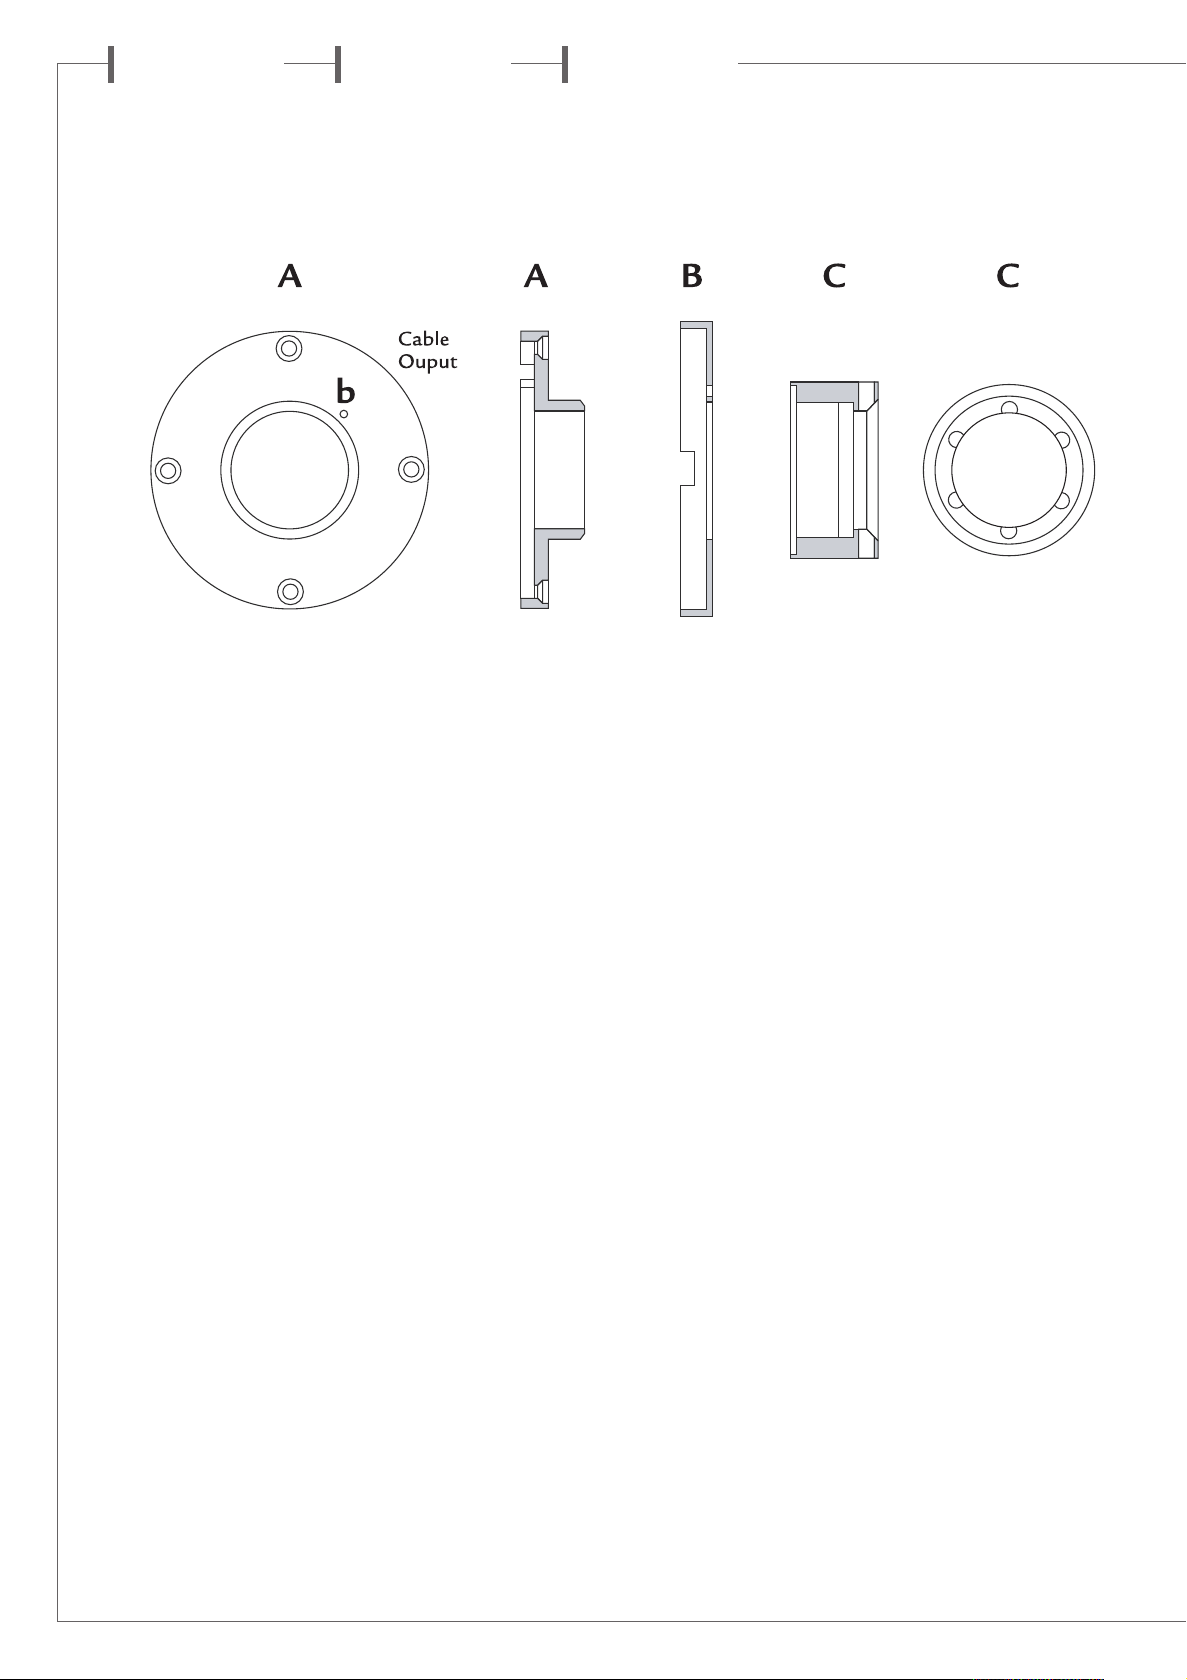
MONTAGE
2
DE RIGA MURALE
■ Déballer la Riga murale
■ Démonter la bague C en utilisant les 2 barres métalliques
livrées avec l’une des Riga murales
■ Enlever la vis b et retirer l’enjoliveur B
■ Installer la plaque A sur le mur avec 4 vis de fixation adap-
tées au type de mur ou de support
■ Bien positionner l’ouverture prévue pour le passage du
câble haut-parleur (Cable Output) en fonction du type de
montage souhaité :
- vers le haut pour ne pas être visible si le câble sort du mur
- dans la direction prévue pour l’arrivée du câble s’il est posé
en applique sur le mur
■ Faire passer le câble à travers les pièces A+B+C
■ Remonter l’enjoliveur B sur la plaque A et le fixer avec
la vis b
■ Visser à la main la bague C sur la plaque A, orienter la Riga
murale et figer la position en serrant fortement avec les 2
barres métalliques fournies
INSTRUCTIONS FOR MOUNTING
2
OF RIGA ON WALL
■ Unpack the Riga on wall
■ Unscrew the C ring with the help of the 2 metal sticks deli-
vered with one of the Riga on wall
■ Take out the screw on b and pull out the B painted carter
■ Wall mount the A metal piece by using 4 screws or bolts
adapted to the characteristics of the wall
■ Do not forget to position the cable (Cable Ouput) in the
optimal way:
- up if your speaker cable comes out of the wall so it can not
be seen
- in the direction your speaker cable will come from if this cable
is not inside the wall
■ Have the speaker cable go through all the pieces A+B+C
■ Mount the B part back on A with the b screw
■ Mount C on A and tight it firmly with the 2 sticks delivered
MONTAGEANLEITUNG FÜR RIGA
2
MIT WANDBEFESTIGUNG
■ Den Riga mit Wandbefestigung aus der Verpackung nehmen
■ Mithilfe der mit einem Riga gelieferten Metallstifte den
Ring C abmontieren
■ Schraube b abschrauben und Kappe B abnehmen
■ Platte A mit 4 der Wand oder der Halterung angepassten
Schrauben installieren
■ Den Durchgang für das Lautsprecherkabel Ouput (Cable
Ouput) je nach gewünschter Befestigung positionieren :
- bei Kabelaustritt aus der Wand nach oben
- in die für den Kabeleingang gewünschte Richtung, wenn
das Kabel entlang der Mauer ange bracht ist
■ Das Kabel durch die Punkte A+B+C führen
■ Kappe B wieder auf Platte A anbringen und mit Schraube
b befestigen
■ Den Ring C von Hand auf der Platte A festschrauben, Riga
in die gewünschte Position bringen und mithilfe der 2 mitgelieferten Stifte festschrauben
Page 5
POSITIONNEMENT DES RIGA
TSA 500 P
A4 A5 A6 A7
+ -
+ -
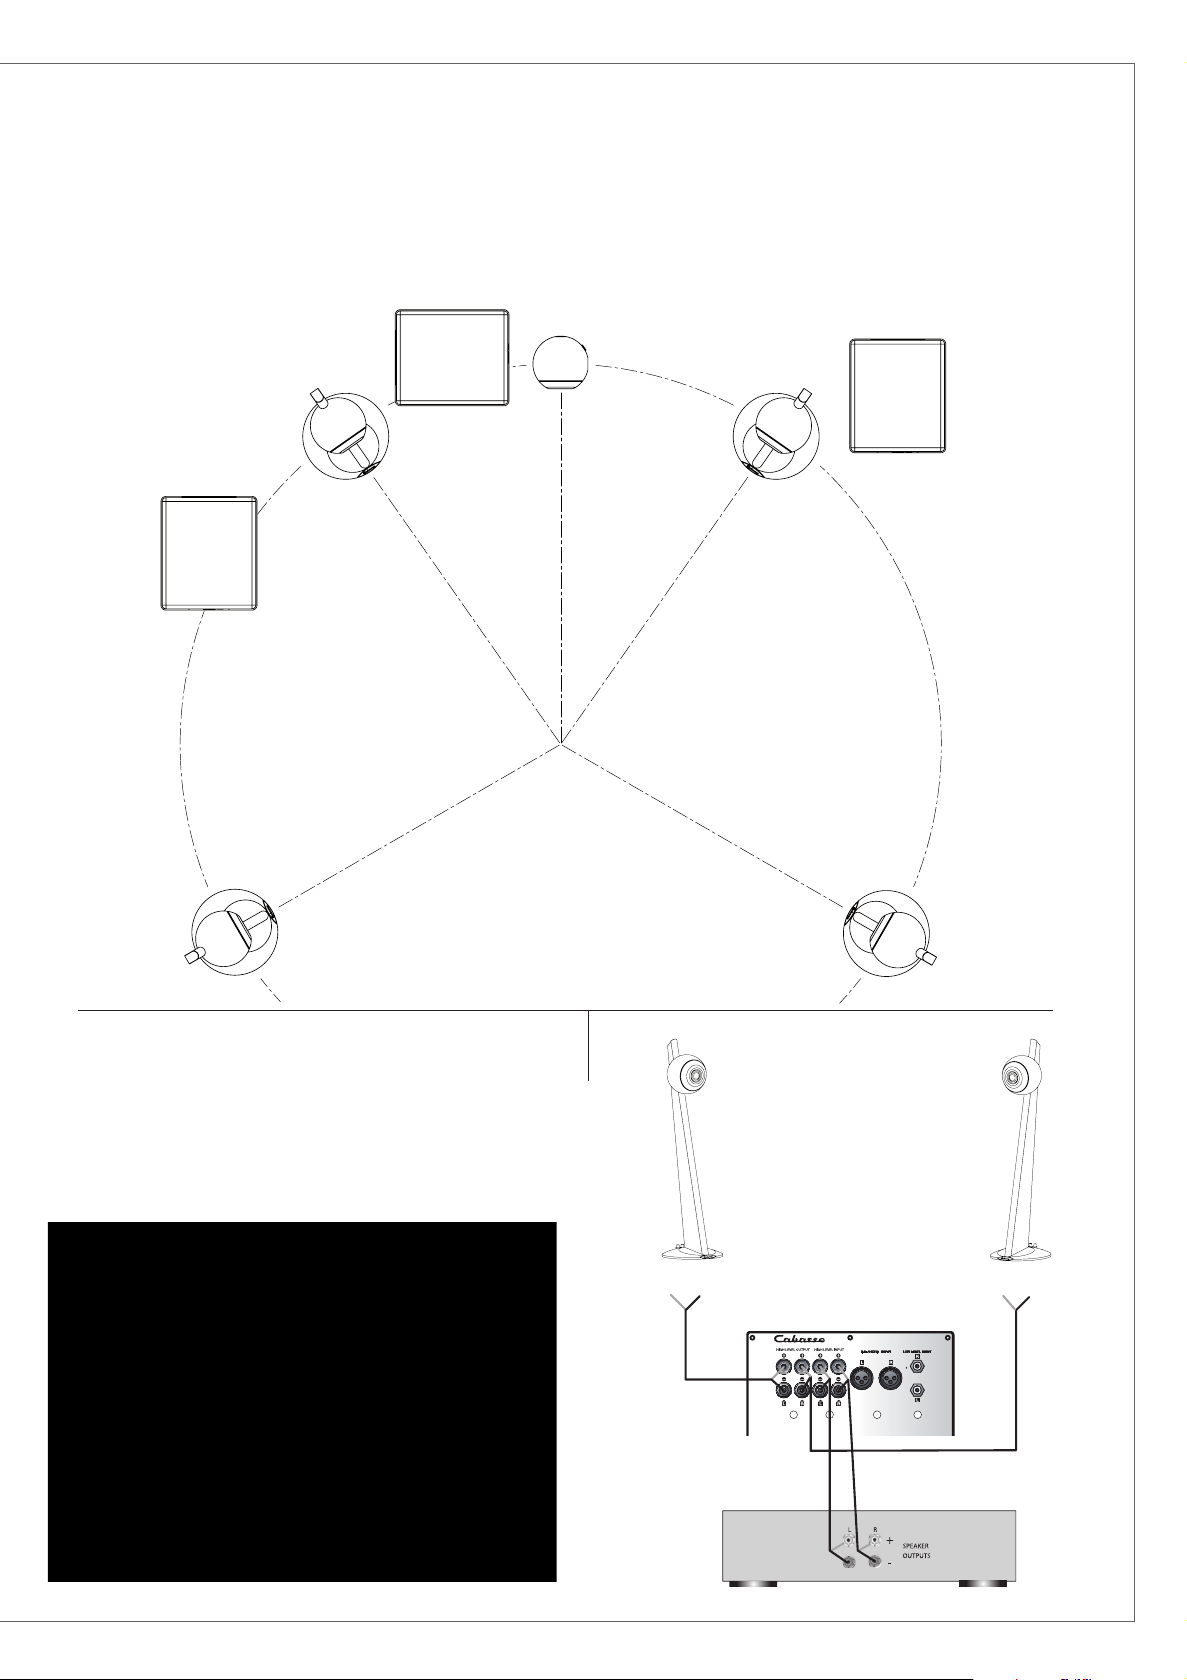
3
ET DU CAISSON DE GRAVES CABASSE
Positioning of Riga speakers and Cabasse subwoofer
Positionierung der Riga und des Cabasse subwoofers
45
Configuration 2.1 (stereo)
2 satellites Riga + 1 caisson de graves Cabasse
2.1 configuration (stereo)
2
Riga
speakers + 1
Cabasse
subwoofer
Konfiguration 2.1 (stereo)
2 Riga Satelliten + 1 Cabasse Subwoofer
Page 6

r a n ç a i s
+ -+ -
+ -
+ -
CENTER
SURROUND
FRONT
L
L
RR
+
-
SUBWOOFER
LFE
+ -
TSA 500 P
A4 A5 A6 A7
A1A2A
3
+ -+ -
+ -
+ -
CENTER
SURROUND
FRONT
L
L
RR
+
-
SUBWOOFER
LFE
+ -
TSA 500 P
A4 A5 A6 A7
A1 A2 A3
f
e
Configuration 5.1 (Audio Video)
5 satellites Riga
+ 1 caisson de graves Cabasse
5.1 configuration (
5
Riga
speakers
+ 1
Cabasse
Audio Video
subwoofer
)
Konfiguration 5.1 (Audio Video)
5 Riga Satelliten
+ 1 Cabasse Subwoofer
n g l i s h
e u t s c h
d
Configuration 5.1 (Audio Video)
2 enceintes principales + 3 satellites Riga
+ 1 caisson de graves Cabasse
5.1 configuration (
2 main speakers + 3
+ 1
Cabasse
Konfiguration 5.1 (Audio Video)
2 Hauptlautsprecher
Audio Video
Riga
subwoofer
)
speakers
+ 3 Riga Satelliten
+ 1 Cabasse Subwoofer
67
Page 7

r a n ç a i s
f
Vous venez d’acheter des enceintes Cabasse et nous vous remercions de votre confiance.
Avant de commencer l’installation de votre système, nous vous recommandons de lire cette notice
attentivement et intégralement.
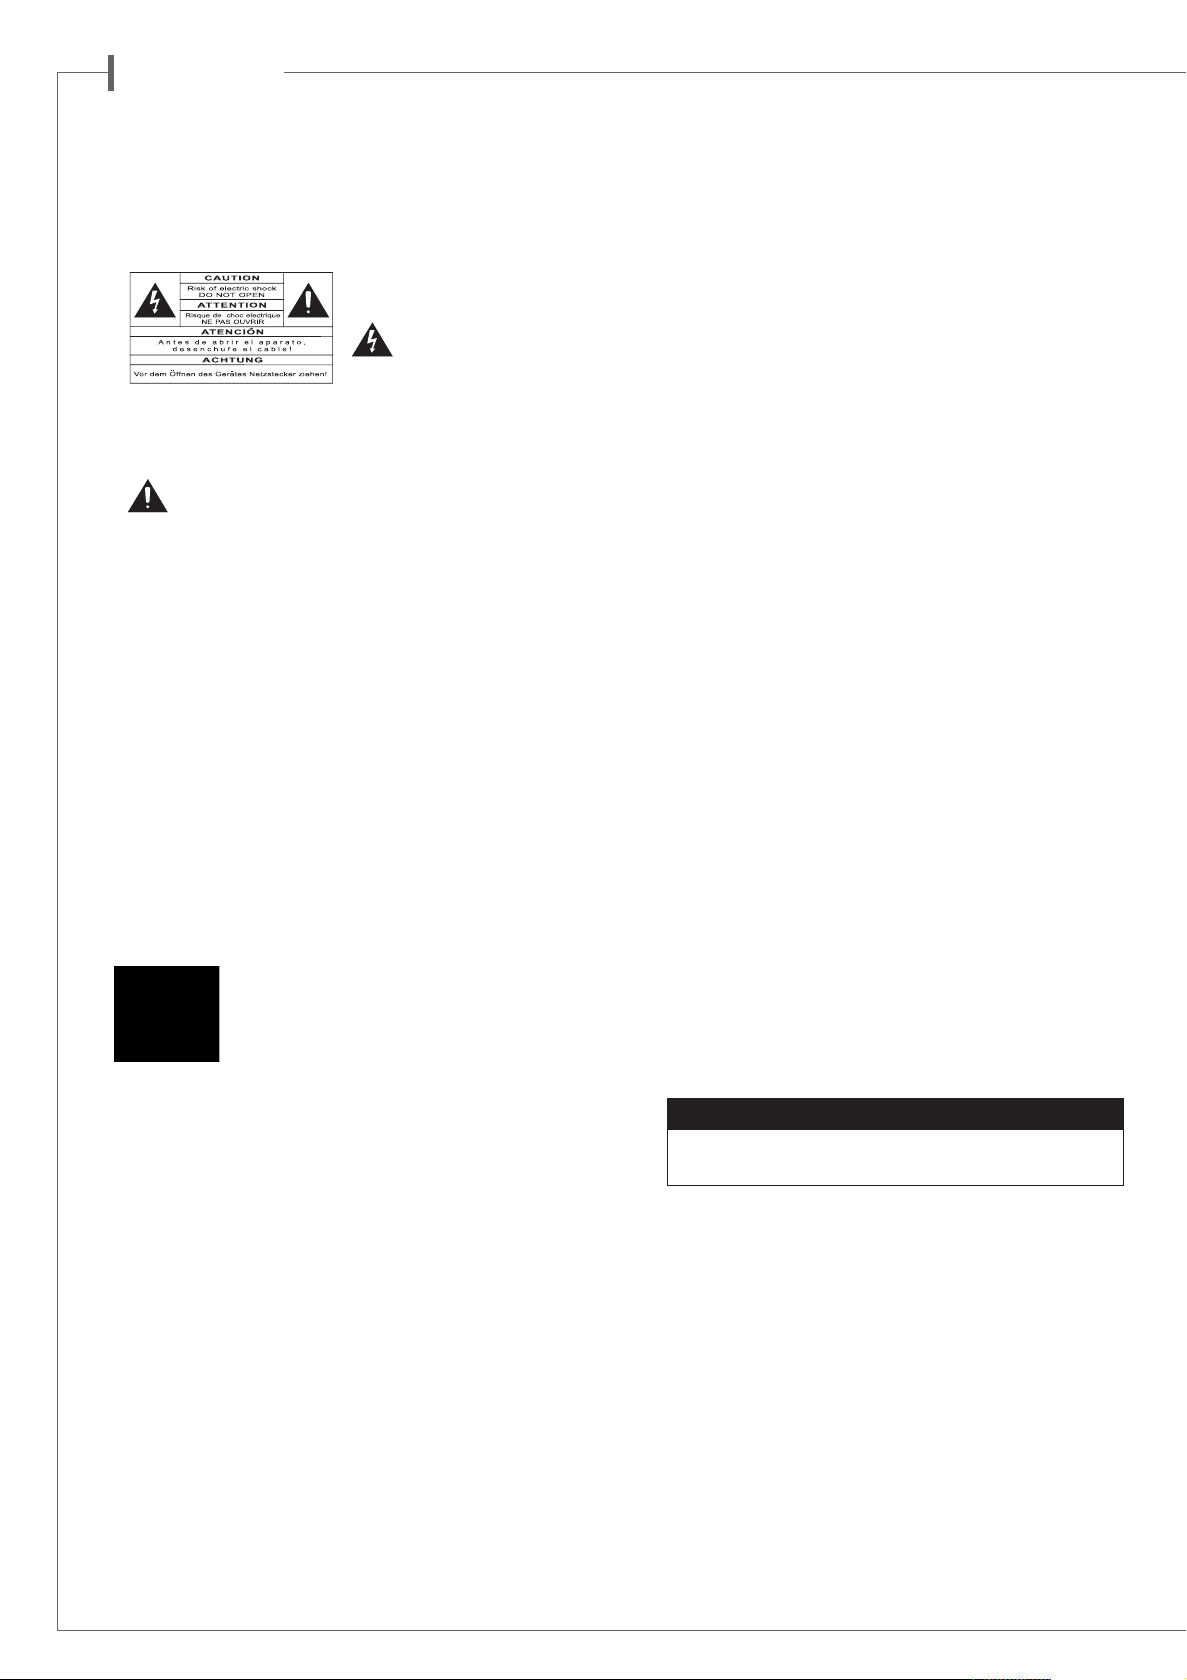
INSTRUCTIONS DE SECURITE
rotection des câbles d’alimentation -
Explication des symboles -
L’éclair dans un triangle
équilatéral avertit de l’existence de tension élevée dan-
gereuse non isolée à l’intérieur du
offret du produit, d’une valeur
c
suffisante pour présenter un risque d’électrocution.
Le point d’exclamation dans un triangle équilatéral avertit
de l’existence d’instructions importantes quant à l’utilisation
t la maintenance dans la documentation jointe à ce produit.
e
Instructions -
tion doivent avoir été lues avant d’allumer tout appareil pour la
première fois.
Retenez les instructions -
permanente pour tout ce qui suit.
Tenez compte des avertissements -
présents sur le produit ou dans les notices d’utilisation doivent
être pris en compte.
Suivez les instructions -
et de mise en œuvre doivent être scrupuleusement suivies.
Nettoyage -
lisez pas de solutions nettoyantes sous forme liquide ou en aérosols. Employez de préférence un chiffon humide.
Accessoires -
citement recommandés par le constructeur, sous peine de risquer
divers accidents.
Eau et humidité -
l’eau, par exemple à proximité d’une baignoire, d’un évier, dans
un sous-sol humide, près d’une piscine, ou de tout ce qui y res-
Toutes les instructions de sécurité et d’utilisa-
Elles doivent servir de référence
Les avertissements
Toutes les instructions d’utilisation
Débranchez l’appareil avant tout nettoyage. N’uti-
N’utilisez pas d’accessoires qui ne soient pas expli-
L’appareil ne doit pas être utilisé près de
semble de près ou de loin.
Chariots et supports - La manutention doit être
effectuée seulement avec des chariots et supports agréés
par le fabricant.
> Attention aux chariots de manutention
Installation sur mobiliers et supports -
cet appareil sur un support instable, qu’il s’agisse de pieds, trépieds, tables, étagères, etc. Il pourrait tomber et causer des blessures sérieuses à un enfant ou un adulte qui se trouverait à proximité.
Ventilations -
qu’il ne gêne pas sa propre ventilation. Par exemple, il ne doit pas
être installé sur un lit, un canapé, une couverture ou des surfaces
similaires qui pourraient bloquer ses orifices d’aération. Il ne
doit pas non plus être encastré dans des enceintes confinées
comme des étagères étroites ou des meubles qui pourraient
limiter la quantité d’air disponible aux entrées d’air.
Alimentation -
trique du type écrit dans le mode d’emploi ou conforme à la
sérigraphie sur le produit. Si vous n’êtes pas sûr du type de courant fourni à l’endroit où vous vous trouvez, adressez-vous à
votre revendeur ou à la compagnie électrique locale.
Sacs plastiques -
ballage à portée des enfants afin d’éviter tout risque d’étouffement.
L’appareil doit être positionné de telle sorte
L’appareil ne doit être relié qu’à une source élec-
Ne pas laisser les sacs plastiques de l’em-
Ne placez pas
P
des câbles d’alimentation doit être prévu de telle sorte qu’ils ne
puissent pas être piétinés, pincés, coincés par d’autres appareils posés dessus, et une attention toute particulière doit être
ccordée à l’adéquation des prises et à la liaison du cordon
a
avec l’appareil.
Foudre -
les orages ou s’il doit rester inutilisé pendant une longue période, débranchez le cordon d’alimentation et débranchez la prise
d’antenne, vous éviterez ainsi les risques de détérioration dus à
la foudre ou aux surtensions.
Surcharges électriques -
mentation, les prolongateurs ou les rappels d’alimentation. Il
pourrait en résulter incendies ou électrocutions.
Corps et liquides étrangers -
jamais laisser entrer d’éléments ou de liquides étrangers dans l’appareil. Ils pourraient occasionner incendies ou électrocutions. Ne
versez jamais aucun liquide d’aucune sorte sur l’appareil.
Entretien -
rations de maintenance au-delà de celles décrites dans le mode
d’emploi. Tout ce qui dépasse le simple niveau de l’entretien
doit être effectué par un personnel qualifié.
Maintenance -
ment débrancher votre appareil et le faire vérifier par un technicien
qualifié :
■ l’alimentation ou la prise a été endommagée.
■ des corps étrangers ou du liquide se sont introduits dans l’ap-
pareil.
■ l’appareil a été exposé à la pluie ou a été aspergé d’eau.
■ l’appareil ne semble pas marcher correctement alors que vous
l’utilisez dans le cadre de ses instructions de fonctionnement
normal. Ne manipulez que les contrôles couverts par le mode
d’emploi. Toute autre procédure pourrait le détériorer et nécessiter l’intervention d’un technicien qualifié.
■ l’appareil est tombé ou bien sa carrosserie est endommagée.
■ l’appareil affiche des performances nettement modifiées.
Pièces détachées -
pièces détachées, assurez-vous que le technicien a bien utilisé les
références préconisées par le fabricant ou présentant les mêmes
caractéristiques que les pièces originales. Des pièces non
conformes peuvent provoquer incendies, électrocutions ou
autres.
Vérifications -
dez au technicien d’effectuer des tests afin de garantir que
l’appareil fonctionne en toute sécurité.
our une meilleure protection de l’appareil pendant
P
Ne surchargez pas les prises d’ali-
On doit être attentif à ne
L’utilisateur ne doit pas tenter de s’occuper des opé-
Dans les cas suivants, vous devez impérative-
Si la réparation a nécessité l’utilisation de
Après toute intervention sur l’appareil, deman-
Exposition aux fortes températures -
tenu éloigné de sources de chaleur comme radiateurs, chauffage divers, amplificateurs, ou tout autre élément susceptible de
le placer dans des conditions de températures anormalement élevées.
Valable aux USA, au Canada et autres pays concernés
Attention !
la plus large de la fiche dans la borne correspondante et pousser
jusqu’au fond
pour éviter les chocs électriques, introduire la lame
Le cheminement
L’appareil doit être
Page 8

r a n ç a i s
f
Avec Riga, Cabasse vous propose un ensemble de solutions Hi Fi / audio-vidéo utilisant
le haut-parleur BC17, dernier-né de la gamme coaxiale SCS (Source à Cohérence Spatiale)
au sein de la gamme ARTIS.
Ces enceintes 2 voies, associées à un caisson de graves Cabasse, vous permettront
de construire un système de très grande qualité en configuration 2.1 (reproduction stéréo),
configuration 5.1 (reproduction 5 canaux), 6.1 ou 7.2...
Selon votre système - stéréo ou multicanal - le volume de la pièce d’écoute, vos goûts
et vos exigences, votre revendeur Artis saura guider votre choix parmi les caissons de graves
de la gamme Cabasse : Santorin 25, Santorin 30i et Santorin 30.
DÉBALLAGE DES ENCEINTES
Ouvrir le côté mentionné sur le carton, replier sur les cotés les
rabats supérieurs du carton et retirer la plaque de protection.
Puis procéder comme indiqué sur les croquis en page 2. Nous
vous conseillons de conserver l’emballage de votre enceinte à
plat pour une utilisation ultérieure éventuelle.
INSTALLATION
Les composants de votre système :
■ 2, 3, 5, 6 ou 7 Riga
■ 1 ou plusieurs caissons de graves Cabasse
Riga murale
La fixation de Riga murale permet d’orienter le haut-parleur
BC17 dans toutes les directions jusqu’à 43° hors de l’axe et de
dissimuler le câble haut-parleur dans le mur sans aucune vis
apparente
dans l’ordre les opérations à effectuer selon le schéma
. Afin d’effectuer correctement le montage, suivre
1
2
.
Riga sur socle
La Riga sur socle est livrée avec un berceau annulaire, permettant de poser la sphère sur toute surface plane horizontale.
Riga
Cette version est à poser au sol, le dessous de la semelle dispose
de cônes-vérins réglables en hauteur pour une stabilité
parfaite sur tous types de sol.
Positionnement de Riga
Pour le positionnement des Riga et du (des) caisson(s)
de graves Cabasse associé(s), nous vous conseillons de respecter le mieux possible le principe du schéma
configuration. Le caisson de graves doit être placé dans
la zone d’écoute avant, et son placement contre un mur
renforce l’extrême grave et limite les réflexions de 80 à 200 Hz.
Cependant, pour obtenir le meilleur résultat, il est toujours
nécessaire de faire des essais d’emplacement en fonction
de l’acoustique de la pièce.
selon votre
3
BRANCHEMENTS
Il est impératif de respecter pour tous les branchements
la mise en phase en reliant les bornes rouges + de l’amplificateur à la borne rouge + de Riga.
Procéder ensuite de la même façon pour les bornes noires -.
Configuration 2.1
■ 2 Riga + 1 caisson de graves Cabasse
A l’aide d’un câble pour enceintes, brancher les sorties
de l’amplificateur aux extrémités HIGH LEVEL INPUT L (left)
et HIGH LEVEL INPUT R (right) du caisson de graves et relier
les sorties HIGH LEVEL OUTPUT L (left) et HIGH LEVEL OUTPUT R (right) du caisson de graves aux Riga
Configuration 5.1
■ 5 Riga + 1 caisson de graves Cabasse ou
■ 2 enceintes principales +3 Riga +1 caisson de graves Cabasse.
Pour une utilisation en mode stéréo, votre amplificateur ou
pré-amplificateur audio vidéo doit prendre en charge la gestion
du caisson de graves pour ce mode. Le branchement du caisson de graves s’effectue dans ce cas sur l’une des prises gauche
L (left) ou droite R (right) Cinch RCA marquées LINE IN
La sortie Cinch RCA de l’ampli audio-vidéo est généralement
libellée « subwoofer » ou « LFE OUT ».
Puis configurer le menu « set-up » de votre amplificateur audio
vidéo comme suit :
4
6
5
.
7
5 Riga + 1 caisson de graves Cabasse
FRONT SMALL
CENTER SMALL
SURROUND SMALL
SUBWOOFER / LFE YES
2 enceintes principales + 3 Riga
+ 1 caisson de graves Cabasse
FRONT SMALL ou LARGE*
CENTER SMALL
SURROUND SMALL
SUBWOOFER / LFE YES
*Réglage en SMALL ou LARGE pour les enceintes principales
selon leur capacité à restituer les fréquences graves.
Certains amplificateurs audio-vidéo nécessitent les informations
complémentaires suivantes :
SUBWOOFER ONLY
SUBWOOFER stereo YES
Si la fréquence du filtre est ajustable, celle-ci doit être réglée
à 100 Hz.
.
Page 9

r a n ç a i s
f
RÉGLAGES DES CAISSON DE GRAVES
SANTORIN 30i - SANTORIN 30
Ces 2 caissons de graves sont équipés d'amplificateurs Cabasse différents.
Les connectiques sont identiques, les modes de réglage diffèrent. Référez-vous
aux manuels spécifiques de chaque modèle pour les réglages qui
dépendent du positionnement relatif des enceintes (Phase, délai,..)
SANTORIN 30i:
es potentiomètres de réglages se trouvent au dos du
L
Santorin 30i.
Réglage de la fréquence (Crossover frequency)
■ En configuration 2.1 : 100 Hz
■ En configuration 5.1 et plus, positionner le poten-
tiomètre « crossover frequency » du Santorin 30i sur 200
Hz et dans le menu du processeur AV régler le passe-bas
du caisson de grave sur 100 Hz.
Réglage du niveau (Level)
Le réglage de niveau LEVEL varie suivant les pièces d'écoute et le positionnement respectif des Riga et du caisson de
graves. le réglage moyen est obtenu avec le potentiomètre
level positionné comme indiqué ci-contre :
Optimiser ensuite le réglage du niveau en écoutant une source
stéréo (CD) et des pièces musicales bien connues
Pour un réglage optimum de ce niveau, nous vous conseillons
de l’effectuer à partir d’une source stéréo (CD).
Pour le réglage du canal LFE ( effets spéciaux dans le grave),
utiliser le menu SET UP de votre amplificateur audio-vidéo et
ajuster le niveau de sortie de ce canal sans modifier le réglage
LEVEL du caisson de graves.
SANTORIN 30:
Les réglages se font dans le menu du Santorin 30 en utilisant le
clavier du panneau de contrôle frontal.
Réglage de la fréquence (Crossover frequency)
■ En configuration 2.1 : 80 Hz dans le menu "LOWPASS FILTER"
■ En configuration 5.1 et plus, entrer 200 Hz dans le menu
"LOWPASS FILTER" du Santorin 30 et 100 Hz dans la rubrique
équivalente du processeur AV.
Réglage du niveau (Volume)
Le réglage de niveau varie suivant les pièces d'écoute et le positionnement respectif des Riga et du caisson de graves. le réglage
moyen est obtenu en enregistrant 0 dB pour le paramètre "VOLUME" du Santorin 30.
Optimiser ensuite le réglage du niveau en écoutant une source
stéréo (CD) et des pièces musicales bien connues.
Pour un réglage optimum de ce niveau, nous vous conseillons
de l’effectuer à partir d’une source stéréo (CD).
Pour le réglage du canal LFE (effets spéciaux dans le grave), utiliser le menu SET UP de votre amplificateur audio-vidéo et
ajuster le niveau de sortie de ce canal sans modifier le réglage
LEVEL du caisson de graves.
ENTRETIEN
Les ébénisteries de la Riga, réalisées avec un placage de bois
naturel protégé par 4 couches de vernis, ne nécessitent aucun
entretien particulier, le matériau utilisé étant un produit de très
haute technicité. Elles peuvent être nettoyées avec un chiffon
humide, tout comme les parties peintes.
GARANTIE
Nous vous remercions de bien vouloir activer la garantie Cabasse
les 60 jours à compter de la date d'achat de votre matériel, soit
en nous retournant la carte de garantie jointe dûment complétée,
soit en enregistrant en ligne votre matériel sur notre site web
www.cabasse.com où figurent également les détails sur la garantie constructeur et l'extension de garantie Cabasse propre à votre
matériel .
dans
MARQUAGE DEEE
Traitement des appareils électriques et électroniques en fin de vie (applicable dans les pays de
l’Union européenne).
Ce symbole, représentant une poubelle sur roues barrée d’une
croix, apposé sur le produit, indique que ce produit ne doit pas
être traité avec les déchets ménagers. Il doit être remis à un point
de collecte pour le traitement des équipements électriques et
électroniques en fin de vie. En s’assurant que ce produit est bien
mis au rebut de manière appropriée, vous aiderez à prévenir les
conséquences négatives potentielles pour l’environnement et la
santé humaine. Le recyclage des matériaux aidera à conserver les
ressources naturelles. Pour toute information supplémentaire au
sujet du recyclage de ce produit, vous pouvez contacter votre
municipalité, votre déchetterie ou le magasin où vous avez acheté le produit.
En suivant les conseils d’installation, de branchement et
d’emploi explicités dans cette notice, vous êtes assurés d’un fonctionnement parfait de vos enceintes acoustiques.
Nous recevons tous les jours des lettres de clients satisfaits
du choix de leurs enceintes et ces lettres sont pour nous
la plus belle récompense de nos efforts.
CARACTÉRISTIQUES TECHNIQUES
SPECIFICATIONS RIGA
Satellite
Voies
Haut-parleurs
Bande passante
Efficacité
Impédance nominale
Impédance minimale
Puissance nominale
Puissance crête
Riga
finitions
dimensions (h xlxp)
Poids
Riga murale
finitions
dimensions (h xlxp)
Poids
Riga sur socle
finitions
dimensions (h xlxp)
Poids
2/7 canaux
2
tweeter-médium/bas médium
2 voies coaxiales BC17
95 - 20 000 Hz
90 dB/2,8V/1m
8 ohms
3,4 ohms
150 W
1000 W
merisier/perle noire,
santos/perle noire,
wenge/perle noire,
wenge/perle
123 x 34 x 39 cm
14 kg
perle noire - perle - blanc
22 x 22 x 27 cm
6 kg
perle noire - perle
22,4 x 22 x 21 cm
5,5 kg
Page 10
n g l i s h
e
Thank you very much for choosing Cabasse speakers.
Please read carefully these instructions before setting up your speakers.
SAFET Y INSTRUCTIONS
Explanation of graphical
symbols -
angle, is intended to alert you to
the presence of uninsulated “dan-
erous voltage” within the product’s enclosure that may be of
g
ufficient magnitude to constitute a risk of electric shock to per-
s
sons.
he exclamation point within an equilateral triangle is inten-
T
ded to alert you to the presence of important operating
and maintenance (servicing) instructions in the literature accompanying the appliance.
Instructions -
ating instructions before switching on any device for the first time.
Carefully read through all the safety and oper-
Keep these instructions in mind -
referred to through this manual.
Pay special care to warnings -
the product or warning notes in the user’s manual must be followed.
Follow the instructions -
tion and operation instructions.
Cleaning -
the device. Do not use cleaning solvent, whether liquid or air
spray. Using a soft damp cloth is recommended.
Accessories -
ly recommended by Cabasse.
Always take off the power cord before cleaning
To avoid incidents, only use accessories express-
Water and moisture -
damp or wet locations, such as humid basements, next to a
bathtub, sink, swimming pool or any other similar
conditions.
Follow carefully all the installa-
The product shall not be used in
The lightning flash
with arrowhead symbol,
within an equilateral tri-
They will be constantly
All the warning labels on
Carts and Stands - The appliance should be used
only with a cart or stand that is recommended by the
manufacturer.
> Portable cart warning
Installation on a piece of furniture and stands -
not place this device on an unsteady surface, i.e. a stand, tripod,
table, shelf, etc. It may fall and cause serious injury to a nearby
child or adult.
Ventilation outlets -
position that restrains the operation of its fans. Avoid installing
the device on a bed, couch, blanket or other similar surfaces
that may prevent the appropriate air flow. Do not install the
device in a confined space, such as a book shelf or other piece
of furniture, that could prevent sufficient air from flowing freely.
Power -
power compliant to the one described in this manual or on relevant printed labels on the product. If you are not sure of the type
of power available, please contact your reseller or the local power company.
Power cords -
that they cannot be walked on, pinched, bent under
other devices. Also pay special attention to the matching of the
plugs and the connection of the cord to the device.
Plastic bags -
risk of suffocation.
The device shall only be connected to a source of
The power cords must be laid out in such a way
Keep them away from children to prevent any
The device shall not be placed in a
Do
Lightning -
device must remain unused for long stretches of time, unplug the
power cord and antenna jack. This minimizes potential damages
due to lightning or line surges.
Overloads -
cords or power relays. This could result in fire or electric shocks.
Foreign bodies and liquids -
rials or liquids enter the device. They could cause fire or electric
shocks. Never spill any liquid on the device.
Maintenance -
device on their own, except for those maintenance operations
described in this manual. Any task beyond regular user maintenance must be performed by qualified service operators.
Troubleshooting -
power supply and have it checked by a qualified technician if:
■ The power supply or the plug is damaged.
■ Foreign bodies or liquid penetrated the device.
■ The device was exposed to dripping or splashing.
■ The device does not seem to work correctly under normal
operating conditions. Only operate the controls described in
this manual. Any other operation could damage the device and
require on-site visit of a qualified technician.
■ The device has fallen or its housing is damaged.
■ The performances of the device are strongly altered.
Spare parts -
make sure that the technician followed the manufacturer’s recommendations or that the replacing parts feature the same
specifications as the original ones. Non-compliant parts can
result in multiple damages, including fire or electric shocks.
Checks -
to perform appropriate testing to make sure that the device
works safely.
Exposure to high temperatures -
kept away from heating sources, such as radiators, heaters,
amplifiers or any other similar item likely to make the operating
temperature rise excessively.
For better protection against lightning or if the
Avoid overloading the power plugs, extension
Avoid letting foreign mate-
Users must never attempt to maintain the
You must unplug your device from the
If spare parts are needed to repair the device,
After any servicing of the device, ask the technician
The device should be
Applicable for USA, Canada or where approved for usage
Caution !
slot, insert fully.
To prevent electric shock, match wide blade plug to wide
UNPACKING
After opening the top carton flaps, fold the carton flaps right back,
remove the cardboard sheet, the bag of accessories and follow the
process ilustrated on page 2.
We suggest you to retain the packing for future use.
Page 11

n g l i s h
e
With Riga, Cabasse proposes a wide palette of Hi Fi / audio video systems fitted with the
BC17, the latest of the SCS (Spatially Coherent System) coaxial range of drivers.
With these 2-way speakers combined with a Cabasse Cabasse active subwoofer, you can get a
very high quality system, either in a 2.1 configuration (standard stereo) or in a 5.1 configuration (5 channels system) or 6.1 or 7.1...
Depending on your system - stereo or multi-channel - the size of the listening room, your taste
and demand, your Artis dealer will guide you in selecting your Cabasse subwoofer(s):
Santorin 25, Santorin 30i, Santorin 30.
INSTALLATION
The components of your system:
, 3, 5, 6 or 7 Riga
■ 2
■ 1 Cabasse active subwoofer
Riga on wall version
The wall bracket of Riga on wall has been designed to allow a
convenient positioning of the BC17 driver in many directions
+/- 43° in any direction, and to give the possibility to hide the
speaker cable in the wall with no apparent bolts or screws
Please follow step by step the instructions as shown in
2
1
.
Riga on base version
Riga on base is delivered with a little cradle, pose the sphere Riga
on this cradle. This system enables you to put Riga on a bookshelf.
Floor standing Riga
The stand version is supplied with adjustable spikes for a perfect stability even if the floor is not horizontal.
Positioning of Riga
Positioning of the speakers: if possible, try to match with the
drawing, with the Cabasse subwoofer in the front area
3
facing the listening spot. Its position against a wall reinforces
the extreme low register and limits the reflections between 80
and 200 Hz. However to obtain the best result, it is always
necessary to carry out tests according to the acoustics of the
room.
CONNECTIONS
It is imperative to respect the correct phasing when connecting:
+ to + (red) and - to - (black).
Configuration 2.1
■ 2 Riga + 1 Cabasse subwoofer
Connect with speaker cables the amplifier outputs to the terminals HIGH LEVEL INPUT L (left) and HIGH LEVEL INPUT R
(right) of the Cabasse subwoofer and connect the outputs
HIGH LEVEL OUTPUT L (left) and HIGH LEVEL OUTPUT R
(right) of the Cabasse subwoofer to the Riga inputs
4
5
.
Configuration 5.1
Riga + 1 Cabasse subwoofer or
■ 5
■ 2 main speakers + 3 Riga + 1 Cabasse
subwoofer
hen the processor of your audio video amplifier includes a
W
2.1 set-up (subwoofer for stereo reproduction), connect each
speaker output of the 5.1 amplifier directly to the matching Riga
(front right, front left, centre, surround...). Connect the sub-
.
woofer CINCH RCA output of the amplifier to one of the CINCH RCA LINE IN terminals of the Cabasse subwoofer
Then adjust the set-up menu of your audio video amplifier:
6
7
.
5 Riga + 1 Cabasse subwoofer
FRONT SMALL
CENTER SMALL
SURROUND SMALL
SUBWOOFER / LFE YES
2 main speakers + 3 Riga + 1 Cabasse subwoofer
FRONT SMALL ou LARGE*
CENTER SMALL
SURROUND SMALL
SUBWOOFER / LFE YES
*Adjustment in SMALL or LARGE, according to their ability in
reproducing deep low frequencies.
Some audio video amplifiers require these information:
SUBWOOFER ONLY
SUBWOOFER stereo YES
If your audio video has an adjustable crossover frequency, the
adjustment will be 100 Hz.
ADJUSTMENTS OF THE SANTORIN 30i
AND SANTORIN 30 SUBWOOFERS
2 different models of amplifiers are fitting these subwoofers.
The connections are identical but the settings are different.
Please use the owner's manual of your subwoofer for phase
and delay adjustments.
Page 12

n g l i s h
e
SANTORIN 30i
The knobs of the potentiometers to be adjusted are placed
on the amplifier plate at the back of the Santorin 30i.
Crossover frequency
- 2.1 configuration: 100 Hz
- 5.1 configuration and above: turn the "crossover frequency" knob of the subwoofer up to
200 Hz and select 100 Hz as low-pass frequency for the LFE channel in the receiver set-up menu.
Level
The adjustment of the LEVEL will depend upon
room positioning, type of amplifier, etc. With Riga
and Santorin 30i, this is the average position of
the LEVEL control:
THOR II, LARGO
For an optimum adjustment of this level, we advise you to carry it out starting from a stereo source (CD).
To adjust the level of the low frequency effect channel (LFE), do
not modify the sound level of the Cabasse subwoofer but go into
the set-up menu of your audio video amplifier 5.1 and adjust
the SUBWOOFER / LFE channel.
SANTORIN 30
Use the front keyboard of the subwoofer for the set up process.
Crossover frequency
- 2.1 configuration: select 80 Hz in "LOWPASS FILTER" menu.
- 5.1 configuration and above: enter 200 Hz in "LOWPASS FILTER" menu and select 100 Hz as low-pass frequency for the
LFE channel in the receiver's set-up menu.
Level
The adjustment of the LEVEL will depend upon room positioning, Select 0 dB in the LEVEL section of the subwoofer to get
the average level. For an optimum adjustment of this level, we
advise you to carry it out starting from a stereo source (CD).To
adjust the level of the low frequency effect channel (LFE), do not
modify the sound level of the Cabasse subwoofer but go into the
set-up menu of your audio video amplifier 5.1 andadjust the
SUBWOOFER / LFE channel.
MAINTENANCE
The Riga cabinets are covered with a natural wood veneer protected by 4 coats of varnish. This hi-tech veneer does not require any specific care. Use a wet cotton waste for cleaning the
veneer, the painted parts and the granite base.
WARRANTY
We thank you for registering the Cabasse warranty within 60 days
after their date of purchase. You can either send us the
enclosed warranty card fully completed or register on line at
www.cabasse.com. In our web site you will also find information on the Cabasse manufacturer warranty.
WEEE MARK
isposal of Wastes of Electrical & Electronic
D
Equipment (Applicable in the European Union).
This symbol on the product, consisting of the crossed-out wheeled bin, indicates that this product
shall not be treated as household waste. Instead
it shall be handed over to the applicable collection point for the
disposal of electrical and electronic equipment at the end of life.
By ensuring this product is disposed of correctly, you will help
prevent potential negative consequences for the environment and
human health, which could otherwise be caused by inappropriate waste handling of this product. The recycling of materials
will help to preserve natural resources. For more detailed information about recycling of this product, please contact your
local city office, your household waste disposal service or the
shop where you purchased the product.
Thanks to the above information, your system is now nicely set
up and you will enjoy your speaker system for many years. We
receive every day letters from customers expressing the ever
growing satisfaction and musical emotion they have been getting with our speakers over the years. These letters are our first
motivation.
TECHNICAL DATA
SPECIFICATIONS RIGA
Speaker
Number of ways
Driver
Frequency bandwidth
Efficiency
Nominal impedance
Minimum impedance
Power handling
Peak power handling
Riga
finish
dimensions
weight
Riga on wall
finish
dimensions
weight
Riga on base
finish
dimensions
weight
2/7 channels
2
co-axial low-midrange-
midrange/tweeter BC17
95 - 20,000 Hz
90 dB/2.8V/1m
8 ohms
3.4 ohms
150 W
1,000 W
wild cherry/black pearl,
santos/black pearl,
wenge/black pearl
wenge/pearl
123 x 34 x 39 cm
48.4 x 13.4 x 15.4 in
14 kg - 31 lbs
black pearl, pearl, white
22 x 22 x 27 cm
8.7 x 8.7 x 10.6 in
6 kg - 13 lbs
black pearl, pearl
22.4 x 22 x 21 cm
8.8 x 8.7 x 8.3 in
5.5 kg - 12.1 lbs
Because of technical improvements already under way in our constant search for optimum quality, Cabasse reserves the right to modify all the models
presented in specification sheets, advertising materials and manuals without prior notice.
Our web site www.cabasse.com will give you the specific adjustments we recommend for the use of our active subwoofers.
Page 13

e u t s c h
d
Vielen Dank, dass Sie Lautsprecher von Cabasse erworben haben. Damit Sie deren
Klangqualität in vollem Maße und uber lange Zeit genießen können, empfehlen wir Ihnen,
die vorliegende Anleitung vor Inbetriebnahme Ihrer Lautsprecher sorgfältig zu lesen.
SICHERHEITSHINWEISE
Bedeutung der Symbole :
Blitz mit Pfeilspitze
in einem gleichseitigen
Dreieck dient als Warnhinweis
gegen nicht isolierte spannung-
sfuhrende Teile innerhalb des Gerätegehäuses, bei denen die anliegende Spannung so hoch ist, dass
eine Beruhrung der Teile lebensgefährlich sein kann.
Das Ausrufezeichen in einem gleichseitigen Dreieck dient als
Hinweis auf wichtige Bedienungs- und Instandhaltung-
vorgänge
s
Hinweise:
nahme aufmerksam durch.
Alle Sicherheits- Bedien-Hinweise vor der Inbetrieb-
Behalten Sie diese Hinweise im Hinterkopf:
wird in der gesamten Anleitung Bezug genommen.
Der
Auf sie
Beachten Sie insbesondere die Warnungen: Alle Warn-
hinweise auf dem Produkt und in der Anleitung sind zu befolgen.
Beachten Sie die Hinweise: Befolgen Sie die Hinweise zur
Inbetriebnahme und zur Bedienung sorgfältig.
Reinigung: Vor jeder Reinigung ist der Gerätestecker zu ziehen.
Keine Flussig-oder Spruh-Reinigungsmittel verwenden. Am besten
eignet sich ein feuchtes Tuch.
Zubehör: Bitte nur vom Hersteller empfohlene Zubehörteile
verwenden. Ansonsten besteht Unfallgefahr.
Wasser und Feuchtigkeit: Das Gerät darf nicht an feucht-
en Orten wie beispielsweise einem feuchten Keller, in der Nähe einer Badewanne, eines Waschbeckens oder eines Swimmingpools
benutzt werden.
Rollwagen und Standfuße -Die Geräte sollten
nur mit vom Hersteller empfohlenen Rollwagen oder
Standfußen verwendet werden.
> Warnung vor transportablen Rollwagen
Aufstellung: Stellen Sie das Gerät nicht auf instabile Standfuße,
Stative, Tische, Regale oder ähnliche Einrichtungen, von denen es
herabfallen und Verletzungen verursachen könnte
Beluftung: Stellen Sie das Gerät so auf, das seine Luftungsöff-
nungen immer frei bleiben. Nicht auf ein Bett, ein Sofa, eine
Decke o.ä. stellen, weil diese einen ausreichenden Luftstromn
verhindern könnten. Enge Bucherregale und ein geschlossener
Schrank sind keine geeigneten Aufstellungsorte, da dort eine ausreichende Luftzufuhr nicht gewährleistet ist.
Stromversorgung: Das Gerät darf nur an eine Steckdose
angeschlossen werden, deren Spannung der auf dem Gerät aufgedruckten entspricht. Wenn Sie nicht sicher sind, welche Netzspannung ihre Haus-Stromversorgung aufweist, wenden Sie
sich bitte an Ihren Fachhändler oder Ihren Elektrizitätsversorgungsbetrieb.
Schutz der Netzanschlussleitungen: Die Netzanschlus-
sleitungen durfen nicht gequetscht, mit scharfen oder spitzen
Gegenständen belastet oder eingeklemmt werden (z.B. von
anderen, auf der Leitung stehenden Geräten).
Gewitter:A
nicht benutzt werden. Wenn das Gerät längere Zeit nicht benutzt
wird, sollten Netzanschluss-Stecker und Antennenanschluss aus
en jeweiligen Dosen herausgezogen werden, um
d
Blitzschäden oder Beschädigungen durch Überspannungen
orzubeugen.
v
us Sicherheitsgrunden sollte das Gerät bei Gewitter
Elektrische Überlastung: Verlängerungsleitungen oder Steck-
osen nicht uberlasten. Feuer- und Stromschlaggefahr!
d
Fremdkörper und -Flussigkeiten: Darauf achten, dass
keine Fremdkörper oder Flussigkeiten in das Gerät gelangen.
Feuer- oder Stromschlaggefahr!
Wartung und Pflege: Instandhaltungsarbeiten, die uber die
in der Bedienungsanleitung beschriebenen Vorgänge hinausgehen, sind ausschließlich von qualifizierten Fachkräften auszufuhren.
Bei Problemen: In folgenden Fällen muss der Gerätestecker
gezogen und das Gerät von einer qualifizierten Fachkraft gepruft
werden:
■ Beschädigung an Netzkabel oder Netzanschluss.
■ Fremdkörper oder -Flussigkeit im Gerät.
■ Das Gerät wurde mit Flussigkeit bespritzt oder ubergossen.
■ Das Gerät scheint unter normalen Betriebsbedingungen nicht
einwandfrei zu funktionieren. Betätigen Sie nur die in dieser
Anleitung beschriebenen Bedienelemente. Alle sonstigen Eingriffe
können das Gerät beschädigen oder Sie selbst gefährden und
sind deshalb von einer qualifizierten Fachkraft auszufuhren.`
■ Das Gerät ist heruntergefallen oder das Gehäuse wurde
beschädigt.
■ Das Verhalten des Gerätes hat sich erheblich geändert.
Ersatzteile: Wenn bei einer Reparatur Teile ausgewechselt wer-
den mussen, vergewissern Sie sich, dass der Techniker die vom Hersteller empfohlenen Ersatzteile oder solche Teile verwendet, die die
gleichen Eigenschaften aufweisen wie Originalteile. Ansonsten
besteht die Gefahr weiterer Defekte einschließlich Feuer und
Stromschlag.
Überpru fung: Nach jedem technischen Eingriff sollte die
Gerätesicherheit von einer qualifizierten Fachkraft kontrolliert
werden.
Wärmeeinwirkung: Das Gerät muss von Wärmequellen
wie Heizkörpern, Heizelementen, Verstärkern oder sonstigen oder
sonstigen Objekten mit starker Wärmeentwicklung, fern gehalten
werden.
AUSPACKEN DER LAUTSPRECHERBOXEN
Öffnen Sie den Karton auf der Seite mit der Aufschrift und biegen
Sie dann die oberen Klappen zuruck. Nehmen Sie anschließend die
Abdeckung aus dem Karton und befolgen Sie dann die Abbildungen auf Seite 2.
Wir empfehlen Ihnen, die Verpackung für eine spätere Verwendung
aufzubewahren und sie flach zu lagern.
Plastiktüten : Um eine Erstickungsgefahr zu vermeiden
bewahren Siebitte die Verpackung weit entfernt von Kindern auf.
Page 14

e u t s c h
d
Cabasse Riga ist ein Hi-Fi Schallwandlersystem für den allerhöchsten Genuss jeglicher Akustischer Reproduktion welches die aus der Artis Reihe stammende SCS Technologie (Spatially
Coherent System) beinhaltet.
Mit diesem 2 Weg-Lautsprechersystem in Verbindung mit einem unserer Subwoofer z.B.
Santorin 25, Santorin 30i, Santorin 30 ist jede Konfiguration von 2.1 bis 7.1 oder auch
jede individuelle Kombination möglich.
Ihr Artis Händler wird Ihnen die optimale Lösung für Ihren persönlichen Anspruch anbieten
können.
AUFBAU
Die einzelnen Bausteine Ihres Systems :
■ 2, 3, 5, 6 oder 7 Riga
■ 1 aktiver Cabasse Subwoofer oder mehrere
Riga Wandbefestigung
Mit der speziellen Riga Wandbefestigung kann der TC23 Lautsprecher in einer Achsabweichung bis 39° orientiert werden,
und das lautsprecherkabel kann ohne sichtbare Schraube in der
Wand versenkt werden
folgender Reihenfolge vorgegangen werden
. Für eine korrekte Montage muss in
1
.
2
Riga mit Sockel
Die Riga Sockelversion wird mit einer Halterung geliefert mit
deren Hilfe Sie die Riga auf beliebige Flächen stellen können.
Riga
Diese Version ist für eine Bodeninstallierung bestimmt und für
optimale Stabilität auf allen Böden mit Spikes bestückt.
Positionierung des Riga
Um die Riga und den Cabasse Subwoofer zu positionieren,
raten wir Ihnen, sich so präzise wie möglich an das Schema
zu halten. Der Cabasse Subwoofer muss im vorderen Teil der
Hörzone aufgestellt werden. Wenn er an einer Wand positioniert ist, werden die extremen Tieftöne noch verstärkt und die
Schallreflexionen der Frequenzen zwischen 80 und 200 Hz
begrenzt. Für optimale Ergebnisse ist es auf jeden Fall in Abhängigkeit von der Raumakustik nötig, die Positionierung des Systems zu testen.
3
ANSCHLÜSSE
Bei jedem Anschluss muss unbedingt die Phase eingehalten
werden : die roten + Anschlüsse des Verstärkers müssen mit
den roten + Anschlüssen des Riga verbunden werden. Das
Gleiche geschieht mit den schwarzen - Anschlüssen.
Konfiguration 2.1
■ 2 Riga + 1 Cabasse Subwoofer
Mit einem Lautsprecherkabel die Verstärkerausgänge an die
HIGH LEVEL INPUT L (links) und HIGH LEVEL INPUT R
(rechts) Enden des Cabasse Subwoofers anschließen und die
HIGH LEVEL OUTPUT L (links) und HIGH LEVEL OUTPUT R
(rechts) Ausgänge des Cabasse Subwoofers an die Riga
Konfiguration 5.1
■ 5 Riga + 1 Cabasse Subwoofer oder
■ 2 Hauptlautsprecher + 3 Riga + 1 Cabasse
Subwoofer
4
5
6
Wenn Ihr Audio-Video Verstärker den Subwoofer in Stereo
steuert, verbinden Sie jeden Audio-Video Verstärkerausgang
direkt mit dem entsprechenden Lautsprecher. In diesem Fall wird
der Cabasse Subwoofer an einen der der linken L (links) oder
rechten R (rechts) CINCH RCA LINE IN Stecker angeschlossen
.
7
Jetzt müssen Sie das « Set up » Menü Ihres Audio-Video Verstärkers folgendermaßen programmieren :
5 Riga + 1 Cabasse Subwoofer
FRONT SMALL
CENTER SMALL
SURROUND SMALL
SUBWOOFER / LFE YES
2 Hauptlautsprecher + 3 Riga
+ 1 Cabasse Subwoofer
FRONT SMALL ou LARGE*
CENTER SMALL
SURROUND SMALL
SUBWOOFER / LFE YES
*Je nach der Wiedergabekapazität der Tieffrequenzen werden
die Hauptlautsprecher auf SMALL oder LARGE eingestellt.
Manche Audio-Video Verstärker benötigen zusätzliche Informationen wie :
SUBWOOFER ONLY
SUBWOOFER stereo YES
Wenn die Filterfrequenz eingestellt werden kann, muss sie auf
100 Hz geregelt werden.
EINSTELLUNGEN DES CABASSE SUBWOOFERS SANTORIN 30I - SANTORIN 30
Diese zwei Subwoofer sind mit unterschiedlichen CabasseEndstufen ausgestattet. Die Anschlüsse sind identisch, die
Einstellungen unterschiedlich. Für die Einstellungen, die von
der Position der Lautsprecher abhängen (Phase, Verspätung), beziehen Sie sich jeweils auf die Betriebsanleitungen
.
der entsprechenden Modelle.
SUBWOOFER SANTORIN 30i
Die Regler zur Einstellung befinden sich auf der Rückseite des
Santorin 30i.
Page 15

e u t s c h
d
Einstellung der Crossover Frequency
- Bei 2.1 Konfiguration : 100 Hz
- Bei 5.1 Konfiguration und mehr : den Frequenzregler “crossover frequency” des Santorin
30i auf 200 Hz stellen und im Menu des AV-Prozessors den Tiefpassfilter des Subwoofers auf 100 Hz stellen.
Level Lautstärkeeinstellung
Die LEVEL Lautstärke wird nach Bedarf und abhängig vom
Hörraum und der jeweiligen Position der Riga und des Subwoofers eingestellt. Die Einstellung auf eine mittlere Lautstärke wird für Riga mit Hilfe des Lautstärkereglers (Level) folgendermaßen gehandhabt :
Optimisieren Sie dann die Lautstärkeeinstellung,
indem Sie eine Stereoquelle (CD) und Ihnen gut bekannte
Musikstücke anhören.
Zur Einstellung des LFE-Kanals (spezielle Basseffekte) benutzen
Sie bitte das Menu SET UP Ihres Audio-Video Verstärkers und
passen Sie das Ausgangsniveau dieses Kanals an, ohne die
Level Einstellung des Subwoofers zu verändern.
SUBWOOFER SANTORIN 30
Diese Einstellungen werden im Menu des Santorin 30 mit Hilfe des frontalen Kontrolpannels geregelt.
Einstellung der Crossover Frequency
- Bei 2.1 Konfiguration : 80 Hz im Menu “LOWPASS FILTER”
- Bei 5.1 Konfiguration und mehr : geben Sie 200 Hz im Menu
„LOWPASS FILTER“ des Santorin 30 und 100 Hz in der entsprechenden Rubrik des AV-Prozessors ein.
Level Lautstärkeeinstellung
Die LEVEL Lautstärke wird nach Bedarf und abhängig vom
Hörraum und der jeweiligen Position der Riga und des Subwoofers eingestellt. Die Einstellung auf eine mittlere Lautstärke wird für Riga durch Eingeben von 0 dB für den Parameter
„VOLUME“ des Santorin 30 erreicht.
Optimisieren Sie dann die Lautstärkeeinstellung, indem Sie
eine Stereoquelle (CD) und Ihnen gut bekannte Musikstücke
anhören.
Zur Einstellung des LFE-Kanals (spezielle Basseffekte) benutzen
Sie bitte das Menu SET UP Ihres Audio-Video Verstärkers und
passen Sie das Ausgangsniveau dieses Kanals an, ohne die
Level Einstellung des Subwoofers zu verändern.
PFLEGE
Die Gehäuse sind mit hochwertigem Echtholz furniert. Sie sind
dank zweier Lackschichten und mit einer zusätzlichen Schicht
gegen Kratzer geschützt und können mit einem feuchten Tuch
abgerieben werden.
GARANTIE
Bitte senden Sie die Garantiekarten innerhalb von 60 Tagen ab
aufdatum komplett ausgefüllt ein oder lassen Sie diese on
K
line registrieren unter www.cabasse.com
Auf unserer Web-seite finden Sie weitere Möglichkeiten der
Garantieverlängerung.
enn Sie, unsere Ratschläge über den Anschluss und die Auf-
W
stellung befolgen, werden Ihre Lautsprecher jederzeit zufriedenstellend funktionieren und Sie erfreuen. Täglich erhalten
ir Briefe von Kunden, die glücklich und zufrieden über die
w
gleichbleibende Qualität ihrer Lautsprecher sind. Diese Briefe
sind unsere größte Belohnung für unsere Arbeit.
TECHNISCHE SPEZIFIKATIONEN
SPEZIFIKATIONEN RIGA
Satellit
Anzahl der Wege
Dreiweg
Bandbreite
Wirkungsgrad
Nennwiderstand
Mindestwiderstand
Nennleistung
Spitzenleistung
Serienmäßige
Riga
Ausführungen
Abmessungen
(H x B x T)
Gewicht
Riga
mit Wandbefestigung
Ausführungen
Abmessungen
(H x B x T)
Gewicht
Riga
mit Sockel
Ausführungen
Abmessungen
(H x B x T)
Gewicht
2/7 Kanäle
2
Coaxial SCS Hoch/
Mittel-Tiefton BC17
95 Hz - 20 000 Hz
90 dB/2,8V/1m
8 ohm
3,4 ohm
150 W
1 000 W
Kirschbaum/Kugel Perlschwarz
Santos/Kugel Perlschwarz
Wenge/Kugel Perlschwarz
Wenge/Kugel Perlmutt
123 x 34 x 39 cm
14 kg
Perlmutt - Perlschwarz - Weiß
22 x 22 x 27 cm
6 kg
Perlmutt - Perlschwarz
22,4 x 22 x 21 cm
5,5 kg
Für größere Verlässlichkeit und optimale Qualität entwickelt Cabasse seine Apparate permanent weiter und behält sich deshalb das Recht vor, an den
auf technischen Unterlagen oder Werbematerial gezeigten Modellen Änderungen vorzunehmen.
Auf unserer Homepage www.cabasse.com können Sie die spezifischen Einstellungen ersehen, die wir für unsere Subwoofer empfehlen.
Page 16

Cabasse SA - 210, rue René Descartes - BP 10 - 29280 Plouzané
Tel +33 (0)2 98 05 88 88 - Fax +33 (0)2 98 05 88 99
www.cabasse.com - info@cabasse.com
Service Consommateur France :
service-conso@cabasse.com
Crédits photos: GPO - Morlaix - NOT0258.09-06
 Loading...