

Page 1

Type 3232, 3233, 3233 K, 3234, 3235, 3239
Manually operated diaphragm valves, Diameter DN 8 - DN 100
Handbetätigte Membranventile, Nennweiten DN 8 - DN 100
Vannes à membrane, commandé manuelle, Piston section nominale DN 8 - DN 100
Operating Instructions
Bedienungsanleitung
Manuel d‘utilisation
Page 2

We reserve the right to make technical changes without notice.
Technische Änderungen vorbehalten.
Sous réserve de modifications techniques.
© 2011 - 2014 Bürkert Werke GmbH
Operating Instructions 1402/04_EU-ML_00809435 / Original DE
Page 3

Type 3232, 3233, 3233 K, 3234,
3235, 3239
Contents
1 OPERATING INSTRUCTIONS ................................................................4
1.1 Symbols .......................................................................................4
1.2 Definition of the Term “Device”............................................... 4
2 AUTHORIZED USE ......................................................................................5
2.1 Restrictions .................................................................................5
3 BASIC SAFETY INSTRUCTIONS ..........................................................5
4 GENERAL INFORMATION ........................................................................7
4.1 Contact Addresses ...................................................................7
4.2 Warranty ......................................................................................7
4.3 Information on the Internet ......................................................7
5 SYSTEM DESCRIPTION ............................................................................7
5.1 General description ..................................................................7
5.2 Intended application area ........................................................ 7
5.3 Conformity ................................................................................... 7
5.4 Standards .................................................................................... 7
6 TECHNICAL DATA ........................................................................................8
6.1 Description of the type label ...................................................8
6.2 Labeling of the forged body .................................................... 8
6.3 Operating conditions ................................................................ 8
6.4 General technical data ...........................................................11
7 STRUCTURE AND FUNCTION............................................................12
7.1 Structure ....................................................................................12
7.2 Type description ......................................................................12
7.3 Function .....................................................................................13
8 INSTALLATION ............................................................................................ 13
8.1 Safety instructions ...................................................................13
8.2 Before installation ....................................................................14
8.3 Installation .................................................................................16
9 MAINTENANCE, CLEANING ................................................................18
9.1 Safety instructions ...................................................................18
9.2 Maintenance work ...................................................................18
10 REPAIRS.........................................................................................................19
10.1 Safety instructions ...................................................................19
10.2 Replacing the diaphragm ......................................................20
11 SPARE PARTS, ACCESSORIES ........................................................22
11.1 Order table ................................................................................22
11.2 Handwheel locking device option .......................................24
12 PACKAGING, STORAGE, DISPOSAL ..............................................24
english
3
Page 4
Type 3232, 3233, 3233 K, 3234,
3235, 3239
Operating Instructions
1 OPERATING INSTRUCTIONS
The operating instructions describe the entire life cycle of the device.
Keep these instructions in a location which is easily accessible to
every user and make these instructions available to every new owner
of the device.
The operating instructions contain important safety
information!
Failure to observe these instructions may result in hazardous
situations.
▶ The operating instructions must be read and understood.
1.1 Symbols
DANGER!
Warns of an immediate danger!
▶ Failure to observe the warning may result in a fatal or serious
injury.
WARNING!
Warns of a potentially dangerous situation!
▶ Failure to observe the warning may result in serious injuries or
death.
CAUTION!
Warns of a possible danger!
▶ Failure to observe this warning may result in a medium or minor
injury.
NOTE!
Warns of damage to property!
▶ Failure to observe the warning may result in damage to the
device or the equipment.
Indicates important additional information, tips and
recommendations.
Refers to information in these operating instructions or in
other documentation.
→ designates a procedure which you must carry out.
1.2 Definition of the Term “Device”
In these instructions, the term “device” always refers to the Type
3232, 3233, 3233 K, 3234, 3235 and 3239.
4
english
Page 5

Type 3232, 3233, 3233 K, 3234,
3235, 3239
Authorized use
2 AUTHORIZED USE
Non-authorized use of the devices may be dangerous to people,
nearby equipment and the environment.
▶ The diaphragm valves of Types 3232, 3233, 3233 K, 3234, 3235
and 3239 are designed for the control of contaminated, ultra-pure
or sterile media, as well as for abrasive or aggressive media (also
with higher viscosity).
▶ The devices may be used only for media which do not attack
the body and seal materials (see type label). Information on the
resistance of materials to the media is available from your Bürkert
sales office or on the Internet at: www.burkert.com
▶ During use observe the authorized data, the operating condi-
tions and conditions of use specified in the contract documents
and operating instructions. These are described in the chapters
„System description“ and „Technical data“.
▶ The device may be used only in conjunction with third-party devices
and components recommended and authorized by Bürkert.
▶ Correct transportation, correct storage and installation and care-
ful use and maintenance are essential for reliable and faultless
operation.
▶ When closing the valve, tighten it hand-tight only. Overtighten-
ing may prematurely damage the diaphragm.
▶ Use the device only as intended.
2.1 Restrictions
If exporting the system/device, observe any existing restrictions.
3 BASIC SAFETY
INSTRUCTIONS
These safety instructions do not make allowance for any
• Contingencies and events which may arise during the installation,
operation and maintenance of the devices.
• Local safety regulations – the operator is responsible for observing
these regulations, also with reference to the installation personnel.
The diaphragm valves Types 3232, 3233, 3233 K, 3234, 3235
and 3239 were developed with due consideration given to the
accepted safety rules and are state-of-the-art. Nevertheless,
dangerous situations may occur.
english
5
Page 6
DANGER!
Type 3232, 3233, 3233 K, 3234,
3235, 3239
Authorized use
Danger – high pressure!
▶ Before loosening the lines and valves, turn off the pressure and
vent the lines.
Risk of electric shock!
▶ Before reaching into the device or the equipment, switch off the
power supply and secure to prevent reactivation!
▶ Observe applicable accident prevention and safety regulations
for electrical equipment!
WARNING!
Danger of bursting from overpressure!
▶ Observe the specifications on the type label for max. control
and medium pressure.
▶ Observe permitted medium temperature.
CAUTION!
Risk of burns/risk of fire if used continuously through hot
device surface!
▶ Keep the device away from highly flammable substances and
media and do not touch with bare hands.
General hazardous situations.
To prevent injury, ensure that:
• The system cannot be activated unintentionally.
• Do not put any loads on the body (e.g. by placing objects on it
or standing on it).
• Do not make any external modifications to the device body. Do not
paint the body parts or screws.
• Installation and repair work may be carried out by authorized
technicians only and with the appropriate tools.
• After an interruption in the power supply or pneumatic supply,
ensure that the process is restarted in a defined or controlled
manner.
• The device may be operated only when in perfect condition and
in consideration of the operating instructions.
• The general rules of technology apply to application planning and
operation of the device.
6
english
Page 7
Type 3232, 3233, 3233 K, 3234,
3235, 3239
General information
4 GENERAL INFORMATION
4.1 Contact Addresses
Germany
Bürkert Fluid Control Systems
Sales Center
Christian-Bürkert-Str. 13-17
D-74653 Ingelfingen
Tel. + 49 (0) 7940 - 10 91 111
Fax + 49 (0) 7940 - 10 91 448
E-mail: info@de.buerkert.com
International
Contact addresses can be found on the final pages of the printed
operating instructions.
And also on the Internet at: www.burkert.com
4.2 Warranty
The warranty is only valid if the device is used as intended in accordance
with the specified application conditions.
4.3 Information on the Internet
The operating instructions and data sheets for Types 3232, 3233,
3233 K, 3234, 3235, 3239 can be found on the Internet at:
www.burkert.com
5 SYSTEM DESCRIPTION
5.1 General description
Type 3232, 3233, 3233 K, 3234, 3235 and 3239 is a manually controlled diaphragm valve with diaphragm seal. The valve is self-draining
in appropriate installation position.
5.2 Intended application area
The diaphragm valve of Type 3232 is designed for the control of contaminated and aggressive media. The valves of Type 3233, 3233 K,
3234, 3235 and 3239 can be used even for ultra-pure or sterile media
with a higher viscosity.
The valves may only control media which do not attack the body and
seal materials (see type label). Information on the resistance of materials
to the media is available from your Bürkert sales office.
5.3 Conformity
Type 3232, 3233, 3233 K, 3234, 3235, 3239 conforms with the EC
Directives according to the EC Declaration of Conformity.
5.4 Standards
The applied standards, which verify conformity with the EC Directives, can be found on the EC-Type Examination Certificate and / or
the EC Declaration of Conformity.
english
7
Page 8

3233 25,0 EPDM VS
Made in Germany
00442376
W36LP
TG44 Pmed
10bar
Type 3232, 3233, 3233 K, 3234,
3235, 3239
Technical data
6 TECHNICAL DATA
6.1 Description of the type label
Body material
Seal material
(Diaphragm size)
Identification number of the
Production date
(encoded)
Line connector,
Max. medium pressure
Fig. 1: Location and description of the type label
Orifice
Type
device
6.2 Labeling of the forged body
Batch number/
manufacturer sign
Production number/
Company logo
Material
Pressure stage
Connection orifice
and pipe dimensions
order number
(F-part)
Serial number
Surface quality
code
Customer-specific
text (optional)
Fig. 2: Labeling of the forged body
6.3 Operating conditions
WARNING!
Danger of bursting from overpressure!
If the device ruptures, the medium may cause injuries, chemical
burns or scalds!
▶ Do not exceed the maximum medium pressure. Observe specifi-
cations on the type label!
▶ Observe permitted ambient and media temperature.
8
english
Page 9
DN 15 - 65
10
20 40 60
100 120
140
Type 3232, 3233, 3233 K, 3234,
3235, 3239
Technical data
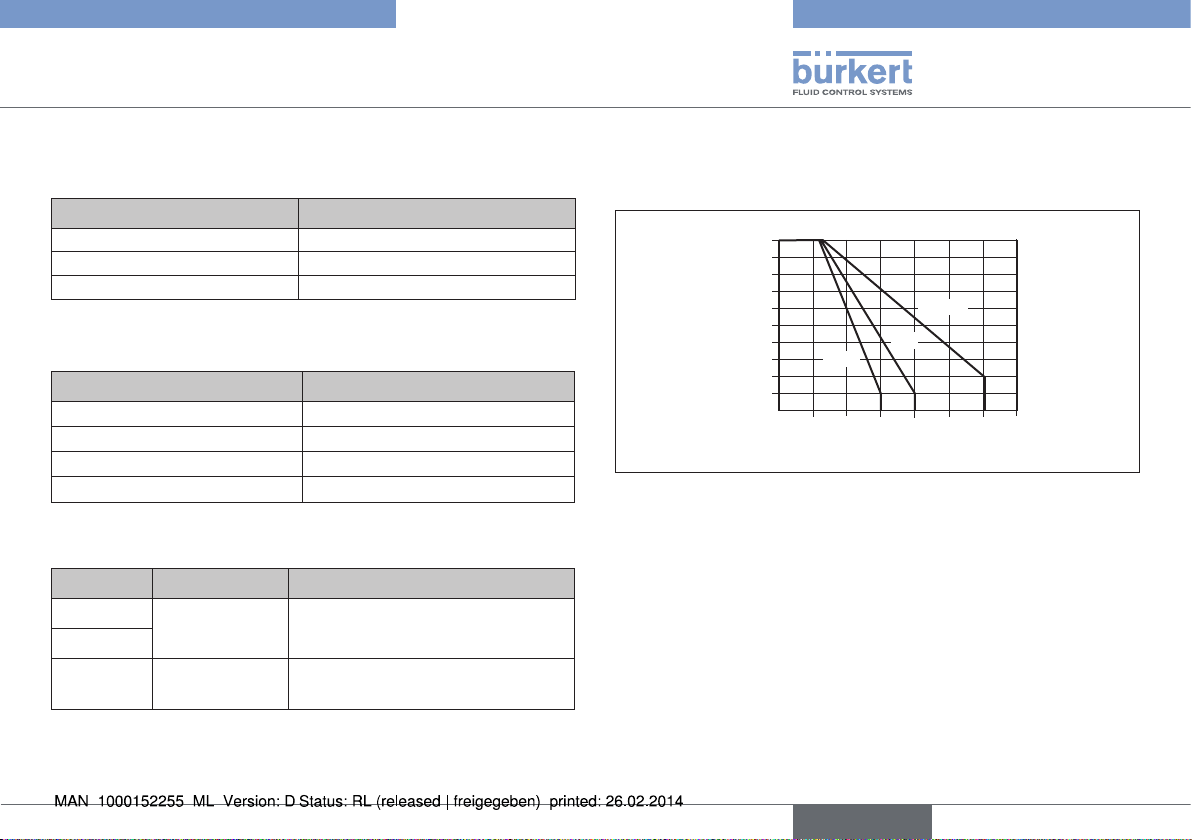
6.3.1 Allowable temperatures
Ambient temperature for actuators:
Material Temperature
PPS Up to 130 °C (briefly up to 150 °C)
Stainless steel Up to 130 °C (briefly up to 150 °C)
Gray cast iron Up to 130 °C (briefly up to 150 °C)
Tab. 1: Ambient temperature for actuators
Medium temperature for body:
Body material Temperature
Stainless steel -10 ... +140 °C
PVC (see PT-Graph) -10 ... +60 °C
PVDF (see PT-Graph) -10 ... +120 °C
PP (see PT-Graph) -10 ... +80 °C
Tab. 2: Medium temperature for body
Medium temperature for diaphragms:
Material Temperature Remarks
EPDM
PTFE
FKM
Tab. 3: Medium temperature for diaphragms
-10 ... +130 °C Steam sterilization up to +150 °C
-5 ... +130 °C
Dry up to +150 °C, otherwise only
briefly up to +150 °C
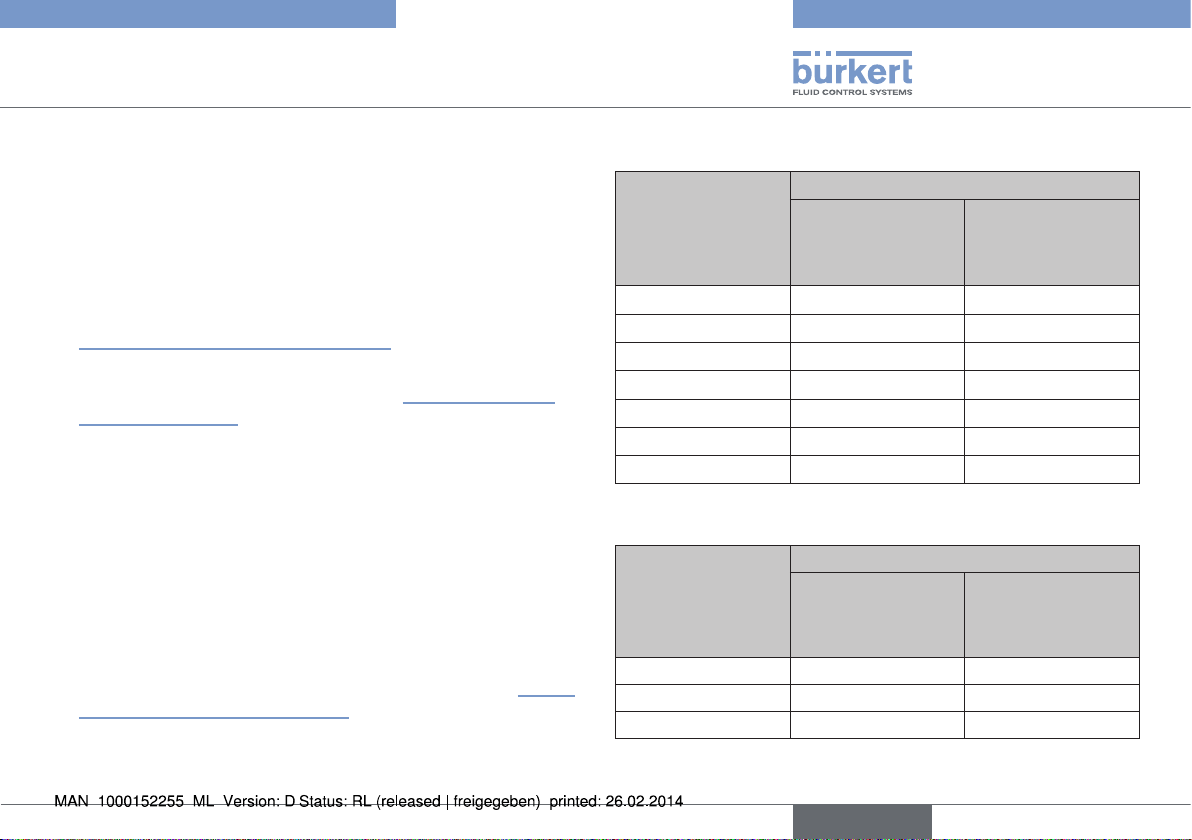
6.3.2 Maximum permitted medium pressure
Permitted medium pressure depending on the medium temperature:
8
6
4
PVC
2
Medium pressure [bar]
Temperature [°C]
Fig. 3: Graph of medium pressure / Medium temperature
PVDF
PP
80
english
9
Page 10
Type 3232, 3233, 3233 K, 3234,
3235, 3239
Technical data
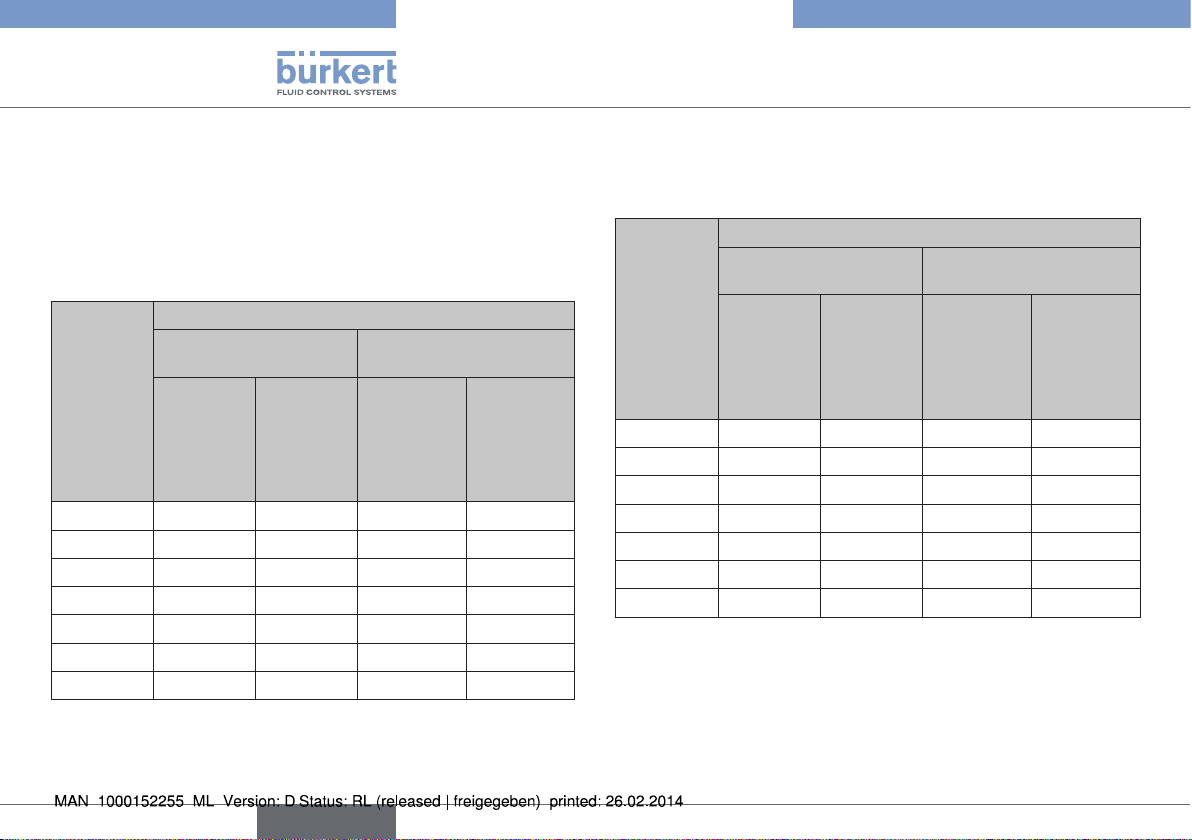
Maximum permitted medium pressure
The values apply to body made of:
• Plastic,
• VA forged steel and VA precision casting, VA block material as well
as VA tube-formed body with socket, DIN welding neck flange and
welded connection in accordance with EN ISO 1127 (ISO 4200)
Orifice
(Diaphragm
size)
DN [mm]
4/6/8/10 10 10 10 10
15 10 10 10 10
20 10 10 10 10
25 10 10 10 10
32 10 10 10 10
40 10 10 10 10
50 7 7 10 10
Max. switchable medium pressure [bar]
Handwheel and
attachment PPS
EPDM/FKM PTFE/
advanced
PTFE/
laminated
advanced
PTFE
Attachment stainless steel
EPDM/FKM PTFE/
Handwheel PPS /
advanced
PTFE/
laminated
advanced
PTFE
Tab. 4: Maximum permitted medium pressure
Maximum permitted medium pressure
The values are valid for body made of:
• VA pipe reshape body with welded support (DIN 11850 series 2)
Orifice
(Diaphragm
size)
DN [mm]
4/6/8/10 10 10 10 10
15 10 10 10 10
20 10 10 10 10
25 10 10 10 10
32 10 10 10 10
40 10 10 10 10
50 10 10 10 10
Max. switchable medium pressure [bar]
Handwheel and
attachment PPS
EPDM/FKM PTFE/
advanced
PTFE/
laminated
advanced
PTFE
Attachment stainless steel
EPDM/FKM PTFE/
Handwheel PPS /
advanced
PTFE/
laminated
advanced
PTFE
Tab. 5: Maximum permitted medium pressure
10
english
Page 11
Type 3232, 3233, 3233 K, 3234,
3235, 3239
Technical data
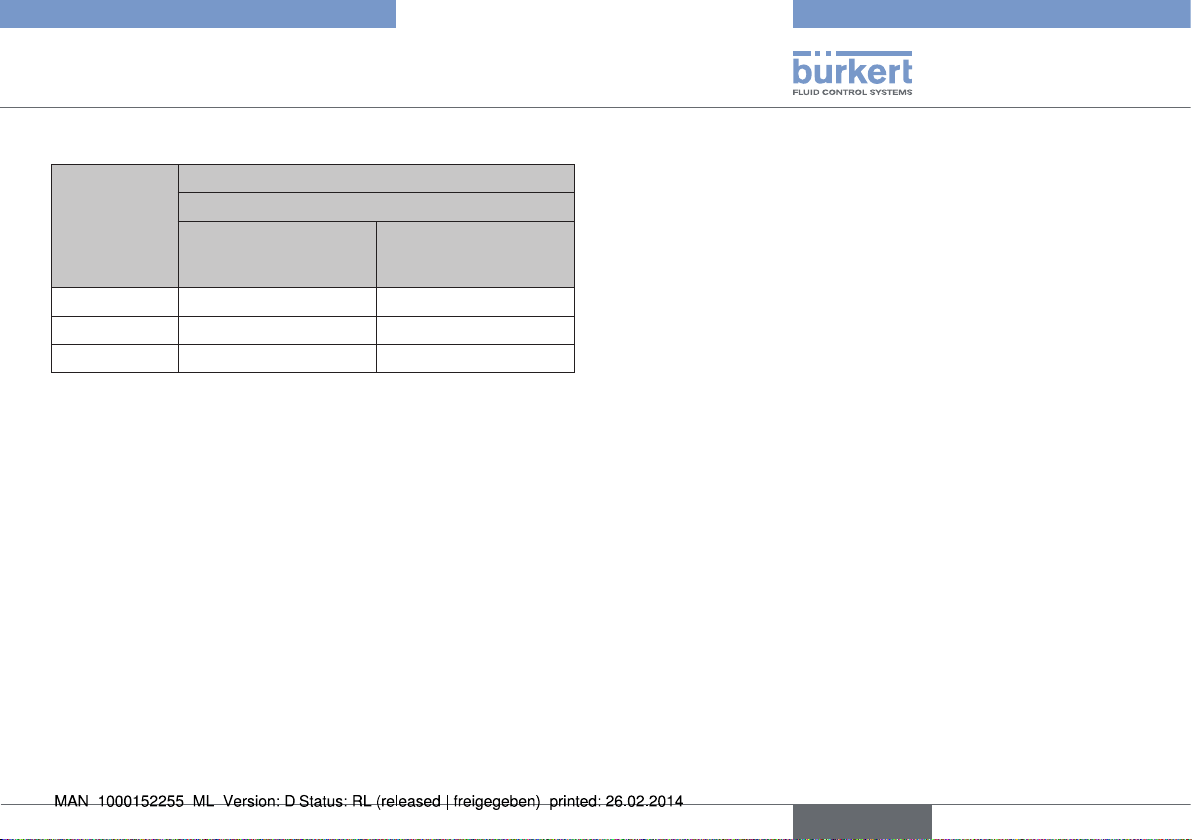
Maximum permitted medium pressure
Orifice
(Diaphragm
size)
DN [mm]
65 5 5
80 5 5
100 5 5
Max. switchable medium pressure [bar]
Handwheel and attachment stainless steel
EPDM / FKM PTFE/advanced PTFE/
Tab. 6: Maximum permitted medium pressure
laminated advanced
PTFE
6.4 General technical data
Materials
Body Pipe reshape body (VA), Precision casting
(VG), Forged steel (VS), PP, PVC, PVDF
Actuator Handwheel and attachment PPS
Handwheel PPS and attachment stainless
steel
Handwheel and attachment stainless steel
DN 65 to DN 100
Diaphragm EPDM, PTFE, FKM
Connections
Medium connection Welded connection according to DIN EN
1127 (ISO 4200), DIN 11850 series 2
other connections on request
Media
Flow media Type 3232; contaminated, aggressive,
ultrapure, sterile media and media with higher
viscosity
Installation position
In any position, floor drain valve type 3235;
actuator face down
english
11
Page 12

Type 3232, 3233, 3233 K, 3234,
3235, 3239
Structure and Function
7 STRUCTURE AND FUNCTION
7.1 Structure
The manually actuated diaphragm valve consists of a manual actuator
and a 2/2-way valve body.
7.2 Type description
The types differ in the body.
7.2.1 Type 3232, 3233 and 3233 K
Handwheel with position
indicator (see chapter 7.3.1)
Attachment
Diaphragm body
P
ort connection
7.2.2 Types 3234, 3235 and 3239
Type Body Structure
T-Valve
Type 3234
Tank bottom
valve
Type 3235
Y-Valve
Type 3239
T-Valve body
Tank bottom
valve with
welding flange
Y-Valve body
Fig. 4: Example of the 2/2-way valve type 3232, 3233
and 3233 K
12
english
Tab. 7: Structure. Types 3234, 3235 and 3239
Page 13
Type 3232, 3233, 3233 K, 3234,
3235, 3239
Installation
7.3 Function
The manual actuation of the handwheel transfers the force via a spindle
and opens and closes the valve.
7.3.1 Position indicator
Actuator size DN 4, DN 6, DN 8, DN 10, DN 65, DN 80 and DN 100
When the valve is opened, a yellow mark is visible between the
attachment and the handwheel.
Actuator size DN 15 to DN 50
From DN 15 a yellow cylinder provides information on the valve
position:
• Yellow cylinder completely retracted in the handwheel:
Valve closed (CLOSED position)
• Yellow cylinder projects all the way out of the handwheel:
Valve opened (OPEN position)
8 INSTALLATION
8.1 Safety instructions
DANGER!
Risk of injury from high pressure in the equipment!
▶ Before loosening the lines and valves, turn off the pressure and
vent the lines.
Risk of injury due to electrical shock!
▶ Before reaching into the device or the equipment, switch off the
power supply and secure to prevent reactivation!
▶ Observe applicable accident prevention and safety regulations
for electrical equipment!
WARNING!
Risk of injury from improper installation!
▶ Installation may be carried out by authorized technicians only
and with the appropriate tools!
Risk of injury from unintentional activation of the system and
an uncontrolled restart!
▶ Secure system from unintentional activation.
▶ Following assembly, ensure a controlled restart.
english
13
Page 14

8.2 Before installation
• Before connecting the valve, ensure the pipelines are flush.
• The flow direction is optional.
8.2.1 Installation position general
Installation for self-drainage of the body
It is the responsibility of the installer and operator to ensure
self-drainage.
Installation for leakage detection
One of the bores (in the actuator base) for monitoring
leakage must be at the lowest point.
8.2.2 Installation position 2/2-way valve
• The manually actuated diaphragm valve can be installed in any
position.
To ensure self-drainage:
→ Install body inclined by angle α = 10° to 40° to the horizontal
(see Fig. 5). Forged and cast body feature a mark which must
face upwards (12 o’clock position, see Fig. 6).
→ Observe an inclination angle of 1° – 5°.
→ One of the bores (in the actuator base) for monitoring leakage
must be at the lowest point.
Type 3232, 3233, 3233 K, 3234,
3235, 3239
Installation
Angle α: 10° to 40°
α
Inclination to the line axis 1° – 5°
Fig. 5: Installation position for self-drainage of the body
Mark for self-drainage
angle
Fig. 6: Mark for the correct installation position
14
english
Page 15

Type 3232, 3233, 3233 K, 3234,
3235, 3239
Installation
8.2.3 Installation position T-valve Type 3234
For the installation of the T-valves into circular pipelines, we recommend
the following installation positions:
When media is supplied: When media is removed:
Fig. 7: Installation position type 3234
8.2.4 Installation position Y-valve Type 3239
For the installation of the Y-valves into systems, we recommend the
following installation positions:
When media is supplied: When media is removed:
8.2.5 Installation of the tank bottom valve
Type 3235
For further information on containers and welding instructions,
please refer to the standard ASME VIII Division I.
It is recommended to weld the valve prior to the container
installation. However, it is possible to weld the valves to readyassembled containers.
Prior to welding, please check to ensure that:
• The tank bottom valve does not collide with other equipment compo-
nents and assembly/disassembly of the actuator is always possible.
• A minimal distance between two welding joints three times the
thickness of the container wall is adhered to.
It is recommended to weld the valve in the center of the drain
to ensure optimum draining of the container.
The diameter of the hole in the container and the flange must be equal.
The valve has two welding edges to make welding and positioning
of the valve easier. The length of the welding edges is approximately
3 mm. In case the thickness of the container wall exceeds 3 mm, the
valve must be positioned as shown in Fig. 9.
→ Prior to welding the valve, grind the outlet wall.
Fig. 8: Installation position type 3239
english
15
Page 16

Grinding point
on tank
Fig. 9: Grinding point on tank
Prior to commencing the welding process, check the charge
number indicated on the supplied manufacturer‘s certificate
3.1.B.
Type 3232, 3233, 3233 K, 3234,
3235, 3239
Installation
8.2.6 Preparatory work
→ Clean pipelines (sealing material, swarf, etc.).
→ Support and align pipelines.
Devices with welded or glued body:
Before welding or gluing the body, the actuator and the
diaphragm must be removed.
8.3 Installation
Procedure:
→ Position the flange into the hole so that the flange surface is
tangent to the drain surface.
→ Tack 4 welding points and check the position of the valve.
→ Weld the valve evenly to the inside and outside of the container,
with gas being supplied and using welding material compatible
with the valve‘s stainless steel 316 L (DIN 1.4435).
→ Allow the welds to cool down before burnishing and cleaning
them according to the applicable specifications.
These instructions assist in the installation of the tank bottom valves and
allow the prevention of deformation and softening within the containers.
Please observe the applicable laws and regulations of the
respective country with regard to the qualification of welders
and the execution of welding work.
16
english
WARNING!
Risk of injury from improper installation!
Non-observance of the tightening torque is dangerous as the
device may be damaged.
▶ Observe tightening torque during installation (see „8.3.2 Tight-
ening torques for diaphragms“).
8.3.1 Devices with welded or glued body
NOTE!
To prevent damage!
Before welding or gluing the body, the actuator and the diaphragm
must be removed.
Page 17

Type 3232, 3233, 3233 K, 3234,
3235, 3239
Installation
Procedure:
→ Cross-loosen fastening screws and remove actuator with dia-
phragm from the body.
→ Weld or glue body in the pipeline.
→ After welding or gluing in the body, smooth the body surface (if
required) by grinding.
→ Clean the body carefully.
→ Place actuator on the body.
→ Lightly cross-tighten the fastening screws until the diaphragm is
between the body and actuator.
Do not tighten screws yet.
→ Activate the diaphragm valve twice to position the diaphragm
correctly.
→ Tighten the fastening screws up to the permitted tightening
torque (see tables in chapter „8.3.2 Tightening torques for
diaphragms“).
8.3.2 Tightening torques for diaphragms
Actuator PPS or stainless steel
Orifice
(Diaphragm size)
DN [mm]
8 2 2,5
15 3,5 4
20 4 4,5
25 5 6
32 6 8
40 8 10
50 12 15
Tab. 8: Tightening torques for diaphragms. Actuator PPS or
stainless steel
Orifice
(Diaphragm size)
DN [mm]
65 20 30
80 30 40
100 40 50
Tab. 9: Tightening torques for diaphragms. Actuator stainless steel
Diaphragm
EPDM / FKM
Actuator stainless steel
Diaphragm
EPDM / FKM
Diaphragm
PTFE/advanced
PTFE/laminated
advanced PTFE
Diaphragm
PTFE/advanced
PTFE/laminated
advanced PTFE
english
17
Page 18
Type 3232, 3233, 3233 K, 3234,
3235, 3239
Maintenance, Cleaning
9 MAINTENANCE, CLEANING
9.1 Safety instructions
DANGER!
Risk of injury due to electrical shock!
▶ Before reaching into the system , switch off the power supply
and secure to prevent reactivation!
▶ Observe applicable accident prevention and safety regulations
for electrical equipment!
WARNING!
Risk of injury from improper maintenance!
▶ Installation may be carried out by authorized technicians only
and with the appropriate tools!
Risk of injury from unintentional activation of the system and
an uncontrolled restart!
▶ Secure system from unintentional activation.
▶ Following maintenance, ensure a controlled restart.
9.2 Maintenance work
9.2.1 Actuator
The actuator of the diaphragm valve is maintenance-free provided it
is used according to these operating instructions.
9.2.2 Wearing parts of the diaphragm valve
Parts which are subject to natural wear:
• Seals
• Diaphragm
→ If leaks occur, replace the particular wearing parts with an appro-
priate spare part (see Chapter 11).
A bulging PTFE diaphragm may reduce the flow-rate.
9.2.3 Service life of the diaphragm
The service life of the diaphragm depends on the following factors:
• Diaphragm material,
• Medium,
• Medium pressure,
• Medium temperature.
18
english
Page 19

Type 3232, 3233, 3233 K, 3234,
3235, 3239
Repairs
9.2.4 Cleaning
Commercially available cleaning agents can be used to clean the
outside.
NOTE!
Avoid causing damage with cleaning agents.
▶ Before cleaning, check that the cleaning agents are compatible
with the body materials and seals.
10 REPAIRS
10.1 Safety instructions
DANGER!
Risk of injury from high pressure in the equipment!
▶ Before loosening the lines and valves, turn off the pressure and
vent the lines.
Risk of injury due to electrical shock!
▶ Before reaching into the system , switch off the power supply
and secure to prevent reactivation!
▶ Observe applicable accident prevention and safety regulations
for electrical equipment!
WARNING!
Risk of injury from improper maintenance!
▶ Installation may be carried out by authorized technicians only
and with the appropriate tools.
▶ Observe the tightening torques.
▶ On completion of the work check valve for leaks and function.
Risk of injury from unintentional activation of the system and
an uncontrolled restart!
▶ Secure system from unintentional activation.
▶ Following maintenance, ensure a controlled restart.
english
19
Page 20

Type 3232, 3233, 3233 K, 3234,
3235, 3239
Repairs
10.2 Replacing the diaphragm
DANGER!
Risk of injury from discharge of medium (acid, alkali, hot media)!
It is dangerous to remove the device under pressure due to the
sudden release of pressure or discharge of medium.
▶ Before removing a device, switch off the pressure and vent the lines.
▶ Completely drain the lines.
Fastening types
Orifice
(Diaphragm size)
DN [mm]
8 Diaphragm buttoned
20
25
40
50
65
80
100
Tab. 10: Fastening types for diaphragm
Fastening types for diaphragm
PTFE EPDM / FKM
Diaphragm with
bayonet catch
Diaphragm with
bayonet catch
Diaphragm with
bayonet catch
Diaphragm buttoned15
Diaphragm screwed in
Diaphragm screwed in
Body
Fig. 10: Replacing the diaphragm
Manual actuator
4 fastening screws
Diaphragm
4 fastenings
screws
Mark tab for direction
of flow
20
english
Page 21
Type 3232, 3233, 3233 K, 3234,
3235, 3239
Repairs
Replacement of the diaphragm
Procedure:
→ Clamp valve body in a holding device (applies only to valves not
yet installed).
→ Cross-loosen fastening screws and remove actuator with dia-
phragm from the body.
→ Detach or unscrew old diaphragm. If attachment is with a
bayonet catch, loosen the diaphragm by turning it 90° (see table
„Tab. 10: Fastening types for diaphragm“).
→ Turn handwheel all the way clockwise (CLOSED position).
→ Install new diaphragm in the actuator (see „Tab. 10: Fastening
types for diaphragm“).
→ Turn handwheel all the way counter-clockwise (OPEN position).
→ Align diaphragm.
Note marker for direction of flow!
→ Place actuator back on the body.
→ Lightly cross-tighten the fastening screws until the diaphragm is
between the body and actuator.
Do not tighten screws yet.
→ Activate the diaphragm valve once to position the diaphragm
correctly.
→ Tighten the fastening screws with the valve in the open position up
to the permitted tightening torque (see tables in chapter „10.2.1
Tightening torques for diaphragms“).
→ Check the tightening torque of the screws again.
10.2.1 Tightening torques for diaphragms
Actuator PPS or Stainless steel
Orifice
(Diaphragm size)
DN [mm]
8 2 2,5
15 3,5 4
20 4 4,5
25 5 6
32 6 8
40 8 10
50 12 15
Tab. 11: Tightening torques for diaphragms, actuator PPS or
stainless steel
Orifice
(Diaphragm size)
DN [mm]
65 20 30
80 30 40
100 40 50
Tab. 12: Tightening torques for diaphragms, actuator stainless steel
Diaphragm
EPDM / FKM
Actuator stainless steel
Diaphragm
EPDM / FKM
Diaphragm
PTFE/advanced
PTFE/laminated
advanced PTFE
Diaphragm
PTFE/advanced
PTFE/laminated
advanced PTFE
english
21
Page 22

Type 3232, 3233, 3233 K, 3234,
3235, 3239
Spare parts, Accessories
11 SPARE PARTS, ACCESSORIES
CAUTION!
Risk of injury and/or damage by the use of incorrect parts!
Incorrect accessories and unsuitable spare parts may cause injuries
and damage the device and the surrounding area.
▶ Use only original accessories and original spare parts from
Bürkert.
The following spare parts are available for the manually actuated
diaphragm valves type 3232, 3233, 3233 K, 3234, 3235 and 3239:
• Manual actuator complete,
• Diaphragm.
Manual actuator
Diaphragm
11.1 Order table
11.1.1 Order tables for manual actuators
(types 3232, 3233 and 3233 K)
Handwheel and
attachment PPS
Connection
size
DN [mm]
4, 6, 8, 10 194 809 194 809 194 808 194 808
15, 20* 432 977 432 978 432 979 432 980
20, 25* 432 984 432 985 432 986 432 987
25, 32* 432 991 432 992 432 993 432 994
32, 40* 432 998 432 999 433 000 433 001
40, 50* 433 005 433 006 433 007 433 008
50 433 012 433 013 433 014 433 015
Diaphragm
EPDM, FKM
Diaphragm
PTFE/
advanced
PTFE/
laminated
advanced
PTFE
Tab. 13: Order table for manual actuator
* Valves type 3233 K with welded support according to DIN 11850 S2, with
OD weld-on ends, with ANSI and JIS welding neck flange
Handwheel PPS,
attachment stainless steel
Diaphragm
EPDM, FKM
Diaphragm
PTFE/
advanced
PTFE/
laminated
advanced
PTFE
Fig. 11: Spare parts
22
Manual actuators for orifice DN 65, DN 80 and DN 100 on
request.
english
Page 23

Type 3232, 3233, 3233 K, 3234,
3235, 3239
Contents
Handwheel and
attachment stainless
Connection
size
DN [mm]
4, 6, 8, 10 194 810 194 810 441 264 441 264
15, 20* 427 753 432 981 441 265 441 270
20, 25* 427 754 432 988 441 266 449 128
25, 32* 427 755 432 995 441 267 441 271
32, 40* 427 756 433 002 - 40, 50* 427 757 433 009 441 268 441 276
50 427 758 433 016 441 269 441 277
Diaphragm
EPDM, FKM
steel
Diaphragm
PTFE/
advanced
PTFE/
laminated
advanced
PTFE
Handwheel and
attachment stainless
steel (for T or tank bottom
Diaphragm
EPDM, FKM
valve)
Diaphragm
PTFE/
advanced
PTFE/
laminated
advanced
PTFE
Tab. 14: Order table for manual actuators
* Valves type 3233 K with welded support according to DIN 11850 S2, with
OD weld-on ends, with ANSI and JIS welding neck flange
11.1.2 Order table for diaphragms
Orifice
(Diaphragm
size)
DN [mm]
4, 6, 8, 10
15, 20*
20, 25*
25, 32‘
32, 40*
40, 50*
50
65
80
100
EPDM
(AB)
677 663 688 421 677 684 677 674 679 540 677 694
677 664 688 422 677 685 677 675 679 541 677 695
677 665 688 423 677 686 677 676 679 542 677 696
677 667 688 424 677 687 677 677 679 543 677 697
677 668 688 425 677 688 677 678 679 544
677 669 688 426 677 689 677 679 679 545 677 698
677 670 688 427 677 690 677 680 679 546 677 699
677 671 688 428 677 691 677 681 679 743
650 082 688 429 650 083 650 087 679 744
650 084 688 430 650 085 650 088 679 745
Tab. 15: Order table for diaphragms
* Valves type 3233 K with welded support according to DIN 11850 S2, with
OD weld-on ends, with ANSI and JIS welding neck flange
Further information on spare parts can be found on the data
sheets for the piston-controlled diaphragm valves type 3232,
3233, 3233 K, 3234 and 3235. The data sheets can be found
on the Internet at: www.burkert.com
Order numbers for diaphragms
EPDM
(AD)
FKM
(FF)
PTFE
(EA)
Advanced
PTFE
Laminated
advanced
PTFE
english
23
Page 24

Type 3232, 3233, 3233 K, 3234,
3235, 3239
Packaging, Storage, Disposal
11.2 Handwheel locking device option
The handwheel locking device option (from actuator size DN 15 to
DN 50) prevents unintentional or unauthorized operation of the valve.
Handwheel can be locked in 12 detent positions per revolution (30°
each).
Lock
→ Using a key, press the pin
Pin
into the lock and turn all the
way to the left.
→ Remove key.
Valve is locked.
Fig. 12: Handwheel with lock
12 PACKAGING, STORAGE,
DISPOSAL
NOTE!
Transport damages!
Inadequately protected equipment may be damaged during
transport.
• During transportation protect the device against wet and dirt in
shock-resistant packaging.
• Avoid exceeding or dropping below the allowable storage
temperature.
Incorrect storage may damage the device.
• Store the device in a dry and dust-free location!
• Storage temperature: -40 … +55 °C.
Damage to the environment caused by device components contaminated with media.
• Dispose of the device and packaging in an environmentally friendly
manner.
• Observe applicable regulations on disposal and the environment.
Note:
Observe national waste disposal regulations.
24
english
Page 25

Typ 3232, 3233, 3233 K, 3234,
3235, 3239
Inhaltsverzeichnis
1 DIE BEDIENUNGSANLEITUNG .........................................................26
1.1 Darstellungsmittel ....................................................................26
1.2 Begriffsdefinition Gerät ..........................................................26
2 BESTIMMUNGSGEMÄSSE VERWENDUNG................................27
2.1 Beschränkungen ......................................................................27
3 GRUNDLEGENDE SICHERHEITSHINWEISE .............................. 27
4 ALLGEMEINE HINWEISE ....................................................................... 29
4.1 Kontaktadressen ......................................................................29
4.2 Gewährleistung ........................................................................29
4.3 Informationen im Internet .......................................................29
5 SYSTEMBESCHREIBUNG .................................................................... 29
5.1 Allgemeine Beschreibung .....................................................29
5.2 Vorgesehener Einsatzbereich ...............................................29
5.3 Konformität ................................................................................29
5.4 Normen ......................................................................................29
6 TECHNISCHE DATEN ............................................................................. 30
6.1 Beschriftung des Typschilds .................................................30
6.2 Beschriftung der Schmiedegehäuse ..................................30
6.3 Betriebsbedingungen .............................................................30
6.4 Allgemeine Technische Daten ..............................................33
7 AUFBAU UND FUNKTION .................................................................... 34
7.1 Aufbau ........................................................................................34
7.2 Typenbeschreibung .................................................................34
7.3 Funktion .....................................................................................35
8 MONTAGE .....................................................................................................35
8.1 Sicherheitshinweise ................................................................35
8.2 Vor dem Einbau........................................................................36
8.3 Einbau ........................................................................................38
9 WARTUNG, REINIGUNG ........................................................................ 40
9.1 Sicherheitshinweise ................................................................40
9.2 Wartungsarbeiten ....................................................................40
10 INSTANDHALTUNG ..................................................................................41
10.1 Sicherheitshinweise ................................................................41
10.2 Austausch der Membran .......................................................42
11 ERSATZTEILE, ZUBEHÖR ....................................................................44
11.1 Bestelltabellen ..........................................................................44
11.2 Option Sicherung Handrad ...................................................46
12 TRANSPORT, LAGERUNG, VERPACKUNG ..................................46
deutsch
25
Page 26

Typ 3232, 3233, 3233 K, 3234,
3235, 3239
Die Bedienungsanleitung
1 DIE BEDIENUNGSANLEITUNG
Die Bedienungsanleitung beschreibt den gesamten Lebenszyklus
des Geräts. Bewahren Sie diese Anleitung so auf, dass sie für jeden
Benutzer gut zugänglich ist und jedem neuen Eigentümer des Geräts
wieder zur Verfügung steht.
Die Bedienungsanleitung enthält wichtige Informationen zur
Sicherheit!
Das Nichtbeachten dieser Hinweise kann zu gefährlichen Situationen
führen.
▶ Die Bedienungsanleitung muss gelesen und verstanden werden.
1.1 Darstellungsmittel
GEFAHR!
Warnt vor einer unmittelbaren Gefahr!
▶ Bei Nichtbeachtung sind Tod oder schwere Verletzungen die
Folge.
WARNUNG!
Warnt vor einer möglicherweise gefährlichen Situation!
▶ Bei Nichtbeachtung drohen schwere Verletzungen oder Tod.
VORSICHT!
Warnt vor einer möglichen Gefährdung!
▶ Nichtbeachtung kann mittelschwere oder leichte Verletzungen
zur Folge haben.
HINWEIS!
Warnt vor Sachschäden!
▶ Bei Nichtbeachtung kann das Gerät oder die Anlage beschädigt
werden.
Bezeichnet wichtige Zusatzinformationen, Tipps und
Empfehlungen.
Verweist auf Informationen in dieser Bedienungsanleitung
oder in anderen Dokumentationen.
→ markiert einen Arbeitsschritt, den Sie ausführen müssen.
1.2 Begriffsdefinition Gerät
Der in dieser Anleitung verwendeten Begriff „Gerät“ steht immer für
das handbetätigte Membranventil Typ 3232, 3233, 3233 K, 3234,
3235 und 3239.
26
deutsch
Page 27

Typ 3232, 3233, 3233 K, 3234,
3235, 3239
Bestimmungsgemäße Verwendung
2 BESTIMMUNGSGEMÄSSE
VERWENDUNG
Bei nicht bestimmungsgemäßem Einsatz des handbetätigten
Membranventils können Gefahren für Personen, Anlagen in der
Umgebung und die Umwelt entstehen.
▶ Die Membranventile des Typs 3232, 3233, 3233 K, 3234, 3235
und 3239 sind für die Steuerung von verschmutzten, hochreinen
oder sterilen Medien, sowie für abrasive oder aggressive Medien
(auch mit höherer Viskosität) konzipiert.
▶ Die Geräte dürfen nur für Medien eingesetzt werden, welche die
Gehäuse und Dichtwerkstoffe (siehe Typschild) nicht angreifen.
Informationen zur Medienbeständigkeit der Werkstoffe erhalten
Sie bei Ihrer Bürkert Vertriebsniederlassung oder im Internet unter:
www.buerkert.de
▶ Für den Einsatz die in den Vertragsdokumenten und der Bedie-
nungsanleitung spezifizierten zulässigen Daten, Betriebs- und
Einsatzbedingungen beachten. Diese sind im Kapitel „Systembeschreibung“ und „Technische Daten“ beschrieben.
▶ Das Gerät nur in Verbindung mit von Bürkert empfohlenen bzw.
zugelassenen Fremdgeräten und -komponenten einsetzen.
▶ Voraussetzungen für den sicheren und einwandfreien Betrieb sind
sachgemäßer Transport, sachgemäße Lagerung und Installation
sowie sorgfältige Bedienung und Instandhaltung.
▶ Ventil beim Schließen nur handfest anziehen. Zu starkes Anziehen
kann zu Vorschädigungen der Membran führen.
▶ Das Gerät nur bestimmungsgemäß einsetzen.
2.1 Beschränkungen
Beachten Sie bei der Ausfuhr des Systems/Geräts gegebenenfalls
bestehende Beschränkungen.
3 GRUNDLEGENDE
SICHERHEITSHINWEISE
Diese Sicherheitshinweise berücksichtigen keine
• Zufälligkeiten und Ereignisse, die bei Montage, Betrieb und Wartung
der Geräte auftreten können.
• ortsbezogenen Sicherheitsbestimmungen, für deren Einhaltung, auch
in Bezug auf das Montagepersonal, der Betreiber verantwortlich ist.
Die Membranventile Typ 3232, 3233, 3233 K, 3234, 3235,
3239 wurden unter Einbeziehung der anerkannten sicherheitstechnischen Regeln entwickelt und entsprechen dem Stand
der Technik. Trotzdem können Gefahren entstehen.
deutsch
27
Page 28

GEFAHR!
Typ 3232, 3233, 3233 K, 3234,
3235, 3239
Bestimmungsgemäße Verwendung
Gefahr durch hohen Druck!
▶ Vor dem Lösen von Leitungen und Ventilen den Druck abschalten
und Leitungen entlüften.
Gefahr durch elektrische Spannung!
▶ Vor Eingriffen in das Gerät oder die Anlage Spannung abschalten
und vor Wiedereinschalten sichern!
▶ Die geltenden Unfallverhütungs- und Sicherheitsbestimmungen
für elektrische Geräte beachten!
WARNUNG!
Berstgefahr bei Überdruck!
▶ Die Angaben auf dem Typschild für max. Mediumsdruck einhalten.
▶ Zulässige Mediumstemperatur beachten.
VORSICHT!
Verbrennungsgefahr/Brandgefahr bei Dauerbetrieb durch
heiße Geräteoberfläche!
▶ Das Gerät von leicht brennbaren Stoffen und Medien fernhalten
und nicht mit bloßen Händen berühren.
Allgemeine Gefahrensituationen.
Zum Schutz vor Verletzungen ist zu beachten:
• Dass die Anlage nicht unbeabsichtigt betätigt werden kann.
• Gehäuse nicht mechanisch belasten (z. B. durch Ablage von
Gegenständen oder als Trittstufe).
• Keine äußerlichen Veränderungen an den Gerätegehäusen vornehmen. Gehäuseteile und Schrauben nicht lackieren.
• Installations- und Instandhaltungsarbeiten dürfen nur von autorisiertem Fachpersonal mit geeignetem Werkzeug ausgeführt
werden.
• Nach einer Unterbrechung der elektrischen oder pneumatischen
Versorgung ist ein definierter oder kontrollierter Wiederanlauf
des Prozesses zu gewährleisten.
• Das Gerät darf nur in einwandfreiem Zustand und unter
Beachtung der Bedienungsanleitung betrieben werden.
• Für die Einsatzplanung und den Betrieb des Geräts müssen die
allgemeinen Regeln der Technik eingehalten werden.
28
deutsch
Page 29

Typ 3232, 3233, 3233 K, 3234,
3235, 3239
Allgemeine Hinweise
4 ALLGEMEINE HINWEISE
4.1 Kontaktadressen
Deutschland
Bürkert Fluid Control Systems
Sales Center
Christian-Bürkert-Str. 13-17
D-74653 Ingelfingen
Tel. + 49 (0) 7940 - 10 91 111
Fax + 49 (0) 7940 - 10 91 448
E-mail: info@de.buerkert.com
International
Die Kontaktadressen finden Sie auf den letzten Seiten der gedruckten
Bedienungsanleitung.
Außerdem im Internet unter: www.burkert.com
4.2 Gewährleistung
Voraussetzung für die Gewährleistung ist der bestimmungsgemäße
Gebrauch des Membranventils unter Beachtung der spezifizierten
Einsatzbedingungen.
4.3 Informationen im Internet
Bedienungsanleitungen und Datenblätter zum Typ 3232, 3233,
3233 K, 3234, 3235, 3239 finden Sie im Internet unter:
www.buerkert.de
5 SYSTEMBESCHREIBUNG
5.1 Allgemeine Beschreibung
Der Typ 3232, 3233, 3233 K, 3234, 3235 und 3239 ist ein handgesteuertes Membranventil mit Membranabdichtung. Das Ventil ist bei
entsprechender Einbaulage selbstentleerend.
5.2 Vorgesehener Einsatzbereich
Das Membranventil des Typs 3232 ist für die Steuerung von verschmutzten und aggressiven Medien konzipiert. Die Ventile des Typs
3233, 3233 K, 3234, 3235 und 3239 können auch für hochreine oder
sterile Medien mit höherer Viskosität eingesetzt werden.
Mit den Ventilen dürfen nur Medien gesteuert werden, die die Gehäuse
und Dichtwerkstoffe (siehe Typschild) nicht angreifen. Informationen
zur Medienbeständigkeit der Werkstoffe erhalten Sie bei Ihrer Bürkert
Vertriebsniederlassung.
5.3 Konformität
Das Membranventil Typ 3232, 3233, 3233 K, 3234, 3235
und 3239 ist konform zu den EG-Richtlinien entsprechend der
EG-Konformitätserklärung.
5.4 Normen
Die angewandten Normen, mit denen die Konformität mit den EG-Richtlinien nachgewiesen wird, sind in der EG-Baumusterprüfbescheinigung
und/oder der EG-Konformitätserklärung nachzulesen.
deutsch
29
Page 30

3233 25,0 EPDM VS
Made in Germany
00442376
W36LP
TG44 Pmed
10bar
Typ 3232, 3233, 3233 K, 3234,
3235, 3239
Technische Daten
6 TECHNISCHE DATEN
6.1 Beschriftung des Typschilds
Gehäusewerkstoff
Dichtwerkstoff
Nennweite
(Membrangröße)
Typ
Identnummer
des Gerätes
Herstellerdatum
(verschlüsselt)
Leitungsanschluss,
Max. Mediumsdruck
Bild 1: Lage und Beschriftung des Typschilds
6.2 Beschriftung der
Schmiedegehäuse
Chargennummer /
Herstellkennzeichen
Fertigungs-/
Firmenzeichen
Werkstoff
Druckstufe
Anschlussnennweite
und Rohrmaße
Auftragsnummer
(F-Teil)
Seriennummer
Code
Oberflächengüte
Kundenspezifischer
Text (optional)
Bild 2: Beschriftung der Schmiedegehäuse
6.3 Betriebsbedingungen
WARNUNG!
Berstgefahr bei Überdruck!
Beim Bersten des Geräts können durch das Medium Verletzungen,
Verätzungen oder Verbrühungen entstehen!
▶ Den maximalen Mediumsdruck nicht überschreiten. Angaben auf
dem Typschild beachten!
▶ Zulässige Umgebungs- und Mediumstemperatur einhalten.
30
deutsch
Page 31

DN 15 - 65
10
20 40 60
100 120
140
Typ 3232, 3233, 3233 K, 3234,
3235, 3239
Technische Daten
6.3.1 Zulässige Temperaturen
Umgebungstemperatur für Antriebe:
Werkstoff Temperatur
PPS bis 130 °C (kurzzeitig bis 150 °C)
Edelstahl bis 130 °C (kurzzeitig bis 150 °C)
Grauguss bis 130 °C (kurzzeitig bis 150 °C)
Tab. 1: Umgebungstemperatur für Antriebe
Mediumstemperatur für Gehäuse:
Gehäusewerkstoff Temperatur
Edelstahl -10 ... +140 °C
PVC (siehe PT-Diagramm) -10 ... +60 °C
PVDF (siehe PT-Diagramm) -10 ... +120 °C
PP (siehe PT-Diagramm) -10 ... +80 °C
Tab. 2: Mediumstemperatur für Gehäuse
Mediumstemperatur für Membranen:
Werkstoff Temperatur Bemerkungen
EPDM
PTFE
FKM
Tab. 3: Mediumstemperatur für Membranen
-10 ... +130 °C Dampfsterilisation bis +150 °C
-5 ... +130 °C
Trocken bis +150 °C, sonst nur
kurz bis +150 °C
6.3.2 Maximal zulässiger Mediumsdruck
Zulässiger Mediumsdruck in Abhängigkeit von der Mediumstemperatur:
8
6
4
PVC
2
Mediumsdruck [bar]
Temperatur [°C]
Bild 3: Diagramm Mediumsdruck / Mediumstemperatur
PVDF
PP
80
deutsch
31
Page 32

Typ 3232, 3233, 3233 K, 3234,
3235, 3239
Technische Daten
Maximal zulässiger Mediumsdruck
Die Werte sind gültig für Gehäuse aus:
• Kunststoff,
• VA-Schmiedestahl und VA-Feinguss, sowie VA-Rohrumformgehäuse
mit Muffe, DIN-Vorschweißflansch und Schweißanschluss nach
EN ISO 1127 / ISO 4200
Nennweite
(Membran-
größe)
DN
[mm]
4/6/8/10 10 10 10 10
15 10 10 10 10
20 10 10 10 10
25 10 10 10 10
32 10 10 10 10
40 10 10 10 10
50 7 7 10 10
Handrad und Aufsatz PPS Handrad PPS / Aufsatz
EPDM/FKM PTFE/
Max. schaltbarer Mediumsdruck [bar]
Edelstahl
EPDM/FKM PTFE/
advanced
PTFE/
kaschierte
advanced
PTFE
advanced
PTFE/
kaschierte
advanced
PTFE
Tab. 4: Maximal zulässiger Mediumsdruck
Maximal zulässiger Mediumsdruck
Die Werte sind gültig für Gehäuse aus:
• VA-Rohrumformgehäuse mit Schweißstutzen (DIN 11850 Reihe 2)
Nennweite
(Membran-
größe)
DN
[mm]
4/6/8/10 10 10 10 10
15 10 10 10 10
20 10 10 10 10
25 10 10 10 10
32 10 10 10 10
40 10 10 10 10
50 10 10 10 10
Handrad und Aufsatz PPS Handrad PPS / Aufsatz
EPDM/FKM PTFE/
Max. schaltbarer Mediumsdruck [bar]
Edelstahl
EPDM/FKM PTFE/
advanced
PTFE/
kaschierte
advanced
PTFE
advanced
PTFE/
kaschierte
advanced
PTFE
Tab. 5: Maximal zulässiger Mediumsdruck
32
deutsch
Page 33

Typ 3232, 3233, 3233 K, 3234,
3235, 3239
Technische Daten
Maximal zulässiger Mediumsdruck
Nennweite
(Membrangröße)
DN
[mm]
65 5 5
80 5 5
100 5 5
Max. schaltbarer Mediumsdruck [bar]
Handrad und Aufsatz Edelstahl
EPDM / FKM PTFE/advanced
Tab. 6: Maximal zulässiger Mediumsdruck
PTFE/kaschierte
advanced PTFE
6.4 Allgemeine Technische Daten
Werkstoffe
Gehäuse Rohrumformgehäuse (VA), Feinguss (VG),
Schmiedestahl (VS), PP, PVC, PVDF
Antrieb Handrad und Aufsatz PPS
Handrad PPS und Aufsatz Edelstahl
Handrad und Aufsatz Edelstahl
DN65 bis DN100
Membran EPDM, PTFE, FKM
Anschlüsse
Mediumsanschluss Schweißanschluss nach DIN EN 1127
(ISO 4200), DIN 11850 R2
andere Anschlüsse auf Anfrage
Medien
Durchflussmedien Typ 3232; verschmutzte, aggressive,
hochreine, sterile Medien und Medien mit
höherer Viskosität
Einbaulage beliebig, Bodenablassventil Typ 3235;
Antrieb nach unten
deutsch
33
Page 34

Typ 3232, 3233, 3233 K, 3234,
3235, 3239
Aufbau und Funktion
7 AUFBAU UND FUNKTION
7.1 Aufbau
Das handbetätigte Membranventil besteht aus einem Handantrieb und
einem 2/2-Wege Ventilgehäuse.
7.2 Typenbeschreibung
Die Typen unterscheiden sich durch das Gehäuse.
7.2.1 Typ 3232, 3233 und 3233 K
Handrad mit Stellungsanzeige
(siehe Kapitel 7.3.1)
Aufsatz
Membrangehäuse
Leitungsanschluss
7.2.2 Typen 3234, 3235 und 3239
Typ Gehäuse Aufbau
T-Ventil
Typ 3234
Bodenablass-
ventil
Typ 3235
Y-Ventil
Typ 3239
T-Ventilgehäuse
Bodenablassgehäuse mit
Schweißflansch
Y-Ventilgehäuse
Bild 4: Beispiel des 2/2-Wege Ventils Typ 3232, 3233
und 3233 K
34
deutsch
Tab. 7: Aufbau Typen 3234, 3235 und 3239
Page 35

Typ 3232, 3233, 3233 K, 3234,
3235, 3239
Montage
7.3 Funktion
Durch die manuelle Betätigung des Handrads wird die Kraft über eine
Spindel übertragen und das Ventil geöffnet oder geschlossen.
7.3.1 Stellungsanzeige
Antriebsgröße DN 4, DN 6, DN 8, DN 10, DN 65, DN 80 und DN 100
Mit Öffnen des Ventils wird eine gelbe Markierung zwischen dem
Aufsatz und dem Handrad sichtbar.
Antriebsgröße DN 15 bis DN 50
Ab DN 15 dient ein gelber Zylinder zur Orientierung über die
Ventilstellung:
• Gelber Zylinder vollständig im Handrad versenkt:
Ventil geschlossen (Stellung ZU)
• Gelber Zylinder ragt maximal aus dem Handrad heraus:
Ventil geöffnet (Stellung AUF)
8 MONTAGE
8.1 Sicherheitshinweise
GEFAHR!
Verletzungsgefahr durch hohen Druck in der Anlage!
▶ Vor dem Lösen von Leitungen oder Ventilen den Druck abschal-
ten und Leitungen entlüften.
Verletzungsgefahr durch Stromschlag!
▶ Vor Eingriffen in das Gerät oder die Anlage, Spannung abschal-
ten und vor Wiedereinschalten sichern!
▶ Die geltenden Unfallverhütungs- und Sicherheitsbestimmungen
für elektrische Geräte beachten!
WARNUNG!
Verletzungsgefahr bei unsachgemäßer Montage!
▶ Die Montage darf nur autorisiertes Fachpersonal mit geeigne-
tem Werkzeug durchführen!
Verletzungsgefahr durch ungewolltes Einschalten der Anlage
und unkontrollierten Wiederanlauf!
▶ Anlage vor unbeabsichtigtem Betätigen sichern.
▶ Nach der Montage einen kontrollierten Wiederanlauf gewährleisten.
deutsch
35
Page 36

8.2 Vor dem Einbau
• Vor dem Anschluss des Ventils auf fluchtende Rohrleitungen achten.
• Durchflussrichtung ist beliebig.
8.2.1 Einbaulage allgemein
Einbau für Selbstentleerung des Gehäuses
Die Sicherstellung der Selbstentleerung liegt in der Verantwortung des Installateurs und Betreibers.
Einbau für Leckagedetektion
Eine der Bohrungen (im Antriebssockel) zur Überwachung
der Leckage muss am tiefsten Punkt sein.
8.2.2 Einbaulage 2/2-Wege-Ventile
• Die Einbaulage des handbetätigten Membranventils ist beliebig.
Um die Selbstentleerung zu gewährleisten:
→ Gehäuse um den Winkel α = 10° bis 40° geneigt zur Horizon-
talen einbauen (siehe Bild 5).
Bei Schmiede- und Gussgehäusen ist hierfür eine Markierung
angebracht, welche nach oben zeigen muss (12 Uhr-Stellung,
siehe Bild 6).
→ Zur Leitungsachse einen Neigungswinkel von 1° ... 5° einhalten.
→ Eine der Bohrungen (im Antriebssockel) zur Überwachung der
Leckage muss am tiefsten Punkt sein.
Typ 3232, 3233, 3233 K, 3234,
3235, 3239
Montage
α
Winkel α: 10° bis 40°
Neigung zur Leitungsachse 1° bis 5°
Bild 5: Einbaulage zur Selbstentleerung des Gehäuses
Markierung für
Selbstentleerungswinkel
Bild 6: Markierung für die korrekte Einbaulage
36
deutsch
Page 37

Typ 3232, 3233, 3233 K, 3234,
3235, 3239
Montage
8.2.3 Einbaulage T-Ventile Typ 3234
Für den Einbau der T-Ventile in Ringleitungen werden folgende Einbaulagen empfohlen:
Bei Zuführung eines Mediums: Bei Entnahme von Medium:
Bild 7: Einbaulage des Typs 3234
8.2.4 Einbaulage Y-Ventile Typ 3239
Für den Einbau der Y-Ventile in Anlagen werden folgende Einbaulagen
empfohlen:
Bei Zuführung eines Mediums: Bei Entnahme von Medium:
Bild 8: Einbaulage des Typs 3239
8.2.5 Einbau des Bodenablassventils
Typ 3235
Für Informationen über Behälter und Schweißanweisungen,
beziehen Sie sich auf die Norm ASME VIII Division I.
Es empfiehlt sich das Ventil zu schweißen bevor der Behälter
aufgebaut wird. Trotzdem ist es möglich, die Ventile an fertig
montierte Behälter zu schweißen.
Vor dem Schweißen überprüfen, ob:
• Das Bodenablassventil mit keinem anderen Einrichtungsteil kollidiert
und dass Auf- und Abbau des Antriebs stets möglich sind.
• Eine Minimaldistanz zwischen zwei Schweißstellen von drei mal die
Dicke der Behälterwand eingehalten wird.
Das Ventil in der Mitte des Ablasses schweißen, damit sich
der Behälter optimal entleert.
Der Durchmesser des Lochs im Behälter und der Flansch müssen
gleich sein. Das Ventil ist mit zwei Schweißkanten versehen, um die
Schweißung und das Positionieren des Ventils einfacher zu machen.
Die Schweißkanten sind ungefähr 3 mm lang. Sollte die Behälterwand
mehr als 3 mm dick sein, muss das Ventil wie auf dem Bild 9 positioniert werden.
→ Vor dem Einschweißen des Ventils Ablasswand abschleifen.
deutsch
37
Page 38

Zu schleifende Stelle
am Tank
Typ 3232, 3233, 3233 K, 3234,
3235, 3239
Montage
8.2.6 Vorbereitende Arbeiten
→ Rohrleitungen von Verunreinigungen säubern (Dichtungsmaterial,
Metallspäne etc.).
→ Rohrleitungen abstützen und ausrichten.
Geräte mit Schweiß- oder Klebegehäuse:
Bild 9: Zu schleifende Stelle am Tank
Vor dem Schweißen die angegebenen Chargen-Nummer auf
dem gelieferten Hersteller-Zertifikat 3.1.B. prüfen.
Vorgehensweise:
→ Flansch in das Loch positionieren, so dass die Flanschoberfläche
mit der Ablassoberfläche tangierend ist.
→ 4 Schweißpunkte heften und die Position des Ventils prüfen.
→ Das Ventil gleichmäßig innerhalb und außerhalb des Behälters unter
Zufuhr von Gas und mit dem Ventil-Edelstahl 316 L (DIN 1.4435)
kompatiblen Schweißmaterial einschweißen.
→ Die Schweißungen abkühlen lassen bevor sie gemäß den geltenden
Spezifikationen glanzgeschliffen und geputzt werden.
Diese Anweisungen helfen zum Einbau der Bodenablassventile und
ermöglichen es, Formänderungen und Entspannungen innerhalb der
Behälter zu vermeiden.
Die geltende Gesetze bezüglich der Qualifikation von
Schweißern und Durchführung der Schweißungen
beachten.
38
deutsch
Vor dem Einschweißen oder Verkleben des Gehäuses muss
der Antrieb und die Membran demontiert werden.
8.3 Einbau
WARNUNG!
Verletzungsgefahr bei unsachgemäßem Einbau!
Das Nichtbeachten des Anzugsmoments ist wegen der möglichen
Beschädigung des Gerätes gefährlich.
▶ Anzugsmoment beim Einbau beachten (siehe „8.3.2 Anzugsmo-
mente für Membranen“).
8.3.1 Geräte mit Schweiß- oder
Klebegehäuse
HINWEIS!
Zur Vermeidung von Schäden!
Vor dem Einschweißen oder Verkleben des Gehäuses muss der
Antrieb und die Membran demontiert werden.
Page 39

Typ 3232, 3233, 3233 K, 3234,
3235, 3239
Montage
Vorgehensweise:
→ Befestigungsschrauben über Kreuz lösen und Antrieb mit Membran
vom Gehäuse abnehmen.
→ Gehäuse in die Rohrleitung einschweißen oder einkleben.
→ Nach dem Einschweißen oder Verkleben des Gehäuses die
Gehäuseoberfläche (falls nötig) durch Abschleifen glätten.
→ Gehäuse sorgfältig reinigen.
→ Antrieb auf das Gehäuse setzen.
→ Die Befestigungsschrauben über Kreuz leicht anziehen, bis die
Membran zwischen Gehäuse und Antrieb anliegt.
Schrauben noch nicht festziehen.
→ Membranventil zweimal betätigen, damit die Membran richtig
anliegt.
→ Befestigungsschrauben bis zum zulässigen Anzugsmoment
anziehen (siehe Tabellen im Kapitel „8.3.2 Anzugsmomente für
Membranen“).
8.3.2 Anzugsmomente für Membranen
Antrieb PPS oder Edelstahl
Nennweite
(Membrangröße)
DN [mm]
8 2 2,5
15 3,5 4
20 4 4,5
25 5 6
32 6 8
40 8 10
50 12 15
Tab. 8: Anzugsmomente für Membranen.
Antrieb PPS oder Edelstahl
Nennweite
(Membrangröße)
DN [mm]
65 20 30
80 30 40
100 40 50
Tab. 9: Anzugsmomente für Membranen.
Antrieb Edelstahl
Membran
EPDM / FKM
Antrieb Edelstahl
Membran
EPDM / FKM
Membran
PTFE/advanced
PTFE/kaschierte
advanced PTFE
Membran
PTFE/advanced
PTFE/kaschierte
advanced PTFE
deutsch
39
Page 40

Typ 3232, 3233, 3233 K, 3234,
3235, 3239
Wartung, Reinigung
9 WARTUNG, REINIGUNG
9.1 Sicherheitshinweise
GEFAHR!
Verletzungsgefahr durch Stromschlag!
▶ Vor Eingriffen in das Gerät oder die Anlage, Spannung abschal-
ten und vor Wiedereinschalten sichern!
▶ Die geltenden Unfallverhütungs- und Sicherheitsbestimmungen
für elektrische Geräte beachten!
WARNUNG!
Verletzungsgefahr bei unsachgemäßen Wartungsarbeiten!
▶ Die Wartung darf nur autorisiertes Fachpersonal mit geeignetem
Werkzeug durchführen!
Verletzungsgefahr durch ungewolltes Einschalten der Anlage
und unkontrollierten Wiederanlauf!
▶ Anlage vor unbeabsichtigtem Betätigen sichern.
▶ Nach der Wartung einen kontrollierten Wiederanlauf gewährleisten.
9.2 Wartungsarbeiten
9.2.1 Antrieb
Der Antrieb des Membranventils ist, wenn für den Einsatz die Hinweise
dieser Bedienungsanleitung beachtet werden, wartungsfrei.
9.2.2 Verschleißteile des Membranventils
Teile die einer natürlichen Abnutzung unterliegen sind:
• Dichtungen
• Membran
→ Bei Undichtheiten das jeweilige Verschleißteile gegen ein entspre-
chendes Ersatzteil austauschen (siehe Kapitel 11).
Eine ausgebeulte PTFE-Membran, kann zur Reduzierung
des Durchflusses führen.
9.2.3 Lebensdauer der Membran
Die Lebensdauer der Membran ist von folgenden Faktoren abhängig:
• Membranwerkstoff,
• Medium,
• Mediumsdruck,
• Mediumstemperatur.
40
deutsch
Page 41

Typ 3232, 3233, 3233 K, 3234,
3235, 3239
Instandhaltung
9.2.4 Reinigung
Zur Reinigung von außen können handelsübliche Reinigungsmittel
verwendet werden.
HINWEIS!
Vermeidung von Schäden durch Reinigungsmittel.
▶ Die Verträglichkeit der Mittel mit den Gehäusewerkstoffen und
Dichtungen vor der Reinigung prüfen.
10 INSTANDHALTUNG
10.1 Sicherheitshinweise
GEFAHR!
Verletzungsgefahr durch hohen Druck in der Anlage!
▶ Vor dem Lösen von Leitungen und Ventilen den Druck abschalten
und Leitungen entlüften.
Verletzungsgefahr durch Stromschlag!
▶ Vor Eingriffen in das System die elektrische Spannung abschalten
und vor Wiedereinschalten sichern!
▶ Die geltenden Unfallverhütungs- und Sicherheitsbestimmungen
für elektrische Geräte beachten!
WARNUNG!
Verletzungsgefahr bei unsachgemäßer Instandhaltung!
▶ Die Montage darf nur autorisiertes Fachpersonal mit geeignetem
Werkzeug durchführen.
▶ Die Anzugsmomente müssen eingehalten werden.
▶ Nach Abschluss der Arbeiten Ventil auf Dichtheit und Funktion
prüfen.
Verletzungsgefahr durch ungewolltes Einschalten der Anlage
und unkontrollierten Wiederanlauf!
▶ Anlage vor unbeabsichtigtem Betätigen sichern.
▶ Nach der Wartung einen kontrollierten Wiederanlauf gewährleisten.
deutsch
41
Page 42

Typ 3232, 3233, 3233 K, 3234,
3235, 3239
Instandhaltung
10.2 Austausch der Membran
GEFAHR!
Verletzungsgefahr durch Mediumsaustritt (Säure, Lauge,
heiße Medien)!
Der Ausbau des Gerätes unter Druck ist wegen plötzlicher Druckentladung oder Mediumsaustritt gefährlich.
▶ Vor dem Ausbau den Druck abschalten und Leitungen entlüften.
▶ Leitungen vollständig entleeren.
Befestigungsarten
Nennweite
(Membrangröße)
DN [mm]
8 Membran eingeknöpft
20
25
40
50
65
80
100
Tab. 10: Befestigungsarten für Membranen
Befestigungsarten für Membranen
PTFE EPDM / FKM
Membran mit
Membran eingeknöpft15
Bajonettverschluss
Membran mit
Bajonettverschluss
Membran mit
Bajonettverschluss
Membran
eingeschraubt
Membran
eingeschraubt
Handantrieb
4 Befestigungsmuttern
Membran
Gehäuse
4 Befestigungsschrauben
Markierungslappen für
Durchflussrichtung
Bild 10: Austausch der Membran
42
deutsch
Page 43

Typ 3232, 3233, 3233 K, 3234,
3235, 3239
Instandhaltung
Austausch der Membran
Vorgehensweise:
→ Ventilgehäuse in eine Haltevorrichtung einspannen (gilt nur für noch
nicht eingebaute Ventile).
→ Befestigungsschrauben über Kreuz lösen und Antrieb mit Membran
vom Gehäuse abnehmen.
→ Alte Membran ausknöpfen oder ausschrauben. Bei Befestigung
mit Bajonettverschluss die Membran durch Drehen um 90° lösen
(siehe Tabelle „Tab. 10: Befestigungsarten für Membranen“).
→ Handrad im Uhrzeigersinn bis zum Anschlag drehen (Stellung ZU).
→ Neue Membran in Antrieb einbauen (siehe „Tab. 10: Befesti-
gungsarten für Membranen“).
→ Handrad gegen den Uhrzeigersinn bis zum Anschlag drehen
(Stellung AUF).
→ Membran ausrichten.
Markierungslappen für Durchflussrichtung beachten!
→ Antrieb wieder auf das Gehäuse setzen.
→ Die Befestigungsschrauben über Kreuz leicht anziehen, bis die
Membran zwischen Gehäuse und Antrieb anliegt.
Schrauben noch nicht festziehen.
→ Das Membranventil einmal betätigen, damit die Membran richtig
anliegt.
→ Die Befestigungsschrauben in geöffneter Stellung des Ventils bis
zum zulässigen Anzugsmoment anziehen (siehe Tabellen im Kapitel
„10.2.1 Anzugsmomente für Membranen“).
→ Das Anzugsmoment der Schrauben nochmals überprüfen.
10.2.1 Anzugsmomente für Membranen
Antrieb PPS oder Edelstahl
Nennweite
(Membrangröße)
DN [mm]
8 2 2,5
15 3,5 4
20 4 4,5
25 5 6
32 6 8
40 8 10
50 12 15
Tab. 11: Anzugsmomente für Membranen, Antrieb PPS oder
Edelstahl.
Nennweite
(Membrangröße)
DN [mm]
65 20 30
80 30 40
100 40 50
Tab. 12: Anzugsmomente für Membranen, Antrieb Edelstahl.
Membran
EPDM / FKM
Antrieb Edelstahl
Membran
EPDM / FKM
Membran
PTFE/advanced
PTFE/kaschierte
advanced PTFE
Membran
PTFE/advanced
PTFE/kaschierte
advanced PTFE
deutsch
43
Page 44

Typ 3232, 3233, 3233 K, 3234,
3235, 3239
Ersatzteile, Zubehör
11 ERSATZTEILE, ZUBEHÖR
VORSICHT!
Verletzungsgefahr, Sachschäden durch falsche Teile!
Falsches Zubehör und ungeeignete Ersatzteile können Verletzungen
und Schäden am Gerät und dessen Umgebung verursachen.
▶ Nur Originalzubehör sowie Originalersatzteile der Firma Bürkert
verwenden.
Als Ersatzteile für die handbetätigten Membranventile Typ 3232, 3233,
3233 K, 3234, 3235 und 3239 sind erhältlich:
• Handantrieb komplett,
• Membran.
Handantrieb
Membran
11.1 Bestelltabellen
11.1.1 Bestelltabellen Handantriebe
(Typen 3232, 3233 und 3233 K)
Handrad und Aufsatz
Anschluss-
größe
DN [mm]
4, 6, 8, 10 194 809 194 809 194 808 194 808
15, 20* 432 977 432 978 432 979 432 980
20, 25* 432 984 432 985 432 986 432 987
25, 32* 432 991 432 992 432 993 432 994
32, 40* 432 998 432 999 433 000 433 001
40, 50* 433 005 433 006 433 007 433 008
50 433 012 433 013 433 014 433 015
Membran
EPDM, FKM
PPS
Membran
PTFE/
advanced
PTFE/
kaschierte
advanced
PTFE
Tab. 13: Bestelltabelle Handantriebe
* Ventile Typ 3233 K mit Schweißstutzen nach DIN 11850 R2, mit OD-
Schweißenden, mit ANSI- und JIS-Vorschweißflansch
Handrad PPS, Aufsatz
Edelstahl
Membran
EPDM, FKM
Membran
PTFE/
advanced
PTFE/
kaschierte
advanced
PTFE
Bild 11: Ersatzteile
44
Handantriebe für Nennweite DN 65, DN 80 und DN 100 auf
Anfrage.
deutsch
Page 45

Typ 3232, 3233, 3233 K, 3234,
3235, 3239
Ersatzteile, Zubehör
Handrad und Aufsatz
Edelstahl
Handrad und Aufsatz
Edelstahl (für T- oder
Bodenablassventil)
Anschluss-
größe
DN [mm]
Membran
EPDM, FKM
Membran
PTFE/
advanced
PTFE/
kaschierte
advanced
PTFE
Membran
EPDM, FKM
Membran
PTFE/
advanced
PTFE/
kaschierte
advanced
PTFE
4, 6, 8, 10 194 810 194 810 441 264 441 264
15, 20* 427 753 432 981 441 265 441 270
20, 25* 427 754 432 988 441 266 449 128
25, 32* 427 755 432 995 441 267 441 271
32, 40* 427 756 433 002 - 40, 50* 427 757 433 009 441 268 441 276
50 427 758 433 016 441 269 441 277
Tab. 14: Bestelltabelle Handantriebe
* Ventile Typ 3233 K mit Schweißstutzen nach DIN 11850 R2, mit OD-
Schweißenden, mit ANSI- und JIS-Vorschweißflansch
11.1.2 Bestelltabelle Membranen
Nennweite
(Membran-
größe)
DN [mm]
4, 6, 8, 10
15, 20*
20, 25*
25, 32‘
32, 40*
40, 50*
50
65
80
100
EPDM
(AB)
677 663 688 421 677 684 677 674 679 540 677 694
677 664 688 422 677 685 677 675 679 541 677 695
677 665 688 423 677 686 677 676 679 542 677 696
677 667 688 424 677 687 677 677 679 543 677 697
677 668 688 425 677 688 677 678 679 544
677 669 688 426 677 689 677 679 679 545 677 698
677 670 688 427 677 690 677 680 679 546 677 699
677 671 688 428 677 691 677 681 679 743
650 082 688 429 650 083 650 087 679 744
650 084 688 430 650 085 650 088 679 745
Tab. 15: Bestelltabelle Membranen
* Ventile Typ 3233 K mit Schweißstutzen nach DIN 11850 R2, mit OD-
Schweißenden, mit ANSI- und JIS-Vorschweißflansch
Weitere Informationen zu Ersatzteilen entnehmen Sie aus
den Datenblättern für die kolbengesteuerte Membranventile
Typ 3232, 3233, 3233 K, 3234 und 3235. Die Datenblätter
finden Sie im Internet unter: www.buerkert.de
Bestellnummern für Membranen
EPDM
(AD)
FKM
(FF)
PTFE
(EA)
Advanced
PTFE
Kaschierte
advanced
PTFE
deutsch
45
Page 46

Typ 3232, 3233, 3233 K, 3234,
3235, 3239
Transport, Lagerung, Verpackung
11.2 Option Sicherung Handrad
Gegen unbeabsichtigte oder unbefugte Bedienung des Ventils dient
die Option Sicherung Handrad (ab Antriebsgröße DN 15 bis DN 50).
Handrad ist in 12 Raststellungen pro Umdrehung (je 30°) arretierbar.
Arretierung
→ Mit einem Schlüssel den
Stift
Stift in Arretierung drücken
und bis Anschlag nach links
drehen.
→ Schlüssel abziehen.
Ventil ist gesichert.
Bild 12: Handrad mit Schloss
12 TRANSPORT, LAGERUNG,
VERPACKUNG
HINWEIS!
Transportschäden!
Unzureichend geschützte Geräte können durch den Transport
beschädigt werden.
• Gerät vor Nässe und Schmutz geschützt in einer stoßfesten
Verpackung transportieren.
• Eine Über- bzw. Unterschreitung der zulässigen Lagertemperatur vermeiden.
Falsche Lagerung kann Schäden am Gerät verursachen.
• Gerät trocken und staubfrei lagern!
• Lagertemperatur -40 … +55 °C.
Umweltschäden durch von Medien kontaminierte Geräteteile.
• Gerät und Verpackung umweltgerecht entsorgen!
• Geltende Entsorgungsvorschriften und Umweltbestimmungen
einhalten.
Hinweis:
Beachten Sie die nationalen Abfallbeseitigungsvorschriften.
46
deutsch
Page 47

Type 3232, 3233, 3233 K, 3234,
3235, 3239
Sommaire
1 LES INSTRUCTIONS DE SERVICE .................................................. 48
1.1 Symboles ...................................................................................48
1.2 Définition du terme appareil ..................................................48
2 UTILISATION CONFORME ................................................................... 49
2.1 Limitations .................................................................................49
3 CONSIGNES DE SÉCURITÉ FONDAMENTALES......................49
4 INDICATIONS GÉNÉRALES ................................................................. 51
4.1 Adresses ...................................................................................51
4.2 Garantie légale .........................................................................51
4.3 Informations sur Internet ........................................................51
5 DESCRIPTION DE SYSTÈME ..............................................................51
5.1 Description générale ..............................................................51
5.2 Utilisation prévue .....................................................................51
5.3 Conformité ................................................................................51
5.4 Normes ......................................................................................51
RACTÉRISTIQUES TECHNIQUES .....................................................................52
6 CA
6.1 Plaque signalétique .................................................................52
6.2 Informations sur le corps forgé ............................................52
6.3 Conditions d’exploitation .......................................................52
6.4 Caractéristiques techniques générales..............................55
7 STRUCTURE ET MODE DE FONCTIONNEMENT ..................... 56
7.1 Structure ....................................................................................56
7.2 Description du type .................................................................56
7.3 Fonction .....................................................................................57
8 MONTAGE .....................................................................................................57
8.1 Consignes de sécurité ...........................................................57
8.2 Avant le montage .....................................................................58
8.3 Montage.....................................................................................60
9 MAINTENANCE, NETTOYAGE .............................................................62
9.1 Consignes de sécurité ...........................................................62
9.2 Travaux d’entretien ..................................................................62
10 MAINTENANCE ........................................................................................... 63
10.1 Consignes de sécurité ...........................................................63
10.2 Remplacement de la membrane ..........................................64
11 PIÈCES DE RECHANGE, ACCESSOIRES .................................... 66
11.1 Tableau de commande de pièces........................................66
11.2 Option verrouillage du volant ................................................68
12 EMBALLAGE, TRANSPORT, STOCKAGE ...................................... 68
français
47
Page 48

Type 3232, 3233, 3233 K, 3234,
3235, 3239
Les instructions de service
1 LES INSTRUCTIONS DE
SERVICE
Les instructions de service décrivent le cycle de vie complet de l’appareil. Conservez ces instructions de sorte qu’elles soient accessibles
à tout utilisateur et à disposition de tout nouveau propriétaire.
Les instructions de service contiennent des informations
importantes sur la sécurité.
Le non-respect de ces consignes peut entraîner des situations
dangereuses.
▶ Les instructions de service doivent être lues et comprises.
1.1 Symboles
DANGER !
Met en garde contre un danger imminent.
▶ Le non-respect peut entraîner la mort ou de graves blessures.
AVERTISSEMENT !
Met en garde contre une situation éventuellement dangereuse.
▶ Risque de blessures graves, voire la mort en cas de non-respect.
ATTENTION !
Met en garde contre un risque possible.
▶ Le non-respect peut entraîner des blessures légères ou de
moyenne gravité.
REMARQUE !
Met en garde contre des dommages matériels.
▶ L’appareil ou l’installation peut être endommagé(e) en cas de
non-respect.
Désigne des informations supplémentaires importantes, des
conseils et des recommandations d’importance.
Renvoie à des informations dans ces instructions de service
ou dans d’autres documentations.
→ identifie une opération que vous devez effectuer.
1.2 Définition du terme appareil
Le terme « appareil » utilisé dans ces instructions désigne toujours
les types 3232, 3233, 3233 K, 3234, 3235 et 3239.
48
français
Page 49

Type 3232, 3233, 3233 K, 3234,
3235, 3239
Utilisation conforme
2 UTILISATION CONFORME
L’utilisation non conforme de l’appareil peut présenter des
dangers pour les personnes, les installations proches et
l’environnement.
▶ Les vannes à membre des types 3232, 3233, 3233 K, 3234, 3235
et 3239 sont prévues pour la commande de fluides encrassés, de
grande pureté ou stériles, ainsi que pour les fluides abrasifs ou
agressifs (également avec viscosité élevée).
▶ Les appareils peuvent uniquement être utilisés pour les fluides
qui n’attaquent pas le corps et les matériaux du joint (voir
plaque signalétique). Vous trouverez toutes les informations
concernant la résistance des matériaux aux fluides auprès
de votre filiale de distribution Bürkert ou sur Internet sous:
www.buerkert.fr.
▶ Lors de l’utilisation, il convient de respecter les données et condi-
tions d’utilisation et d’exploitation admissibles spécifiées dans
les instructions de service et dans les documents contractuels.
Elles sont décrites dans les chapitres „Description de système“
et „Caractéristiques techniques“.
▶ L’appareil peut être utilisé uniquement en association avec les
appareils et composants étrangers recommandés et homologués
par Bürkert.
▶ Les conditions pour l’utilisation sûre et parfaite sont un transport,
un stockage et une installation dans les règles ainsi qu’une parfaite
utilisation et maintenance.
▶ Fermer la vanne en la serrant seulement à la main. Le fait de
trop serrer peut endommager prématurément la membrane.
▶ Veillez à ce que l’utilisation de l’appareil soit toujours conforme.
2.1 Limitations
Lors de l’exportation du système/de l’appareil, veuillez respecter les
limitations éventuelles existantes.
3 CONSIGNES DE SÉCURITÉ
FONDAMENTALES
Ces consignes de sécurité ne tiennent pas compte
• Des hasards et des événements pouvant survenir lors du montage,
de l’exploitation et de l’entretien des appareils.
• Des prescriptions de sécurité locales que l’exploitant est tenu de
faire respecter par le personnel chargé du montage.
Les vannes à membrane de type 3232, 3233, 3233 K, 3234,
3235, 3239 ont été développées dans le respect des règles
reconnues en matière de sécurité et correspondent à l’état
actuel de la technique. Néanmoins, des risques peuvent se
présenter.
français
49
Page 50

DANGER !
Type 3232, 3233, 3233 K, 3234,
3235, 3239
Utilisation conforme
Danger dû à la haute pression.
▶ Avant de desserrer les conduites et les vannes, coupez la pres-
sion et purgez l’air des conduites.
Danger présenté par la tension électrique.
▶ Avant d’intervenir dans l’appareil ou l’installation, coupez la ten-
sion et empêchez toute remise sous tension par inadvertance !
▶ Veuillez respecter les réglementations en vigueur pour les appa-
reils électriques en matière de prévention des accidents ainsi
qu’en matière de sécurité !
AVERTISSEMENT !
Risque d’éclatement en cas de surpression.
▶ Respectez les indications figurant sur la plaque signalétique
relatives à la pression de commande et du fluide max.
▶ Respectez la température de fluide admissible.
ATTENTION !
Risque de brûlures/d’incendie en fonctionnement continu dû à
des surfaces d’appareils brûlantes.
▶ Tenez les substances et les fluides facilement inflammables à
l’écart de l’appareil et ne touchez pas ce dernier à mains nues.
Situations dangereuses d’ordre général.
Pour prévenir les blessures, respectez ce qui suit :
• L’installation ne peut pas être actionnée par inadvertance.
• Ne soumettez pas le corps à des contraintes mécaniques (par ex.
pour déposer des objets ou en l’utilisant comme marche).
• N’apportez pas de modifications à l’extérieur du corps de l’appareil.
Ne laquez pas les pièces du corps et les vis.
• Les travaux d’installation et de maintenance doivent être effectués
uniquement par des techniciens qualifiés et habilités disposant de
l’outillage approprié.
• Après une interruption de l’alimentation électrique ou pneumatique,
un redémarrage défini ou contrôlé du processus doit être garanti.
• L’appareil doit être utilisé uniquement en parfait état et en respectant les instructions de service.
• Les règles générales de la technique sont d’application pour
planifier l’utilisation et utiliser l’appareil.
50
français
Page 51

Type 3232, 3233, 3233 K, 3234,
3235, 3239
Indications générales
4 INDICATIONS GÉNÉRALES
4.1 Adresses
Allemagne
Bürkert Fluid Control Systems
Sales Center
Christian-Bürkert-Str. 13-17
D-74653 Ingelfingen
Tel. + 49 (0) 7940 - 10 91 111
Fax + 49 (0) 7940 - 10 91 448
E-mail: info@de.buerkert.com
International
Les adresses se trouvent aux dernières pages des instructions de
service imprimées.
Egalement sur internet sous : www.burkert.com
4.2 Garantie légale
La condition pour bénéficier de la garantie légale est l’utilisation
conforme de l’appareil dans le respect des conditions d’utilisation
spécifiées.
4.3 Informations sur Internet
Vous trouverez les instructions de service et les fiches techniques
concernant les types 3232, 3233, 3233 K, 3234, 3235, 3239 sur
Internet sous : www.buerkert.fr
5 DESCRIPTION DE SYSTÈME
5.1 Description générale
Les types 3232, 3233, 3233 K, 3234, 3235 et 3239 sont des vannes
à membrane à commande manuelle avec un joint d’étanchéité de
membrane. La vanne se vide automatiquement lorsque sa position de
montage est correcte.
5.2 Utilisation prévue
La vanne à membrane de type 3232 est conçue pour la commande de
fluides encrassés et agressifs. Les vannes des types 3233, 3233 K,
3234, 3235 et 3239 peuvent également être utilisées pour les fluides
à pureté élevée ou stériles présentant une viscosité plus élevée.
Seuls les fluides qui n’attaquent pas le corps et les matériaux du joint
(voir plaque signalétique) peuvent être utilisés avec les vannes. Vous
trouverez toutes les informations concernant la résistance des matériaux
aux fluides auprès de votre filiale de distribution Bürkert.
5.3 Conformité
Le type 3232, 3233, 3233 K, 3234, 3235, 3239 est conforme aux
directives CE comme stipulé dans la déclaration de conformité CE.
5.4 Normes
Les normes appliquées justifiant la conformité aux directives CE
peuvent être consultées dans le certificat d’essai de modèle type CE
et / ou la déclaration de Conformité CE.
français
51
Page 52

3233 25,0 EPDM VS
Made in Germany
00442376
W36LP
TG44 Pmed
10bar
Type 3232, 3233, 3233 K, 3234,
3235, 3239
Caractéristiques techniques
6 CA
RACTÉRISTIQUES TECHNIQUES
6.1 Plaque signalétique
Matériau du corps
Matériau du joint
Diamètre nominal
(Taille de membrane)
Type
Numéro d‘identification de
l‘appareil
Date de fabrication
(codée)
Raccord de conduite,
Pression max. du fluide
Fig. 1 : Emplacement et description de la plaque signalétique
6.2 Informations sur le corps forgé
Numéro de lot/
marque de fabrique
Numéro de fabri-
Logo entreprise
Matériau
Étage de pression
Diamètre nominal de raccordement
et dimensions du tube
cation/numéro de
commande (pièce F)
Numéro de série
Code de qualité de
surface
Texte spécifique au
client (facultatif)
Fig. 2 : Informations sur le corps forgé
6.3 Conditions d’exploitation
AVERTISSEMENT !
Risque d’éclatement en cas de surpression.
Des blessures, brûlures par acide ou par eau bouillante sont possibles en cas d’éclatement de l’appareil.
▶ Ne dépassez pas la pression de fluide maximale. Respectez les
indications sur la plaque signalétique.
▶ Respectez la température ambiante et du fluide autorisée.
52
français
Page 53

DN 15 - 65
10
20 40 60
100 120
140
Type 3232, 3233, 3233 K, 3234,
3235, 3239
Caractéristiques techniques
6.3.1 Températures admissibles
Température ambiante pour les actionneur :
Matériau Température
PPS Jusqu’à 130 °C (brièvement jusqu’à 150 °C maxi)
Acier inoxydable Jusqu’à 130 °C (brièvement jusqu’à 150 °C maxi)
Fonte grise Jusqu’à 130 °C (brièvement jusqu’à 150 °C maxi)
Tab. 1 : Température ambiante pour les actionneur
Température du fluide pour le corps :
Matériau du corps Température
Acier inoxydable -10 ... +140 °C
PVC (voir diagramme PT) -10 ... +60 °C
PVDF (voir diagramme PT) -10 ... +120 °C
PP (voir diagramme PT) -10 ... +80 °C
Tab. 2 : Température du fluide pour le corps
Température du fluide pour les membranes :
Matériau Température Remarques
EPDM
PTFE
FKM
-10 ... +130 °C
-5 ... +130 °C
Stérilisation à la vapeur jusqu’à
+150 °C
A sec jusqu’à +150 °C,
sinon uniquement brièvement
jusqu’à +150 °C
Tab. 3 : Température du fluide pour les membranes
6.3.2 Pression maximale admissible du
fluide
Pression du fluide admissible en fonction de la température de fluide.
8
6
4
PVC
2
Pression de fluide [bar]
Température [°C]
Fig. 3 : Diagramme pression de fluide / Température de fluide
PVDF
PP
80
français
53
Page 54

Type 3232, 3233, 3233 K, 3234,
3235, 3239
Caractéristiques techniques
Pression de fluide maximale admissible
Les valeurs sont valables pour des corps en
• Plastique,
• Acier forgé VA et coulée de précision VA, bloc VA ainsi que corps de
déformation de tuyaux VA avec manchon, bride à souder à collerette
DIN et raccord soudé selon EN ISO 1127 (ISO 4200)
Diamètre
nominal
(Taille de
membrane)
DN [mm]
4/6/8/10 10 10 10 10
15 10 10 10 10
20 10 10 10 10
25 10 10 10 10
32 10 10 10 10
40 10 10 10 10
50 7 7 10 10
Max. Pression de fluide commutable [bar]
Volant et chapeau en
PPS
EPDM/FKM PTFE /
advanced
PTFE /
advanced
PTFE
laminé
Volant en PPS / Chapeau
en acier inoxydable
EPDM/FKM PTFE /
advanced
PTFE /
advanced
PTFE
laminé
Tab. 4 : Pression de fluide maximale admissible
Pression de fluide maximale admissible
Les valeurs sont valables pour : les corps de déformation de tuyaux
VA avec raccord à souder (DIN 11850 série 2)
Diamètre
nominal
(Taille de
membrane)
DN [mm]
4/6/8/10 10 10 10 10
15 10 10 10 10
20 10 10 10 10
25 10 10 10 10
32 10 10 10 10
40 10 10 10 10
50 10 10 10 10
Max. Pression de fluide commutable [bar]
Volant et chapeau en
PPS
EPDM/FKM PTFE /
advanced
PTFE /
advanced
PTFE
laminé
Volant en PPS / Chapeau
en acier inoxydable
EPDM/FKM PTFE /
advanced
PTFE /
advanced
PTFE
laminé
Tab. 5 : Pression de fluide maximale admissible
54
français
Page 55

Type 3232, 3233, 3233 K, 3234,
3235, 3239
Caractéristiques techniques
Pression de fluide maximale admissible
Diamètre nominal
(Taille de membrane)
DN [mm]
65 5 5
80 5 5
100 5 5
Max. Pression de fluide commutable [bar]
Volant et chapeau en acier inoxydable
EPDM / FKM PTFE / advanced PTFE
Tab. 6 : Pression de fluide maximale admissible
/ advanced PTFE
laminé
6.4 Caractéristiques techniques
générales
Matériaux
Corps Corps de déformation de tuyaux (VA),
coulée de précision (VG), acier forgé
(VS), PP, PVC, PVDF
Actionneur Volant et chapeau en PPS
Volant PPS et chapeau en acier
inoxydable
Volant et chapeau en acier inoxydable
DN 65 à DN 100
Membrane EPDM, PTFE, FKM
Raccords
Raccord de fluide Raccord à souder selon DIN EN 1127
(ISO 4200), DIN 11850 S2
autres raccords sur demande
Fluides
Fluides de débit Type 3232 ; fluides encrassés, agressifs,
très purs, stériles et fluides à haute
viscosité
Position de montage au choix, vanne de fond de cuve type
3235 ; actionneur vers le bas
français
55
Page 56

Type 3232, 3233, 3233 K, 3234,
3235, 3239
Structure et mode de fonctionnement
7 STRUCTURE ET MODE DE
FONCTIONNEMENT
7.1 Structure
La vanne à membrane à commande manuelle est composée d’un
actionneur manuel et d’un corps de vanne 2/2.
7.2 Description du type
Les types différents dans le corps.
7.2.1 Type 3232, 3233 et 3233 K
Volant avec indicateur de
position
(voir chapitre 7.3.1)
Chapeau
Corps à membrane
Raccord de conduite
7.2.2 Type 3234, 3235 et 3239
Type Corps Structure
Vanne T Type
3234
Corps de
vanne de fond
de cuve
Type 3235
Vanne Y Type
3239
Corps de
vanne T
Corps de
vanne de fond
de cuve avec
bride à souder
Corps de
vanne T
Fig. 4 : Exemple de la vanne 2/2 voies types 3232, 3233 et 3233 K
56
Tab. 7 : Structure. Types 3234, 3235 et 3239
français
Page 57

Type 3232, 3233, 3233 K, 3234,
3235, 3239
Montage
7.3 Fonction
L’actionnement manuel du volant transmet la force via une broche,
entraînant l’ouverture ou la fermeture de la vanne.
7.3.1 Indicateur de position
Tailles d’actionneur DN 4, DN 6, DN 8, DN 10, DN 65, DN 80 et
DN 100
A l’ouverture de la vanne, une marque jaune apparaît entre le chapeau
et le volant.
Tailles d’actionneur de DN 15 à DN 50
A partir de DN 15, un cylindre jaune indique la position approximative
de la vanne :
• Cylindre jaune entré entièrement dans le volant :
Vanne fermée (position de fermeture)
• Cylindre jaune sortant au maximum du volant :
Vanne ouverte (position d’ouverture)
8 MONTAGE
8.1 Consignes de sécurité
DANGER !
Risque de blessures dû à la présence de haute pression dans
l’installation.
▶ Avant de desserrer les conduites et les vannes, coupez la pres-
sion et purgez l’air des conduites.
Risque de choc électrique.
▶ Avant d’intervenir dans l’appareil ou l’installation , coupez la ten-
sion et empêchez toute remise sous tension par inadvertance !
▶ Veuillez respecter les réglementations en vigueur pour les appa-
reils électriques en matière de prévention des accidents ainsi
qu’en matière de sécurité !
AVERTISSEMENT !
Risque de blessures dû à un montage non conforme.
▶ Le montage doit être effectué uniquement par un personnel
qualifié et habilité disposant de l’outillage approprié !
Risque de blessures dû à la mise en marche involontaire de
l’installation et le redémarrage non contrôlé.
▶ Empêchez tout actionnement involontaire de l’installation.
▶ Garantissez un redémarrage contrôlé après le montage.
français
57
Page 58

8.2 Avant le montage
• Veillez à ce que les tuyauteries soient correctement alignées.
• Le sens de débit est indifférent.
8.2.1 Position de montage, généralités
Montage pour la vidange automatique du corps
Il est de la responsabilité de l’installateur et de l’exploitant
de garantir la vidange automatique.
Montage pour la détection des fuites
L’un des alésages (dans le socle de l’actionneur) destiné à
la surveillance des fuites doit se trouver au point le plus bas.
8.2.2 Position de montage vanne 2/2 voies
• La position de montage est au choix.
Pour que le corps se vide automatiquement :
→ Montez le corps avec un angle d’inclinaison α = 10° à 40° par
rapport à l’horizontale (voir Fig. 5). Les corps forgés et coulés
présentent pour cela un marquage qui doit être dirigé vers le
haut (position 12 heures, voir Fig. 6).
→ Respecter un angle d’inclinaison de 1° – 5°.
→ L’un des alésages (dans le socle de l’actionneur ) destiné à la
surveillance des fuites doit se trouver au point le plus bas.
Type 3232, 3233, 3233 K, 3234,
3235, 3239
Montage
Angle α: 10° à 40°
α
Inclinaison par rapport à l’axe de
conduite
1° - 5°
Fig. 5 : Montage permettre au corps de se vider automatiquement
Marquage pour angle de
vidange automatique
Fig. 6 : Marquage pour position de montage correcte
58
français
Page 59

Type 3232, 3233, 3233 K, 3234,
3235, 3239
Montage
8.2.3 Position de montage vanne T 3234
Les positions de montage suivantes sont recommandées pour les
vannes T dans des conduites en boucle :
Pour l’alimentation
d’un fluide :
Fig. 7 : Position de montage type 3234
Pour le soutirage
d’un fluide :
8.2.4 Position de montage vanne Y 3239
Les positions de montage suivantes sont recommandées pour les
vannes Y dans des installations :
Pour l’alimentation
d’un fluide :
Pour le soutirage
d’un fluide :
8.2.5 Montage de la vanne de fond de
cuve type 3235
Veuillez vous référer à la norme ASME VIII, section I pour obtenir
des informations sur les cuves et les instructions de soudage.
Il est recommandé de souder la vanne avant d’installer la cuve.
Cependant, il est possible de souder les vannes sur des cuves
prémontées.
Avant de souder, s’assurer que :
• La vanne de fond de cuve ne peut entrer en collision avec une
autre partie de l’équipement et que le montage et le démontage de
l’actionneur restent possibles.
• La distance minimale entre deux points de soudage égale à 3 fois
l‘épaisseur de la paroi de la cuve est respectée.
Il est recommandé de souder la vanne au centre de l’évacuation
pour garantir une vidange optimale de la cuve.
Le diamètre du trou dans la cuve et celui de la bride doivent être identiques. La vanne est dotée de deux chanfreins pour faciliter le soudage
et le positionnement de la vanne. La longueur des chanfreins est
d’environ 3 mm. Si l‘épaisseur de la paroi de cuve est supérieure à 3
mm, il convient de positionner la vanne comme le représente la Fig. 9.
→ Meuler la paroi de l’évacuation avant de souder la vanne.
Fig. 8 : Position de montage type 3239
français
59
Page 60

Endroit à meuler sur
la cuve
Type 3232, 3233, 3233 K, 3234,
3235, 3239
Montage
8.2.6 Travaux préparatoires
→ Nettoyez les tuyauteries (matériau d’étanchéité, copeaux de
métal, etc.).
→ Soutenez et alignez les tuyauteries.
Appareils avec corps soudé ou collé :
Fig. 9 : Endroit à meuler sur la cuve
Vérifier le numéro de charge indiqué sur le certificat 3.1.B
fourni par le fabricant avant de procéder au soudage.
Procédure à suivre :
→ Positionner la bride dans le trou de sorte que la surface de la
bride soit tangentielle à celle de l’évacuation.
→ Réaliser 4 points de soudure et contrôler la position de la vanne.
→ Souder la vanne de façon régulière à l’intérieur et à l’extérieur de la
cuve en assurant l’alimentation de gaz et de matériau de soudage
compatible avec l’acier inoxydable 316 L (DIN 1.4435) de la vanne.
→ Laisser refroidir les soudures avant de les polir et de les nettoyer
conformément aux spécifications en vigueur.
Ces instructions facilitent le montage des vannes de fond de cuve et
permettent d’éviter les déformations et les détentes à l’intérieur de
la cuve.
Veuillez respecter les lois en vigueur dans le pays en ce qui
concerne la qualification des soudeurs et le soudage.
60
Avant le soudage ou le collage du corps, il est nécessaire
de démonter l’actionneur et la membrane.
8.3 Montage
AVERTISSEMENT !
Risque de blessures dû à un montage non conforme.
Le non-respect du couple de serrage est dangereux du fait de
l’endommagement possible de l’appareil.
▶ Respectez le couple de serrage lors du montage (voir „8.3.2
Couples de serrage pour membranes“).
8.3.1 Appareils avec corps soudé ou collé
REMARQUE !
Pour éviter les dommages.
Avant le soudage ou le collage du corps, il est nécessaire de
démonter l’actionneur et la membrane.
français
Page 61

Type 3232, 3233, 3233 K, 3234,
3235, 3239
Montage
Procédure :
→ Desserrer les vis de fixation en croix et retirer l’actionneur avec la
membrane du corps.
→ Souder ou coller le corps dans la tuyauterie.
→ Après le soudage ou le collage du corps, meuler la surface du corps
jusqu’à ce qu’elle soit lisse (si cela est nécessaire).
→ Nettoyer minutieusement le corps.
→ Placer l’actionneur sur le corps.
→ Serrer légèrement les vis de fixation en croix jusqu’à ce que la
membrane soit en contact entre le corps et l’actionneur.
Ne pas encore serrer les vis à fond.
→ Activer deux fois la vanne à membrane pour que la membrane
soit bien en place.
→ Serrer les vis de fixation au couple autorisé (voir tableaux au
chapitre „8.3.2 Couples de serrage pour membranes“).
8.3.2 Couples de serrage pour membranes
Actionneur PPS ou acier inoxydable
Diamètre nominal
(Taille de membrane)
DN [mm]
8 2 2,5
15 3,5 4
20 4 4,5
25 5 6
32 6 8
40 8 10
50 12 15
Tab. 8 : Couples de serrage pour les membranes. Actionneur PPS
ou acier inoxydable
Diamètre nominal
(Taille de membrane)
DN [mm]
65 20 30
80 30 40
100 40 50
Tab. 9 : Couples de serrage pour les membranes. Actionneur acier
inoxydable
Membrane
EPDM / FKM
Actionneur acier inoxydable
Membrane
EPDM / FKM
Membrane
PTFE / advanced
PTFE / advanced
PTFE laminé
Membrane
PTFE / advanced
PTFE / advanced
PTFE laminé
français
61
Page 62

Type 3232, 3233, 3233 K, 3234,
3235, 3239
Maintenance, nettoyage
9 MAINTENANCE, NETTOYAGE
9.1 Consignes de sécurité
DANGER !
Risque de choc électrique.
▶ Avant d’intervenir dans le système , coupez la tension et empê-
chez toute remise sous tension par inadvertance !
▶ Veuillez respecter les réglementations en vigueur pour les appa-
reils électriques en matière de prévention des accidents ainsi
qu’en matière de sécurité !
AVERTISSEMENT !
Risque de blessures dû à des travaux d’entretien non conformes.
▶ Le montage doit être effectué uniquement par un personnel
qualifié et habilité disposant de l’outillage approprié !
Risque de blessures dû à la mise en marche involontaire de
l’installation et le redémarrage non contrôlé.
▶ Empêchez tout actionnement involontaire de l’installation.
▶ Garantissez un redémarrage contrôlé après l’entretien.
9.2 Travaux d’entretien
9.2.1 Actionneur
A condition de respecter les consignes de ces instructions de service,
l’actionneur de la vanne à membrane ne nécessite aucun entretien.
9.2.2 Pièces d’usure de la vanne à
membrane
Les pièces soumises à une usure naturelle sont les suivantes :
• Joints
• Membrane
→ En cas de fuites, remplacez la pièce d’usure concernée par une
pièce de rechange correspondante (voir Chapitre 11).
Une membrane PTFE déformée peut entraîner une
réduction du débit
9.2.3 Durée de vie de la membrane
La durée de vie de la membrane dépend des facteurs suivants :
• Matériau de la membrane,
• Fluide,
• Pression du fluide,
• Température du fluide.
62
français
Page 63

Type 3232, 3233, 3233 K, 3234,
3235, 3239
Maintenance
9.2.4 Nettoyage
Pour nettoyer l’extérieur, des produits de nettoyage courants
peuvent être utilisés.
REMARQUE !
Évitez les dommages dus aux produits de nettoyage.
▶ Vérifiez la compatibilité des produits avec les matériaux du corps
et les joints avant d’effectuer le nettoyage.
10 MAINTENANCE
10.1 Consignes de sécurité
DANGER !
Risque de blessures dû à la présence de haute pression dans
l’installation.
▶ Avant de desserrer les conduites et les vannes, coupez la pres-
sion et purgez l’air des conduites.
Risque de choc électrique.
▶ Avant d’intervenir dans le système , coupez la tension et empê-
chez toute remise sous tension par inadvertance !
▶ Veuillez respecter les réglementations en vigueur pour les appa-
reils électriques en matière de prévention des accidents ainsi
qu’en matière de sécurité !
AVERTISSEMENT !
Risque de blessures dû à une maintenance non conforme.
▶ Le montage doit être effectué uniquement par un personnel
qualifié et habilité disposant de l’outillage approprié.
▶ Les couples de serrage doivent être respectés.
▶ Après les travaux, contrôlez l’étanchéité et le fonctionnement de
la vanne.
Risque de blessures dû à la mise en marche involontaire de
l’installation et le redémarrage non contrôlé.
▶ Empêchez tout actionnement involontaire de l’installation.
▶ Garantissez un redémarrage contrôlé après l’entretien.
français
63
Page 64

Type 3232, 3233, 3233 K, 3234,
3235, 3239
Maintenance
10.2 Remplacement de la membrane
DANGER !
Risque de blessures en cas d’échappement de fluide (acide,
soude, fluides brûlants).
Le démontage de l’appareil sous pression est dangereux du fait
de la décharge de pression ou de la sortie de fluide soudaine.
▶ Avant le démontage, coupez la pression et purgez l’air des conduites.
▶ Videz entièrement les conduites.
Types de fixation
Diamètre nominal
(Taille de membrane)
DN [mm]
8 Membrane clipsée
20
25
40
50
65
80
100
Tab. 10 : Types de fixation pour membranes
Types de fixation pour membranes
Membrane à
PTFE EPDM / FKM
Membrane clipsée15
fermeture à baïonnette
Membrane à
fermeture à baïonnette
Membrane à
fermeture à baïonnette
Membrane vissée
Membrane vissée
Membrane
Corps
4 vis de fixation
Languettes de repère
pour le
Fig. 10 : Replacement de la membrane
Actionneur manuel
4 vis de fixation
sens de débit
64
français
Page 65

Type 3232, 3233, 3233 K, 3234,
3235, 3239
Maintenance
Remplacement de la membrane
Procédure :
→ Serrer le corps de la vanne dans un dispositif de maintien (néces-
saire uniquement si la vanne n’est pas encore montée).
→ Desserrer les vis de fixation en croix et retirer l’actionneur avec la
membrane du corps.
→ Déclipser ou dévisser l’ancienne membrane. En cas de
fixation avec fermeture à baïonnette, desserrer la membrane
en la tournant de 90° (voir „Tab. 10 : Types de fixation pour
membranes“).
→ Tourner le volant dans le sens des aiguilles d’une montre
jusqu’en butée (position de fermeture).
→ Monter une membrane neuve sur l’actionneur (voir Tab. 10).
→ Tourner le volant dans le sens contraire des aiguilles d’une
montre jusqu’en butée (position d’ouverture).
→ Aligner la membrane.
Respecter les languettes de repère pour le sens de débit !
→ Remettre l’actionneur en place sur le corps.
→ Serrer légèrement les vis de fixation en croix jusqu’à ce que la
membrane soit en contact entre le corps et l’actionneur.
Ne pas encore serrer les vis à fond.
→ Activer une fois la vanne à membrane pour que la membrane soit
bien en place.
→ La vanne étant en position d’ouverture, serrer les vis de fixation
au couple autorisé (voir tableaux au chapitre „10.2.1 Couples de
serrage pour membranes“).
→ Contrôler une nouvelle fois le couple de serrage des vis.
10.2.1 Couples de serrage pour membranes
Actionneur PPS ou acier inoxydable
Diamètre nominal
(Taille de membrane)
DN [mm]
8 2 2,5
15 3,5 4
20 4 4,5
25 5 6
32 6 8
40 8 10
50 12 15
Tab. 11 : Couples de serrage pour les membranes. Actionneur PPS
ou acier inoxydable
Diamètre nominal
(Taille de membrane)
DN [mm]
65 20 30
80 30 40
100 40 50
Tab. 12 : Couples de serrage pour les membranes. Actionneur acier
inoxydable
Membrane
EPDM / FKM
Actionneur acier inoxydable
Membrane
EPDM / FKM
Membrane
PTFE / advanced
PTFE / advanced
PTFE laminé
Membrane
PTFE / advanced
PTFE / advanced
PTFE laminé
français
65
Page 66

Type 3232, 3233, 3233 K, 3234,
3235, 3239
Pièces de rechange, Accessoires
11 PIÈCES DE RECHANGE,
ACCESSOIRES
ATTENTION !
Risque de blessures, de dommages matériels dus à de mauvaises pièces.
De mauvais accessoires ou des pièces de rechange inadaptées
peuvent provoquer des blessures et endommager l’appareil ou
son environnement.
▶ Utilisez uniquement des accessoires ainsi que des pièces de
rechange d’origine de la société Bürkert.
Disponibles en tant que pièces de rechange pour les types 3232,
3233, 3233 K, 3234, 3235 et 3239 :
• Actionneur manuel complet et Membrane.
Actionneur manuel
Membrane
11.1 Tableau de commande de pièces
11.1.1 Tableaux de commande pour
actionneurs manuels (types 3232,
3233 et 3233 K)
Volant et chapeau en
PPS
Grandeur de
raccordement
DN [mm]
4, 6, 8, 10 194 809 194 809 194 808 194 808
15, 20* 432 977 432 978 432 979 432 980
20, 25* 432 984 432 985 432 986 432 987
25, 32* 432 991 432 992 432 993 432 994
32, 40* 432 998 432 999 433 000 433 001
40, 50* 433 005 433 006 433 007 433 008
50 433 012 433 013 433 014 433 015
Membrane
EPDM, FKM
Membrane
PTFE /
advanced
PTFE /
advanced
PTFE
laminé
Tab. 13 : Tableaux de commande pour actionneurs manuels
* Vannes, type 3233 K avec raccord à souder selon DIN 11850 série 2, avec
extrémités soudées OD, avec bride à souder à collerette ANSI et JIS
Volant en PPS, chapeau
en acier inoxydable
Membrane
EPDM, FKM
Membrane
PTFE /
advanced
PTFE /
advanced
PTFE
laminé
Fig. 11 : Pièces de rechange
66
Actionneurs manuels de diamètres nominaux DN 65, DN 80
et DN 100 sur demande.
français
Page 67

Type 3232, 3233, 3233 K, 3234,
3235, 3239
Sommaire
Volant et chapeau en
acier inoxydable
Volant et chapeau en acier
inoxydable (pour vanne en
T ou de fond de cuve)
Grandeur de
raccordement
DN [mm]
Membrane
EPDM, FKM
Membrane
PTFE /
advanced
PTFE /
advanced
PTFE
laminé
Membrane
EPDM, FKM
Membrane
PTFE /
advanced
PTFE /
advanced
PTFE
laminé
4, 6, 8, 10 194 810 194 810 441 264 441 264
15, 20* 427 753 432 981 441 265 441 270
20, 25* 427 754 432 988 441 266 449 128
25, 32* 427 755 432 995 441 267 441 271
32, 40* 427 756 433 002 - 40, 50* 427 757 433 009 441 268 441 276
50 427 758 433 016 441 269 441 277
Tab. 14 : Tableaux de commande pour actionneurs manuels
* Vannes, type 3233 K avec raccord à souder selon DIN 11850 série 2, avec
extrémités soudées OD, avec bride à souder à collerette ANSI et JIS
11.1.2 Tableau de commande pour
membranes
Diamètre
nominal
(Taille de
membrane)
[mm]
4, 6, 8, 10
15, 20*
20, 25*
25, 32‘
32, 40*
40, 50*
50
65
80
100
EPDM
(AB)
677 663 688 421 677 684 677 674 679 540 677 694
677 664 688 422 677 685 677 675 679 541 677 695
677 665 688 423 677 686 677 676 679 542 677 696
677 667 688 424 677 687 677 677 679 543 677 697
677 668 688 425 677 688 677 678 679 544
677 669 688 426 677 689 677 679 679 545 677 698
677 670 688 427 677 690 677 680 679 546 677 699
677 671 688 428 677 691 677 681 679 743
650 082 688 429 650 083 650 087 679 744
650 084 688 430 650 085 650 088 679 745
Tab. 15 : Tableau de commande pour membranes
* Vannes, type 3233 K avec raccord à souder selon DIN 11850 série 2, avec
extrémités soudées OD, avec bride à souder à collerette ANSI et JIS
Vous trouverez de plus amples informations concernant les
pièces de rechange dans les fiches techniques des vannes à
membrane commandées par piston. Vous trouverez les fiches
techniques sur Internet sous : www.buerkert.fr
Références pour membranes
EPDM
(AD)
FKM
(FF)
PTFE
(EA)
Advanced
PTFE
Advanced
PTFE
laminé
français
67
Page 68

Type 3232, 3233, 3233 K, 3234,
3235, 3239
Emballage, Transport, Stockage
11.2 Option verrouillage du volant
L’option de verrouillage du volant sert à protéger la vanne contre
toute commande involontaire ou non autorisée (à partir des tailles
d’actionneur DN 15 à DN 50). Le volant peut être verrouillé sur 12
positions d’arrêt par tour (tous les 30°).
Arrêt
→ A l’aide d’une clé, pousser
Goujon
le goujon dans l’arrêt et
tourner vers la gauche
jusqu’en butée.
→ Retirer la clé.
La vanne est verrouillée.
Fig. 12 : Volant avec verrou
12 EMBALLAGE, TRANSPORT,
STOCKAGE
REMARQUE !
Dommages dus au transport.
Les appareils insuffisamment protégés peuvent être endommagés
pendant le transport.
• Transportez l’appareil à l’abri de l’humidité et des impuretés et
dans un emballage résistant aux chocs.
• Évitez le dépassement vers le haut ou le bas de la température
de stockage admissible.
Un mauvais stockage peut endommager l’appareil.
• Stockez l’appareil au sec et à l’abri des poussières.
• Température de stockage : -40 – +55 °C.
Dommages à l’environnement causés par des pièces d’appareil contaminées par des fluides.
• Éliminez l’appareil et l’emballage dans le respect de l’environnement.
• Respectez les prescriptions en matière d’élimination des déchets
et de protection de l’environnement en vigueur.
Remarque :
Respectez les prescriptions nationales en matière d’élimination
des déchets.
68
français
Page 69

Page 70

www.burkert.com
 Loading...