

Page 1
GPS RECEIVER
Quick Start Guide
Model # 363500 Lit # 98-1246/08-08
English
Page 2

Warnings and Notices
GPS System & Map Data Accuracy Notice:
e Global Positioning System (GPS) is operated by the government of the United States, which is solely responsible for
its accuracy and maintenance. e system is subject to changes which could affect the accuracy and performance of all
GPS equipment.
All map data sources contain some level of inaccuracies or incomplete data. Bushnell strives to provide the most recent map
information at a reasonable cost. Basemap data is supplied by NAVTEQ
®
, a major supplier of digital map data for handheld
and vehicle navigation products worldwide. NAVTEQ® continually refines and improves their digital map databases to
maintain their leadership position in the industry.
Warning:
is device is intended as a supplemental handheld navigation aide only. e user assumes all responsibility associated with
the use of this product. It must not be used for any purpose requiring precise measurement of location, direction, distance,
velocity or topography. is device should not be used for any aircraft navigation applications.
Warning:
is device uses a rechargeable lithium-ion battery pack. Follow the directions for charging the battery before use. Do
not attempt to open the battery pack, modify or charge it other than as directed. Check the battery compartment after the
unit has had any prolonged exposure to significant amounts of water (rain, snow, etc), and remove any moisture before
continuing to use the unit. If it becomes necessary to dispose of the battery pack, please take it to your local waste collection
service or recycling center for environmentally responsible processing.
Vehicular Use Notice:
Bushnell is committed to the safe and responsible enjoyment of the outdoors.
Do not use this product while driving. An accident can result in property damage, injury or death if the operator fails to
practice prudent driving practices. It is the sole responsibility of the driver of any vehicle to operate the motor vehicle in
a safe manner. Information from the GPS unit can distract the operator of a motor vehicle. It is unsafe to operate the
controls of the GPS unit while operating a motor vehicle. If used in a motor vehicle, it must not be used by the operator
of the motor vehicle. If it is used in a motor vehicle it must be mounted in a manner such that it does not distract the
operator, does not interfere with the operator’s field of view, and does not block or interfere with the air bags or other safety
mechanisms of the motor vehicle.
Software License Agreement
B
Y USING THE ONIX, YOU AGREE TO BE BOUND BY THE TERMS AND CONDITIONS OF THE
FOLLOWING SOFTWARE LICENSE AGREEMENT. PLEASE READ THIS AGREEMENT CAREFULLY.
Bushnell grants you a limited license to use the software embedded in this device (the “Software”) in binary executable
form in the normal operation of the product. Title, ownership rights and intellectual property rights in and to the Software
remain with Bushnell.
You acknowledge that the Software is the property of Bushnell and is protected under the United States of America
copyright laws and international copyright treaties. You further acknowledge that the structure, organization and code
of the Software are valuable trade secrets of Bushnell and that the Software in source code form remains a valuable trade
secret of Bushnell. You agree not to decompile, disassemble, modify, reverse assemble, reverse engineer or reduce to human
readable form the Software or any part thereof or create any derivative works based on the Software. You agree not to export
or re-export the Software to any country in violation of the export control laws of the United States of America.
Page 3

3
e Bushnell ONIX 350 features a unique Almanac page, which uses patented Solunar Edge
technology developed by Speedtech® Instruments to provide a significantly more accurate
predictor of animal and fish activity than standard “sun & moon tables”, utilizing the current
environmental pressure and temperature condition data to provide the most reliable activity
predictions for your location.
About Solunar Edge Technology
e various environmental conditions affecting wildlife behavior have been integrated in a
mathematical algorithm to determine optimal animal and fish activity times. e factors
and relationships used in the instrument were obtained through an extensive study of the
scientific literature, and use of well documented wildlife behavior studies. is information,
combined with discussions with wildlife biologists and experienced outdoorsmen, has
contributed to the development of the software used in the Solunar Edge to provide you
with the ability to determine the absolute best predictor of animal and fish activity.
e Almanac Page and Solunar Edge Technology
by Speedtech® Instruments
Page 4

4
ank you for purchasing the Bushnell ONIX350 – the most advanced outdoor navigation device available today! e
ONIX350 comes preloaded with a base road map of the United States and Canada including a Points of Interest data
base. e GPS receiver has the capability to receive satellite signals worldwide.
ONIX has been designed to be much simpler to operate than other handheld GPS receivers, while offering powerful
features like TruView Navigation, which allows you to layer satellite photos or topographic maps right over your trail map
screen, providing a useful “real world” frame of reference1. Your trails, a compass or other navigation aids-as much or as
little information as you choose can all be displayed together in various combinations on the extra large 3.5” full color
LCD screen.
e ONIX GPS lets you easily create and store user profiles that let you save your most frequently used personal setups.
Bushnell’s exclusive SafeTrack™ battery conservation feature extends your battery life while maintaining GPS contact,
so you can check your current location anytime without the restart delay typical of other GPS receivers. You will find
your ONIX to be an invaluable companion for all your outdoor adventures. Just hit the “HOT” button to quickly see
your current position on the map. Want to see the temperature there, or wondering if a storm is coming? Just go to the
Weather page. If you hunt or fish, wouldn’t it be great to know when wildlife was likely to be most active in the forest
or lake area you’re headed for tomorrow? An Almanac page uses data from internal sun and moon tables along with a
barometric pressure sensor to predict animal activity levels at different times of the day- for any date and location. Like to
climb? A built-in altimeter works with GPS data on the Elevation page to display a graph showing your current altitude
and compare it to any other point on your trail since you started up the mountain, see how the total ascent adds up, and
see the distance or elevation difference between any two points of your choice.
Before using your new ONIX, please read the instructions contained in this manual and take time to familiarize yourself
with the unit’s operation and many great features. You may want to start near your home, by turning on the ONIX, then
pressing the MENU button to run through the different display pages (MAP, NAV, SAT, SET, etc) while reading the
manual section for each. After that, practice using the “HOT” button and 5-way button to see and select from a menu of
options, perhaps on the SET screen by setting a few personal preferences for information displays. Once you begin feeling
more comfortable with the controls and screens, the best way to really learn to use your ONIX is to take it outside (right
in your own neighborhood or a local park), and let it lock onto the GPS satellite signals as you watch the SAT page (be
patient, this can take 3 or 4 minutes the first time you use it-make sure you have a clear view of the sky and are not right
next to a large building for best results), then take a short walk and finish by using the ONIX to guide you back to your
starting point (you can either mark a waypoint at the start by clicking the center of the 5-way button twice, or just begin
walking, later following the dotted “breadcrumb” trail back). After that, you might try downloading a satellite photo of
this local area, layer it on top of the map screen, and try walking the same trail again, setting a few waypoints as you go.
Continue referring to this manual and practicing as often as necessary until you master the basics, before heading out on
a hike of any significant length or attempting to navigate an unfamiliar area.
• Extra Large 3.5” Full Color, Sunlight Readable LCD • Download Topographic Maps
1
• Altimeter for Elevation Tracking • Download Georeferenced Satellite Photographs
1
• Heads-Up Digital Compass • SiRF 20 Channel GPS Receiver, WAAS Enabled
• Built-In Base Maps (North America) • Waterproof (IPX7 Standard)
• Save/Load Waypoints, Trails and Routes • Durable Rubber Armoring
• Stores Up to 1000 Waypoints, 50 Routes, 50 Trails • SafeTrack™ Battery Conservation Mode
• Micro SD Card Storage (512MB card inc.) • Internal Pressure and Temperature Sensors
• Exclusive TruView Navigation with Screen Layering • Sun & Moon Tables with Wildlife Activity Prediction
ONIX 350 Model # 363500 FEATURES
1
Download satellite photos and topo maps at www.bushnellgps.com
Page 5
5
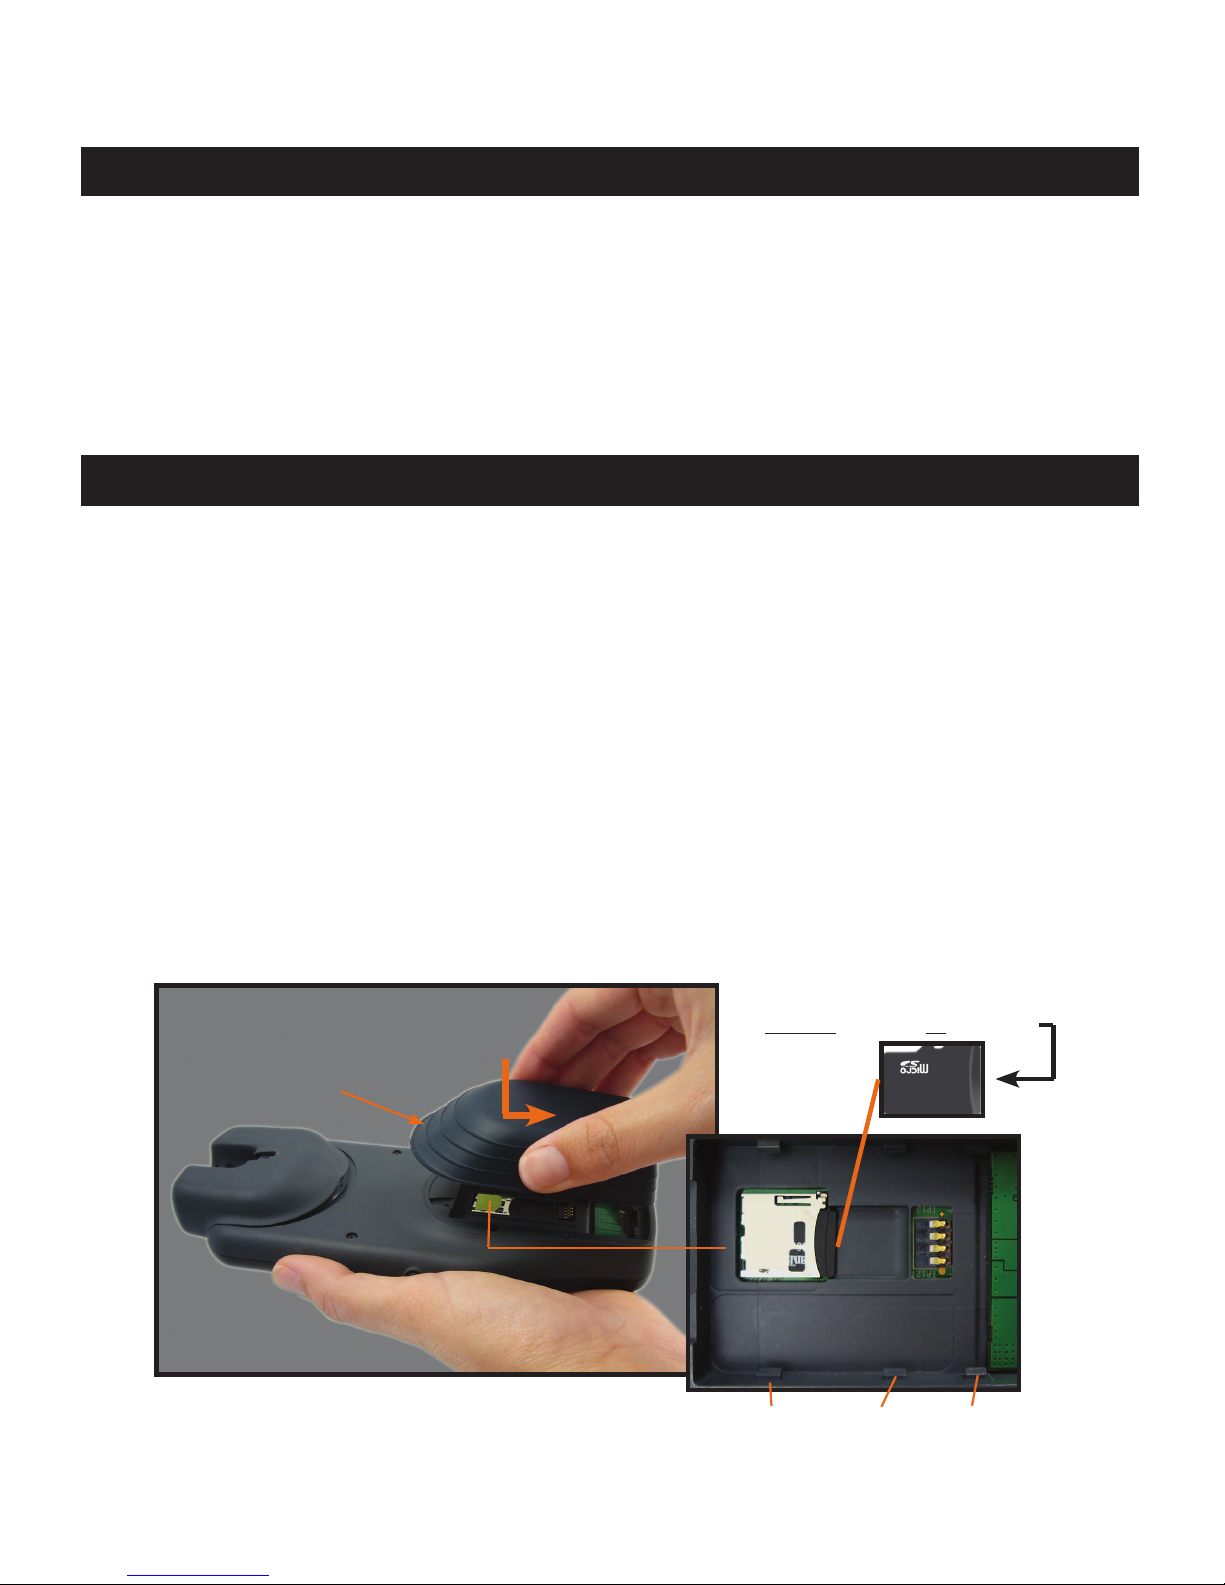
• e internal Lithium Ion battery pack must be charged before the ONIX can be used for the rst time. Make sure
the MicroSD card is inserted in the card slot first, then attach the battery pack by lining it up with the opening on the
bottom of the unit, pushing it straight onto the unit until flush with the surface, then sliding the battery down towards
the end with the USB and accessory ports, until it locks securely into place (to remove the battery, press the soft release
area (see yellow arrow below) at the curved end of the battery, then slide it up and lift directly away from the ONIX
body). Connect the supplied AC charging cord to the accessory connector port at the bottom of the unit, then into a
wall outlet. When the Status LED changes from red to green, the battery is fully charged.
• e ONIX is designed to be waterproof to a depth of 1 meter (IPX7 rating), however it is recommended that the user
opens and checks the battery compartment following any submersion or prolonged exposure to rain, snow, etc. Any
moisture observed inside the battery compartment or on the exterior of the battery pack or MicroSD card should be
dried o immediately and completely. Prolonged submersion (over 30 minutes) and/or to water depths greater than 1
meter can cause damage to the unit.
• If the ONIX exterior becomes dirty, clean it with a soft cloth dampened with a mild detergent solution, then wipe
dry. To avoid possible scratches, a (dry) micro fiber cloth is ideal for cleaning the display screen. Do not use chemical
solvents or cleaners of any type on the ONIX unit’s exterior, battery compartment, or display, as these may damage
plastic components.
INCLUDED PARTS LIST
• ONIX 350 GPS Receiver
• Lithium Ion Battery Pack
• 512MB MicroSD Card
• AC Charging Cord
• USB Cable
• Info Pack with Quick Start Guide,
Registration Card, and CD-ROM
BATTERY CHARGING, CLEANING & MAINTENANCE
MicroSD Card
Battery pack attachment lugs
Push here to release
battery pack
To attach
battery pack
Battery Pack & Compartment Details
Push In to Insert or Remove
Page 6
6
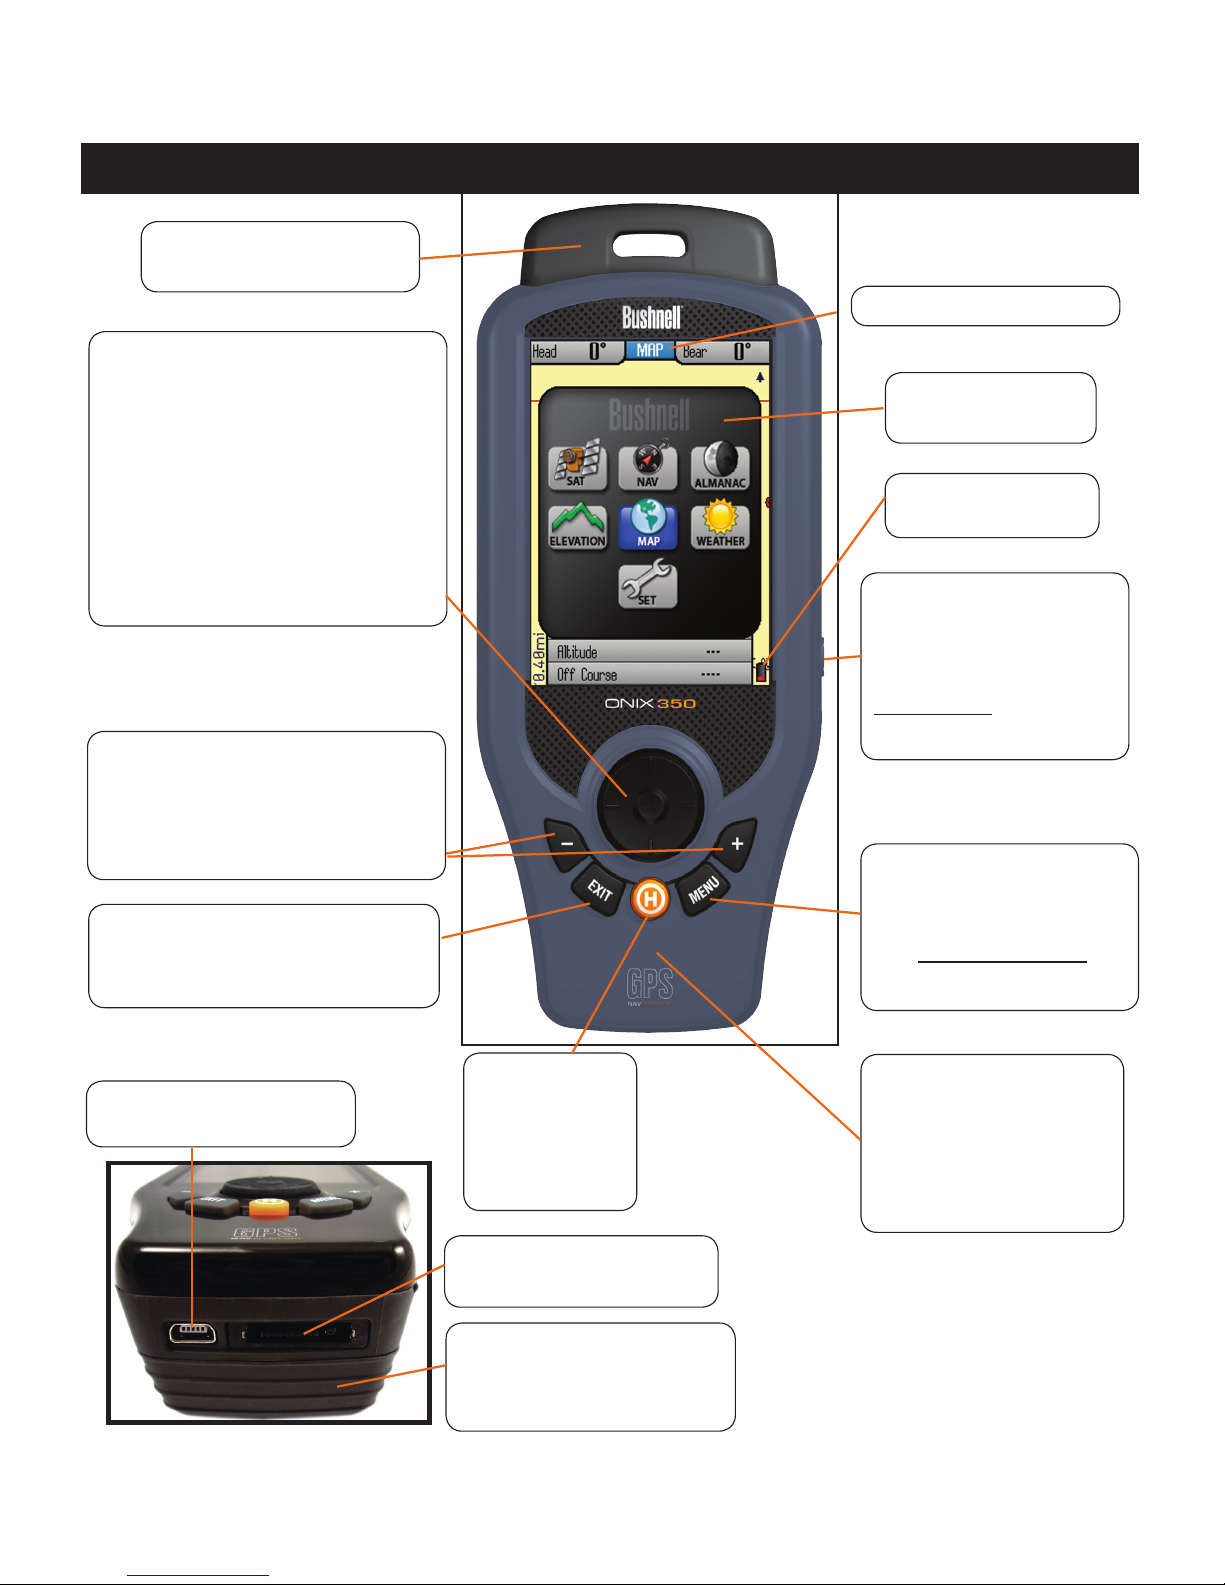
MENU Button:
Press to
view Main Menu with choice
of 7 Pages. (Hold down to
see Display Options for
layers/info boxes.)
5-Way Button (Key) Pad:
Used to
navigate on screen, select from menu
options, and create waypoints. Press
UP/DOWN keys to select items in a
menu, RIGHT key to view submenus
(if available), LEFT key to exit the
menu. Press the “OK” center button
to confirm a menu selection or turn an
option on/o. Press the “OK” button
to set a waypoint on the MAP.
EXIT Button:
Press to exit any
menu and return to current screen
with selected layers and info boxes.
“Hot” Button:
controls all
actions:
• Navigation
• SafeTrack
USB Port:
connect to
PC with supplied cable
Accessory Port:
used for
AC charging cord
Battery Pack Module:
houses Lith-Ion battery pack.
Also covers MicroSD card slot.
Status LED:
Red=charging,
Green=battery charging
complete.
Blinking Red (during use)=
SafeTrack mode
CONTROLS AND PORTS IDENTIFICATION
Zoom Buttons:
Zoom the view
closer in or further out on maps and
photos by pressing the “+” or “-”
buttons. Also used to view additional
page menu lists or tabs.
Helical Satellite Antenna
and Lanyard Attachment
Current Page Indicator
3.5” Color LCD
Display Screen
Battery Level
Indicator
Power Button:
located on
right side of ONIX. Push to
turn on. Once the unit is
on, press briefly to see the
Power Menu. Hold button
for 2 sec to turn power o.
Page 7
7
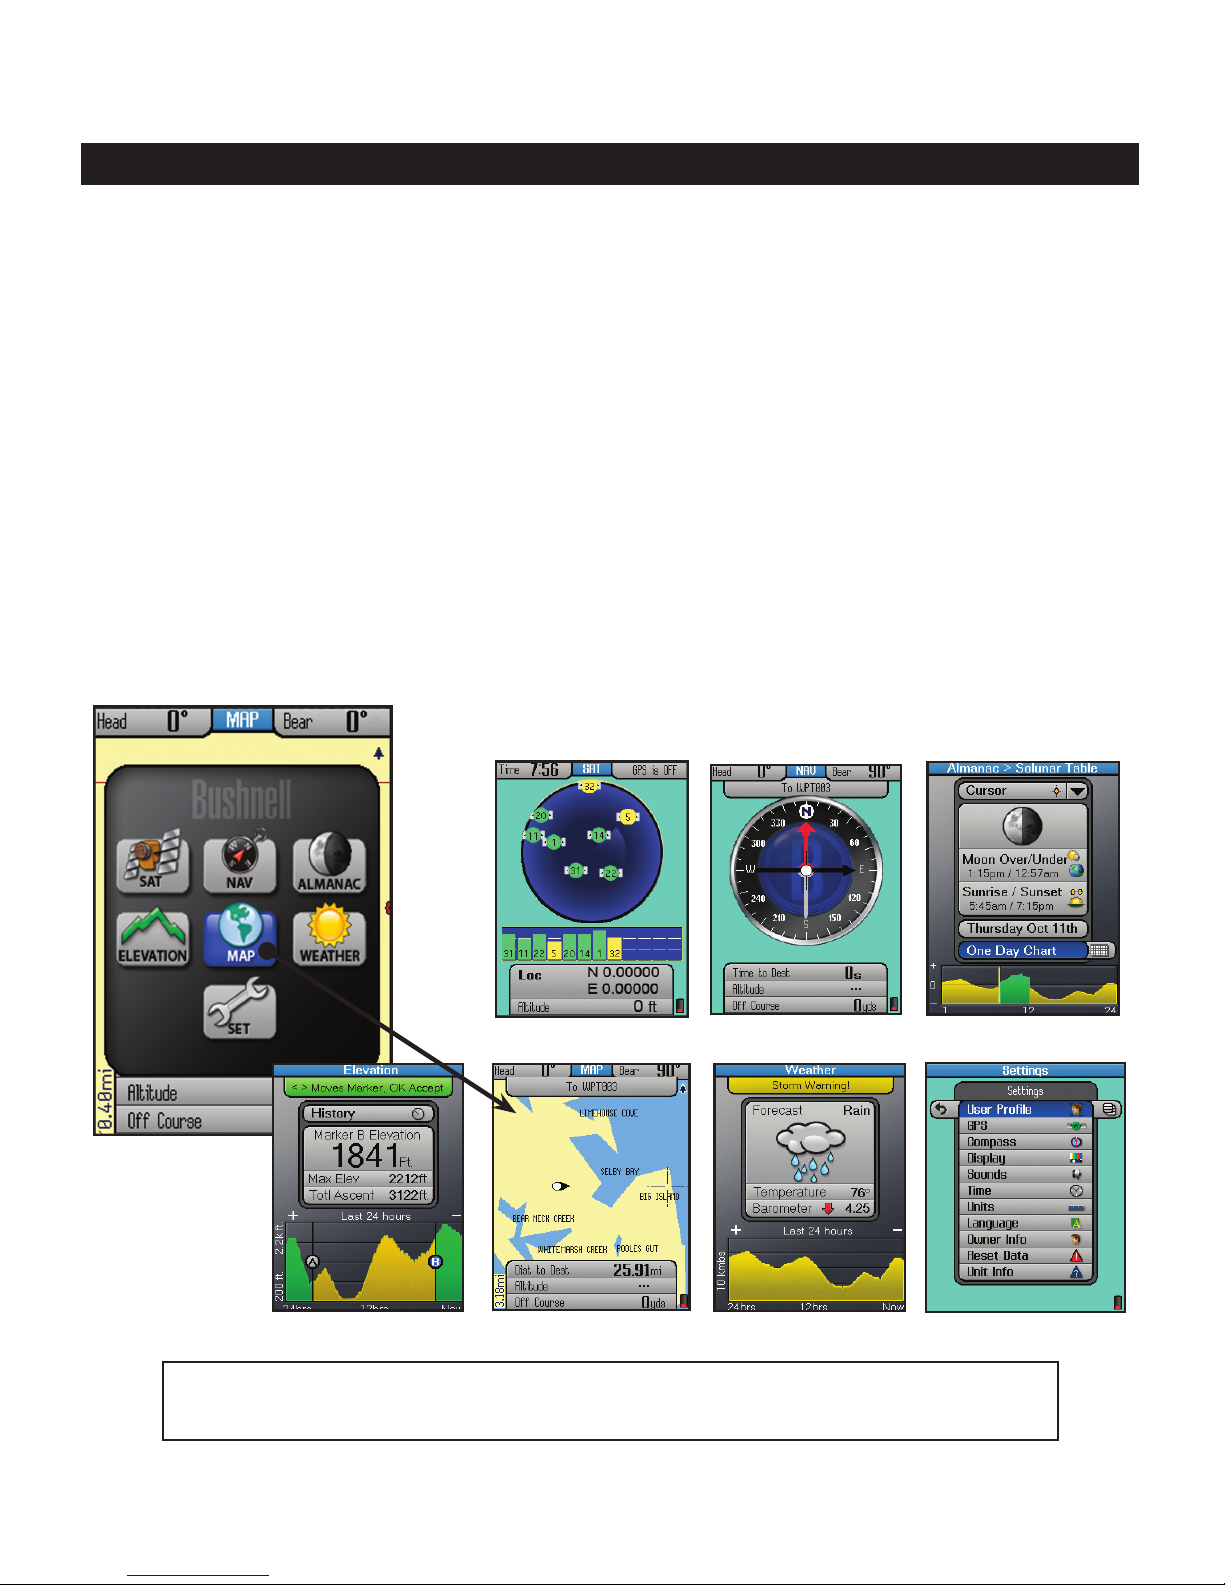
THE SEVEN PAGES OF THE ONIX350
Press the MENU button briefly, use the 5-way keypad to select (highlight) a page
on the menu display, then press OK (center button) to view and use that page.
1. SAT (Satellite) - this page allows you to monitor the signal strength of multiple GPS satellites, confirming
when you have a “lock”-adequate number and quality of satellites to ensure good reception.
2. NAV (Navigation) - a basic display of the digital compass. View your current heading and true or magnetic
north at any time by switching to this page.
3. ALMANAC - this page lets you view lunar and solar information for your chosen location, including
sunrise/sunset times and Solunar data graphs that can help predict the level of mammal and sh activity.
4. ELEVATION - your current altitude as well as a graph of changes in altitude over time as you travel on
a trail.
5. MAP - you will likely spend the most time on the MAP page, since it shows your current location relative
to other objects and places. You can layer a compass, photos, and other navigation related items alone or in
combinations over the top of the base map, making it even more useful and informative.
6. WEATHER - Local temperature and barometric pressure data based on internal sensors, as well as a
weather forecast prediction and pressure graph derived from the sensor data, altitude, etc.
7. SET (Setup) - go here to set your personal user preferences, enable XM satellite reception, setup a custom
user profile, and other user adjustable operating utilities.
2. NAV Page
1. SAT Page
3. ALMANAC Page
Main MENU
7. SET Page
5. MAP Page
6. WEATHER Page
4. ELEVATION Page
Page 8

8
Fig. A
Fig. C
Fig. B
e ONIX350 uses the latest technology and exclusive features to provide the most efficient combination of
battery life and functionality.
e rechargeable Lithium Ion battery pack provides an extended capacity of
power.
Power Saving Options
e following features allow the user to extend battery life.
1) Power Menu
Access this quick menu anytime by clicking the Power Button (see Fig. A)
e Power menu provides these options to increase battery life:
• Backlight – Turn the backlight “O” when outdoors in daylight to increase battery
life. Use the backlight in low light, or dark conditions, or when indoors.
• Brightness – Select and press OK to use the Brightness slider (Fig. B) Increasing
brightness increases power consumption. Select a brightness level based on your
viewing requirements.
• GPS – Turn GPS “O” when not using the GPS navigation functions or when
indoors where GPS signals are not accessible.
2) SafeTrack™ Battery Conservation Mode
• SafeTrack Mode creates a low power state while maintaining satellite connection
• Utilize SafeTrack to extend battery life during navigation
• Access SafeTrack from the Hot button menu (see Fig. C).
For more information on Safe Track please reference “SafeTrack Battery Conservation Mode” on pg. 22.
Utilize SafeTrack™ mode to maximize battery life.
TIPS FOR MAXIMIZING BATTERY LIFE IN THE ONIX 350
Page 9

9
1. You must charge the battery pack before using the ONIX350. Attach the battery pack (first, verify
that the MicroSD card is installed in its slot), referring to the instructions and photos on pg. 5. Plug
the AC charger cord into the accessory port (pg. 6), then into an AC outlet (110-120 volt/60 cycle).
2. e initial charge may take up to 4 hours. A full charge is indicated when the status LED below
the orange Hot button changes from red to green. You may then disconnect the charger cord from the
outlet and accessory port. Store it safely for future use.
3. To ensure adequate satellite signal strength, make sure you are in a location with an unobstructed
view of the sky (GPS units typically do not work well indoors unless you are very near to a window)
4. Press and hold the power button for a few seconds until the display starts up.
5. Press the MENU button briefly. You will see the Main Menu screen, with seven “pages” to choose
from. Use the 5-way button pad to select (highlight) SAT, then press the “OK” (center) button.
6. You are now viewing the Satellite (SAT) page. You will begin to see multiple icons on the circular
“radar” screen, representing the closest satellites to you in the global GPS system. ese icons will turn
green as the ONIX “locks on” to each satellite, and the satellite ID# will be shown. e bar graph
below the “radar” screen indicates the relative signal strength of each satellite. Once you have a lock
on at least 3 or 4 satellites, you are ready to navigate. Note that the satellite “lock” process will take
longer (up to 3 or 4 minutes), the first time you use your GPS in a new geographical area, but will be
much faster on future usage in the same area (see “Reset Data” in the SET Page>GPS options, if you
later relocate more than 300 miles away from your initial area). You can check reception with the SAT
page at any time, but will likely find that you use it less than any other page-in fact, you may simply
go directly to the MAP (or any other) page the next time you use your ONIX.
7. You’re ready to go! Let’s take a look in more detail at the other pages, and see how easy it is to enjoy
the many features and capabilities of the ONIX350 You’ll learn how to mark and name your own
waypoints (locations or objects you want to return to later), navigate towards a nearby point of interest,
layer a compass over the map.....and much, much more!
GETTING STARTED
Page 10

10
EXPLORING THE PAGES : SAT / MAP
e many functions and features of your ONIX350 are organized into
seven “pages” or screens of related information. Press MENU, then use the
5-way button to select (highlight) a page, then press “OK” (center button)
to view that page. e current page you are on is always indicated in the box
at the top of the display, just below the “Bushnell” logo. Let’s take a tour of
the various pages and the options they provide:
e SAT Page
As seen earlier in “Getting Started”, e SAT page view
(Fig. 1)
is used
to identify the quality or strength of the satellite signals being received by
the unit. e Info Boxes on the bottom of the satellite page are used to
identify your location, shown as Location (latitude, longitude) and Altitude
(above sea level). e items displayed on the satellite page view are fixed,
and cannot be changed by the user, so there is are no options or settings
menus for this page.
e MAP Page
You will likely spend more time on the MAP page than any of the others
while using the ONIX350. Using Bushnell’s exclusive TruView Navigation
screen layering feature, this page can display multiple location and
navigation related information in a single view. e following items are
always displayed on this page:
• Base Map (Fig. 2)-primary streets and location, similar to a basic road
map.
• Cursor-shows your location and direction. e cursor can assume one of
three shapes (Fig. 3):
-a crosshairs cursor that allows you to pan the map, check the
position of waypoints or POI when moved over them, use as a distance
measuring tool, or create routes.
-a bearing arrow that shows your navigation direction when you are
moving (or heading when you are not actively navigating)
-a circle-“you are here locator” to display your current location relative
to the map
•Zoom Display Level-on lower left next to the Info Boxes. Shows scale or
actual distance represented by height of current display (e.g. “10.2km” span
from top to bottom of screen). Use the “+” and “-” buttons to change the
zoom level.
Fig 2. MAP Page
Base Map
Fig 1.
SAT Page
Fig 3. MAP Page
Cursors
Page 11

11
MAP Page Layering Options utilizing TruView Technology
You may choose to add other items to your view of the MAP page. To select
these items, press the HOT button, then press the DOWN key until “Map
Detail” is highlighted, and press OK-you will see a map page layer options
screen (Fig. 4). Use the 5-way button to move up and down the options, press
the center button to select (check) or deselect (uncheck) the items you wish
to include in your view. Press EXIT or use the LEFT key to exit the map layer
options.
e MAP page layer options list:
•Compass-
exclusive to ONIX, your compass shows your direction right
on top of the map.
•Range Rings (Fig. 5)-visual tool that represents distance on your map or
photo within a circle. e distance shown is the radius of the circle. is
radius is half the zoom level. Use Up/Down on the 5-way pad to adjust the
radius of the rings, then press OK to exit.
• Photos (Aerial/Satellite) (Fig. 6) -superimposed over Base Map if desired.
You do not need to manually select the right photo (or topo map) to use, as
these downloaded files are “geo referenced”, enabling your ONIX to choose
the correct photo automatically, based on your current location and zoom
level. Note that while both types of images can be stored at the same time
on your ONIX, only one of them (photo or topo map) can be displayed
over the base map at a time.
•Topo-the topographic map you choose from files you download and store
in the ONIX will be layered over the base map
•North UP-when checked, the top of the screen is oriented due north. If
unchecked, the top of the screen is oriented to your current direction of
travel (i.e.“track up”-like automotive GPS units). Satellite photos and topo
maps are displayed “North Up” by default.
• Map Data-turns on/o display of roads and places on the base map
•Bread Crumbs-a dotted line on the display showing the simple path
you’ve traveled. Breadcrumbs are automatically stored, but only displayed
if this option is selected.
•Points of Interest-major or common facilities from a pre-programmed list
(airports, hospitals, etc)
Setting Up and Using the Info Boxes
(MAP & NAV Pages)
e wide rectangular Info Boxes at the bottom of the Page display (along with
two smaller boxes at the top of the screen) allows you to keep an eye at all times
on a wide variety of information, all user selectable-they let you “customize”
your display (in the MAP and NAV Pages). Take a moment to explore the Info
Boxes by following these steps:
EXPLORING THE PAGES : MAP & Info Boxes
Fig 5. MAP Page
Range Rings Layer
Fig 6. MAP Page
Satellite Photo Layer
Fig 4. MAP Page
Layer Options
Page 12

12
EXPLORING THE PAGES : MAP & Info Boxes
1. Go to the MAP page if you are not already there (this example will use the
MAP Page as a starting point, but Info Boxes are available on other Pages as
well).
2. Hold the MENU button for 2 sec. You will see a “Nav” tab pop up above the
lower set of Info Boxes, and the first Info Box is highlighted.
3. Press OK to see a list of the different types of information available to display
in the Info Box (Fig. 7). Four sets of lists are available-use the “+” and “-“
buttons to see the other lists.
4. Use UP/DOWN buttons to highlight one of the listed options (for example,
“Local Time” from the 3rd list) (Fig. 8), then press OK to checkmark it (press
EXIT to return without changing the selected Info Box). e first Info Box will
change to display the local time-your new selection has replaced the previous
type of info.
5. Press DOWN to select the second Info Box and repeat steps 3 & 4 to change
what is displayed in this box. Repeat the process again if you like for the third
box. Note that if you choose “Location” (your latitude/longitude) for one of
your info boxes, it will take up 2 Info Boxes (latitude is the top box).
6. You may have noticed that there is an option at the top of the first list of
information types labeled “No Information”. You may select this option for any
of the Info Boxes if you prefer not to use one or more of them-as selecting “No
Information” will actually clear and remove that Info Box “slot” from the lower
set of boxes. You can reduce the “stack” of three boxes you start with to just
two, one or even zero. You can also press DOWN to step below the third box,
where you will find that a fourth box is “hidden” because “No Information” is
selected for display there. Simply select something else, and you can have up to
a maximum of 4 Info Boxes in the lower part of your Map screen (Fig. 9).
7. Once you have set up the lower Info Boxes with a few different types of Nav
data, press EXIT or hold MENU again to leave the Info Box setup process and
return to normal display. e info you chose will still be displayed in the boxes,
and any boxes with “No Information” selected will not appear.
8. You can also change the info displayed in the upper two Info Boxes, but
these can only be used to show Nav related data. After following step 2 above to
highlight the first lower Info Box, press UP and you will jump to the upper left
Info Box. Press OK to see the list of info to display here (then press “+” to see a
second list). As described in step 4, make a selection from one of the lists, then
press OK. Press RIGHT to jump to the upper right Info Box and repeat. Once
you have one or both upper boxes set up as you like, press EXIT.
Setting Up and Using the Info Boxes-continued
Fig 7.
Info Boxes
Info Box Options (Nav)
for lower boxes
Fig 8.
MAP Page
Info Box Options
for upper boxes
Fig 9. MAP Page
4 Info Boxes After
Set Up and Exit
Upper Info Boxes
Lower Info Boxes
(0 ~ 4, set by user)
Page 13

13
EXPLORING THE PAGES : NAV / SET
e NAV Page
e NAV page provides a standard compass display, with arrows to indicate your
last heading and/or current bearing, along with magnetic or true north indication
and other optional navigation related data, depending on the display preferences
the user has set up. (Fig. 10) is page is especially useful if you do not choose to see
a compass image layered on top of the MAP page-you may switch over to it at any
time, then return to MAP page just as you left it. e ONIX350 utilizes a digital
compass, so you do not need to be moving to obtain
a bearing, unlike GPS driven
compasses. e digital compass is self-calibrating (no user- initiated calibration
routine is required).
e view options (press the HOT button, DOWN to Compass Options, press OK)
of the NAV page include (Fig. 11):
•Heading Arrow-if user selected. Small arrow “head” only. Indicates the direction
you are actually moving in.
•North Arrow-if user selected-points to true or magnetic north (user options).
Identified by “N” circle at head of arrow.
•True North-direction to the earth’s geographic north pole.
•Magnetic North- direction to the earth’s magnetic north pole Note: you can select
True or Magnetic North, but not both together-they are mutually exclusive.
•Bearing Arrow (Fig. 10)- only appears during active navigation (see pg.10,
Fig. 3). is will be seen as a long black line with an arrow head. It indicates
where you should go to get to your navigation destination, and is only valid while
navigating.
Upper and Lower Info Boxes are visible while on the NAV Page-these operate the
same way as previously described in the MAP Page section (“Setting Up and Using
the Info Boxes”)
e SET Page
e SET page user options (Fig. 12) include all the following:
• User Proles (Fig. 13)-select to customize and set various display options. You
can save different sets of screen configurations that are best suited to your different
activities.
To save a prole, select an activity from the list (hiking/camping, etc), then press
the right arrow to save your current display configuration under that name.
e checkmark indicates the current active profile. One “custom” user profile
may bet setup and selected in addition to the other five pre-named profiles for
common activities (Hiking/Camping, Hunting, Inland Boating, Ocean Boating,
Geocaching, Custom). You may also choose to “Reset to default” instead of saving
your current settings as one of the profiles-this restores the original factory default
screen configuration (display options for all pages).
Fig 10. NAV Page
Fig 11. NAV Page
View Options
Page 14

14
EXPLORING THE PAGES : SET
• GPS-press the right button and select GPS satellite reception “ON” to for normal
GPS operation, select “OFF” to conserve battery life if you are not going to be
navigating, or while you are getting more familiar with your ONIX indoors where
GPS reception is not possible. Two other options are available:
WAAS (Wide Area Augmentation System)- turning WAAS on will provide
slightly better GPS accuracy in the United States. As this can decrease battery
life, you may want to keep it turned off for most normal navigation activities.
Cold Start Receiver-press OK to re-activate GPS satellite reception. is will
force the ONIX to clear the satellite “almanac” information, which is stored
automatically during the first power-on to speed up the process of choosing the
best GPS satellites for your usual starting area. If this almanac data is no longer
valid, it will cause longer startup times. Enabling a cold start is recommended
if you have re-located to a new area that is over 300 miles away from your last
power-on position. Note that this will only take effect the next time the unit is
powered on-there is no advantage or reason to force a cold start if the unit has
already locked onto satellites in a reasonable amount of time, and are still within
about a 300-mile radius of the location where you first powered up the ONIX.
• Compass-options to select your preferred navigation units (Degrees, Cardinal
Letter, or Mils) and North Reference (True or Magnetic).
• Display-allows adjustment of display Brightness and Breadcrumbs Color.
• Sounds-options to mute all sounds, set volume, and mute or select different tones
for: key beep, destination arrival and warning sound.
•Time-sets time format: 24 hr or AM/PM, North American time zone, UTC
(Universal Time) Oset (for other time zones), daylight savings (on/o/auto).
•Units-selecting distance/speed units, elevation units, GPS position format,
pressure, temperature, and datum (default for North America is WGS84-see the
glossary for more info.)
•Language- selects language used for all display menus and option screens.
•Owner Info- allows you to input personal information for identification (this
can be shown during startup if desired). Please refer to the “Using the Text Tool”
section on page 19 for details on how to enter letters and numerals.
•Reset Data-(Fig. 14) allows you to reset (clear) all existing data, or speed, distance,
time, or breadcrumb data individually or in any combination. Press OK to select
any item or items, then go down to “Reset Selected” and press OK to reset it/them.
After resetting, the “checkmark” next to the item(s) will disappear, and a “Reset
Complete” message is shown. A common use of reset is to clear old “breadcrumb”
trail marks from a past trip to the same area.
• Unit Info-provides hardware/software version numbers, serial number, etc.
Fig 12. SET Page
Options List
Fig 13. SET Page
User Proles
Fig 14. SET Page
Reset Data
Options
Page 15

15
EXPLORING THE PAGES : WEATHER / ALMANAC
e WEATHER Page
e Weather Prediction page
(Fig. 15)
displays the current temperature and
barometric pressure at your position (based on the data from internal sensors in
the unit). e pressure indication box also displays a rising or falling “trend” arrow
(unless the pressure is steady), and pressure data stored in the unit for up to 24 hours
is used to generate a forecast based on how significant the increase or decrease in
pressure is over time. A rapid drop in pressure (>6 mB) triggers a Storm Warning
message. A graph at the bottom of the Weather page tracks the change in pressure
over time (beginning after the unit has been on for at least half an hour). Press “+” or
“-” to change the horizontal scale and view presssure variance over a longer or shorter
time period. e vertical scale automatically changes to “fit” max presssure. If the
ONIX unit’s power is turned off, temperature and pressure will not continue to be
actively measured. However, the pressure readings are stored in memory, so when
the unit is turned on again, the graph will resume where it stopped when you shut
down before-therefore, it is showing pressure during an accumulated total of up to
24 hours of active (powered) operation, not necessarily pressure over a continuous
24 hour period. If you wish to continuously monitor barometric pressure, you can
use the SafeTrack feature to enter “sleep mode” while maintaining uninterrupted
weather sensor operation with minimized battery drain.
No HOT button menu is available for the Weather page.
e ALMANAC Page
e Almanac page
(Fig. 16)
primarily is used to view the information stored in
internal Solunar Edge* data tables, which includes times for sunrise, sunset, and
times when the moon’s position is overhead or “underfoot”, along with a graphic
showing the current moon phase. is solunar chart data can be displayed for your
current position, or any waypoint, point of interest, a location in another city or
state, etc. You also have the option of viewing solunar data for a past or future date.
Many outdoorsmen have found that animals and fish seem to exhibit higher or
lower levels of activity related to the position of the sun and moon (think of its effect
on tides) , along with changes in atmospheric pressure. e graph at the bottom of
the Almanac page displays the estimated level of animal or fish activity based on the
stored data. e “0” line in the middle represents an average level of activity, while
“+” or “-” readings (respectively) indicate higher and lower activity levels.
Several options are available on the Almanac page:
•
With the top box (above the moon phase graphic) selected, press the RIGHT key
to see location options
(Fig. 17)
for the solunar data (data shown is for “where”?). To
see the data for your current location, select “Where I Am”. Or, move your cursor
on the MAP page anywhere you like, and select “Cursor”
on the Almanac page to
see the data for that location. Other options include selecting a waypoint you stored
earlier, a POI, any geographic location (latitude/longitude), etc.
Fig 16. Almanac
Page (Date Selected)
Fig 17. Almanac
Page (Location
Options)
Fig 15. Weather
Page
Note falling barometer
and Storm Warning
Page 16

16
EXPLORING THE PAGES : ALMANAC / ELEVATION
• Press the HOT button to open a ToolBox with three options (Fig. 18):
Fishing Chart-highlight this and press OK (a checkmark will appear) if you
want the animal activity level chart to be relevant for fish.
Hunting Chart-select and check this if you prefer the activity graph to indicated
mammal activity levels.
Set Timezone-select this and press OK to temporarily jump to the “Time”
options on the SET page (24 hr or AM/PM format, daylight savings, etc).
• To change the date (for example, if you want to see the solunar data and predicted
activity level for a day in the future), press the DOWN key to select the date box.
Now you can press the LEFT or RIGHT keys to go back or move ahead to a
different date. Or, press OK to get a popup one month calender, then use the 4way keypad to select a date and press OK. Pressing the “-” or “+” buttons when
the calender is displayed will change it to a past or future month.
• Press the DOWN key to select the “time period” box just above the graph,
then press either the OK button or RIGHT key to toggle between displaying an
animal/sh activity chart for One Day (Fig. 19) (just the currently displayed date
in the box above the time period) or for a One Month period of time. Note: e
green area that will appear shows the correction to the activity graph based on SoLunar
Edge Technology. is technology incorporates local pressure and temperature variations
that affect animal/fish behavior during that part of the day. A red line indicates the
selected day (One Month mode) or current time (One Day mode).
* For more information on patented Solunar Edge technology and Speedtech
Instruments products, visit www.Speedtech.com
e ELEVATION Page
e Elevation page uses data from the internal altimeter to display elevation
related information, including your current location’s elevation, the maximum
elevation reached on your trail, and the ascended total distance in feet or meters
(Fig. 20). You can view the elevation history for any of your previously stored
trails or the current one you’re on. A graph at the bottom of the screen shows how
your elevation has changed over time (up to 24 hours), or over distance traveled
on a trail. “A” and “B” markers may be placed on the graph to easily compare the
elevation differences between two points of distance or time on the trail. ese
markers are independent and each can be shown on the graph or not, removed, or
“Set to Now” to indicate your current position. Select the Elevation page on your
ONIX350 and explore the features and options:
Fig 21. Elevation:
Trip List
Fig 19. Almanac
Chart: Time
Period=1 Day
Fig 18. Almanac
Chart: HOT Button
Fig 20. Elevation
Page
Page 17

17
EXPLORING THE PAGES : ELEVATION
With “History” highlighted at the top of the screen, press OK to see a list of your stored
Trails (Fig. 21). Select a Trail from the list and press OK to replace “History” on the pageyou now see the elevation history for that trail, showing the changes in altitude as you
originally walked/created the trail.
Press the HOT button to see the Elevation page ToolBox (Fig. 22), with these options:
Show Distance-press OK to check, the horizontal scale on the graph will represent change
in elevation over distance traveled (based on trail breadcrumbs).
Show Time-same as above, but scale will indicate elevation change over time. You may
choose either distance or time for the horizonal graph scale but not both at once.
Marker A-press OK to add “A” marker to the graph. Press the RIGHT key for 3 options
(Fig. 23): Show Marker (toggles marker visibility), Set to Now (resets marker to your
current position), Remove (deletes the graph marker).
Marker B-same as above, for Marker “B”. Add this second marker to compare elevation
differences between two points in time or distance on a trail.
Set Units-pressing OK temporarily jumps to the SET page so you can choose your
preferences for distance and altitude units (kilometers or statute miles, feet or meters,
etc).
Calibrate Altitude-if you know that the actual altitude at your current location is
different than what the display indicates (this can happen due to changes in barometric
pressure), press OK to use the onscreen keyboard to manually enter the true altitude for
your position. Calibrating Altitude is a recommended step to ensure the best possible
accuracy of all data shown on the Elevation page.
After one or both Markers have been set, you can freely modify them. First, press the UP or
DOWN key to highlight the Marker (dot labeled with “A” or “B”) on the elevation graph.
You can then do the following:
• Press OK to show or hide the Marker. Turn both markers on to see a comparison in
altitiude between two different locations separated by distance or time (Fig. 24), for
example, two rest points where you stopped on a mountain climbing trail a few hours
apart. Or, turn on only one marker to compare another point in distance or time with
“Now” (your current position). Turning one or both markers on or off affects how much
elevation related data is shown in the center box on the Elevation page. When only one
Marker is set up or visible on the graph (Fig. 25), it’s elevation will automatically be
compared to “Now” (your current position). For example, you will see a data row in the
Elevation page box named “A-N Ascent” that tells you the total distance (with altitude
factored in) traveled between the Marker A position and “N” (where you are Now).
• Use the LEFT or RIGHT key to move the Marker position horizontally on the graph
• Use the “+” or “-” keys to change (zoom) the horizontal scale to view elevation changes
over a greater or lesser amount of distance or time.
Fig 23. Elevation:
Options-Marker A
Fig 22. Elevation:
Toolbox Menu
Fig 24. Elevation:
Marker A vs B
Fig 25. Elevation:
Marker A vs “Now”
Page 18

18
Setting Waypoints
e simplest GPS function is to mark your present location, so you can find it again
later. Any location that you choose to mark is called a “waypoint”. To set a waypoint
at your current position, just press “OK” (center of the 5-way button). You will see
the Waypoint Menu (Fig. 26), with a numbered default name assigned to the new
waypoint (WPT000, WPT001, etc) shown at the top, with these options below
it: Edit Name, Edit Icon, Activate Alert, Set Waypoint. Since “Set Waypoint” is
already highlighted, simply press OK again to accept “WPT###” as the name and
create a waypoint at your current position. Or, scroll up to edit the new waypoint’s
name and/or icon before setting it-this might make it easier to nd later (see “How
to Create/Edit Names..” and “How to Set/Edit Icons” for details). After editing the
name and/or icon, go down to “Set Waypoint” and press OK-you’ll then see the
new waypoint on the map with the name and icon you gave it. If you decide not to
set the waypoint, simply press EXIT or the LEFT key.
To set an alert beep to signal anytime in the future when you return to the waypoint,
select “Activate Alert” and press OK to set the alert (repeat to De-Activate previously
set Alerts).
Of course, you can always rename a previously set waypoint, change its icon, or
delete it entirely at any time in the future. Press the HOT button, then “+” to view
the “My Stuff” menu. Select “My Waypoints”, press OK, then select the previously
set waypoint you want to work with from the list. Press OK, and you will see the
Waypoint Options menu (Fig. 27). Along with the same options you saw when you
originally created the waypoint (Edit Name, Edit Icon (Fig. 28), Activate Alert),
you can navigate to the waypoint, or delete the waypoint completely (there is a
confirmation step to prevent accidentally deleting an important waypoint).
Creating a Map Area (My Map Areas)
A special feature available on the MAP page lets the user define a polygonal (triangle,
square, etc) area of any size, placed anywhere, which can then be used to simply
measure that area (show the total sq.mi. or sq.ft.), help define map and property
boundaries, and/or generate an alert message when the area is either entered or
exited. is is done by placing a minimum of three virtual “fence posts” on the map
which are used to define the limits of the area (Fig. 29). e process for setting up a
custom Map Area is outlined on the next page. More information about utilizing
the “My Map Areas” features can be found at: http://www.bushnell.com/gps/
by clicking the Product Support link.
Let’s take a look at the basics of setting up and using your Map Areas...
USING YOUR ONIX350 GPS RECEIVER : Setting Waypoints / Map Areas
Fig 26.
Waypoint
Menu-Press OK to set
new waypoint
Fig 27.
Options for
previous waypoints:
Navigate To, Edit
or Delete
Fig 28.
Waypoint
“Edit Icon”
Page 19

19
How to Dene a New Map Area (Using “Fence Posts”):
• Click the HOT button to get the HOT menu, then press “+” to switch to the
“My Stuff” menu.
• Highlight “My Map Areas” and press OK-you will see “Create New Map Area”,
already selected. Press OK.
• A default name for the new Map Area is assigned (MPA001), and you’ll see 3
options: Add Fence Post, Edit Name, and Delete. You can edit the name of the
Map Area now, or change it later. Select “Add Fence Post” and press OK. e
default name for your first Fence Post is “FP001”, this can be changed later if
you like.
• Use the 4-way keypad to move the Fence Post if you need to ne tune its
location (zoom in first with the “+” key if necessary.
• Once you have the rst Fence Post where you want it, press OK to conrm and
set it. Its name will then be displayed under the Map Area heading (MPA001).
Press OK or the RIGHT key to see these options
(Fig. 30)
:
Insert After-press OK to place the next Fence Post where the first is (you can
then move it elsewhere with the 4-way keypad), or press the RIGHT key to
see options for placing the next Fence Post based on a waypoint, POI, your
current location, etc.
Move-change the position of this Fence Post
Edit Name-change the name for this Fence Post
Set as Post #1-after selecting a previously placed Fence Post, select this
option and press OK to use the same Fence Post as the starting point of a new
(adjacent) Map Area.
Delete-erase the Fence Post
• Keep using “Insert After” to add Fence Posts until you have placed at least three
or four to define the boundaries of the Map Area you are creating. Press EXIT or
the LEFT key to see the Map Areas List, with your new Map Area added. With
the name of the Map Area selected, press the RIGHT key to view the Area on the
base map, with lines visible between the Fence Posts. e Info Box at the bottom
of the display will automatically show the total area (in square miles) of the Map
Area. If your Map Area is very small, the Info Box changes to square feet instead
of miles. If you need to know the area in acres, 1 sq. mi.=640 acres, so simply
multiply the number in the info box by 640. For small areas, divide the square
feet by 43560 to see the total area in acres.
• Press EXIT to return to the Map Areas list. Press OK to see the list of options
for the Map Area
(Fig. 31)
:
Stay Within-when this is checked, a “Map Area Breached!” warning will flash
onscreen if you leave the Map Area boundary.
Avoid Area-check this to generate the “Map Area Breached!” warning if you
enter the Map Area (for example, to prevent accidentally trespassing on private
property).
Navigate To-go towards the closest point in the area relative to your current
position
USING YOUR ONIX350 GPS RECEIVER : Map Areas/Fence Posts
Fig 29. Completed
Map Area-built with
4 fence posts
Sq. Miles
Fig 31. Map Area
Options List
Fig 30. Map Area
Fence Post Options
Page 20

20
Visible On Map-turns viewing of the Map Area on/o
De-activate Alert-cancels the warning message that was automatically set
when you checked “Stay Within” or “Avoid Area”
Edit Name-change the name of the Map Area
Edit Map Area-select and press OK to access the Fence Post list for that Map
Area (to move, delete, rename, etc an individual Post) (Fig. 32)
Delete-delete the entire Map Area
Using the HOT Button
e HOT Menu
When you are on the MAP or NAV page, all basic navigation actions are easily
controlled by Bushnell’s exclusive “HOT button”. e HOT button is also used to
select the view options for the current display Page. Let’s take a look-from the MAP
page, click the HOT button to view the “Hot Menu”, then use the DOWN or UP
keys to select (highlight) an option (Fig. 33):
• Where Am I: Press OK to see your current location on the map display. is
function lines up the GPS position icon (small black circle) with the crosshair
pointer icon.
• Find / Go To: Click OK or the RIGHT key to find or go to any of the listed
items (note that you can only select from previously stored items, not create a
new one, when using the Find/GoTo feature). After selecting your destination and
pressing OK, the title of the destination will show in a yellow box at the top of the
screen, and the bearing arrow will point in the correct direction to take you to it. To
stop this navigation activity, press the HOT button again-you will see the option
to stop. Press OK to confirm you want to stop navigating, and you will be returned
back to the MAP page screen, but without the bearing arrow pointing the way to a
specific destination. e bearing arrow effectively becomes a “heading arrow” once
you stop navigating.
e available Find/GoTo items you can choose for navigation or viewing are (Fig.
34):
1) Nearest Waypoints-a short list of close by waypoints
2) All Waypoints-pick from list of all stored waypoints (shown in order beginning
with the closest)
3) POI (Point of Interest)-gas stations, hospitals, airports, etc.
4) Places-built into the base map-city names, etc.
5) My Trails-pick from list of saved Trails (see next section). e ONIX will
start pointing you to the closest point on that trail. A trail is a previously walked
path, for example a trail that you took back to your campsite that wound around
trees and past the edge of a pond.
6) My Routes-pick from your list of saved routes (point to point navigation)
USING YOUR ONIX350 GPS RECEIVER : The HOT Button
Fig 32. Editing a Map
Area by Moving a
Fence Post
Fig 34.
Find/GoTo
Sub-Menu
Fig 33.
HOT Button
Menu
Page 21

21
7) My Map Areas-pick from list of your previously created custom map
areas
8) My Photos (or Topos)-after you pick a photo or topo from the list (arrow
down to it) and press OK to confirm you wish to navigate towards that area,
the ONIX will begin to point you towards that area. (Note that you must have
selected photos or topos as a screen layer in your MAP options as described
earlier on page 9 if you want to see it while navigating.) Alternatively, instead
of pressing OK, you can press the RIGHT key from the name on the list
and go to the “eyeball” icon, then press OK to just view the photo or topo
without starting navigation. To exit this “view only” mode, press OK again
to return to the list.
9) Location-a latitude and longitude coordinate
• Map Details (or Compass Options) (Name varies with current display Page):
When you are on the MAP Page, this will say “Map Details”. You can decide
whether you wish to view details such as the compass, points of interest, range
rings, etc. superimposed onto the base map by toggling them on/o in the Map
Detail list. On the NAV Page, it will say “Compass Options” (see details in the
NAV Page section)
• Info Boxes: an alternate way (instead of holding MENU down) to pop up
the Info Boxes for editing. See “Setting Up and Using the Info Boxes” for more
details.
• Draw Ruler: a tool to quickly find the distance between multiple points on
the map. After selecting “Draw Ruler” from the MAP Page HOT menu
(Fig.
33)
, either press OK and move the cursor to any point on the map, or press
the RIGHT key and chose an existing location from the To/From list
(Fig. 35)
.
Once a location has been selected, press OK and choose “Measure To”
(Fig.
36)
. is will create a fence post at that location. e info boxes will show
the distance from your current location to that point (fence post)
(Fig. 37)
. To
measure the distance between any two points, use the same process, except that
after a selection has been made, press “Measure From”, then repeat the process to
select a second point to “Measure To”. To add more points, select an additional
location from the map or the list and choose “Add Fence Post”. If you continue
to set additional points, you will see more options appear in the Measuring
menu
(Fig. 38)
. You can clear all ruler guides and start over, or select “Close
Region” to turn three or more points into a Map Area and measure its area in
square yards or miles. e regions created by your rulers can be saved as Routes
or Map Areas. Open regions are saved as routes and closed regions are saved as
Map Areas. ey will be stored in My Routes and My Map Areas. A “Measuring
Info Box” is automatically displayed when drawing rulers, displaying relevant
data: Distance to Cursor, Total Length, Last Segment Length and Total Area.
• SafeTrack: select and press OK to enter SafeTrack mode, or to see the SafeTrack
options. See “SafeTrack™ Battery Conservation Mode” on the next page for more
details.
USING YOUR ONIX350 GPS RECEIVER : The HOT Button
Fig 37. Draw Ruler-
Info Box Data
Fig 35. Draw Ruler-
To/From List
Fig 36. Measuring
Menu-basic options
Fig 38. Measuring
Menu-more options
Page 22

22
e My Stuff Menu
From the Hot Menu, press “+” or “-“ to see the “My Stuff” menu (Fig. 39). is
menu lets you work with your personal waypoints, trails, map areas, etc that you
have already created. e “My Stuff” menu items are:
• My Waypoints: Press OK to see a list of all the waypoints you have marked.
Select one and press OK to edit, delete or navigate to the waypoint. Or, press
the Right key to view the waypoint on the base map (cursor moves to the
waypoint)
• My Trails: A trail is a path or course that been started (by moving) or previously
completed and saved by the user. Press OK or the RIGHT key. e options here
are (Fig. 40:
Start New Trail: select this to begin a new trail, for example, from a parking
lot or other landmark to your camp.
Trail List-your previous trails (if any) are listed below “Start New Trail”.
Highlight a trail name and press OK to see these 4 options (Fig. 41):
Navigate To: navigate a saved trail. is starts navigation through a
previously completed trail.
Reverse-press OK to navigate the selected trail from its endpoint to its start
(very useful to “go back” to a point of origin)
Edit Name: option to rename a previously saved trail. Especially useful if
you saved a trail with the “default” name.
Delete: deletes a previously saved trail from memory.
End & Save Trail
(Fig. 42)
(only available after a New Trail has been started):
select this when you reach the end of a new trail, saving it in memory for later
recall. You will have the option of naming the trail so it is easy to find in your
“My Trails” list. Note: this option will only be seen if you are already actively
navigating a trail you started.
• My Routes (same 5 options as listed above for “My Trails”)-a Route is the
most direct or shortest path between two points. “Routes” are more often used
for water based navigation (due to the reduced number of natural obstacles),
whereas “trails” are more useful on land.
• My Map Areas - options here to navigate towards a previously created map
area, and to manage them.
• My Photos -you have the options here to navigate towards a stored satellite
photo or topo map, and to manage them (photos & maps are downloaded, not
user created).
SafeTrack™ Battery Conservation Mode
SafeTrack is a Bushnell exclusive feature that extends and conserves battery power,
without the wait to re-establish GPS satellite contact after a full power down.
When you are in SafeTrack mode, the display screen will shut off, and the status
LED will blink green. Intermittent satellite contact is maintained, so you will
quickly be able to check your current location or progress. To enter SafeTrack
mode, press and hold the HOT button, or select SafeTrack from the Hot Menu.
USING YOUR ONIX350 GPS RECEIVER : My Stuff Menu / SafeTrack
™
Fig 41.
My Trails-
Options after Selecting a
saved Trail
Fig 42. My Trails-
End & Save Trail
Fig 40.
My Trails Options
Fig 39.
My Stuff Menu
Page 23

23
USING YOUR ONIX350 GPS RECEIVER : Name & Icon Editing
You will see the SafeTrack screen (Fig. 43), with a count down delay (time can
be adjusted in the Set Page Menu) before the unit enters SafeTrack mode. If you
accidentally hold the HOT button down, select “Cancel” and press OK. If you
do not cancel, at the end of the countdown, the unit will be in SafeTrack mode.
e display will black out. e ONIX will automatically make GPS satellite
contact every 5 minutes (default, can be changed in SafeTrack Options menu),
which extends battery life significantly while still allowing you to instantly get a
fix on your location and resume navigation when you exit SafeTrack mode.
As long as you are actively using the GPS and pressing buttons (within time
limit set in SafeTrack options (Fig. 44), the screen display will stay active-but
the unit is still in SafeTrack mode.
After a period of inactivity (length of time selectable in SafeTrack options menu),
the Start SafeTrack screen (Fig. 43) will appear.
If you do not want to return to SafeTrack, press OK or LEFT with “Cancel”
selected.
How to Create/Edit Names for Waypoints, Trails, Map Areas, etc.
(Using the Type Tool)
With “Edit Name” selected, click OK to bring up the Type Tool, a “virtual
keyboard” (Fig. 45). is is a multi-function tool that is controlled by the 5-way
button. Your currently selected character is highlighted. Move LEFT/RIGHT
or UP/DOWN to select letters, then press OK to enter your selected characteryou’ll see it appear in the name near the top of the display. Use the LEFT/
RIGHT keys to move around in a row (it “wraps around” when you go past
the 1st or last character in a row), and use UP/DOWN to move through the
columns. e Text Tool automatically switches to lower case after starting a
word with upper case, but you may use “SHIFT”(select, press OK) to change it
anytime. Use “back” to backspace if you make a mistake, or to delete the default
“WPT 000” assigned to a new waypoint before starting to “type” your preferred
name for it. To switch from letter characters to numbers or symbols, press the
“+” or “-“ buttons (you will see the tabs at the top of the Text Tool change).
Once you are finished creating or editing the name for your waypoint, trail, etc,
be sure to select “done” and press OK to actually confirm and enter the name in
the memory of the ONIX350.
How to Set or Edit Icons
With “Edit Icon” selected, click OK and the display will show a menu of icons
(Fig. 46), or common symbols, that you may choose to represent your waypoint
on the map. If you have previously set up a user profile for a particular type
of activity (for example, camping), the group of icons that appears in the icon
selection menu will be the ones most relevant to that activity. Simply use the
LEFT/RIGHT and UP/DOWN keys to move around the available icons, press
OK to select one (you will see it appear next to the name at the top of the
display), then select “done” and press OK again to confirm and enter the icon,
so it appears on the map along with the name.
Fig 43.
SafeTrack
Screen
Fig 44.
SafeTrack
Options
(select “Options”
from SafeTrack
Screen)
Fig 46.
Waypoint
“Edit Icon”
Fig 45.
Type Tool-
Editing a
Waypoint Name
Page 24

24
Downloading, Uploading and Storing Satellite (Aerial) Photos and Topo Maps
Now that you are familiar with your Bushnell ONIX series GPS, you are ready to take advantage of many of the
easy to use exclusive Bushnell features. In conjunction with your Bushnell GPS unit, you have two additional
tools that make your ONIX the most functional GPS for your next outdoor excursion– BushnellGPS.com
and the ONIX CD with the GPS PC Companion program.
e BushnellGPS.com Website
Bushnellgps.com provides access to Satellite Imagery and Topographic Map downloads so that you can create
detailed maps of your specific area of interest. BushnellGPS.com (or through Bushnell.com) enables you to
plan your next adventure by searching and viewing Satellite Imagery and Topographic maps. Here’s how to
get started:
• Log onto www.bushnellgps.com
• Click on “Download Images and Register your GPS”. Register your GPS unit.
• As a rst time user, set up a Login Account and Password
• Connect your ONIX GPS to your computer via the included USB cable
• Once your account is established, you can start browsing the website. e Help le on the “My Map”
webpage provides step by step details explaining how to search for, purchase, and download your maps,
including Satellite Images and Topographic maps.
• BushnellGPS.com saves your images in your folders on our safe and secure server so that you can access
them at any time.
• After you complete an outdoor excursion, BushnellGPS.com also enables you to upload all of your trip’s
navigation information into your account folders to review, and analyze, and save for the next return trip.
• BushnellGPS.com also provides detailed GPS product features and specications, Software Update
Downloads, Troubleshooting and Frequently Asked Questions, and the Bushnell Shopping Cart to purchase
accessories, Photo/Map downloads, and printable Photos/Maps.
So log on, log in, and start downloading to experience a whole new world of GPS functionality.
e Bushnell GPS ONIX CD-ROM
Your CD contains software to help you get the most out of the ONIX GPS:
1. e ONIX GPS PC Companion program – Click the link to download and install the latest version of
“GPS PC Companion” onto your PC. e PC Companion enables you to plan and save your GPS trips
on your PC. Similar to the website, you can upload and save waypoints, trails, routes, photos and maps
between your GPS and PC, so you can trip plan even when you are not connected to the internet and
BushnellGPS.com. Take your PC along on your next adventure and the GPS PC Companion provides the
perfect tool for storing and analyzing all of your GPS information.
2. A pdf copy of this QuickStart Guide.
Visit www.BushnellGPS.com for a detailed GPS glossary, frequently asked questions
(FAQ), and other useful information related to the ONIX series GPS receivers.
DOWNLOADS / BushnellGPS.com / CDROM
Page 25

25
SYMPTOM POSSIBLE PROBLEM SOLUTION
No Power On 1. Battery charge is low
2. Power button was not pressed for 1-2 sec.
1. Be sure battery has been fully charged before use.
Avoid excessive use of the backlight, which may
shorten battery life.
2. Press power button until LCD comes on
Unit does not
detect GPS
satellites
1. GPS reception is turned off in SET page
2. Insucient time allowed for satellite acquisition
3. Unit does not have unobstructed view of the
sky
1. Make sure GPS is turned ON in the SET Page.
e center circle of the SAT page should be circling.
If not, turn GPS ON in the SET page.
2. After the unit has been o for an extended time it
may take longer for it to acquire GPS satellites. Check
the SAT page for progress.
3. For fastest acquisition times make sure the unit has
a clear view of the sky. Avoid areas of heavy brush and
areas next to large buildings or cliffs. Keep unit out of
backpacks and concealed areas in order to maintain
consistent GPS signals. Try holding the unit further
away from your body.
Unit “freezes”
or “locks up”unable to turn
off normally
1. Processing malfunction or similar cause 1. If holding the power button for 2 sec. has no
effect, reset the unit by removing the battery pack
(and power cord if attached), then reattach it. Check
website for latest software update (your software
version # is found in the “Unit Info” on SET page).
Downloaded
photos or maps
are not found or
cannot be used
1. USB cable was disconnected or power was shut
off before download was completed
2. Unit was used immediately after download
without restarting (power off then on again)
1. When downloading information from the PC
program or Web, please wait until the download has
been completed. Disconnecting the unit prior to
completion of download will result in incomplete data
download and loss of data.
2. After a download, the unit must be powered o and
then powered back on for it to recognize the data.
Check out http://www.bushnellgps.com for the latest version of the GPS PC Companion. You can
download the newest versions right from the website to any PC. Just click the “Product Support” tab
at the top of the main page, then “Software Updates” in the left frame.
TROUBLESHOOTING
Component PC System Requirements (to use the “PC Companion” software with Bushnell ONIX GPS products)
CPU 500 megahertz (MHz), Pentium III processor or higher
Memory 64 megabyte (MB) RAM or higher
Hard Disk 20MB (a portion of this disk space will be freed after installation if the original download package is removed
from the hard drive.)
Drive CD-ROM or DVD drive
Display 1024x768 or higher resolution monitor
Operating
System
Microsoft Windows ME, Windows 2000, XP with Service Pack (SP) 2, Windows Server 2003 with SP1, or
later operating system including Vista2
Other One Free USB Port, Internet connection 56Kb or better, DSL recommended, Internet browser- Microsoft
Explorer 5.2 or later
Page 26

26
Specifications and designs are subject to change without
any notice or obligation on the part of the manufacturer.
FCC Compliance Statement
is device complies with Part 15 of the FCC Rules. Operation is subject to the following two
conditions:
(1) is device may not cause harmful interference, and
(2) is device must accept any interference received, including interference that may cause undesired
operation.
NOTE: is equipment has been tested and found to comply with the limits for a Class B digital device,
pursuant to part 15 of the FCC Rules. ese limits are designed to provide reasonable protection against
harmful interference in a residential installation.is equipment generates, uses and can radiate radio
frequency energy and, if not installed and used in accordance with the instructions, may cause harmful
interference to radio communications. However, there is no guarantee that interference will not occur
in a particular installation. If this equipment does cause harmful interference to radio or television
reception, which can be determined by turning the equipment off and on, the user is encouraged to try
to correct the interference by one or more of the following measures:
· Reorient or relocate the receiving antenna.
· Increase the separation between the equipment and receiver.
· Connect the equipment into an outlet on a circuit different from that to which the
receiver is connected.
· Consult the dealer or an experienced radio/TV technician for help.
Note: e ONIX complies with Part 15 of the FCC interference limits for Class B digital devices FOR HOME
OR OFFICE USE. ese limits are designed to provide reasonable protection against harmful interference in a
residential installation, and are more stringent than “outdoor” requirements.
e ONIX does not contain any user-serviceable parts. Repairs should only be made by an Authorized
Bushnell repair center. Unauthorized repairs or modifications could result in permanent damage to
the equipment, and will void your warranty and your authority to operate this device under Part 15
regulations.
e shielded interface cable which is provided must be used with the equipment in order to comply
with the limits for a digital device pursuant to Subpart B of Part 15 of FCC Rules.
Page 27

27
ONE YEAR LIMITED WARRANTY
Your Bushnell® GPS receiver is warranted to be free of defects in materials and workmanship for one year after
the date of purchase. In the event of a defect under this warranty, we will, at our option, repair or replace the
product, provided that you return the product with return postage prepaid. This warranty does not cover
damages caused by misuse, improper handling, installation, or maintenance provided by someone other than a
Bushnell Authorized Service Department.
Any return made under this warranty must be accompanied by the items listed below:
1) A check/money order in the amount of $10.00 to cover the cost of return postage and handling
2) Name and address for product return
3) An explanation of the defect
4) Proof of Date Purchased
5) Product should be well packed in a sturdy outside shipping carton, to prevent
damage in transit, with return postage ($10.00) to the address listed below:
IN U.S.A. Send To: IN CANADA Send To:
Bushnell Outdoor Products Bushnell Outdoor Products
Attn.: Repairs Attn.: Repairs
8500 Marshall Drive 25A East Pearce Street, Unit 1
Lenexa, Kansas 66214 Richmond Hill, Ontario L4B 2M9
For products purchased outside the United States or Canada please contact your local dealer for applicable
warranty information. In Europe you may also contact Bushnell at:
Bushnell Germany GmbH
European Service Center
Mathias-Brüggen-Str. 80
GERMANY
D- 50827 Köln
Tel: +49 221 995568-0
Fax: +49 221 995568-20
This warranty gives you specific legal rights.
You may have other rights which vary from country to country.
©2008 Bushnell Outdoor Products
www.bushnell.com
©2008 Bushnell Outdoor Products
Customer Service: (800) 423-3537
IN NO EVENT SHALL BUSHNELL BE LIABLE FOR ANY INCIDENTAL,
SPECIAL, INDIRECT OR CONSEQUENTIAL DAMAGES, WHETHER
RESULTING FROM THE USE, MISUSE, OR INABILITY TO USE THIS
PRODUCT OR FROM DEFECTS IN THE PRODUCT.
Some states do not allow the exclusion of incidental or consequential damages, so the above
limitations may not apply to you.
Page 28

©2008 Bushnell Outdoor Products
For further questions or additional information please contact:
Bushnell Outdoor Products
9200 Cody, Overland Park, Kansas 66214
Customer Service (800) 423-3537 • www.bushnell.com
 Loading...