

Bushnell Northstar 78-8876, Northstar Goto 78-8876 Instruction Manual
78-8876 76mm RefLEctor
Instruction
Manual
Lit.#: 98-0262/06-03

2.
Never Look Directly At The Sun
With Your Telescope
Permanent Damage To Your Eyes
May Occur
❂
Congratulations on the purchase of your Bushnell Northstar Goto Telescope. Included with this
product are several value added features such as a Moon Filter, 9V battery, CDROM, and Magnetic
Compass. The moon filter should be screwed into the eyepiece when viewing the full moon to
increase contrast of this extremely bright phase of the moon. The 9V battery is included as well as
an interactive astronomy CDROM for your computer to aid you in your understanding of the night
sky. Finally, the magnetic compass will aid you in finding North after dark while setting up for your
viewing session.
After reading through this manual and preparing for your observing session as outlined in these
pages, you can start enjoying this fantastic product. At Bushnell we have made every effort to give
you a superior quality product that meets your high standards for Quality, Durability, and
Performance.
However, if you have questions about use and function or included accessories or feel the product is
not working properly, please DO NOT RETURN IT TO THE PLACE OF PURCHASE. For assistance,
personal customer service and prompt customer care, please call our Toll Free Number (800) 4233537 or visit our website at www.bushnell.com.
4.
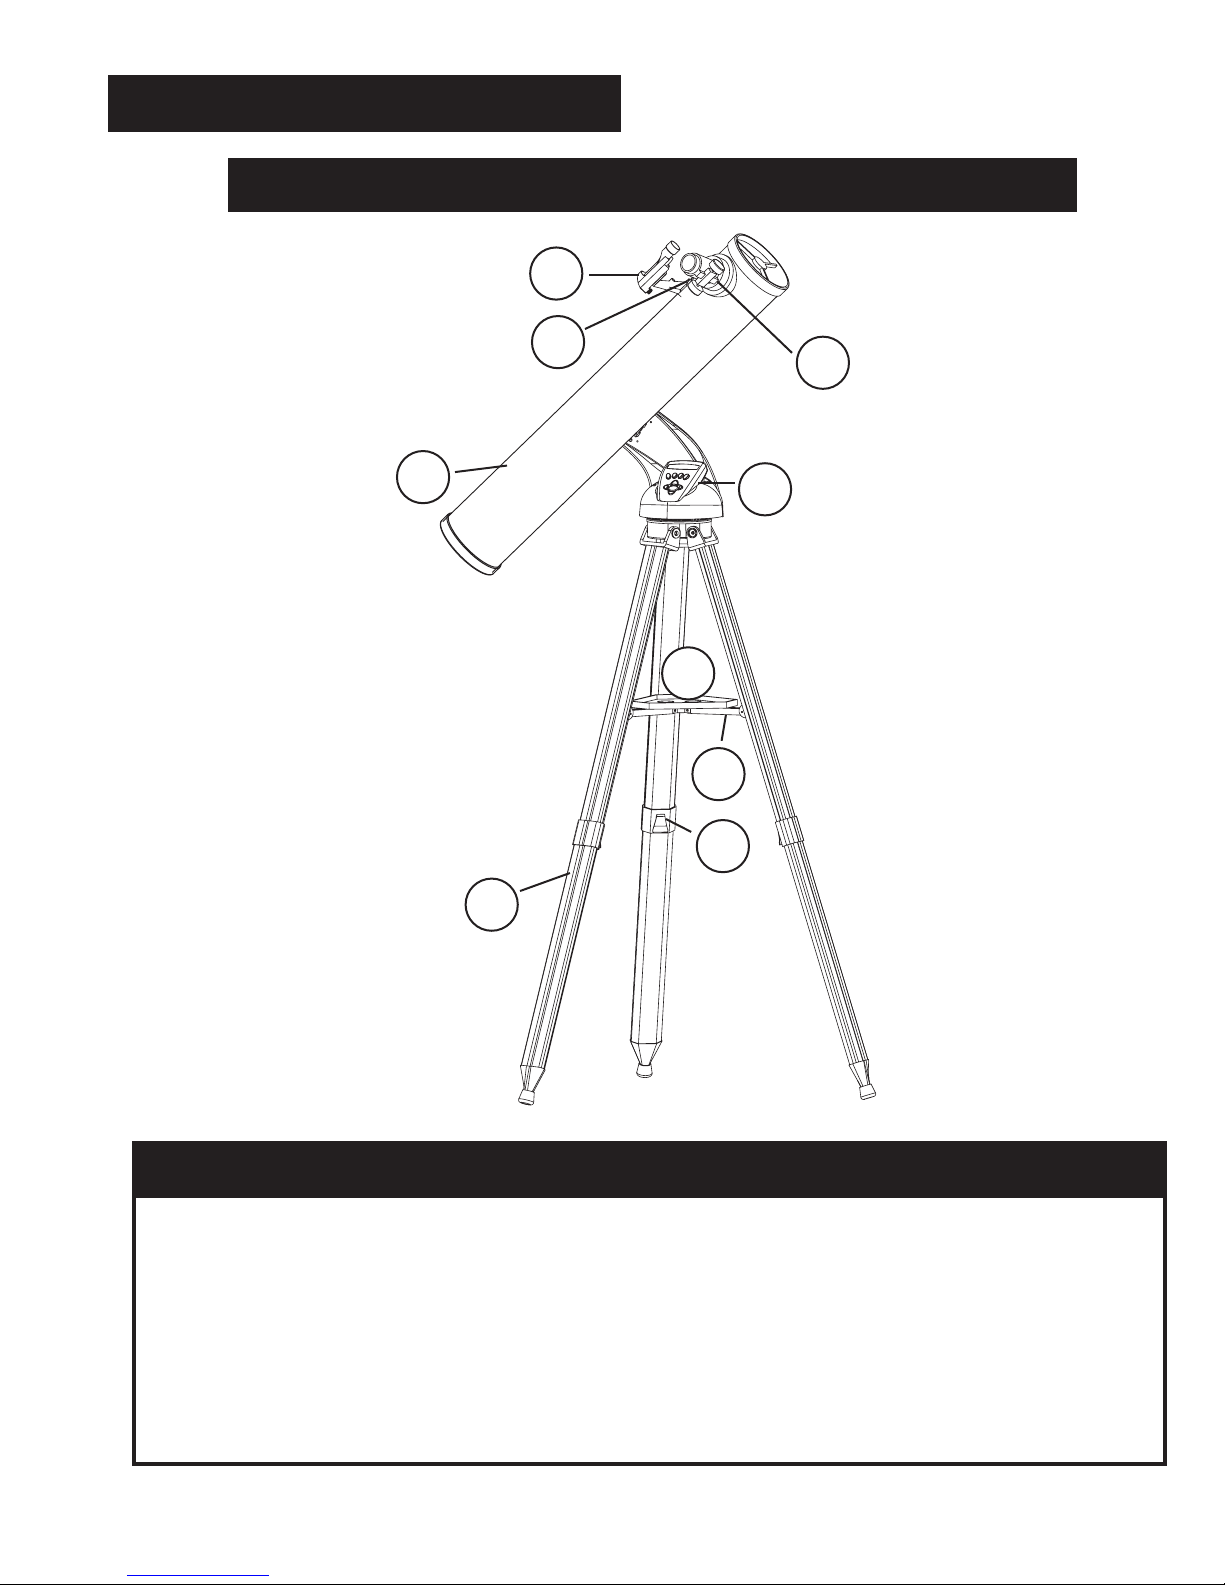
78-8876 76mm Reflector
Parts Diagrams
1. Red Dot Finderscope
2. 1.25" Format Eyepiece
3. Rack and Pinion Focusing Mechanism
4. Accessory Tray Brace
5. Quick-Release Tripod Leg Lever
6. Quick-Release Accessory Tray
7. Remote Computer Controller
8. Main Telescope Tube
9. Quick-Release Adjustable Aluminum Tripod
Telescope Parts Diagram
1.
2.
3.
4.
5.
6.
7.
8.
9.

DETAILED ASSEMBLY
No tools are required for assembly of your telescope.
Remove all components from the carton and identify all components. It is a good idea to lay all the parts out in front of
you before assembly. Since your telescope is a precision optical system the parts require careful handling—particularly
the onboard computer, telescope, eyepieces, and various accessory lenses.
SET UP TRIPOD AND ACCESSORY TRAY
1. Stand Northstar Computerized Star Locator Assembly and attached tripod legs in
the upright position. Spread tripod legs to a comfortable distance.
2. Fold down the accessory tray braces and place the Quick Release Accessory
Tray on top of braces. (See Quick Assembly Diagram)
3. Turn accessory tray until it snaps into place.
4. Adjust tripod leg height to suit by opening tripod leg lever and extending tripod legs
to desired height. Clamp Tripod Leg lever closed when complete.
ATTACH TELESCOPE TUBE
1. Locate Main Telescope Tube.
2. Remove Telescope Tube Thumb Nuts from side of Telescope Tube.
(See Quick Assembly Diagram)
3. Position Main Telescope Tube Attachment Bolts through Telescope Tube Bracket at the top of the Northstar
Computerized Star Locator Assembly. Make sure the telescope is pointing in the correct direction. (Logo on
telescope tube should be right-side up.)
4. Reattach Telescope Tube Thumb Nuts to Main Telescope Tube Attachment Bolts once Main Telescope Tube and
Northstar Computerized Star Locator Assembly are assembled together.
ATTACH FINAL TELESCOPE ACCESSORIES
1. Locate Red Dot Finderscope.
For Reflector Telescopes: Remove Finderscope attachment nuts from Main Telescope Tube. Place Finderscope
Assembly over Finderscope Attachment Bolts and reattach Finderscope thumb nuts to Finderscope Mount Bolts.
NOTE: The large end of the finderscope should face the open end of telescope tube.
2. Attach Low Power Eyepiece.
For Reflector Telescope Models: Insert lowest power eyepiece in the focusing mechanism by backing out
eyepiece set screw and inserting eyepiece fully.
3. Tighten all set screws to secure accessories.
4. Remove Objective Dust Cover exposing entire diameter of open end of telescope.
6.
SELECTING AN EYEPIECE
You should always start viewing with the lowest power eyepiece, which in this case is the 20 mm lens. Note: the base
power of each eyepiece is determined by the focal length of the telescope objective lens. A formula can be used to
determine the power of each eyepiece: telescope OBJECTIVE lens focal length divided by EYEPIECE focal length =
MAGNIFICATION (e.g. Using the 20 mm lens, a sample calculation could look like this: 750 mm / 20 = 38x or 38
power. Telescope models will vary in focal length.)
Included with this telescope is a Barlow lens. Barlow lenses are used to double or triple the power of your telescope.
Place your Barlow between the focusing tube and the eyepiece. Using the example above, your 3x Barlow lens would
give you a total power of 114x or 114 power. (38 x 3 = 114x or 114 power). The magnification calculation would look like
this: 750 mm /20mm = 38 power. 38 power x 3=114 power.

M
ENJOYING YOUR NEW TELESCOPE
8.
1. First determine your targeted object. Any bright object in the night sky is a good starting point.
One of the favorite starting points in astronomy is the moon. This is an object sure to please
any budding astronomer or experienced veteran. When you have developed proficiency at
this level, other objects become good targets. Saturn, Mars, Jupiter, and Venus are good
second steps to take.
2. The first thing you need to do after assembling the telescope as planned is center the desired
object in the finderscope’s cross hairs. Provided you did a reasonable job aligning the
finderscope, a quick look through the main telescope tube at low power should reveal the
same image. With the lowest power eyepiece (the one with the largest number printed on it)
you should be able to focus the same image that you saw through the finderscope. Avoid the
temptation to move directly to the highest power. The low power eyepiece will give you a
wider field of view, and brighter image—thus making it very easy to find your target object. At
this point with a focused image in both scopes, you’ve passed the first obstacle. If you don’t
see an image after attempting to focus it in, you might consider aligning your finderscope
again. Once you pass this step, you’ll will enjoy the time spent ensuring a good alignment.
Every object you center in the finderscope will be easily found in the main telescope tube,
which is important for continuing your exploration of the night sky.
3. The low power eyepieces are perfect for viewing the full moon, planets, star clusters, nebulae,
and even constellations. These should build your foundation. However, for more detail, try
bumping up in magnification to higher power eyepieces on some of these objects. During
calm and crisp nights, the light/dark separation line on the moon (called the "Terminator") is
marvelous at high power. You can see mountains, ridges and craters jump out at you due to
the highlights. Similarly, you can move up to higher magnifications on the planets and nebulae.
Star clusters and individual stars are best viewed through the low power no matter what.
4. The recurring astronomical theater we call the night sky is an ever-changing billboard. In other
words, the same movie does not play all the time. Rather, the positions of the stars change
not only hourly as they seem to rise and set, but also throughout the year. As the earth orbits
the sun our perspective on the stars changes on a yearly cycle about that orbit. The reason
the sky seems to move daily just as the sun and the moon "move" across our sky is that the
earth is rotating about its axis. As a result you may notice that after a few minutes or a few
seconds depending on what power you are viewing at, the objects in your telescope will move.
At higher magnifications especially, you will notice that the moon or Jupiter will "race" right out
of the field of view. To compensate, just move your telescope to "track" it in the necessary path.
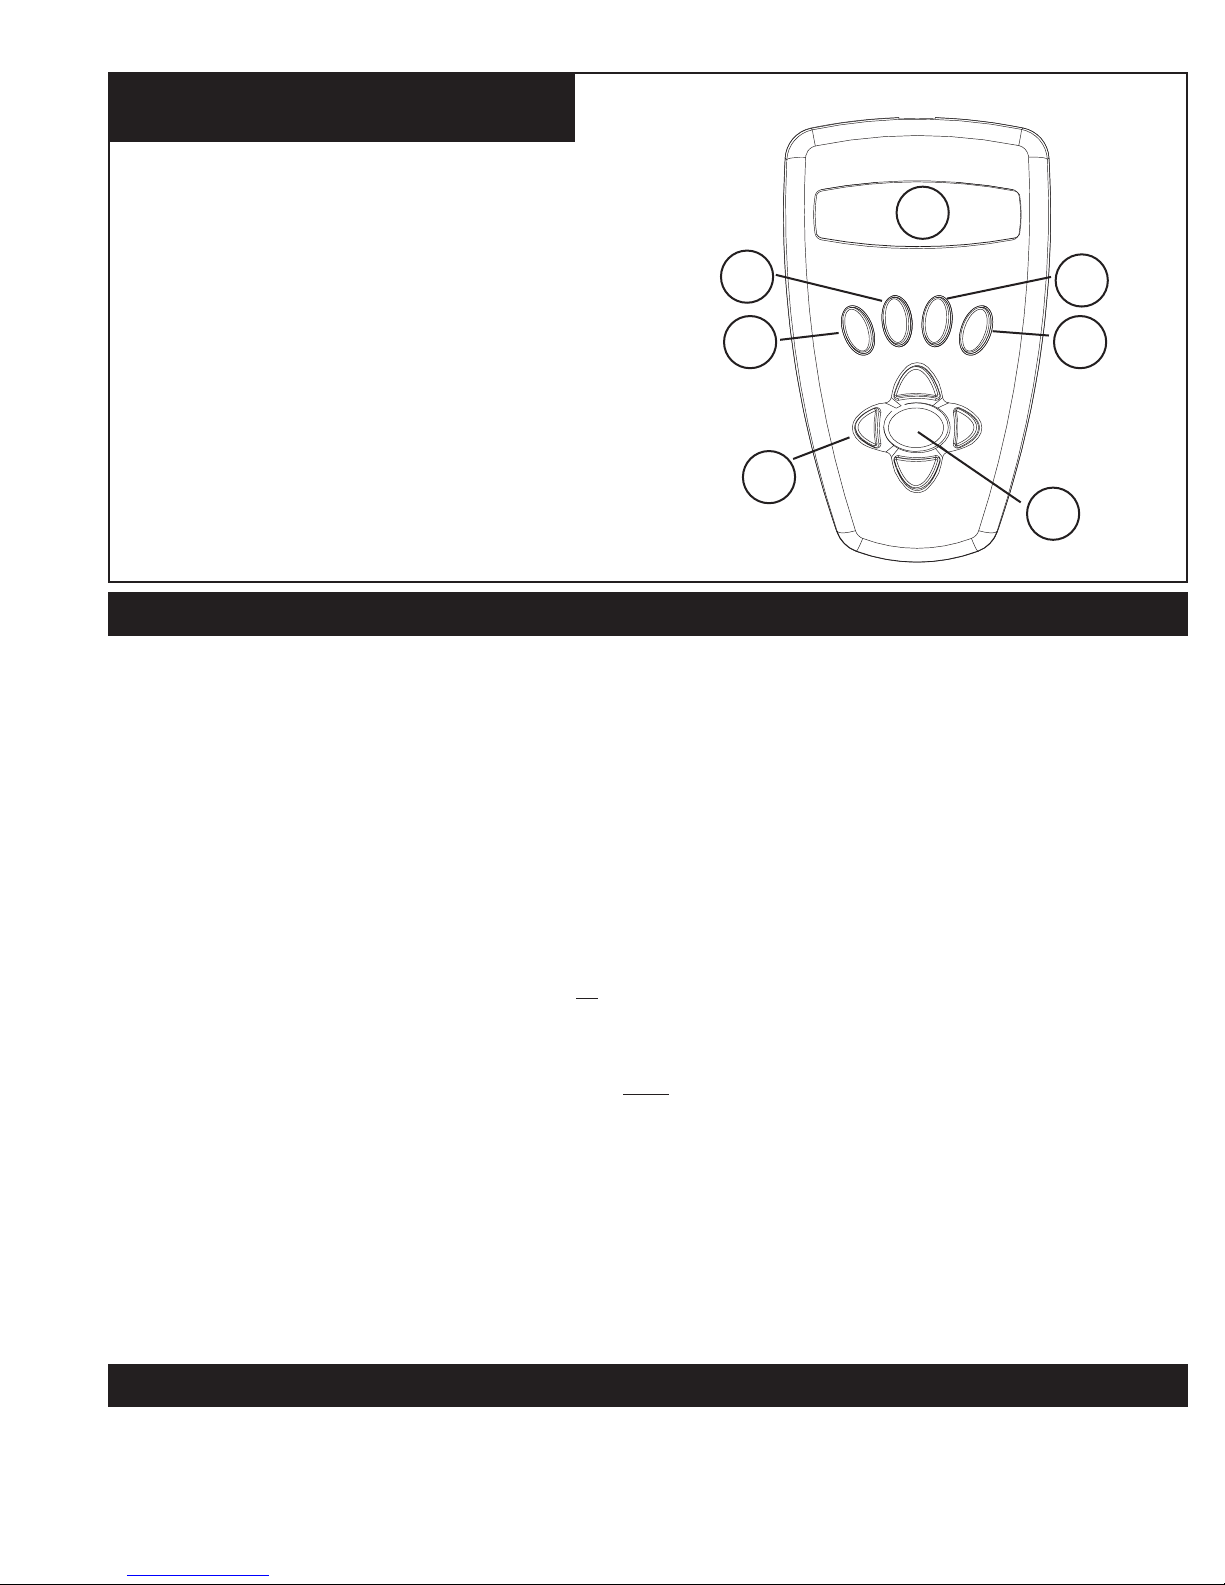
BUTTON FUNCTIONS
1. On/Off Button (On Northstar Base)
2. Back Button
3. Enter Button
4. Scroll Up Button
5. Scroll Down Button
6. LCD Display
7. “GO” Button
8. Motorized Movement Buttons (4)
9. Battery Door (On Northstar Base)
NORTHSTAR COMPUTER
INTERFACE DIAGRAM
The Liquid Crystal Display (LCD) is a two-line, sixteen character display. The LCD is illuminated for use during nighttime
viewing just like the buttons.
ALL BUTTONS ARE ILLUMINATED FOR NIGHTTIME USE.
On/Off Button: The On/Off Button will turn the Northstar Computerized Star Locator on and off. This button flashes
or strobes on and off during normal use. To turn the unit off, simply depress and hold the On/Off button for three
seconds and release. (Note: The Northstar Computerized Star Locator will automatically turn itself off after 10 minutes
of inactivity.)
Back Button: This button functions to navigate to the previous level within the operating framework and/or back to the
previous level of input.
Enter Button: This button functions to select certain menu choices. By pressing the ENTER button Northstar will
advance to the selected level. When an object name or number is listed on the screen, the ENTER button can also be
pressed to display a scrolling text description of the object.
Scroll Up Button: This button functions to scroll up
through various menus within Northstar. Anytime you encounter
a blinking text/number option, the scroll button will display the various choices within that menu. (Note: To select an
option that you have scrolled to, just press the ENTER button.)
Scroll Down Button: This button functions to scroll down
through various menus within Northstar. Anytime you
encounter a blinking text/number option, the scroll button will display the various choices within that menu.
(Note: To select an option that you have scrolled to, just press the ENTER button.)
“GO” Button: The GO button will automatically center any object displayed on the LCD display. By pushing the “GO”
button, the telescope will automatically find and follow the selected object until another object is selected and the “GO”
button is pushed again.
Motorized Movement Buttons: These four multi-directional buttons will allow the user to override the tracking system
and move the telescope utilizing the motors manually to another desired location. The longer these buttons are
depressed, the faster the Northstar will move until it reaches its maximum speed.
10.
LCD DISPLAY
2.
3.
4.
5.
6.
7.
8.
 Loading...