

Bush CTV401DVD Quick Start Guide
3
Using your TV for the first time
Let’s get started
4
Troubleshooting
Help is always at hand
Quick start guide
CTV401DVD
Contact:
www.argos-support.co.uk
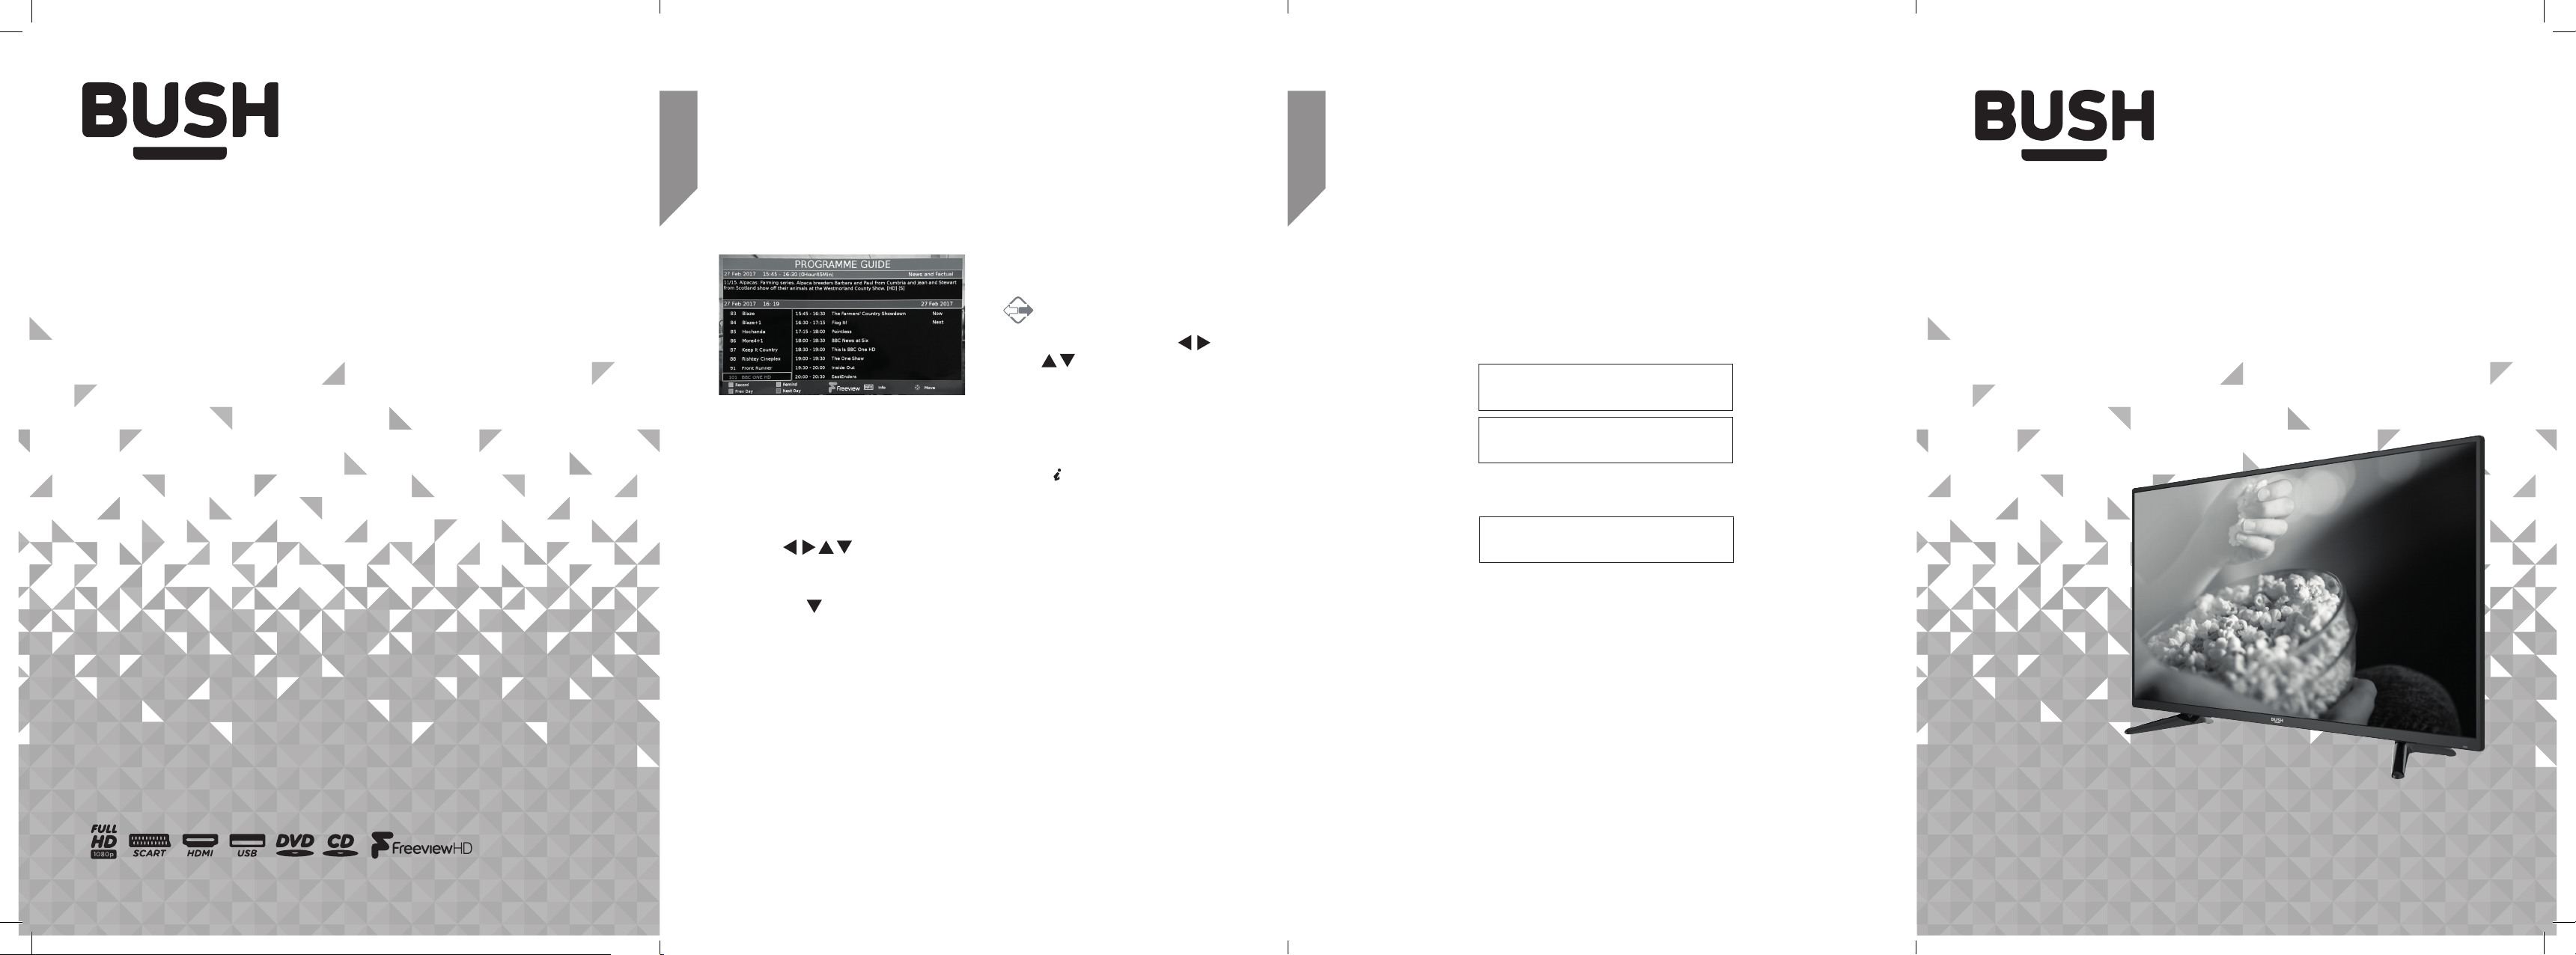
Using the Electronic Program Guide
Open the guide by pressing the EPG button on
the remote.
The program guide displays a list of 8 channels
along with the program schedule for the next
8 programmes.
The current channel marker is highlighted with
a green block. The selected day/ date is listed
along the top left.
• Use the
to highlight any current or future
programs.
• Pressing the
the highlight marker proceeds past the
displayed 8 programmes will load the next
set of programs.
Along the bottom left of the guide is a key
showing the usage of the colour buttons
found on the remote control.
navigation buttons
button repeatedly so that
Channel selection
• Press the CH+/- buttons on the TV or
remote control repeatedly; or use the 0-9
buttons on the remote control to select a
channel.
Alternative:
Press the OK button to enter the
channel list. Then use the
buttons to highlight and
select the channel.
Press the OK button to view the
selected channel.
Display channel information
• Press the INFO button to view the
current information.
Volume adjustment
• Press the VOL+/- buttons on the TV or
remote control to adjust the volume.
• If you wish to switch the sound off, press
the MUTE button on the remote control.
Press the MUTE button once more or the
VOL+/- buttons to resume the audio.
Help and assistance
If you require any technical guidance or find that your DVD Player is not operating as intended, a
simple solution can often be found in the Troubleshooting section of the instruction manual or
online at www.argos-support.co.uk
If you still require further assistance, call one of our experts on 0345 604 0105*. To help us give
you a fast and efficient service please have the following information ready:
You can find these
Model Ref.
Serial number
Date of purchase
Local call rates applies*
CTV401DVD
on the rating plate - a
small information
panel (usually a
sticker or metal plate)
on the rear of your
product.
This will be shown
on your receipt
Lines open 8am-7pm Monday to Saturday and 10am-4pm Sunday.
*Calls to Argos enquiry lines may attract a charge and set up fee from residential lines depending
on your call plan/tari. Mobile and other providers costs may vary, see www.bt.com/pricing for
details.
For security and training purposes, telephone calls to and from customer service centres may be
recorded and monitored. Calls from Republic of Ireland will attract international call charges.
Helpline: 0345 604 0105
section of the Instruction manual or online at www.argos-support.co.uk If you still require further assistance, call one of our experts on 0345 604 0105.If you require any technical guidance or find that your product is not operating as intended, a simple solution can often be found in the Troubleshooting
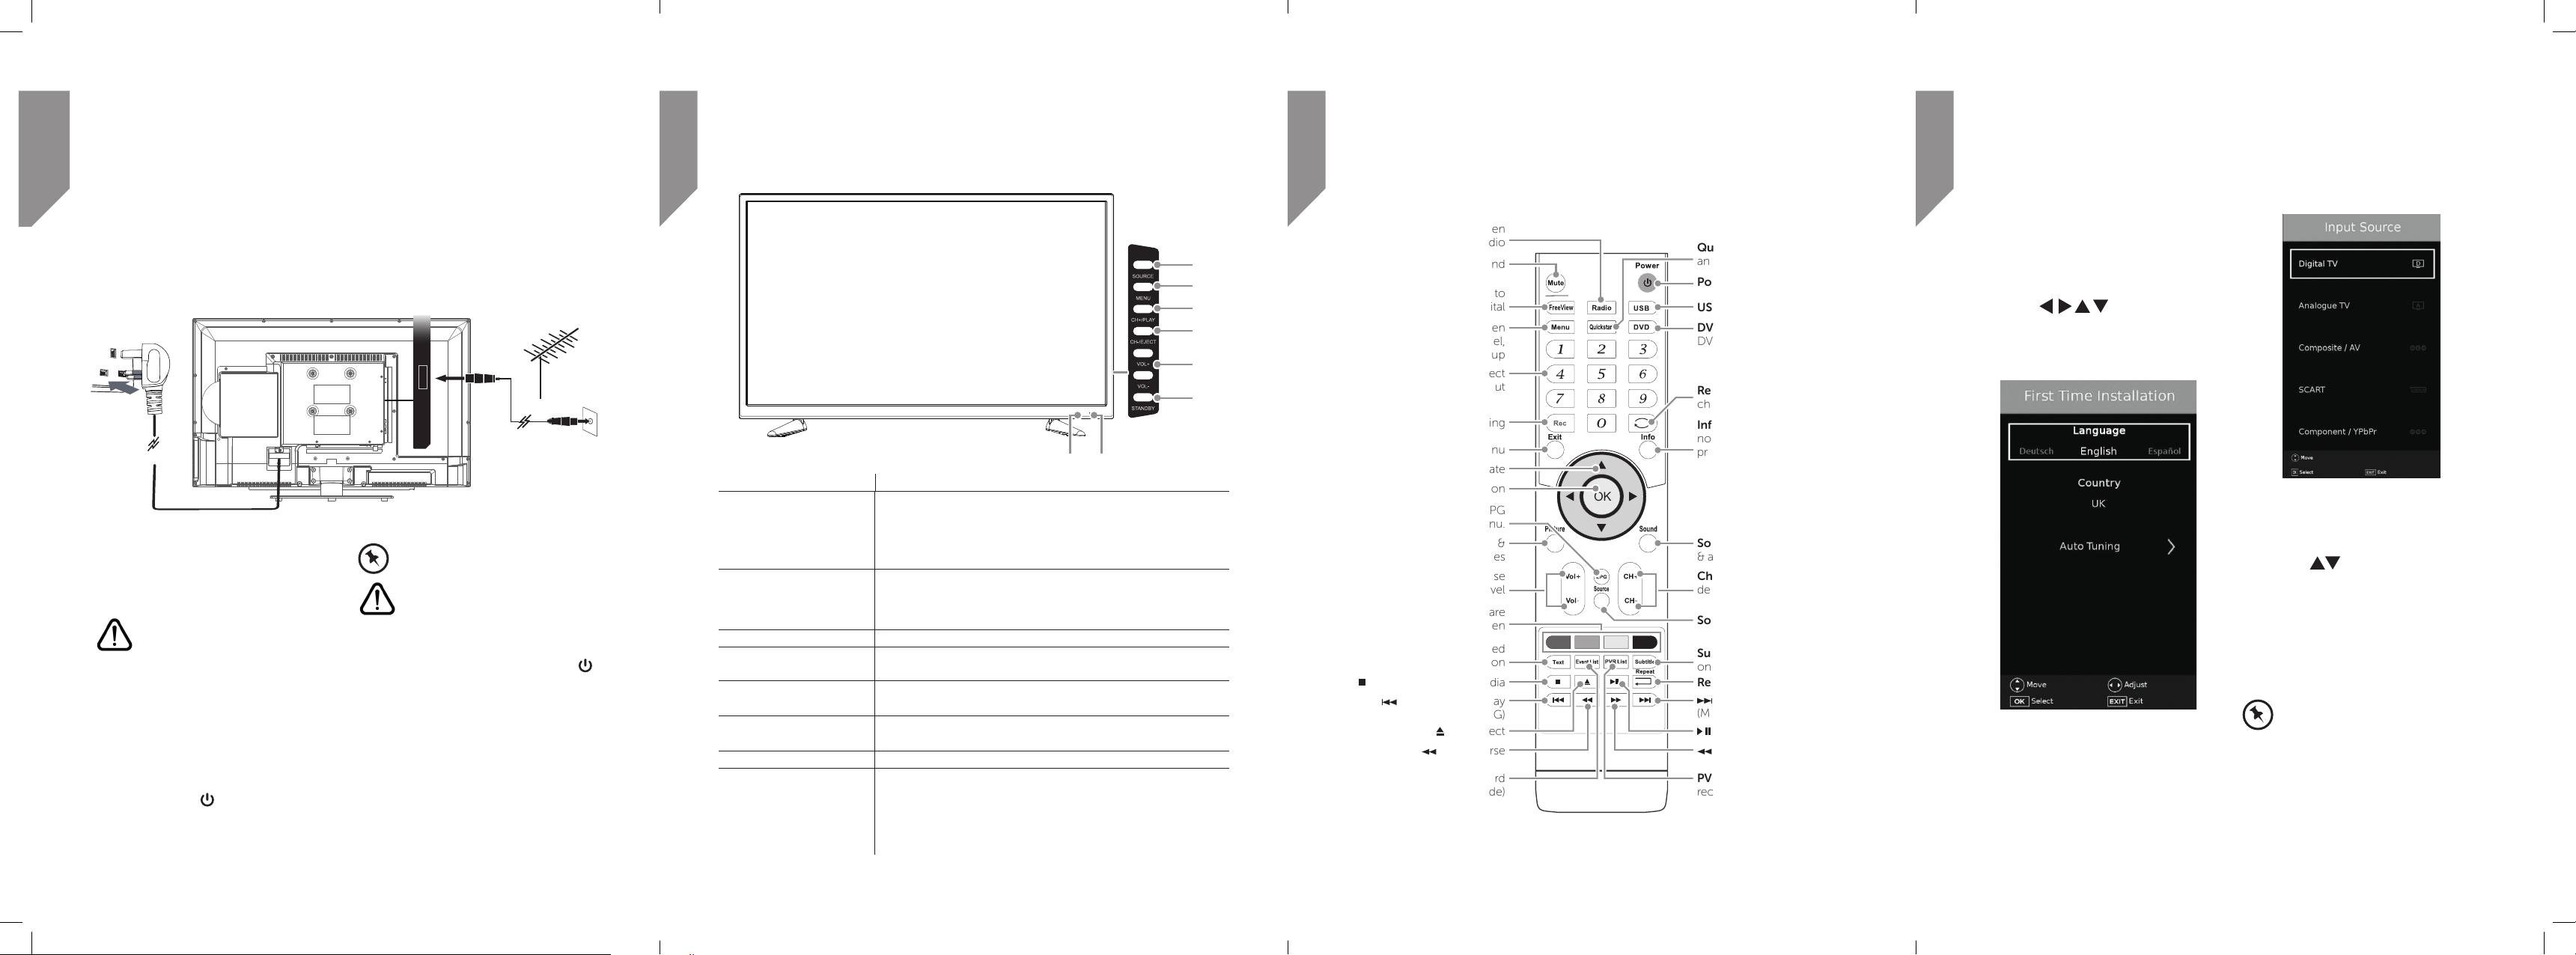
Connections
Getting to know your TV
Getting to know your TV
Using your TV for the first time
1
Bringing it all together
You’ll soon be enjoying your new TV.
This guide will help you get started, full details of your TV and its features
can be found in the Instruction manual.
Connecting the power and aerial
Digital
audio out
1. Connect one end of the RF coaxial cable
to the aerial socket on the wall and the
other end of the cable to the aerial socket
at the rear bottom of the TV.
• DO NOT connect the TV to the
mains supply until you have
completed all the connections.
2. Connect the mains cable to a mains
socket (after completing all other
connections).
3. At this stage the TV will power on in
standby mode (red LED indicator on the
front panel). Press the STANDBY button
on the TV or the
control to turn on your TV (the red LED will
change to green).
button on the remote
ANT IN
HDMI3
RF coaxial cable
(not included)
• The STANDBY button is located on
the rear right hand side of the TV.
• Always disconnect the TV from the
mains socket when not in use for a
long period of time.
• The STANDBY button on the rear
right hand side of the TV or the
button on the remote control is
only used for switching the TV into
standby. It does not disconnect
the TV from the mains power. To
completely disconnect the mains
power, please remove the mains
cable from the mains socket.
OR
2
Item Description
1. Power LED Illuminates green when the TV is turned on. Illuminates red when
2. IR (infrared receiver) Receives IR signals from the remote control.
3. Standby Switches the TV on or off from standby mode.
4. Vol + / - Adjust the volume level. Press to select and adjust a setting in the
5. CH - / EJECT Press to select a channel or select a sub-menu from the OSD
6. CH + / Play Press to select a channel or select a sub-menu from the OSD
7. Menu Displays the OSD (On Screen Display) menu.
8. Source Press to select the various input signal sources.
You’ll be up and running in no time
the TV is in standby mode.
The LED will alternate between red and green when the PVR timer
programming has started in the standby mode.
Do not place anything in front of the sensor, as its function may
be affected.
OSD menu.
menu. / Press to eject a DVD disc.
menu. / Press to play or pause a DVD disc or multimedia file.
DTV, ATV, COMPOSITE-AV, SCART, VGA-PC, YPBPR
(COMPONENT), HDMI1, HDMI2 and HDMI3.
Confirm a selection on the OSD menu.
1 2
2
8
7
6
5
4
3
Navigation : Press to navigate
OK : Press to select an option
EPG : Press to enter the EPG
Volume: Increase or decrease
Teletext : Display associated
You’ll be up and running in no time
Radio: Switch between
TV and Radio
Mute: Mute sound
Free View: Switch to
Freeview digital
Menu: Switch between
Picture, Sound, Channel,
Feature & Setup
Numeric buttons : Direct
channel input
Rec: Start recording
Exit : Exit from any menu
menu.
Picture : Switch sound &
aspect ratio modes
the volume level
Soft keys: Actions are
displayed on-screen
teletext information
Stop: PVR and Multimedia
: Prev track, File, Day
(Media, PVR and EPG)
: DVD eject
: Fast reverse
Event List: Show the record
schedule list (DTV mode)
OK
Quickstart: Searches all ATV
and DTV channels
Power: Turn on or standby
USB: Switch to USB mode
DVD: Switch to DVD mode/
DVD menu when in DVD
mode
Recall: Return to last selected
channel
Info: DTV mode displays
now/next. 2nd press extended
program info.
When recording displays
detail of the recording and
space available on the card.
TXT mode - Index function
Sound : Switch sound modes
& audio language.
Channel +/-: Increase or
decrease the channel number
Source: Switch input
Subtitle: DVD / DTV modes
only
Repeat: Select a repeat mode
: next track, File, Day
(Media, PVR & EPG)
: PVR and Multimedia
: Fast forward
PVR list: Display list of
recorded programs (DTV
mode)
3
Let’s get started
Turning the TV on for the first time
1. If this is the first time you are turning on
the TV and there are no programs in the
TV memory, the First Time Installation
menu will appear on the screen.
Use the navigation buttons
to enter the settings, select the ‘auto
tuning’ option and press the OK button to
begin the setup process.
Selecting the input source
1. Press the SOURCE button on the TV or the
remote control to display the input source
list.
2. Press the
input source you require: DTV, ATV,
COMPOSITE-AV, SCART,
PC-VGA, YPBPR, HDMI1, HDMI2 or HDMI3.
3. Press the OK button to confirm your
selection.
• In DTV mode, press the RADIO
buttons to select the
button to switch to TV/Digital radio
channels directly.
If you require any technical guidance or find that your product is not operating as intended, a simple solution can often be found in the Troubleshooting
section of the Instruction manual or online at www.argos-support.co.uk If you still require further assistance, call one of our experts on 0345 604 0105. section of the Instruction manual or online at www.argos-support.co.uk If you still require further assistance, call one of our experts on 0345 604 0105.
If you require any technical guidance or find that your product is not operating as intended, a simple solution can often be found in the Troubleshooting
 Loading...