

Page 1
High Definition
Digital Set Top Box
DFTA42FV
INSTRUCTION MANUAL
The Gold Technical Support Line: 1902 215 259
(Charges will apply at $2.95 per minute)
Page 2

Safety Instructions
Always read the safety instructionscarefully
Keep this InstructionManual forfuture reference
Keep this deviceawayfrom humidity
Lay this deviceonareliable flat surfacebefore setting it up
Do not standitonsoft furnishings
If anyof thefollowingsituationarises, get the Set TopBoxcheckedby
a servicetechnician:
It hasbeenexposedto moisture
It hasbeendroppedanddamaged
It hasobvioussignof breakage
It hasnot beenworkingwelloryoucannot get it to work according
to the Instruction Manual
Warning
To prevent theriskof electric shock, do not openthecoverorthe
back of thereceiver.
Do not blocktheventilationholesof thedevice. Leaveappropriate
gap above and around it to allow foradequate ventilation.
Do not placethedevicein anunventilatedcabinet orontopof a unit
which emits heat.
Copyright Statement
No part of this publicationmaybereproducedin any form by any means
without thepriorwrittenpermission. Othertrademarksorbrandnames
mentioned herein are trademarksorregisteredtrademarksof their
respective companies.
Disclaimer
Information in this document issubject to change without notice.
The manufacturer does not makeanyrepresentationsorwarranties
(implied or otherwise) regarding the accuracy and completeness of this
document andshallin noevent beliable for any loss of profit orany
commercial damage, includingbut not limited to special, incidental,
consequential, or other damage.
Page 3

Introduction
Thank youforbuyingthis Bushproduct, which is designedto give you many
years of trouble-freeservice.
You may alreadybefamiliarwithusing a similar unit, but pleasetake time to
read these instructions. Theyare designed to familiarise you with the unit s
many features and to ensure youget thevery best from yourpurchase.
Safety isimportant
Your safety and the safety of others isimportant. Pleasetherefore, ensure you
read the Safety Instructions before youoperate this unit.
Warranty
In theunlikely event that yourproduct failsto work normally, please call the
below Bush warranty numberfor support.
Australia
Bush Warranty: 1800 509 394
New Zealand
Bush Warranty: 0800 450 259
Page 4

Aboutthe SetTopBox
This DVB-T TV Receiver allows you to access Freeview Digital TV
Channels andRadio Broadcasts on your TV set. Its digital reception
covers VHF & UHF band. Digital TV eliminates noise and interference
and offers high quality videoand audio.
Aneasy to useon-screen installation guide is provided. In addition,
a fully featured Remote Control isincluded that offers you access
to every feature witha simple pressof a button.
Main Features
Compliant with both Australian Standard and High Definition Video
Freeview Compliant
Decoding MPEG2 and H264 MPEG4 AVC Formats
Upgrade receiver software by over-the-air download
COFDM Demodulator
Automatic/Manual Channel Search
Channel Edit, Movingand Deletion
Parental LockControl
EPG (Electronic Program Guide)and Teletext Function (where
available)
HDMI 1.3 Output
Multiple-Language OSD
Supports Multi-Subtitle
USB Port forViewing JPEG Files, Music Fileand to UpgradeSoftware
TunerRF In/LoopThrough
Component / Video/ Digital Audio via Coaxial Output
Full Function Remote Control
Package Contents
Before installation, pleasecheck the items of thepackage.
Thepackage should contain thefollowing items:
~ DVB-T TV Receiver x1 pc
~ Remote Control x1 pc
~ AAABattery forthe Remote Control x1 pair
~ InstructionManual x1 pc
~ CompositeRCACable x1 pc
Page 5

Table ofContents
Front andRear Panel ..........................................................................5
Remote Control ................................................................................6-7
Connecting to a Television................................................................... 8
Connecting to an Audio System............................................................. 9
Connecting to a DVD Recorder or VCR.................................................10
First Time Installation... ......................................................................11
Basic Operations..........................................................................
Troubleshooting
Technical Specifications..................................................................... 20
Warranty........................................................................................... 21
................................................................................19
11-19
Page 6
N14119
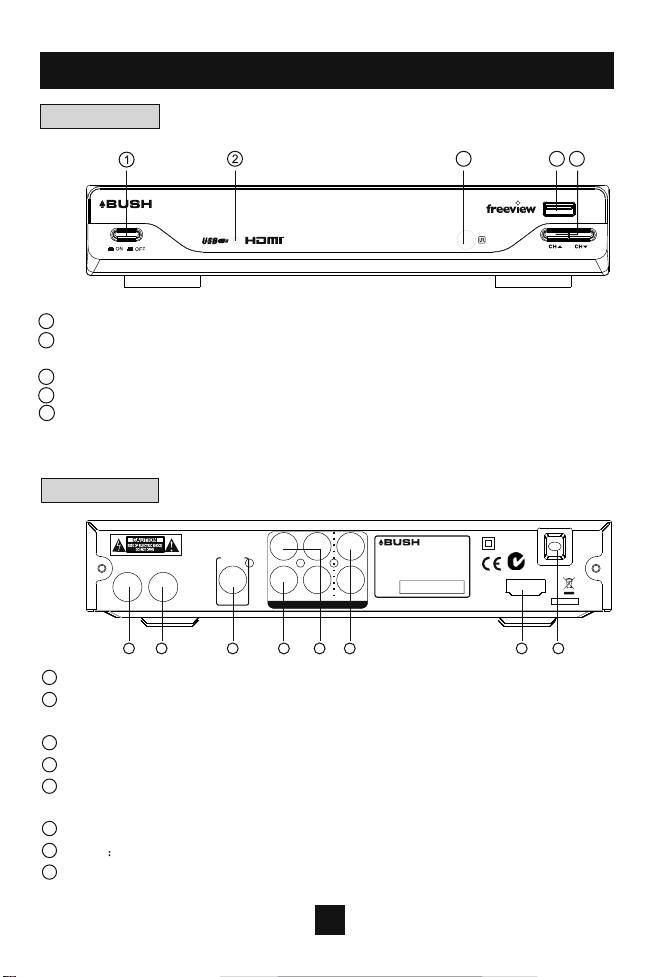
Front and Rear Panel
1. Front panel
345
1 POWER BUTTON: Usedto turn on/off the main power supply.
2 STANDBYINDICATOR: Used to visually showpower state of the Set Top Box,
the LED will turn redif the Set Top Box enters standbymode.
3 REMOTE CONTROL SENSOR: Usedto receivethe signal from theRemote Control.
4USB:
5 CHANNEL UP/DOWN: Usedto changechannels without usingthe Remote Control.
Data input from USBstorage devices.
2. Rear panel
Digital
Digital
Audio
LOOPRF
INRF
THROUGH
1 2
1
RF IN : This socket connects to your external Aerial.
2
RF LOOP THROUGH: This socket will bypass theRF signal to either your TV or
Audio
CoaxialCoaxial
3
Pb
Pr
Y
VIDEO
COMPONENT VIDEO /AUDIO OUT
4
5
POWER SUPPLY: 230V~50Hz
MAX POWER CONSUMPTION: 8WATTS
L
MADE IN PRC
BUSH WARRANTY: 1800509 394 AUSTRALIA
BUSH WARRANTY: 0800450 259 NEWZEALAND
Serial No.:
R
6
another videosystem.
3
COAXIAL: This socket connectsto a Coaxial cable on your surround sound system.
4
VIDEO: This socket outputs composite videosignal.
5 COMPONENT VIDEO OUT:
These sockets connect toyour TVcomponent input
terminals.
6
AUDIO L/R: This socket outputs Analog Audio L/R signal.
7
HDMI
High definition audio andvideo output used to connect toa HDMI device
8
MAINS CABLE: This is used to connect toyour main power supply.
5
DFTA42FV
HDMI OUT
7 8
2009/06
AC 230V
~50Hz
Page 7
Remote Control
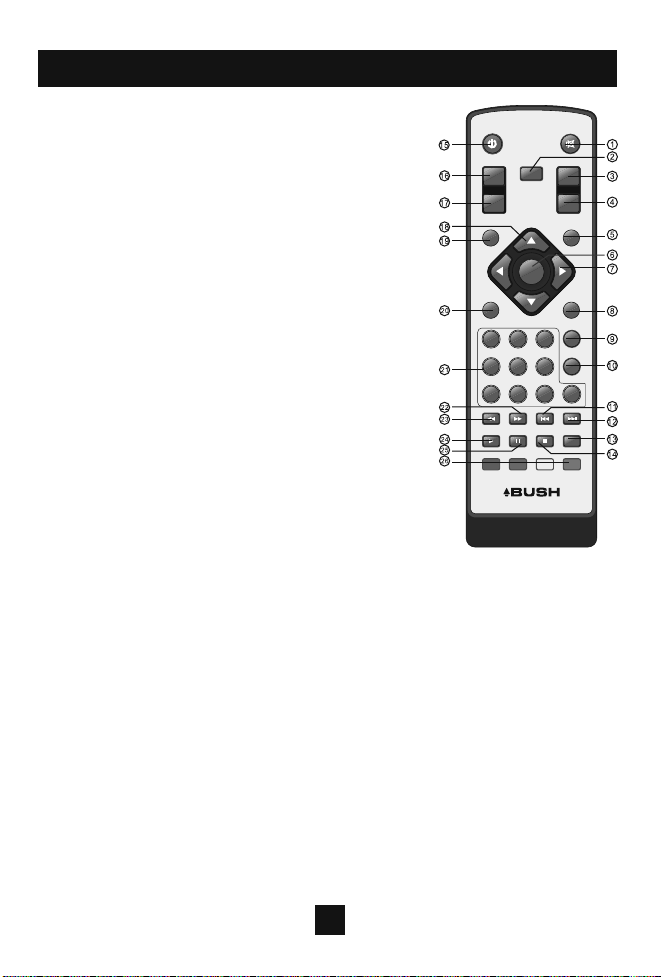
1. MUTE: Mute or Restore Audio Output.
2. INFO: Displays additional channel information.
3. TTX: Displays Teletext Information.
4. SUBTITLE: Selects Subtitles Language.
STANDBY
EPG
MUTE
TTX
INFO
5. EXIT: Exits the current Menu or returns to the
previous Menu.
6. OK: Confirms an entry or selection. Displays
the list of channels.
7. RIGHT / LEFT:Navigates through the Menus.
Increases or decreases volume.
8. TV/RADIO: Switches from TV function to Radio
function and from Radio to TV.
9. RECALL:
Used to switch between the last
two viewed channels.
10. GOTO:Selects the play time of media.
11. PREV: Skips to the previous track during
playing media and skips to the previous channel
during playing DTV.
12. NEXT: Skips to the next track during playing.
AUDIO
MENU EXIT
FAVOURITE
123
456
7890
REV
PLAY
SUBTITLE
CH+
OK
CH-
TV/RADIO
RECALL
GOTO
PREV N EXT
FWD
PAUSE STOP REPEAT
VOL+VOL-
media and skips to the next channel during playing
DTV.
13. REPEAT:Selects Repeat or turn off Repeat
mode.
14. STOP:Stops media play.
15. STANDBY:
Switch the product to on or standby.
16. EPG: (Electronic Program Guide)T urns the
program guide on.
17. AUDIO: Selects an Audio Language or Audio Mode.
18. UP / DOWN: Navigates through the Menus. Selects the next or previous
Channel.
19. MENU: Turns on Main Menu.
20. FAVOURITE: Turns on Favourite Menu.
21. 0-9 (Numeric Buttons): Selects a channel or setting .
22. FWD: Searches forwards during media play.
23. REV:Searches backwards during media play.
24. PLAY: Starts or resumes media play.
25. PAUSE: Pauses media play.
26. COLOUR BUTTONS:
Operate different function in TEXT screen.
6
Page 8
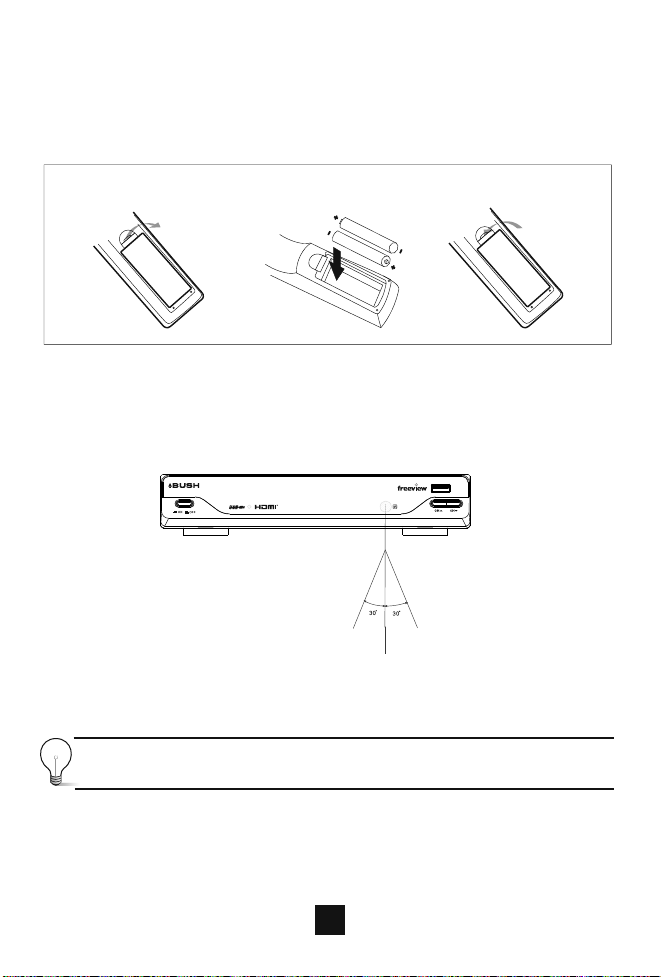
Installing the Batteries
Remove the battery cover from the and put 2xAAA size
Remote Control
batteries inside the compartment.
The diagram inside the Battery Compartment shows the correct way to
install the batteries.
1.Open thecover
N
PE
O
2.Install batteries
3.Close thecover
LOSE
C
Using the Remote Control
To use the Remote Control,point it towardsthe front of the Digital Set Top Box.
The Remote Control hasa range of upto 7 metresfrom theSet Top Box at an
angle of upto 60 degrees.
The Remote Control will not operate if its path isblocked.
Sunlight or very bright light will decrease the sensitivity of the
Remote Control.
7
Page 9
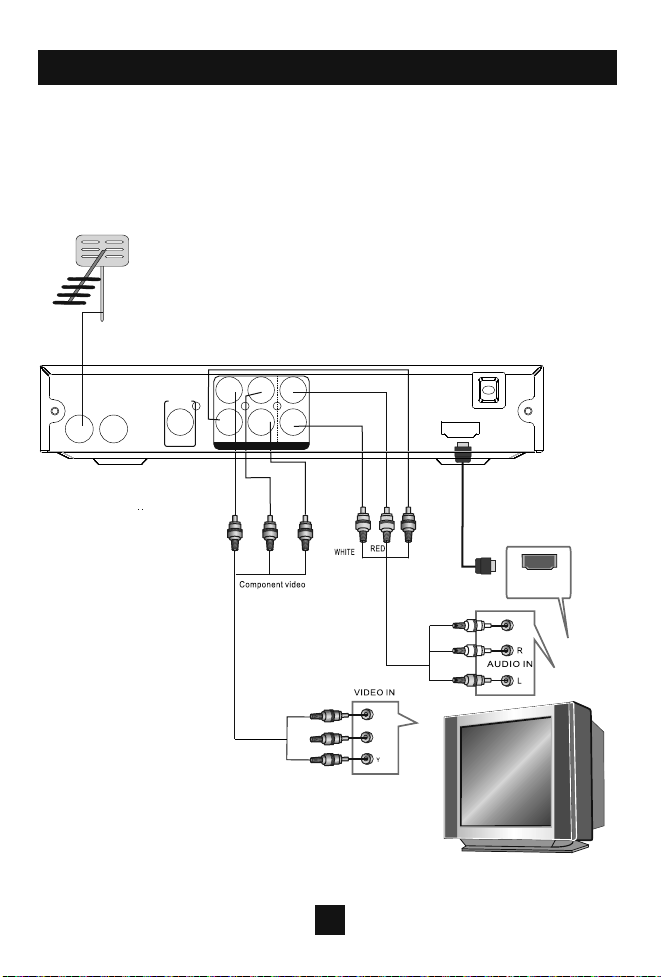
Connecting to a Television
For a basic connection from your Set Top Box to the television,
use the Composite connection outlined below.
For a higher quality connection, use the Component Video
connection outlined below combined with the Composite Audio Connection.
For the highest quality connection use a direct HDMI connection, see below.
TVAerial
100-240V~
Digital
Audio
LOOPRF
INRF
THROUGH
Coaxial
Pb
Pr
Y
CVBS
COMPONENT VIDEO /AUDIO OUT
L
R
50/60Hz
HDMI OUT
(Audio) (Video)
Composite
Cr
Cb
8
YELLOW
HDMI
VIDEO IN
Page 10
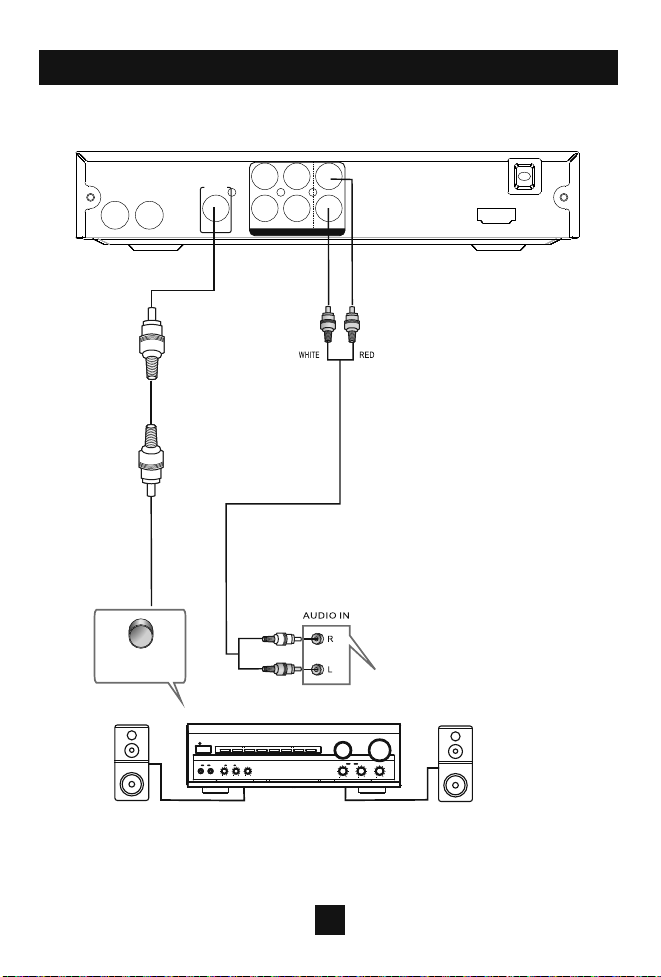
Connecting to an Audio System
Digital
Audio
LOOPRF
INRF
THROUGH
Coaxial cable
Coaxial
Pb
Pr
Y
CVBS
COMPONENT VIDEO /AUDIO OUT
L
R
100-240V~
50/60Hz
HDMI OUT
Coaxial
POWER
MIC
211
Amplifier
PRO LOGIC
MODE
3 STEREO
BYPASS
MICVOL
EXCITE
2
KARAOKE
DOWN
UP
BASS
ECHO
MIC
TREBLE
9
5
VOLUME
INPUT SELECTOR
MUTE
CHANNEL
TEST
Page 11
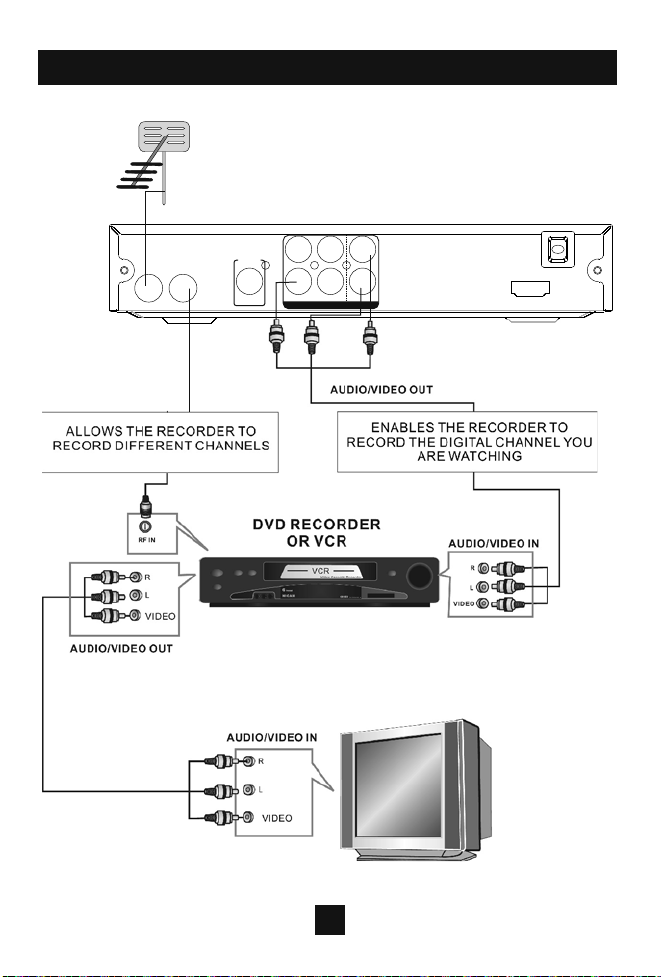
Connecting to a DVD Recorder or VCR
TV Aerial
Digital
Audio
LOOPRF
INRF
THROUGH
Coaxial
Pb
Pr
Y
CVBS
COMPONENT VIDEO /AUDIO OUT
L
R
100-240V~
50/60Hz
HDMI OUT
10
Page 12
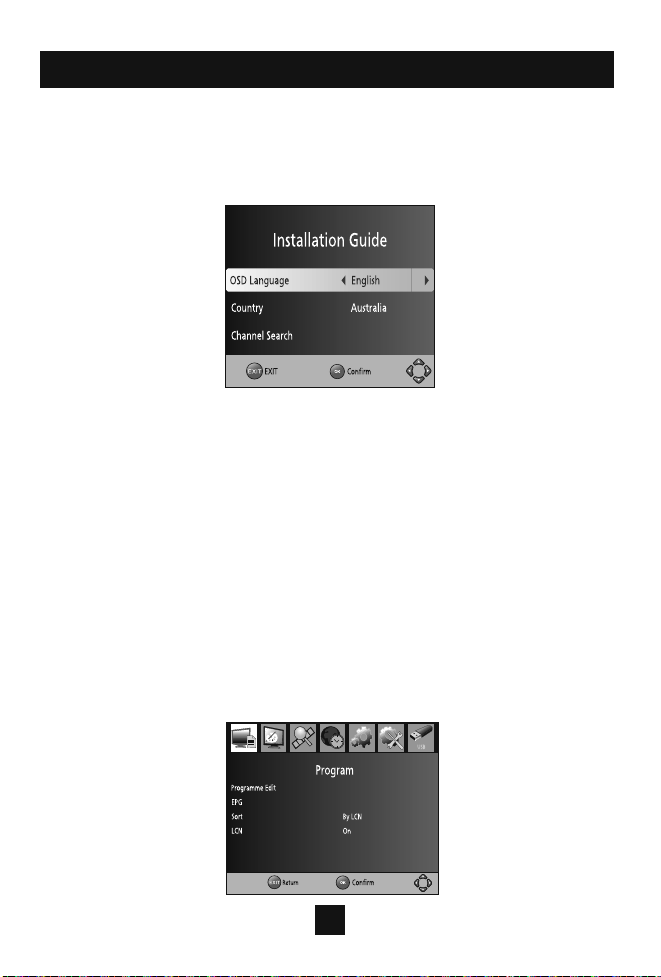
First Time Installation
After all connections have been made properly, switch on TV and make
sure the receiver is connected to the Main Power. Press Power button to
switch receiver on. If you are using the receiver for the first time or
restored to Factory Default, the Main Menu will appear on your TV screen.
(1) Select [OSD Language] andpress RIGHT/LEFT key to select anlanguage
(2) Select [Country] andpress RIGHT/LEFTkey to select your countryof
residence
(3) Select [Channel Search] andpress RIGHT or OKkey to begin Automatic
channel search
(4) Oncechannel tuningis complete, youare now ready to watchTV
Basic Operation
(1) Program Manage Settings
To access the Menu, press the MENU button and select [Program]. The
Menu provides options to adjust the Program Manage Settings. Select an
option and press OK or RIGHT to adjust that setting. Press the EXIT button
to exit the Menu.
11
Page 13
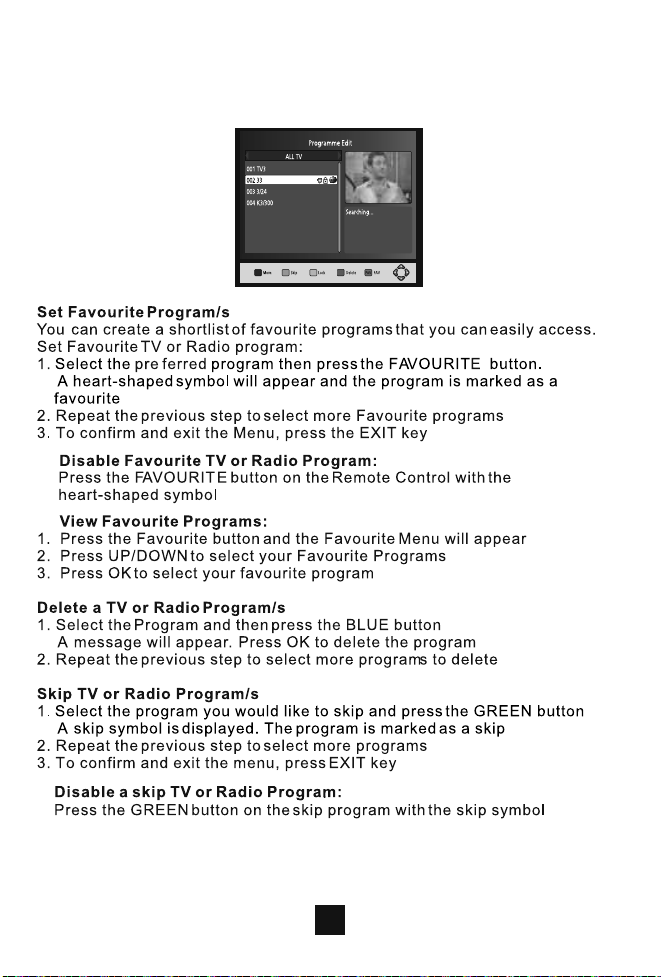
(2) Program Edit
To edit your program preferences (lock, skip, favourite, move or delete), you
will need to enter the Program Edit Menu. This Menu requires a password to
access. Enter the default password '000000'.
12
Page 14
Move a TV or Radio Program/s
1. Select the preferred program then press the RED button. A move symbol
will appear
2. Press UP/DOWN to move the program
3. Press OK to confirm
4. Repeat the above steps to move more channels
Lock Program/s
You can lock selected programs for restricted view.
Lock a TV or Radio Program:
1.Select the preferred program then press the YELLOW button. A lock-shaped
symbol is displayed. The program is now marked as locked
2. Repeat the previous step to select more programs
3. To confirm and exit the menu, press the EXIT button
4. Press the YELLOW button to disable the locked program
5. To view the locked program, you will be require to enter either the default
password '000000' or your last set password.
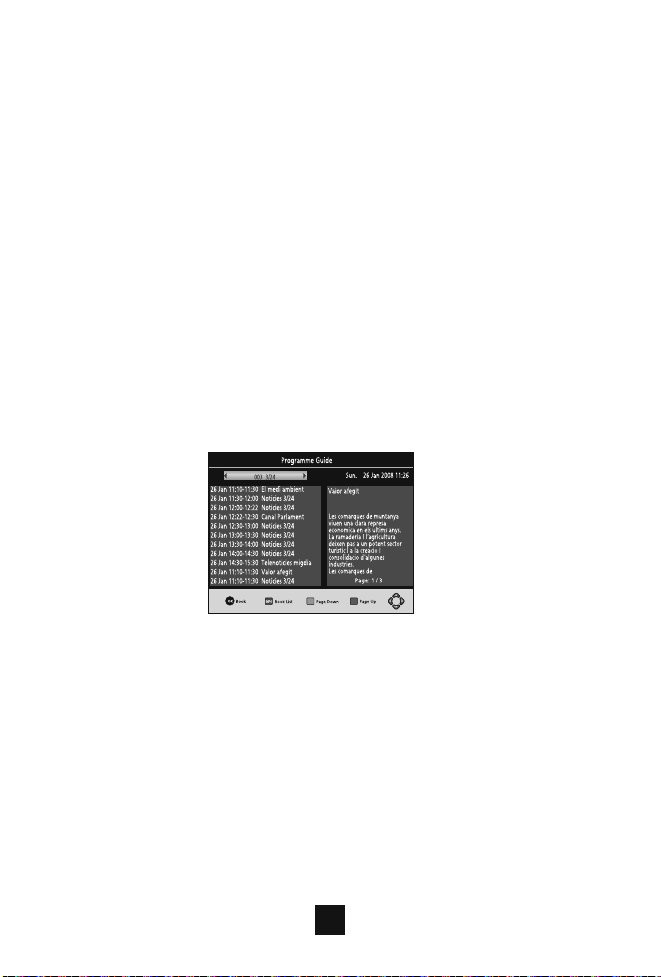
(3) EPG (Electronic program guide)
The EPG isan on-screen TV guide thatshows scheduled programs seven
days in advance for every tuned channel. Press the EPG button on the Remote
Control to accessguide.
You can use the UP/DOWN key to select the preferred program. If there is
more than one page of information, use the BLUE button for page upand
the YELLOW button for page down.
(4) Sort
Sort your channels from the following options:
[LCN] - Sort the channels in ascending order
[Name] - Sort the channels in alphabetical order
[Service ID] - Sort the channels according to the station
(5) LCN (Logical channel number)
Set LCN on or off.
13
Page 15
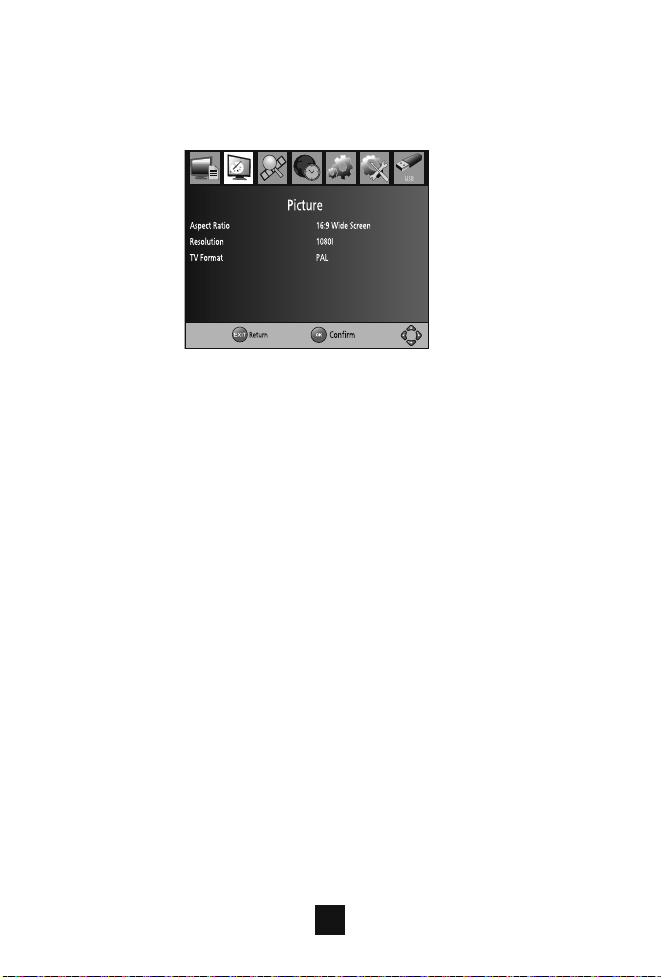
(6) Video Setting
To access the Menu, press MENU then select [Picture]. The Menu
provides options toadjust the video settings. Press UP/DOWN to select an
option and press RIGHT/LEFT to adjust that setting. Press EXIT to exit the
menu.
(1). Aspect Ratio
You must set the display format to either 4:3 PanScan, 4:3 Letter Box,16:9
Full Screen or Auto to get the maximum display when watching TV.
(2). Resolution
If the video does not appear correctly, change the setting. This setting is to
match the most common setting for HDMI.
[480i]: for NTSC system TV.
[480P]: for NTSC system TV.
[576i] for PAL system TV.
[576P]: for PAL system TV.
[720P]: for NTSC or PAL system TV.
[1080I]: for NTSC or PAL system TV.
(3). TV format
If the video does not appear correctly, you need to change the settings.
This should match the most common setting for TVs in your country.
[NTSC]: for NTSC system TV.
[PAL]: for PAL system TV.
14
Page 16
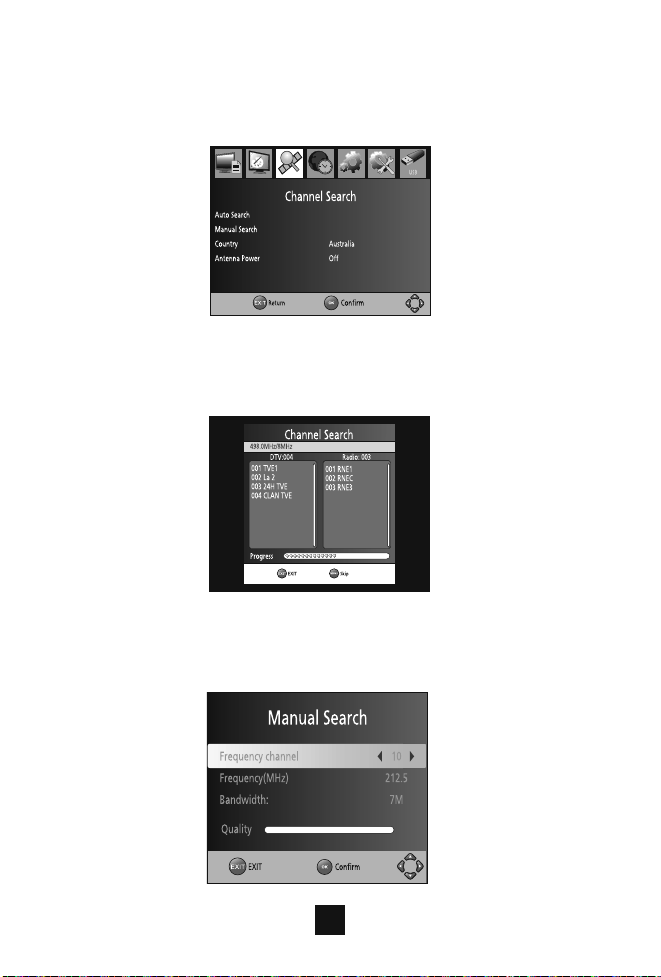
(7) Channel Search
To access the menu,press MENU select [Search Channel]. The enu
provides options to adjust the earch hannel settings.
Select an option and press RIGHT/LEFT to adjust the setting .
Press EXIT the enu
1 . Auto Search
Search and install all channels automatically. This option overwrites all
preset channels.
1. Select [Auto Search] and press OK or RIGHT to start channel search.
2. To cancel channel search, press EXIT.
2. Manual Search
Install new channels manually. This option adds new channels without
changing the current channels list.
1. Select [Manual Search] then press OK or RIGHT. The channel search
screen will appear.
to exit M
and M
SC
s
15
Page 17
2. Press the RIGHT/LEFT key to select the channel frequency
3. Press OK to start searching channels
If a channel is found, it is saved and added to the channels list. If channels
can t be found, then exit the menu.
'
(3) Country
Select your country of residence.
(4) Antenna power
Enable AntennaPower if an external active antenna is connected.
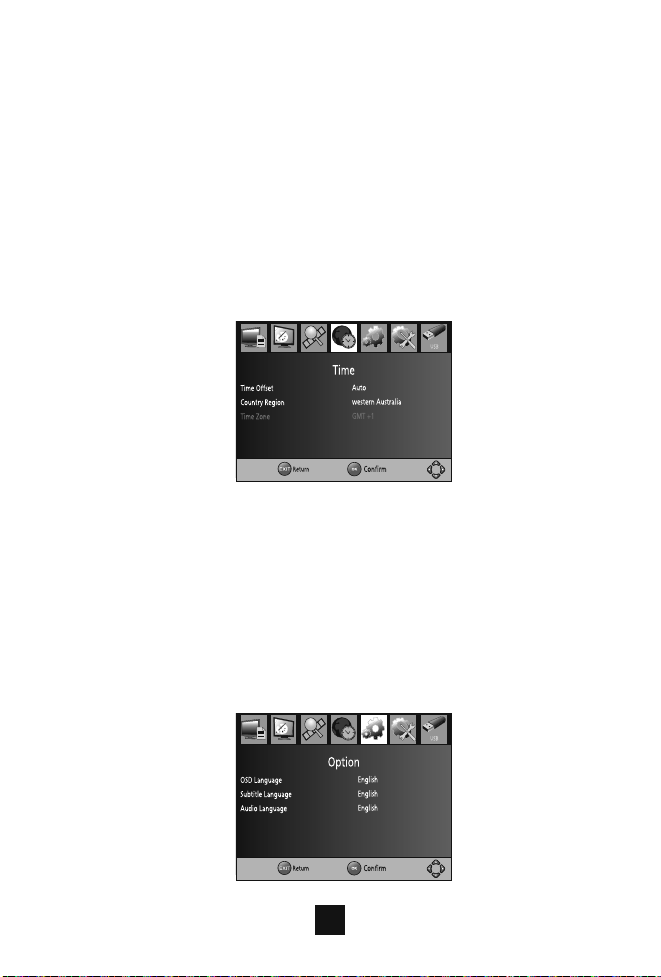
(8) Time Setting
To access the enu,press MENU select [Time]. The enu provides
options to adjust the time settings.
Press UP/DOWN to s
setting . Press EXIT to exit the menu
(1) Time offset
Select auto or manual for GMT offset adjustments.
(2) Country Region
Select the Country Region when [Time Offset] is set to Auto.
(3) Time Zone
Select the Time Zone Offset when [Time Offset] is set to Manual.
M then M
elect an option and press RIGHT/LEFT to adjust the
s .
(9) Option
To access the enu,press MENU select [Option]. The menu provides
options to adjust the
Select an optionand press to adjust the setting.
Press EXIT the enu
M and
OSD Language, Subtitle Language and AudioLanguage.
RIGHT/LEFT
to exit M
16
Page 18
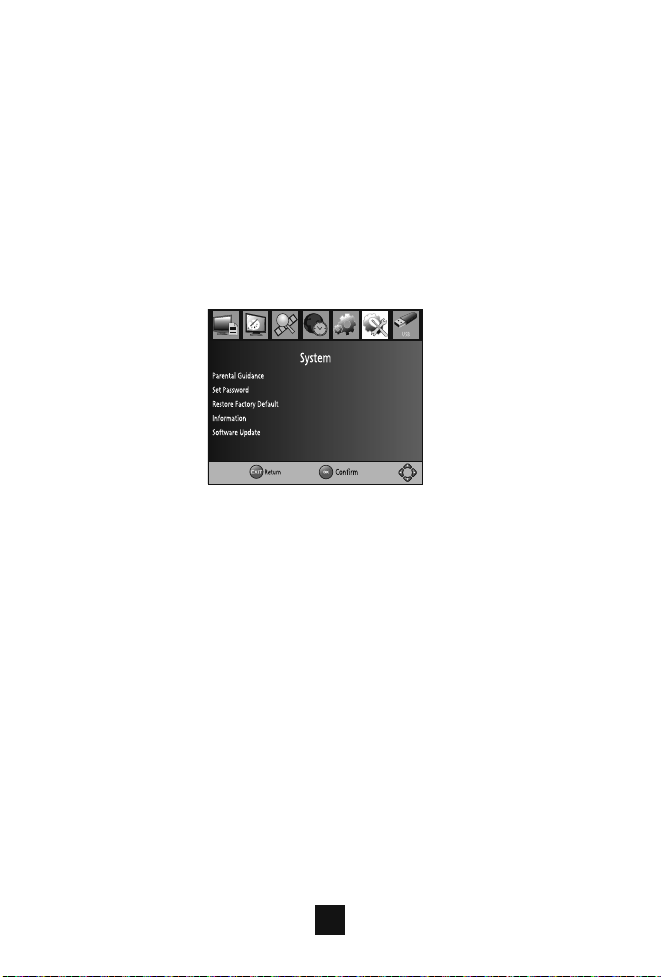
(1). OSD Language
Select an OSD language
(2). Audio Language
Select the preferred audio language for watching TV channels.
If the language is not available, the default program language will be used.
(3). Subtitle Language
Select the preferred subtitle language.
(10) System Setting
To access the enu,press MENU select [System].The menu
provides options to adjust the system settings.
Press the UP/DOWN key to s
adjust the setting.
Press EXIT to exit the enu .
(1) Parental Guidance
You can restrict access to channels thatare unsuitable
for children. To restrict/lock the channel you will need to enter either the
default password '000000' or your own password.
(2) Set Password
Set or change the password for locked programs. Enter your old
password or the default password '000000'. You will then be asked to
enter your newpassword. To confirm re-enter your new password. Once it
is confirmed, press EXIT to exit the Menu.
M and
elect an option and press RIGHT/LEFT to
M
17
Page 19
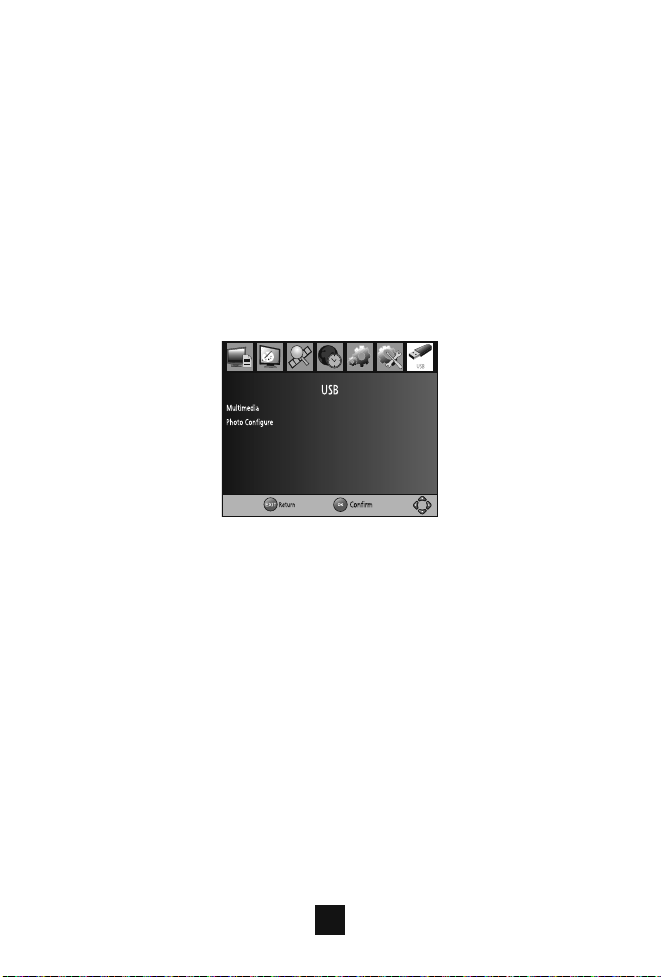
(3) Restore Factory Default
Reset your Set Top Box to the Default Factory Settings.
In Main Menu select [Restore Factory Default] and press OK or RIGHT to
select. Enter your password or the default password '000000' and press OK
to confirm. This option will delete all preset channels and settings.
(4) Information
View model, hardware and software information.
(5) Software update
If the status is set ''ON'', it will begin searching for new software from
broadcast according to your preferred time in ''Start Time''.
(11)USB
To access the Menu, press the Menu button and select USB.
Multi-Media
Switch to USB mode and plug in USB to view files.
18
Page 20
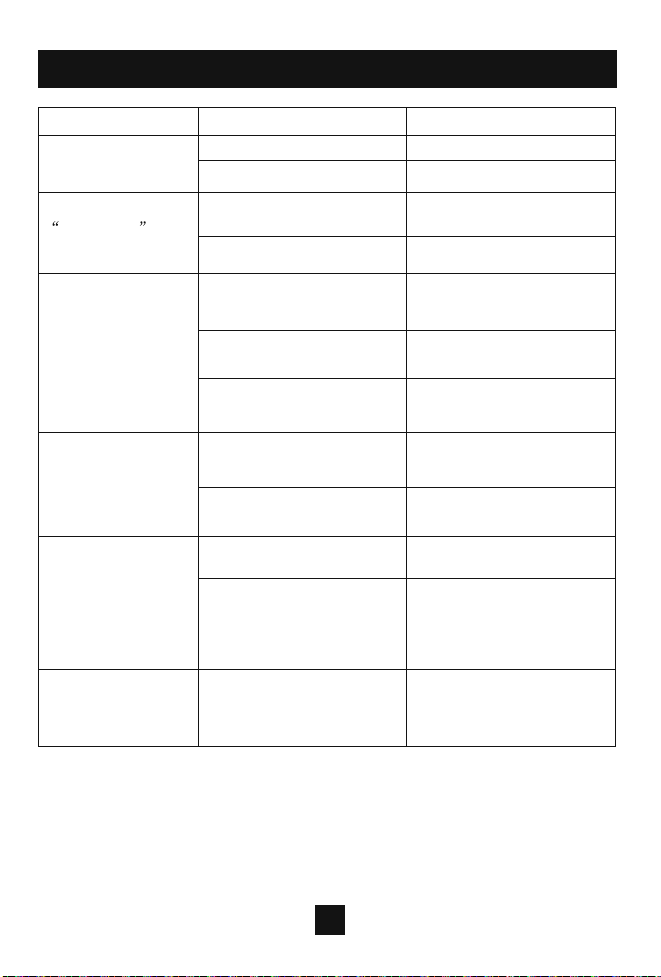
Troubleshooting
Problem Potential Reasons What to do
No picture
Screen shows
No Signal
Power isn't connected
The power switch is not on Switch on the power
DVB-T cable not connected
Incorrect setting
Connect the power
Plug in the DVB-T cable
Reset setting
No sound from
speaker
Only sound, no
image on the
screen
Remote Control
is not responding
The image stopped
suddenly or mosaic
No or incorrect connection
with audio cable
Sound on mute
Incorrect sound track Try another sound track
No or incorrect connection
with A V cable
The program is a radio
program
The battery is exhausted
Remote Control is not
facing or close enough
to the Set Top Box
The signal is too weak
Connect the audio cable
correctly
Turn off mute function
Make sure cables are
connected correctly
Press <TV/RADIO> key to
shift into TV mode
Change battery
Adjust the position of the
Remote Control and move
closer to the unit
Strengthen the signal
19
Page 21
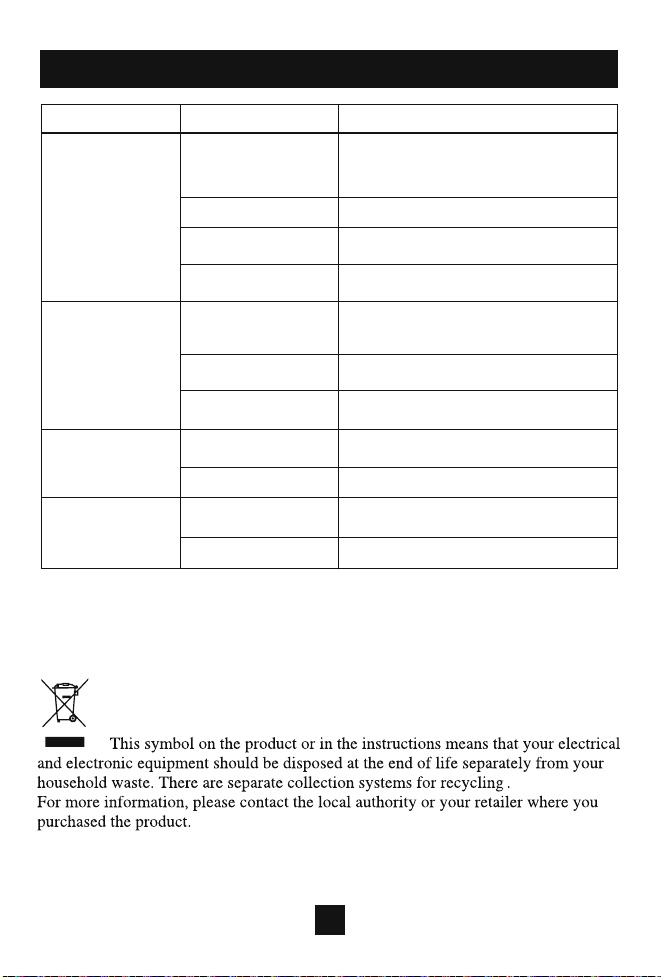
Technical Specifications
Item Sub Item Parameter
Tuner
Video
Audio
Power
Input Frequency
RF Input level
IF Bandwidth
Modulation
Decoder Format
Output Format
Output Port
Decoder Format
Audio output
Voltage
Power
170~230MHz
470~860MHz
-25~-82dBm
7MHz and 8MHz
QPSK,16QAM,64QAM
MPEG4AVC/H.264HP@L4
MPEG2 [email protected]
576P, 720P,1080i,4:3 and16:9
HDMI
MPEG-1 (layer1&2)
Digital audio: S/PDIF
230V~ 50Hz
Max 8W
20
Page 22
Warranty
Please keep your receipt as proof of purchase. This product is warranted
for any defect in materials or workmanship for one year after the original
date of purchase. This product isfor normal domestic and office use only.
This warranty does not cover damage from misuse or neglect, accidental
damage, vermin infestation, excessive voltages such as lightning or power
surges or any alteration that affects the performance or reliability of the
product.
In the unlikely event that your product fails to work normally, please
contact the Bush Warranty on1800 509 394 (Australia) or
0800 450 259 (New Zealand) and have your receipt of purchase on hand.
This is subject to the following provisions:warranty
This w is in addition to, and does not diminish, arranty
your statutory or legal rights.
PO BOX 6287,
SILVERWATER NSW 1811
www.bushaustralia.com.au
Bush : 1800 509 394 Australia
Warranty
Bush : 0800 450 259 New Zealand
Warranty
21
Page 23

PO BOX 6287,
SILVERWATER NSW 1811
www.bushaustralia.com.au
 Loading...