

Page 1
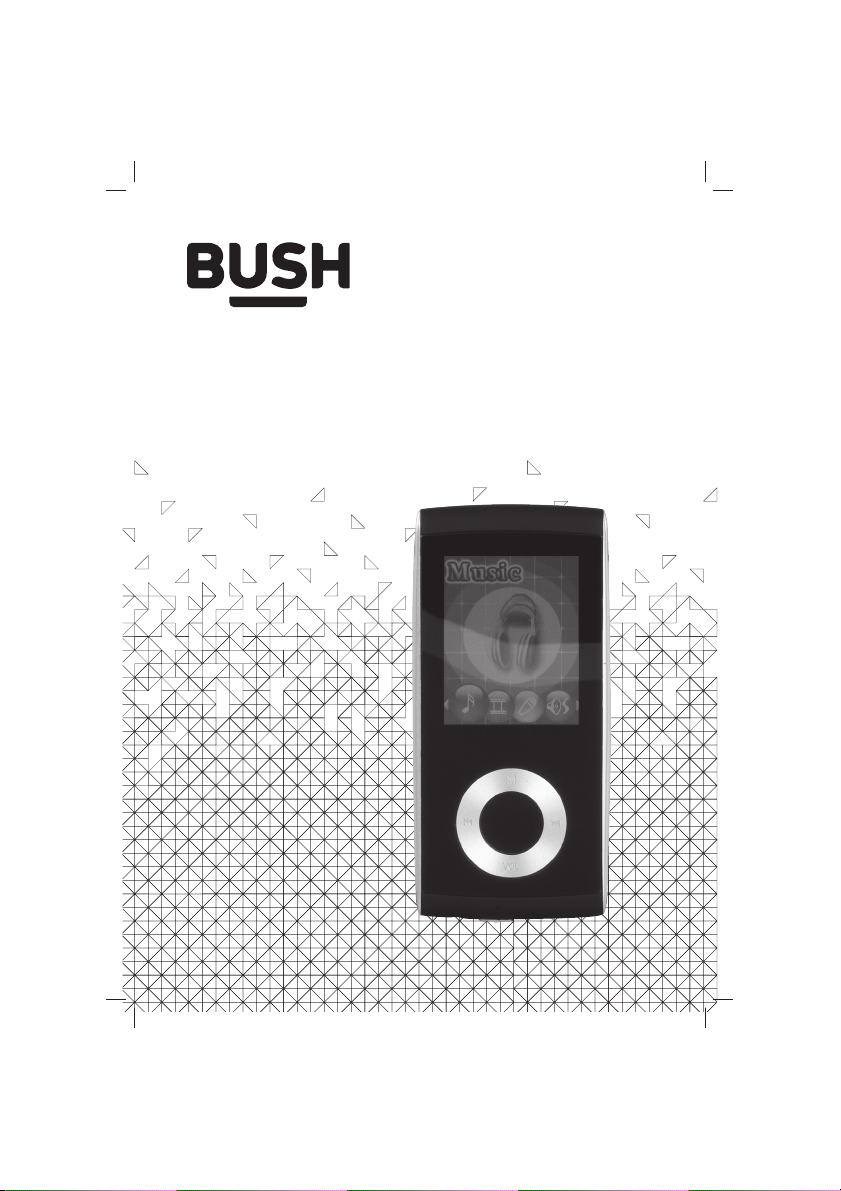
Instruction Manual
CMP42
Page 2
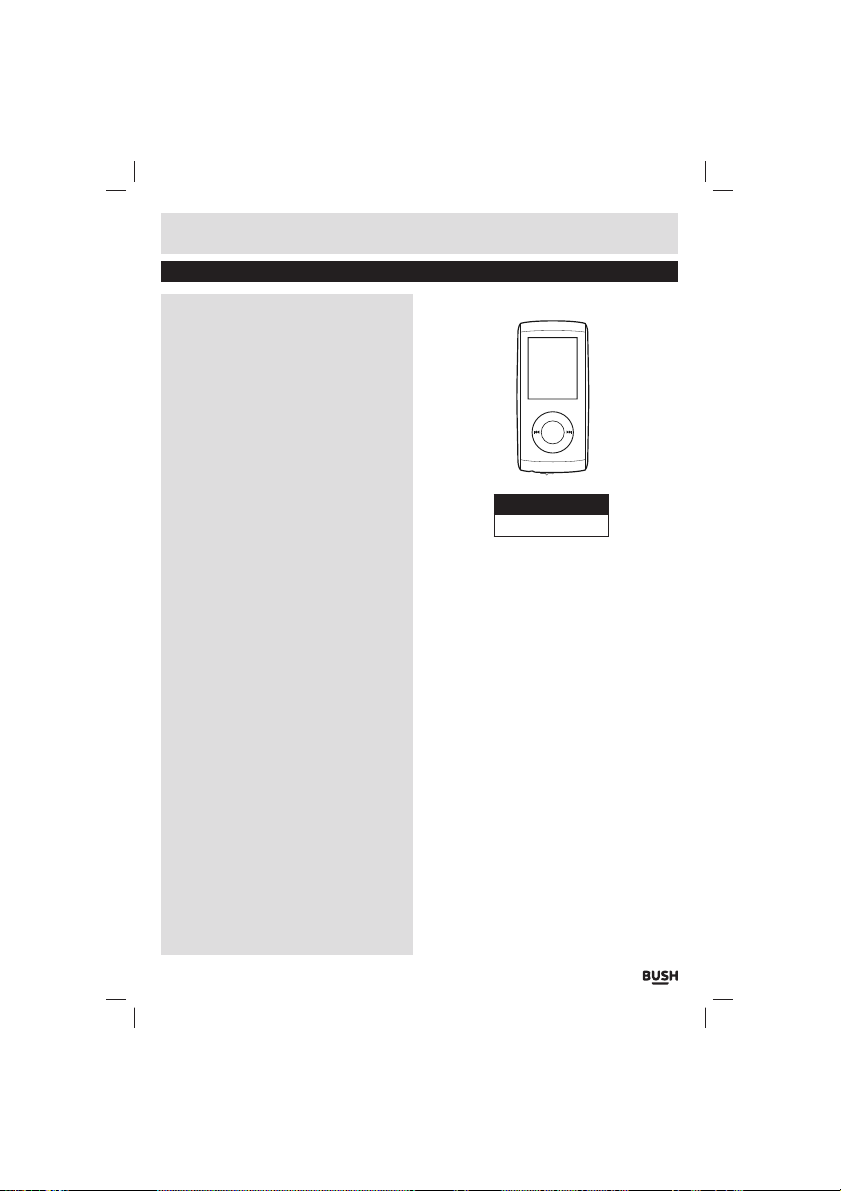
Table of contents
Care & maintenance .......................... 2
Disposal information ......................... 2
Rechargeable battery disposal ................ 2
Accessories included ............................3
Overview of controls .............................3
Getting started ............................... 3
Button functions ............................. 4
Connecting to a PC ............................ 4
Earphone connection ......................... 5
Music playback ............................... 5
Display lyrics ................................. 5
Editing lyrics ................................. 5
Replay mode ................................. 5
Repeat mode ................................. 6
EQ modes .................................... 6
Video playback ............................... 6
Photo browser ................................ 6
Slideshow .......................................7
Ebook ........................................ 7
Auto play setting ................................ 7
Voice recording ............................... 7
Voice recording playback ..................... 7
Voice recording playback (cont) ...............8
File management ............................. 8
Game ......................................... 8
Settings ...................................... 8
Clock ............................................8
LCD Set ......................................... 8
Language ....................................... 8
Power Off ....................................... 8
Power Off (cont) ................................. 9
Memory Info ....................................9
Technical specifications ...................... 9
Troubleshooting .............................. 9
M
VOL
Product Code
CMP42D
Page 1
Page 3
Safety information
Important – Please read these instructions fully before using
CAUTION: TO REDUCE THE RISK OF ELECTRIC SHOCK, DO NOT REMOVE ANY COVER. NO USER-SERVICEABLE
PARTS INSIDE, REFER ANY SERVICING TO QUALIFIED SERVICE PERSONNEL.
• Please read this owner’s guide
• Please take the time to follow the instructions in
this owner’s guide carefully. It will help you set up
and operate your system properly and enjoy all of its
advanced features.
• Please save this owner’s guide for future reference.
• The product label is located on the back of the
product.
• Heed all warnings - on the product and in the owner’s
guide.
• Do not use this apparatus near water or moisture.
• Do not use this product near a bathtub, washbowl,
kitchen sink, and laundry tub, in a wet basement,
near a swimming pool, or anywhere else that water or
moisture is present.
• Only use attachments/accessories specified by the
manufacturer.
• Unplug this apparatus during lightning storms or
when unused for long periods of time - to prevent
damage to this product.
• Refer all servicing to qualified service personnel
• Servicing is required when the apparatus has
been damaged in any way: such as liquid has been
spilled or objects have fallen into the apparatus; the
apparatus has been exposed to rain or moisture, does
not operate normally, or has been dropped -
• Do not attempt to service this product yourself.
• Opening or removing covers may expose you to
dangerous voltages or other hazards.
• To prevent risk of fire or electric shock, avoid
overloading wall outlets, extension cords, or integral
convenience receptacles.
• Use suitable power sources - Plug the product into a
suitable power source, as described in the operating
instructions or as marked on the product.
Before making any electrical connections, ensure the
following:
• Do not bend, stretch or pull the supply cable in order
to avoid electric shock.
• The supply voltage should be the same as that
indicated in the technical specifications and the
appliance rating plate.
This product complies with European low
voltage (2006/95/EC) and electromagnetic
compatibility (2004/108/EC) directives.
Care & maintenance
Care and cleaning
• All care and cleaning operations should be carried out
with the unit unplugged from the mains power.
• Occasionally wipe the cabinet with a lint free duster.
Never clean the unit with liquids or solvents.
Disposal information
WEEE marking “Information for the consumer”
Disposal of your old product Your product is
designed and manufactured with high quality
materials and components, which can be
recycled and reused. When this crossed out wheeled bin
symbol is attached to a product it means the product is
covered by the European Directive 2002/96/EC. Please
make yourself aware of the local collection system for
electrical and electronic products. Please act according
to your local rules and do not dispose of your old
products with your normal household waste. The correct
disposal of your old product will help prevent potential
negative consequences for the environment and human
health.
Rechargeable battery disposal
Your product contains a built-in rechargeable battery
covered by the European Directive 2006/66/EC. To
safeguard the functionality and safety of your product,
always take your product to an official collection point
or service centre where a professional can remove the
battery.
Please inform yourself about the local rules on
separate collection of batteries because the correct
disposal will help prevent negative consequences for
the environmental and human health. Please do not
dispose of your batteries with your normal household
waste. Always bring your product to a professional to
remove the battery.
This product complies with Electromagnetic
compatibility (2004/108/EC) directives.
Page 2
Page 4

Functions & controls
Please familiarize yourself with the parts and accessories listed below
Accessories included
• 1 x CMP42D • 1 x Instruction manual • 1 x USB charging cable • 1 x earphones
Overview of controls
LCD display
M button
Previous button
Play/Pause button
Volume button
Next button
Getting started
Before use your player will require charging fully.
Follow the below instructions to charge.
M
Micro SD
VOL
card slot
Reset
Earphone jack
USB port
On/ Off switch
1: Using the usb charging cable connect the mini usb
plug into the usb charge socket on the bottom of the
unit.
2: Connect the other end of the cable to a laptop/pc usb
input & power on the pc/laptop.
3: During charging you will see the battery animation in
the lower right corner of the display. When the charge
is at maximum the battery turns fully blue and no
M
longer animates.
VOL
Page 3
Page 5

User instructions
Button functions
To Press
General
Music
Movie
Images
Connecting to a PC
Once the unit is charged or during charging you can
copy files to the player.
1: Follow steps 1-2 of ‘Getting started’ to connect the
player to a pc/ laptop.
2: When the unit is connected a hardware driver
is automatically installed and the device is then
available in the list of devices (Named CMP42D-4G).
On some operating systems an auto play window will
appear. Choose to take no action and click OK to close
the window.
3: Double click ‘My Computer’ Or ‘Computer’ on some
operating systems. Look for ‘Removable disks
or storage’ option and locate the device named
‘CMP42D-4G’ and double click.
NOTE: Do not disconnect the USB cable at any
time when copying data to or from the device.
Power On/ Off
Turn On/ Off
Scroll through lists
Select option
Return to previous menu
Volume up
Volume down
Quit to main menu
Play/ Pause tracks
Skip to the next track
Fast forward
Skip back to previous track
Fast rewind
Display lyrics
Play/ Pause a movie
Skip to next movie
Fast forward
Skip back to previous movie
Fast rewind
Select image
Skip to next image
Skip to previous image
Switch the On/ Off switch
Hold the Play/Pause button for 1 second
M button
Press & hold the M button for 1 second
Press VOL then press the
Press VOL then press the
Press & hold the M button for 1 second
Press the Play / Pause button
Press the
Press & hold the
Press the
Press & hold the
Press & hold the M button for 1 second
Press the Play / Pause button
Press the
Press & hold the
Press the
Press & hold the
Press the Play / Pause button
Press the
Press the
/ buttons
button
button
button
button
button
button
button
button
button
button
button
button
4: Drag & drop media files into the removable device.
You can create additional folders using the operating
system installed on your pc/ laptop.
5: Close the removable device window and disconnect
the player from your pc/ laptop after data transfer
has completed.
Page 4
Page 6

User instructions
Earphone connection
Instructions for earphone usage.
1: Connect the 3.5mm earphone plug into the
EARPHONE socket on the bottom of the unit.
To prevent possible hearing damage,
do not listen at high volume levels
for long periods.
In music mode, when the volume is adjusted to
85dB the above icon will appear on the display.
Press the ‘M’ button to continue.
If you hear no sound during playback, do not turn
the volume up as the music may suddenly begin
at a high volume.
Excessive sound pressure from earphones and
headphones can cause hearing loss.
To avoid damaging your ears, adjust the volume to
the lowest safe level before playing, and turn up
to the desired level when playback has started.
Music playback
1: Select ‘MUSIC’ on the main menu and press ‘M’ to
enter music mode.
Replay mode
Replay mode will allow you to repeat a designated
section of an audio track.
1: During playback press the ‘M’ button to enter the
audio function menu.
2: Use the
3: Select ‘Replay’ and press the ‘M’ button to begin the
4: Press the
5: The selected audio will now repeat for the specified
6: From the Replay menu you can select ’Replay Times’.
7: From the Replay menu you can choose ‘Replay Gap’
You can apply various sound EQ’s to audio following the
below steps.
1: During playback press the ‘M’ button to enter the
2: Use the
3: Use the
4: Press the ‘M’ button to return back to the music
/ buttons to select ‘Replay Mode’ and
press the ‘M’ button to enter the Replay menu.
A-B replay settings.
of the repeat section). Press the
more to set the ‘B’ marker (end of the repeat
section).
amount of times (see point 6).
Use the
times the replay is to repeat. Press the ‘M’ button to
activate.
to specify the length of time in-between each ‘replay’.
Use the
the ‘M’ button to activate.
audio function menu.
press the ‘M’ button to enter the EQ menu.
following options:- Natural, Rock, Pop, Classic, Soft,
Jazz & dbb (dynamic bass boost).
interface.
button to set the ‘A’ marker (beginning
/ buttons to set the number of
/ buttons to set the gap time. Press
EQ modes
/ buttons to select ‘Equalizer’ and
/ buttons to select one of the
button once
2: To skip through the available tracks on the device
using the
3: Press the Play/ Pause button to begin playback of
4: Press and hold either
5: To adjust the volume levels press the ‘VOL’ button
Page 5
/ buttons.
a selected track. To pause playback press the Play/
Pause button once more.
forward or rewind the current track during playback.
and then use the
decrease the level.
/ buttons to fast
/ buttons to increase or
Page 7

User instructions
Repeat mode
1: During playback press the ‘M’ button to enter the
audio function menu.
2: Select the REPEAT menu by pressing ‘M’ once.
3: Use the
/ buttons to select an option and
press the ‘M’ to activate. The REPEAT functions are
explained below.
Normal
All audio tracks will be played one by one until the
last track is played.
Repeat One
The current track plays repeatedly until the function
is disabled.
Folder
Plays all tracks in a selected folder once.
Repeat Folder
Plays all tracks in a selected folder repeatedly until
the function is disabled.
Repeat All
Repeats every track on the player until the function
is disabled.
Random
Plays every track on the player in a random order
until the function is disabled.
Intro
Plays the first 10 seconds of every track on the player
until the function is disabled.
Video playback
1: Use the
2: To skip through the available movies on the device
3: Press the Play/ Pause button to begin playback of a
4: Press and hold either
5: To adjust the volume level press the Play/ Pause
1: Use the
/ buttons and select ‘VIDEO’ on the
main menu, press ‘M’ to enter video mode.
use the
/ buttons.
selected movie. To pause playback press the Play/
Pause button once more.
or rewind the current movie during playback.
button to pause playback. Press the ‘VOL’ button and
use the
/ buttons to increase or decrease the
level. Press the Play/ Pause button twice to resume
video playback/
NOTE: Search the internet for ‘AMV converter ’
software to convert any videos you may have into
the compatible format.
Photo browser
/ buttons and select ‘PHOTO’ on the
main menu, press ‘M’ to enter video mode.
/ button to fast forward
2: To skip through the available photos on the device
using the
3: Press the Play/ Pause button to begin playback of a
selected movie. To pause playback press the Play/
Pause button once more.
/ buttons.
Page 6
Page 8

User instructions
Slideshow
Should you wish to view all images in a slide show follow
the below steps.
1: Select any photo in your list and press the ‘M’ button
to enter the file function menu.
2: Use the
3: Select ‘Auto Play’ and press the ‘M’ button.
4: Use the
5: Press the Play/ Pause button to begin the slideshow.
6: To reset the function back to manual viewing select
1: Use the
2: To skip through the available ebooks on the device
3: Press the Play/ Pause button to begin playback of a
4: To skip through the pages of the ebook use the
Instead of manually pressing the skip buttons to skip
the pages you can set a timer to skip pages after a
certain amount of seconds. Follow the below steps to
activate this function.
1: Select any ebook in your list and press the ‘M’ button
/ buttons to select ‘Playback Set’
and press the ‘M’ button to activate.
/ buttons to increase or de-crease
the playback duration of each photo. Press the ‘M’
button to return to the photo list.
‘Manual Play’ in step 3 above.
Ebook
/ buttons and select ‘EBOOK’ on the
main menu, press ‘M’ to enter ebook mode.
using the
/ buttons.
selected ebook
buttons.
NOTE: The ebook format is ‘.TXT’ so you may need
to copy and paste ebook’s in any other format into
a text document and re-save.
Auto play setting
to enter the file function menu.
/
Auto play setting (cont)
2: Use the
3: Select ‘Auto Play’ and press the ‘M’ button.
4: Use the
5: Press the Play/ Pause button to begin displaying the
To record using the internal microphone follow the
below steps.
1: Use the
2: Press the Play/ Pause button to begin recording. The
3: To pause recording press the Play/ Pause button
4: To save a recording press and hold the ‘M’ button for
5: To change the recording quality press the ‘M’ button
6: Select from 32kbps, 64kbps, 128kbps or 256kbps
/ buttons to select ‘Playback Set’
and press the ‘M’ button to activate.
/ buttons to increase or de-crease
the playback duration of each page. Press the ‘M’
button to return to the ebook list.
ebook. The pages will skip after the duration set in
step 4.
Voice recording
/ buttons and select ‘RECORD’ on the
main menu, press ‘M’ to enter voice record mode.
display will show a timer and the PLAY icon ‘
appear in the bottom left corner.
once more. The PAUSE icon ‘
icon in the bottom left corner.
1 second.
in stop mode and select ‘REC Type’ from the list, and
press the ‘M’ button to enter the option menu.
bitrates using the
activate.
NOTE: The higher the bitrate the bigger the file
size will be and the less you will be able to record.
You can see this effect in the ‘remaining’ section
of the record display.
’ will replace the PLAY
/ buttons and press ‘M’ to
’ will
Page 7
Page 9

User instructions
Voice recording playback
To play back recordings follow the below steps.
1: Use the
2: To skip through the available tracks on the device
3: Press the Play/ Pause button to begin playback of
4: Press and hold either
5: To adjust the volume levels press the ‘VOL’ button
6: To select from a simple list of just recordings press
7: Use the
1: In Stop/ Pause mode press the ‘M’ button to enter the
2: Use the
/ buttons and select ‘VOICE’ on the
main menu, press ‘M’ to enter voice playback mode.
using the
/ buttons.
NOTE: This method displays all audio tracks on
the player, not just voice recordings.
a selected track. To pause playback press the Play/
Pause button once more.
forward or rewind the current track during playback.
and then use the
decrease the level.
the ‘M’ button from the VOICE main menu. The press
the ‘M’ button again to select ‘Local Folder’.
/ buttons to skip through the voice
tracks and press the ‘M’ button to begin playback.
File management
file management menu.
/ buttons to select an option and
press the ‘M’ button to enter the option menu.
Local Folder Displays all files from the internal
Card Folder As above, but displays the contents
Delete File When activated allows you to select
Delete All Delete all files
/ buttons to fast
/ buttons to increase or
memory in a list format.
of an SD card (if present).
a file for deletion.
File management (cont)
NOTE: Use the
select ‘Yes’ & ‘No’. Press the ‘M’ button to activate/
select.
Game
1: Use the
main menu, press ‘M’ to enter the game options
menu. Press the ‘M’ button to select ‘BoxMan’.
2: Press the ‘M’ button to begin the game.
3: The game is controlled using the following buttons:-
4: To exit the game press the Play/ Pause button.
Settings
LCD Set
Dark Mode
Sets the duration before the display backlight dims.
1: Use the
2: Press the ‘M’ button to select & return to the menu.
Language
1: Use the
2: Press the ‘M’ button to select & return to the menu.
/ buttons to select files &
/ buttons and select ‘GAME’ on the
MUp
VOL Down
Left
Right
/ buttons to select the time span.
/ buttons to select a language.
Page 8
Page 10

User instructions
Power Off
Off Time
Sets the period of inactivity before the player enters
standby mode.
1: Use the
2: Press the ‘M’ button to select & return to the menu.
Sleep Time
When listening to audio or watching a video you can
allocate a timer to switch the unit into standby mode.
1: Use the
2: Press the ‘M’ button to select & return to the menu
In the unlikely event of difficulties with your appliance please follow the trouble shooting guide below.
If the problem persists, contact the retailer if the machine is still under guarantee.
Customer helpline: 0870 600 3030
/ buttons to adjust the slider to
the time duration you wish to set between 10-200
seconds.
/ buttons to adjust the slider to the
time duration you wish to set between 10-120 mins.
NOTE: If you are not listening to audio or watching
a video the device will enter standby from the ‘Off
Time’ setting long before the ‘Sleep Time’ setting
is reached.
Troubleshooting
Memory Info
When selected displays the amount of free memory
available in Megabytes and a percentage.
Technical specifications
Power Supply .........180mAh, 3.7V Lithium battery
Dimensions ........................42 x 89 x 10mm
Weight ........................................30g
Capacity ................ 4GB internal flash memory
Supported OS ...........Windows 2000, XP or above
Interface ..................................USB 2.0
Supported music formats ............... MP3, WMA
Voice record formats ..........................WAV
Video playback format ...........AMV @ 128x128px
Supported photo format ............JPG, BMP & GIF
Problem Reason(s) Solution(s)
No Power
No Sound
Sound is distorted
Page 9
• The unit requires charging • Connect to a PC or laptop using the
• Volume is too low
• Playback is not initiated
• No audio files have been copied
to the internal memory
• The earphones have not been
connected correctly
• Volume is too high • Reduce the volume
supplied cable to charge. Or purchase
a compatible USB mains charger.
• Increase the volume
• Press the PLAY/PAUSE button
• Follow ‘Connecting to a PC’
instructions on page 4 of this manual
• Insert the 3.5mm earphone plug into
the earphone socket on the MP3
player
Page 11

Guarantee
PRODUCT GUARANTEE
This product is guaranteed against manufacturing defects for a period of
Year
This product is guaranteed for twelve months from the date of original purchase.
Any defect that arises due to faulty materials or workmanship will either be replaced,
refunded or repaired free of charge where possible during this period by the dealer from
whom you purchased the unit.
The guarantee is subject to the following provisions:
The guarantee does not cover accidental damage, misuse, cabinet parts, knobs or
consumable items.
The product must be correctly installed and operated in accordance with the instructions
contained in this manual.
It must be used solely for domestic purpose.
The guarantee will be rendered invalided if the product is re-sold or has been damaged by
inexpert repair.
Specifications are subject to change without notice.
The manufacturer disclaims any liability for the incidental or consequential damages.
The guarantee is in addition to, and does not diminish your statutory or legal rights.
Guarantor: Argos Limited
489 - 499 Avebury Boulevard
Central Milton Keynes
MK9 2NW
Page 10
 Loading...