

Page 1
BUSH - CD micro system
Installation & User Instructions – Please keep for future reference
152/7881(D)
Important – Please read these instructions fully before installing or using
These instructions contain important information which will help you get the best from your appliance and
ensure safe and correct installation, use and maintenance.
If you need help or have damaged or missing parts, call the Customer Helpline: 0870 600 3030
Page 2

Table of contents
Safety Warnings ................................2
Disc handling ...................................2
Accessories included ............................3
Overview of controls .............................3
Power supply ....................................4
Setting the clock ................................4
Setting the alarms ..............................4
Snooze function .................................4
Sleep function. . . . . . . . . . . . . . . . . . . . . . . . . . . . . . . . . . . 5
Setting the volume level .........................5
Mute function ...................................5
Basic CD operation ..............................5
Basic CD operation (cont) .......................5
Skipping tracks .................................5
Searching tracks ................................5
Repeat & random function ......................5
Program function ...............................5
Radio function ..................................6
Radio station presets ...........................6
Aux input mode .................................6
EQ modes .......................................7
Remote control battery replacement ............7
Care & maintenance ............................8
Troubleshooting .................................8
Technical specifications .........................9
Product Codes
CMC111
Page 1
Page 3
Safety information
Important – Please read these instructions fully before installation
Safety Warnings
CAUTION: TO REDUCE THE RISK OF ELECTRIC
SHOCK, DO NOT REMOVE ANY COVER. NO
USER-SERVICEABLE PARTS INSIDE, REFER ANY
SERVICING TO QUALIFIED SERVICE PERSONNEL.
Please read this owner’s guide
• Please take the time to follow the instructions in
this owner’s guide carefully. It will help you set up
and operate your system properly and enjoy all of its
advanced features.
• Please save this owner’s guide for future reference.
• The product label is located on the back of the
product.
• This product must be used indoors. It is neither
designed nor tested for use outdoors, in recreation
vehicles, or on boats.
• Heed all warnings - on the product and in the
owner’s guide.
• Do not use this apparatus near water or moisture.
• Do not use this product near a bathtub, washbowl,
kitchen sink, and laundry tub, in a wet basement,
near a swimming pool, or anywhere else that water
or moisture is present.
• Only use attachments/accessories specified by the
manufacturer.
• Unplug this apparatus during lightning storms or
when unused for long periods of time - to prevent
damage to this product.
• Refer all servicing to qualified service personnel
• Servicing is required when the apparatus has
been damaged in any way: such as liquid has been
spilled or objects have fallen into the apparatus; the
apparatus has been exposed to rain or moisture,
does not operate normally, or has been dropped -
• Do not attempt to service this product yourself.
• Opening or removing covers may expose you to
dangerous voltages or other hazards.
• To prevent risk of fire or electric shock, avoid
overloading wall outlets, extension cords, or integral
convenience receptacles.
• Use proper power sources - Plug the product into a
proper power source, as described in the operating
instructions or as marked on the product.
• The mains plug is used as the disconnect device, the
disconnect device shall remain readily accessible
CAUTION
RISK OF ELECTRIC SHOCK!
DO NOT OPEN!
This symbol means that this unit is double
insulated. An earth connection is not required.
CAUTION : CLASS 1 LASER PRODUCT
Use of contents or adjustments of performance of
procedures other than those specified Herein may
result in hazardous radiation exposure.
LASER SAFETY
This unit employs a laser, only qualified
service personnel should attempt repair.
DANGER: Invisible laser radiation when open and
interlock failed or defeated avoid direct exposure to
beam.
CAUTION: hazardous laser radiation when open and
intelock defeated.
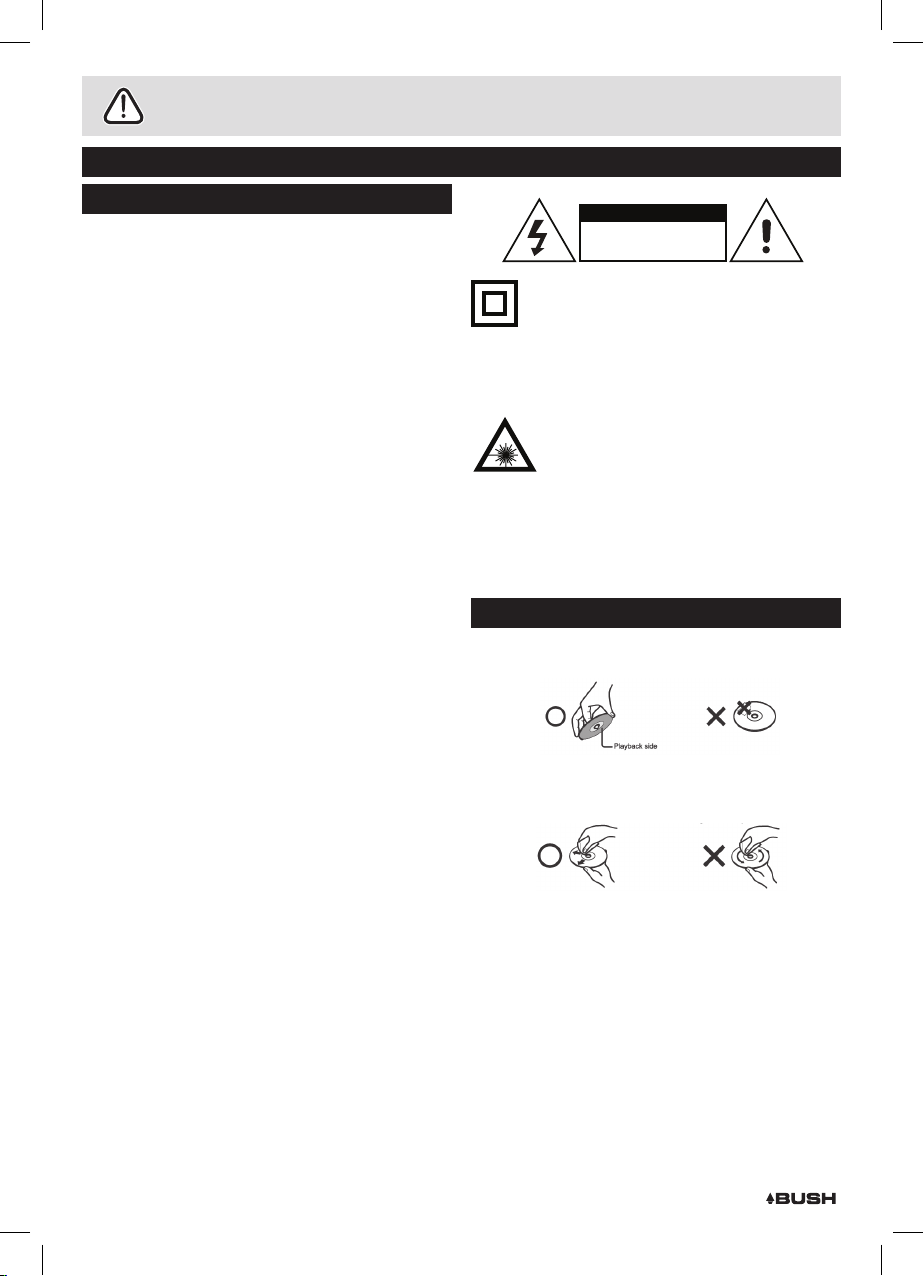
Disc handling
Do not touch the playback side of the disc.
Do not attach paper or tape to disc.
Fingerprints and dust on the disc cause picture and
sound deterioration. Wipe the disc from the centre
outwards with a soft cloth. Always keep the disc clean.
• If you cannot wipe off the dust with a soft cloth, wipe
the disc lightly with a slightly moistened soft cloth
and finish with a dry cloth.
• Do not use any type of solvent such as thinner,
benzene, commercially available cleaners or
antistatic spray for vinyl. It may damage the disc.
• Do not store discs in a place subject to direct
sunlight or near heat source.
• Do not store discs in a place subject to moisture and
dust such as a bathroom or near a humidifier.
• Store discs vertically in a case, stacking or placing
object on discs outside or their case may cause
warping.
Page 2
Page 4
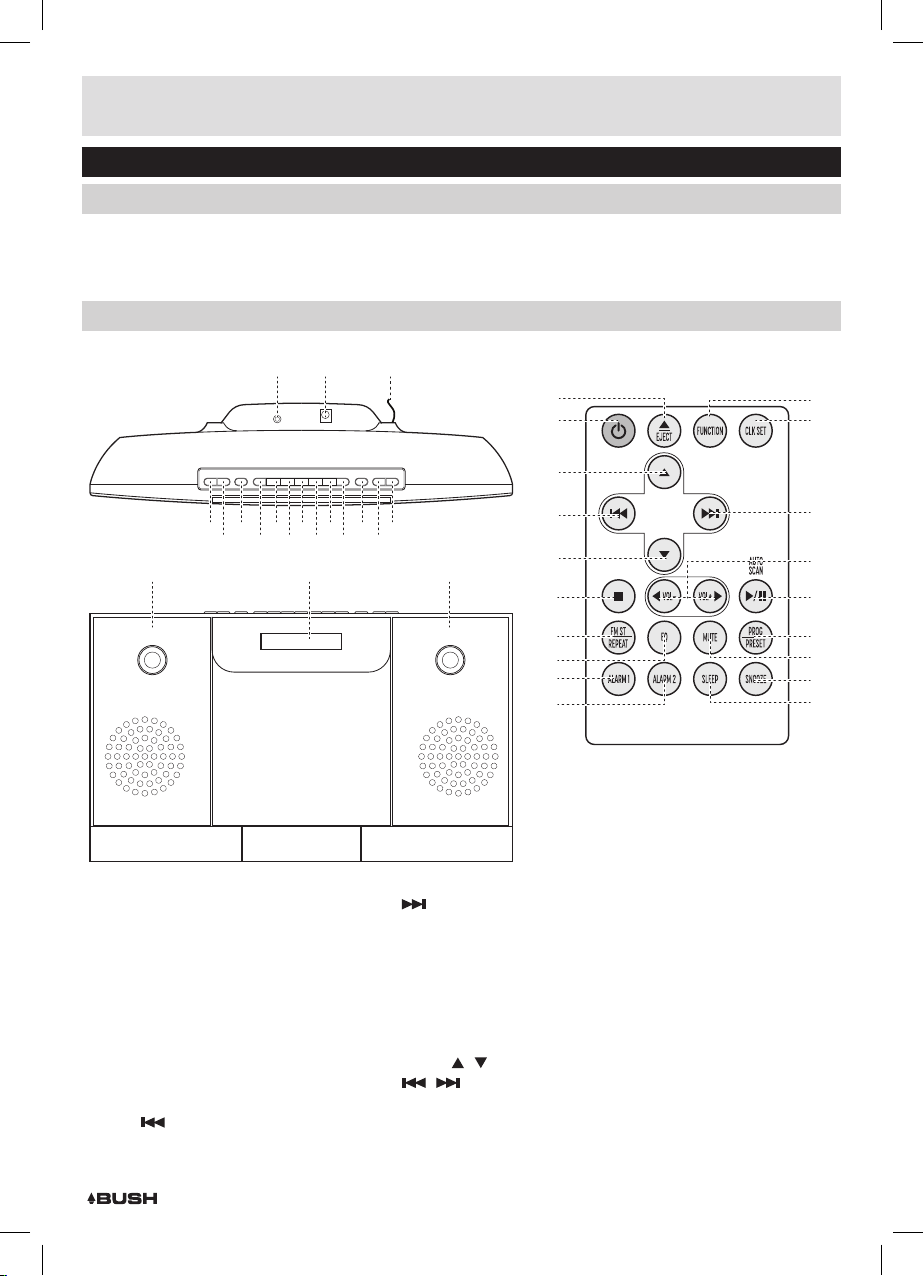
Functions & controls
1 3 5 7 9 11 13
2 4 6 8 10 12
14 15 16
35
19
Please familiarize yourself with the parts and accessories listed below
Accessories included
• 1 x CMC111 • 1 x Remote control
Overview of controls
1 3 5 7 9 11 13
2 4 6 8 10 12
17 1718
(including 1 x CR2025)
14 15 16
• 1 x Mains adapter • 1 x Instruction Manual
20
21
22
21
23
24
25
26
27
34
22
33
32
31
30
29
28
1: SNOOZE/VOLUME -
2: SNOOZE/VOLUME +
3: STANDBY button
4: FUNCTION button
5: CLOCK SET button
6: SLEEP button
7: REPEAT/FM STEREO button
8: PROG./PRESET button
9: STOP/ALARM OFF button
10: PLAY/PAUSE button
11: EJECT button
12: SKIP
button
13: SKIP
14: AUX input
15: DC power input
16: Antenna
17: Speakers
18: LCD display
19: EJECT button
20: STANDBY button
21: NAVIGATION
22: SKIP
23: STOP button
24: FM STEREO/REPEAT button
button
/ buttons
/ buttons
25: EQ button
26: ALARM 1 button
27: ALARM 2 button
28: SLEEP button
29: SNOOZE button
30: MUTE button
31: PROG./PRESET button
32: PLAY/PAUSE/AUTOSCAN button
33: VOLUME +/- buttons
34: CLOCK SETbutton
35: FUNCTION button
Page 3
Page 5

User instructions
Power supply
Mains Power Using the supplied AC adaptor
1: Connect the mains adaptor to a UK mains outlet.
2: Connect the adaptor plug into the rear mains socket
(15).
NOTE: Please ensure you only use the supplied
mains adaptor with this unit.
3: When the power is connected the unit will be in
STANDBY mode. You will need to press the STANDBY
button (3), or (20) on the remote to wake up the unit.
4: To put the unit into standby mode, press the
STANDBY button (3) or (20).
NOTE: This unit is designed to enter STANDBY
mode automatically after 20 MINUTES of inactivity.
Press the STANDBY button to wake the unit.
Setting the clock
1: Ensure the unit is in STANDBY mode by pressing the
STANDBY button. If you see only ‘0:00’ then you are in
the correct mode.
NOTE: If the time has been set previously the
display will not show ‘0:00’ but the time from the
original setting.
Setting the alarms
This unit is equipped with two independent alarms.
The following steps will assume the clock has been
set already and the unit is in STANDBY mode.
Setting Alarm 1/ 2 from the remote control
1: Press and hold the ALARM 1 or ALARM 2 button
(26,27) to initiate the alarm setting function. You will
see the corresponding alarm icon appear on the
display and the hour digit will flash.
2: Set the hour digits by pressing either of the
buttons (12,13/22). Once the hour has been set
press the ALARM 1 or 2 button again to move onto
the minute setting. Use the same process to set the
minutes. Press the ALARM 1 or 2 button once more to
complete the time setting.
AL1
/
0:00
3: You will now see BU appear on the display. Use the
/ buttons to select from BU (buzzer), CD or
RAD (radio). The CD or RADIO alarm volume level is
set using the VOLUME+/- buttons (1,2/33).
AL1
2: Press and hold the CLK SET button (5), or (34) on the
remote to enter the clock setting menu.
0:00
3: Set the hour digits by pressing either of the /
buttons (12,13/22). Once the hour has been set press
the CLK SET button again to move onto the minute
setting. Use the same process to set the minutes.
4: When set press the CLK SET button once more to
store the setting.
NOTE: the clock is set in 24hr mode only.
Page 4
4: Press the ALARM 1 or 2 button to complete the alarm
setting.
5: To activate or deactivate an alarm press the relevant
alarm button eg:- ALARM 1 or 2 (26, 27).
NOTE: Pay attention to the alarm icons on the
display. If the icon is not present the alarm is
inactive.
6: To disable the alarm when sounding press the STOP/
AL OFF button (9), or press either ALARM 1 or 2
button.
Snooze function
Should you wish to delay the alarm for 9 minutes you
can activate the SNOOZE function.
1: When the alarm sounds press either SNOOZE button
(1,2,29) to delay the alarm for 9 minutes.
2: After one hour of snoozing the SNOOZE function will
no longer operate.
Page 6

User instructions
Sleep function
Should you wish to set a timer for the unit to enter
standby mode after a period of time follow the steps
below.
SLP 90
1: Ensure the unit is ON and not in STANDBY.
2: Press the SLEEP button (6, 28) repeatedly to cycle
through the preset timers from 90 minutes to 10
minutes then OFF.
3: When you have selected the required timer duration,
after 1 second of inactivity the setting will be stored
and the countdown will begin.
Setting the volume level
1: To increase the volume level press the VOL+ button
(2,33). To decrease the volume level press the VOL-
button (1,33).
Mute function
1: Press the MUTE button (30) on the remote control to
temporarily silence audio playback. You will see the
letter ‘M’ appear on the display to indicate MUTE is
active.
2: Press the MUTE button once more to enable audio
playback again.
Basic CD operation
1: Press the FUNCTION button (4,35) repeatedly until
you see ‘Cd’ appear on the top of the display.
2: Press the EJECT button (11,35) to open the CD door.
Load a CD with the label facing outwards and press
the EJECT button again to close the door. The EJECT
function only operates in CD mode.
NOTE: You may need to angle the disc and slide
the top half into the unit before mounting the disc
on the mechanism.
DO NOT push the door downwards to close.
Basic CD operation (cont)
3: Once loaded the unit will read the disc contents
and begin playback. Pause playback by pressing
the PLAY/PAUSE button (10,32) once. To resume
playback press the PLAY/PAUSE button again.
4: To stop playback press the STOP button (9,23).
Skipping tracks
1: Press the SKIP
track on the disc.
2: Press the SKIP
previous track
Searching tracks
1: Press and hold the SKIP
forward the current track playing.
2: Press and hold the SKIP
rewind the current track playing.
Repeat & random function
1: Press the REPEAT button (24) once to repeat the
current track. You will see
portion of the display.
2: Press the REPEAT button again to repeat the entire
disc. You will see the
of the display stop flashing and remain solid.
3: Press the REPEAT button once more to enter
RANDOM playback mode. This function will playback
all tracks on the current disc in a random order. You
will see ‘RAN’ appear to the right of the timecode.
4: Press the REPEAT button once more to cancel any
repeat functions and resume normal playback. All
icons will disapear.
Program function
You can program an alternative playback sequence for
up to 20 tracks on a single disc.
1: First press the STOP button if a disc is playing.
2: Press the PROG. button (8,31). You will see ‘PROG’
flash on the right of the display & P-01 appear to
indicate program mode operation.
button (13,22) to skip to the next
button (12,22) to skip to the
button (13,22) to fast
button (12,22) to fast
flash on the top right
icon on the top right portion
P01
PROG
Page 5
Page 7

User instructions
Program function (cont)
3: Press either
number you wish to play in position one.
4: Press the PROG. button to store the track.
5: Repeat steps 3-4 until you have programmed all the
tracks you wish to play.
6: Press the PLAY/PAUSE button to begin playback of
your programmed sequence.
7: To delete the program press the STOP button twice.
You will notice the ‘PROG’ icon disapears from the
display.
Radio function
Before tuning the radio extend the antenna (16) fully.
1: Press the FUNCTION button (4,35) repeatedly until
you see a radio frequency appear on the display
EG:-89:60.
2: To manually scan for radio stations press and hold
either of the
seconds to scan down or up the frequency band.
When a station is found the scan will stop and the
station will begin to play.
3: To fine tune the frequency press either of the
buttons (do not press & hold), to jump 0.05 MHz.
4: There is an autoscan function that will scan the entire
frequency range and store all located stations in the
preset memory slots. To use this function press and
hold the AUTOSCAN button on the remote (32). The
unit will scan the frequency band and stop when
finished. See ‘Radio station presets’ below for details
on how to recall located stations.
NOTE: Placement of the aerial is important to
get a good FM signal. If you are having problems
tuning a station, moving the aerial may improve
the reception. If not try moving the unit to another
location.
/ buttons to select the track
/ buttons (12,13,22) for two
/
Radio station presets
It is possible to store up to 20 preset stations. The
below steps will explain how to store & recall them.
1: With a radio station tuned, press and hold the
PRESET button (8,31). You will see a P01 flash on the
display to indicate preset 01.
2: If you wish to store the current station in slot 01 press
the PRESET button again to store. Should you wish to
use another slot use the NAVIGATION
(21) to cycle through slots 1-20 until you reach the
slot you wish to use.
3: Press the PRESET button to store the station in the
selected slot.
Radio station presets (cont)
4: To recall stations stored in preset slots use the
NAVIGATION
1-20. Each press will play the stored station on that
slot. If no station is stored then static will be heard.
Aux input mode
You can connect an audio devices to the unit using a
3.5mm audio cable (not supplied).
1: Connect the 3.5mm plug (not supplied) into the AUX
socket on the rear of the unit (14).
/ buttons (21) to cycle through slots
/ buttons
MP3 PLAYER
AUX INPUT SOCKET
5: If you are experiencing poor stereo FM reception, you
can press the FM ST. button (7,24) to revert to MONO
mode which can clean up the reception.
Stereo mode is indicated by this icon ‘
NOTE: Not all stations will allow this function.
Page 6
’.
2: Connect the other end to your audio device.
3: Press the FUNCTION button (4,35) repeatedly until
you see AUX appear on the display.
4: Power on the external audio device and begin
playback.
5: Adjust the volume on the CMC111 unit.
Page 8

User instructions
Aux input mode (cont)
NOTE: it is recommended to try various volume
levels on the external audio device until you reach
an acceptable balance.
Too much volume and the audio will be distorted,
too little and the audio will be too weak.
The actual volume level is controlled on the
CMC111 unit, using the VOL + / - buttons.
EQ modes
You can change the EQ levels to adapt to the type of
audio you are listening to.
1: Press the EQ button (25) repeatedly to cycle through
the available options of: FLAT, ROCK, CLASSIC, POP
& JAZZ.
Remote control battery replacement
• Replace the remote control battery when it no
longer operates the unit, or the range is reduced
considerably.
• Use only CR2025 3V lithium batteries
• Bear in mind that lighting & other room conditions, in
addition to battery age, can affect the operating range
of an infrared remote control.
C
B
A
1: Press the tab on the bottom of the remote control
inwards as shown (A).
2: Pull the battery compartment out (B).
3: Remove old battery and replace with the same type
with the + facing upwards (C).
4: Push the battery compartment back inside the
remote and close.
Page 7
Page 9

User instructions
Care & maintenance
Important: Always unplug the appliance from the power socket during cleaning and maintenance.
Never use any sharp instruments or abrasive substances, soap, household cleaner, detergent or wax polish for
cleaning.
Clean the external surfaces with a damp soft cloth only. Never use abrasive products or solvents as it may
damage the appliance.
Troubleshooting
In the unlikely event of difficulties with your appliance please follow the trouble shooting guide below.
If the problem persists, contact the retailer if the machine is still under guarantee.
Customer helpline: 0870 600 3030
Problem Reason(s) Solution(s)
No Power • Power cable not connected to wall
No Sound CD/AUX/RADIO
No Sound from AUX input
Sound is distorted
Sound is distorted from AUX
input
Unable to Play • No disc in the tray
Static Sound • Poor reception • Re-locate the antenna (FM)
Unit switches off after 20
minutes of inactivity
socket
• Power socket is not switched on
• Volume is too low
• AUX source volume is too low
• Volume is too high
• AUX source volume is too high
• Disc not loaded properly
• Disc is dirty
• Auto standby mode in operation • This unit is designed to enter STANDBY
• Make sure the plug is connected
• Switch the power on
• Increase the volume
• Increase the output volume of the AUX
source.
• Reduce the volume
• Reduce the output volume of the AUX
source.
• Insert a compatible disc
• Check the disc loaded
• Clean the disc
mode automatically after 20 MINUTES
of inactivity. Press the STANDBY button
to wake the unit.
Page 8
Page 10

User instructions
Technical specifications
General
Power • Mains adaptor : 100-240V ~ 50/60Hz
Power Consumption • 15 Watts
Dimensions • Approx. 350mm(L) x 110mm(W) x 205mm(H)
AUX In • 3.5mm stereo socket
Tuner
FM • 87.5 - 108 MHz
CD Player
Playback system • Compact Disc Digital Audio System
DAC • 1 Bit DA converter with 8 x over sampling.
Frequency response • 100Hz - 12KHz (+/- 6 dB)
S/N ratio • 55dB
Dynamic range • 85dB
Audio
Output Power • 3.5W x 2 (RMS)
Speaker impedance • 8 ohms
Disc Compatibility
Disc Type • CD-DA/CD-R/CD-RW
Size • 12cm & 8cm
• Mains adaptor output : 10V DC 1500mA
Page 9
Page 11

Guarantee
PRODUCT GUARANTEE
This product is guaranteed against manufacturing defects for a period of
Year
This product is guaranteed for twelve months from the date of original purchase.
Any defect that arises due to faulty materials or workmanship will either be replaced,
refunded or repaired free of charge where possible during this period by the dealer from
whom you purchased the unit.
The guarantee is subject to the following provisions:
The guarantee does not cover accidental damage, misuse, cabinet parts, knobs or
consumable items.
The product must be correctly installed and operated in accordance with the instructions
contained in this manual.
It must be used solely for domestic purpose.
The guarantee will be rendered invalided if the product is re-sold or has been damaged by
inexpert repair.
Specifications are subject to change without notice.
The manufacturer disclaims any liability for the incidental or consequential damages.
The guarantee is in addition to, and does not diminish your statutory or legal rights.
Guarantor: Argos Limited
489 - 499 Avebury Boulevard
Central Milton Keynes
MK9 2NW
 Loading...