

Page 1
设 计
DESIGN
校 对
CO.BY
汤明枝
20 15.7.1
图纸名称 PART NAME
BUSH (CE-BD99-ST)通用说明书
图号/物料编码 PART NO.
16132000A00382
标准化
STANDARD
业务
seller
批 准
AUTHORIZE
曾斌
图样标记
REL
版本号
REV.NO.
10
重量(g)
WEIGHT
比例
scale
材料 MATERIAL
80g双胶纸
美的冰箱事业部
共 页
TOTAL SHEETS
技术要求
1、尺寸:32k
2. 说明书印刷颜色:单色;
3. 样板需送设计部门封样;
4. 制件必须满足QMB-J53.005 产品说明书及其它类似印刷件技术规范。
5. 需要符合美的冰箱事业的最新版《QMB-GC08.007 有害物质管理规定》的限值要求。
第 页
NO. OF SHEETS
MIDEA REFRIGERATION DIVISION
标记
更内容
ARKER
M
变
①
②
③
④
⑤
⑥ 自订单MO-281704开始更改页码P23页内容 2016.11.21 蒋卨敏
7 自订单MO-577853开始增加客户型号更新整体版面
8 自订单MO-615704开始更新整体版面
9 自订单MO-766677开始更新整体版面
10 自订单MO-766677开始更改页码24页内容
更换页码8页内容,自441638订单执行 2015.7.21 蒋
更改P8页内容以及参数页四星,自443583之后的订单开始切换 2015.9.29 蒋
自订单445926开始更改整体版面 2015.11.14 蒋
自订单445926开始更改P10页页码 2015.12.5 蒋
升版图纸编码,内容版式无任何更改 2016.1.20 蒋
2018.04.04 林芳芳
2018.06.13 林芳芳
2019.06.17 韩文静
2019.06.24 韩文静
修
改日期
签
名
Page 2
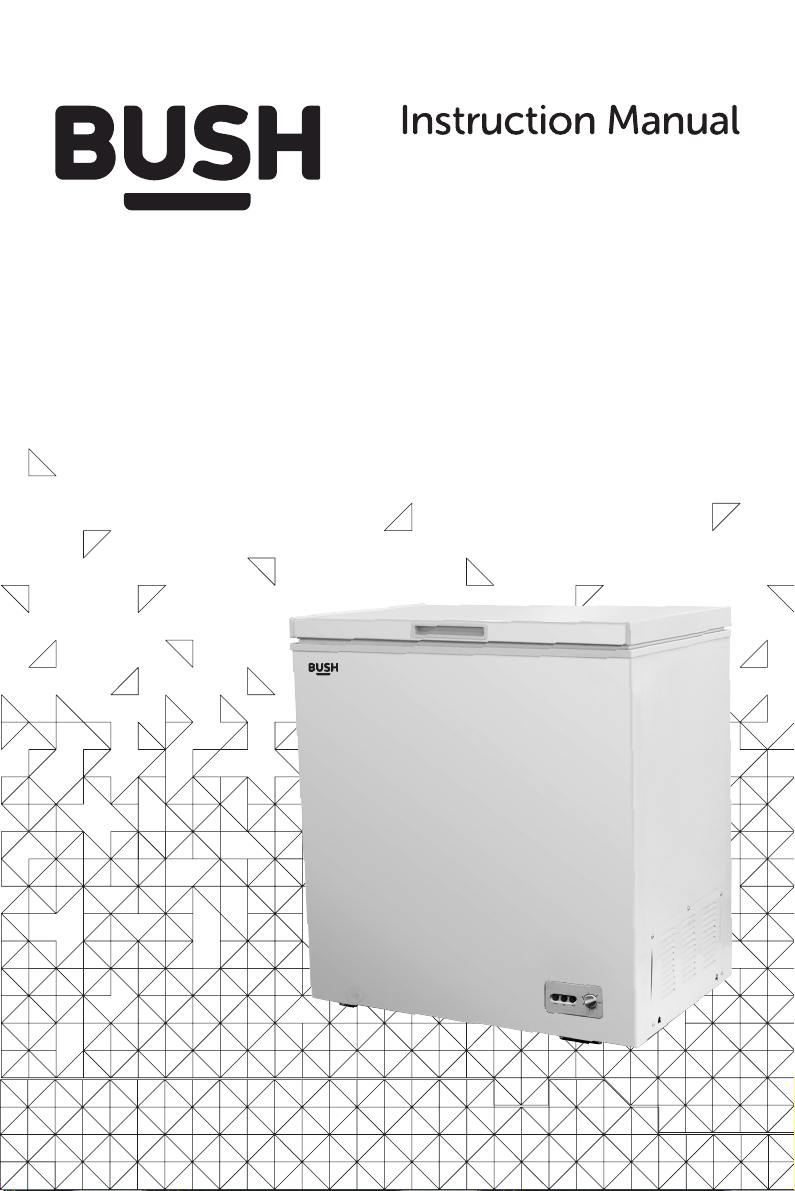
BCF99L
MCF99BL
Page 3

You’ll soon be enjoying your new chest freezer.
It all begins here, with your instructions. Don’t worry,
there’s nothing too technical coming up. Just simple,
step-by-step guidance to get you up and running
quickly. Sound good? Then let’s get started.
Help and Guidance
We’re here to help you get the most from your chest freezer. Should you require
any guidance, a simple solution can often be found online at:
www.bush-support.com
If you still require further assistance, call one of our experts on 0345 257 7271.
2
Help and Guidance
Page 4

Contents
Safety information
1
Safety information
Getting to know your chest
2
freezer
Ready? Let’s begin
Accessories
Installing your chest freezer
3
Transportation
Installation
Electrical connections
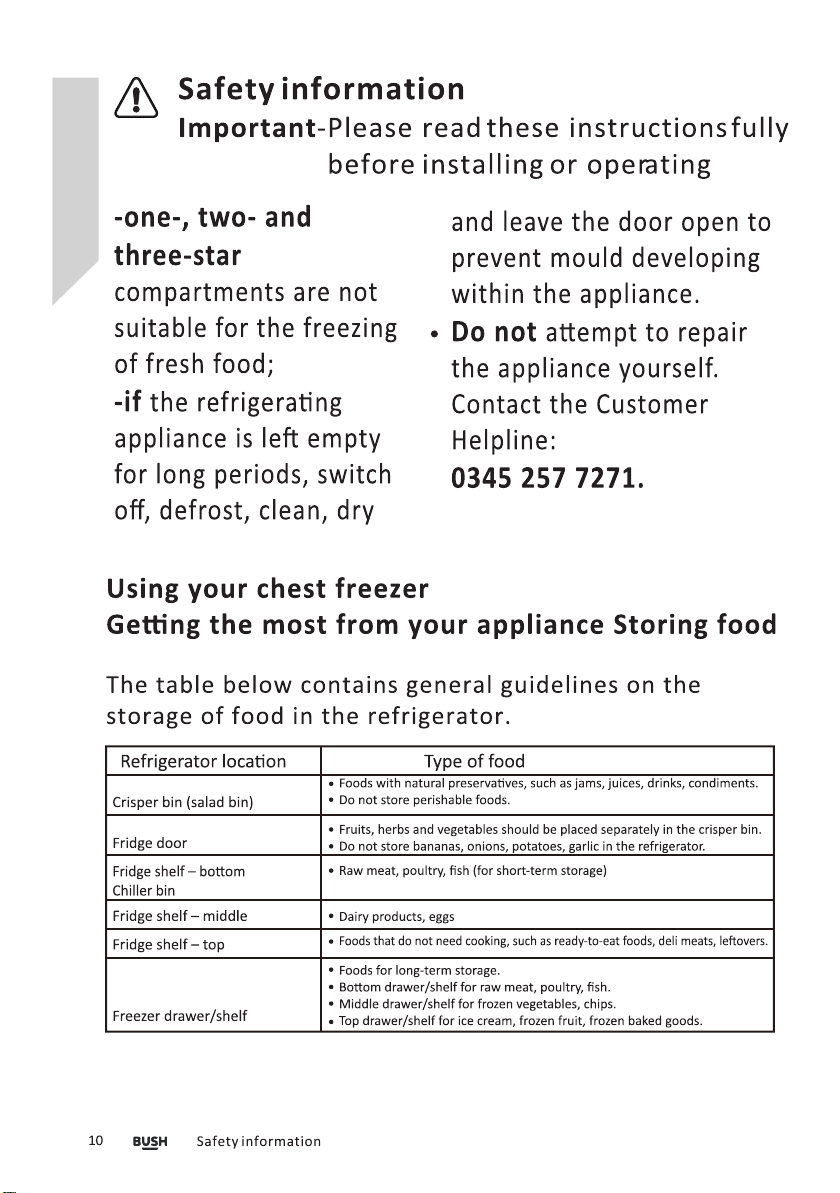
Using your chest freezer
4
Before first use
Using your appliance
Useful information
6
12
16
16
17
13
20
20
21
Product support
6
Troubleshooting 28
Help and assistance 29
Guarantee 30
Energy saving tips
Care and Maintenance
5
General
Defrosting
Power failure
Moving your appliance
Technical specification
21
24
24
25
25
25
Contents
3
Page 5

Page 6

1Safety information
Page 7
6
Safety informtion
Page 8
Safety informtion
7
Page 9
8
Safety informtion
Page 10
Page 11
Page 12

Getting to know your chest freezer
2
Page 13

Getting to know your chest freezer
Getting to know your chest freezer12
Page 14

Getting to know your chest freezer
You’ll be up and running in no time
1. Door handle
2. Door
3. Hinge
4. Basket
5. Temperature knob
Accessories included
Instructions x 1
6. Drain cap
7. Power lamp
8. Side cover
9. Supply cord and plug
10. F rotsa C /too
Scraper x 1
Getting to know your chest freezer
13
Page 15

Page 16

Installing your chest freezer
3
Page 17

Installing your chest freezer
Bringing it all together
Transportation
Caution: 2 people are required to unpack
and handle the appliance, it is recommended that
gloves are worn.
The appliance should be transported only in
an upright position. Do not tilt the appliance
greater than 45°. The packaging as supplied
must be intact during transportation.
After transporting the appliance, leave it for at
least 4 hours before switching on to allow the
cooling system to settle. Failure to comply
could result in damage to the appliance.
Do not move the appliance by pulling the door
or handle as it may damage your flooring and
wall coverings etc.
Ensure the supply cable is not caught under
the appliance during and after moving.
Carefully remove all packaging materials
including the foam base, dispose of correctly.
Installation
Ensure sufficient spacing is provided for the
appliance to be installed. Leave space on
both sides (15cm), back (20cm) and above the
appliance (30cm) to ensure proper ventilation.
Do not place the appliance near a heat source
or in direct sunlight.
Do not put any heavy objects on top of the
appliance. It will damage the appliance.
Do not install the appliance in moist and wet
place.
It should be installed on a smooth surface to
avoid excessive vibration and noise.
Each appliance has a climate class (shown on
the rating plate) where it indicates the
temperature range of the appliance operation
in place. The appliance may not work properly
if it is left for a long period at a temperature
outside the specified range.
Refer to section “Care and Maintenance” to
prepare your appliance for use.
Climate Class
SN
N
ST
T
Amb. T. (°C) Amb. T. (°F)
10 ~ 32°C 50 ~ 90°F
16 ~ 32°C 61 ~ 90°F
16 ~ 38°C 61 ~ 100°F
16 ~ 43°C 61 ~ 110°F
16
Installing your chest freezer
Page 18

Installing your chest freezer
Bringing it all together
Electrical connection
Any electrical work that is required to
install this appliance MUST be carried out by
a qualified electrician.
Warning: THIS APPLIANCE MUST BE
EARTHED
Before making any electrical connections,
ensure that:
Electrical safety is only guaranteed when the
earth system of your house is in accordance
with the related local regulations.
Do not damage the refrigerant circuit.
Do not bend, stretch or pull the supply cable to
avoid electric shock.
Do not use electrical appliances inside the
food storage compartments of the appliance,
unless they are of the type recommended by
the manufacturer.
Ensure the power socket is suitable for the
maximum power of the machine (fuses in the
power circuit must be 13 amp).
The supply voltage should be the same as that
indicated in the technical specifications and
the appliance rating plate.
The appliance should be earthed and in
compliance with the applicable law.
When installed, the power socket must be
within easy reach.
If the socket outlets in your home are not
suitable for the plug supplied with this unit
check with a qualified electrician for
replacement.
The use of adapters, multiple connectors or
extension cables are not recommended.
The appliance must be connected to a 220-
240 volt 50Hz AC supply by means of a three
pin socket, suitably earthed and protected by a
13 amp fuse.
Should the fuse need to be replaced, a 13
amp fuse approved to BS1362/A must be used.
The plug contains a removable fuse cover that
must be refitted when the fuse is replaced. If
the fuse cover is lost or damaged, the plug
must not be used until a replacement cover
has been fitted or the plug is replaced.
A damaged plug should be cut off as close to
the plug body as possible, the fuse should be
removed and the plug disposed of safely.
Plug replacement (UK & Ireland only)
Should you need to replace the plug;
The wires in the power cable are coloured
in the following way:
Blue – Neutral ‘N’
Brown – Live ‘L’
Green & Yellow – Earth ‘E’
As the colours of the wires in the power cable
may not correspond with the coloured markings
identifying the terminals in your plug, and
proceed as follows:
The green & yellow wire must be connected to
the terminal in the plug that is marked with the
letter E or by the earth symbol.
The blue wire must be connected to the terminal
that is marked with the letter N.
The brown wire must be connected to the
terminal that is marked with the letter L
If power supply cord is damaged, it must
replaced by the manufacturer or its service
agent or a similar qualified person in order to
avoid
a hazard.
Installing your chest freezer 1 7
.
Page 19

Page 20

Using your chest freezer
4
Page 21

Using your chest freezer
Getting the most from your appliance
Before first use
Final checks before operating the appliance
Good air circulation around the appliance positioned.
The feet have been adjusted for perfect levelling.
Clean the compartment per recommendation in section “Care and
Maintenance”.
Plug in the appliance and power light will come on.
The compressor starts up and in operation may produce some background noise and it is
normal, this is not a defect.
Using your appliance
1. Temperature adjustment
Your freezer has one control for regulating the temperature. The temperature control is located
on the lower right hand corner.
The range of the temperature control is from position" 1" the warmest to "6" the coldest.
temperature
appropriate for home or office freezer use.
To turn the freezer off, turn the temperature control to "OFF".
2. Indicator light
- Power (Green) indicator - when the unit connected to the mains and turned ON, the indicator
light will be illuminated.
- Run (Red) Indicator - When the compressor is operating, the indicator light will be illuminated.
During the daily operation, the indicator light will be on and off and this is normal.
- Alarm (Orange) indicator - When the temperature inside the cavity is increasing to -10℃ or above,
it will illuminate. Once the temperature goes down, the indicator light will turn off.
When you found the indicator is light up , you should double check the cover has been closed properly.
3. Storing frozen food
The freezer compartment is 4 Star rated and suitable for the freezing and storage of pre
frozen food.
Check the food packaging for suggestion before storage.
Adjust the
control to the setting that best suits your needs. The setting of “4” should be
20
Using your chest freezer
Page 22

Using your chest freezer
Getting the most from your appliance
Useful information
The following guidelines and recommendations are suggested to obtain the best results and storage
hygiene.
Frequent door openings can cause internal temperature rise so the door shall be closed as soon as
possible after use.
For hygiene reasons, it is always a good practise to pack, wrap and cover the food before storing.
Food shall cool to room temperature before storing.
Do not fill the appliance with too much food: cold air must circulate freely for food to be preserved
properly.
Never re-freeze anything that has thawed out unless you cook it again, to kill off harmful bacteria.
Never re-freeze thawed shellfish.
Re-seal packs properly after removing items. This prevents drying or ‘freezer burn’ and a build up of
frost on any remaining food.
Energy saving tips
Place your freezer away from direct sunlight, your oven or any other heat sources. Allow 20 cm clear
space on both sides and above, and at least 5 cm behind.
Higher cold setting will use more energy. Do not set to maximum cold if it is not necessary.
Frequently open and close door would cause internal temperature rise and it will consume more
energy.
Close the door(s) properly, and make sure the seals and hinges are airtight. Check the seals by putting
a sheet of paper between the door and the main body of the fridge. If the paper moves, your seals
need replacing.
Defrost regularly. Accumulated ice layer should not be more than 5 mm thick.
The pre-set position of basket has already set in the most efficient use of this product.
Using your chest freezer
21
Page 23

Page 24

Care and maintenance
5
Page 25

Care and maintenance
Looking after your appliance
General
Important: Always unplug the appliance from the power socket during cleaning
and maintenance.
Never use any sharp instruments or abrasive substances, soap, household cleaner, detergent
or wax polish for cleaning.
Use luke warm water to clean the cabinet of the appliance and wipe it dry.
Never clean the appliance with flammable fluids. It could cause damage and a fire hazard.
Clean the exterior of the appliance and door seal with a damp cloth and dry it through.
Avoid water going into the temperature control box. Clean with a dry cloth only.
Clean the condenser (located at the back of the appliance) with a vacuum cleaner.
It is suggested to remove the dust every year.
Shelves are all removable for cleaning purpose.
Dusts behind the refrigerator and on the ground shall be timely cleaned to improve cooling effect
and energy saving.
The interior of the refrigerator should be cleaned regularly to avoid odor.
Check the door gasket regularly to make sure there are no debris.
Please turn off the power before cleaning, remove all food, shelves, drawers, etc.
Clean the door gasket with mild soap and water
Use a soft cloth or sponge to clean the inside of the refrigerator, with two tablespoons of
baking soda and a quart of warm water. Then rinse with water and wipe clean, and open
the door and dry it naturally before the power is turned on.
For areas that are difficult to clean in the refrigerator (such as narrow sandwiches,gaps or
coners),it is recommended to wipe them regularly with a soft rag, soft brush,etc.and when
necessary,combined with some auxiliary tools(such as thin sticks) to ensure no contaminant
accumulation in these aeras.
Do not use soap, detergent, scrub powder, spray cleaner, etc., as these may cause odors in the
interior of the refrigerator.
Clean the bottle frame, shelves and drawers with a miid detergent and dry with a soft cloth.
Wipe the outer surface of the refrigerator with a soft cloth dampened with soapy water,
detergent, etc., and then wipe dry.
Do not use hard brushes, clean steel balls, wire brushes, abrasives, such as toothpastes,
organic solvents (such as alcohol, acetone, banana oil, etc.), boiling water, acid or alkaline
items clean refrigerator considering that this may damage the fridge surface and interior.
Do not rinse with water so as not to affect the eletrical insulation properties.
Defrosting
The appliance require defrosting once or twice a year when ice layer thickness reaches 5~10mm.
Unplug the appliance from the mains before defrost
Remove all frozen food from the freezer and roll it firmly in newspapers. Put it into a container in a
cool place for temporary storage.
Use an ice scraper or similar tool to remove the ice layer.
pot of warm water inside the freezer.
Open the drain hole cap to empty the defrosting water.
Clean the freezer according to the steps above.
Turn on the freezer and set to maximum temperature. Refill the frozen food to freezer.
This process should be completed within 2 hours.
24
Care and maintenance
ing
.
This process can be speed up by placing a
Page 26

Care and maintenance
Looking after your appliance
Power failure
In case there is a power failure, you should contact the electricity supply company and take the following
actions:
Power failure
If it is last within 24 hours, keep the doors closed. This will allow the stored food to stay cold as long as
possible.
If it is last more than 24 hours, it is advised to empty the freezer compartment and temporarily store the
f
in a portable freezer or using artificial ice packs. Try to use up the food which is more easily
ood
perishable.
Remarks: Full appliance will stay cold longer than a partially filled one.
If ice crystals are still visible on the food, it may be frozen again, although flavour and aroma may be
affected. I
f food is found to be in a poor condition, it is best to throw it away.
Short vacation
There is no need to disconnect the appliance from the mains if you will be away for two to three weeks.
Use up the perishable food.
Long vacation
Remove all the food if you are away for three weeks or more. Unplug the appliance and leave the doors
open to provide air circulation to prevent odour and mould.
Moving your appliance
Moving
Refer to section “Transportation” under “Installation”
Technical specificaiton
Model
BCF99L / MCF99BL
A+ Energy efficiency class
168 Energy consumption – Kwh/year
0 L Net storage – volume fresh food (litres)
99L Net storage – volume frozen food (litres)
99 L Total net storage (litres)
Frozen food compartment rating
4 Star
T/TS/N/NSClimate class
1
4Operating noise level dB(A)
Minimum Operating Temperature
Temperature rise value(min)
Product Dimensions(mm)(WxDxH)
10°C
1800
565*523*850
We apologise for any inconvenience caused by any minor inconsistencies in these instructions, which may
occur as a result of product improvements and development.
This appliance complies with the following EEC directives:
2014/35/EU Low voltage directive
2014/30/EU EMC directive
Disposal information
Remember: Old fridges must be disposed of carefully - older models contain CFC gases that are harmful - if in doubt,
contact your local council for details on how to dispose of an old fridge.
Care and maintenance
25
Page 27

Page 28

Product support
6
Page 29

Product support
Help is always at hand
chest freezer
chest freezer
28
Product support
Page 30

Product support
Help is always at hand
Help and assistance
If you require any technical guidance or find that your chest freezer is not operating as intended, a simple solution
can often be found in the Troubleshooting section of these instructions or online at www.bush-support.com
If you still require further assistance, call one of our experts on 0
345 257 7271*. To help give us give you a fast and
.
Model Ref.
Serial number
Date of purchase
Local call rates applies*
Lines open 8am-7pm Monday to Saturday and 10am-4pm Sunday.
You can find these on
the rating plate - a small
information panel (usually
a sticker or metal plate) on
the rear of your appliance
This will be shown on
your receipt
*Calls to Bush enquiry lines may attract a charge and set up fee from residential lines depending on y . Mobile and other
providers costs may vary, see www.bt.com/pricing for details.
For Security and training purposes, telephone calls to and from customer service centres maybe recorded and monitored. Calls from
Republic of Ireland will attract international call charges.
Product support
29
Page 31

30 Product support
Page 32

Page 33

Page 34

Page 35

Contact:
www.bush-support.com
Helpline: 0345 257 7271
 Loading...