

Page 1
Instruction Manual
CCR231DAB
Page 2
Introduction
Contents Care & maintenance
CCR231DAB Instruction manual
Congratulations on purchasing the CCR231DAB.
We trust that this product will give you hours of listening pleasure, and
provide years of unparalleled performance. As with any new electrical
product please be patient and allow 36 hours of use before all components
have acclimatized themselves with your surroundings and found their
optimum working temperature.
Page 1
Introduction
Care & maintenance
Page 2
What is DAB
Page 3
Safety instructions
Mains adapter information
Page 4
Controls & Functions
Page 5
Battery installation
Getting started
Page 6-7
DAB operation
Page 8- 9
FM operation
Pa ge 9 - 11
General operation
Time & Date
Alarm setup
Snooze mode
Sleep timer
Factory reset
Backlight
Earphones
Pag e 12
Troubleshooting
Specications
Contact details
Pag e 13
Guarantee
Impor tant: Always unplug the appliance from the power socket
during cleaning and maintenance.
• Ensure the unit is switched off and unplugged from any electrical outlet
• Wipe the case with a slightly moist lint free cloth
• Do not use any cleaning uids containing alcohol, ammonia or abra-
sives
• Do not spray an aerosol at or near the object
• Do not allow liquids to spill or objects to drop into any openings
• Do not inser t sharp items into speaker grills or any other openings
• Always us the original packaging if it is necessary to transport the unit
at any time
If the unit is used in a dusty environment, it may be necessary to have the
unit serviced at your local dealer periodically. It is not advisable to allow
large deposits of dust to accumulate within the unit as it may prevent adequate cooling. Similarly dust deposits which become damp can sometimes
lead to electrical problems which may cause severe damage to the delicate
electronics within this unit.
1
Page 3
What is DAB?
DAB radio will change the way that people listen to radio over the next
few years. You will probably not be aware that digital radio will become
mandatory in the future as the terrestrial radio frequencies which you
currently listen to will be re allocated for other uses such as emergency
services. This means that today you are one of the pioneers using this
technology, however in a short space of time everybody will benet from
clear digital radio.
Digital radio offers an abundance of new digital only stations and improved
sound quality. There are no frequencies to remember so the CCR 231DAB
can be tuned by searching through station names. The audio quality of
DAB is near that of a CD with virtually no interference and no retuning. DAB
is also enhanced with DLS (Digital Label Segment), this is data transmitted
by the station which may include information about the station, program or
song (see page 9).
The BBC was the pioneer of digital radio, beginning transmissions in
September 1995. Digital One, the national commercial radio multiplex
operator, began broadcasting in November 1999. There has been a growth
in the number of digital radio stations throughout the UK and both the BBC
and Digital One are committed to extending their coverage. Digital One
currently covers 80% of the UK population, soon to increase to 85%, and
the BBC covers 65% with the aim of increasing coverage to 90%
Your CCR231DAB will receive DAB programs broadcast on Band 3 digital
radio (174-240MHz). There are a total of 41 channels within this range
numbered 5A to 13F, the number of channels you can receive will be
dependant on your location and signal strength. The UK has been allocated
seven multiplexes by the Radio Authority - in the spectrum 217.5-230.0
MHz, which are numbered 11B to 12D.
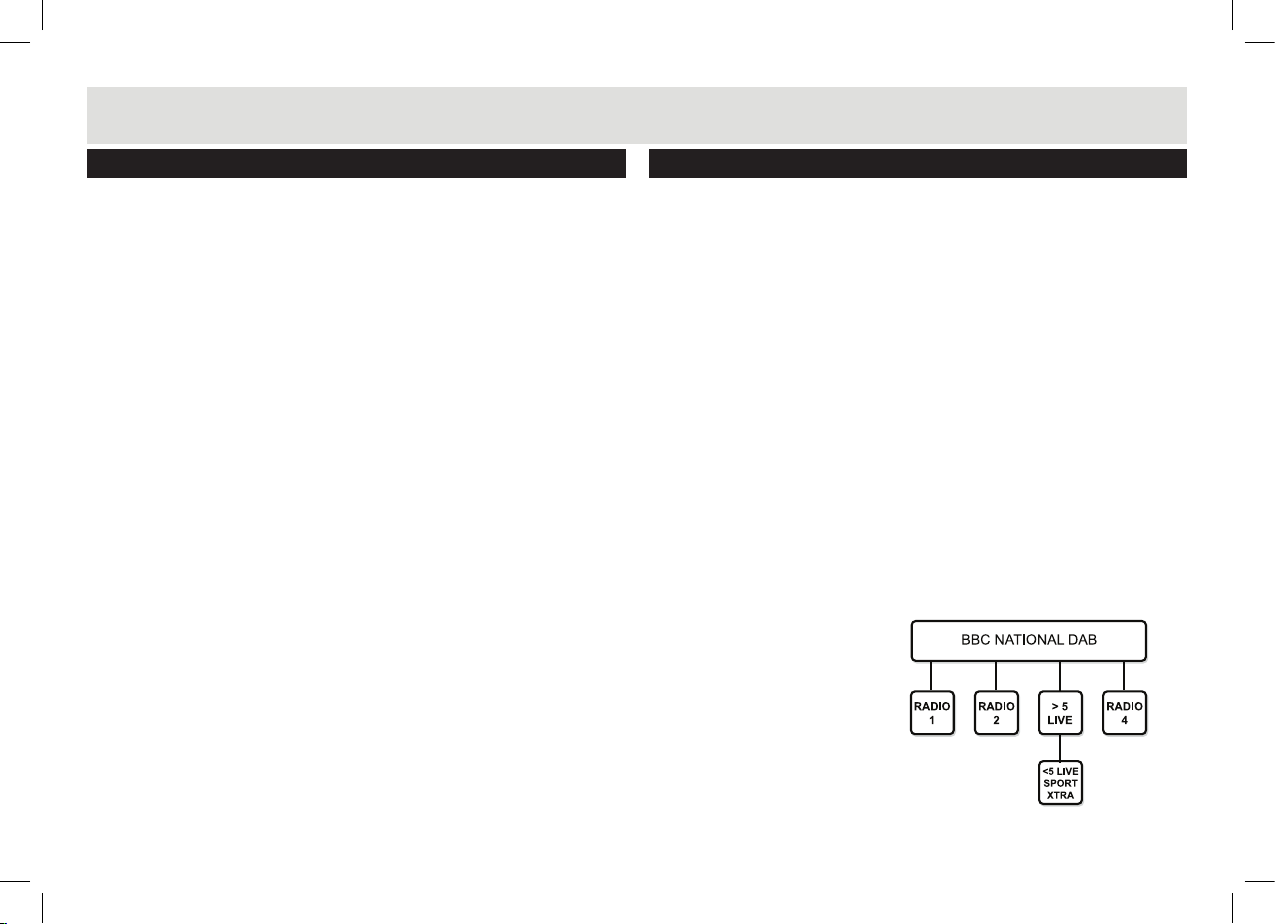
A multiplex is a broadcaster such as BBC National DAB or Digital One
who will provide a host of different stations within their multiplex. If we
consider the BBC as an example, the following diagram shows how the BBC
multiplex may work.
Below the main multiplex provider (in this case ‘BBC National DAB’) will be
a number of primary stations. These are labelled with the station name (e.g
Radio 2) rather than the frequency. This allows you to tune the CCR231DAB
by station name, which is easier than trying to recall frequencies.
Sometimes a secondary ser vice station may be provided by the
broadcaster, for instance this is sometimes used when an alternative
commentary is provided on a sporting match or event. These secondary
service stations are not permanent and may not always be used for
broadcast. When a secondary station is available below the primary station,
a ‘>’ symbol will be displayed after the primary station name. A secondary
station can be recognise by the ‘<’ symbol before the secondary station
name .
Check how many stations you can
get in your area by texting DAB
and your postcode to 88600#, or
nd out which stations are available on the website at:
www.getdigitalradio.com
2
Page 4

Safety Information
Important – Please read these instructions fully before installation
CAUTION: TO REDUCE THE RISK OF ELECTRIC SHOCK, DO NOT REMOVE ANY COVER. NO USER-SERVICEABLE PARTS INSIDE, REFER
ANY SERVICING TO QUALIFIED SERVICE PERSONNEL.
• Please read this owner’s guide
• Please take the time to follow the instructions in this owner’s guide
carefully. It will help you set up and operate your system properly and
enjoy all of its advanced features.
• Please save this owner’s guide for future reference.
• The product label is located on the back of the product.
• This product must be used indoors. It is neither designed nor tested for
use outdoors, in recreation vehicles, or on boats.
• Heed all warnings - on the product and in the owner’s guide.
• Do not use this apparatus near water or moisture.
Do not use this product near a bathtub, washbowl, kitchen sink, and
laundry tub, in a wet basement, near a swimming pool, or anywhere
else that water or moisture is present.
• Only use attachments/accessories specied by the manufacturer.
• Unplug this apparatus during lightning storms or when unused for long
periods of time - to prevent damage to this product.
• Refer all servicing to qualied service personnel
• Servicing is required when the apparatus has been damaged in any
way: such as liquid has been spilled or objects have fallen into the apparatus; the apparatus has been exposed to rain or moisture, does not
operate normally, or has been dropped -
Do not attempt to service this product yourself.
Opening or removing covers may expose you to dangerous voltages or
other hazards.
• To prevent risk of re or electric shock, avoid overloading wall outlets,
extension cords, or integral convenience receptacles.
• Use proper power sources - Plug the product into a proper power
source, as described in the operating instructions or as marked on the
product.
• The mains plug is used as the disconnect device, the disconnect de-
vice shall remain readily accessible
Mains adapter information
• Ensure the mains adaptor supplied is not submerged in liquid
• Ensure the mains adaptor is not forced into incorrect mains outlet
sockets
• Do not allow the power cable to become snagged or damaged
• Disconnect the mains power supply if bare wires are visible and
replace the mains adaptor accordingly
• Do not overload mains outlet sockets with multiple plugs or power
adaptors
• Do not inser t foreign objects (especially metal) into the DC plug at the
end of the power cable
CAUTION
RISK OF ELECTRIC SHOCK!
DO NOT OPEN!
This symbol means that this unit is double
insulated. An earth connection is not required.
3
Page 5
1 2 3 4 5
8 9 11 12 1310 1414
6
7
1 2 3 4 5
8 9 11 12 1310 1414
6
7
15
Absolute Radio
Red Hot Chili P
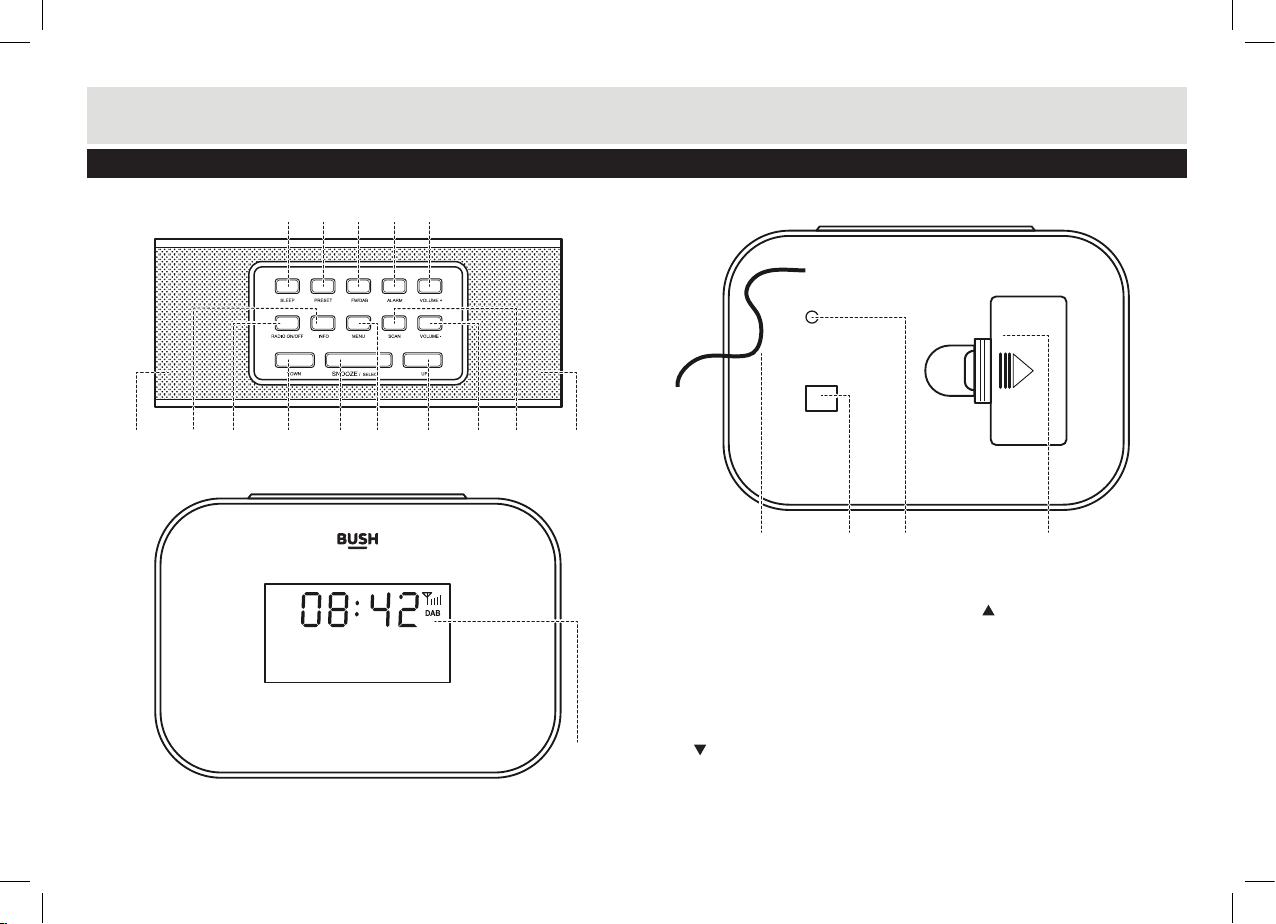
Functions & controls
Controls & functions
6
7
1 2 3 4 5
8 9 11 12 13
10 1414
Absolute Radio
Red Hot Chili P
15
1. SLEEP button
2. PRESET button
3. FM/DAB button
4. ALARM button
5. VOLUME+ but ton
6. INFO button
7. RADIO ON/OFF button
8. DOWN button
9. SNOOZE/SELECT button
10. MENU button
4
11. UP button
12. VOLUME- button
13. SCAN button
14. SPEAKERS
15. LCD display
16. ANTENNA
17. DC power input
18. EARPHONE output
19. Batter y cover
1917 1816
Page 6

User instructions
Battery installation Getting started
Fitting batteries (Clock backup)
1. Push the batter y cover (19) clip
towards the direction indicated,
and remove the cover.
2. Fit 2 x AAA batteries in the
sequence shown, observing
polarity.
3. Ret the battery cover.
Getting started
Switching on for the first time
1. Mains Adaptor (supplied with the package)
Connect the mains adaptor plug to the DC power input (17) on the rear
of the unit. Connect the mains adapter plug to a UK mains socket, and
switch the power ON.
2. Extend the antenna as far as it can go.
3. The radio will automatically tune and operate the quick scan.
Welcome to
Digital Radio
During scan mode, the LCD will display a slide bar that indicates the
progress of the scan, and the amount of radio stations that have been
found so far. Once the scan has nished, the radio will select the rst
alphanumeric station.
Scanning... 34
Station Name
Scrolling Text
NOTE: The name of the DAB radio station will be displayed on the middle
section of the display. The associated scrolling text on the bottom section.
Powering the radio ON/OFF
To switch the radio off and display only the clock press the RADIO ON/OFF
button (7). Press again to enable radio playback once more.
Memory function
When you power up the radio (after use), the radio plays the same mode
(DAB or FM) as the last operation.
Volume
1. To increase the volume level press the VOLUME+ button (5) repeatedly
or press and hold for rapid increase.
Station Name
Scrolling Text
2. To decrease the volume level press the VOLUME- button (12) repeatedly
or press and hold for rapid decrease.
5
Page 7

User instructions
DAB operation DAB operation
Listening to the stored DAB stations
To listen the DAB stations that have been stored press either UP/DOWN
buttons (8,11) to cycle through the list. Press the SNOOZE/SELECT button
(9) to tune to the selected station.
Storing preset stations
It is possible to store up to 10 of your favorite stations to the preset keys.
1. Press and hold the PRESET button (2) for
2 seconds. The display will then show the
following.
2. Use the UP/DOWN buttons (8,11) to select
the preset number from 1-10 you wish to use.
Then press the SNOOZE/SELECT button (9)
Preset Store
<1: (Empty) >
to store.
3. When stored the display will show ‘Preset _ Stored’, where ‘_’ is the
preset location number.
Recalling preset stations
Once you have saved stations to the preset buttons, you can recall them at
any time.
1. Press the PRESET button once. The display
will then show the following.
2. Then use the UP/DOWN buttons (8,11) to
select the desired preset station.
3. Press the SNOZE/SELECT button (9) to
activate.
NOTE: If you choose a preset that hasn’t been allocated a station, then
“<Empty>” will be displayed.
Preset Recall
<1: Absolute R>
Display modes
Every time you press the “ INFO” button (6), the display will cycle through the
following display modes: The information is displayed on the lower segment
of the LCD display.
DLS (scrolling text)
Signal Strength
Programme Type
Ensemble Name
Channel Frequency
DLS (Dynamic Label Segment)
Dynamic label segment is a scrolling message that the broadcaster may
include with their transmissions. This message usually includes information, such as program detail etc.
Signal strength
This option will display a bar with the current signal strength indicated with
a larger reversed out block.
Program type
This describes the “Style” or “genre” of music that is being broadcast e.g.
“Rock “or “Classical”.
Ensemble/Multiplex (Group name)
A multiplex /ensemble is a collection of radio stations that are bundled and
transmitted on one frequency. There are national and local multiplexes.
Local ones contain stations that are specic to that area e.g. MXR West.
NOTE: DAB – unlike normal radio, groups together several radio stations
and transmits them on one frequency.
6
Signal Error
Bitrate
Time
Date
Page 8

User instructions
DAB operation DAB operation
Channel Frequency
Displays the current DAB multiplex in use.
Signal error
Displays the amount of errors encountered in numerical format.
Bitrate
Displays the bitrate of the current station.
Time & Date
The time & date can be set automatically from the DAB or FM broadcast
or set manually. Follow the steps on page 9 to set manually.
Scan modes
There are two types of scan, one is Quick scan and the other is Auto scan.
Quick scan: searches the UK DAB band III
Full scan: searches all DAB channels.
1. To activate the quick scan press the SCAN button (13).
2. To perform a FULL SCAN, press the MENU but ton (10).
3. When the <Full Scan> option appears press the SNOOZE/SELECT
button (9) to per form a full scan.
Manual Tuning
As well as an auto tune function, you can manually tune the receiver. This
can help when aligning your aerial or when adding stations that were missed
while auto tuning.
1. Press the MENU button (10).
2. When the <Full Scan> option appears press either UP or DOWN button
(8,11) and nd <Manual Tune>, press the SNOOZE/SELECT button (9).
3. Use the UP or DOWN buttons to cycle through the DAB multiplexes,
which are numbered from 5A to 13F.
4. Now press the SNOOZE/SELECT button (9) to enter the current
ensemble/multiplex, the top line will now display the multiplex information.
5. To save any extra stations located to the station list or to return to the
default screen, press the SNOOZE/SELECT button (9).
Pruning
When the radio has performed a Scan in several locations you may nd
there are stored stations that you can no longer receive. This function
automatically removes them from the stored station list.
1. Press the MENU button (10).
2. When the <Full Scan> option appears press either UP or DOWN button
(8,11) and nd <Prune>, press the SNOOZE/SELECT button (9).
3. Use the UP or DOWN buttons to select YES or NO and press the
SNOOZE/SELECT button (9) to perform the prune function.
DRC ( Dynamic Range Control )
This function causes the radio to reduce the dynamic range of the audio
signal. The purpose of this is to adapt the dynamic range of the audio signal
to listening in a noisy environment.
NOTE: this is not available on many DAB stations.
1. Press the MENU button (10).
2. When the <Full Scan> option appears press either UP or DOWN button
(8,11) and nd <DRC>, press the SNOOZE/SELECT button (9).
3. Use the UP or DOWN buttons to select between DRC off, DRC Low and
DRC High.
4. Press SNOOZE/SELECT button (9) to save the setting.
7
Page 9

User instructions
FM operation FM operation
Switching from DAB to FM
Press the FM/DAB button once to switch. The display will show FM Mode.
Scan Modes
Auto Scan
The Auto scan setting will scan up or down depending on where the starting
frequency is. Once it nds a station it will stop. There are two options to
consider when using this function.
NOTE: Ensure you are in the FM mode before following the below steps.
1. Press the MENU button (10).
2. When the <Scan Setting> option appears press the SNOOZE/SELECT
button (9).
3. You now have the choice of either <Strong Stations Only> or <All
Stations>. Strong stations only, will only stop at stations with a strong signal. All stations will stop at any station found with a strong or weak signal.
4. Use the UP or DOWN buttons to select an option and press the
SNOOZE/SELECT button (9) to store.
5. Wait for 1 second for the display to return to the default screen, now press
the SCAN button (13). The auto scan searches for stations, depending on
the setting you chose.
Manual tuning (scan)
To manually tune a station follow the below steps
1. Press and hold either UP or DOWN buttons (8,11) to scan up or down the
frequency range. When a station is found the scan will stop and the
detected station will begin playback. Repeat until you reach the required
frequency (station).
2. To ne tune the frequency you can press either UP or DOWN buttons
(8,11) to advance in 0.05MHz increments.
Audio Mode (Stereo/Mono)
This option will allow you to specify that a station can be only played in
mono or that stereo is allowed.
1. Press the MENU button (10).
2. When the <Scan Setting> option appears press either UP or DOWN
(8,11) and nd <Audio Setting>, press the SNOOZE/SELECT button (9).
3. Use the UP or DOWN (8,11) buttons to cycle through the 2 options
<Forced Mono> or <Stereo Allowed>. Press SNOOZE/SELECT button
(9) to save the setting.
Stereo allowed: Means any station broadcast in stereo with a strong
enough signal will be played in stereo.
Forced Mono: Plays ALL stations in mono regardless of the availability of a
stereo signal.
Storing & recalling stored stations
The procedure for storing & recalling stations is the same as DAB, See pg 6.
Display modes
Every time you press the INFO button, the display will cycle through the
following display modes: The information is displayed on the lower segment
of the LCD display.
<Programme Type>
<Programme Name>
or
<Station Frequency>
Audio Mode (Stereo/Mono)
Time
Date
Radio text
8
Page 10

User instructions
FM operation General operation
Program type
This describes the “Style” or “genre” of music that is being broadcast e.g.
“Rock “or “Classical”.
Programme Name
Station name (if broadcast). Frequency of the station is displayed if no
name is broadcast.
Time
Displays the current time. Please see below for setting.
Date
Displays the current date. Please see below for setting.
Radio Text
Displays scrolling text broadcast by the station (only if broadcast).
General operation
Time & Date
The time & date can be set automatically from the DAB or FM broadcast or
set manually. Follow the steps below to set manually.
1. Press the MENU button (10).
2. When the <Full Scan> option appears (DAB mode) or <Scan Setting>
(FM mode), press either UP or DOWN (8,11), locate <System> and press
the SNOOZE/SELECT button (9).
3. Use the UP or DOWN (8,11) buttons to nd <Time> and press the
SNOOZE/SELECT button (9).
4. Inside the <Time> menu there are several options <Set Time/Date>,
<Auto Update>, <Set 12/24 Hour> & <Set Date Format>.
Set Time/Date
1. When activated the Hour digit ashes, use the UP or DOWN buttons
(8,11) to set the digit to the correct hour then press SNOOZE/SELECT
button (9), Repeat the process for the minutes pressing SNOOZE/SE-
LECT to advance.
2. The next setting is the Date. Use the same process as step 1 using the
UP/DOWN buttons to select the correct digits and the SNOOZE/SELECT
button (9) to store and advance.
3. When complete the display will show ‘Time Saved’ and return to the
default screen.
Set 12/24 Hour Use the UP or DOWN buttons (8,11) to select 12 or 24 hour
and then press the SNOOZE/SELECT button (9) to activate.
Auto Update Use the UP or DOWN buttons (8,11) to cycle through the
various options for auto setting the time & date. These range from <Update
from any>, <Update from DAB>, <Update from FM> and <No Update>.
Press the SNOOZE/SELECT button (9) to store the setting.
Set Date Format Use the UP or DOWN buttons (8,11) to cycle between
DD-MM-YYYY or MM-DD-YYYY. Press the SNOOZE/SELECT button (9)
to store the setting.
NOTE: When the power is disconnected the settings will be lost.
Alarm Setup
Follow the below instructions to set both alarms.
NOTE: The radio must be ON in order to program an alarm.
1. Press the ALARM button (4) repeatedly to
cycle between Alarm 1 Setup and Alarm 2
Setup.
2. Press the SNOOZE/SELECT button (9)
when the alarm setup you wish to program
is selected EG: 1 or 2. This will activate the
Alarm wizard.
9
1
Alarm 1 Setup
Page 11

User instructions
General operation General operation
3. Use the UP or DOWN buttons (8,11) to set the On time Hour digit, then
press the SNOOZE/SELECT button (9) to skip to the minute digits.
Repeat the process using the UP or DOWN buttons, and press the
SNOOZE/SELECT button to proceed to the source option.
4. Using the UP or DOWN buttons (8,11) cycle between BUZZER, DAB or
FM. Use the SNOOZE/SELECT button to save the setting.
If you choose DAB or FM the next step is to
choose the station you want to play when the
alarm sounds. There is a choice of Last sta-
tion listened to, or a preset station (if any
stored). Use the UP or DOWN (8,11) buttons
1
Alarm 1 Wizard
1: Absolute Rad
to select an option and press the SNOOZE/
SELECT button to proceed.
5. Next is the option to have the alarm activate only D A I LY, ONCE,
WEEKENDS or WEEKDAYS. Select which you require using the UP or
DOWN buttons (8,11). Press the SNOOZE/SELECT button to store the
setting.
6. The next step is to set the volume level required. Use the UP / DOWN
buttons (8,11) to set and press the SNOOZE/SELECT button to save the
alarm settings.
7. Use the UP / DOWN buttons (8,11) to select the Alarm status ON or
OFF. Press the SNOOZE/SELECT button to proceed. Alarm Saved will
appear on the display to indicate the alarm status has been saved.
8. To silence the alarm when sounding press the ALARM button (4).
The alarm will sound for one hour, without pressing the ALARM button.
9. To disable the alarm, press the ALARM button (4) during radio playback,
the Alarm 1 Setup screen appears on the display. If you wish to disable
‘Alarm 2’, press the ALARM button once more to display ‘Alarm 2 Setup’.
Use the UP / DOWN buttons (8,11) to cycle between ‘Alarm On’ or ‘Alarm
Off’. Press the SNOOZE/SELECT button (9) to store the setting.
10. You can also disable the alarm while the
radio is OFF. Press the ALARM button (4) to
1
display this screen.
Alarm 1: off
Use the UP / DOWN buttons (8,11) or
Alarm 2: off
ALARM to toggle bet ween ON & OFF for
each alarm.
Press the SNOOZE/SELECT button to store the setting.
NOTE: Alarm icons ‘
’ will display ‘1’ or ‘2’ inside the icon to denote which
alarm is active.
Snooze Mode
When the alarm sounds you can press the SNOOZE/SELECT button to
activate the SNOOZE mode and delay the alarm for 5 minutes.
Sleep Timer
When listening to the radio you can preset
a period of time for the radio to shut down.
NOTE: The radio must be ON already.
Press the SLEEP button (1) repeatedly to cycle
through the sleep timer options 15-90 minutes.
The next press will disable the sleep timer ‘Sleep Off’.
1
Set sleep time
15 minutes
Factory Reset
To reset the radio to the factory settings follow the below steps.
1. Press the MENU button (10).
2. When the <Full Scan> option appears (DAB mode) or <Scan Setting>
(FM mode), press either UP or DOWN (8,11), locate <System> and press
the SNOOZE/SELECT button (9).
10
Page 12

User instructions
General operation General operation
3. Use the UP or DOWN (8,11) buttons to nd <Factory Reset> and press
the SNOOZE/SELECT button (9).
4. Use the UP or DOWN (8,11) buttons to select ‘Yes’ and press the
SNOOZE/SELECT button (9).
5. The software will return to the default settings and re-scan for DAB
stations.
Backlight
To set the backlight time out duration.
1. Press the MENU button (10).
2. When the <Full Scan> option appears (DAB mode) or <Scan Setting>
(FM mode), press either UP or DOWN (8,11), locate <System> and press
the SNOOZE/SELECT button (9).
3. Use the UP or DOWN (8,11) buttons to nd <Backlight> and press
the SNOOZE/SELECT button (9).
4. When you see <Level> press the SNOOZE/
SELECT button (9) once more to proceed to
the backlight level options.
5. Using the UP / DOWN buttons (8,11) toggle
between <Low>, <Medium> and <High>.
When selected press the SNOOZE/SELECT
button (9) to store the setting.
NOTE: an ‘*’ will appear on the display when the current backlight setting is
selected.
1
level *
<High >
Earphones
You can listen to the radio privately using a pair of headphones with a
3.5mm socket (not provided).
1. Connect the 3.5mm jack into the EARPHONE socket (18) on the unit.
2. The audio will be muted and routed through the earphones only.
To prevent possible hearing damage, do not listen at high
volume levels for long periods.
If you hear no sound during playback, do not turn the volume up as the
music may suddenly begin at a high volume.
Excessive sound pressure from earphones and headphones can cause
hearing loss.
To avoid damaging your ears, adjust the volume to the lowest safe level
before playing, and turn up to the desired level when playback has started.
11
Page 13

User instructions
Troubleshooting Specication
PROBLEM CAUSE SOLUTION
No Sound
Static Sound
Sound is
distorted
Desired station not found Weak signal Use the Manual Tune function.
The display shows
“SERVICES N/A”
The display is blank This may occur if the
I can hear a burbling
noise on some stations.
Volume not turned up
Signal reception too low.
Volume is to o high.
No DAB coverage in yo ur
area.
Poor reception Adjust the posit ion of the a ntenna.
broadcaster changes the
label of a s ervice or removes
a label wh ile tune d.
Weak signal Try re-positioning the aerial
Adjust the main volume.
Adjust the antenna or move the
unit to a str onger signal lo cation.
Adjust the main volume.
The radi o will tr y to retun e.
Perfo rm a scan.
Power Supply Adaptor: 100-240V to 6V DC 1A
Battery: 2 x 1.5V AAA size
Power consumption: 5 Watts
RF section: Band III 174.92 - 239.20Mhz
Input: 75R, nominal
Sensitivity: -99.20dBm Typical
FM frequency: FM (87.5-108MHz)
Headphone Output: 3.5mm stereo jack socket
Dimensions 145mm x 100mm x 60mm
Contact details
In the unlikely event of difculties with your appliance please follow the
trouble shooting guide to the left. If the problem persists, contact the
retailer if the machine is still under guarantee.
Customer helpline: 0870 600 3030
WEEE marking
“Information for the consumer”
Disposal of your old product
Your product is designed and manufactured with high quality materials and components,
which can be recycled and reused.
When this crossed out wheeled bin symbol is attached to a product it means the
product is covered by the European Directive 2002/96/EC.
Please make yourself aware of the local collection system for electrical and
electronic products.
Please act according to your local rules and do not dispose of your old products with
your normal household waste. The correct disposal of your old product will help prevent
potential negative consequences for the environment and human health.
This product complies with European low voltage (73/23/
EEC) and electromagnetic compatibility (89/336/EEC)
directives.
12
Page 14

Product Guarantee
This product is guaranteed for twelve months from the date of original purchase.
Any defect that arises due to faulty materials or workmanship will either be replaced, refunded or repaired free of charge where
possible during this period by the dealer from whom you purchased the unit.
The guarantee is subject to the following provisions:
• The guarantee does not cover accidental damage, misuse, cabinet parts, knobs or consumable items.
• The product must be correctly installed and operated in accordance with the instructions contained in this manual.
• It must be used solely for domestic purpose.
• The guarantee will be rendered invalided if the product is re-sold or has been damaged by inexpert repair.
• Specications are subject to change without notice.
• The manufacturer disclaims any liability for the incidental or consequential damages.
• The guarantee is in addition to, and does not diminish your statutory or legal rights.
Guarantor: Argos Limited
489 - 499 Avebury Boulevard
Central Milton Keynes MK9 2NW
13
 Loading...