

Bully Dog Triple Dog GT Gas, Triple Dog GT Diesel, GT for Hemi Plus, WatchDog Installation Manual
Page 1
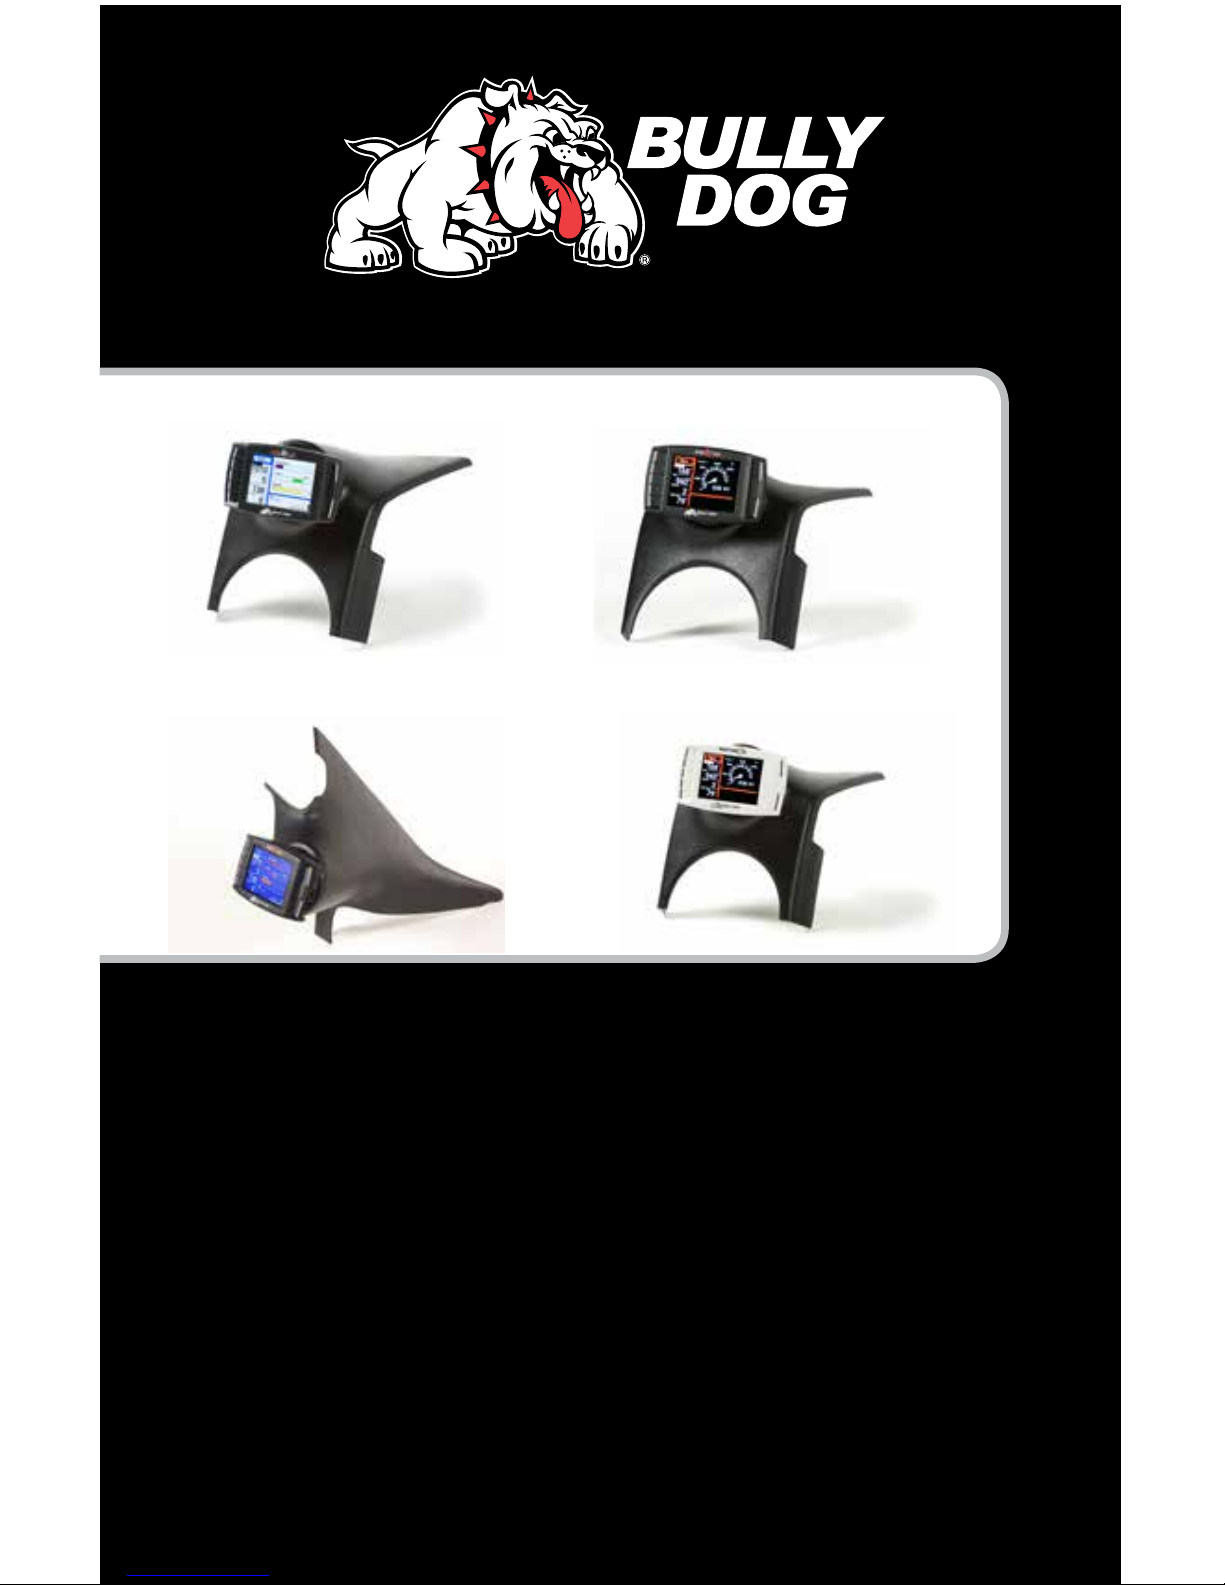
Custom Gauge Pods INSTALLATION MANUAL
Triple Dog™ GT Gas
Triple Dog™ GT Diesel
WatchDog™
GT for Hemi Plus
GT Gas (40415), GT Diesel (40420) and GT Hemi Plus (40430)
are not legal for sale or use in California on pollution-controlled vehicles.
Page 2
1
Introduction
These custom gauge pods oer a clean, seamless OEM t in a
convenient and safe location for Bully Dog performance
products like the GT and WatchDog.
Table of Contents
Gauge Pod Assembly Diagrams ........................ 3-4
GT and WatchDog .........................................................3
PMT ..............................................................................4
Installation .......................................................... 5-26
31302 ............................................................................5-6
31303 ............................................................................7-8
31304 ............................................................................9-10
32303 ............................................................................11-12
32304 ............................................................................13-16
32305............................................................................15-16
32306............................................................................17-18
33306/33307 .................................................................21-23
33302/33303 .................................................................25-26
IMPORTANT: A gauge pod adapter (sold separately, part
#30420) is required to mount a GT or WatchDog unit with a
custom pod mount.
Page 3

2
Tools Needed
31302
Phillips screwdriver
Flat-head screwdriver
8 or 10 mm socket
Socket wrench
31303
Phillips screwdriver
10 mm socket
Socket wrench
31304
Flat-head Screwdriver
Rachet
9/32 Socket w/ extension
33302 and 33303
(Optional)
Drill
13/64″ drill bit
32304
Phillips and/or at-head
screwdriver
10 mm socket
Socket wrench
32305
Torx spin driver
Phillips screw driver
T20 Torx bit
32306
Torx spin driver
T20 Torx bit
33306 and 33307
Phillips screwdriver
7 mm socket
Socket wrench
Page 4

3
Gauge Pod Assembly Diagrams
GT/WatchDog
When assembling, consider the following:
• Will the custom mount be painted? If so, paint the
mount BEFORE assembly.
IMPORTANT: A gauge pod adapter (sold separately, part
#30420) is required to mount a GT or WatchDog unit with a
custom pod mount.
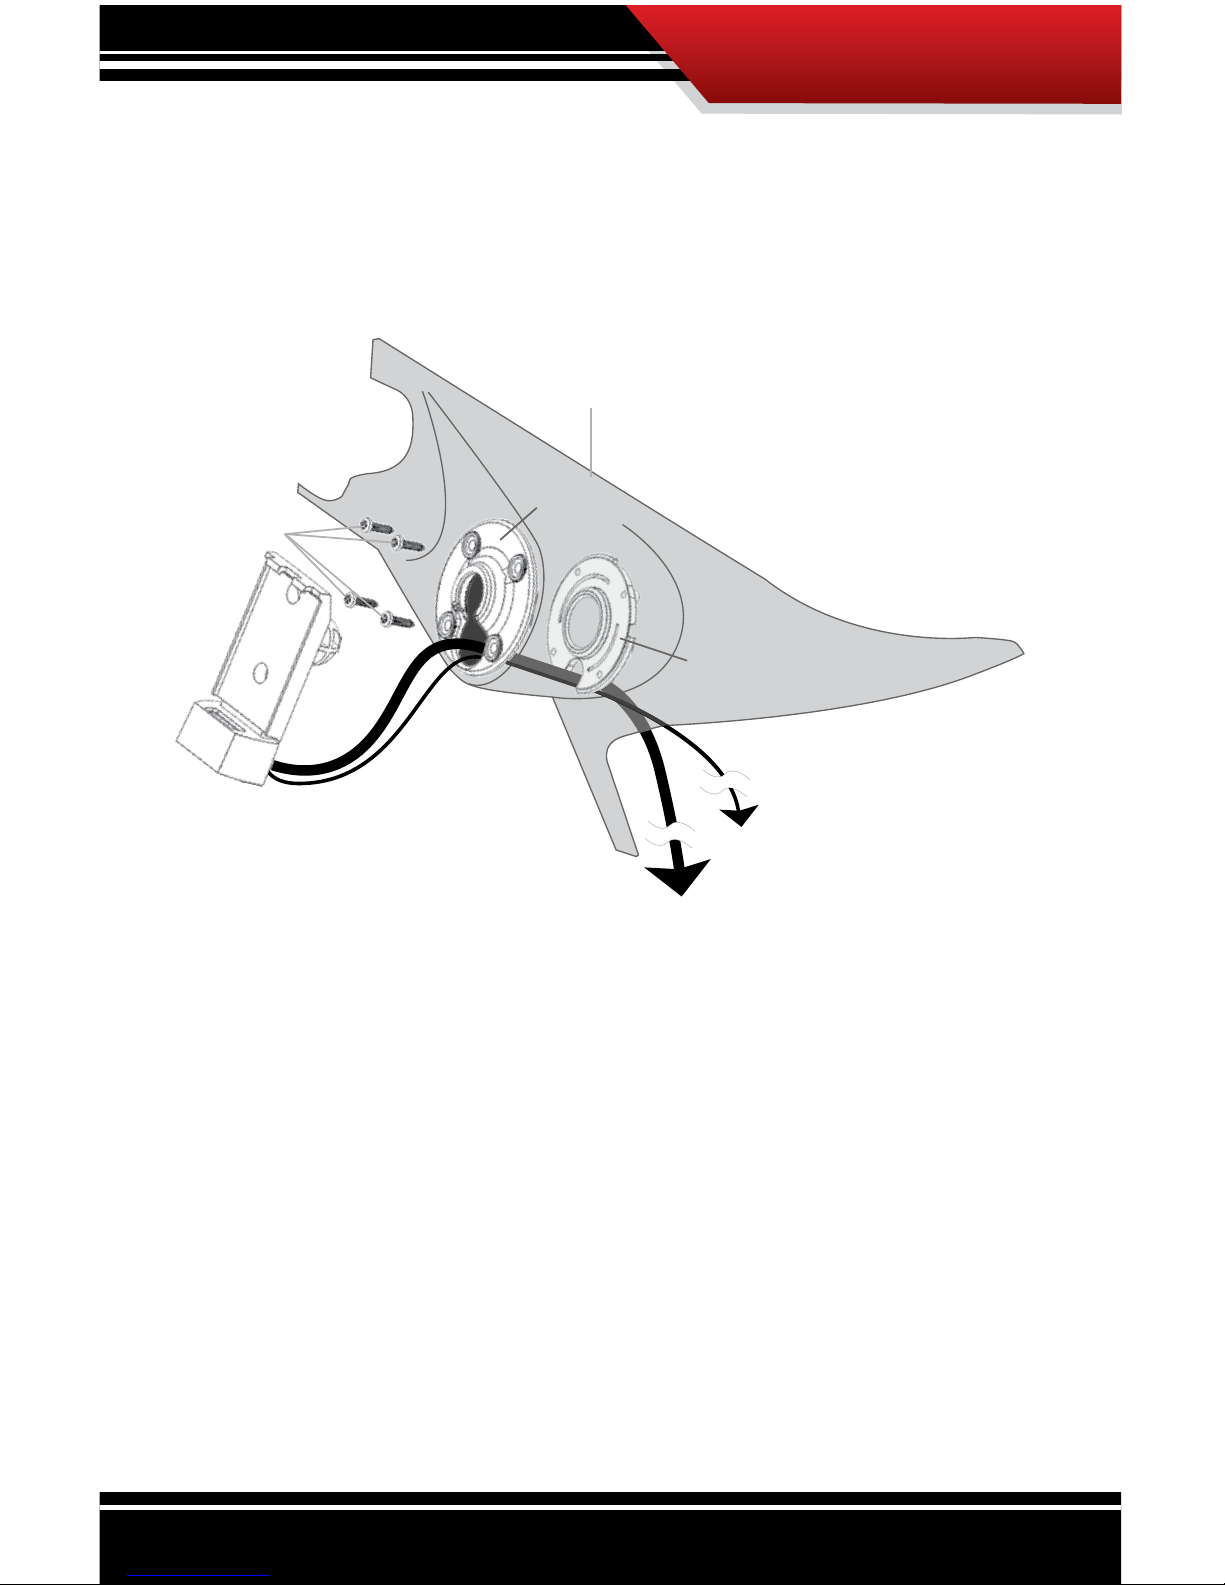
GT/WatchDog™ Head Unit
Custom Pod Adaptar
(sold separately)
Custom Gauge Pod
GT Gauge Pod Assembly Diagram
(To OBDII Adapter Plug)
Main Harness
Main Harness Plug
Page 5
4
PMT
When assembling, consider the following:
• Will the custom pod be painted? If so, paint the mount
BEFORE attaching cradle assembly.
• The cradle mounting plates can be painted to match the
custom mount.
• Painting the PMT cradle is not recommended.
PMT Cradle
Front Mounting Plate
Back Mounting Plate
(Threaded Screw Holes)
Mounting Screws
Custom Gauge Pod
PMT Gauge Pod Assembly Diagram
(To OBDII Adapter Plug)
(To Vehicle Fuse Box)
Cradle Cable
Ignition Fuse Wire
Page 6
5
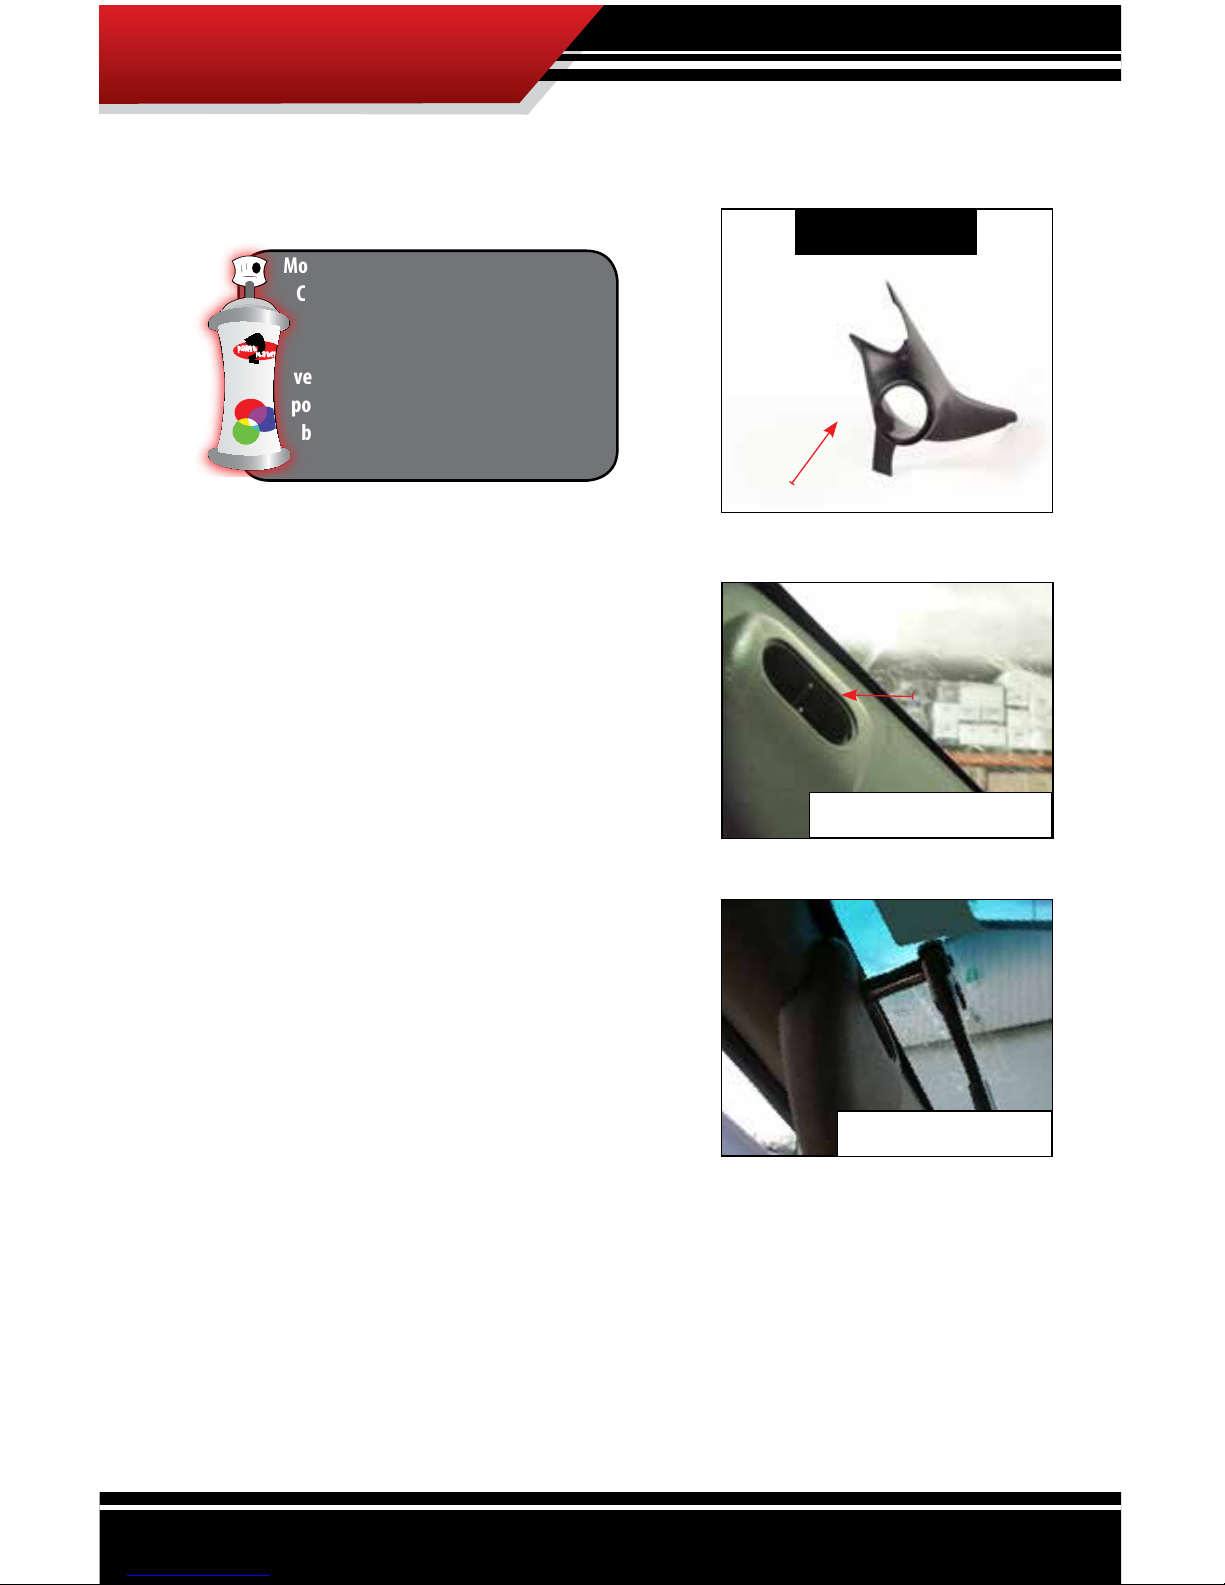
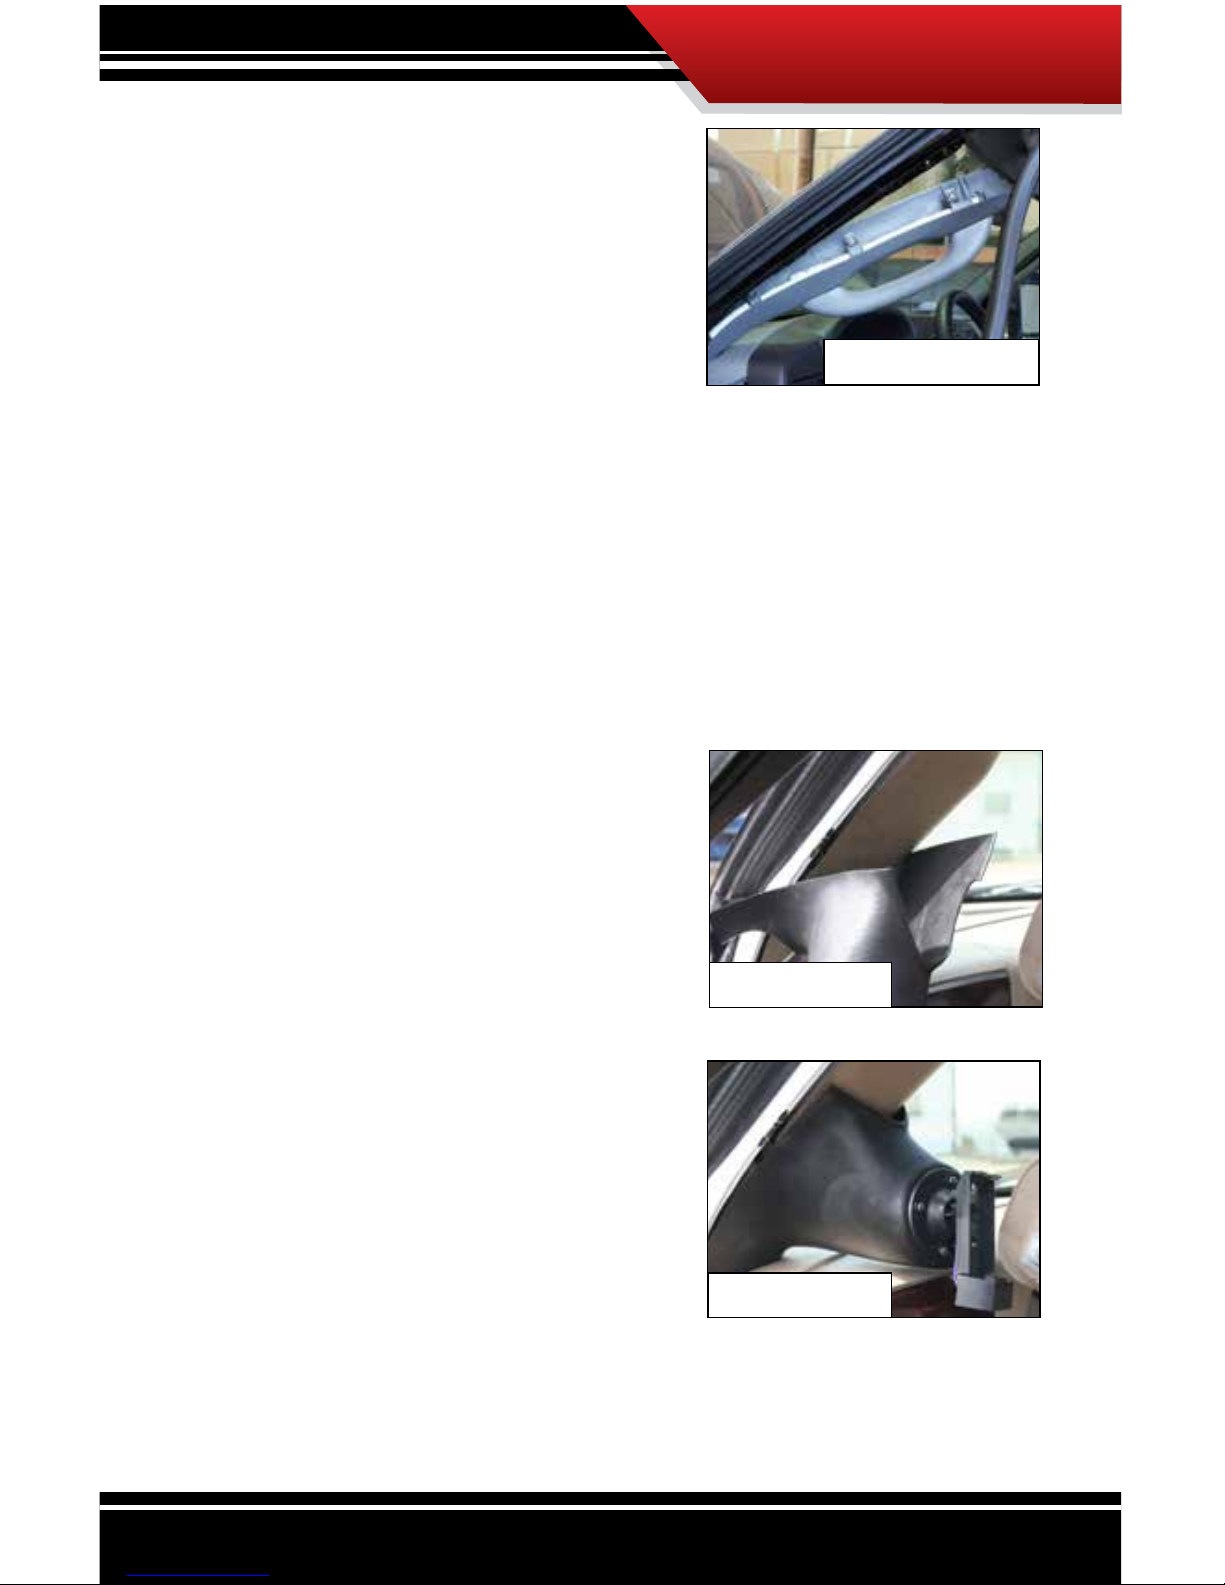
31302: Ford F-Series Super Duty 2003-2007
1. Remove the two plastic caps
on the grab handle on the
driver’s side.
2. Remove the four bolts that
were under the caps.
(Use an 8 or 10 mm socket.)
3. Pull out the weather stripping
around the A-pillar (so it can be pulled down easily).
4. Release the two plastic clips that hold the A-pillar in
place. (Use a at-head screwdriver.)
Bill of Materials
POD
Most custom gauge pods come in black.
Consider before beginning installation
that the custom gauge pod can be
painted to match the color of the
vehicle interior. The custom gauge
pod is made from ABS plastic and can
be painted with spray paint found at
auto parts stores.
Remove Caps
Cap Location
Remove 8mm Bolts
Page 7
6
5. Pull the A-pillar down to
access the screws that secure
the grab handle.
6. Remove the two
grab handle screws.
(Use a Phillips screwdriver.)
a. The grab handle will separate from the A-pillar.
b. Set the grab handle and screws aside.
7. Push the stock A-pillar back into its original location.
a. Secure it with the plastic clips (step 4).
8. Attach the GT, WatchDog or PMT to the custom pod.
(See diagrams on pages 3
and 4.)
9. Slide the custom pod onto the
stock A-pillar so that it sits just
below where the handle would
t.
10. Replace the grab handle.
(Secure it using the stock 8
mm bolts.)
11. Replace the side panel
and re-secure the weather
stripping.
Position
Reattach Handle
Pull Back Stock Pillar
Page 8
7
31303: Ford F-Series Super Duty 2008-2012
1. Attach the GT, WatchDog or PMT to the custom pod.
a. See the diagrams on pages 3 and 4.
2. Install any necessary cables
before placing the pod mount.
a. Make sure the cable(s)
will reach the pod mount
location.
b. Hide the cable(s) behind the
dash or weather stripping for
protection if necessary.
3. Peel the clear strip(s) o the
adhesive tape on the back of
the pod mount.
Place Cords
Peel Strip o Tape
Double Stick
Tape
Most custom gauge pods come in black.
Consider before beginning installation
that the custom gauge pod can be
painted to match the color of the
vehicle interior. The custom gauge
pod is made from ABS plastic and can
be painted with spray paint found at
auto parts stores.
Bill of Materials
POD
Page 9
8
4. Place the pod mount in the correct position.
(See the gure A.)
5. Firmly press down on the parts of the pod mount
where the adhesive tape touches the dash for a secure
attachment.
Place pod mount
Figure A
Page 10

9
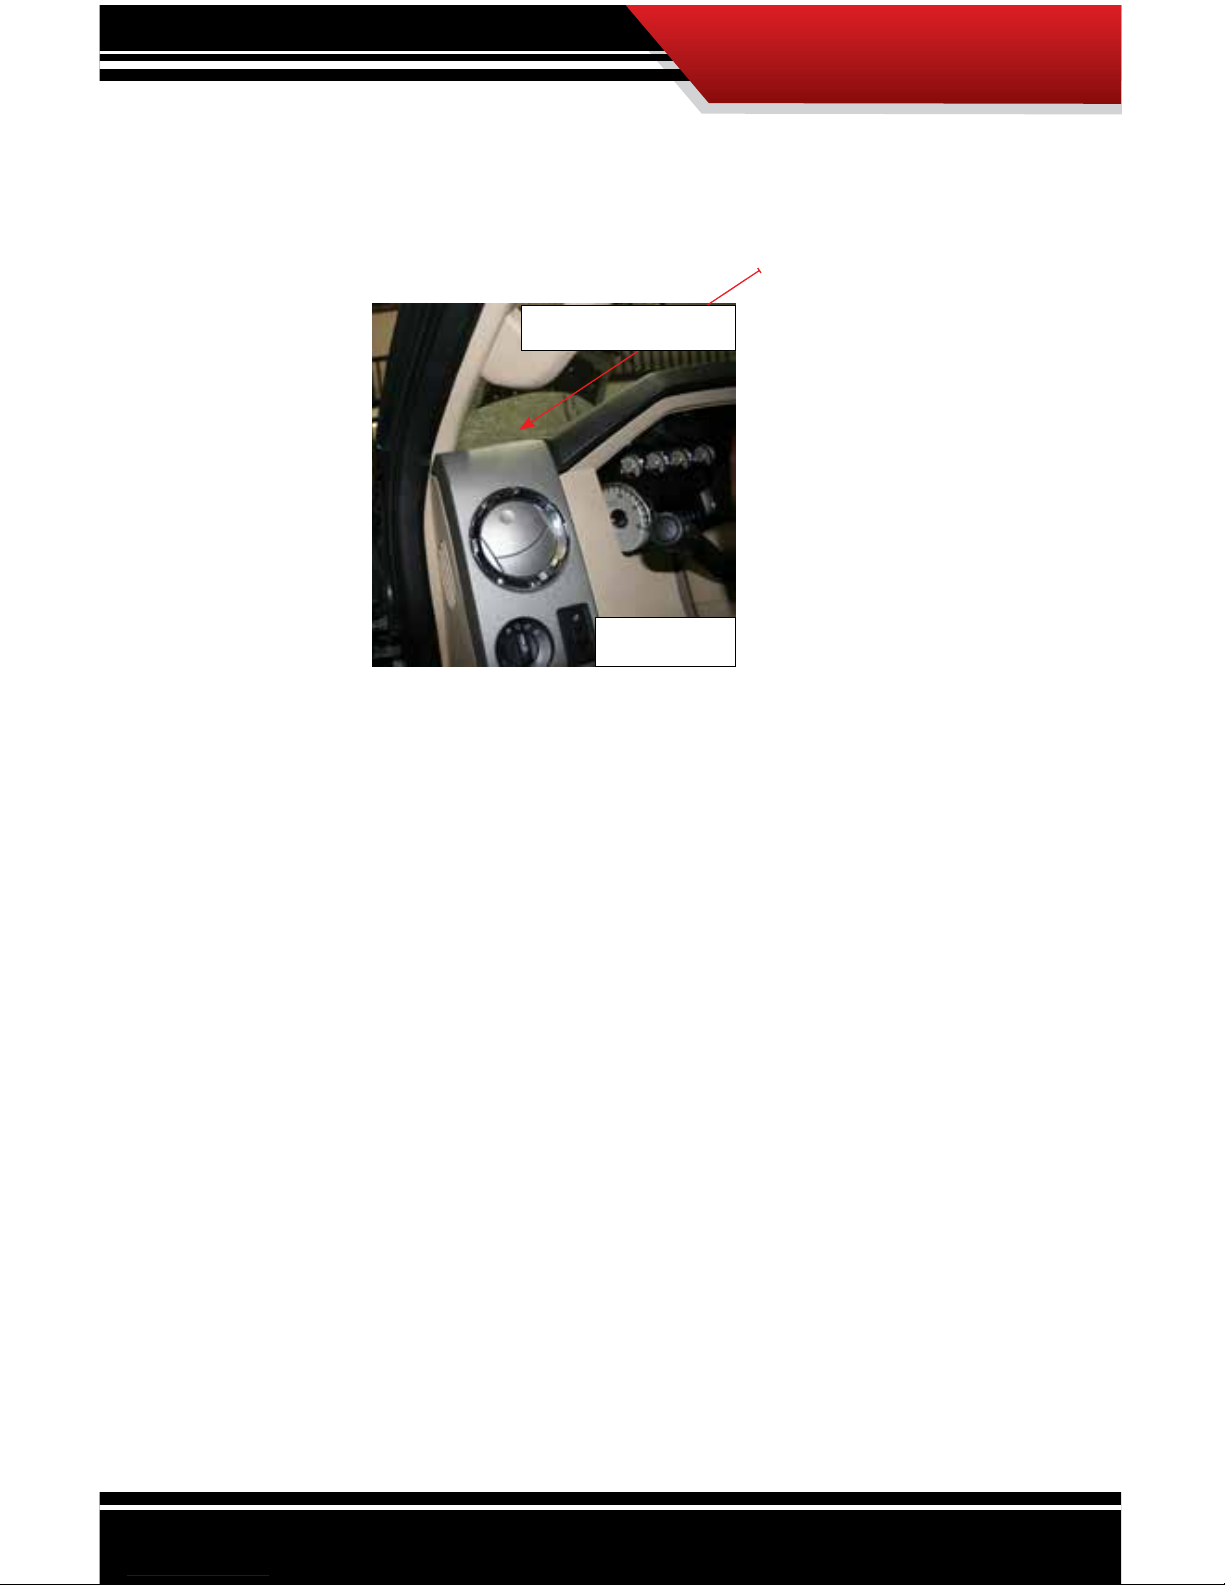
31304: Ford SD 2011+
Installation
Existing Trim Removal
1. Place at head screwdriver in the middle of each side of
the cap and open cap, taking care not to damage stock
A-pillar.
2. Using a 7mm socket with extension and ratchet; unscrew
the two bolts securing the stock A-pillar where the caps
were opened up. Loosen them all the way and remove
stock A-pillar.
Most custom gauge pods come in black.
Consider before beginning installation
that the custom gauge pod can be
painted to match the color of the
vehicle interior. The custom gauge
pod is made from ABS plastic and can
be painted with spray paint found at
auto parts stores.
Screwdriver
Placement
Page 11

10
3. Pull back weather stripping in the area of the A-pillar and
remove the side panel of the dash by the driver door.
4. Run cables as needed through the dash to the custom
pod. Install the custom gauge pod by rst aligning the
tab into the slot on dash. Guide custom gauge pod so
the screw hole lines up with the stock screw hole. Secure
using the supplied screw, not the stock screw.
5. Secure the weather stripping, install the side panel and
the job is nished. Enjoy your Bully Dog Custom Pod
Mount!
Tab
Install
Screw
Page 12

11
32303: Dodge Ram
®
2003-2009
1. Remove the bolt that holds the stock A-pillar in place.
a. It is located about halfway down the pillar behind a
small oval cover.
b. Remove the cover piece and set it aside.
c. Use a 10 mm socket.
2. Pull out the weather stripping around the A-pillar (so it
can be moved easily).
3. Attach the GT, WatchDog or PMT to the custom pod
mount.
a. See the diagrams on page 3 and 4.
Remove Stock Bolt
Stock Bolt
This model comes prematched
to the vehicle so it does not
require any paint.
Bill of Materials
POD
Screw
Page 13

12
4. Peel the clear strip(s) o the adhesive tape on the back
of the pod mount.
5. Position the custom
gauge pod over the
stock A-pillar. (Do not
attach or secure it yet.)
6. Route all wiring under
the gauge pod (and
under the dash, if
necessary).
7. Slide the pod down
until the pod screw
hole lines up with the
screw hole on the
stock A-pillar.
a. Be careful not to
touch the pod to
the pillar (adhesive
tape).
8. Use the provided bolt
(not the stock bolt) to secure the gauge pod and the
stock A-pillar to the vehicle frame.
9. Firmly press down on the parts of the pod mount where
the adhesive tape touches the stock A-pillar for a
secure attachment.
10. Re-secure the weather stripping.
Line up the Pod
Position the pod on the A-Pillar
Page 14

13
32304: Dodge Ram® 2010+
1. Remove the bolt that holds the stock A-pillar in place.
a. It is located about halfway down the pillar behind a
small oval cover piece.
b. Remove the cover piece and set it aside.
c. Use a 10 mm socket.
2. Pull out the weather stripping around the A-pillar (so it
can be moved easily).
This model comes prematched
to the vehicle so it does not
require any paint.
Bill of Materials
POD
Screw
Page 15

14
Step 3 is for PMT only.
3. Attach the PMT cradle to the custom pod.
(See diagrams on page 4.)
4. Remove the small side panel on the side of the dash.
(Use a at-head screwdriver.)
Step 5 is for PMT only.
5. Run the PMT wiring harness through the open part of
the dash (see step 4).
PMT installs: skip step 6.
6. Run the HDMI cable to the top of the dash.
a. Run the cable up the side of the dash.
b. Hide the cable behind the dash (if desired).
c. Leave some slack.
7. Peel the clear strip(s) o the adhesive tape on the back
of the pod mount.
Page 16

15
8. Line up the gauge pod.
a. Be careful not to touch the pod to the vehicle
(adhesive tape).
b. The bottom of the pod should match the bottom of
the A-pillar.
PMT installs: skip step 9.
9. Make sure that the HDMI cable is sticking out through
the gauge hole.
10. Slide the pod down until the pod screw hole lines up
with the screw hole on the stock A-pillar.
a. Be careful not to touch the pod to the pillar
(adhesive tape).
11. Use the provided bolt (not the stock bolt) to secure the
gauge pod and the stock A-pillar to the vehicle frame.
Page 17

16
12. Firmly press down on the parts of the pod mount where
the adhesive tape touches the stock A-pillar for a
secure attachment.
13. Replace the driver’s side dash panel and re-secure the
weather stripping.
Page 18

17
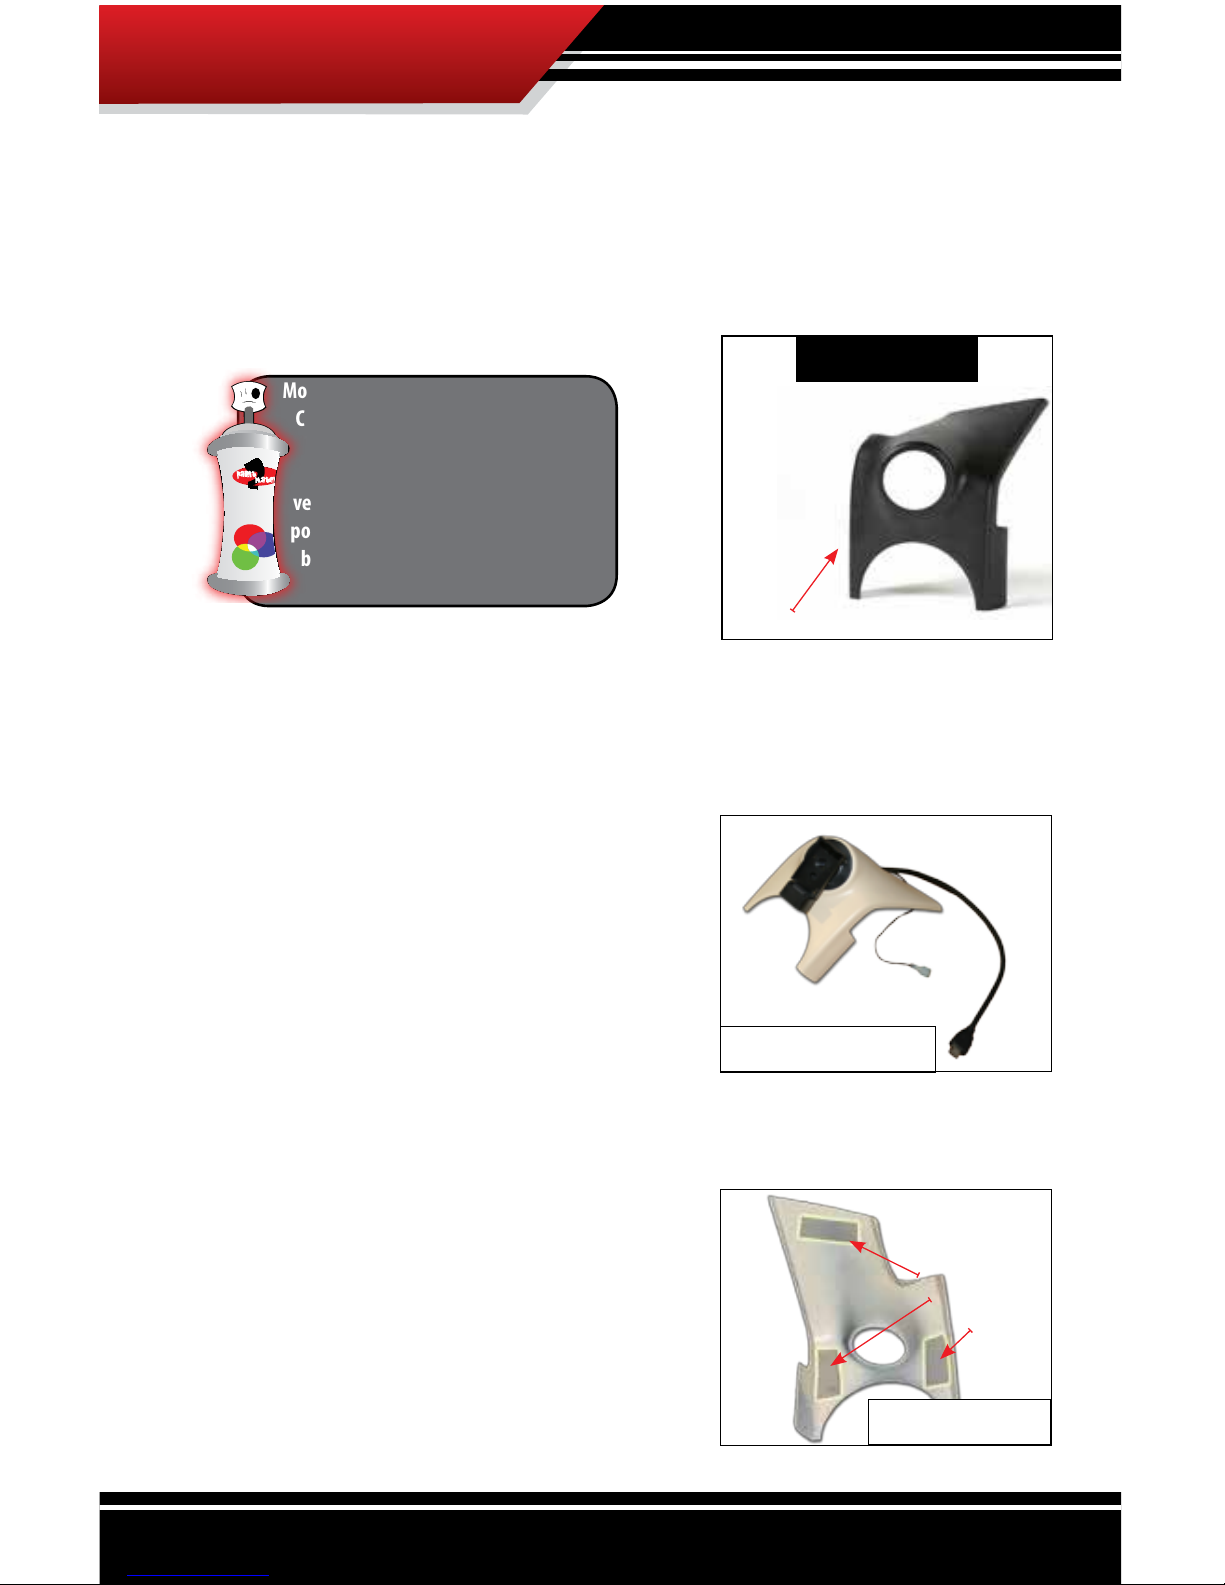
32305: Jeep JK 2007-2010
Existing Trim Removal
1. Using a no. 2 Phillips, back
out the plastic screw from the
A-Pillar trim.
2. Remove Torx screws from the
visor mounting bracket with
the T20 Torx bit.
3. Pull upper visor trim down/o.
4. Pull o the stock A-pillar.
5. You should now have exposed
the corner frame of your Jeep
where you can install the Bully
Dog custom gauge pod mount.
Most custom gauge pods come in black.
Consider before beginning installation
that the custom gauge pod can be
painted to match the color of the
vehicle interior. The custom gauge
pod is made from ABS plastic and can
be painted with spray paint found at
auto parts stores.
Page 19

18
Custom Pod Mount Install
6. Install the appropriate mount adapter and run cables
for your vehicle through the accessory hole in the Bully
Dog A-pillar as needed. (Some route out through, while
some mount back in before install) Pull the driver side
dash panel o to run cables under the dash to the
OBDII Plug.
7. Install Bully Dog A-pillar by
guiding the push pin into the
appropriate hole and pushing
it into place. Secure it with the
remaining screw.
8. Install visor trim piece.
9. Reinstall visor.
10. Finish by inserting plastic
screws.
11. Enjoy the sleek new look of
your Custom Mounted Bully
Dog GT!
Page 20

19
32306: Jeep JK 11+
Existing Trim Removal
1. First remove the visor trim
following the step by step
instructions below.
2. Remove Torx screws from the
visor mounting bracket with
the T20 Torx bit.
3. Pull upper visor trim down/o.
4. Pull o the stock A-pillar.
5. You should now have exposed the corner
frame of your Jeep where you can install
the Bully Dog custom gauge pod mount.
Most custom gauge pods come in black.
Consider before beginning installation
that the custom gauge pod can be
painted to match the color of the
vehicle interior. The custom gauge
pod is made from ABS plastic and can
be painted with spray paint found at
auto parts stores.
Page 21

20
Custom Pod Mount Install
6. Install the appropriate mount adapter and run cables
for your vehicle through the accessory hole in the Bully
Dog A-pillar as needed. (Some route out through, while
some mount back in before install) Pull the driver side
dash panel o to run cables under the dash to the
OBDII Plug.
7. Install Bully Dog A-pillar by
guiding the push pins into the
appropriate hole and pushing
it until it locks in place.
8. Install visor trim piece.
9. Reinstall visor.
10. Finish by inserting plastic
screws.
11. Enjoy the sleek new look of your
Custom Mounted Bully Dog GT!
Page 22

21
33306/33307: GM Sierra/Silverado 2007
(2014 1500 and 2013+ Avalanche Not Included)
1. Remove the A-pillar trim screw.
a. Remove the screw cover.
b. Remove the screw.
(Use a 7 mm socket.)
2. Pull out the weather stripping around the A-pillar
(so it can be moved easily).
3. Remove the stock A-pillar
trim piece.
Bill of Materials
POD
Screw
Most custom gauge pods come in black.
Consider before beginning installation
that the custom gauge pod can be
painted to match the color of the
vehicle interior. The custom gauge
pod is made from ABS plastic and can
be painted with spray paint found at
auto parts stores.
Remove Screw Cover
Remove A-Pillar trim
Page 23

22
If the vehicle has a speaker attached to the A-pillar, the speaker
will need to be removed before the trim piece can be completely
removed.
4. To remove the speaker:
a. Disconnect the speaker
wire. (The plug is located
about 4” away from the
speaker.)
b. Release the securing tabs
by pushing them outward
from the speaker.
c. Push the speaker out of
the trim piece.
5. To install the speaker in the custom gauge pod:
a. Run the speaker wire
through the front of the
speaker hole.
b. Line up the speaker and
snap it into place.
6. Attach the GT, WatchDog or
PMT cradle to the custom
gauge pod. (See diagrams on
pages 3 and 4.)
7. Peel the clear strip(s) o the adhesive tape on the back
of the pod mount.
Disconnect Speaker
Install Speaker in Pod
Attach GT, WatchDog or PMT
cradle to gauge pod.
Page 24

23
8. Slide the pod over the stock A-pillar until they line up.
a. If there is a speaker on the
A-pillar, make sure that
the speaker in the pod is
placed directly over the
speaker wire.
9. Reconnect the speaker wire.
10. Route all wiring down along the side of the dash.
11. Firmly press down on the parts of the pod mount where
the adhesive tape touches the stock A-pillar for a
secure attachment.
12. Re-secure the weather stripping.
Optional Permanent Installation Steps:
13. Drill one hole on the top part of the pod.
a. Use a 13/64” drill bit.
b. Drill underneath the weather stripping facing out of
the driver’s side door.
14. Place a plastic rivet in the hole to ensure a good t and
nish.
Additional holes may be drilled if needed.
Position Pod
Page 25

24
NOTES
Page 26

25
33302/33303: GM Sierra/Silverado 1999-2007
1. Remove the driver’s side dash
panel.
2. Pull out the weather stripping
around the A-pillar (so it can be
moved easily).
3. Attach the GT, WatchDog or
PMT cradle to the pod. (See
diagram on pages 3 and
4.)
4. Peel the clear strip(s) o the
adhesive tape on the back of
the pod mount.
5. Slide the pod over the stock
A-pillar until they line up.
a. Be careful not to touch the
pod to the pillar (adhesive
tape).
b. If you are installing a pod
Remove dash panel
Bill of Materials
(4) Plastic Rivets
POD
Most custom gauge pods come in black.
Consider before beginning installa-
tion that the custom gauge pod can
be painted to match the color of the
vehicle interior. The custom gauge pod
is made from ABS plastic and can be
painted with spray paint found at auto
parts stores.
Pull out weather stripping
Line up and slide gaugepod
over stock A-pillar;
then push into place.
Page 27

26
with a speaker, make sure that the speaker hole lines
up so that it is directly over the speaker in the stock
A-pillar.
6. Firmly press against the parts of the pod mount where
the adhesive tape touches the stock A-pillar for a
secure attachment.
7. Run all wiring down the side of the dash.
8. Replace the driver’s side dash panel and re-secure the
weather stripping.
Page 28

27
NOTES
Page 29

28
NOTES
Page 30

Doc.# 31303-99 V1.3
Gauge Pod Adapter
Part #30420
Prelters
and
Cleaning Kit
Accessories
Sensor Docking Station
See More Products from Bully Dog Technologies
Free Technical Support at:
866-bullydog (866-285-5936)
See More at: bullydog.com
Put in a Hat
 Loading...