

Page 1
INSTALLATION MANUAL
Dodge 5.9L Cummins 2500-3500 ‘04.5-’07 Part #
Rapid Flow 4” Turbo Back Dual Aluminized 82224
Page 2

RAPID FLOW INSTALLATION
TROUBLESHOOTING:
Please review the Troubleshooting section on page 9 before
calling technical support to cover most common issues. Technical support is available by calling 866-bullydog (866-285-
5936).
TABLE OF CONTENTS
INTRODUCTIONS .................................................................. PG 2
BILL OF MATERIALS .............................................................. PG 3
EXHAUST REMOVAL .............................................................. PG 4
EXHAUST INSTALLATION ...................................................PGS 5-8
QUICK LOCATION OVERVIEW.................................................................PG 5
INSTALLATION STEPS......................................................................PGS 6-8
TROUBLESHOOTING .............................................................. PG 9
This Application was designed as a performance cosmetic upgrade. Towing a 5th
wheel or bumper tow trailer with more than 500lbs tongue weight may result in
damage to your vehicle and/or the exhaust system.
3
Rapid Flow Exhaust # 82224
Page 3
RAPID FLOW INSTALLATION
300 HP
400 HP
500 HP
600 HP
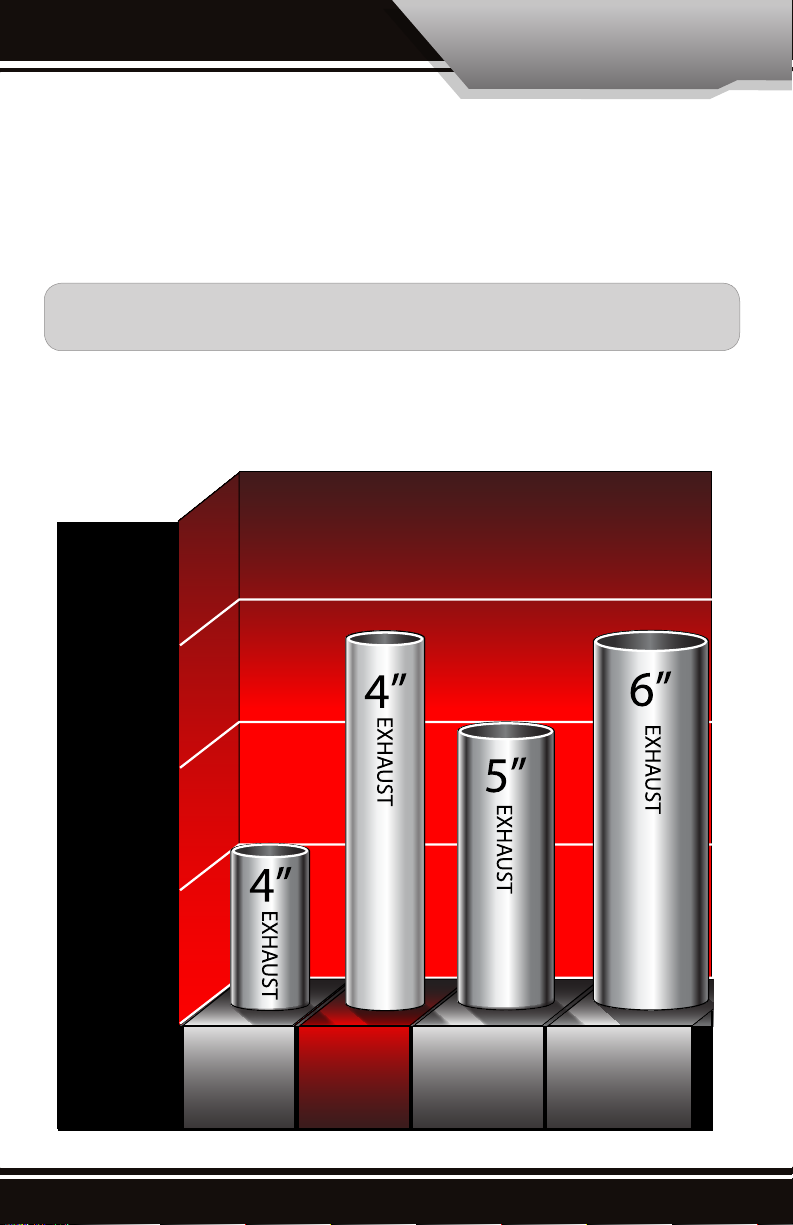
4” Exhaust
Systems for
HP Applications
Less Than
450hp
5” Exhaust
Systems for
HP Applications
Between 450hp
and 550hp
6” Exhaust Systems
for HP Applications
over 550hp
4”
Ceramic-Coated
Exhaust System
for all HP
Applications
INTRODUCTION
The Bully Dog Rapid Flow Exhaust Systems have been specially designed to allow the lowest mandrel
bends in the industry. The lower mandrel bends allow increased air ow which reduces exhaust temperatures, improves engine eciency and increases horsepower. This results in adding additional horsepower and fuel economy. This instruction set covers the 4” Rapid Flow Aluminized Dual Exhaust designed
specically for the 5.9L Cummins.
Note: This instruction set and the Rapid Flow Exhaust system included is made exclusively for the 5.9L
Cummins ‘04.5-’07.
BULLy DOg’S RULE OF ThUmB FOR ExhAUST SIzES
Rapid Flow Exhaust # 82224
4
Page 4
RAPID FLOW INSTALLATION
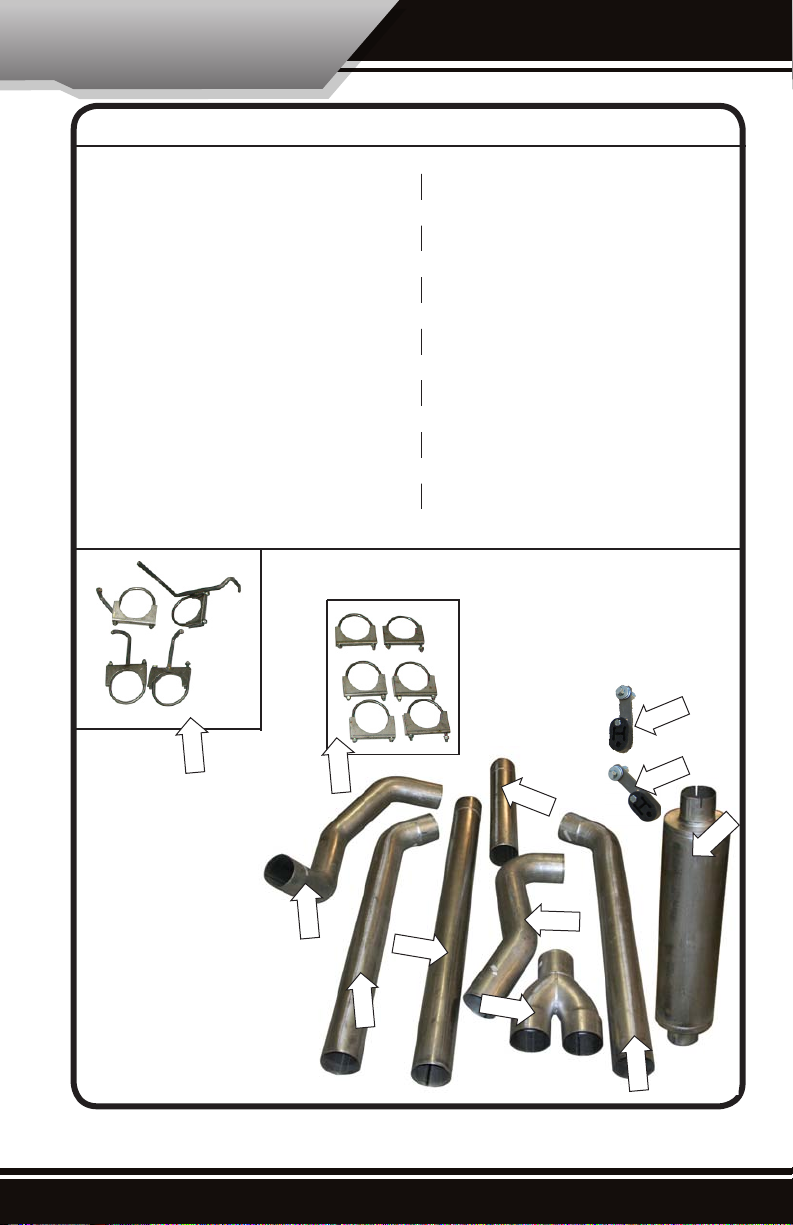
BILL OF MATERIALS
1. 48” Straight Pipe
2. 24” Straight Pipe
3. Muffler
4. Y-Pipe
5. Passenger Front Piece Tail Pipe
6. Passenger Tail Pipe Tip
7. Driver Front Piece Tail Pipe
8. Driver Tail Pipe Tip
9. Hanger Bracket (2 pieces)
10. Clamps (6 Pieces)
11. Hangers (4 Pieces)
A. FRONT OF MUFFLER
B. REAR OF MUFFLER
C. PASSENGER TAIL PIPE TIP
D. DRIVER TAIL PIPE TIP
A.
B.
A.
C.
D.
B.
11.
10.
TOOLS NEEDED
- 9/16” Wrench
- Sawzall
- Silicone Spray Lubricant
-Channel Locks
C.
9.
9.
2.
3.
7.
1.
8.
5
Rapid Flow Exhaust # 82224
5.
4.
6.
Page 5

RAPID FLOW INSTALLATION
REMOVAL OF STOCk EXHAUST SySTEM
In these steps you will remove the stock exhaust system.
IMPORTANT: It is illegal in all 50 states and Canada to remove the catalytic converter.
1.Use a sawzall to cut the
exhaust directly behind the
muer.
2. Cut the Straight Pipe in front of the muer.
3. Cut the stock Down Pipe
just after the bend.
7/16”
4. Loosen the stock band
clamp using a 7/16” deep socket where the
stock down pipe is connected to the turbo.
The stock band clamp will be used later so
don’t remove it, just
loosen it enough to remove the stock down
pipe.
Cut directly behind the Muer
5. To make removing the Hangers an easier
process it is recommended that you use a
silicone spray lubricant to spray each of the
rubber hangers holding the stock exhaust.
6. Remove each piece of the stock exhaust system, including
the stock exhaust hangers.
Remove all the necessary exhaust hangers
Rapid Flow Exhaust # 82224
Cut 4” behind Catalytic Converter
6
Page 6

RAPID FLOW INSTALLATION
INSTALLATION OF THE BULLy DOG RAPID FLOw EXHAUST SySTEM
In these steps you will install the Rapid Flow Exhaust System. Bully Dog’s Exhaust Systems are onecut systems, meaning that you should only have to cut one pipe or less if installed correctly.
Tool s Needed:
Silicone Spray Lubricant•
9/16” Wrench•
7/16” Deep Socket•
Socket Wrench•
Tape Measure•
1. It is suggested that before installing the system on the truck, the Rapid Flow Exhaust System be laid out on a
large at surface to acknowledge the location of each piece
QUICk OVERVIEw FULL EXHAUST
Straight Pipe
Driver Front Piece Tail
Driver Tail Pipe Tip
CLAMP AND HANGER PLACEMENT
Pipe
Y-Pipe
Muer
Hanger B
Straight Pipe
Passenger Front Piece Tail
Passenger Tail
Pipe Tip
Pipe
Clamp
Clamps
Clamps
Clamp
Hanger A
Clamp
Rapid Flow Exhaust # 82224
Hanger D
Hanger C
7
Page 7

2. Hang each of the hangers. Hangers A & B will serve dual
purposes, acting as both hangers and clamps. Hanger A
will hold the front of the muer and Hanger B will hold
the rear of the muer.
RAPID FLOW INSTALLATION
Hanger A
Hanger B
Hang the Hangers
3. Hanger C will hold the Passenger Tail Pipe Tip and Hanger
D will hold the Driver Tail Pipe Tip.
4. Before hanging Hanger D you will need rst attached the Hanger Bracket onto the Frame. No
drilling is necessary as there is already a hole
in the frame at the correct location. Shown is
Hanger D which is directly across the frame from
Hanger C.
Hanger B
Install Hanger B
Hanger D
Install Hanger D
Rapid Flow Exhaust # 82224
8
Page 8

RAPID FLOW INSTALLATION
SwITCH DIRECTIONS: THE NEXT STEPS wILL BE FROM THE BACk OF THE TRUCk
5. Hang the Muer from Hangers A & B.
Hanger B
Muffler
Install Muffler
6. Install the “Y” piece into the back of the Muer. Secure by
tightening Hanger B. The Y Pipe will sit straight up and
down.
7. Install the Passenger Front Piece Tail Pipe by sliding it
into the bottom junction point of the Y-Pipe. Secure with a
Clamp. At this point do not tighten completely to allow for
adjustments.
8. Install the Passenger Tail Pipe Tip and hang from Hanger C.
9. Install the Driver Tail Pipe Tip into the top junction point of
the Y-Pipe. You may need to zip-tie the brake lines away
from the exhaust, otherwise the heat may melt them.
10. Install the Driver Tail Pipe Tip and hang from Hanger D.
Y-Pipe
Muffler
Hanger B
Install Y-Pipe
Muffler
Install Passenger Front Piece Tail Pipe
Driver Front Piece Tail Pipe
Brake Lines
Passenger Tail Pipe Tip
Passenger Front Piece Tail Pipe
Install Driver Front Piece Tail Pipe
9
Rapid Flow Exhaust # 82224
Page 9

Straight Pipe
Clamp
Measure Straight Pipe
Complete System Installed
Hanger A
Muffler
RAPID FLOW INSTALLATION
11.Snug up the Hangers to hold the system in place but do
not tighten completely as the system may need to be adjusted in future steps
12. At this point it is time to install the Straight Pipe. You
will need to measure and cut the Straight Pipe for the
nal t. Keep in mind on both systems when you make
your nal cut you will need to leave an extra 3 inches of
overlap when you cut the Straight Pipe. Do not cut the
ared end.
13. Once the entire exhaust system is installed, inspect the
system to ensure that no part of the exhaust is in direct
contact with the chassis or body; adjustments may be
necessary.
14. Return to each of the Clamps and tighten with a 9/16”
wrench. Do not over tighten the Clamps.
Rapid Flow Exhaust # 82224
10
Page 10

RAPID FLOW INSTALLATION
TROUBLEShOOTINg/FAQ
CONDITION POSSIBLE SOURCES ACTION
Exhaust Rattle Exhaust Sounds
Exhaust is too loud Exhaust Sounds
Exhaust is not loud
enough
Exhaust Sounds
Either one of the clamps is not tight or the exhaust
is coming in contact with the chassis or body. Adjust
the exhaust to ensure that no contact is made.
If your exhaust seems too loud, Bully Dog can sell
you another muer which will allow you to double
stack muers. This extra muer would take place of
one of the straight pipes included with this system.
This is only applicable for aluminized systems.
If your exhaust is too quiet (and is being used exclusively for o-road use) you can purchase another
straight pipe to replace your muer.
This is only applicable for aluminized systems.
11
Rapid Flow Exhaust # 82224
Page 11

RAPID FLOW INSTALLATION
Rapid Flow Exhaust # 82224
12
Page 12

Doc.# 82224-99 V2.0
Check out more of our ADRENALINE PUMPING products!
Downloaders
Intake Systems
Exhaust SystemsTriple Dog GT
®
Free Technical Support at:
866-bullydog (866-285-5936)
See More at: bullydog.com
 Loading...