

Bully Dog Heavy Duty GT Quick Start Manual

QUICK START GUIDE
(940) 783-9915 | WWW.BIGRIG.BULLYDOG.COM
Fuse Puller | Voltage Tester | Battery Charger | Pliers
TOOLS NEEDED:
This devi ce is not legal fo r sale or use in Ca lifornia on po llution-co ntrolled vehi cles.
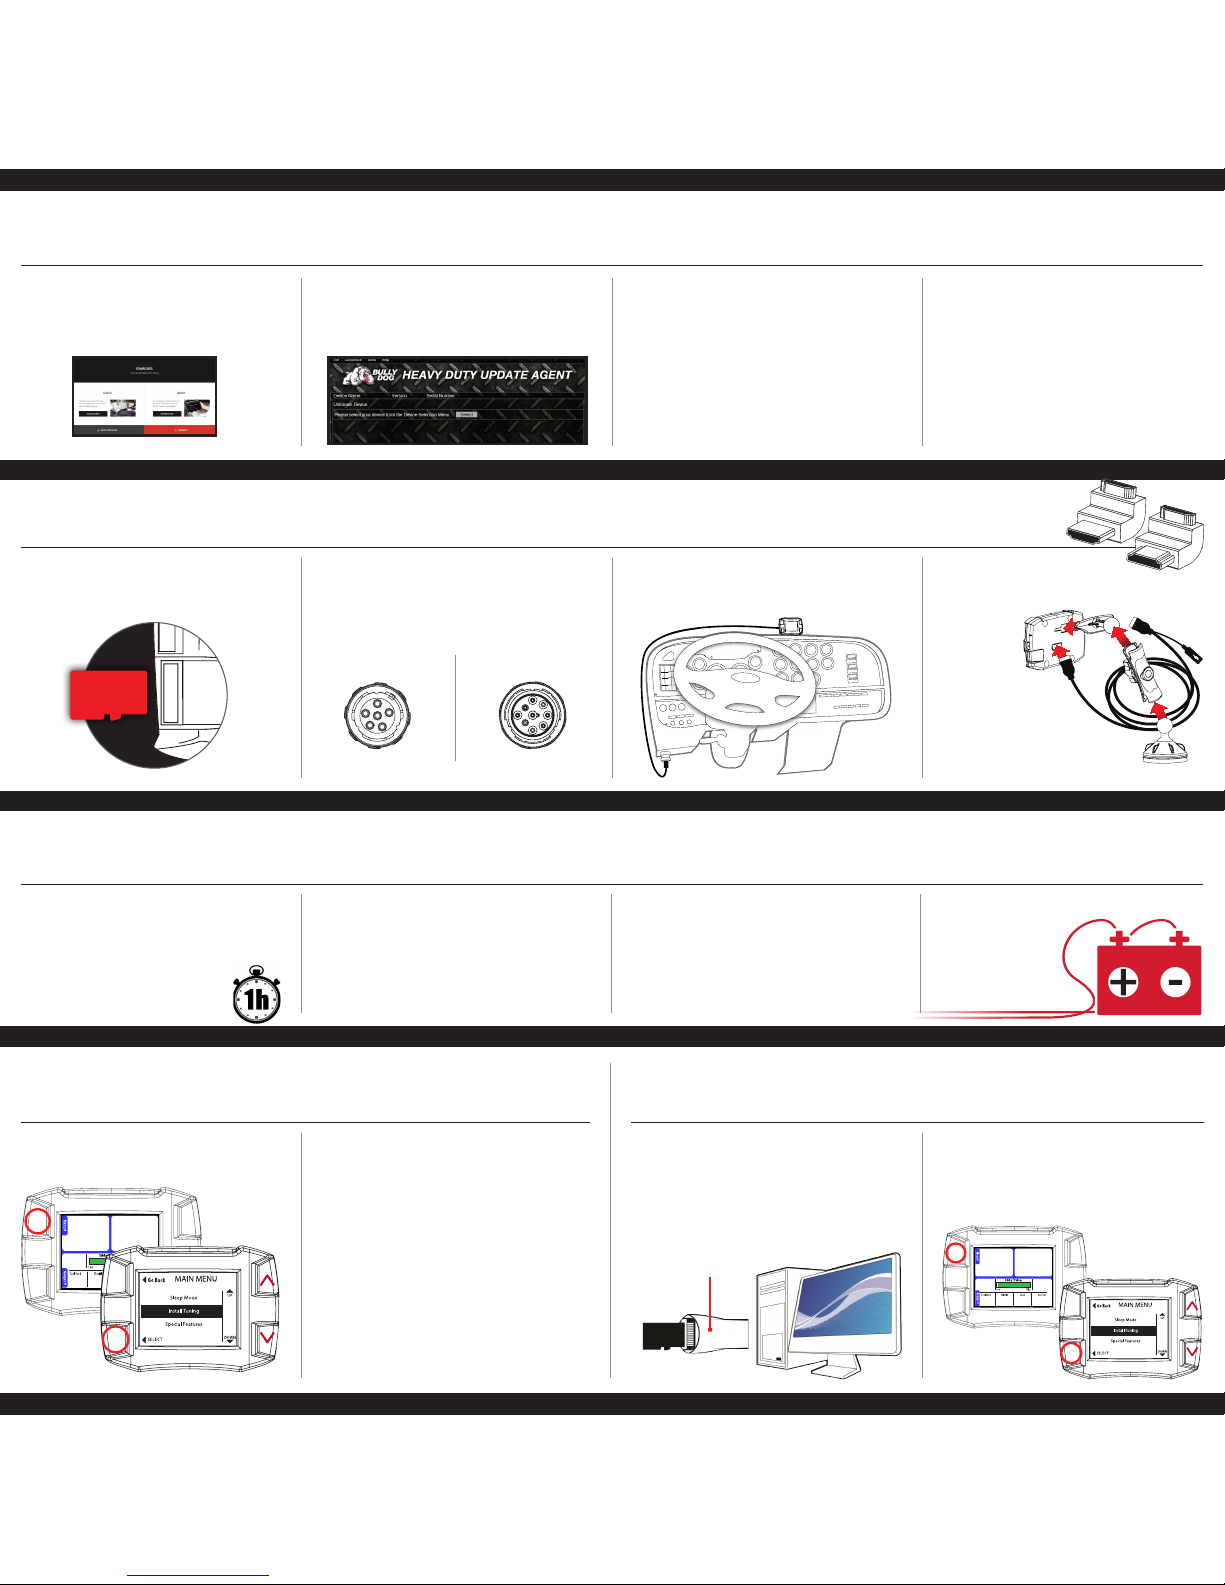
SECTION 1:
PARTS CHECKLIST
HDGT DEVICE
RAM® WINDOW MOUNT
4’ MINI USB™ CABLE
10’ HDMI CABLE
HDMI PORT SAVERS (2)
MICRO SD CARD & READER
6-PIN PLUG ASSEMBLY
9-PIN PLUG ASSEMBLY
TUNING LEVELS:
Bully Dog’s HDGT oers four tuning congurations
for just the right balanc e of industry-leading power
and unrivaled fue l economy. Get the power you
need to haul loads over long mo untain passes
or across frozen winter roads, or simply focus on
fuel economy for long hauls across the countr y.
Bully Dog tuning help s you get the most from your
engine and spend less at the pump, no matter
what the driving cond itions.
STOCK:
Factory Power Level
ECONOMY:
10% Power Increase
6-12% Increase in Fuel Economy
POWER & ECONOMY:
15% Power Increase
6-12% Increase in Fuel Economy
POWER:
20% Power Increase
SECTION 2:
PRE-INSTALL CHECKLIST
BUSINESS HOUR S
Technical Support is ava ilable Monday - Frid ay between
the hours of 8 A.M. and 5 P.M. Mountain Standard T ime.
Call (940) 783-9915 or take advantage of live ch at on
bullydog.com. Please be sure to have your device with
you when you reach out to us.
INTERNET ACCESS
During the i nstallation pro cess, you will need to
connect your Medium Dut y Gauge Tuner to a PC with
Internet acces s.
ALLOW TIME FOR INITIAL SE TUP
Make sure you have at least an ho ur to complete the
initial setup, update, and inst allation proces s.
TECH SUPPORT
Do you need a real person to guide you thro ugh your
install? Our knowled geable sta is here to help with
answers to your questions and re solutions to your issues.
SECTION 4:
MENU TREE
From the Main Menu you can access the features
listed below.
SLEEP MODE
INSTALL T UNING
SPECIAL F EATURES
- Speed Limiter, Cruise Limiter
DRIVING COACH OPTIONS
- Display/Change Levels
- Driving Stats
- Clear/Reset Driving Stats
- Calibrate MPG
- Driving Coach Sound Options
- Assign Truck Number
USER OPTIONS
- Adjust Backlight
- Set Background Theme
- US/Metric Units
- Administrator Pas sword
- Reset to System Default
- Copy Device Info To SD Card
VEHICLE SET TINGS
- Change Warning Levels
- Change Monitoring Type
- Enter ECM Password
VEHICLE DIAGNOST ICS
SHOW SETTING S
UNINSTALL DE VICE
UPDATE DEVICE SOFT WARE
CHANGE VEHICLE/ENGINE
SECTION 3:
MAIN-SCREEN NAVIGATION
The diagram below covers the function of HDGT’s buttons while on the main screen. Choose between
display options, take a closer look at specic gauges, and scroll through vehicle parameters – all from the
main screen.
Use these buttons
to scroll
though menus
Touch to enter or
to return to the
previous menu
Touch to select the
menu item highlighted
on the screen
Press and hold to
switch to
daytime mode
Press and hold to
switch to
nighttime mode
MAIN SCREEN VERSION 1
Two Gauges + Driving Coach
MAIN SCREEN VERSION 2
Four-Guage Setup
Part# 46500-99 v3.0
SECTION 5:
UPDATING THE HEAVY DUTY GT
INSTALL ING THE UPDATE AGENT ON YOUR P C.
• Open a web browser and visit http://bigrig.
bullydog.com/updateagent.php. Once there, click
on the Update Agent button and complete the
process of installing the Update Agent.
• Start up the Heavy Duty Update Agent program
that you have just downloaded and then plug in
your micro SD card into your computer via the
card reader.
• Once your computer recognizes the micro SD card,
close all the autoplay windows and you should be
prompted to register your product
• The Heavy Duty Update Agent will display the
software version on the memory card. Click on the
Update button.
• Once the update is complete, click ‘OK’, and then
disconnect the card reader from your computer.
• Take your Micro SD card out of the reader and plug
it into your HDGT.
• Connect the HDGT to your vehicle and then turn
the key to the RUN or ON position.
• Scroll down and select “Update Device Software”.
• Conrm the correct engine/vehicle application
is listed and then press the top right button to
continue the updating process. The HDGT will now
load the new les and restart. Once the HDGT has
restarted, the update process is complete.
SECTION 6:
PH YSICAL INS TAL LATIO N
INSTALL T HE MICRO SD CARD.
Insert the Micro SD memory card into the side of
th e H DGT.
SECTION 8:
INSTALL THE TUNE
POWER UP T HE HDGT.
Turn the key to the RUN (or ON) position to power up
th e H DGT.
SECTION 9:
CAT® APPLICATIONS ONLY
CAT® PHASE 2 :
• Remove the memory card.
• Connect it to a computer with Internet access. (Use
the included card reader)
• Use the Heavy Duty Update Agent* to download
and save the tuning les to the memory card.
• Put the memory card back into the HDGT.
TURN OFF S TOCK ELECTR ONICS
• Air conditioning, DVD players, headlights heater,
Stereo, etc.
REMOVE THE FOLLOWING FUSE/RELAYS
• ABS Fuse for truck and trailers.
• Fuse relay for the automatic transmission.
OPEN THE MAIN MENU.
Press the top left button.
CHOOSE ‘INS TALL TUNING’.
• Highlight ‘Install Tuning’ (right buttons).
• Select the highlighted option (bottom left button).
FOLLOW THE P ROMPTS ON THE HDGT SCR EEN.
Cat® Engines:
After gathering vehicle les, the HDGT will prompt you
to move on to Phase 2; complete section 9.
(OR)
Other applications: The HDGT will complete the tune
installation. Your HDGT tune installation is complete!
DISCONNECT AFTERMARKET ELECTRONICS..
• CB, Sirius/XM satellite radio, alarm, QualComm,
GPS, Driver Information System, aftermarket
gauges, etc.
MAKE S URE THE TRUCK BATT ERIES ARE
FULLY CHARGED.
CAT® PHASE 3 :
• Open the Main Menu.
• Choose Install Tuning.
• Follow the prompts on the HDGT screen;
the HDGT will complete the tune installation.
CONNECT THE D ATA PLUG.
Locate the data port (under the dash or behind the
driver’s seat). Connect the matching plug. (If two ports
are present, use the 9-pin connection.)
CHOOSE THE HDG T LOCATION
Do not obstruct the driver’s view. Make sure the 10’
HDMI cable will connect to the data plug.
RUN THE HDMI CA BLE.
Hide the cable under the weather stripping and/or
dash. Use zip ties to secure loose wiring.
MOUNT AND
CONNECT THE
HDGT UNIT.
Use the RAM®
suction cup mount.
Connect the HDMI
cable to the port on
the back of the HDGT.
6-P IN DATA P LUG
9-P IN DATA P LUG
Use the right-angle adapters if
you need to direct the cable.
0
0
0
0
0
0
0
0
0
0
Grade Instant Econ
4.4A
5.870551.3
Trans Temp
138
º
F
Boost
13
PSI
0
0
0
0
0
0
0
0
0
0
Grade Instant Econ
4.4A
5.870551.3
Trans Temp
138
º
F
Boost
13
PSI
SECTION 7:
PREPARING TO INSTALL THE TUNE
SCHEDULE ENOUGH T IME.
Ensure there is sufcient time to do the install. (See the
list of install times by engine)
Some installations require extra steps. Allow enough
time in case your installation is not typical.
It is best to prepare for at least a one hour
install time, regardless of the application.
Card Reader
 Loading...