


GT Diesel
Part #40420
 Not legal for sale or use in California on
pollution-controlled vehicles.
Doc. 40420-99 v3.5
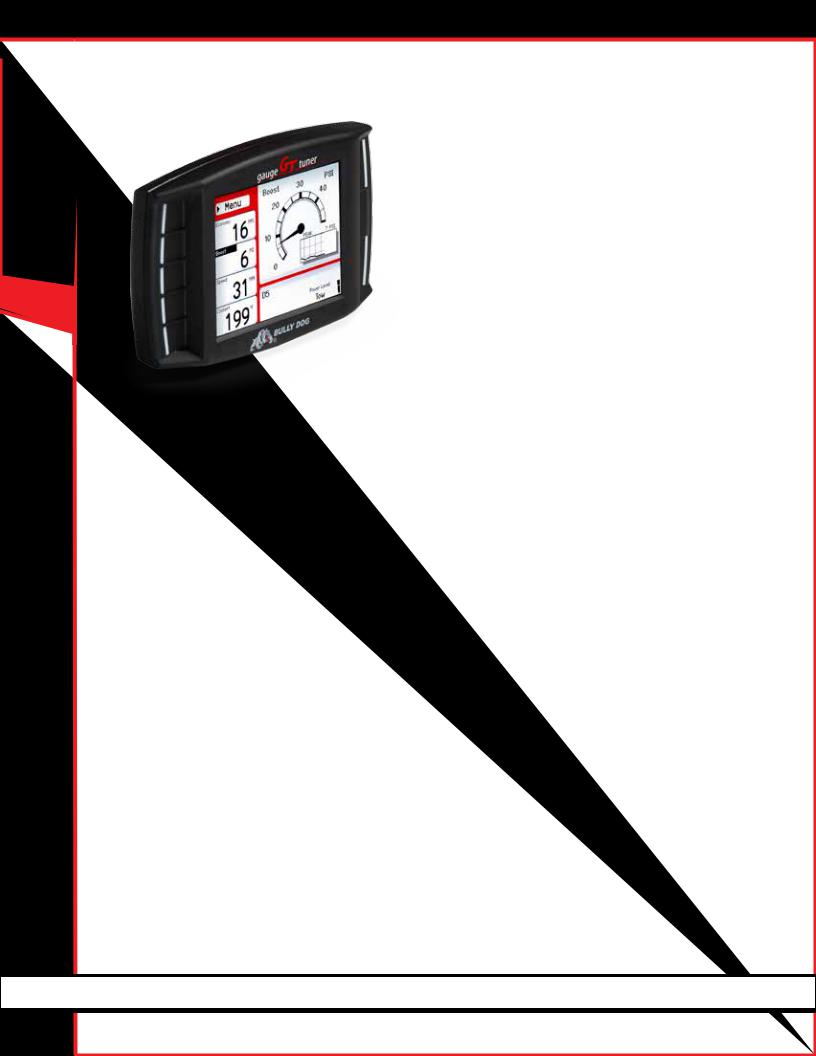
DIESELGT
Contents
About the GT.......................................................... |
2-16 |
Preview of Basic Installation Steps............................................. |
2 |
California Emissions Regulations............................................... |
2 |
Tuning Information.................................................................... |
2 |
Vehicle Applications................................................................... |
3 |
Parts List..................................................................................... |
4 |
Parts Description.................................................................... |
5-6 |
Button Navigation...................................................................... |
7 |
The Main Screen......................................................................... |
8 |
Available Options – All Models.............................................. |
9-16 |
Change Vehicle............................................................................................... |
9 |
Install Download............................................................................................ |
9 |
Gauge Setup............................................................................................. |
9-10 |
Performance Testing.................................................................................... |
11 |
DPF Burn-Off................................................................................................ |
11 |
Special Functions......................................................................................... |
11 |
Diagnostics................................................................................................... |
11 |
Driving Coach Setup.............................................................................. |
12-14 |
Vehicle Setup............................................................................................... |
15 |
User Options................................................................................................. |
16 |
Show Settings.............................................................................................. |
16 |
Uninstall Download..................................................................................... |
16 |
Update Firmware......................................................................................... |
16 |
Special Functions....................................................... |
17 |
Vehicle Specific Download Features............................ |
18 |
Speed Limiter........................................................................... |
18 |
Calibrate Speedometer............................................................. |
18 |
Low End Power......................................................................... |
18 |
Important Warranty Information................................ |
19 |
Updating the GT................................................... |
20-27 |
Overview.................................................................................. |
20 |
FAQs about Updating................................................................................... |
20 |
Basic Steps to Update (Short Version)......................................................... |
21 |
What You Need to Update the GT................................................................ |
21 |
Updating (Detailed Steps for Windows)............................... |
22-25 |
Troubleshooting Updating Problems........................................ |
26 |
Updating (Detailed Steps for Apple)......................................... |
27 |
Physical Installation.............................................. |
28-31 |
Brief Preview............................................................................ |
28 |
Detailed Instructions........................................................... |
29-30 |
Using the Universal Windshield Mount..................................... |
30 |
Additional GT Mounting Options.............................................. |
31 |
Installing the Tune................................................ |
32-37 |
Important Preparation Steps............................................... |
32-35 |
How to Install the Tune............................................................. |
36 |
Troubleshooting Installation Problems..................................... |
37 |
Uninstalling - Returning to Stock........................... |
38-40 |
What does this mean?.............................................................. |
38 |
When to Return to Stock........................................................... |
38 |
How to Return to Stock............................................................. |
39 |
What if I Don’t Return to Stock?................................................ |
40 |
How Do I Know if the GT is (Still) Installed?.............................. |
40 |
More Information.................................................. |
41-53 |
Pyrometer Calibration............................................................... |
41 |
Reset Fee.................................................................................. |
41 |
Performance Testing Software.................................................. |
41 |
Windows Update................................................................. |
42-48 |
Contacting Technical Support................................................... |
49 |
USB Mode................................................................................. |
49 |
Transmission Relearn Process................................................... |
50 |
FAQs/Troubleshooting......................................................... |
51-53 |
1

About the GT
Preview of Basic Installation Steps
1.Update the GT. This step is very important!!! See page 20 for more information.
2.Physically install the GT. See page 28 for more information.
3.Install the tune to your vehicle. See page 32 for more information.
IMPORTANT NOTE: You MUST uninstall your Bully Dog engine tune before taking your vehicle in for ANY type of service. There are also other important times to uninstall the tune. Please see page 38 for more information.
See pages 4-6 for a complete list and description of the items included with your GT.
California Emissions Regulations
Due to emissions regulations in California we offer a 50 state legal product that is legal for use in California. The 50 state legal GT Diesel is part number 40425. If your vehicle is registered in the state of California you must use our 50 state legal GT Diesel on your vehicle. The 49 state legal GT Diesel, part number 40420, is not legal for use on vehicles that are emissions regulated and registered in the state of California. Installing a 49 state legal GT diesel on a vehicle registered in California can result in certain state penalties imposed by the state of California. The executive order (EO) is issued by the California ARB to signify that our vehicle tunes have been emissions tested and are legal for on road use. To discover Bully Dog applications that have an EO number, visit our website at www.bullydog.com/carb_info.php. If your vehicle has received an EO number the EO label should be in this package. If there is no EO label for you vehicle application and it has been indicated as legal then please contact Bully Dog Tech Support. See page 49 for more information about contacting technical support.
Tuning Information
The results we have provided are typical – variations do occur between vehicles. Some vehicles do not have the extreme power level setting available or On-The-Fly horsepower adjustability.
SETTING |
PEAK HORSEPOWER |
PEAK TORQUE |
Extreme |
Up to 120+ |
Up to 250+ |
Performance |
75+ |
125+ |
Tow/Economy |
50+ |
100+ |
Stock Power |
Stock |
Stock |
DIESELGT
2

DIESELGT
vehicle applications
This vehicle application list is current for GT software version 1.13.8. Check the GT product page at www.bullydog.com to check for new applications.
CHEVROLET/GMC
EXPRESS/SAVANA
6.6L 2006-2014
KODIAK/TOPKICK
6.6L 2006-2010
SIERRA/SILVERADO
6.6L 2001-2014
FORD
EXCURSION
6.0L 2003-2006
7.3L 1999-2003
F 250 550
6.0L 2003-2007
6.4L 2008-2010
6.7L 2011-2014 *NO 2013 CAB & CHASSIS
7.3L 1999-2003
DODGE
RAM 2500 3500
5.9L 2003-2007
6.7L 2007-2013
RAM 4500 5500
5.9L 2003-2007
6.7L 2007-2012
3
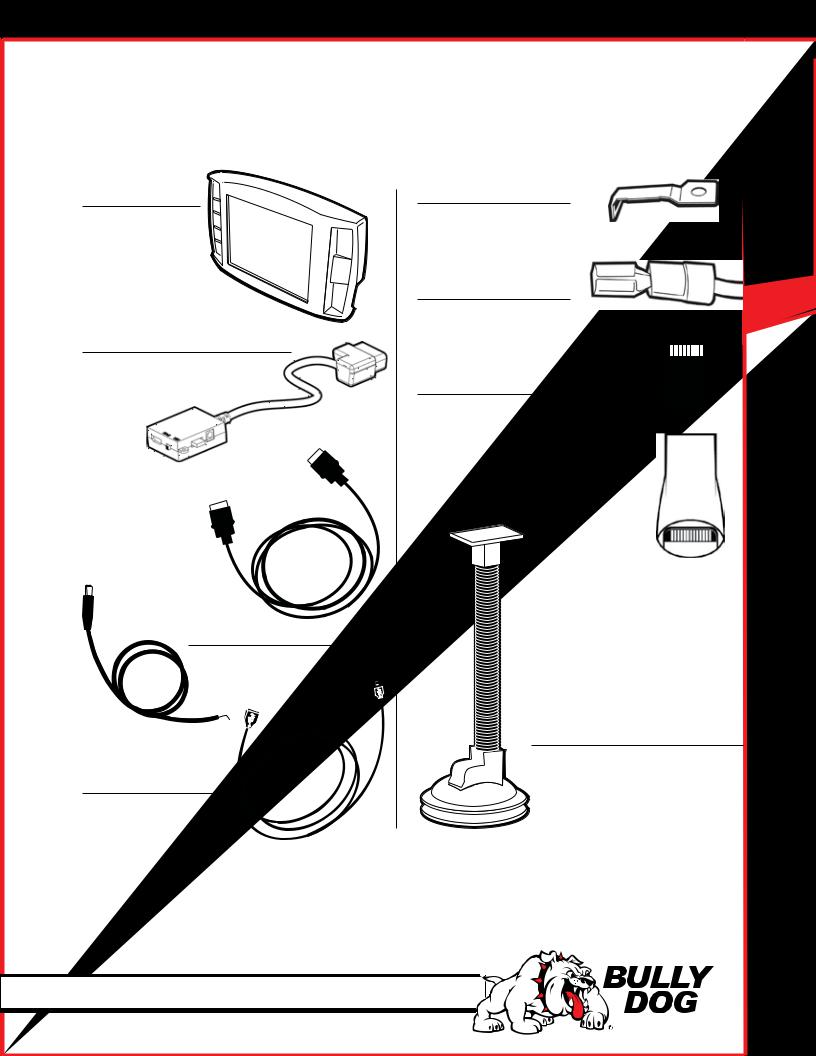
PARTS LIST
Your GT package should include the following items:
1. The GT Head Unit |
5. Fuse Tap |
Part Number: 40420-1
6. Fuse Spade
2. OBDII Adapter Plug
Part Number: 40400-105
7. Micro SD Card
Part Number: 40410-10
3. HDMI Cable |
8. Micro SD Card Reader |
||
|
|
||
Part Number: 40410-10 |
|||
Part Number: 40400-100 |
|||
|
|
||
4. Power Wire
Part Number: 40400-101
. Windshield Mount
Part Number: 40400-102
4. Mini USB
Part Number: 40400-103
You may also want to have the items listed below available when you are installing the GT:
Tools Needed |
Extra Parts (Optional) |
•FusePuller |
•BatteryCharger |
•VoltageMeter(optional) |
•AlternativeMountingSolution(See page 31 for more information.) |
|
|
DIESELGT
4
DIESELGT
Parts Description
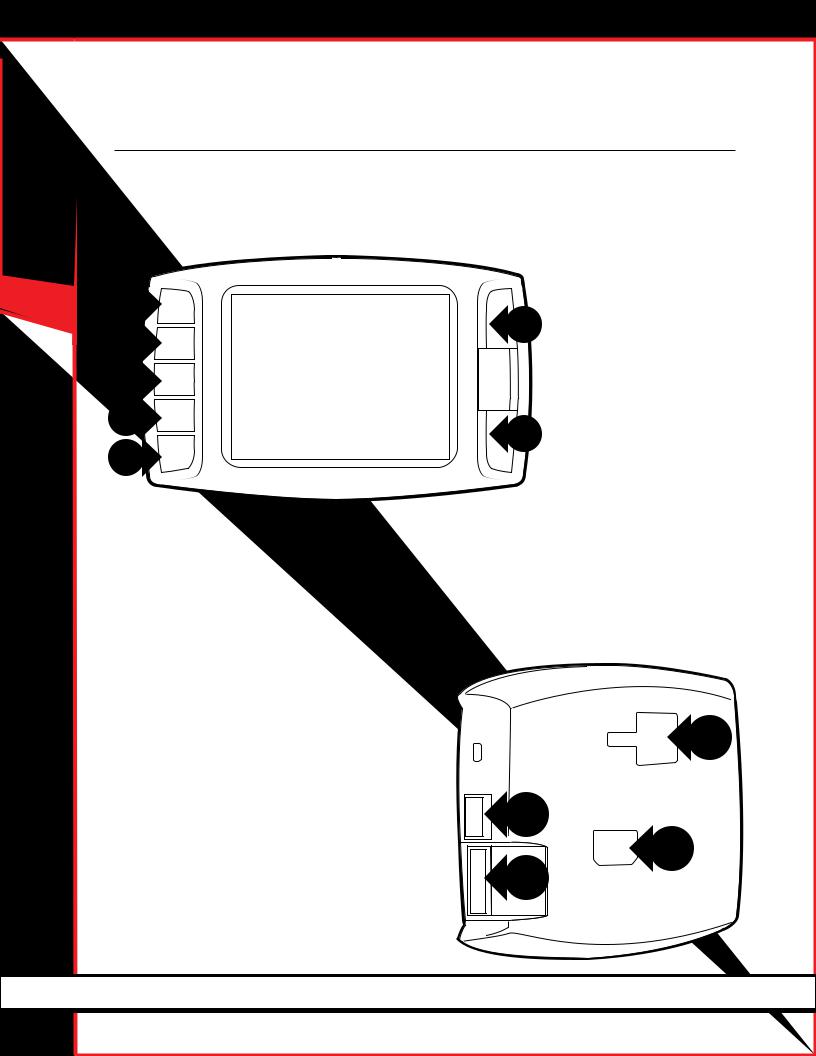
The GT Head Unit
The main component of the Gauge Tuner is the head unit. It has the screen and the buttons that allow you to access all of the functions and features of the tuner.
GT Back Side:
1.T-Slot Mount Socket, which allows you to use the GT with different mounting options.
2.HDMI port
3.Micro SD card port
4.Mini-USB port
GT Front Side:
The GT has seven capacitive touch buttons. Capacitive touch is a button style that is sensitive to the presence of your finger. Capacitive buttons do not need to be pushed, only touched to activate. The front of the GT head unit features a 2.4” LCD screen.
1
4
2
3
5
Parts Description
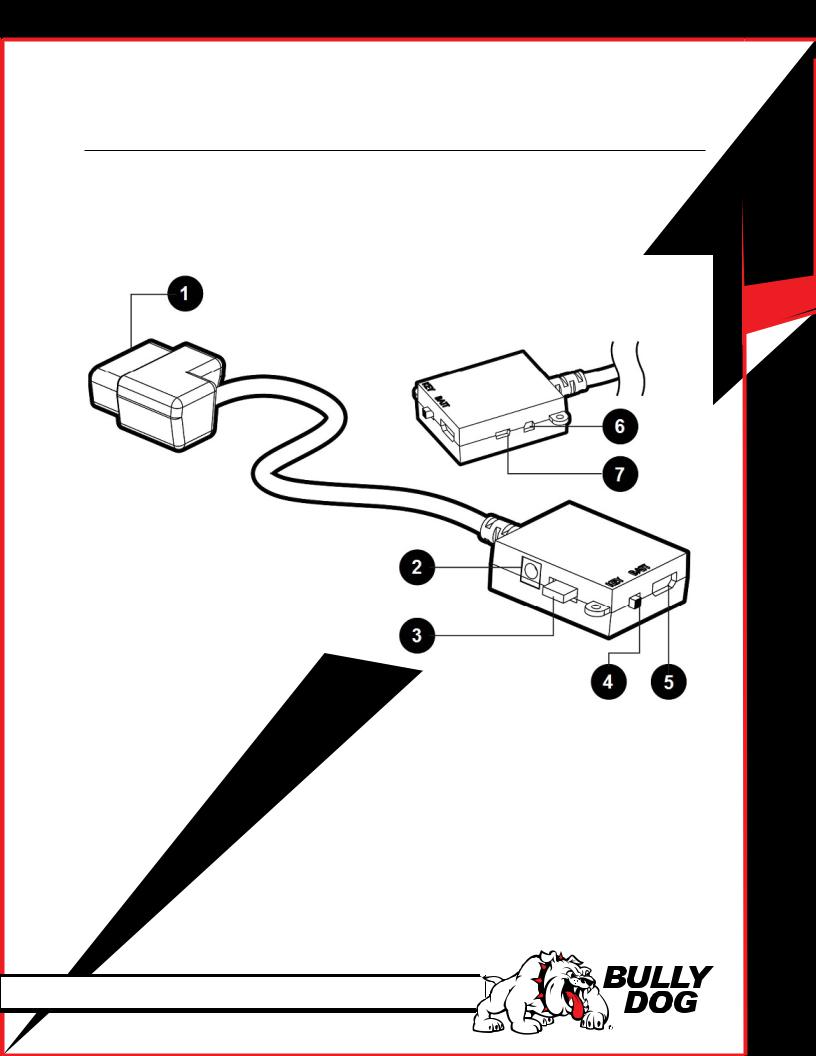
The OBDII Adapter Plug
The GT assembly connects to your vehicle through the diagnostic port, which is located under the dash on the driver’s side. The OBDII Adapter Plug connects to the diagnostic port on your vehicle and has a connection for the HDMI cable that plugs into the back of the GT Head Unit. The illustration and numbered list below contain more information about the other parts of this important piece of the GT assembly.
1.OBDII Male End: Connects to the vehicle diagnostic port.
2.Power Wire Port: Connects the GT to the power wire and the vehicle fuse box. Allows the GT to turn on and off with the key.
3.Fuse: The adapter plug fuse protects the GT from being damaged by unexpected power surges.
4.Power Switch: Changes the active power source of the GT.
The two options are: 1) KEY: this pulls energy from the fuse box through the power wire and allows the GT to automatically turn on and off based on the vehicle’s ignition key position; and 2) BATT: This provides continuous battery power to the GT directly through the vehicle’s diagnostic port.
5.HDMI Port: Connects the OBDII adapter plug to the GT Head Unit.
6.Pyrometer/Sensor Docking Station Port: Connects the GT to optional sensors including pyrometers or the Bully Dog Sensor Docking Station.
7.Future Peripherals: Not currently in use – may be used to connect additional devices in the future
DIESELGT
6
DIESELGT
BUTTON NAVIGATION
Function 1: Press the top left button to enter the Main Menu, also use this button to exit menus.
Function 2: Press any of the four buttons on the left side of the GT adjacent to one of the vehicle parameters on the screen will display that parameter in the large gauge area.
Function 3: Continuously hold any of the four buttons to change the Large Gauge style, there are four different styles that pop up.
Function 4: Only for On-the-Fly Vehicles Power Level Up
Power Level Down
Use the power level buttons to control power levels on-the-fly only while in the main screen.
Function 5: Use these buttons to scroll up and down when GT is in a menu screen.
NOTE: The GT buttons are Capacitive Touch. This means that a light touch is all that is needed to choose different options. You do not need to push hard or get the buttons to move down or in for the GT to work for you.
7
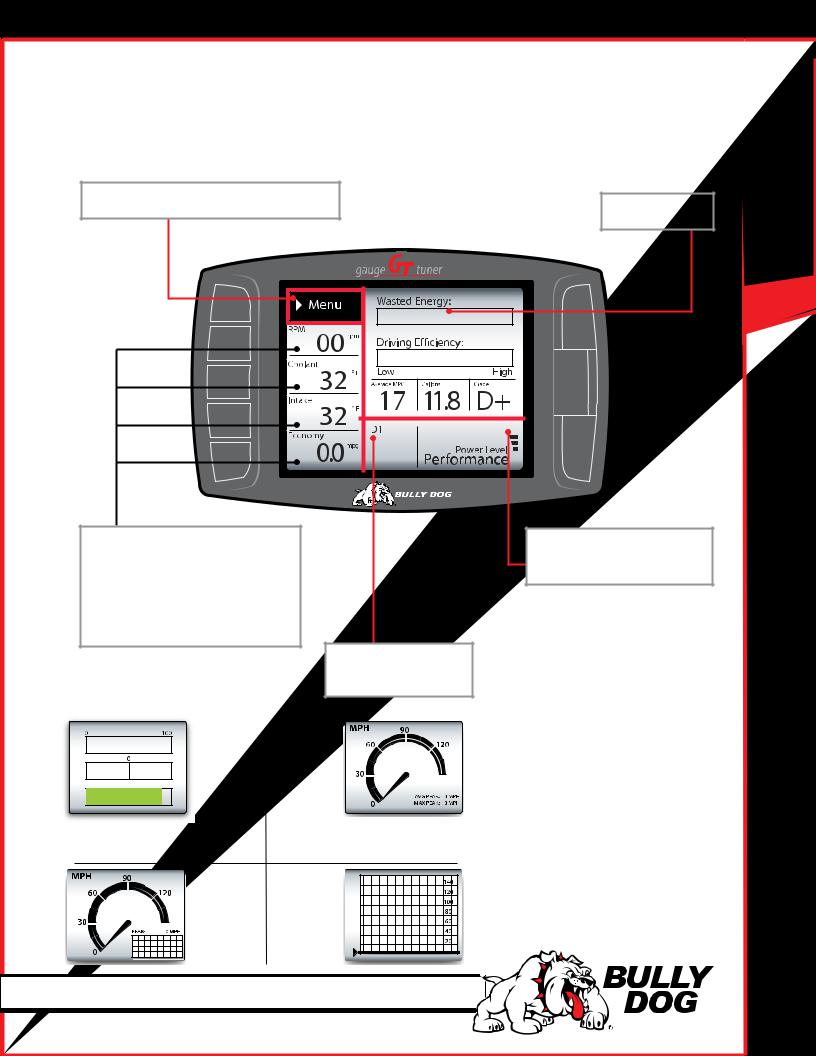
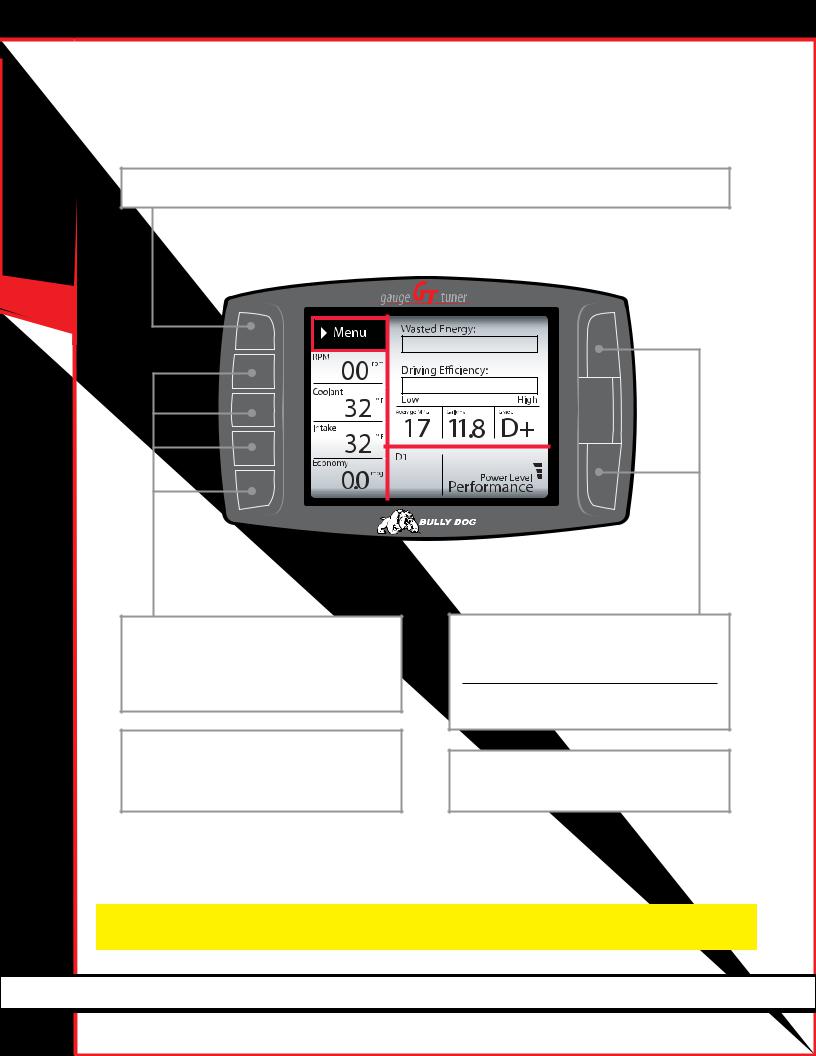
The Main Screen
This picture of the GT main screen has the Driving Coach selected for the Large Gauge option. You can change which gauge is featured in the upper right corner of the main screen by holding down one of the buttons on the left side of the GT until the gauge type that you want is shown.
Menu button: press to enter the main menu.
Large Gauge area
DIESELGT
Vehicle parameters: To change which vehicle parameter is displayed in the large gauge area simply press one of the four buttons next the preferred vehicle parameter.
|
|
|
Automatic transmission |
|
|
1. |
gear indicator |
Instant Economy |
|
2. |
|
Dec. |
Acc. |
|
|
Report Card: |
|
The Driving |
Analog gauge |
|
Coach |
with average |
|
|
B |
||
|
and max peaks |
||
|
|
||
|
|
|
3. |
4. |
Analog gauge |
Large real time |
with mini graph |
graph |
Power bar: indicates power level, but only on diesels.
See page 9 for more information about changing the information shown on the main gauge screen.
8
DIESELGT
Available Options – All Models
These options are presented in the order they appear on the Main Menu. If options are missing in your Main Menu, you should update your GT. See pages 20-27 for more information on updating your GT.
Change Vehicle
This option allows you to choose the type of vehicle that the GT will be used with. If the tune has already been installed, the Change Vehicle option cannot be used. Pages 38-40 have more information about how to uninstall the tune and how to check to see if the tune has
been successfully removed.
Install Download
This option allows you to install the tune to the engine computer in your vehicle. If the tune is already installed, this option will allow you to change certain settings that can only be changed by writing a new tune to the engine computer. Pages 18 and 38 have more informa-
tion about the download options and returning to stock.
Gauge Setup
This option will allow you to change which gauges are being displayed on the main gauge screen. Definitions for each type of gauge option available are listed on the next page.
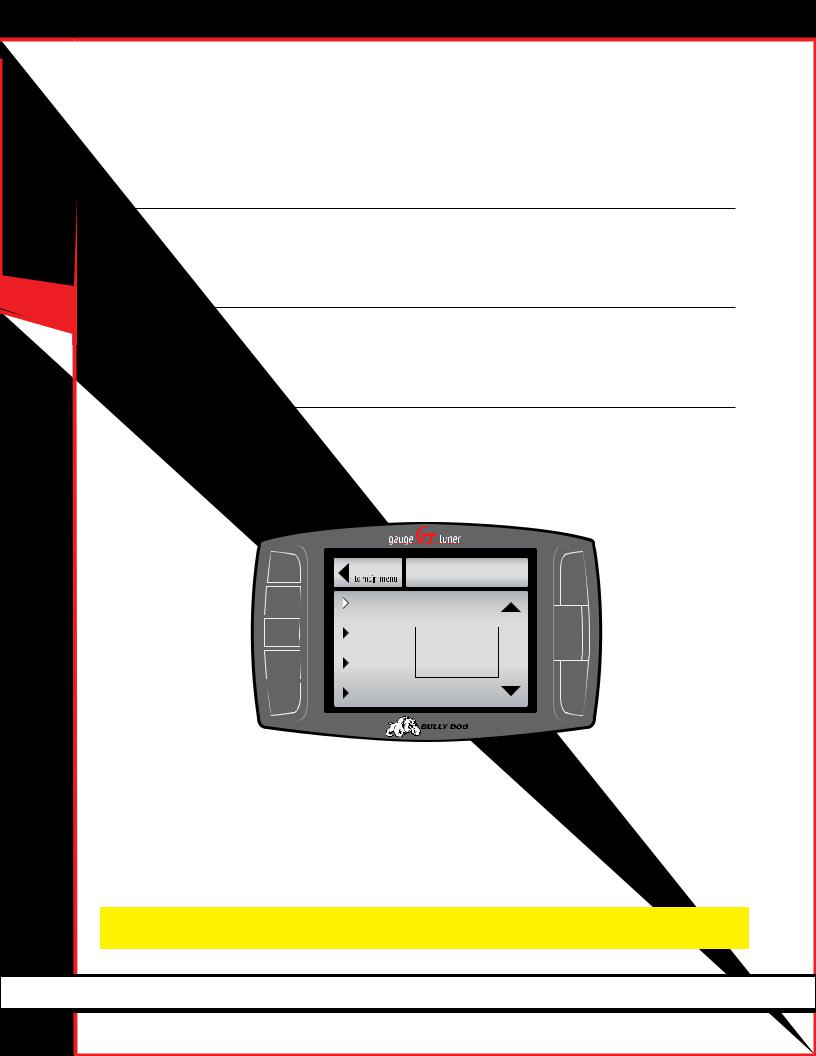
Changing the Information on the General Display
1. Choose Gauge Setup from the Main Menu.
2..Press the button on the left side of the GT to highlight the gauge slot you would like to change.
|
Go Back |
|
GAUGE SETUP |
|
|
|
|
|
|
|
Speed |
|
Gauge 1 |
|
|
Set Gauge 1 |
|
Use the Up & Down Arrows to |
|
|
Boost |
|
Change the Tranny Tune |
|
|
|
Pyro 2 |
||
|
Set Gauge 2 |
|
||
|
|
|
|
|
|
RPM |
|
Speed |
|
|
|
Boost |
||
|
Set Gauge 3 |
|
||
|
|
|
|
|
|
Coolant |
|
|
|
|
Set Gauge 4 |
|
|
|
®
3..Use the buttons on the right side of the GT to scroll through the different functions and highlight the one you want shown on the General Display.
4..When you are done, use the top left button to go back to the Main Menu and General Display.
Note: All of the gauge types may not be available through your vehicle’s diagnostic port (OBDII port). This fact is out of the control of Bully Dog; however, Bully Dog offers a range of add-on automotive sensors and sensor interface equipment. Contact Bully Dog or a Bully Dog dealer to learn more.
9
Gauge Setup (continued)
Pyro 1 & 2
Both pyro 1 and pyro 2 measure exhaust gas temperature. The only difference between them is the location of the temperature sensor. These temperature readings are used for defuel and warning level settings, which can help protect your engine from heat damage. The availability and location of factory installed pyrometers vary according to vehicle make and year. All ’07.5 and newer diesel pickups that are equipped with OEM diesel particulate filters also include factory installed pyrometer sensors. For all other vehicles, pyrometer kits are available for purchase from www.BullyDog.com.
Speed
This option shows the current vehicle speed. Monitoring this information can help you ensure that the speed displayed on the GT and the vehicle speedometer match the actual vehicle speed. Other important numbers, like the odometer and fuel efficiency, are based on this information. If the speed is displayed incorrectly on the GT, it can easily be corrected. See page 13 for more information.
Boost
This option shows the turbo boost pressure.
RPM
This option shows the number of revolutions per minute of the engine. This will help you protect your vehicle and improve performance by watching and ensuring that the RPMs stay within the optimal operating range for your engine.
Coolant
This option shows the coolant temperature. The temperature information is used in defuel and warning level settings to help prevent damage to the engine.
Throttle
This option shows the throttle position measurement – it is displayed as the percent open.
The throttle position information is used by the Driving Coach to indicate where changes can be made to driving habits to maximize fuel efficiency.
Intake
This option shows the intake air temperature.
Air temperature affects combustion temperature and engine performance. Adding a Bully Dog Rapid Flow Intake (RFI) closed air system will lower this temperature, improve performance, and increase horse power. The Gauge Tuner (GT) is designed to work with the RFI to get the most out of your engine.
ICP
This option shows the injection control pressure (ICP). The ICP affects correct fuel injection, and this information is used by the engine computer to adjust other settings like fuel flow to achieve optimum engine performance and increase horse power.
Trans Temp
This option shows the transmission temperature.
The transmission temperature is used in defuel and warning level settings to help prevent damage to the transmission.
MAF
This option displays information from the Mass Airflow Sensor. It is used by the Engine Control Module (ECM), aka: the engine computer, to determine how much air is going into the engine. The ECM then sends the correct amount of fuel for optimum engine performance.
Fuel Econ.
This option displays a real-time measurement of the vehicle’s fuel economy, shown in miles per gallon.
This information will help you to determine when your fuel efficiency peaks or dies to improve your driving habits and your bottom line when visiting the pump.
Fuel Flow
This option displays the amount of fuel being used at any given time; it is shown in gallons per hour.
The following gauge options are provided to allow the GT to monitor additional sensors that are only available with the Bully Dog Sensor Docking Station.
A/F Ratio 1 & 2
This gauge option shows the ratio of air to fuel. The GT will use this information to ensure that your engine is using the correct ratio to completely burn all of the fuel being used and maximize performance and efficiency.
Only available on Bully Dog Sensor Docking Station part number 40385.
AUX 1, 2 & 3
This gauge option shows the information from sensors connected to the 0-5V auxiliary inputs on the Bully Dog Sensor Docking Station.
AUX Temp
This gauge option shows the information returned to the Sensor Docking Station by an optional temperature sensor. The port for this sensor is marked as 5V out.
Frequency
This gauge option shows the information from a pulsing type of sensor, like an on-board speed sensor or another optional sensor that operates on the 0-5kHz 5V pulse range. The port on the Bully Dog Sensor Docking Station for this gauge option is marked as FN.
DIESELGT
10

DIESELGT
11
Performance Testing
This feature offers drag racers the ability to complete the 1/4 Mile and 0-100 KPH performance tests.
You can also download saved tests from your GT to your computer and analyze it using the Bully Dog Performance Testing Software. The software is available by free download from www.bullydog.com. See page 41 for more information about the Performance Testing Software.
SPECIAL NOTE: Street racing is illegal and extremely unsafe. The performance testing feature should only be used on a sanctioned 1/4 mile drag racing track.
There are two different styles available for both tests. The GT will show different test screens based on the style of test that is currently selected in the Performance Testing Setup Menu.
Speed Sensitive Performance Test
Once this test is begun, the GT will show instructions to the user to first bring the vehicle to a stop. Once the vehicle is at zero miles per hour, the test is ready. The test will automatically start once the vehicle begins to move.
Race Tree Performance Test
Before initiating the Race Tree style performance test it is important that the vehicle should already be at a complete stop. Once the test is begun, the GT will display a classic race tree on the screen. As soon as the lights on the tree turn green, the GT will begin to record the vehicle’s time. In this style of test, the GT will not wait for the vehicle to start moving before it starts recording performance data.
1/4 Mile Performance Test
This option will test the vehicle’s performance until the vehicle has traveled 1/4 mile.
-View Test Results
View the results for the last performance test that was run.
-Save Previous Test to SD Card
Save the results of the last run to the SD card in the GT. All runs that are saved to the SD Card can be transferred to your computer using our Performance Testing Analysis Software. For more information on our Performance Testing Analysis software, see page 41 or visit our website: www.bullydog.com
-Fastest Times
View the results for the quickest 1/4 mile ever recorded.
DPF Burn-Off
0-100 KPH Test.
This option will test the vehicle’s performance until the vehicle has reached a speed of 100 kilometers per hour, which is about the same speed as 62 miles per hour.
Also known as Mobile Desoot, this option is not available for all vehicles. See page 17 for more information about this special function.
Special Functions
These options vary from vehicle to vehicle. See page 17 for more information.
Diagnostics
This option reads the Diagnostic Trouble Codes (DTCs) from your vehicle engine. You can also erase these codes from here. To look up the DTC codes, the following website is very helpful: http://engine-codes.com/
You can also search for more information about DTC codes online using your favorite search engine.
IMPORTANT NOTE: Most DTCs indicate a problem with the engine, not with the tune or the tuner itself. If you want to know if a DTC is being caused by the GT or not, uninstall the tune and drive your vehicle for about one week. If the DTC comes back, there is a problem with the vehicle and you
should take it to a trusted mechanic. If the DTC doesn’t come back, reinstall the tune and test drive for another week – if the DTC comes back while the tune is reinstalled, contact technical support. Be sure to have your tuner, vehicle, and a computer with internet access available when contacting technical support. See page 49 for more information about contacting technical support.

Driving Coach Setup
The Driving Coach is a special feature designed to be your fuel economy dashboard and information center. It provides real-time visual and audio feedback about driving efficiency and where energy is being lost. The driving coach will help you understand the optimal conditions for your particular vehicle through real-time observation, giving you the power to maximize your vehicle’s fuel economy.
Two hidden bonuses of driving more efficiently are: saving money on fuel and helping the environment!
Before the Driving Coach can give you accurate information, it is important to make sure that the GT is showing the correct speed. In the sections below, you will find specific instructions for using the Driving Coach to become the best driver you can be.
Set Economy Goal
This option will allow you to select a fuel economy goal. The Driving Coach will use the economy goal to calculate your driving grade.
It is very important to select an economy goal that is realistic for both your vehicle and the kind of driving you will be doing. If you will be driving mainly in the city or on the highway, choose a goal that is very close to the advertised fuel efficiency for your vehicle in that type of environment. If you will be doing a mixture, choose an economy goal between the advertised city and highway mileage for your car.
Reset Average Economy
This option will clear the values stored in the GT for the average fuel economy, the number of gallons used, and the grade in the Driving Coach.
Adjust Acceleration
This option will allow you to select the GT sensitivity for the acceleration and deceleration for your vehicle.
Coach Sound Setup
This option will allow you to turn the Driving Coach sounds on or off.
Showing/Hiding the Driving Coach
The driving coach is always running, even if you choose not to have the information displayed. You can show or hide the driving coach on the Main Display by holding one of the four bottom left buttons until the display cycles through to the gauge style that you want.
DIESELGT
12

DIESELGT
Driving Coach Setup (continued)
Checking Speedometer Accuracy
First: Change the Gauge Setup to have the Speed displayed on the main display screen. See page 9 for more information about changing the information displayed on the main display screen.
Next: Go to a safe place with little to no traffic where you can perform a speed test. Make sure the speed limit is at least 60 mph. Here are two different ways to find out your vehicle’s actual speed:
Method 1: GPS
1.Use a GPS device to compare your actual speed and the speed displayed on the Bully Dog.
2.Calculate the Percent Difference by using
this formula: |
|
GT speed - GPS Speed |
|||
|
Percent difference = |
||||
|
|
|
|
|
|
|
|
GPS Speed |
|||
|
|
|
|||
|
Example 1: A GPS device reads 65 mph and the GT reads 62 mph for one single moment. |
||||
|
Step 1. Percent difference = |
|
62 - 65 |
|
|
|
65 |
|
|
||
|
|
|
|
||
|
Step 2. Percent difference = |
|
-3 |
|
|
|
65 |
|
|
||
|
|
|
|
||
|
Step 3. Percent difference = .046 or 4.6% then round up 5% |
||||
Method 2: Stopwatch
1.Use a Stop Watch to measure how long it takes to travel one mile while traveling at 60 mph according to the GT.
Accelerate up to a speed of 60 mph (as shown on the GT)
While traveling at that constant speed, record the amount of time in seconds that it takes to travel exactly one mile. *Use highway mile markers to ensure that your one mile measurement is correct.
2.Record the time.
3.Calculate the Percent Difference.
If it takes 60 seconds to travel one mile at 60 mph, then the GT is accurately reading your vehicle speed.
If it takes 2 seconds more or less than
60 seconds to travel one mile, then use the formula to the right to calculate the Percent Difference.
Once you have calculated the Percent Difference, you can use that information to adjust the speed display as described below
Adjusting the Speed Display
To calculate the percent difference use this formula:
Percent difference = |
Recorded Time - 60 seconds |
|
60 seconds |
||
|
Example 1: Using a stop watch the actual time it took to drive one mile while traveling at 60 mph according to the GT was 63 seconds.
Step 1. Percent difference = |
63 - 60 |
|
60 |
||
|
||
Step 2. Percent difference = |
3 |
|
60 |
||
|
Step 3. Percent difference = |
.05 or 5.0% |
|
1.Use one of the methods described in the previous section to determine the exact percentage difference between the GT and your actual speed.
2.Choose the opposite percentage in the Adjust Speed Display menu.
For example, if the difference between your actual speed and the speed displayed on the GT was 5%, you should choose -5% (negative five percent).
13
Driving Coach Setup (continued)
Checking Average Fuel Economy
It is important to check the accuracy of the average economy readout on the GT at least once every changing season. There are many reasons to check and adjust the average fuel economy, here is one example: The fuel delivered to gas stations during the winter contains an average of 1.3% less energy than the fuel delivered in warmer seasons. That means that the same amount of liquid is going into the tank, but it is 1.3% less effective, on average.
There are many similar factors that affect your fuel efficiency that you cannot control and the GT cannot sense or adjust for. That is why it is important to adjust the fuel economy of the GT every once in a while.
To adjust the Average Fuel Economy displayed by the GT, follow these steps:
1.Go to the gas station and get a full tank of gas.
2.Reset both of the following gauges before driving away from the gas station:
-The Average Economy on your GT.
-The trip odometer on your vehicle.
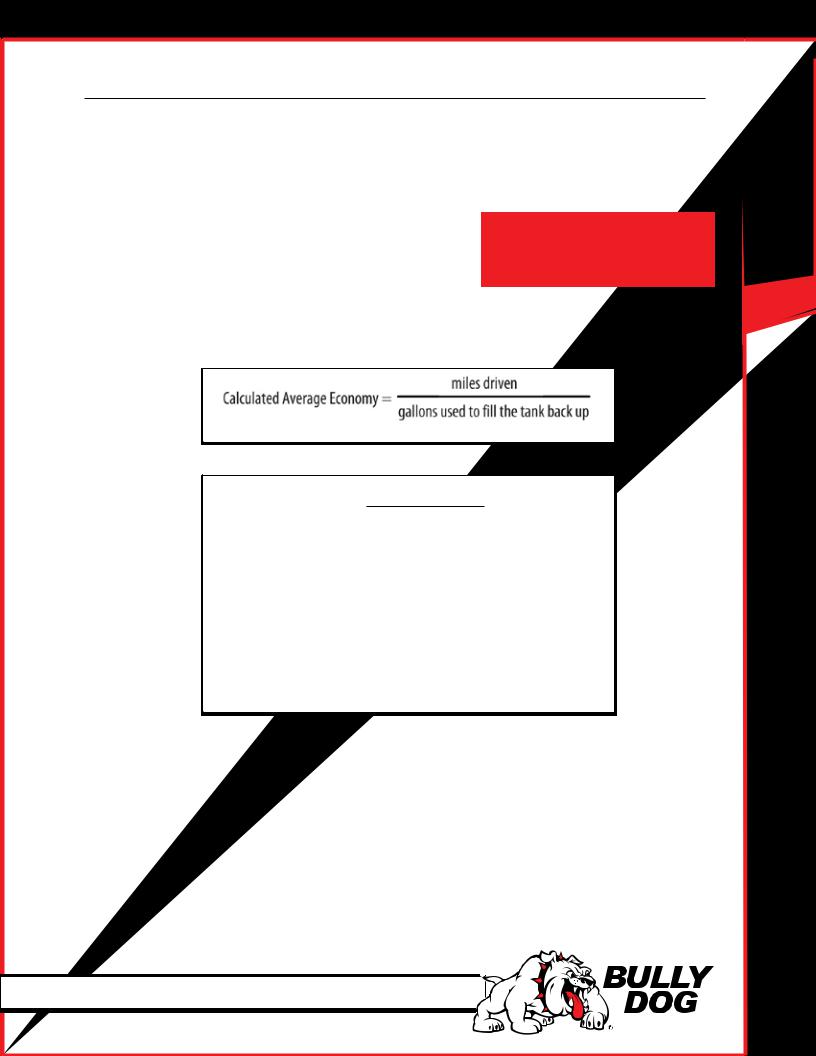
4.Drive the vehicle for an entire tank (or two)
5.Calculate your vehicle’s average fuel economy by hand using the following equation:
•NOTE:Ifthespeedometeronthevehicleisnotaccurate, then the odometer will also be incorrect. You will need to be able to calculate the exact number of miles driven before your next refill.
GT Average Economy - Calculated Average Economy
Percent difference =
Calculated Average Economy
Example 1: Assume the GT Average Economy is 24 mpg and the Calculated Economy is 21.
Step 1. Percent difference = |
24-21 |
|
21 |
||
|
||
Step 2. Percent difference = |
3 |
|
21 |
||
|
Step 3. Percent difference = .142 or 14.2% round down to 14%
6.Use the equation below to calculate the Percent Difference between the average fuel economy that you have calculated and the average fuel economy that is displayed by your GT.
Adjust the Average Fuel Economy
Follow the steps listed below to change the average fuel economy that is displayed by the GT:
1.Go to the Main Menu
2.Choose Vehicle Setup
3.Choose Adjust Economy Display
4.Use the buttons on the right to move up and down the percentages
5.Choose a percent value that is the opposite sign of the Percent Difference that you calculated using the equation above.
-For example, if you determine that the Percent Difference is 14%, you should choose -14%.
DIESELGT
14

DIESELGT
Vehicle Setup
Select Pyro Source
Choose either factory installed or Bully Dog pyrometers.
Set Defuel Levels
Set the temperature level at which the extra power level settings on your GT are automatically turned off to protect your engine from damage.
It is also possible to turn each of these settings completely off. This is appropriate if the sensor for that setting is not available or if you do not wish to have that setting controlled by the GT.
See the Pyrometer Calibration section on page 41 for help in determining the correct temperatures for the defuel settings:
Adjust Economy Display
Change the miles per gallon shown by the GT.
This setting should be changed if the GT is showing incorrect fuel mileage. See page 14 for more information about how to do this.
NOTE: The defuel option is only available on vehicles that can adjust horsepower levels on the fly. For vehicles that cannot adjust power levels on the fly, on screen warnings are available in place of automated defueling.
Adjust Speed Display
Change the vehicle speed shown by the GT.
This setting should be changed if the GT is showing an incorrect vehicle speed. See page 13 for more information on how to do this.
Pyro 1 Temperature Level
Pyro 2 Temperature Level
Engine Coolant Temp Level
Boost Level
Turn this setting off or add a Bully Dog boost sensor if your vehicle does not have a factory turbo boost.
Transmission Temperature
Turn this setting off or add a Bully Dog boost sensor if your vehicle does not have a factory transmission temperature sensor.
Startup Coolant Temp Level
This option was included to ensure that the vehicle is warmed up properly before the GT tuning options that provide additional power are available to be used.
NOTE: If the GT is stuck in Engine Warm Up mode, change this setting to a lower temperature or turn the feature off.
15

User Options
Set Background Theme
Change the display colors on your GT.
Adjust Backlight
Change the brightness for both the day and the night operating modes of the GT.
To change between night and day mode, hold both the right buttons (the up and down buttons) while you are in the general gauge display.
Set Animation Preferences
Turn the Wave Effect on or off. This effect creates a ripple on the screen whenever you press a button.
English/Metric Units
Switch between miles/kilometers and gallons/liters.
Reset to Default
Change the user preferences back to the original Bully Dog default settings.
This option does not change other GT features to default settings.
Show Settings
The Show Settings screen will show you information about your vehicle, the GT, and your current vehicle settings. This screen will also indicate if the GT tune is currently installed or not installed on a vehicle.
Uninstall Download
This option will allow you to uninstall the tune from your vehicle. This process is very similar to installing the tune, so be sure to take the same precautions listed on pages 32-35.
You can find more information about uninstalling the download on pages 38-40.
Update Firmware
This option will update the software on the GT itself from the files on the Micro SD card. This is an important final step to the update process. See pages 20-27 for more information about updating your GT.
DIESELGT
16
 Loading...