


BTL-4000
Series
U S E R ’ S M A N U A L
v 1 0 0 z 2 A M 1 6 / 0 7 / 2 0 0 4 E N
B T L - 4 0 0 0 S E R I E S |
U S E R ' S M A N U A L |
|
|
Dear Customer,
Thank you for buying our medical equipment of the BTL-4000 Series. We hope that you will be satisfied with our product and that thanks to you it will help many patients.
We are interested in your experience with this equipment and your view on possible improvements. That is why we beg to ask you for filling in the enclosed customer card and sending it back to us. Your comments will be a feedback thanks to which we can manufacture our products as good as possible.
We wish you much success at your work.
Best regards,
BTL Industries Limited
Manufacturer of BTL devices
p a g e 2 o f 5 2
B T L - 4 0 0 0 S E R I E S |
U S E R ' S M A N U A L |
|
|
CONTENTS |
|
||
1 |
GENERAL CHARACTERISTICS........................................................................................................................ |
5 |
|
2 |
INSTRUCTIONS FOR USE................................................................................................................................. |
6 |
|
2.1 |
|
Description of the Device ............................................................................................................................... |
6 |
2.1.1 |
|
Top Panel ................................................................................................................................................. |
6 |
2.1.2 |
|
Rear Panel ............................................................................................................................................... |
8 |
2.1.3 |
|
Front Panel............................................................................................................................................. |
10 |
2.2 |
|
Assembly and Putting into Operation........................................................................................................... |
11 |
2.3 |
|
Basic Operating of the Device...................................................................................................................... |
12 |
2.4 |
|
Therapy (principle of Setting) ....................................................................................................................... |
13 |
2.4.1 |
|
Therapy Setting Flowchart...................................................................................................................... |
13 |
2.4.2 |
|
Opening Screen and Selection of Channels, Tabs, Accessories............................................................ |
14 |
2.4.3 |
|
Setting of Therapy Parameters by Selection of Diagnosis – "diag" button ............................................. |
14 |
2.4.4 |
|
Setting of Therapy Parameters by Selection of Program – "prog" button ............................................... |
16 |
2.4.5 |
|
User Setting of Therapy Parameters –"man" button............................................................................... |
16 |
2.4.5.1 |
|
Therapy Parameters Screen............................................................................................................. |
18 |
2.4.5.2 |
|
Setting of Therapy Time.................................................................................................................... |
18 |
2.4.5.3 |
|
Setting of Intensity of Therapy .......................................................................................................... |
18 |
2.5 |
|
Course of Therapy ....................................................................................................................................... |
19 |
2.5.1 |
|
Start, Interruption and End of Therapy ................................................................................................... |
19 |
2.5.2 |
|
Running Therapy Screen........................................................................................................................ |
20 |
2.5.3 |
|
Electrotherapy – Setting during Therapy ................................................................................................ |
20 |
2.5.3.1 |
|
Setting the Intensity in 4-Electrode Therapies .................................................................................. |
20 |
2.5.3.2 |
|
Manual Turning of Vector in Dipole Interference............................................................................... |
20 |
2.5.4 |
|
Accessories –Signalling of Operation..................................................................................................... |
21 |
2.5.5 |
|
Indication of Operation – Energy on Output ........................................................................................... |
21 |
2.5.5.1 |
|
Electrotherapy................................................................................................................................... |
21 |
2.5.5.2 |
|
Ultrasound Therapy .......................................................................................................................... |
22 |
2.5.5.3 |
|
Laser Therapy................................................................................................................................... |
22 |
2.6 |
|
Therapy Parameters .................................................................................................................................... |
22 |
2.7 |
|
Encyclopaedia.............................................................................................................................................. |
23 |
2.8 |
|
Therapy Saving............................................................................................................................................ |
23 |
2.9 |
|
Interconnection of Devices........................................................................................................................... |
26 |
2.9.1 |
|
Interconnection of BTL-4000 Puls (Combi) and BTL vac........................................................................ |
26 |
2.9.2 |
|
Interconnection of BTL-4000 Puls and BTL-4000 Sono ......................................................................... |
26 |
2.9.3 |
|
Interconnection of BTL-4000 Puls, BTL-4000 Sono and BTL vac .......................................................... |
27 |
2.9.4 |
|
Setting and Running of Combined Therapy on Single Devices .............................................................. |
28 |
2.9.5 |
|
End of Combined Therapy on Single Devices ........................................................................................ |
28 |
3 |
"MENU" BUTTON............................................................................................................................................. |
29 |
|
3.1 |
|
Menu ............................................................................................................................................................ |
29 |
3.1.1 |
|
Accessories ............................................................................................................................................ |
29 |
3.1.1.1 |
|
Accessories Installation .................................................................................................................... |
29 |
3.1.1.2 |
|
Information on Accessories............................................................................................................... |
29 |
3.1.1.3 |
|
Connectors - Information .................................................................................................................. |
30 |
3.1.2 |
|
Unit Settings ........................................................................................................................................... |
30 |
3.1.2.1 |
|
Password Setting.............................................................................................................................. |
30 |
3.1.2.2 |
|
Sound Setting ................................................................................................................................... |
30 |
3.1.2.3 |
|
Auto Switch Off ................................................................................................................................. |
30 |
3.1.2.4 |
|
Setting of Display Contrast ............................................................................................................... |
31 |
3.1.2.5 |
|
Setting Contrast for Small Display .................................................................................................... |
31 |
3.1.2.6 |
|
Setting Backlight ............................................................................................................................... |
31 |
3.1.2.7 |
|
Date and Time Setting ...................................................................................................................... |
31 |
3.1.2.8 |
|
Language Setting.............................................................................................................................. |
31 |
3.1.2.9 |
|
User Options..................................................................................................................................... |
31 |
3.1.2.10 |
Style of Operation ............................................................................................................................. |
31 |
|
3.1.2.11 |
Configuration - Information ............................................................................................................... |
31 |
|
3.1.2.12 |
Service Functions ............................................................................................................................. |
31 |
|
3.1.3 |
|
Specific Settings..................................................................................................................................... |
32 |
3.2 |
|
User Settings ............................................................................................................................................... |
32 |
3.2.1 |
|
User Sequences..................................................................................................................................... |
32 |
3.2.1.1 |
|
Creating New Sequence................................................................................................................... |
32 |
3.2.1.2 |
|
Parameters of Sections in Sequence................................................................................................ |
34 |
p a g e 3 o f 5 2
B T L - 4 0 0 0 S E R I E S |
U S E R ' S M A N U A L |
|
|
3.2.1.3 |
Saving New Sequence ..................................................................................................................... |
34 |
3.2.2 |
User Diagnoses/Programs ..................................................................................................................... |
35 |
3.2.3 |
Recent Therapies ................................................................................................................................... |
35 |
4 |
ACCESSORIES................................................................................................................................................. |
36 |
4.1 |
Power Supply Adapter BTL-228................................................................................................................... |
36 |
4.2 |
Accumulator ................................................................................................................................................. |
37 |
4.3 |
Lithium Battery ............................................................................................................................................. |
37 |
4.4 |
Common Accessories .................................................................................................................................. |
37 |
4.5 |
Accessories for Electrotherapy .................................................................................................................... |
38 |
4.6 |
Accessories for Ultrasound Therapy ............................................................................................................ |
38 |
4.7 |
Accessories for laser Therapy...................................................................................................................... |
38 |
5 |
EQUIPMENT MAINTENANCE AND SAFETY .................................................................................................. |
39 |
5.1 |
Safety........................................................................................................................................................... |
40 |
5.2 |
Contraindications ......................................................................................................................................... |
42 |
5.2.1 |
Contraindications for Electrotherapy ...................................................................................................... |
42 |
5.2.2 |
Contraindications for Ultrasound Therapy .............................................................................................. |
42 |
5.2.3 |
Contraindications for Laser Therapy ...................................................................................................... |
42 |
5.3 |
Useful addresses ......................................................................................................................................... |
43 |
5.4 |
Warranty ...................................................................................................................................................... |
43 |
6 |
TECHNICAL PARAMETERS............................................................................................................................ |
44 |
6.1 |
Technical Parameters of the BTL-4000 Series Devices............................................................................... |
44 |
6.2 |
Technical Parameters of Power Supply Adapter BTL-228 ........................................................................... |
45 |
6.3 |
Basic Parameters of Electrotherapy Generator............................................................................................ |
46 |
6.4 |
Basic Parameters of Ultrasound Generator ................................................................................................. |
46 |
6.5 |
Basic Parameters of Laser Generator.......................................................................................................... |
46 |
6.6 |
Technical Parameters of Ultrasound Heads................................................................................................. |
47 |
6.7 |
Technical Parameters of Laser Probes ........................................................................................................ |
47 |
6.8 |
Applicable Standards ................................................................................................................................... |
49 |
6.9 |
Interconnection with Other Devices.............................................................................................................. |
49 |
7 |
CONFIGURATIONS OF DEVICES ................................................................................................................... |
51 |
7.1 |
Configurations of Combined Devices BTL-4000 Combi ............................................................................... |
51 |
7.2 |
Configurations of Electrotherapy Devices BTL-4000 Puls............................................................................ |
51 |
7.3 |
Configurations of Ultrasound Devices BTL-4000 sono................................................................................. |
52 |
7.4 |
Configurations of Laser Devices BTL-4000 Laser........................................................................................ |
52 |
p a g e 4 o f 5 2
B T L - 4 0 0 0 S E R I E S |
U S E R ' S M A N U A L |
|
|
1 G E N E R A L C H A R A C T E R I S T I C S
BTL-4000 Series is a series of devices designed for physiotherapy. Depending on the required configuration it has one or two generators – for electrotherapy, ultrasound therapy and/or laser therapy. The device can be configured for treating of one or two patients and can run up to four independent therapies. The device can be also further upgraded
– see the configuration tables of individual devices at the end of this User’s Manual.
The BTL-4000 Series devices have extensive databases of preset diagnoses and programs. If the preset diagnoses and programs do not satisfy your needs you can modify them easily and program and save your own therapies (programs). You can also program sequences of therapies. The user therapies and sequences can be saved in the device's memory under the user program number and/or the user diagnosis name. Thanks to this the equipment can be used not only for common medical practice but also for laboratory work.
The BTL-4000 Series devices detect and check the connected accessories. After each switch-on the device tests its internal circuits and generators. During therapy it checks the status on the output – for example in case of electrotherapy it monitors the quality of application of the electrodes to the patient’s body, in case of ultrasound it monitors the contact between the ultrasound head and the patient’s skin – and according to this status the device automatically adjusts the output intensity value. If contact is bad, the running therapy is automatically interrupted, data (intensity and time) on the current channel tab start blinking and an acoustic signal is emitted.
The BTL-4000 Series devices divide into the following type groups: BTL-4000 Puls – electrotherapy devices, BTL4000 Sono –ultrasound therapy devices, BTL-4000 Laser – laser therapy devices, and BTL-4000 Combi, made as combinations of the Puls, Sono and Laser models.
The BTL-4000 Series devices enable to perform combined therapy ultrasound + electrostimulation. Naturally it is possible to choose the ultrasound head polarity (anode / cathode), in combined therapy it is also possible to utilize interference currents.
Recommended therapies for the BTL-4000 Series devices, contraindications, additional information about therapies and references to related literature are in the User’s Guides that are supplied together with each device.
Device BTL-4000 Puls and BTL-4000 Combi can be interconnected with the BTL vac vacuum unit, to apply electrotherapy using its suction cup electrodes. If the pulse mode is selected on BTL vac, electrotherapy can be further combined with simple mechanotherapy. The BTL vac device can be controlled by the BTL-4000 Series device
– suction in the vacuum electrodes is adjusted according to the intensity of the output current.
Devices BTL-4000 Puls and BTL-4000 Combi with the electro-generator can apply a wide range of currents – galvanic current, diadynamic currents, TENS currents, interference currents, a wide range of pulses, microcurrents, even the high-voltage therapy. For most of the currents the output mode can be selected – constant current or constant voltage (the constant voltage mode is suitable especially for combined therapy and/or stimulation by a point electrode, or if as a result of various circumstances the intensity in the CC mode decreases).
Devices BTL-4000 Sono and BTL-4000 Combi with the ultrasound generator work with the ultrasound heads of a size of 1 cm2 or 4 cm2; the frequency of the ultrasound waves can be set to 1 MHz or 3 MHz, which influences the depth of their penetration into the tissue. You can select either continuous or pulse mode of ultrasound waves, set the pulse frequency or the “duty factor”.
Devices BTL-4000 Sono and BTL-4000 Combi with the laser generator work with the laser probes, which can generate many types of laser radiation (red, infrared, divergent or convergent beam, etc.). The probe types include probes with green supplementary lighting of the laser beam; you can select the continuous or pulse mode of the laser and set the pulse frequency and the "duty factor".
For the latest information about BTL products and for contact to the BTL companies please refer to our website http://www.btlnet.com.
p a g e 5 o f 5 2

B T L - 4 0 0 0 S E R I E S |
U S E R ' S M A N U A L |
|
|
2 I N S T R U C T I O N S F O R U S E
2 . 1 D E S C R I P T I O N O F T H E D E V I C E
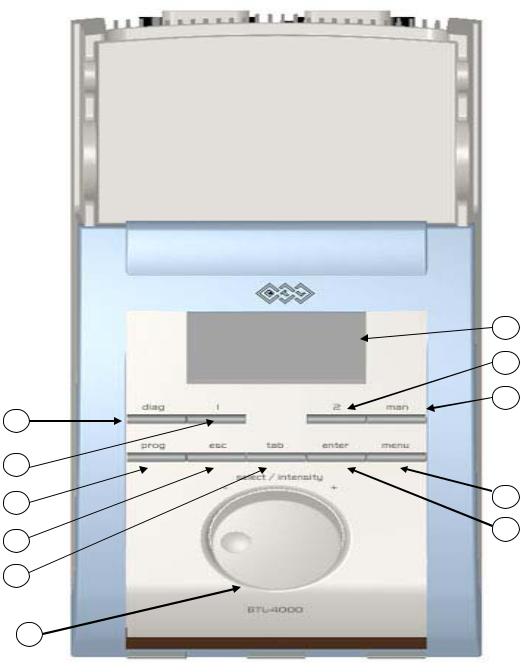
2 . 1 . 1 T o p P a n e l
1 - 6 outputs for patient cables on the rear panel of the device, see 2.1.2 Rear Panel
7display
8diag button for quick selection of diagnosis
9prog button for quick selection of therapy program
10man button for manual setting of all therapy parameters
11menu button (setting of date, time, language, display contrast, sounds, customizing, etc.)
12select/intensity knob (selection and setting of individual parameters)
13enter button (confirmation of selection or setting)
14esc button (rejection of selection or setting and return to the previous state)
15tab button for switching between the buttons on the display
16button 1 for switching to the tab of the first generator
17button 2 for switching to the tab of the second generator
p a g e 6 o f 5 2
B T L - 4 0 0 0 S E R I E S |
U S E R ' S M A N U A L |
|
|
7
17
10
8
16
9 |
11 |
|
|
|
13 |
14
15
12
p a g e 7 o f 5 2

B T L - 4 0 0 0 S E R I E S |
U S E R ' S M A N U A L |
|
|
2 . 1 . 2 |
R e a r P a n e l |
1 - 6 patient outputs – for exact configuration see table Tab. 2.1
18mains switch for switching the device on/off – positions 1 / 0.
19socket for connection of external power supply adapter BTL-228
20warning label with parameters of power supply and input of the device
p a g e 8 o f 5 2
B T L - 4 0 0 0 S E R I E S |
U S E R ' S M A N U A L |
|
|
Tab. 2.1 Configuration of Output Connectors
Device Type |
output 1 |
output 2 |
output 3 |
output 4 |
output 5 |
output 6 |
BTL-4610 Puls Optimal |
|
|
|
|
|
E1opti |
BTL-4615 Puls Optimal |
|
|
|
|
|
E1opti |
BTL-4621 Puls Optimal |
|
|
|
|
|
E1opti |
BTL-4620 Puls Optimal |
|
|
|
|
E2opti |
E1opti |
BTL-4625 Puls Optimal |
|
|
|
|
E2opti |
E1opti |
BTL-4110 Laser Optimal |
L1A |
L1B |
door |
acup. |
|
|
BTL-4120 Laser Optimal |
L1A |
L1B |
door |
L2A |
|
|
BTL-4710 Sono Optimal |
U1A |
U1B |
E input |
E output |
|
|
BTL-4810 S Combi Optimal |
U1A |
U1B |
|
|
|
E1opti |
BTL-4815 S Combi Optimal |
U1A |
U1B |
|
|
|
E1opti |
BTL-4821 S Combi Optimal |
U1A |
U1B |
|
|
|
E1opti |
BTL-4810 L Combi Optimal |
L1A |
L1B |
door |
|
|
E1opti |
BTL-4815 L Combi Optimal |
L1A |
L1B |
door |
|
|
E1opti |
BTL-4821 L Combi Optimal |
L1A |
L1B |
door |
|
|
E1opti |
BTL-4800 SL Combi Optimal |
U1A |
U1B |
door |
L1A |
|
|
|
|
|
|
|
|
|
BTL-4610 Puls Professional* |
|
|
|
E1 |
|
|
BTL-4615 Puls Professional* |
|
|
|
E1 |
|
|
BTL-4621 Puls Professional* |
|
|
|
E1 |
|
|
BTL-4620 Puls Professional |
|
|
E2 |
E1 |
|
|
BTL-4625 Puls Professional |
|
|
E2 |
E1 |
|
|
BTL-4640 Puls Professional |
|
|
E2 |
E1 |
|
|
BTL-4110 Laser Professional |
L1A |
L1B |
door |
acup. |
|
|
BTL-4120 Laser Professional |
L1A |
L1B |
door |
L2A |
|
|
BTL-4710 Sono Professional |
U1A |
U1B |
E input |
E output |
|
|
BTL-4810 S Combi Professional |
U1A |
U1B |
|
E1 |
|
|
BTL-4815 S Combi Professional |
U1A |
U1B |
|
E1 |
|
|
BTL-4821 S Combi Professional |
U1A |
U1B |
|
E1 |
|
|
BTL-4810 L Combi Professional |
L1A |
L1B |
door |
E1 |
|
|
BTL-4815 L Combi Professional |
L1A |
L1B |
door |
E1 |
|
|
BTL-4821 L Combi Professional |
L1A |
L1B |
door |
E1 |
|
|
BTL-4800 SL Combi Professional |
U1A |
U1B |
door |
L1A |
|
|
* can be extended by the HVT module
Legend: |
|
E1 |
connector for connection of electrotherapy accessories (BTL-236-1(2), BTL vac) to the E1 generator |
E2 |
connector for connection of electrotherapy accessories (BTL-236-1(2), BTL vac) to the E2 generator |
E1opti |
connector for connection of electrotherapy cables (BTL-226, BTL vac) to the E1 generator |
E2opti |
connector for connection of electrotherapy cables (BTL-226, BTL vac) to the E2 generator |
L1A |
connector for connection of laser probe BTL-448, e.g. red, to the L1 generator |
L1B |
connector for connection of laser probe BTL-448, e.g. infrared, to the L1 generator |
L2A |
connector for connection of laser probe BTL-448, e.g. red, to the L2 generator |
L2B |
connector for connection of laser probe BTL-448, e.g. infrared, to the L2 generator |
U1A |
connector for connection of ultrasound head BTL-237, e.g. 1 cm2, to the U1 generator |
U1B |
connector for connection of ultrasound head BTL-237, e.g. 4 cm2, to the U1 generator |
E input |
connector for input of external electrotherapy BTL-46xx, BTL-56xx on the ultrasound device at |
combined therapy |
|
E output |
connector for output of external electrotherapy BTL-46xx, BTL-56xx on the ultrasound device at |
combined therapy |
|
door |
connector for the open door sensor |
acup. |
connector for the acupuncture electrode |
To see how many patients and to which outputs you can simultaneously connect, press menu / accessories / connectors - information.
p a g e 9 o f 5 2

B T L - 4 0 0 0 S E R I E S |
U S E R ' S M A N U A L |
|
|
2 . 1 . 3 |
F r o n t P a n e l |
21display of the remaining time of therapy for the first channel
22display of the remaining time of therapy for the second channel
23start/stop1 button for starting/stopping of therapy on the first channel
24start/stop2 button for starting/stopping of therapy on the second channel
25on/off switch – serves for switching the device on/off
26service connector under a cover and the type, manufacture and warning labels (placed on the bottom cover of the device)
12 
21 |
|
22 |
23 |
|
24 |
|
25 |
26 |
|
|
p a g e 1 0 o f 5 2
B T L - 4 0 0 0 S E R I E S |
U S E R ' S M A N U A L |
|
|
2 . 2 A S S E M B L Y A N D P U T T I N G I N T O O P E R A T I O N
Unpack the equipment and place it on a stable horizontal surface proportioned for the equipment's weight, out of reach of sunlight. During the operation the equipment gets warm, therefore it must not be located close to heatproducing devices. Cooling of the equipment is provided by forced air circulation. Cooling vents are located on the rear panel of the equipment and must not be covered. Place the equipment so that the free space behind the rear side is at least 10 cm. Do not put the equipment on a soft surface so as not to obstruct the airflow. Do not put any heatproducing devices on the equipment, neither objects containing water or other liquid. Do not place the equipment close to devices producing strong electromagnetic, electric or magnetic field (diathermy, X-rays, etc.), otherwise the equipment could be undesirably influenced. In case of any questions please contact an authorized service of BTL devices.
The same installation conditions apply for the BTL-228 power supply adapter and must be observed.
We recommend keeping the packing of the equipment for further possible transport.
Plug the device in the mains socket by means of the BTL-228 power supply adapter (see Chapter 6 Technical
Parameters.
Plug the power supply adapter directly in the mains socket; do not use any multi-connection extension cable or adaptor.
Check of correct mains voltage 230 V (115 V)
Before first connection of the external power supply adapter BTL-228 to the mains check if the mains voltage switch on the adapter is in the position corresponding to the local network parameters (i.e. either in the position 230 V or in the position 115 V). For details see 4.1 Power Supply Adapter BTL-228.
In case of any questions contact the authorized service of BTL devices.
Switching the device on:
Connect the power supply adapter to the device and plug its mains cable in the mains socket, switch the O/ I rocker switch (18) on the rear panel to the I position and in the end press the ON/OFF switch (25) on the front panel. If the internal functions test passes OK, the display writes the device type and the equipment is ready for operation – see Note.
Connection of accessories
Connect the supplied accessories successively to the output connectors (1) to (6) on the rear panel of the device according to Tab. 2.1. The unit automatically detects the accessory, determines its type and displays it in the corresponding tab on the screen. If you happen to connect unsuitable accessory, e.g. a laser probe to the electrotherapy generator, the screen displays a warning and information where the accessory shall be connected.
Recharging of accumulator
If the device contains internal accumulator (the Professional variant), it is sold in half-charged status. That is why we recommend formatting of the accumulator after purchase of the device: connect the device to the mains via the external adapter for at least 48 hours without interruption, the mains rocker switch (18) in position 1. The device will be recharged and the accumulator will be properly formatted. The properly formatted accumulator enables longer operation of the device without . For details see 4.2 Accumulator.
Restart of the device - reset
If for a reason (electromagnetic interference, etc.) the device stops responding to the user's commands and the message "please wait..." with small moving squares is not displayed, the device can be put into the initial state by simultaneous pressing of the prog (9) and menu (11) buttons. After this the device immediately gets into the initial status as well as after switch-on of power supply.
The mains switch (18) on the rear panel has the same effect – the whole device switches off; however, we recommend using the above described combination of keys prog + menu which is more friendly to the electronics of the device.
Note:
After the switch-on the equipment tests its internal functions (for approx. 5 – 10 seconds) and in case of any discrepancy it alerts to it and, if needed, locks itself in the secure state. In such case it is necessary to contact the authorized service of BTL devices.
p a g e 1 1 o f 5 2
B T L - 4 0 0 0 S E R I E S |
U S E R ' S M A N U A L |
|
|
2 . 3 B A S I C O P E R A T I N G O F T H E D E V I C E
The display contains several graphic elements. Some of them are only for information, some can be activated. The basic elements are the following:
•buttons (it is possible to activate them by the tab button (15) and to change their values.) The activated buttons are displayed inversely.
•information texts
•channel tabs (switching between the tabs, selection)
The buttons can be enabled or disabled. The disabled buttons are crossed out.
All the displayed enabled buttons can be successively activated by pressing the tab button (15). By repeated pressing of this key further buttons on the screen are successively activated.
If the button contains one numeric value, this value can be directly changed by the select/intensity knob (12). If the button contains more numeric values or an item selected from a list, pressing of the enter button (13) opens the detailed subscreen of the button. To leave the subcscreen press esc (14) – all data you have changed will remain changed.
Information texts
The text is displayed directly on the display, in a menu or in a button. If a text is too long and does not fit on the display in full, after a while it starts scrolling automatically.
Selected channel
Although most of the devices of the BTL-4000 Series can run more therapies at a time, only one channel can be controlled at the particular moment, That channel is called the "selected channel". The tab of the "selected channel" in the bottom part of the screen is coloured dark. All information on the screen and all controls relate to this channel. The most important information about the therapies on the other channels remains visible on their tabs.
channel identification: E - electrotherapy
buttons
|
|
|
|
|
|
|
|
|
tab of the selected channel |
|
|
tab of the channel which is not selected |
|||||
|
|
|
|
|
|
|
|
|
information about connected accessories
information
tab of the channel with running therapy
disabled button
p a g e 1 2 o f 5 2

B T L - 4 0 0 0 S E R I E S |
U S E R ' S M A N U A L |
|
|
|
|
|
|
|
2 . 4 T H E R A P Y ( P R I N C I P L E O F S E T T I N G ) |
|
|
|
|||||
2 . 4 . 1 |
T h e r a p y S e t t i n g F l o w c h a r t |
|
|
|
|
|
||
|
|
OPENING |
|
|
|
|
|
|
|
|
SCREEN |
|
|
|
|
|
|
|
|
|
|
diag |
1 |
|
2 |
man |
|
SELECTION BY DIAGNÓSIS |
|
|
|
|
|
|
|
|
esc |
|
|
prog |
esc |
tab |
enter |
menu |
|
|
|
|
|
|
|
|
|
|
|
|
|
|
SELECTION BY |
|
|
|
|
|
|
|
|
PROGRAM |
|
|
|
select |
|
|
|
|
|
|
|
|
|
|
|
|
|
|
|
|
esc |
|
enter |
enter |
|
|
|
|
||
|
MANUAL SETTING |
|
|
|
|
|
|
|
|
- SETTING OF ALL |
|
|
|
|
|
|
|
|
THERAPY PARAMETERS |
|
|
|
|
|
|
|
|
|
esc |
|
|
|
|
|
esc |
|
|
start/stop |
|
|
|
|
INTERRUPTION |
|
|
|
START OF THERAPY |
|
|
|
|
|
|
|
|
|
|
|
|
|
|
OF THERAPY |
|
|
|
|
|
|
|
|
start/stop |
|
|
RUNNING |
|
|
|
|
|
|
|
|
THERAPY |
|
|
|
|
|
|
|
|
p a g e |
1 3 |
o f |
5 2 |
|
|
|
B T L - 4 0 0 0 S E R I E S |
U S E R ' S M A N U A L |
|
|
2 . 4 . 2 |
O p e n i n g S c r e e n a n d S e l e c t i o n o f C h a n n e l s , T a b s , |
|
A c c e s s o r i e s |
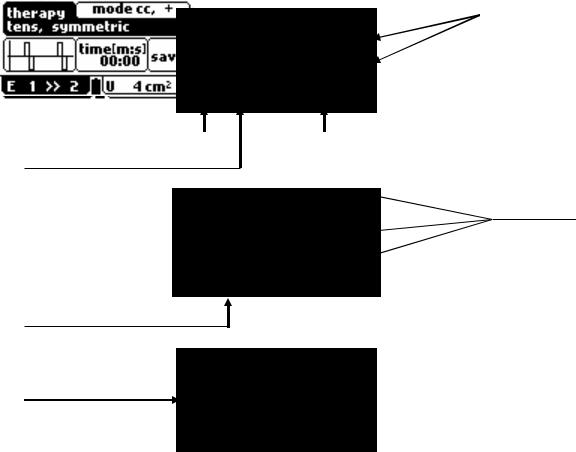
Besides the initial information, this screen contains channel tabs with description of the connected accessories. The number of channels – tabs depends on the required configuration of the device. To display all information of the channel press button1 (16) or 2 (17) under the tab. The information set on the "invisible channels" remain preserved. The following scheme shows that almost the entire screen is available for the "selected channel".
Buttons 1(16) and 2(17) located directly under the tabs serve for switching between the tabs.
On the channels where more accessories can be connected to one generator (ultrasound generator and two ultrasound heads, laser generator and laser probes), repeated pressing of the tab's button serves for switching between these accessories.
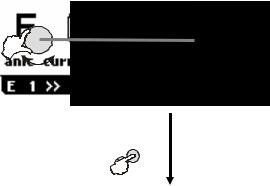
The tab of the channel which is selected (i.e. its information is just on the display) is black.
Examples of information on the tabs:
tab of the selected E channel to which no accessory is connected
tab of the E channel which is not selected, with connected accessory BTL-236-2
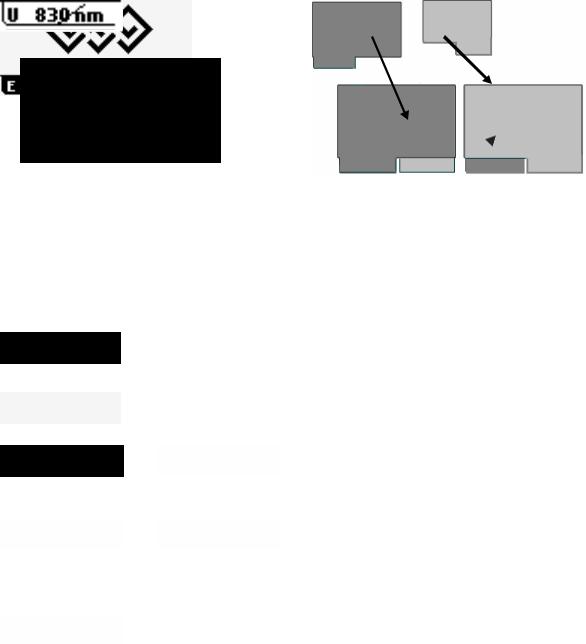
tab of the U generator which is not selected, with connected ultrasound head; pressing of buttons 1 (16) and 2 (17) under the tab serves for switching between the connected heads – 1 cm2/4 cm2
tab of the selected L generator with connected laser probe; pressing of buttons 1 (16) and 2 (17) under the tab serves for switching between the connected probes– 685nm/830nm (red/infrared)
tab of the selected E2 channel with unsuitable connected accessory, which this generator cannot work with
2 . 4 . 3 |
S e t t i n g o f T h e r a p y P a r a m e t e r s b y S e l e c t i o n o f D i a g n o s i s |
|
– " d i a g " b u t t o n |
To view the list of diagnoses press the diag button (8). Each tab – channel – is assigned the list of diagnoses which can be performed on this tab. For example, on the U generator tab you can find all diagnoses which can be performed with the ultrasound heads. On the E generator tab you can find all diagnoses which can be treated by electrotherapy;
p a g e 1 4 o f 5 2

B T L - 4 0 0 0 S E R I E S |
U S E R ' S M A N U A L |
|
|
in addition the list can contain e.g. diagnoses for high-voltage and/or combined therapy, depending on the configuration of the device.
For moving in the list of diagnoses use the select knob (12), the currently selected diagnosis is displayed in bold. For fast finding of a diagnose select its initial letter by the tab button (15).
After finding of the required diagnosis select it by pressing the enter button (13). If the diagnosis is assigned more therapies – e.g. the treatment can be done by several various types of current – the list of therapies appears after selection of the diagnosis. Select the required therapy by the select knob (12) and press enter (13) again.
select |
|
|
|
select |
|
|
|
|
|
enter
select
enter
The user therapies which you create yourselves are in the *user diagnoses / programs directory. Their list appears after pressing the enter button (13).
enter
p a g e 1 5 o f 5 2
B T L - 4 0 0 0 S E R I E S |
U S E R ' S M A N U A L |
|
|
2 . 4 . 4 |
S e t t i n g o f T h e r a p y P a r a m e t e r s b y S e l e c t i o n o f P r o g r a m |
|
– " p r o g " b u t t o n |
After pressing the prog button (9) a screen opens where you can enter the number of the required therapy program. The program number contains the prefix, i.e. the letter corresponding to the therapy principle: E – electrotherapy; U – ultrasound; L – laser therapy.
Combined therapies E+U are sorted among the E programs and are on the E1 electrotherapy tab – in the following pictures on the E1 channel. They are on positions E-35xx to E-39xx.
Your user diagnoses (except sequences) are stored under the program numbers E-80xx to E-89xx for electrotherapy, U-80xx to U-89xx for ultrasound therapy and L-80xx to L-89xx for laser therapy.
Your user sequences are stored under the program numbers E-95xx to E-99xx for electrotherapy, U-95xx to U-99xx for ultrasound therapy and L-95xx to L-99xx for laser therapy.
The recommended programs assigned to recommended diagnoses are in the User's Guide.
For faster setting, the program numbers are arranged into pairs. For change of the number use the select knob (12), for switching between the pairs of digits use the tab key (15).
select
enter
2 . 4 . 5 |
U s e r S e t t i n g o f T h e r a p y P a r a m e t e r s – " m a n " b u t t o n |
The therapy parameters screen for user (manual) setting appears after pressing the man button (10). All therapy parameters can be set and saved as a user program or diagnosis.
It Is obvious that the therapy parameters screens of individual currents of electrotherapy, ultrasound therapy and laser therapy differ in dependence on the options which can be set in the particular moment. For more details see the respective User's Guide.
To open the required menu or setting dialog select the respective button by the tab key (15) and then press enter (13). Most dialogs are accompanied with illustration pictures and symbols. See the scheme of possibilities of individual settings in this mode.
p a g e 1 6 o f 5 2
 Loading...