

Page 1
Diverse 2-Line telephone system
For cordless and corded communications DECT
Start-up Guide
Instructions for setting up your Diverse 2-Line and Diverse Additional and Executive Handsets
This equipment is not designed for making emergency telephone
calls when the power fails. Alternative arrangements should be
made for access to emergency services.
Page 2

Please open this page for an ‘at a glance’
guide to your Diverse 2-Line.
Page 3

Please open this page for a further ‘at a
glance’ guide to your Diverse 2-Line.
Page 4

1
At a glance
Front view
Green registration light
Comes on when mains
power is switched on.
Flashes during handset
registration.
. . . . . . . . . . . . . . . . . . . .
. . . . . . . . . . . . . . . . . . . .
. . . . . . . . . . . . . . . . . . . .
Diverse 2-Line
Page 5
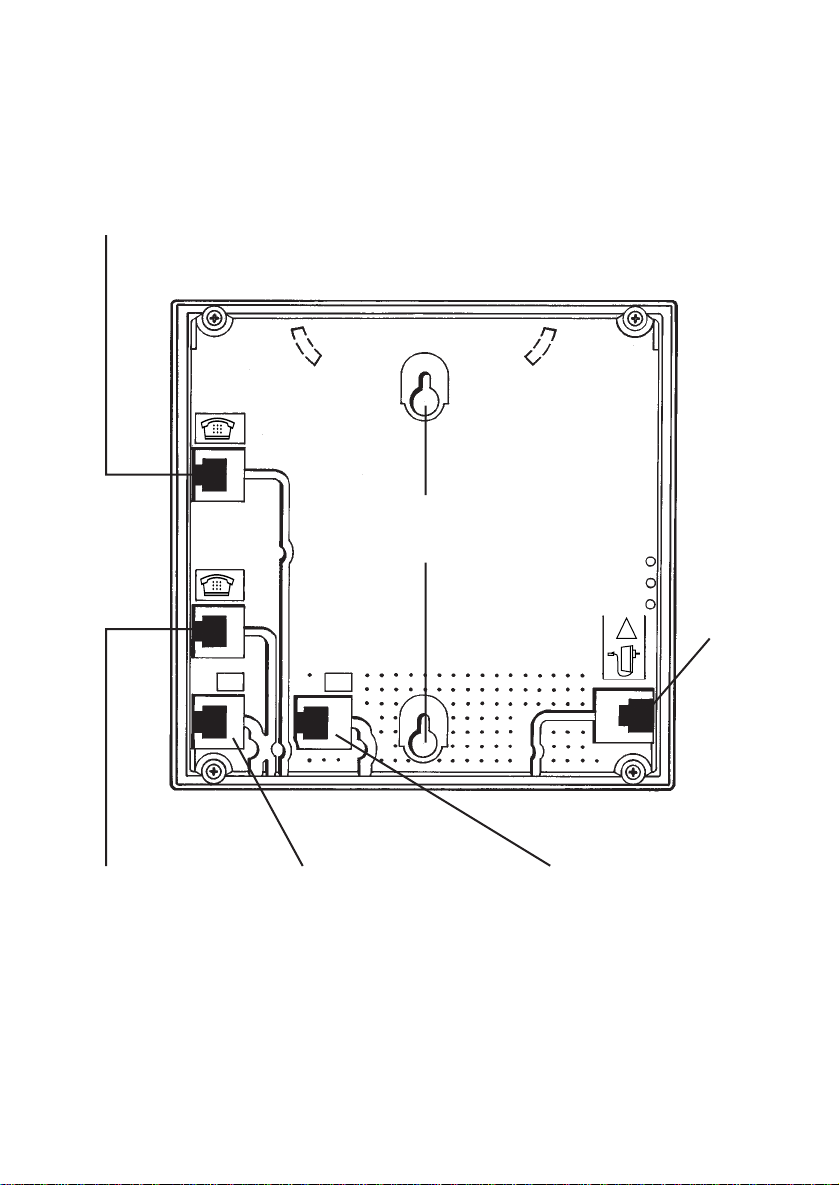
2
Mains
power
cord
Telephone
line socket 2 –
external line 2.
Telephone
line socket 1 –
external line 1.
Socket for line cord
socket adaptor –
internal number 9.
Socket for line cord
socket adaptor –
internal number 0.
Corded sockets
Allows you to plug in up to
two additional, corded machines
such as a fax, answering machine
or telephone.
Back view
Wall mounting
screw sockets
0
9
L1
L2
!
Page 6
3
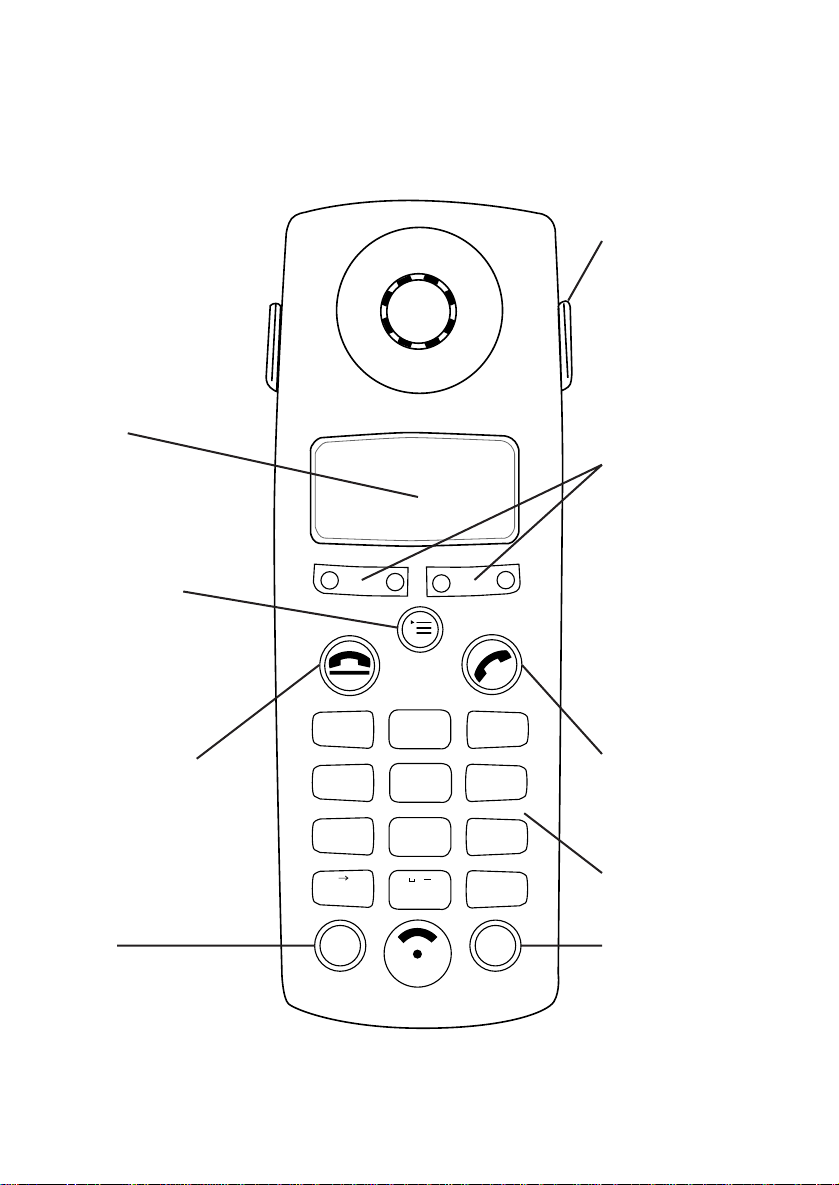
At a glance: Diverse Executive
Handset
1
2
ABC
3
DEF
4
GHI
5
JKL
6
MNO
7
PQRS
8
TUV
9
WXYZ
#
✱
0
RCL
PWR
.
a A
Power
For switching
the handset
ON and OFF and
locking the keys
(PROTECTED
Mode).
Recall
For use with
switchboards and
BT Select Ser vices.
Phone
Used to make and
answer calls.
End Call
Used to end a
telephone call.
Menu
Brings up the
menu onto the
display.
Options
Lets you select
options from the
menus shown on
the display.
Carrying clip
Keypad
Display
Page 7
4
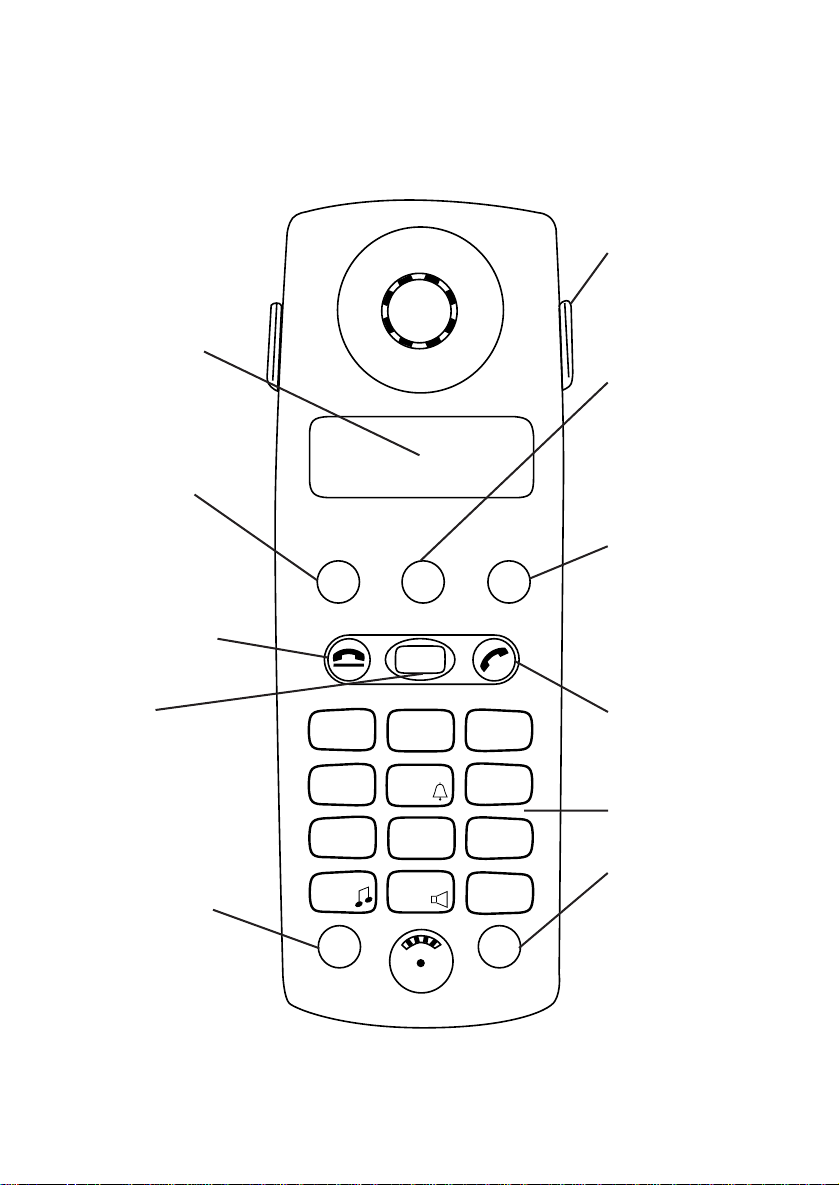
At a glance: Diverse Additional
Handset
INT
1
2
ABC
3
DEF
4
GHI
5
JKL
6
MNO
7
PQRS
8
TUV9WXYZ
#
✱
0
RCL
PWR
STO
MEM
LNR
Carrying clip
Power
For switching
the handset
ON and OFF and
locking the keys
(PROTECTED
Mode).
Recall
For use with
switchboards and
BT Select Ser vices
Keypad
Phone
For making and
answering calls
Intercom
Enables internal
communication
and call transfer
between handsets
End call
Used to end a call
Last number
redial
Lets you redial the
last five external
numbers you
called
Memory speed
dial
Enables quick
dialling of 10
numbers stored in
the memor y
Store
Lets you store
numbers on the
memor y and
access other
phone functions
Display
Displays the status
of your handset
Page 8

In this guide
At a glance 2-4
Introduction 8
Warnings 9
Setting up 10
Installing the system 10
Registering your handsets 13
Using your Diverse 2000 Executive Handset 15
Switching ON/OFF and to PROTECTED 15
Making and receiving calls 16
Using your Diverse 2000 Additional Handset 17
Switching ON/OFF and to PROTECTED 17
Making and receiving calls 18
Connecting and using corded telephones
and other equipment
20
Using an Executive Handset to set the configuration 21
Using an Additional Handset to set the configuration 22
Using attached corded telephones 24
Customising your Diverse 2-Line system 25
Customising using an Executive Handset 26
Automatic external line 26
Automatic call pickup 27
Call allocation 28
Call barring 31
5
Page 9

6
Customising using an Additional Handset 39
Automatic external line 39
Automatic call pickup 39
Call allocation 40
Call barring 42
Using and changing the base station
security code and handset PIN
47
To register a handset on more than one
Diverse 2-Line base station
49
System settings 53
Wall mounting 56
Maintenance 57
Index 58
Hints and tips boxes
In this user guide, we’ve included helpful tips and important information in grey boxes.
Page 10

7
Check that your Diverse 2-Line is
complete. When you unpack you
should have:
• Diverse 2-Line base station.
• Mains power adaptor.
• Two telephone line cords.
• Two telephone line cord socket adaptors.
• Rawlplugs and screws for wall mounting.
• Two User Guides (one Start-up User Guide and one standard User Guide)
For your records
For warranty purposes, proof of pur chase is requir ed, so please keep your receipt.
Date of purchase:
Place of purchase:
Serial number:
(on the underside of the telephone base station)
Purchase price:
Page 11

8
We thank you for making the right choice
and expect that your Diverse 2-Line will
give you many years of quality service.
This Star t-up Guide will give you the
information you need to set up your
Diverse 2-Line and handsets ready for
use, and to customize your phone system
to your own personal requirements.
Please refer to the standard User Guide
for full instructions on day to day usage
of your Diverse 2-Line and handsets once
your system has been set up.
Please be sure to retain this Start-up
Guide for future reference.
DE C T
By purchasing your Diverse 2-Line you
now own a product which combines the
advantages of cordless operation with
the per for mance of a high quality
telephone. It complies with the standard
for Digital European Cordless
Telecommunications (DECT) and offers
unparalleled quality and features.
Building up a phone system
The BT Diverse range of products have
been designed with flexibility in mind.
With the exception of the Diverse 1000,
the products in the Diverse range have
been designed to grow in tandem to build
the total telephone solution that best
meets your needs. With the Diverse
2-Line you can use up to 8 handsets plus
two corded machines - faxes, answering
machines, modems or telephones – with
your Diverse 2-Line base station. If you
wish to connect more than 2 corded
devices, you can purchase the Diverse
Cordless Socket.
This Star t-up Guide applies to both
single and multiple handset systems.
Introduction your Diverse
2-Line is designed for ease of use
and made to the high standards set
by BT.
Page 12

9
Warning
1. Use only approved nickel-cadmium
(NiCad) rechargeable batteries, size
AA for the handset. Never use other
types of rechargeable batteries or
conventional alkaline batteries. Using
such batteries could lead to a short
circuit or destroy the battery casing.
Recommended batteries should have
a power rating of 600m Ah 1.2V.
Batteries are available from the
Diverse Helpline 0345 90 80 70 or
your local BT shop.
2. Do not try to use any power supply
except the one provided, otherwise
you may permanently damage your
Diverse 2-Line. It will also result in
non-compliance with EN41003:1993,
which will invalidate the approval
given to this apparatus.
3. Ther e is a slight chance that your
phone could be damaged by an
electrical storm. We recommend
that you unplug your Diverse from
the mains power and telephone line
socket during storms.
4. If you wear a hearing aid, please
note that the Diverse 2-Line works
by sending radio signals between
the base station and handset. These
signals can inter fere with hearing
aids, causing a humming noise.
5. Diverse 2-Line can interfer e with
other electrical equipment, such as
answering machines, TV and radio
sets, clock radio/alarms and
computers if placed too close. It is
recommended that you place your
Diverse 2-Line at least one metre
away from such appliances to avoid
any risk of inter ference.
6. It is possible that the Diverse 2-Line’s
range may be af fected by being near
bodies of water (such as ponds, lakes,
the sea).
7. The Diverse 2-Line will pr oduce a
cer tain amount of heat during
operation. Equally, the Additional
and Executive Handsets as well as
the chargers can become warm
during charging. Whilst this is
entirely safe, we advise against
placing these products on antique,
veneered or wooden sur faces as
damage may occur.
8. In the event of a power failur e to
the Diverse base station, calls can
still be made from a corded
telephone connected to the socket
marked Tel no: 0 via Tel line 1 only.
9. Do not use the Diverse 2-Line and
handsets in damp, humid conditions
such as bathrooms. Do not expose
the equipment or batteries to fire
or water.
10. Do not dispose of used batteries in
with general household rubbish and
do not burn them.
11. Ensure that the telephone lines
and power cables are located in
the correct sockets in your Diverse
2-Line. Incorrect placement is
dangerous.
12. Do not use the handsets in rooms
where there are explosion hazards.
Page 13

10
Setting up follow these steps to
get your Diverse 2-Line ready for use.
Installing the system
1. Where to install your
Diverse 2-Line
To ensure that you achieve the maximum
range possible with your Diverse 2-Line
(up to 50 metres indoors, up to 300m
outdoors) please note the following
advice.
General points
Install the base station as centrally as
possible in the area in which you will be
using the telephones, for example:
• At an easily accessible point in the
room.
• In a central room in your house, of fice
or apar tment.
• Not in a niche in the wall.
• Not behind metal doors, heavy
furniture or metal cabinets.
• Not in the cellar or roofspace.
• Not at points where thick walls of
(reinforced) concrete or metal would
block radio signals.
and if you intend to use your handset(s)
outdoors;
• At window level if possible.
• In a room overlooking the outdoor
area.
Specific points
Select the best possible location, bearing
the following criteria in mind.
• The telephone cable has to reach the
telephone socket.
• The location has to be close to a
mains socket for the power supply for
the base station.
• To avoid inter ference, do not locate the
base station in the immediate vicinity
of other equipment such as a stereo,
of fice equipment or microwave oven.
• The base station is designed for use in
protected indoor environments and a
temperature range from 0 to +50°C.
• Do not install the base unit in the
bathroom, for example, a utility room
or a damp cellar, or close to sources of
heat such as radiators and the like.
• Do not install the base station where it
will be exposed to direct sunlight.
If you intend to wall mount your Diverse
2-Line, it is a good idea to test the range
of the product in the site you propose to
locate it before actually fixing it to the
wall. (See wall mounting on page 56.)
Page 14
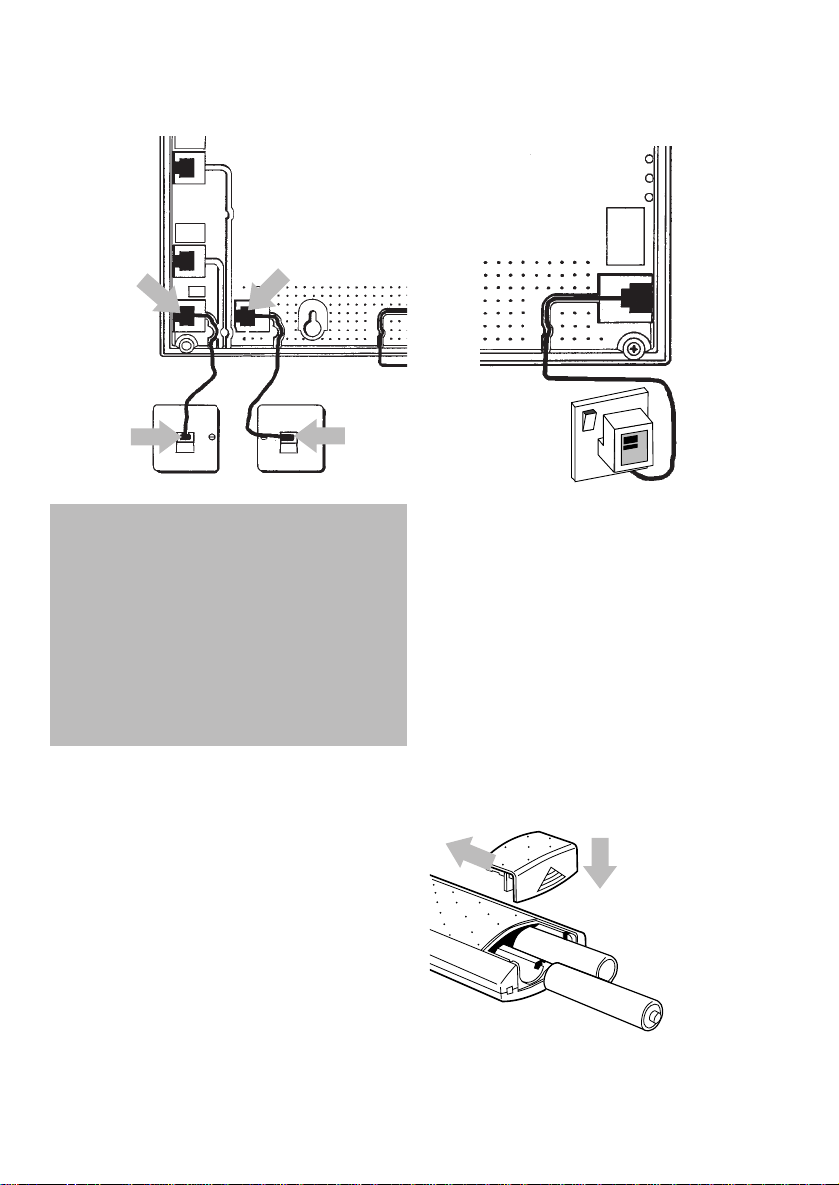
4. Switch on the mains power
The base station green
registration light comes on
5. Install the rechargeable
batteries in the handset
Both the Additional Handset and
Executive Handset use two AA size
nickel cadmium (NiCad) batteries.
These are supplied with the handsets.
Hold the handset with the keypad facing
down and slide open the batter y
compar tment.
Inser t the batteries as indicated on the
label inside the batter y compartment and
slide the battery compartment cover shut.
11
2. Connect the two telephone
line cords to the Diverse 2-Line
base station
3. Now plug your Diverse
2-Line into the two telephone
line sockets
If you do not have modern phone
sockets, call Freefone 0800 800 150 and
ask for a BT engineer to come and fit
the correct type. This is a chargeable
ser vice.You can wall mount your
Diverse 2-Line base station or leave it
free-standing on a flat sur face. To wall
mount, see page 56.
1
1
22
Although the Diverse 2-Line is designed
to be used with two telephone lines, if you
wish to use it with one line only, please
ensure that you use LINE 1 for your line
connection. Additionally, you will need to
set your second line to ‘internal calls only’.
Please see instructions in your Handset
User Guides to set up each handset or
telephone to this mode.
1
2
Page 15
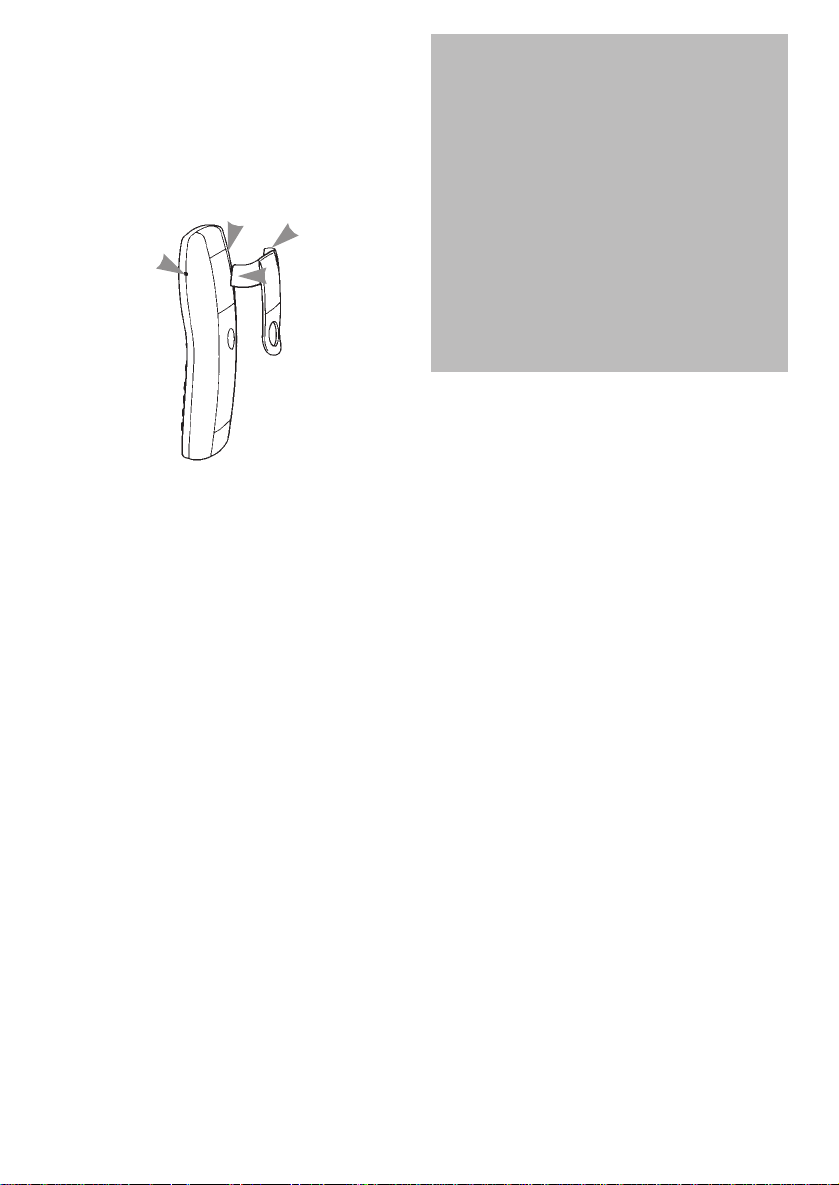
6. Fit the handset carrying
clip
Fit tab B of the clip into the slot on the
edge of the handset as shown, then
press tab A into place.
7. Charge the handset
batteries for at least 16 hours
Place the handset in the charger
(supplied separately).
When the handset batteries are
charging, the green CHARGING light
comes on.
When the handset has been charging for
16 hours, it is ready for use with your
Diverse 2-Line.
For full instructions on how to use your
charger, please refer to your charger
user guide.
12
Tab
B
Tab
A
Slot
Slot
After charging your Executive/Additional
Handset for the first time, normal
charging time for the handset batteries
Page 16
8. Register your handsets
Up to a total of eight handsets or
cordless devices can be registered and
operated from the Diverse 2-Line base
station. Each handset must be registered
for it to work.
The system allows you to make up to
three internal calls and one external call
OR two internal calls and two external
calls at the same time.
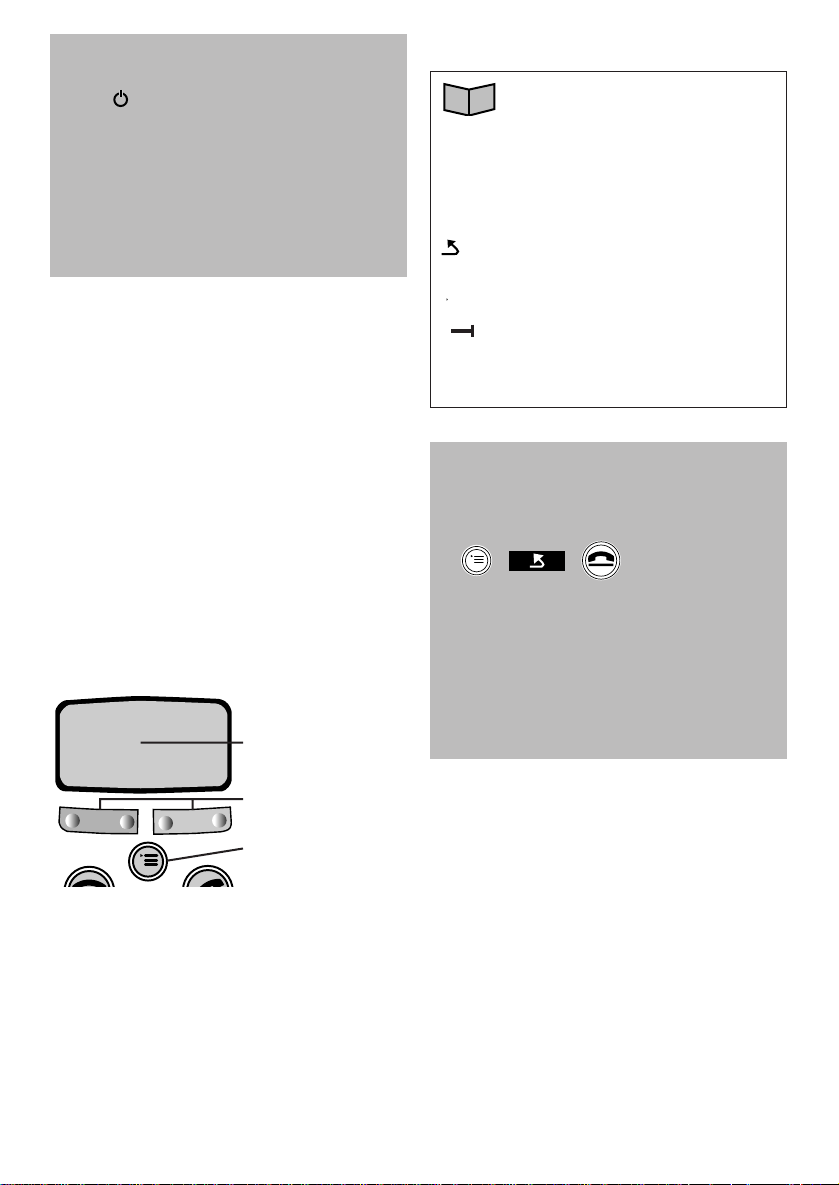
Using an Executive Handset
Your handset of fers a menu-driven display.
You enter the menu lists by using the
MENU button. The option buttons below
the display allow you to select the options
within each menu and make adjustments
to their settings.
The options shown on the display are
indicated by symbols.
13
Range warning symbol
If ‘search station’ (Executive Handset)
or the symbol (Additional Handset)
flashes on the display, it means the
handset is not registered with the base
station. To register it see below. All
handsets you purchase will need to be
individually registered with the base
station before they will work.
Display
Option buttons
Menu button
The symbols are as follows:
PHONEBOOK, to enter use
and alter phonebook entries.
INT INTERNAL.
REDIAL.
▲ Move UP through menu.
▼ Move DOWN through menu.
GO BACK to previous menu.
OK OK.
ACTIVATE.
DELETE.
< BACK.
> FORWARD.
➜
➞➞
During registration, if you make a
mistake you can return to the
previous level in the menu list
• Press the MENU button when in a
menu list.
• Or press the GO BACK option.
Or
• Exit menu options completely by
pressing the END CALL button.
-
–
-
–
–
–
–
Page 17
14
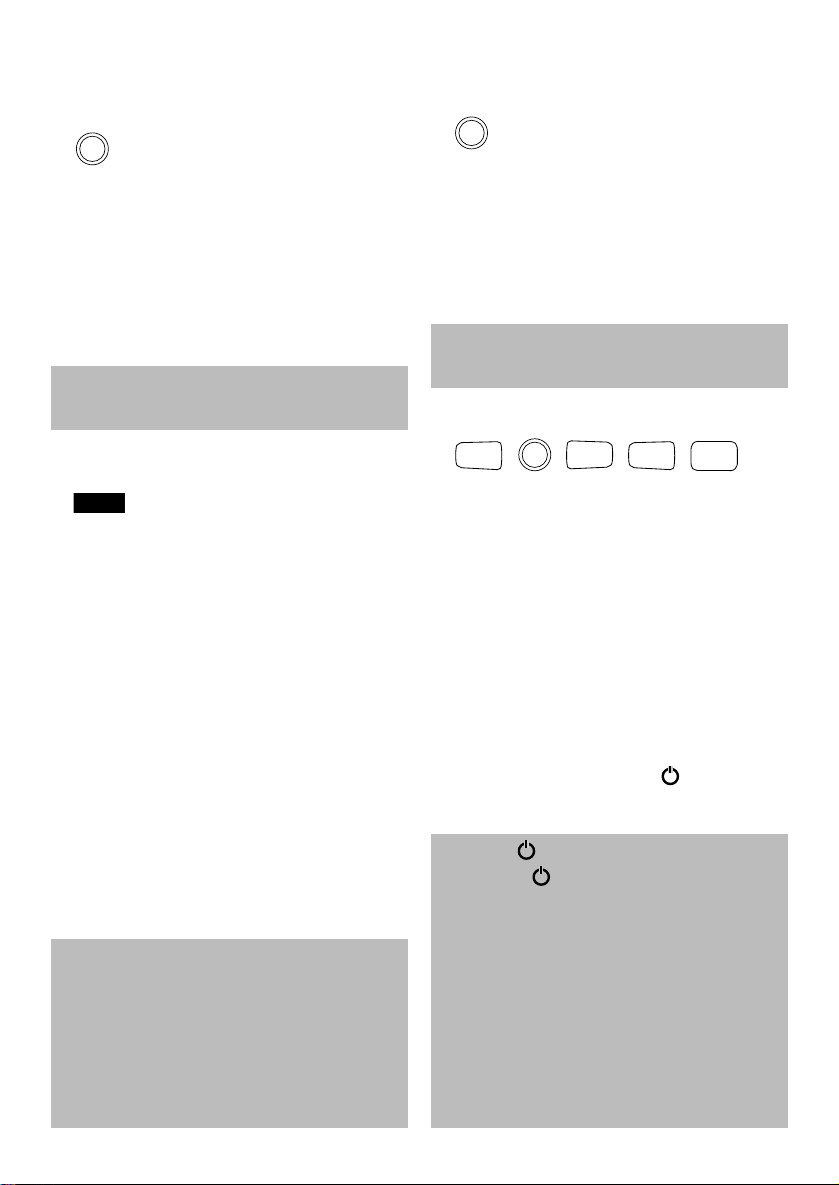
To register an Executive Handset
Make sure the handset is switched OFF.
At the handset:
• Press the PWR button. The display
shows REGISTER?
At the base station:
• Press and release the green registration
light (this will flash during the
registration process).
At the handset:
• Press the option button below OK
on the display.
• Enter the base station system code,
using the keypad (default 0000).
• Press OK.
• Wait until all available extension
numbers are displayed.
• Enter one of the extension numbers,
using the keypad.
• Your handset is now registered as the
extension number you have chosen.
The handset will beep once and the
display will momentarily show INTERN
and the number of the handset.
PWR
OK
You now have up to 1 minute to register
your handset.
You can register your Executive Handset
with up to six base stations. Please ensure
that you register your handset with the
correct base station number. If you have
only one base station, please ensure that
you have selected ‘Base 1’ in the above
procedure.
To register an Additional Handset
Make sure the handset is switched OFF.
To switch from ON to OFF
• Press and hold down the PWR button
until the display goes blank.
At the base:
• Use a pencil tip (or similar) to press
and release the green registration
light. It will now star t to flash.
At the handset:
• Press and hold down the 1 button
together with the PWR button until the
display shows 1-
• Enter the 4-digit system code
(default 0000).
• Press the #button. The display shows
all the available handset numbers (1-8).
• Select and enter one of the displayed
numbers. This is now the handset’s
internal number and it is register ed
with the base station. This is confirmed
by a shor t beep and the symbol will
stop flashing.
PWR
PWR
1#1
8
TUV
You now have up to 1 minute to register
your handset.
Flashing
A f lashing symbol means the handset
is not registered with the base station or
is out of range. All additional handsets
you purchase will need to be individually
registered with the Diverse 2-Line base
station before they will work.
If eight handsets are already registered
with the base, the handset display will
show three dashes – – – after you have
entered the system code.
Page 18

15
Using your Diverse 2000
Executive Handset
The following instructions tell you how
to begin to make and receive calls from
your Executive Handset.
For full instructions of how to use your
Executive Handset, including how to
store numbers into the handset memory,
please refer to the Diverse 2-Line standard
User Guide.
Switching your handset
ON/OFF and to
PROTECTED mode
Using the PWR button. The Executive
Handset can be operated in one of three
dif ferent modes.
When the handset is OFF, calls cannot
be made and the handset does not
respond to incoming calls.
To switch ON
• Press and hold down the PWR button
until the display is activated.
When the handset is switched ON, you
can make and receive calls.
To switch from ON or PROTECTED
to OFF
• Press and hold down the PWR button
until the display goes blank.
To switch from ON to PROTECTED
• Press and release the PWR button
briefly.
When the handset is in PROTECTED
mode, you cannot accidentally operate
the handset’s keypad when carrying it
around. You can still receive incoming
calls but cannot make outgoing calls.
To switch from PROTECTED to ON
• Press the PWR button briefly.
If your Executive Handset is out of range
of the Diverse 2-Line base station, the
displays flashes the base station name.
You cannot make or receive calls until
the handset is back within range.
PWR
PWR
PWR
PWR
Base 1
INT
➔➔
Page 19
16
• If the handset is on the charging
station, simply lift the handset and
speak. (You will still need to press the
PHONE button if the automatic call
pick-up setting has been switched
of f. See page 27.)
To make an internal call to a specific
handset or telephone
The handset must be switched ON:
• Press the INT button. Display shows
your handset number.
• Enter the internal number (0-9) you
want to call. The handset or telephone
will ring.
• To end the call, press the END CALL
button or replace the handset on the
base.
To redial the last external number
• Press the PHONE button.
• Press REDIAL.
To redial any of the last five external
numbers
You can redial the last five numbers
dialled from your handset.
• Press the REDIAL option.
• Press DOWN to find the number you
want.
• Press PHONE and the number is
dialled.
Making and receiving calls
To make an external call
Ensure the handset is switched ON.
• Press the PHONE button. You will
hear the external dial tone and the
display prompts you to dial. If automatic
external line is switched off, you will
have to select a line number first (see
automatic external line on page 26) to
get dial tone.
• Dial the number. The display shows
the number you have dialled.
Alternatively, you can key-in the phone
number you want first including line
number if necessar y, check that it’s
correct on the display and then pr ess the
PHONE button to dial.
To end a call
• Press the PHONE button.
or
• Place the handset back on the charger.
To receive calls
When the handset rings:
• Press the PHONE button on the
handset and speak.
or
If both external lines are busy, your
handset will display ‘
–––
’ flashing and
the word ‘EXTERN’ and you will hear the
internal‘busy’ signal.
For full instructions of the many ways
to make, receive and pass calls, please
refer to your Diverse 2-Line Standard
User Guide.
INT
0-9
REDIAL
REDIAL
▼
➔➔
Page 20

17
Using yourDiverse 2000
Additional Handset
The following instructions explain how
to begin to make and receive calls from
your Additional Handset. For full
instructions on how to use your Additional
Handset, including how to store numbers
into the memor y, please refer to your
Diverse 2-Line standard User Guide.
Switching your handset
ON/OFF and to
PROTECTED mode
Using the PWR button, the handset can
be operated in one of three dif fer ent
modes.
When the handset is OFF, calls cannot
be made and the handset does not
respond to incoming calls.
To switch ON
• Press and hold down the PWR button
until the display is activated.
When the handset is switched ON you
can make and receive calls.
To switch from ON or PROTECTED
to OFF
• Press and hold down the PWR button
until the display goes blank.
To switch from ON to PROTECTED
• Press and release the PWR quickly.
When the handset is in PROTECTED
mode, you cannot accidentally operate
the handset’s keypad when carrying it
around. You can still receive incoming
calls but cannot make outgoing calls.
To switch from PROTECTED to ON
• Press and release the PWR button
quickly.
If your Additional Handset is out of
range of the Diverse 2-Line base station,
the symbol f lashes. You cannot make
or receive calls until the handset is
brought back within range.
PWR
PWR
PWR
PWR
Page 21

18
To receive an external call
• When the handset rings the display
flashes EXT.
• Press the PHONE button on the
handset and speak.
or
• If the handset is on the charging
station, simply lift it up and speak,
(you will still need to press the PHONE
button if the automatic call pickup
setting has been switched of f. See
main User Guide).
• To end the call either press the END
CALL
button or replace the handset
on the charger.
To make an internal call to a specific
handset or telephone
• Press the INT button. The display
shows your handset number.
• Enter the internal number (0-9) of the
handset/telephone you want to call.
The called handset/telephone will ring.
• To end the call either press the END
CALL
button or replace the handset
on the charger.
Note: If you wish to include a pause in
the telephone number then press the LNR
button. The pause will be indicated by a
‘P’ in the number.
If both external lines are busy your
handset will display three f lashing darts
at the top of the screen and you will hear
the busy signal.
Making and receiving calls
To make an external call
Ensure the handset is switched ON.
• Press the PHONE button. You will
hear the external dial tone, and the
display prompts you to dial. If automatic
external line is switched off you will
have to select a line number first (see
automatic external line in your main
User Guide) to get dial tone.
• Dial the number. The display shows
the number you have dialled.
Alternatively, you can key in the phone
number you want first, including line
number if necessar y, check that it’s
correct on the display and then pr ess the
PHONE button to dial.
To end a call
• Press the END CALL button
or
• Place the handset back on the
charger.
INT
0-9
EXT
Page 22

19
To redial any of the last five external
numbers
• Press the LNR button until the desired
number is displayed.
• Press the PHONE button.
• To end the call either press the END
CALL
button or replace the handset
on the charger.
To receive an internal call
When the handset rings, the display
flashes INT plus the number of the
handset calling you.
• Press the PHONE button and speak
or
• If the handset is on the charging
station, simply lift the handset and
speak (you will still need to press the
PHONE button if the automatic call
pickup setting has been switched of f.
See your main User Guide).
• To end the call either press the END
CALL
button or replace the handset
on the charger.
To redial the last external number
• Press the PHONE button.
• Press the LNR button. The last
number you called will be redialled
automatically.
• To end the call either press the END
CALL
button or replace the handset
on the charger.
LNR
For full instructions of all the ways in
which you can make and receive calls
using your Diverse Additional Handset,
please consult your standard Diverse
User Guide.
LNR
Page 23

20
As well as connecting up to eight
cordless handsets/cordless sockets you
can connect two corded devices to your
Diverse 2-Line, for example: fax machine
+ telephone answering machine
Each corded device attached must be
connected via socket adaptors to the two
corded telephone sockets on the Diverse
2-Line so that each one will be connected
to a separate internal phone number. Fax
and modems should if possible be
connected to the socket marked Tel No:
0 which can suppor t a data rate of
28.8kbit/s. This is due to a 9.6Kb limit on
the socket marked tel no: 9.
Connecting a corded telephone
A telephone can be plugged in and used
immediately. No registration is required
but you may want to alter group ringing
or collective ringing settings (see Call
allocation on page 28).
Connecting other corded
devices
Using a registered handset, you must tell
the Diverse 2-Line whether the attached
device is a fax machine, answering
machine or modem.
Connecting and using
corded telephones and
other equipment
When connecting a fax machine to your
Diverse 2-Line you may need to set the
fax machine for use with a switchboard.
See your fax user guide for details.
Page 24

21
On the Executive Handset the configuration
options are displayed within a menu list of
possible settings. The current setting has
the word “activ:” next to it.
Using an Executive Handset
to set the connection
configuration.
You can stipulate which types of cordless
devices are connected to the Diverse
2-Line base station. It is impor tant to set
the right configuration to ensure corr ect
operation.
Cordless Sockets
If you require to add more than 2 corded
devices to your Diverse 2-Line, you can
purchase a Diverse Cordless Socket.
This allows you to attach another cordless
device per cordless socket, but will
reduce the number of handsets you can
have (one less per every Cordless Socket).
If you wish for more information on
Cordless Sockets, please contact your
local retailer.
Codes for equipment type:
Executive Handset
no funct.
Disables the internal number.
Produces busy tone to internal calls.
Valid only for internal numbers 0 and 9.
Mobileset
Used for Cordless handset/socket.
Valid only for internal numbers 1 to 8.
Telephone
Used for corded telephone or
answering machine.
Valid only for internal numbers 0 and 9.
Modem.
Used for modems. No echo
suppression/ cancellation. Produces
busy tone to internal calls.
FAX
Used for fax machines. No echo
suppression/cancellation. Produces busy
tone to internal calls.
Doorstatio
Used for door phone systems.
Inhibits ringing to door phone and uses
own call group to call internal numbers.
Valid only for internal number 9.
Note: Do not use this setting. It is not
supported by BT.
neutral (telephone or fax machine)
Allows you to call a telephone attached
to a fax machine or to transfer a fax
call to it.
Socket/ Register
Connected
internal it on the
machine
tel no base as:
Telephone 0 or 9 Telephone
Answering
machine 0 or 9 Telephone
Fax machine 0 only Fax or
‘Neutral’
Modem 0 only Modem
External bell 0 or 9 Telephone
Entr y phone 9 only Doorstatio
Page 25

22
To select the equipment type and the
internal line to which it is to be
attached
The handset must be switched ON
• Press the MENU button to display the
main menu.
• Press DOWN to highlight SERVICE.
• Press OK.
• Press NEXT to highlight SYSTEM
SETTINGS.
• Press OK.
• Enter the system code (default 0000).
• Press OK.
• Press NEXT to highlight EQUIPMENT
DATA.
• Press OK.
• Press NEXT to highlight A/B LINE.
• Press OK.. The display shows:
A/B LINE 0; A/B LINE 9; INTERNAL 1;
INTERNAL 2; to INTERNAL 8.
• Press NEXT to highlight the inter nal
line to which you wish to connect
your equipment.
• Press OK. The display shows the codes
for the type of equipment which you
can connect to that internal line (see
table). The active setting is also shown.
• Press NEXT to highlight the required
equipment setting.
• Press SAVE if a new setting has been
selected or OK to confirm the cur rent
setting.
Using an Additional
Handset to set the connection
configuration.
You can stipulate which types of devices
are connected to the Diverse 2-Line base
station. It is impor tant to set the right
configuration to ensure corr ect operation.
In the Additional Handset the
configuration setting is displayed as a
single digit (1-6). The meaning of this
digit is shown in the following table:
Codes for equipment type:
Additional Handset
Code Meaning
0 No function.
Disables port. Produces busy to
internal calls.
Valid only for internal numbers
0 and 9.
1 Cordless handset or Diverse
cordless socket.
Valid only for internal numbers
1 to 8.
2 Corded telephone or answering
machine.
Valid only for internal numbers
0 and 9.
3 Modem.
No echo suppression/
cancellation. Produces busy tone
to internal calls.
4 Fax machine.
No echo suppression/
cancellation. Produces busy tone
to internal calls.
5 Door entry phone
Inhibits ringing to door phone
and uses own call group to call
internal numbers.
Valid only for internal number 9.
Note: Do not use this setting.
If is not supported by BT.
6 Neutral (telephone or fax
machine). Allows you to call a fax
machine with a telephone, or to
transfer a fax call to it.
▼
NEXT
OK
SAVE
Page 26

23
• Press the LNR button to scroll
through until the internal number you
want is displayed.
• Press the appropriate button (0-6)
which corresponds to the correct
configuration, if dif ferent to the one
displayed (see table on page 22).
• Press the STO button to confirm.
To set the equipment type and the
internal line to which it is to be
attached
The handset must be switched ON
• Press the STO button.
• Press the #button.
• Press the 1 button.
• Enter the system code (default 0000).
• Press the 0 button.
• Press the LNR button.
• Press the #button.
• Press the 0 button. The display will
show two digits towards the left of the
screen.
The leftmost digit is a 0 and is the internal
number currently selected. The digit to
the right of it indicates the equipment
type for that internal number (default
setting 2 = telephone).
The LNR button is used to step through
the internal numbers (0-9) of all
registered equipment. The left most digit
will change to indicate the current
internal number and the digit to the
right will indicate its equipment setting.
STO
LNR
#
1
0
20
When using modems
In the initialisation string of your modem
software application you may need to set
the modem to “blind dial”. With the
standard Hayes command set, ATZO will
perform this function (refer to modem
user guide).
You may also need to set any automatically
dialled numbers to first dial the line
access digit (0,1,2) and then pause to
allow external dial tone to arrive (say
2 sec) before dialling the remainder of
the number.
Page 27

24
Using attached, corded
telephones
Once set up, basic calls can be made and
received as follows. For more detailed
instructions on how to use attached
corded telephones, please refer to your
Diverse 2-Line standard User Guide.
To make an external call
Lift the handset.
• Press the 0, 1 or 2 button for an
external line (0 denotes first available
free line) .
• Dial the number you want.
To make an internal call to a specific
handset or telephone.
• Lift the handset.
• Press the 9 button.
• Press the button (0-9) which
corresponds to the internal number of
the handset or telephone you want.
To answer an incoming call when your
phone rings:
• Lift the handset and speak.
0
9
W
X
Y
Z
0-9
Page 28

25
Customising your
Diverse 2-Line system
Your Diverse 2-Line system can be
customised to suit your personal
operating requirements. The following
features can be adjusted.
Automatic external line
When you press the PHONE button on
your registered handset, you will
automatically get an external line. You
can change this setting so that you will
also have to press 0, 1 or 2 to get an
external line. This enables you to choose
a specific line ever y time you make a
call. This may be useful if for instance,
one of the two lines is a direct external
line and the other is connected to a
switchboard.
Executive Handset see page 26.
Additional Handset see page 39.
Automatic call pick-up
When the handset is placed on the
charger and a call comes in, you can
answer the call just by lifting the
handset. You can switch this setting of f
so that you will always have to press the
PHONE button to answer the call. The
original setting is ON.
Executive Handset see page 27.
Additional Handset see page 39.
Call allocation
Your Diverse 2-Line system is pre-set to
ring all registered handsets and any
attached corded machines as soon as
there is an incoming call on either line.
This is called “collective ringing”.
You can change this to enable a selected
group of phones to ring on either external
line 1 or external line 2.
You can also set one group of handsets/
telephones to ring as soon as a call comes
in and for a second group of handsets to
then ring if the first group of handsets
have not answered. This is called “group
ringing”.
Executive Handset, see page 28.
Additional Handset, see page 40.
Page 29

26
Customising
using an
Executive Handset
Automatic external line
You can set up your Diverse system to
make calls in two dif ferent ways:
Automatic external line switched ON
means that when you press the PHONE
button, you automatically get an external
line (this is the default setting).
Automatic external line switched OFF
means when you want to make a call, you
will first have to press 0, 1 or 2 and then
the PHONE button to get an external line
(dialling 0 picks up any free line).
Call barring
You can choose to restrict calls from
your Diverse 2-Line in four dif ferent
ways.
Executive Handset, see page 31.
Additional Handset, see page 42.
1.You can bar all outgoing calls from
your Diverse 2-Line other than for 3
pre-programmed (999, 112 and 9112)
or 4 user programmable (i.e. doctor,
plumber, equipment breakdown
engineer) emergency numbers. Useful
if you want your handsets to function
purely as an internal phone system.
2.Barring specific numbers being
called from handsets registered with
Diverse 2-Line bases. These restrictions
apply to specific handsets. Each one
can have up to three barr ed number
prefixes up to eight digits each set
against them.
3.Restricting handsets and attached
phones to incoming plus internal calls
or internal calls only. The restrictions
apply to specific handsets or telephones
and may be set dif ferently for external
Line 1 and external Line 2.
4.Restricting an individual handset
from making any calls (except the 3
preset emergency numbers and 4 user
programmable emergency numbers
stored in the base station).
Page 30

Automatic Call Pickup
If Automatic Call Pickup is OFF, you will
have to press the PHONE button to take
a call (even if the handset is in the
charger). The default setting in ON.
To switch automatic call pick up off/on
The handset must be switched ON:
• Press the MENU button to display the
main menu.
• Press DOWN to highlight SETTINGS.
• Press OK.
• Press NEXT to highlight HANDSET
SETTINGS.
• Press OK.
• Press NEXT to highlight AUTO TALK.
• Press OK. The display shows the
current setting and gives you the
choice to turn ON or OFF.
• Either press GO BACK to exit or
change the setting as follows.
To switch from ON to OFF:
• Press the OFF button.
• Press the OK button to confirm.
To switch from OFF to ON:
• Press the ON button.
• Press the OK button to confirm.
27
To switch automatic external line
on/off
The handset must be switched ON:
• Press the MENU button to display the
main menu.
• Press DOWN to highlight SERVICE.
• Press OK.
• Press NEXT to highlight SYSTEM
SETTINGS.
• Press OK.
• Enter the system code (default 0000).
• Press OK.
• Press NEXT to highlight EQUIPMENT
DATA.
• Press OK.
• Press NEXT to highlight AUTOM.
SEIZURE.
• Press OK. Display lists the inter nal
numbers of all registered handsets
(1-8) that are set to get an automatic
external line.
• Press
DELETE
to remove numbers
and buttons 1-8 to add numbers
displayed on the screen, until the
numbers displayed are the internal
numbers of the handsets to which you
want to allocate automatic external line.
• Press SAVE to confir m any changes or
OK if no changes are made.
1-8
NEXT
▼
OK
NEXT
OK
▼
OFF
ON
Page 31

28
To select group ringing for a specific
external line and/or assign internal
numbers to the call groups
• Press the MENU button to highlight
the main menu.
• Press DOWN to highlight SERVICE.
• Press OK.
• Press NEXT to highlight SYSTEM
SETTINGS.
• Press OK.
• Enter the system code (default 0000).
• Press OK.
• Press NEXT to highlight LINE DATA.
• Press OK.
• Press NEXT to highlight EXTERNAL 1 or
EXTERNAL 2.
• Press OK.
• Press NEXT to highlight CALL DATA.
• Press OK.
• Press NEXT to highlight RING
ALLOCATION.
• Press OK. The display shows the two
types of ringing and which one is
active.
• Press NEXT to select GROUP CALL.
Call allocation
You can allocate collective or group
ringing to each external line.
Group ringing
EXAMPLE
You want handsets 1 and 3 to ring on
external line 1. If there is no answer after
say three rings, you want the system to
also make handsets 2, 4 and 6 ring.
You would in the example set:
– Handsets 1 & 3 allocated to external
line 1, group 1.
– Handsets 2, 4 & 6 allocated to external
line 1, group 2.
– Number of rings set to three ring cycles.
3 rings, then
13 24 6
External Line 1
1
2
ABC
3
DEF
4
GHI
5
JKL6MNO
7
PQRS
8
TUV9WXYZ
#
✱
0
RCL
PWR
.
a A
1
2
ABC
3
DEF
4
GHI
5
JKL6MNO
7
PQRS
8
TUV9WXYZ
#
✱
0
RCL
PWR
.
a A
1
2
ABC
3
DEF
4
GHI
5
JKL6MNO
7
PQRS
8
TUV9WXYZ
#
✱
0
RCL
PWR
.
a A
1
2
ABC
3
DEF
4
GHI
5
JKL6MNO
7
PQRS
8
TUV9WXYZ
#
✱
0
RCL
PWR
.
a A
1
2
ABC
3
DEF
4
GHI
5
JKL6MNO
7
PQRS
8
TUV9WXYZ
#
✱
0
RCL
PWR
.
a A
NEXT
OK
▼
Page 32

29
If GROUP CALL was active
• Press OK to confirm. The display
shows the internal numbers assigned
to Group 1. These are the ones that
will ring first.
• Press the internal numbers of the
handsets/telephones you want to add
to this group or press the §button to
delete numbers in this group.
• Press SAVE to confir m the changes or
press OK if no changes have been
done. Any saving will be confirmed.
The display shows the internal
numbers assigned to Group 2. These
are the ones that will ring after a set
number of rings.
• Press the internal numbers of the
handsets/telephones you want to add
to this group or press the §button to
delete numbers in this group.
• Press SAVE to confir m the changes or
press OK if no changes have been
done. Any saving will be confirmed.
The display will now move to the menu
for the external line you selected.
(EXTERNAL 1 or EXTERNAL 2.)
• Press the END CALL button to end the
session and return to idle mode.
Alternatively you may want to select
CALL DATA again to r edo the settings
or as a shor tcut to set the number
of rings.
If GROUP CALL is new
• Press SAVE to confir m. The display
does not show any internal numbers
assigned to Group 1.
• Press the internal numbers of the
handsets/telephones to add to this
group. These are the ones you want
to ring. First use DELETE to remove any
number you entered incorr ectly.
• Press SAVE to confir m. The display
confirms the changes, then shows
Group 2 without any internal numbers
assigned to it.
• Press the internal numbers of the
handsets/telephones to add to this
group. These are the ones you want
to ring after a set number of rings.
Use DELETE to r emove any number
you entered incorr ectly.
• Press SAVE to confirm. The display
confirms the changes.
• Press the END CALL button to end the
session and return to idle mode.
Alternatively you may want to select
CALL DATA again to redo the settings
or as a shor tcut to set the number
of rings.
If collective ringing is set for a particular
line, then any previous group ringing
setting is automatically cancelled and
vice verse.
OK
SAVE
SAVE
➜
Page 33

30
Collective ringing
To select collective ringing for a
specific external line and/or assign
internal numbers to call groups
• Press the MENU button to highlight
the main menu.
• Press DOWN to highlight SERVICE.
• Press OK.
• Press NEXT to highlight SYSTEM
SETTINGS.
• Press OK.
• Enter the system code (default 0000).
• Press OK.
• Press NEXT to highlight LINE DATA.
• Press OK.
• Press NEXT to highlight EXTERNAL 1 or
EXTERNAL 2.
• Press OK.
• Press NEXT to highlight CALL DATA.
• Press OK.
• Press NEXT to highlight RING
ALLOCATION.
• Press OK. The display shows the two
types of ringing and which one is
active.
• Press NEXT to highlight COLL. CALL.
To set the number of ring cycles before
the second group of handsets/
telephones are called
When in group ringing mode, the original
setting is for three ring cycles to occur
before the second group of handsets/
telephones ring.You can change the
number of ring cycles.
• Press the MENU button to display the
main menu.
• Press DOWN to highlight SERVICE.
• Press OK.
• Press NEXT to highlight SYSTEM
SETTINGS.
• Press OK.
• Enter the system code (default 0000).
• Press OK.
• Press NEXT to highlight LINE DATA.
• Press OK.
• Press NEXT to highlight EXTERNAL 1 or
EXTERNAL 2.
• Press OK.
• Press NEXT to highlight CALL DATA.
• Press OK.
• Press NEXT to highlight NO. RING CYCLES.
• Press OK.
• Enter the number of ring cycles you
want to hear before the second group
will ring by pressing the 1-9 buttons
(1= one ring cycle, 9 = 9 ring cycles).
• Press SAVE to confir m the changes or
OK to keep the number displayed. The
display shows the menu for the external
line selected.
• Press either the END CALL button to
return to idle, or select CALL DATA as a
shor tcut t o change the Group call
settings.
NEXT
▼
OK
SAVE
NEXT
▼
OK
SAVE
➜
Page 34

31
If COLLECTIVE RINGING was active.
• Press OK to confirm. The display
shows the internal numbers currently
assigned to the collective call group.
If COLLECTIVE RINGING is new
• Press SAVE to confir m. You will get
a blank screen for you to enter the
required inter nal numbers for this
collective call group.
Add handsets/telephones to the group
• Press the internal numbers of the
handsets/telephones you want to add
to the group.
Delete handsets/telephones from the group
• Press DELETE to delete. (You may
have to re-enter some deleted numbers.)
When the call group is corr ect
• Press SAVE to confir m the changes
or OK if no changes have been done.
The display shows the menu for the
external line selected.
• Press either the END CALL button to
return to standby, or select CALL DATA
to change the collective ringing
settings.
If collective ringing is set for a particular
line, then any previous group ringing
setting is automatically cancelled and
vice verse.
Call barring
1.Barring outgoing calls from all
handsets and attached telephones.
You can bar all outgoing calls from your
Diverse 2-Line. However, you can store
up to four 16-digit emergency numbers
which will always be enabled. This is
useful if you want your handsets to
function purely as an internal phone
system with only incoming calls accepted.
The national emergency numbers 999 and
112 (including 9112 for cases where a
switchboard line is used) have already been
permanently programmed into your
Diverse 2-Line and are not able to be
barred in any way.
To bar all outgoing calls
• Press the MENU button to display the
main menu.
• Press DOWN to highlight SERVICE.
• Press OK.
• Press NEXT to highlight SYSTEM
SETTINGS.
• Press OK.
• Enter the system code (default 0000).
• Press OK.
• Press NEXT to highlight SYSTEM LOCK.
• Press OK.
• Press NEXT to highlight LOCK ON.
• Press OK. Display shows SYSTEM LOCK
ACTIVATED. The system is now locked
to all outgoing calls except from the 3
emergency numbers and the 4 user
programmable numbers.
NEXT
▼
OK
Page 35

32
To view or change the user
programmable emergency numbers
• Press the MENU button to highlight
the main menu.
• Press DOWN to highlight SERVICE.
• Press OK.
• Press NEXT to highlight SYSTEM
SETTINGS
• Press OK.
• Enter the system code (default 0000).
• Press OK.
• Press NEXT to highlight SYSTEM LOCK.
• Press OK.
• Press NEXT to highlight PHONE NO. LIST.
• Press OK. You can now view the
emergency numbers.
You now have 2 options:
1. Only view the numbers displayed.
• Press MENU button to display the
menu or END CALL to return to
standby.
2. Change a number.
• Press OK. You can now change the
number by using DELETE and keypad
buttons.
• Press OK if no change done or SAVE
if number was edited.
To cancel the bar on all outgoing calls
• Press the MENU button to display the
main menu.
• Press DOWN to highlight SERVICE.
• Press OK.
• Press NEXT to highlight SYSTEM
SETTINGS
• Press OK.
• Enter the system code (default 0000).
• Press OK.
• Press NEXT to highlight SYSTEM LOCK.
• Press OK.
• Press NEXT to highlight LOCK OFF.
• Press OK. The system is now unlocked.
To store up to four user programmable
emergency numbers
You can store up to four numbers, each
up to 16 digits long
• Press the MENU button to display the
main menu.
• Press DOWN to highlight SERVICE.
• Press OK.
• Press NEXT to highlight SYSTEM
SETTINGS.
• Press OK.
• Enter the system code (default 0000).
• Press OK.
• Press NEXT to highlight SYSTEM LOCK.
• Press OK.
• Press NEXT to highlight NEW ENTRY.
• Press OK. You can now enter one
emergency number.
• Press SAVE to confir m.
• To add another number, press NEXT
to highlight NEW ENTRY again.
NEXT
OK
▼
NEXT
OK
▼
NEXT
OK
▼
➜
OK
SAVE
Page 36

33
To enter a phone number you want to bar
• Press the MENU button to display the
main menu.
• Press DOWN to highlight SERVICE.
• Press OK.
• Press NEXT to highlight SYSTEM
SETTINGS.
• Press OK.
• Enter the system code (default 0000).
• Press OK.
• Press NEXT to highlight CALL BARRING.
• Press OK.
• Press NEXT to highlight the inter nal
number of the handset/telephone you
want to bar from making cer tain calls.
• Press OK.
• Press NEXT to highlight NEW ENTRY.
• Press OK. Display shows NO1, NO2 or
NO3, depending on which memor y
location is empty. If all three ar e full,
you hear warning beeps.
• Enter the number you want barred.
• Press SAVE. You can highlight NEW
ENTRY again to add another number for
the same handset/telephone.
• Press OK. Display returns to the Call
Barring menu. You can now select
another internal number of a
handset/telephone you want to bar
from making cer tain calls.
• Press the END CALL button to complete
(returns to standby).
The emergency and the user
programmable numbers cannot be barred
from a handset/telephone.
To delete the emergency numbers
• Press the MENU button to display the
main menu.
• Press DOWN to highlight SERVICE.
• Press OK.
• Press NEXT to highlight SYSTEM
SETTINGS.
• Press OK.
• Enter the system code (default 0000).
• Press OK.
• Press NEXT to highlight SYSTEM LOCK.
• Press OK.
• Press NEXT to highlight
DELETE PHONE NO.
• Press OK.
• Press NEXT to highlight the phone
number you want to delete.
• Press DELETE to delete the number.
The emergency number list is
displayed for a few seconds to enable
other deletions if required.
2. Barring specific phone numbers
You can prevent numbers being dialled
which begin with specific digits. Up to
three barr ed number prefixes fr om 1 to
8 digits each can be stored in the base
station memor y for each r egistered
handset or telephone. For example, by
entering 00 as a barred number, you can
prevent all international calls.
DELETE
NEXT
OK
▼
NEXT
OK
▼
SAVE
Page 37

34
To view or change a barred number
• Press the MENU button to display the
main menu.
• Press DOWN to highlight SERVICE.
• Press OK.
• Press NEXT to highlight SYSTEM
SETTINGS.
• Press OK.
• Enter the system code (default 0000).
• Press NEXT to highlight CALL BARRING.
• Press OK.
• Press NEXT to highlight the inter nal
number of the handset/telephone or
device you want. (The display shows
LOCK INTx, where x is a number
between 0 and 9.)
• Press OK.
• Press NEXT to highlight LOCK NO. LIST.
• Press OK. The display shows the
barred numbers for the internal
handset/telephone or device.
You now have 2 options:
1. Only view the numbers displayed.
• Press the MENU button to retur n to
the call barring menu. If desired, you
can now press MENU again then pr ess
NEXT to highlight another internal
number to view.
• Press the PHONE button to end the
session (returns to standby).
2. Change a number.
• Press NEXT to highlight the number
you want to change.
• Press OK. The number is displayed
ready to edit.
• Edit the number as required, using
DELETE to remove characters and 0 to
9,
#
and R to add characters.
• Press SAVE. The changes are saved
and the display returns to the Call
Barring menu.
• Press the END CALL button to end the
session (returns to standby).
▼
NEXT
OK
SAVE
➜
Page 38

35
To delete a barred number
• Press the MENU button to display the
main menu.
• Press DOWN to highlight SERVICE.
• Press OK.
• Press NEXT to highlight SYSTEM
SETTINGS.
• Press OK.
• Enter the system code (default 0000)
• Press OK.
• Press NEXT to highlight CALL BARRING.
• Press OK.
• Press NEXT to highlight the inter nal
number of the handset/telephone or
device you want. (The display shows
LOCK INTx, where x is a number
between 0 and 9.)
• Press OK.
• Press NEXT to highlight DELETE LOCK NO.
• Press OK.
• Press NEXT to highlight the number
you want to delete.
• Press DELETE. If desir ed, you can
now press NEXT to highlight another
number and press DELETE to
remove it.
• Press OK (you may need to press the
NEXT button first to get the DELETE
button to change to OK). The display
returns to the Call Barring menu.
You can now select another internal
handset/telephone or device if
required.
• Press the END CALL button to end the
session (returns to standby).
To switch call barring of specific
numbers on and off
You can choose which handsets are
prevented from calling specified numbers.
• Press the MENU button to display the
main menu.
• Press DOWN to highlight SERVICE.
• Press OK.
• Press NEXT to highlight SYSTEM
SETTINGS.
• Press OK.
• Enter the system code (default 0000).
• Press OK.
• Press NEXT to highlight CALL BARRING.
• Press OK.
• Press NEXT to highlight the inter nal
number of the handset/telephone or
device for which you want to switch
call barring on or off. (The display
shows LOCK INTx, where x is a number
between 1 to 9.)
• Press OK. If Call Bar ring is alr eady on,
the display will show a menu option
LOCK OFF. If Call Barring is already off,
the display will show a menu option
LOCK ON.
DELETE
NEXT
OK
▼
NEXT
▼
OK
Page 39

36
To switch on Call Barring
• Press NEXT to highlight LOCK ON.
• Press OK. The setting is confirmed on
the display. Display returns to the Call
Barring menu.
To switch off Call Barring
• Press NEXT to highlight LOCK OFF.
• Press OK. The setting is confirmed on
the display. Display returns to the Call
Barring menu.
To keep Call Barring in its current state
• Press MENU. The display
returns to the Call Barring menu.
Note: To end the session from the Call
Barring menu, press the END CALLbutton.
To remove all barred numbers
• You can delete all the barred numbers
from all the handsets in one operation.
• Press the MENU button to highlight
the main menu.
• Press DOWN to highlight SERVICE.
• Press OK.
• Press NEXT to highlight SYSTEM
SETTINGS.
• Press OK.
• Enter the system code (default 0000).
• Press OK.
• Press NEXT to highlight CALL BARRING.
• Press OK.
• Press NEXT to highlight DELETE ALL.
• Press OK.
3. Restricting the type of calls
allowed on handsets and telephones
You can set a specific handset or
telephone:
– to make and receive internal and
external calls. This is the original
setting
– to receive incoming calls and make
internal calls only
– to make and receive internal calls only.
Each handset/telephone may have the
restriction set dif fer ently for exter nal
Line 1 and external Line 2. This enables
you to control the type of calls made and
received by each handset/telephone
user on the system.
NEXT
OK
NEXT
OK
NEXT
OK
▼
Page 40

37
To set the type of calls allowed
When the handset is ON:
• Press the MENU button.
• Press DOWN to highlight SERVICE.
• Press OK.
• Press NEXT to highlight SYSTEM
SETTINGS.
• Press OK.
• Enter the system code (default 0000).
• Press OK.
• Press NEXT to highlight EQUIPMENT
DATA.
• Press OK.
• Press NEXT to highlight ACCESS RIGHTS.
• Press OK.
• Press NEXT to highlight which
external line you want to apply the
restrictions– EXTERNAL 1 or EXTERNAL 2.
• Press OK.
• Press NEXT to highlight the inter nal
number for which you want to set or
remove restrictions. (Display shows
INTERNALx, where x is a number
between 0-9.)
• Press OK. The choice of settings is
displayed. The active setting is also
shown.
Use the NEXT button to highlight one of
the following:
TRUNK ACC. – all external incoming or
outgoing calls possible to
the handset.
INCOMMING – handset can receive
incoming calls but not make
external calls.
INTERNAL – handset can make or receive
internal calls only.
If the setting highlighted is the current
one
• Press OK. No changes are made.
The display returns to the Internal 1 or
Internal 2 menu (whichever one you
have selected). You can now set the
type of call allowed for other internal
numbers for the selected external line.
If the setting highlighted is not the
current one
• Press SAVE. The change will be saved.
Display returns to the External 1 or
External 2 menu (whichever one you
have selected). You can now set the
type of call allowed for other internal
numbers for the selected external line.
Note: When in the EXTERNAL1 or
EXTERNAL 2 menu you can press the
END CALL button to end the session.
(Handset returns to idle state.)
If only one external line has been
connected to your Diverse 2-Line system
the unused line should be set to internal
calls only.
NEXT
OK
▼
Page 41

38
To switch OFF barring on the handset
The handset display shows HANDSET
LOCKED.
• Press the MENU button to display the
highlighted item HANDSET LOCK.
• Press OK.
• Enter the handset PIN number
(default 0000).
• Press OK. The display shows the
closed lock symbol.
Either continue:
• Press OFF. The display shows an open
lock symbol.
• Press OK to confirm. The barring on
the handset will now be switched of f.
Or stop:
• Press OK. The bar ring on the handset
will remain on.
4. Barring all calls from a handset
except for emergency numbers
This prevents unauthorised use of a
specific handset. The handset can only
receive incoming calls or make calls to
one of the three pre-programmed or four
user programmable emergency numbers
(999, 112 and 9112).
To switch ON barring on the handset
• Press the MENU button to display the
main menu.
• Press DOWN to highlight HANDSET LOCK.
• Press OK.
• Enter the handset PIN number
(default 0000).
• Press OK.
• Press DOWN to highlight LOCK ON/OFF.
• Press OK. The display shows an open
lock symbol.
• Press ON. The display shows the lock
closed.
• Press OK.
You can only view, change or enter the
4 user programmable numbers when
barring on the handset is switched off.
▼
NEXT
ON
OK
OK
OFF
OK
Page 42

Automatic Call Pickup
If Automatic call pickup is OFF, you will
have to press the PHONE button to take
a call (even if the handset is in the
charger). The default setting is ON.
To switch Automatic Call Pickup
off/on
• Press the STO button.
• Press the 3 button followed by the
8 button.
• Press the 0 to switch Automatic Call
Pickup OFF, or 1 to switch in ON
again.
• Press the STO button to confirm.
39
Customising using
an Additional
Handset
Automatic External Line
You can set up your Diverse system to
make calls in two dif ferent ways:
Automatic external line switched ON
means that when you press the PHONE
button, you automatically get an external
line (this is the default setting).
Automatic external line switched OFF
means when you want to make a call, you
will first have to press 0, 1 or 2 and then
the PHONE button to get an external line
(dialling 0 picks up any free line).
To switch automatic external line
on/off
• Press the STO button.
• Press the #button. Press the 1
button.
• Enter the system code (default 0000).
• Press 0 to select both lines.
• Press the LNR button followed by the
✱button and the 3 button. The display
shows all the registered handsets
(i.e.,12345678 if the maximum number
of handsets are registered).
• Press the internal number of the
handset you wish to change.
• Press 0 to switch automatic exter nal
line OFF, or 1 to switch it ON again.
• Press the STO button to confirm.
STO
LNR
#
✱
3
DEF
1
STO
3
DEF
0
8
TUV
Page 43

40
To select group ringing for a specific
line and/or assign internal numbers to
the call group
• Press the STO button.
• Press the #button.
• Press the 1 button.
• Enter the system code (default 0000).
• Press either 1 or 2 to select the
external line for the group ringing
setting.
• Press the LNR button.
• Press the ✱ button.
• Press the 2 button.
• Press the 2 button to select Group
ringing.
• Select all the handsets (and any
attached corded machines) in the
group you want to ring first. Press the
0-9buttons as necessary.
• Press the #button.
• Select the handsets (and any attached
corded machines) you want to ring in
addition to the first group by pressing
the 0-9buttons as necessary.
• Press the STO button.
STO
#
1
LNR
✱
0-9
2
ABC
Call allocation
You can allocate collective or group
ringing to each external line.
Group ringing
EXAMPLE
You want handsets 1 and 3 to ring on
external line 1. If there is no answer after
say three rings, you want the system to
also make handsets 2, 4 and 6 ring.
You would in the example set:
– Handsets 1 & 3 allocated to external
line 1, group 1.
– Handsets 2, 4 & 6 allocated to external
line 1, group 2.
– Number of rings set to three ring cycles.
3 rings, then
13 24 6
External Line 1
1
2
ABC
3
DEF
4
GHI
5
JKL6MNO
7
PQRS
8
TUV9WXYZ
#
✱
0
RCL
PWR
.
a A
1
2
ABC
3
DEF
4
GHI
5
JKL6MNO
7
PQRS
8
TUV9WXYZ
#
✱
0
RCL
PWR
.
a A
1
2
ABC
3
DEF
4
GHI
5
JKL6MNO
7
PQRS
8
TUV9WXYZ
#
✱
0
RCL
PWR
.
a A
1
2
ABC
3
DEF
4
GHI
5
JKL6MNO
7
PQRS
8
TUV9WXYZ
#
✱
0
RCL
PWR
.
a A
1
2
ABC
3
DEF
4
GHI
5
JKL6MNO
7
PQRS
8
TUV9WXYZ
#
✱
0
RCL
PWR
.
a A
Page 44

41
To set the number of ring cycles
before the second group of handsets/
telephones are called
When in group ringing mode, the original
setting is for three ring cycles to occur
before the second group of handsets/
telephones ring. You can change the
number of ring cycles.
• Press the STO button.
• Press the #button.
• Press the 1 button.
• Enter the system code (default 0000).
• Press either 1 or 2 to select the
external line you want.
• Press the LNR button.
• Press the ✱ button.
• Press the 6 button.
• Enter the number of ring cycles you
want to hear before the second group
will ring by pressing the 1-9 buttons.
(1=one ring cycle, 9=nine ring cycles).
• Press the STO button.
If collective ringing is set for a
particular line, then any previous group
ringing setting is automatically cancelled
and vice versa.
STO
#
1
LNR
✱
0-9
2
ABC
Collective ringing
To select collective ringing for a
specific external line and/or assign
internal numbers to the call group
• Press the STO button.
• Press the #button.
• Press the 1 button.
• Enter the system code (default 0000).
• Press either 1 or 2 to select the
external line for the collective ringing
setting.
• Press the LNR button.
• Press the ✱ button.
• Press the 2 button.
• Press the 1 button to select Collective
ringing.
• Select all the handsets, telephones
and attached corded machines you
want to include by pressing as many
of the 0-9buttons as necessary. The
selected internal station numbers will
be displayed.
• Press the STO button.
STO
#
1
LNR
✱
0-9
2
ABC
Page 45

42
Call barring
There are four ways of restricting calls
from your Diverse 2-Line.
1.Barring outgoing calls from all
handsets and attached telephones.
You can bar all outgoing calls from your
Diverse 2-Line. However, you can store
up to four 16-digit emergency numbers
which will always be enabled. This is
useful if you want your handsets to
function purely as an internal phone
system with only incoming calls accepted.
The national emergency numbers 999
and 112 and 9112 have already been
permanently programmed into your
Diverse 2-Line and are not able to be
barred in any way.
To bar all outgoing calls
• Press the STO button.
• Press the #button.
• Press the 2 button.
• Press the 4 button.
• Enter the system code (default 0000).
• Press the 1 button.
• Press the STO button.
STO
#
2
ABC
1
4
GHI
To cancel the bar on all outgoing calls
• Press the STO button.
• Press the #button.
• Press the 2 button.
• Press the 4 button.
• Enter the system code (default 0000).
• Press the 0 button.
• Press the STO button.
To store, change or view your
emergency numbers
You can store up to four 16-digit numbers
on the system. These numbers can be
dialled from all registered handsets and
attached phones.
• Press the STO button.
• Press the #button.
• Press the 2 button.
• Press the 5 button.
• Enter the system code (default 0000).
• Press the LNR button to scroll
through and view the four memory
locations for your emergency numbers.
Empty locations are indicated with a
—
——symbol.
Either:
• Press the STO button to end the
session.
Or:
• Display the location you want.
• Enter your emergency number into
a blank location or edit any existing
number.
• Press the STO button to confirm.
STO
#
2
ABC
0
4
GHI
STO
LNR
#
2
ABC
5
JKL
Page 46

43
To delete your emergency numbers
• Press the STO button.
• Press the #button.
• Press the 2 button
• Press the 7 button.
• Enter the system code (default 0000).
• Press the STO button.
2. Barring specific phone numbers
You can prevent numbers being dialled
which begin with specific digits. Up to
three barr ed number prefixes fr om 1 to 8
digits each can be stored in the base
station memor y for each r egistered
handset or telephone. For example, by
storing 00 as a barred number, you can
prevent all international calls.
To enter, change or view the barred
numbers
• Press the STO button.
• Press the #button.
• Press the 8 button.
• Press the 5 button.
• Enter the system code (default 0000).
The display shows the internal
numbers of all registered handsets/
telephones.
• Press the internal number of the
handset/telephone which you want to
view or enter the barred numbers for.
The display shows the first of three
locations. You can now enter, change
or view the first barred number.
STO
RCL
#
8
TUV
5
JKL
STO
#
2
ABC
7
PQRS
• Enter a barred number (between 1
and 8 digits) or edit any existing one
if required.
• Press the RCL button to display the
second location.You can now enter,
change or view the second barred
number as required
• Press the RCL button to display the
third location. You can now enter,
change or view the barred number as
required
• Press the STO button to confirm and
return to nor mal operation.
To enter, change or view the barred
numbers for several handsets/
telephones
• Press the STO button.
• Press the #button.
• Press the 8 button.
• Press the 5 button.
• Enter the system code (default 0000).
The display shows the internal
numbers of all registered handsets/
telephones.
• Press the internal number of the
handset/telephone which you want
to enter, change or view the barr ed
numbers for. The display shows the
first of three locations.
STO
RCL
INT
#
8
TUV
5
JKL
Page 47

44
You can now enter, change or view the
first barred number and pr ess RCL to deal
with the second and third barr ed
numbers. Do not press the STO button.
• Press the INT button. All available
internal numbers are displayed.
• Press the internal number of the next
handset/telephone you want to view,
enter or change barred numbers for.
The display shows the first of 3
locations. You can now enter, change
or view the first barred number and
press RCL to deal with the 2nd and
3rd barr ed numbers.
• Press the STO button to confirm and
return to nor mal operation or pr ess
the INT button to select another
internal number.
INT
RCL
STO
To switch call barring of specific
numbers on and off
Once you have stored the numbers you
want to bar, you can choose to have this
function switched on or of f. The setting
applies to the whole system. The original
setting is OFF.
• Press the STO button.
• Press the #button.
• Press the 8 button.
• Press the 4 button.
• Enter the system code (default 0000).
The display shows the internal
numbers of all registered handsets/
telephones.
• Press the internal number you want to
switch barred numbers ON or OFF.
• Press the 1 button to switch the bar
ON or press the 0 button to switch
the bar OFF.
• Press the STO button to confirm.
STO
#
8
TUV
1
0
4
GHI
Page 48

45
To remove all barred numbers for
specific handsets/telephones
• Press the STO button.
• Press the #button.,
• Press the 8 button.
• Press the 7 button.
• Enter the system code (default 0000).
The display shows the internal
numbers of all handsets/telephones
which have barred numbers
programmed.
• Press the internal number(s) for the
handsets/telephone for which you
want the barred numbers r emoved.
When you enter the number, it
disappears from the display. Only
internal numbers for handsets which
are still displayed will continue to have
the call barring setting switched on.
• Press the STO button to confirm.
The four emergency numbers cannot be
barred from a handset/telephone.
STO
#
8
TUV
7
PQRS
3. Restricting the type of calls
allowed on handsets and telephones
You can set a specific handset or
telephone:
– to make and receive internal and
external calls (the original setting).
– to receive incoming calls and make
internal calls only
– to make and receive internal calls only.
Each handset/telephone may have the
restriction set dif fer ently for exter nal
Line 1 and external Line 2. This enables
you to control the type of calls made and
received by each handset/telephone user
on the system.
To set the type of calls allowed
• Press the STO button.
• Press the #button.
• Press the 1 button.
• Enter the system code (default 0000).
• Select the external line by pressing
1 or 2.
• Press the RCL button.
• Press the ✱ button.
• Press the 1 button. The display shows
internal numbers of all register ed
handsets/telephones.
• Enter the internal number (0-9) of
the handset/telephone to be set.
• Press 0 to allow incoming calls only,
1 to allow all calls as normal or 2 to
allow internal calls only.
• Press the STO button to confirm.
If only one external line has been
connected to your Diverse 2-Line system
the unused line should be set to internal
call only.
STO
#
1
RCL
✱
2
ABC
Page 49

46
4. Barring all calls from a handset
except for emergency numbers
This prevents unauthorised use of a
specific handset. The handset can only
receive incoming calls or make calls to
one of the three pre-programmed
numbers (999, 112 and 9112) or four
user programmable emergency numbers.
To switch ON barring on the handset
• Press the STO button.
• Press the 8 button.
• Press the 1 button.
• Enter the handset PIN number
(default 0000).
• Press the STO button. The handset is
now locked. The display shows a key
symbol.
To switch OFF barring on the handset
• Press the STO button.
• Press the 8 button. If this button is
not pressed within 3 seconds of
pressing the STO button, the handset
will dial the hotline number if one
was stored.
• Press the 0 button.
• Enter the handset PIN number
(default 0000).
• Press the STO button. The handset is
now unlocked and the key symbol in
the display will disappear.
You can only enter, view or delete the 4
user programmable numbers when
barring on the handset is switched off.
STO
8
TUV
1
STO
8
TUV
0
Page 50

To change the system code on the
Diverse 2-Line using an Executive
Handset
The handset must be switched ON:
• Press the MENU button. The main
menu is displayed.
• Press DOWN to highlight SERVICE.
• Press OK.
• Press NEXT until SYSTEM SETTINGS is
highlighted.
• Press OK.
• Enter the current system code
(default 0000).
• Press OK.
• Press NEXT until CHANGE SYS CODE is
highlighted.
• Press OK.
• Enter your new 4-digit system code.
(If you make a mistake, use the
button to go back and change a digit).
• Press OK.
• Enter your new system code again.
• Press OK to confirm.
➜
47
NEXT
As a digital phone system, your Diverse
2-Line provides excellent security
features against others ‘listening in’ to
your calls. You can also prevent
unauthorised use of the handset(s).
Each handset needs to be registered
with the base station. To do this you
need to know and use the system code.
System code
This protects your settings and helps
prevent unauthorised handsets using
your system.
Handset PIN
A PIN on your handset protects
information such as stored numbers from
being changed by any unauthorised
persons.
The default setting for both the system
code and the Executive Handset PIN is
0000. If you do not wish to change
either, you can use this number for all
code and PIN-related functions.
Using and changing
the base station security
code and handset PIN
Caution: Do not forget your Diverse 2Line system code or the handset PIN.
Special, expert help is required if you
forget the system code or the handset
PIN. Please contact the Diverse Helpline
on 0345 908070. Calls are charged at
local rates.
Your base station or handset may need to
be returned and you may have to pay a
charge for getting them reset.
▼
➜
OK
Page 51

48
To change the Executive Handset PIN
(personal identification number).
A handset PIN is necessar y in or der to:
– change the PIN
– lock the handset so that only
emergency numbers can be dialled
– unlock the handset
– delete phonebook entries
– reset to the original settings (this does
not de-register the handset)
The handset must be switched ON:
• Press the MENU button
• Use UP and DOWN to highlight
SETTINGS.
• Press OK. Display shows a list of menu
options.
• Press DOWN to highlight HANDSET
SETTINGS.
• Press OK.
• Press DOWN to highlight CHANGE PIN.
• Press OK.
• Enter the current PIN number
(default 0000). If you make a mistake,
use DELETE to delete numbers.
• Press OK.
• Enter the new PIN (this can be up to
eight digits long).
• Press OK.
• Enter the new PIN again.
• Press OK.
• A confirmation beep is sounded and
the message NEW PIN STORED! is
displayed.
If you enter an incorrect PIN number
whilst changing your PIN, the display
branches back to Handset Settings
and you have to work through the
process again.
To change the system code on the
Diverse 2-Line using an Additional
Handset
Handset power must be switched to ON.
• Press the STO button then the
#
button.
• Press the 8 button.
• Press the ✱ button.
• Enter the current system code
(default 0000).
• Enter the new 4-digit code you want.
• Confirm the code by entering it again.
• Press the STO button. The code is
now entered.
• Press the PHONE button to retur n to
standby.
To change the Additional Handset PIN
(personal identification number).
A handset PIN is necessar y in or der to:
– change the PIN
– lock the handset so only an
emergency numbers can be dialled
– unlock the handset
– delete the Speed Dial memor y
– reset to the original original settings
(this does not de-register the
handset).
To set your Additional Handset PIN
• Press the STO button.
• Press the 8 then the 9 buttons.
• Enter the current PIN (default 0000).
• Enter the new 4-digit PIN you want.
Confirm the PIN by entering it again
• Press the STO button. The PIN is
now entered.
STO
#
8
TUV
✱
STO
8
TUV9WXYZ
▲
▼
OK
➜
Page 52

49
At the handset:
• Press the MENU button.
• Press DOWN to highlight SETTINGS.
• Press OK.
• Press DOWN to highlight REGISTER.
• Press OK.
• Press DOWN to highlight the BASE
number you want (ie BASE 2).
• Press OK. This identifies the base
station. The handset searches for a
base station. When found, the handset
will ask you to enter the base station
system code.
• Enter the system code (default 0000).
• Press OK. Wait until the handset
displays all available internal numbers.
• Press one of the number buttons
(0-9) corresponding to one of the
available numbers.
The handset is now registered.
You can register your handsets with up
to four base stations. Each base station
should have its own number, from 1-4
and each handset should be registered
with the same extension number at each
base station.
To register an Executive Handset on
more than one Diverse 2-Line base
station
The handset must be switched ON.
At the base station at which you want to
register the handset:
• Press and release the registration
button on the base (use a pointed
object such as a pencil) the light will
flash. You have up to one minute to
register the handset.
To register a handset on
more than one Diverse
2-Line base station
If you are not registering to a Diverse
2-Line, follow the instructions which are
in the User Guide for the second base
station.
▼
OK
NO
Page 53

50
To set the Executive Handset to select
the best base station signal
Once you have registered your handset
to additional base stations you can also
set it to find the strongest base station
signal automatically, each time you make
a call.
• Press the MENU button.
• Press DOWN to highlight SELECT BASE.
• Press OK.
• Press DOWN to highlight BEST. BEST.
• Press OK.
• Press END CALL.
To set the Executive Handset to search
first for a specific base signal
If you are using your handset in an area
where two base signals overlap, we
recommend that you specify a prefer red
base signal for your handset to search for
first. If the handset does not find a clear
signal from this base it will then resor t
to finding an alternative signal.
• Press the MENU button.
• Press DOWN to highlight SELECT BASE.
• Press OK.
• Press DOWN to highlight the base
station that you require to be first
choice ie BASE 1.
• Press ACTIVATE.
• Select PRIORITY SELECT.
• Press OK.
To change what the base station is
called on your handset
• Press MENU button.
• Press DOWN to highlight SETTINGS,
• Press OK.
• Press DOWN to highlight BASE
SETTINGS.
• Press OK.
• Press DOWN to highlight the base you
want to change the name of.
• Press ACTIVATE. Display will show
CHANGE BASE NAME highlighted.
• Press OK.
• Use the DELETE option to delete the
current name.
• Use the keypad to write the new name.
• Press ACTIVATE.
• SAVE ENTRY will be highlighted, press
OK. Display will show ENTRY IS SAVED.
Your new base station name will now
show on the handset display.
If you want your handset to search for
only one base, and not switch to
searching for a better signal, select FIXED
SELECTION instead of PRIORITY SELECT.
▼
OK
-
–
OK
-
–
–
–
➜
–
-
–
▼
OK
-
–
–
–
–
Page 54

51
To register an Additional Handset on
more than one base station
The handset must be turned OFF.
At the base station at which you want to
register the handset:
• Press the registration button on the
base (use a pointed object such as a
pencil) the light will flash. You have up
to one minute to register the handset.
At the handset:
• Press and hold either the 1, 2, 3 or 4
button (the base station number)
together with the PWR button until
the display come on and indicates the
selected number.
• Enter the system code (default 0000).
• Press the #button. Wait until
connection is made with the base.
Display shows all available internal
numbers for handsets.
• Press the internal number (1-8) you
want for your handset. The handset is
now registered with the base station.
To set the Additional Handset for
automatic selection of base station
If you are moving around, and likely to
lose contact with your base station, your
handset can be made to automatically
switch to the first available base. If you
are in an area where the signals of two
base stations are overlapping, your
handset will select the strongest signal.
The handset must be switched ON.
• Press the STO button.
• Press the INT button. Display shows
the numbers of the base station at
which the handset is registered.
• Press the 0 button.
• Press the STO button.
Note: The above may be repeated with
other base stations up to a maximum of 4.
1
4
GHI
#
2
ABC
3
DEF
PWR
0
STO
INT
You can change your handset to manual
selection so that if you are in an area where
the ranges of the base stations overlap, you
can specify which station you prefer to use.
Note:
If you move between base stations during
a call (internal or external) you will lose
that call.
Page 55

52
To display to which base station the
Additional Handset is connected
• Press the STO button.
• Press the 3 button.
• Press the 6 button.
• Press 0 to switch the display OFF,
or 1 to switch in ON.
• Press the STO button to confirm.
To set the Additional Handset for
manual selection of a base station
The handset must be ON.
• Press the STO button.
• Press the INT button. Display shows
the numbers of the base stations at
which the handset is registered.
• Press the number (1-4) of the base
station you want.
• Press the STO button.
To set combined manual and
automatic selection of a base station
The handset will search for the base
station you have chosen for 30 seconds.
If it cannot locate it, then it will search
for the base with the strongest signal.
The handset must be ON.
• Press the STO button.
• Press the INT button. Display shows
the numbers of the base station at
which the handset is registered.
• Press the number (1-4) of the base
station you want to search for first.
• Press the same number again to set
the combined search.
• Press the STO button.
1-4
1-4
STO
INT
STO
INT
3
DEF
6
MNO
0
1
STO
Page 56

53
The following char t shows the default settings for your Diverse 2-Line base station.
It also indicates how these settings would be ef fected by perfor ming a system reset
or if there were a power cut. For explanation of these settings, please refer to the
main sections of the user guide.
DIVERSE 2-LINE BASE STATION DEFAULT SETTINGS
Default System Reset Power Cut
Handset Registration none registered Unaffected Unaffected
System Code 0000 Unaffected Unaffected
Dialling Mode Tone Dialling Unaf fected Unaffected
Automatic Line Seizure Activated Activated Unaf fected
Automatic Call Pickup Activated Activated Unaffected
User programmable
Emergency Numbers None Deleted Unaffected
User programmable
Barred Numbers None Deactivated Unaf fected
Connection Non-Cordless
Configuration equipment Unaf fected Unaffected
type = telephone
Call Allocation – Activated – both
Collective Ringing lines Unaf fected Unaffected
(all handsets ring on
incoming external call)
Call Allocation –
Group Ringing None Unaf fected Unaffected
(specific handsets ring)
Call Allocation –
Number of Ring Cycles 3 Ring Cycles Unaf fected Unaffected
(before all other
handsets will ring if a call
is unanswered)
System settings
Page 57

54
To reset your Diverse 2-Line to the
original settings using an Additional
Handset
Handset power must be switched to ON.
• Press the STO button.
• Press the #button.
• Press the 1 button.
• Enter the system code (default 0000).
• Press the 0 button.
• Press the LNR button.
• Enter the code 250.
• Press the STO button to confirm.
This will reset:
– settings
– configurations.
It will also delete:
– emergency numbers that have been
stored in the system memory
– any restricted numbers that have
been set
– any access codes that have been set
(for connection to a switchboard).
It will NOT reset:
– system code
– handset registration settings
– collective ringing and group ringing
settings
– connection configuration
– dialling mode and flash settings.
STO
LNR
#
1
To reset your Diverse 2-Line to the
original settings using an Executive
Handset
• Press the MENU button to display the
main menu.
• Press DOWN to highlight SERVICE.
• Press OK.
• Press NEXT to highlight SYSTEM
SETTINGS.
• Press OK.
• Enter the system code (default 0000).
• Press OK.
• Press NEXT to display INITIALISATION.
• Press OK.
This will reset:
– system settings
– configurations.
It will also delete:
– emergency numbers that have been
stored in the system memory
– any restricted numbers that have
been set
– any access codes that have been set
(for connection to a switchboard).
It will NOT reset:
– system code
– handset registration settings
– collective ringing and group ringing
settings
– connection configuration
– dialling mode and flash settings.
NEXT
▼
OK
Page 58

55
It will NOT reset:
– system code
– handset registration settings
– collective and group ringing settings
– dialling modes and flash settings
– connection configuration.
To reset your Additional Handset to
the original settings
Handset power must be switched to ON.
• Press the STO button.
• Press the 8 button.
• Press the MEM button.
• Enter the handset PIN number
(default 0000).
• Press the STO button to confirm.
This will reset:
– ringer volume
– ringer tone
– batter y warning tone
– outside-range warning tone
– in-range tone
– automatic call acceptance
– confirmation tones.
It will delete:
– numbers stored in the speed dialling
memor y
– last number redial memory.
It will NOT reset:
– the handset PIN
– the handset registration settings.
STO
MEM
8
TUV
To reset your Executive Handset to the
original settings
The handset must be switched on:
• Press the MENU button to display the
main menu.
• Press DOWN to highlight SETTINGS.
• Press OK.
• Press DOWN to highlight HANDSET
SETTINGS.
• Press OK.
• Press DOWN to highlight
INITIALISATION.
• Press OK.
• Enter the handset PIN number
(default 0000).
• Press OK.
This will reset:
– ringer volume
– ringer tone
– battery war ning tone
– outside-range warning tone
– in-range tone
– automatic call acceptance
– confirmation tones.
It will delete:
– last number redial memory.
It will NOT reset:
– the handset PIN
– the handset registration settings
– the names and numbers stored in the
handset’s phonebook memor y.
It will also delete:
– emergency numbers that have been
stored in the system’s memory
– any restricted numbers that have
been set
– any access codes that have been set.
OK
▼
Page 59

56
When deciding on a site to wall mount
your Diverse 2-Line base station, please
site it at least 1 metre away from corded
phones, fax machines and answering
machines as they can pick up
interference.
You may want to check that the base
station is located so as to provide you
with the fullest range possible before you
wall mount it. Remember that the range
is dependent on the environment. For
example, thick walls may reduce the
range. It is recommended that the base
station is located at desk hight.
To wall mount the Diverse 2-Line base
station
Make sure the mains power is
disconnected.
Using the base station template at the
back of this guide, mark, then drill two
holes for the two screws and rawlplugs
(if you need them).
Inser t the screws, leaving about 5mm
sticking out on which to hang the
base station.
Attach the base station by hooking it
over the screws protr uding fr om the wall.
Wall mounting
Page 60

57
Maintenance
General
Simply clean the Diverse 2-Line and all
handsets with a damp cloth (not wet) or
an antistatic wipe. Never use a dr y cloth
as this may cause a static shock.
Service
Within warranty
If you experience a problem with your
Diverse 2-Line or Handset, you should
contact the Diverse Helpline on
0345 908070. Calls are charged at
local call rates. If the problem is not
remedied, you will be advised to contact
your original point of purchase.
Some suppliers of fer extended war ranty
schemes for cover outside the initial
12-month period. Please ask them for
details.
If you have to return your Diverse
2-Line
Pack the base station and handset securely,
preferably in the original packaging
(including all line cords, adaptors and
original batteries).
BT does not take responsibility for goods
damaged in transit.
Outside warranty
If your Diverse 2-Line needs repair after
the warranty period has ended, it must
be repaired so as to remain compliant
with the approval requirements for
connection to the telephone network.
We r ecommend that you call the Diverse
Helpline on 0345 90 80 70, which will
give details of our recommended repair
agents.
Page 61

58
Index
Note: In this index, where two page numbers are given, First number = Executive
Handset, Second number = Additional Handset.
Additional Handset 17
registering 14
Automatic call pickup 27, 39
Automatic external line 26, 39
Automatic select base station 52
Base name 50
Batteries
approved 9
batter y low 11
charging 11
installing 11
Call allocation 28, 40
Call barring 31, 42
Cancel barring 32, 42
Carrying clip 12
Change PIN 47
Charger 9
Collective ringing 30, 41
Combined select base station 52
Connecting to telephone line 7
Connection configuration 21, 22
Corded equipment 20
Corded telephones 20, 24
Cordless sockets 21
Customising 25
DECT 8
Default settings 53
Delete emergency numbers 33, 43
Emergency numbers 32, 38, 42, 46
Executive Handset 15
registering 14
Flashing 14, 17
Fax machine 22
Group ringing 28, 40
Mains power 11
Maintenance 57
Making calls 16, 18
Manual select base station 52
Memor y numbers standard
User Guide
Modems 23
Multibase registering 49
On/Of f 15, 17
Phone book standard
User Guide
PIN 47
Power failure 9
Protected keypad 15, 17
Range 10, 13
Receiving calls 16, 18
Redial 16, 19
Registering with the base 14, 49
Reset handsets 55
Ring cycles 30, 41
Reset system 54
Security code 47
Setting up 10
Siting 10
System code 47
System settings 53
Wall mounting 56
Warnings 9
Warranty 57
For a full description of the more
advanced operational features of your
Diverse 2-Line and Executive and
Additional Handsets, please consult your
Diverse 2-Line standard User Guide.
Page 62

Offices in Europe, North America,
Japan and Asia Pacific.
The Telecommunications services described in this
publication are subject to availability and may be modified
from time to time. Services and equipment ar e provided
subject to British Telecommunications plc’s respective
standard conditions of contract. Nothing in this
publication forms any part of any contract.
Touchtone
TM
is a registered trade mark of
British Telecommunications plc in the UK.
© British Telecommunications plc 1997.
Registered Office: 81 Newgate Street, London EC1A 7AJ.
Registered in England No. 1800000.
Printed in Germany. Issue No.1 (2/98) 4.
Designed by The Art & Design Partnership Limited.
Siemens number: A30852 – X954 – M201 – 1 – 7619
APPROVED for connection to
telecommunication systems specified
in the instructions for use subject to
the conditions set out in them
504380
CE compliant to 89/336/EEC
(EMC Directive) & 73/23/EEC (Low
Voltage Directive)
 Loading...