

Page 1

OPERATION MANUAL
Model
XL2010
brother
Page 2
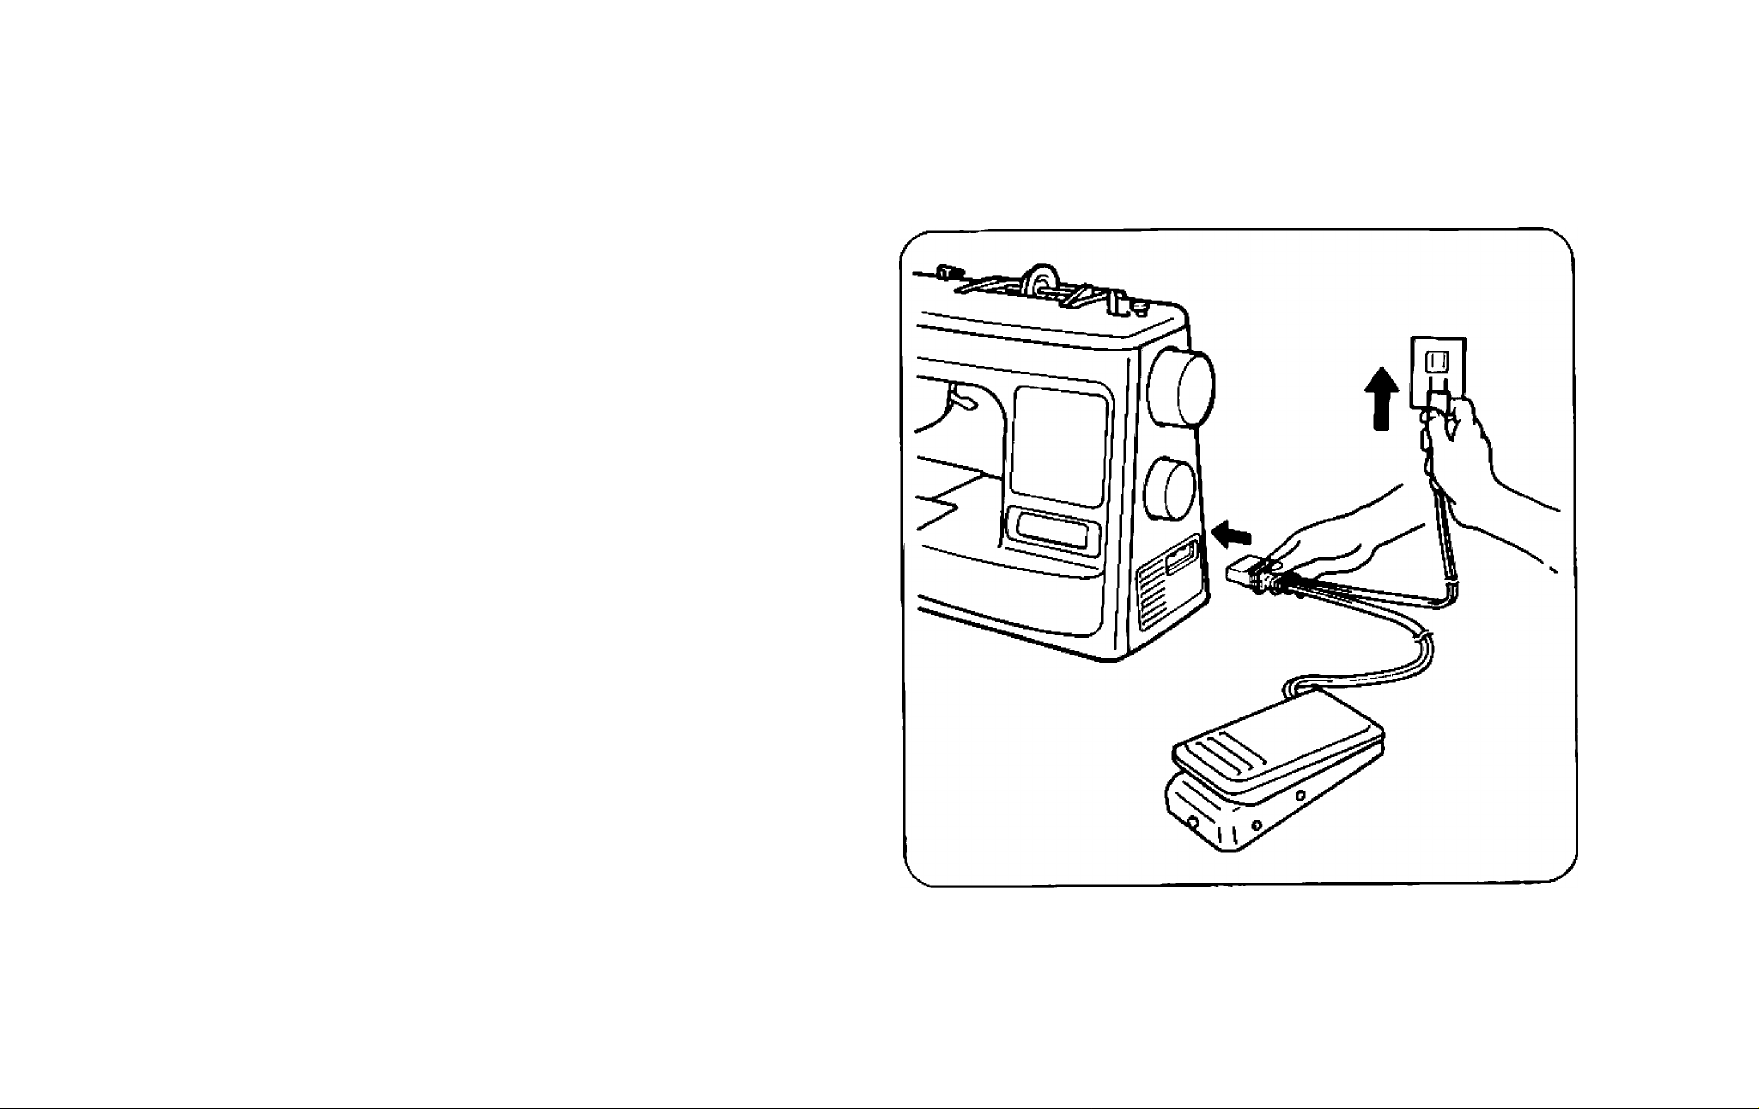
CAUTKM
When leaving the sewing machine unattended, the power suppty
plug must be removed from the outlet. When servicing the sewing
machine, removing covers or changing the bulb, the machine or
electrical set must be disconnected from the power supply by
removing the plug from the outlet.
Page 3

CONTENTS
Page
KNOWING YOUR SEWING MACHINE
Principal parts .......................................................... 1
Accessories ............................................................
VARIOUS CONTROLS ................................................. 3
Pattern selector......................................................... 3
Stitch length dial ...................................................... 5
Reverse sewing button
Foot controller........................................................... 5
Sew-light
Free-arm model ...................................................... 6
Twin needle.............................................................. 6
THREADING THE MACHINE......................................... 7
Winding the bobbin.................................................... 7
Lower threading
Upper threading
To draw up lower thread
Tension controls
RELATIVE CHART OF SEWING FABRICS,
NEEDLE AND THREAD.............................................. 12
STRAIGHT AND ZIGZAG STITCHING
Straight stitch
Zigzag stitch
...
...
........................................................
........................................................
......................................................
..........................................................
...
.....................................................
....
.......................................
.....
................................... 10
....................................................
.........................
........................
1
2
5
5
8
9
11
13
13
15
BUILT-IN STITCHES
Blind hem stitch ...................................................... 16
Overedging stitch
Elastic stitch............................................................ 18
BUTTONHOLE AND BUTTON SEWING
Buttonhole
Button sewing ........................................................ 21
USING ATTACHMENTS AND
APPLICATIONS
Zipper insertion ....................................................... 22
Darning.................................................................. 23
Applique
Monogramming and Embroidering
MAINTENANCE.......................................................... 25
Changing the needle
Changing the bulb.................................................. 26
Cleaning................................................................. 27
Oiling ................................................................... 28
Performance check list
Repacking the machine
INDEX........................................................................ 32
................................................................
..................................................
................................................
.....................
............................................................
.........................................................
............................
............................................
..........................................
...
....................................... 31
16
17
19
19
22
23
24
25
29
Page 4
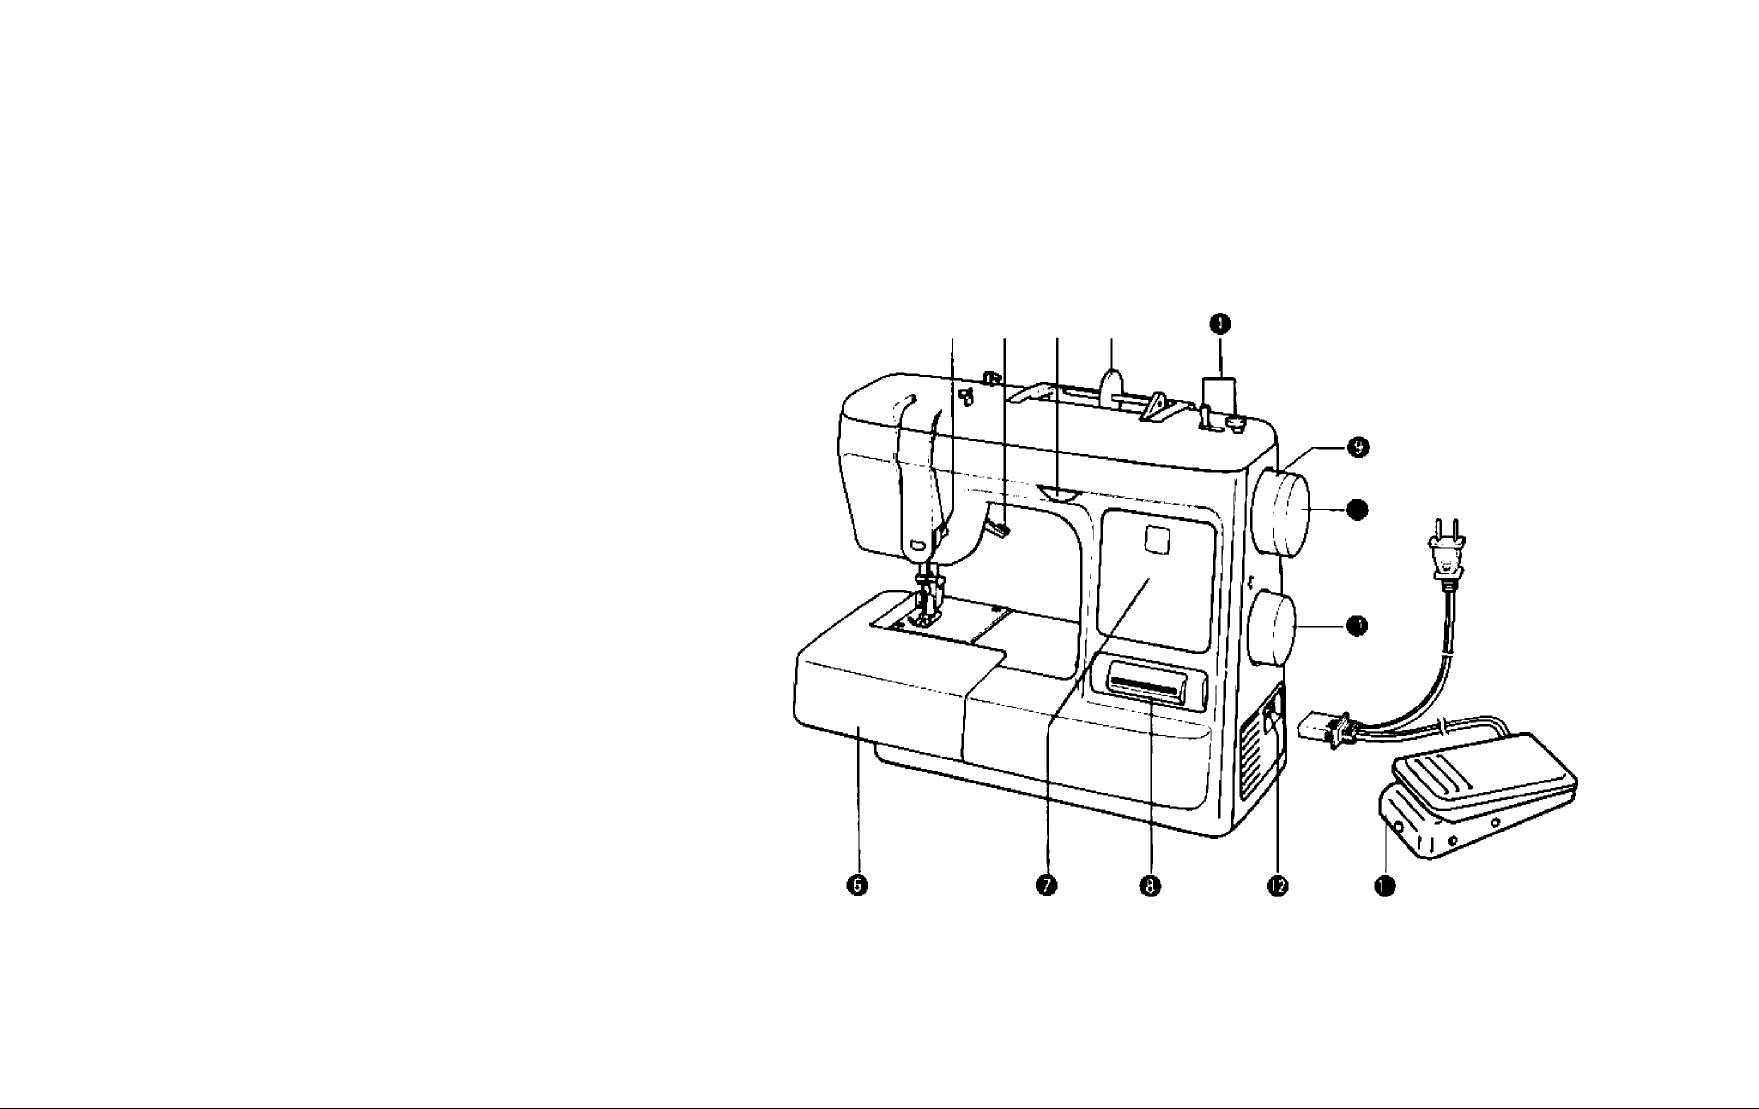
KNOWING YOUR SEWING MACHINE
Principal parts
O BOB8IN WINDER DEVICE
Winds the lower thread onto the bobbin.
O SPOOL HOLDER
0 STITCH LENGTH DIAL
Controls the feed of stitches.
O PRESSER FOOT LEVER
0 UPPER TENSION CONTROL DIAL
Controls the upper tension.
O EXTENSION TABLE & ACCESSORIES COMPARTMENT
O PATTERN INDICATION PANEL
O REVERSE SEWING BUTTON
Push for reverse stitching.
O BALANCE WHEEL
Turn toward you to iower and raise the needle.
0
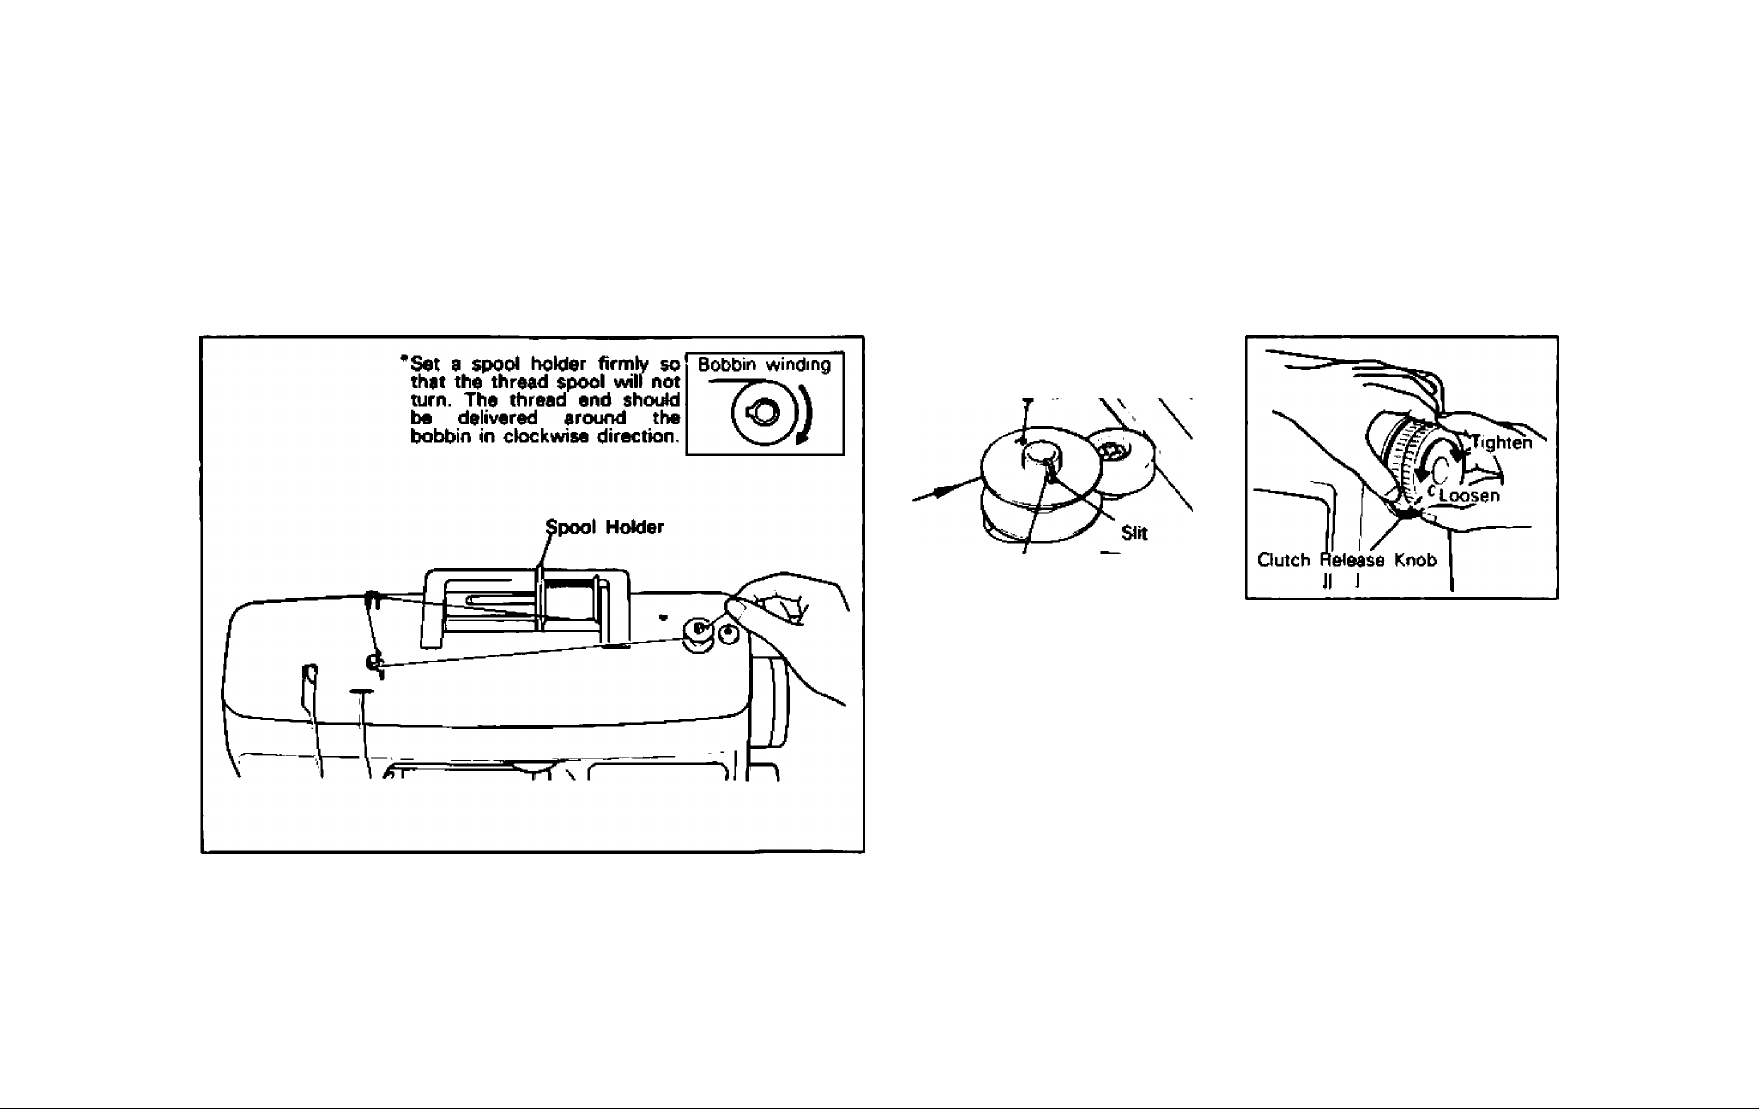
CLUTCH RELEASE KNOB
0
PATTERN SELECTOR
Turn in any direction to select the desired stitch.
0 FOOT CONTROLLER RECEPTACLE
Insert the foot controller plug for operation.
0
FOOT CONTROLLER
0 o e o
Page 5
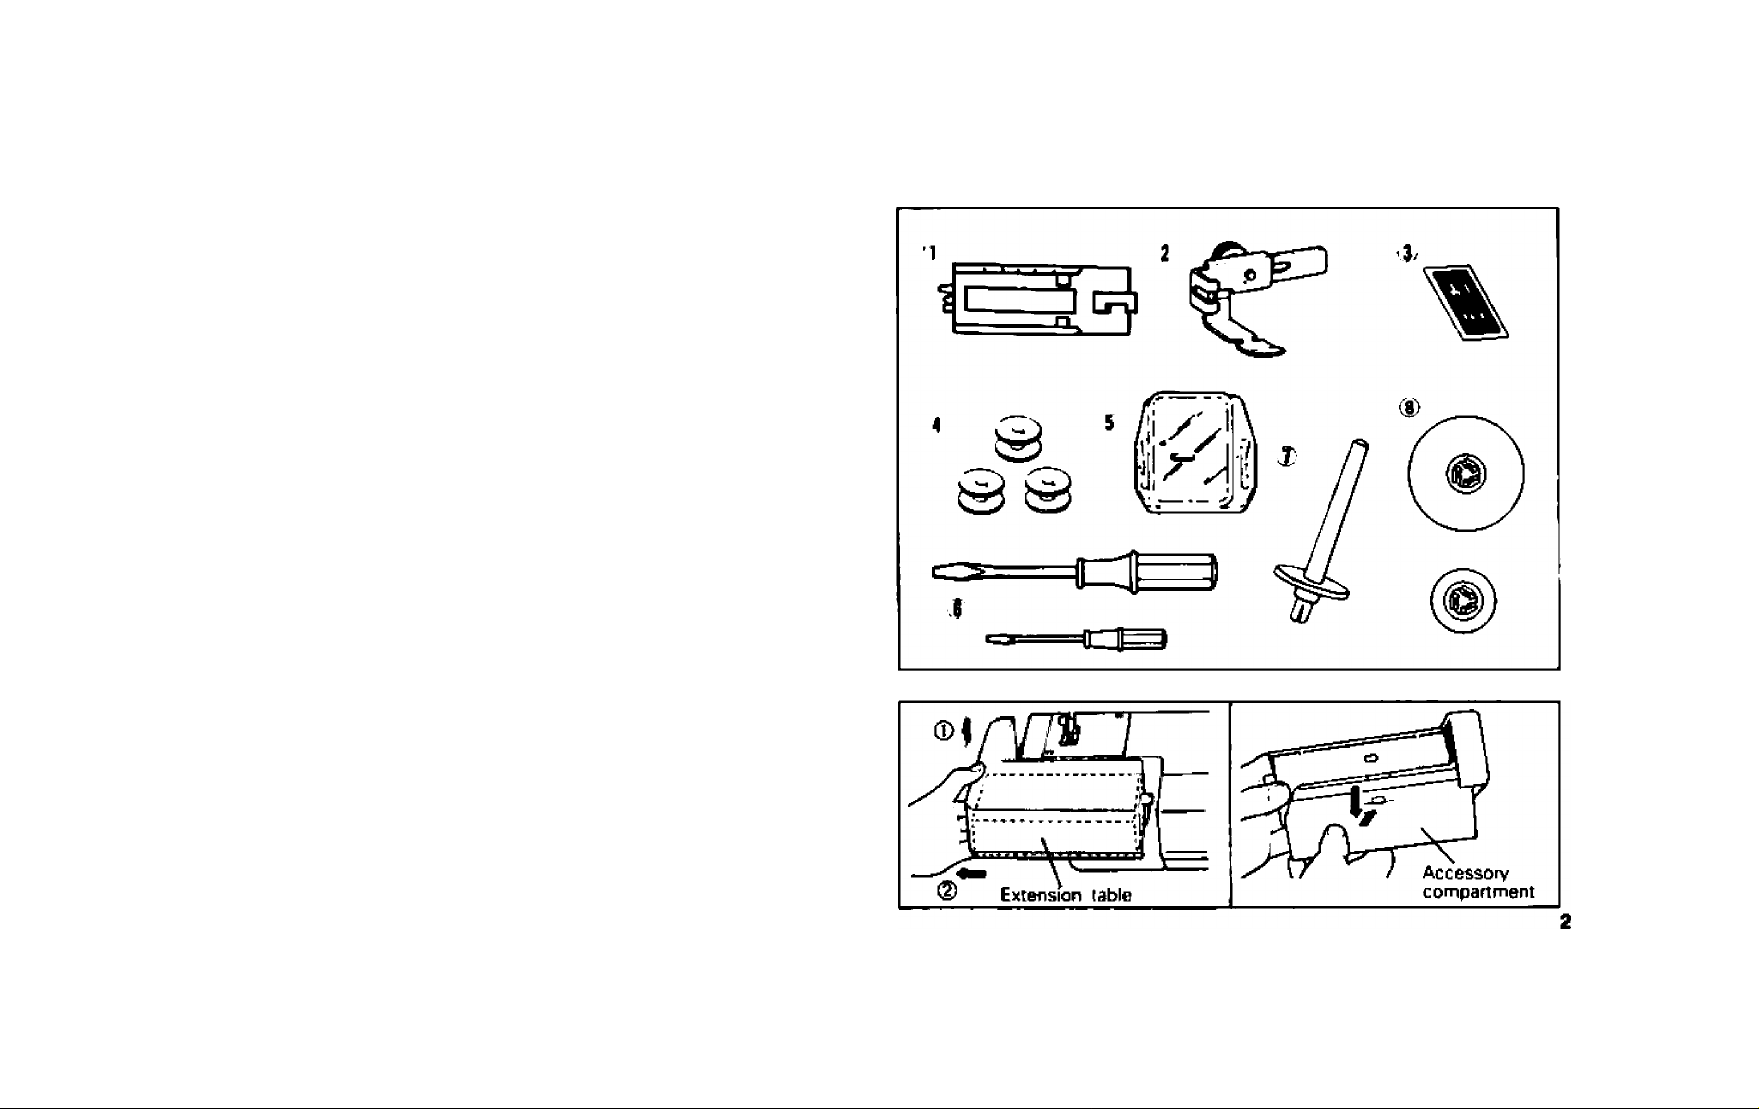
Accessories
(D Buttonhole & Button Sewing
X Zipper Foot
X' Needle Pack
(Regular Single Needle No. 14 ..
(Twin Needle
X Bobbin
X Darning Plate
T Screw Driver (Large & Small)
7 Extra Spool Pin
B Spool Holder (Large Si Small)
The above accessories are stored in the accessory compart
ment under the extension table. These accessories have been
designed tor easy and perfect sewing. For more details, see
each page listed.
........................
*.......
1 pc. (Page 19-21)
1 pc. (Page 22)
...................
......................
2 pcs. (Page 25,2B)
2 pcs. (page 7, 9)
3 pcs.)
1 pc.)
3 pcs. (Page 7)
1 pc. (Page 23)
1 pc. (Page 6)
1 set
Accessory compartment
Lift the extension table up and slide it out.
Then draw the accessory compartment down pushing its
underside.
Page 6
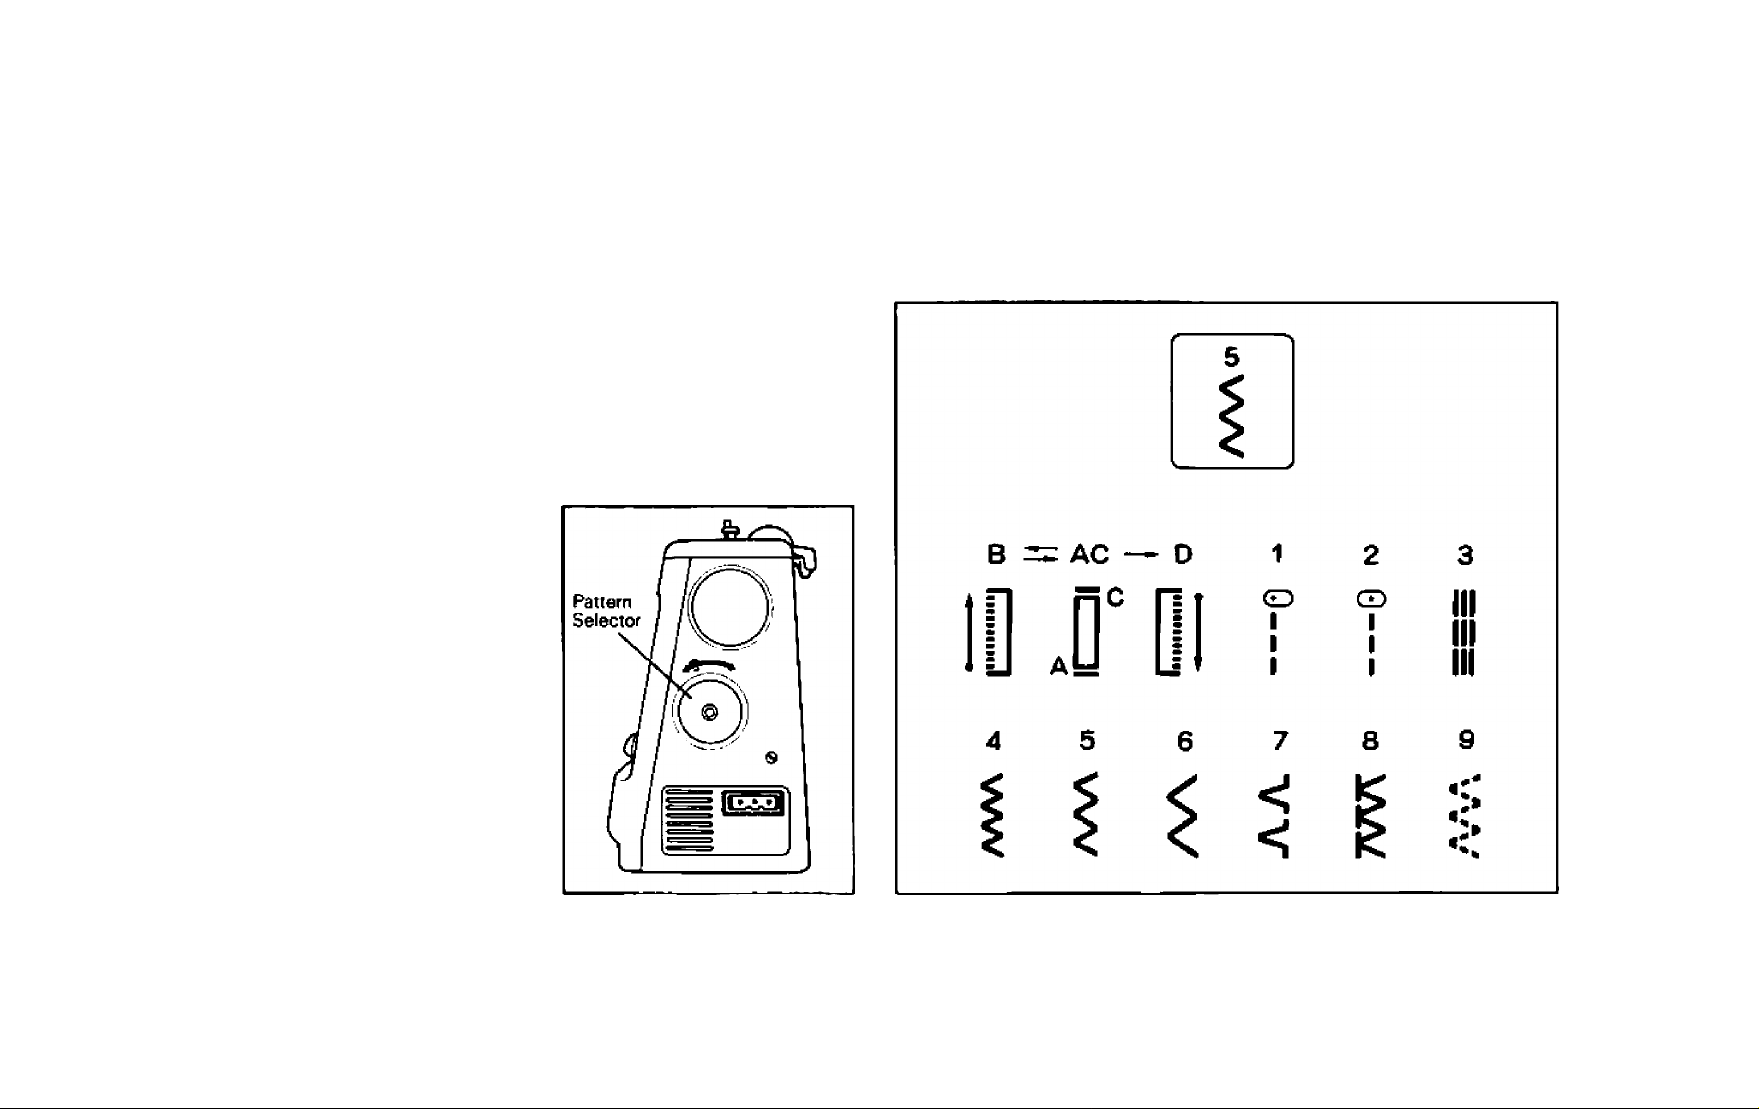
VARIOUS CONTROLS
Pattern selector
To select a stitch, simply turn the pattern selector located on
the end of the machine. All stitches are preset in width,
therefore, the stitch length is the only adjustment.
The following table represents the preset width of each stitch
and the recommended range of stitch length.
Page 7

RECOMMENDED LENGTH
PATTERN STITCH NAME
A-B-C-D
1
2
3
4
5
6
7 Blind Hem Stitch 3
8
Automatic Buttonhole 4.8 F-3 19
Straight Stitch
(Left needle position)
Straight Stitch
(Center needle position)
Stretch Straight Stitch
Zigzag Stitch 1,6 F-4 15
Zigzag Stitch
Zigzag Stitch 4.8 F-4 15
Elastic Overlock
PRESET WIDTH
(MM)
0 F-4
0 F-4
0
3.6
4,8 4 17
RECOMMENDED
LENGTH (MM)
4 13
F-4
1-2 16
PAGE
13
13
15
9
Elastic Stitch
4.8 1-2 18
Page 8
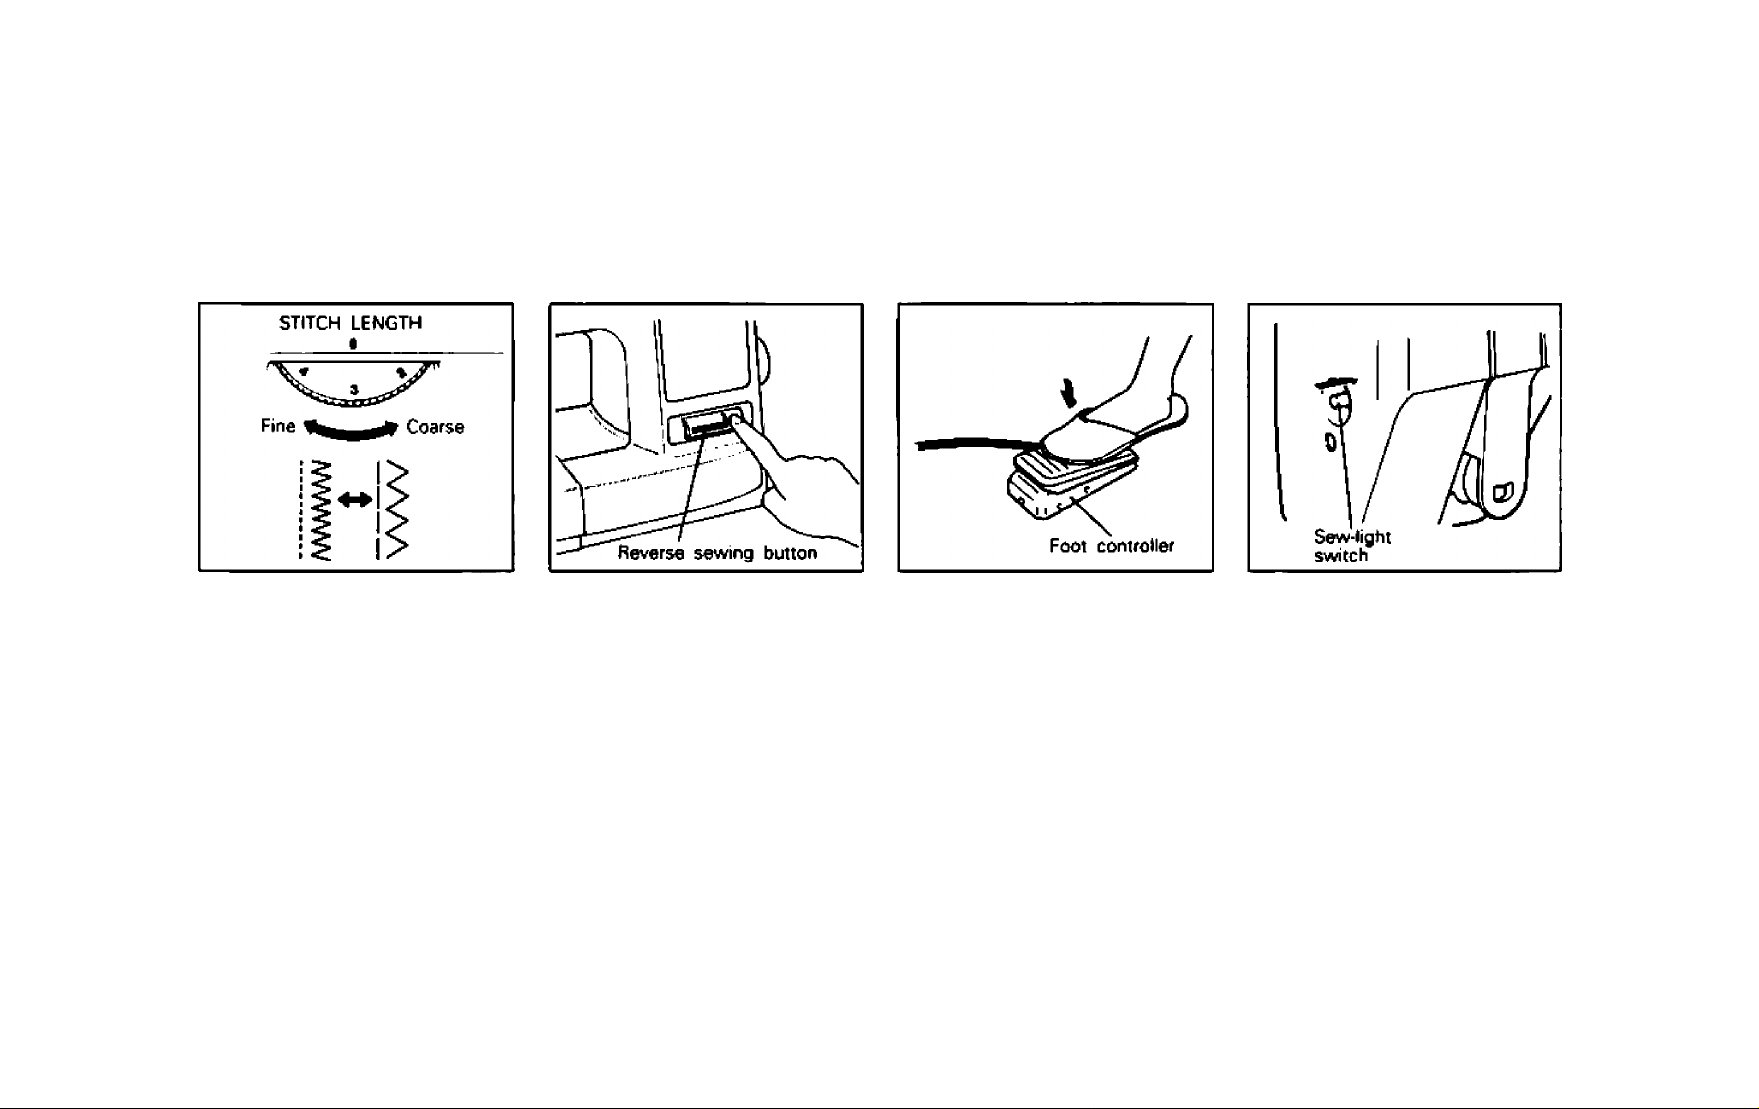
Stitch length dial
Reverse sewing
button
Foot controller
Sew-light
Depending on the stitch select
ed, you may need to adjust the
stitch length.
The numbers marked on the dial
represent the stitch length.
THE HIGHER THE NUMRER, THE
LONGER THE STiTCH.
The ‘‘O” means the material does
not feed.
The area is used for making a
SATIN stitch (closed stitch) for
buttonhole and decorative
stitches.
To sew in reverse, push the
button as far as it goes. Hold the
button in this position until you
wish to sew forward. When the
button is released, it will spring
back in original position and the
machine will sew forward. Re
verse sewing is used for backtacking and reinforcement of
seams.
When the foot controller is de
pressed lightly, the machine will
run at a low speed.
When the pressure on the foot
controller is increased, the ma
chine will pick up the speed.
When the foot controller is re
leased, the machine will stop.
Care should be taken that noth
ing is placed on the foot control
ler when the machine is not in
use.
To turn the sew-light on or off,
push the sew-light switch.
Page 9
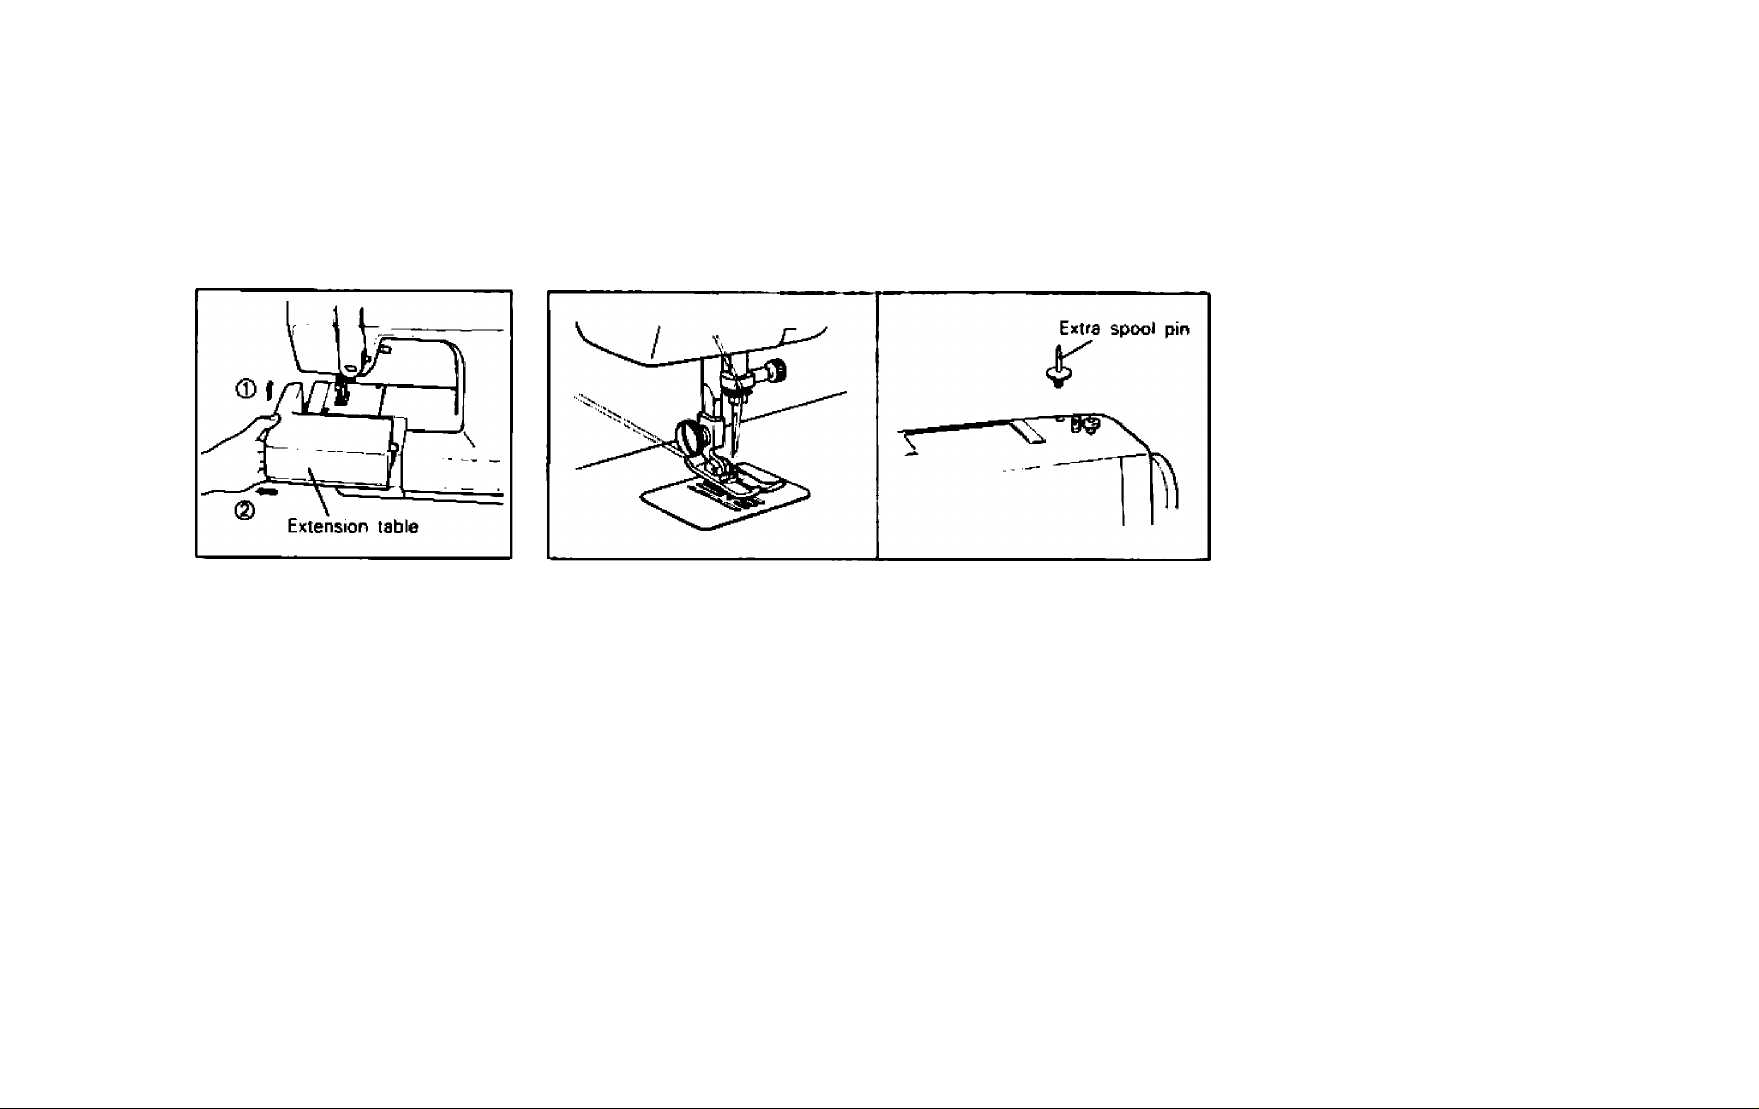
Free-arm model
Twin needle
For sewing tubular and hard-toreach garment areas, free-arm
sewing is convenient, To change
your machine to a free-arm mod
el, simply lift the extension table
then slide it out.
Vour sewing machine is designed for twin needle sewing with
Straight Stitch (Center) and Stretch Straight Stitch.
INSERTING TWIN NEEDLE
Insert the twin needle in the same manner as single needle.
THREADING TWIN NEEDLE
Set the extra spool pin into a hole on the top of the machine. Follow
the instructions for single needle threading (See page 9), but thread
each needle separately.
6
Page 10
THREADING THE MACHINE
Winding the bobbin
1 ¥WVltSdWUScK^ 1
Spring
1, Dalhrar thread through tho thraad-guidas as illustrated.
2. Holding tho thread and, push
tha bobbin windar shaft to
the right.
*Tha slit on tha bobbin should
match with the spring on the
shaft.
3. Loosen tha Clutch Ralaasa
Knob by turning toward you.
Page 11
Winding the bobbin (CONTINUED)
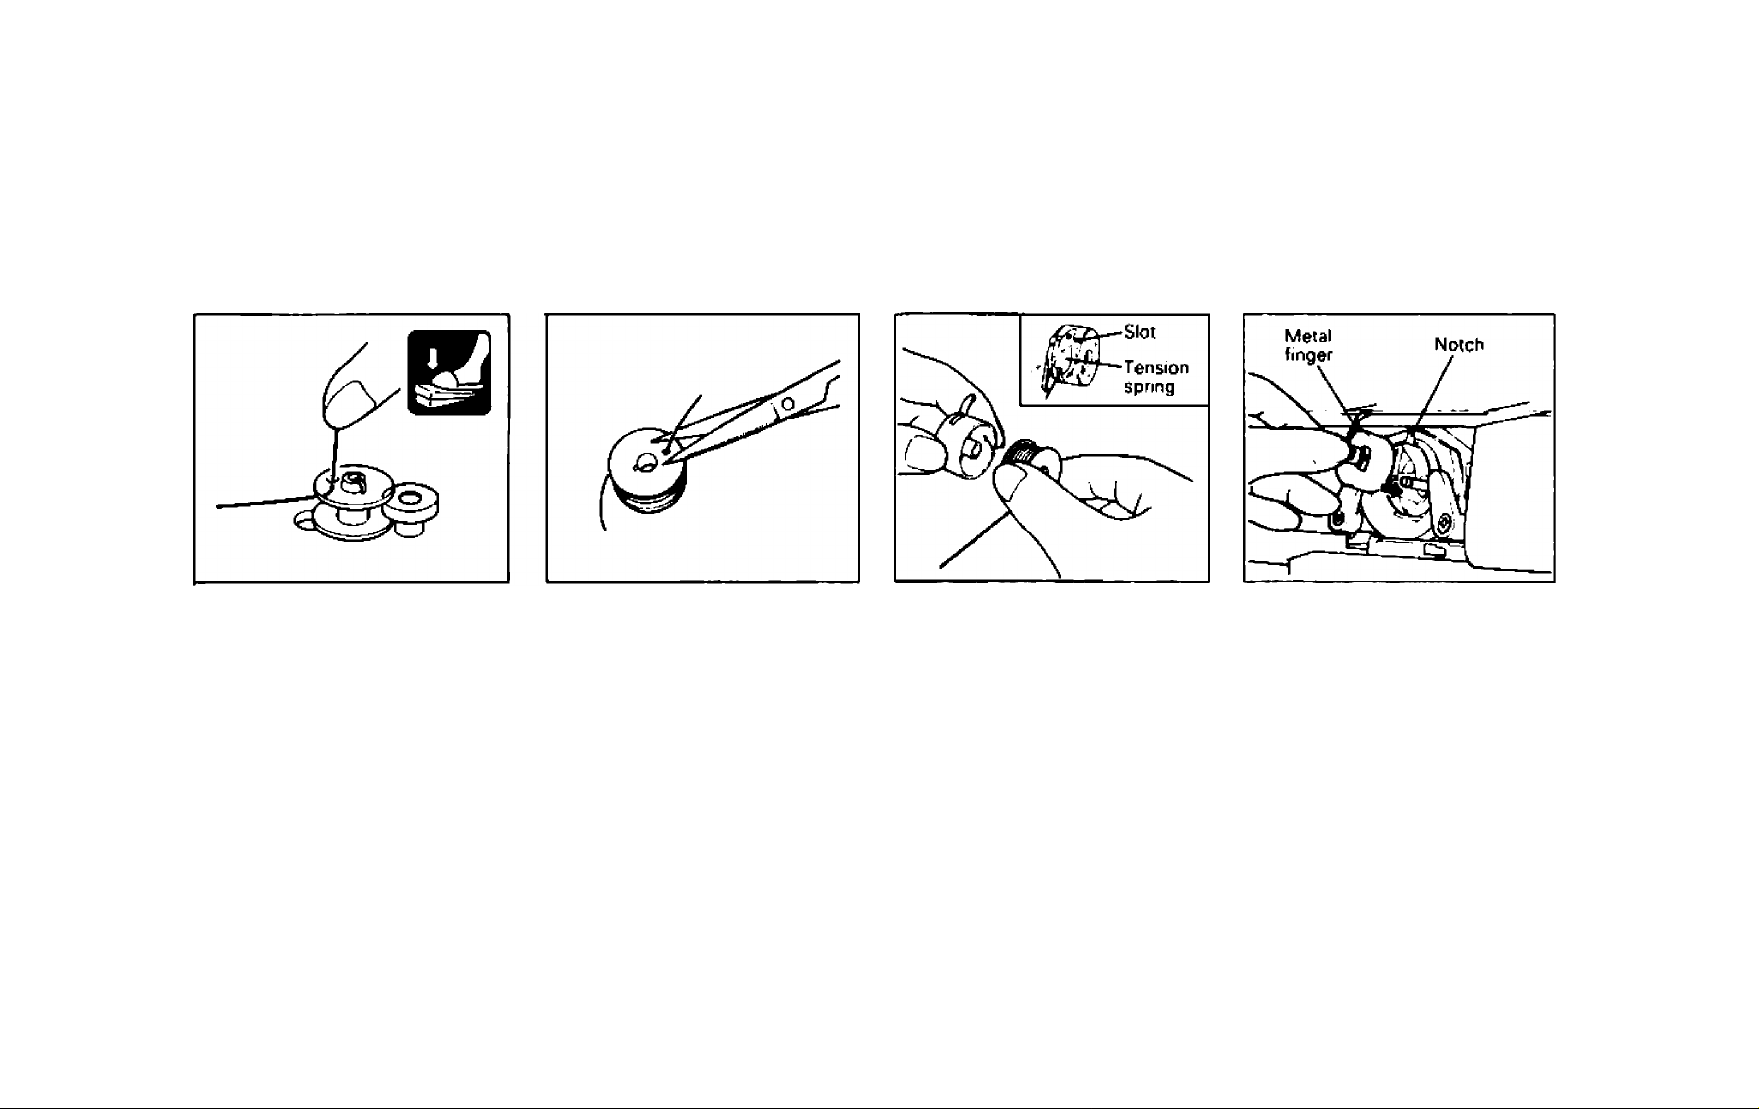
Lower threading
Holding the thread end, de
press the foot controller to
wind the thread.
The machine stops automati
cally when the bobbin is full.
S. Push the shaft to the left.
Remove the full bobbin from
the shaft, and trim the excess
thread.
Tighten the clutch release
knob securely.
Unwind about 4 inches (10
cm( from the bobbin, and
insert the bobbin into the
bobbin case. Pull the trailing
thread into the slot, down
and to the left until it enters
the delivery eye under the
tension spring.
Holding the bobbin case
latch, insert the bobbin into
the shuttle race. Make sure to
fit the metal finger into the
notch at the top of race.
8
Page 12

Upper threading
1. Raiw th« pr«s««r foot l«v«r.
2. Raiso the needle to its high’est position by turning the
balance wheel toward you.
{Large} (Small)
PiBca a thread ^wol on
horizontal spool pin.
Choose an appropriate spoof
holder according to type and
diameter of spool being used.
(The diameter of spool holder
should be larger than that of
the spool itself)
Press the spool holder firmly
to the spool.
9
7. Make sure to guide the
thread through thread-take-
up lever from right to left.
6. Deliver the upper thread as Illustrated.
Page 13

To draw up lower thread
1. Rai«s the needle and the
presser foot to the highest
position. With left hand, hold
the end of upper thread and
with right hand, turn baiance
wheel toward you until the
needle moves down and up
again to its highest position.
2. The upper thread has caught 3. Pull about 4 inches (10 cm) of
the lower thread in a loop.
Pull the upper thread toward
you and the lower thread will
come up from the bobbin in a
large loop.
thread under the toe of the
presser foot toward the back
of the machine.
10
Page 14

Tension controls
11
■ Upper tension is
loo tight.
Locks appear on the
fabric surface.
■ Upper tendon Is
too loose.
Locks appear on the
reverse side of the
fabric.
o
O
f(
Upper Tension DisI
Decrease tension
Lower number
Bobbin
Correct tension is important be
cause too much or too little ten
sion will weaken your seems or
cause puckers on your fabric.
Page 15

RELATIVE CHART OF SEWING FABRICS, NEEDLE AND THREAD
SEWING MATERIALS
VERY THIN
LIGHTWEIGHT
MEDIUM
HEAVY
Fine tricot. Fine lace.
Thin linen. Silk, Tulle,
Chiffon
Organdy, Jersey, Voile,
T afteta, Synthetics,
Silk,
6a^e
Cotton, Gingham, Poplin,
Percale, Pique, Satin,
Velvet, Lightweight wool.
Fine corduroy. Suitings
Denim, Gabardine,
Tweed, Corduroy
NEEDLE
SIZES
9
11
14
16
NOTE;
1. Select the correct needle end thread size from the above chart.
2. Use the same size thread for the upper and lower threads.
THREAD SIZES
Cotton; 80
Synthetic
Fine Mercerized Cotton
Cotton: 60'80
Silk: “A"
Synthetic
Mercerized 50
Cotton: 50-60
Silk; “A"
Synthetic
^^гceгized 50-60
Cotton: 40-50
Mercerized Heavy Duty
12
Page 16

STRAIGHT AND ZIGZAG STITCHING
13
Straight stitch
1 (Left needle position)
2 (Center needle position)
3 (Stretch Straight Stitch)
How to Start Sowing
1. Raise the needle to its highest
position and lift the presser
foot.
Pattorn
Stitch Length
1-4
2. Pull up the lower thread by
turning the balance wheel
toward you and pull both up'
per and lower thread to the
back of presser foot.
3. Place fabric under the presser
foot and position needle 5/8
inch (10 mm) beyond fabric
edge.
4. Lower the presser foot.
5. To back tack, push the Re
verse Sewing Button as far as
it goes. Reserve sewing is
used for locking end of seam
and where reinforcement is
needed.
6. Release the Reverse Sewing
Bunon and start sewing in
forward direction.
How to Change Sewing Direc>
lion
1. Stop the machine at the turn
ing point while the needle is in
the fabric.
2. Raise the presser foot and
turn the fabric to its new di
rection while the needle acts
as the axis.
3. Lower the presser foot and
start sewing in new direction.
Page 17

How to Finish Your Sowing
Projsct
Reverse stitching is used to lock
the threads at the end of the
seam or wherever reinforcement
is needed.
1, This is done by stitching to
the end of the seam. Then
stop.
2. Push the Reverse Sewing But
ton and stitch backward for
3/8 inch (10 mm) from end of
the seam fabric.
How to Remove from Machine
1. Stop the machine.
2. Raise the needle to its highest
position and make sure that
the thread take-up lever is
also in the highest position.
3. Lift the presser foot and pull
out the fabric gently to the left
side.
4. Cut both threads by the
thread cutter equipped with
the machine.
5. To prepare the machine for
the next seam, pull 4 inches
(10 cm) of thread between the
toe of the presser foot toward
the back of the machine.
Top Stitching atKf Stretch Mate
rials
No. 1 (Left needle position) is
used for Top stitching and sew
ing light weight fabrics.
No. 3 (Stretch Straight Stitch) is
for stretchable fabrics.
14
Page 18

Zigzag stitch
Pattern
4 (Stitch Width at 1.6
15
Stitch Length
5 (Stitch Width at 3.6 mm|
6 (Stitch Width at 4.8 mm)
SIMPLE ZIGZAG STITCHING
Select the Pattern number de
pending on the width you need
and select the stitch length.
It is recommended to sew the
straight stitch at the beginning
and end of zigzag stitches,
F-4
SATIN STITCH
When stitch length is set at “F”
position, it produces the "SATIN
STITCH" used for making button
holes or decorative stitches.
Page 19

BUILT-IN STITCHES
Blind hem stitch p^twn
Stitch Length
1 7 (Blind Hem Stitch) 1-2
1. Thread used should be the
same color as the fabric used.
2. Fold the fabric to the size of
hem desired and then fold
back as shown in Figure A.
Leave 1/4 inch overlap at
edge.
3. Sew on the fold as in Figure B.
4. When the fabric is unfolded
you will have a blind stitch
hem as in Figure C.
Fig. B
16
Page 20

Overedging stitch
Pattern
Stitch Langth
8 (Elastic Overiock Stitch) 4
Position the fabric under the
presser foot so the right (zigzag)
side of the stitch pattern forms
along the cut edge of the fabric.
The left hand (straight stitch pat*
tern) forms the seam stitching
tine of approximately 1M inch
seam allowance, tf the seam al
lowance is wider than the stitch
pattern, trim away any excess
fabric after stitching.
17
Page 21

Elastic stitch
Pattern
I
9 (Elastic StKch)
Stitch Langth
1-2
/ ^
;l:
1
MENDING
1. Set the stitch Length Dial be
tween F-1-
2. Place reinforcement fabric un
der tear.
3. Following the line of tear, sew
using the elastic to join both
sides of the tear.
SEWING ELASTIC
1. Place the elastic on the fabric.
2. As stretch elastic
both in front and in back of
the presser foot as shown in
illustration.
H.. Ir
JOINING STITCH
1. The elastic stitch is used to
join fabric together.
2. Place fabric edge to edge un
der the presser foot.
3. Sew together using elastic
stitch. Care should be taken to
keep the two fabric edges
close together.
18
Page 22

BUTTONHOLE AND BUTTON SEWING
Buttonhole
Pattern
В AC D F-3 Buttonhole foot
Stitch Length Foot
Automatic buttonhote making is a simple process that provides
reliable results.
MAKING BUTTONHOLE
1. Use buttonhole foot with sliding portion.
2. Using tailor chalk, mark the position of buttonhole on the fabric.
3. Attach the buttonhole foot and push its sliding portion backward
until it stops.
4. Place the fabric under the presser foot so that front end of bar tack
can be sewn first.
19
NOTE; It is a good idea to practice making a buttonhole on a scrap of
fabric before attempting the actual garment.
Page 23

PROCEDURE OF MAKING BUTTONHOLE
Stop
Step A
(Front
end of
bar
tack)
StepB
(Left
side
row)
StepC
(Back
end of
bar
tack)
StepD
(Right
side
row)
Sowing
Pattorn
How to sow
1. Set the pattern at A.
2. Lower presser foot and sew 5
to 6 stitches.
3. Stop machine and raise needle
from the material.
I 1. Turn the pattern selector and
I set at B.
I 2. Sew predetermined length,
j 3. Stop machine and raise the
needle.
1. Turn the selector and set at C
(same position as A).
2. Sew 5 to 6 stitches.
3. Stop machine and raise the
needle.
1. Set at 0.
2. Sew the right side row until the
needle reaches position D.
HOW TO SECURE STITCHING
AND CUT MATERIAL FOR BUT
TONHOLE.
1. To secure stitching, turn the
material 90 degrees counter
clockwise and sew 5-6
straight stitches.
2. Remove the material from the
machine. Cut opening in but
tonhole with seam ripper tool.
Care should be taken not to
cut through any stitching.
3. It is recommended that pins
are placed across both ends
of buttonhole as a protection
against cutting bar tack stitch
ing.
20
Page 24

Button sewing
Pattern
4 or 5 or 6
Stitch Length
Any position
Foot
Button Sewing
Foot
1, Measure the distance between the holes and select the Pattern.
Others
Darning plate
21
Button sewing foot
Distance of
holes
1.6 mm
{0.06 inch)
3.6 mm
(0.14 inch)
4.8 mm
(0.19 inch)
2. By removing the sliding portion of buttonhole foot, you will have a
button sewing foot.
3. Place the Darning Plate on the needle plate.
4. Place a button between the foot and fabric, and make sure that
needle enters both holes without hitting the button.
5. At slow speed, sew approximately 10 stitches.
6. Remove the button from the machine. Cut upper and lower
threads and tie both threads at back side.
k—
Pattern
4
5
6
________________^
Page 25

USING ATTACHMENTS AND APPUCATIONS
Zipper insertion ;
______
Stitch Length
2-3
Zipper foot is used to sew vari
ous types of zippers and can
easily be positioned to right or
left side of needle. When zipper
is sewn at right side of the nee
dle, place the zipper foot by
loosening thumb screw and slid
ing zipper foot to the left.
When the zipper is sewn at left
side of needle, place the zipper
foot by loosening thumb screw
and sliding zipper foot to the
right.
Foot
____
Zipper Foot
1. Lower needle into side notch
located on the presser foot
(right or left).
2. Tighten the thumb screw to
lock presser foot into position.
3. To sew opposite side of zip
per loosen thumb screw and
place the zipper foot (right or
left.)
22
Page 26

23
Darning
! Pattern Dial
r 2 ^
1. Set the darning plate on the
needle plate as illustrated.
2. Place portion to be darned
under the presser foot to
gether with fabric underlav for
reinforcement.
3. Lower the presser foot.
Stitch Length
fikny position
Others
Darning Plate
4. Sew alternately drawing the
work gentty away from you
and pulling it toward you.
5. Repeat this motion until the
portion to be darned is filled
with parallel lines of stitching.
Applique
Pattern Stitch Lanoth
4 or 5 or 6
F-2
1. Baste the cut design to the
fabric.
2. Sew carefully around the
edge of the cutout design.
3. Cut away surplus fabric out
side of stitching.
4. Remove basting.
NOTE: Make reinforcement
straight stitches at be
ginning and the end of
the stitches.
Page 27

Monogramming and Embroidering
Pattern
Stitch Length
4 or 5 or 6 At any position
PREPARATION FOR MONO
GRAMMING AND EMBROIDER
ING
1, Place the darning plate on the
needle plate.
2. Set your sewing machine as
per the above instructions.
Foot Others
Remove Darning plate
3. Draw lettering (for monogramming) or design (for em
broidering) on the right side
of the fabric,
4. Stretch work between em
broidery hoops as firmly as
possible.
5. Place the work under the nee
dle and lower the presser bar.
6. Pull the lower thread up
through the work at starting
position by turning balance
wheel and make a few hold
ing stitches.
6. Hold the hoop with thumb
and forefingers of both hands
while pressir^g the fabric with
middle and third fingers and
supporting the outside of
hoop with smaller finger.
1. Sew, moving hoop slowly
along the lettering at the same
speed.
2. Secure with a few straight
stitches.
(NOTE: These instructions also
apply to embroidering.)
1. Stitch the outline of the de
sign by moving the embroi
dery hoop accordingly,
2, Fill in design stitch from the
outline of the design to the
inside and from inside to edge
of the outline alternately until
design is completely filled in.
Keep stitching close together.
NOTE: A long stitch is made by
moving the embroidery
hoop rapidly and a short
stitch is made by mov
ing it slowly.
24
Page 28

MAINTENANCE
Changing the needle
25
• Remove the power supply plug from the outlet.
1. Remove the needle
Lower the presser foot
loosen the screw,
and
Inserting the needle
With the flat side facing back,
insert the needle as far as it
will go against the needle
stopper. Tighten the screw.
• How to check the needle.
for smooth sewing.
as shown
right.
in illustration at
Page 29

Changing the bulb
• Remove the power supply plug from the outlet.
1. Loosen the screw.
machine.
4. Attach the face plate and fas*
ten the screw.
26
Page 30

Cleaning
Remove the power supply plug from the outlet.
27
Lint and dust easily accumulate. Always keep clean.
Retaining ring
Latch lever
yww
HOW TO REMOVE THE SHUTTLE HOOK
1. Raise the needle to its highest position.
2. Open the shuttle cover.
3. Take out the bobbin case.
4. Push latch levers outside and remove the retaining ring.
5. Remove the hook by grasping center post of the hook.
NOTE: When needle is lowered, shuttle hook cannot be
removed.
Hook
sa.co
Race body
Driver
Retaining ring
t
CLEANING SHUTTLE RACE
1. Remove accumulated lint and thread
from the retaining ring, hook, driver and
race body with brush.
2. A cloth dampened with machine oil
should be used to wipe shuttle race
clean.
3. Clean shuttle hook in same manner as
above.
4. Reassemble and push the latch levers
inside.
CLEANING FEED DOG
1. Take out the needle plate.
2. Clean the upper part of feed
dog and shuttle race body
with a brush.
Page 31

Oiling
Remove the power supply plug from the outlet.
OIL ONCE A WEEK IF THE MACHINE IS USED MORE THAN ONE
HOUR PER DAY.
IF THE MACHINE IS USED MORE OFTEN OIL EVERY DAY.
• OIL 2 TO 3 DROPS TO THE POINTS MARKED
• After oiling, run the machine fast without thread.
• Be sure to wipe off any excess oil.
Page 32

Performance check list
Whenever sewing difficulty is encountered, review the section of the instruction book that explains the operation you are performing to make
sure you are using the machine correctly. If the problem still exists, the following check list may help you correct it.
If you still have difficulties, contact your nearest service center.
29
UPPER
THREAD
BREAKS
LOWER
THREAD
BREAKS
SKIPPED
STITCHES
LOOP IN
SEAM
Upper threading
is not correct.
T”
'^PagaS
-^Page 10
Needle is not
correctly
inserted.
►Pageto
Thread tension
is not correct.
—►PageTi
No
upper thread is
tangled.
Bobbin is not
threaded pro>
perly in the
shuttle hook.
No
Inferior needle
is used.
No
No
Upper thread
tension is too
tight.
' ►Pages ^- ►PageIT
No
Lower thread
tension is
too tight.
►Pages
No
^Page 25
^ ►Page 11
The combina
tion of needle/
thread/ fabric is
wrong.
TT
w^Page12 -►Page 27
Spool of thread
^ is not correctly
set.
•Page?
No
No
Lint is clinging
under the
needle plate.
No
Needle is bent or
not sharp.
No
Threading is not
correct.
’age 25
•Page 9
The combine'
No
tion of needle/
thread/ fabric ie
wrong.
No
No
I—fc-Pagel 2
U
(A
I
O
u
Page 33

-►Page 27 -Page 28
LU
u
lU
U
>
s
§
No
30
Page 34

Repacking the machine
Keep the carton and packing materials for future uee when it is necessary to reship the sewing machine. Improper
packing or improper packing material could result in damage during shipping, Instructions for repacking the
machine are illustrated below.
31
Page 35

INDEX
Page
Accessories
Applique ....
Blind hem stitch
Buttonhole
Button sewing ..
Changing the bulb ...
Changing the needle
Cleaning
Darning
Draw up lower thread
Elastic stitch..................................................................................... IB
Foot controller .
Free-arm model
Lower threading
Monogramming and embroidering
Oiling
Overedging stitch
..........
....................
.......................
.................................
.................................................
................................
.... 2
.... 23
16
19
21
26
25
27
23
10
24
28
17
Page
Pattern selector
Performance check List.................................................................. 29
Principal parts................................................................................... 1
Relative chart of sewing fabrics, needle and thread.............................. 12
Repacking the machine.................................................................... 31
Reverse sewing button ...................................................................... 5
Sewing-light....................................................................................... 5
Stitch length dial................................................................................. 5
Straight stitch .................................................................................. 13
Tension controls
Twin needle ...................................................................................... 6
5
6
8
Upper threading ............................................................................... 9
Winding the bobbin .......................................................................... 7
Zigzag stitch..................................................................................... 15
Zipper insertion................................................................................ 22
.................................................................................
..............................................................................
3
11
32
 Loading...