

Page 1
With a barcode reader connected to the printer, labels and
barcodes can easily be printed by scanning barcodes.
Connect a barcode reader to the printer to create a label or barcode using "P-touch
Editor 5.0"
The following example uses the Windows® XP operating system. Information displayed using different
•
Windows
•
Template transfer is only available for printers connected to a Windows
A USB connection is recommended for connecting this printer to Windows
This printer does not support Macintosh
Ensure that the P-touch Editor 5.0 label size matches the printer label size. Printing will not be possible if
•
the label sizes do not match.
®
operating systems and settings will vary.
®
operating systems.
®
operating system.
®
operating systems.
Advance preparation
z
Setting up P-touch templateP1
z
Setting up RS-232C communication (for communication with a
barcode reader)
P2
Basic operation
z
Preset template printingP2
If a frequently used label layout is stored in the printer, identical
labels can be printed simply by scanning barcodes.
Example: To simplify printing when the same labels are frequently
reused
z
Barcode creation (copy) and printingP3
A barcode scanned with the barcode reader can be printed with the
protocol and size from a previously created template.
Example: To print scanned barcodes with multiple protocols and
sizes
Advance preparation
Setting up P-touch template
z
z
Database-assisted label printing
If a template and a database (Excel, etc.) are created, the database
data can then be arranged in the template.
Labels can be printed by scanning key barcodes that match the
barcodes in the database.
Example: To manage part numbers using a database (Excel, etc.),
and print the corresponding labels
P4
Advanced operation
z
Numbered (sequential) printingP5
Label and barcode numbers can be printed sequentially.
Supplement
z
Connecting a barcode readerP7
z
Setting up barcode printingP7
2.
Set respective items and click [Set].
Download the P-touch template settings tool from the
1.
following URL and start P-touch Template Settings.exe.
http://solutions.brother.com/
Go to [Select your region/country] - [Choose your product] [Downloads] sequentially, and download "P-touch Template
Tools".
1
Page 2
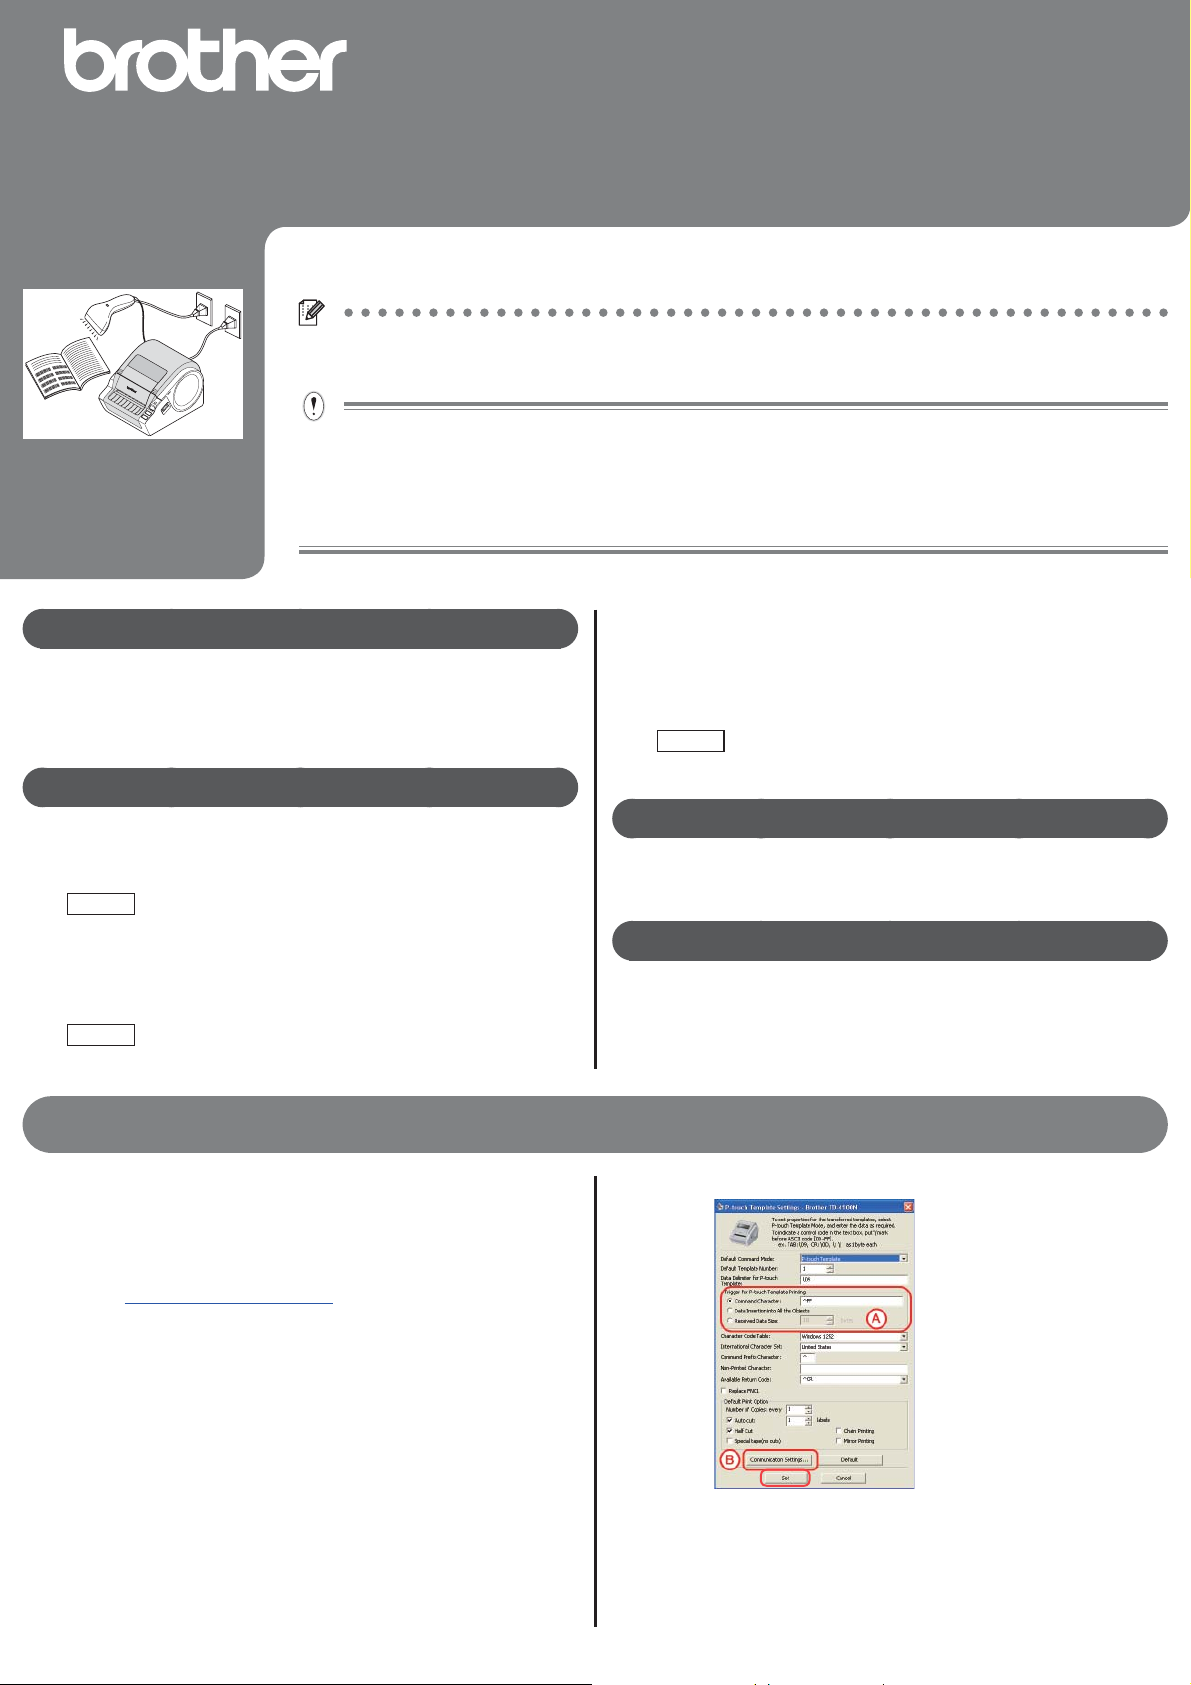
Advance preparation
In the default setting, printing starts when the ^FF code is scanned
by the barcode reader. (This can be changed in A.)
Select the [Received Data Size] check box and specify the number
of bytes to print automatically when a barcode with the specifi ed
number of bytes is scanned.
The above settings are reset if you print from a computer even once
after specifying settings.
If you have printed from a computer, reapply the above settings.
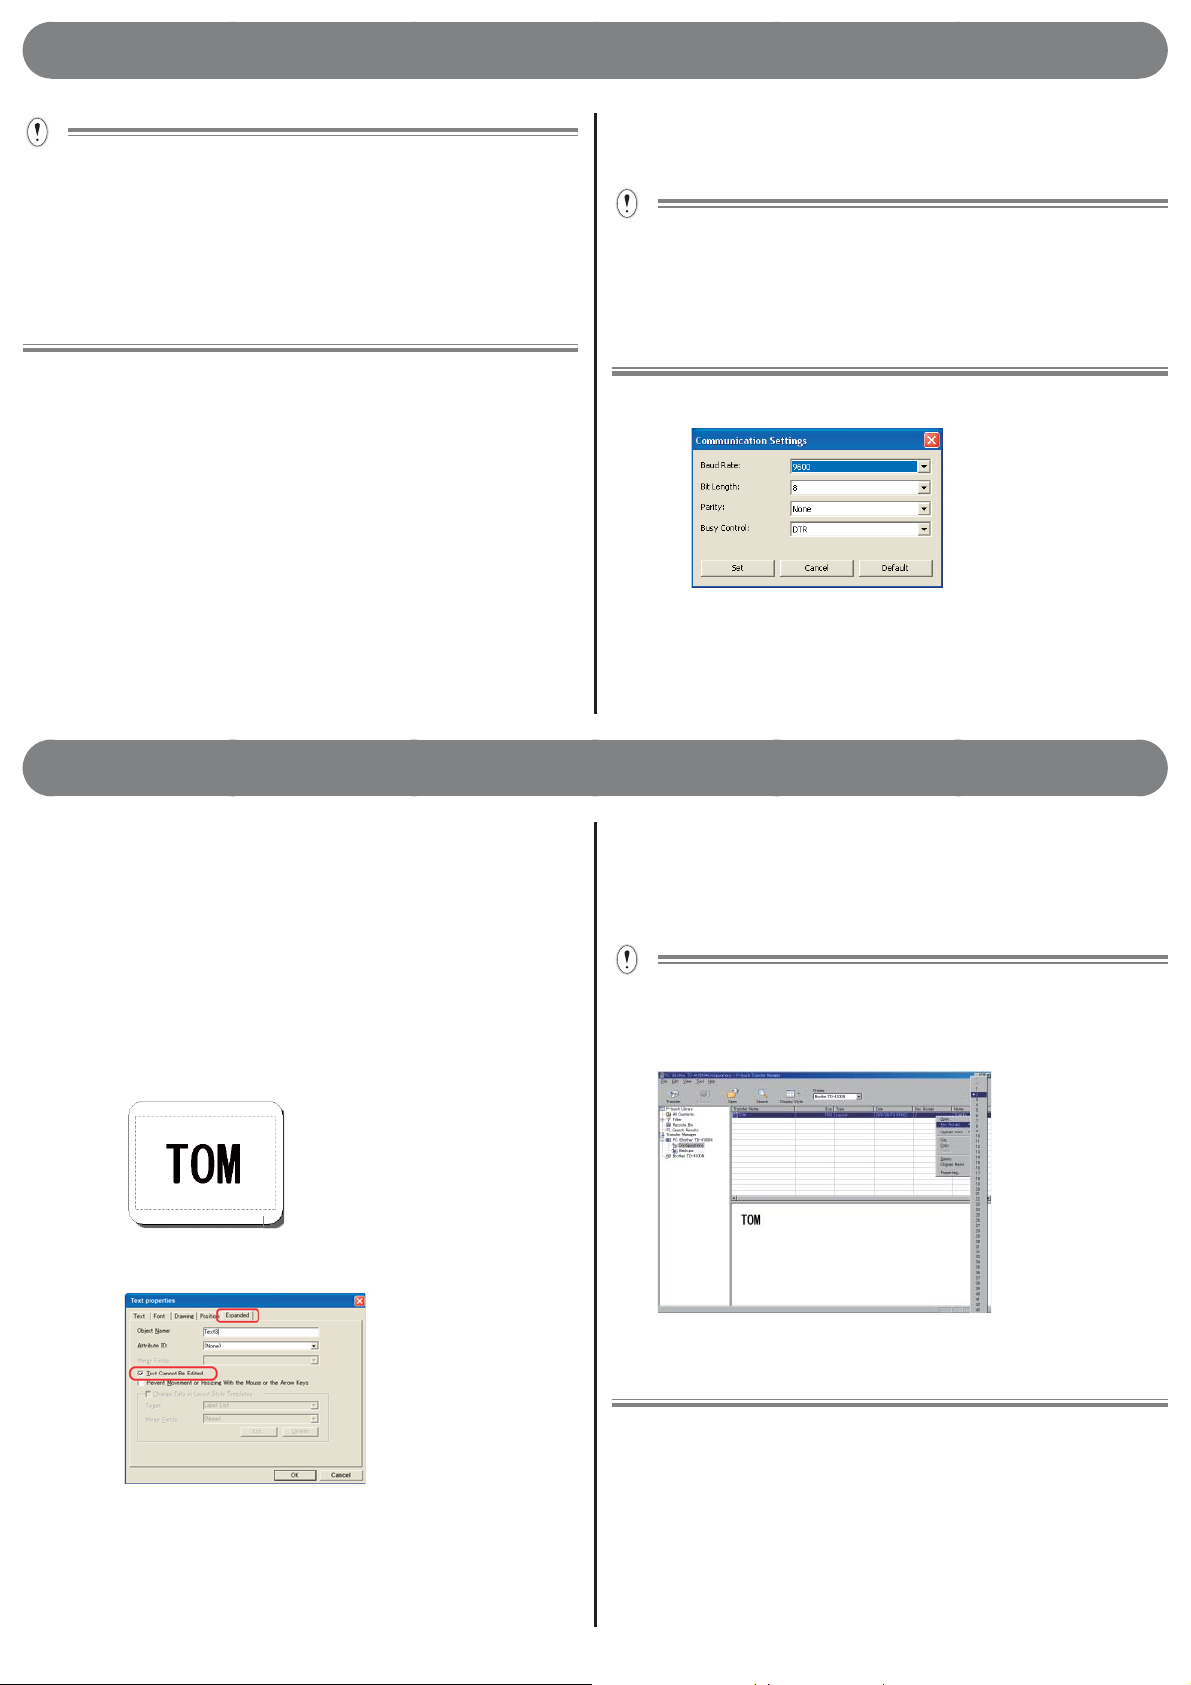
Setting up RS-232C communication
z
(communication with a barcode reader)
Default printer settings
Baud Rate: 9600
Bit Length: 8
Parity: None
Busy Control: DTR
Stop bit: 1 (Fixed)
Click B in Setting up P-touch template
If there are no problems, click the [Set] button.
Note: The above settings may differ depending on the
scanner.
Ask the scanner manufacturer for details.
Basic operation
Preset template printing
z
Procedure overview
Create a labelTransfer label data to printerPrint label
Procedure
Create a label template
1.
Start P-touch Editor 5.0, and then create and edit the label
1.
to be printed.
Example:
2.
Select the text on the created label, and then right-click to
open [Properties]. Select the [Expanded] tab.
Ensure that the printer is connected to a computer
2.
and then transfer the label data to the printer.
Click [File]-[Transfer Template...] to start the P-touch Transfer
1.
Manager.
Select the label data from the list and right-click to display the
menu.
Select [Key Assign] to assign the key number.
This number becomes the label template number when printing.
Note : - In the example, the "Key Assign" number is 2.
- When printing preset templates, specify a number between
1 and 10.
3
Select the [Text Cannot Be Edited] check box and then click
.
[OK].
Note: If this check box is not selected, the data will be
replaced and normal printing may not be possible.
2.
Click [Transfer] to transfer the label data to the printer.
Connect a barcode reader to the printer.
3.
Refer to "Connecting a barcode reader" on P.7 for more
details.
2
Page 3
Basic operation
e e
e e
Print a label
4.
Scan the barcode below, and then scan the barcode
that corresponds to the "Key Assign" number used when
transferring the data, referring to the preset template
numbers below.
Preset template
e
Ртеуеффенрмбфе Ртеуеффенрмбфе
Ртеуеффенрмбфе Ртеуеффенрмбфе
The template created in step 1 is printed.
In the example,scan the preset template 2 to print the TOM
label
Note: The barcodes shown above integrate selection and
printing of templates.
For information about preset template numbers other than
the above, refer to the "Preset template number" list on P9.
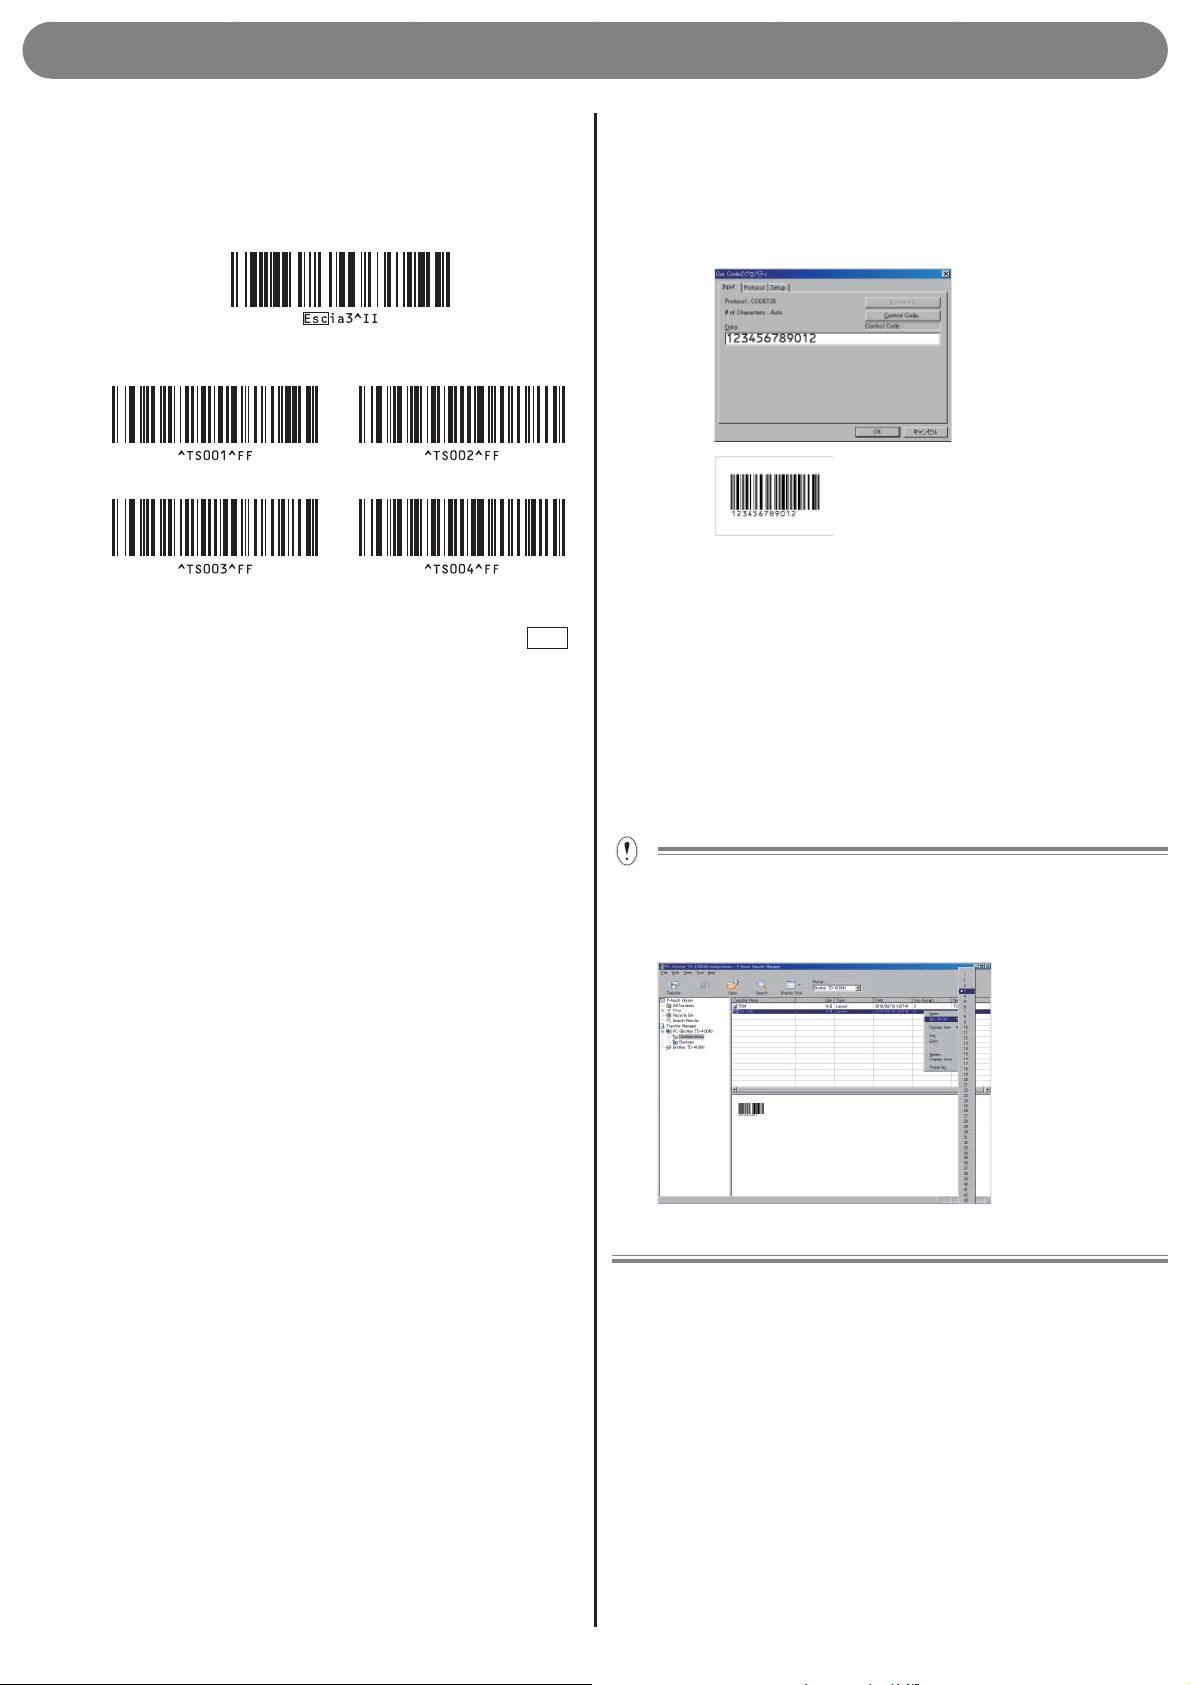
Create a label template (barcode)
2.
Start P-touch Editor 5.0.
1.
Press [Insert] [Barcode] to open the barcode properties, and
2.
enter the data.
Note: In the example, the following number is used to create
a template.
Example:
(EAN13)
Save the data.
3.
Note : - The label will be printed using the protocol of the
barcode previously specifi ed in the template.
- Specify the label length in accordance with the
maximum number of barcodes to be used.
Ensure that the printer is connected to a computer
3.
and then transfer the label data to the printer.
Click [File]-[Transfer Template...] to start the Transfer
1.
Manager.
If you want to print a template with a template number
of 10 or above, refer to "List of barcodes for specifying
settings" on page 9 and the following pages to scan
"Select template"(^TS)/"Entering numbers"(for number
15, scan barcodes in the order of 0, 1, and 5) and "Begin
printing"(^FF).
Barcode creation (copy) and printing
z
Procedure overview
Prepare the label to be copiedCreate barcode label
Transfer label dataScan barcode label to be copiedPrint
label
Note: Prepare the barcode label to be created (copied).
Procedure
Prepare the label to be copied.
1.
Example: Product barcode, etc.
Select the label data from the list and right-click to display the
menu.
Select [Key Assign] to assign the key number.
This number becomes the label template number when printing.
Note: In the example, the "Key Assign" number is 3.
Click [Transfer] to transfer the label data to the printer.
2.
Connect a barcode reader to the printer.
4.
Refer to "Connecting a barcode reader" on P.7 for more
details.
3
Page 4

Basic operation
Print a barcode
5.
Scan the "P-touch template command (Initialize + begin
1.
specifying settings)" barcode below.
P-touch template command (Initialize + begin specifying
settings)
Scan the template that corresponds to the "Key Assign"
2.
number.
Example: If the "Key Assign" number is 3.
Select template
Note: The above barcode integrates ^TS,00,3 and three
3.
Scan the barcode label prepared in step 1.
Example: Product barcode, etc.
4.
Scan the "Begin printing" barcode below.
Begin printing
^TS003
barcodes. For details on each barcode, refer to "List of
barcodes for specifying settings" on P.8.
(3) Price
Create a database containing the above data.
Start P-touch Editor 5.0, connect to the database, and
2.
create the linked data.
Click [File] – [Database] – [Connect], and specify the
database location to connect to the database.
Click [Insert] – [Database fi eld], and specify any additional
object formatting.
Select the fi elds to be added from the available database
fi elds.
Note: For details on how to link to a database, refer to the
P-touch Editor Help.
z
Example:
The label scanned in step 5-3 above is printed.
Database-assisted label printing
Procedure overview
Create database-linked dataTransfer label dataPrint
label
In the following example, a label is created containing a
product barcode (1), a product name (2), and a price (3).
The required label can be printed by scanning the product
barcode.
Note: Create in advance the key barcode to be used in step
4-3.
Procedure
•
Compatible Excel database formats: *.xls, *.mdb, *.csv, and *.txt.
•
Save the P-touch Editor data (*.lbx) and database data in the
same folder.
•
An item title entered in the fi rst line of the database can be used
as the fi eld name when linked.
•
The fi eld name can be specifi ed on the [Database] and [Connect]
wizards.
•
Enter the barcode number in the fi rst line of the database.
This setting enables you to print the label that corresponds with
the barcode number scanned in step 4-3.
Ensure that the printer is connected to a computer
2.
and then transfer the data linked to the database
to the printer.
Click [File]-[Transfer Template...] and start the P-touch
1.
Transfer Manager.
Select the label data from the list and right-click to display the
menu. Select [Key Assign] to assign the key number.
This number becomes the label template number when printing.
Create database-linked (Excel, etc.) data.
1.
Create an Excel database (list).
1.
When creating the label in the example
(1) Items to be contained in the barcode section (control
number, etc.) = key barcode
(2) Product name
Click [Transfer] to transfer the database data to this printer.
2.
4
Page 5

Basic operation
Connect a barcode reader to the printer.
3.
Refer to "Connecting a barcode reader" on P.7 for more
details.
Print a label.
4.
Scan the "P-touch template command (Initialize + begin
1.
specifying settings)" barcode below.
P-touch template command (Initialize + begin specifying
settings)
2.
Scan the template that corresponds to the "Key Assign"
number.
Example: If the "Key Assign" number is 4
Select template
^TS004
Print
example:
Scan the barcode to be printed from the database sent
3.
together with the template.
Example: 2222222222222 barcode
Scan the "Delimiter" barcode below.
4.
Delimiter
Scan the "Begin printing" barcode below.
5.
Begin printing
In the following example, a product name (Black) and
price ($1.55) label is printed that corresponds to the same
barcode(2222222222222) line.
Note: The above barcode integrates ^TS,00,4 and three
barcodes. For details on each barcode, refer to "List of
barcodes for specifying settings" on P.8.
Advanced operation
Numbered (sequential) printing
z
Label and barcode numbers can be printed while
automatically counting up.
Text labels
Procedure overview
Create text labelTransfer label dataPrint label
Procedure
Create a text label.
1.
Start P-touch Editor 5.0.
1.
Enter text.
2.
Example:
Right-click and select [Numbering (sequential)].
4.
For each template, numbering ranges can be specifi ed for up to
•
9 objects.
•
Up to 15 characters can be specifi ed in a numbering range.
Ensure that the printer is connected to a computer
2.
and then transfer the label data to the printer.
Click [File]-[Transfer Template...] to start the P-touch Transfer
1.
Manager.
Select the label data from the list and right-click to display the
menu.
Select [Key Assign] to assign the key number.
This number becomes the label template number when printing.
"Hold down the left mouse button and highlight the entered
3.
text."
Click [Transfer] to transfer the label data to the printer.
2.
5
Page 6

Advanced operation
Connect a barcode reader to the printer.
3.
Refer to "Connecting a barcode reader" on P.7 for more
details.
Print a label
4.
Scan the "P-touch template command (Initialize + begin
1.
specifying settings)" barcode below.
"Find the relevant "Key Assign" numbers on P.9, and scan."
2.
Example:If the "Key Assign" number is 5
Select template
^TS005
3.
Scan the "Number of copies for numbered (sequential)
printing" command.
^NN
Barcode labels
Procedure overview
Create barcode label Transfer label data Print label
Procedure
Create a barcode label.
1.
Start P-touch Editor 5.0.
1.
Click [Insert]-[Bar Code…] to open the barcode properties
2.
and then enter data.
Example:
"Hold down the left mouse button and highlight the entered
3.
data."
4.
Specify the number of labels to be printed.
Refer to "Entering numbers" on P.8 and scan the barcodes
to specify the number of labels to be printed in the 3-digit
format.
Example: To print 5 labels
005
5.
Scan the "Begin printing" barcode below.
In the example, labels 1234567890 to 1234567894 are
printed.
•
Labels are counted up one at a time as each label is printed.
•
The number of labels printed is retained by the printer even when
the power is turned OFF.
•
To reset the counter, scan the following "Initialize template data"
barcode.
^ID
Click the [Numbering (sequential)] button, and then click
4.
[OK].
For each template, numbering ranges can be specifi ed for up to
•
9 objects.
•
Up to 15 characters can be specifi ed in a numbering range.
Ensure that the printer is connected to a computer
2.
and then transfer the label data to the printer.
Click [File]-[Transfer Template...] to start the P-touch Transfer
1.
Manager.
Select the label data from the list and right-click to display the
menu.
Select [Key Assign] to assign the key number.
This number becomes the label template number when printing.
6
Page 7

Advanced operation
Click [Transfer] to transfer the label data to the printer.
2.
Connect a barcode reader to the printer.
3.
Refer to "Connecting a barcode reader" on P.7 for more
details.
Specify the number of labels to be printed.
4.
Refer to "Entering numbers" on P.8 and scan the barcodes to
specify the number of labels to be printed in the 3-digit format.
Example: To print 5 labels
Print a label
4.
Scan the "P-touch template command (Initialize + begin
1.
specifying settings)" barcode below.
"Find the relevant "Key Assign" numbers on P.9, and scan."
2.
Example: If the "Key Assign" number is 6.
Select template
Scan the "Number of copies for numbered (sequential)
3.
printing" command.
Supplement
^TS006
^NN
005
Scan the "Begin printing" barcode below.
5.
In the example, labels 1234567890 to 1234567894 are
printed.
•
Labels are counted up one at a time as each label is printed.
•
The number of labels printed is retained by the printer even when
the power is turned OFF.
•
To reset the counter, scan the following "Initialize template data"
barcode.
^ID
Connecting a barcode reader
z
Set the barcode reader with no prefi x or suffi x.
1.
Settable functions differ depending on the type of barcode reader.
For serial connection (RS-232C) only.
2.
Execute that the communication settings of this printer and
the barcode reader match.
For more details on the communication settings for this
printer, refer to "Setting up RS-232C communication
(communication with a barcode reader)".
3.
Connect a barcode reader.
Setting up barcode printing
z
Printing can be setup or specifi ed on the barcode reader.
Changing the basic settings
Scan the "P-touch template command" barcode. Refer to
1.
"List of barcodes for specifying settings" on P.8.
2.
From the "Basic settings" barcodes, scan the barcode for
the specifi ed parameter.
Ú
Precautions when specifying the number of
copies to be printed.
Scan the "P-touch template command" barcode. Refer to
1.
"List of barcodes for specifying settings" on P.8.
2.
Scan "Number of copies" barcode. Refer to "List of barcodes
for specifying settings" on P.8.
3.
Scan the barcodes for number of copies to be triple digits.
Refer to "List of barcodes for specifying settings" and
"Entering numbers" on P.8.
Example: 7[00][7] 15[0][1][5]
7
Page 8

Supplement
e
e e
e e
e e
e e
e e
e e
e e
e
List of barcodes for specifying settings
Request:
When using this list of barcodes for specifying settings, set the P-touch Template control and prefi x character command initial settings.
•
P-touch template command (Initialize + begin specifying settings)
•
Basic settings
Cut Every 1 Cut Every 2
Cut at end setting Cutter Off
^CO1010 ^CO1020
^CO0001 ^CO0000
•
Entering numbers
0WODGTQHEQRKGU
*2
Always scan as a three-digit number.
e
8
Page 9

Supplement
Preset template number
•
Preset template 1 Preset template 2
Preset template 3 Preset template 4
Select template
•
Delimiter
•
Preset template 5
Preset template 7
Preset template 9
*2
Preset template 6
Preset template 8
Preset template 10
Begin printing
•
*1 Default settings.
*2 Used when specifying the number of copies and selecting the template number. Scan as 3-digits, such as [007] or [015].
Numbers are set automatically when scanned as 3-digits. To change settings, scan "Number of copies" or "Select template"
accordingly, and then re-scan the 3-digit number.
9
Page 10

Supplement
FAQ
z
Q What is the built-in memory capacity?
A It's 2MByte.
Q What is the maximum number of templates that can be
entered?
A Up to 99 templates can be entered.
However, it may not be possible to enter 99
templates if the maximum memory capacity
(2MB) is exceeded.
Q Is it possible to check templates transferred to the printer?
A Yes.
Hold down the feed button to print a list of
transferred templates.
Q How can the transferred data be deleted?
A Connect the printer to a computer USB
port and open P-touch Transfer Manager.
Right click the items to be deleted from the
transferred data list.
Q How can "Key Assign" be checked?
A Hold down the feed button to check "Key
Assign" along with the transferred templates.
It is also possible to check easily on a
computer using P-touch Transfer Manager.
Q Is it possible to link multiple databases to one template?
A No.
Multiple databases cannot be linked to one
template.
Q Is it possible to print the date and time automatically?
Q Is there a tool to easily specify P-touch template settings?
A Refer to "Setting up P-touch templates" in
"Advance preparation" on page 1 of this
manual.
Q Is it possible to change the numbering of transferred
templates?
A Yes.
Edit the original template with P-touch Editor
to create a template with the numbers to be
changed.
After editing, transfer to the printer.
Q Is it possible to initialize the numbering?
A Yes.
Scan the ^ID command on P7 to initialize the
numbering.
Q What is the maximum number of digits for numbering?
A No.
The printer does not have a clock function,
and so it is not possible to automatically print
the date and time.
Note: Our QL-650TD features a clock
function.
Q What kind of barcode scanners can be used?
A It is possible to use a scanner with a RS-232C
(serial) connection and its own power supply.
Note: The printer cannot supply power to a
scanner.
Q What should I do if there's no response after following all
the setting and scanning steps?
A The settings are reset if you print from a
computer even once. Specify the settings
again, referring to "Advance preparation" on
P1.
A Up to 15 digits can be used.
10
 Loading...