

Page 1

User's Guide
Introduction
STEP
1
Getting Started
STEP
2
Troubleshooting
Maintenance and
STEP
3
Be sure to read and understand this guide before using the machine. We
recommend that you keep this guide nearby for future reference.
www.brother.com
Reference
Page 2

Thank you for purchasing the Brother QL-500.
This guide briefly describes the steps to start using the Brother QL-500.
See the User's Guide for details. The User's Guide can be found in the Manuals folder of
the included CD-ROM.
We strongly recommend that you read this guide carefully before using the Brother
QL-500, and then keep it nearby for future reference.
Page 3

Introduction
Contents
1
STEP1
STEP1
STEP2
STEP2
Introduction •••••••••••••••••••••••••••••••••••••••••••••••••••• 1
Contents ••••••••••••••••••••••••••••••••••••••••••••••••••••••••••••••••••••••••• 1
General Information ••••••••••••••••••••••••••••••••••••••••••••••••••••••••••• 2
Safety precautions••••••••••••••••••••••••••••••••••••••••••••••••••••••••••••• 3
General Precautions •••••••••••••••••••••••••••••••••••••••••••••••••••••••••••••••••••• 5
Getting Started ••••••••••••••••••••••••••••••••••••••••••••••••• 7
Unpacking the Brother QL-500•••••••••••••••••••••••••••••••••••••••••••••• 8
Parts Description••••••••••••••••••••••••••••••••••••••••••••••••••••••••••••••• 9
Main Printing Unit•••••••••••••••••••••••••••••••••••••••••••••••••••••••••••••••••••••••• 9
Button descriptions•••••••••••••••••••••••••••••••••••••••••••••••••••••••••••••••••••••• 9
LED Lamp••••••••••••••••••••••••••••••••••••••••••••••••••••••••••••••••••••••••••••••••• 10
Connecting the power supply ••••••••••••••••••••••••••••••••••••••••••••••• 10
Setting the DK Roll •••••••••••••••••••••••••••••••••••••••••••••••••••••••••••• 11
Setting the Paper Guide•••••••••••••••••••••••••••••••••••••••••••••••••••••• 12
Maintenance and Troubleshooting •••••••••••••••••••••••••• 13
Maintenance •••••••••••••••••••••••••••••••••••••••••••••••••••••••••••••••••••• 14
Print head maintenance •••••••••••••••••••••••••••••••••••••••••••••••••••••••••••••••• 14
Roller maintenance ••••••••••••••••••••••••••••••••••••••••••••••••••••••••••••••••••••• 14
Label outlet maintenance •••••••••••••••••••••••••••••••••••••••••••••••••••••••••••••• 15
Replacing the cutter unit ••••••••••••••••••••••••••••••••••••••••••••••••••••••••••••••• 16
Troubleshooting •••••••••••••••••••••••••••••••••••••••••••••••••••••••••••••••• 18
Potential types of problems•••••••••••••••••••••••••••••••••••••••••••••••••••••••••••• 18
Introduction
STEP
1
Getting Started
STEP
2
Troubleshooting
Maintenance and
STEP
3
STEP3
STEP3
Reference••••••••••••••••••••••••••••••••••••••••••••••••••••••• 19
Main specifications •••••••••••••••••••••••••••••••••••••••••••••••••••••••••••• 20
For Australia Only:••••••••••••••••••••••••••••••••••••••••••••••••••••••••••••• 21
Reference
Page 4

2
General Information
Compilation and Publication Notice
Under the supervision of Brother Industries Ltd., this guide has been compiled and
published, covering the latest product’s descriptions and specifications.
The contents of this guide and the specifications of this product are subject to
change without notice.
Brother reserves the right to make changes without notice in the specifications and
materials contained herein and shall not be responsible for any damages (including
consequential) caused by reliance on the materials presented, including but not limited to
typographical and other errors relating to the publication.
© 2010 Brother Industries Ltd.
Trademarks
The Brother logo is a registered trademark of Brother Industries, Ltd.
Brother is a registered trademark of Brother Industries, Ltd.
© 2010 Brother Industries, Ltd. All rights reserved.
Microsoft
Corporation, USA.
Macintosh® and Mac OS® are registered trademarks of Apple Inc.
The names of other software or products used in this document are trademarks or
registered trademarks of the respective companies that developed them.
Each company whose software title is mentioned in this guide has a Software Licence
Agreement specific to its proprietary programs.
All other brand and product names mentioned in this Setup & Operation Guide and the
User's Guide are registered trademarks of their respective companies.
®
, Windows Vista® and Windows® are registered trademarks of Microsoft®
Symbols Used in this Guide
The symbols used throughout this guide are as follows:
This symbol shows information or directions that should be followed. If ignored, the
result may be injury, damage, or failed operations.
This symbol shows information or directions that can help you better understand and
use the machine more efficiently.
Page 5
Safety precautions
Read and understand all of these instructions and save them for later reference. Follow
all warnings and instructions marked on the product.
Warning Tells you what to do to avoid the risk of injury.
Caution
The symbols used in this guide are as follows:
Action NOT allowed to do DO NOT disassemble the product.
DO NOT splash the product with or
immerse the product in water.
Mandatory action Unplugging
Alerts to the possibility of electrical
shock
To use the machine safely
Follow these guidelines to avoid fire, electric shock, or other damage.
The Machine
Unplug the power cord immediately and
stop using the machine during an
electrical storm. There may be a remote
risk of electric shock from lightning.
Do not touch any metal parts near the
print head. The print head becomes very
hot during use and remains very hot
immediately after use. Do not touch it
directly with your hands.
Dispose of plastic bags correctly and
keep away from babies and children. Do
not wear or play with plastic bags.
Unplug the power cord immediately and
stop using the
abnormal odour, heat, discolouration,
deformation or anything unusual whilst the
machine
Do not disassemble the machine.
For inspection, adjustment and repair of
the machine contact the retail outlet
where the machine was purchased or
your local authorised service centre.
Tells you about procedures you must follow to prevent damage to the machine.
DO NOT touch a given portion of the
product.
Warning
Do not drop, hit or otherwise bang the
machine.
Do not hold and lift the machine by the
DK Roll cover. The cover could come off
and the machine could fall and become
damaged.
machine
is in use or storage.
if you notice any
Do not allow the
way.
Do not use the machine with foreign
objects in it. If water or any foreign
objects should enter the machine,
unplug the power cord from the electric
outlet and remove the foreign object. If
necessary, contact the retail outlet
where the machine was purchased or
your local authorised service centre.
Do not hold the machine with only one
hand. The machine may slip out of your
hand.
machine
to get wet in any
3
Introduction
STEP
1
Getting Started
STEP
2
Troubleshooting
Maintenance and
STEP
3
Reference
Page 6
4
Warning
Follow these guidelines to avoid fire, electric shock, or other damage.
Power Cord
Use only the authorised power source
(220-240V AC) for the machine.
Use only the power cord included with
the machine.
Do not handle the power cord or plug if
your hands are wet.
Do not overload the electrical outlet
sockets with too many appliances or
plug the power cord into a damaged
electrical outlet.
Do not cut, damage, alter or place heavy
objects on the power cord.
Do not use the power cord if it is
damaged.
Ensure the power cord is correctly
inserted into the electrical outlet.
If the machine will not be used for an
extended period, remove the power cord
from the electrical outlet.
Caution
Follow these guidelines to avoid fire, electric shock, or other damage.
The Machine
The electrical outlet should be close to the machine and be easily accessible.
Power Cord
Always hold the power cord when unplugging the power cord from or plugging it into
the electrical outlet. Pulling on the power cord could cause problems.
Cutter Unit
Do not touch the cutter unit.
Do not open the top cover when the cutter is operating.
Installation/Storage
Put the machine on a flat, stable surface
such as a desk.
DK Roll (DK Label, DK Tape)
Be careful not to drop the DK Roll.
DK Rolls use thermal paper and thermal
film. Both the label and print will fade
with sunlight and heat. Do not use DK
Rolls for outdoor use that requires
durability.
Do not put any heavy objects on top of
the machine.
Depending on the area, material, and
environmental conditions, the label may
unpeel or become irremovable, the
colour of the label may change or be
transferred to other objects.
Before applying the label, check the
environmental condition and the
material. Test the label by affixing a
small piece of it to an inconspicuous
area of the intended surface.
Page 7
General Precautions
The Machine
• Never disassemble the machine or allow it to get wet to avoid possible fire or electrical
shock. Do not unplug the power cord from or plug it into the electrical outlet with wet
hands. Doing so could cause an electrical shock or fire.
• Do not touch the cutter. Personal injury could result.
• The machine is a precision machine. Do not drop, hit or otherwise bang the machine.
• Do not lift the machine by the DK Roll compartment cover. The cover could come off and
the machine could fall and become damaged.
• The machine may malfunction if left near a television, radio, etc. Do not use the machine
near any machine that can cause electromagnetic interference.
• Do not expose the machine to direct sunlight or near heaters or other hot appliances, in
any area exposed to extremely high or low temperatures, high humidity or dusty areas.
Doing so could cause the machine to malfunction.
• Do not use paint thinner, benzene, alcohol or any other organic solvents to clean the
machine. Doing so may cause damage to the surface finish. Use a soft, dry cloth to clean
the machine.
• Do not put any heavy objects or objects containing water on top of the machine. If water
or any foreign object enters the machine, contact the retail outlet where the machine was
purchased or your local authorised service centre. If you continue to use the machine
with water or a foreign object in the machine, the machine may be damaged or personal
injury could result.
• Do not insert any objects into or block the label output slot, USB port.
• Do not put any metal parts near the print head. The print head becomes very hot during
use and remains very hot immediately after use. Do not touch it directly with your hands.
• Use only the interface cable (USB cable) included with the machine.
• When not in use for an extended period, remove the DK Roll from the machine.
• Do not attempt to print labels while the DK Roll cover is open.
Power Cord
• Use only the power cord included with the machine.
• If the machine will not be used for an extended period, unplug the power cord from the
electrical outlet.
• Always hold the power cord when unplugging the power cord from or plugging it into
electrical outlet. Do not pull on the power cord. The wire in the electrical cord may
become damaged.
• You should put the machine near an easily accessible, standard electrical socket.
DK Roll (DK Label and DK Tape)
• Use only genuine Brother accessories and supplies (with , marks). Do not use any
unauthorised accessories or supplies.
• If the label is attached to a wet, dirty, or oily surface, it may peel off easily. Before
applying the label, clean the surface to which the label will be applied.
• DK Rolls use thermal paper or film that can fade in colour or peel off surfaces if exposed
to ultraviolet light, wind or rain.
• Do not expose the DK Rolls to direct sunlight, high temperatures, high humidity, or dust.
Store in a cool, dark place. Use the DK Rolls soon after opening the package.
• Scratching the printed surface of the label with your finger nails or metal objects, or
touching the printed surface with hands dampened by water, sweat, or medicated cream,
etc., can cause the colour to change or fade.
• Do not apply labels to any persons, animals, or plants.
5
Introduction
STEP
1
Getting Started
STEP
2
Troubleshooting
Maintenance and
STEP
3
Reference
Page 8
6
• As the end of the DK Roll is designed to not adhere to the label spool, the last label may
not be cut properly. If this happens, remove the remaining labels, insert a new DK Roll,
and reprint the last label.
Note: To account for this, the number of DK Labels included on each DK Roll may be
more than indicated on the package.
• If a label is removed after being applied to a surface, some portion of the label may
remain. Remove the remaining portion before attaching a new label.
• Some DK Rolls use permanent adhesive for their labels. These labels cannot be easily
peeled off once attached.
• Prior to using CD/DVD labels, be sure to follow the instructions in your CD/DVD player's
instruction guide regarding applying CD/DVD labels.
• Do not use CD/DVD labels in a slot loading CD/DVD player, for example a CD player in
a car where the CD is slid into a slot in the CD player.
• Do not peel off the CD/DVD label once it is applied to the CD/DVD, a thin surface layer
may come off, resulting in damage to the disk.
• Do not apply CD/DVD labels to CD/DVD disks designed for use with ink jet printers.
Labels peel off these disks easily and using disks with peeled labels can result in loss or
damage of data.
• When applying CD/DVD labels, use the applicator included with the CD/DVD label rolls.
failure to do so could cause damage to the CD/DVD player.
• User's shall take full responsibility for applying CD/DVD labels. Brother accepts no
responsibility for any loss or damage of data caused by the inappropriate use of CD/DVD
labels.
CD-ROM and Software
• Do not scratch or subject the CD-ROM to high or low temperatures.
• Do not put heavy objects on the CD-ROM or apply force to the CD-ROM.
• The software contained on the CD-ROM is meant for use with the machine only. See the
Licence on the CD for details. This software may be installed on multiple computers for
use in an office, etc.
Cutter unit
• The cutter unit contains a very sharp blade. To
prevent injury from a broken cutter blade:
• Make sure the top cover is closed when using
the cutter unit.
• Don't apply too much pressure when fitting or
removing the cutter unit.
• When the cutter unit becomes blunt you
should replace it with a new one.
• If you break the cutter unit, unplug your QL-
500 from the power and remove the cutter
unit carefully with a pair of tweezers.
• If the machine jams due to a build up of adhesive,
you should clean the surface of the paper guide.
Unplug the QL-500 from the power and wipe away
the adhesive build up from the surface of the
paper guide using a cloth or tissue dipped in
isopropyl alcohol. We recommend that you clean the paper guide when replacing the
cutter unit.
• The cutter unit should give you an average number of 5000 cuts or more, depending on
how you use the machine. If your QL-500 does not cut the labels properly or starts to jam
often, the cutter might have reached the end of its life; you should replace the cutter.
Paper guide surface
Page 9

STEP1
STEP1
Getting Started
7
Introduction
STEP
1
Take the printer out of the box and make preparations for the printer before
creating a label. Follow the procedures from "Unpacking the Brother QL-500" on
page 8.
Unpacking the Brother QL-500
Parts Description
Connecting the power supply
Setting the DK Roll
Setting the Paper Guide
ÎPage 8
ÎPage 9
ÎPage 10
ÎPage 11
ÎPage 12
Getting Started
STEP
2
Troubleshooting
Maintenance and
STEP
3
Reference
Page 10

STEP1 Getting Started
8
Unpacking the Brother QL-500
Check that the package contains the following before using the Brother QL-500. If any item
is missing or damaged, contact your Brother dealer.
Brother QL-500 User's Guide
USB cable Software Installation Guide
CD-ROM DK Label & Tape Guide
AC Power cord
The illustration is for UK. The shape of the plug
may vary depending on the country/region.
Paper guide
Cleaning Sheet
DK Roll (Starter roll)
The Brother QL-500 includes the following
starter roll :
• One starter roll of DK Die-cut Standard Address
Labels (100 labels)
Page 11

Parts Description
9
Main Printing Unit
Front
DK Roll compartment cover
FEED button
LED lamp
CUT lever
Back
Do not connect the QL-500 to your
personal computer until directed to do so
when installing the printer driver.
Button descriptions
ON/OFF button
AC Power cord
USB port
Introduction
STEP
1
Getting Started
STEP
2
Troubleshooting
Maintenance and
STEP
3
Button Condition
ON/OFF button Turns power to the QL-500 on and off.
• When using DK Die-cut Labels, feeds the DK Label Roll to the
beginning of the first label on the roll. If this button is held for more than
one second, the DK Label Roll is fed to the beginning of the next label
FEED button
on the roll.
• When using DK Continuous Tapes, feeds 25.4 mm of the DK Label Roll.
• If there is no DK Label Roll installed, the mode changes to a cleaning
mode and the roller rotates for 8 mm. If this button is held for more than
one second, the roller rotates for 100 mm.
Use CUT lever when cutting a printed label.
CUT Lever
Reference
Page 12

STEP1 Getting Started
10
LED Lamp
Lamp Condition
Not lit
Power is OFF.
Lit
Flashing fast
Flashing slow
Turns off after flashing
fast ten times
Power is ON.
(Normally lit while power is on, the LED flashes during cleaning or if an
error has occurred.)
Indicates one of the following errors.
• Cutter error
• Label sensor error
(DK Roll not installed correctly, end of DK Roll, or label jam)
• DK Roll compartment cover is open during operation
• Incorrect DK Roll installed
• No DK Roll installed
Cooling
(Waiting for temperature of print head to lower)
System error
Turn the QL-500 off and then on again.
If this error re-occurs, contact the retail outlet where the QL-500 was
purchased or your local authorized service center.
Connecting the power supply
Connect the power cord to the Brother QL-500
and then plug the power cord into a electrical
outlet.
• The illustration is for UK. The shape of the plug may
vary depending on the country/region.
• Check that the electrical outlet is 220-240V AC
before plugging the power cord.
• Unplug the power cord from the electrical outlet
after you have finished using the Brother QL-500.
• Do not pull the power cord when unplugging it from
the electrical outlet. The wire in the power cord may
become damaged.
• Do not connect the Brother QL-500 to the computer until directed to do so when
installing the printer driver.
Page 13

Setting the DK Roll
Press the ON/OFF button to turn the
1
QL-500 off. Hold the DK Roll
compartment cover at the sides near
the front of the QL-500 and firmly lift up
to open the cover.
Place the spool into the spool guides in the
2
DK Roll compartment.
• Make sure that the spool arms are inserted
firmly in the spool guides on the left and right.
• Insert the spool with the DK Roll located on the
right hand side of the QL- 500.
11
Introduction
STEP
1
Getting Started
STEP
2
Troubleshooting
Maintenance and
Lift the label lever and then
3
thread the end of the DK Roll into
the slot immediately before the
cutter.
When unable to thread the end of the
DK Roll into the slot, thread it as far
as possible, then lower the label
lever and close the cover. Press the
ON/OFF button to turn the QL-500
on, and then press the FEED button
to set the roll.
STEP
3
Reference
Page 14

STEP1 Getting Started
12
Lower the label lever and then close
4
the DK Roll compartment cover.
Setting the Paper Guide
Your QL-500 comes with a paper guide that
collects strips of printed labels that have not
been cut off from the machine.
Attach the paper guide to the front of the QL-500 as
shown in the figure.
Page 15

STEP2
STEP2
Maintenance and Troubleshooting
13
Introduction
STEP
1
This section of the manual explains how to properly maintain this printer so as to
ensure many years of reliable service.
This section also covers how to troubleshoot potential problems and how to read
and understand error messages.
Maintenance
Print head maintenance
Roller maintenance
Label outlet maintenance
Replacing the cutter unit
ÎPage 14
ÎPage 14
ÎPage 15
ÎPage 16
Troubleshooting
Potential types of problems
ÎPage 18
Getting Started
STEP
2
Troubleshooting
Maintenance and
STEP
3
Reference
Page 16

STEP2 Maintenance and Troubleshooting
14
Maintenance
Maintenance of the printer needs only to be done when required. However, some
environments will require that maintenance should be done more frequently (e.g. in dusty
conditions).
Print head maintenance
The DK Roll (thermal recording paper type) used with the printer is designed to clean the
print head automatically. When the DK Roll passes the print head during printing and
label feeding, the print head is cleaned.
Roller maintenance
Clean the roller using the cleaning sheet (available separately).
The printer contains only one cleaning sheet.
When doing maintenance on the roller, be sure to use the cleaning sheet supplied
exclusively for this printer.
If using other cleaning sheets, the surface of the roller may be damaged and may
cause a malfunction.
Turn OFF the printers power.
1
Lift both sides of the lower part of the DK Roll
2
cover on the front side of the printer to open
the cover.
Pull up the roll release lever and remove the
3
DK Roll.
Be sure to remove the DK Roll before cleaning the
roller. The roller cleaning function will not operate
correctly if the DK Roll is not removed.
Page 17

Insert edge (A) of the cleaning sheet into the printing unit and guide
4
it out to just in front of the cutter.
• Do not remove part (A) of the cleaning sheet.
• The printed side of the cleaning sheet should be facing upwards.
After inserting the cleaning sheet into the
5
printing unit, push down the roll release lever
and remove the B part of cleaning sheet.
To purchase a cleaning sheet, contact the retail
outlet where the printer was purchased or your local
authorized service centre.
Close the DK Roll cover and turn ON the printer’s power.
6
15
Introduction
STEP
1
Getting Started
STEP
2
Troubleshooting
Maintenance and
Press the Feed button for more than one
7
second.
The roller rotates for 100 mm.
The adhesive face of the cleaning sheet removes any
stains or dust on the roller.
• If you do not press the Feed button for more than
one second, the roller rotates for only 8 mm.
• Dispose the cleaning sheet after use.
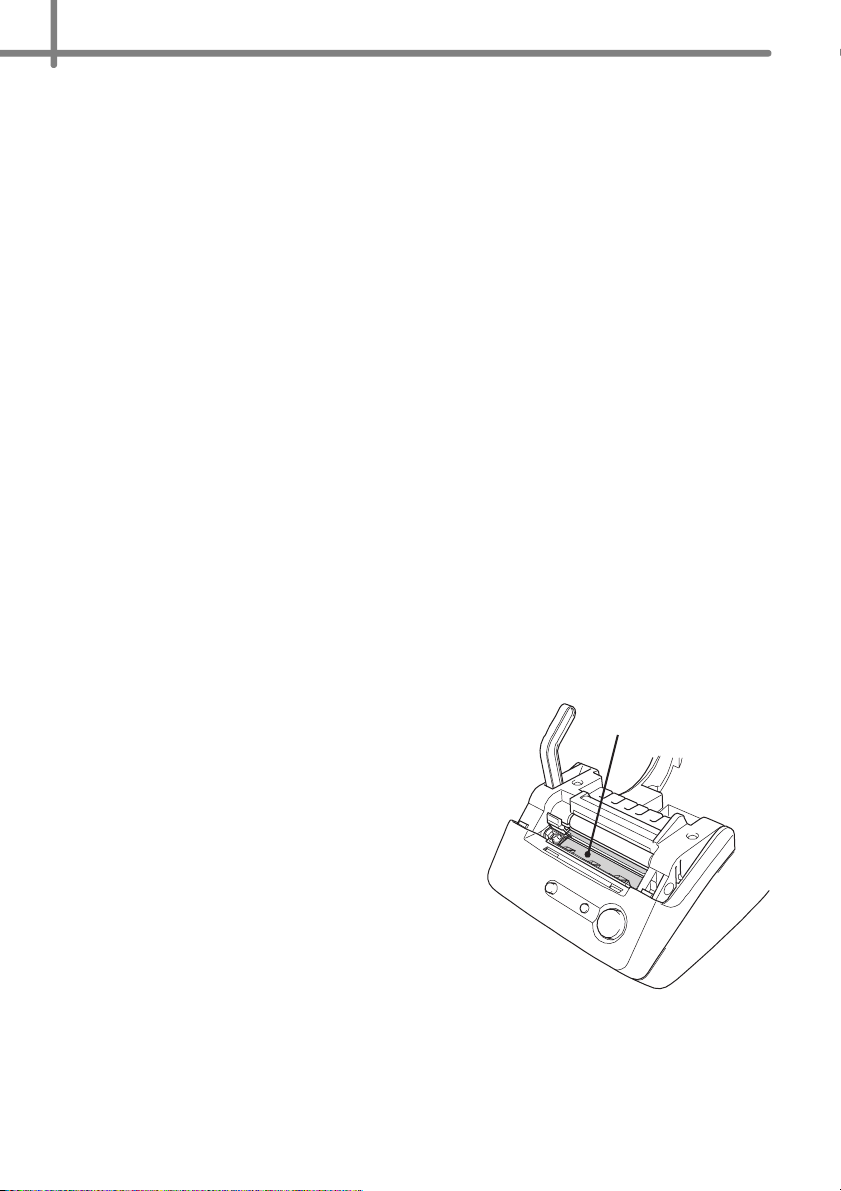
Label outlet maintenance
When glue is attached to the label
outlet (metallic plate part and resin
guide part) and the printer damages
the label, pull out the power plug from
the socket and clean the label outlet
with a cloth dipped into ethanol or
isopropyl alcohol.
It is recommended to clean the label
outlet when replacing the cutter unit.
Feed button
STEP
3
Reference
Label outlet
Page 18

STEP2 Maintenance and Troubleshooting
16
Replacing the cutter unit
Eventually the cutting blade on the cutter unit will become dull (blunt) and need to be
replaced. At the appropriate time, purchase a new replacement cutter unit and install it
according to the following procedure.
Check that the cutter unit is located in the home position.
1
Turn OFF the power to the printer and pull out the power cord from
2
the wall socket.
Open the DK Roll cover and pull the roll
3
release lever to the up position. Remove the
DK Roll.
Lift up the cutter cover.
4
Using a cross-head screwdriver, loosen the
5
screw which holds the cutter blade unit inplace.
The screw securing the cutter unit should not be
completely removed. Simply loosen it to remove
the cutter unit from the printer.
Page 19

Grip the tab and lift out the cutter unit.
6
Take care not to touch the blade of the cutter.
Set the new cutter unit in the correct position.
7
17
Introduction
STEP
1
Once set in the correct position, tighten the
8
screw which holds the cutting blade unit in
place.
Set the DK Roll and close the DK Roll cover.
9
For details, refer to Î"Setting the DK Roll" in page 11.
CAUTION
Do not touch the blade of the cutter unit.
Do not open the top cover when the cutter is operating.
Do not apply excessive pressure to the cutter unit.
Getting Started
STEP
2
Troubleshooting
Maintenance and
STEP
3
Reference
Page 20

STEP2 Maintenance and Troubleshooting
18
Troubleshooting
If problems occur while using this printer, the following may help you to solve the
problems.
Potential types of problems
Problem Solution
• Is the USB cable loose?
Check that the USB cable is connected correctly.
•
The QL-500 does not
print, or a printing error
is received.
•
The power button does
not light up or flash.
•
The printed label
contains streaks or
poor quality characters,
or the label is not fed
correctly.
•
A data transmission
error appears on the
PC.
•
Labels are jammed in
the cutter or are not
ejected correctly after
printing.
•
The layout style is not
updated when the Addin is still activated and a
new label roll is
installed.
•
The P-touch Add-in
icon is not displayed in
Microsoft
®
Word.
• Is the DK Roll installed correctly?
If not, remove the DK Rolls and reinstall.
• Is there enough roll remaining?
Check that there is enough roll remaining.
• Is the DK Roll compartment cover open?
Check that the DK Roll compartment cover is closed.
• Is the power supply cord connected correctly?
Check that the power supply cord is connected and plugged in. If
connected correctly, try connecting it to another electrical socket.
* If the power button still does not light up or flash, contact the retail
outlet where the printer was purchased or your local authorized
service centre.
• Is the print head or roller dirty?
While the print head generally remains clean under normal use, lint or
dirt from the roller may become stuck on the printer head. If this occurs,
clean the roller. Refer to "Roller maintenance" in page 14.
• Is the correct port selected?
Check that the correct port is selected from the “Print to the following
port” list in the Printer Properties dialog box.
• Is the QL-500 in cooling mode (the LED lamp is flashing slowly)?
Wait until the LED lamp stops flashing and then try printing again.
• Does the edge of the cutter unit seem to have lost its sharpness?
• Do cutter errors occur frequently?
Replace the cutter. For details, refer to "Replacing the cutter unit" in
page 16.
• Is there dirt or lint on the roller preventing it from rolling freely?
Use a Cleaning Sheet to clean the roller. For details, refer to "Roller
maintenance" in page 14.
• Was a new label roll installed before activating the P-touch Add-In (The
P-touch function is added to your standard Microsoft toolbar)?
Exit the P-touch Add-In, load the second label roll type, reactivate the
P-touch Add-in, choose "Select Layout", and then verify the layout.
• Is Microsoft
• Is Microsoft
Outlook
Due to program limitations, the Microsoft
with the above settings. Quit Microsoft
Microsoft
®
Word started up from Microsoft® Outlook®?
®
Word chosen for the editor usually used for Microsoft®
®
?
®
Word.
®
Word Add-In does not work
®
Outlook®, and restart
Page 21

STEP3
STEP3
Reference
19
Introduction
STEP
1
Getting Started
STEP
2
Main specifications
For Australia Only:
ÎPage 20
ÎPage 21
Troubleshooting
Maintenance and
STEP
3
Reference
Page 22

STEP3 Reference
20
Main specifications
Product specifications
Items Specifications
Display LED lamp (green)
Printing method Direct thermal printing via thermal head
Printing speed
Printing
Buttons
Interface
Power source 220 - 240 VAC 50/60 Hz (0.9 A)
Dimensions 146 (W) × 196 (D) × 152 (H) mm
Weight Approx. 1.3 kg (Without DK Rolls)
Cutter Manual cutter
Print head 300 dpi/720 dot
Maximum Printing
Width
Minimum printing
length
Max.90 mm/sec, Max.56 labels/min.
(Standard Adress Labels)
59 mm
25 mm
ON/OFF button
FEED button
USB (USB Spec. 1.1 protocol)
Page 23

For Australia Only:
21
Warranty & Repair
For details about warranty on your Brother Product, the details are listed
on the following link:
http://www.brother.com.au/ServiceSupport.aspx
For warranty service (repair) of your Brother product you will need to retain
a copy of your sales docket and contact the Support Centre for location of
the nearest Authorised Warranty Centre (AWC).
Support
For technical support for your Brother Product other than what you can
resolve through the User's Guide, please visit our website for FAQs/
Troubleshooting, Drivers & Software, or contact the Product Support
Centre for any technical or customer care/support enquiry.
Product Support Centre: Australia
Brother International (Aust) Pty Ltd
Phone: 02 8875 6000
Fax: 02 9870 7223
E-mail: productsupport@brother.com.au
Web Site: www.brother.com.au
Solutions Site: http://solutions.brother.com
Introduction
STEP
.
1
Getting Started
STEP
2
Maintenance and
STEP
3
Troubleshooting
Reference
Page 24

Printed in China
LB8719001
 Loading...