

Page 1
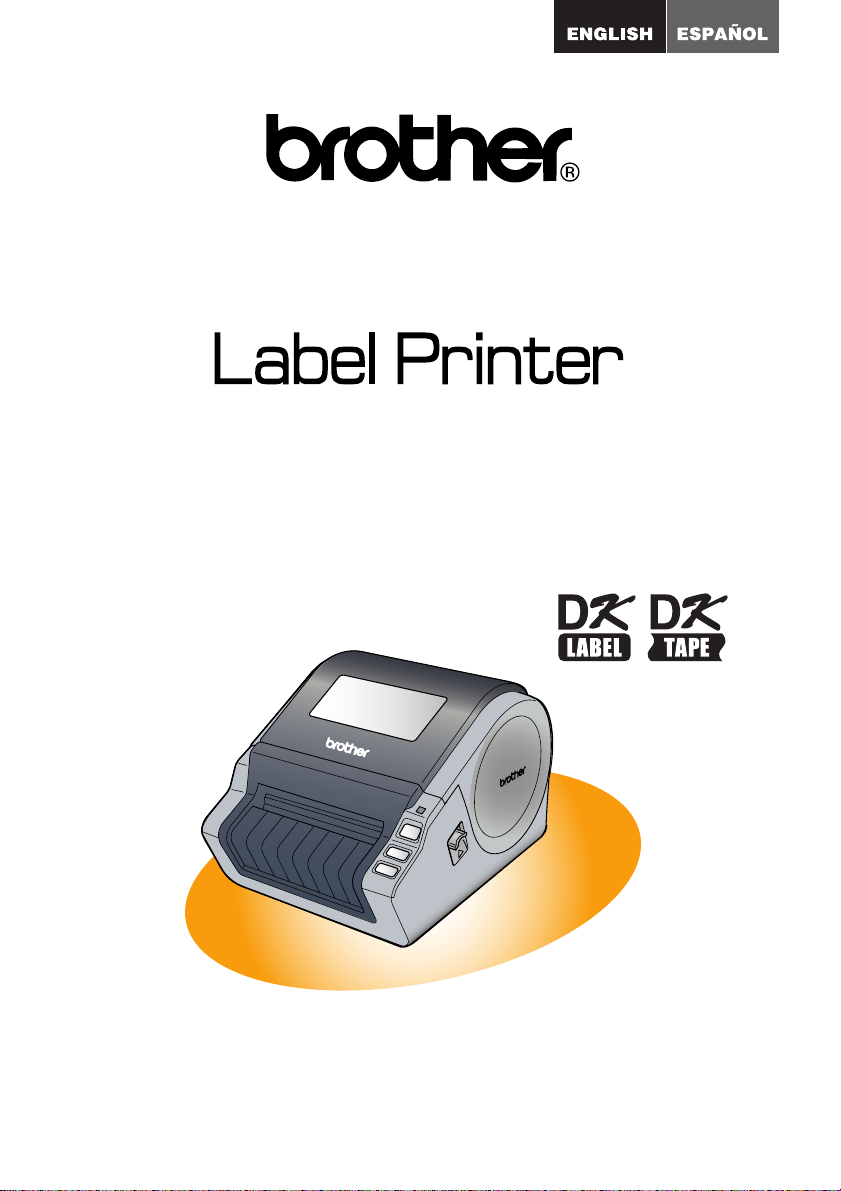
QL-1050/1060N
User's Guide
Guía del usuario
Be sure to read this guide before using the machine. We recommend that you
keep this guide nearby for future reference.
Asegúrese de leer este manual antes de usar la impresora. Le recomendamos
conservar este manual a mano par a referencia en el futuro.
www.brother.com
Page 2

Thank you for purchasing the Brother QL label printer.
This guide briefly describes how to use the Brother QL label printer.
We strongly recommend that you read this guide carefully before using the Brother
QL label printer and then keep it nearby for future reference.
T o t ake full a dvantage of our se rvice a nd supp ort we recomm end tha t you take this
opportunity to register with us by visiting us at:
Online User Registration
http://registermybrother.com/
Online Support Page
http://solutions.brother.com/
NOTE: It is also possible to access the above sites from the online user registration
window on the included CD-ROM. We look forward to your registration.
Federal Communications Commission (FCC) Declaration of Conformi ty (For USA Only)
Responsible Party: Brother International Corporation
Product Name: Label Printer QL-1050/QL-1060N
Model Number: QL-1050/QL-1060N
This device complies with Part 15 of the FCC Rules. Operation is subject to the following two
conditions: (1) this device may not cause harmful interference, and (2) this device must accept any
interference received, including interference that may cause undesired operation.
This equipment has been tested and found to comply with the limits for a Class B digital device,
pursuant to Part 15 of the FCC Rules. These limits are designed to provide reasonable protection
against harmful interference in a residential installation. This equipment generates, uses and can
radiate radio frequency energy and, if not installed and used in accordance with the instructions,
may cause harmful interference to radio communications. However, there is no guarantee that
interference will not occur in a particular installation. If this equipment does cause harmful
interference to radio or television reception, which can be determined by turning the equipment off
and on, the user is encouraged to try to correct the interference by one or more of the following
measures:
100 Somerset Corporate Boulevard
Bridgewater, NJ 08807-0911 USA
TEL: (908) 704-1700
• Reorient or relocate the receiving antenna.
• Increase the separation between the equipment and receiver.
•
Connect the equipment into an outlet on a circuit different from that to which the receiver is connected.
• Consult the dealer or an experienced radio/TV technician for help.
Important
• The enclosed interface cable should be used in order to ensure compliance with the limits for a
Class B digital device.
• A shielded interface cable should be used in order to ensure compliance with the limits for a Class
B digital device.
• Changes or modifications not expressly approved by Brother Industries, Ltd. could void the user's
authority to operate the equipment.
Page 3

Brother® Two-Year Limited Warranty and Replace ment Service
(USA Only)
Who is covered:
• This limited warranty ("warranty") is given only to the original end-use/retail purchaser
(referred to in this warranty as "Original Purchaser") of the accompanying product,
consumables and ac cessori es (collec tively re ferred to i n this wa rranty as "this Prod uct").
• If you purchased a product from someone other than an authorized Brother reseller in
the United States or i f th e product was used (i ncl ud ing but not limited t o floor models or
refurbished product), pr ior to y our p urc has e y ou a re n ot th e O riginal Purchaser and the
product that you purchased is not covered by this warranty.
What is covered:
• This Product includes a Machine and Consumable and Accessory Items. Consumable
and Accessory Items i nc lud e but are not limit ed to lab el an d tape rolls and print servers.
• Except as otherwise provided herein, Brother warrants that the Machine and the
accompanying Consumable and Accessory Items will be free from defects in materials
and workmanship, when used under normal conditions.
• This warranty applies only to products purchased and used in the United States. For
products purchased in, but used outside, the United States, this warranty covers only
warranty service within the United States (and does not include shipping outside the
United States).
What is the length of the Warranty Periods:
• Machines: two year from the original purchase date.
• Accompanying Consumable and Accessory Items: 90 days from the original purchase
date or the rated life of consumable, whichever comes first.
What is NO T covered:
This warranty does not cover:
(1) Physical damage to this Product;
(2) Damage caused by improper installation, improper or abnormal use, misuse, neglect or
accident (including but not limited to transporting this Product without the proper
preparation and/or packaging);
(3) Damage caused by another device or software used with this Product (including but not
limited to damage resulting from use o f non Brother
Accessory Items);
(4) Consumable and Accessory Items that expired in accordance with a rated life; and,
(5) Problems arising from other than defects in materials or workmanship.
This limited warranty is VOID if this Product has been altered or modified in any way
(including but not limited to attempted warranty repair without authorizatio n from Broth er
and/or alteration/removal of the seri al numbe r).
What to do if you think your Product is eligible for warranty service:
Report your issue to our P-touch Customer Service Hotline at 1-877-BROTHER (1-877276-8437) or to a Brother Authorized Service Center within the applicable warranty
period. Supply Brother or the Brother Authorized Service Center with a copy of your
dated bill of sale showing tha t this Produ ct was purc has ed within the U .S.. For the nam e
of local Brother Authorized Serv ice Center(s ), call 1-877 -BROTHER (1-877-27 6-8437) or
visit www.brother-usa.com.
What Brother will ask you to do:
After contacting Brother or a Brother Authorized Service Center, you may be required to
deliver (by hand if you prefer) or send the Product properly packaged, freight prepaid, to
the Authorized Service Center together with a photocopy of your bill of sale.
You are responsible for the cost of shipping, packing product, and insurance (if you desire).
You are also responsible for loss or damage to this Product in shipping.
®
-brand parts and Co nsum ab le and
Page 4

INTRODUCTION
What Brother will do:
If the problem reported c oncerning your Mach ine and/or ac comp anying Con sumable and
Accessory Items is covered by this warranty and if you first reported the problem to
Brother or an Authorized Service Center with in the applicab le warranty perio d, Brother or
its Authoriz ed Service Center will repai r or replace the Machine an d/or accompanying
Consumable and Ac ce ss ory I tem s at no charge to y ou for p arts or labor. Th e d ec is ion a s
to whether to repair or replace the Machine and/or accompanying Consumable and
Accessory Items is made by Brother in it s sol e dis cre tion .
Brother reserves the right to supply a refurbished or remanufactured replacement
Machine and/or accompanying Consumable and Accessory Items and use refurbished
parts provided such replacement products conform to the manufacturer's specifications
for new product/part s.
The repaired or repl acement Mac hine and/ or accomp anyi ng Consu mable and Ac cessory
Items will be returned to you freight prepaid or made available for you to pick up at a
conveniently located Authorized Service Center.
If the Machine and/or accompanying Consumable and Accessory Items are not covered
by this warranty (either stage), you will be charged for shipping the Machine and/or
accompanying Consumable and Accessory Items back to you and charged for any
service and/or replacement parts/products at Brother's then current published rates.
The foregoing are your sole (i.e., on ly) and ex clusive remedies under this warranty.
What happens when Brother elects to replace your Machine:
When a replacement Machine is authorized by Brother, and you have delivered the
Machine to an Auth orized Service C enter, th e Authori zed Se rvice C enter w ill p rovid e you
with a replacement Machine after receiving one from Brother. If you are dealing directly
with Brother , Bro ther will send t o yo u a repl acem ent Machi ne wi th the un derst a nding t hat
you will, after receipt of the replacement Machine, supply the required proof of purchase
information, together with the Machine that Brother agreed to replace. You are then
expected to pack the Machine that Brother agreed to replace in the package from the
replacement Machine and return it to Brother using the prepaid freight bill supplied by
Brother in accordance with the instructions provided by Brother. Since you will be in
possession of two machines, Brother will require that you provide a valid major credit
card number.
Brother will issue a hold against the credit card account number that you provide until
Brother receives your original Product and determines that your original Product is
entitled to warranty coverage. Your credit card will be charged up to the cost of a new
Product only if: (i) you do not return your original Product to Brother within five (5)
business days; (ii) the p robl em s w it h yo ur ori ginal Product are not covered by the limited
warranty; (iii) the proper p ackagin g instruct ions are not fo llowed a nd has caused damage
to the product; or (iv ) th e w a rran ty p eri od on your original Prod uc t ha s exp ire d or has not
been sufficiently validated with a copy of the proof of purchase (bill of sale).
The replacement Machine you receive (even if refurbished or remanufactured) will be
covered by the balance of the limited warranty period remaining on the original Product,
plus an additional thirty (30) days. You will keep the replacement Machine that is sent to
you and your ori ginal M achine sh all bec ome the property of Brother.
Accessory Items and a copy of the return freight bill, signed by the courier.
Retain your original
Page 5

Limitations:
Brother is not responsible for damage to or loss of any equipment, media, programs or
data related to the u se o f this Produc t. Exc ept fo r that rep air or replac emen t as descr ibed
above, Brother shall not be liable for any direct, indirect, incidental or consequential
damages or specific relief. Because some states do not allow the exclusion or limitation
of consequential or incidental damages, the above limitation may not apply to you.
THIS WARRANTY IS GIVEN IN LIEU OF ALL OTHER WARRANTIES, WRITTEN OR
ORAL, WHETHER EXPRESSED BY AFFIRMATION, PROMISE, DESCRIPTION,
DRAWING, MODEL OR SAMPLE. ANY AND ALL WARRANTIES OTHER THAN THIS
ONE, WHETHER EXPRESS OR IMPLIED, INCLUDING IMPLIED WARRANTIES OF
MERCHANTABILITY AND FITNESS FOR A PARTICULAR PURPOSE, ARE HEREBY
DISCLAIMED.
• This Limited Warranty is the onl y warranty tha t Brother is giving for this Pro duct. It is the
final expression and the exclusive and only statement of Brother's obligations to you. It
replaces all other agree ments and understan dings tha t you may ha ve with Br other or its
representatives.
• This warranty gives you c ertain ri ghts a nd yo u may also have o ther rig hts tha t may vary
from state to state.
• This Limited Warranty (and Brothe r's obl igatio n to you) ma y not be ch ang ed in any way
unless you and Brother si gn the same piece of p aper in which we (1 ) refer to this Product
and your bill of sale dat e, (2) describe the ch ange to this wa rranty and (3) agree to make
that change.
Important:
We recommend that you keep al l original packing materials, in the eve nt that you shi p
this Product.
Page 6

Important Information
Should you have questions, or need information about your Brother Product, we have a
variety of support options for you to choose from:
USA-Customer Service:
Customer Service
1-877-BROTHER (1-877-276-8437)
Customer Service
1-901-379-1210 (fax)
Website
www.brother-usa.com
Supplies / Accessories
www.brothermall.com
or 877-552-6255
BROTHER INTERNATIONAL CORPORATION
100 SOMERSET CORPORATE BLVD.
BRIDGEWATER, NEW JERSEY 08807-0911
Record your model and serial number and your date and location of Purchase below for
your records. Keep this information with your proof of purchase (bill of sale) in case your
Product requires service.
Model # __________________________________________
Serial # __________ ________________________________
Date of purchase: __________________________________
Store where purcha se d: _____ ___ ___ __ ___ _____________
Location of store: __________________________________
Important: We rec omme nd that you keep all original packing m ater ials, in the event that
you need to ship the machine.
Save Time - Register On-Line!
Don’t stand in line at the post office or worry about lost mail. Visit us on-line at
www.registermybrother.com
Y our product will immediately be registered in our database and you can be on your way!
Also, while you're there, look for contests and other excit ing information!
Page 7

Introduction
Contents
Introduction ••••••••••••••••••••••••••••••••••••••••••••••••••••••••1
Contents••••••••••••••••••••••••••••••••••••••••••••••••••••••••••••••••••••••••••••••1
General Information••••••••••••••••••••••••••••••••••••••••••••••••••••••••••••••••2
Safety Precautions •••••••••••••••••••••••••••••••••••••••••••••••••••••••••••••••••3
General Precautions •••••••••••••••••••••••••••••••••••••••••••••••••••••••••••••••••••••• 5
Getting started •••••••••••••••••••••••••••••••••••••••••••••••••••••7
1 Unpacking the QL-1050/1060N•••••••••••••••••••••••••••••••••••••••••••••7
2 Parts Description•••••••••••••••••••••••••••••••••••••••••••••••••••••••••••••••8
Main Printing Unit•••••••••••••••••••••••••••••••••••••••••••••••••••••••••••••••••••••••••• 8
3 Installing the DK Roll••••••••••••••••••••••••••••••••••••••••••••••••••••••••••8
4 Connecting the Power Supply•••••••••••••••••••••••••••••••••••••••••••••••9
5 Attaching the Label Tray •••••••••••••••••••••••••••••••••••••••••••••••••••••10
6 Using the Interface Cable••••••••••••••••••••••••••••••••••••••••••••••••••••10
Installing the software •••••••••••••••• ••••••••••••••••••••••••••••13
1 Installing the Software for QL-1050••••••••••••••••••••••••••••••••••••••••13
1. When using Microsoft® Windows®•••••••••••••••••••••••••••••••••••••••••••••••••• 13
2. When using Mac OS
2 Installing the Software for QL-1060N••••••••••••••••••••••••••••••••••••••17
1. When using Microsoft® Windows®•••••••••••••••••••••••••••••••••••••••••••••••••• 17
2. When using Mac OS
3 Uninstalling Software and Printer Driver ••••••••••••••••••••••••••••••••••28
Uninstalling P-touch Editor •••••••••••••••••••••••••••••••••••••••••••••••••••••••••••••• 28
Uninstalling the Printer Driver••••••••••••••••••••••••••••••••••••••••••••••••••••••••••• 28
®
••••••••••••••••••••••••••••••••••••••••••••••••••••••••••••••••• 15
®
••••••••••••••••••••••••••••••••••••••••••••••••••••••••••••••••• 23
1
Reference•••••••••••••••••••••••••••••••••••••••••••••••••••••••••••30
1 Status LED Indications •••••••••••••••••••••••••••••••••••••••••••••••••••••••30
2 Maintenance••••••••••••••••••••••••••••••••••••••••••••••••••••••••••••••••••••31
3 Troubleshooting••••••••••••••••••••••••••••••••••••••••••••••••••••••••••••••••32
4 Main Specifications••••••••••••••••••••••••••••••••••••••••••••••••••••••••••••35
Accessories (For USA Only) •••••••••••••••••••••••••••••••••••••••••••••••••••••••••••• 37
Page 8

Introduction
2
General Information
Compilation and Publication Notice
Under the supervision of Brother Industries Ltd., this guide has been compiled and
published, covering the latest product’s descriptions and specifications.
The contents of this guide and the specifications of this product are subject to
change without notice.
Brother reserves the right to make changes without notice in the specifications and
materials contained herein and shall not be responsible for any damages (including
consequential) ca used by reliance on the ma terials pre sented, i ncluding but not li mited to
typographical and other errors relating to the publication.
The screen images in this guide can differ depending on your Operating System (OS) or
printer.
© 2010 Brother Industries Ltd.
Trademarks
The Brother logo is a registered trademark of Brother Industries, Ltd.
Brother is a registered trademark of Brother Industries, Ltd.
© 2010 Brother Industries, Ltd. All rights reserved.
QR code is a registere d tr adema rk of DEN SO WAVE Incorporated. QR Code Gene rating
Program Copyright © 2008 DENSO WAVE INCORPORATED
BarStar Pro Encode Library (PDF417) Copyright © 2007 AINIX Corporation. All rights
reserved.
The names of other software or products used in this document are trademarks or
registered trademarks of the respective companies that developed them.
Each company whose software title is mentioned in this guide has a Software License
Agreement specific to its proprietary programs.
All other brand and product names mentioned in this User's Guide and the Software
Installation Guide are registered trademarks of their respective companies.
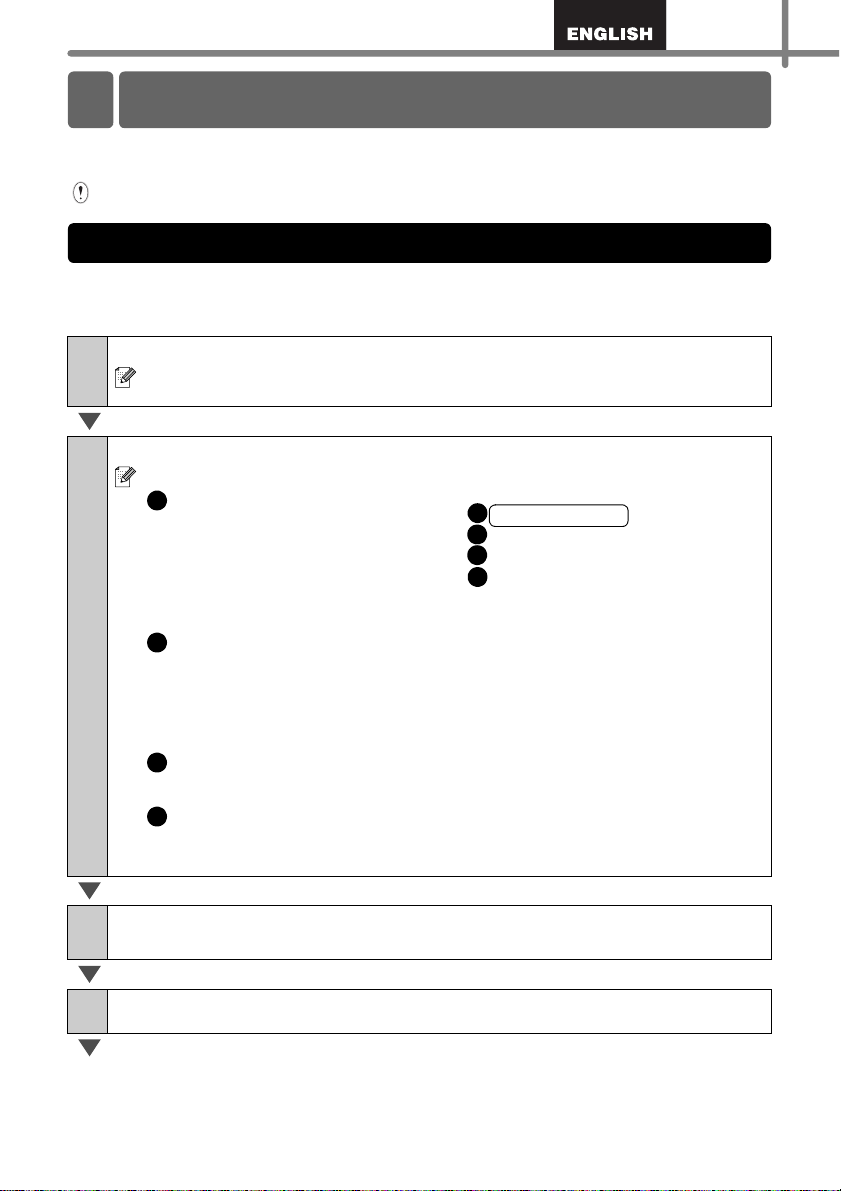
Symbols Used in this Guide
The symbols used throughout this guide are as follows:
This symbol shows information or directions that should be followed. If ignored, the
result may be injury, damage, or failed operations.
This symbol sho ws inf ormati on or direct ion s that c an h elp y ou be tter unde rstand and
use the machine more efficiently.
Page 9
Safety Precautions
We recommend that you read all of these instructions prior to using this product, and
save them for later reference. Follow all warnings and instructions marked on the
product.
WARNING
CAUTION
The symbols used in this guide are as follows:
Action NOT allowed to do DO NOT disassemble the product.
DO NOT splash the product with or
immerse the product in water.
Mandatory action Unplugging
Alerts to the possibility of electrical
shock
Follow these guidelines to avoid fire, electric shock, or other damage.
The Machine
Unplug the power co rd immedi ately and
stop using the machine during an
electrical storm. There may be a rem ote
risk of electric shock from lightning.
Do not touch any metal parts near the
print head. The prin t head becomes very
hot during use and remains very hot
immediately after use. Do not touch it
directly with your hands.
Dispose of plastic bags correctly and
keep away from babie s and children. Do
not wear or play with plastic bags.
Unplug the power cord immediately and
stop using the
abnormal odor, heat, discoloration,
deformation or anything unusual whilst the
machine
Do not disassemble the machine.
For inspection, adjus tment and repair of
the machine contact the retail outlet
where the machine was purchased or
your local authorized service center.
Tells you what to do to avoid the risk of injury.
Tells you about pro cedures you must follow to pre vent d amage to the m achine .
DO NOT touch a given portion of the
product.
WARNING
Do not drop, hit or otherwise bang the
machine.
Do not hold and lift the machine by the
DK Roll cover. Th e cover could come off
and the machine could fall and become
damaged.
machine
is in use or storage.
if you notice any
Do not allow the
way.
Do not use the machine with foreign
objects in it. If water or any foreign
objects should enter the machine,
unplug the power cord from the electric
outlet and remove the foreign object. If
necessary, contact the retail outlet
where the machine was purchased or
your local authorized service center.
Do not hold the machine with only one
hand. The machi ne ma y s li p o ut of your
hand.
Never disassemble the mach ine or allow
it to get wet to avoid possible fire or
electrical shock. Doing so could cause
an electrical shock or fire.
machine
to get wet in any
3
Page 10
Introduction
4
WARNING
Do not use paint thinner, benzene,
alcohol or any other organic solvents to
clean the machine. Do ing so may ca use
damage to the surface fin ish. Use a soft,
dry cloth to clean the machine.
Do not put any heav y ob jec t s or objects
containing water on top of the machine.
If water or any foreign object enters the
machine, contact the retail outlet where
the machine was purchase d or your
local authorized service center. If you
continue to use the machine with water
or a foreign object in the machine, the
machine may be damaged or personal
injury could result.
Follow these guidelines to avoid fire, electric shock, or other damage.
Power Cord
Use only the authorized power source
(120V AC) for the machine.
Use only the power cord included with
the machine.
Do not handle the power cord or plug if
your hands are wet.
Do not overload the electrical outlet
sockets with too many appliances or
plug the power cord into a damaged
electrical outlet.
Do not cut, damage, al ter or place heavy
objects on the power cord.
Cutter
Do not touch the blade of the cutter. Do not open the top cover when the
The electrical outlet should be close to
the machine and be easily accessible.
Do not touch the cutter. Personal injury
could result.
Do not expose the machine to direct
sunlight or near heaters or other hot
appliances, in any area exposed to
extremely high or low temperatures,
high humidity or dusty areas. Doing so
could cause the ma chine to m alfunctio n.
Do not use the power cord if it is
damaged.
Ensure the power cord is correctly
inserted into the electrical outlet.
Always hold the power cord when
unplugging the power cord from or
plugging it into electrical outlet. Do not
pull on the power cord. The wire in the
electrical cord may become damaged.
If the machine will not be used for an
extended period, remove the power cord
from the electrical outlet.
cutter is operating.
CAUTION
Follow these guidelines to avoid fire, electric shock, or other damage.
Installation/Storage
Put the machine on a flat, stable surfac e
such as a desk.
Do not put any heavy objects on top of
the machine.
Page 11
CAUTION
DK Roll (DK Label, DK Tape)
Be careful not to drop the DK Roll.
DK Rolls use thermal paper and thermal
film. Both the label and print will fade
with sunlight and heat. Do not use DK
Rolls for outdoor use that requires
durability.
Depending on the area, material, and
environmental con ditions, the labe l may
unpeel or become irremova ble, the color
of the label may change or be
transferred to other objects.
Before applying the label, check the
environmental condition and the
material. Test the label by affixing a
small piece of it to an inconspicuous
area of the intended sur face.
General Precautions
The Machine
• The machine is a precision machine. Do not drop, hit or otherwise bang the machine.
• The machine may ma lfunction if left near a te levision, r adio, etc. Do not us e the machine
near any machine that can cause electromagnetic interference.
• Do not insert any objects into or block the labe l output slot, U SB port, Serial port or LAN
port.
• Use only the USB Interface Cable included with the machine.
• When not in use for an extended period, remove the DK Roll from the machine.
• Do not attempt to print labels while the DK Roll cover is open.
DK Rolls (DK Labels and DK Tapes)
• Use only genuine Br other accesso ries and s upplies (wi th , marks). Do not use any
unauthorized accessories or supplies.
• If the label is attached to a wet, dirty, or oily surface, it may peel off easily. Before
applying the label, clean the surface to which the label will be applied.
• As DK Rolls use thermal paper and thermal film, ultraviolet rays, wind, and rain may
cause the color of the label to fade and the ends of the label to peel off.
• Do not expose the DK Roll s to direc t sunlig ht, high te mperatures , high hum idity, o r dust.
Store in a cool, dark plac e. Use the DK Rolls soon after opening the package.
• Scratching the printed surface of the label with your finger nails or metal objects, or
touching the print ed surface with ha nds dampened by w ater, sweat, or m edicated cream,
etc., can cause the color to change or fade.
• Do not apply labels to any persons, animals, or plants.
5
Page 12

Introduction
6
• As the end of the DK Roll is desi gned to not ad here to the la bel spool , the last lab el may
not be cut properly. If thi s ha ppe ns , rem ove the remaining labels, insert a new DK Roll,
and reprint the last label.
Note: To account for this, the number of DK Labels included on each DK Roll may be
more than indicated on the package.
• If a label is removed after being applied to a surface, some portion of the label may
remain. Remove the remaining portion before attaching a new label.
• Some DK Rolls use permanent adhesive for their labels. These labels cannot be easily
peeled off once attached.
• Prior to using CD/DVD la bels, be sure to fol low the in struction s in you r CD/DVD pl ayer's
instruction guide regarding applying CD/DVD labels.
• Do not use CD/DVD labels in a sl ot load ing CD/ DVD p layer, for ex ample a CD play er in
a car where the CD is slid into a slot in the CD player.
• Do not peel off the CD/DVD label once it is applied to the CD/DVD, a thin surface layer
may come off, resulting in damage to the disk.
• Do not apply CD/DVD labels to CD/DVD disks designed for use with ink jet printers.
Labels peel off the se disk s easil y and us ing disk s with peeled l abels c an result in loss or
damage of data.
• When applying CD/DVD lab els, use t he applicator includ ed with the C D/DVD label rolls.
failure to do so could cause damage to the CD/DVD player.
• Users shall take full responsibility for applying CD/DVD labels. Brother accepts no
responsibility for any los s or damage of data caused by the inappropriate use of CD/DV D
labels.
CD-ROM and Software
• Do not scratch or subject the CD-ROM to high or low temperatures.
• Do not put heavy objects on the CD-ROM or apply force to the CD-ROM.
• The software contained on the C D-ROM is m eant for use with the m achine onl y. See the
License on the CD for detai ls . Thi s softw a re m ay be installed on multiple computers for
use in an office, etc.
Page 13
Getting started
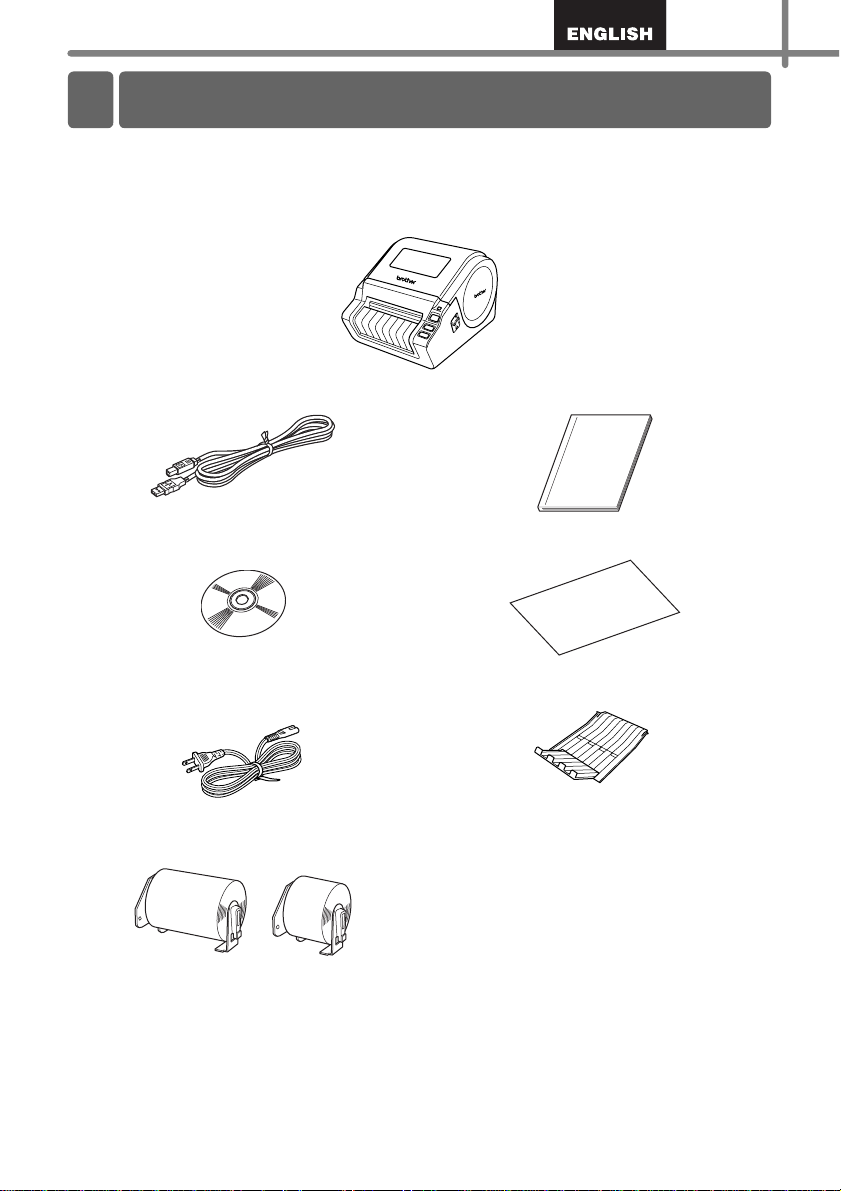
1 Unpacking the QL-1050/1060N
Check that the package contains the following before using the printer. If any item is
missing or damaged, contact your Brother dealer.
QL-1050/1060N
USB cable User's Guide
CD-ROM DK Label & Tape Guide
7
AC Power cord Label tray
DK Roll (Starter roll)
The QL-1050/1060N includes two starter rolls of:
•DK Die-cut
4" X 6" (102mm × 152mm) Labels
• DK Continuous Paper Tape
2-3/7" (62mm)
Page 14
Getting started
8
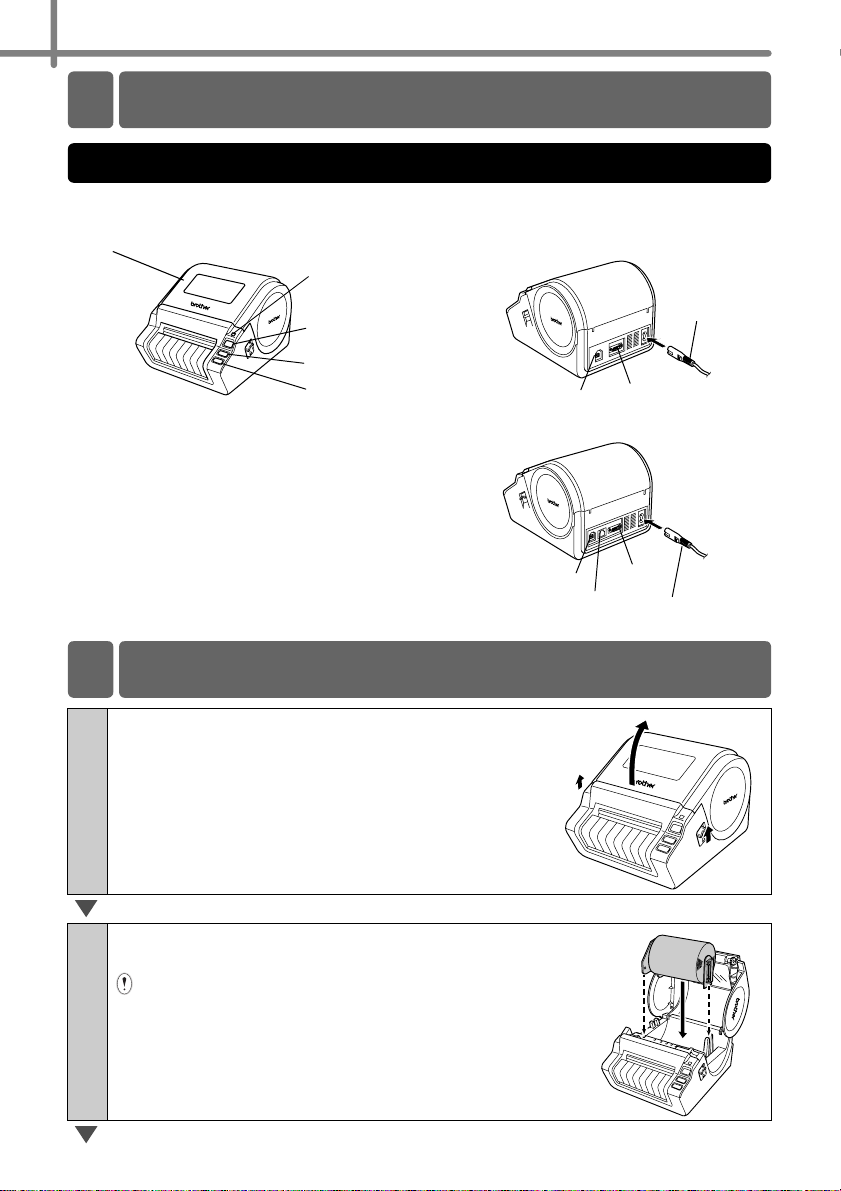
2 Parts Description
Main Printing Unit
Front Rear
DK Roll compartment cover
LED lamp
<QL-1050>
ON/OFF button
CUT button
FEED button
USB port
USB port
3 Installing the DK Roll
Press and hold the ON/OFF button to turn
1
the QL label printer off. Pull up the left and
right levers on the machine under the top
cover , and open the cover.
LAN port
Power cord
Serial port
<QL-1060N>
Serial port
Power cord
Put the spool into the spool guides in the DK
2
Roll compartment.
• Make sure that the spool arms are inserted firmly in
the spool guides on the left and right.
• Insert the spool of the DK Roll along the spool gui de
of the printer.
Page 15
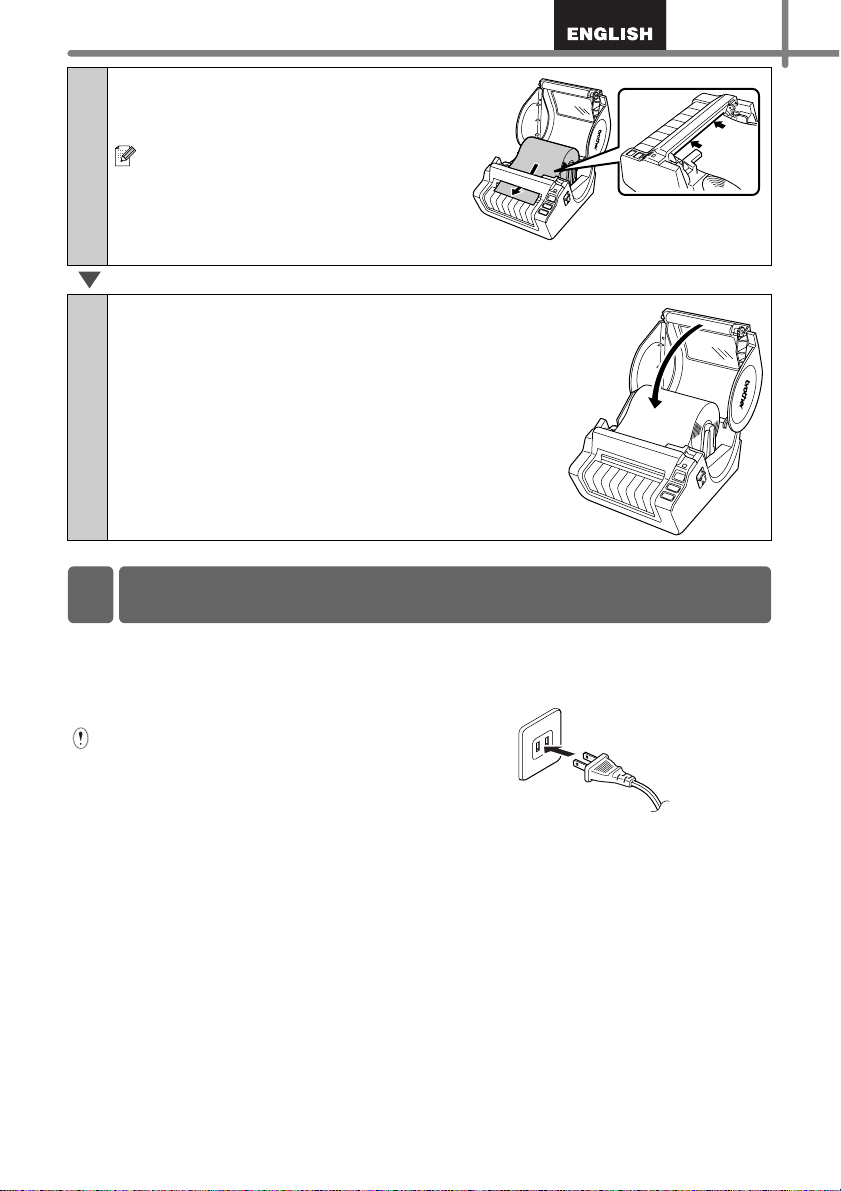
Thread the end of the DK Roll into
3
the slot until it can be seen from the
other side.
When unable to thread the end of the
DK Roll into the slot, thread it as far a s
possible, and then close the cover.
Press the ON/OFF button to turn the
QL label printer on, and then press the
FEED button to set the roll.
Close the DK Roll compartment cover until it
4
clicks on both sides.
4 Connecting the Power Supply
9
Connect the power cord to the
QL label printer and then plug the
power cord into a 120V AC
electrical outlet.
• Check that the electrical outlet is 120V
AC before plugging the power cord.
• Unplug the power cord from the
electrical outlet after you have fini shed
using the QL-1060N.
• Do not pull the power cord when
unplugging it from the electrica l outlet.
The wire in the power cord may
become damaged.
• Do not connect the QL label printe r to
the computer until directed to do so
when installing the prin ter driver. For
how to install the printer driver and
software, refer to
installation Guide".
Î "Software
Page 16
Getting started
10
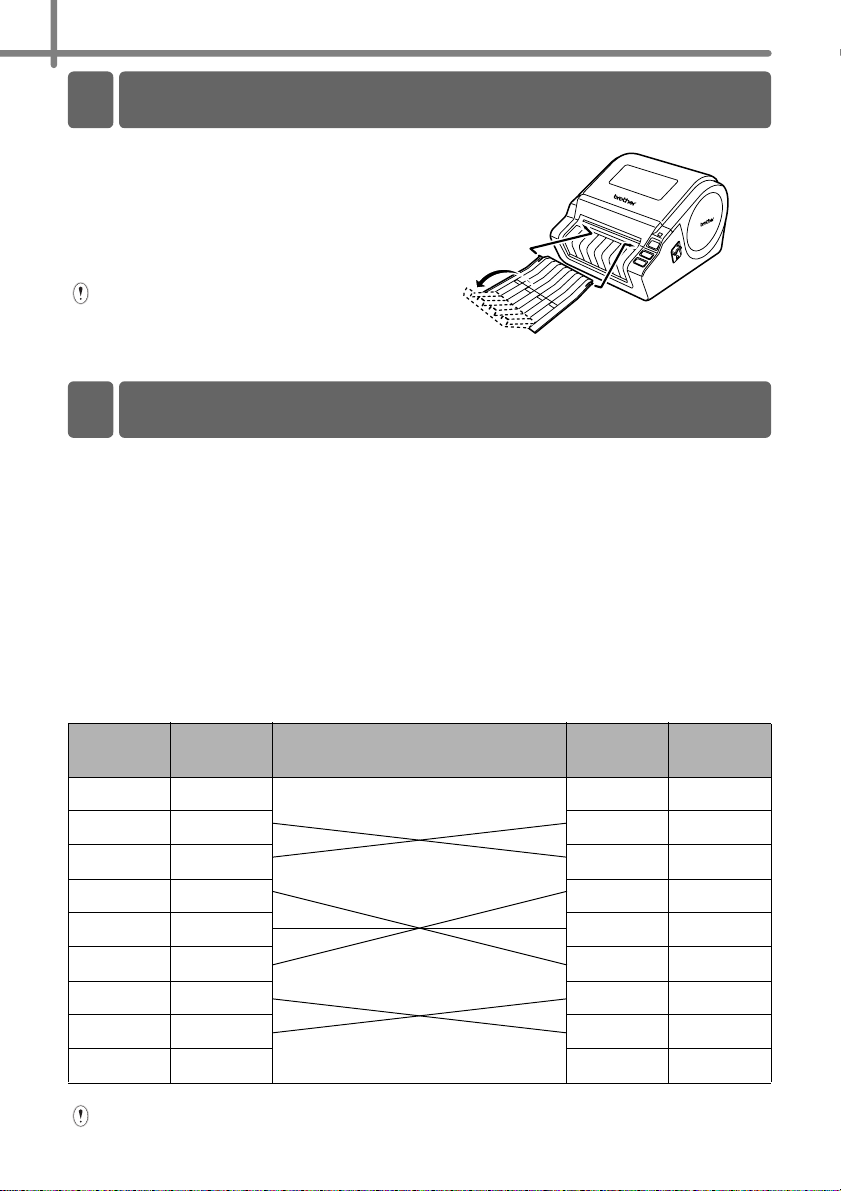
5 Attaching the Label Tray
The machine contains a label tray
which can hold up to 10 individual
label sheets.
As shown in the right hand
illustration, attach the label tray to
the front face of the machine.
• When printing more than 10 labels
continuously using the auto cut
function, remove the paper guide to
prevent a paper jam.
6 Using the Interface Cable
Serial (RS-232C) cables and Networ k (Ethernet) cables are not st andard
accessories.
Use the appropriate cable for your type of interface.
• USB Interface Cable
Use the enclosed interface cabl e.
• RS-232C (Serial) Cable (Windows
The pin assignments for the serial c ables (RS-2 32C ca bles) whic h can b e used wi th this
machine are shown in the table below. You can purchase the cables at an electronics
store. Do not use an interface cable that is longer than 6 feet (2.0 meters).
Brother QL label printer PC
(D-sub female, lock screw #4-40 inch screw) (D-Sub9P female)
®
only)
Signal
Name
DCD 1 1 DCD
RXD 2 2 RXD
TXD 3 3 TXD
DTR 4 4 DTR
GND 5 5 GND
DSR 6 6 DSR
RTS 7 7 RTS
CTS 8 8 CTS
RI 9 9 RI
•
It is not possible to connect a RS-232C cable and USB cable to the printer at the same time.
•
The RS-232C serial connector part of this equipment is not Limited Power Source.
Pin
Number
Pin Assignments
Pin
Number
Signal
Name
Page 17

• Network Cable (QL-1060N only)
Use a straight-through Category5 (or greater) twisted-pair cable for 10BASE-T or
100BASE-TX Fast Ethernet Network.
Important
• The enclosed USB interface cable should be used in order to ensure
compliance with the limits for EMC.
• A shielded interface cable that is no longer than 6 feet (2 meters)
should be used in order to ensure compliance with the limits for EMC.
• Changes or modifications not expressly approved by Brother
Industries, Ltd. could voi d the user's authority to operate the
equipment.
• Caution for LAN connection (QL-1060N only)
Connect this product to a LAN connection that is not subjected to overvoltages.
11
Page 18

12
Getting started
Page 19
Installing the software
1 Installing th e Sof tw are for QL-1050
The procedure for installing them varies depending on the OS of the computer.
Install procedure is subject to change without notice.
Please note: It is important you do no connec t the printer to the computer until directed
to do so.
1. When using Microsoft® Windows®
This section explains how to install the P-touch Editor 5.0, P-touch Address Book 1.1,
Printer Driver, and Software User's Guide as a whole.
The following is the example for Wi ndows Vista
St art the computer and put the CD-ROM into the CD-ROM drive.
1
2
If it does not start up automatically, open the files on the CD-ROM and double
click on "Setup.exe".
Click "Standard Installation".
Installation items:
1
Standard Installation
P-touch Editor 5.0,
P-touch Address Book 1.1,
Printer Driver, and
User's Guide (PDF)
2
Custom Installation
P-touch Editor 5.0,
P-touch Address Book 1.1,
Printer Driver, or Software User's Guide (PDF)
3
Display User's Guide
The Software User's Guide (PDF)
4
Reader Download
Adobe
Link to the download pa ge for Adobe
®
.
1
2
3
4
®
Reader® will be displayed.
13
Read the license agreement and click [Yes] if you agree with the
3
terms and conditions.
Follow the on-screen instructions.
4
Page 20
Installing the software
14
5
6
7
Put a check mark in the box next to the
Add-In programs you want to install, and
click [Next].
Follow the on-screen instructions.
Make sure that you closed all Microsoft®
Office applications.
For details on the Add-in, see the "Software
User's Guide (PDF)".
Select the desired model, and then click [OK].
Follow the on-screen instructions of the Printer
Driver installation.
When instructed, connect the
printer to finish the print er driver
installation.
• For USB installation, it is important
you do not connect the printer to the
computer until directed to do so.
• Before connecting the USB interface
cable, remove the caution label
affixed to the USB port of the machine.
USB port
Power cord
Serial port
Select a registration method and click [Next].
8
• If you choose "Yes, display the page", you will go to the online user registration
page before finishing the installation. (recommended)
• If you choose "No, do not display the page", you will continue the installation.
Click [Finish].
9
The software installation is now complete.
When you are asked to restart the computer, choose "Restart" and click [Finish].
Start the software.
10
•
Click [Start] - [All Programs] - [Brother P-touch] - [P-touch Editor 5.0] to start P-touch Editor.
• Click [Start] - [All Programs] - [Brother P-touch] - [P-touch Address Book 1.1] to
start P-touch Address Book.
For details on software, see Î"Software User's Guide".
You can find the Software User's Guide by clicking [Start] - [ALL Programs] - [Brother
P-touch] - [Manuals] - [QL-Series] - [Software User's Guide].
Page 21
15
2. When using Mac OS
This section explains how to install the P-touch Editor 5.0, Fonts, Auto Format
Templates, Clip Art, and Printer Driver. After installing the Printer Driver, it also explains
how to set it for the machine.
• Until the installation of printer driver is completed, do not connect the machine to
Macintosh
• When installing it, log in as the adminis trato r.
Here explains the example of Mac OS
XXX.
Read "XXX" as your printer name. The printer names in the following screens may differ
from your purchased printer name.
Start up Macintosh®, and insert the CD-ROM into CD-ROM drive.
1
Double click [QL_Series] (CD-ROM) icon.
Click [Mac OS X] folder and double click [QL-XXX Driver.pkg].
2
Follow the on-screen instructi ons .
After the installation is completed and
3
the screen shown below is displayed,
®
. If it has been conn ected t o it , pull o ut the USB cab le from M acinto sh®.
®
®
X 10.5.7. In the following steps, you will see QL-
click [Close].
The installation of printer driver is completed.
Next, install the P-touch Editor 5.0.
Double click [P-touch Editor 5.0 Installer.mpkg] in [Mac OS X] folder.
4
P-touch Editor 5.0 Installer starts up. Follow the on-screen instructions.
When the installation is completed and
5
the message "Click Restart to finish
installing the software" is displayed,
click [Restart].
Macintosh® is restarted.
The installation of software is completed.
Page 22
Installing the software
16
6
7
8
After restarting the computer,
connect your printer to the
computer by using the USB cable,
and then turn on the printer.
· Before connecting the USB interface
cable, remove the caution labe l
affixed to the USB port of the
machine.
· If you are connecting the printer to
Macintosh
not be detected correctly. If so,
connect the printer directly to the
USB port on Macintosh
®
via a USB hub, it may
®
.
USB port
Serial port
Power cord
(For Mac OS® X 10.3.9 - 10.4.x) Double click the drive where Mac
®
X is installed, and click in order of [Applications]-[Utilities]-
OS
[Printer Setup Utility].
(Mac OS
®
X 10.5.x-10.6) Click in order of [Apple menu]-[System
Preferences], and click [Print & Fax].
For Mac OS® X 10.3.9 - 10.4.x
Click [Add] and choose USB at the top of the screen.
Choose "QL-XXX" from the list and click [Add] again to add the
printer to the "Printer List".
®
For Mac OS
X 10.5.x - 10.6
Choose "Brother QL-XXX" from the list and click [Add] / to add
the printer to the "Printer List" / "Print & Fax".
When the screen returns to [Print er List / Print & Fax] scre en, check
9
the "QL-XXX" is added, and close [Printer List / Print & Fax] screen.
Now you can use the machine.
For details on software, see the P-touch Editor Help.
Page 23
Installing the Software
2 Inst alling the Software for QL-1060N
The procedure for installing them varies depending on the OS of the computer.
Install procedure is subject to change without notice.
Please note: It is important you do no connec t the printer to the computer until directed
to do so.
1. When using Microsoft® Windows®
This section explains how to install the P-touch Editor 5.0, P-touch Address Book 1.1,
Printer Driver, and Software User's Guide as a whole.
The following is the example for Wi ndows Vista
St art the computer and put the CD-ROM into the CD-ROM drive.
1
2
If it does not start up automatically, open the files on the CD-ROM and double
click on "Setup.exe".
Click "Standard Installation".
Installation items:
1
Standard Installation
P-touch Editor 5.0,
P-touch Address Book 1.1,
Printer Driver, Software User's
Guide (PDF), and Network User's
Guide (PDF)
2
Custom Installation
P-touch Editor 5.0,
P-touch Address Book 1.1,
Printer Driver, Software User's Guide (PDF), and Network User's Guide
(PDF)
3
Utility Installation
BRAdmin Light
4
User's Guide
Software User's Guide (PDF), Network User's Guid e (PDF), and link to the
download page for Adobe
®
®
Reader®.
.
1
2
3
4
17
Read the license agreement and click [Yes] if you agree with the
3
terms and conditions.
Follow the on-screen instructions.
4
Page 24
Installing the software
18
Put a check mark in the box next to the
5
Add-In programs you want to install, and
click [Next].
Follow the on-screen instuructions.
Make sure that you closed all Microsoft®
Office applications.
For details on the Add-in, see the "User's
Guide (PDF)".
Select the desired model, and then click [OK].
6
Then, choose your connection method and click
[Next].
For USB interface cable users
7-1
Choose Local Printer with USB cable
and click [Next].
7-2
Follow the on-screen instructions. When
this screen appears, make sure to turn
on the power . Connect t he USB interface
cable to your computer, and then
connect it to the machine.
Now, go to step 8 on Page 19.
Page 25
For Network interface cable users
7-1
Choose Brother Peer-to-Peer Network
Printer, and then click [Next].
Check that LAN cable and the machine are
connected.
7-2
Choose Search the network for devices and choose from a list of
discovered devices (Recommended). Or enter your machine’s IP
address or its node name. Click [Next].
You can find your printer's IP address and the node name by printing out the
Printer Settings Page, please refer to the NETWORK USER'S GUIDE (PDF)
for details.
7-3
Choose your printer.
Now, go to step 8 on Page 19.
For shared network printer users
7-1
Choose Network Shared Printer, and
then click [Next].
19
Check that LAN cable and the machine are
connected.
7-2
Choose your printer's queue, and then click [OK].
Contact your administrator if you do not know the location or the name of the
printer in the network
Click [Next].
8
• If you choose "Yes, display the page", you will go to the online user registration
page before finishing the installation. (recommended)
• If you choose "No, do not display the page", you will continue the installation.
Click [Finish].
9
Page 26

Installing the software
20
10
For details on software, see Î"User's Guide (PDF)".
You can find the User's Guide (PDF) by clicking [Start] - [ALL Programs] - [Brother
P-touch] - [Manuals] - [QL-Series-N] - [Software User's Guide].
Start the software.
• Click [Start] - [All Programs] - [Brother P-touch] - [P-touch Editor 5.0] to start
P-touch Editor.
• Click [Start] - [All Programs] - [Brother P-touch] - [P-touch Address Book 1.1] to
start P-touch Address Book.
Page 27
Installing the BRAdmin Light configuration utility for Windows
The BRAdmin Light is a utility for initial setup of Brother network connected devices. It
can also search for Brother products on your network, view the status and configure
basic network settings, such as IP address.
For more information on BRAdmin Light, visit us at http://solutions.brother.com.
• If you require more adv anced printer manag ement, use the l atest Brother BRAdmin
Professional utility version that is available as a download from
http://solutions.brother.com.
• If you are using Personal Firewall software, BRAdmin Light may fail to detect the
unconfigured device. In that case, disable your Personal Firewall software, try
BRAdmin Light again. Re-start your Personal Firewall software after the address
information is set.
Click Utility Installation.
1
2
This screen is the same screen as you
see when you insert the CD-ROM.
Click BRAdmin Light and follow the onscreen instructions.
If the Windows Firewall is enabled on your PC,
the message “Do you w ish to add this application
to the list of exceptions?” appears. Check your
PC environment and choose Yes or No.
21
Setting your IP address, Subnet Mask and Gateway using
BRAdmin Light
Click [S tart]-[All Programs]-[Brother]-
1
[BRAdmin Light]. BRAdmin Light will searc h
for new devices automatically.
If you have a DHCP/BOOTP/RARP server in your
network, you don’t have to do the following
operation. Because the print server will
automatically obtain its IP address.
Page 28

Installing the software
22
2
3
4
Double-click the unconfigured device.
The default password is "acc ess."
Choose STATIC for the Boot Method. Enter
the IP Address, Subnet Mask and Gateway,
and then click [OK].
The address information will be saved to the printe r.
Page 29

23
2. When using Mac OS
This section explains how to install the P-touch Editor 5.0, Fonts, Auto Format
Templates, Clip Art, and Printer Driver. After installing the Printer Driver, it also explains
how to set it for the machine.
• Until the installation of printer driver is completed, do not connect the machine to
Macintosh®. If it has been connected to it, pull out t he USB interface cabl e/Network
interface cable from Macintosh
• When installing it, log in as the adminis trato r.
Here explains the example of Mac OS® X 10.5.7. In the fo llowin g step s, y ou will see QL-XX X.
Read "XXX" as your printer name. The printer names in the following screens may differ
from your purchased printer name.
Start up Macintosh®, and insert the CD-ROM into CD-ROM drive.
1
Double click [QL_Series] (CD-ROM) icon.
Click [Mac OS X] folder and double click [QL-XXX Driver.pkg].
2
Follow the on-screen instructi ons .
After the installation is completed and
3
the screen shown below is displayed,
®
®
.
click [Close].
The installation of printer driver is completed.
Next, install the P-touch Editor 5.0.
Open [Brother OL-XXX Driver] in [Mac OS X] folder.
4
Double click [P-touch Editor 5.0 Installer.mpkg] in [your
OS name].
P-touch Editor 5.0 Installer starts up. Follow the on-screen instructions.
When the installation is completed and
5
the message "Click Restart to finish
installing the software" is displayed,
click [Restart].
The Macintosh® is restarted.
The installation of software is completed.
Page 30

Installing the software
24
6
7
8
After restarting the computer,
connect the USB/LAN cable to the
machine.
As the caution label is put on the USB
port of the machine, remove it and
then connect the USB cabl e.
LAN port
Serial port
Power cord
USB port
Connect the USB/LAN cable to the USB/LAN port of Macintosh®.
Press ON/OFF button ( ) of the machine to turn on the power.
When connecting the machi ne to Macint os h® via USB hub, it may not be
connected correctly . At that t ime, c onnec t the mac hine d irectl y to the U SB port
of Macintosh
®
.
(Mac OS® X 10.3.9 - 10.4.x) Double click the drive where Mac OS®
X is installed, and click in order of [Ap plicat ions] - [Uti lities ] - [Printer
Setup Utilit y].
®
(Mac OS
X 10.5.x - 10.6) Click in order of [Apple menu] - [Syst em
Preferences], and click Print & Fax. Then click .
For USB interface cable users
(Mac OS® X 10.3.9
9
USB at the top of the screen.
) Click Add and choose
Choose QL-XXX from the list and click Add again
to add the printer to the Printer Setup Utility.
(Mac OS® X 10.4.x - 10.6) Click Add/ .
Choose QL-XXX from the list and click Add to
add the printer to the [P rinter Se tup Utilit y/Print &
Fax].
For Mac OS® X 10.4.x, click Add and add the
printer with the BRPTUSB connection. (If you do so, an error dialog appears
when an printing error occurs.) Set the appropriate printer name.
Now, go to step 10.
Page 31

For Network interface cable users (Simple Network Configuration)
9-1
Click Add.
(Mac OS
®
X 10.3.9) Make the selection
shown right.
®
(Mac OS
X 10.4.x - 10.6) Go to the next
step.
9-2
Choose QL-XXX from the list and click Add a gain to add the printer
to the Printer Setup Utility.
(Mac OS® X 10.3.9) (Mac OS® X 10.4.x)
25
®
(Mac OS
X 10.5.x-10.6)
Now, go to step 10.
Page 32

Installing the software
26
For Network interface cable users (Manual Network Configuration)
9
10
(Mac OS® X 10.3.9) Click Add and choo se IP
Printing at the top of the scr een. Enter the IP
address of the printer into the Printer
Address box. Choose QL-XXX from the list
and click Add again to add the printer to the
Printer Setup Utility.
®
(Mac OS
X 10.4.x - 10.6) Click Add and
choose IP Printer / IP at the top of the
screen. Enter the IP address of the printer
into the Address box. Choose QL-XXX from
the list and click Add again to add the printer
to the Printer Setup Utility.
When specifying the Queue Name, use the value BRNxxxxxxxxxxxx at where
xxxxxxxxxxxx is the Ethernet address.
When the screen returns to the [Printer List / Print & Fax] screen,
check that “QL-XXX” is added, and close the [Printer List / Print &
Fax].
Now you can use the machine.
For details on software, see the P-touch Editor Help.
Installing the BRAdmin Light configuration utility for Mac®
The BRAdmin Light is a utility for initial setup of Brother network connected devices. It
can also search for Brother products on your network, view the status and configure
basic network settings, such as IP address.
For more information on BRAdmin Light, visit us at http://solutions.brother.com.
If you are using Personal Firewall software, BRAdmin Light may fail to detect the
unconfigured device. In that case, disable your Personal Firewall software, try
BRAdmin Light again. Re-start your Personal Firewall software after the address
information is set.
Double click [BRAdmin Light.pkg] in the
1
[Mac OS X] folder.
The BRAdmin Light Installer starts up. Follow the
on-screen instructions.
Page 33

When the installation is completed and
2
the message “The Software was
successfully installed.” is displayed,
click [Close].
The installation of BRA dmin Light is completed.
Setting your IP Address, Subnet Mask and Gateway using
BRAdmin Light
Click [Library]-[Prin ters]-[Brother]-[P-touch
1
Utilities]-[BRAdmin Light.jar].
BRAdmin Light will search for new devices
automatically.
If you have a DHCP/BOOTP/RARP server in your
network, you don't have to do the following
operation, as the print server will automatically
obtain its IP address.
Double-click the unconfigured device.
2
The default password is "acc ess."
27
Choose ST A TIC for the Boot Method. Enter
3
the IP Address, Subnet Mask and
Gateway, and then click [OK].
The address information will be saved to the printe r.
4
Page 34

Installing the software
28
nstalling the Software
3 Uninstalling Software and
Printer Driver
This section describes how to uninstall the software and printer driver. In the following
steps, you will see XX-XXXX. Read "XX-XXXX" as your printer name.
Uninstalling P-touch Editor
For Windows® XP
1
From [Control Panel], go to [Add or Remove Programs].
The [Add or Remove Programs] dialog appears.
For Windows Vista®/Windows® 7
From the [Control Panel], go to [Programs] and open [Programs and Features].
The [Uninstall or change a program] window appears.
For Windows® XP
2
Choose "Brother P-touch Editor 5.0", and click [Remove].
For Windows Vista®/Windows® 7
Choose "Brother P-touch Editor 5.0", and click [Uninstall].
Click [OK].
3
The uninstall operation starts. After the software is removed from your computer,
the [Maintenance Complete] dialog box appears.
Close the [Add or Remove Programs] (XP) / [Programs and
4
Features] (Windows Vista
P-touch Editor has been uninstalled.
The Software User’s Guide (PDF) and Network User’s Guide (PDF) (TD-4100 N
only) can also be uninstalled by following the same procedure.
®
/Windows® 7) dialog.
Uninstalling the Printer Dri ver
Turn off the printer.
1
For Windows® XP
2
From [Control Panel], go to [Printer and other hardware], open [Printer and Faxes] Window.
For Windows Vista
From [Control Panel], go to [Hardware and Sound] and open [Printers].
For Windows® 7
Click the , go to [Devices and Printers].
For details, see Windows® Help.
®
Page 35

For Windows® XP
3
Choose "Brother XX-XXXX", and click [File]-[Delete].
For Windows Vista®/Windows® 7
Choose "Brother XX-XXXX", right click on the icon, and then click [Delete]
(Windows Vista
For Windows® XP
4
Go to [File]-[Server Properties].
®
)/ [Remove device] (Windows® 7).
29
For Windows Vista
In the [Printers] window, right click and go to [Run as administrator]-[Server
Properties...].
If the [Authorization confirmation] dialog appears, click [Continue]. If the [User
Account Control] dialog appears, enter the password and click [OK].
For Windows
Choose [Fax] or [Microsoft XPS Document Writer] in the [Devices and Printers]
window, and then click [Print server properties], which appears in the menu bar.
For Windows® XP
5
Click the [Drivers] tab and choose "Brother XX-XXXX". Then, click [Remove].
For Windows Vista
Click the [Drivers] tab and choose "Brother XX-XXXX". Then, click [Remove...].
For Windows
Click the [Drivers] tab, and then click [Change Driver Settings].
(If a User Account Control message appears, type in the password, and then click
[OK]).
Choose "Brother XX-XXXX", and then click [Remove...].
For Windows® XP
6
Go to step 7.
®
®
7
®
®
7
For Windows Vista®/ Windows® 7
Choose [Remove driver and driver package], and then click [OK].
Close the [Print Server Properties] window.
7
The Printer Driver has been uninstalled.
Page 36

Reference
30
Reference
1 Status LED Indications
Lamp Condition
Not lit
Power is OFF.
Lamp is Green
Power is ON.
Green lamp is flashing
Receiving the data from PC.
Lamp is Orange
The roll cover is opened. Close the roll cover properly.
Orange lamp is flashing
Lamp is Red
Red lamp is flashing
Cooling
(Wait for temperature of print head to lower)
Activating the boot.
Indicates one of the following errors.
• Label sensor error
(End of DK Roll or label jam)
• Incorrect DK Roll installed
• Transmission error
Page 37

2 Maintenance
Maintenance of the machine may be carried out as required. However, some
environments require that maintenance must be done more frequently (e.g. in dusty
conditions).
Print head maintenance
The DK Roll (thermal printing paper
type) used with the machine is
designed to clean the print head
automatically. When the DK Roll
passes the print head during printing
and label feeding, the print head is
cleaned. If the print head is not
cleaned thoroughly use a cotton swab
and wipe the head.
Roller maintenance
Cut the DK label and remove the
backing paper of the label. Then, put
the adhesive side of the label against
the roller and remove the dirt.
Label outlet maintenance
If glue accumulates on the label outlet
and the machine becomes jammed,
disconnect the power plug from the
machine and clean the label outlet
with a cloth dipped in isopropyl
alcohol.
Print head
Roller
31
Label outlet
Page 38

Reference
32
Reference
3 Troubleshooting
If the problems occur while using this machine, the following may help you to solve the
problems.
Potential types of problems
Problem Solution
• Is the cable loose?
Check that the cable is connected securely.
• Is the DK Label or DK Tape roll installed correctly?
If not, remove the DK Roll and reinstall.
The Brother QL label printer
does not print, or a printing error
is received.
The Status LED lamp is not lit.
The printed label contains
streaks or poor quality
characters, or the label is not fed
correctly.
A data transmission error
appears on the personal
computer screen.
Labels are jammed in the cutter
or are not ejected correctly after
printing.
The label is not ejected properly
after printing.
The print quality is poor
After replacing the Roll while the
Add-In feature was activated, the
layout style was not updated.
• Is there enough label/tape roll r emaining?
Check that there is enough label/tape roll remaining.
• Is the DK Roll compartment cover open?
Check that the DK Roll compartment cover is closed.
• Has a print error or transmission error occurred?
Turn off the Brother Label Printer and on again if the problem
still occurs, contact Brother Customer Service at 1-877BROTHER.
• Is the power cord plugged in correctly?
Check that the power cord is plugged in. If inserted, try plugging
it into another electrical outlet.
* If the power button still does not light up, contact Brother
Customer Service at 1-877-BROTHER.
• Is the print head or roller dirty?
While the print head generally remains clean under normal use,
lint or dirt from the roller may become stuck on the printer head.
If this occurs, clean the roller.
For details, see
• Is the correct port chosen?
Check that the correct port is chosen from the “Print to the
following port” list in the Printer Properties dialog box.
• Is the Brother Label Printer in cooling mode (the LED lamp is
flashing orange)?
Wait until the LED lamp stops flashing and then try printing
again.
• Is someone printing via the network?
If you try to print while other users are printing large amounts of
data, the printer is unable to accept your print job until the
printing is finished. In such situations, execute the print job
again after the other jobs are completed.
• Is there dirt or lint on the roller preventing it from rolling freely?
For details, see
• Check that the ejection path of the label is not blocked.
• Check that the DK Label or DK Tape roll is set properly by
removing the DK Label or DK Tape roll and reinstalling
• Ensure that the DK Label or DK Tape roll compartment cover is
closed properly.
• Is there dirt or lint on the roller preventing it from rolling freely?
Clean the roller using the cleaning sheet (available separately).
For details, see
• Close the P-touch Editor to exit the Add-In, and reactivate the
Add-In.
Î"Roller maintenance" in page 31.
Î"Roller maintenance" in page 31
Î"Roller maintenance" in page 31.
Page 39

Problem Solution
The Add-in feature icon is not
displayed on Microsoft
Cutter error
The printed bar code cannot be
read.
I want to reset the printer/delete
the data transferred from PC.
(QL-1060N only)
I want to cancel the current
printing job. (QL-1060N only)
®
Word.
®
• Is Microsoft
• Is Microsoft
Microsoft
Due to the limitation of the program, the Add-in feature of
Microsoft
Quit Microsoft
Word started up from Microsoft® Outlook®?
®
Word chosen for the editor usually used for
®
Outlook®?
®
Word is unable to be used with the above settings.
®
Outlook®, and restart Microsoft® Word.
• If the cutter error occurs, keep the DK roll compartment cover
closed and press ON/OFF button. The cutter moves back to the
normal position and turns the machine OFF automatically. After
the machine is OFF, inspect the cutter unit and remove the
paper jam.
• Set the label vertical to the print head as shown below.
Label exit slot
Recommended
Print head
print direction
• Some types of scanner are not able to read the bar code. Try
using another scanner.
• We recommend printing the Bar code with Print Quality options
set to "Give priority to print quality".
®
Windows
XP:
To change the Print Quality options, open the printer properties
from [Control Panel]-[Printer and other hardware]-[Printer and
Faxes], right-clicking the printer whose settings are to be
changed, then selecting [Properties]. Then, in the [General] tab,
click [Printing Preferences...].
®
Windows Vista
:
To change the Print Quality options, open the printer properties
by going to [Control Panel]-[Hardware and Sound]-[Printers],
right-clicking the printer whose settings are to be changed, then
selecting [Properties]. Then, in the [General] tab, click [Printing
Preferences...].
®
Windows
7:
To change the Print Quality options, open the printer properties
by going to -[Devices and Printers], right-clicking the printer
whose settings are to be changed, and selecting [Printer
properties]. Then, in the [General] tab, click [Preferences...].
• To reset the machine, press and hold the ON/OFF button to
switch the machine OFF. Then, hold down the ON/OFF button
for two seconds. Continue holding down the ON/OFF button,
and press the CUT button six times. The machine will then
reset. All the transferred data from the PC will be deleted and
the machine will be reset to factory setting.
• Make sure that the printer is ON, and press ON/OFF button.
33
Page 40

Reference
34
When printing via the USB
cable, the printer repeatedly
pauses and then continues
printing. (QL-1060N only)
Problem Solution
• Is the printer set for sequential printing?
If so, set print mode to buffered printing. (Open printer
properties from [Control Panel]-[Printer and FAX] and click
[Printing Preferences...] button in the [General] tab. Choose the
option "After one page of data is received".)
• An alternative solution is to disconnect the LAN cable until USB
printing is completed.
Page 41

4 Main Specifications
Product specifications
Items Specifications
Display LED lamp (green, red, orange)
Printing method Direct thermal printing via thermal head
Speed of printing
Print
Print head 300 dpi/1296 dot
Max. printing width 3.9 inch (98.6 mm)
Min. printing length 1 inch (25.4 mm)
Cutter Durable automatic cutter
Button
Interface USB, Serial (RS-232C)*1, 10/100BASE-TX Wired Ethernet*
Power supply 120V AC 60 Hz 1.8 A
Size (W × D × H) 6.7" (170 mm) × 8.7" (222 mm) × 5.8" (148 mm)
Weight
*1 Windows® only
*2 QL-1060N only
Operating environment
Max. 4.3 inch (110 mm)/sec, Max. 69 labels/min. (Standard
Address Labels) (When connecting USB cable)
ON/OFF button ( ), FEED button, CUT button
QL-1050: Approx. 3.7 lb (1.69 kg) (Without DK Rolls)
QL-1060N: Approx. 3.8 lb (1.73 kg) (Without DK Rolls)
35
2
Items Specifications
Windows® XP/Windows Vista®/Windows® 7
OS
Windows
Macintosh
Windows
Interface
Macintosh
Hard
Disk
Windows
Macintosh
Windows
Memory
Macintosh
Monitor
Windows
Macintosh
Others CD-ROM drive
® *1
Windows Server
(Pre-installed device)
®
Mac OS® X 10.3.9 - 10.6
Serial (RS-232C)*3, USB port (USB Spec. 1.1 or 2.0 protocol),
®
10/100BASE-TX Wired Ethernet
USB port (USB Spec. 1.1 or 2.0 protocol), 10/100BASE-TX Wired
®
Ethernet
®
Disk space more than 70 MB
®
Disk space more than 100 MB
Windows® XP: More than 128 MB
Windows Server
®
Windows Vista® /Windows Server® 2008*4/2008 R2*4: More than 512 MB
Windows® 7: More than 1 GB (32-bit) or 2GB (64-bit)
Mac OS® X 10.3.9: More than 128 MB
®
Mac OS
®
Mac OS
Mac OS
®
SVGA, high color or higher graphics card
®
More than 256 colors
X 10.4.x: More than 256 MB
®
X 10.5.x: More than 512 MB
®
X 10.6: More than 1 GB
®
2003*4/2008*4/2008R2
*2
*2
®
2003*4: More than 256 MB
*4
Page 42

Reference
36
Items Specifications
Operating temperature 50°F to 95 °F (10°C to 35°C)
Operating humidity 20% to 80% (without condensation)
*1 The computer should meet Microsoft®'s recommendations for the OS installed.
*2 Required available space when installing the software with all of the options.
*3 The RS-232C interface is required when printing with ESC/P commands.
*4 QL-1060N only
Page 43

Accessories (For USA Only)
Brother recommends the use of genuine Brother accessories with the Brother QL-1050/
1060N.
The use of other products may effect the print quality or may damage the Brother QL-1050/
1060N. The following supplies and accessories are available for the Brother QL-1050/1060N
and can be ordered directly from Brother should your retailer not stock them. Availability subject to change without notice.
DK Rolls
DK Die-cut Label
Stock No. Description
DK-1201 Standard Address Labels, 1-1/7" × 3-1/2" (29 mm × 90 mm), 400 labels
DK-1202 Shipping Labels, 2-3/7" × 4" (62 mm × 100 mm), 300 labels
DK-1203 File Folder Labels, 2/3" × 3-7/16" (17 mm × 87 mm), 300 labels
DK-1204 Multi Purpose/Return Address Labels, 2/3" × 2-1/8" (17 mm × 54 mm), 400 labels
DK-1207 CD / DVD Film Round Labels, 2-1/3" (58 mm) Diameter, 100 labels
DK-1208 Large Address Labels, 1-1/2" × 3-1/2" (38 mm × 90 mm), 400 labels
DK-1209 Small Address Labels, 2-3/7" × 1-1/7" (62 mm × 29 mm), 800 labels
DK-1218 Round Paper Labels, 1" (24 mm) Diameter, 1000 labels
DK-1219 Round Paper Labels, 1/2" (12 mm) Diameter, 1200 labels
DK-1221 Square Paper Labels, 10/11" x 10/11" (23 mm × 23 mm), 1000 labels
DK-1240 Large Multi-Purpose Labels, 4" x 2" (102 mm x 51 mm), 600 labels
DK-1241 Large Shipping Labels, 4" x 6" (102 mm x 152 mm), 200 labels
37
DK Continuous Length Tape
Stock No. Description
DK-2205 Wide Paper Tape 2-3/7" (62mm), 100
DK-2210 Medium Width Paper Tape 1-1/7" (29mm), 100
DK-2211 Medium Film Tape - White 1-1/7" (29mm), 50 ft (15.24 M)
DK-2212 Wide Film Tape - White 2-3/7" (62mm), 50 ft (15.24 M)
DK-2113 Wide Film Tape - Clear 2-3/7" (62mm), 50 ft (15.24 M)
DK-2214 Narrow Width Paper Tape 1/2" (12mm), 100 ft (30.48 M)
DK-2243 Wide Paper Tape - White 4" (102 mm), 100 ft (30.48 M)
DK-2606 Wide Film Tape - Yellow 2-3/7" (62mm), 50 ft (15.24 M)
DK-4205* Removable Wide Paper Tape - White 2-3/7" (62mm), 100ft (30.48M)
DK-4605* Removable Wide Paper Tape - Yellow 2-3/7" (62mm), 100ft (30.48M)
* Removable adhesive labels can be cleanly removed from several flat, smooth surfaces.
Removing other labels, once applied, may damage label and/or surface.
ft
(30.48 M)
ft
(30.48 M)
Page 44

QL-1050/1060N
Guía del usuario
Asegúrese de leer este manual antes de usar la impresora. Le recomendamos
conservar este manual a mano para referencia en el futuro.
www.brother.com
Page 45

Gracias por adquirir la impresora de etiquetas QL.
Esta guía describe brevemente cómo utilizar la impresora.
Para obtener detalles, consulte la Guía del usuario.
Es altamente recomendable que lea esta guía detenidamente antes de utilizar la
impresora y consérvela a mano para futuras consultas.
Para obtener el máximo de nuestro servicio de asistencia, le recomendamos que
aproveche esta oportunidad para registrarse visitándonos en:
Registro de usuario online
http://registermybrother.com/
Página de asistencia online
http://solutions.brother.com/
NOTA: También puede acceder a las páginas de Internet mencionadas arriba desde la
ventana de reg istro del usuario en línea usando el disco CD-ROM de instalación
que viene con la impresora. Esperamos el registro de su producto.
Declaración de conformidad de la Comisión Federal de Comunzicaciones (sólo para
Estados Uni dos )
La parte responsable: Brother International Corporation
Nombre del producto: Impresora de etiquetas QL-1050/QL-1060N
Número de modelo: QL-1050/QL-1060N
Este dispositivo cumple con la Parte 15 de la normativa de la FCC. El funcionamiento está sujeto
a las dos condiciones siguientes: (1) este dispositivo no puede causar interferencias nocivas y (2)
este dispositivo debe aceptar cualquier interferencia que reciba, incluidas las interferencias que
puedan provocar un funcionamiento no deseado.
Este equipo ha sido sometido a diversas pruebas y se ha comprobado que cumple con los límites
establecidos para los dispositivos digitales de Clase B, de acuerdo con la Parte 15 de la normativa
de la FCC. Dichos límites están diseñados para proporcionar una protección razonable contra las
interferencias nocivas en las instalaciones residenciales. Este equipo genera, utiliza y puede
irradiar energía de radiofrecuencias y, si no se instala y utiliza siguiendo las instrucciones
suministradas, podría provocar interferencias nocivas en las comunicaciones de radio. No
obstante, no existe garantía alguna de que no se produzcan dichas interferencias en una
instalación determinada. Si este equipo causara interferencias nocivas en la recepción de radio o
televisión, lo cual se puede determinar apagando y encendiendo el equipo, se anima al usuario a
intentar corregir la interferencia mediante una o más de las siguientes medidas:
100 Somerset Corporate Boulevard
Bridgewater, NJ 08807-0911 USA
TEL: (908) 704-1700
• Cambie la orientación o la ubicación de la antena de recepción.
• Aumente la separación entre el equipo y el receptor.
•
Conecte el equipo a una toma de corriente en un circuito distinto al que está conectado el receptor.
• Consulte a su distribuidor o a un técnico experto en radio/TV para obtener ayuda.
Importante
• El cable de conexión incluido se debe utilizar para garantizar el cumplimiento con los límites
establecidos para los dispositivos digitales de Clase B.
• El cable de interfaz apantallado se debe utilizar para garantizar el cumplimiento con los límites
establecidos para los dispositivos digitales de Clase B.
• Si se realizan cambios o modificaciones no aprobadas expresamente por Brother Industries, Ltd.
se podría anular la autoridad del usuario para utilizar el equipo.
Page 46

Garantía limitada de dos años y servicio de sustitución de Brother
®
(Sólo para EE.UU.)
A quién cubre:
•
Esta garantía limitada ("Garantía") sólo se ofrece al comprador o usuario final (en adelante en
esta Garantía denominado "Comprador original") del producto que acompaña, consumibles y
accesorios (denominado conjuntamente en esta Garantía como "este Producto").
• Si adquiere un producto de un dis tribuidor no autori zado por Brother en Est ados Unidos
o si el producto se utilizó (ya sea como modelos de muestra o productos reformados)
anteriormente a su compra, usted no es el Comprador original y el producto que ha
adquirido no está cubierto por esta Garantía.
Qué cubre:
•
Este Producto incluye una máquina, su s cons umib les y ac cesor ios. Los consu mible s y los
accesorios incluyen, entre otros, los rollos de cinta y e tiqueta y los serv idores de im presión .
• Salvo que se indique lo co ntrario en este do cu mento , Brothe r garan tiza que la máq uina
junto con los consumi bles y acce sorios est arán libr es de defecto s en los materi ales y la
mano de obra si se utilizan en condiciones normales.
• Esta garantía se aplic a s ól o a lo s productos adquiridos y utilizado s en Estados Unidos.
Para los productos adquiridos en Estados Unidos, pero utilizados fuera, esta Garantía
sólo cubre el servicio de garantía dentro de Estados Unidos (y no incluye el transporte
fuera de Estados Unidos ).
Duración de la garantía:
• Máquinas: dos años a partir de la fecha de compra original.
• Consumibles y accesorios: 90 días desde la fecha de compra original o la vida útil
nominal del consumible, siendo válida la primera que acontezca.
Qué NO cubre:
Esta Garantía no cubre:
(1) Daños físicos a este Producto
(2) Daños causados por la instalación inadecuada, uso inapropiado o anómalo, uso
incorrecto, negligencia o accidente (entre los que se incluyen el transporte de este
Producto sin la preparación y/o embalaje adecuado)
(3) Daños provocados por otro dispositivo o software utilizado con este Producto (entre los
que se incluyen los daños resu ltantes de l uso de pieza s, consum ibles y acces orios que no
sean de la m a rca de Brother
(4) Consumibles y accesorios que estén caducados según la vida útil nominal
(5) Los problemas ocasionados por motivos distintos de defectos en el material o la mano de obra.
Esta Garantía limitada se ANULARÁ si este Producto se ha modific ad o de al gun a forma
(entre las que se incluyen reparaciones conforme a la Garantía sin autorización de
Brother y/o alteración o eliminación del número de serie).
Qué hacer si considera que su Producto cumple los requisitos para el servicio de
garantía:
Informe de su problema en nuestra línea de atención al cliente de P-touch en 1-877BROTHER (1-877-276-8437) o en un centro de servicio técnico autorizado de Brother
dentro del período de Garantía. Proporcione a Brother o al centro de servicio técnico
autorizado de Brother una copia de la prueba de compra con fecha en la que se ind iqu e
que este Producto se adquirió en EE.UU. Para obtener el nombre de los centros de
servicio técnico autorizado de Brother, llame al 1-877-BROTHER (1-877-276-8437) o
visite www.brother-usa.com.
Qué le pedirá Brother que haga:
Después de contactar con Brother o con un centro de servicio técnico autorizado de
Brother, puede que se le solicite que entregue (personalmente si así lo prefiere) o envíe
el Producto correctamente empaquetado y con porte pagado al centro de servicio
técnico autorizado junto con una fotocopia de su prueba de compra.
Se hará responsable de los costes de envío, embalaje de producto y seguro (si lo
desea). También se hará responsable de la pérdida o daño de este Producto
durante el envío.
®
.
Page 47

INTRODUCCIÓN
Qué hará Brother:
Si el problema del que ha informado sobre su máquina y/o consumibles y accesorios lo
cubre esta Garantía y si primero ha informado del problema a Brother o a su centro de
servicio técnico autorizado dentro del período de garantía, Brother o su centro de
servicio técnico autorizado reparará o sustituirá la máquina y/o los consumibles y
accesorios sin coste alguno por las piezas o la mano de obra. Brother decide bajo su
propio criterio si repara y sustituye la máquina y/o los consumibles y ac cesorios.
Brother se reserva el derecho de suministrar una máquina de sustitución reformada o
fabricada de nuevo y/o los correspondientes consumibles y accesorios y de utilizar
piezas reformadas que ofrezcan productos de sustitución conforme a las
especificaciones del fabricante de nuevos productos o pi ezas.
La máquina y/o los consumibles y accesorios reparados o de sustitución se le
devolverán con porte pagado o se pondrán a su disposición para que los recoja en un
centro de servicio técnico autorizado convenientemente situado.
Si la máquina y/o lo s con su mi ble s o accesorios no los c ub re e st a Garantía (en cualquier
fase), se le cargarán los gastos de envío de la máquina y/o los consumibles y
accesorios, así como lo s coste s de servicio técnico y/o sustituci ón de pie zas o productos
conforme a las tarifas vigentes de Brother.
Lo anterior supone su única y exclusiva compensación de acuerdo con esta
Garantía.
Qué sucede cuando Brother opta por sustituir su máquina:
Cuando Brother autoriz a la susti tució n d e una máqui na y usted ha e ntregad o la m áquin a
a un centro de servicio técnic o au tori zado, este centro le proporcionará una máquina de
sustitución tras recibirla de Brother. Si está tratando directamente con Brother, éste le
enviará una máquina de sustitución, interpretando que usted, tras recibir la máquina de
sustitución, proporcionará la información de la prueba de compra necesaria junto con la
máquina que Brother ha acordado sustituir. Entonces, tendrá que embalar la máquina
que Brother ha acordado sustituir en el embalaje de la máquina de sustitución y
devolverlo a Brother c on el porte pagado que Brother le ha p r opo rci ona do si gui endo sus
indicaciones. Dado que estará en posesión de dos máquinas, Brother le pedirá un
número de tarjeta de crédito válida.
Brother estará en posesión del número de la cuenta de la tarjeta de crédito que le haya
proporcionado hasta que Brother reciba su producto original y determine que cumple con
los requisitos de cobertura de la Garantía. Se le cargará en su tarjeta de crédito el coste
de un nuevo Producto sólo si: (i) no devuelve el producto original a Brother en un período
de cinco (5) días laborables; (ii) los problemas del producto original no los cubre la
Garantía limitada; (iii) no se han seguido las instrucciones de embalaje apropiadas y se
han producido daños en el producto; o (iv) el período de garantía de su producto original
ha vencido o no se ha probado con la suficiente validez mediante la prueba de compra.
La máquina de sustitución que ha recibido (incluso si se ha reformado o fabricado de
nuevo) tendrá una garantía compuesta por el período de garantía limitada restante del
producto original más treinta (30) días adicionales. Se quedará con la máquina de
sustitución que se le ha enviado y su máquina original será propiedad de Brot her.
Conserve sus accesorios originales y una copia del porte de vuelta firmado por el
mensajero.
Page 48

Limitaciones:
Brother no se hace responsable de los daños o pérdidas de equipos, soportes,
programas o datos relacionados con el uso de este Producto. Salvo la reparación o
sustitución descrita anteriormente, Brother no se hará responsable de ningún daño
directo, indirecto, secundario o derivado o de compensaciones específicas. Ya que
algunos estados no permiten la exclusión o la limitación de la responsabilidad por los
daños derivados o secundarios, la limitación anterior puede no serle aplicable.
ESTA GARANTÍA ANULA CUALQUIER OTRA GARANTÍA, ESCRITA U ORAL,
EXPRESADA POR AFIRMACIÓN, PROMESA, DESCRIPCIÓN, GRÁFICO, MODELO O
MUESTRA. POR LA PRESENTE SE RECHAZA CUALQUIER OTRA GARANTÍA DISTINTA
DE ESTA, EXPLÍCITA O IMPLÍCITA, INCLUYENDO LAS GARANTÍAS IMPLÍCITAS DE
COMERCIABILIDAD Y ADECUACIÓN PARA UN PROPÓSITO EN PARTICULAR.
• Esta Garantía limitada es la única garantí a que Brother ofrec e para este Prod ucto. Es la
expresión final y la declaración única y exclusiva de las obligaciones de Brother con
usted. Sustituye cualquier acuerdo y comunicación que tenga con Brother o sus
representantes.
• Esta Garantía le ofrece cie rtos de recho s y pu ede go zar tam bién de otros derec hos q ue
varían de estado a estado.
• La Garantía limitada (y las obligaciones de Brother con usted) no se podrán cambiar a
menos que usted o Brot her firmen un docum ento conjun to en el q ue (1) nos refiramos a
este Producto y la fecha de su prueba de compra, (2) describamos el cambio de esta
garantía y (3) acordemos realizar dicho cambio.
Importante:
Le recomendamos que conserve todos los materiales del embalaje original, en caso de
envío de este Producto.
Page 49

Información importante
Si tiene alguna pregunta o necesita información acerca de su producto Brother, puede
elegir entre las siguientes opciones de asistencia:
(En EE.UU.)
Servicio de atención al cliente
1-877-BROTHER (1-877-276-8437) (voz)
Servico de atención a cliente
1-901-379-1210 (fax)
World Wide Web
www.brother-usa.com
Consumibles / Accesorios
www.brothermall.com
o 877-552-6255
BROTHER INTERNATIONAL CORP ORATIO N
100 SOMERSET CORPORATE BLVD.
BRIDGEWATER, NEW JERSEY 08807-0911
Centro Nacional de Atención a Clientes
8503-8701 (voz) - Ciudad de México
01-800-759-8000 (voz) - lada sin costo
8503-8766 (fax) - Ciudad de México
01-800-759-9000 (fax) - lada sin costo
World Wide Web
www.brother.com.mx
Consumibles / Accesorios
www.brother.com.mx
o Centro Nacional de Atención a Clientes
BROTHER I NTE RNATIONAL DE ME XI CO, S .A. DE C .V.
Circuito Nemesio Diez Riega No. 8 Mz. 2 Lt. 4
Parque Industrial Cerrillo II, C.P. 52000
Lerma, Estado de México / R.F.C. : BIM-920922-A53
(En México)
Registre a continuación la información de su modelo y número de serie, junto con la
fecha y lugar de co mpra, para t enerla co mo referen cia. C onserve esta i nformaci ón con l a
prueba de compra (factura) por si su máquina necesitara algún tipo de servicio.
Nº de modelo ________________ ___ __ ________________
Nº de serie __________________ ___ __ ________________
Fecha de compra: __________________________________
Establecimiento donde se realizó la compra: _____________
Dirección del establecimiento: ________________________
Importante: Le recomendamos que conserve todo el material de empaque original por
si tuviera que transportar la má qui na.
(Sólo en Estados Unidos)
No pierda su tiempo, ¡regístrese en línea!
No haga fila en una oficina de correos ni se preocupe por correo extraviado. Visite
nuestro sitio Web en
www.registermybrother.com
Su producto quedará registrado inmediatamente en nuestra base de datos y ust ed
podrá continuar ocupándose de sus asuntos.
Además, mientras nos visita, puede comprobar qué concursos o información
interesante hay disponibles.
Page 50

Introducción
Contenido
Introducción••••••••••••••••••••••••••••••••••••••••••••••••••••••••1
Contenido ••••••••••••••••••••••••••••••••••••••••••••••••••••••••••••••••••••••••••••1
Información general ••••••••••••••••••••••••••••••••••••••••••••••••••••••••••••••••2
Precauciones de seguridad•••••••••••••••••••••••••••••••••••••••••••••••••••••••3
Precauciones generales ••••••••••••••••••••••••••••••••••••••••••••••••••••••••••••••••• 5
Procedimientos iniciales •••••••••••••••••••••••••••••••••••••••••7
1 Desembalaje de la QL-1050/1060N••••••••••••••••••••••••••••••••••••••••7
2 Descripción de piezas ••••••••••••••••••••••••••••••••••••••••••••••••••••••••8
Unidad principal de impresión •••••••••••••••••••••••••••••••••••••••••••••••••••••••••• 8
3 Instalación del rollo DK•••••••••••••••••••••••••••••••••••••••••••••••••••••••8
4 Conexión de la alimentación ••••••••••••••••••••••••••••••••••••••••••••••••9
5 Instalación de la bandeja de etiquetas ••••••••••••••••••••••••••••••••••••10
6 Uso del cable de interfaz•••••••••••••••••••••••••••••••••••••••••••••••••••••10
Instalación del software ••••••••••••••••••••••••••••••••••••••••••13
1 Instalación del software para QL-1050••••••••••••••••••••••••••••••••••••13
1. Usuarios de Microsoft® Windows®•••••••••••••••••••••••••••••••••••••••••••••••••• 13
2. Usuarios de Mac OS
2 Instalación del software para QL-1060N••••••••••••••••••••••••••••••••••17
1. Usuarios de Microsoft® Windows®•••••••••••••••••••••••••••••••••••••••••••••••••• 17
2. Usuarios de Mac OS
3 Desinstalación del software y del controlador de la impresora •••••••30
Desinstalació n de P-t o uch Ed it o r••••••••••••••••••••••••••••••••••••••••••••••••••••••• 30
Desinstalación del controlador de la impresora ••••••••••••••••••••••••••••••••••••• 30
®
••••••••••••••••••••••••••••••••••••••••••••••••••••••••••••••••• 15
®
••••••••••••••••••••••••••••••••••••••••••••••••••••••••••••••••• 23
1
Referencia••••••••••••••••••••••••••••••••••••••••••••••••••••••••••32
1 Testigo LED•••••••••••••••••••••••••••••••••••••••••••••••••••••••••••••••••••••32
2 Mantenimiento••••••••••••••••••••••••••••••••••••••••••••••••••••••••••••••••••33
3 Solucionar problemas•••••••••••••••••••••••••••••••••••••••••••••••••••••••••34
4 Especificaciones principales•••••••••••••••••••••••••••••••••••••••••••••••••37
Accesorios (sólo en Estados Unidos) ••••••••••••••••••••••••••••••••••••••••••••••••• 39
Page 51

Introducción
2
Información general
Compilación y aviso de publicación
Esta guía ha sido compilada y editada por Brother Industries Ltd. e incluye las
descripciones y especificaciones más actualizas del producto.
El contenido de esta guía y las especificaciones de este producto está sujeto a
modificación sin previo aviso.
Brother se reserva el derecho de modificar sin previo aviso las especificaciones y materiales
aquí contenidos y no asumirá responsabilidad alguna por daños de cualquier índole
(incluyendo daños derivados) producidos al basarse en el material presentado, incluyendo
entre otros los errores tipográficos y de otra naturaleza contenidos en la publicación.
Los mensajes de pantalla que aparecen en esta guía pueden ser diferentes,
dependiendo de su sistema operativo o impresora.
© 2010 Brother Industries Ltd.
Marcas comerciales
El logotipo de Brother es una marca registrada de Brother Industries, Ltd.
Brother es una marca registrada de Brother Industries, Ltd.
© 2010 Brother Industries, Ltd. Reservados todos los derechos.
QR code es una ma rca reg istrad a de DEN SO WAVE Incorporated. QR Code Gene rating
Program Copyright © 2008 DENSO WAVE INCORPORATED
BarStar Pro Encode Library (PDF417) Copyright © 2007 AINIX Corporation. All rights
reserved.
Los nombres de otros programas o productos utilizad os en este documento son marcas
comerciales o marcas comerciales registradas de sus respectivos titulares.
Todas las empresas cuyo título de sof tware s e menc ione en est a guía ti enen un contrato
de licencia de software específico para sus programas.
El resto de marcas y nombres de produ cto s mencionados en esta Guía del usuario y en
la Guía de instalación del software son marcas registradas de sus respectivos
propietarios.
Símbolos utilizados en esta guía
Los símbolos utilizados en esta guía se indican a continuación:
Este símbolo muestr a la información o las in dicaciones que s e deben seguir. Si no se
tienen en cuenta, pueden producirse daños, lesiones o fallos en el funcionamiento.
Este símbolo muestra la información o las indicaciones que pueden ayudarle a
comprender mejor y utilizar la máquina con mayor eficacia.
Page 52

Precauciones de seguridad
Le recomendamos qu e lea to das es tas instruc cion es ante s de us ar el prod ucto y que las
conserve para futuras consultas. Siga todas las advertencias e instrucciones indicadas
en el producto.
ADVERTENCIA
PRECAUCIÓN
Los símbolos utilizados en esta guía se indican a continuación:
Acción NO permitida NO desmonte el producto.
NO salpique o sumerj a el produ cto en
agua.
Acción obligatoria Desenchufar
Aviso de posible descarga eléctrica
Siga estas indica ciones p ara evit ar que se produ zcan daños, desc argas eléctric as
o incendios.
La máquina
Desenchufe inmedi atamente el cable de
alimentación y no utilice la máquina
durante tormentas eléct ricas. Los ray os
pueden suponer un riesgo remoto de
descarga eléctrica.
No toque ninguna pieza de metal junto
al cabezal de impresión. El cabezal de
impresión alcanza temperaturas
elevadas durante su uso y mantiene
dichas temperaturas inmediatamente
después de su uso. No lo toque
directamente con las manos.
Deseche las bolsas de plástico
correctamente y manténgalas fuera del
alcance de bebés y niños. No juegue
con las bolsas de plástico.
Desenchufe inmedi atamente el cable de
alimentación y no utilice la máquina si
nota un olor extraño, calor,
decoloración, deformación, u otra
anomalía durante el funcionamien to o el
almacenamiento de la máquina.
No desmonte la máquina. Para la
inspección, el ajuste o la reparación de la
máquina, contacte con el establecimiento
de venta donde adquirió la máquina o su
centro local de servicio autorizado.
Le indica qué hacer para impedir el riesgo de lesiones.
Le indica los p rocedimiento s que d ebe segu ir para evitar daña r la máq uina.
NO toque una parte determinada del
producto.
ADVERTENCIA
No deje caer, golp ee o a gite la m áquina.
No sujete ni levante la máquina por la
cubierta del ro llo DK. La cu bierta se pue de
salir y la máquina se puede caer y dañar.
No permita, bajo ni nguna circumstancia,
que la máquina se moje.
No utilice la máquina con objetos
extraños en su interior. Si la máquina
entra en contacto con agua o cualquier
objeto extraño, desenchufe el cable de
la alimentación de la toma eléctrica y
retire el objeto extraño. En caso
necesario, póngase en contacto con el
establecimiento de venta donde
adquirió la máquin a o su centro loc al de
servicio autorizado.
No sujete la máquina con una sola
mano. La máquina se le pue de resbal ar.
No desmonte la má quina ni permi ta que
se moje para evitar posibles descargas
eléctricas o incendio. Si lo hace puede
provocar una descarga eléctrica o un
incendio.
3
Page 53

Introducción
4
ADVERTENCIA
No utilice disolvente para pintura,
bencina, alcohol u otros disolventes
orgánicos para limpiar la máquina. Si lo
hace, puede provocar daños en el
acabado de la máquin a. Uti lice u n paño
suave y seco para limpiar la máquina.
No coloque objetos pesados o que
contengan agua sobre l a máquina. Si la
máquina entra en contacto con objetos
extraños o agua, contacte con el
establecimiento de venta donde
adquirió la máquina o su cent ro local d e
servicio autorizado. Si sigue utilizando la
máquina con agua u otro ob jeto extra ño
en el interior, puede da ñar la máqu ina o
provocar heridas personales .
Siga estas indica ciones p ara evit ar que se produ zcan daños, desc argas eléctric as
o incendios.
Cable de alimentación
Utilice sólo la fuente de alimentación
autorizada (120 V de CA) para la
máquina.
Utilice únicamente el cable de
alimentación que se proporciona con la
máquina.
No toque el enchufe o el cable de
alimentac ión con las manos mojadas.
No sobrecargue la toma eléctrica con
demasiados dispositivos ni conecte el
cable de alimentación en una toma
eléctrica dañada.
No corte, dañe, altere o co loque objetos
pesados sobre el ca ble de alim entación .
Cortador
No toque la cuchilla del cortador. No abra la cubierta superior cuando esté
La toma eléctrica debe estar cerca de la
máquina y debe ser de fácil acceso.
No toque la cuchilla. Puede provocar
lesiones personale s.
No exponga la máquina directamente a
la luz solar o la coloque cerca de
calefactores o dispositivos que emitan
calor, en zonas expuestas a
temperaturas extremadamente altas o
bajas, humedad elevada o zonas
polvorientas. Si lo hac e, puede provocar
fallos en la máquina.
No utilice el cable de alimentación si
está dañado.
Asegúrese de que el cabl e de
alimentación está conectado
correctamente a la toma eléctrica.
Sujete siempre el cable de alimentación
cuando lo enchufe o desenchufe en la
toma eléctrica. Se pueden producir
problemas si tira del cable de
alimentación.
Si no va a utilizar la má quina durante un
largo período de tiempo, desconecte el
cable de alimentación de la toma
eléctrica.
utilizando el cortador.
PRECAUCIÓN
Siga estas indica ciones p ara evit ar que se produ zcan daños, desc argas eléctric as
o incendios.
Instalación y almacenamiento
Coloque la máquina sobre una superficie
plana y estable, como en un escritorio.
No coloque objetos pesados sobre la
máquina.
Page 54

PRECAUCIÓN
Rollo DK (etiqueta DK, cinta DK)
Tenga cuidado de no dejar ca er el rollo DK.
Los rollos DK utilizan papel térmic o y
película térmica. La etiqueta y la
impresión perderán el color con la luz
solar y el calor. No ut ilice rollos DK para
usos exteriores que requieran
durabilidad.
En función de la zona, el material y las
condiciones medioam bien tales, la e tiqueta
puede quedarse pe gada o fija, el color de la
etiqueta puede cam biar o pue de pasar se a
otros objetos.
Antes de colocar la etiqueta, compruebe
las condiciones medioambientales y el
material. Compruebe la etiquet a pegando
una pequeña muestra e n una zona discreta
de la superficie en la que desee pegarla.
Precauciones generales
La máquina
• La máquina es un dispositivo de precisión. No deje caer, golpee o agite la máquina.
• Se puede producir un mal funcionam iento de la máquina si se dej a cerca de un televisor,
una radio, etc. No utilice la máquina cerca de otra que pueda provocar interferencias
electromagnéticas.
• No inserte ningún objeto ni bloquee la ranura de salida de etiquetas o el puerto USB.
• Utilice únicamente el cable de interfaz (cable USB) que se pro porciona con la máquina.
• Si no va a utilizar la máquina duran te un largo perí odo de tiemp o, retire el roll o DK de la
máquina.
• No intente imprimir etiquetas mientras la cubierta del rollo DK esté abierta.
Rollo DK (etiqueta DK y cinta DK)
• Utilice sólo accesorio s y su mi nis t ro s or igi nales de Brother (con las marcas , ). No
utilice accesorios o suministros no autorizados.
• Si la etiqueta se coloca sobre una superficie mojada, sucia o grasienta, es posible que
se despegue con faci lidad. Ant es de colo car l a etiq ueta , lim pie l a sup erfici e en la qu e la
va a colocar.
• El rollo DK utiliza papel y pelícu la térmica que puede pe rder intensidad o despega rse de
las superficies si se expone a la luz ultravioleta, lluvia o viento.
• No exponga los roll os DK a la luz directa d el sol, a al tas temperatura s, humedad e levada
o polvo. Almacénelos en un lugar fresco y oscuro. Utilice los roll os D K inmediatamente
después de abrir el paquete.
• Si raya la superf icie de im presi ón de la e tiq ueta con l as u ñas u ob jetos met álico s o toca
la superficie de impresión con las manos impregnadas en agua, sudor, crema, etc.,
puede cambiar el color de la etiqueta o decolorarse.
• No coloque etiquetas a personas, animales o plantas.
5
Page 55

Introducción
6
• Dado que el extremo del rollo DK está d iseña do para que n o se a dhiera al car rete de la
etiqueta, puede que la ú ltima etiquet a no se c orte co rrectam ente. Si e sto su cede, re tire
las etiquetas restantes, inserte un nuevo rollo DK y vuelva a imprimir la última etiqueta.
Nota: Teniendo esto en cuenta, el número de etiquetas DK incluido en cada rollo DK
puede ser mayor al indicado en el paquete.
• Si una etiqueta se retira después de col ocarla en una superfi cie, pue den que dar restos
de la etiqueta. Retire los restos antes de colocar una etiqueta nueva.
• Algunos rollos DK utiliz an adhesiv o permanente en sus etique tas. Estas et iquetas no s e
pueden despegar fácilmente una vez pegadas.
• Antes de utilizar etiquetas de CD/D VD, asegúrese de seg uir las instru cciones indica das
en las instruccio nes de su reprodu ctor de CD/DV D respecto a la c olocación de e tiquetas
de CD/DVD.
• No utilice etiquetas de CD /D VD en un reproductor de carga de CD/DVD de ranura, po r
ejemplo, un reproductor de CD de coche, en el que el CD se introduce por una ranura
del reproductor.
• No despegue la etiqueta de CD /DVD una vez coloc ada en el CD/DVD, pu ede retirar una
fina capa de la superficie del disco y dañarlo.
• No aplique etiquetas de CD/DVD en discos CD/DVD diseñados para su uso con
impresoras de chorro de tinta . Las etiq ueta s s e des pe gan fáci lm en te de estos discos y
si utiliza discos a los que se les ha despegado la etiqueta puede provocar daños o
perder los datos.
• Para colocar etiquetas en CD/D VD, uti lice el ap licad or inclu ido en los rollos de etiquet a
de CD/DVD. Si no los utiliza, puede dañar el reproductor de CD/DVD.
• Los usuarios son res ponsables de la col ocación de e tiquetas de CD/DVD. Brother no s e
hace responsable de la pérdida o daños provocados por el uso inadecuado de las
etiquetas de CD/DVD.
CD-ROM y software
• No raye ni exponga el CD-ROM a temperaturas altas o bajas.
• No coloque objetos pesados en el CD-ROM o aplique fuerza sobre el CD-ROM.
• El software contenido en el CD-ROM está diseñado para su uso exclusivo con la
máquina. Consulte l a licencia del CD pa ra obtener informaci ón detall ada. Este s oftware
se puede instalar en varios ordenadores para su uso en oficinas, etc.
Page 56

Proced i m ientos in iciale s
1 Desembalaje de la QL-1050/1060N
Antes de usar la impresora, compruebe que el paquete de la impresora contiene todos los
accesorios siguientes. Si falta cualquiera de estos accesorios o si alguno de ellos tiene
algún defecto, comuníquese con su distribuidor local.
QL-1050/1060N
Cable USB Guía del usuario
CD-ROM Guía de etiquetas y cintas DK
7
Cable eléctrico de CA
Rollo DK (rollo inicial)
La QL-1050/1060N incluye dos rollos iniciales:
• Etiquetas DK con tamaños predeterminados de
102 mm X 152 mm
• Cinta continua duradera DK de
62 mm
Bandeja de etiquetas
Page 57

Procedimientos iniciales
8
2 Descripción de piezas
Unidad principal de impresión
Vista frontal Vista posterior
Cubierta de compartimiento de rollo DK
Testigo LED
<QL-1050>
Botón ON/OFF
Botón de corte
Botón de
alimentación
Puerto USB
Puerto USB
Puerto serie
Puerto LAN
3 Instalación del rollo DK
Pulse y mantenga pulsado el botón ON/O FF
1
para apagar la impresora . Tire hacia arriba
de las palancas izquierda y derecha de la
máquina bajo la cubierta superi or y abra la
cubierta.
<QL-1060N>
Puerto serie
Cable de
alimentación
Cable de
alimentación
Coloque el carrete en las guías del
2
compartimiento de rollo DK.
• Asegúrese de que los brazos del carrete se insertan
firmemente en las guías derecha e izquierda.
• Inserte el carrete del rollo DK a lo largo de la guía de
carrete de la impresora.
Page 58

Introduzca el extremo del rollo DK
3
en la ranura hasta que se alinee
con el rodillo.
Si no puede introducir el extremo del
rollo DK en la ranura, insértelo lo más
alejado posible y, a continuación, cierre
la cubierta. Pulse el botón ON/OFF
para encender la impresora y pulse el
botón FEED para ajustar el rodillo.
Cierre la cubierta del compartimiento del rollo
4
DK hasta que encaje en ambos lados.
9
4 Conexión de la alimentación
Conecte el cable de alimentación a
la impresora y enchúfelo a un toma
corriente de 120V AC.
• Compruebe que el toma corriente es
de 120V AC antes de enchufar el cab le
de alimentación.
• Desenchufe el cable de alimentación
del toma corriente una vez que termine
de utilizar la QL-1060N.
• No tire del cable de alimentación
cuando lo desenchufe del toma
corriente. El hilo del cable de
alimentación se puede dañar.
• No conecte la impresora al ordenador
hasta que se le indique en el
procedimiento de instalación del
controlador de impresora. Para
instalar el controlador y software,
consulte la
software".
Î "Guía de instalaci ón del
Page 59

Procedimientos iniciales
10
5 Instalación de la bandeja de etiquetas
La máquina contiene una bandeja de
etiquetas con una capacidad par a hasta
10 hojas de etiquetas individuales.
Instale la bande ja de eti qu etas en la p arte
delantera de la máquina tal y como se
muestra en la ilustración de la derecha.
• Si imprime más de 10 etiquetas de forma
continua con la función de corte
automático, retire la guía de papel para
evitar un atasco de papel.
6 Uso del cable de interfaz
El cable RS-232C (serie) y el ca ble de red (Ethernet) no son accesorios estándar.
Prepare el cable adecuado para su interfaz.
• Cable USB
Utilice el cable de interfaz proporcionado.
• Cable RS-232C (Sólo en Windows
Las asignaciones de patillas de los cables serie (cables RS-232C) que
se pueden utilizar en la máquina se muestran en la tabla siguient e.
Puede adquirir los cables en cual quier tienda de elect rónicos. No u tilice
un cable de interfaz con una longitud superior a 2 metros.
Brother QL-1050/1060N PC
(D-sub hembra, tornillo de fijación y tornillo de 4,40 pulgadas) (D-Sub9P hembra)
®
)
Nombre
de la señal
DCD 1 1 DCD
RXD 2 2 RXD
TXD 3 3 TXD
DTR 4 4 DTR
GND 5 5 GND
DSR 6 6 DSR
RTS 7 7 RTS
CTS 8 8 CTS
RI 9 9 RI
•
No es posible conec tar un ca ble R S-232C y un ca ble USB a la impres ora al m ismo
tiempo.
•
El conector del cable s erial RS-232C de este ordenador no es una Fuente de
alimentación limitada .
Número
de pin
Asignaciones de pin
Número
de pin
de la señal
Nombre
Page 60

• Cable de red (Sólo en QL-1060N)
Utilice un cable de par trenzado recto de Categorí a 5 (o superior) para
redes Fast Ethernet 10BASE-T o 100BASE-TX.
Importante
• Debe utilizarse el cable de interf az (Cable USB) i ncluido p ara asegurar
el cumplimiento de los límites de EMC.
• Debe utilizarse un cable de interfaz apantallado para asegurar el
cumplimiento de los límites de EMC.
• Todo cambio o modificación que se realice sin aprobación expresa de
Brother Industries, Lt d. podría dejar si n efecto la autoriz ación al usuario
para hacer funcionar el equipo.
• Precauciones para la conexión LAN (Sólo en QL-1060N)
Conecte este producto a una conexión LAN que no esté expuesta a
sobretensiones.
11
Page 61

Procedimientos iniciales
12
Page 62

Instalación del software
1 Instalación del s of tware para QL-1050
El procedimiento de instalación varía dependiendo de sistema operativo del ordenador.
El procedimiento de instalación puede estar sujeto a cambios sin previo aviso.
No conecte la impresora al equipo hasta que se le pida que lo haga.
1. Usuarios de Microsoft® Windows
Esta sección explica cómo instalar P-touch Editor 5.0, P-touch Address Book 1.1, el
controlador de impresora y la Guía del usuario de software.
A continuación se muestra un ejemplo para Windows Vista
Inicie el ordenador e inserte el CD-ROM en su unidad de CD-ROM.
1
2
Si no se ejecuta automáticamente, abra los archi vos del CD-R OM y haga dobl e
clic en "Setup.exe".
Haga clic en "Instalación
estándar".
Elementos de la instalación:
1
Instalación estándar
P-touch Editor 5.0,
P-touch Address Book 1.1,
Controlador de la impresora y
Guía del usuario (PDF)
2
Instalación perso nali zad a
P-touch Editor 5.0,
P-touch Address Book 1.1,
el controlador de impresora o la Guía del usuario de software (PDF)
3
Mostrar el Manual del usuario
La Guía del usuario de software (PDF)
4
Descargar Adobe Reader
Se mostrará un enlace a la página de descargas de Adobe
1
2
3
4
®
®
.
®
Reader®.
13
Lea el contrato de licencia y haga clic en [Sí] si está de acuerd o con
3
las condiciones.
Siga las instrucciones que irán apareciendo en pantalla.
4
Page 63

Instalación del software
14
Coloque una marca de verificación en la
5
casilla situada junto a los componentes que
desea instalar y haga clic en [Siguiente].
Siga las instrucciones que irán aparecien do
en pantalla.
Seleccione el modelo deseado y, después, haga
6
clic en [Aceptar]. Siga las instru cciones en
pantalla para instalar el controlador de
impresora.
Cuando se le solicite, conecte
7
la impresora para finalizar la
instalación del controla dor.
•
•
Asegúrese de que todas las aplica ci ones de
Microsoft
Para obtener detalles sobre los componentes,
consulte "Guía del usuario de software (PDF)".
Para la instalación del US B, es
importante que no conecte la impresora
en el equipo hasta que se le so licite.
Antes de cone ctar el cable de interfaz
USB, extraiga la etiqueta de precau ción
del puerto USB de la máquina.
®
Office estén cerradas.
Puerto USB
Puerto serie
Cable de
alimentación
Seleccione un método de registro y haga clic en [Siguiente].
8
• Si selecciona "SÍ, most rar la págin a.", irá a la página de registro de usuario on line
antes de finalizar la instalación. (recomendado)
• Si selecciona "No, no mostrar la página." continuará con la instalación.
Haga clic en [Finalizar].
9
Ha finalizado la instalación del software.
Cuando se le pid a que reinicie el ordenador, selec ci one " Re in ici ar" y ha ga clic
en [Finalizar].
Inicie el software.
10
• Haga clic en [Inicio] - [Todos los programas] - [Brother P-touch] -
[P-touch Editor 5.0] para iniciar P-touch Editor.
• Haga clic en [Inicio] - [Todos los programas] - [Brother P-touch] -
[P-touch Address Book 1.1] para iniciar P-touch Address Book.
Para obtene r detalles sobre el software, co nsulte Î"Guía del usuario de software (PDF)".
Puede encontrar la Guía del usuario de software (PDF) haciendo clic en [Inicio] - [Todos los
programas] - [Brother P-touch] - [Manuals] - [QL-Series] - [Guía del usuario de software].
Page 64

15
2. Usuarios de Mac OS
Esta sección explica cómo inst alar P-touch Editor 5.0, las fuentes, las plantillas de fo rmato
automático, las imágenes prediseñadas y el controlad or de impresora. Después de instalar
el controlador de impresora, se explica cómo configurarlo.
• Hasta que no finalice la instalación del controlador de impresora, no conecte la
máquina al Macintosh®. Asegúrese de no conectar el cable USB hasta que se le
pida que lo haga.
Aquí se explica el e jempl o de M ac OS® X 10.5.7. En los pasos siguientes, aparecerá QLXXX. "XXX" corresponde al nombre de su impresora. Los nombres de impresora de las
siguientes pantallas pueden no coincidir con el nombre de la impresora que ha
adquirido.
Inicie el Macintosh® e inserte el CD-ROM en la unidad de CD-ROM.
1
Haga doble clic en el icono [QL_Series] (CD-ROM).
Haga clic en la carpeta [Mac OS X] y haga doble clic en [QL-XXX
2
Driver.pkg].
Siga las instrucciones que irán apareciendo en pantalla.
Una vez finalizada la instalación y que
3
se muestre la pantalla siguiente, haga
®
clic en [Cerrar].
La instalación del controlador de la impresora
habrá finalizado.
A continuación, instale P-touch Editor 5.0.
Haga doble clic en [P-touch Editor 5.0 Installer.mpkg] en
4
la carpeta [Mac OS X].
Se iniciará el instalador del P-touch Editor 5.0. Siga las instrucciones
que irán apareciendo en pantalla.
Page 65

Instalación del software
16
Una vez finalizada la instalación y que se
5
muestre el mensaje “Haga clic en
Reiniciar para acabar de instalar el
software.”, haga clic en [Reiniciar].
La computadora Macintosh® se reiniciará.
La instalación del software se ha completado.
Después de reiniciar la computadora,
6
conecte la impresora a la
computadora mediante el cable USB
y, a continuación, encienda la
impresora.
(Mac OS® X 10.3.9 - 10.4.x) Haga doble clic en la unidad donde
7
está instalado el Mac OS
[Utilidades]-[Utilidad Configuración Impresoras].
(Mac OS
Preferences] y después en "Impresión y Fax".
Si conecta la impresora a la
computadora Macintosh® mediante un
hub USB, es posible que no se detec te
correctamente. En tal caso, c onecte la
impresora directamente al puerto USB
de la computadora Macintosh
®
X 10.5.x-10.6) Haga clic en [Apple menu]-[System
®
.
®
X y haga clic en [Aplicaciones]-
Puerto USB
Puerto serie
Cable de
alimentación
En Mac OS® X 10.3.9 - 10.4.x
8
Haga clic en [Añadir] y seleccione USB en la parte superior de la pantalla.
Seleccione “QL-XXX” en la lista y vuelva a hacer clic en [Añadir] para añadir la
impresora a la “Lista de impresoras”.
En Mac OS® X 10.5.x - 10.6
Seleccione “Brother QL-XXX” en la list a y haga cl ic en [Añad ir] / para añadir la
impresora a la “Lista de impresoras” / “Impresión y Fax”.
Cuando vuelva a aparecer la pantalla [Lista de impresoras /
9
Impresión y Fax], compruebe que se ha añadido "QL-XXX" y cierre
la pantalla [Lista de impresoras / Impresión y Fax].
Ahora puede utilizar la máquina.
Para obtener más deta lle s a ce rca del so ftw are , co ns ulte la Ayuda de P-touch Editor.
Page 66

2 Instalación del software p ara QL-1060N
El procedimiento de instalación varía dependiendo de sistema operativo del ordenador.
El procedimiento de instalación puede estar sujeto a cambios sin previo aviso.
No conecte la impresora al equipo hasta que se le pida que lo haga.
1. Usuarios de Microsoft® Windows
Esta sección explica cómo instalar P-touch Editor 5.0, P-touch Address Book 1.1, el
controlador de impresora y la Guía del usuario de software.
A continuación se muestra un ejemplo para Windows Vista
Inicie el ordenador e inserte el CD-ROM en su unidad de CD-ROM.
1
2
Si no se ejecuta automáticamente, abra los archi vos del CD-R OM y haga dobl e
clic en "Setup.exe".
Haga clic en "Instalación estándar".
Elementos de la instalación:
1
Instalación estándar
P-touch Editor 5.0,
P-touch Address Book 1.1,
Controlador de la impresora,
Guía del usuario de s oft ware (PDF)
y Guía del usuario en red (PDF)
2
Instalación perso nali zad a
Se pueden instalar por separado
P-touch Editor 5.0, P-touch
Address Book 1.1, el controlador de impresora, la Guía del usuario de
software (PDF) y la Guía del usuario en red (PDF)
3
Instalación de la utilidad
BRAdmin Light
4
Manual del usuario
Guía del usuario de software (PDF), Guía del usuario en red (PDF) y
enlace a la página de descarga de Adobe
1
2
3
4
®
®
.
®
Reader®.
17
Lea el contrato de licencia y haga clic en [Sí] si está de acuerd o con
3
las condiciones.
Siga las instrucciones que irán apareciendo en pantalla.
4
Page 67

Instalación del software
18
Coloque una marca de verificación en la
5
casilla situada junto a los componentes que
desea instalar y haga clic en [Siguiente].
Siga las instrucciones que irán apareciendo en
pantalla.
Asegúrese de que todas las aplicaciones de
Office estén cerradas.
Para obtener detalles sobr e los componentes,
consulte "Guía del usuario (PDF)".
Seleccione el modelo dese ado y, después, haga
6
clic en [Aceptar].
A continuación, seleccione su método de
colección y haga clic en [Siguiente].
Para usuarios de cable de interfaz USB
7-1
Seleccione Impresora local con cable
USB y haga clic en [Siguiente].
7-2
Siga las instrucciones que irán
apareciendo en pantal la. Cuando
aparezca esta pantalla, asegúrese de
encender la alimentación. Conecte el
cable de interfaz USB al ordenador y, a
continuación, conéctelo a la máquina.
A continuación, vaya al paso 8 de la
Page 19.
Page 68

Para usuarios de cable de interfaz de red
7-1
Seleccione Impresora de red punto a
punto de Brother y haga clic en
[Siguiente].
Compruebe que la máquin a es tá c one ct a da a
la red mediante un cable LAN.
7-2
Seleccione Buscar equipos en la red y elegir de la lista de equipos
encontrados (Recomendado). O bien introduzca la dirección IP de
la máquina o su nombre de nodo. Haga clic en [Siguiente].
Para conocer el nombre de nodo y la dirección IP de su impresora, imprima la
página de configuración de la impresora; consulte la Guía del usuario en red
(PDF) para obtener más detalles.
7-3
Seleccione su impresora.
A continuación, vaya al paso 8 de la Page 19.
Para usuarios de impresora de red compartida
19
7-1
Seleccione Impresora compartida d e red
y haga clic en [Siguiente].
Compruebe que la m áqu in a e stá c one ctada a
la red mediante un cable LAN.
7-2
Seleccione la cola de la impresora y haga clic en [Aceptar].
Póngase en contacto con su administrador si no conoce la ubicación o el
nombre de impresora en la red.
Haga clic en [Siguiente].
8
• Si selecciona "SÍ, most rar la págin a.", irá a la página de registro de usuario on line
antes de finalizar la instalación. (recomendado)
• Si selecciona "No, no mostrar la página." continuará con la instalación.
Page 69

Instalación del software
20
Haga clic en [Finalizar].
9
Inicie el software.
10
• Haga clic en [Inicio] - [Todos los programas] - [Brother P-touch] -
• Haga clic en [Inicio] - [Todos los programas] - [Brother P-touch] -
Para obtener detalles sobre el software, consulte Î"Guía del usuario (PDF)".
Puede encontrar la Guía del usuario (PDF) haciendo clic en [Inicio] - [Todos los
programas] - [Brother P-touch] - [Manuals] - [QL-Series-N] - [Guía del usuario de
software].
[P-touch Editor 5.0] para iniciar P-touch Editor.
[P-touch Address Book 1.1] para iniciar P-touch Address Book.
Page 70

Instalación de la utilidad de configuración BRAdmin Light (para Windows)
BRAdmin Light es una utilidad para la configuración inicial de dispositivos Brother
conectados a la red. También puede buscar productos Brother en la red, ver el estado y
realizar configuraciones básicas de red, como una dirección IP.
Para obtener información adicional sobre BRAdmin Light, visite http://solutions.brother.com.
A continuación se muestra un ejemplo para Windows Vista
• Si requiere una administra ción de impresora más avanz ada, utilice la última versió n
de la utilidad Brother BRAdmin Professional, disponible para descargarse en
http://solutions.brother.com
•
Si está utilizando software de cortafuegos (por ejemplo, Firewall de Windows), es
posible que BRAdmin Light no detecte el dispositivo sin configurar. En ese caso,
desactive su software de cortaf uegos e inténtelo c on BRAd min Lig ht de nu evo. Rein icie
su software de cortafuegos después de establecer la información de dirección.
Haga clic en "Instalación de la utili dad".
1
2
Esta pantalla es la misma que ve cuando
introduzca el CD-ROM.
Haga clic en "BRAdmin Light" y siga las
instrucciones que irán apareciendo en
®
.
pantalla.
Si tiene el Firewall de Windows activado en su
PC, aparecerá el mensaje "¿Desea añadir esta
aplicación a la lista de excepci ones?".
Compruebe el entorn o de su PC y seleccione [Sí]
o [No].
21
Configuración de la dirección IP, la máscar a de subred y la puerta
de acceso con BRAdmin Light
BRAdmin Light buscará nuevos dispositivos
1
de forma automática.
Si dispone de un servidor DHCP/BOOTP/RARP en
su red, no tiene que realiz ar la si guient e operac ión,
ya que el servidor de impresión obtendrá de forma
automática su dirección IP.
Page 71

Instalación del software
22
Haga doble clic en el dispositivo sin
2
configuración.
Seleccione STATIC para Método de
3
arranque. Introduzca la Dirección IP,
Máscara Subred y Puerta de acceso y haga
clic en [Aceptar].
La información de dirección se guardará en la impresora.
4
La contraseña predeterminada es "access".
Page 72

23
2. Usuarios de Mac OS
Esta sección explica cómo inst alar P-touch Editor 5.0, las fuentes, las plantillas de fo rmato
automático, las imágenes prediseñadas y el controlad or de impresora. Después de instalar
el controlador de impresora, se explica cómo configurarlo.
• Hasta que no finalice la instalación del controlador de impresora, no conecte la
máquina al Macinto sh®. Si ya se ha conec tado, retire e l cable d e inte rfaz U SB o el
cable de interfaz de red del Macintosh
• Al instalar la máquina, inicie sesión con derechos de administrador.
A continuación se mu es tra u n ej em pl o p ara Mac OS® X 10.5.7. En los pasos siguientes,
aparecerá QL-XXX. "XXX" corresponde al nombre de su impresora. Los nombres de
impresora de las sigui entes p ant all as pue den no c oinci dir con el nom bre de la impresora
que ha adquirido.
Inicie el Macintosh® e inserte el CD-ROM en su unidad de CD-ROM.
1
Haga doble clic en el icono [QL_Series] (CD-ROM).
Haga clic en la carpeta [Mac OS X] y haga doble clic en [QL-XXX
2
Driver.pkg].
Siga las instrucciones que irán apareciendo en pantalla.
Una vez finalizada la instalación y que
3
se muestre la pantalla siguiente, haga
®
®
.
clic en [Cerrar].
La instalación del controlador de impresora se ha
completado.A continuación, instale P-touch
Editor 5.0.
Abra [Brother QL-XXX Driver] en la carpeta [Mac OS X].
4
Haga doble clic en [P-touch Editor 5.0 Installer.mpkg] en
la carpeta del nombre de su sistema operativo.
Se iniciará el instalador del P-touch Editor 5.0. Siga las instrucciones que irán
apareciendo en pantalla.
Page 73

Instalación del software
24
Una vez finalizada la instalación y que
5
se muestre el mensaje “Haga clic en
Reiniciar para acabar de instalar el
software.”, haga clic en [Reiniciar].
La computadora Macintosh® se reiniciará.
La instalación del software se ha completado.
Después de reiniciar el equipo,
6
conecte el cable USB/LAN a la
máquina.
Conecte el cable USB/LAN al puerto USB/LAN del Macintosh®.
7
Pulse el botón ON/OFF ( ) de la máquina para encenderla.
El puerto USB de la máquin a tiene
una etiqueta de precaución,
retírela y conecte el cable USB.
Puerto USB
Si conecta la máquina al Macintosh® con un concentrador USB, es posible que
no se conecte correctamente. En ese momento, conecte la máquina
directamente al puerto USB del Macintosh
®
.
Puerto serie
Puerto LAN
Cable de
alimentación
(Mac OS® X 10.3.9 - 10.4.x) Haga doble clic en la unidad donde
8
está instalado el Mac OS
®
X y haga clic en [Aplicaciones] -
[Utilidades] - [Utilidad Configuración Impresoras].
®
(Mac OS
X 10.5x - 10.6) Haga clic en [Apple menú] - [Preferenc ias
del Sistema] y después en "Impresión y Fax". A co ntinuaci ón, haga
clic en .
Page 74

Para usuarios de cable de interfaz USB
(Mac OS® X 10.3.9) Haga clic en [Añadir] y
9
seleccione USB en la parte superior de la
pantalla.
Seleccione QL-XXX de la lista y vuelva a
hacer clic en [Añadir] para añadir la
impresora a Utilidad de Configuración de
Impresoras.
®
(Mac OS
X 10.4.x - 10.6) Haga clic en
[Añadir]/ . Seleccione QL-XXX en la lista y
haga clic en [Añadir] para añadir la
impresora a la [Utilidad Configuración
Impresoras/Impresión y Fax].
Para Mac OS® X 10.4.x, haga clic en [Añadir] y añada la impresora con la
conexión BRPTUSB. (En ese caso, aparecerá un cuadro de diálogo de error
cuando se produzca un error de impresión.) Seleccione el nombre de la
impresora apropiada .
Ahora siga en el paso 10.
Para usuarios de cable de interfaz de red (configuración simple de red)
9-1
Haga clic en [Añadir].
(Mac OS
®
X 10.3.9) Seleccione lo
que se muestra a la derecha.
®
(Mac OS
X 10.4.x - 10.6) Vaya al
siguiente paso.
25
Page 75

Instalación del software
26
9-2
Seleccione QL-XXX de la lista y vuelva a hacer clic en [Añadir]
para añadir la impresora a Utili dad de Configurac ión de Impre soras.
(Mac OS® X 10.3.9) (Mac OS® X 10.4.x)
®
(Mac OS
X 10.5.x-10.6)
Ahora siga en el paso 10.
Para usuarios de cable de interfaz de red (configuración manual de red)
(Mac OS® X 10.3.9) Haga clic en [Añadir] y
9
seleccione Impresión IP en la parte superior
de la pantalla. Introduzca la dirección IP de la
impresora en el cuadro Dirección impresora.
XXX
Seleccione QL-
de la lista y vuelva a
hacer clic en [Añadir] para añadir la im presora
a Utilidad de Configuración de Impresoras.
(Mac OS® X 10.4.x - 10.6) Haga clic en
[Añadir] y seleccione Impresora IP / IP en la
parte superior de la pantalla. Introduzca la
dirección IP de la impresora en el cuadro
Dirección. Seleccione QL-XXX de la lista y
vuelva a hacer clic en [Añadir] para añadir la
impresora a Utilidad de Configuración de Impresoras.
Al especificar el Nom bre de la co la, utilic e el valor BRN xxxxx xxxxxxx at, d onde
xxxxxxxxxxxx es la dirección Ethernet.
Page 76

Cuando vuelva a aparecer la pantalla [Lista de impresoras / Impresión
10
y Fax], compruebe que se ha añadido "QL-XXX" y cierre la pantalla
[Lista de impresoras / Impresión y Fax].
Ahora puede utilizar la máquina.
Para obtener más deta lle s a ce rca del so ftw are , co ns ulte la Ayuda de P-touch Editor.
27
Page 77

Instalación del software
28
Instalación de la utilidad de configuración BRAdmin Light para Mac
BRAdmin Light es una utilidad para la configuración inicial de dispositivos Brother
conectados a la red. También puede buscar productos Brother en la red, ver el estado y
realizar configuraciones básicas de red, como una dirección IP.
Para obtener información adicional sobre BRAdmin Light, visite http://solutions.brother.com.
Si está utilizando software de cortafuegos, es posible que BRAdmin Light no detecte el
dispositivo sin configurar. E n ese caso, desactive su software de cortafuegos e in téntelo
con BRAdmin Light de nuevo. Reinicie su software de cortafuegos después de establecer
la informació n de dirección.
Haga doble clic en "BRAdmin Light.pkg" en
1
la carpeta [Mac OS X].
Se iniciará BRAdmin Light Installer. Siga las
instrucci ones que irán apareciendo en pantalla.
Una vez que finalice la instalación y
2
aparezca el mensaje "The Software
was successfully inst alled", h aga clic en
[Close].
La instalación de BRAdmin Light habrá finalizado.
®
Page 78

Configuración de la dirección IP, la máscar a de subred y la puerta
de acceso con BRAdmin Light
Haga clic en [Library]-[Printers]-[Brother]-
1
[P-touch Utilities]-[BRAdmin Light.jar].
BRAdmin Light buscará nuevos dispositivos
automáticamente.
Si dispone de un servidor DHCP/BOOTP/RARP en
su red, no tiene que realizar la siguiente operación, ya que el servidor de
impresión obtendrá de forma automática su dirección IP.
Haga doble clic en el dispositivo sin
2
configuración.
La contraseña predeterminada es "access".
Seleccione STATIC para Método de
3
arranque. Introduzca la Dirección IP,
Máscara Subred y Puerta de acceso y
haga clic en [OK].
29
La información de dirección se guardará en la impresora.
4
Page 79

Instalación del software
30
Desinstalación del so ftware
3 Desinstalación del software y del
controlador de la impresora
En esta sección de describe cómo desinstalar el software y el controlador de
la impresora. En los siguientes pa sos, verá XX-XXXX. “XX-XXXX” corresponde
al nombre de su impresora.
Desinstalación de P-touch Editor
Para Windows® XP
1
En [Panel de control], vaya a [Agregar o quitar programas].
Aparecerá el cuadro de diálogo [Agregar o quitar programas].
Para Windows Vista®/Windows® 7
En [Panel de control], vaya a [Programas] y abra [Programas y características].
Aparece la ventana [Desinstalar o cambiar un programa].
Para Windows® XP
2
Seleccione “Brother P-touch Editor 5.0” y haga clic en [Eliminar].
Para Windows Vista®/Windows® 7
Seleccione “Brother P-touch Editor 5.0” y haga clic en [Desinstalar].
Haga clic en [Aceptar].
3
Se inicia el procedimiento de desinstalación. Después de quitar el software del
ordenador, aparecerá el cuadro de diálogo [Mantenimiento completado].
Cierre el cuadro de diálogo [Agregar o quitar programas] (XP)/
4
[Programas y características] (Wi ndows Vista
Se completó la desinstalación de P-touch Editor.
La Guía del usuario d e software (PDF) y la Guía del usuario e n red (PDF) (so lo
TD-4100N) también se pueden desi ns tala r sigu ien do el mi sm o pr oc edi mi ent o.
®
/Windows® 7).
Desinstalación del controlador de la impresora
Apague la impresora.
1
Para Windows® XP
2
Desde [Panel de control], vaya a [Impresoras y otro hardware] y abra la ventana
[Impresoras y faxes].
Para Windows Vista
Desde [Panel de control], vaya a [Hardware y sonido] y abra [Impresoras].
Para Windows® 7
Haga clic en , vaya a [Dispositivos e impresoras].
Para obtener información, consulte la Ayuda de Windows
®
®
.
Page 80

Para Windows® XP
3
Seleccione “Brother XX-XXXX” y haga clic en [Archivo] - [Eliminar].
Para Windows Vista®/Windows® 7
Seleccione “Brother XX-XXXX”, haga clic con el botón secundario en el icono
y luego haga clic en [Eliminar] (Windows Vista
Para Windows® XP
4
Vaya a [Archivo] - [Propiedades del servidor].
Para Windows Vista
En la ventana [Impresoras], haga clic con el botón secundario y vaya
a [Ejecutar como administrador] - [Propiedades del servidor...].
Si aparece el cuadro de diálogo [Confirmación de autorización], haga clic en
[Continuar]. Si aparece el cuadro de diálogo [Control de cuenta de usuario],
ingrese la contraseña y haga clic en [Aceptar].
Para Windows
Seleccione [Faxes] o [Escritor de documentos XPS de Microsoft] en la vent ana
[Dispositivos e impresoras] y , a continua ción, haga clic en [Propiedades del servid or
de impresión], que aparece en la barra de menú.
Para Windows® XP
5
Haga clic en la ficha [Controladores] y seleccione “Brother XX-XXXX”.
A continuación, haga clic en [Quitar].
Para Windows Vista
Haga clic en la ficha [Controladores] y seleccione “Brother XX-XXXX”.
A continuación, haga clic en [Quitar...].
Para Windows
Haga clic en la ficha [Controladores] y, a continuación, haga clic en [Cambiar
configuración de controlado res ].
(Si aparece un mensaje de Control de cuentas de usuario, escriba la contraseña
y haga clic en [Aceptar].)
Seleccione “Brother XX-XXXX” y haga clic en [Quitar...].
®
®
7
®
®
7
®
)/[Quitar dispositivo] (Windows® 7).
31
Para Windows® XP
6
Vaya al paso 7.
Para Windows Vista®/Windows® 7
Seleccione [Quitar el controlador y el paquete de controladores] y haga
clic en [Aceptar].
Cierre la ventana [Propiedades del servidor de impresión].
7
El Controlador de la impresora se ha desinstalado.
Page 81

32
Referencia
Referencia
1 Testigo LED
Testigo Estado
Apagado
No hay alimentación.
Testigo verde encendido
Hay alimentación.
Testigo verde parpadeando
Recibiendo datos del PC.
Testigo naranja encendido
Testigo naranja parpadeando
Testigo rojo encendido
Testigo rojo parpadeando
La tapa del rollo está abierta. Cierre la cubierta del rollo
correctamente.
Enfriándose
(Espere a que se reduzca la temperatura del cabezal de
impresión)
La máquina está arrancando.
Indica uno de los errores siguientes.
• Error del sensor de etiquetas
(Fin del rollo DK o atasco de papel)
• Rollo DK incorrecto instalado
• Error de transmisión
Page 82

2 Mantenimiento
El mantenimiento de la máquina se debe realizar cuando sea necesario. Sin embargo
algunos entornos pueden requerir que realice el mantenimiento con mayor frecuencia
(por ejemplo en entornos con mucho polvo).
Mantenimiento del cabezal de impresión
El rollo DK (tipo de pap el de impresi ón
térmica) que utiliza la máquina está
diseñado para limpiar el cabezal de
impresión de forma automática.
Cuando el rollo DK p ara por el cabezal
de impresión durante la entrada e
impresión de etiquetas, el cabezal de
impresión se limpia. Si el cabezal de
impresión no está completamente
limpio, utilice un bastoncillo de
algodón y limpie el cabezal.
Mantenimiento del rollo
Corte la etiqueta DK y retire el papel
del reverso de la etiqueta. A
continuación, coloque el lado
adhesivo de la etiqueta en el rollo y
elimine la suciedad.
Cabezal de impresión
Rodillo
33
Mantenimiento de la salida de etiquetas
Si la etiqueta provoca atascos en la
máquina debido a la existencia de
pegamento en la salida de etiquetas,
retire el cable de alimentación y
limpie la salida de etiquetas con un
paño mojado con etanol o alcohol
isopropílico.
Salida de etiquetas
Page 83

Referencia
34
Reference
3 Solucionar problemas
Si el problema sucede mie ntras la máqui na está funcionand o, las siguie ntes operacion es
pueden ayudarle a resolver los problemas.
Tipos potenciales de problemas
Problema Solución
• ¿Está suelto el cable?
Compruebe que el cable USB está conectado correctamente.
• ¿Ha instalado el rollo DK correctamente?
Si no lo ha hecho, retire el rollo DK y vuelva a instalarlo.
La impresora QL no imprime o
se recibe un error de impresión.
El botón de alimentación no se
enciende.
La impresora imprime con rayas
o caracteres con poca calidad o
la etiquetas no se alimentan
correctamente.
Aparece un mensaje de error de
transmisión en la pantalla de
ordenador
Hay etiquetas atascadas en el
cortador o no se expulsan
correctamente después de
imprimirse.
La etiqueta no sale
correctamente después de la
impresión.
• ¿Queda aún suficiente cantidad de rollo?
Compruebe que queda una cantidad de rollo suficiente.
• ¿Está abierta la tapa del compartimiento del rollo DK?
Compruebe que la tapa del compartimiento del rollo DK está
cerrada.
• ¿Se ha producido un error de impresión o en la transmisión?
Apague la impresora Brother QL y vuelva a encenderla. Si el
problema persiste, contacte con su distribuidor de Brother.
• ¿Está el cable de alimentación correctamente conectado?
Compruebe que el cable de alimentación está conectado. Si
está bien insertado, intente enchufarlo a otro toma corriente.
• ¿Están sucios los cabezales de impresión y el rollo?
Mientras el cabezal de impresión permanece generalmente
limpio con un uso normal, el polvo o la suciedad del rodillo
pueden obstruir el cabezal de impresión. Si esto ocurre, limpie
el rodillo. Consulte
33.
• ¿Ha seleccionado el puerto correcto?
Compruebe que ha seleccionado el puerto correcto de la lista
“Imprimir en el siguiente puerto” en el cuadro de diálogo de
propiedades de la impresora.
• ¿Está la impresora QL en modo de enfriamiento (el testigo LED
parpadea de color naranja)?
Espere hasta que el testigo LED deje de parpadear y vuelva a
intentar la impresión.
• ¿Hay algún otro usuario imprimiendo en red?
Si intenta imprimir mientras otros usuarios están imprimiendo
grandes cantidades de datos, la impresora no podrá aceptar el
trabajo de impresión hasta que haya terminado de imprimir el
trabajo actual. En este tipo de situaciones, vuelva a ejecutar el
trabajo de impresión una vez se hayan completado el resto de
trabajos.
• ¿Hay suciedad o polvo en el rollo que im pide su correct o
funcionamiento?
Para obtener más información, consulte
rollo" en la página 33.
• Compruebe que la ruta de salida de la etiqueta no esté
bloqueada.
• Compruebe que el rollo DK está correctamente ajustado; retire
el rollo DK y vuelva a instalarlo
• Asegúrese de que la cubierta del rollo DK está bien cerrada.
Î "Mantenimiento del rollo" en la página
Î "Mantenimiento del
Page 84

Problema Solución
La calidad de impresión es
deficiente
El estilo de diseño no se ha
actualizado después de cambiar
el rollo mientras estaba activada
la función del complemento.
El icono de Add-In no aparece
en Microsoft
Error del cortador
®
Word.
• ¿Hay suciedad o pelusas que impiden que el rodillo gire
libremente?
Limpie el rodillo con la hoja de limpieza (disponible por
separado). Para obtener detalles, consulte
Î"Mantenimiento
del rollo" en la página 33
• Cierre P-touch Editor para salir del complemento y vuelva a
activar el complemento.
• ¿Se inicia M icrosof t
• ¿Se ha seleccionado Microsoft
electrónico predeterminado para Microsoft
Debido a limitaciones del programa, el complemento para
Microsoft
®
Word no funciona con la configuración indicada
arriba. Salga de Microsoft
®
Word desde Microsoft® Outlook®?
®
Word como el editor de correo
®
Outlook® y reinicie Microsoft®
®
Outlook®?
Word.
• Si se produce un error del cortador, cierre la tapa del rollo DK
y pulse el botón ON/OFF. El cortador volverá a su posición
normal y la máquina se apagará automáticamente. Con la
máquina apagada, compruebe la unidad del cortador y elimine
el atasco de papel.
• Coloque las etiquetas en posición vertical respecto al cabezal
de impresión como se muestra a continuación.
Ranura de salida
de etiquetas
Cabezal de
impresión
Dirección de
impresión
recomendada
35
El código de barras impreso
no se puede leer.
• Algunos tipos de escáner no pueden leer el código de barras.
Inténtelo con otro escáner.
• Se recomienda imprimir el código de barras con las opciones
de Calidad de impresión ajustadas en “Dar prioridad a la
calidad de impresión”.
Windows
Para cambiar las opciones de la Calidad de impresión, abra
las propiedades de la impresora desde [Panel de control] -
®
XP:
[Impresoras y otro hardware] - [Impresoras y faxes], haga
clic con el botón derecho del ratón en la impresora cuya
configuración desea cambiar y, a continuación, seleccione
[Propiedades]. En la ficha [General], haga clic en [Preferencias
de impresión...].
Windows Vista
Para cambiar las opciones de la Calidad de impresión, abra
las propiedades de la impresora desde [Panel de control] -
®
:
[Hardware y sonido] - [Impresoras], haga clic con el botón
derecho del ratón en la impresora cuya configuración desea
cambiar y, a continuación, seleccione [Propiedades]. En la ficha
[General], haga clic en [Preferencias de impresión...].
Windows
®
7:
Para cambiar las opciones de la Calidad de impresión, abra
las propiedades de la impresora desde - [Dispositivos
e impresoras], haga clic con el botón derecho del ratón en
la impresora cuya configuración desea cambiar y seleccione
[Propiedades de impresión]. En la ficha [General], haga clic
en [Preferencias...].
Page 85

Referencia
36
Problema Solución
Quiero restablecer la impresora/
eliminar los datos transferidos
desde el PC. (Sólo en QL1060N)
Quiero cancelar el trabajo de
impresión actual.
(Sólo en QL-1060N)
Cuando imprimo por medio del
cable USB, la impresora realiza
pausas repetidas y sigue
imprimiendo.
(Sólo en QL-1060N)
• Para restablecer la máquina, pulse y mantenga pulsado el
botón ON/OFF para apagar la máquina. Luego mantenga
pulsado el botón ON/OFF durante dos segundos. Mientras
mantiene pulsado el botón ON/OFF, pulse el botón de corte
seis veces. De este modo se restablecerá la máquina. Todos
los datos transferidos del PC se eliminarán y la máquina
restablecerá sus valores predefinidos.
• Compruebe que la impresora está encendida y pulse el botón
ON/OFF.
• ¿Está la impresora ajustada para la impresión secuencial?
Si es así, ajuste el modo de impresión para que utilice la
memoria intermedia (abra las propiedades de la impresora
desde [Panel de control]-[Impresoras y faxes] y haga clic en el
botón [Configuración de impresión] en la ficha [General].
Seleccione la opción "Después de haber recibido todos los
datos").
Una solución alternativa es desconectar el cable LAN hasta que
•
haya finalizado la impresión a través de USB.
Page 86

4 Especificaciones principales
Especificaciones del producto
Elementos Especificaciones
Visor Testigo LED (verde, rojo, ámbar)
Método de
impresión
Velocidad de
impresión
Cabezal de impresión
Anchura máxima de
Impresión
impresión
Longitud mínima de
impresión
Cortador Cortador automático duradero
Botón
Interfaz USB, RS-232C*1, LAN (10/100BASE-TX Ethernet cableada)*
Fuente de alimentación 120V AC 60 Hz 1.8 A
Tamaño 6,7" (170 mm) × 8,7" (222 mm) × 5,8" (148 mm)
Peso
*1 Sólo en Windows
®
*2 Sólo en QL-1060N
Entorno de funcionamiento
Impresión térmica directa por cabezal térmico
Máx. 4,3 inch (110 mm)/seg, Máx. 69 etiquetas/min. (etiquetas
estándar de direcciones) (cuando se conecta un cable USB)
300 ppp/1296 puntos
3,9 inch (98,6 mm)
1 inch (25,4 mm)
Botón ON/OFF ( ), botón FEED, botón CUT
QL-1050: Aprox. 3.7 lb (1.69 kg) (sin rollo DK)
QL-1060N: Aprox. 3.8 lb (1.73 kg) (sin rollo DK)
37
2
OS
Interfaz
Disco
Duro
Memoria
Monitor
Items Specifications
Windows® XP/Windows Vista®/Windows® 7
®
Windows
Macintosh
Windows
Macintosh
Windows
Macintosh
Windows
Macintosh
Windows
Macintosh
*1
Windows Server
(dispositivo preinstalado)
®
Mac OS® X 10.3.9 - 10.6
RS-232C*3, puerto USB (Espec. USB protocolo 1.1 ó 2.0),
®
LAN (10/100BASE-TX Ethernet cableada)
puerto USB (Espec. USB protocolo 1.1 ó 2.0),
®
LAN (10/100BASE-TX Ethernet cableada)
®
Espacio de disco superior a 70 MB
®
Espacio de disco superior a 100 MB
Windows® XP: Más de 128 MB
Windows Server
®
Windows Vista
Windows
Mac OS® X 10.3.9: Más de 128 MB
®
Mac OS
®
®
®
®
Mac OS
®
Mac OS
Tarjeta gráfica SVGA, de color de alta densidad o superior
Más de 256 colores
®
2003*4/2008*4/2008R2
*2
*2
®
2003*4: Más de 256 MB
®
/Windows Server® 2008*4/2008 R2*4: Más de 512 MB
®
7: Más de 1 GB (32 bits) o 2GB (64 bits)
X 10.4.x: Más de 256 MB
X 10.5.x: Más de 512 MB
X 10.6: Más de 1 GB
*4
Page 87

Referencia
38
Items Specifications
Otros Unidad CD-ROM
Temperat u ra de fun c io na m i en t o
Humedad de funcionamiento
*1 El ordenador debe cumplir las recomendaciones de Microsoft® para el SO instalado
*2 Espacio disponible necesario al instalar el software con todas las opciones.
*3 La interfaz RS-232C es necesaria para imprimir con comandos ESC/P.
*4 Sólo en QL-1060N
10 °C a 35 °C
20 % a 80 % (sin condensación)
Page 88

Accesorios (sólo en Estados Unidos)
Brother recomienda el uso de accesorio s originales de B rothe r con la impre sora B ro ther Q L-10 50 /
1060N.
El uso de otros productos puede afectar a la calidad de impresión o puede causar daños a la
Brother QL-1050/1060N.
Están disponibles los siguientes accesorios y suministros para la impresora Brother
QL-1050/1060N y puede pedirlos directamente a Brother si su distribuidor no dispone de
ellos. Disponibilidad de accesorios tema variar sin noticia.
Rodillos D K
Etiquetas DK con tamaños predeterminados
Nº de stock
DK-1201
DK-1202 Etiquetas para transporte, 2-3/7" × 4" (62 mm × 100 mm), 300 etiquetas
DK-1203 Etiquetas para carpetas de archivos, 2/3" × 3-7/16" (17 mm × 87 mm), 300 etiquetas
DK-1204
DK-1207 Etiquetas de película para discos CD/DVD, 2-1/3" (58 mm), 100 etiquetas
DK-1208
DK-1209
DK-1218 Etiquetas de papel redondas 1" x 1" (24 mm), 1000 etiquetas
DK-1219 Etiquetas de papel redondas 1/2" x 1/2" (12 mm), 1200 etiquetas
DK-1221
DK-1240 Etiquetas de códigos de barras 4" x 2" (102 mm x 51 mm), 600 etiquetas
DK-1241 Etiquetas de envío grandes 4" x 6" (102 mm x 152 mm), 200 etiquetas
Etiquetas para direcciones estándar de 1-1/7" × 3-1/2" (29 mm × 90 mm),
400 etiquetas
Etiquetas de papel para diversos usos/direcc ión de devolución,
2/3" × 2-1/8" (17 mm × 54 mm), 400 etiquetas
Etiquetas para direcciones grandes de 1-1/2" × 3-1/2" (38 mm × 90 mm),
400 etiquetas
Etiquetas pequeñas para direcciones, 2-3/7" × 1-1/7" (62 mm × 29 mm),
800 etiquetas
Etiquetas de papel cuadradas 10/11" x 10/11" (23 mm × 23 mm),
1000 etiquetas
Descripción
39
Cinta continua DK
Nº de stock
DK-2113
DK-2205 Cinta de papel continua, 2-3/7" (62mm), 100 ft (30.48 M)
DK-2210 Cinta de papel continua, 1-1/7" (29mm), 100 ft (30.48 M)
DK-2211
DK-2212
DK-2214
DK-2243
DK-2606
DK-4205* Cinta de papel continua y extraíble, color blanco, 2-3/7" (62mm), 100ft (30.48M)
DK-4605* Cinta de papel continua y extraíble, color amarillo, 2-3/7" (62mm), 100ft (30.48M)
* Las etiquetas adhesivas reutilizables pueden retirarse fácilmente de varias superficies planas y suaves.
Si se retiran otras etiquetas una vez fijadas pueden dañar la superficie y/o la etiqueta en sí.
Cinta de película continua transparente, 2-3/7" (62mm), 50 ft (15.24 M)
Cinta de película continua, color blanco, 2-3/7" (62mm), 50 ft (15.24 M)
Cinta de película continua, color blanco, 2-3/7" (62mm), 50 ft (15.24 M)
Cinta de papel continua, 1/2" (12mm), 100 ft (30.48 M)
Cinta continua de papel blanca, 4" (102 mm), 100 ft (30.48 M)
Cinta de película continua, color amarillo, 2-3/7" (62mm), 50 ft (15.24 M)
Descripción
Page 89

Printed in China
LB8712001
 Loading...