

Page 1

ENG
Brother Printer Management Tool Quick Start Guide
Version 03
© 2020 Brother Industries, Ltd. All rights reserved.
Page 2

Contents
1. Introduction .................................................................................................. 1
2. Getting Started ............................................................................................. 1
3. Printer Configuration .................................................................................... 2
4. File Manager .............................................................................................. 26
5. Comm and Tool ........................................................................................... 28
6. RTC (Real Time Clock) Setup .................................................................... 29
7. Printer Function .......................................................................................... 30
8. Bitmap Font Manager ................................................................................. 32
9. Users Configuration .................................................................................... 33
10. Alert Configuration .................................................................................. 34
11. Group Configuration ............................................................................... 35
12. Setup Configuration ................................................................................ 36
13. Manual Name Configuration ................................................................... 37
14. Firmware Update .................................................................................... 38
Page 3
1. Introduction
The Brother Printer Management Tool allows you to:
- Check a printer’s status and settings
- Change printer settings
- Send additional commands to a printer
- Download graphics and fonts
- Create a printer bitmap font
- Download and update firmware
2. Getting Started
The BPM does not support the Bluetooth connection. We recommend connecting your
printer to the computer using either the USB or Wi-Fi connection.
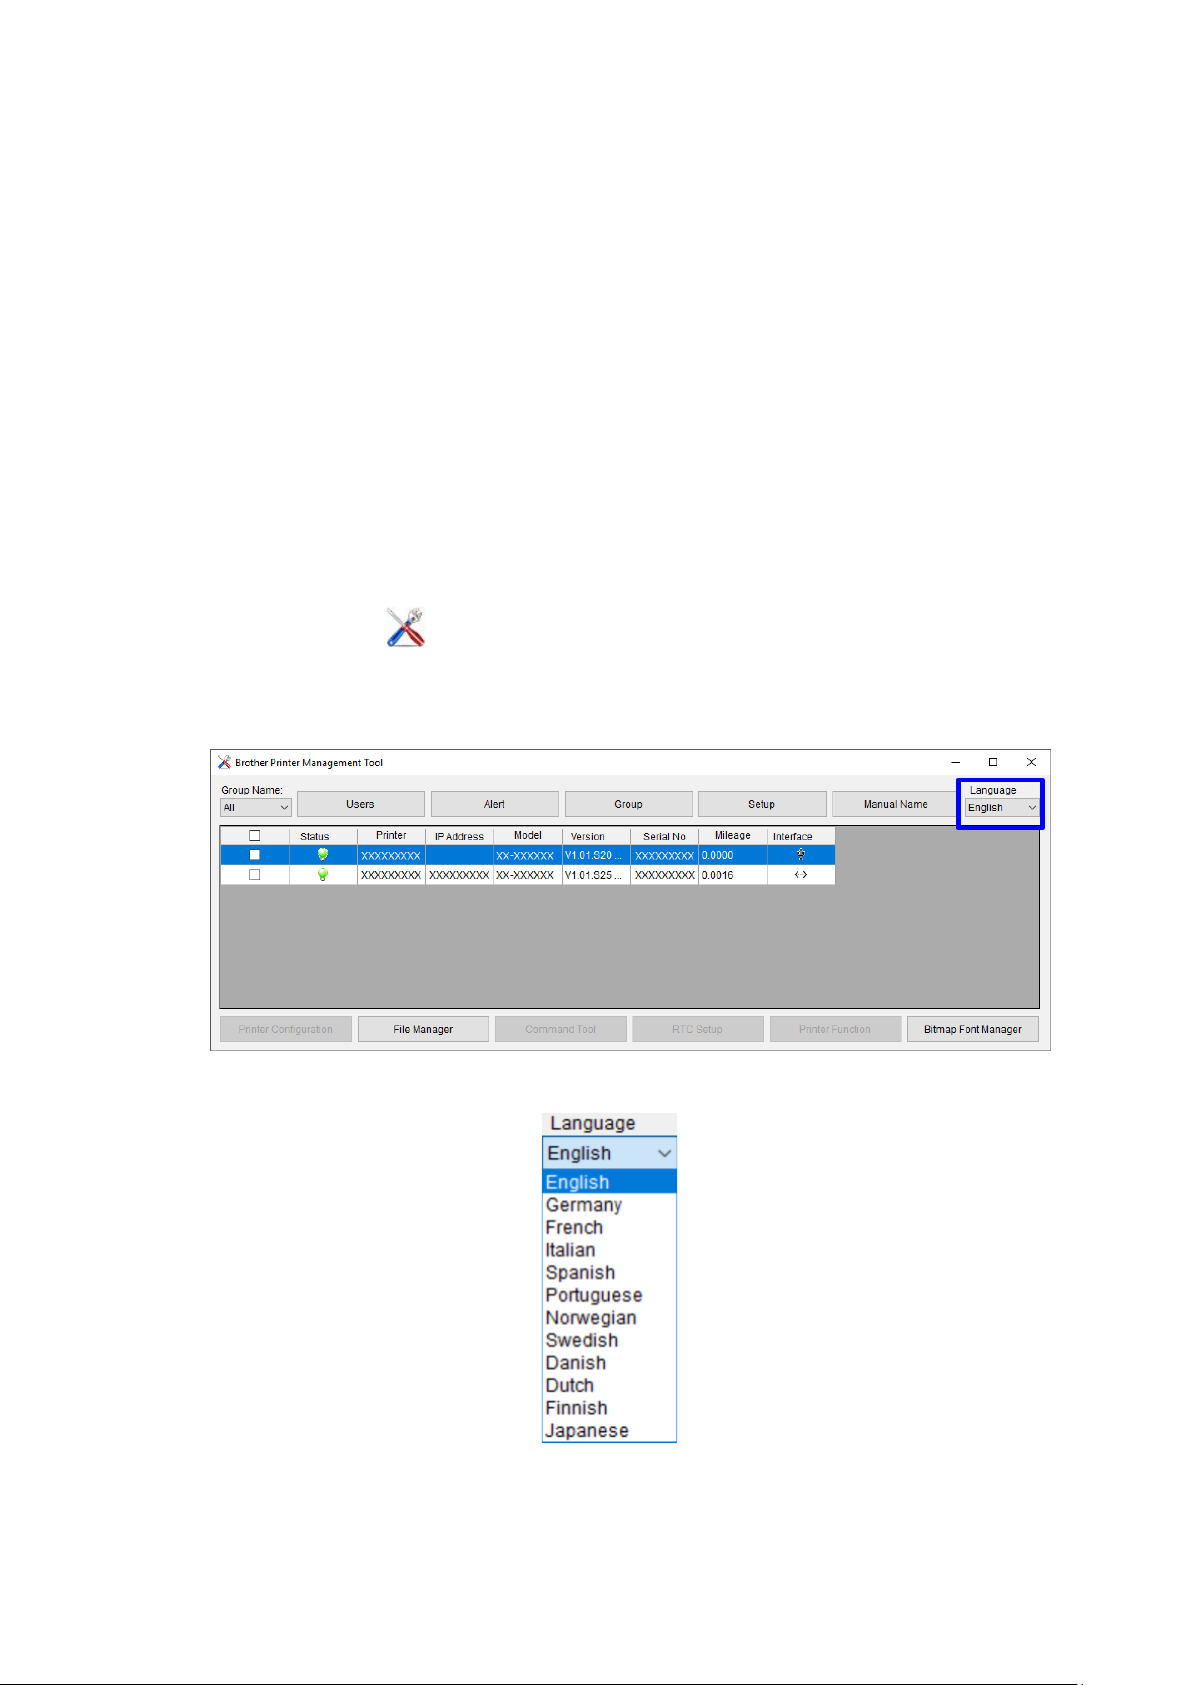
1. Double-click the (Brother Printer Management Tool.exe) icon to run the tool.
2. The Settings Page lists both USB-connected pr i nter s an d netw or k-connected printers
(belonging to the same subnet as your computer).
Select your language from the Language drop-down list, if necessary.
1
Page 4
3. Printer Configuration
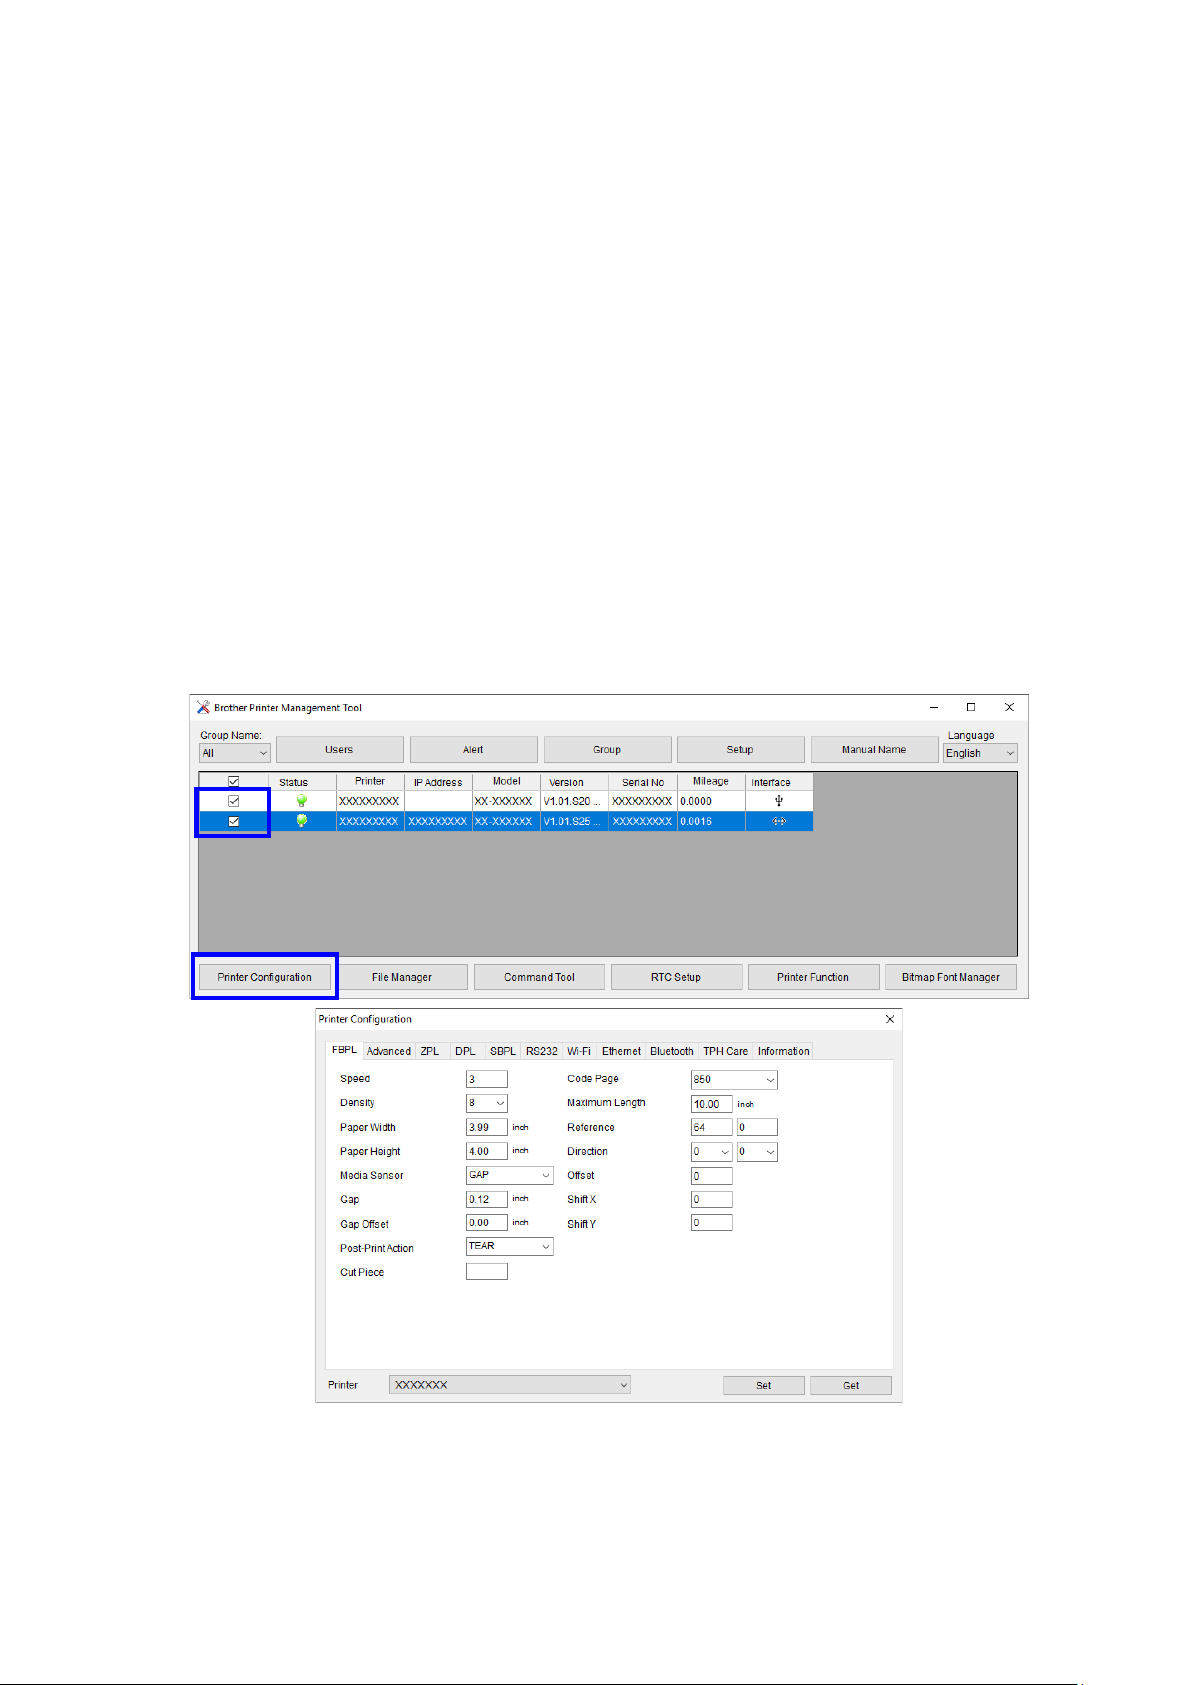
The Printer Configuration page is used to modify (Set) and view (Get) printer settings.
This page includes the following tabs:
- FBPL
- Advanced
- ZPL
- DPL
- SBPL
- Wi-Fi
- Ethernet
- Bluetooth
- TPH Care
- Information
- RS 232
These correspond to the printer settings most commonly used in the
FBPL/EPL2/ZPL/D PL/ SB PL printer languages.
1. Select the printer you want to modify.
2. Click the Printer Configuration button to modify the printer settings.
3. Select the printer setting tab you want.
2
Page 5
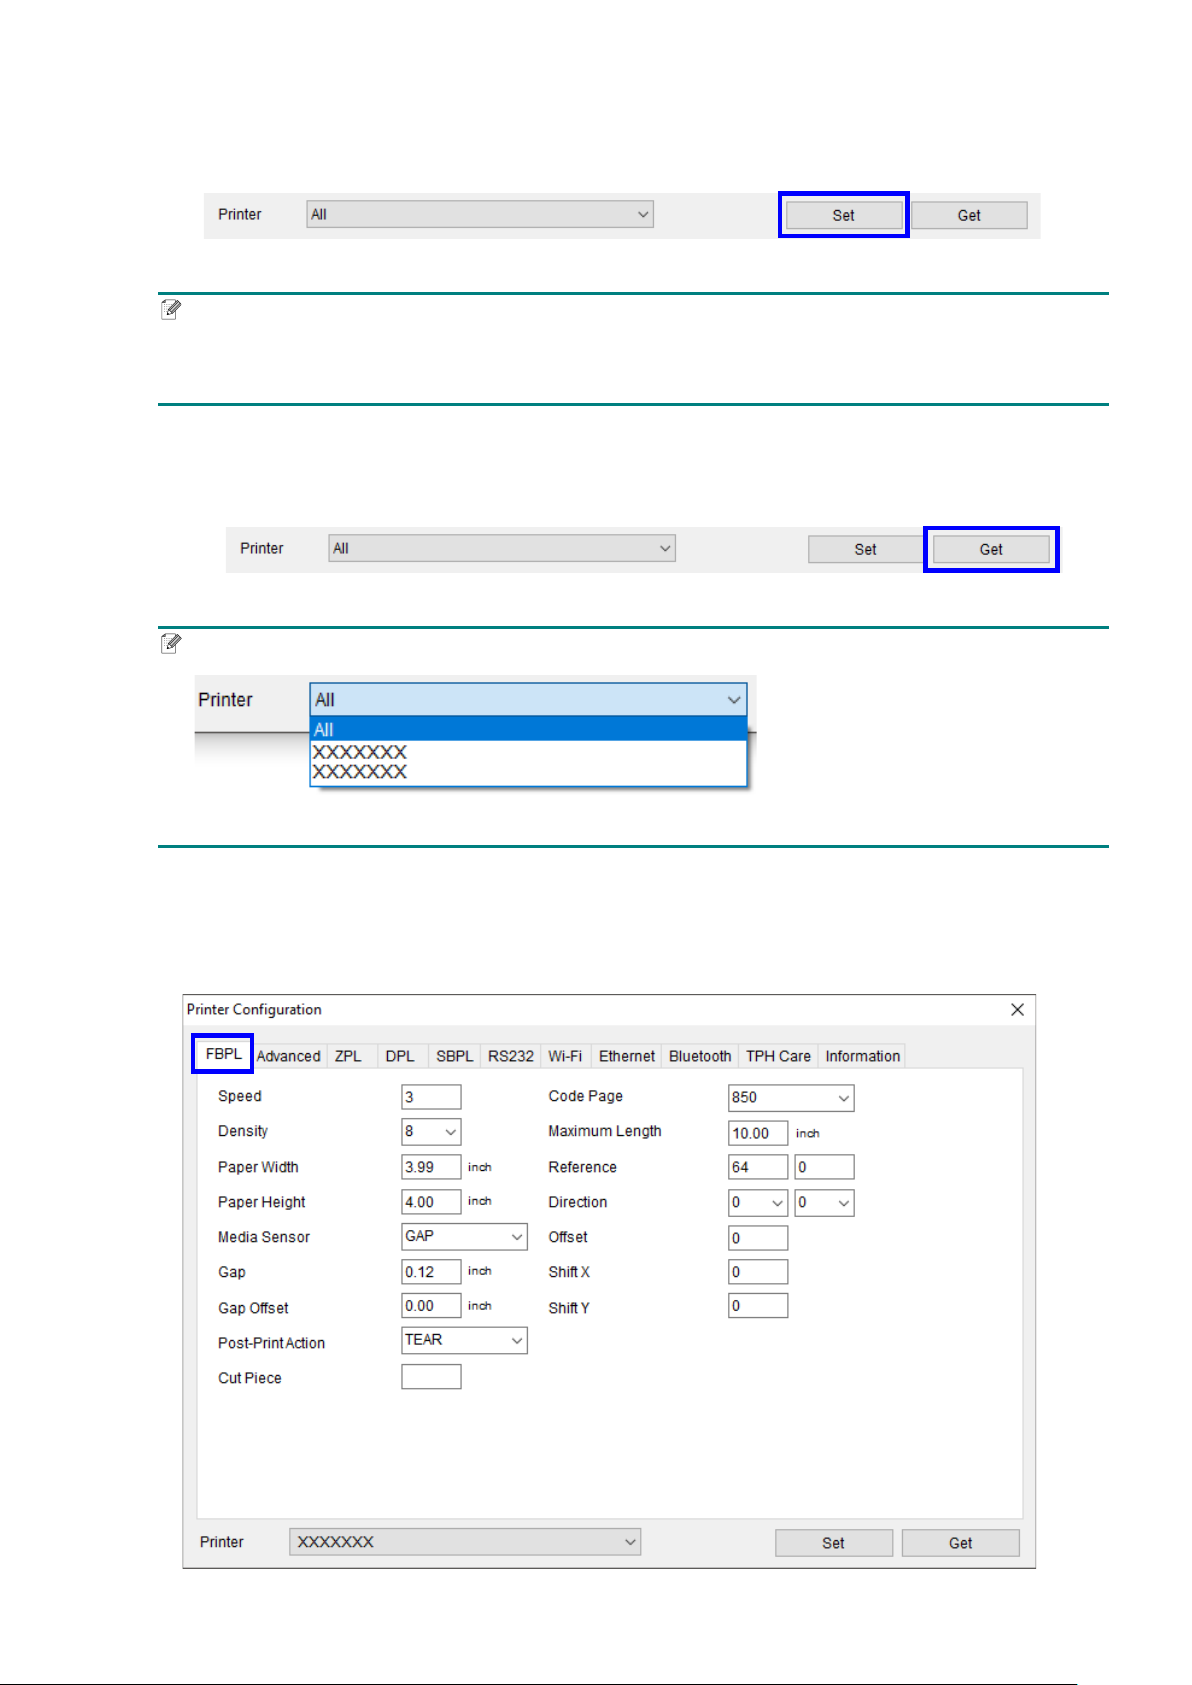
4. Modify the printer settings by selecting or entering new values, and then click the Set
button to apply the new settings.
Note
- Any modified values will be highlighted in yellow.
- If you select more than one printer, only the values shared by the selected printers will be shown.
5. After the printer settings have been modified, click the Get button to view the new
printer settings.
Note
Use the Printer drop-down list to view individual printer groups and their settings.
FBPL & Advanced
FBPL printer language settings
3
Page 6
Function Description
Speed Set the print speed. For more information about the available print speed settings,
see the SPEED co mma nd i n FBPL Command Reference.
Density Set the print density from 0 to 15.
Paper Width Set the media width.
Paper Height Set the media height.
Media Sensor Set the media sensor type.
Gap Set the gap distance between two labels.
Gap Offset Set the offset distance of the gap.
Post-Print Action Set the post-print action.
Cut Piece Set the number of printing labels between each automated cut.
Code Page Set the international character set code page. For more information, see the
CODEPAGE command in FBPL Command Reference.
Maximum Length Set the maximum length for the sensor detection. If the label length is less than the
default length (10" or 254mm, for example a wristband), set a value larger than the
label length so that the sensor can detect the label correctly..
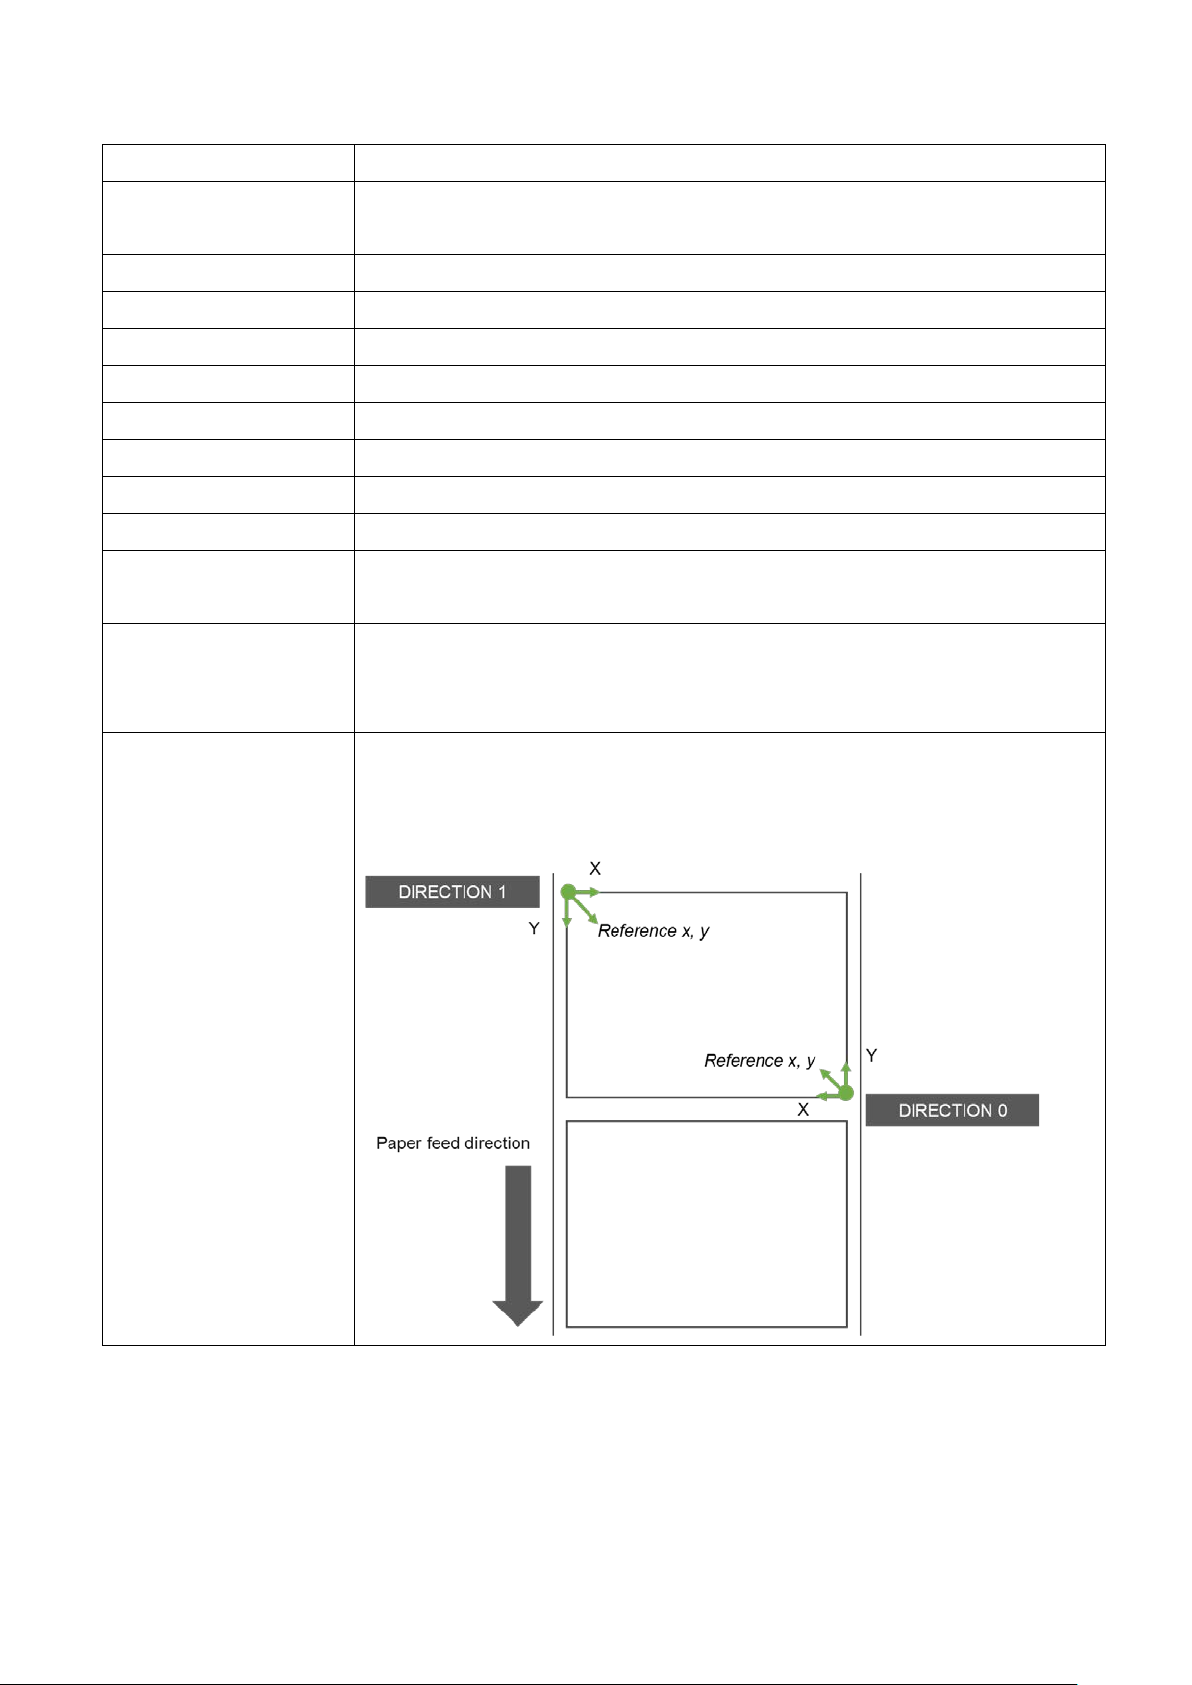
Reference Set the origin of the printer coordinate system vertically and horizontally: Left: X
(Horizontal) coordinate, Right: Y (Vertical) coordinate. Settings range from 0 dots to
999 dots. The reference point varies depending on the print direct ion.
4
Page 7
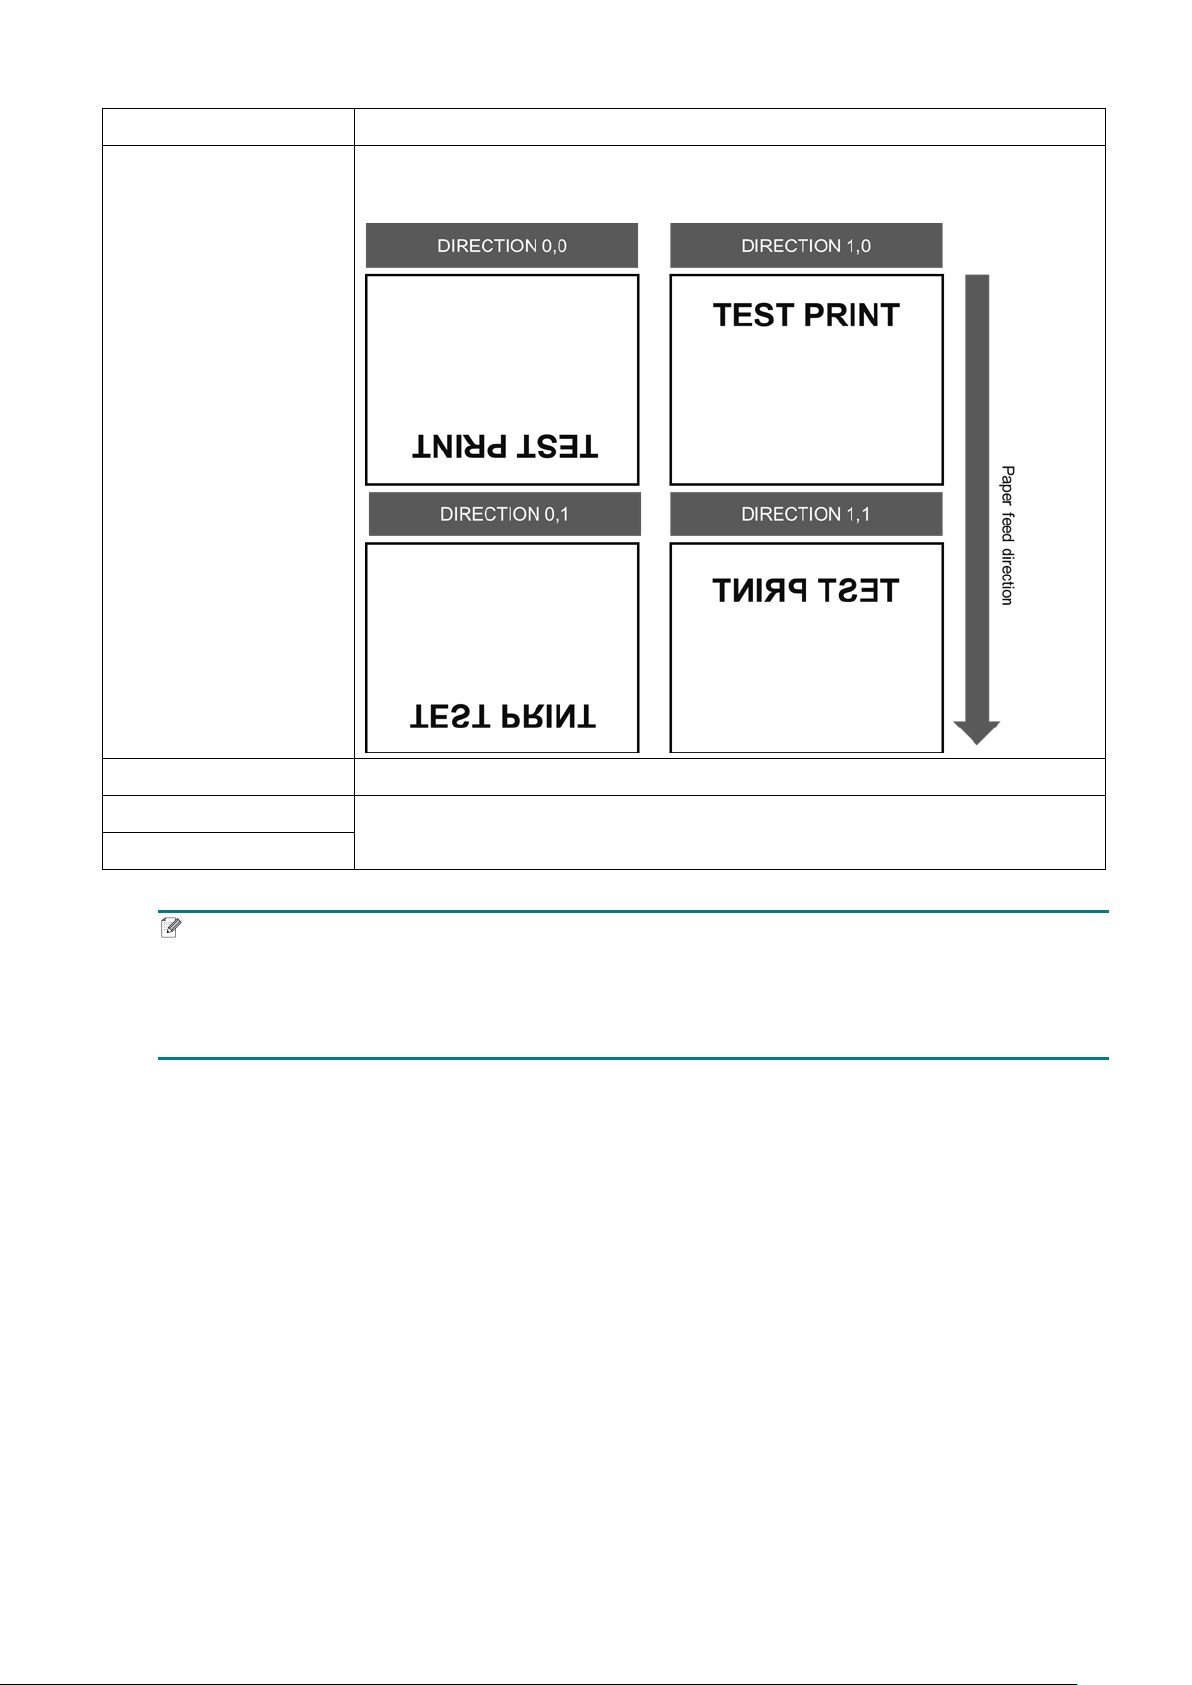
Function Description
Direction Specify the print direction. For more information, see the DIRECTION command in
FBPL Command Reference.
Offset Fine-tune the media stop location. Settings range from -999 dots to 999 dots.
Shift X
Shift Y
Fine-tune the print position. Settings range from -999 dots to 999 dots.
Note
To change the unit of measurement to millimeters or inches, go to Control Panel > Clock and Region >
Region > Formats > Additional settings... > Measurement System. Select U.S. for “inch” and Metric for
“mm”.
5
Page 8
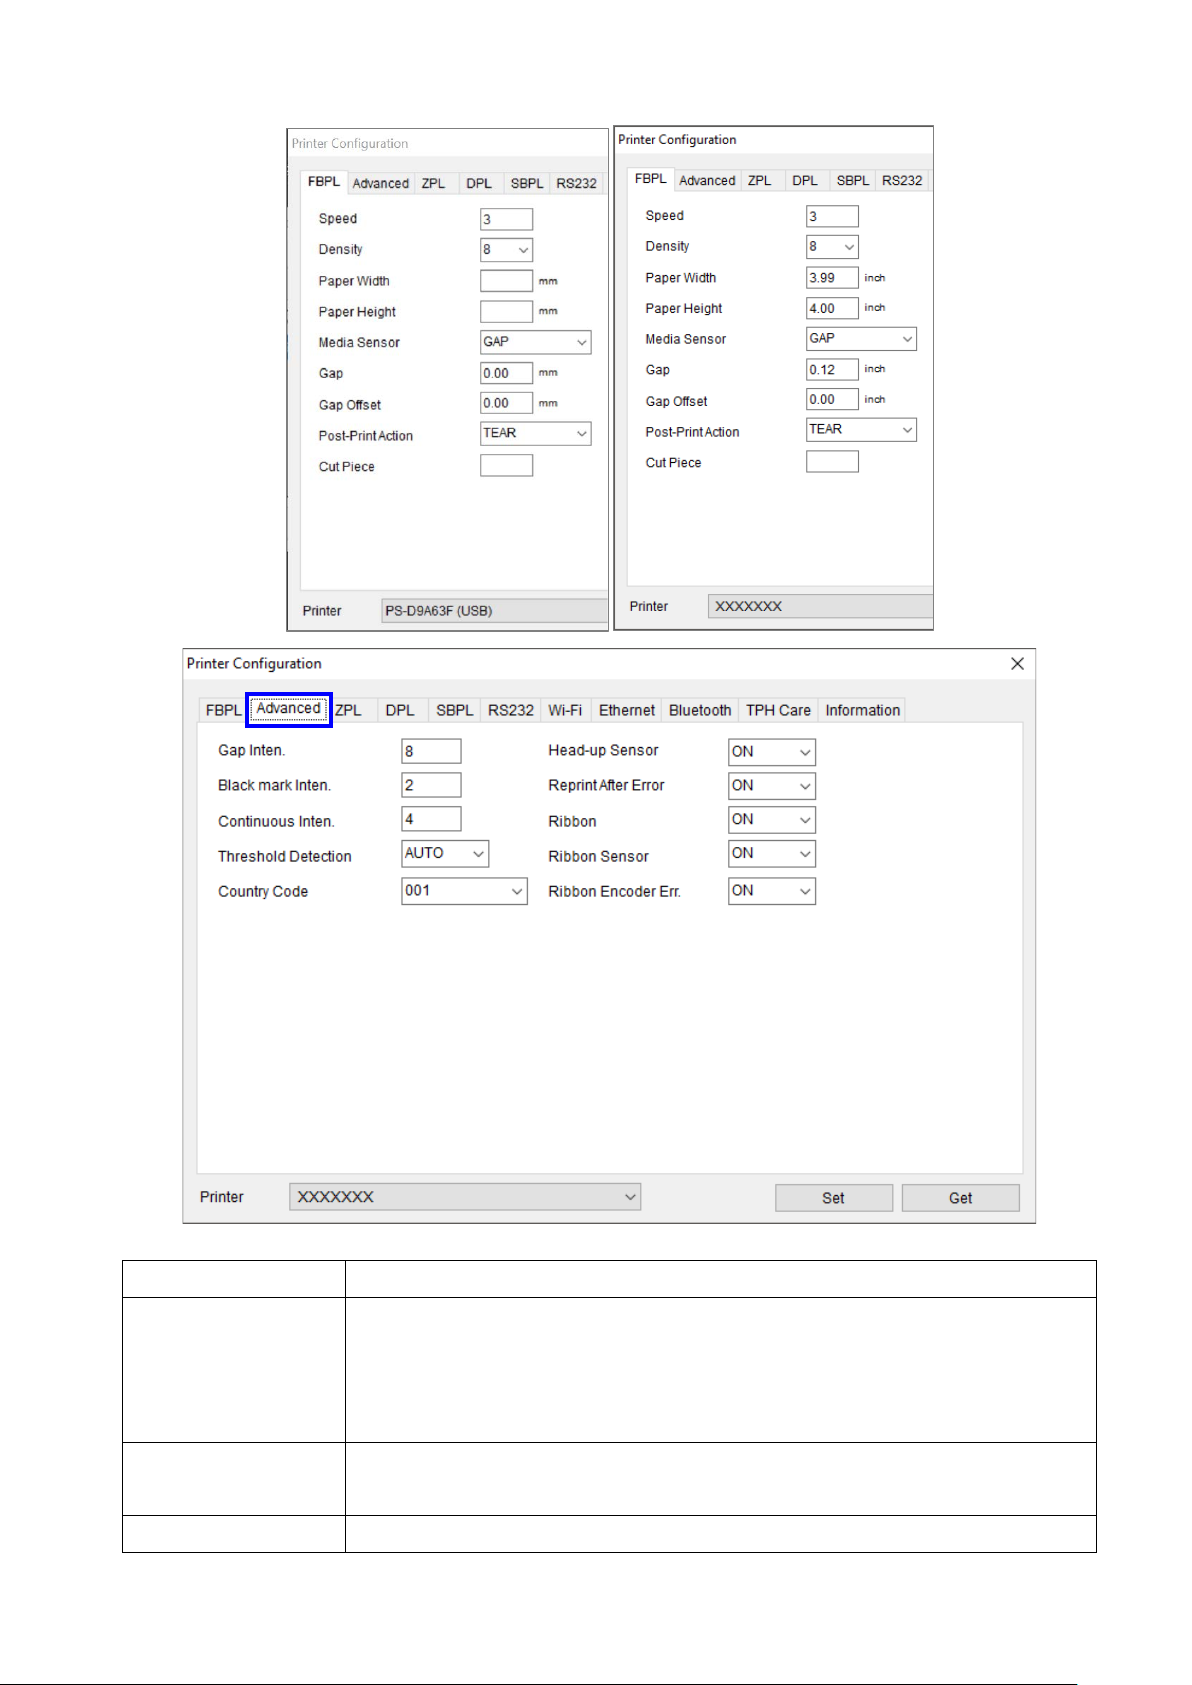
Function Description
Gap Inten. Adjust the sensor detection sensitivity. Use this setting when auto calibration does
not work because the thickness of the backing paper and that of the label with
backing paper are not of within the sensor's detection range, or there are
pre-printed marks or patterns on the label.
Black mark Inten. Adjust the sensor detection sensitivity if the printer cannot detect the black mark
correctly.
Continuous Inten. Adjust the sensor detection sensitivity if the paper is either too thin or too thick.
6
Page 9

FIXED
Function Description
Threshold Detection
Country Code Set the country code.
Head-up Sensor Enable or disable the print head-up sensor.
Reprint After Error Enable or disable the print restart after an error.
Ribbon Enable or disable both the ribbon end sensor and the ribbon encoder sensor.
Ribbon Sensor Enable or disable the ribbon end sensor.
Ribbon Encoder Err. Enable or disable the ribbon encoder sensor.
Set the sensor sensitivity to AUTO or FIXED.
AUTO: Fine-tune the paper positioning threshold automatically when feeding paper.
: Fix the paper positioning threshold.
Note
For more information, see the FBPL Command Reference Manual at your model’s Manuals page at
support.brother.com
.
7
Page 10

ZPL
ZPL printer language settings
Function Description
Darkness Set the print darkness.
Print Speed Set the print speed.
Tear Off Adjust the tear off position.
Print Mode Set the post-print action.
Print Width Set the print width.
Control Prefix Set the control character.
Format Prefix Set the format character.
Delimiter Char Set the delimiter character.
Set the action of the media when turning on the print er or closin g the print hea d.
Feed: Advance one label.
Media Power Up /
Calibration: Calibrate the sensor levels, determine the length, and feed a label.
Head Close
Length: Determine the length and feed a label.
No Motion: The printer will not adjust the media.
Label Top Adjust the print position on the label vertically.
Left Position Adjust the print position on the label horizontall y.
8
Page 11
Note
The items in the ZPL tab work only with the ZPL printer language.
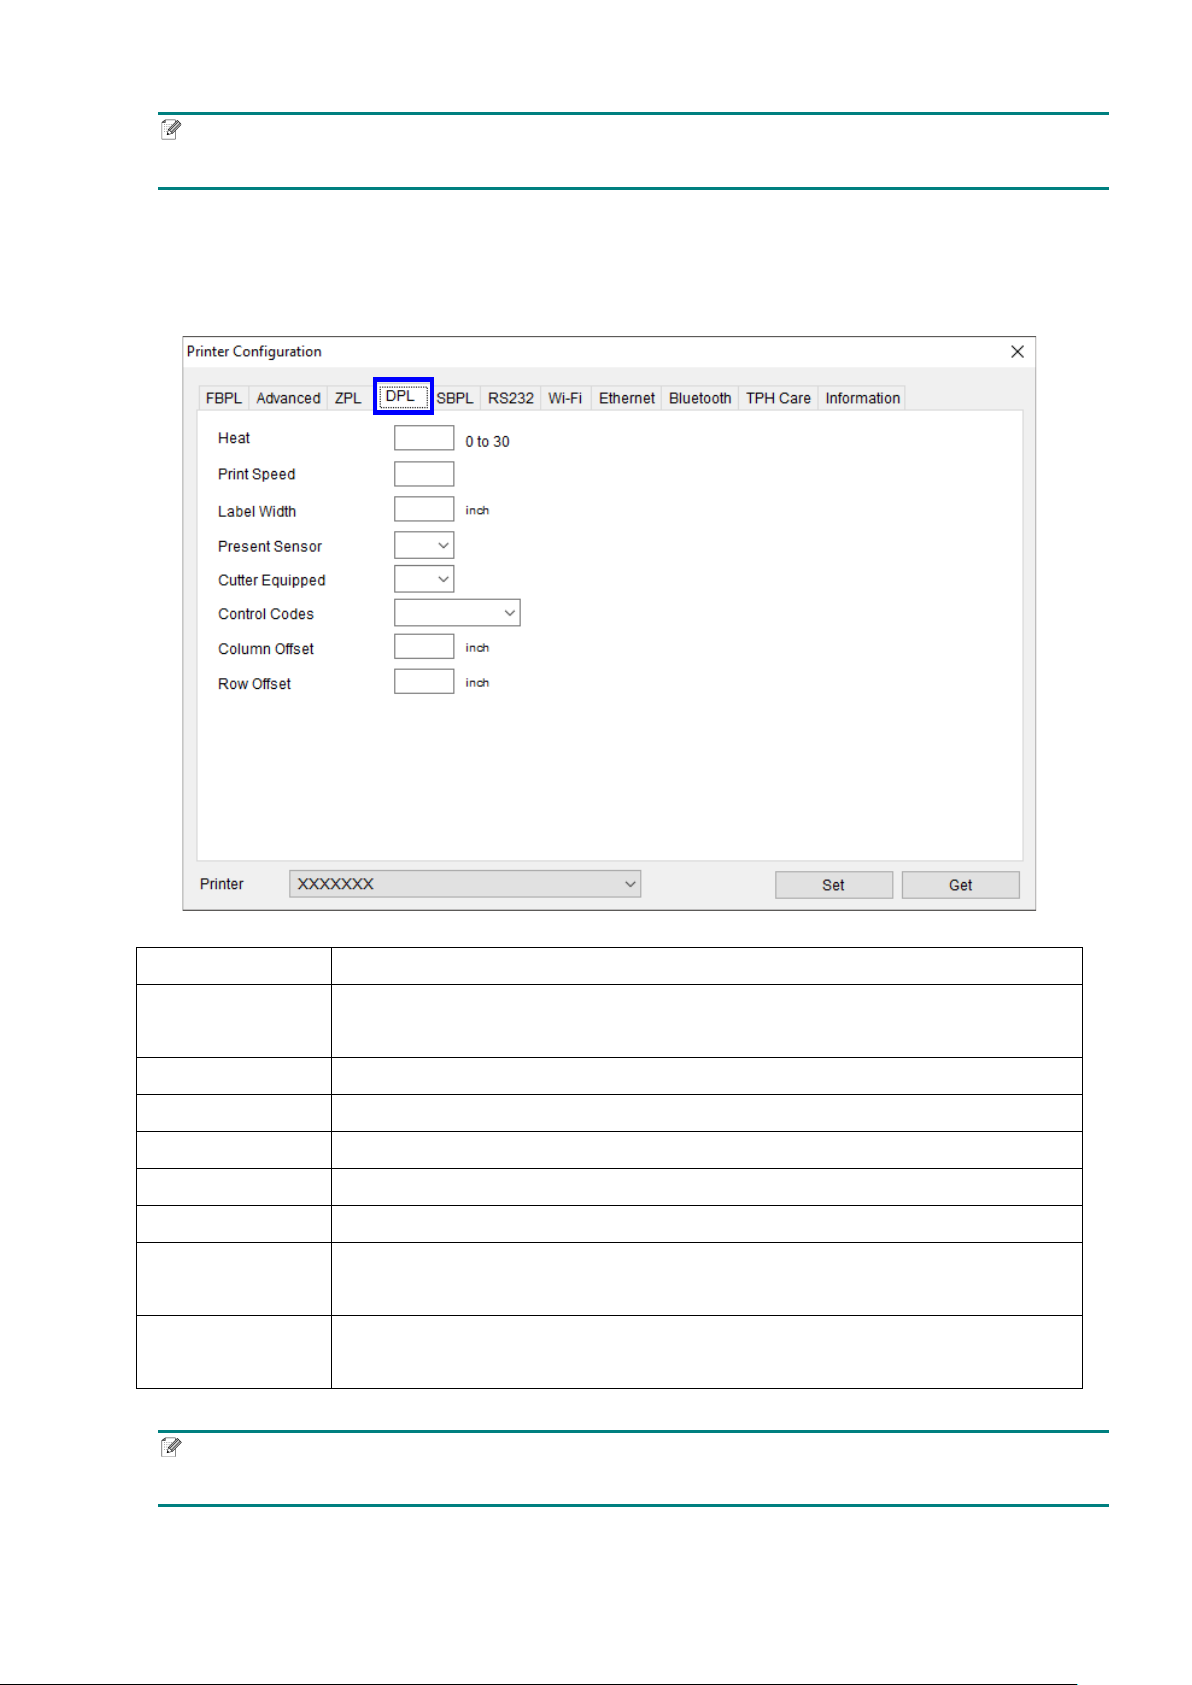
DPL
DPL printer language settings
Function Description
Increase or decrease the heat applied by the print head to the media to darken or
Heat
lighten the print contrast.
Print Speed Set the print speed.
Label Width Set the maximum limit for the printable width.
Present Sensor Enable or disable the present sensor.
Cutter Equipped Enable or disable the opt io nal Cutter.
Control Codes Change the prefix of the commands interpreted by the printer.
Shift both the horizontal print start position and the label width end point to the
Column Offset
right.
Shift the vertical print start position.
Row Offset
Note
The items included in the DPL tab only work with the DPL printer language.
9
Page 12

SBPL
SBPL printer language settings
Function Description
Print Speed Set the print speed.
Print Darkness Set the print darkness.
Sensor Type Set the sensor type: Black Mark, Gap, or Continuous.
Label Gap Set the gap between labels.
Horizontal LabelSize Set the horizontal label size.
Vertical LabelSize Set the vertical label size.
Horizontal Correction Pitch Value Adjust the print start position horizontally.
Vertical Correction Pitch Value Adjust the print start position vertically.
Label Pitch Offset
Tear Off Offset
Set the offset of the label stop position for each operation.
Cutter Offset
Dispenser Offset
Note
The items in the SBPL tab only work with the SBPL printer language.
10
Page 13
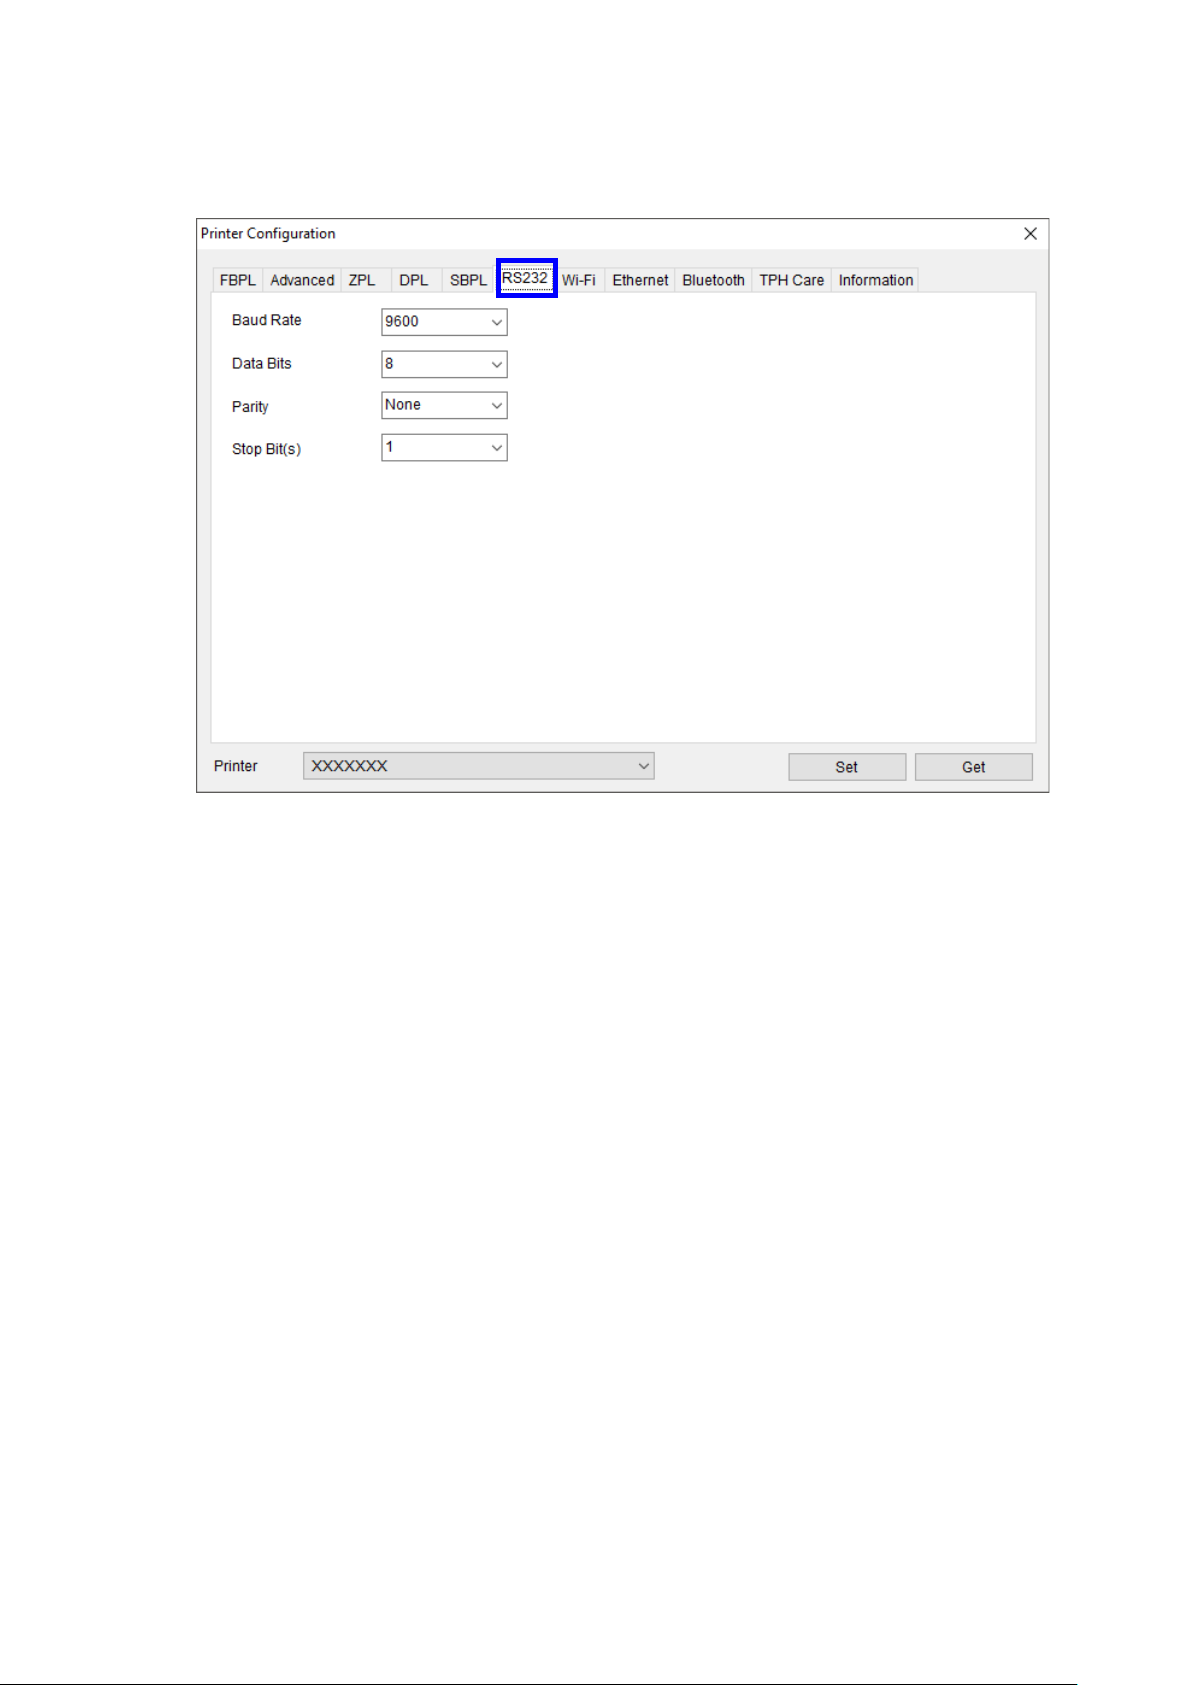
RS232
Printer RS232 interface settings
11
Page 14

Wi-Fi
Wireless print server settings
Using BPM to set the Wi-Fi Module
Make sure both your wireless router/access points and your printer's network settings
are correctly set up. For more information, see the documentation provided with your
wireless router/access point, or contact the router manufacturer, your system
administrator, or Internet service provider.
1. Setting the Wi-Fi Module
1. Connect the computer and printer using a USB cable.
2. Turn on the printer.
3. Start the BPM.
4. Click the Printer Configuration button.
12
Page 15

2
6 1 7
3 4 5
Printer Configuration:
Non-Enterprise
1. Click the Wi-Fi tab.
2. Type the SSID (Network Name ).
3. Click the Encryption drop-down list and select Personal.
4. Type the Key.
5. Click the DHCP drop-down list and select ON.
If you are not using DHCP, type the IP Address, Subnet Mask, and Gateway.
6. Click Set.
7. Click X to exit.
Note
Modified settings are highlighted in yellow before they are set.
When DHCP is on, type a new Printer Name if you want to change
configuration screens.
Use the RAW Port field to type the applicable RAW Port.
13
how the printer appears in
Page 16

1
6
5
7
2
3
4
Enterprise
1. Click the Wi-Fi tab.
2. Type the SSID (Network Name).
3. Click the Encryption drop-down list and select Enterprise.
4. Click the DHCP drop-down list and select ON.
If you are not using DHCP, type the IP Address, Subnet Mask, and Gateway.
5. Click the EAP Type drop-down list and make a selection.
To use EAP-TLS, you must u pl oa d the correct CA Certificate and Key f or mut ual
authentication, integrity-protected cipher suite negotiation, and key exchange
between two endpoints.
6. Click Set.
7.
Click X to exit.
Note
Modified settings are highlighted in yellow before they are set.
When DHCP is on, type a new Printer Name if you want to change how the printer appears in
configuration screens.
Use the RAW Port field to type the applicable RAW Port.
14
Page 17

5. After completing the pri nter con fi gur ation, the following message appears. Clic k
OK to reset the printer.
The printer's IP address appears in the IP address field when the Wi-Fi module has been
connected.
Note
The IP address should appear 5 to 15 seconds after turning on the printer.
For Non-LCD models, go to step 9.
For LCD models, follow steps 6 to 8.
6. The printer's IP address and Wi-Fi icon appear on the LCD, when the Wi-Fi
module is connected.
7. Unplug the USB cable connecting the computer and the printer.
8. From the list, select the printer whose IP Address is displayed on the LCD.
15
Page 18

9. Click the Printer Function button.
10. Click the Print Test Page button to print the test page via Wi-Fi.
16
Page 19

2. Initialize the Wi-Fi Module
1. Start the BPM.
2. Select the printer from the list, and then click the Printer Function button.
3. Clic k the Wi-Fi Default button.
17
Page 20

Ethernet (Wired)
Ethernet print server settings
Function Description
DHCP/Static IP The default IP address is obtained using DHCP. To use a static IP, select the
Static IP radio button.
Printer Name Change the printer name. Make sure you click Set Printer Name to complete the
update.
Raw Port Change the raw port. Make sure you click Set RAW Port to complete the update.
Note
After clicking Set IP, Set Printer Name, or Set RAW Port, the printer restarts to apply the settings.
18
Page 21

Bluetooth
Setting the Bluetooth connection
1. Connect the USB cable between the computer and the printer.
2. Turn on the printer.
3. Start the BPM.
4. Click the Printer Configuration button.
5. Click the Bluetooth tab.
6. Type the new Bluetooth Local Name or Bluetooth PIN Code.
7. Click Set to set the new Bluetooth Local Nam e or Bluetooth PIN Code.
8. Click Get to retrieve the settings. Make sure the Bluetooth module settings are set
correctly.
Note
You can also connect the printer to the computer using a USB cable.
19
Page 22

TPH Care
Thermal Print Head (TPH) Care settings
Function Description
TPH Care Auto Protection Enable or disable the TPH Care function.
Unhealthy TPH dot number Check the number of unhealthy TPH dot elements.
Unhealth TPH dot number Set the warning condition for the unhealthy TPH dot number.
Get TPH Care Profile Detect the unhealthy TPH dots.
TPH Test Page Print a TPH test image to check the TPH printing status.
1. Select ON from the TPH Care Auto Protection drop-down list to enable the TPH care
function.
2. Click Get TP H care profile. The TPH graph appears.
• If the profi le is fl at or the unhealthy TPH dot number is 0, the Print Head's c onditio n is
good.
20
Page 23

• If the profile shows a spike, the Print Head may contain damaged dots and the
printer will stop printing.
Printer information
To view the current printer settings, click the Information tab, and then click the Get
button.
Function Description
Version Printer model name and firmware version.
Serial No Printer serial number.
Printer Status Get the printer status.
Check Sum Printer firmware checksum.
Ribbon remaining Get the ribbon capacity.
Cutter Counter Number of cuts made by the Cutter.
Mileage (Km) Printing mileage information of the Print Head.
Label Count Number of printed labels.
21
Page 24

Note
- The Cutting Counter and Mileage settings should be reset as follows:
• Cutting Counter: when replacing the Cutter or the Print Head
• Mileage: when replacing the Print Head.
Their total values will still be listed in the non-resettable fields.
- If the printer is in an error state, its LED will blink in red, and its status icon will display "!". To learn more
about the printer's status, select the printer, click Printer Configuration, and then click the Information
tab.
Troubleshooting
Error Message Solution
Head Open
Paper Jam
Out of Paper
- Close the Print Head mechanism.
- Check if the right and left sides of the Print Head mechanism are locked
into place.
- Check if any labels are jammed in the Print Head mechanism.
- Check that the label size and GAP/Black Mark Size settings match the
installed media.
- Check the sensor type.
- Calibrate the sensor again.
- Check that the GAP/Black Mark Sensor position is aligned with the
GAP/Black Mark sensing path.
- Check if the label roll is empty.
- Calibrate the sensor again.
- Check if the ribbon has run out.
- Check if the ribbon roll is broken between the ribbon supply/take-up
Ribbon End Error
spindle.
- Check if the paper core is installed on the ribbon take-up spindle (for
applicable models only).
- Check if the ribbon spindle is installed incorrectly in the printer.
22
Page 25

in solid red and the printer stops printing. As soon
Error Message Solution
- Close the Print Head mechanism and make sure the right and left sides
are locked into place.
Ribbon Encoder Error
Pause Press the Feed/Pause button again to resume printing.
Other Error
- Check if the ribbon roll is empty.
- Check if the ribbon is broken between the ribbon supply/take-up spindle.
- Check if the paper core is installed on the ribbon take-up spindle (for
applicable models only).
- Print Head is overheated:
The error indicator is lit
as the print head cools down, the printer will resume printing.
- Cutter jam:
• Remove the jammed media from the Cutter area.
• Check the Media Specifications and make sure the media thickness is
supported.
For more information about the Media Specifications, see the User's
Guide.
23
Page 26

Battery
Check the charge level and life of the Rechargeable Li-ion Battery (Smart Battery)
(RJ-3035B/RJ-3055WB only)
Display the Rechargeable Li-ion Battery Capacity and Battery Life in the BPM:
1. Insert the Rechargeable Li-ion Battery (Smart Battery) into your printer.
2. Connect the printer to the computer using a USB cable or Wi-Fi.
24
Page 27

3. Start the BPM and click the Setup button.
4. Select the Battery Management System s etti ngs y ou wa nt , and then close the Setup
dialog box by clicking the X in its upper right corner.
25
Page 28

Downloading files to the specified memory device
4. File Manager
The File Manager feature allows you to generate file headers, downl oad fil es into the
printer and browse them.
Select the printers from the list, and then click the File Manager button to access the
settings page.
1. Select the file type, and then
click the Browse button to
select the files you want to
download.
2. Select where to download the
file using the Memory
Device drop-down menu.
3. Click the Download button to
start downloading the file to
all printers.
26
Page 29

Listing the files saved on the specified memory device
Removing selected files from the specified memory device
Removing all files from the specified memory device
1. Select the printer .
2. Select the memory device
type, and then click the Get
button to retrieve a list of the
files saved on the specified
memory device.
1. Select the files you w ant to
remove.
2. Click the Remove button to
delete selected files from the
specified memory device.
1. Select the memory device.
2. Click the Format button to
delete all the files on the
specified memory device.
27
Page 30

5. Command Tool
The Command Tool feature allows you to unlock additional features, which cannot be
configured using the Brother Printer Management Tool, using printer commands.
Select the printers from the list, and then click the Command Tool button to access the
settings page.
1. Select the radio button of the Editor page you want.
2. Enter the commands in the Editor window. Make sure you press the Enter key at the
end of each command line.
3. Click the Send button to s end th e com mands to m ore t han on e pri nter at the s am e time.
You can also send a command file to all printers by clicking the Send File button.
28
Page 31

6. RTC (Real Time Clock) Setup
This feature allows you to synchronize the printer's Real Time Clock with the computer.
1. Select the printers from the list, and then click the RTC Setup button to access the
settings page.
2. Click the Se t to System Time button to synchronize the printer's Real Time Clock with
the computer.
29
Page 32

7. Printer Function
The Brother Printer Management Tool allows you to configure printer functions without
pressing any printer bu ttons .
Select the printers from the list, and then click the Printer Function button to access the
settings page.
Function
Calibrate
Reset Printer Reboot the printer.
Factory Default
Print Test Page Print a test page.
Configuration
Page
Ignore
AUTO.BAS
Exit Line Mode Exit the line mode.
Enter Line Mode Enter the line mode.
Dump Text Activate the printer's dump mode.
Description
Calibrate the sensor selected in the Media
Sensor in the Printer Configuration feature.
Initialize the printer and restore the settings to
their default values.
Print the printer configuration.
Ignore the downloaded AUTO.BAS program.
Wi-Fi Default Reset the Wi-Fi settings to their default values.
Calibrating the Media Sensor:
1. Make sure the media is already installed and the Print Head is closed.
2. Click the Printer Function button.
3. Click the Calibrate button.
30
Page 33

4. Select the sensor media type you want to use.
Note
• The printer starts the calibration first from the sensor you selected.
• If the printer cannot calibrate the pre-printed media or media with holes, type the Paper Height or Gap.
5. Click Calibrate.
Note: Models RJ-2035B/2055WB/3035B/3055WB only:
For more information about Line Mode, visit www.brother.co.jp/eng/dev/ and see the CPCL Emulation
Command Reference or ESC/POS Emulation Command Reference.
31
Page 34

8. Bitmap Font Manager
The Bitmap Font Manager helps convert TTF fonts into the bitmap fonts supported by the
printer (both fixed pitch and variable pitch bitmap).
1. Select the printers from the list, and then click the Bitmap Font Manager button to
enter the settings page.
2. Select Standard Encode from the Font Encode drop-down list and select Variable
Pitch from the Font Pitch drop-down list. Then, specify the applicable font settings.
32
Page 35

9. Users Configuration
The Users feature allows you to create user profiles, protect the settings with a password,
and assign permissions to specific user IDs.
Example:
Enter a user named “test”, enter the password, and select the Admin and Group: usb
permission check boxes.
For more information, see 11.Group Configuration.
Click Add. The login dialog box will appear every time the Brother Print Managem ent Tool
starts.
33
Page 36

10. Alert Configuration
The Alert feature allows you to monitor and record the status of specific printers or printer
groups.
1. Click the Alert button.
2. Select the items you want to be alerted to.
3. Select the printer group.
4. Close the Alert window.
Example:
If you select the Enable and Head Open check boxes, a nd t he n select the "usb" group, an
alert will be displayed every time the "Head Open" error occurs. You can also export these
settings into a file. For more information, see 11.Group Configuration.
34
Page 37

11. Group Configuration
The Group feature allows you to create printer groups according to their IP address,
interface, and model name.
Example:
If you add "usb" as the Group Name, leave the IP address fields blank, set the Interface to
USB, and the Model Name to Not specify, so that all USB-connected printers are filtered
out.
Click Add. The new "usb" group appears in the Group Name drop-down menu.
35
Page 38

Changes the device discovery
method (Auto/Manual).
Exports the current settings to a
file.
12. Setup Configuration
The Setup feature allows you to configure the Brother Printer Management Tool.
1. Click the Setup button.
2. Select the settings you want.
3. Click the Setting Export button.
Function
Run at Windows
startup
Auto search for
network
Show offline printer Displays or hides offline printers.
Support Main UI
Download
Discover Device
Setting Export
Setting Import Imports settings from a file.
Description
Runs the BPM at Windows startup.
Sets the BPM to automatically
search for new printers.
Enables or disables the Download
button on each settings page.
Note
If you have changed the device discovery setting to "Manual", click the Discover Device
button to refresh the printer list.
When in manual mode, the discovered printer's status icon will be highlighted in blue
(Ethernet connection only).
36
Page 39

13. Ma nua l Name Configuration
The Manual Name feature allows you to rename the printers listed b y the softwar e, helpi ng
to manage multiple printers more easily.
Example:
37
Page 40

14. Firmware Update
To update your printer group's fi r m w are , make sure the printers belong to the same
subnet and are listed on the Brother Printer Management Tool's home page. Check
your router's settings, if necessary.
1. Click the Group button to create a printer group.
2. Add a group named "XX-XXXXXX group".
3. Set the IP address range between 10.10.1.1 and 10.10.4.254.
4. Select Not specify for Interface.
5. Select the "XX-XXXXXX" for Model Name.
6. Click the Add button. The new printer group appears in the list.
38
Page 41

7. Close the Group window.
8. Select the "XX-XXXXXX group" on the home page. The printers belonging to that group
will be listed. Select up to four printers that need a firmware update.
9. Click the Command Tool button.
39
Page 42

10. Click the Browse button to select a firmware file (*.NEW), and then click the Open button.
11. Click the Send File button to start updating the XX-XXXXXX printer group's firm w ar e.
12. Check the Version column to make sure the printers' firmware has been updated.
40
Page 43

 Loading...