

Brother MFC-J4510DW, MFC-J4710DW Basic User’s Guide

Basic User’s Guide
MFC-J4510DW
MFC-J4710DW
Version A
UK/IRE/GEN

If you need to call Customer Service
Please complete the following information for future
reference:
Model Number: MFC-J4510DW and MFC-J4710DW
(Circle your model number)
1
Serial Number:
Date of Purchase:
Place of Purchase:
1
The serial number is on the back of the unit. Retain
this User's Guide with your sales receipt as a
permanent record of your purchase, in the event of
theft, fire or warranty service.
Register your product on-line at
http://www.brother.com/registration/
© 2012 Brother Industries, Ltd. All rights reserved.

User's Guides and where do I find them?
Which Guide? What's in it? Where is it?
Product Safety Guide Read this Guide first. Please read the Safety
Instructions before you set up your machine. See
this Guide for trademarks and legal limitations.
Quick Setup Guide Follow the instructions for setting up your machine
and installing the drivers and software for the
operating system and connection type you are
using.
Basic User’s Guide Learn the basic Fax, Copy, Scan and PhotoCapture
Center™ operations and how to replace
consumables. See troubleshooting tips.
Advanced User’s Guide Learn more advanced operations: Fax, Copy,
security features, printing reports and performing
routine maintenance.
Software User’s Guide Follow these instructions for Printing, Scanning,
Network Scanning, PhotoCapture Center™,
Remote Setup, PC-Fax, Web Services (Scan), and
using the Brother ControlCenter utility.
NetworkUser’sGuide This Guide provides useful information about wired
and wireless network settings and security settings
using the Brother machine. You can also find
supported protocol information for your machine and
detailed troubleshooting tips.
Printed / In the box
Printed / In the box
Printed / In the box
PDF file / CD-ROM
PDF file / CD-ROM
PDF file / CD-ROM
1
Web Connect Guide This Guide provides useful information about
accessing Internet services from the Brother
machine, as well as downloading images, printing
data and uploading files directly to Internet services.
AirPrint Guide This Guide provides information for using AirPrint to
print from Mac OS X v10.7.x and your iPhone, iPod
touch, iPad, or other iOS device to your Brother
machine without installing a printer driver.
Google Cloud Print Guide
This Guide provides details on how to use Google
Cloud Print™ services for printing over the Internet.
Wi-Fi Direct™ Guide This Guide provides details on how to configure and
use your Brother machine for wireless printing
directly from a mobile device supporting the Wi-Fi
Direct™ standard.
Mobile Print/Scan Guide
for Brother iPrint&Scan
This Guide provides useful information about
printing from your mobile device and scanning from
your Brother machine to your mobile device when
connected to a Wi-Fi network.
1
This may differ depending on your country.
2
Visit us at http://solutions.brother.com/.
PDF file / Brother
Solutions Center
PDF file / Brother
Solutions Center
PDF file / Brother
Solutions Center
PDF file / Brother
Solutions Center
PDF file / Brother
Solutions Center
2
2
2
2
2
i

Table of Contents
(Basic User’s Guide)
1 General information 1
Using the documentation ....................................................................................... 1
Symbols and conventions used in the documentation ....................................1
Accessing the Advanced User’s Guide, Software User’s Guide and
Network User’s Guide......................................................................................... 1
Viewing User’s Guides .................................................................................... 1
Accessing Brother Support (Windows
Accessing Brother Support (Macintosh) ................................................................ 3
Control panel overview ..........................................................................................4
3.7" (93.4 mm) Touchscreen LCD...................................................................6
Setting the Ready screen .............................................................................. 10
Basic Operations ...........................................................................................10
Shortcut Settings ................................................................................................. 11
Adding Copy Shortcuts ..................................................................................11
Adding Fax Shortcuts .................................................................................... 12
Adding Scan Shortcuts ..................................................................................13
Adding Web Connect Shortcuts .................................................................... 14
Changing Shortcuts.......................................................................................15
Editing Shortcut Names ................................................................................. 16
Deleting Shortcuts .........................................................................................16
Recalling Shortcuts........................................................................................ 16
Volume Settings...................................................................................................16
Ring Volume .................................................................................................. 16
Beeper Volume..............................................................................................17
Speaker Volume............................................................................................17
Touchscreen LCD ................................................................................................ 18
Setting the backlight brightness..................................................................... 18
®
)................................................................ 3
2 Loading paper 19
Loading paper and other print media...................................................................19
Loading paper in paper tray #1......................................................................19
Loading smaller paper (Photo, Photo L and envelopes) ...............................22
Loading paper in paper tray #2 (MFC-J4710DW) .........................................26
Loading paper in the manual feed slot ..........................................................33
Unprintable area ............................................................................................ 37
Paper settings......................................................................................................38
Paper Size and Type (MFC-J4510DW).........................................................38
Paper Size and Type (MFC-J4710DW).........................................................39
Tray use in Copy mode (MFC-J4710DW) .....................................................39
Tray use in Fax mode (MFC-J4710DW)........................................................40
Acceptable paper and other print media..............................................................40
Recommended print media ...........................................................................41
Handling and using print media.....................................................................41
Choosing the right print media.......................................................................42
ii

3 Loading documents 45
How to load documents .......................................................................................45
Using the ADF ............................................................................................... 45
Using the scanner glass ................................................................................ 46
Unscannable area .........................................................................................47
4 Sending a fax 48
How to send a fax ................................................................................................ 48
Stop faxing..................................................................................................... 50
Setting scanner glass size for faxing .............................................................50
Colour fax transmission ................................................................................. 50
Cancelling a fax in progress .......................................................................... 50
How to preview an outgoing fax .................................................................... 51
Transmission Verification Report...................................................................52
5 Receiving a fax 53
Receive Modes....................................................................................................53
Choose the Receive Mode .................................................................................. 53
Using Receive Modes.......................................................................................... 55
Fax Only ........................................................................................................ 55
Fax/Tel........................................................................................................... 55
Manual...........................................................................................................55
External TAD ................................................................................................. 55
Receive Mode settings ........................................................................................56
Ring Delay ..................................................................................................... 56
F/T Ring Time (Fax/Tel mode only)...............................................................56
Fax Detect ..................................................................................................... 57
Fax Preview (Monochrome only).........................................................................58
How to preview a received fax....................................................................... 58
Turning off Fax Preview................................................................................. 60
6 Telephone and external devices 61
Voice operations..................................................................................................61
Fax/Tel mode................................................................................................. 61
Caller ID (U.K. and Ireland only)....................................................................61
Telephone services..............................................................................................62
Setting the Telephone Line Type...................................................................62
Connecting an external TAD (telephone answering device)................................63
Connections settings .....................................................................................64
Recording an outgoing message (OGM) on an external TAD.......................64
Multi-line connections (PBX) ......................................................................... 64
External and extension telephones......................................................................65
Connecting an external or extension telephone ............................................65
Operation from external and extension telephones.......................................65
Using extension telephones (U.K. only) ........................................................66
Using remote codes....................................................................................... 67
iii

7 Dialling and storing numbers 68
How to dial ........................................................................................................... 68
Manual dialling...............................................................................................68
Dialling from the Address Book ..................................................................... 68
Fax Redial .....................................................................................................69
Additional Dialling Operations.............................................................................. 69
Outgoing Call history ..................................................................................... 69
Caller ID history .............................................................................................70
Storing numbers .................................................................................................. 70
Storing a pause .............................................................................................70
Storing Address Book numbers .....................................................................70
Changing Address Book names or numbers.................................................71
8 Making copies 73
How to copy ......................................................................................................... 73
Stop copying .................................................................................................. 73
Copy preset settings ............................................................................................ 74
Copy options ........................................................................................................ 75
Paper Type....................................................................................................75
Paper Size.....................................................................................................76
Tray Select (MFC-J4710DW) ........................................................................76
9 Printing photos from a memory card or
USB Flash memory drive 77
PhotoCapture Center™ operations (PHOTO mode) ...........................................77
Using a memory card or USB Flash memory drive ....................................... 77
Getting started .....................................................................................................78
Print Images.........................................................................................................80
View Photos................................................................................................... 80
PhotoCapture Center™ print settings.................................................................. 81
How to scan to a memory card or USB Flash memory drive...............................81
10 How to print from a computer 85
Printing a document .............................................................................................85
11 How to scan to a computer 86
Before scanning...................................................................................................86
Scanning a document as a PDF file using ControlCenter4 (Windows
How to change the machine’s SCAN mode settings for PDF scanning ..............90
How to scan a document as a PDF file using the Touchscreen ....................91
®
) .............87
iv

A Routine maintenance 93
Replacing the ink cartridges ................................................................................93
Cleaning and checking the machine....................................................................96
Cleaning the scanner glass ...........................................................................96
Cleaning the print head .................................................................................97
Checking the print quality .............................................................................. 98
Checking the print alignment ......................................................................... 99
B Troubleshooting 101
Identifying your problem ....................................................................................101
Error and maintenance messages.....................................................................103
Error animations display .............................................................................. 112
Transferring your faxes or Fax Journal report .............................................112
Document jam ............................................................................................ 113
Printer jam or paper jam..............................................................................115
If you are having difficulty with your machine .................................................... 122
Dial Tone detection......................................................................................132
Telephone line interference / VoIP ..............................................................132
Machine Information .......................................................................................... 133
Checking the serial number ......................................................................... 133
Reset functions ............................................................................................ 133
How to reset the machine............................................................................ 133
C Settings and features tables 134
Using the Settings Tables.................................................................................. 134
Settings tables ................................................................................................... 135
Features tables .................................................................................................. 151
Entering Text ..................................................................................................... 175
Inserting spaces ......................................................................................... 175
Making corrections ...................................................................................... 175
D Specifications 176
General..............................................................................................................176
Print media.........................................................................................................179
Fax..................................................................................................................... 181
Copy .................................................................................................................. 182
PhotoCapture Center™ ..................................................................................... 183
PictBridge .......................................................................................................... 184
Scanner .............................................................................................................185
Printer ................................................................................................................186
Interfaces ...........................................................................................................187
Network.............................................................................................................. 188
Computer requirements.....................................................................................189
Consumable items ............................................................................................. 190
EIndex 191
v

Table of Contents
(Advanced User’s Guide)
The Advanced User’s Guide explains the following features and operations.
You can view the Advanced User’s Guide on the CD-ROM.
1 General setup
IMPORTANT NOTE
Memory Storage
Automatic Daylight Saving Time
Sleep Mode
Touchscreen LCD
2 Security features
Secure Function Lock 2.0
Restricting dialling
3 Sending a fax
Additional sending options
Additional sending operations
Polling overview
4 Receiving a fax
Memory Receive (Monochrome only)
Remote Retrieval
Additional receiving operations
Polling overview
8 Printing photos from a
memory card or USB Flash
memory drive
PhotoCapture Center™ operations
Print Images
PhotoCapture Center™ print settings
Scan to a memory card or USB Flash
memory drive
9 Printing photos from a
camera
Printing photos directly from a
PictBridge camera
Printing photos directly from a digital
camera (without PictBridge)
A Routine maintenance
Cleaning and checking the machine
Packing and shipping the machine
B Glossary
5 Dialling and storing numbers
Voice operations
Additional dialling operations
Additional ways to store numbers
6 Printing reports
Fax reports
Reports
7 Making copies
Copy options
A3 Copy Shortcuts
vi
CIndex

General information 1
1
Using the
1
NOTE
documentation
Thank you for buying a Brother machine!
Reading the documentation will help you
make the most of your machine.
Symbols and conventions used in the documentation 1
The following symbols and conventions are
used throughout the documentation.
Bold Bold typeface identifies the
dial pad numbers of the
Touchpanel and buttons on
your computer screen.
Italics Italicized typeface
emphasizes an important
point or refers you to a related
topic.
Courier
New
WARNING
Text in the Courier New font
identifies messages on the
Touchscreen of the machine.
1
Notes tell you how you should respond to a
situation that may arise or give tips about
how the operation works with other
features.
Electrical Hazard icons alert you to
possible electrical shocks.
Accessing the Advanced User’s Guide, Software User’s Guide and Network User’s Guide
This Basic User’s Guide does not contain all
the information about the machine, such as
how to use the advanced Fax, Copy,
PhotoCapture Center™, Printer, Scanner,
PC-Fax, and Network features. When you are
ready to learn detailed information about
these operations, you can read the
Advanced User’s Guide,
Software User’s Guide and
Network User’s Guide that are on the
CD-ROM.
1
WARNING indicates a potentially
hazardous situation which, if not avoided,
could result in death or serious injuries.
CAUTION
CAUTION indicates a potentially hazardous
situation which, if not avoided, may result in
minor or moderate injuries.
IMPORTANT
IMPORTANT indicates a potentially
hazardous situation which, if not avoided,
may result in damage to property or loss of
product functionality.
Viewing User’s Guides 1
(Windows®) 1
To view the documentation, from ,
All Programs, select Brother, MFC-XXXX
(where XXXX is your model name) from the
programs list, and then choose
User’s Guides.
If you have not installed the software, you can
find the documentation on the CD-ROM by
following the instructions below:
a Turn on your PC. Insert the Brother
CD-ROM into your CD-ROM drive.
1
Chapter 1
NOTE
NOTE
If the Brother screen does not appear
automatically, go to Computer or
My Computer then double-click the
CD-ROM icon and double-click start.exe.
d Click User’s Guides. If the country
screen appears, choose your country.
e After the list of User’s Guides appears,
choose the Guide you want to read.
How to find Scanning instructions 1
b If the model name screen appears, click
your model name.
c If the language screen appears, click
your language. The CD-ROM
Top Menu will appear.
d Click User’s Guides.
e Click PDF documents. If the country
screen appears, choose your country.
After the list of User’s Guides appears,
choose the guide you want to read.
(Macintosh) 1
There are several ways you can scan
documents. You can find the instructions as
follows:
Software User’s Guide
Scanning
ControlCenter
Network Scanning
Nuance™ PaperPort™ 12SE
How-to-Guides
(Windows
The complete Nuance™ PaperPort™
12SE How-to-Guides can be viewed from
the Help section in the PaperPort™ 12SE
application.
Presto! PageManager User’s Guide
(Macintosh)
Presto! PageManager must be
downloaded and installed before use. For
more information, see Accessing Brother
Support (Macintosh) on page 3.
®
)
a Turn on your Macintosh. Insert the
Brother CD-ROM into your CD-ROM
drive. The following window will appear.
b Double-click the User’s Guides icon.
c Choose your language.
2
The complete Presto! PageManager User’s
Guide can be viewed from the Help section
in the Presto! PageManager application.
How to find Network setup instructions
Your machine can be connected to a wireless
or wired network.
Basic setup instructions
(See Quick Setup Guide.)
The wireless access point or router
supports Wi-Fi Protected Setup™ or
AOSS™
(See Quick Setup Guide.)
More information about network setup
(See Network User’s Guide.)
1
General information
Accessing Brother
Support (Windows
You can find all the contacts you will need,
such as Web support (Brother Solutions
Center) on the CD-ROM.
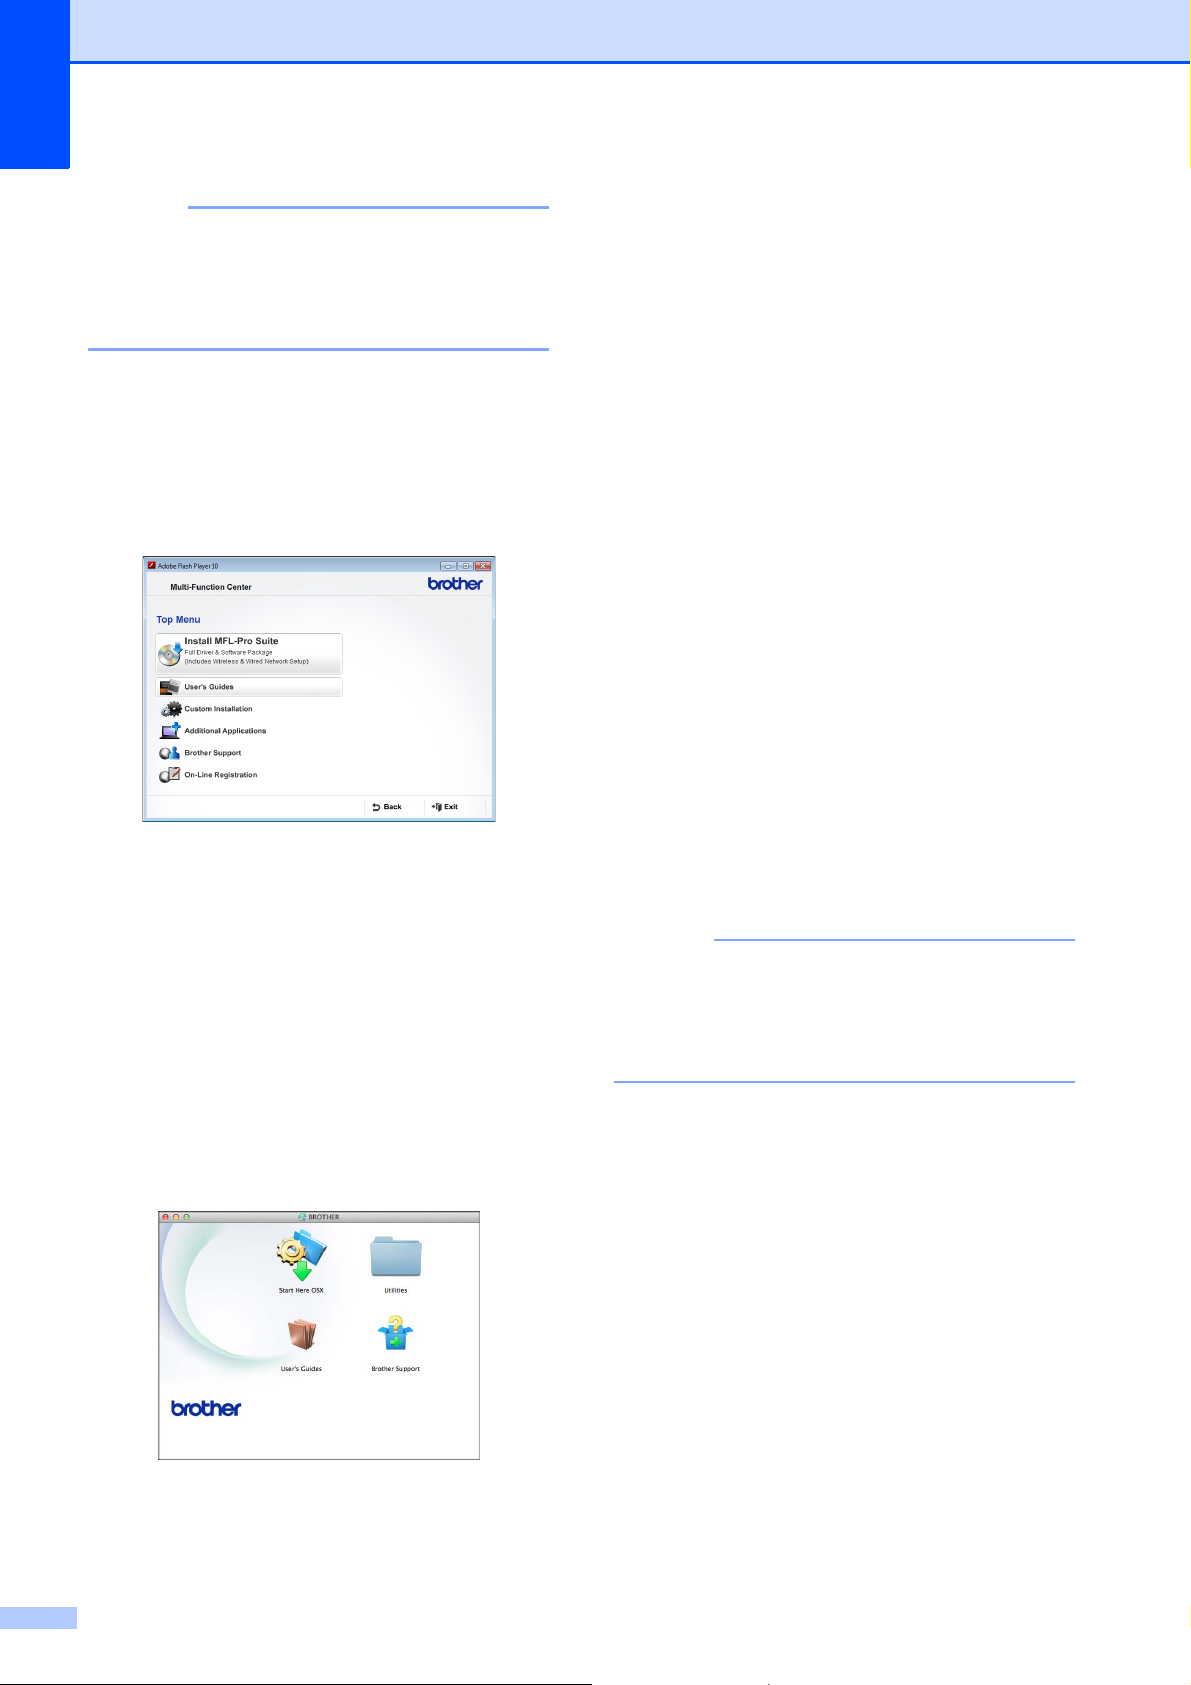
Click Brother Support on the Top Menu.
The following screen will appear:
®
) 1
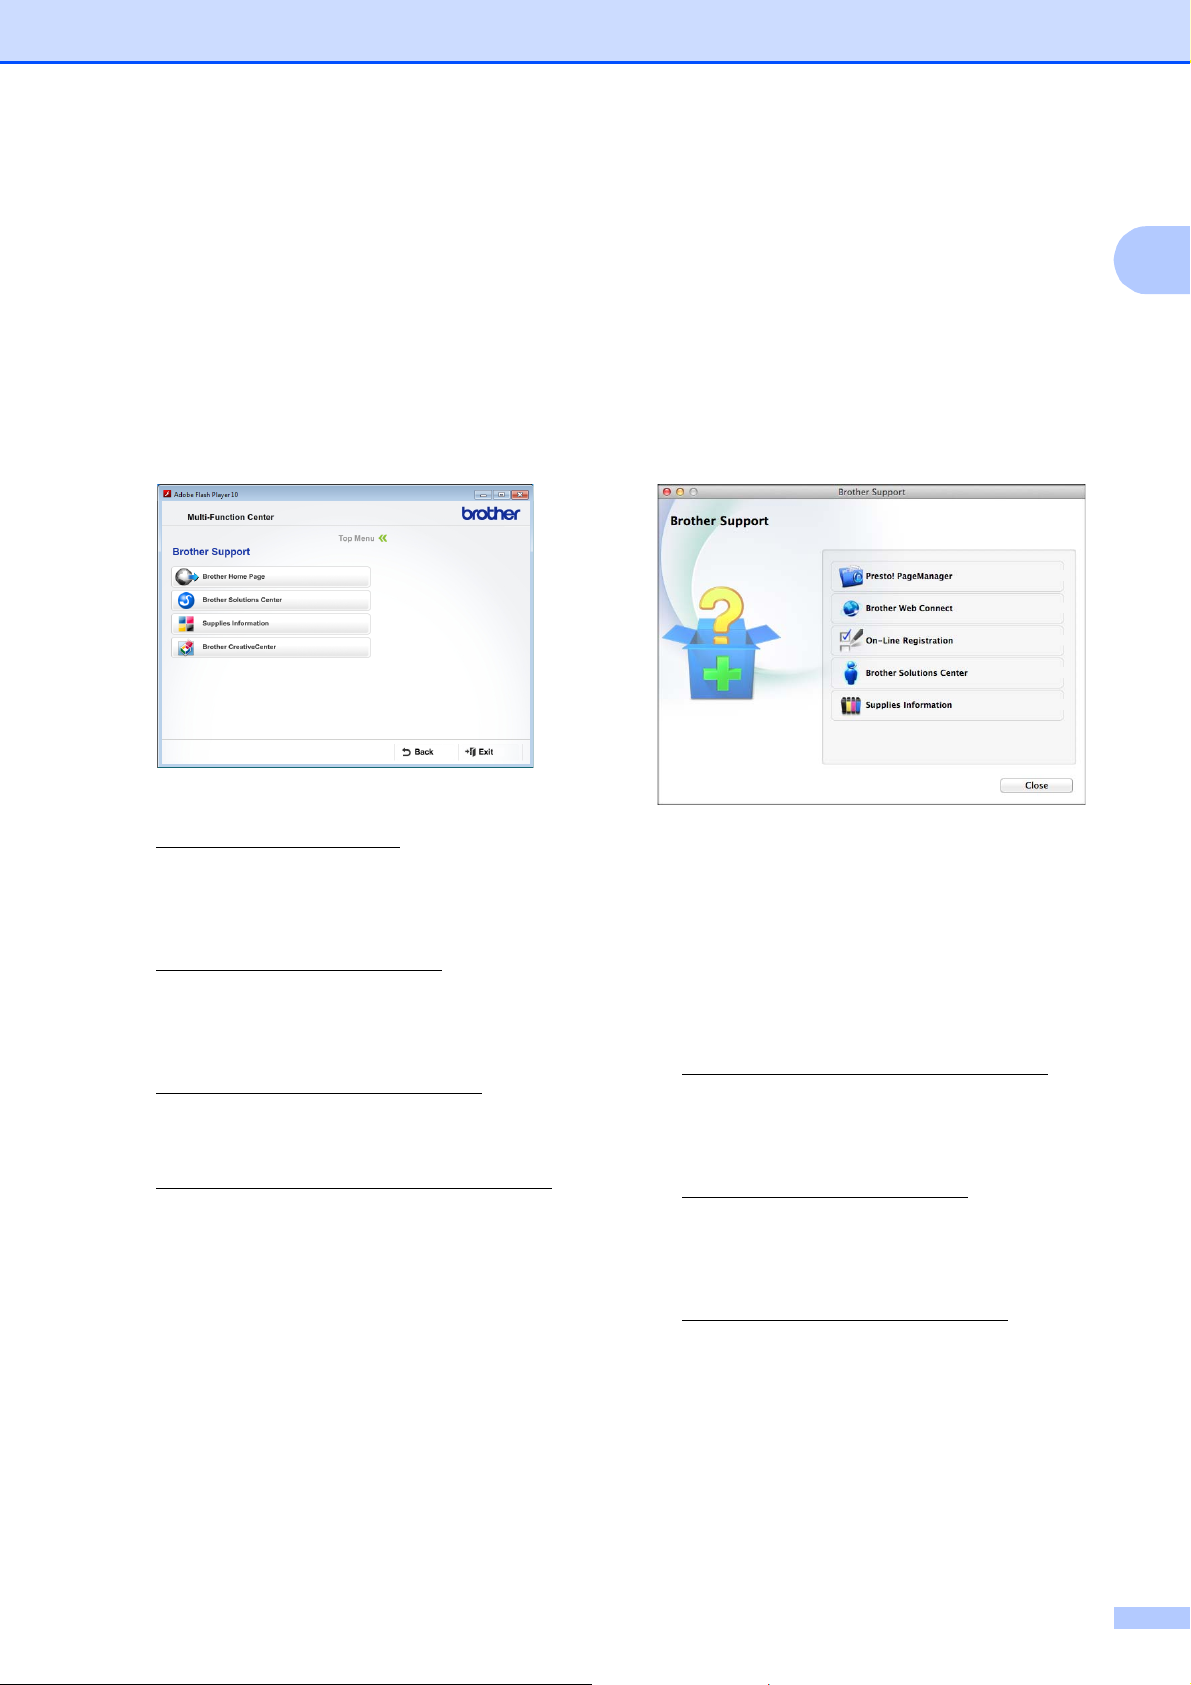
Accessing Brother Support (Macintosh)
You can find all the contacts you will need,
such as Web support (Brother Solutions
Center) on the CD-ROM.
Double-click the Brother Support icon.
The following screen will appear:
1
1
To access our website
(http://www.brother.com/
Brother Home Page.
For the latest news and product support
information
(http://solutions.brother.com/
Brother Solutions Center.
To visit our website for original Brother
Supplies
(http://www.brother.com/original/
click Supplies Information.
To access the Brother CreativeCenter
(http://www.brother.com/creativecenter/
for FREE photo projects and printable
downloads, click
Brother CreativeCenter.
To return to the top menu, click Back or if
you have finished, click Exit.
), click
), click
),
)
To download and install Presto!
PageManager, click
Presto! PageManager.
To access the Brother Web Connect
page, click Brother Web Connect.
To register your machine from the Brother
Product Registration Page
(http://www.brother.com/registration/
click On-Line Registration.
For the latest news and product support
information
(http://solutions.brother.com/
Brother Solutions Center.
To visit our website for original Brother
Supplies
(http://www.brother.com/original/
Supplies Information.
), click
),
), click
3
Chapter 1
NOTE
1
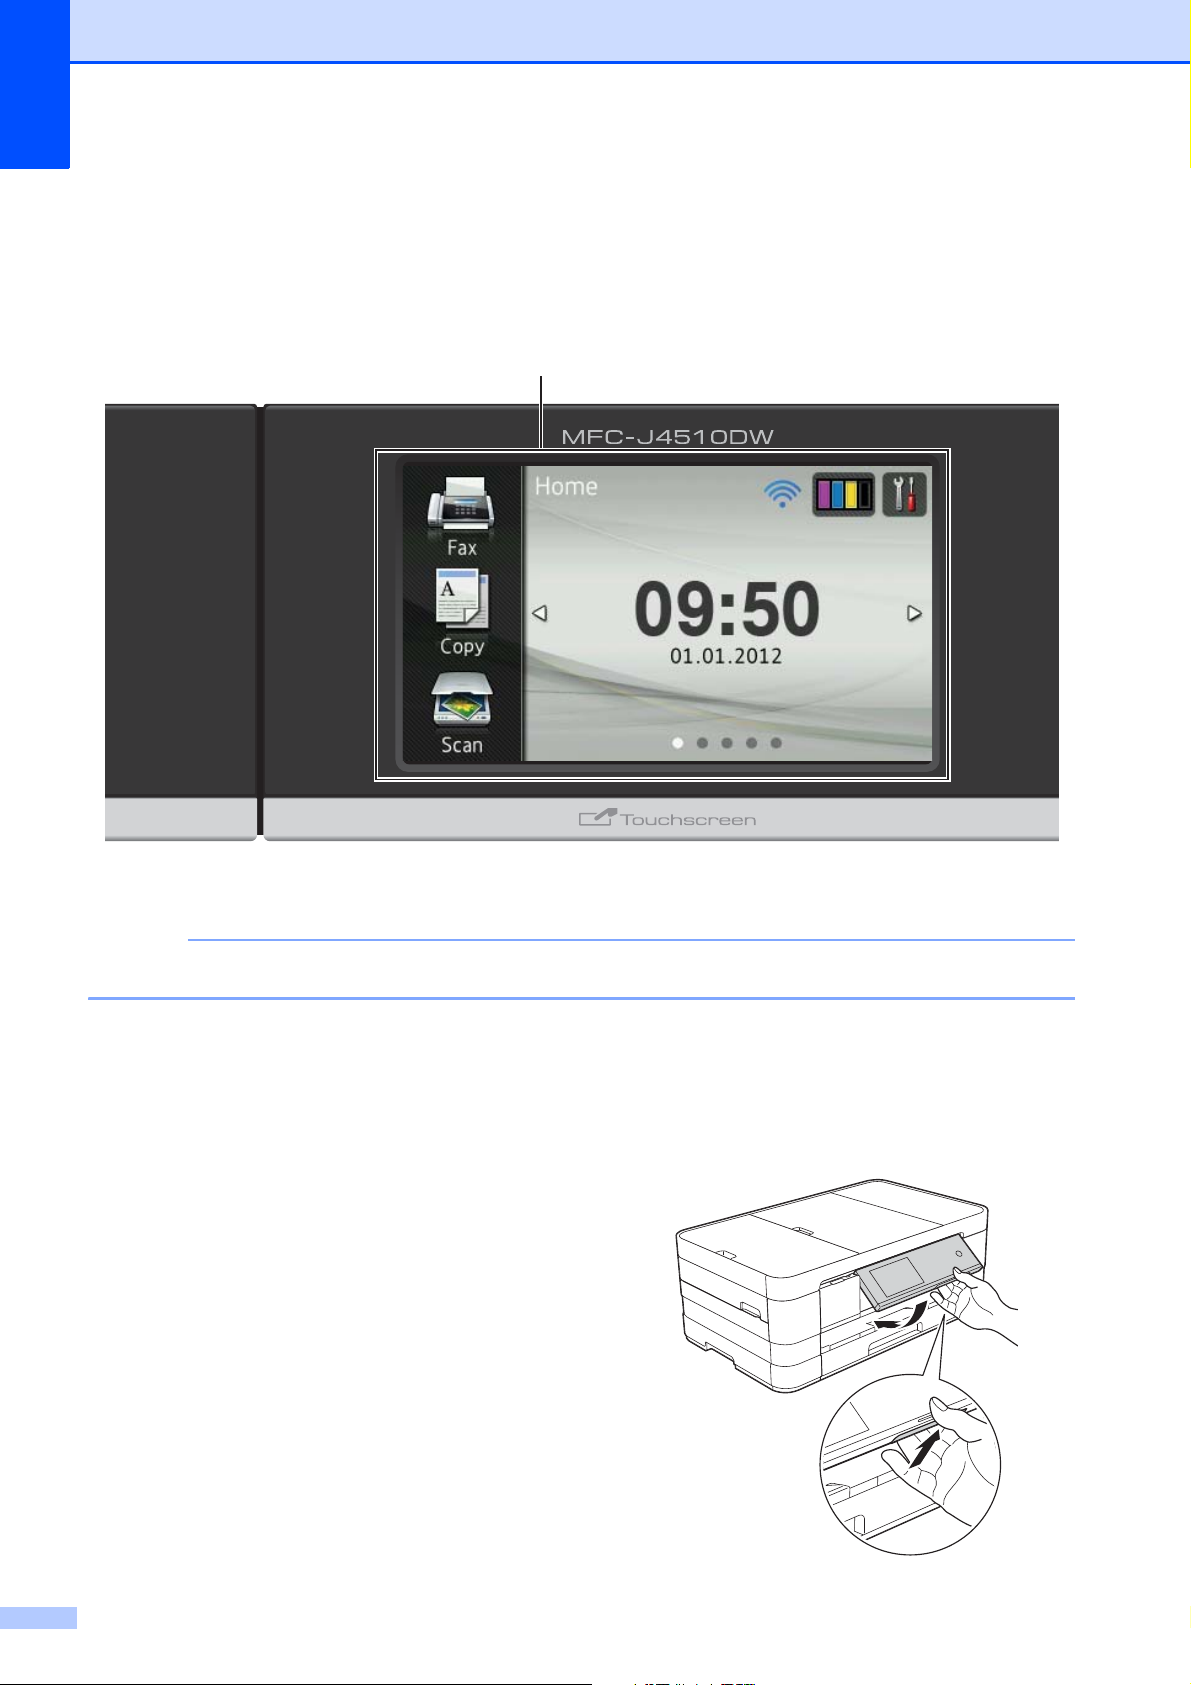
Control panel overview 1
The MFC-J4510DW and MFC-J4710DW have the same 3.7" (93.4 mm) Touchscreen LCD
and Touchpanel.
Most of the illustrations in this User’s Guide show the MFC-J4510DW.
1 3.7" (93.4 mm) Touchscreen LCD (Liquid
Crystal Display)
This is a Touchscreen LCD. You can access
the menus and options by pressing them as
they are displayed on this screen.
You can adjust the angle of the Touchscreen
LCD and Touchpanel by lifting it. To lower this
control panel, push the release button that is
located behind the mark, as shown in the
illustration.
4
General information
1
2
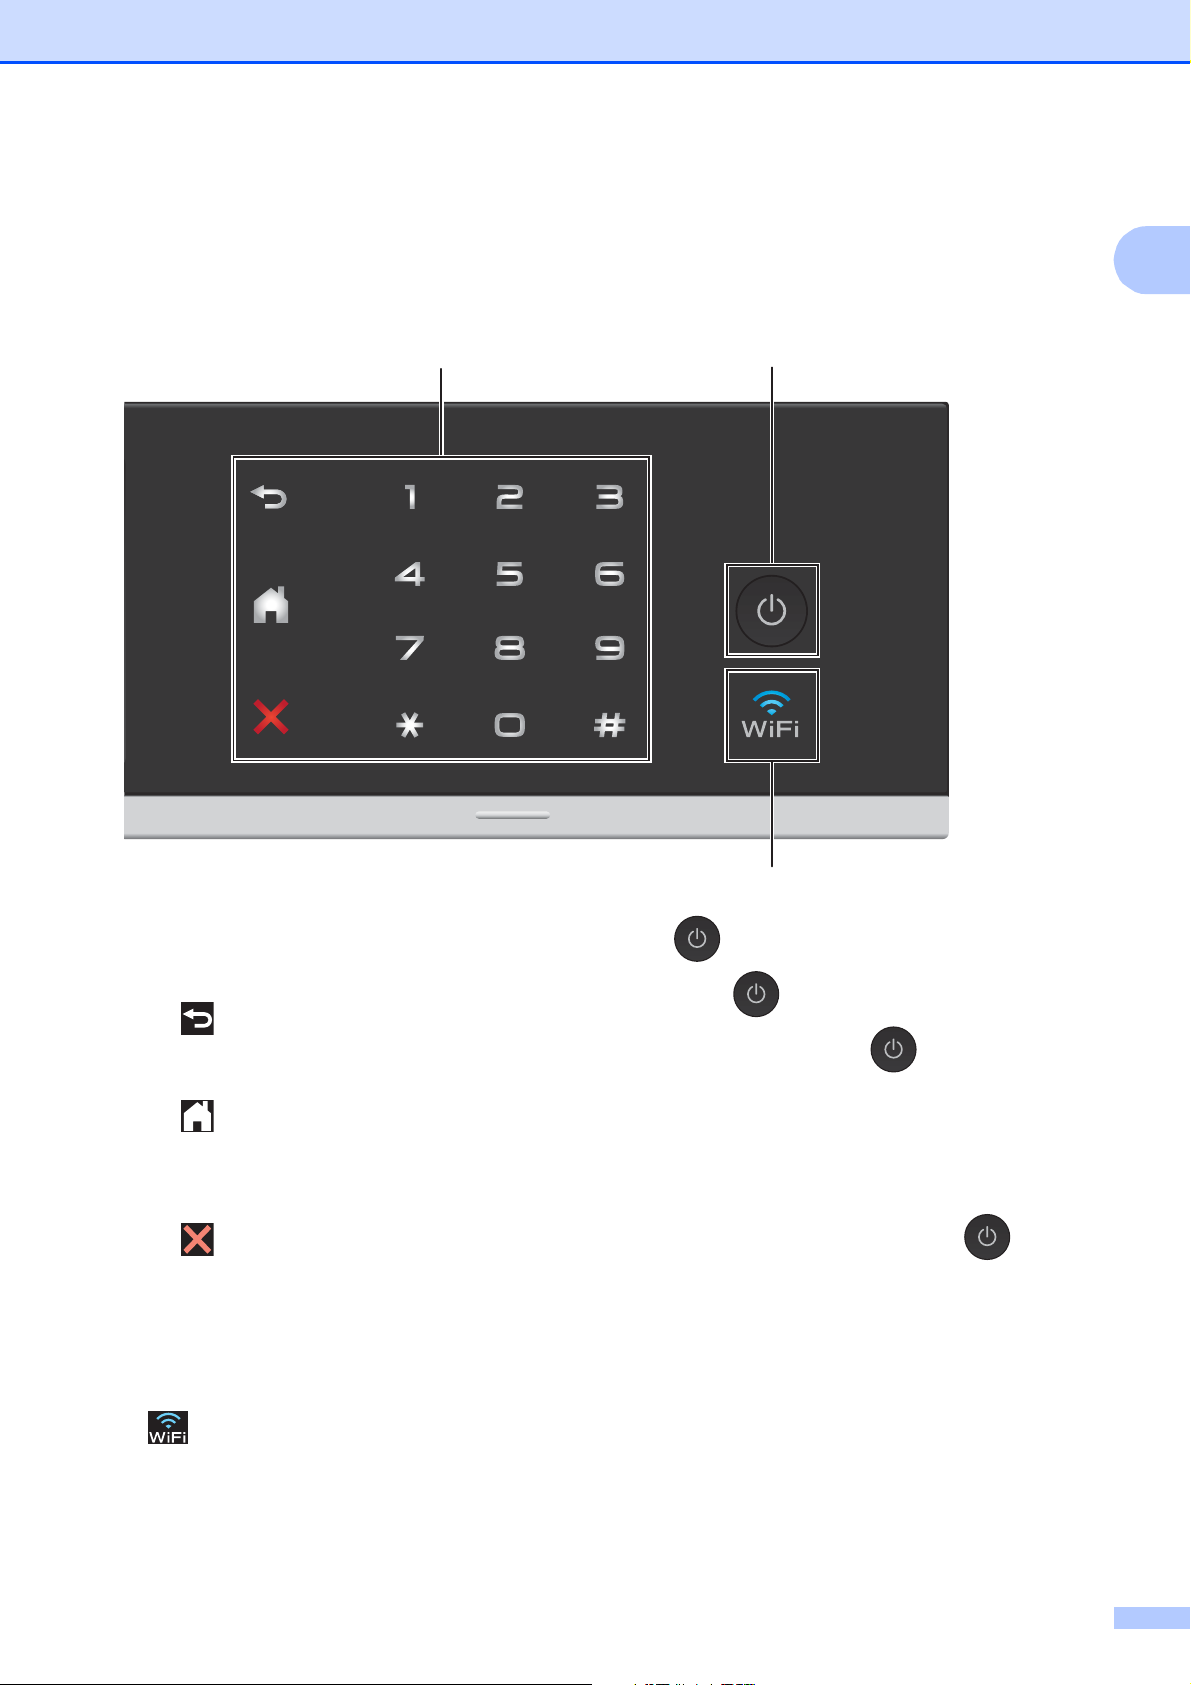
2 Touchpanel:
The LEDs on the Touchpanel only light up
when they are available for use.
Back
Press to go back to the previous menu
level.
Home
Lets you return to the Home screen. The
default shows the date and time, but you
can change the default setting.
4
3
4 Power On/Off
Press to turn the machine on.
Press and hold down to turn the machine
off. The Touchscreen LCD will show
Shutting Down and will stay on for a few
seconds before turning off.
If you have connected an external telephone or
TAD, it is always available.
Cancel
Press to cancel an operation when lit.
Dial Pad
Press the numbers on the Touchpanel to
dial telephone or fax numbers and to enter
the number of copies.
3
The WiFi light is on when the network interface
is WLAN.
If you turn the machine off using , it will still
periodically clean the print head to maintain
print quality. To prolong the life of the print
head, provide better ink efficiency and
maintain print quality, you should keep your
machine connected to the power at all times.
5
Chapter 1
21
5
3 4
21
6 7 8
3
4
21
9
3
4
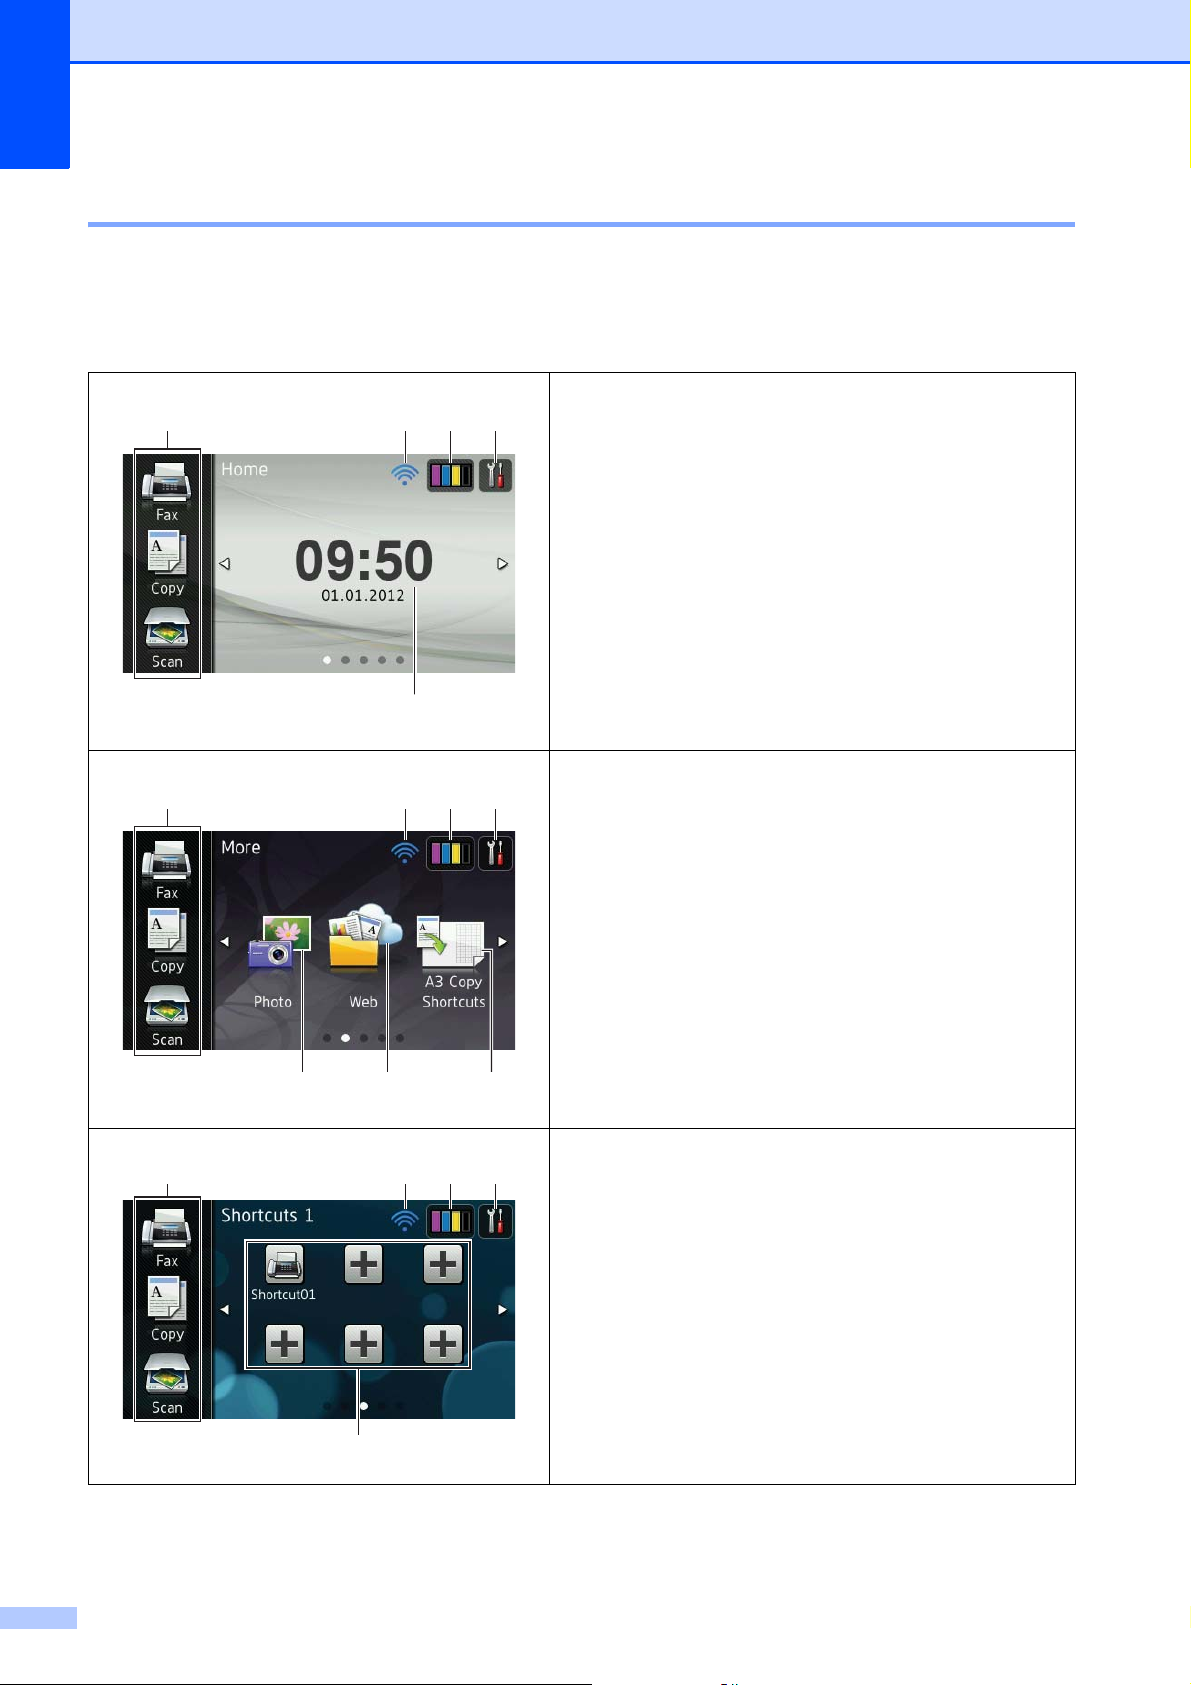
3.7" (93.4 mm) Touchscreen LCD 1
You can select three types of screens for the Home screen. When the Home screen is displayed,
you can change the displayed screen by swiping left or right, or pressing d or c.
The following screens show the machine status when the machine is idle.
Home screen 1
The Home screen shows the date and time, as well as
provide access to Fax, Copy and Scan, WiFi setup, Ink
levels and Setup screen.
When the Home screen is displayed the machine is in
1
Ready mode. If Secure Function Lock
turned on an icon is prominently displayed.
1
See Advanced User’s Guide: Secure Function Lock 2.0.
has been
More screen 1
The More screen provides access to additional
features, such as Photo, Web and A3 Copy Shortcuts.
6
Shortcut screens 1
You can save certain settings as a Shortcut so you can
quickly send a fax, copy, scan and use web connect
services. (For details, see Shortcut Settings
on page 11.)
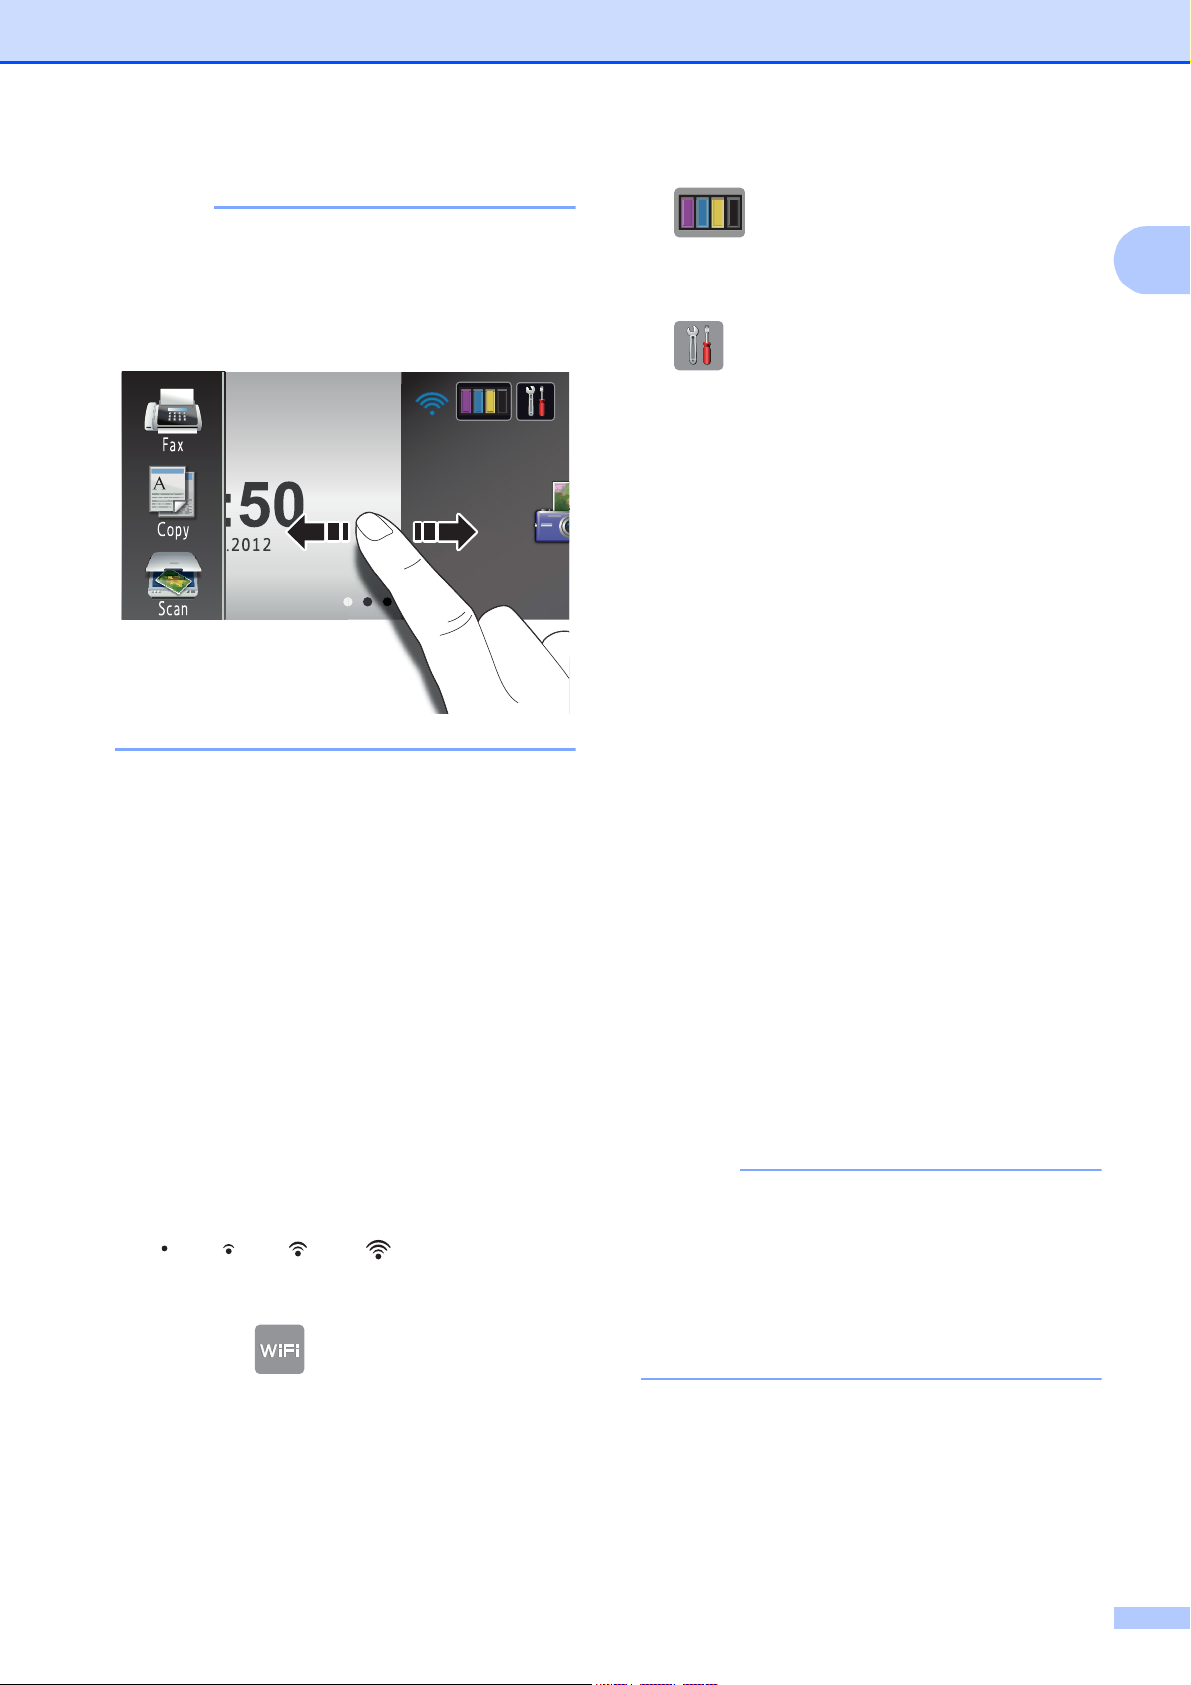
NOTE
Swiping is a type of user operation on the
NOTE
Touchscreen LCD that is performed by
brushing your finger across the screen to
display the next page or item.
General information
3
Lets you see the available ink volume.
Also, lets you access the Ink menu.
4
Lets you access the main settings.
For details, see Settings screen
on page 9.
5 Date and Time
Displays the date and time that has been
set in the machine.
6 Photo
Lets you access Photo mode.
7 Web
1
1 Modes:
Fax
Lets you access Fax mode.
Copy
Lets you access Copy mode.
Scan
Lets you access Scan mode.
2 Wireless Status
A four-level indicator on the Ready mode
screen shows the current wireless signal
strength if you are using a wireless
connection.
0Max
Lets you connect the Brother machine to
an Internet service.
For details, see Web Connect Guide.
8 A3 Copy Shortcuts
You can quickly copy to A3 or Ledger size
paper using this preset menu. For details,
see Advanced User’s Guide: A3 Copy
Shortcuts.
9 Shortcuts
Lets you set up Shortcuts.
You can save certain settings as a
Shortcut so you can quickly send a fax,
copy, scan and use web connect services.
• Three Shortcut screens are available. You
can set up to six Shortcuts in each
Shortcut screen. A total of 18 Shortcuts
are available.
If you see at the top of the screen,
you can easily configure the wireless
settings by pressing it. For more
information, see Quick Setup Guide.
• To display the other Shortcut screens,
swipe left or right, or press d or c.
7
Chapter 1
NOTE
NOTE
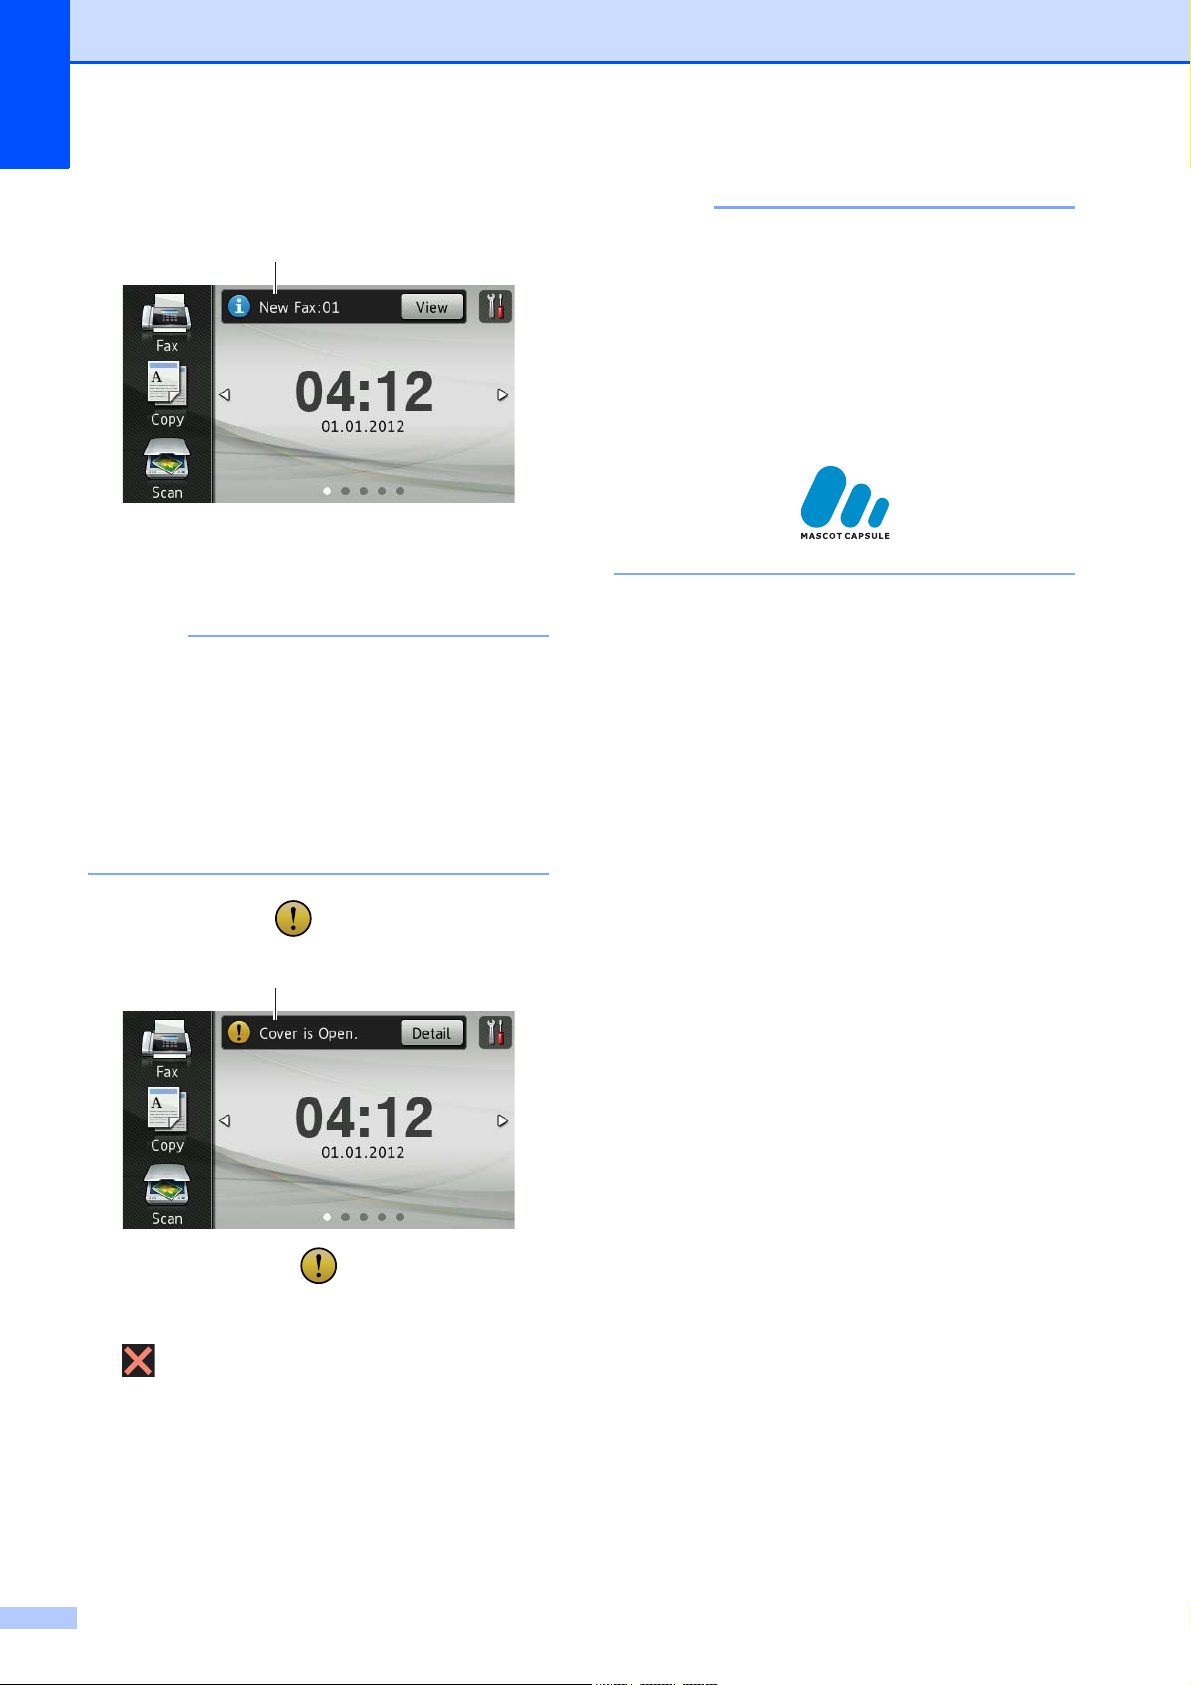
10
11
10 New Fax
When Fax Preview is set to On, you can
see how many new faxes you have
received and stored in the memory.
(MFC-J4710DW)
• This product adopts the font of ARPHIC
TECHNOLOGY CO.,LTD.
• MascotCapsule UI Framework and
MascotCapsule Tangiblet developed by
HI CORPORATION are used.
MascotCapsule is a registered trademark
of HI CORPORATION in Japan.
If you receive a fax containing multiple
paper sizes (for example, a page of A4
data and a page of A3 data), the machine
may create and store a file for each paper
size. The Touchscreen may show that
more than one fax job has been received.
11 Warning icon
The warning icon appears when there
is an error or maintenance message;
press Detail to view it, and then press
to return to Ready mode.
For details, see Error and maintenance
messages on page 103.
8
General information
12 43
9 10 6
5
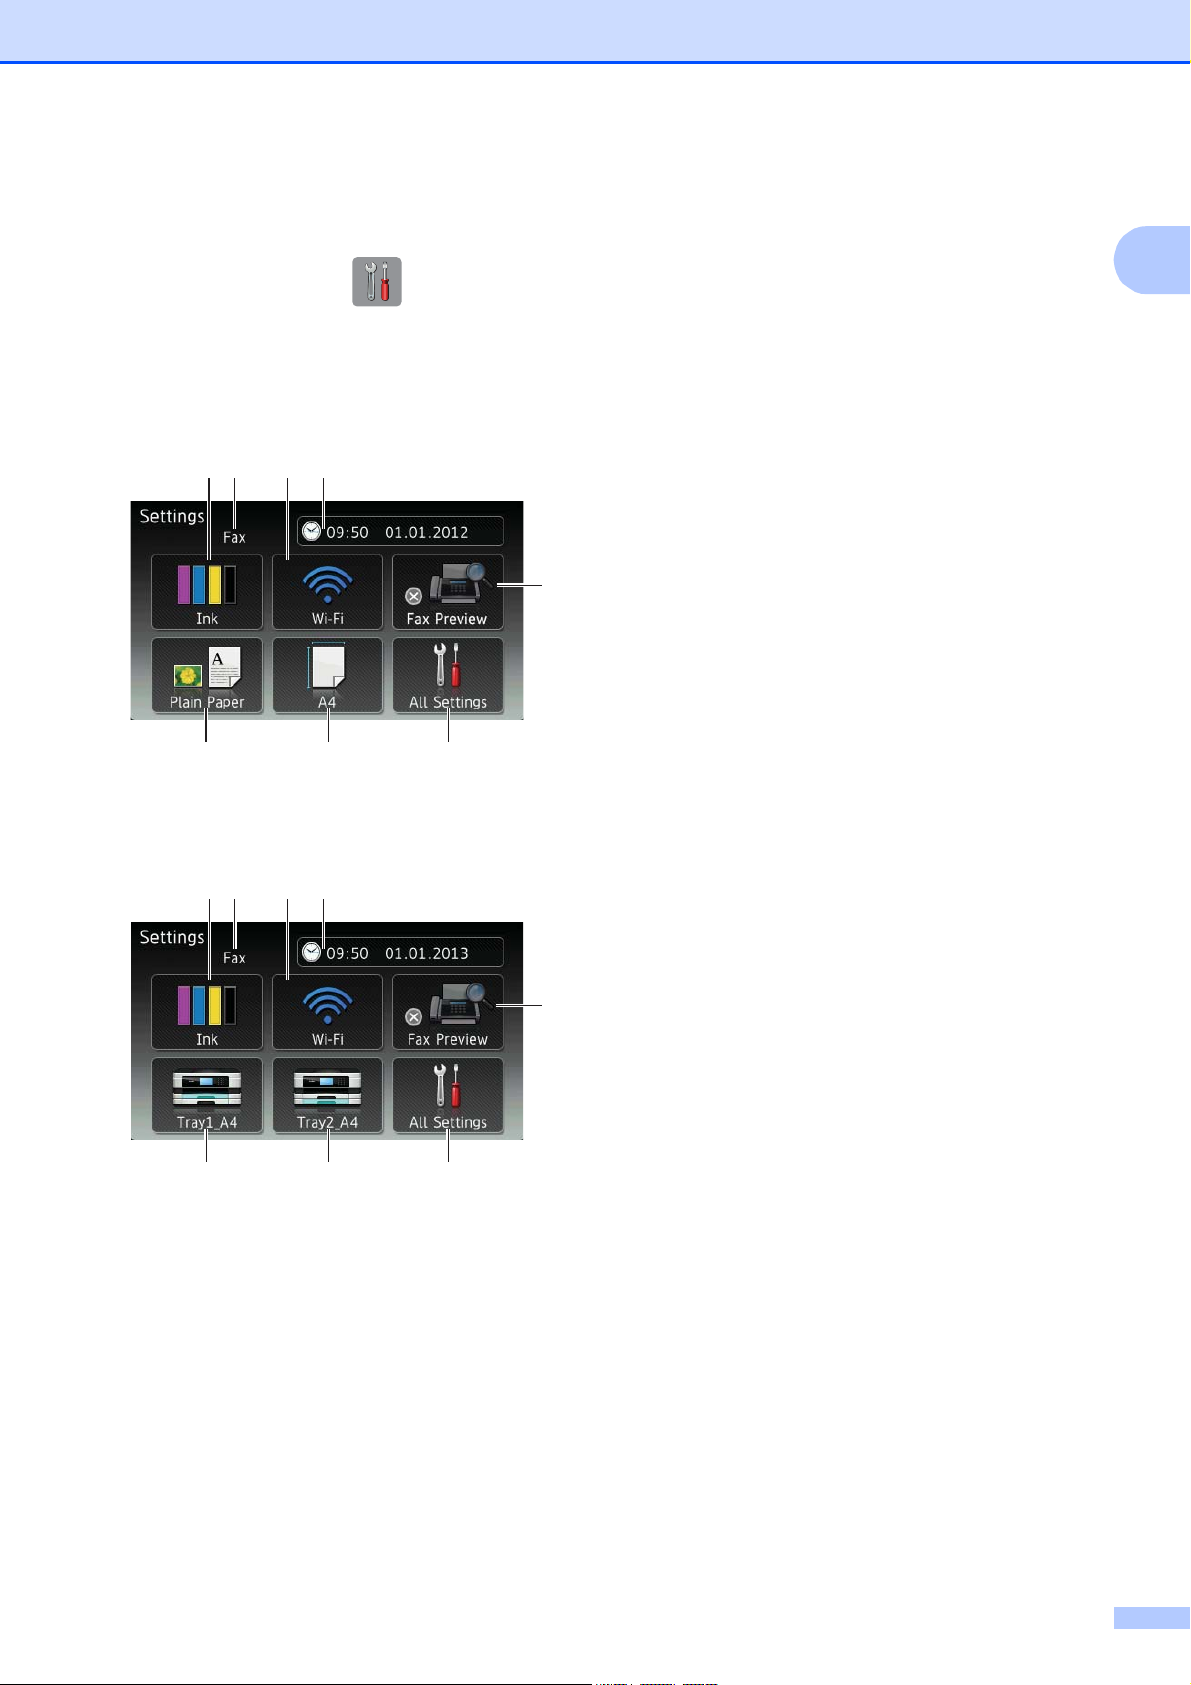
Settings screen 1
The Touchscreen LCD shows the machine
status when you press .
You can check and access all the machine's
settings from the following screen.
(MFC-J4510DW)
12 43
5
8 7 6
(MFC-J4710DW)
3 Wi-Fi
Lets you setup a Wi-Fi network
connection.
A four level indicator on the screen shows
the current wireless signal strength if you
are using a wireless connection.
4 Date & Time
Lets you see the date and time.
Also, lets you access the Date & Time
menu.
5 Fax Preview
Lets you check the Fax Preview status.
Also lets you access the Fax Preview
setting.
6 All Settings
Lets you access the full Settings menu.
7 Paper Size (MFC-J4510DW)
Lets you check the current paper size.
Also, lets you access the Paper Size
setting.
8 Paper Type (MFC-J4510DW)
1
1 Ink
Lets you see the available ink volume.
Also, lets you access the Ink menu.
2 Receive Mode
Lets you see the current Receive Mode.
Fax (Fax Only)
Fax/Tel (Fax/Tel)
External TAD (External TAD)
Lets you check the current paper type.
Also, lets you access the Paper Type
setting.
9 Tray #1 (MFC-J4710DW)
Lets you check the current paper size of
Tray #1. Also, lets you access the
Tray #1 setting. You can change the
paper size and paper type.
10 Tray #2 (MFC-J4710DW)
Lets you check the current paper size of
Tray #2. Also, lets you access the
Tray #2 setting. You can change the
paper size.
Manual (Manual)
9
Chapter 1
Setting the Ready screen 1
You can set the Ready screen to either Home,
More, Shortcuts 1, Shortcuts 2 or
Shortcuts 3.
When the machine is idle or you press ,
the machine will go back to the screen that
you have set.
a Press .
b Press All Settings.
c Swipe up or down, or press a or b to
display General Setup.
d Press General Setup.
e Swipe up or down, or press a or b to
display Button Settings.
Basic Operations 1
To operate the Touchscreen LCD, use your
finger to press directly on the Touchscreen.
To display and access all the screen menus
or options, swipe left, right, up, down, or press
d c or a b to scroll through them.
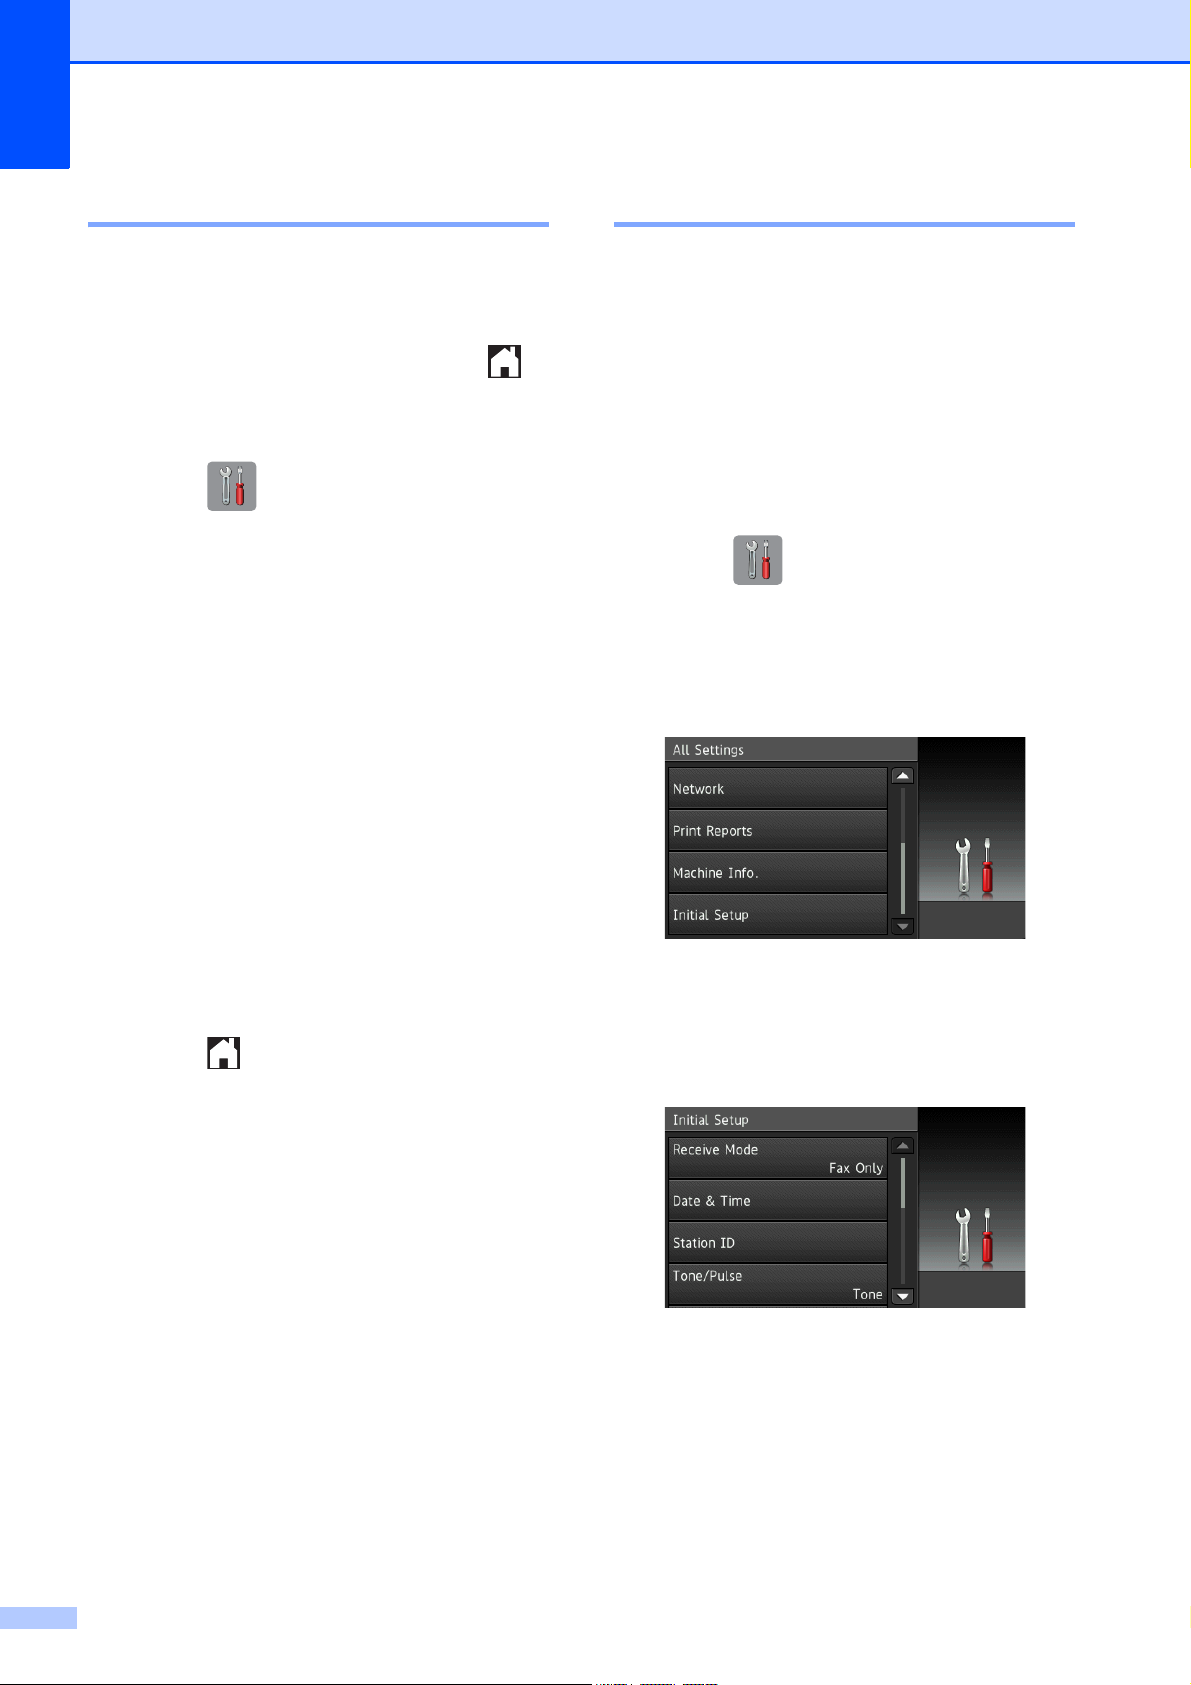
The following steps show how to change a
setting in the machine. In this example, the
Receive Mode setting is changed from
Fax Only to Fax/Tel.
a Press .
b Press All Settings.
c Swipe up or down, or press a or b to
display Initial Setup.
f Press Button Settings.
g Press Home Button Settings.
h Swipe up or down, or press a or b to
display Home, More, Shortcuts 1,
Shortcuts 2 or Shortcuts 3, and
then press the option you want.
i Press .
The machine will go to the Home screen
that you have set.
d Press Initial Setup.
e Swipe up or down, or press a or b to
display Receive Mode.
f Press Receive Mode.
10
General information
NOTE
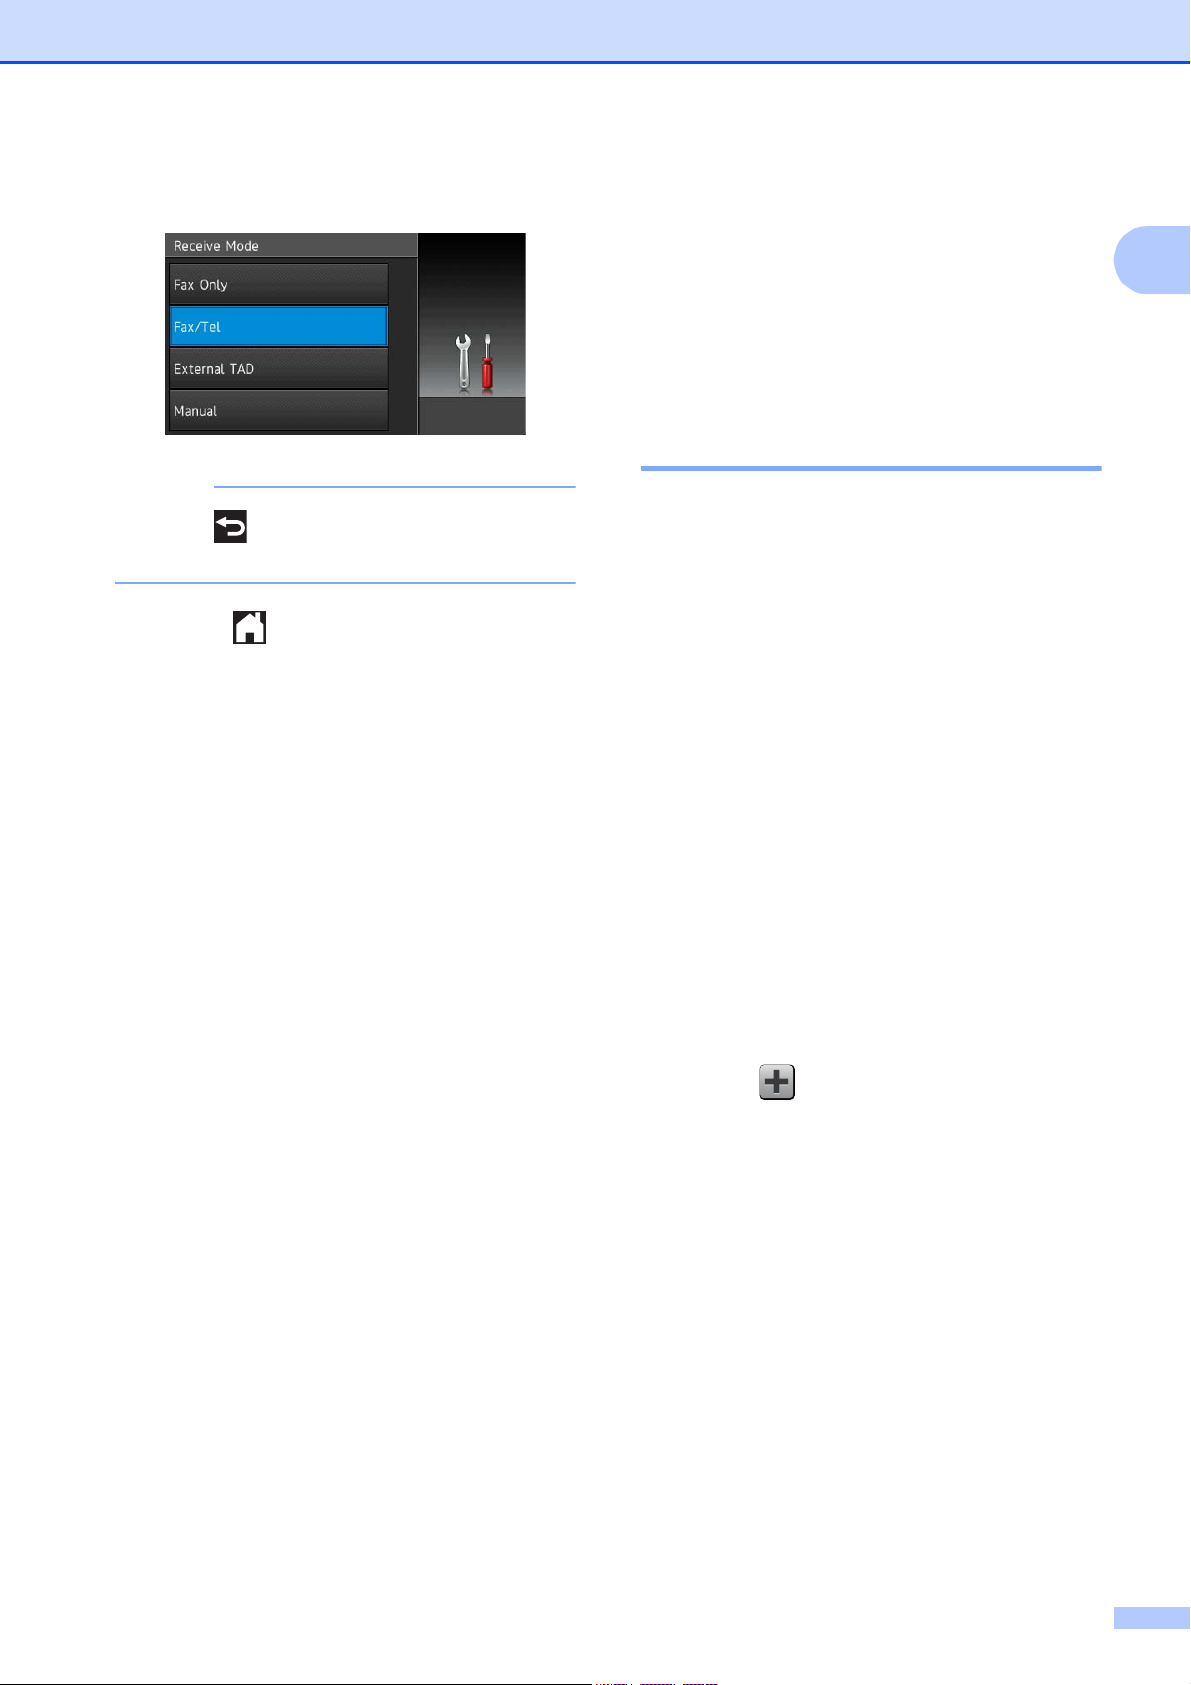
g Press Fax/Tel.
Press if you want to go back to the
previous level.
h Press .
Shortcut Settings 1
You can add the fax, copy, scan and Web
Connect settings you use most frequently by
setting them as your Shortcuts. Later you can
recall and apply these settings quickly and
easily. You can add 18 Shortcuts.
Adding Copy Shortcuts 1
The following settings can be included in a
copy Shortcut:
Quality
Paper Type
Paper Size
Tray Select (MFC-J4710DW)
Enlarge/Reduce
Density
1
Stack/Sort
Page Layout
2-sided Copy
Advanced Settings
a If the displayed screen is either Home or
More, swipe left or right, or press d or c
to display a Shortcut screen.
b Press where you haven’t added a
Shortcut.
c Press Copy.
d Read the information on the
Touchscreen, and then confirm it by
pressing OK.
e Press a copy preset you want to include
in the copy Shortcut.
f Swipe up or down, or press a or b to
display the available settings, and then
press the setting you want to change.
11

Chapter 1
NOTE
g Swipe up or down, or press a or b to
display the available options for the
setting, and then press the option you
want to set.
Repeat steps f and g until you have
chosen all the settings for this Shortcut.
h When you have finished changing
settings, press Save as Shortcut.
i Read and confirm the displayed list of
settings you have chosen, and then
press OK.
j Enter a name for the Shortcut using the
keyboard on the Touchscreen. (To help
you enter letters, see Entering Text
on page 175.)
Press OK.
k Press OK to save your Shortcut.
Adding Fax Shortcuts 1
The following settings can be included in a fax
Shortcut:
Address
Fax Resolution
2-sided Fax (MFC-J4710DW)
Contrast
Broadcasting
Preview
Colour Setting
Real Time TX
Overseas Mode
Glass Scan Size
a If the displayed screen is either Home or
More, swipe left or right, or press d or c
to display a Shortcut screen.
d Read the information on the
Touchscreen, and then confirm it by
pressing OK.
e Enter the fax number using the dial pad
on the Touchpanel, or the Address Book
or Call history on the Touchscreen.
When you have finished, go to step f.
• You can enter up to 20 digits for a fax
number.
• If the Shortcut is to be used for
broadcasting, press Options and choose
Broadcasting in step g before entering
the fax number in step e.
• You can enter up to 20 fax numbers if the
Shortcut is for broadcasting. The fax
numbers can be entered in any
combination of Group numbers from the
Address Book and individual fax numbers
from the Address Book or entered
manually. (See Advanced User’s Guide:
Broadcasting (Monochrome only).)
• When you enter a fax number in a
Shortcut, it will be added automatically to
the Address Book. The name in the
Address Book will be the Shortcut name
plus a sequential number.
f Press Options.
g Swipe up or down, or press a or b to
display the available settings, and then
press the setting you want to change.
h Press the new option you want to set.
Repeat steps g and h until you have
chosen all the settings for this Shortcut.
Press OK.
i When you have finished choosing new
options, press Save as Shortcut.
b Press where you haven’t added a
Shortcut.
c Press Fax.
12
j Read and confirm the displayed list of
options you have chosen, and then
press OK.

General information
NOTE
k Enter a name for the Shortcut using the
keyboard on the Touchscreen. (To help
you enter letters, see Entering Text
on page 175.)
Press OK.
l Press OK to save your Shortcut.
Adding Scan Shortcuts 1
The following settings can be included in a
scan Shortcut:
to Media
2-sided Scan (MFC-J4710DW)
Scan Type
Resolution
File Type
File Name
Auto Crop
Skip Blank Page (MFC-J4710DW)
Remove Background Colour
to E-mail Server (Available after IFAX
has been downloaded)
Address
2-sided Scan (MFC-J4710DW)
Scan Type
a If the displayed screen is either Home or
More, swipe left or right, or press d or c
to display a Shortcut screen.
b Press where you haven’t added a
Shortcut.
c Press Scan.
d Swipe up or down, or press a or b to
display the type of scan you want to do,
and then press it.
e Do one of the following:
If you pressed to Media, read the
information on the Touchscreen, and
then press OK to confirm it. Go to
step h.
If you pressed
to E-mail Server, read the
information on the Touchscreen, and
then press OK to confirm it. Go to
step f.
If you pressed to File, to OCR,
to Image or to E-mail, read the
information on the Touchscreen, and
then press OK to confirm it. Go to
step g.
If you pressed to Network or
to FTP, read the information on the
Touchscreen, and then press OK to
confirm it.
1
Resolution
File Type
to OCR/to File/to Image/to E-mail
PC Select
to FTP/to Network
Profile Name
Swipe up or down, or press a or b to
display the Profile Name, and then
press it.
Press OK to confirm the Profile Name
you have chosen. Go to step m.
To add a Shortcut for to Network and
to FTP, you must have added the Profile
Name beforehand.
13

Chapter 1
NOTE
f Do one of the following:
To enter an E-mail address
manually, press Manual. Enter the
E-mail address using the keyboard
on the Touchscreen. (See Entering
Text on page 175.)
Press OK.
To enter an E-mail address from the
Address Book, press
Address Book. Swipe up or down,
or press a or b to display the E-mail
address you want, and then press it.
Press OK.
After you confirm the E-mail address
you entered, press OK. Go to step h.
Press Detail to view the list of
addresses you have entered.
g Do one of the following:
When the machine is connected to a
PC using a USB connection:
Press OK to confirm <USB> is chosen
as the PC Name. Go to step m.
j Swipe up or down, or press a or b to
display the available options for the
setting, and then press the new option
you want to set.
Repeat steps i and j until you have
chosen all the settings for this Shortcut.
When you have finished changing
settings, press OK.
k Review the settings you have chosen:
If you need to make more changes,
return to step h.
If you are satisfied with your
changes, press
Save as Shortcut.
l Review your settings on the
Touchscreen, and then press OK.
m Enter a name for the Shortcut using the
keyboard on the Touchscreen. (To help
you enter letters, see Entering Text
on page 175.)
Press OK.
n Read the information on the
Touchscreen, and then press OK to save
your Shortcut.
When the machine is connected to a
network:
Swipe up or down, or press a or b to
display the PC Name, and then press
it. Press OK to confirm the PC Name
you have chosen. Go to step m.
h Press Options.
i Swipe up or down, or press a or b to
display the available settings, and then
press the setting you want to change or
store.
Adding Web Connect Shortcuts 1
The settings for the following services can be
included in a Web Connect Shortcut:
PICASA Web Albums™
Google Drive™
FLICKR
Facebook™
EVERNOTE
Dropbox
®
14

General information
NOTE
NOTE
NOTE
NOTE
• Web services may have been added
and/or service names may have been
changed by the provider since this
document was published.
• To add a Web Connect Shortcut, you
need to have an account with the desired
service. (For details,
see Web Connect Guide.)
a If the displayed screen is either Home or
More, swipe left or right, or press d or c
to display a Shortcut screen.
b Press where you haven't added a
Shortcut.
c Press Web.
d If Information regarding the Internet
connection is displayed, read the
information and confirm it by pressing
OK.
The Shortcut name will be assigned
automatically. If you want to change the
Shortcut names, see Editing Shortcut
Names on page 16.
Changing Shortcuts 1
You can change the settings in a Shortcut.
You cannot change a Web Connect
Shortcut.
If you want to change the Shortcut, delete
it, and then add a new Shortcut.
(For details, see Deleting Shortcuts
on page 16 and Adding Web Connect
Shortcuts on page 14.)
a Press the Shortcut you want to change.
The settings for the Shortcut that you
chose are displayed.
1
e Swipe left or right, or press d or c to
display the available services, and then
press the desired service.
f Press your account.
If the account needs a PIN code, enter
the PIN for the account using the
keyboard on the Touchscreen.
Press OK.
g Choose the function you want to use.
The functions that can be set vary
depending on the chosen service.
h Read and confirm the displayed list of
functions you have chosen, and then
press OK.
i Press OK to save your Shortcut.
b Change the settings for the Shortcut you
chose in step a. (For example, see
Adding Copy Shortcuts on page 11.)
c Press Save as Shortcut when you
have finished changing settings.
d Press OK to confirm.
e Do one of the following:
If you want to overwrite the Shortcut,
press Yes. Go to step g.
If you do not want to overwrite the
Shortcut, press No to enter a new
Shortcut name. Go to step f.
f To edit the name, hold down to
delete the current name, and then enter
a new name using the keyboard on the
Touchscreen. (To help you enter letters,
see Entering Text on page 175.)
Press OK.
g Press OK to confirm.
15

Chapter 1
NOTE
NOTE
Editing Shortcut Names 1
You can edit a Shortcut name.
a Press and hold the Shortcut until the
dialog box appears.
You can also press , All Settings
and Shortcut Settings.
b Press Edit Shortcut Name.
c To edit the name, hold down to
delete the current name, and then enter
a new name using the keyboard on the
Touchscreen. (To help you enter letters,
see Entering Text on page 175.)
Press OK.
Volume Settings 1
Ring Volume 1
You can choose a range of ring volume
levels, from High to Off. The machine will
keep your new setting until you change it.
Setting the Ring Volume 1
a Press .
b Press All Settings.
c Swipe up or down, or press a or b to
display General Setup.
d Press General Setup.
e Swipe up or down, or press a or b to
display Volume.
Deleting Shortcuts 1
You can delete a Shortcut.
a Press and hold the Shortcut until the
dialog box appears.
You can also press , All Settings
and Shortcut Settings.
b Press Delete to delete the Shortcut
that you chose in step a.
Press Yes to confirm.
Recalling Shortcuts 1
The Shortcut settings are displayed on the
Shortcut screen. To recall a Shortcut, simply
press the Shortcut name.
f Press Volume.
g Press Ring.
h Press Low, Med, High or Off.
i Press .
16

General information
Beeper Volume 1
When the beeper is on, the machine will
make a sound when you press the
Touchscreen or Touchpanel, make a
mistake, or after you send or receive a fax.
You can choose a range of sound volume
levels, from High to Off.
a Press .
b Press All Settings.
c Swipe up or down, or press a or b to
display General Setup.
d Press General Setup.
e Swipe up or down, or press a or b to
display Volume.
f Press Volume.
g Press Beep.
Speaker Volume 1
You can choose a range of speaker volume
levels, from High to Off.
a Press .
b Press All Settings.
c Swipe up or down, or press a or b to
display General Setup.
d Press General Setup.
e Swipe up or down, or press a or b to
display Volume.
f Press Volume.
g Press Speaker.
h Press Low, Med, High or Off.
i Press .
1
h Press Low, Med, High or Off.
i Press .
17

Chapter 1
Touchscreen LCD 1
Setting the backlight brightness 1
If you are having difficulty reading the
Touchscreen LCD, try changing the
brightness setting.
a Press .
b Press All Settings.
c Swipe up or down, or press a or b to
display General Setup.
d Press General Setup.
e Swipe up or down, or press a or b to
display LCD Settings.
f Press LCD Settings.
g Press Backlight.
h Press Light, Med or Dark.
i Press .
18
CAUTION
NOTE
NOTE
Loading paper 2
2
Loading paper and other print media
DO NOT carry the machine by holding the
scanner cover, the Jam Clear Cover, the
manual feed slot cover, or the control panel.
Doing this may cause the machine to slip
out of your hands. Carry the machine by
sliding your hands into the handhold
indentations located on each side of the
machine.
For detailed information, see Product
Safety Guide.
2
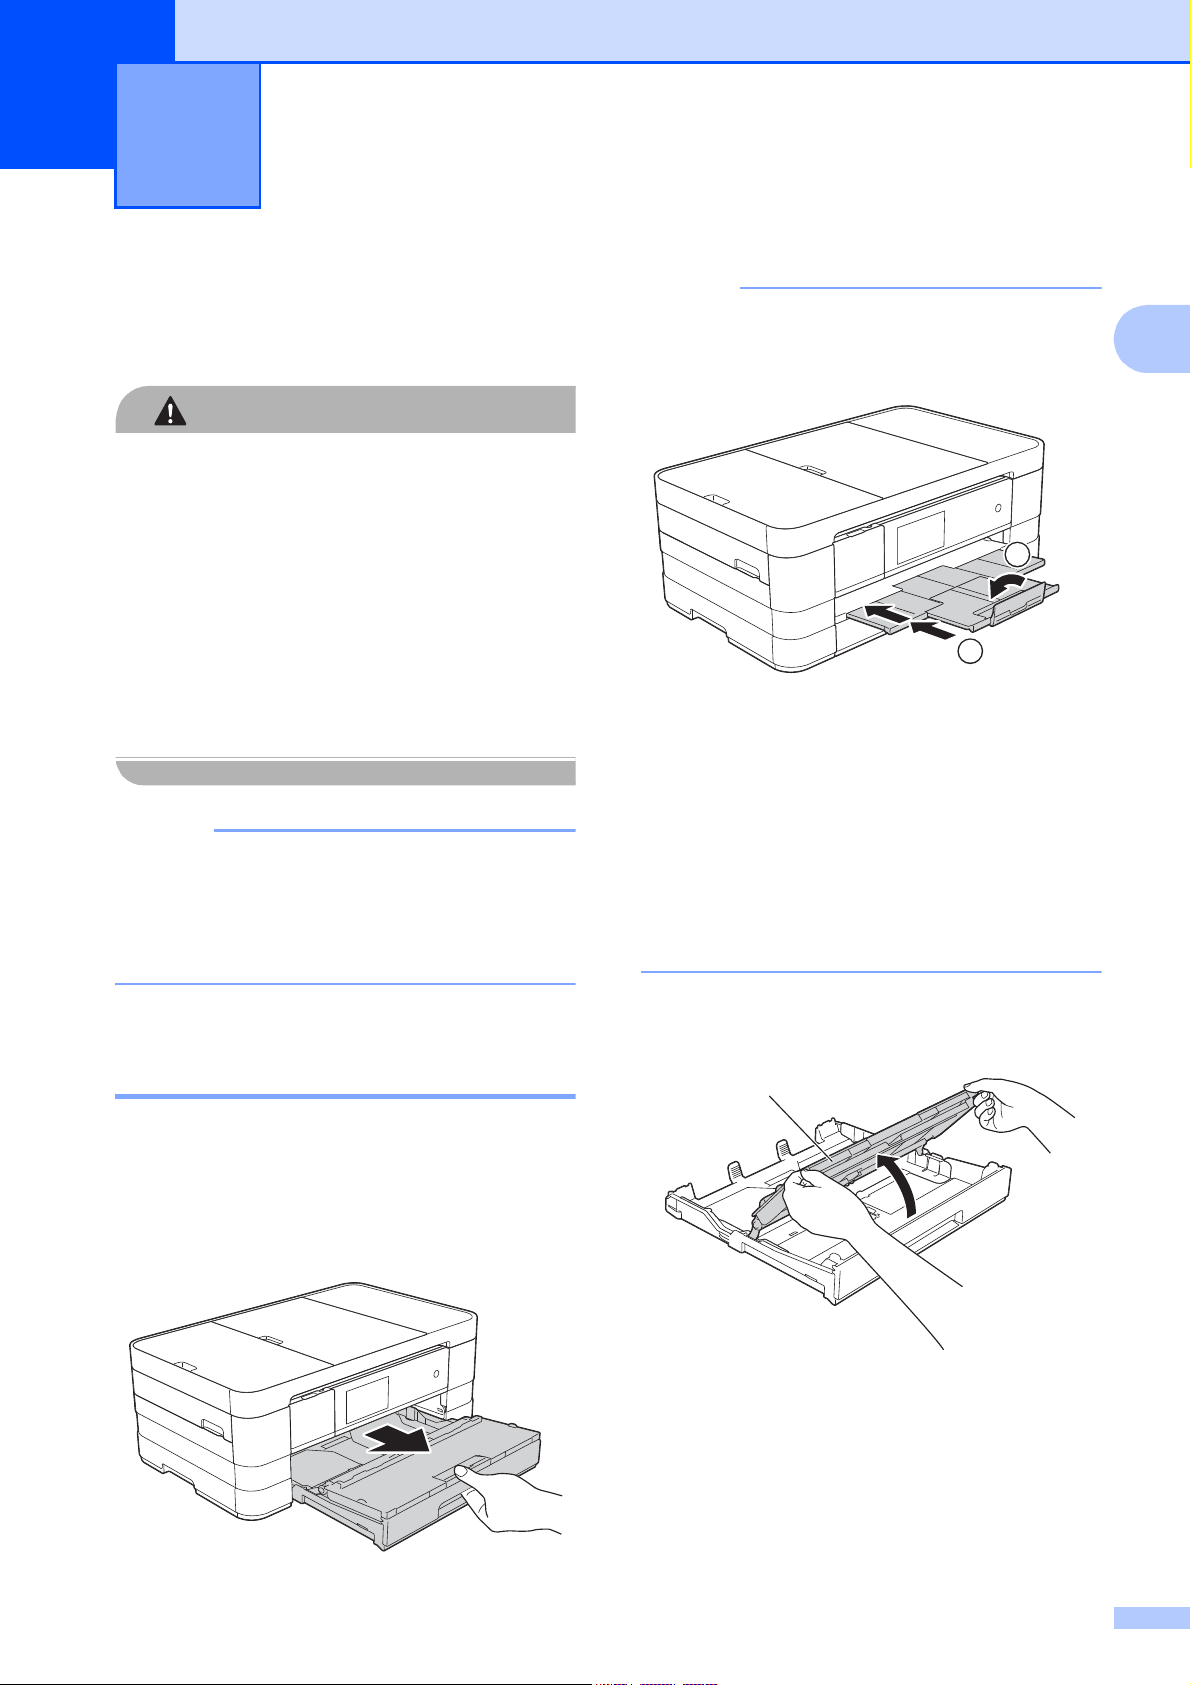
• If the paper support flap (1) is open, close
it, and then close the paper support (2).
1
2
• When you load a different paper size in
the tray, you will need to change the paper
size setting in the menu of the machine at
the same time.
2
(For MFC-J4710DW)
For tray #2 (lower tray), see Loading
paper in paper tray #2 (MFC-J4710DW)
on page 26.
Loading paper in paper tray #1 2
Load only one size of paper and one type of
paper in the paper tray at any time.
a Pull the paper tray completely out of the
machine.
(MFC-J4510DW: See Paper Size
on page 38.)
(MFC-J4710DW: See Paper Size and
Type (MFC-J4710DW) on page 39.)
b Open the output paper tray cover (1).
1
19
Chapter 2
NOTE
IMPORTANT
NOTE
1
2
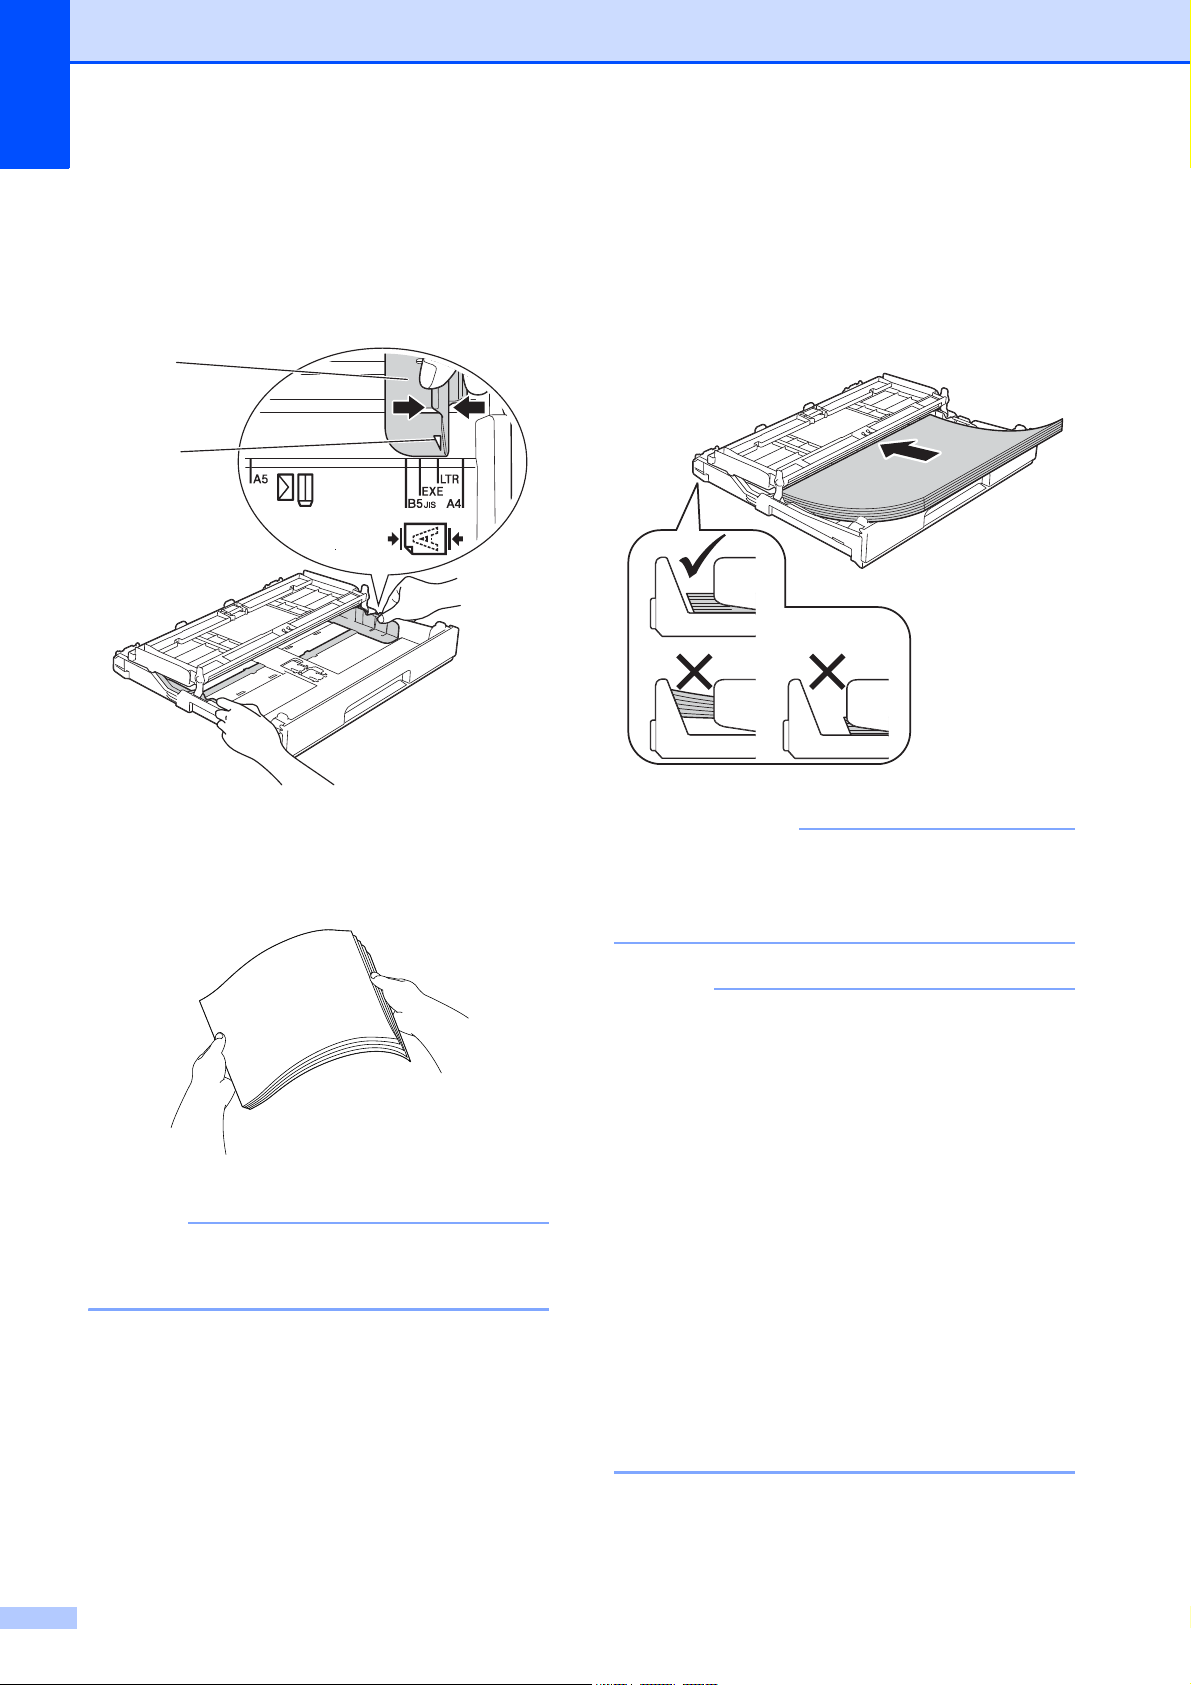
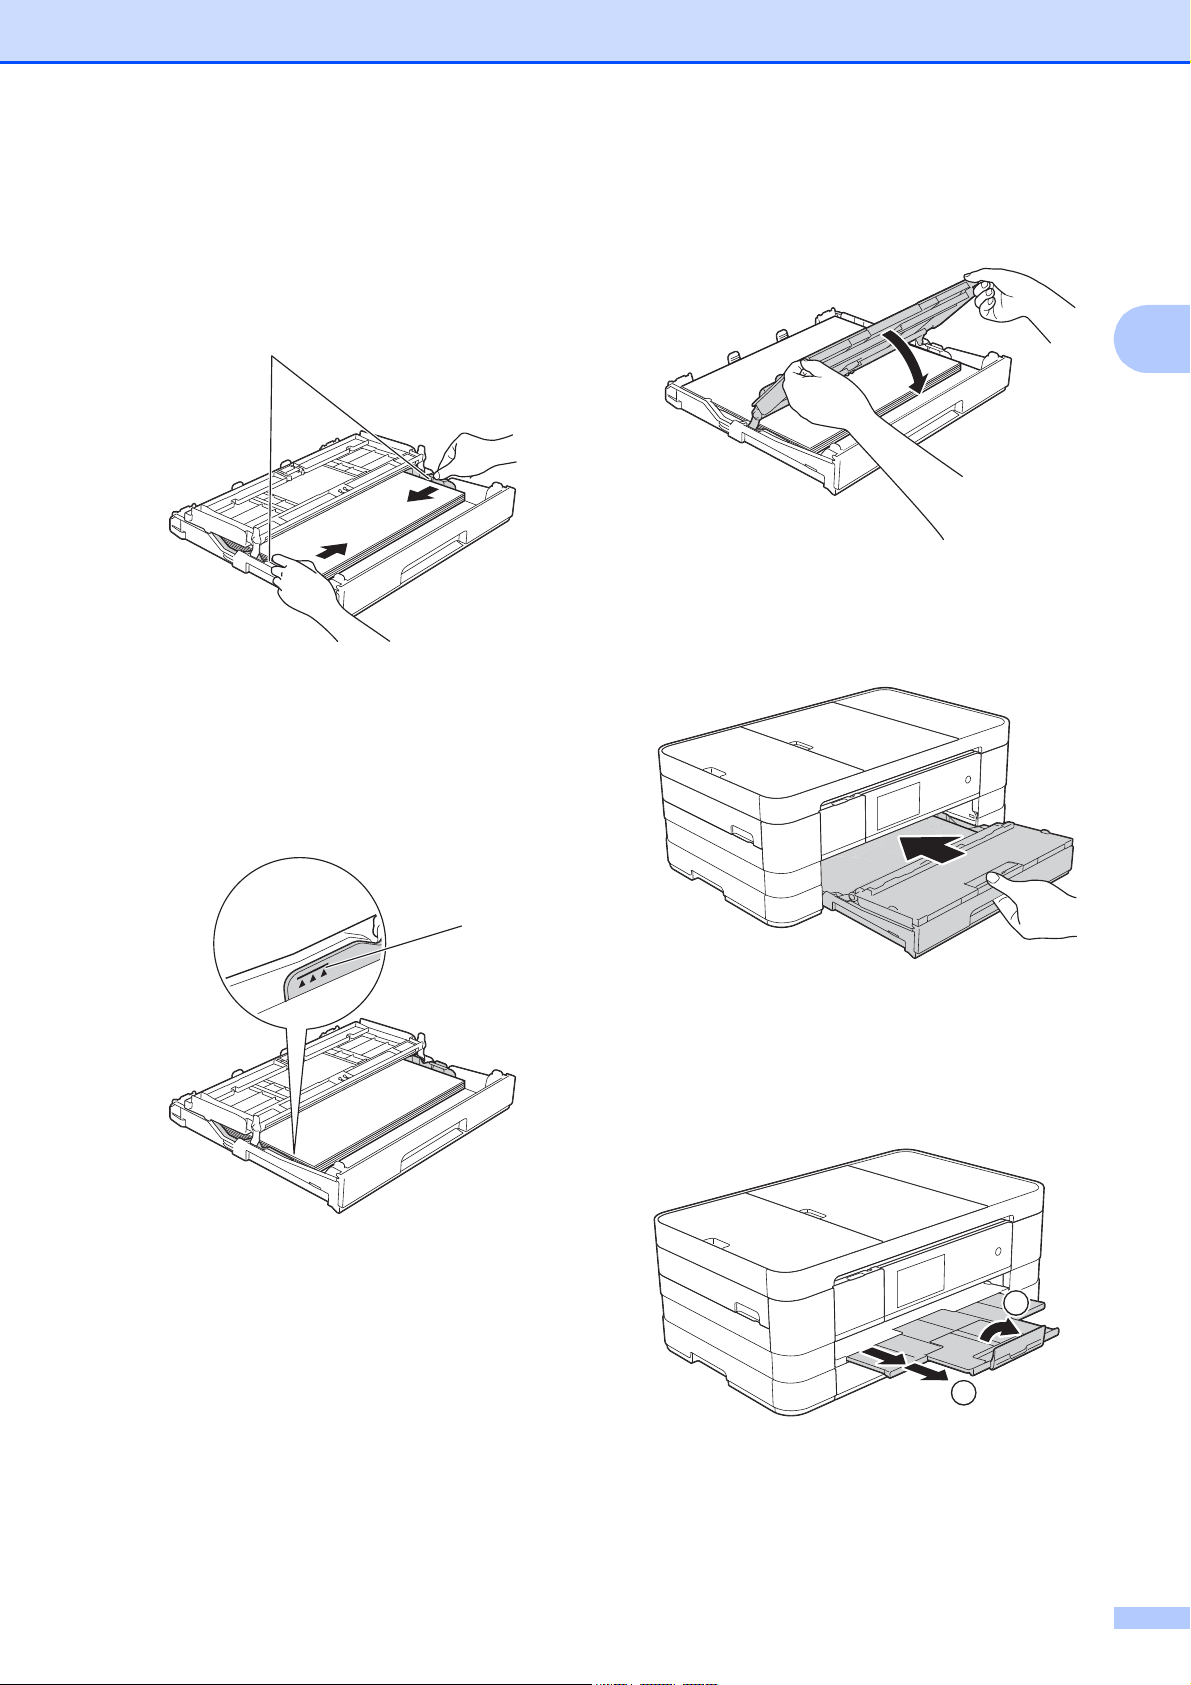
c Gently press and slide the paper
guides (1) to fit the paper size.
Make sure that the triangular mark (2)
on the paper guide (1) lines up with the
mark for the paper size you are using.
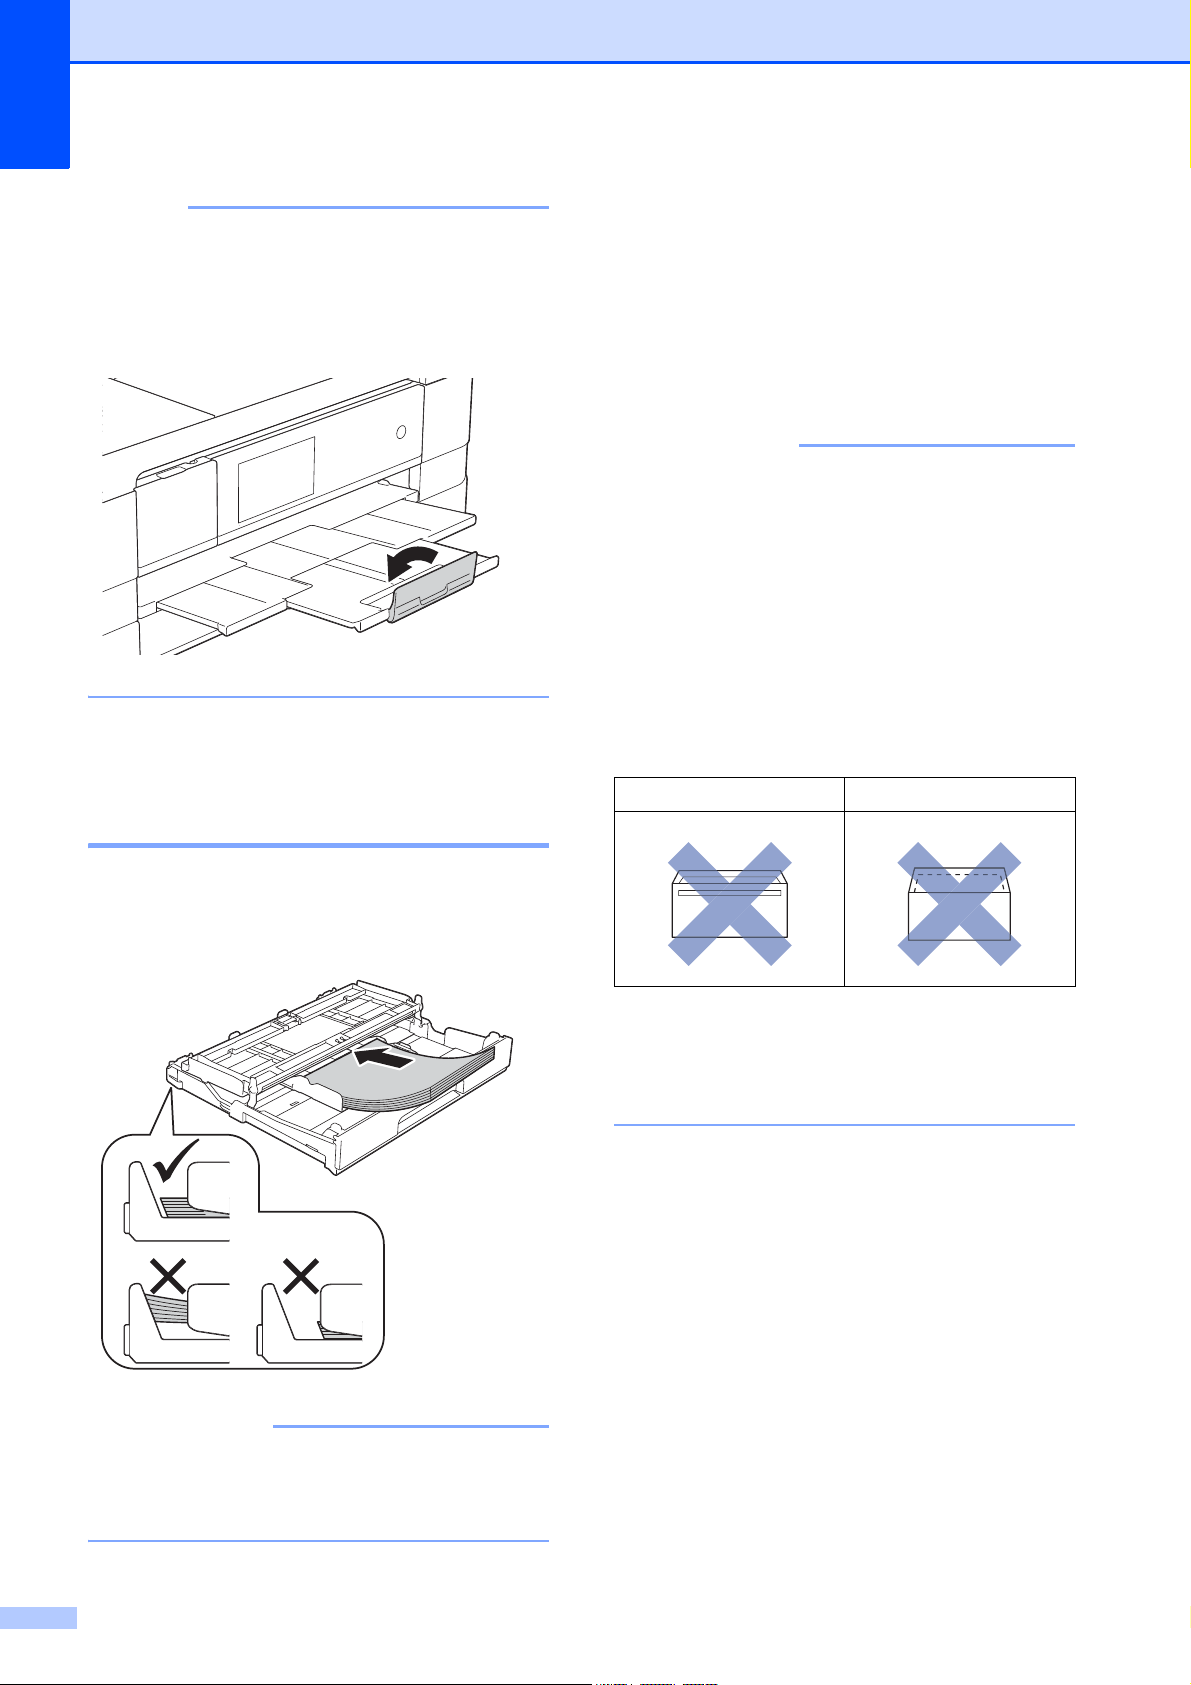
e Gently put the paper into the paper tray
print side down.
Check that the paper is flat in the tray.
Using A4, Letter or Executive
Landscape orientation
2
d Fan the stack of paper well to avoid
paper jams and misfeeds.
Always make sure that the paper is not
curled or wrinkled.
Be careful not to push the paper in too far;
it may lift at the back of the tray and cause
paper feed problems.
• A5 or smaller size paper should be loaded
into the tray in portrait orientation.
For details, see Loading smaller paper
(Photo, Photo L and envelopes)
on page 22.
• If you want to add paper before the tray is
empty, remove the paper from the tray
and combine it with the paper you are
adding. Always fan the stack of paper well
before loading it in the tray. If you add
paper without fanning the stack, the
machine may feed multiple pages.
• For details of the paper orientation, see
Paper orientation and capacity of the
paper trays on page 43.
20
Loading paper
f Gently adjust the paper guides (1) to fit
the paper.
Make sure the paper guides touch the
sides of the paper.
1
g Check that the paper is flat in the tray
and below the maximum paper
mark (1).
Overfilling the paper tray may cause
paper jams.
h Close the output paper tray cover.
i Slowly push the paper tray completely
into the machine.
2
1
j While holding the paper tray in place,
pull out the paper support (1) until it
clicks and unfold the paper support
flap (2).
2
1
21
Chapter 2
NOTE
IMPORTANT
IMPORTANT
About envelopes 2
If you are using paper that is longer than
A4, Letter size paper or envelopes with
the flap on the short edge, close the paper
support flap.
Loading smaller paper (Photo, Photo L and envelopes) 2
Use envelopes that weigh between 80 to
2
95 g/m
.
Some envelopes need margin settings to
be set in the application. Make sure you
do a test print first before printing many
envelopes.
DO NOT use the following types of
envelopes, as they will not feed correctly:
• That are of a baggy construction.
• That have windows.
• That are embossed (have raised
writing on them).
• That have clasps or staples.
• That are pre-printed on the inside.
Glue Double flaps
Portrait orientation
(A5 or smaller size paper)
Be careful not to push the paper in too far;
it may lift at the back of the tray and cause
paper feed problems.
Occasionally you may experience paper
feed problems caused by the thickness,
size and flap shape of the envelopes you
are using.
22
 Loading...