

Page 1
Quick Setup Guide
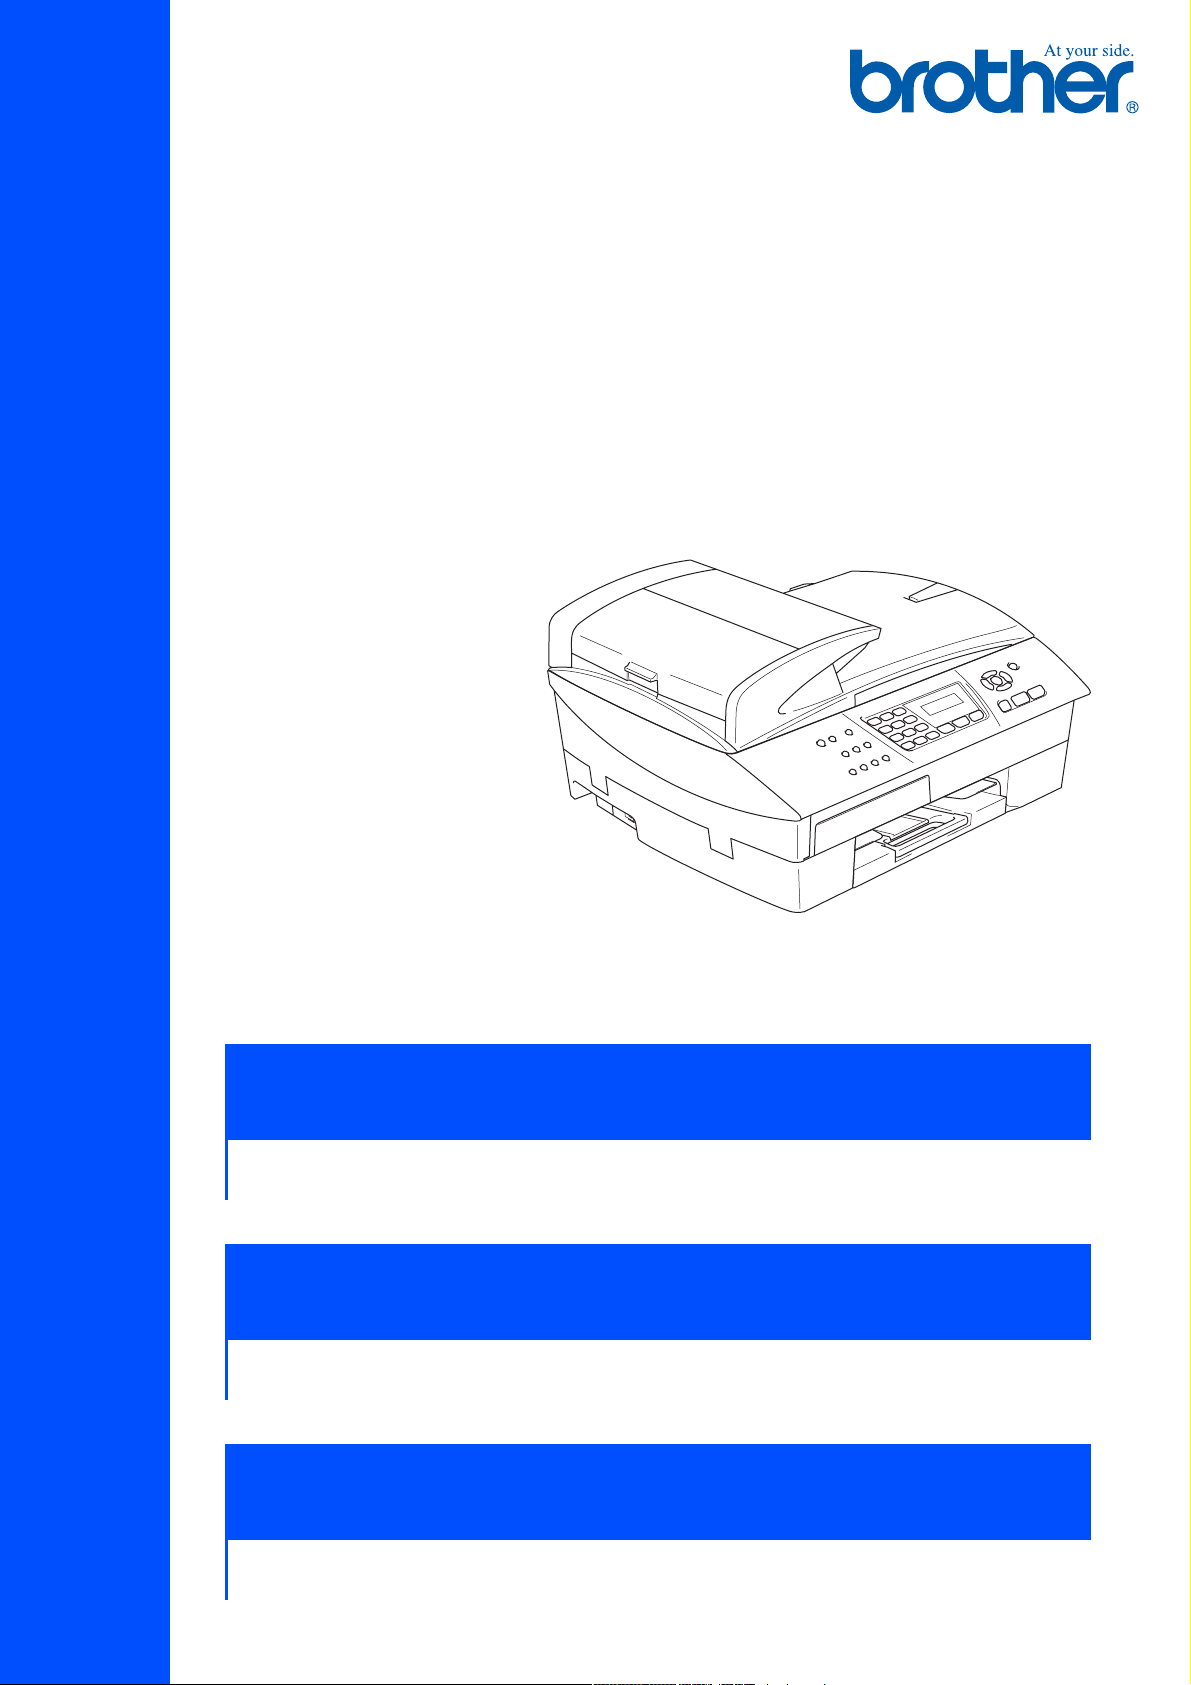
MFC-5440CN
Quick Setup Guide
➟ English …
MFC-5440CN
Go to page 1
Ръководство за Бързо Инсталиране
➟ Български …
MFC-5440CN
отидете на стр. 19
Ghid rapid de setare
➟ Română …
MFC-5440CN
mergeţi la pagina 37
Page 2

Page 3
Before you can use the machine, you must set up the hardware and install the driver.
To help you get started in setting up the machine and installing the driver and software,
please read this “Quick Setup Guide” and follow the simple instructions.
Step 1
Setting Up
the Machine
MFC-5440CN
Step 2
Setting Up the Machine
Installing the Driver & Software
Setup is Complete!
®
Windows
®
Network
Windows
XMac OS
®
Mac OS
Installing the Driver & Software
®
For the latest drivers and to find the best solution for your problem or question, access the Brother
Solutions Center directly from the driver or go to http://solutions.brother.com
Keep this “Quick Setup Guide” supplied CD-ROM in a convenient place for quick and easy
reference at all times.
Quick Setup Guide
®
Macintosh
For
8.6 - 9.2
Network
Network Users
1
Page 4
Step 1
1
1
2
To load paper or other media
Setting Up the Machine
Removing the Protective Parts
Remove the protective tape and paper.
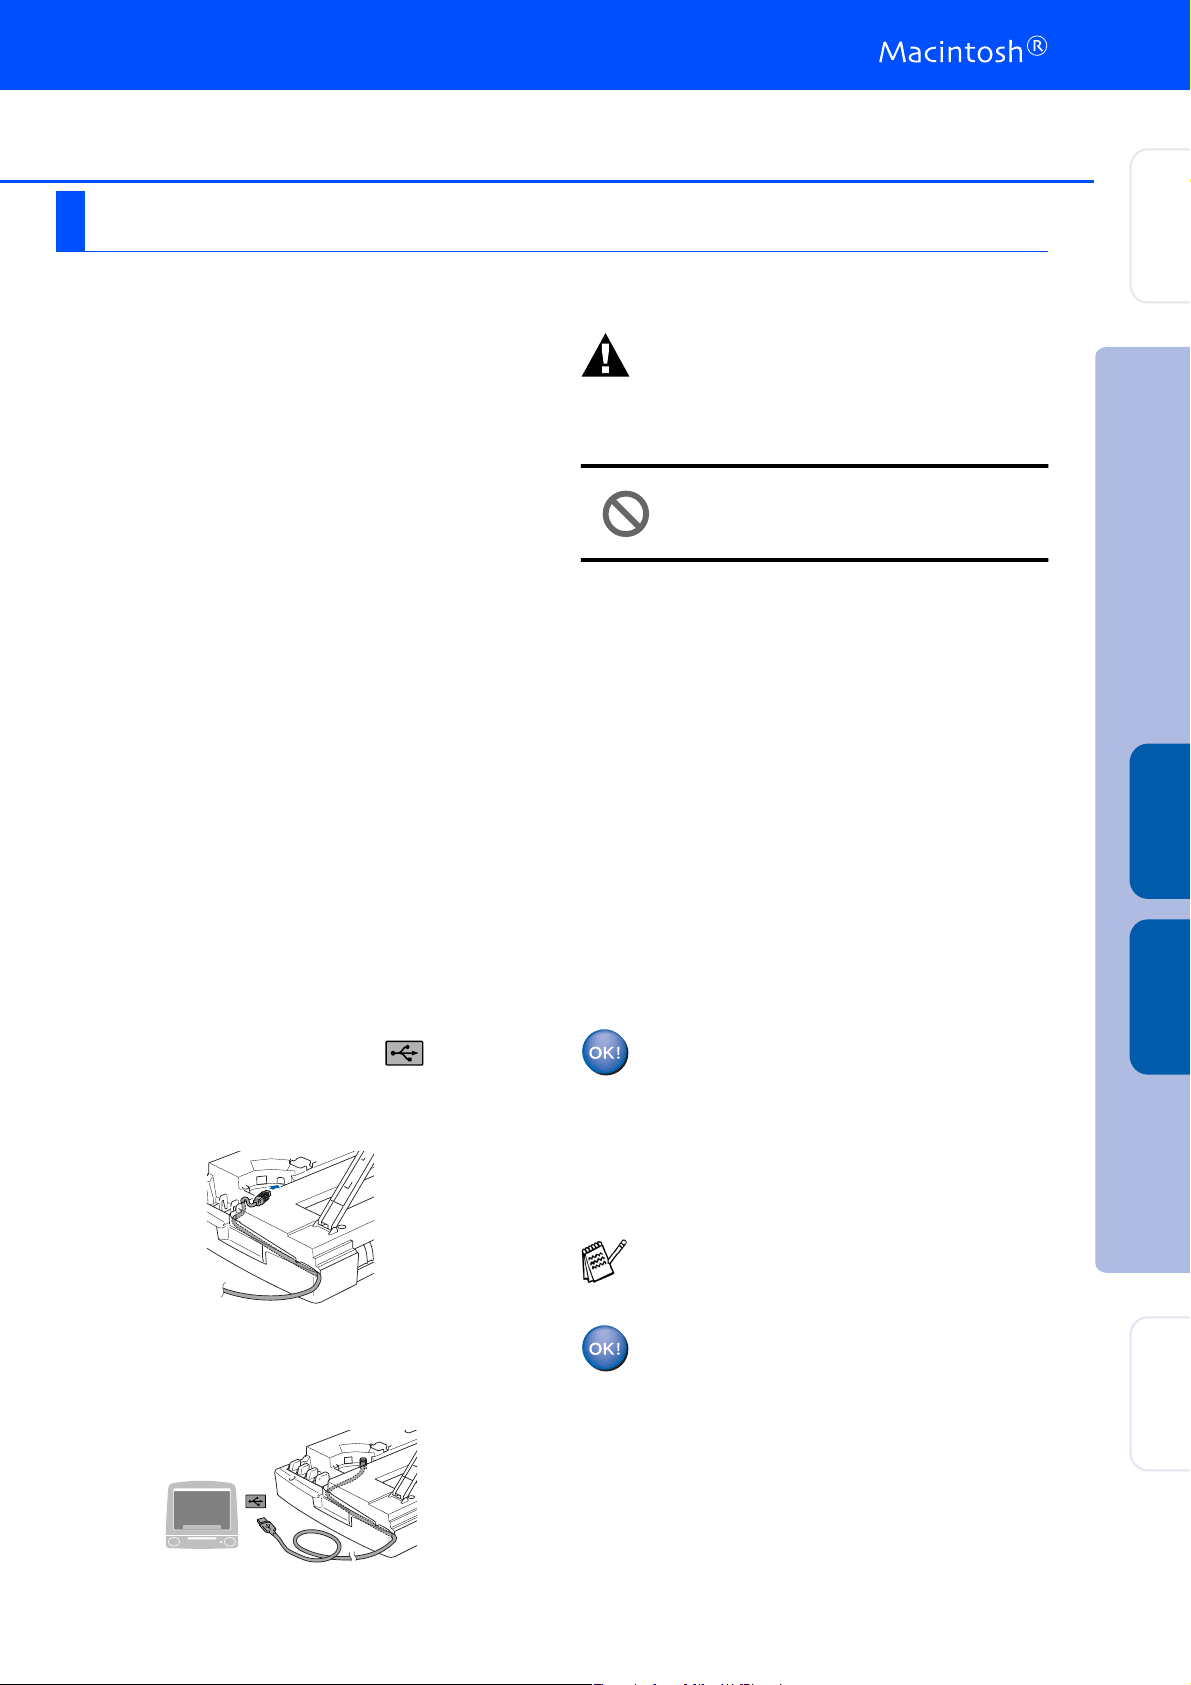
DO NOT connect the USB cable.
Connecting the USB cable is done
when installing the driver.
Loading Paper
3
Pull out the paper support and unfold the
paper support flap.
Paper Support
Paper Support Flap
Use the paper support flap for Letter, Legal
and A4 size paper.
4
Fan the stack of paper well to avoid paper
jams and mis-feeds.
1
Pull the paper tray completely out of the
MFC and remove the output paper tray.
2
Press and slide the paper side guide to fit
the paper width.
Paper Side Guide
5
Gently insert the paper into the paper tray
print side down and the leading edge (top of
the paper) in first.
Check that the paper is flat in the tray and
below the maximum paper mark.
Maximum Paper Mark
■ Make sure the paper side guides touch
the sides of the paper.
■ Be careful that you do not push the paper
in too far; it may lift at the back of the tray
and cause paper feed problems.
6
Put the output paper tray back on and push
the paper tray firmly back into the MFC.
2
Page 5
.
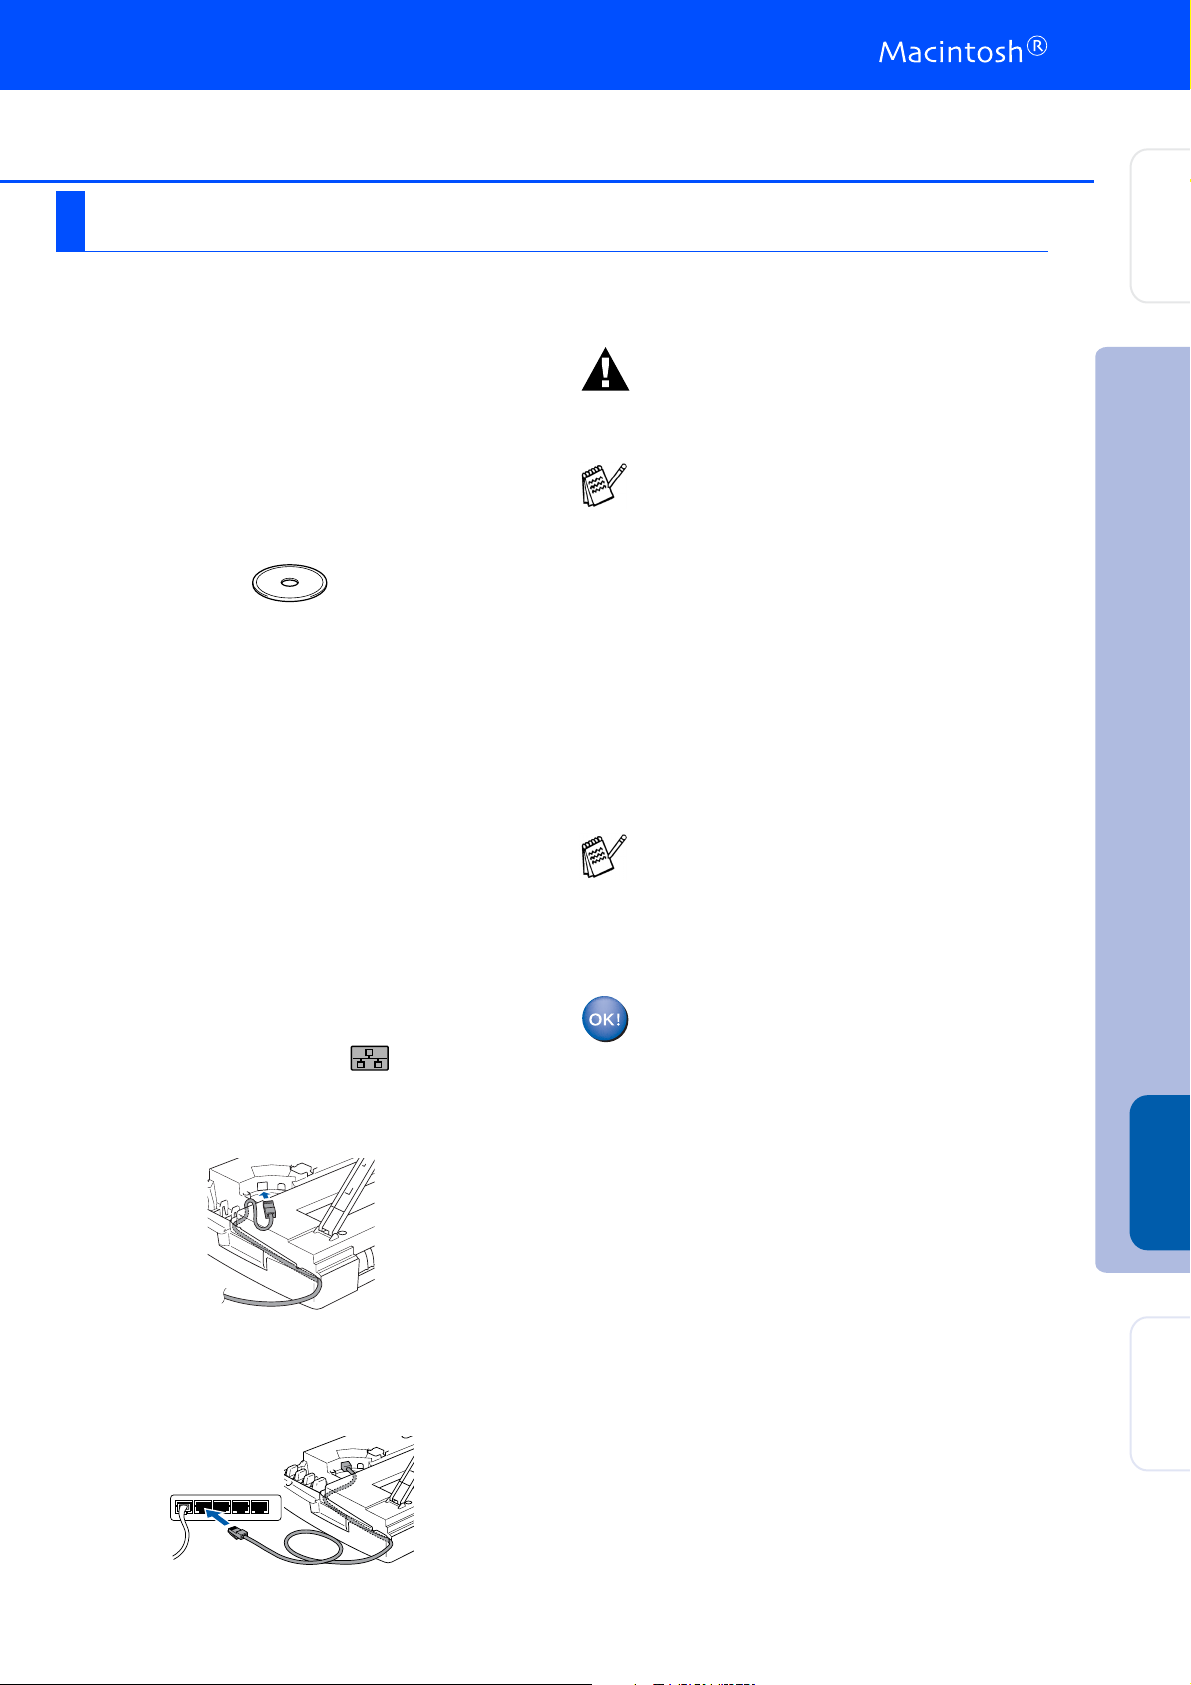
Installing the Phone Line
3
and Power Cord
1
Connect the power cord.
2
Connect the telephone line cord.
Connect one end of the telephone line cord
to the socket on the machine marked
and the other end to a modular wall socket.
DO NOT connect the USB cable yet.
Warning
■ The machine must be fitted with an earthed plug.
■ Since the machine is grounded through the power
outlet, you can protect yourself from potentially
hazardous electrical conditions on the telephone
network by keeping the power switched on when
you connect the machine to a telephone line.
Similarly, you can protect yourself when you want
to move your machine by disconnecting the
telephone line first and then the power cord.
LINE
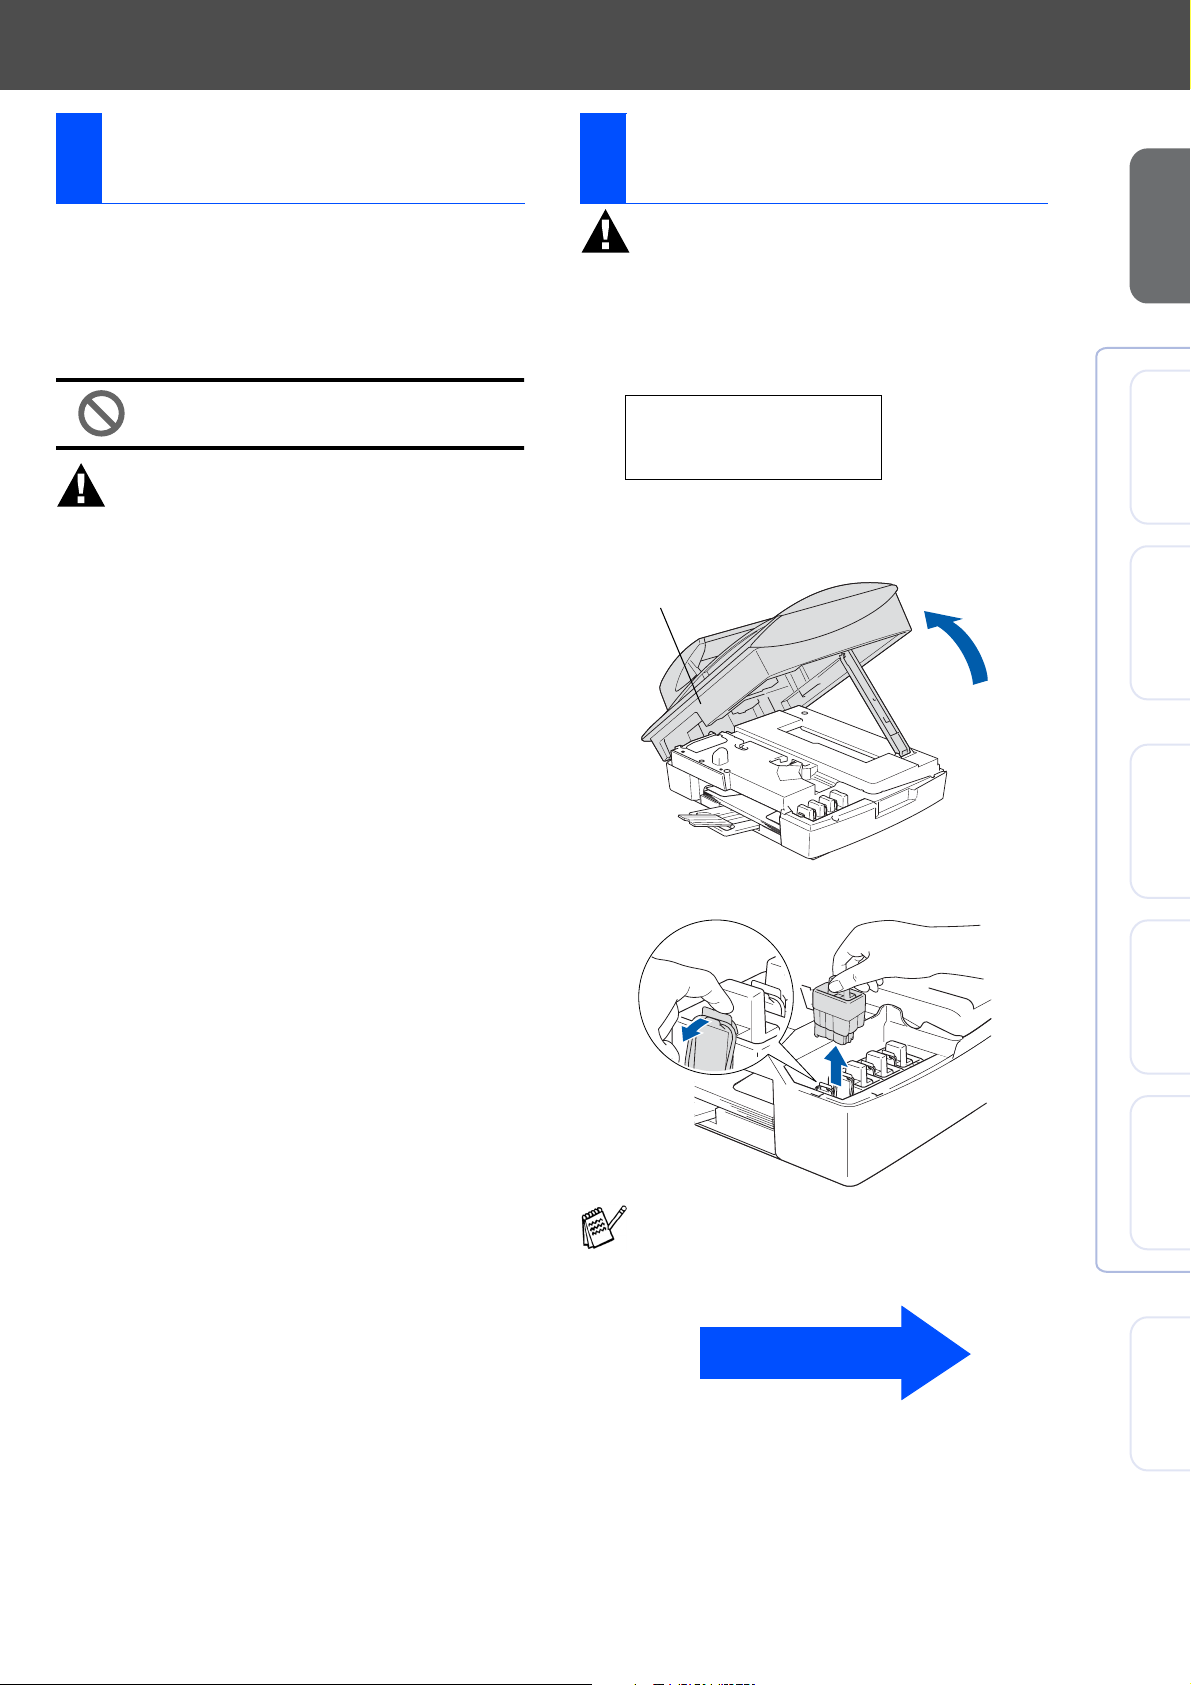
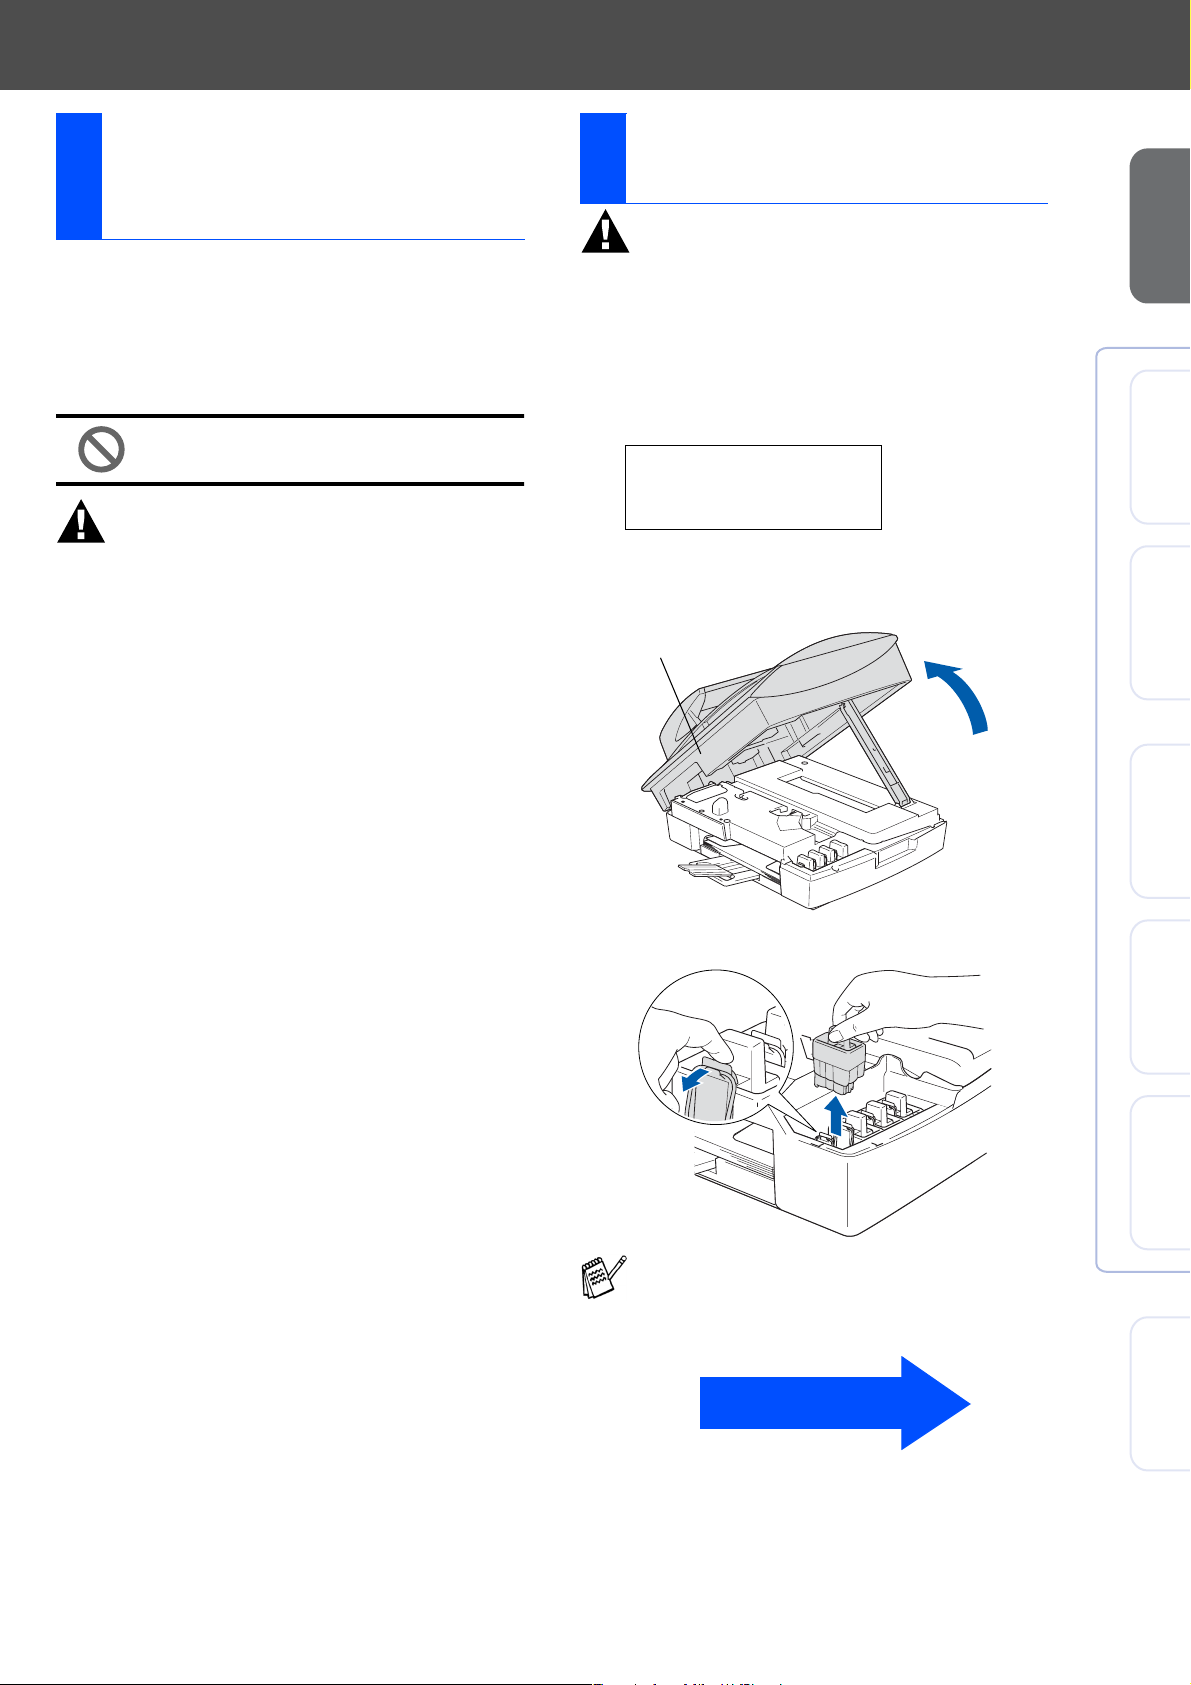
Installing the Ink
4
Cartridges
Warning
If ink gets in your eyes wash them with water
immediately, and if irritation occurs consult a doctor.
1
Make sure that the power is turned on.
The LCD shows:
No Cartridge
Open scanner...
2
Lift the scanner cover from the right-hand
side of the machine until it locks securely
into the open position.
Scanner Cover
Setting Up
the Machine
®
Windows
®
Network
Windows
3
Remove the protective parts.
Do not throw away the protective parts.
You will need them when you transport the
machine.
Continued...
XMac OS
®
Mac OS
®
®
Macintosh
8.6-9.2
Network
For
Network Users
3
Page 6
OK
OK
Step 1
Setting Up the Machine
4
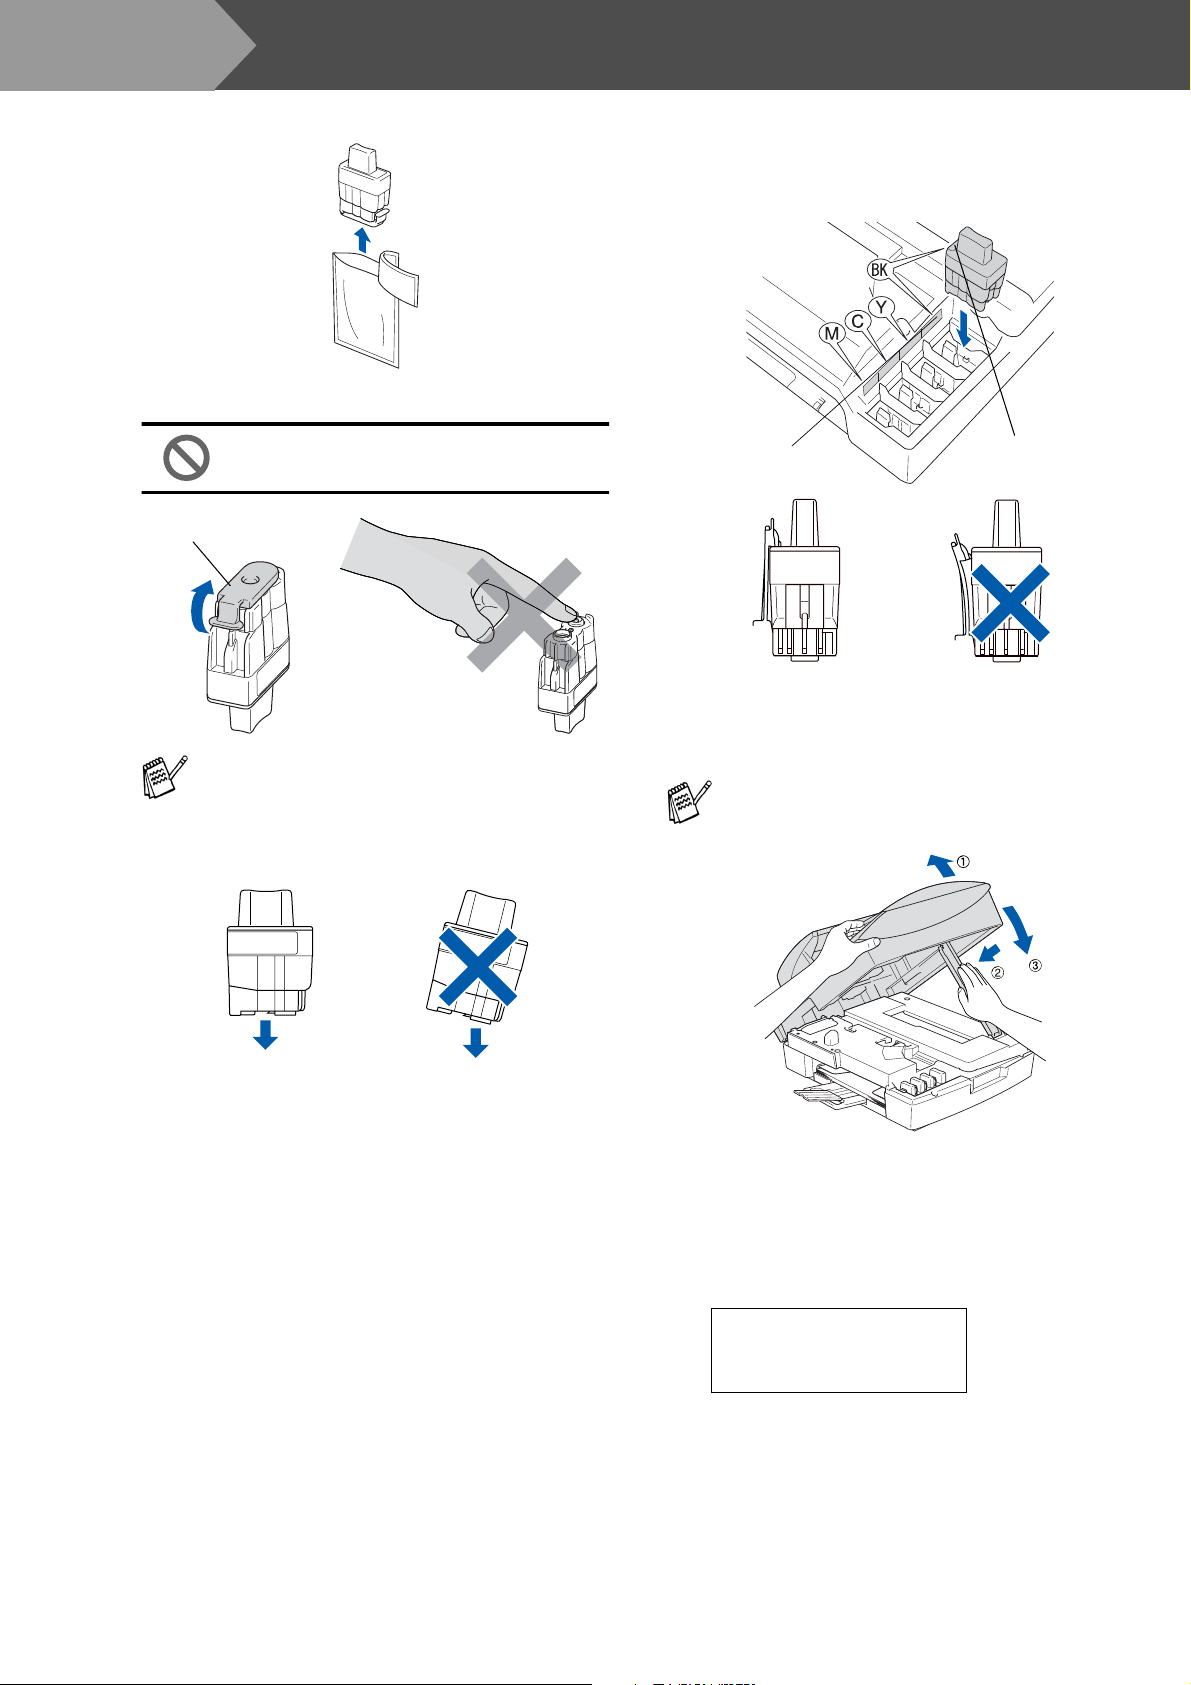
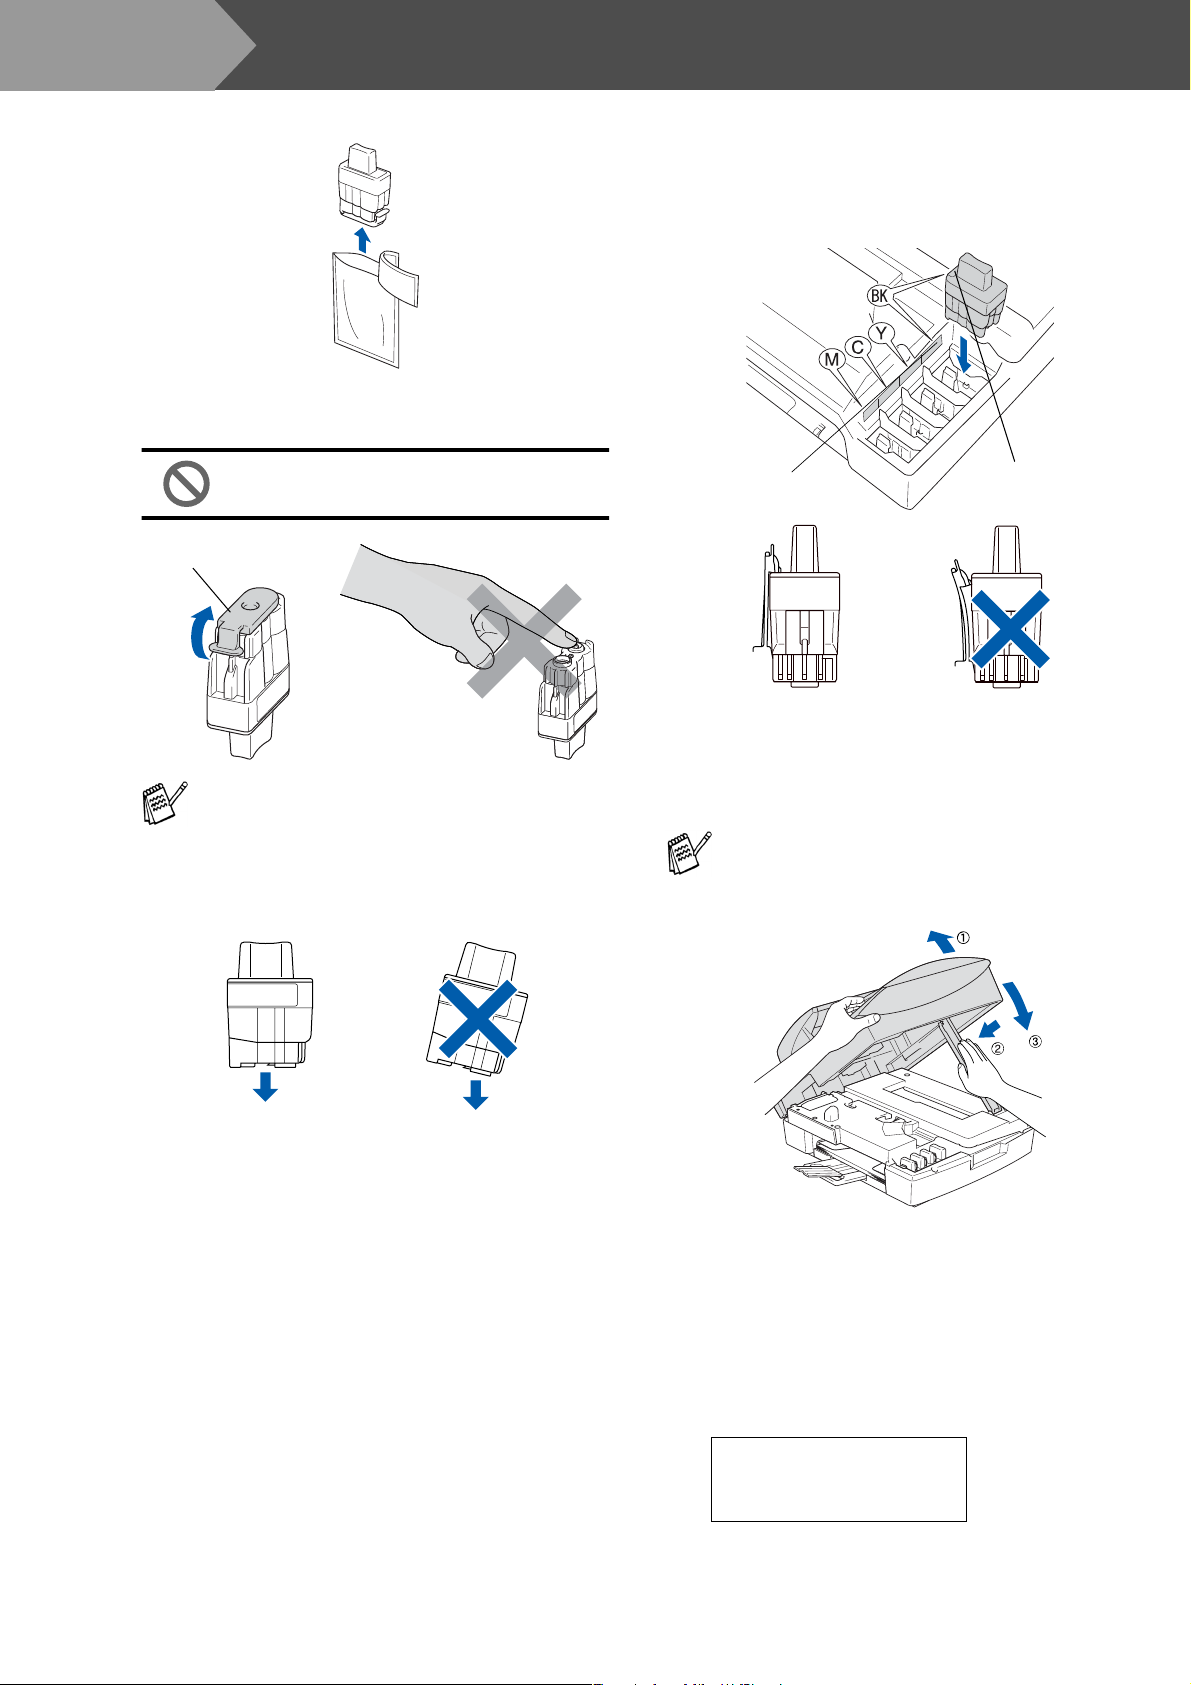
Take out the ink cartridge.
5
Carefully remove the bottom cap.
DO NOT touch the area shown in the
illustration below.
Opening
If the cartridge cover comes off when you
open the bag the cartridge will not be
damaged.
Keep the ink cartridge in an upright position
when you insert it into the slot.
6
Press firmly down on the ink cartridge until
the hook snaps over it, taking care to match
the slot colour (A) with the cartridge colour
(B), as shown in the diagram below.
(A)
OK
OK
7
Lift the scanner cover to release the lock.
Gently push the scanner cover support
down and close the scanner cover.
If Install shows on the LCD after you install
the ink cartridges, check to make sure the ink
cartridges are installed correctly.
(B)
OK
OK
The machine will clean the ink tube system
for use for the first time. This process will
occur only once, the first time ink cartridges
are installed. The cleaning process will last
approximately four minutes.
The LCD shows:
Preparing System
Approx 4 Minutes
4
Page 7
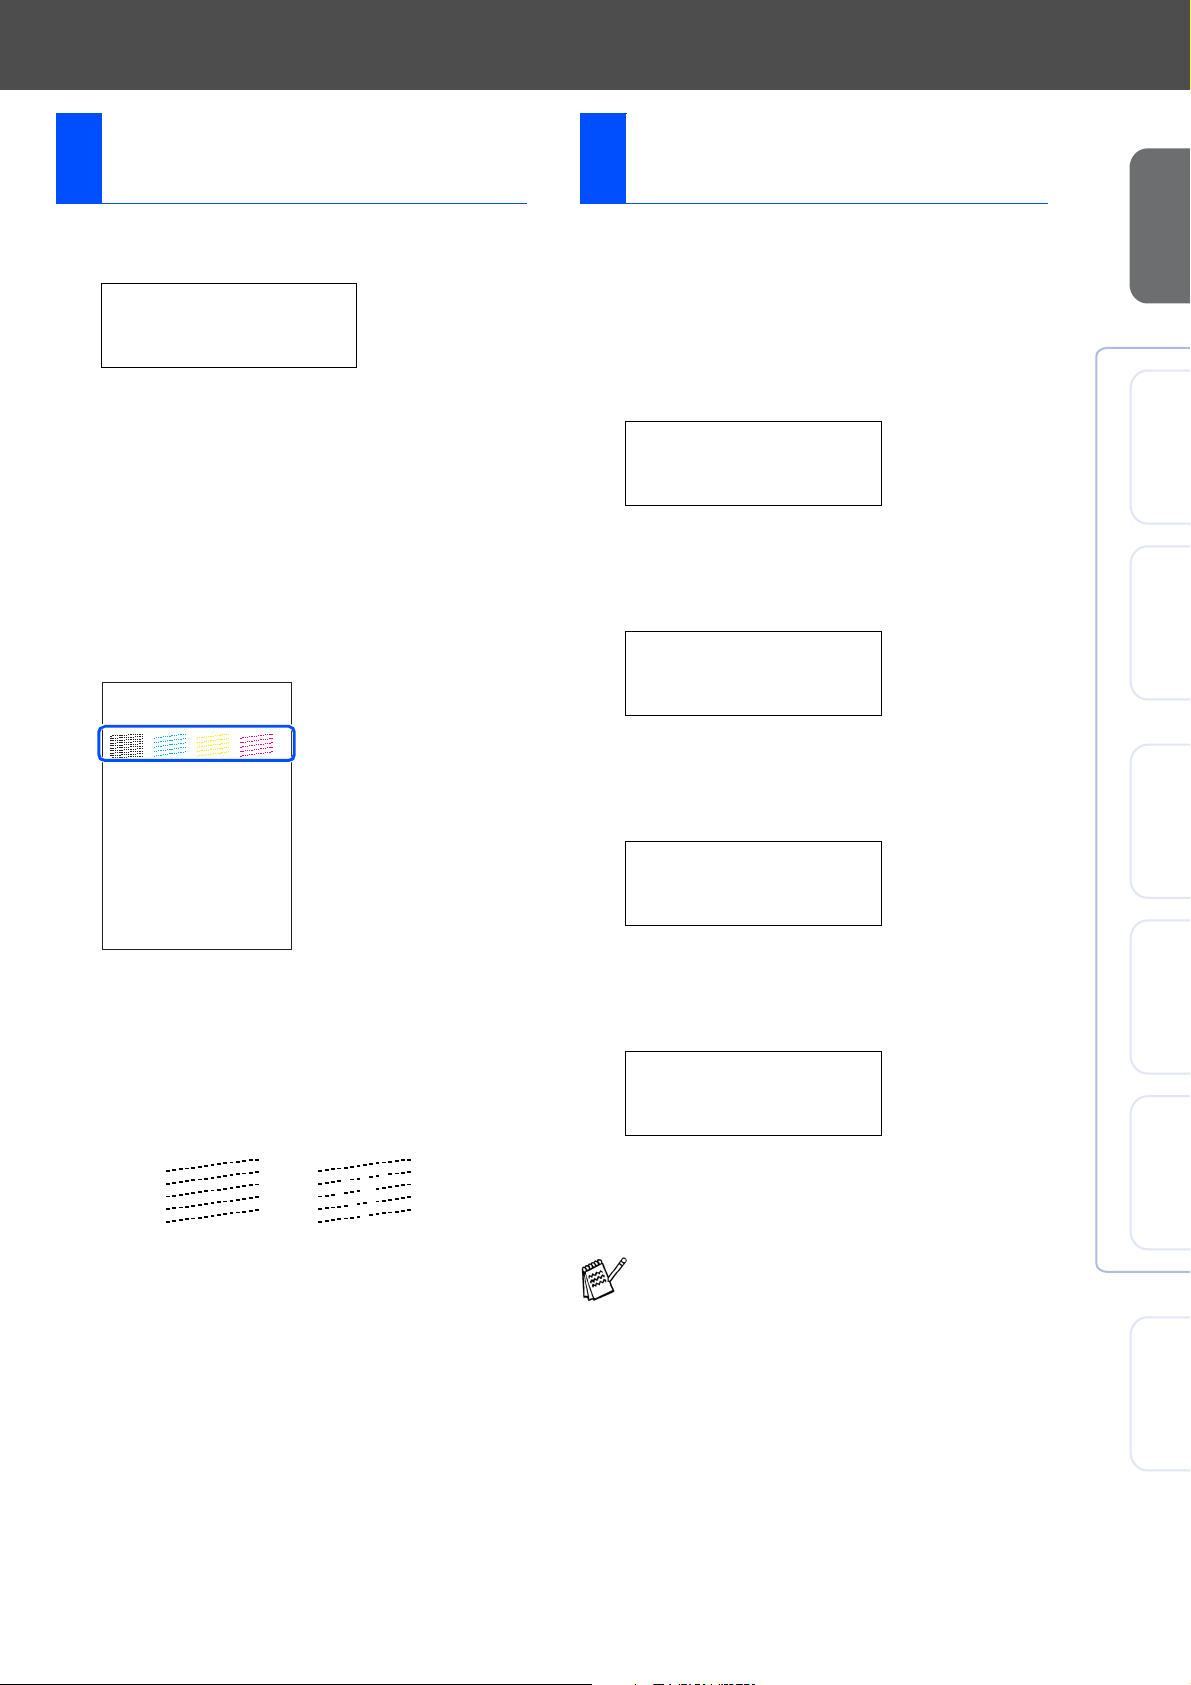
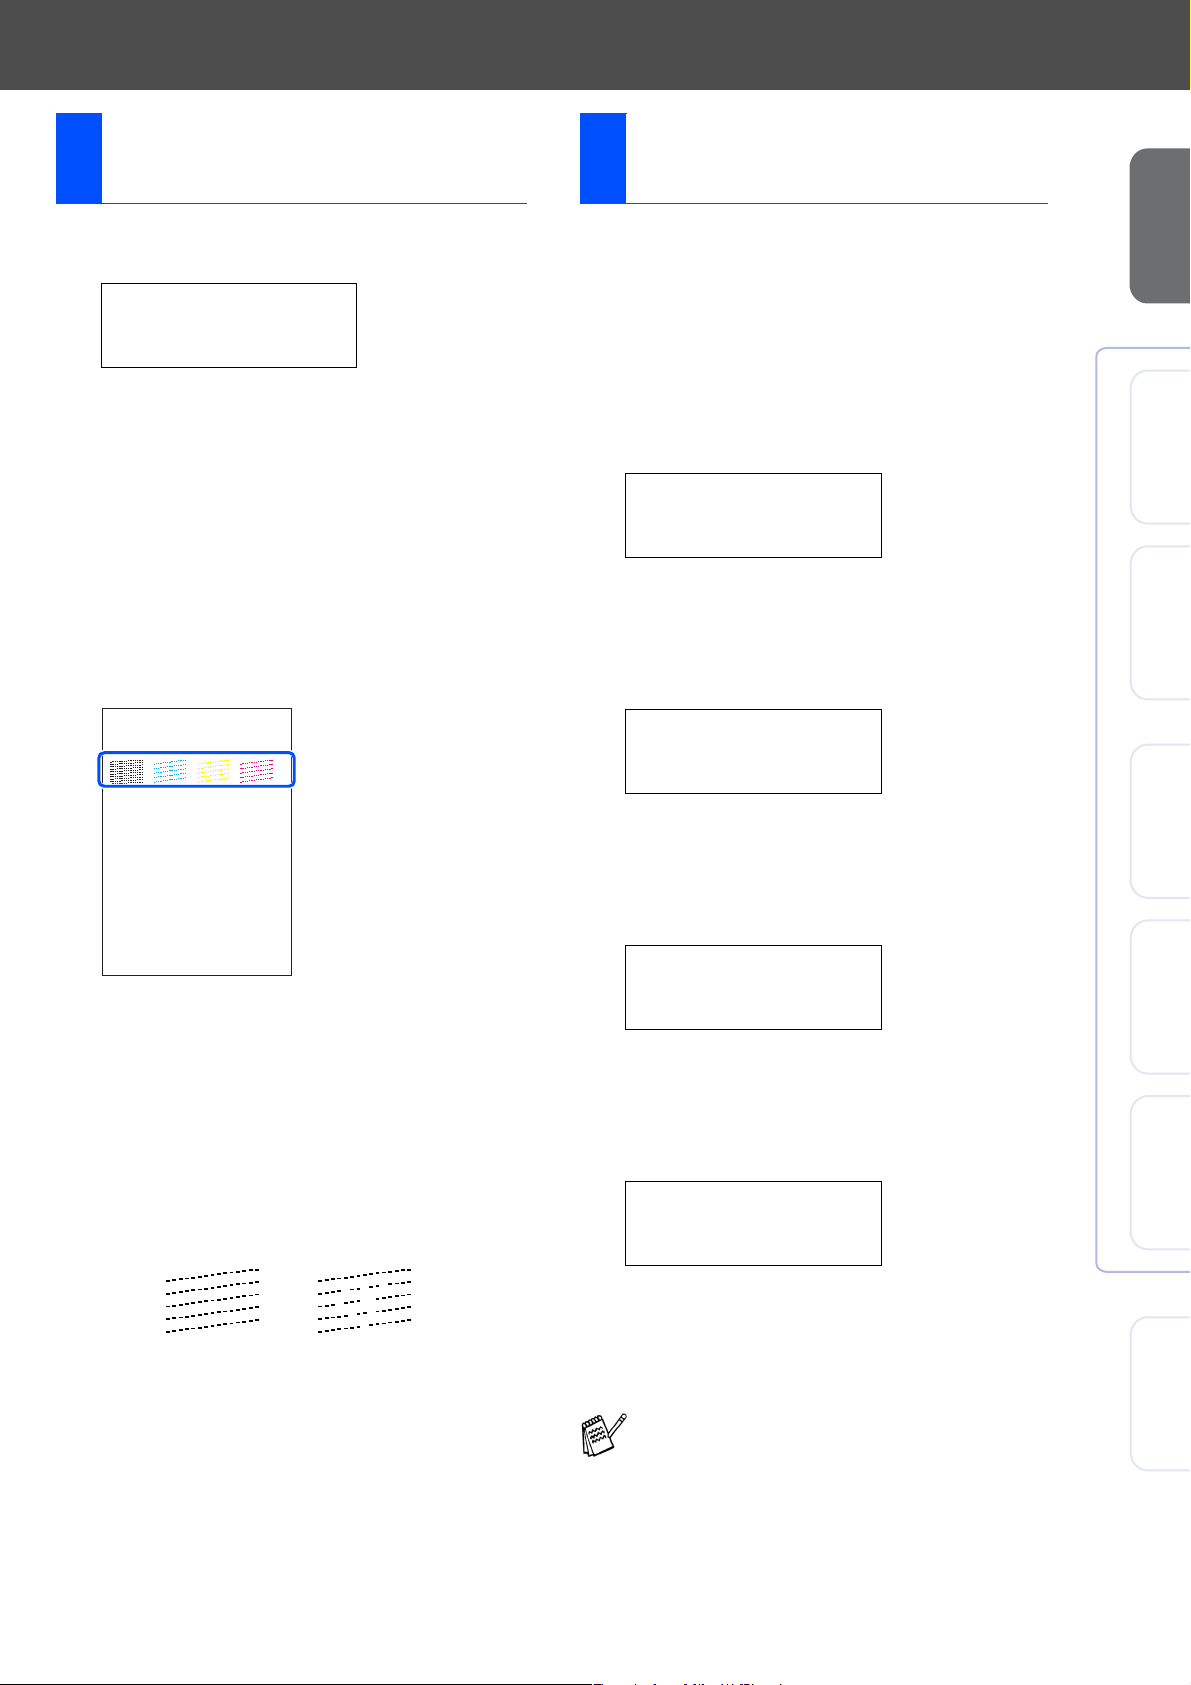
Print Quality Check
5
Setting the Date and
6
Time
1
After the cleaning cycle is finished, the LCD
shows:
Set Paper and
Press Start
2
Make sure the paper is loaded in the paper
tray.
Press Colour Start.
The machine starts printing the PRINT
QUALITY CHECK SHEET (only during
initial ink cartridge installation).
3
Check the quality of the four colour blocks
formed by the short lines printed on the
sheet.
(BLACK/ CYAN/ YELLOW/ MAGENTA)
1. Check the quality of the f our-color blocks formed by the short lines.
2. If all the short lines are c lear and visible, the qu ality is acceptable. the qu ality is acceptable.
Select (Yes). If you can see missing short li nes, select (No) to begin the co lor cleaning process
and follow the prompts on the LCD.
Print Quality Check
1
Press Menu/Set.
2
Press 0.
3
Press 2.
4
Enter the last two digits of the year on the
dial pad, and then press Menu/Set.
Date/Time
Year:2004
(e.g. Enter 0 4 for 2004.)
5
Enter the two digits for the month on the dial
pad, and then press Menu/Set.
Date/Time
Month:03
(e.g. Enter 0 3 for March.)
6
Enter the two digits for the day on the dial
pad, and then press Menu/Set.
Setting Up
the Machine
®
Windows
®
Network
Windows
XMac OS
®
4
If all lines are clear and visible, the quality is
acceptable. Press 1 (
If you can see missing short lines, press 2
(No) to begin the color cleaning process and
then follow prompts on the LCD.
OK Poor
5
After cleaning is finished, press
Colour Start
the PRINT QUALITY CHECK SHEET again
and goes back to step
. The machine starts printing
Yes
3
).
.
Date/Time
Day:01
(e.g. Enter 0 1.)
7
Enter the time in 24-hour format on the dial
pad, and then press Menu/Set.
Date/Time
Time:15:25
(e.g. Enter 1 5, 2 5 for 3:25 P.M.)
8
Press
Stop/Exit
If you want to repeat input, press
to start from Step
.
1
.
Stop/Exit
Mac OS
®
8.6-9.2
®
Network
Macintosh
For
Network Users
5
Page 8

Step 1
Setting Up the Machine
Setting Your Station ID
7
You should store your name and fax number to be
printed on all fax pages that you send.
1
Press Menu/Set.
2
Press 0.
3
Press 3.
4
Enter your fax number (up to 20 digits) on
the dial pad, and then press Menu/Set.
Station ID
Fax:_
5
Use the dial pad to enter your name (up to
20 characters), and then press Menu/Set.
Station ID
Name:_
Selecting a Receive
8
Mode
There are four possible receive modes:
Fax Only, Fax/Tel, Manual and External TAD.
Are you connecting an external telephone or external
telephone answering device to the MFC?
Yes No
Are you using the voice
message function of your
external telephone answering
device?
No
Do you want the MFC to
answer every call?
Yes
Fax Only
The MFC automatically
answers every call as a
fax.
Fax/Tel
The MFC controls the
line and automatically
answers every call. If the
call is not a fax, the
phone will ring for you to
pick up the call.
■ Refer to the following chart for entering
your name.
■ If you need to enter a character that is on
the same key as the previous character,
press to move the cursor to the right.
Press
key
2 ABC2
3 DEF 3
4 GH I 4
5
6
7 PQRS
8 TUV8
9
6
Press
One
time
JKL5
MNO 6
WXY Z
For more details, see “Setting the Station
ID” in Chapter 2 of the User's Guide.
Stop/Exit
If you want to repeat input, press
to start from Step
Two
times
.
1
Three
times
.
Four
times
Stop/Exit
No
Yes
1
Press Menu/Set.
2
Press 0.
3
Press 1.
4
Press ▲ or ▼ to select the mode.
5
Press Menu/Set.
Manual
You control the phone
line and must answer
every call yourself.
External TAD
Your external telephone
answering device (TAD)
automatically answers
every call. Voice
messages are stored on
the external TAD. Fax
messages are printed.
6
Press Stop/Exit.
For more details, see “Setup Receive” in
Chapter 4 of the User’s Guide.
Go to Next page to
install the driver
6
Page 9
Step 2
Installing the Driver & Software
Follow the instructions on this page for your operating system and interface cable.
Setting Up
the Machine
For USB Interface Cable Users
®
■ Windows
98/98SE/Me/2000 Professional/XP ... Go to page 8
For Network Interface Cable Users
Windows® 98/98SE/Me/2000 Professional/XP
■
For USB Interface Cable Users
®
■ Mac OS
X 10.2.4 or greater........................... Go to page 12
For USB Interface Cable Users
®
■ Mac OS
8.6 to 9.2........................................... Go to page 13
... Go to page 10
®
Windows
®
Windows
XMac OS
®
Mac OS
®
Network
8.6-9.2
For Network Interface Cable Users
®
■ Mac OS
■ Mac OS
X 10.2.4 or greater........................... Go to page 14
®
8.6 to 9.2........................................... Go to page 15
For Network Users ............................................... Go to page 16
®
Network
Macintosh
For
Network Users
7
Page 10
Step 2
For USB Interface Cable Users
(For Windows
Make sure that you have completed the instructions from Step 1 “Setting Up
the Machine” on pages 2 - 6.
Installing the Driver & Software
®
98/98SE/Me/2000 Professional/XP)
1
Disconnect the machine from the power
socket and from your computer, if you have
already connected an interface cable.
2
Turn on your computer.
(For Windows
must be logged on as the administrator.)
3
Insert the supplied CD-ROM into your
CD-ROM drive. If the model name screen
appears, select your machine. If the
language screen appears, select your
language.
4
The CD-ROM main menu will appear.
Install MFL-Pro Suite
Click
If this window does not appear, use
Windows
program from the root directory of the Brother
CD-ROM.
5
After reading and accepting the ScanSoft®
PaperPort
Yes.
®
2000 Professional/XP, you
.
®
Explorer to run the setup.exe
®
9.0SE License Agreement, click
9
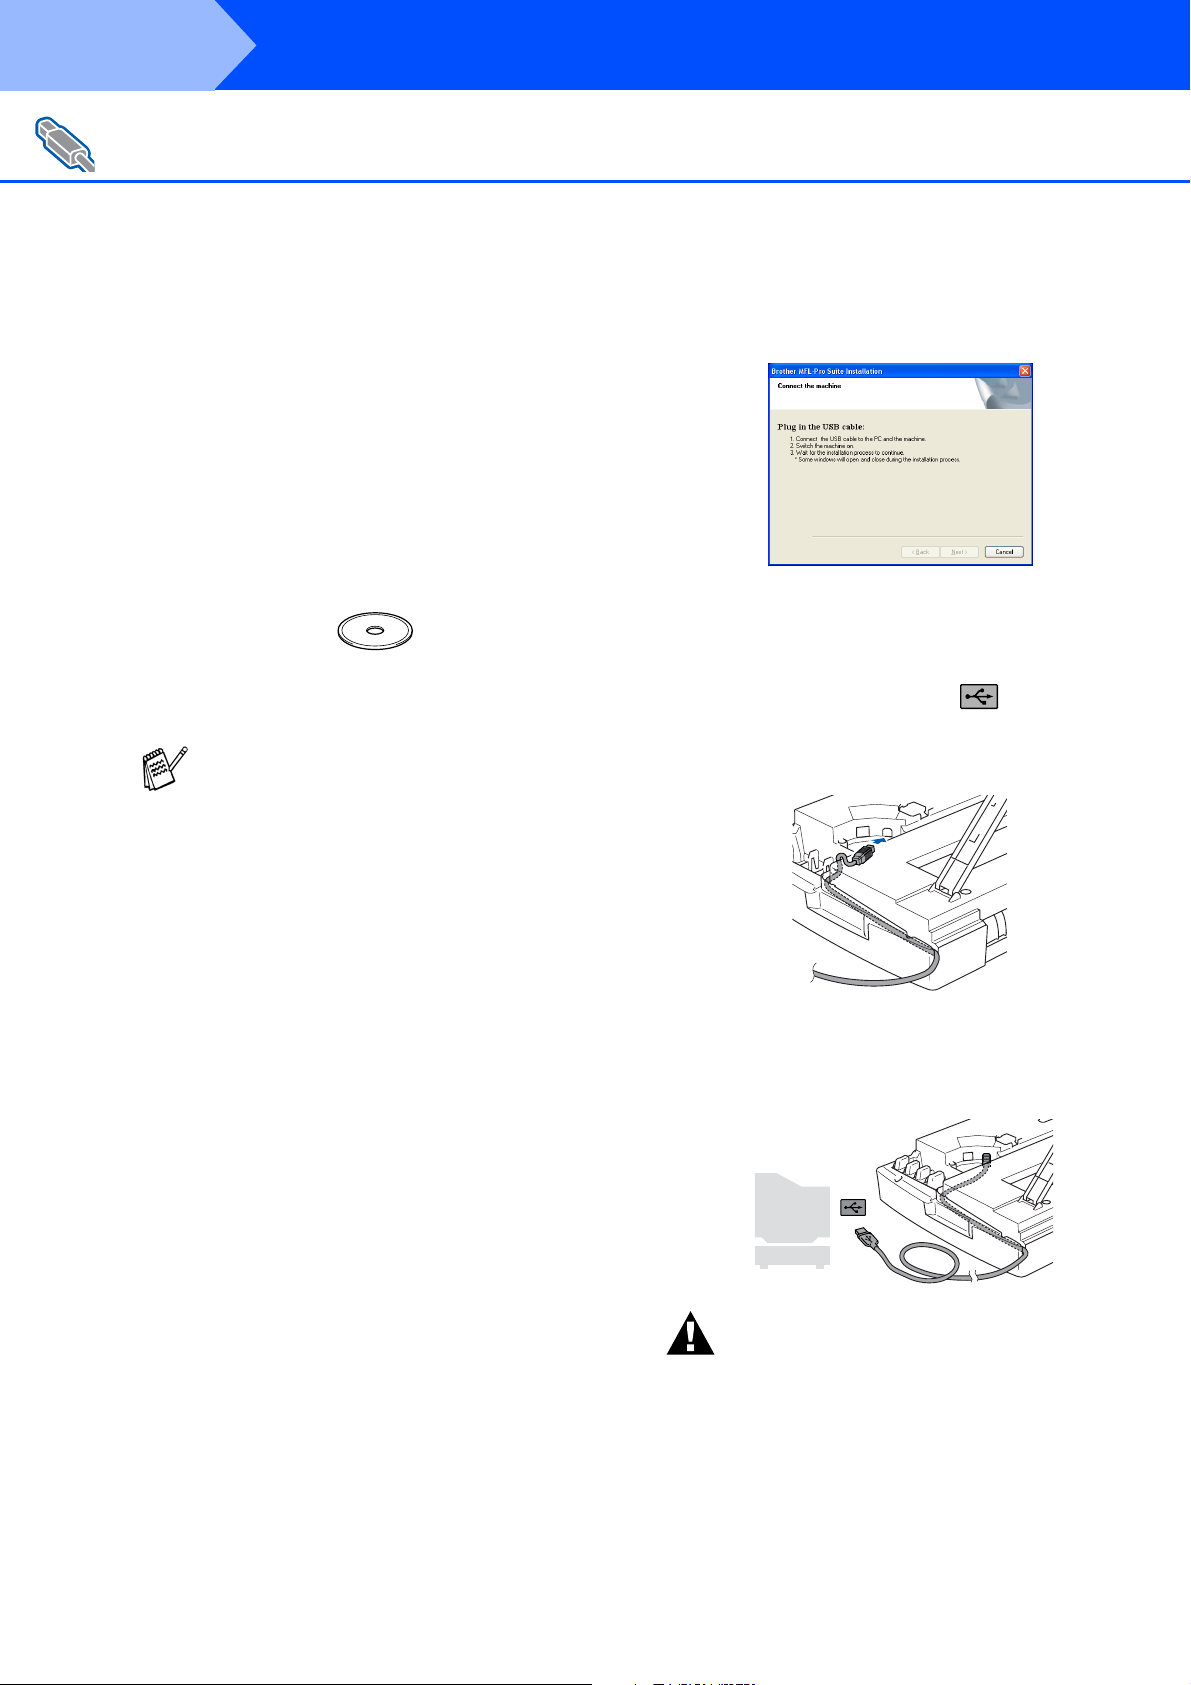
When this screen appears, connect the
USB interface cable to your PC, and then
connect it to the machine.
To connect the USB cable to the machine:
1. Open the scanner cover to its open
position.
2. Connect the USB cable into the USB
socket, marked with a symbol. You
will find the USB socket above and to the
left of the ink cartridge slots, as shown
below.
6
The installation of PaperPort® 9.0SE will
automatically start and is followed by the
installation of MFL-Pro Suite.
7
When the Brother MFL-Pro Suite Software
License Agreement window appears, click
Yes, if you agree to the Software Licence
Agreement.
8
Select
Next
The installation will continue.
Local Connection
.
, and then click
3. Carefully guide the USB cable into the
trench as shown below, following the
trench round and toward the back of the
machine.
Warning
Ensure that the cable does not restrict the cover from
closing, or an error may occur.
8
Page 11
0
Lift the scanner cover to release the lock.
Gently push the scanner cover support
down and close the scanner cover.
A
Turn on the machine by plugging in the
power cord.
It will take a few seconds for the installation
screens to appear.
The installation of the Brother drivers will
automatically start. The installation screens
appear one after another, please wait for a
while.
B
When the Brother and ScanSoft on-line
Registration screen is displayed, make your
selection and follow the on-screen
instructions.
C
Click Finish to restart your computer.
D
After restarting the computer, the
Installation Diagnostics will run
automatically and the installation results
window will be shown.
Setting Up
the Machine
®
Windows
If the installation is unsuccessful try installing
again using the Repair MFL-Pro Suite
option from the main menu. Select
MFL-Pro Suite and follow the instructions on
the screen.
The MFL-Pro Suite, Brother Printer
driver and Scanner driver have been
installed and the installation is now
complete.
Repair
Installing the Driver & Software
For
Network Users
9
Page 12
Step 2
For Network Interface Cable Users
(Windows
Make sure that you have completed the instructions from Step 1 “Setting Up
the Machine” on pages 2 - 6.
Installing the Driver & Software
®
98/98SE/Me/2000 Professional/XP)
Before installation, if you are using Personal
Firewall software, disable it. Once you are
sure that you can print, re-start your
Personal Firewall software.
1
Connect the network cable to the machine,
and then connect it to a free port on your
hub.
To connect the network interface cable to
the machine:
1. Open the scanner cover to its open
position.
2. Connect the network cable into the LAN
socket, marked with a symbol. You
will find the LAN socket above and to the
left of the ink cartridge slots, as shown
below.
2
Lift the scanner cover to release the lock.
Gently push the scanner cover support
down and close the scanner cover.
3
Turn on the machine by plugging in the
power cord.
4
Turn on your computer.
(For Windows
must be logged on as the administrator.)
5
Insert the supplied CD-ROM into your
CD-ROM drive. If the model name screen
appears, select your machine. If the
language screen appears, select your
language.
6
The CD-ROM main menu will appear.
Click Install MFL-Pro Suite.
If this window does not appear, use
Windows
program from the root directory of the Brother
CD-ROM.
®
2000 Professional/XP, you
®
Explorer to run the setup.exe
3. Carefully guide the network cable into the
trench as shown below, following the
trench round and toward the back of the
machine.
Warning
Ensure that the cable does not restrict the cover from
closing, or an error may occur.
In case of using both USB and LAN cables,
route both cables through the trench.
7
After reading and accepting the ScanSoft®
PaperPort
Yes.
8
The installation of PaperPort® 9.0SE will
automatically start and is followed by the
installation of MFL-Pro Suite.
9
When the Brother MFL-Pro Suite Software
License Agreement window appears, click
Yes
Agreement.
0
Select
Next
®
9.0SE License Agreement, click
, if you agree to the Software Licence
Network Connection
.
, and then click
10
Page 13

A
The installation of the Brother drivers will
automatically start. The installation screens
appear one after another, please wait for a
while.
B
If the machine is configured for your
network, select the machine from the list,
and then click Next.
This window will not appear if there is only
one machine connected on the network, it
will be selected automatically.
If the machine is not yet configured for use
on your network, the Configure IP Address
window will appear. Enter the IP address
information appropriate to your network by
following the on-screen instructions.
C
When the Brother and ScanSoft on-line
Registration screen is displayed, make your
selection and follow the on-screen
instructions.
Setting Up
the Machine
®
Network
Windows
D
Click Finish to restart your computer.
E
After restarting the computer, the
Installation Diagnostics will run
automatically and the installation results
window will be shown.
For network installations the Repair MFL-Pro
Suite selection from the main menu is not
supported.
The MFL-Pro Suite, Brother Network
Printer driver, Network Scanner driver
and Network PhotoCapture Center
have been installed and the installation
is now complete.
™
Installing the Driver & Software
For
Network Users
11
Page 14
Step 2
For USB Interface Cable Users
Make sure that you have completed the instructions from Step 1 “Setting Up
the Machine” on pages 2 - 6.
1
2
3
4
5
Installing the Driver & Software
For Mac OS® X 10.2.4 or greater
Turn off and unplug the machine from the
AC outlet and disconnect it from your
Macintosh
interface cable.
Turn on your Macintosh®.
Insert the supplied CD-ROM into your
CD-ROM drive.
Double-click the Start Here OSX icon to
install the printer driver, Scanner driver and
Remote Setup program. If the language
screen appears, select your language.
Click MFL-Pro Suite to install.
®
if you already connected an
Warning
Ensure that the cable does not restrict the cover from
closing, or an error may occur.
DO NOT connect the machine to a
USB port on a keyboard or a non
powered USB hub.
9
Lift the scanner cover to release the lock.
Gently push the scanner cover support
down and close the scanner cover.
0
Turn on the machine by plugging in the
power cord.
6
Follow the on-screen instructions, and
restart your Macintosh
7
After the DeviceSelector window appears,
connect the USB interface cable to your
Macintosh
8
Connect the USB interface cable to your
Macintosh
machine.
To connect the USB cable to the machine:
1. Open the scanner cover to its open
position.
2. Connect the USB cable into the USB
socket, marked with a symbol. You
will find the USB socket above and to the
left of the ink cartridge slots, as shown
below.
®
and then to the machine.
®
, and then connect it to the
®
.
A
Select Applications from the Go menu.
B
Open the Utilities folder.
C
Open the Print Center icon.
D
Click Add.
E
Select USB.
F
Select
name), and then click
G
Select Quit Printer Setup Utility from the
Printer Setup Utility
H
To install Presto!® PageManager®, click the
Presto! PageManager
on-screen instructions.
MFC-XXXX
The MFL-Pro Suite, Brother Printer
driver, Scanner driver and Remote
Setup Program have been installed and
the installation is now complete.
(XXXX is your model
Add
.
menu.
icon and follow the
12
3. Carefully guide the USB cable into the
trench as shown below, following the
trench round and toward the back of the
machine.
You can easily scan, share and organize
photos and documents using Presto!
PageManager
Presto!
installed and the installation is now
complete.
®
.
®
PageManager® has been
®
Page 15

For Mac OS® 8.6 to 9.2
Make sure that you have completed the instructions from Step 1 “Setting Up
the Machine” on pages 2 - 6.
1
Turn off and unplug the machine from the
AC outlet and disconnect it from your
Macintosh
interface cable.
2
Turn on your Macintosh®.
3
Insert the supplied CD-ROM into your
CD-ROM drive.
4
Double-click the
the printer and scanner drivers. If the
language screen appears, select your
language.
5
Click MFL-Pro Suite to install.
®
if you already connected an
Start Here
icon to install
Warning
Ensure that the cable does not restrict the cover from
closing, or an error may occur.
DO NOT connect the machine to a
USB port on a keyboard or a non
powered USB hub.
8
Lift the scanner cover to release the lock.
Gently push the scanner cover support
down and close the scanner cover.
9
Turn on the machine by plugging in the
power cord.
Setting Up
the Machine
6
Follow the on-screen instructions, and
restart your Macintosh
7
Connect the USB interface cable to your
Macintosh
machine.
To connect the USB cable to the machine:
1. Open the scanner cover to its open
position.
2. Connect the USB cable into the USB
socket, marked with a symbol. You
will find the USB socket above and to the
left of the ink cartridge slots, as shown
below.
3. Carefully guide the USB cable into the
trench as shown below, following the
trench round and toward the back of the
machine.
®
, and then connect it to the
®
.
0
From the Apple® menu, open the
A
Click the Brother Ink icon.
On the right side of the Chooser, select the
machine to which you want to print.
Close the Chooser.
The Brother Printer driver and Scanner
driver have been installed.
B
To install Presto!® PageManager®, click the
Presto! PageManager
on-screen instructions.
You can easily scan, share and organize
photos and documents using Presto!
PageManager
Presto!
installed and the installation is now
complete.
®
®
.
PageManager® has been
icon and follow the
Chooser
®
.
XMac OS
®
Mac OS
Installing the Driver & Software
®
8.6 - 9.2
For
13
Network Users
Page 16
Step 2
For Network Interface Cable Users
Make sure that you have completed the instructions from Step 1 “Setting Up
the Machine” on pages 2 - 6.
1
Installing the Driver & Software
For Mac OS® X 10.2.4 or greater
Turn off and unplug the machine from the
AC outlet and disconnect it from your
Macintosh
interface cable.
®
if you already connected an
Warning
Ensure that the cable does not restrict the cover from
closing, or an error may occur.
2
Turn on your Macintosh®.
3
Insert the supplied CD-ROM into your
CD-ROM drive.
4
Double-click the Start Here OSX icon to
install the printer driver and Remote Setup
program. If the language screen appears,
select your language.
5
Click MFL-Pro Suite to install.
6
Follow the on-screen instructions, and
restart your Macintosh
7
After the
connect the Network interface cable to your
Macintosh
8
Connect the network interface cable to the
machine, and then connect it to a free port.
To connect the network interface cable to
the machine:
1. Open the scanner cover to its open
2. Connect the network cable into the LAN
DeviceSelector
®
and then to the machine.
position.
socket, marked with a symbol. You
will find the LAN socket above and to the
left of the ink cartridge slots, as shown
below.
®
.
window appears,
In case of using both USB and LAN cables,
route both cables through the trench.
9
Lift the scanner cover to release the lock.
Gently push the scanner cover support
down and close the scanner cover.
0
Turn on the machine by plugging in the
power cord.
A
Select Applications from the Go menu.
B
Open the Utilities folder.
C
Open the Print Center icon.
D
Click Add.
E
Make the selection shown below.
F
Select Brother MFC-XXXX (XXXX is your
model name) (BRN_xxxxxx_P1), and then
click the Add button.
xxxxxx are the last six digits of the Ethernet
address.
Network User's Guide Chapter 5 on the
CD-ROM.
G
Select
Printer Setup Utility
Quit Printer Setup Utility
menu.
from the
14
3. Carefully guide the network cable into the
trench as shown below, following the
trench round and toward the back of the
machine.
The setup is now complete.
Please see Network User’s Guide Chapter 5
on the CD-ROM for more information about
connecting the MFC to a Macintosh
®
network.
Page 17
For Mac OS® 8.6 to 9.2
Make sure that you have completed the instructions from Step 1 “Setting Up
the Machine” on pages 2 - 6.
1
Turn off and unplug the machine from the
AC outlet and disconnect it from your
Macintosh
interface cable.
®
if you already connected an
Warning
Ensure that the cable does not restrict the cover from
closing, or an error may occur.
Setting Up
the Machine
2
Turn on your Macintosh®.
3
Insert the supplied CD-ROM into your
CD-ROM drive.
4
Double-click the Start Here icon to install
the printer and scanner drivers. If the
language screen appears, select your
language.
5
6
7
MFL-Pro Suite
Click
Follow the on-screen instructions, and
restart your Macintosh
Connect the network interface cable to the
machine, and then connect it to a free port.
To connect the network interface cable to
the machine:
1. Open the scanner cover to its open
position.
2. Connect the network cable into the LAN
socket, marked with a symbol. You
will find the LAN socket above and to the
left of the ink cartridge slots, as shown
below.
to install.
®
.
In case of using both USB and LAN cables,
route both cables through the trench.
8
Lift the scanner cover to release the lock.
Gently push the scanner cover support
down and close the scanner cover.
9
Turn on the machine by plugging in the
power cord.
0
Open the Chooser from the Apple menu.
A
Click the Brother Ink (IP) icon, and then
select BRN_xxxxxx.
Close the
■ xxxxxx are the last six digits of the
■ Please see Network User’s Guide Chapter
The setup is now complete.
Chooser
Ethernet address.
5 on the CD-ROM for more information
about connecting the MFC to a
Macintosh
.
®
network.
Installing the Driver & Software
®
3. Carefully guide the network cable into the
trench as shown below, following the
trench round and toward the back of the
machine.
15
Macintosh
For
Network
Network Users
Page 18

■ For Network Users
This section is for using the machine on a network.
An administrator should set up the machine using the following steps.
Installing the BRAdmin Professional
Configuration Utility (Windows
The BRAdmin Professional utility is designed to manage your Brother network connected
devices such as network-ready Multifunction devices and/or network-ready printers in a Local
Area Network (LAN) environment.
BRAdmin Professional can also be used to manage devices from other manufacturers whose
products support SNMP (Simple Network Management Protocol).
For more information on BRAdmin Professional go to http://solutions.brother.com
1
Insert the supplied CD-ROM into your CD-ROM drive.
The opening screen will appear automatically.
Follow the on-screen instructions.
®
only)
2
Click the Install Optional Applications icon on the main menu screen.
3
Click BRAdmin Professional and follow the on-screen instructions.
The default password for the print server is “access”. You can use BRAdmin Professional to change this
password.
Setting your IP Address, Subnet Mask and
Gateway using BRAdmin Professional
(Windows
1
Start BRAdmin Professional, and select TCP/IP.
2
Select Search Active Devices from the Devices menu.
BRAdmin will search for new devices automatically.
3
Double-click the new device.
4
Enter the
5
The address information will be saved to the machine.
IP Address, Subnet Mask
®
only)
and
Gateway
, and then click the OK button.
16
The default password for the print server is “access”. You can use BRAdmin Professional to change this
password.
Page 19

Trademarks
The Brother logo is a registered trademark of Brother Industries, Ltd.
Brother is a registered trademark of Brother Industries, Ltd.
Multi-Function Link is a registered trademark of Brother International Corporation.
© Copyright 2004 Brother Industries, Ltd. All rights reserved.
Windows and Microsoft are registered trademarks of Microsoft in the U.S. and other countries.
Macintosh and True Type are registered trademarks of Apple Computer, Inc.
PaperPort and OmniPage OCR are registered trademarks of ScanSoft, Inc.
Presto! PageManager is a registered trademark of NewSoft Technology Corporation.
Each company whose software title is mentioned in this manual has a Software License Agreement specific to its
proprietary programs.
All other brand and product names mentioned in this manual are registered trademarks of their respective
companies.
Compilation and Publication
Under the supervision of Brother Industries Ltd., this manual has been compiled and published, covering the latest
product descriptions and specifications.
The contents of this manual and the specifications of this product are subject to change without notice.
Brother reserves the right to make changes without notice in the specifications and materials contained herein and
shall not be responsible for any damages (including consequential) caused by reliance on the materials presented,
including but not limited to typographical and other errors relating to the publication.
This product is designed for use in a Professional Environment.
©2004 Brother Industries, Ltd.
English Quick Setup Guide has finished.
17
Page 20

Page 21

Преди да можете да използвате принтера, трябва да го настроите и да
инсталирате драйвера.
За полесно инсталиране на принтера, драйвера и софтуера, прочетете това
Ръководство за Бързо Инсталиране и следвайте инструкциите.
Стъпка 1
Инсталация на
устройството
MFC5440CN
Стъпка 2
Инсталация на устройството
Инсталиране на драйвера и
софтуера
Инсталацията завърши!
®
Windows
®
Windows
мрежов кабел
XMac OS
®
Mac OS
®
Инсталиране на драйвера и софтуера
За найновите драйвери и за найдоброто решение на вашия проблем или въпрос
посетете Brother Solutions Center директно от драйвера или на адрес:
http://solutions.brother.com
Съхранявайте приложения компактдиск с Ръководството за Бързо инсталиране на
подходящо място за бърза и лесна справка по всяко време.
Ръководство за Бързо Инсталиране
8.6 9.2
®
Macintosh
мрежов кабел
в мрежа
За потребители
19
Page 22

Стъпка 1
Отстраняване на
1
предпазните
елементи
1
Отстранете предпазните лепенки и
хартия.
НЕ свързвайте USB кабела. USB
кабелът се включва при
инсталирането на драйвера.
2 Зареждане на хартия
За да заредите хартия или друг
носител
Инсталация на устройството
3
Издърпайте подложката за хартията и
разгънете удължителя.
Подложка за
хартия
подложката за хартия
4
Удължител на
Използвайте удължителя на подложката
при размери на хартията Letter, Legal и
A4.
Разлистете хартията, за да избегнете
засядане и пошото и подаване.
1
Издърпайте напълно тавата за хартия от
устройството и отстранете изходящата
тава.
2
Натиснете и плъзнете страничния водач
за хартията, докато съвпадне с нейната
ширина.
Страничен водач за
хартията
5
Внимателно поставете хартията в
тавата с лицевата страна надолу и с
горната част напред.
Проверете дали хартията е легнала
равномерно в тавата и дали е под
маркировката за максимално ниво на
хартията.
Показалец за
максимум хартия
■
Уверете се, че страничните водачи се
допират до краищата на хартията.
■
Внимавайте да не поставите хартията
прекалено навътре; тя може да се
повдигне в задната част на тавата и да
причини проблеми при подаването.
6
Поставете обратно изходящата тава и я
сложете плътно в устройството.
20
Page 23
.
Свързване на
3
телефонна линия и
захранващ кабел
1
Свържете захранващия кабел.
2
Свържете единия край на телефонния
кабел към куплунга на машината,
означен с LINE (линия), а другия към
телефонната розетка.
Още НЕ свързвайте USB кабела.
Внимание
■
Устройството трябва да бъде включен към
заземен контакт.
■
Докато свързвате включеното устройство към
телефонната линия, вие сте защитени от
евентуален токов удар по телефонната
мрежа, тъй като то е заземено чрез контакта.
По подобен начин, когато искате да
преместите устройството, можете да се
предпазите, като изключите първо
телефонния, а след това захранващия кабел.
Поставяне на
4
касетите с мастило
Внимание
Ако в очите ви попадне мастило, веднага ги
измийте с вода, а ако се появи дразнене,
консултирайте се с лекар.
1
Уверете се, че устройството е
включено.
Дисплеят показва:
No Cartridge
Open scanner...
2
Повдигнете отдясно капака на скенера,
докато застане стабилно в отворено
положение.
Капак на скенера
Инсталация на
®
®
®
устройството
Windows
Windows
мрежов кабел
XMac OS
3
Отстранете предпазните елементи.
Не изхвърляйте предпазните елементи.
Те ще ви бъдат необходими при
транспортиране на устройството.
Продължение...
Mac OS
®
8.6 9.2
®
Macintosh
мрежов кабел
в мрежа
За потребители
21
Page 24
OK
OK
Стъпка 1
Инсталация на устройството
4
Извадете касетите с мастило.
5
Внимателно отстранете долната
капачка.
НЕ пипайте зоната, показана на
илюстрацията подолу.
Отваряне
6
Натиснете касетата с мастило силно
надолу, докато отгоре щракне палчето,
като се стараете цветът на гнездото (A)
да съвпадне с цвета на касетата (B),
както е показано на диаграмата подолу.
(A)
OK
OK
(B)
Ако капачката на касетата падне, докато
я разопаковате, касетата няма да се
повреди.
Дръжте касетата с мастило изправена,
докато я поставяте в съответното
гнездо.
OK
OK
7
Повдигнете капака на скенера, за да го
освободите от отвореното положение.
Внимателно приберете подпората за
капака на скенера и го затворете.
Ако Install (Инсталиране) се покаже на
дисплея, след като сте поставили
касетите с мастило, проверете дали те
са поставени правилно.
Устройството ще почисти каналите на
системата за мастило при първата
употреба. Този процес се извършва
само веднъж при първоначалното
поставяне на касетите с мастило.
Процесът на почистване трае около
четири минути.
Дисплеят показва:
Preparing System
Approx 4 Minutes
22
Page 25
Проверка на
5
качеството на печат
Настройка на датата и
6
часа
1
След като почистването приключи,
дисплеят показва:
Set Paper and
Press Start
2
Уверете се, че тавата за хартия е
заредена.
Натиснете Colour Start (Старт цветно).
Устройството разпечатва СТРАНИЦА ЗА
ПРОВЕРКА НА КАЧЕСТВОТО (само при
първоначалното поставяне на касетите
с мастило).
3
Проверете качеството на четирите
цветни колонки, образувани от късите
линии, отпечатани на листа.
(BLACK/ CYAN/ YELLOW/ MAGENTA)
1. Check the quality of the f ourcolor blocks formed by the short lines .
2. If all the short lines are c lear and visible, the qu ality is acceptabl e. the quality is acceptable.
Select (Yes). If you can see missing short li nes, select (No) to begin t he color cleaning
process and follow the promp ts on the LCD.
Print Quality Check
1
Натиснете Menu/Set
(Меню/Настройки).
2
Натиснете 0.
3
Натиснете 2.
4
Въведете от клавиатурата последните
две цифри за годината и натиснете
Menu/Set
Date/Time
Year:2004
(например въведете 0 4 за 2004 г.)
5
Въведете от клавиатурата двете цифри
за месеца и натиснете Menu/Set
(Меню/Настройки).
Date/Time
Month:03
(например въведете 0 3 за м. Март.)
(Меню/Настройки).
Инсталация на
®
®
®
устройството
Windows
Windows
мрежов кабел
XMac OS
4
Ако всички линни са ясни и видими,
качеството е приемливо. Натиснете 1
Yes
(
) (Да).
Ако видите, че някои от късите линии
липсват, натиснете 2 (No) (Не), за да
започне процесът на почистване на
цветовете, и следвайте указанията на
дисплея.
OK Лошо
5
След като почистването приключи,
натиснете
Устройството отново разпечатва
СТРАНИЦА ЗА ПРОВЕРКА НА
КАЧЕСТВОТО и се връща към Стъпка
Colour Start
(Старт цветно).
3
6
Въведете от клавиатурата двете цифри
за деня и натиснете Menu/Set
(Меню/Настройки).
Date/Time
Day:01
(например въведете 0 1.)
7
Въведете от клавиатурата часа в 24
часов формат и натиснете Menu/Set
(Меню/Настройки).
Date/Time
Time: 15:25
(например въведете 1 5, 2 5 за 3:25
P.M.)
8
Натиснете
Ако искате да повторите въвеждането,
натиснете Stop/Exit (Стоп/Изход), за да
.
започнете от Стъпка
Stop/Exit
(Стоп/Изход).
1
.
Mac OS
®
8.6 9.2
®
Macintosh
мрежов кабел
в мрежа
За потребители
23
Page 26

Стъпка 1
Инсталация на устройството
7 Настройка на ID
Трябва да въведете името и факс номера си, за
да се отпечатват на всички страници, които
изпращате.
1
Натиснете Menu/Set
(Меню/Настройки).
2
Натиснете 0.
3
Натиснете 3.
4
Въведете от клавиатурата факс номера
си (до 20 цифри) и натиснете Menu/Set
(Меню/Настройки).
Station ID
Fax:_
5
Въведете от клавиатурата името си (до
20 букви) и натиснете Menu/Set
(Меню/Настройки).
Station ID
Name:_
Избор на режим за
8
получаване
Има четири възможни режима за получаване:
Fax Only
Manual
Свързвате ли външен телефон или външен телефонен
секретар към устройството?
Използвате ли функцията
Гласово съобщение на
външния телефонен
секретар?
(Само факс),
(Ръчно) и
Да Не
Искате ли
устройството да
отговаря на всяко
обаждане?
Fax/Tel
External TAD
Не
Да
(Факс/Тел.),
(Външен секретар).
Fax Only
(Само факс)
Устройството
автоматично отговаря
на всяко обаждане
като факс.
Fax/Tel
(Факс/Тел.)
Устройството
контролира линията и
автоматично отговаря
на всяко обаждане.
Ако не се изпраща
факс, телефонът ще
позвъни, за да
отговорите на
обаждането.
■
Следвайте таблицата, за да въведете
името си.
■
Ако трябва да въведете буква, която е
на същия клавиш като предишната,
натиснете, за да преместите курсора
надясно.
Натиснете
клавиш
2 ABC2
3 DEF3
4 GH I 4
5 JKL5
6 MNO 6
7 PQRS
8 TUV8
9 WX Y Z
6
Натиснете
Един
път
За повече подробности вижте
"Настройка на ID" в Глава 2 на
Ръководството на потребителя.
Ако искате да повторите въвеждането,
натиснете Stop/Exit (Стоп/Изход), за да
започнете от Стъпка
Два
пъти
Stop/Exit
Три
пъти
Четири
пъти
(Стоп/Изход).
1
.
Не
Да
1
Натиснете
2
Натиснете 0.
3
Натиснете 1.
4
Натиснете ▲ или ▼, за да изберете режима.
5
Натиснете
6
Натиснете
За повече подробности вижте
"Настройка на получаването" в Глава 4
на Ръководството за потребителя.
Menu/Set
Menu/Set
Stop/Exit
Manual
Вие контролирате
телефонната линия и
отговаряте на всяко
обаждане.
(Ръчно)
External TAD
(Външен секретар)
Външният телефонен
секретар автоматично
отговаря на всяко
обаждане. Гласовите
съобщения се
съхраняват във
външния телефонен
секретар. Факсовете
се разпечатват.
(Меню/Настройки).
(Меню/Настройки).
(Стоп/Изход).
24
Отидете на следващата
страница, за да
инсталирате драйвера.
Page 27

Стъпка 2
Инсталиране на драйвера и софтуера
Следвайте инструкциите на тази страница за вашата операционна система и
интерфейсен кабел.
Инсталация на
устройството
За потребители с USB интерфейсен кабел
Windows® 98/98SE/Me/2000 Professional/XP
■
... отидете на стр. 26
За потребители в компютърна мрежа
Windows® 98/98SE/Me/2000 Professional/XP
■
... отидете на стр. 28
За потребители с USB интерфейсен кабел
Mac OS® X 10.2.4 или понова версия
■
... отидете на стр. 30
За потребители с USB интерфейсен кабел
®
■ Mac OS
8.6 до 9.2 ..................... отидете на стр. 31
®
Windows
®
Windows
мрежов кабел
XMac OS
®
Mac OS
®
За потребители в компютърна мрежа
Mac OS® X 10.2.4 или понова версия
■
®
■ Mac OS
8.6 до 9.2 ..................... отидете на стр. 33
За потребители в компютърна мрежа
... отидете на стр. 32
... отидете на стр. 34
8.6 9.2
®
Macintosh
мрежов кабел
в мрежа
За потребители
25
Page 28

Стъпка 2
За потребители с USB интерфейсен кабел
(За Windows
Уверете се, че сте изпълнили инструкциите от Стъпка 1 "Инсталация
на устройството" на страници 20 24.
Инсталиране на драйвера и софтуера
®
98/98SE/Me/2000 Professional/XP)
1
Ако вече сте свързали интерфейсен
кабел, изключете устройството от
контакта и от компютъра.
2
Включете компютъра.
(Под Windows
с администраторски права.)
3
Поставете компактдиска в CDROM
устройството. Ако се появи екранът с
имена на моделите, изберете вашия.
Ако се появи екранът с езици, изберете
вашия.
4
Появява се главното меню на
компактдиска.
Натиснете Install MFLPro Suite
(Инсталиране на MFLPro Suite).
Ако този прозорец не се появи,
използвайте Windows
стартирате програмата setup.exe от
основната директория на компактдиска
Brother.
®
2000 Professional/XP сте
®
Explorer, за да
9
Когато се появи този екран, свържете
USB интерфейсния кабел към
компютъра и след това към
устройството.
За да свържете USB интерфейсния
кабел към устройството:
1. Повдигнете капака на скенера до
отворено положение.
2. Поставете USB кабела в USB порта,
отбелязан със символа . USB
портът се намира вляво над гнездата
за касетите с мастило, както е
показано подолу.
5
След като прочетете и приемете
лицензното споразумение за ScanSoft
PaperPort
6
Инсталацията на PaperPort® 9.0SE ще
започне автоматично, последвана от
инсталация на MFLPro Suite.
7
Когато се появи прозорецът с
лицензното споразумение на софтуера
Brother MFLPro Suite, натиснете Yes
(Да), ако сте съгласни с него.
Local Connection (Локална връзка) и
8
натиснете Next (Напред).
Инсталацията ще продължи.
®
9.0SE, натиснете
Yes
(Да).
®
3. Внимателно поставете USB кабела в
канала, както е показано подолу,
като следвате извивката му в посока
задната част на устройството.
Внимание
Уверете се, че кабелът не пречи на капака да се
затвори, защото иначе може да възникне
грешка.
26
Page 29

0
Повдигнете капака на скенера, за да го
освободите от отвореното положение.
Внимателно приберете подпората за
капака на скенера и го затворете.
Инсталация на
устройството
A
Включете устройството, като свържете
захранващия кабел.
Инсталационните екрани ще се появят
след няколко секунди.
Инсталацията на драйверите Brother ще
започне автоматично.
Инсталационните екрани се появяват
един след друг, затова изчакайте.
B
Когато се появят екраните за онлайн
регистрация на Brother и ScanSoft,
направете своя избор и следвайте
инструкциите на екрана.
C
Натиснете Finish (Готово), за да
рестартирате компютъра.
D
След като рестартирате компютъра,
автоматично ще се включи
Инсталационната диагностика и ще се
покаже прозорец с резултатите от
инсталацията.
Ако инсталацията е неуспешна,
опитайте отново, като използвате
опцията Repair MFLPro Suite
(Поправка на MFLPro Suite) от главното
меню. Изберете Repair MFLPro Suite
(Поправка на MFLPro Suite) и следвайте
инструкциите на екрана.
®
Windows
Инсталиране на драйвера и софтуера
MFLPro Suite, драйверът за
принтера и драйверът за скенера са
инсталирани и инсталацията
приключи.
в мрежа
За потребители
27
Page 30

Стъпка 2
За потребители в компютърна мрежа
(Windows
Уверете се, че сте изпълнили инструкциите от Стъпка 1 "Инсталация
на устройството" на страници 20 24.
®
Инсталиране на драйвера и софтуера
98/98SE/Me/2000 Professional/XP)
Ако ползвате Personal Firewall,
деактивирайте го преди инсталацията.
След като се уверите, че може да
разпечатвате, активираите отново
Personal Firewall.
1
Свържете мрежовия кабел към
устройството и след това към
свободен порт на хъба.
За да свържете мрежовия интерфейсен
кабел към устройството:
1. Повдигнете капака на скенера до
отворено положение.
2. Поставете мрежовия кабел в LAN
порта, отбелязан със символа .
LAN портът се намира вляво над
гнездата за касетите с мастило,
както е показано подолу.
2
Повдигнете капака на скенера, за да го
освободите от отвореното положение.
Внимателно приберете подпората за
капака на скенера и го затворете.
3
Включете устройството, като свържете
захранващия кабел.
4
Включете компютъра.
(Под Windows
трябва да влезете като администратор.)
5
Поставете компактдиска в CDROM
устройството. Ако се появи екранът с
имена на моделите, изберете вашия.
Ако се появи екранът с езици, изберете
вашия.
6
Появява се главното меню на
компактдиска.
Натиснете Install MFLPro Suite
(Инсталиране на MFLPro Suite).
®
2000 Professional/XP
3. Внимателно поставете мрежовия
кабел в канала, както е показано по
долу, като следвате извивката му в
посока задната част на устройството.
Внимание
Уверете се, че кабелът не пречи на капака да се
затвори, защото иначе може да възникне
грешка.
Ако използвате USB и LAN кабели,
поставете и двата в канала.
Ако този прозорец не се появи,
използвайте Windows
стартирате програмата setup.exe от
основната директория на компактдиска
Brother.
7
След като прочетете и приемете
лицензното споразумение за ScanSoft
PaperPort
8
Инсталацията на PaperPort® 9.0SE ще
започне автоматично, последвана от
инсталация на MFLPro Suite.
9
Когато се появи прозорецът с
лицензното споразумение на софтуера
Brother MFLPro Suite, натиснете Yes
(Да), ако сте съгласни с него.
0
Изберете Network Connection
(Мрежова връзка) и натиснете
(Напред).
®
9.0SE, натиснете Yes (Да).
®
Explorer, за да
Next
®
28
Page 31

A
Инсталацията на Brother драйверите ще
започне автоматично.
Инсталационните екрани се появяват
един след друг, затова изчакайте.
B
Ако устройството е настроено за
вашата мрежа, изберете устройството
от списъка и натиснете Next (Напред).
Този прозорец няма да се появи, ако
само едно устройство е свързано към
мрежата то ще бъде избрано
автоматично.
Ако устройството още не е настроено за
работа в мрежата, ще се появи
прозорецът Configure IP Address
(Конфигуриране на IP адрес). Въведете
съответния за мрежата IP адрес, като
следвате инструкциите на екрана.
C
Когато се появят екраните за онлайн
регистрация на Brother и ScanSoft,
направете своя избор и следвайте
инструкциите на екрана.
Инсталация на
®
устройството
Windows
мрежов кабел
D
Натиснете Finish (Готово), за да
рестартирате компютъра.
E
След като рестартирате компютъра,
автоматично ще се включи
Инсталационната диагностика и ще се
покаже прозорец с резултатите от
инсталацията.
За мрежови инсталации не се поддържа
опцията Repair MFLPro Suite (Поправка
на MFLPro Suite) от главното меню.
MFLPro Suite, мрежовите
драйвери за принтера и скенера и
Network PhotoCapture Center
инсталирани и инсталацията
приключи.
™
Инсталиране на драйвера и софтуера
са
в мрежа
За потребители
29
Page 32

Стъпка 2
За потребители с USB интерфейсен кабел
За Mac OS® X 10.2.4 или понова версия
Уверете се, че сте изпълнили инструкциите от Стъпка 1 "Инсталация
на устройството" на страници 20 24.
1
Спрете и изключете устройството от
контакта и от своя Macintosh
сте свързали интерфейсен кабел.
2
Включете своя Macintosh®.
3
Поставете компактдиска в CDROM
устройството.
4
Кликнете два пъти върху иконата
Here OSX (Начало OSX), за да
инсталирате драйвера за принтера,
драйвера за скенера и програмата
Remote Setup. Ако се появи екранът с
езици, изберете вашия.
5
Натиснете MFLPro Suite, за да
извършите инсталацията.
6
Следвайте инструкциите на екрана и
рестартирайте своя Macintosh
7
След като се появи прозорецът
DeviceSelector (Селектор на
устройства), свържете USB
интерфейсния кабел със своя
Macintosh
8
Свържете USB интерфейсния кабел със
своя Macintosh
устройството.
За да свържете USB интерфейсния
кабел към устройството:
1. Повдигнете капака на скенера до
отворено положение.
2. Поставете USB кабела в USB порта,
отбелязан със символа . USB
портът се намира вляво над гнездата
за касетите с мастило, както е
показано подолу.
Инсталиране на драйвера и софтуера
®
, ако вече
Start
®
.
®
и след това с устройството.
®
и след това с
Внимание
Уверете се, че кабелът не пречи на капака да се
затвори, защото иначе може да възникне
грешка.
НЕ свързвайте устройството към
USB порт на клавиатура или на
незахранен USB хъб.
9
Повдигнете капака на скенера, за да го
освободите от отвореното положение.
Внимателно приберете подпората за
капака на скенера и го затворете.
0
Включете устройството, като свържете
захранващия кабел.
A
Изберете Applications (Приложения) от
менюто Go (Старт).
B
Отворете папката Utilities (Помощни
програми).
C
Отворете иконата Print Center (Център
за печат).
D
Натиснете Add (Добавяне).
E
Изберете USB.
F
Изберете
модела) и натиснете Add (Добавяне).
G
Изберете Quit Printer Setup Utility
(Изход от помощната програма за
инсталация на принтер) от менюто
Printer Setup Utility (Помощна
програма за инсталация на принтер).
MFCXXXX
(XXXX е името на
30
3. Внимателно поставете USB кабела в
канала, както е показано подолу,
като следвате извивката му в посока
задната част на устройството.
MFLPro Suite, драйверите за
принтера и скенера и програмата
Remote Setup са инсталирани и
инсталацията приключи.
H
За да инсталирате Presto!®
PageManager
Presto! PageManager
инструкциите на екрана.
С помощта на Presto!® PageManager®
можете лесно да сканирате, споделяте и
организирате снимки и документи.
Presto!
инсталиран и инсталацията
приключи.
®
, щракнете върху иконата
и следвайте
®
PageManager® е
Page 33
За Mac OS® 8.6 до 9.2
Уверете се, че сте изпълнили инструкциите от Стъпка 1 "Инсталация
на устройството" на страници 20 24.
1
Спрете и изключете устройството от
контакта и от своя Macintosh
сте свързали интерфейсен кабел.
2
Включете своя Macintosh®.
3
Поставете компактдиска в CDROM
устройството.
4
Кликнете два пъти върху иконата Start
Here (Начало), за да инсталирате
драйверите за принтера и скенера. Ако
се появи екранът с езици, изберете
вашия.
5
Натиснете MFLPro Suite, за да
извършите инсталацията.
6
Следвайте инструкциите на екрана и
рестартирайте своя Macintosh
7
Свържете USB интерфейсния кабел със
своя Macintosh
устройството.
За да свържете USB интерфейсния
кабел към устройството:
1. Повдигнете капака на скенера до
отворено положение.
2. Поставете USB кабела в USB порта,
отбелязан със символа . USB
портът се намира вляво над гнездата
за касетите с мастило, както е
показано подолу.
®
и след това с
®
, ако вече
®
.
Внимание
Уверете се, че кабелът не пречи на капака да се
затвори, защото иначе може да възникне
грешка.
НЕ свързвайте устройството към
USB порт на клавиатура или на
незахранен USB хъб.
8
Повдигнете капака на скенера, за да го
освободите от отвореното положение.
Внимателно приберете подпората за
капака на скенера и го затворете.
9
Включете устройството, като свържете
захранващия кабел.
0
От менюто Apple® отворете Chooser
(Периферни устройства).
A
Натиснете иконата Brother Ink.
Отдясно в Chooser (Периферни
устройства) изберете устройството, на
което искате да печатате.
Затворете
устройства).
Драйверите за принтера и скенера
са инсталирани.
B
За да инсталирате Presto!®
PageManager
Presto! PageManager
инструкциите на екрана.
Chooser
®
(Периферни
, кликнете върху иконата
и следвайте
устройството
Инсталация на
XMac OS
®
Mac OS
®
Инсталиране на драйвера и софтуера
8.6 9.2
3. Внимателно поставете USB кабела в
канала, както е показано подолу,
като следвате извивката му в посока
задната част на устройството.
С помощта на Presto!® PageManager®
можете лесно да сканирате, споделяте и
организирате снимки и документи.
Presto!® PageManager® е
инсталиран и инсталацията
приключи.
в мрежа
За потребители
31
Page 34

Стъпка 2
За потребители в компютърна мрежа
За Mac OS® X 10.2.4 или понова версия
Уверете се, че сте изпълнили инструкциите от Стъпка 1 "Инсталация
на устройството" на страници 20 24.
1
Спрете и изключете устройството от
контакта и от своя Macintosh
сте свързали интерфейсен кабел.
2
Включете своя Macintosh®.
3
Поставете компактдиска в CDROM
устройството.
4
Кликнете два пъти върху иконата Start
Here OSX (Начало OSX), за да
инсталирате драйвера за принтера и
програмата Remote Setup. Ако се появи
екранът с езици, изберете вашия.
5
Натиснете
извършите инсталацията.
6
Следвайте инструкциите на екрана и
рестартирайте своя Macintosh
7
След като се появи прозорецът
DeviceSelector (Селектор на
устройства), свържете мрежовия
интерфейсен кабел със своя
Macintosh
устройството.
8
Свържете мрежовия интерфейсен
кабел към устройството и след това
към свободен порт.
За да свържете мрежовия интерфейсен
кабел към устройството:
1. Повдигнете капака на скенера до
отворено положение.
2. Поставете мрежовия кабел в LAN
порта, отбелязан със символа .
LAN портът се намира вляво над
гнездата за касетите с мастило,
както е показано подолу.
Инсталиране на драйвера и софтуера
®
MFLPro Suite
®
и след това с
, ако вече
, за да
®
.
Внимание
Уверете се, че кабелът не пречи на капака да се
затвори, защото иначе може да възникне
грешка.
Ако използвате USB и LAN кабели,
поставете и двата в канала.
9
Повдигнете капака на скенера, за да го
освободите от отвореното положение.
Внимателно приберете подпората за
капака на скенера и го затворете.
0
Включете устройството, като свържете
захранващия кабел.
A
Изберете Applications (Приложения) от
менюто Go (Старт).
B
Отворете папката Utilities (Помощни
програми).
C
Отворете иконата Print Center (Център
за печат).
D
Натиснете Add (Добавяне).
E
Изберете, както е показано подолу.
F
Изберете
името на модела) (BRN_xxxxxx_P1) и
натиснете бутона Add (Добавяне).
xxxxxx са последните шест символа от
Ethernet адреса.
Ръководство на мрежовия
потребител, Глава 5, на
компактдиска.
Brother MFCXXXX
(XXXX е
32
3. Внимателно поставете мрежовия
кабел в канала, както е показано по
долу, като следвате извивката му в
посока задната част на устройството.
G
Изберете Quit Printer Setup Utility
(Изход от помощната програма за
инсталация на принтер) от менюто
Printer Setup Utility (Помощна
програма за инсталация на принтер).
Инсталацията завърши.
За повече информация относно
свързването на устройството към
Macintosh
мрежовия потребител, Глава 5, на
компактдиска.
®
мрежа вижте Ръководство на
Page 35

За Mac OS® 8.6 до 9.2
Уверете се, че сте изпълнили инструкциите от Стъпка 1 "Инсталация
на устройството" на страници 20 24.
1
Спрете и изключете устройството от
контакта и от своя Macintosh
сте свързали интерфейсен кабел.
2
Включете своя Macintosh®.
3
Поставете компактдиска в CDROM
устройството.
4
Кликнете два пъти върху иконата Start
Here (Начало), за да инсталирате
драйверите за принтера и скенера. Ако
се появи екранът с езици, изберете
вашия.
5
Натиснете MFLPro Suite, за да
извършите инсталацията.
6
Следвайте инструкциите на екрана и
рестартирайте своя Macintosh
7
Свържете мрежовия интерфейсен
кабел към устройството и след това
към свободен порт.
За да свържете мрежовия интерфейсен
кабел към устройството:
1. Повдигнете капака на скенера до
отворено положение.
2. Поставете мрежовия кабел в LAN
порта, отбелязан със символа .
LAN портът се намира вляво над
гнездата за касетите с мастило,
както е показано подолу.
®
, ако вече
®
.
Внимание
Уверете се, че кабелът не пречи на капака да се
затвори, защото иначе може да възникне
грешка.
Ако използвате USB и LAN кабели,
поставете и двата в канала.
8
Повдигнете капака на скенера, за да го
освободите от отвореното положение.
Внимателно приберете подпората за
капака на скенера и го затворете.
9
Включете устройството, като свържете
захранващия кабел.
0
Отворете Chooser (Периферни
устройства) от менюто Apple.
A
Щракнете върху иконата Brother Ink
(IP) и изберете BRN_xxxxxx.
Затворете Chooser (Периферни
устройства).
■
xxxxxx са последните шест символа от
Ethernet адреса.
■
За повече информация относно
свързването на устройството към
Macintosh
на мрежовия потребител, Глава 5, на
компактдиска.
Инсталацията завърши.
®
мрежа вижте Ръководство
устройството
Инсталация на
Инсталиране на драйвера и софтуера
®
3. Внимателно поставете мрежовия
кабел в канала, както е показано по
долу, като следвате извивката му в
посока задната част на устройството.
33
Macintosh
мрежов кабел
в мрежа
За потребители
Page 36

■
За потребители в компютърна мрежа
Този раздел се отнася за употребата на устройството в мрежа.
Администраторът трябва да инсталира устройството, като следва тези стъпки.
Инсталиране на BRAdmin Professional
Configuration Utility (само за Windows
®
BRAdmin Professional е създаден за управление на свързани в мрежа устройства
Brother, като networkready мултифункционални устройства и/или networkready
принтери в локална компютърна мрежа.
BRAdmin Professional може да се използва и за управление на устройства на други
производители, чиито продукти поддържат SNMP (Simple Network Management
Protocol).
За повече информация относно BRAdmin Professional отидете на адрес
http://solutions.brother.com
1
Поставете компактдиска в CDROM устройството. Началният екран се появява
автоматично.
Следвайте инструкциите на екрана.
)
2
Кликнете върху иконата Install Optional Applications (Инсталиране на допълнителни
приложения) от главното меню на екрана.
3
Натиснете BRAdmin Professional и следвайте инструкциите на екрана.
По подразбиране паролата за сървъра на принтера е “access”. Можете да използвате BRAdmin
Professional, за да промените тази парола.
Задаване на IP адрес, Subnet Mask и Gateway
чрез BRAdmin Professional
(само за Windows
1
Стартирайте BRAdmin Professional и изберете
2
Изберете Search Active Devices (Търсене на активни устройства) от менюто
Devices (Устройства).
BRAdmin автоматично търси нови устройства.
3
Щракнете два пъти върху новото устройство.
4
Въведете IP Address (IP адрес), Subnet Mask (Подмрежова маска) и Gateway (Шлюз) и
натиснете бутона OK.
®
)
TCP/IP
.
34
5
Информацията за адреса ще се съхрани в устройството.
По подразбиране паролата за сървъра на принтера е “access”. Можете да използвате BRAdmin
Professional, за да промените тази парола.
Page 37

Търговски марки
Графичният знак на Brother е регистрирана търговска марка на Brother Industries, Ltd.
Brother е регистрирана търговска марка на Brother Industries, Ltd.
MultiFunction Link e регистрирана търговска марка на Brother International Corporation.
© 2004 Brother Industries, Ltd. Всички права запазени.
Windows и Microsoft са регистрирани търговски марки на Microsoft в САЩ и в други страни.
Macintosh и True Type са регистрирани търговски марки на Apple Computer, Inc.
PaperPort и OmniPage OCR са регистрирани търговски марки на ScanSoft, Inc.
Presto! PageManager е регистрирана търговска марка на NewSoft Technology Corporation.
Всяка компания, чийто софтуер е споменат в това Ръководство, притежава Лицензно споразумение,
специфично за собствените й програми.
Всички марки и имена на продукти, споменати в това Ръководство, са регистрирани търговски
марки на съответните компании.
Съставяне и публикуване
Това ръководство е съставено и публикувано под контрола на Brother Industries Ltd. на базата на най
новите описания и спецификации на продукта.
Съдържанието на това ръководство и спецификациите на този продукт може да бъдат променяни без
предизвестие.
Brother си запазва правото да прави промени без предизвестие в спецификациите и съдържащите се
тук материали и не носи отговорност за каквито и да е вреди (включително последващи), възникнали
вследствие на използването на предоставените материали, включително, но без ограничение до
печатни и други грешки, свързани с публикацията.
Този продукт е предназначен за професионална употреба.
©2004 Brother Industries, Ltd.
Край на българската версия на Ръководството за Бързо Инсталиране
35
Page 38

Page 39

Înainte de a putea utiliza echipamentul, trebuie să instalaţi hardware-ul și apoi să instalaţi
driver-ul.
Pentru a vă ajuta la instalarea echipamentului și la instalarea driver-ului și software-ului,
va rugăm citiţi acest “Ghid rapid de setare” și executaţi instrucţiunile simple cuprinse în
ghid.
Instalarea și
configurarea
echipamentului
Pasul 1
MFC-5440CN
Pasul 2
Instalarea și configurarea
echipamentului
Instalarea driverului și a
software-ului
Instalarea și configurarea au
Instalarea driver-ului și a software-ului
®
Windows
Reţeaua
XMac OS
®
Mac OS
®
®
Windows
Pentru a descărca cele mai noi drivere și pentru a afla cea mai bună soluţie la problemele sau
întrebările dumneavoastră, accesaţi Brother Solutions Center (Centrul de Soluţii Brother) direct
din driver sau vizitaţi site-ul web http://solutions.brother.com
Păstraţi acest “Ghid rapid de setare” într-un loc corespunzător și folosiţi-l drept referinţă rapidă și
facilă în orice moment.
Ghid rapid de setare
fost finalizate !
8.6 - 9.2
®
Reţeaua
Macintosh
de reţea
Pentru utilizatorii
37
Page 40

Pasul 1
Îndepărtarea părţilor cu
1
rol de protecţie
1
Îndepărtaţi banda și hârtia protectoare.
2 Încărcarea hârtiei
Pentru încărcarea hârtiei sau a altui
suport de tipărire
Instalarea și configurarea echipamentului
3
Trageţi în exterior suportul pentru hârtie și
desfaceţi prelungitorul suportului.
Suportul pentru
hârtie
NU conectaţi cablul USB.
Conectarea cablului USB se face la
instalarea driverului.
Prelungitorul suportului
4
pentru hârtie
Utilizaţi prelungitorul suportului pentru hârtia
de mărime Letter, Legal sau A4.
Răsfoiţi și stivuiţi bine hârtia pentru a evita
blocarea hârtiei în imprimantă sau
alimentarea eronată cu hârtie.
1
Trageţi tava de hârtie complet în exteriorul
MFC și îndepărtaţi tava pentru exemplarele
tipărite.
2
Apăsaţi și glisaţi ghidajul pentru hârtie
pentru a corespunde lăţimii hârtiei.
Ghidajul pentru
poziţionarea hârtiei
5
Introduceţi cu grijă hârtia în tava pentru
hârtie, cu faţa pentru tipărire în jos și cu
marginea de sus spre interior.
Verificaţi dacă hârtia este întinsă în tavă și
sub marcajul pentru limita maximă de hârtie.
Limita maximă de
hârtie
■ Asiguraţi-vă că ghidajele laterale pentru
hârtie ating marginile hârtiei.
■ Nu împingeţi hârtia prea tare în interior;
ea se poate ridica în partea din spate a
tăvii și poate cauza probleme de
alimentare cu hârtie.
6
Puneţi la loc tava pentru exemplarele
tipărite și împingeţi ferm la loc tava pentru
hârtie în MFC.
38
Page 41

.
Instalarea liniei
telefonice și a
3
cordonului de
alimentare
1
Conectaţi cordonul de alimentare.
2
Conectaţi cablul pentru linia telefonică.
Conectaţi un capăt al cablului la mufa de pe
echipament care poartă marcajul LINE
(LINIE) și celălalt capăt la o mufă modulară
de perete.
Nu conectaţi încă cablul USB.
Avertizare
■ Echipamentul trebuie alimentat de la o priză cu
împământare.
■ Din momentul în care echipamentul este
împământat prin intermediul prizei din perete, vă
puteţi proteja faţă de problemele electrice potenţial
periculoase apărute în reţeaua telefonică prin
păstrarea tensiunii de alimentare atunci când
conectaţi echipamentul la o linie telefonică. În mod
similar, vă puteţi proteja atunci când doriţi să mutaţi
echipamentul deconectând mai întâi linia
telefonică și apoi cordonul de alimentare.
Instalarea cartușelor de
4
cerneală
Avertizare
Dacă v-a pătruns cerneală în ochi, spălaţi-vă imediat
pe ochi cu apă, iar în cazul apariţiei unei iritaţii
consultaţi un doctor.
1
Asiguraţi-vă că este echipamentul este
pornit.
Ecranul LCD afișează:
No Cartridge
Open scanner...
2
Ridicaţi capacul scanerului din partea
dreaptă a echipamentului până când se
blochează în poziţia deschis.
Capacul scanerului
Instalarea și
®
Windows
Reţeaua
XMac OS
®
Mac OS
configurarea
®
echipamentului
Windows
3
Îndepărtaţi părţile protectoare.
Nu aruncaţi aceste părţi protectoare.
Veţi mai avea nevoie de ele atunci când
transportaţi echipamentul.
Continuare...
®
®
Reţeaua
de reţea
Pentru utilizatorii
8.6 - 9.2
Macintosh
39
Page 42

OK
OK
Pasul 1
Instalarea și configurarea echipamentului
4
Scoateţi cartușul de cerneală.
5
Îndepărtaţi cu grijă căpăcelul inferior.
NU atingeţi zona prezentată în
ilustraţia de mai jos.
Deschiderea
6
Apăsaţi cu putere pe cartușul de cerneală
până când se fixează în locașul său, având
grijă sa potriviţi culoarea slotului (A) cu
culoarea cartușului (B), așa cum se arată în
diagrama de mai jos.
(A)
OK
OK
(B)
Cartușul nu se va deteriora în cazul în care
capacul său se desface atunci când
deschideţi capsula.
Atunci când introduceţi cartușul în slotul
său, păstraţi-l în poziţie verticală.
OK
OK
7
Ridicaţi capacul scanerului pentru a elibera
blocajul. Împingeţi ușor în jos suportul
capacului și închideţi capacul scanerului.
Dacă după instalarea cartușelor de cerneală
ecranul LCD afișează Install (Instalare),
verificaţi dacă aţi introdus corect cartușele.
Echipamentul va curăţa sistemul tubului de
cerneală care este utilizat pentru prima
oară. Acest proces va avea loc o singură
dată, atunci când cartușele sunt instalate
pentru prima oară. Procesul de curăţare va
dura aproximativ patru minute.
Ecranul LCD afișează:
Preparing System
Approx 4 Minutes
40
Page 43

5 Controlul calităţii tipăririi
6 Setarea datei și orei
1
După finalizarea ciclului de curăţare,
ecranul LCD afișează:
Set Paper and
Press Start
2
Asiguraţi-vă că aţi introdus hârtia în tava
pentru hârtie.
Apăsaţi
Colour Start
(Start color).
Echipamentul începe să tipărească PRINT
QUALITY CHECK SHEET (foaia pentru
controlul calităţii tipăririi) (numai la
instalarea iniţială a cartușului de cerneală).
3
Verificaţi calitatea celor patru blocuri de
culoare formate de liniile scurte tipărite pe
foaie.
(BLACK/ CYAN/ YELLOW/ MAGENTA)
1. Check the quality of the f our-color blocks formed by the short lines.
2. If all the short lines are c lear and visible, the qu ality is acceptable. the qu ality is acceptable.
Select (Yes). If you can see missing short li nes, select (No) to begin the co lor cleaning process
and follow the prompts on the LCD.
Print Quality Check
1
Apăsaţi Menu/Set (Meniu/Setare).
2
Apăsaţi 0.
3
Apăsaţi 2.
4
Tastaţi ultimele două cifre ale anului pe
tastatură și apoi apăsaţi Menu/Set
(Meniu/Setare).
Date/Time
Year:2004
(de ex. Tastaţi 0 4 pentru 2004.)
5
Tastaţi două cifre corespunzătoare lunii pe
tastatură și apoi apăsaţi Menu/Set
(Meniu/Setare).
Date/Time
Month:03
(de ex. Tastaţi 0 3 pentru Martie.)
6
Tastaţi două cifre corespunzătoare zilei pe
tastatură și apoi apăsaţi Menu/Set
(Meniu/Setare).
Instalarea și
®
Windows
Reţeaua
XMac OS
®
Mac OS
configurarea
®
echipamentului
Windows
4
Dacă toate liniile sunt clare si vizibile,
calitatea este acceptabilă. Apăsaţi 1 (
(Da).
Dacă vedeţi linii scurte discontinue, apăsaţi
2 (No) (Nu) pentru a iniţia procesul de
curăţare și apoi procedaţi conform
instrucţiunilor de pe ecranul LCD.
OK Slab
5
După finalizarea operaţiei de curăţare,
apăsaţi Colour Start (Start color).
Echipamentul reîncepe tipărirea foii pentru
controlul calităţii tipăririi și revine la pasul
Yes
3
Date/Time
Day:01
)
(de ex. Tastaţi 0 1.)
7
Tastaţi ora în formatul cu 24 de ore pe
tastatură și apoi apăsaţi
Menu/Set
®
8.6 - 9.2
(Meniu/Setare).
Date/Time
®
Ora:15:25
Reţeaua
Macintosh
(de ex. Tastaţi 1 5, 2 5 pentru 3:25 P.M.)
8
Apăsaţi
.
Stop/Exit
Dacă doriţi să repetaţi intrarea, apăsaţi
Stop/Exit
la Pasul
(Stop/Ieșire) pentru a reîncepe de
1
(Stop/Ieșire).
.
de reţea
Pentru utilizatorii
41
Page 44

Pasul 1
Instalarea și configurarea echipamentului
7 Setarea ID-ului staţiei
Trebuie să configuraţi echipamentul astfel încât
numele și numărul dumneavoastră de fax să fie
tipărite pe toate paginile pe care le trimiteţi.
1
Apăsaţi Menu/Set (Meniu/Setare).
2
Apăsaţi 0.
3
Apăsaţi 3.
4
Tastaţi numărul de fax (până la 20 de cifre)
pe tastatură și apoi apăsaţi
(Meniu/Setare).
Station ID
Fax:_
5
Utilizaţi tastatura pentru a vă tasta numele
(până la 20 de caractere) și apoi apăsaţi
Menu/Set
Station ID
Name:_
(Meniu/Setare).
Menu/Set
Selectarea unui mod de
8
primire
Există patru moduri de primire posibile:
Fax Only (Numai Fax), Fax/Tel, Manual și
External TAD (Robot telefonic extern).
Doriţi să conectaţi la FAX un telefon extern sau un robot
telefonic extern?
Da Nu
Folosiţi funcţia mesaj vocal a
robotului telefonic extern?
Doriţi ca MFC să
răspundă la fiecare
apel?
Nu
Da
Fax Only
(Numai Fax)
MFC răspunde automat
la fiecare apel în calitate
de fax.
Fax/Tel
MFC controlează linia și
răspunde automat la
fiecare apel. Dacă
apelul nu este fax, va
suna telefonul pentru ca
dumneavoastră sa
răspundeţi.
■ Pentru introducerea corectă a numelui
consultaţi diagrama următoare.
■ Dacă doriţi să tastaţi un caracter care este
pe aceeași tastă ca și cel precedent,
apăsaţi tasta de navigare pentru a muta
cursorul la dreapta.
Apăsaţi
tasta
2 ABC2
3
4 GH I 4
5 JKL5
6 MNO 6
7
8 TUV8
9 WX Y Z
6
Apăsaţi Stop/Exit (Stop/Ieșire).
Dacă doriţi să repetaţi intrarea, apăsaţi
Stop/Exit
la Pasul
O
dată
DEF 3
PQRS
Pentru informaţii suplimentare, consultaţi
"Setarea ID-ului staţiei" în Capitolul 2 al
Ghidului utilizatorului.
De două
ori
(Stop/Ieșire) pentru a reîncepe de
1
.
De trei
ori
De patru
ori
Nu
Da
1
Apăsaţi
2
Apăsaţi 0.
3
Apăsaţi 1.
4
Apăsaţi ▲ sau ▼ pentru a selecta modul.
5
Apăsaţi Menu/Set (Meniu/Setare).
6
Apăsaţi Stop/Exit (Stop/Ieșire).
Menu/Set
Pentru informaţii suplimentare, consultaţi
"Configurarea primirii" în Capitolul 4 al
Ghidului utilizatorului.
Manual
Aveţi controlul liniei și
trebuie să răspundeţi
personal la fiecare apel.
External TAD
(Robot telefonic extern)
Robotul telefonic extern
(TAD) răspunde
automat la fiecare apel.
Mesajele vocale sunt
memorate de robotul
telefonic extern.
Mesajele fax sunt
tipărite.
(Meniu/Setare).
42
Mergeţi la pagina următoare
pentru a instala driverul
Page 45

Pasul 2
Instalarea driverului și a software-ului
Executaţi instrucţiunile de pe această pagină pentru sistemul dvs. de operare și pentru cablul
dvs. de interfaţă.
Instalarea și
configurarea
echipamentului
Pentru utilizatorii cablului de interfaţă USB
Windows® 98/98SE/Me/2000 Professional/XP
■
...mergeţi la pagina 44
Pentru utilizatorii cablului de interfaţă de reţea
Windows® 98/98SE/Me/2000 Professional/XP
■
...mergeţi la pagina 46
Pentru utilizatorii cablului de interfaţă USB
Mac OS® X 10.2.4 sau o versiune ulterioară
■
...mergeţi la pagina 48
Pentru utilizatorii cablului de interfaţă USB
®
■ Mac OS
de la 8.6 la 9.2
.............................mergeţi la pagina 49
®
Windows
Reţeaua
XMac OS
®
Mac OS
®
®
Windows
Pentru utilizatorii cablului de interfaţă de reţea
Mac OS® X 10.2.4 sau o versiune ulterioară
■
®
■ Mac OS
de la 8.6 la 9.2
Pentru utilizatorii de reţea
.............................mergeţi la pagina 51
..............................mergeţi la pagina 52
...mergeţi la pagina 50
8.6 - 9.2
®
Reţeaua
Macintosh
de reţea
Pentru utilizatorii
43
Page 46

Pasul 2
Pentru utilizatorii cablului de interfaţă USB
(Pentru Windows
Asiguraţi-vă că aţi finalizat executarea instrucţiunilor de la Pasul 1
“Instalarea și configurarea echipamentului” de la paginile 38 - 42.
Instalarea driverului și a software-ului
®
98/98SE/Me/2000 Professional/XP)
1
Deconectaţi echipamentul de la mufa
cordonului de alimentare și de la calculator,
dacă aţi conectat deja un cablu de interfaţă.
2
Porniţi calculatorul.
(Pentru Windows
trebuie să fiţi logat ca administrator.)
3
Introduceţi CD-ROM-ul livrat cu
echipamentul în unitatea CD-ROM. Dacă
apare ecranul cu numele modelului,
selectaţi echipamentul dumneavoastră.
Dacă apare ecranul pentru limbă, selectaţi
limba dorită.
4
Va apărea meniul principal al discului
CD-ROM.
Executaţi clic pe Install MFL-Pro Suite
(Instalare MFL-Pro Suite).
Dacă nu apare această fereastră, utilizaţi
Windows
programul setup.exe din directorul rădăcină
al discului CD-ROM furnizat de Brother.
®
®
2000 Professional/XP,
Explorer pentru a executa
9
Atunci când apare acest ecran, conectaţi
cablul de interfaţă USB la PC și apoi la
echipament.
Pentru a conecta cablul USB la echipament:
1. Deschideţi capacul scanerului
aducându-l în poziţia deschis.
2. Conectaţi cablul USB la mufa USB,
marcată cu un simbol . Mufa USB se
găsește deasupra și în stânga faţă de
sloturile pentru cartușul de imprimantă,
așa cum se arată mai jos.
5
După citirea și acceptarea Convenţiei de
Licenţă ScanSoft
executaţi clic pe Yes (Da).
6
Instalarea PaperPort® 9.0SE va începe
automat și este urmată de instalarea
MFL-Pro Suite.
7
Atunci când pe ecran apare Convenţia de
Licenţă Software Brother MFL-Pro Suite,
executaţi clic pe
acord cu termenii acestei licenţe.
8
Selectaţi
locală) și apoi executaţi clic pe
(Următor).
Instalarea va continua.
Local Connection
®
PaperPort® 9.0SE,
Yes
(Da) dacă sunteţi de
(Conexiune
Next
3. Ghidaţi cu grijă cablul USB în canalul
adecvat, așa cum se arată mai jos,
urmărind canalul de ghidare în jurul și
către partea din spate a echipamentului.
Avertizare
Asiguraţi-vă că acest cablu nu împiedică închiderea
capacului, în caz contrar se pot produce erori.
44
Page 47

0
Ridicaţi capacul scanerului pentru a elibera
blocajul. Împingeţi ușor în jos suportul
capacului și închideţi capacul scanerului.
A
Porniţi echipamentul branșându-l la cablul
de alimentare.
Va dura câteva secunde până să apară
ecranul de instalare.
Instalarea driverelor Brother va începe
automat. Ecranele de instalare apar unul
după altul, vă rugăm așteptaţi puţin.
B
Atunci când este afișat ecranul de
înregistrare on-line Brother și ScanSoft,
efectuaţi selecţia corespunzătoare și
executaţi instrucţiunile de pe ecran.
C
Executaţi clic pe Finish (Finalizare) pentru
a reporni calculatorul.
D
După repornirea calculatorului va rula
automat programul Installation Diagnostics
(diagnosticarea instalării) și va fi afișată
fereastra cu rezultatele instalării.
Instalarea și
configurarea
echipamentului
®
Windows
Dacă instalarea a eșuat, încercaţi să instalaţi
din nou folosind opţiunea Repair MFL-Pro
Suite
(Reparare MFL-Pro Suite) din meniul
principal. Selectaţi Repair MFL-Pro Suite
(Reparare MFL-Pro Suite) și executaţi
instrucţiunile de pe ecran.
În acest moment, pachetul MFL-Pro
Suite, driverele imprimantei și
scanerului Brother au fost instalate și
instalarea este completă.
Instalarea driverului și a software-ului
de reţea
Pentru utilizatorii
45
Page 48

Pasul 2
Pentru utilizatorii cablului de interfaţă de reţea
(Windows
Asiguraţi-vă că aţi finalizat executarea instrucţiunilor de la Pasul 1
“Instalarea și configurarea echipamentului” de la paginile 38 - 42.
Instalarea driverului și a software-ului
®
98/98SE/Me/2000 Professional/XP)
Dacă folosiţi un software de tip Personal
Firewall, dezactivaţi-l înainte de instalare.
După ce v-aţi asigurat că puteţi tipări,
reactivaţi software-ul de tip Personal
Firewall.
1
Conectaţi cablul de interfaţă de reţea la
echipament, și apoi conectaţi-l la un port
liber de pe hub.
Pentru a conecta cablul de reţea la
echipament:
1. Deschideţi capacul scanerului
aducându-l în poziţia deschis.
2. Conectaţi cablul de reţea la mufa LAN,
marcată cu un simbol . Priza LAN se
găsește în stânga sus a sloturilor de
cartuș, așa cum este arătat mai jos.
2
Ridicaţi capacul scanerului pentru a elibera
blocajul. Împingeţi ușor în jos suportul
capacului și închideţi capacul scanerului.
3
Porniţi echipamentul introducând în priză
cablul de alimentare.
4
Porniţi calculatorul.
(Pentru Windows
trebuie să fiţi logat ca administrator.)
5
Introduceţi CD-ROM-ul livrat cu
echipamentul în unitatea CD-ROM. Dacă
apare ecranul cu numele modelului,
selectaţi echipamentul dumneavoastră.
Dacă apare ecranul pentru limbă, selectaţi
limba dorită.
6
Va apărea meniul principal al discului
CD-ROM.
Executaţi clic pe Install MFL-Pro Suite
(Instalare MFL-Pro Suite).
®
2000 Professional/XP,
3. Ghidaţi cu grijă cablul de reţea în canalul
adecvat, așa cum se arată mai jos,
urmărind canalul de ghidare în jurul și
către partea din spate a echipamentului.
Avertizare
Asiguraţi-vă că acest cablu nu împiedică închiderea
capacului, în caz contrar se pot produce erori.
În cazul folosirii atât a cablului USB cât și a
cablului LAN, ghidaţi ambele cabluri prin
canal.
Dacă nu apare această fereastră, utilizaţi
Windows
programul
al discului CD-ROM furnizat de Brother.
7
După citirea și acceptarea Convenţiei de
Licenţă ScanSoft
executaţi clic pe Yes (Da).
8
Instalarea PaperPort® 9.0SE va începe
automat și este urmată de instalarea
MFL-Pro Suite.
9
Atunci când pe ecran apare Convenţia de
Licenţă Software Brother MFL-Pro Suite,
executaţi clic pe
acord cu termenii acestei licenţe.
0
Selectaţi
reţea) și apoi executaţi clic pe Next
(Următor).
®
Explorer pentru a executa
setup.exe
Network Connection
din directorul rădăcină
®
PaperPort® 9.0SE,
Yes
(Da) dacă sunteţi de
(Conexiune
46
Page 49
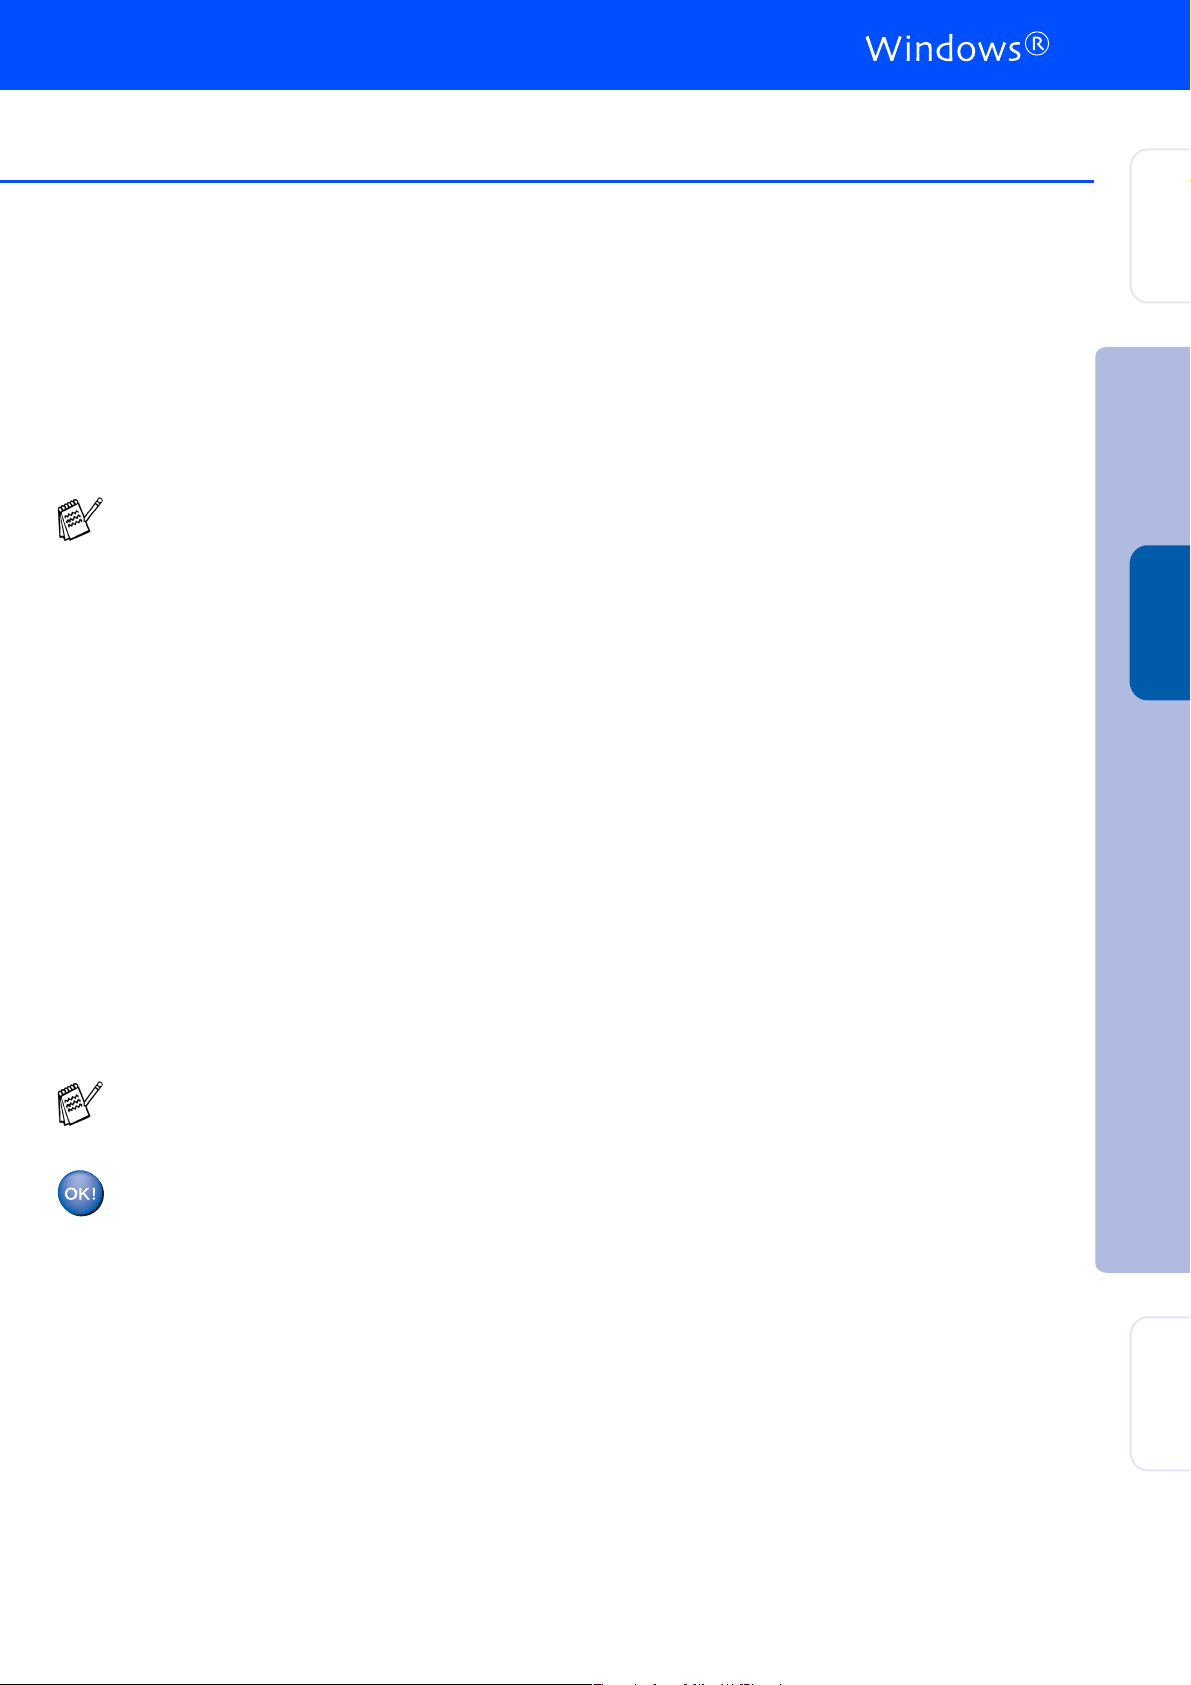
A
Instalarea driverelor Brother va începe
automat. Ecranele de instalare apar unul
după altul, vă rugăm așteptaţi puţin.
B
Dacă echipamentul este configurat pentru
reţeaua dumneavoastră, selectaţi
echipamentul din listă și apoi executaţi clic
pe Next (Următor).
Fereastra nu va apărea dacă există doar un
singur echipament conectat la reţea; în acest
caz echipamentul va fi selectat automat.
Dacă echipamentul nu este configurat încă
pentru utilizarea reţelei, va apărea fereastra
Configure IP Address (Configurare adresă
IP). Tastaţi adresa IP corespunzătoare
reţelei dumneavoastră conform
instrucţiunilor de pe ecran.
C
Atunci când este afișat ecranul de
înregistrare on-line Brother și ScanSoft,
efectuaţi selecţia corespunzătoare și
executaţi instrucţiunile de pe ecran.
Instalarea și
configurarea
echipamentului
®
Reţeaua
Windows
D
Executaţi clic pe Finish (Finalizare) pentru
a reporni calculatorul.
E
După repornirea calculatorului va rula
automat programul Installation Diagnostics
(diagnosticarea instalării) și va fi afișată
fereastra cu rezultatele instalării.
Pentru instalarea în reţea, selecţia Repair
MFL-Pro Suite
din meniul principal nu este acceptată.
(Reparare MFL-Pro Suite)
În acest moment, pachetul MFL-Pro
Suite, driverul imprimantei de reţea
Brother, driverul scanerului de reţea
Brother și software-ul Network
PhotoCapture Center
™
au fost instalate
și instalarea este completă.
Instalarea driverului și a software-ului
de reţea
Pentru utilizatorii
47
Page 50

Step 2
Pentru utilizatorii cablului de interfaţă USB
Asiguraţi-vă că aţi finalizat executarea instrucţiunilor de la Pasul 1
“Instalarea și configurarea echipamentului” de la paginile 38 - 42.
1
2
3
4
5
6
7
8
Instalarea driverului și a software-ului
Pentru Mac OS® X 10.2.4 sau o versiune ulterioară
Închideţi echipamentul și scoateţi din priză
cablul de alimentare și apoi deconectaţi
echipamentul de la Macintosh
conectat deja un cablu de interfaţă
Deschideţi Macintosh-ul®.
Introduceţi CD-ROM-ul livrat cu
echipamentul în unitatea CD-ROM.
Executaţi dublu clic pe pictograma
Here OSX (Începeţi aici OSX) pentru a
instala driverul de imprimantă, driverul de
scaner și programul Remote Setup (pentru
configurare de la distanţă). Dacă apare
ecranul pentru limbă, selectaţi limba dorită.
Executaţi clic pe MFL-Pro Suite pentru a
realiza instalarea.
Executaţi instrucţiunile de pe ecran, și
restartaţi Macintosh-ul
După ce apare fereastra
(SelectorDispozitiv), conectaţi cablul de
interfaţă USB la Macintosh
echipament.
Conectaţi cablul de interfaţă USB la
Macintosh
Pentru a conecta cablul USB la echipament:
1. Deschideţi capacul scanerului
aducându-l în poziţia deschis.
2. Conectaţi cablul USB la mufa USB,
marcată cu un simbol . Mufa USB se
găsește deasupra și în stânga faţă de
sloturile pentru cartușul de imprimantă,
așa cum se arată mai jos.
®
și apoi la echipament.
®
.
®
dacă aţi
Start
DeviceSelector
®
și apoi la
Avertizare
Asiguraţi-vă că acest cablu nu împiedică închiderea
capacului, în caz contrar se pot produce erori.
NU conectaţi echipamentul la un
port USB de pe o tastatură sau la un
hub USB nealimentat.
9
Ridicaţi capacul scanerului pentru a elibera
blocajul. Împingeţi ușor în jos suportul
capacului și închideţi capacul scanerului.
0
Porniţi echipamentul introducând în priză
cablul de alimentare.
A
Selectaţi Applications (Aplicaţii) din meniul
Go (Pornire).
B
Deschideţi directorul Utilities
(Instrumente).
C
Deschideţi pictograma
(Centru tipărire).
D
Executaţi clic pe
E
Selectaţi USB.
F
Selectaţi MFC-XXXX (XXXX este numele
modelului), și apoi executaţi clic pe Add
(Adăugare).
G
Selectaţi Quit Printer Setup Utility
(Părăsire instrument configurare
imprimantă) din meniul
Utility
(Instrument configurare imprimantă).
În acest moment pachetul MFL-Pro
Suite, driverele imprimantei și
scanerului Brother și programul
Remote Setup (configurare de la
distanţă) au fost instalate și instalarea
este completă.
Print Center
Add
(Adăugare).
Printer Setup
48
3. Ghidaţi cu grijă cablul USB în canalul
adecvat, așa cum se arată mai jos,
urmărind canalul de ghidare în jurul și
către partea din spate a echipamentului.
H
Pentru a instala Presto!® PageManager®,
executaţi clic pe pictograma Presto!
PageManager și executaţi instrucţiunile de
pe ecran.
Puteţi cu ușurinţă scana, partaja și organiza
fotografii și documente utilizând Presto!
PageManager
În acest moment Presto!
PageManager
instalarea este completă.
®
.
®
®
a fost instalat și
®
Page 51

Pentru Mac OS® de la 8.6 la 9.2
Asiguraţi-vă că aţi finalizat executarea instrucţiunilor de la Pasul 1
“Instalarea și configurarea echipamentului” de la paginile 38 - 42.
1
Închideţi echipamentul și scoateţi din priză
cablul de alimentare și apoi deconectaţi
echipamentul de la Macintosh
conectat deja un cablu de interfaţă
2
Deschideţi Macintosh-ul®.
3
Introduceţi CD-ROM-ul livrat cu
echipamentul în unitatea CD-ROM.
4
Executaţi dublu clic pe pictograma
Here (Începeţi aici) pentru instalarea
driverelor imprimantei și scanerului. Dacă
apare ecranul pentru limbă, selectaţi limba
dorită.
5
Executaţi clic pe
realiza instalarea.
6
Executaţi instrucţiunile de pe ecran, și
restartaţi Macintosh-ul
7
Conectaţi cablul de interfaţă USB la
Macintosh
Pentru a conecta cablul USB la echipament:
1. Deschideţi capacul scanerului
aducându-l în poziţia deschis.
2. Conectaţi cablul USB la mufa USB,
marcată cu un simbol . Mufa USB se
găsește deasupra și în stânga faţă de
sloturile pentru cartușul de imprimantă,
așa cum se arată mai jos.
®
MFL-Pro Suite
®
.
și apoi la echipament.
®
dacă aţi
pentru a
Start
Avertizare
Asiguraţi-vă că acest cablu nu împiedică închiderea
capacului, în caz contrar se pot produce erori.
NU conectaţi echipamentul la un
port USB de pe o tastatură sau la un
hub USB nealimentat.
8
Ridicaţi capacul scanerului pentru a elibera
blocajul. Împingeţi ușor în jos suportul
capacului și închideţi capacul scanerului.
9
Porniţi echipamentul introducând în priză
cablul de alimentare.
0
Din meniul Apple®, deschideţi
(Selector).
A
Executaţi clic pe pictograma Brother Ink.
În partea dreaptă a pictogramei
(Selector), selectaţi echipamentul cu care
doriţi să tipăriţi.
Închideţi Chooser (Selector).
Driverele imprimantei și scanerului
Brother au fost instalate.
B
Pentru a instala Presto!® PageManager®,
executaţi clic pe pictograma Presto!
PageManager
pe ecran.
și executaţi instrucţiunile de
Chooser
Chooser
Instalarea și
configurarea
echipamentului
XMac OS
®
Instalarea driverului și a software-ului
Mac OS
®
8.6 - 9.2
3. Ghidaţi cu grijă cablul USB în canalul
adecvat, așa cum se arată mai jos,
urmărind canalul de ghidare în jurul și
către partea din spate a echipamentului.
Puteţi cu ușurinţă scana, partaja și organiza
fotografii și documente utilizând Presto!
PageManager
În acest moment Presto!
PageManager
instalarea este completă.
®
.
®
®
a fost instalat și
®
de reţea
Pentru utilizatorii
49
Page 52

Pasul 2
Pentru utilizatorii cablului de interfaţă de reţea
Pentru Mac OS® X 10.2.4 sau o versiune ulterioară
Asiguraţi-vă că aţi finalizat executarea instrucţiunilor de la Pasul 1
“Instalarea și configurarea echipamentului” de la paginile 38 - 42.
1
Închideţi echipamentul și scoateţi din priză
cablul de alimentare și apoi deconectaţi
echipamentul de la Macintosh
conectat deja un cablu de interfaţă
2
Deschideţi Macintosh-ul®.
3
Introduceţi CD-ROM-ul livrat cu
echipamentul în unitatea CD-ROM.
4
Executaţi dublu clic pe pictograma Start
Here OSX
instala driverul de imprimantă și programul
Remote Setup (pentru configurare de la
distanţă). Dacă apare ecranul pentru limbă,
selectaţi limba dorită.
5
Executaţi clic pe MFL-Pro Suite pentru a
realiza instalarea.
6
Executaţi instrucţiunile de pe ecran, și
restartaţi Macintosh-ul
7
După ce apare fereastra DeviceSelector
(SelectorDispozitiv), conectaţi cablul de
interfaţă de reţea la Macintosh
echipament.
8
Conectaţi cablul de interfaţă de reţea la
echipament, și apoi conectaţi-l la un port
liber.
Pentru a conecta cablul de reţea la
echipament:
1. Deschideţi capacul scanerului
2. Conectaţi cablul de reţea la mufa LAN,
Instalarea driverului și a software-ului
®
dacă aţi
(Începeţi aici OSX) pentru a
®
.
®
și apoi la
aducându-l în poziţia deschis.
marcată cu un simbol . Priza LAN se
găsește în stânga sus a sloturilor de
cartuș, așa cum este arătat mai jos.
Avertizare
Asiguraţi-vă că acest cablu nu împiedică închiderea
capacului, în caz contrar se pot produce erori.
În cazul folosirii atât a cablului USB cât și a
cablului LAN, ghidaţi ambele cabluri prin
canal.
9
Ridicaţi capacul scanerului pentru a elibera
blocajul. Împingeţi ușor în jos suportul
capacului și închideţi capacul scanerului.
0
Porniţi echipamentul introducând în priză
cablul de alimentare.
A
Selectaţi
Go (Pornire).
B
Deschideţi directorul
(Instrumente).
C
Deschideţi pictograma Print Center
(Centru tipărire).
D
Executaţi clic pe
E
Efectuaţi selecţia prezentată în continuare.
F
Selectaţi Brother MFC-XXXX (XXXX este
numele modelului) (
apoi executaţi clic pe
Applications
xxxxxx sunt ultimele 6 cifre ale adresei
Ethernet.
Capitolul 5 "Ghidul utilizatorilor reţelei"
de pe CD-ROM.
(Aplicaţii) din meniul
Utilities
Add
(Adăugare).
BRN_xxxxxx_P1
Add
(Adăugare).
) și
50
3. Ghidaţi cu grijă cablul de reţea în canalul
adecvat, așa cum se arată mai jos,
urmărind canalul de ghidare în jurul și
către partea din spate a echipamentului.
G
Selectaţi
(Părăsire instrument configurare
imprimantă) din meniul Printer Setup
Utility (Instrument configurare imprimantă).
Instalarea este completă.
Consultaţi Capitolul 5 "Ghidul utilizatorilor de
reţea" de pe CD-ROM pentru informaţii
suplimentare privind conectarea MFC la o
reţea Macintosh
Quit Printer Setup Utility
®
.
Page 53

Pentru Mac OS® de la 8.6 la 9.2
Asiguraţi-vă că aţi finalizat executarea instrucţiunilor de la Pasul 1
“Instalarea și configurarea echipamentului” de la paginile 38 - 42.
1
Închideţi echipamentul și scoateţi din priză
cablul de alimentare și apoi deconectaţi
echipamentul de la Macintosh
conectat deja un cablu de interfaţă
2
Deschideţi Macintosh-ul®.
3
Introduceţi CD-ROM-ul livrat cu
echipamentul în unitatea CD-ROM.
4
Executaţi dublu clic pe pictograma
Here (Începeţi aici) pentru instalarea
driverelor imprimantei și scanerului. Dacă
apare ecranul pentru limbă, selectaţi limba
dorită.
5
Executaţi clic pe MFL-Pro Suite pentru a
realiza instalarea.
6
Executaţi instrucţiunile de pe ecran, și
restartaţi Macintosh-ul
®
.
®
dacă aţi
Start
Avertizare
Asiguraţi-vă că acest cablu nu împiedică închiderea
capacului, în caz contrar se pot produce erori.
În cazul folosirii atât a cablului USB cât și a
cablului LAN, ghidaţi ambele cabluri prin
canal.
8
Ridicaţi capacul scanerului pentru a elibera
blocajul. Împingeţi ușor în jos suportul
capacului și închideţi capacul scanerului.
9
Porniţi echipamentul introducând în priză
cablul de alimentare.
0
Selectaţi Chooser (Selector) din meniul
Apple
A
Executaţi clic pe pictograma Brother Ink
(IP) și apoi selectaţi BRN_xxxxxx.
Închideţi Chooser (Selector).
.
Instalarea și
configurarea
echipamentului
7
Conectaţi cablul de interfaţă de reţea la
echipament, și apoi conectaţi-l la un port
liber.
Pentru a conecta cablul de reţea la
echipament:
1. Deschideţi capacul scanerului
aducându-l în poziţia deschis.
2. Conectaţi cablul de reţea la mufa LAN,
marcată cu un simbol . Priza LAN se
găsește în stânga sus a sloturilor de
cartuș, așa cum este arătat mai jos.
3. Ghidaţi cu grijă cablul de reţea în canalul
adecvat, așa cum se arată mai jos,
urmărind canalul de ghidare în jurul și
către partea din spate a echipamentului.
■ xxxxxx sunt ultimele 6 cifre ale adresei
Ethernet.
■ Consultaţi Capitolul 5 "Ghidul utilizatorilor
de reţea" de pe CD-ROM pentru informaţii
suplimentare privind conectarea MFC la o
reţea Macintosh
Instalarea este completă.
®
.
Instalarea driverului și a software-ului
®
Reţeaua
Macintosh
de reţea
Pentru utilizatorii
51
Page 54

■ Pentru utilizatorii de reţea
Această secţiune se referă la utilizarea echipamentului în reţea.
Administratorul trebuie să configureze echipamentul conform următorilor pași.
Instalarea instrumentului de configurare
BRAdmin Professional (numai Windows
Instrumentul BRAdmin Professional administrează dispozitivele Brother conectate la reţea, ca
de exemplu dispozitivele multifuncţionale pentru reţea și/sau imprimantele de reţea într-un
mediu de reţea locală (LAN).
BRAdmin Professional poate fi folosit și pentru a administra dispozitivele altor producători ale
căror produse acceptă protocolul SNMP (Simple Network Management Protocol).
Pentru mai multe informaţii despre BRAdmin Professional vizitaţi site-ul web
http://solutions.brother.com
1
Introduceţi CD-ROM-ul livrat cu echipamentul în unitatea CD-ROM. Ecranul de deschidere va
apărea automat.
Executaţi instrucţiunile de pe ecran.
®
).
2
Executaţi clic pe pictograma
principal.
3
Executaţi clic pe BRAdmin Professional și executaţi instrucţiunile de pe ecran.
Parola implicită pentru serverul de tipărire este “access”. Puteţi utiliza BRAdmin Professional pentru a
schimba această parolă.
Install Optional Applications
(Instalare aplicaţii opţionale) din meniul
Configurarea parametrilor IP Address (adresa IP),
Subnet Mask (masca de sub-reţea) și Gateway
(serviciul de portal) folosind BRAdmin
Professional (numai Windows
1
Lansaţi BRAdmin Professional, și selectaţi TCP/IP.
2
Selectaţi
BRAdmin va căuta automat noile dispozitive.
3
Executaţi dublu clic pe noul dispozitiv.
Search Active Devices
(Căutare) din meniul
®
)
Devices
(Dispozitive).
52
4
Introduceţi parametrii IP Address (Adresă IP), Subnet Mask (Masca de sub-reţea) și Gateway
(Portal) și apoi executaţi clic pe butonul OK.
5
Echipamentul va memora informaţiile referitoare la adresă.
Parola implicită pentru serverul de tipărire este “access”. Puteţi utiliza BRAdmin Professional pentru a
schimba această parolă.
Page 55

Mărci comerciale
Sigla Brother este marcă înregistrată a companiei Brother Industries, Ltd.
Brother este marcă înregistrată a companiei Brother Industries, Ltd.
Multi-Function Link este marcă înregistrată a Corporaţiei Brother International.
© Copyright 2004 Brother Industries, Ltd. Toate drepturile rezervate.
Windows și Microsoft sunt mărci înregistrate ale Microsoft în S.U.A. și în alte ţări.
Macintosh și True Type sunt mărci înregistrate ale Apple Computer, Inc.
PaperPort și OmniPage OCR sunt mărci înregistrate ale ScanSoft, Inc.
Presto! PageManager este marcă înregistrată a NewSoft Technology Corporation.
Fiecare companie care are un software menţionat în acest manual are o Convenţie de Licenţă Software specifică
programelor sale brevetate.
Toate celelalte mărci și nume de produse menţionate în acest manual sunt mărci comerciale înregistrate
ale companiilor respective.
Compilare și publicare
Acest manual, care acoperă cele mai recente descrieri și specificaţii ale produselor, a fost compilat și publicat sub
supravegherea companiei Brother Industries Ltd.
Conţinutul acestui manual precum și specificaţiile produselor se pot modifica fără o notificare prealabilă.
Compania Brother își rezervă dreptul de a efectua modificări, fără notificare prealabilă, ale specificaţiilor și
materialelor conţinute în acest document și nu poate fi făcută răspunzătoare pentru nici un fel de daune (inclusiv
indirecte) cauzate de încrederea în materialele prezentate, inclusiv, dar fără a se limita la, erorile tipografice și alte
erori aferente procesului de publicare.
Acest produs este destinat utilizării într-un mediu profesional.
©2004 Brother Industries, Ltd.
Română Ghidul de instalare rapidă s-a încheiat.
53
Page 56

Page 57

Page 58

ENG/BUL/ROM
LP0011001
Printed in China
Отпечатано в Китай
Tipărit în China
 Loading...