

Page 1

brother.
Inte
l l i F A X ’ 7 1 0 M
7 2 0 M
CONTENTS
Chapter 1 SETUP & PREPARATION BEFORE USE
Chapter 2 THE CONTROL PANEL KEYS
Chapter 3 HOW TO USE ON-SCREEN
PROGRAMMING (OSP) AND HELP KEY
Chapter 4 TELEPHONE FUNCTION SETTINGS
Chapter 5 USING THE UNIT AS A TELEPHONE
Chapter 6 SENDING FAXES
Chapter 7 RECEIVING FAXES AND OTHER CALLS
Chapter 8 HOW TO USE COPY FUNCTIONS
Chapter 9 POLLING
Chapter 10 PRINTING REPORTS AND LISTS
Chapter 11 REGULAR MAINTENANCE AND
TROUBLESHOOTING
Chapter 12 IMPORTANT INFORMATION
Chapter 13 INDEX
Chapter 14 SPECIFICATIONS
Page 2

Page 3

How to Use This Owner’s Manual
Thank you for purchasing a Brother fax machine. This fax machine has been designed
to be simple to use, but you can utilize it to its fullest potential by taking some time to
read this owner's manual. You will be ready to use the fax machine as soon as you read
the first four chapters. Then you can refer to topics in the remaining chapters, as
needed.
Structure of the Manual
■ Chapters 1-4
How to set up the fax machine and what you need to know before you use it.
■ Chapters 5-7
Basic operations, how to send and receive faxes.
■ Chapters 8-10
Advanced operations.
Finding Information in the Owner’s Manuai
• Use the table of contents. This side of the manual is coded so you can find topics
easily.
• If there is a key on the fax machine you are not familiar with, refer to chapter
2.
• To find information about a function, refer to the “Function Selection Table” in
chapter 3.
• If you have trouble, refer to chapter 11 on how to troubleshoot.
• Use the chapter 13 index.
Test Sheet Procedure
Please fill out the TEST SHEET and fax it to 1-908-469-4547 as your first transmission.
This will verify that your fax machine is properly installed.
When this document is received at Brother Diagnostic Center, a confirmation sheet will
be sent back to your machine from Brother Automatic Fax Back Response System. Be
sure to set up your “Station ID”. (See page 4-3.)
FAX NO. : 1-908-469-4547 (Fax Transmission Only)
TEL NO. : 1-800-284-4FAX (Voice Phone Only)
1-800-284-4329
Page 4

CONTENTS
FOR YOUR INFORMATION
Chapter 1,
Chapter 5.
Chapter 4.
Chapter 5.
Chapter 6,
SETUP & PREPARATION BEFORE USE 1-1
Choosing a Suitable Place for Your Fax Machine
The Good Places................................................................................ 1-1
And the Bad Places...............................................................................l-l
Packing List............................................................................................... 1-2
Setting up Your Fax Machine....................................................................1-2
• Multi Line Connections (PBXs)...........................................................1-4
• Connecting to a Private Branch Exchange.......................................... 1-4
.................................
1-1
THE CONTROL PANEL KEYS 2-1
TELEPHONE AREA................................................................................2-2
ONE-TOUCH AREA.............................................................................. 2-3
FUNCTION AND USER SETTING AREA
....
........................................
2-4
HOW TO USE ON-SCREEN PROGRAMMING (OSP)
AND HELP KEY 3-1
User-friendly programming
On-screen Programming (OSP)
Function Selection Table...........................................................................3-1
Using the Function Mode to Access On-screen Programming (OSP)
Alternating Displays for On-screen Programming (OSP)
Help Key....................................................................................................3-5
How to Print a Help List
How to Enter Text in Function Mode........................................................3-7
How to Enter Special Characters, Symbols and Punctuation Marks in
Function Mode......................................................................................... 3-8
......................................................................
................................................................
........................
......
.....................................................................
......
3-1
3-1
3-4
3-5
3-5
TELEPHONE FUNCTION SETTINGS 4-1
Setting the Dialing Mode (Tone/Pulse)
Setting the Beeper Sound Level................................................................4-1
Setting the Date and Time.........................................................................4-2
Setting the Station ID................................................................................4-3
Storing One-Touch Dial Numbers.............................................................4-4
• Types of Numbers
• Chain Dialing.......................................................................................4-5
Storing Speed-Dial Numbers
• When You Wish to Change the Stored One-Touch and Speed-Dial
Numbers (During Step 4 on Page 4-4, 6, 8)........................................4-7
• Memory Storage
Setting Up Number Groups (Only for FAX-720M)
..............................................................................
.....................................................................4-6
................
......
....................................................
............................................................4-7
........................................
4-1
4-5
4-8
USING THE UNIT AS A TELEPHONE 5-1
Manual Dialing..........................................................................................5-1
One-Touch Dialing....................................................................................5-1
Speed Dialing............................................................................................ 5-1
• Using Keys with the Telephone...,......................................................5-1
• On Hook Dialing.................................................................................5-1
SENDING FAXES 6-1
A) DOCUMENT BASICS........................................................................6-1
Page 5

CONTENTS
The Size of Your Documents................................................................6-1
How to Insert the Document
The Auto Document Feeder (ADF)
Getting Ready to Send a Fax
Resolution........................................................................................6-2
Contrast...........................................................................................6-3
B) BASIC FAX TRANSMISSIONS
• Sending a Fax..................................................................................6-3
• Talking to the Other Party When Sending a Fax
Sending a Fax Automatically...............................................................6-4
■ Sending a Fax Manually
Automatic and Manual Re-dialing.......................................................6-5
Setting the Auto Re-dial
• Possible Settings When You Send a Fax Manually.........................6-6
• Printing Page Headers.....................................................................6-6
Sending a Fax by Using Ouick-Scan (Memory Transmission)............6-6
• If You Get a MEMORY FULL Message When Trying to
Send a Fax by Using Quick-Scan
Delayed Transmission..........................................................................6-7
Setting the Daily Timer (for Delayed Transmissions)..........................6-8
Broadcasting (Only for FAX-720M)..........................................................6-8
7 - • Getting Familiar with the Broadcasting Function
Sending by Multi-Transmission (Only for FAX-720M)............................6-9
Jit: Interrupting the Timer and Polled Job...............................................6-11
Canceling a Job..................................................................................6-12
C) FAX TRANSMISSION OPTIONS...................................................6-13
Setting the Overseas Mode
Setting Your Fax Machine for Multiple Resolution Transmission
Gray Scale (Only for FAX-720M).......................................................... 6-15
iiiii
Sending a Fax with a Cover Page......................................................6-15
• The Comments Section on the Cover Page....................................6-16
Customizing Your Cover Page Comment
Printing the Cover Page.................................................................. 6-17
Setting Cover Page ON/OFF.............................................................6-18
• Sending an Automatic Cover Page
Sending a Fax When the Cover Page Is ON.......................................6-19
Sending a Fax with Call Reservation
• Using the Call Reservation Function
Printing the Call Back Message.........................................................6-20
Next-FAX Reservation......................................................................6-21
ECM (Error Correction Mode) Feature (Only for FAX-720M)
Error Re-Transmission (On/y/or FAX-720M)
€h€tpter $* ❖ RECEIVING FAXES AND OTHER CALLS 7 1
A) BASIC SETUP TO RECEIVE FAXES
Selecting an Answer Mode..................................................................7-1
Manual Reception (MANU AL mode)
Automatic Fax Reception (AUTO mode)
Setting the Ring Delay.........................................................................7-2
.................................................................
......................................................
................................................................
..........................................................
.............................
...........................
.....
................................................................
................................................................
............................................6-5
...................................................
.............................
.........................................
...............................................
................................................
............................................
...............
..................................
............................................
................................................
...........................................
....
6-1
6-2
6-2
6-3
6-4
6-3
6-7
6-9
6-13
6-14
6-17
6-18
6-19
6-20
6-22
6-22
7-1
7-2
7-2
Page 6

CONTENTS
The F/T Switch (F/T Mode)..................................................................7-3
Setting the F/T Ring Time...................................................................7-3
Smoothing............................................................................................7-4
Speaker Volume...................................................................................7-4
Ring Volume........................................................................................7-5
• Reception into Memory
B) REMOTE ACTIVATION...................................................................7-6
What is Remote Activation................................................................ 7-6
• Connecting an External or Extension Telephone to the Unit
Using Remote Codes...........................................................................7-7
• Limitation of Using External (or Extension) Phones
Registering Remote Codes
C) CONNECTION TO A TELEPHONE ANSWERING DEVICE (TAD) .. 7-8
The TAD Mode................................................................................... 7-8
• Connecting an External TAD to the Unit
• Sequence of TAD Mode Reception
D) DISTINCTIVE RINGING
Distinctive Ringing............................................................................7-10
What Is Distinctive Ringing?........................................................7-10
Can My Fax Machine Utilize Distinctive Ringing?
Can I Change the Setting Later?...................................................7-10
How Will the Fax Machine Treat All Other Distinctive Ringing?..7-10
How Does the Distinctive Ringing Function Work?
What’s the Advantage of Using the Distinctive Ringing Function? .. 7-10
Setting the Distinctive Ringing Function........................................ 7-11
While You Are Setting the Distinctive Ringing Function:
Once You Have Finished Setting the Distinctive Ringing Function: .7-12
How to Turn the Distinctive Ringing Function ON or OFF
ChCLpterB, HOW TO USE COPY FUNCTIONS 8-1
: ' r Making a Single Copy ................................................................................8-1
Making Multiple Copies {Only for FAX- 720M)...
• What To Do When You Get a “MEMORY FULL” Message while
Making Copies.....................................................................................8-2
Chapter^, ❖ POLLING 9-1
• What Is Polling?..................................................................................9-1
• How Does It Work?.............................................................................9-1
• When to Use Polling?........................................................................ 9-1
Polling Another Fax Machine.................................................................. 9-2
Setting up Polled Waiting...........................................................................9 2
Secure Polling............................................................................................9-3
Polling Another Fax Machine with Secure Code
Setting up Polled Waiting with Secure Polling.........................................9-4
Delayed Polling........................................................................................ 9-5
Setting up Polled Waiting with Quick-Scan..............................................9-5
ChapterlO, ❖ PRINTING REPORTS AND LISTS 10-1
Activity Report Interval
Printing the All Dial List
..................................................................
......................
..................................................................
........................................
..............
................................................................
.........
..................................................................10-2
.........................................................................
.................................
.....................
..................
.........
..............
.........................................
.................................... 9-3
..........
7-6
7-6
7-7
7-7
7-8
7-9
7-10
7-10
7-10
7-12
7-13
8-2
10-3
Page 7

CONTENTS
Chapterll,
€hapterX2,
ChapterlS,
Chapterl4,
Transmission Verification (Xmit) Report
Memory Status List..................................................................................10-5
...............................................
10-4
❖ REGULAR MAINTENANCE AND TROUBLESHOOTING 11-1
Regular Maintenance...............................................................................11-1
Paper Jams
Troubleshooting.......................................................................................11-4
............................................................................................. 11-2
Fixing a Document Jam.....................................................................11-2
Fixing a Cutter Jam or Printer Jam....................................................11-3
Error Messages...................................................................................11-4
Other Problems..................................................................................11-5
❖ IMPORTANT INFORMATION 12-1
Standard Telephone and FCC Notices {Only applies to 120V model)
Important Safety Instructions
..................................................................
...........
12-1
12-3
❖ INDEX 13-1
❖ SPECIFICATIONS 14-1
Page 8

Never install telephone wiring during a lightning storm.
Never install telephone jacks in wet locations unless the jack is specifically designed
for wet locations.
Never touch uninsulated telephone wires or terminals unless the telephone line has
been disconnected at the network interface.
Use caution when installing or modifying telephone lines.
Avoid using a telephone (other than a cordless type) during an electrical storm. There
may be a remote risk of electric shock from lightning.
Do not use the telephone to report q gas leak in the vicinity of the leak.
Page 9
..
■iiMiiiliiiilïillf-" J*
.
l«jyRSc^M.;tKAl^KHÜN BEFORE USE
/. SETUP & PREPARATION BEFORE USE
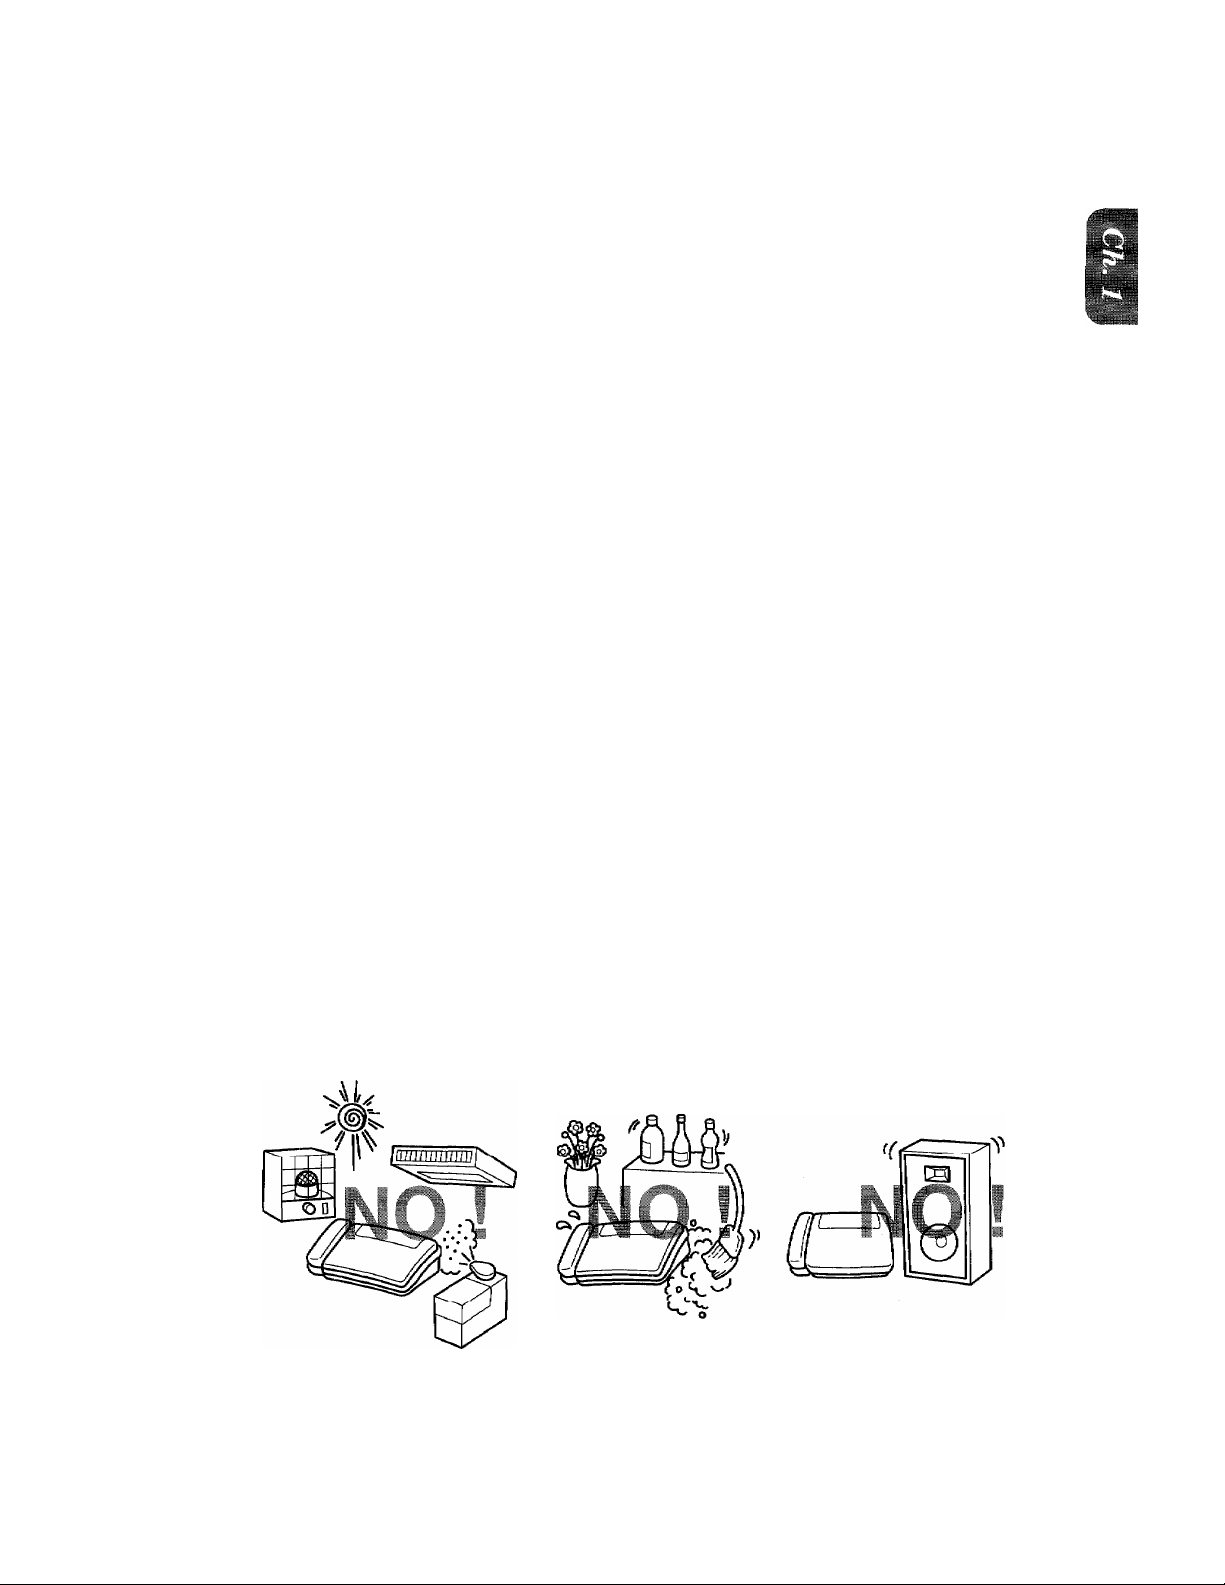
Choosing a Suitable Place for Your Fax Machine
Use the following list as a guide to find a suitable place for your fax machine.
The Good Places..,
Place your fax machine on a flat, stable surface, such as a desk.
Select a place that is free of vibration and shocks.
Locate it near a telephone jack and a standard, grounded power outlet.
For PLUGGABLE EQUIPMENT, the socket-outlet should be installed near the equipment and
should be easily accessible.
And the Bad Places...
Avoid setting it up in a high-traiîic area.
Avoid setting up the machine near heaters, air conditioners, water, chemicals, or refrigerators.
Do not select a place that exposes your fax machine to direct sunlight, excessive heat, moisture,
or dust.
Do not connect your fax machine to electrical outlets controlled by wall switches or automatic
timers. Disruption of power can wipe out information in the unit’s memory.
Do not connect your fax machine to electrical outlets on the same circuit as large appliances or
other equipment that might disturb the power supply.
Avoid interference sources, such as speakers or the base units of cordless phones.
1-1
Page 10
^L.
wr rKcr/AKMI IkJIN bthOkb USt
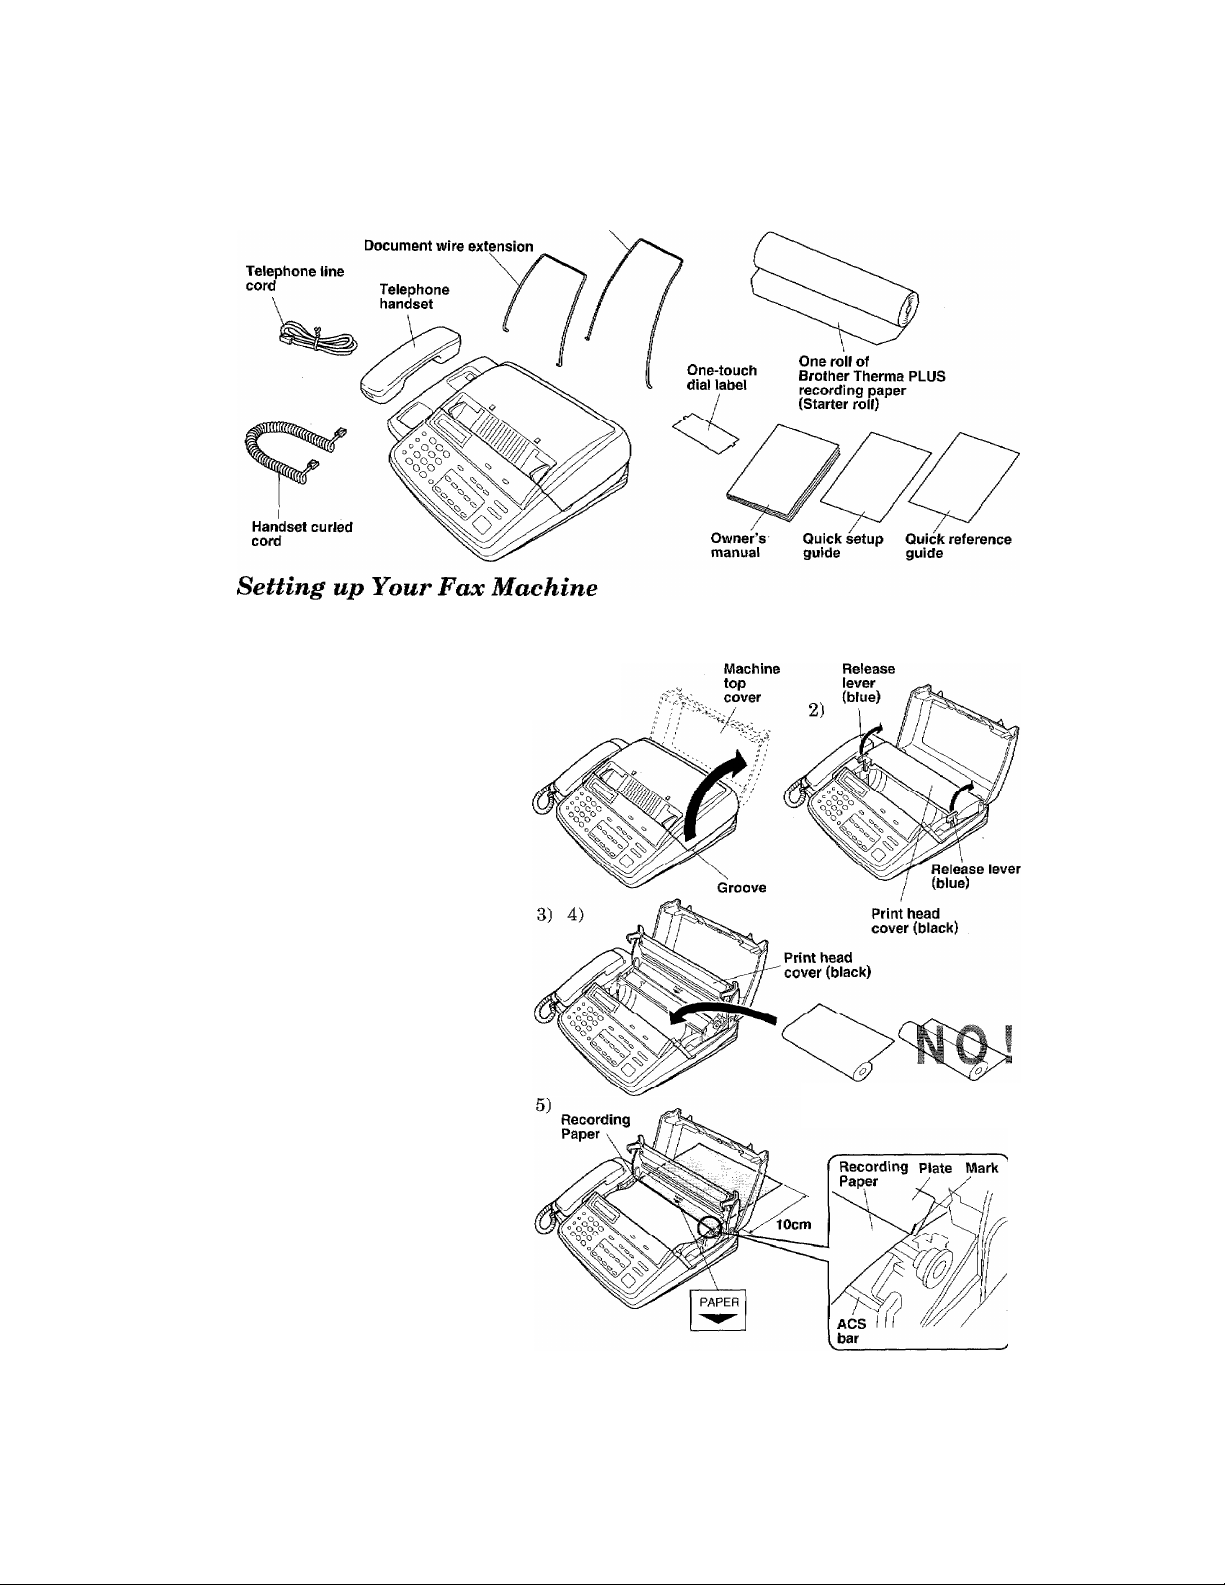
Packing List
Please check to see that you have the following items;
Follow these steps to set up your fax machine;
Receive wire extension
1. Load the recording paper.
1) Lift up the machine top cover p)
by placing your finger in the
groove on the right-hand side
of the fax machine and lifting
up.
2) Pull the release levers (blue)
on both sides of the print head
cover (black) so that you can
lift it up and remove the re
cording paper,
3) Take the new roll of record
ing paper out of its wrapper.
If you are replacing a roll, you
need to remove any paper
remaining in the machine.
4) Insert the new recording pa
per into the paper bin, with
the paper coming over the
top of the roll.
5) Insert the edge of the paper
into the slot that says “ ”
and pull the paper out about
10cm (4 inches) from the back
side. Make sure paper is fed
over the ACS bar. Adjust the
recording paper so that it is
between the marks.
Correct Incorrect
Recording Paper
1-2
Page 11
is« ^ SETUP & PREPARATION BEFORE USE
■■"S; ‘m;.. - ■ ' ■*
6) Close the print head cover. Make sure it is completely closed by pressing down on both edges
until you hear the levers “click”. Then close the machine top cover.
2* Connect the handset.
3. Connect the power cord.
When you connect the power, your fax machine will automatically cut the fax paper, and the
display will read: “01/01/1995 00:00”.
NOTICE
1. This fax machine must be grounded, using a 3-prong plug.
2. Since the machine is grounded through the power outlet, you can protect yourself
from potentially hazardous electrical conditions on the telephone network by
keeping the power to your fax machine on before you connect it to a telephone line.
Similarly, you can protect yourself when you want to move your machine, by
disconnecting the telephone line first, and then the power cord.
* This part is only for use
with the Brother Missing
Link option. If you have
not purchased this option
then ignore the part.
1-3
Page 12
■ÆH?'- “ rKcr«,<a„uiM BbhUIÆ ust
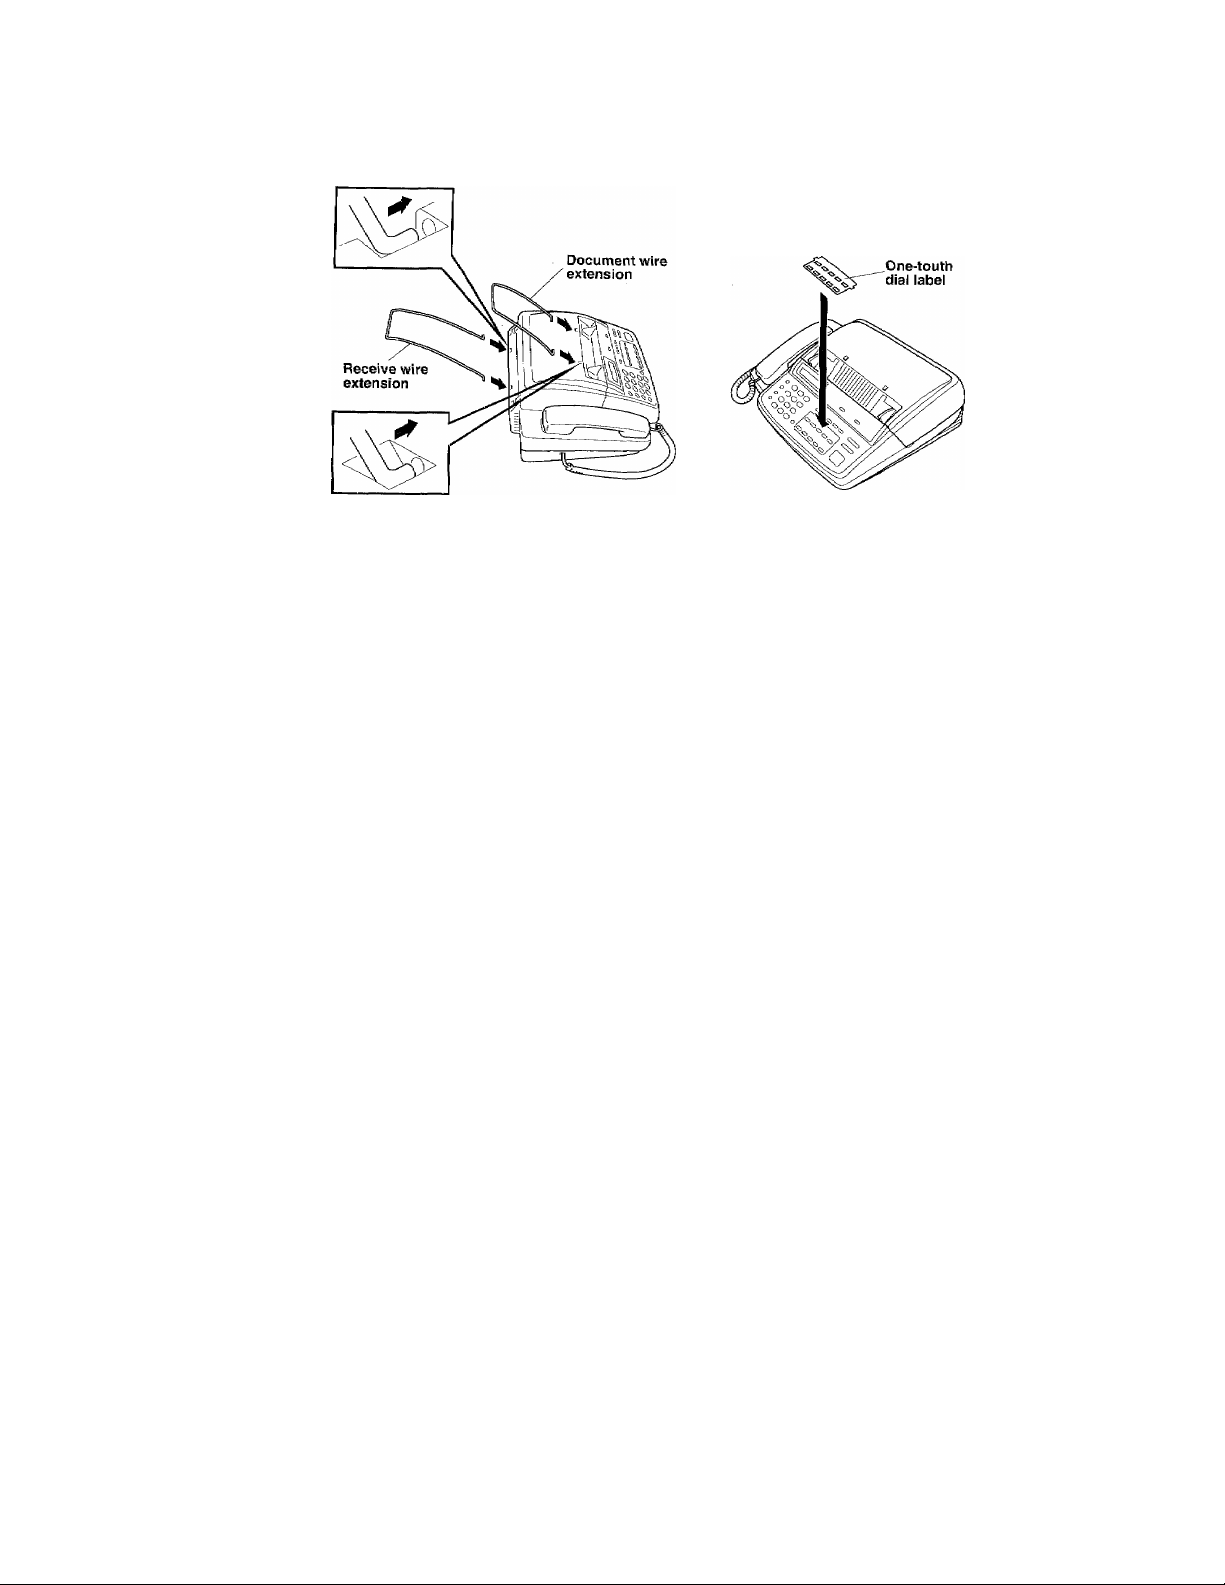
5. Attach the wire extensions and One-touch dial label.
Multi Line Connections (PBXs)
Most offices use a central telephone system. While it is often relatively simple to
connect the machine to a key system or a PBX (private branch exchange), we suggest
that you contact the company that installed your telephone system and ask them to
connect the fax machine for you.
=i-
It is advisable to have a separate line for the fax machine, You can then leave the
machine in AUTO Answer Mode to receive faxes at any time of the day or night.
If the fax machines is to be connected to a multi-line system, ask your installer to
connect the unit to the last line on the system. This will prevent the unit from being
activated each time a telephone call is received.
• As with all fax units this machine must be connected to a two wire system. If your
line has more than two wires, proper connection of the fax machine can not be
made.
Connecting to a Private Branch Exchange
The following points should be kept in mind if you are installing the machine to work
with a private branch exchange (PBX).
1) It is not guaranteed that the unit will operate correctly under all circumstances
with PBXs. Any cases of difficulty should be reported first to the company that
handles your PBX.
2) If all incoming calls will be answered by a switchboard operator, it is recom
mended that the Answer Mode be set to be MANUAL, (Seepage 7-2.) All incoming
calls should initially be regarded as telephone calls.
3) The unit may be used with either the pulse or tone dialing telephone types.
1-4
Page 13
*ii*l::E5iiN£i!iligiiilip^
l!!l*.llll,
..............
.
■ liillN
■■i
PANEL KEYS
ir:
*
2. THE CONTROL PANEL KEYS
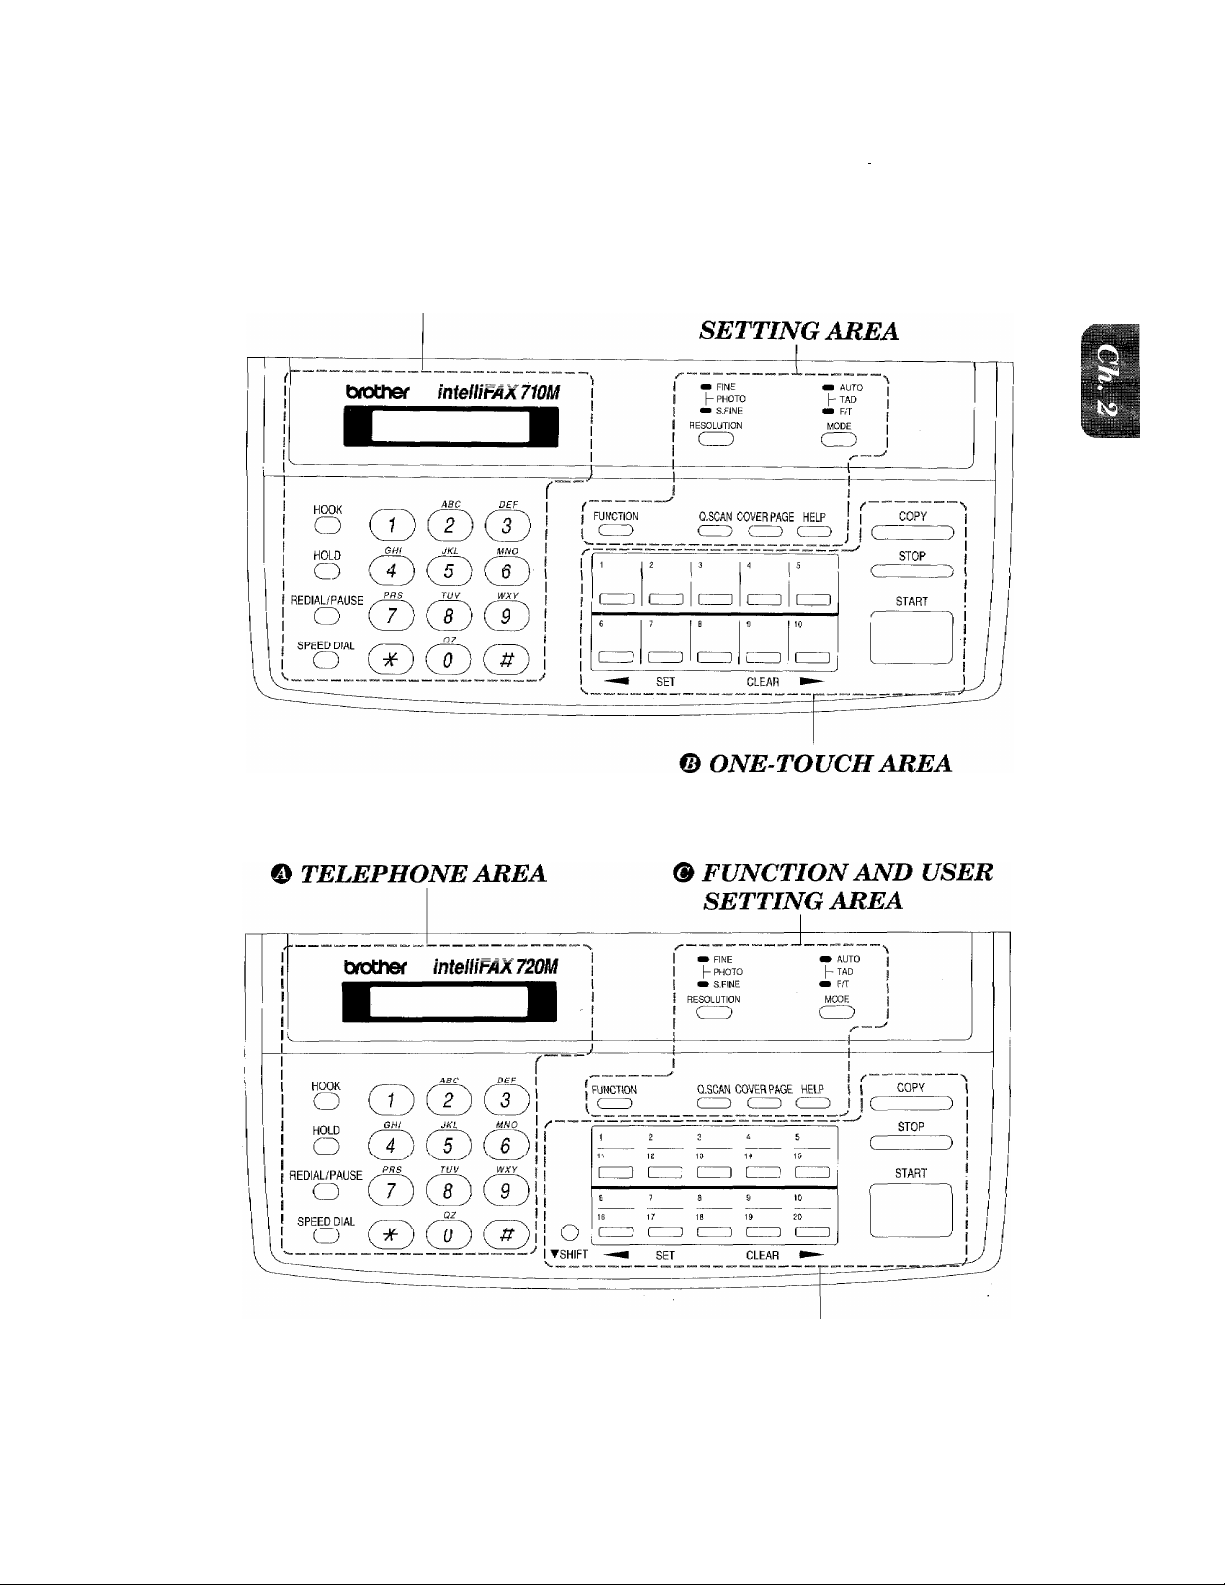
FAX-710M
O TELEPHONE AREA
-
® FUNCTION AND USER
FAX-720M
© ONE-TOUCH AREA
2-1
Page 14
iiiii
me KAIMbL
© TELEPHONE AREA
; ..4 ;4 ,;- .-. jr j:::- J ,4 .. • j: 4■“4^r^::f^J-j,,4'.j :;4 J' " jl J, j. ,;44£ .:
■:v-' ■:■"■■ ji:“- •:. - -
.
CHWer CnNvrAXTiiai
■
-----
o OOO
o OOO
o OOO
OOO
■Vi iV:
■ ..
. “ .. 'P . .
intelli FAX-71 OWl
1. Liquid Crystal Display
The LCD displays messages that
will help you set up and operate
your fax machine. (On-Screen
Programming) (See page 3-1.)
3. HOOK
This key lets you dial telephone
and fax numbers without lifting
the handset. (See page 5-1.)
O OOO
O OOO
O OOO
3
intelli FAX-720M
2, Number Keys
These twelve keys are used
to dial phone and fax num
bers (see page 5-1), and can
also be used as an alpha
numeric keyboard for en
tering information into the
fax machine (see page 37~8).
:
CD
4, HOLD
You can use this key to put a call
on hold. (See page 5-1.)
5. REDIAL/PAUSE
This key re-dials the last number
called. (See page 6-5.) This key is
also used to insert a pause in
autodial numbers. (See page 4-5,
5-1.)
6. SPEED DIAL
This key lets you access previ
ously stored speed dial phone
numbers with a two digit number.
(See page 4-6, 5-1.)
2-2
Page 15
■ '.r..
"
.
:; :t ':.:s..:f :> 3,:i a
jgWNiua
a-a, ■a. tt a...
........................
..................... :a:- ■■-
.
.....................
mmmsiammmmm
‘
.....
....
...................
..........................................
..........
E CONTROL
■■
■I
■
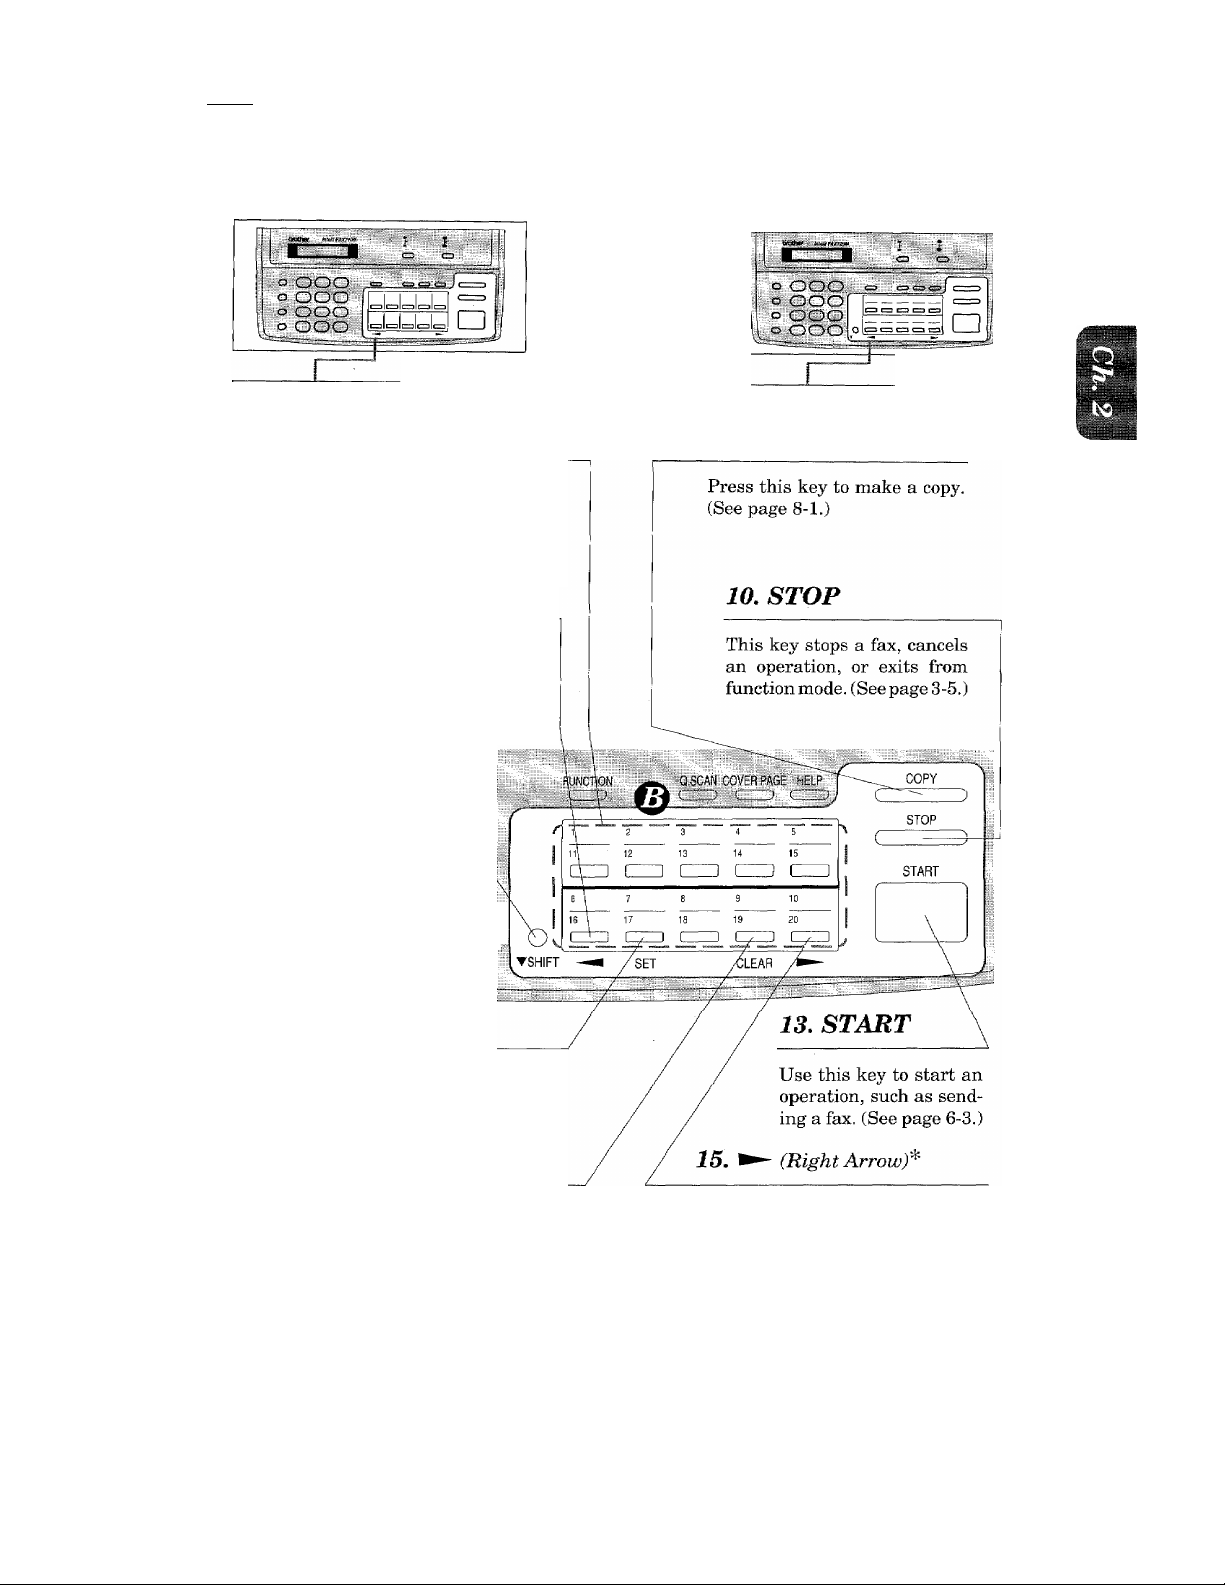
© ONE-TOUCH AREA
intelli FAX-71 OM
7. One-Touch Dial Keys
These ten keys give you in
stant access to previously
stored phone numbers. (See
page 4-4, 5-1.)
9,
This key moves the LCD cur
sor to the left. It also allows
you to back up one step when
you are in function mode. (See
page 3-4.)
(Left Arrowy
11, SHIFT^ ^ (Only
forFAK-720M)
This key is used to access
the “11” through “20" One-
Touch keys. {See page 4-4.) ;
intelli FAX-720M
8. COPY
12. SET*
This key is used for storing a
function setting into the fax
machine. (See page 3-4.)
14, CLEARS
This key deletes entered data
or backs up one step in
function procedure.
(See page 3-5.)
* The Left and Right Arrow keys, SET and CLEAR keys are also shared with one-touch keys.
—The SHIFT key is not available on the FAX-71 OM.
This key moves the LCD cursor to the
right, and it also lets you advance one
step when you are in function mode. (See
page 3-4.)
2-3
Page 16
■■I
.
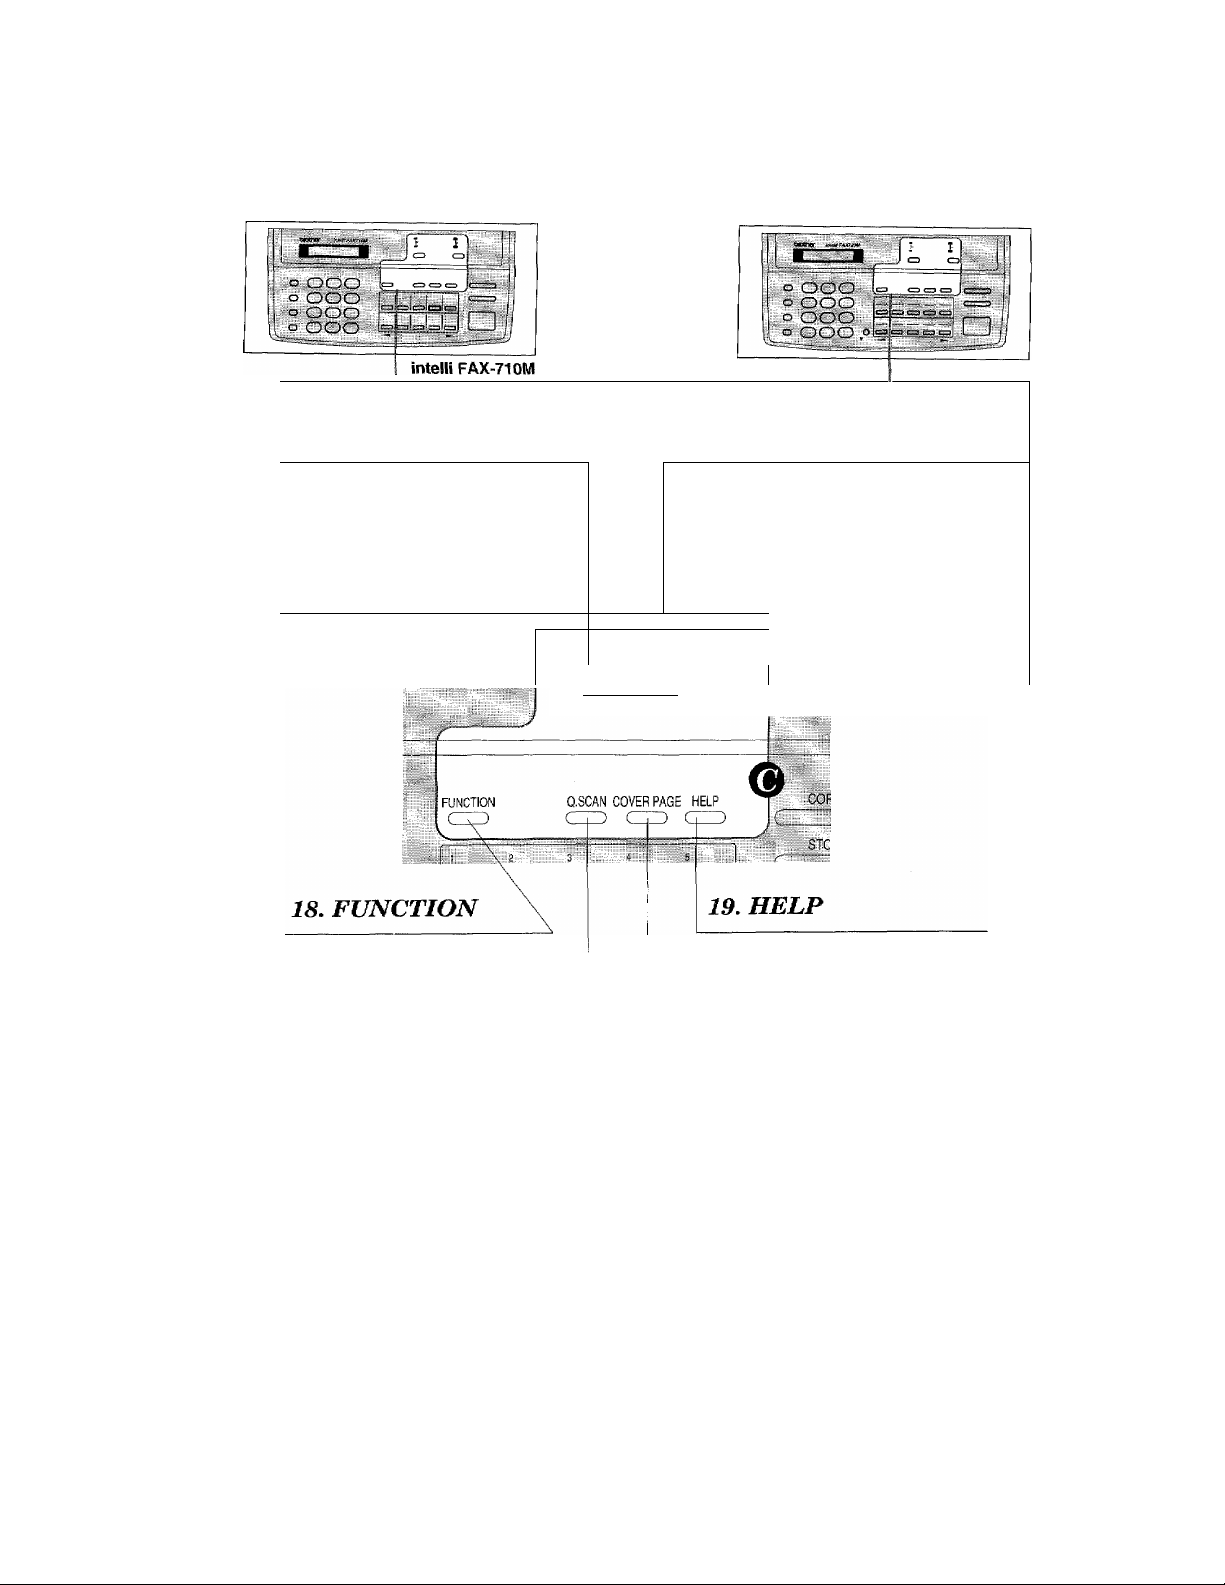
® FUNCTION AND USER SETTING AREA
intelli FAX-720M
16. RESOLUTION
This key is used to set the
resolution requirements when
sending a fax. (See page 6-2,}
r ■, ^ ^ *
t —
..
....................
This key accesses the function
and programming mode (OSP),
so you can alter various settings.
(See page 3-1.)
.
R&^SOLjUTION
20, QUICKSCAN
This key enables you to scan in
your originals at twice the normal
speed, hy storing them in the
memory before actual transmission.
(See page 6-6.) When it is pressed,
Broadcasting is available. (Only for
FAX-720M.) (See page 6-8.) When
QUICKSCAN is pressed together
with SHIFT, Multi TX is available.
(Only for FAX-720M.) (See page 6-
9.)
“INC
PHOTO \ 1- TAD
T
S.FINE
*
\ «» AUTO
21. COVERPAGE
This key is used to send an automatic
Cover Page as the first page of a fax
transmission. (See page 6-15.)
17. MODE
This key is used to specify how the
fax machine should handle
incoming calls. (See page 7-1.)
-
ST
Press this key whenever you want
a quick reference Help List
printed. This Help List will give
you information on how to per
form settings for a function, how
to register information, or how to
get some basic information for
sending or receiving faxes. (See
page 3-5~6.)
2-4
Page 17
.
■Ì™
■Millil
3. HOW TO USE ON-SCREEN PROGRAMMING (OSP) AND HELP KEY ^
.......
-iJ
User-friendly Programming
__________
We have designed your fax machine with on-screen programming and a HELP key, user-friendly
programming that help you take full advantage of all the functions your fax machine has to offer.
On-screen Programming (OSP)
Since your fax programming is done on the LCD, we created step-by-step on-screen prompt
messages to help you program your fax machine. All you need to do is follow the prompt
instructions as they guide you through the function menu selections and programming options
and settings.
Function Selection Table
If you have a basic understanding of how to program a fax machine, you can perform most of the
programming settings without the owner's manual. To help you understand what function
selections, options, and settings are found in your fax programs, we have the following Function
Selection Table.
Read through this table to gain a basic understanding of what your new fax model can do, and
then the next section will begin instructing you how to use on-screen programming.
Level one
function
L TEMP.
(TEMPORARY)
SETTINGS
Level two
function
1. TIMER
2. POLLING
3. CALL
RESERVE
4. CONTRAST
5. RESOLUTION
____________________________
Explanation of Options
Use this for sending documents at a later
time.
Polling is the process of retrieving faxes
from another machine. You can also choose
whether you want your polling secured or
not.
STANDARD/SECURE
You can send a fax and then talk to the recipient
using the CALL RESERVE function.
ON/OFF.
There are three types of contrast settings.
Usually the AUTO setting is acceptable.
But if you want to send an especially light or
dark document, you should change this Bet
ting.
AUTO: Default setting is AUTO. Contrast
setting always reverts to AUTO af
ter one transmission.
S. LIGHT: To send very light documents.
S. DARK: To send very dark documents.
If you need to send a set of originals at
various resolutions, this function will allow
you to set the required resolution page by
page. (If all documents are the same resolu
tion, use the RESOLUTION key. See page
2-4 #16.)
STANDARD/FINE/S. FINE/PHOTO
Factory
setting
Page
6-6
STAN
DARD
9-1-5
OFF 6-19-20
AUTO
STAN
DARD
6-3
6-14
3-1
Page 18

nv^vv
leiiEiiE
Level one
function
1. TEMP.
SETTINGS
2. CANCEL
JOB
3. PRINT
REPORTS
4. SET AUTO
DIAL
Level two
function
6. OVERSEAS
MODE
See page 10-1 for
a list of reports.
1. ONE-TOUCH
DIAL
2, SPEED-DIAL
3. SETUP
GROUPS
(only for FAX-
720M)
Explanation of Options
If you have trouble when sending overseas,
you may want to set OVERSEAS MODE to
ON.
ON/OFF
If you wish to cancel a job that has been set
with the timer, a polled job etc., use this
function.
You can print several different lists and
reports, which are available under function
item 3. PRINT REPORTS.
If you register names and numbers on OneTouch dial keys, you can dial a number
automatically just by pressing a One-Touch
key.
Ifyou register names and numbers as SpeedDial numbers, you can dial a number auto
matically just by pressing SPEED DIAL
and a two-digit number.
This is used for setting up a group number
used for broadcasting.
—
Factory
setting
OFF 6-13
Page
6-12
10-1-5
4-4-5
4-6
4-8
5. USER
OPTIONS
6. TEL
OPTIONS
1. SMOOTHING
2. BEEPER
3. COVERPG
ON/OFF
4. GRAY SCALE
(only for FAX720M)
5. ERROR RE-TX
(only for FAX-
720M)
1. rONE/PULSE
Smoothing enhances the appearance of in
coming faxes.
If you set SMOOTHING to UN, you will
receive messages with the smoothing en
hancement.
ON/OFF
You can adjust the volume of the beeper
with this function.
OFF/LOW/HIGH
If you set COVERPAGE to ON, you can
send your documents with a Cover Page
generated by your machine. When the
COVERPAGE setting is ON, you can select
a Cover Page comment.
ON/OFF
You can select a GRAY SCALE level.
16/32
Ifyou set ERROR RE-TRANSMISSION to
ON, the machine automatically re-sends
the page once an error occurs.
ON/OFF
There are two different dial types and you
must select the type of signal suitable for
your telephone.
TONE/PULSE
ON
LOW
OFF
32
OFF
7-4
4-1-2
6-18
6-15
6-22
TONE 4-1
3 2
Page 19
lu Ubt UlM-bCI^EEN PROGRAMMING AND HELP KEY
Level one
function
6. TEL
OPTIONS
Level two
function
Explanation of Options
The number of rings that will occur before
2. RING DELAY
F/T or AUTO Answer Mode selections are
activated.
0/1/2/3/4 rings
If you set AUTO REDIAL to ON, your ma
chine will automatically re-dial the last
3. AUTO REDIAL
number called if the number was busy or
the call failed for some other reason.
ON/OFF
4. SPEAKER
VOLUME
5. F/T RING
TIME
6. RING VOLUME The settings are OFF/LOW/HIGH.
You can adjust the speaker volume with
this function.
OFF/LOW/HIGH
F/T RING TIME sets the time for simulated
ringing in F/T mode.
10/20/30/60 seconds
If you have distinctive ringing service from
your phone company, you can use this func
tion to register the ringing pattern of your
7. DISTINCTIVE
fax number. And if you set it to ON, you can
use the registered number as a fax number
only.
OFF/ON/SET
1
20
----------
Page
2
7-2
6-5
7-4-5
7-3-4
Factory
setting
ON
LOW
HIGH 7-5
OFF
7-10-13
7. SETUP
SYSTEM
1.DATE/TIME
2. DAILY TIMER
3. INTERVAL
4. STATION ID
5. REMOTE
CODE
6. SET
COVERPAGE
If you enter the date and time in 24-hour
format, the LCD will display the date and
time and they will also be printed on outgo
ing faxes.
If you frequently have delayed jobs, all for
execution at same time each day, you can
program that time. Once you register it, you
do not need to enter that time, just set
Timer Transmission in temporary settings.
You can select the time interval at which
the activity report is printed.
6/12/24 hours, 2/4/7 days, OFF
You can enter your name or com pany name,
fax number and telephone number in STA
TION ID.
It is printed at the top of each page of every
outgoing fax. It is also printed on the auto
matic Cover Page.
If you enter REMOTE CODE, you can acti
vate or deactivate the fax machine from a
remote telephone.
ON/OFl'
You can register your own two programma
ble comments on the Cover Page.
01/01/1995
00:00
00:00
OFF
10-2-3
ON
=f=51 (ACT.)
#51(DEACT.)
4-2
6-8
4-3
7-7
6-17
3-3
Page 20

MMINGAND HELP KEY
Level one
function
0. INTERRUPT
Level two
function
Explanation of Options
You can send a fax without canceling the
timer or polled waiting, even if there are
documents in the feeder, by “interrupting”
it.
Factory
setting
—
Page
6-11
Using the Function Mode to Access On-screen Programming (OSP)
You access the function mode by pressing FUNCTION found in the Function Area of your Fax
Control Panel. (See page 2-4.)
When you enter the function mode, your fax machine will display a list of Level One Functions
to choose from (see pages 3-1 through 3-4 for these Level One Functions), as seen below.
Press FUNCTION
( E N T E R N O . i
S E T
1 -
1 T
A )
*
( 1 . T E M P . S E T T I N G S ' l
+
[ 2 . C A N C E L J C
) B
■■■)
1
1 3 . P R I N T R E P O R T S ' )
+
Left arrow
sequence
[ 4 . S E T A U T O D I A L
*
[ O N S
1 5.1S£.. . R .
t
. . . . . . . .
.DPli
k J
Right arrow or
aulo scroll
sequence
t
I 6 . T E L O P T I C
ms
1
[
7 . S E T U P S Y S T F M j
♦
.....
-
. .
y
These function options will appear one after the other on the display. You can then choose one of
these options by pressing SET when your desired option appears on the LCD.
You can also move through the function menu options at a faster rate by pressing (right
arrow). (See page 2-3 to locate this key on your Control Panel.) When you find the option you want,
press SET.
You can simply press the Level One Function number associated with each option (refer to page
3-1 through 3-4),
3-4
Page 21

illll
liiikM:;-
iiWiS
HOW TO USE ON-SCREEN PROGRAMMING AND HELP KEY
H©lpfu( Hints If you want to exit the function mode, simply press STOP. Also, if you select the
wrong menu, and to return to the previous step, press CLEAR.
Alternating Displays for On-screen Programming (OSP)
(SPEAKERiHIGH a
C
i.3.gl.gty <- -> & seQ
ALTERNATE
When you see alternating displays, the LCD will
usually alternate between the currently selected
:)
option, and a help message giving brief instruc
tions on how to proceed. The example shows the
current speaker volume is high and prompts you
to use (left arrow) and (right arrow) to alter
the setting, and then to press SET to store it.
Help Key
Press this key whenever you need a quick reference Help List printed. This Help List will give
you information on how to perform settings for a function, how to register information, or how to
get some basic information for sending or receiving faxes.
How to Print a Help List
Press HELP to get a print-out of the Help List. Use it when you need information about how to
register or set one of the functions, or how to send or receive faxes. You can request a print-out
whenever the machine meets the following conditions:
-while the LCD displays the date and time.
-while the machine is timer waiting.
-while the machine is polled/polling waiting.
-while the machine is at level one or two of the function menu.
-while you are using the phone.
3-5
Page 22

<£TPPS roR KLy rUNCTI0N5>
IJPRESS FUNCTION
2 SLLECT A LEVEL ONE FUNCTinK
BV PRESSING kUMBER KEY ^
(FROM THE SELECTION ( )
CHART ON THE RIGHT) ^
3)SELECT A LEVEL TUO FUNCTION
BY PRESSING NUMBER KEY q
TjSELECT THE DESIREO SETTING
USING THE ARROW KEYS
□ CZ]
5}PRESS SET
CZD
6)PRESS STOP TO EXIT
NOTE
MAKE SURE YOU FIRST SET
TONE/PULSE(rUNCTION 6-1),
DATE/TIMEIEUNCTICN 7-1) AND
STATION ]D(FUNCTION 7-4),
KSTQRING QNE-TOUCH>
FUNCTION
l~~l ^ 0 ^
KSENDING A FAK (AUTO)>
NUMBER
INSERT KEYS
DOCUMENT TO
a^o
DIAL
ONE-TOUCH
OR
—
□
HELP LIST
'UNCTION SELECIiON
LEVEL ONE
1.TEMP.SETTINGS--
2.CANCEL JOB
3.PRINT REPORTS--
4.SET AUTO DIAL--
5.USER OPTIONS --
6.TEL OPTIONS --
7.SETUP SYSTEM -- -l.DATE/TIME
0. INTERRUPT
ONE-TOUCH
a
SPEED
DIAL START
CZ3
OR -t- -4
INO
DIGITS
NUMBER
KEYS
TO ENTER
PHONE #
LEVEE TWO
-1.TIMER
2.POLLING
3.CALL RESERVE
4 CONTRAST
5.RESOLUTION
5.OVERSEAS MOOE
-1, AC".REPORT
p.aLl. dial
3, C0VERPAGE
4, CALL BACK MSG
5, USER OPTIONS
6. XMIT REPORT
7. MEMORY STATUS
-1,ONE-TOUCH DIAL
2.SDEEJ-DIAL
3.SETUD GROUPS
-1, SMOOTHI MG (ON/OFF)
2.BEEPER
3.COVERPG ON/OFF (ON/O-F)
4, GRAY SCALE
5.ERROR RE-TX
-1 .TOME/PULSE
¿.RING DELAY
a.A.UiO REDIAL {ON/OFF)
4,SPEAKER VOLUME
5.E7T RING TIME
6,RING VOLUME (OFF/LOW/E'IGH)
7 .DISTINCTIVE
¿.DAILY TIMER
3.INTERVAL
4.STATION ID
5. REMOTE COC'E
6.SET COVERPAGE
(AMPLE
□
SET
O
CHARI>
OPTIONS
(STANDARD7SECURE)
(OM/'OEF)
CAUTO.'S. LIGHT/S.DARK)
(Sij/FINE/S.EINE/RhOTO)
(ON/OFF)
(0N70F'^)
i:0"F/L0N7HIGH)
(32/16)
CCN/OFF)
(TONE/PUlSE)
(0.71/2/3/4)
(OFF/LOW/HIOH)
(10/20/30/60)
(OFF/OM/SET)
(0FF76H/I2H/24H/2D/4D//D)
(FAX/TE./NAME)
fON/OFF,SET COGE)
<-k-k-k-k”*:'k-k-k±-T^
ALPHA
KEYS
TO ENTER
NAME
□
SET
SPRINTING A LIST/REPORT>
FUNCTION KEY
L
......
J ^
REPORT TYPE
MANUAL MODE AUTO MODE
*FOR dedicate:' 'FOR DEDICATED
TELEPHONE USE
ONLY.
3-6
NUMBER
TC SELECT
<FA;( RECEPTION SETTINGSS
FAX LISE ONLY.
START
*FOR BOTH FAX AND
1 ELEPHONE.
F/T MODE
TAD MO.OE
’^WHEN CONNECTING
EXTERNAL TELEPHONE
ANSWERING DEVICE.
(HELP LIST of FAX-720M)
Page 23

How to Enter Text in Function Mode
Each number key has two or three letters printed above it. The following keys “1”, and
have no printed letters because they have special characters.
ABC
CD
GHI .IKL
CD
(D
PRS
CD
TUV
(D
CDQZ(D
By pressing the appropriate number key the correct number of times, you can access
the character you want. When you are making certain settings, such as the Station ID settings,
you need to enter text into your fax machine.
Key
once twice
A
D
G
J
M
P
T
w
Q
B
E
H
K
N
R
U
X
Z
DBF
CD
MNG
CD
WXY
CD
CD
three times four times
C
F
I
L
O
S
V
Y
0
Let’s say that you want to enter the initials “BR.” Follow the example below.
KEYS TO BE PRESSED
1. Press 2 twice to enter the letter B.
2. Press 7 twice to enter the letter R.
3. Press SET.
STATUS OF LCD DISPLAY
fNAME:
C
i ENTER & SET
[ NAME:B
! NAME:BR
_____
iB
:)
3-7
Page 24

n^vv
f FOR YOUR INFORMATION
1. if you want to enter a blank space, press (right arrow) twice.
2. If you entered a letter incorrectly and want to change it, you can use (left
arrow) to move the cursor back. When you reach the letter, you can enter a new
one in it’s place. You can only overwrite letters, not insert them, so you may have
to go back and overwrite a lot of letters if you forget to enter a letter.
3. If you enter a character that is assigned to the same number key as the previous
character, press (right arrow) to move the cursor to the right.
■11
—
How to Enter Special Characters, Symbols and Punctuation
Marks in Function Mode
1key -------------- AEOUAgEEl * key
------
----
----
(space)
#key
--------
The “1 ” key contains all the accented characters. The and the “#” key are used for punctuation
marks and symbols. Let’s say that you want to enter the symbol Follow the example below.
-----
- :;<=>?@[]^_
STATUS OF LCD DISPLAY
1. Presssfi to show a list of characters.
2. Press * (6 times).
3. Press (right arrow).
1NAME:JAMES
i MARXSay#$M:
f kMkS J ’t)
(NAME:JAMES &
3
J
3-8
Page 25

rnmmmimm
....................
^rn^amBrnt
..
glAPHCpE Rd|gOTIO^TTlN(S§ ’
..
4. TELEPHONE FUNCTION SETTINGS
There are some settings, such as the date and time, you should make to your fax machine before
you begin using it. Once entered, these settings will remain in the machine until you change them.
You can begin customizing the settings by pressing FUNCTION on the control panel. This
activates the function mode and On-Screen Programming prompts. You can complete a variety
of settings in this mode.
Setting the Dialing Mode (TonefPulse)_____________________________________
Your fax machine supports both tone (or multi-frequency) and pulse (or rotary) dialing. It is
initially set to TONE, so you do not need to change the setting if you use that kind of line. If you
are using a pulse dial line, you can change the setting to PULSE by following the steps below:
KEYS TO BE PRESS
1. Press FUNCTION.
You will see scrolling options on the dis
play. You can choose one.
2. Press 6,
3. Press 1.
After two seconds you will be automati
cally prompted to select pulse or tone.
4. Press (left arrow) or (right
arrow) to find the dialing mode
that matches your telephone line.
Example: PULSE.
5. Press SET.
6. Press STOP to return to the date
and time.
STATUS OF LCD DISPLAY
f Vt/yh/rggfe 00:00 ]
6.TEL OPTIONS
: l.TONE/PULSE r~DIALING:TONE
c
r"SELeErt,<- sfYI
i DIAIING:PULSE
( 1.TONE/PULSE )
:)
Setting the Beeper Sound Level
If the beeper setting is LOW or HIGH, it will “beep” every time you press a key, make an error,
or at the end of sending or receiving a fax.
The initial setting on your fax machine for the beeper is LOW. If you do not want the beeper on,
select OFF, and if you want it loud, select HIGH.
4-1
Page 26

M-L.i_rnv^iM(i ruiNL^IlUIM bt\ lINCz^S
KEYS TO BE PRESSED
1. Press FUNCTION.
2. Press 5.
3. Press 2.
4. Press (left arrow) or (right
arrow) until you get the setting you
want.
Example: OFF.
5. Press SET.
6. Press STOP to return to date and
time.
STATUS OF LCD DISPLAY
hO,:r/'Q’f / i'S;9,5;
i:.‘yEMf,. S€TTI^№QS^
{ b.USFR OPTIONS "')
i 2.BFKPLR
BbLPER-.LOW
c
; shLECT & sr.T :
( BEEPERiOFF
I 2.BEEPER
D
Setting the Date and Time
Your fax machine shows the date and time on the display and prints it on every fax page you send.
You can set the date and time in function mode.
:)
iiiiM li"
1. Press FUNCTION.
2. Press 7.
3. Press 1.
4. Enter the last two digits of the year.
Example: 94.
5. Enter two digits for the month.
(JAN. = 01, OCT. = 10, etc.)
Example; 09.
6. Enter two digits for the day.
Example: 12.
7. Enter the time in 24-hour format.
Example; 15:25 (3:25 P.M.).
8. Wait for two seconds.
9. Press STOP to exit and view the
new date and time.
STATUS OF LCD DISPL
t OJ/OJ/1995 00:00
( X.TCMP.SLTTINGS I
(
.
y..SETUP SYSTEM
Г I^DATE/TIME
{
.
r-NTCfc: YE A К:,:-ЖХ" .
i ■ E'NT E'R
f wnEfe-
f €WE:R И'О^Ун;: 0'9
i yWTtR T№:JCX
f, ENTER DAY:!?
( ЕНТЁТГУГ1ИЕД;ХХгХХГ)
f FNTER_TTMF:15:25 )
(Ц ^DAM/ylPIE
d ‘ 9
/Л г
...
EAR": 94
/ L a.94 IS-:
3
J
I
3
4-2
Page 27

Setting the Station ID
The Station ID is for identification purposes. Here you can store your name, fax number, and
telephone number. Your machine then prints this information on the electronic Cover Page and
every fax page you send.
1. Press FUNCTION.
2. Press 7:
3. Press 4,
You will then be prompted to enter your
fax number.
4. Enter your fax number (up to 20 digits).
Example: 4155554444.
5. Press SET.
You will now be prompted to enter your
telephone number.
6. Enter your telephone number (up to 20 digits).
If your telephone number and fax number
share the same line, enter the same
number again.
Example: 4155554445.
7. Press SET.
Yon will be prompted to enter your name
or company’s name.
-:i0' ■'■‘.i" iu
( 09/12/1W94 15:25 ]
( ivTEHP'. seTTisWGs ;)
PlililillBlllrlfiM
.
................. . . .
f FAX
C
PtPliliiiaiiiiiaMiiiiip
f TEL:
c
( ENIER & SET
f TEL:4155554445_r]
t NAME:;::-;
c
r'ENTER & SET
ISPLAY
iia
:)
D
:)
8. Enter your name by using the number keys (up tq 20 characters).
Example: BROTHER.
Refer to the section “How to Enter Text
in the Function Mode” on the page 3-7-8.
9. Press SET to confirm the entry.
10. Press STOP to return to date and time.
Helpful Hints 1. The telephone number that you stored above is only used for the Call Back
Message and the Cover Page features.
2. If you do not enter a fax number, no additional information can be entered.
3. When you enter a space, use (right arrow). Then it will be registered as a
blank space,
4. If Station ID has already been programmed, then after Step 3 the name will be
displayed with the prompt “1” to change “2” to exit. Press “1” if jmu need to
change any information. Pressing “2” to exit will take you out of the function.
G
i 4 b ST ATI OH ID
E:BROTHER
4-3
Page 28

f Lm La Lm i
iv-^iNC ruiNv^ll^lM bhi IIIMCi7i:>
NOTICE
The Telephone Consumer Protection Act. of lyai makes it unlawful for any person
to use a computer or electronic device to send any message via a telephone fax
machine unless such messages clearly contain in a margin at the top or bottom of
each trariBHiitted page or on the first page of the transiniasion, the date and time it
is sent and an identification of the business or other entity, or other individual
sending the message and the telephone number of the sending machines or such
business, other entity, or individual.
In order to program this information into your fax machine, you should complete the
steps on the previous page.
Storing One-Touch Dial Numbers
You can dial numbers automatically by storing telephone or fax numbers as One-Touch dial
numbers. You can also store names with the numbers so that when you call, you can verify the
destination on the display. You can store a maximum of 10 phone numbers for FAX-7lOM (01 to
10) and 20 phone numbers for FAX-720M (01 to 20). To use 11 to 20 One-Touch number locations
(only for FAX-720M), you need to press SHIFT. For example, One-Touch location “11” is accessed
by pressing SHIFT + One-Toueh “01” simultaneously. Here is how to store a telephone number
as a One-Touch dial number:
1. Press FUNCTION.
2. Press 4.
3. Press 1.
4. Press one of the One-Touch keys
you want to use to store a number.
Example; One-Touch 05.
The One-Touch keys are not the number
keys.
fi. Enter the number (up to 20 digits).
Example; 14155551212.
6. Press SET.
You then Vt^ill be prompted to enter the
name or company associated with this
number.
7. Enter the name by using the
number keys (up to 15 charac
ters).
Example: NJ OFFICE.
(See pages 3-7-8 for how to enter text.)
STATUS OF LCD DISPLAY
(ni It M P'f St TO lil:G
(j....
SET"- tf'lO
........
•D'"I
f..I j„0"N E-5rp#CH:'''
piiSBCfCf o'^EfTfU G'H.. 1
^ f %0 5
hr
ENTER & SET
i 1415 g551 g mYJ
( NAME:
C
[ ENTER & _SET
(¿N-AWe:.::.Na
-"J
....'...........
......
-
DtRIXg' ^
J
:)
3
:)
4-4
Page 29

allHliB:
IIB
::|r'
wlg^ts^mmlKm
......
IbLtPHONb bUNCTION SETTINGS
8. Press SET.
9. Select the type of number (FAX,
; TYPE:FAX
C
(TYPE: fax"
^ & SET T
TEL, F/T, CHAIN) by using ^
(left arrow) or (right arrow) to
find the type you want.
(See For Your Information below.)
Example: FAX.
10. Press SET.
fBsl-fciCT ON$.-Touca ]
11. Return to step 4 to enter another
number, or press STOP to return to
date and time.
Helpful Hints If you have to wait for a dial tone when you get access to the outside line, you
should use REDIAL/PAUSE. When you press REDIAL/PAUSE, a dash
will appear on the display. By storing the nuujbers with a pause, you can create
a delay of 3.5 seconds.
FOR YOUR INFORMATION
Types of Numbers
When you store a number as a One-Touch or as a fipeed-nial mimher^ yon have a
choice of choosing the type of number. There are 4 options:
9
1. FAX (A fax number).
2. TEL (A telephone number).
3. F/T (Both a fax number and a telephone number).
4. CHAIN (A number, usually an access code, for chain dialing).
Chain Dialing
Sometimes you may want to choose from among several long-distance carriers when
you make a call. This is because rates may vary depending on the time and
destination. To take advantage of low rates, you can register the access code of a long
distance carrier as a One-Touch or a Speed-Dial number for chain dialing. To do this,
you store the access code as you would a regular number and register it as a “chain”
number. (See step 9 on this page.) Then, when you want to make a call, you use this
number in combination with the regular number, which also may be a One-Touch or
a Speed-Dial number.
When more than one stored number is used to dial, the first number(s) must be called
type CHAIN, the last number in the sequence may be either type FAX, TEL or F/T.
This is also important for transmissions using credit cards.
If you want to store a phone/credit card number to be used in your dialing sequence,
you must store that phone/credit card number as a “chain” number. You can start
a chain dialing call by pressing a One-Touch key or Speed-Dial number where your
chain number is stored. Next you press another One-Touch or Speed-Dial number
for the regular phone number (either FAX, TEL or F/T number), or enter the number
manually. And then press START to begin calling.
NOTE; When you send a fax using your credit card number in chain dialing, do NOT
send a cover page because your credit card number will be on it.
4-5
Page 30

■Iliiili
Storing Speed‘Dial Numbers
When you store a phone or fax number as a Speed-Dial number, you need to enter a two-digit
number, from 01 to 20 for FAX-710M and from 01 to 40 for FAX-720M using the number keys,
For example, you cannot enter “5”. You need to enter “0”, “5”. You can store as many as 20 numbers
(FAX-710M) or 40 numbers (FAX-720M) as Speed-Dial numbers.
KEYST
1. Press FUNCTION.
2. Press 4.
3. Press 2.
4. Use the number keys to enter a
two-digit number.
Example: 05
5. Enter the number (up to 20 digits).
Example; 5555151.
6. Press SET.
You then will be prompted to enter the
name or company associated with this
number.
7. Use the number keys to enter a
name (up to 15 characters).
Example: MANCHESTER.
(See pages 3-7-8 for how to enter text.)
№
STATUS OF LCD DISPLAY
(09/12a;5'tasT)
f l .fEWy,.-SrTTfe3:N6S,
( ^vSetWUTO DIAL I
r SPEED-DIAL?"
c
ENTER & SET
i #05
1 NAME:
c
1 ENTER & SET
(:TM.AME : MA„NCHESTgEl.;„ -)
3
3
D
8. Press SET.
9. Select the type of number (FAX,
TEL, F/T, CHAIN) by using ^
(left arrow) or (right arrow) to
display the type you want.
Example: TEL.
10. Press SET.
11. You are ready to enter another
Speed-Dial number, or press STOP
to return to the date and time.
4-6
f TYPE:FAX
^ i. SELfCl; <- & scT )
pff me! J E
f SPEED-DIAL? # )
3
Page 31

.
.......
.
lii
Bi
I—
ifaiiisi
iHBil
IBI
SETTINGS
Holpful Hints 1. Print the All Dial List to make sure you have stored the correct numbers. (See
page 10-3.) This list will contain the type of number: FAX, TEL, F/T, or CHAIN.
2, Kven if there should be a loss of electrical power to your fax machine,
the telephone and fax numbers you have stored will not be lost.
■■
FOR YOUR INFORMATION
When You Wish to Change the Stored One-Touch and Speed-Dial
Numbers (During Step 4 on Page 4-4, 6, 8)
When you access the function for a One-Touch key or Speed-Dial number, that is
already in use, you will be asked if you wish to change it or to exit and select a
different One-Touch or Speed-Dial number. This display does not appear if the OneTouch key or Speed-Dial number you chose is not assigned.
1. Press 1 to assign a new number to the One-Touch key or Speed-Dial number, or
press 2 to choose a different One-Touch key or Speed-Dial number.
( *05 : NJ C
c
f 1.CHANGE
2. If you are replacing an existing number with a new one, the old number and name
will appear in the display. Press CLEAR to erase the old number and name. Then,
enter the new number and name and press SET to store the entry.
)FFICE
3
Memory Storage
Your fax machine is equipped with an internal battery that will keep the memory
working for up to two hours after power has been cut off. After that time, the date and
time will be lost and you will have to re-enter the information. All other settings in
the SET AUTO DIAL, USER OPTIONS and SETUP SYSTEM functions are stored
permanently and will be retained even in the event of a power failure. However, the
data stored in the memory such as Out-of-Paper Received and Memory Transmission
will be lost after the power is disconnected.
Helpful Hints If your fax machine is connected to a PBX, you may need to insert an additional
number before each fax or telephone number to access an outside line.
4-7
Page 32

cLcrn'^Nt f-UNUIi<JN S
iiiiliiiasiiiii
llltMaSSS:
lilBiliiiill
SMsiPlN
liliiiiil
Setting Up Number Groups (Only for FAX-720M)
Number Group allows you to send the same fax message to many fax numbers by pressing only
one One-Touch key. (Broadcasting.) You must store each fax number first as a One-Touch or
Speed-Dial number. Then you can combine them into a Group.
You can have up to 6 Groups and can assign up to 59 numbers for each Group. They can have a
name up to 15 characters long.
S TO BE PRESSED
1. Press FUNCTION.
2. Press 4.
3. Press 3.
4. Press one of the One-Touch keys to
be the stored group number.
Example; select “One-Touch 1” as a group.
5. After two seconds enter the group
number by using the number keys.
Example: 1.
^ i SFTUP GROUP:GO .) ^
^yEiNa~ER'-X."aET: ■'I ^
c
_________________________________
STATUS OF LCD DISPLAY
f.. V 9Vl ZXi y» JM.:
(i 3>yCTU# GROUPS ? d
[■;
.....
g'ELlET ONF-TOUCH i
f'?SEE:UE':iftoa.e-E60i^
f GOl:
hEDEER'C JET>^
3
3,
6. Enter the One-Touch or Speed-Dial
numbers in this group.
Example: #03, #05, *02. (Note: Use the #
key and number keys for Speed-Dial num
bers, and the * key and number keys for
One-Touch numbers.)
7. Press SET.
8. Enter the group’s name.
Example: ALL BROTHER.
9. Press SET.
10. Press STOP to return to the date
and time.
Helpful Hints You can print a list of all One-Touch numbers and Speed-Dial numbers. Group
numbers will be listed under One-Touch numbers. (See page 10-3.)
(:» UQj’:: # 5 *0 M a '1
f _NAME
c
f ENTER & SET
Hn ^i€E: ae l eoteheI/I
( 3.SETUP GROUPS )
3
4-8
Page 33

pillili
USING THE UNIT AS A TELEPHONE
5. USING THE UNIT AS A TELEPHONE
Your fax machine can be used to make regular telephone calls. You can dial numbers manually,
by pressing the number keys, or by using One-Touch or Speed-Dialing.
!■■■
Manual Dialing
1. Pick up the handset, or press HOOK.
2. When you hear a dial tone, you can begin dialing by pressing the number keys.
3. If you used HOOK, pick up the handset when the call is answered.
________________
One~Touch Dialing
1. Pick up the handset, or press HOOK.
2. When you hear a dial tone, press the desired One-Touch key.
3. If you used HOOK, pick up the handset when the call is answered.
If you try to use a One-Touch number that has not been registered, you will hear a warning sound
and the display will carry a message reading,“NOT REGISTERED”. The display will return to
normal after 2 seconds.
Speed Dialing_______________________________________
1. Pick up the handset or press HOOK.
2. When you hear a dial tone, press SPEED DIAL and then the two-digit Speed-Dial number.
3. If you used HOOK, pick up the handset when the call is answered.
________________________
FOR'tDDR
Using Keys with the Telephone
- Use REDIAL / PAUSE for putting a pause between numbers.
- Use HOLD to put a call on hold. You can put down the handset without
disconnecting the call. You must pick up the fex handset to release the call from
HOLD.
- Use # to switch the dialing type from “pulse” to “tone”. This key is also used for push
button sendees, such as those offered by banks, credit card companies, or paging
services.
....
..............................
.
1:::;
On Hook Dialing
When you make a call using HOOK, you can listen to the other end of the line, hut
they can’t hear you unless you pickup the handset. Also, if you press HOOK a second
time, the call will be disconnected.
5-1
Page 34
■■ii
■iHBBBW
6. SENDING FAXES
A) DOCUMENT BASICS
The Size of Your Documents
The size of the documents you want to send by fax should not be larger (or smaller) than your fax
machine can accommodate. The documents should each be between 148 and 216 mm (5.8 and 8.5
inches) wide and between 100 and 900 mm (3.9 and 35.4 inches) long.
The maximum width of the scanned area is 208 mm (8.2 inches), which can be printed on the
recording paper of the recipient’s fax.
How to Insert the Document
To send a fax, first insert the document you wish to send, face down, in the
document feeder. The top edge of the document should go in first, or the fax will
be received up side-down.
To prevent the document from going crooked as it is fed, adjust the paper
guides to fit the width of the document.
NOTICE
V
dOi
Page 35

■il
DOCUMENT BASICS SENDING FAXES
The Auto Document Feeder (ADF)
The Auto Document Feeder (ADF) automatically feeds documents (up to 15 pages) into the fax
machine, one at a time. The thickness and weight of the documents should fall into the following
categories:
Thickness: For one sheet: 0.07 to 0.12 mm (2.8 x 10‘^ to 4.7 x 10’^ inches).
For multiple sheets; 0.07 to 0.10 mm (2.8 x 10-^ to 3.9 x lO'^ inches).
Weight; For one sheet; 52 to 85 g/m^ (0.07 x 10'^ to 0.121 x 10'^ Ibs/inch^).
For multiple sheets; 52 to 80 giro? (0.07 x 10'^ to 0.114 x 10'^ Ibs/inch^.
As a reference, please note that the paper on which this is printed has the following thickness and
weight:
Thickness; 0.10 mm (3.9 x 10'^ inches)
Weight; 80 g/m^ (0.114 x 10'^ Ibs/inch^)
Before inserting documents into the document feeder, fan the sheets of paper to make sure the
documents are not sruck together. Then tap the leading edge on a table so that all the pages are
even when placed in the feeder. Make sure you always put the documents in face down.
HI
Getting Ready to Send a Fax
Resolution
You can choose a setting (STANDARD, FINE, SUPERFINE, or PHOTO) for the resolution any
time before you press START or COPY. You can choose a setting by pressing the Resolution key.
( O means light off. means light on.)
STANDARD
FINE
SUPERFINE O fine
PHOTO
O fine
|- PHOTO
O S.RNE
^ FINS
■ PHOTO
o S.FINE
PHOTO
S.FINE
FINE
PHOTO
S.FINE
The STANDARD resolution can be used for most typewritten
text. When the STANDARD setting is on, both lights are off
Transmission speed is uurmtil.
The FINE resolution is an ideal setting to use if you want to send
documents that have small print. When the FINE setting is on,
the FINE light will be lit.
Transmission speed is slower than STANDARD.
The SUPERFINE resolution is a good setting to use for documents
with very small print or artwork. When the SUPERFINE setting
is on, the 8. FINE light will be lit.
Transmission speed is slower than FINE.
The PHOTO resolution is ideal for sending documents that have
varying shades of gray, such as photographs. The PHOTO setting
is on when both lights are lit.
Transmission speed is slower than FINE.
To set different resolutions for each page, refer to “Multiple Resolution Transmission” on page 6-
14.
6-2
Page 36

OCIN Ul IMVZ7 f-AAtb DOCnmENT BASICS
Contrast
The fax machine has automatic contrast control, but if you need to send a document that is very
light or very dark, you may want to set the contrast yourself.
Use SUPER LIGHT to send a very light document.
Use SUPER DARK to send a very dark doeument.
KEYS TO BE PRESSED
1. Place the documents face down in
the feeder.
^ f ,’f NO ■ & SI ART ) ^
^ 6QFWj U
isp-as*?)
■i
■III
■li
2. Press FUNCTION.
3. Press 1.
4. Press 4.
The display will alternate messages.
5. Use (left arrow) or (right
arrow) to select one of the settings,
AUTO, S.LIGHT, or S. DARK.
Example: S.LIGHT.
6. Press SET.
7. Press STOP to exit.
Then start fax sending operation (see page 6-4) or copy (see page 8-1).
B) BASIC FAX TRANSMISSIONS
QE S S Hl li Z I
r~4. CONTRAST ~
c
h s E kecg f i&5 $ ffl
(:;ypft4syr$Tya,si¥l
(....................................................................,}
[ FAX: NO. & START
c
f COPY : COPT'l ^
FOR YOUR INFORMATION
IfTEMftCJmiNGS )
—
Sending a, Fax
There are 3 basic ways of sending a fax:
1) Manual tranamiaaion;
You can talk or listen to the other party before you send a fax by picking up the
handset and dialing the number. After the other party has finished talking and
has pushed its
START key and putting the handset back down in its cradle. (If you call and all
you hear is the chirping sound of a fax machine, you can go ahead and press your
START key, and then put down the handset.)
START
6-5
button, you will be able to send your fax by pressing your
Page 37

illiiiinhZlniiiniiK:.
BASICF,\xTRANSAiissioNs SENDING FAXES
■IMl
m
2) Automatic transmission;
You can send a fax without picking up the handset or without pressing HOOK
by dialing the fax number and then pressing START.
a. One-Touch Dialing
Press one of the One-Touch keys. (The numbers must be stored beforehand. See
page 4-4-5.) Then press START.
h, Speed-Dialing
Press SPEED DIAL, then use the number keys to enter a two-digit number,
For example, press “0”, “5” for 05. (The numbers must be stored beforehand. See
page 4-6.) Then press START.
3) Timer transmission:
It is possible to send documents at a later time by using the TIMER function. (See
page 6-7.)
Talking to the Other Party When Sending a Fax
When you are sending a fax manually and you hear the recipient’s voice instead of
fax tones, you can use the handset to have a conversation. When or if you want to then
send a fax, ask the person on the other line to press START on his/her fax machine
and when you hear fax tones you can press START to begin sending your fax.
FOR YOUR INFORMATION
Sending a Fax Automatically
KEYS TO BE PRESSED
1. Insert the documents face down in the feeder.
2. Enter a fax number.
Example; One-Touch dialing.
3. Press START.
I
STATUS OF LCD DISPLAY
( 097^gy;ig9A;5rMg^
Fi Rg-SilF. & START )
c
C COPY: "press C
I NJ OFFICE
[DIALING f SENDING
:)
llliill
6-4
Page 38

oi_lNL^Il\iV37 r/AAUD BASIC FAX TRANSMISSIONS
Sending a Fax Manually
KEYS TO BE PRESSED
1. Insert the documents face down in
the feeder,
2. Pick up the handset or press HOOK
and listen for the dial tone.
3. Dial the fax number.
You can use manual dialing, One-Touch
dialing or Speed-Dialing.
4. When you hear a fax tone, press
START.
Your fax machine will begin sending the
documents.
5. Return the handset to its cradle, if
you did not use HOOK.
STATUS OF LCD DISPLAY
iE
C
:C ort ? -i^R 6§;s. :'GO;P^Y; 1
C ENTER FAX NO
c
f;;rp:R:E:3:S''rsT'ARji::.'-.i<£''FF)
[ NJ OFFICE
fs ending"
D
3
Automatic and Manual Re-dialing
If a number you have dialed is busy or your call did not go through for some other reason, you can
re-dial that number. There are two ways for re-dialing, “automatic” and “manual”. Automatic re
dialing can only be used for faxes that were sent using automatic transmission—not for telephone
calls. The factory setting is “auto re-dial on”, but you can change it to “auto re-dial off’, if needed.
If the re-dial function is set to “auto re-dial on”, it will automatically re-dial the number 3 times
at 5 minutes intervals before giving up. Whether the setting is on or off, the fax machine will re
dial the last dialed number when you press REDIAL/PAUSE (manual re-dialing),
3
3
Setting the Auto Re-dial_____________________________________________________
KEYS TO BE PRESSED
1. Press FUNCTION.
2. Press 6.
3. Press 3.
4. Use ^ (left arrow) or ► (right
arrow) to turn the auto re-dial
function ON or OFF.
Example: OFF.
5. Press SET.
6. Press STOP to exit.
6-5
STATUS OF LCD DISPLAY
f T.TEMB.tETTrNGS )
b 6.T&L QJUI0NS
[ .T. AUTO REDIAE"~~]
AUTO REDIAL :0N
l & SET
i AUTO RFDIAI:OFF ]
f 3.AUrO REDIAL , )
Page 39

.
..............
.................
.
BASIC FAX TRANSMISSIONS S ENDING FAXES
Possible Settings When You Send a Fax Manually
* Resolution (See page 6-2, 6-14.)
■ Cover Page (See page 6-15.)
• Call Reservation (See page 6-19.)
Printing Page Headers
Your fax machine can print a page header on top of every document you send. It is
printed on the receiving party's fax paper. It contains the date and time of
transmission, your fax number and name (Station ID), and page number. Of course
you need to register your Station ID beforehand for that information to be available.
Transmission Date and Time Station ID
1
09/12/1994
.
...................
1 3:25 ¿155554444 BROTHER
Contrast (See page 6-3.)
Overseas Mude (See page 6-13.)
Page Number
1 1
1 _ _ 1
P.4Ge|
Sending a Fax by Using Quick-Scan (Memory Transmission)
If you are faxing a set of documents that are confidential in nature or you just need your original
dnenments right away, you don’t have to stand at the machine and wait for the transmission of
each page to be completed. You can use Quick-Scan in order to get your original documents quickly
before transmission.
BE PRESSED
1. Insert the documents into the
feeder.
2. Press Q.SCAN.
The display indicates how much memory
is available.
3. Enter the fax number.
4. Press ST ART to begin scanning the
documents into memory. Once com
pleted, the fax machine will dial
the destination.
STATUS OF LCD DISPLAY
foiv
12/1994 15:25 )
,lfO. & SIART
top/; PRFSS COPY )
c
[ EllTEl: FÁX NO. ~~~)
(' NJ OFFICE
: MEMORY
:)
!)
D
6-6
Page 40

hAXtb BASIC FAX TRANSMISSIONS
.
If You Get a MEMORY FULL Message When Trying to Send a Fax by
Using Quick-Scan
If the memory becomes full when scanning page one, the display showes “PRESS
STOP KEY”, then press STOP to abort the job.
If the memory becomes full on page 2 or more of a multi-page document, you will be
prompted to press START to send the portion already scanned, or STOP to abort the
job.
........
■ ';'; "C '.;:;i, i it it t f 'i s,;
Delayed Transmission
You can set the timer to send documents at a later time (up to 24 hours later). Your fax machine
will also produce a report, the “Delayed Sending Report”, after the fax is sent. You can set up to
three different documents for delayed transmission.
KEYS TO BE PRESS
1. Insert the documents into the feeder.
2. Press FUNCTION.
3. Press 1.
4. Press 1.
5. Enter the time in 24-hour format
using the number keys.
Example: 19:45(7:45 P.M.).
6. Wait for two seconds.
7. Press STOP.
8. Enter the fax number.
9. Press START.
The fax machine waits until the specified
time to call.
STATUS OF LCD DISPLAY
m
f mivzjvm is^g#l
t
...
riteyNO'': '»gg.
C
: COPY: PRESS COPY !
[ U ■ rrae. sc I TINGS ‘A
TEMp. sr.Ti I NG
i liuiMEfe ' *y
rslTYi M£=^mo
I SFT riME-19:"
11.TIMER
i ENTER FAX NO.
c
f PtCSS'S START KET'^
1
NJ OFF IC^
IMER WAITING
:)
3
:)
i
6-7
Page 41

■■
WKBmg,
BASIC FAX
■ill
Setting the Daily Timer (for Delayed Transmissions)
The Daily Timer function lets you send a fax at a set time every day, This is handy for sending
delayed jobs that must go out at the same time daily. Once you make this setting, you don’t have
to enter the time everyday. The setting will stay the same until you change it.
KEYS TO BE PRESSED
1. Press FUNCTION.
2. Press 7.
3. Press 2.
4. Enter the time in 24-hour format
using the number keys.
Example: 19:45 (7:45 P.M.)
5. Wait for two seconds.
6. Press STOP to exit.
ATUS OF LCD DISPLAY
i q;a/’rg7199 4'- - j 53 €S£]
l:,i.;l>T€»-a,S'tTrri8iS
f 7 .^E mJU? ;. SfSf Ea ~)
( y2?bAJ*Ly.TIMER.,
f€Eir;ER
I:: iW It R, rfrg
______________________
..........................]
......
....
WEi.flQ;: :&№)
...........
A:tUf
......
T'f-M
Suits.: ]
Broadcasting (Only forFAX-720M)
By using the numbers you have stored for One-Touch dialing, Speed-Dialing, or group dialing, you
can automatically send faxes to a maximum of 60 different locations.
KEYS TO BE PRESSED
1. Insert documents into the feeder.
2. Press Q.SCAN.
3. Enter the One-Touch, Speed-Dial,
or group number, one after the
other.
Example; Group number,
4. Press START and the fax machine
will read the documents into
memory, and then start sending
faxes to all the numbers you en
tered.
STATUS OF LCD DISPLAY
I E4xa
c
iiCOPY: i PRESS COPY)
fTTEMORY 10W~I
c
' ENIIR FAX NO. ~j)
(: ALL BROTHER
f MEMORY
I DIALING
r SENDING
& :;gtART 1
g0O%1
ZI Z D
:)
:)
3
6-8
Page 42

01-1'jLyiir/-\Atò
BASIC FAX TRANSMISSIONS
FOR YOUR INFORMATION
Getting Familiar with the Broadcasting Function
1. To stop the broadcast in progress, press STOP.
2. Enter the chain dialing numbers as you normally would, but keep in mind that
each key counts as one location, so the number of locations you can call becomes
limited. (You have up to 60 locations for FAX-720M you can call with One-Touch,
Speed-Uialing, and group numbers,)
3. If the line is busy or for some other reason a connection could not be made during
broadcasting, the fax machine will automatically re dial the number, (See page G-
5.)
4. If the memory is full, press STOP to abort the job or press START to send the
portion that is in the memory (if more than one page has been scanned.) (See page
6-7.)
Helpful Hints After transmission is completed, a Broadcast Report will be printed
automatically to let you know the result of transmission.
WmmiéMmmmmM«
wmrnmwwmm
Sending by Multi-Transmission (Only for FAX-720M)
Use multi-transmission for sending several different faxes to several destinations at once. For
example, you can automatically fax “Document A” to one destination and “Document B” to
another destination.
This is not to be confused with Broadcasting, which is sending one document(s) to many
destinations.
If you desire, you can combine this function with broadcasting so that you can fax different
documents to different lists of people at the same time. To do this, you store various sets of
documents in memory. Then, for example, you can automatically fax “Document A to one list of
people and “Document B” to another list of people. You can preset 3 different documents in
cluding timer transmission in memory.
KEYS TO BE PRESSED
1. Tn.snrt “Document A” into the
feeder.
2. Press SHIFT + Q.SCAN together to send by multiple transmission.
The display shows remaining memory.
3. Enter the fax number. (Or a series
of numbers if you are broadcast
ing.)
STATUS OF LCD DISPLA
a.-!.STAfer,
C
( COPYj~ MUgS:' CO PY)
i MUL I j IX acfB% )-
c
Einii^AX' Ito m
fàNUlCPFFÌCt _ S ')
........
1
:)
6-9
Page 43

iii
.
............._
BAMf^mAMmssioNs SENDING FAXES
■■
4. Press START to start scanning
iiJMCri QOff)
documents.
(tQi9yia/>gg94iA5
5. Insert "Document B” within 30 sec
onds after "Document A” has been
scanned. (After 30 seconds if there
r fe'€M.TS'R ' FAX NO ^
^ ts:#8CSS';S»ARr
are no further documents, the fax
machine starts sending what it
has.)
6. Repeat the step 2, 3,4 for the third
(:wtllTt tx>:, '
document.
7. After 30 seconds, your fax machine
DIALING
will start sending them in scanned
order.
HGipful Hints 1. If you press only Q.SCAN instead of SHIFT + Q.SCAN for the last document,
your fax machine will start dialing without waiting for 30 seconds.
2. Multi-transmission is available for up to three selections, however the total
number includes Timer transmission. If you set one timer transmission, multi
transmission is available for two documents.
6-10
Page 44

OLI MLyil MVj:7 r/AACO BASIC FAX TRj\NSMISSIONS
Interrupting the Timer and Polled Job
You can send a fax without canceling the timer (see page 6-7) or polled waiting (see page 9-2) with
documents in the feeder by “interrupting” it. When you interrupt the timer to send a “new” set
of documents, the fax machine does not automatically re-dial the number if it is busy. Also, you
cannot use the function mode when you are interrupting the timer or polled waiting.
Example; TIMER WAITING with document in the feeder.
KEYS TO BE PRESSED
1. Press FUNCTION.
2. Press 0.
3. Wait for two seconds.
4. Remove documents from the fax
machine.
5. Place the ^‘new” documents into the
feeder.
6. Enter the new number to send the
documents to, then press START.
7. After the transmission is finished,
place the “old” documents back into
the feeder.
8. Press FUNCTION and 0 to restore
the timer.
S OF LCD DISPLAY
I^ÌMER WAITING )
'CGJEMf_• SETTINGS ~1
( n , INTERRUPT
r FAX OR COPY
c
FUNC 0 TO RES
r DIAL!
r SENDING pyol J
f
.
^t:N€el.T5i:№U M E NT 1
C___________
c
i FUNC 0
1 3 . INTERRUPT f TIMER WAITING
3
ET:: '..)
D
3
3)
3)
J
6-11
Page 45

FAX TRANSMISSIONS
FAXES
Canceling a Job
Use the cancel job function to permanently remove scheduled tasks such as polling or polled job
(see page 9-2) and timer jobs (see page 6-7) from your fax machine.
Example: TiMEK WAITING- with documents in the feeder.
KEYS TO BE PRESSED
1. Press FUNCTION.
2, Press 2,
Any waiting jobs that have been set up
will appear in the display.
3. Press (left arrow) or (right arrow) to select the job you wish to cancel.
4. Press SET.
5. Press 1 to cancel the selected job, or 2 to exit without canceling.
Tf 1 is selected, the job will be canceled
and the next job in the queue will appear
in the display.
6. To cancel the next job, press 1 again.
To exit, simply press 2.
In the event that no jobs are waiting to be
processed, a “NO JOB WAITING” mcs
sage will appear in the display.
STATUS OF LCD DISPLAY
( TIMER WAITT
r l.TEMP.SETTI
2.CANCEL JOB
( 19:45:,,a»jJiar Qiff
c
r~19~:45 NJ 0~FfTc~1
,NJ- O'FFIC '
c
t
..
Tmi egEAR-.;^ . EXlT^
3
:)
:)
6-12
Page 46

OI_l
C) FAX TRANSMISSION OPTIONS
Setting the Overseas Mode
If you experience difficulty with sending faxes overseas, you may want to use the Overseas mode.
Using the Overseas mode is an effective way to send faxes overseas,
KEYS TO BE PRESSED
1. Insert the documents into the
feeder.
2. Press FUNCTION.
3. Press 1.
4. Press 6.
5. Press (left arrow) or (right
arrow) to switch to ON.
6. Press SET.
7. Press STOP to exit.
8. Then start fax sending operation.
(See page 6-4.)
STATUS OF LCD DISPLAY
(■'Q§n^/199‘4 1 S'itSj
c
(- jCO riilsi OO'Pvil
hlCrEHteit&ETTrr.G.S^
f 11' ■ rEM:P"'Vgirr f fel
i l6.:6VERSEAS ^MOQlV^
tiWERSEAS,:QFf:i.-
c
p'SELECt "'^SET ;
r.OVeRSEAS>0‘Nc;'.
f' E WrgR:::... FA X%№8 '''Vj
c
F’VBESS. SI ART....................KEY " j
:)
i lZ)
:)
After sending your fax, the machine will
switch itself OFF.
6-13
Page 47

..
........
........
.....
■■■
..
FAX TRANSMISSION OPTIONS SENDING FAXES
■■■iiB
Setting Your F{ix Machine for Multiple Resolution Transmission
This is a temporary setting for the current transmission.
You can set the resolution of the documents you send by pressing RESOLUTION. Once you set
the resolution, all the pages will be sent at the same resolution. However, there may be times
when you want to send some pages at one resolution, such as “standard”, and other pages in
another resolution, such as “photo.” If you send all pages in photo resolution, for instance, it would
take a great deal of time. It would be better to specify the resolution for each page to minimize
transmission time. This is possible using the 1. TEMP. SETTINGS function.
KEYS TO BE PRESSED
1. Place the documents into the feeder.
2. Press FUNCTION.
3. Press 1.
4. Press 5.
5. Press (left arrow) or (right
arrow) to find the resolution you
want for the page in your docu
ments.
Example; FINE.
6. Press SET,
Return to step 5 for setting the resolution
for page 2 and the following pages.
7. When you finish setting the resolu
tion for all your pages, press STOP.
8. Enter the fax number.
STATUS OF LCD DISPLAY
( 097112/1994 ]
(..i3gthri SSTlTSGg , -3
Tf:H€.-''SErTr^^
■ RliSOLUrJC':...
^ t*PA6E«01iSFANDARU ] ^
k (ELFCT <- -» & SET -)
( PACT 01:fine; 3 ]
¿""3
f rA GE gal'SiMg;. 1
^ P FAX jaCtO ■ % START ! ^
gBPY: PRI SS COPY )
u
9. Press START.
The resolution will revert to STANDARD
after the documents have been sent.
6-14
Page 48

rAAtÒ FAX
....
Gray Scale (Only for FAX-720M)
You can set initial gray scale level to either 16 or 32. The default setting is 32. This is the initial
level of photo mode, which is effective for sending photographs. If you try to send a document in
32 level photo mode and the receiving machine does not have super fine mode, the machine will
fall back to the 16 level automatically. Therefore, if you send frequently to such a machine, you
may want to set the initial gray scale level to 16.
KEYS TO BE PRESSE
1. Press FUNCTION.
2. Press 5.
3. Press 4.
r"-"3
TATUS OF LCD DISPLAY
t
a : ; ;f t m S YI
li
(■■■■ iSPAite
I /tf bay? 1C it» t * i % ]
c
( ,.&f
.
W)
3
4. Press (left arrow) or (right
arrow) to choose either 16 or 32.
Example: 16.
5. Press SET.
( 4.GRAY SCALE
6. Press STOP to exit.
Sending a Fax with a Cover Page
An automatic Cover Page will allow you to send details of who the fax is going to, who it is from
and when it was sent. This is what the Cover Page looks like:
09/12/1994 15:25
=== COVER PAGE ==7
TO; N0 OFFICE ^
FAX: 14155551212
FROM: BROTHER
FAX: 4155554444
TEL: 4155554445
03 PAGE[S] TO follo /
COMMENT:
When Cover Page is sent each time by using the automatic settings (see page 6-18), the number
of pages will be left blank.
PLEASE CALL
___________
------
^
-----------
(1) The “TO” information comes from the
One-Touch or the Speed-Dial memory.
If you are dialing manually, the name
of the destination will be left blank.
(2) The “FROM” information comes from
the Station ID.
(3) The number of page s you are sending.
(4) Your comments. You may customize
comments.
6-15
Page 49

KEYS TO BE PRESSED
1. Insert the documents into the
feeder.
2. Press COVERPAGE.
3. Use (left arrow) or (right
arrow) to select the comment you
want.
Example; 2, PLEASE CALL.
STATUS OF LCD DISPLAY
C
c
( g&Lgcr gi>&eT~l
( ¿.PLEASE CALT
.
M':";;)
:)
:)
D
4. Press SET,
5. Enter the number of pages you are
sending. (Enter to leave the
number of pages blank.)
Example: 03.
6. Enter the fax number and press
START.
FOR 'maiflNIibiMION'
The Comments Section on the Cover Page
You can choose one comment from among 6 options. The first option is to send no
comment at all. The next 3 are built-in comments, and the last two are ones you can
set yourself. (For more information see page 6-17.)
1. COMMENT OFF
2. PLEASE CALL
3. URGENT
4. CONFIDENTIAL
5. (Your own customized comment).
6. (Your own customized comment).
i iaififf
...............
fe,.:£Nag'‘Ti№j Pa
C
PRESS STAR r Kb'Y~ ')
f "dialing
MAiasi
.
:)
1
■■
6-16
Page 50

^I_I NL^II N'c? TMAtlO FAX 7'RAsWSMISSlONOPTIONS
....
...............
.................................................................................................................................................................... ■■
.........
Customizing Your Cover Page Comment
You can customize the comment on your Cover Page as follows;
...:
KEYS TO BE PRESSED
1. Press FUNCTION.
2. Press 7.
3. Press 6.
4. Press (left arrow) or (right
arrow) to select 5 or 6 where you
wish to store a comment.
Example; 5.
5. Press SET.
6. Enter your customized comment
by using the number keys (up to 27
characters).
(See page 3-7-8 for more details.)
Example: TOP SECRET
7. Press SET.
8. Press STOP to exit.
STATUS OF LCD DISPLAY
I5:g¥l
t_l-TEMP.SËTTI
(l 7 .SETUP SOJra ^
fl 6 .:sga COVERPAGE
5.
c
f:SE:EECn. ». -> : g-‘SErh
( 5 ■
[ 5.TOP SECRET
i: COVERPAGE )
D
D
3
3
Printing the Cover Page
You can print out a Cover Page to check the format.
KEYS TO BE PRES
1. Press FUNCTION.
2. Press 3.
3. Press 3.
4. Press START.
6-17
as.
STATUS OF LCD DISPLAY
i 09/1?/ 1994 lb • 2l7]
. TEMP. SETrrNËSyr)
( 3 . r ftIMr keRQj^Ts~n
(/ 3 .eef E R p y^GE ' -
f PRESS START KEY 1
f PRINTING
3
Page 51

■ -t. i.: iii-. :
nMIM
FAX TRANSMISSION OPTIONS S[
Setting Cover Page ONfOFF
If you often send an automatic Cover Page, you can set it to ON to avoid having to set up the details
of the Cover Page each time. Here is how you can switch the setting for the automatic Cover Page
to ON or OFF;
KEYS TO BE PRESSED
1. Press FUNCTION.
2. Press 5.
3. Press 3.
4. Press (left arrow) or (right
arrow) to choose ON or OFF.
Example: ON.
5. Press SET.
6. If you selected ON, you need to
select a comment, by pressing
(left arrow) or (right arrow).
(See page 6-15-16.)
Example: 2. PLEASE CALL.
7. Press SET.
STATUS OF LCD DISPLAY
C 09/12/1994 15:2S']
C l.TEMP.SETTI
: !>.USfR OPTIONS
; 3.C0VERPG gN;0l#r)
t
...
CO Yi Wi ficiiKe...................
c
[ ; e g B ii j v
C 0yElEA6 E-mN,2
( RCjmENTlJPff y~E)
C
[ SKI FCT & sfT~]
: ?.PI EASE CAt I : )
( l.GOVimPG ON/QFF )
.
s e fi
1
1
7
:)
8. Press STOP to exit.
r
Sending an Automatic Cover Page
If you have the Cover Page ON/OFF setting to ON, the total number of pages will not
be printed on the Cover Page. Also, the comment you selected when you set it to ON
will be printed on all the Cover Pages you send.
Helpful Hints • Even if the Cover Page ON/OFF setting is ON, you can avoid sending an
automatic Cover Page by pressing COVERPAGE once to turn off the Cover
Page for that transmission.
• If you want the total number of pages sent to be printed on the coverpage,press
COVERPAGE once to set the COVERPAGE ON/OFF option to OFF. Then
press COVERPAGE once again and enter the number of pages. (See page 615-16.)
FOR YOUR INFORMATION
•
6-18
Page 52

DtINJUIIMÎc? hAXhS TRANSMISSION OPTIONS
Sending a Fax When the Cover Page Is ON
KEYS TO BE PRESSED
1. Insert the documents into the
feeder. The display will say
"COVERPAGE ON” for one sec
ond.
2. Enter the fax number.
3. Press START.
Your machine will begin transmit
ting the Cover Page and original
document.
I
STATUS OF LCD DISPLAY
[ CO'V'ÉRPÂGE ON
Cb
OFFICE
f;$Ëw'BfÇ0Y;rfrWi6E\^
[ SENDING
!)
:)
1
Н1ТЭ
Sending a Fax with Call Reservation
You can send a fax and then talk to the recipient using the Call Reservation feature. After your
fax has been printed on the receiving end, the receiving fax macliine will ring as if it were receiving
a telephone call. If the recipient picks up the handset, your fax machine will ring. Then you can
pick up your handset and start a conversation. If you have both Call Reservation and Call Back
Message set to ON and the recipient does not pick up the handset when it rings, your fax machine
will leave a fax message asking them to call you back.
KEYS TO BE PRESSED
STATUS OF LCD DISP
1, Insert the documents into the
feeder.
2. Press FUNCTION.
3. Press 1,
4, Press 3.
5. Press (left arrow) or (right
arrow) to select Call Reservation
ON or OFF.
Example: ON.
6. Press SET,
7. Press (left arrow) or (right
arrow) to select Call Back Message
ON or OFF.
Example: ON.
f * 0Щ[£/ I994e 15 : 25J
r г FAX: NO. & START ,
СйШ PRESS COPY ) ^
f IfcTrMP-sevniNGS : i
f 1ЛЕМР.SETTINGS )
f, a. САЁЁ ЖЕ5ЕВУё::Г\ i
(ГСА ЕС*Ш»БКУ Е :'РРШ
С
pCAEb -BAC KiSÉF ,
с
{.sE4scr:> v^. j.
r~CALL BACK:ON
:)
D
6-19
Page 53

..
...
'................
iligMlllliiliii
.
miNiillliNiimggliii::
■■■■■
SEND:
8. Press SET.
9. Press STOP.
10. Enter the fax number.
11. Press START,
12. Pick up your handset if it rings.
09/12/1994 15:25
=== CALL BACK
TO:
FROM:
PLEASE
NJ OFFICE
FAX: 14155551212
BROTHER
CALL AT [TEL]
[FAX]
™ FOR YOUR INFORMATION
Using the Call Reservation Function
l-ra:::.atBi,REl
..
.............................
c
i NJ OFFI
i DIALING
MESSAGE ===
4155554445
4155554444
3
acig
3
1. There are some fax machines that will not respond to this function.
2. When you use auto re-dialing, you cannot use the Call Reservation function, but
if Call Back Message is ON, your fax machine will leave a Call Back Message to
ask the other party call you back.
3. You cannot use Call Reservation with the timer or with the polling function.
4. You must register Station ID number to set Call Back Message: ON. (See
page 4-3.)
Printing the Call Back Message
You can print a Call Back Message to check the format.
KEYS TO BE PRESSED
1. Press FUNCTION.
2. Press 3.
3. Press 4.
4. Press START.
STATUS OF LCD DISPLAY
F %9/::rj;/r9.&....................t'Sj.'.ZS ]
..
.......
..
§S3::;::::E.RI WEIlE P O..R'l:SYa)
(.... :fcL
[ P
flJiRINTliifi ...............
..............
....
............ T A'Rg-::.J<:’E Y a... )
'.;M S
..
6-20
Page 54

OLIMUII\ic7
IMIll
iii=iiiS:Nfl;siiu:ft;r ...
Next‘FAX Reservation
You can use Next-FAX Reservation for sending a fax when the fax machine is busy receiving or
memory transmitting. This function saves you from having to wait until the incoming fax has
finished coming through or the fax stored in the memory has finished transmission. All you have
to do is insert the documents as you normally would and follow a few other simple steps.
EJfciu
...
MilMlIM
KEYS TO BE PRESSED
STATUS OF LCD DISPLAY
f RCCLIVING P.Ol )
1. Insert tlic documents into tlie
f, ENrEKKNo-yiSIIARr )
feeder.
2. Enter a fax number.
3. Press START.
4. Press SET.
- If a One-Touch or SPEED DIAL number is selected that is not stored, a warning beep will
sound.
1
1415555l;?.34~
f PRESS SET
f M fet gg
[dialing
FOR Y0yR INFORMATION
1. Next-FAX Reservation cannot be used when there are documents in the document
feeder awaiting timer transmission or polled waiting or when the interrupt
function is in use.
2. When you are making a call using Next-FAX Reservation, you can dial manually,
or use One Touch, Speed-Dial, Redial, or Chain dialing. However, when you rise
One-Touch dialing, the screen will display the number of the One-Touch number
you are using, such as “*01” and not the name of the person you are calling.
Similarly, if you use Speed- dialing, the screen will show you only the Speed-Dial
number, such as “#02”.
D
3. You can set the resolution for Next-FAX Reservation by using RESOLUTION,
but you cannot change any aettings using the
cannot change a setting for multiple resolution transmission by using function
mode.)
4. To cancel a Next-FAX Reservation, remove the documents and press STOP.
FUNCTION
key. (For example you
6-21
Page 55

ECM (Error Correction Mode) Feature (Only for FAX-720M)
The Error Correction Mode (ECM) is a means for checking the integrity of a fax transmission
while it is in progress. ECM transmissions are only possible between machines that both have the
ECM feature. Your machine has this ECM feature so if other party also has ECM, you can send
and receive a fax message that is continually checked for its integrity.
Sufficient memory must be available for this feature to work.
___________
Error Re-Transmission (Only for FAX-720M) __________________
Error-Re Transmission is helpful when the receiving machine does not have ECM. Even though
your machine cannot check the integrity of the message, it will send the page(s) again after
occurrances of accidental noise have caused an error.
( 09/1?/1994 15:25 i
1. Press FUNCTION.
2. Press 5.
3. Press 5.
4. Press (left arrow) or (right arrow) to choose either ON or OFF.
Example; ON
5. Press SET.
6. Press STOP to exit.
- This feature is only available for memory transmission using Quick-Scan (see page
6-6, 6-8-10).
... )
S E:R..01,V1
(5.ERROR RE-TX
; ERROR Rr-TX:0FF
SELECT <- -> & SET 1-^
i ERROR RE:-TX:0N 1
[ 5 . ERRbI'
1
6-22
Page 56

I \i_ l_l V n
Nv:? I AAAco MiNL>' uiMtk UALLi) mivaKTUPTomcF-ivEFAXKS
7. RECEIVING FAXES AND OTHER CALLS
A) BASIC SETUP TO RECEIVE FAXES
Selecting an Answer Mode
There are 4 answer inodes for your fax machine. You can choose one by pressing MODE
repeatedly until you find the mode you want. Choose one that suits your needs. If you need more
information about a particular mode, refer to the page number given,
( O means light off.
s' A
means light on.)
Answer Mode
1. MANUAL O AUTO
(— TAD
O FA
For
You must answer each call manually. 7-2
Use this mode mainly for the telephone use.
If you want to answer each incoming call, choose MANUAL mode.
2. AUTO
If you use your telephone line exclusively for sending and receiving faxes, you may want to use
• AUTO
1— TAD
O F/r
Dedicated fax use. Telephone line and fax
line are separate.
AUTO mode. In this mode, you can receive all your incoming faxes automatically.
3. F/T
O AUTO
\- TAD
IP F/T
Both fax and telephone use. When you
share one line for your telephone and
fax machine.
If you want to use your telephone line for both fax and telephone, you may want to choose
F/T mode. In F/T mode, your fax machine will answer incoming faxes automatically.
4 TAD
\\
• AUTO
1-- TAD
• F/T
For use with an external TAD (Telephone 7-8
Answering Device). When you are not at
home.
See Page
7-2
7-3
- When you want to use your fax machine together with your telephone answering machine,
choose TAD mode.
- The TAD must be a physical device that is connected to the “EXT'jack on the back of the fax
machine. (See page 7-8.)
- TAD mode will not work with an outside telephone answering service.
7-1
Page 57

■■■■ffliiii>aeiiii!^
CALLS
Manual Reception (MANUAL mode)
When you set the Answer Mode to manual, you must answer each incoming call yourself. Here
is what you should do when using MANUAL mode:
If You Get a...
1. Regular phone call
2. Phone call and request
to send a fax
3. Fax tone...
Then You Should...
Talk as you normally would.
Press START when finished talking, and replace the handset.
Note: Sender must also press START.
Press START, and replace the handset.
__________________
Automatic Fax Reception (AUTO mode)
You can automatically receive all your faxes in Automatic Fax Reception mode (AUTO mode).
Select this mode by pressing MODE.
Setting the Ring Delay
You can set up the number of rings before the fax machine will receive automatically in AUTO
and F/T mode.
i---
1. Press FUNCTION
2. Press 6.
R. Press 2.
4. Press (left arrow) or (right
arrow) repeatedly until you find
the number of rings you want.
Example: 00.
When you set 00, you can receive your
incoming faxes without a ring delay.
5. Press SET.
6. Press STOP to exit.
STATUS OF LCD DISPL
Lg|/r2/1994 15:25 ;
f1.TFMP.SFTTTNRS 1
i 6.TEL OPTION
i,::2 . RTNIGgiEl AY - ]
f RING- DELAY :02
c
i’~SEttCT » ^ & SET 1
.
ft (il a D ELAY
r 2.RING DELAY
3
:)
7-2
Page 58

..._wi_ivitNv^ t /^/\[io MiNJU I CJALLS
The FIT Switch (FIT Mode)
When you share one line for your telephone and fax machine, in the F/T switch mode, the fax
machine can determine whether an incoming call is a fax or a telephone call. (See Chart below.)
■■■I
The caller may hang up.
Setting the FIT Ring Time
You can specify the maximum time you want the fax machine to ring when set to telephone. There
are four predefined settings; 10, 20, 30 or 60 seconds.
KEYS TO BE PRESSED
1. Press FUNCTION.
7-3
STATUS OF LCD DISPLAY
1-5 : 2M
( I _TEMP.§ETtINGS^
Page 59

BAsic;:Sfil№^^^^gìms’S..OTHE CALLS
UH
2. Press 6.
3. Press 5.
4. Press (left arrow) or (right
arrow) repeatedly until you find
the setting you want.
Example: 10 SEC.
5. Press SET.
6. Press STOP to exit.
f_6^TEL “opti
.
......
Tg'4p~-..TTM't: "T)
^ [ gRCN G% ¿0 :rSt gg ^
c ( SELECT <- ^ & SET )
I' RING roteiio Slel)
( 5.PÆ afN& TIHEH
1
Smoothing
The smoothing feature enhances the appearance of incoming faxes by making the lines smooth
and takes no additional time. This function does not apply to outgoing faxes, or to lists or reports
you print. The initial setting is ON.
EYS TO BE PRESSED ATUS OF LCD DISPLAY
1. Press FUNCTION.
2. Press 5,
3. Press 1.
4. Press (left arrow) or (right
arrow) to choose ON or OFF.
Example: OFF.
5. Press SET,
6. Press STOP to exit.
; 09/12/19
( l.TEMP.S ett:
( 5.USER 0 PTK
i 1.SMOOTH
SMOOTHIN
SÉLECT <- 1
( SMOOTHING:0I
11.SMOOTH
94 :Li...
ING
G:01
I NG
25 1
[ NGS )
IN'S
....
'""5
. j
V«.- )
i sn ;
FR :]
F
.
Speaker Volume
There are three settings available for the speaker volume, OFF, LOW or HIGH. This setting
controls the loudness of the fax machine’s speaker, which is connected to the phone line. The
initial setting is LOW.
3
7-4
Page 60

............
- ■ ' nCK OMLLO MSJC SETUP TO RECEIVE FAXES
KEYS TO BE PRESSE
STATUS
(i ;0 9 / m/i Ша 1Ь:2;Ь i
1. Press FUNCTION.
2. Press 6.
3. Press 4.
1
1; ТЕМP.SC1TINGS ;
i 6.TEI OPTIONS )
^ 4.SPEAKER VOLUME ^
^ { SPEAKER: LOM ’ ~T71 ^
^ i SEI^tGr
4. Press Cleft arrow) nr (right
arrow) to choose a setting either
OFF, LOW or HIGH.
Example: HIGH.
5. Press SET.
6. Press STOP to exit.
f SPEAKE'R: HIGH
f 4 уЗД;Е A К E Ymi)
Ring Volume
You can set the ring volume to either OFF, LOW or HIGH. The initial setting is HIGH.
Э
KEYS TO BE PRESSED
STATUS OF LCD DISPLAY
f 09/i?/1994 15:25
1. Press FUNCTION.
2. Press 6.
3. Press 6.
tri . ТГЙГГ5ЕЛ^Г№55Т1
Г e.tCL OPTipüS
i бГкМй voLUMegi. )
t: SEÌ.à V;>‘ ^ :&r'S-ET ; )
4. Press (left arrow) or (right
arrow) to choose either OFF, LOW
or HIGH.
Example: LOW.
5. Press SET.
6. Press STOP to exit.
Helpful Hints Even the ring volume is set OFF, during F/T ringing and Call Reservation, it
will ring with LOW volume.
fi. RING
.
VOLЦMO LOW 1
[ 6.RING VOLUME
3
7-5
Page 61
BASIC
TO RECEIVE FAXES
.......
^■■|pRyP№
Rficepliun into Memory
If the paper roll becomes empty, the LCD will display the message “PAPER ROLL
EMPTY”. Simply load a new roll of paper. (See page 1-2.)
Your fax machine will automatically store any incoming faxes in its memory if it runs
out of paper. The contents of the memory will be printed when you replace the paper
roll. The memory will not bo lost as long as you do not turn off the machine or
disconnect the power.
UiHbk CALLS
B) REMOTE ACTIVATION
What is Remote Activation
If you are using a touch tone phone, you can remotely activate or deactivate your fax machine from
an external phone (a phone connected to your fax machine) or from an extension phone (a phone
connected to the same line as your fax machine).
FOR YOUR INFORMATION
Connecting an External or Extension Telephone to the Unit
You may connect an external or extension telephone to your fax machine, as shown
below. Use the “EXT.” jack on your fax machine.
Alternatively, you may wish to use this “EXT.” jack to connect a telephone answering
device (TAD).
If the external telephone is in use, the warning message “EXT. TEL IN USE” will be
displayed. When the handset on the fax machine is picked up, an alarm will sound.
You can disconnect the external phone and switch to the fax machine by pressing
HOOK.
9
7-6
Page 62

rnmmmmmmimBMsmmimSSBmsass
V f[ NVC7 r/AAtC) AINU U I HbR CALLS «JiAiOTTi ACTIVATION
- ' ■, ii,. Hl. i. J :■ :i|. |i: :2' S- :?■ :S J J . f f: ihi .¿T I. I; , 4, ■ ^ , ' '^ V'' ' j' ' '44 4 4 ' if' ' .
Using Remote Codes
If you are on an external phone (or extension phone), and you receive an incoming fax call, you
can transfer the call back to your fax machine by entering a remote activation code. In the same
situation, if you receive a telephone call from someone who requests that you switch on your fax,
you can transfer the call back to your fax machine with this code. Also, you can deactivate the fax
machine with another remote code during the F/T ringing from an extension phone. In essence
you have one remote code to activate your fax machine and one remote code to deactivate it. The
remote code to activate is and the remote code to deactivate is “#51”, If you want
to set your own code, see the following section, “Registering Remote Codes”.
You should check other equipment that will be on the same telephone line to insure that there
is no conflict with our codes. (Our codes can be changed, see below.)
■IPillilill
rJTroiYOtW; y i
Limitation of Using External (or Extension) Phones
1. If you accidentallj'’ pick up an extension phone when a fax is coming in, you may
disrupt the transmission or render some portions unreadable. Error codes may be
encountered.
2. The remote activation and deactivation code may not work with some telephone
systems or telephone sets.
Registering Remote Codes
KEYS TO BE PRESSED
1. Press FUNCTION.
2. Press 7.
3. Press 5.
4. Press (left arrow) or (right arrow) to choose ON or OFF.
Example: ON.
STATUS OF LCD DISP
( 1 .TEMP."sett I
p4r Aeyy P: sisre
( 4.S ..R WOtfePPD'E-:,- YY)
h Tg4j:Ac T‘>„ 4Q N ; -j
C
i. S E L gcy4y> 'yft.S tf~l
f 4RËMQrE,4ACT.*:BN Y)
9
:)
5. Press SET.
6. Enter new remote code to activate.
(Factory setting is Then
wait for 2 seconds.
7. Enter new remote code to deacti
vate. (Factory setting is '‘#51”.)
8. Wait for 2 seconds.
9. Press STOP to exit.
7-7
rYCT4C0BEr*5144 "4^
(.B.,E. A C14 GOPC : 15' 1YY)
(ys;ÆËMCftif :CgDE.f 4~~)
Page 63

IVXNECTION rOA TEf£PHONEAXSMRL\'G DtTICE W, RECEIVING
C) CONNECTION TO A TELEPHONE ANSWERING DEVICE
(TAD)
The TAD Mode______________________________________________________________
When you leave your fax machine set in TAD mode, phone calls will be forwarded to the externally
connected telephone answering device, and your fax calls will be received automatically.
*M*il
ilB*
h:h:h:i:: .:M;aiNliiiil
.
........
.
Helpful Hints When You Use TAD Mode
1. You can inform callers beforehand that if they call manually and get your
telophoue answering device when they want to send a fax, all they have to do
is press your remote code (*51 unless you have changed it) to activate your fax
machine from a touch tone phone.
‘Z. Another alternative is to record a TAD message that says, for example, "This
answering machine is connected to a fax unit. If you wish to leave a voice
message, please speak after the beep. If you wish to send a fax message, please
press (your remote activation code) after the beep. Thank you.”
3. You need to erase the incoming messages on your external telephone answering
device when it’s full, or TAD mode will not answer any calls, faxes or otherwise.
7-S
Page 64

KtUhlVINlri hAXh5 AND to a tele^$one answering device rim
iBiiliiiiiiiM
M
FOR YOUR INFORMATION
Sequence of TAD Mode Reception
Fax reception is
automatically
activated by
fax tone.
The fax message
is received on
paper.
Auto dial
fax call
Incoming Call
The call is picked up
by the external TAD.
(Recommended short
TAD ring delay such
as 1 or 2 rings.)
The external TAD
outgoing message
begins (recommended
length of less than
20 seconds).
Voice call
The caller leaves a
voice message on the
external TAD.
The caller must
Manual
fax call
The caller
can also
send a fax message.
press your remote
activation code
to activate the
fax machine.
The fax message is
received on paper.
Telephone Answering Device
1. Set the telephone answering device so that it is ready to record incoming telephone
calls.
2. Set the number of rings to one or two on your telephone answering device.
3. Try to record the shortest possible message on your telephone answering device
(up to 20 seconds).
Please note that some faxes that are sent manually cannot be received auloiiiatically
because some fax machines do not send a fax tone in manual mode.
So you must indicate a remote activation code for the caller to enter. (See page 7-7.)
7-9
J
Page 65

DISTINC
D) DISTINCTIVE BINGING
Distinctive Ringing
What Is Distinctive Ringing?
Distinctive ringing is a service offered by telephone carriers that allows you to have
several different numbers on one line, each with its own distinctive ring. This way,
when you get an incoming call, you can identify what number is being called by the
ring pattern. Your local telephone carrier can provide you with more information
about this service. This service is usually offered as a monthly charge to your normal
phone bill.
Can My Fax Machine Utilize Distinctive Ringing?
Yes, it has a distinctive ringing function that allows you to register one additional
distinctive ring pattern. (See page 7-ii.) The ring pattern you register should be for
the number you want to use as your dedicated fax number. Once you register the
pattern, your fax machine will be able to identify its own incoming calls and
automatically start to receivo faxes, regardless of how you last set the answer mode.
You can only register one additional ring pattern.
llBlilil
¡■i
—
Can I Change the Setting Later?
Yes, you can change or cancel the distinctive ringing setting anytime.
How Will the Fax Machine Treat All Other Distinctive Ringing?
It will act the way it normally does. In other words, the fax machine will treat all the
other unregistered, distinctive rings according to the machine’s answer mode setting
(MANUAL, AUTO, F/T, or TAD). For instance, if a call comes in that is not for your
(registered) dedicated fax number, and the machine is set to MANUAL, the fax
machine will respond as per the MANUAL mode.
How Does the Distinctive Ringing Function Work?
When you receive an incoming call, the fax machine compares the ring pattern with
the one that is registered. If the two are identical, then the fax machine automatically
accepts the call as an incoming fax. Otherwise, the fax machine will treat the call in
the usual way, depending on the machine’s answer mode setting (MANUAL, AUTO,
F/T, or TAD). The function has 3 modes; (ON, SET, OFF). Set it to ON when you want
to use it, and to OFF when you do not want to use it. Use the SET mode for registering
a number.
WhaFs the Advantage of Using the Distinctive Ringing Function?
By registering a ring pattern (see page 7-11) you may operate your fax machine in
the most efficient way possible should you require the distinctive ringing service.
With the distinctive function ON, you can receive your faxes automatically, and
people who call you on one of your other numbers do not have to talk to your fax
machine. It basically gives you two independent numbers by using only one line.
y
7-10
Page 66

i\L_'wE:iVllNJic7 rA A tbAINU UIHER CALLS DlSriNCTIVE RINGING
H©lpful Hints If You Do Not Have a Distinctive Ringing Service...
Your phone carrier can give you more information about it. If you are not
currently receiving a distinctive ringing service, don’t try to set up
your distinctiveringfeature.lt may cause your machine to malfunction.
If your phone carrier provides this service and you decide to use it, it’s a good
idea to use one of the new numbers you receive for your fax number and keep
the old number for it’s original purpose. Remember to tell your customers and
colleagues your new fax number.
If You Already Have a Distinctive Ringing Service...
It is a good idea to register the ring pattern of your existing dedicated fax
number. Use the registration mode under the distinctive ringing function. You
will not be able to use the fax machine's distinctive ringing feature until this
pattern has been registered. (See this page.)
Setting the Distinctive Ringing Function
If you currently haven distinctive ringing service (a telephone service that provides you with
multiple numbers, each with a distinctive ring, on one line), you can register any one of the ring
patterns of your line with your fax machine so that it can immediately identify a call as an
incoming fax by the distinctive ring pattern it uses. You also will need to arrange to have someone
call your fax machine to do this.
You may have difficulty registering a distinctive ring pattern if your fax machine is
connected to a telephone answering device. Disconnect it before you set this function.
1. Press FUNCTION.
2. Press 6.
3. Press 7.
4. Press (left arrow) or (right
arrow) to find the SET mode.
5. Press SET.
6. Press STOP.
IMPORTANT;
- “D/R SET MODE’’ stays on screen
until set.
- Answer mode LED is flashing.
You now must wait for someone to
call the corresponding fax number
with distinctive pattern or ask a
friend to call your specific distinc
tive ring fax number.
STATUS OF LCD DISPLAY
f
f: £: tEMPfstTTj
r 6 Ue k. OPtlONS
( gISTINfiXJVlfOFftU)
c
r .gEUECT % fETkl
(^DISXi NCTIVE; SEUQ
f 7.DI$riNCTIVI:
f n/R .SET MODE )
.. 1,5 : gF)
D
:)
7-11
Page 67

7. Once someone calls. listen care
fully and see if the ring pattern is
the one coirespoiidiiia to the
number you want to register. If it is
and the LCD shows the message
“PICK UP TO SET”, after two or
more rings lift up the handset on
the fax machine.
[■ yrr~FiP\,:%o*..s£r,:;
[ START TO SET
c
^.ST@CEO ,:cgMg:Et
8. Press START to set (or STOP to
[ REGIS rhRhU
cancel),
9. Press START again to receive the
incoming fax, or if the call is a voice
call, talk into the handset.
i;:--;,:....C.ppR-^QURj:NFD8WM^^
While You Are Setting the Distinctive Ringing Function:
1. When someone calls your fax machine, it will continue to ring until you pick up the
handset or press HOOK, even if you have set the number of rings.
2. If you get a call and the ring pattern is NOT the one you want to register, press
STOP. (See step 8 above:)
3. There are some ring patterns that cannot be registered.
4. Answer mode is automatically switched to MANUAL during registration. The
answer mode that you had set before distinctive ringing registration now flashes.
NOTE: Some Telephone Answering Devices may pick up a call before your fax
machine finishes detecting the ringing pattern. We suggest you set your
Answering Device ring delay to its maximum setting.
Once You Have Finished Setting the Distinctive Ringing Function:
1. The Distinctive Ringing function will be set to ON, and you will be ready to use
this function.
2. You will not hear the first two rings of all incoming calls on the fax machine.
However, other extension phones connected to the same line, or any external
phones connected to the fax machine will ring. If the fax machine recognizes the
ring pattern, it will automatically accept the call as an incoming fax, and you will
not hear any further ringing. Otherwise, you will hear the phones continue to ring,
and the fax machine will also ring.
3. You can receive faxes on numbers other than the one you registered. The fax
machine will respond to these calls according to how you have set the answer mode
(MANUAL, AUTO, F/T, or TAD).
H©lpful Hints Remember that you should let your phone ring at least twice before answering
to allow the fax machine to pick up first if necessary. Answering an incoming
call before two rings will defeat the purpose of the distinctive ringing function.
You should turn the distinctive ringing function to OFF if you move and/or get
a new number. To turn off the distinctive ringing set-up go into function mode.
(See page 7-13.)
7-12
Page 68

rAAtb A|>4y FfNGfNG
How to Turn the Distinctive Ringing Function ON or OFF
The distinctive ringing function is designed to accommodate the distinctive ringing service (a
telephone service that provides you with multiple numbers, each with a distinctive ring, on one
line). Please note that you need to register the ring pattern of your fax number before you can set
the distinctive ringing mode ON. (See page 7-11.)
____________________
STATUS OF LCD DISPLAY
2/
D
Z)
BfSt rNCTtfE; tZl
1. Press FUNCTION.
2. Press 6.
,S. Press 7.
4. Press (left arrow) or (right arrow) to find the mode (OFF, SET, ON) you want.
Example; ON.
5. Press SET.
6. Press STOP to exit.
f
f 6.TEL OPTI
( 7.DI SI INCTIVC y r^T
^ ^ D'l-yrtf mfygfOrFZ) ^
^ tl: grijEiCT 'V & SET ) ^
i DBSTINeTti/i:j3W )
7-23
JC^yOUR
If you wish to use an external Telephone Answering Device (TAD) and the
distinctive ringing feature with your fax machine:
1. You niEist use the di.stiuctive ringing pattern for your fax number, otherwise
both the TAD and fax may conflict in picking up the call.
2. Select the TAD mode on your fax machine (see page 7-1).
3. Connect the external TAD into EXT. jack of your fax machine (see page 7-8). Do
not parallel connect the external TAD into other wall jack.
4. You must set the external TAD to its maximum ring delay setting (minimum 4
rings).
5. You can not use the Toll Saver feature of the external TAD when using the
distinctive ringing feature.
If you do not use an external Telephone Answering Device (TAD) with your fax
machine:
Select the MANUAL mode on your fax machine (see page 7-1).
.
Page 69

.
1.
.........................
^ ‘ ^' • • ' '
■ili::ai:
HOW TO USE COPY FUNCTIONS
8. HOW TO USE COPY FUNCTIONS
Making a Single Copy
These are the steps for making one copy each of your original documents:
STATUS OF LCD DISPLAY
\ J9YK/faa# 15:^5
1. Place the documents face down into the fax machine.
2. Press COPY.
3. Press COPY, again. Or after 5 sec
onds, the copying will start.
- As for FAX-710M, the LCD shows ‘"COPYING” after pressing COPY in Step 2.
Helpful Hints 1, When you want to make a copy, make sure the text or image on the original
document is not too close to the edge. Your fax machine cannot read anything
closer than 4 mm (1/8 inch) from the edge.
2. You can select the resolution to either SUPERFINE or PHOTO. Set the
resolution to either one. If you do not set the resolution, the fax machine
automatically makes a copy at SUPERFINE resolution. For example, if
your original is a photo, you may select PHOTO resolution. (To get PHOTO
resolution, press RESOLUTION repeatedly until both lights are lit.) You
can also set the resolution page by page using the 1. TEMP. SETTINGS
function. (See page 6-14.)
( "iAX : 'It.. STAfftl
C
.
r’RMSj’JgM...................4
f NO.Oh COPTEStOl ;
c
( FNTfR &. COPY KEY )
i COPYING
t ..................................
(. .........................................
i
t)
3
:)
3. Do not pull on the paper while copying is in progress. This may distort the
copied image.
8-i
Page 70
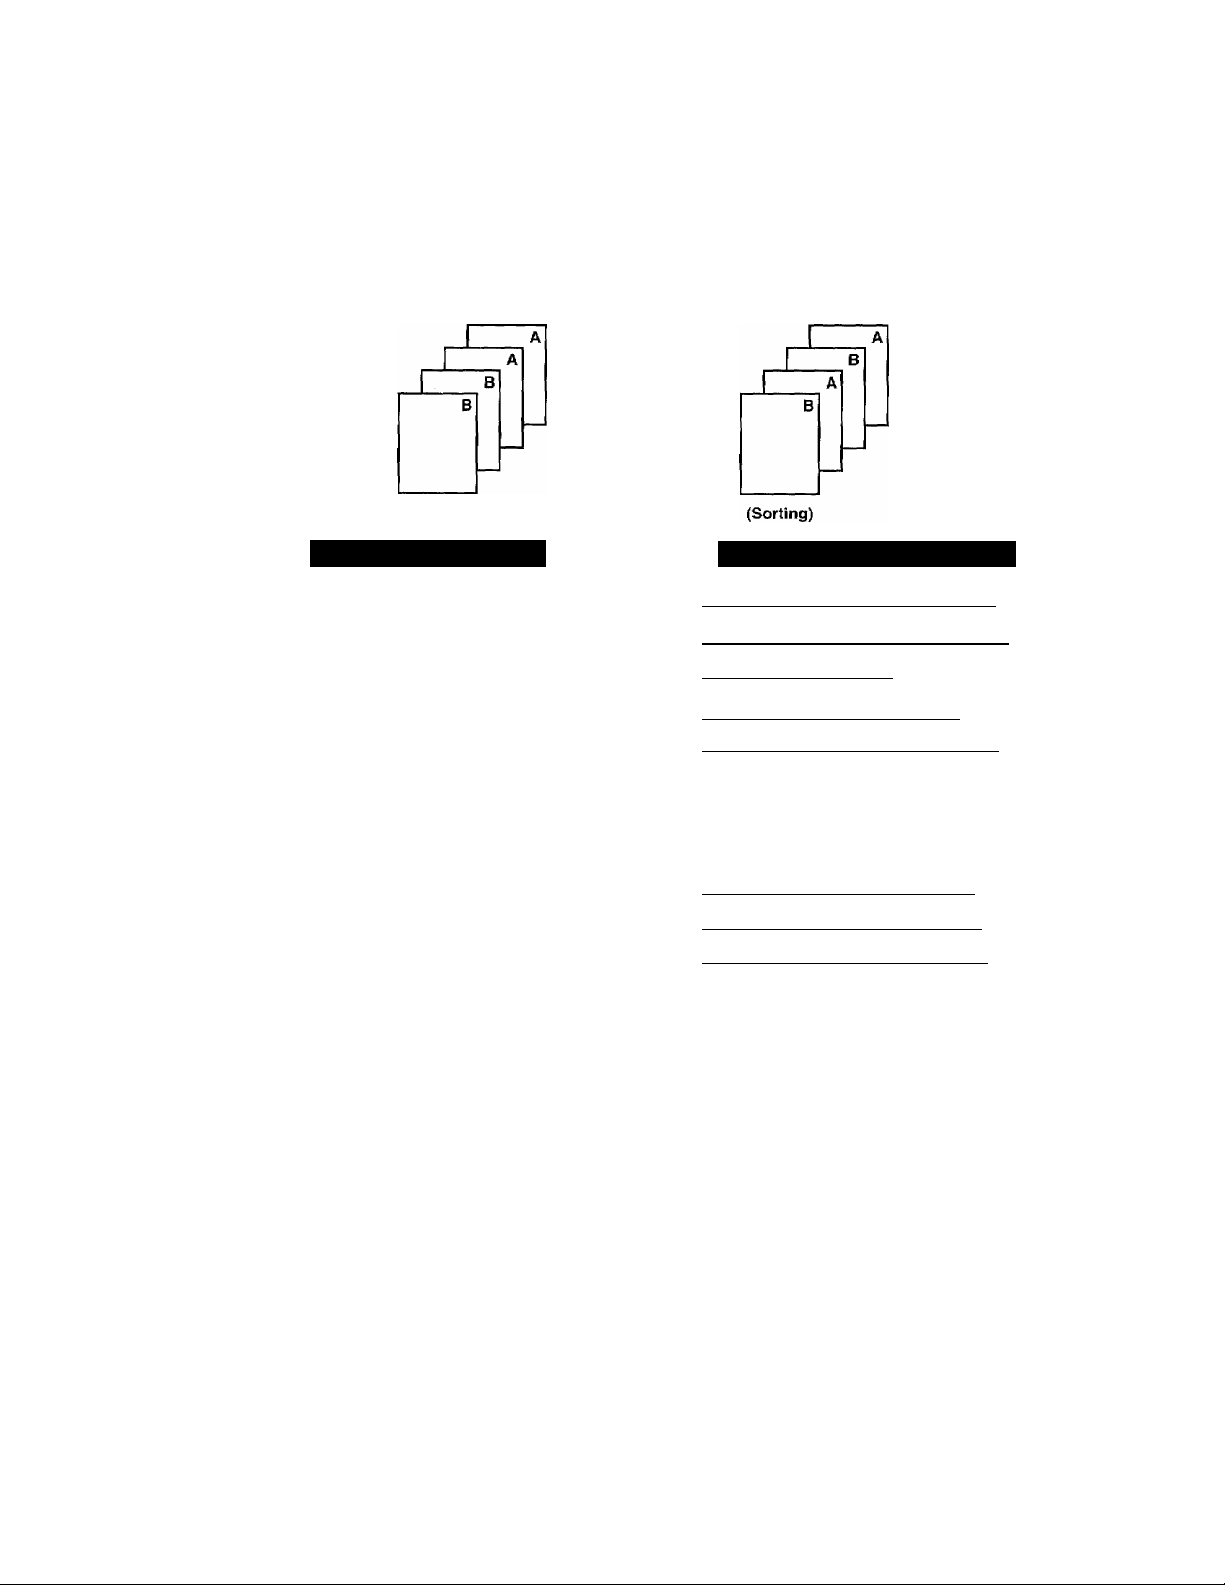
■¡¡■I
Making Multiple Copies (Only for FAX-720M)
There are two ways to make multiple copies on your fax machine. The first is the stacking method,
this will make n copies of page one, n copies of page two and so on, These will all be stacked on
top of each other. The second method is the sorting or collating method. This is when the fax
machine scans the entire document and then makes 1 copy of page 1,2,3, 4 in order. Then makes
a second copy of 1, 2, 3, 4 until a total of n copies has been made.
(Stacking)
KEYS TO BE PRESSE
1. Place the documents face down into
the feeder,
2. Press COPY.
3. Enter two digits for the number of
copies you want using the number
keys (Max. 99 copies).
Example: 05.
4. Press COPY or just wait 5 seconds.
5. Press (left arrow) or (right
arrow) to select the stacking or
sorting method.
Example: STACK.
6. Press COPY to begin copying.
NOTE: 1. When making Multiple Copies, do not let the receiving tray over stacked. Remove
copied paper from receiving tray frequently.
2. When making Multiple Copies, make sure there is enough recording paper in the
machine.
STATUS OF LCD DISPLAY
r 09 /1211^94?15 : 2 5)
t J&i START)
C
[ iCP W: £ MesS:- oopO
t N 0^. O F cop ns
C
( KNTCR S C0PY KEY Ì
f N0.0F COP I rS tfìsT~)
f Nlffcrl COPY: STACK )
c
k select;: %-» & GfirYT
t MULTI COPY:SIACK I
I COPY STACK P.Ol ;
3
:)
3
' £
...
, " £ Z;;: RpR YQUR INFDRMATiDh ' : ;
What To Do When You Get a “MEMORYFULL”Message while Making Copies
If you are using the stacking method, press STOP. If you are using the sorting
method, press COPY to copy the portion that is in the memory, or press STOP to
cancel. (Only for FAX-720M)
8^2
Page 71

Äliliil
9. POLUNG
■■■II
3i:
iPBii
iliilli
--------
-
FOR YOUR INFORMATION
What Is Polling?
Polling is the process of retrieving faxes from another fax machine. You may use
your machine to “poll” other machines, or you may ask someone to poll your machine.
The party who polls pays for the cost of the call.
How Does It Work?
First, two parties set up their fax machines so that they can accommodate polling.
Then one party leaves documents in the fax machine so that the other party can call
up and have the documents sent to them.
Polled side
When to Use Polling?
Use polling to control the cost of sending a fax.
1. If you want to pay for the cost of the call: Send out faxes to other parties as you
normally would, and if another party has documents to send you, ask if you can
poll for them.
2. If you want others to pay for the cost of the call: Ask them to poll your fax machine
for documents they want, and have them fax any documents that you want.
There are some fax machines that will not respond to this function.
Helpful Hints Using Polling Effectively (Examples)
Problem No. 1: You want another party to send you a long fax, but they do not
want to pay for the call.
Solution: Ask them to leave the document in their fax machine so you can
poll for it.
Problem No. 2:
Solution; Head office can poll the sales representatives’ fax machines.
Problem No. 3: Because of the time or location, it is cheaper for someone else to
Solution: Ask the other party to poll for the documents and offer to pay for
Sales representatives have difficulty sending in faxes to the
head office’s fax machine because it is busy so much of the time.
call you than it is for you to make the call.
the call at their lower rate.
9-1
Page 72

mmiBmmmmmmammmm
I—N8:iai
Polling Another Fax Machine
Once you have set up polling, as described below, and the other party has set their fax machine
to “POLLED WAITING”, you can automatically receive their documents.
illiiii
KEYS TO BE PRESSE
Make sure no documents are in the
feeder,
1. Press FUNCTION.
2. Press 1.
3. Press 2.
4. Wait for two seconds,
5. Press SET.
6. Press STOP.
7. Enter the fax number.
6. Press START.
Setting up Polled Waiting
STATUS OF LCD DISPLAY
i 09/IC/J994 15:?5 Ì
C_2 . poll!
^ , POI LING:STANDARD ) ^
^ (■^^Sg:Lecт ■: ti •■S.ET-' 1 ^
L2.POLLING
f ENTER FAX NO
C
PRISS START KFY I
f NJ OFFICE
[ DIALING
( CË ivySG ' a rgyj
D
7
Polled W aiting is when you place a document in your fax machine and set your machine to allow
another fax machine to retrieve that document. Your fax machine will print a Polled Report
after the transmission.
KEYS TO BE PRESSED
STAT
thS^yLl2/TV»^ 15:25 )
1. Insert the documents into the
feeder.
2. Press FUNCTION.
3. Press 1.
4. Press 2.
5. Wait for two seconds.
6. Press SET.
f^=rMi:.?N:DL"¥'#TARQ^
c
( 1.TFMP.SETTINGS ^
■PgE'g^S-,e.OPr^
f, 1 . T FMP. SLII ING S~1
[ 2.POLLING
r 2.PÓLLI
Ì
D
9-2
Page 73

7. Press STOP.
8. Press START and wait for the piSpiSTlp
polling call to come in.
Secure Polling
Stjcure Pulling is a way to keep your documents and others' from falling into the wrong hands
while the fax machines are set up for polling. You can use Secure Polling only with another
Brother fax machine. Your four-digit ID number must be entered on the fax machine that polls
for your documents.
i-.i-jf
Polling Another Fax Machine with Secure Code
You can poll another fax machine that has Secure Polling by following the steps below:
You need to make sure you are using the same ID number as the other party.
KEYS TO BE PRESSED
U
_____________________
STATUS OF LCD DISPLAY
Make sure no documents are in the
feeder.
(.toy f 4iii-.1
1. Press FUNCTION.
2. Press 1.
3. Press 2.
4. Wait for two seconds.
¡y3r; jtW Ot yrtT LN GS ya]
f ?.POLLING > y 1
^ f PO-feLMG :ir AXPARIX')
^ i S E L E C I ^ & S ET )
5. Press (left arrow) or (right
f.:................................................
arrow) to find the POLLING
SECURE setting.
6. Press SET.
7. Enter a four-digit number. This is
f POhnNGSiU^XXiX
[
...
FOprr'Mo
the same security code of the fax
machine you are polling.
Example: 1234.
...............
;j
.
"t
8. Wait for two seconds.
9. Press STOP.
10. Enter the fax number.
Example: One-Touch dialing.
11. Press START.
( 2 .'to LL
^ f.
...
€W.T§CtP*X...
)
^ripRess :'.sT KE«. )
f'MJ
(DIALING
'OFriCE
...............
f RECEIVING; P.Ol )
. .......
:)
]
1
9-3
Page 74

... '.w
IBlliiii
• .. ■- J'.
Setting up Polled Waiting with Secure Polling
Secure Polling allows you to create a Polling ID number to protect your documents during polled
waiting mode. Anyone who polls your machine must enter this polling ID number.
KEYS TO BE PRESSED
_______________________
TATUS OF LCD DISPLAY
E iy94r 15:2 5'1
1. Insert the documents into the
feeder.
2. Press FUNCTION.
3. Press 1.
4. Press 2.
5. Wait for two seconds.
6. Press (left arrow) or (right
arrow) to find the POLLING
SECURE setting.
7. Press SET.
i j- it-r E MiB.^S£W: 1 MSS...' -1
ri-TEMP.SETTI f Z.POLlfNG
^ g:g.ELEt'Tj' a«-'' V- %
iaap:OXtt'N'B::SrCBRE. ■: ]
8. Enter a four-digit number.
Example: 1234.
9. Wait for two seconds.
10. Press STOP.
11. Press START and wait for the poll
ing call to come in.
t #8XLrN(r Ife: iZM ^
C 2.POLLING
f' PRESS srART*K:Ey'^iD
...
.......................................A
3
9-4
Page 75

;:iai||»||i
ja-.- a-
...
.I!!::'...' .ih:';^.-ìì!!!!v::....!>ì5ì.
iii'aiilMiiiyii
POLLING
illBillilllliiH
■¡■I
ÌÌMESÌÌÌ3iiilÌ
Delayed Polling
After you select STANDARD or SECURE, press SET, then press 1 and use the number keys to
enter the time at which you want polling to take place.
..........
/
KEYS TO BE PRESSE
Make sure no documents are in the feeder.
1. Press FUNCTION.
2. Press 1.
3. Press 2.
4. Wait for two seconds.
5. Press (left arrow) or (right arrow) to select STANDARD or SECURE.
Example: STANDARD.
6. Press SET.
7. Press 1.
8. Enter the time.
Example; 19:45 (7:45P.M.).
9. Wait for two seconds.
10. Press STOP.
k-^iMEaHa3B2Ei
( : iL:.yMRgsBT%iies~E
r 1 .TEMP.SEltl r~2rPOLLING
c
h:§l,tE'CT°_,<-'.; % •"'5-ETh
L..RStlf'ftG
nr.'POLLING'
f IT time'r PSET TIME=
[ SET t,.IME=19
f 1-TIMER
c
|i pRlSSsISTARpXEY ^
:)
ED
3
:)
11. Enter the fax number.
Example: One-touch dialing.
12. Press START.
The fax machine waits until the specified
time to call.
Setting up Polled Waiting with Quick-Scan
Before pressing START, press Q.SCAN so that you can store your polled waiting document in
the memory.
Helpful Hints If you use Quick Scan to place the Polled Waiting documents into the memory,
they will not be erased automatically after they are polled. To erase them you
must use the Cancel Job function, (see page 6-12.)
C,Nti &FFICE
i..
......
.....
........
15:?5
D
________________________________
9-5
Page 76

M. ^ III i\i_r lO MINL^ Lib lb
JO. PRINTING REPORTS AND LISTS
You can print the following lists and reports under function item 3. PRINT REPORTS.
Level one
function
3. PRINT REPORTS
Level two
function
1. ACT. REPORT
2. ALL DIAL
3. COVERPAGE
4. CALL BACK MSG
5. USER OPTIONS
6. XMtT REPORT
Explanation of Options
The Activity Report lets you know
whether transmissions and incoming
faxes w’ere received.
This is a list of the names and numbers
that are stored in One-Touch and SpeedDial memory. Printed in One-Touch
and Speed-Dial number order.
This allows you to check the Cover Page
format.
Used to check the Call Back message
format.
The settings for Function menu 5~7
(USER OPTIONS, TEL OPTIONS and
SETUP SYSTEM) are printed here.
You can set up whether the Transmission
Verification Report will be printed after
all faxes you send.
ON/OFF
Page
10-3
10-3
6-15
6-20
10-4
The addressee and the amount of
7. MEMORY STATUS
occupied memory for items stored in
the memory are printed here.
Other Reports
The following reports are printed automatically, for your information.
Help List (By pressing HELP on the control panel.) (See page 3-5~6)
Power Failure Report
Polled Report
Delayed Sending Report
Broadcast Report (Only for FAX-720M)
Helpful Hints
• If you need an ACS eheclc sheet, press (left arrow) and (right
arrow) simultaneously.
• If you press (left arrow) and (right arrow) simultaneously
again, an ACS check sheet will not be printed.
10-1
10-5
Page 77

All the reports and lists may be printed as follows:
PRINTING REPORTS AND LISTS
STATUS OF LCD DISPLAY
1. Press FUNCTION.
r f. fEMPTsETTINGS~]
2. Press 3.
----
_______
'
1
1
:
3. Press the number of the level two
function you wish to print.
Example: 1. ACT. REPORT.
4. Press START.
ri . act'.'REPORT
RINTING
Activity Report Interval
An activity report can be printed at certain intervals that you specify. You have a choice of setting
the journal period to “OFF”, “6 hours”, “12 hours”, “24 hours”, “2 days”, “4 days”, or “7 days”. The
activity report will provide a list of all outgoing and incoming faxes (up to 30) during the period.
The initial setting is “OFF”.
STATUS OF LCD DISPLAY
r09/12/l9a#!|Fl5 : 2 5 ;
1. Press FUNCTION.
2. Press 7.
3. Press 3.
FT) T E M PigPlT'iMiiSlB
f .. .
SETUP SYSTEM
f 3 ■
..
4. Press (left arrow) or (right
arrow) to choose the setting.
Example: 12 HOURS.
If You select seven days, you should
choose the base day of the week.
5. Press SET.
6. Enter the time to print in 24 hour
format using the number keys.
Example: 19:45 (7:45 P.M.).
7. Wait for two seconds.
8. Press STOP to exit.
hf SEtlCpSeri».: & SET^ 7
Frmgjtf -rggRQVRS ]
L START...
r START AT:19:45
....-a: 00 ]
f 3.INTERVAL
10-2
Page 78

I\i-I ( O /-\l NIU lîcdicd
ACTIVITY REPORT
DATE
09/12
09/12
09/12
TIME
10:00
10:10
15 ; 5T
FAX NO./NAME
BROTHER BOSTON
NJ OFFICE
BROTHER BOSTON
CV : COVERPAGE
CA : CALL BACK MSG
POL; POLLING
DURATION
04:23
00
48
TIME
NAME
FAX
TEL
PAGE!S)
20 CV CA
00
01 CV CA
09/12/1994 19:45
BROTHER
415555'14-1'1
4155554445
RFSIll.T
OK
BUSY
OK
COMMENT
TX
TX
TX ECM
Note: “TX” means Transmit, “RX” means Receive.
Printing the All Dial List
You can print a list of all One-Touch numbers and Speed-Dial numbers. Group numbers will be
listed under One-Touch numbers. (Group numbers are available only on FAX-720M)
ALL DIAL LIST
TIME ;
NAME ;
EAX
TEL
; 09/12/1994 15:25
BROTHER
: 4155554444
; 4155554445
ONE-TOUCH DIAL
NUMBER
*01
*02
*03
SPEED-DIAL
NUMBER
#01
#02 @
#03
#04
#05
^#39^
#40
10-5
FAX/TEL NUMBER
*** GROUP 1 ***
234-5678
334-5566
FAX/TEL NUMBER
5892786
1234567
03-256-1121
5555151
CHAU
DESTINATION
ALL BROTHER
TEL
Irx
F/T PTHMJG M.
FAX
TEL
ABC COMPANY
HEAD OFFICE
DESTINATION.
W. COMPANY
TOKYO OFFICE G1
MANCHESTER G1
GROUP
G1
GROUP
(ALL DIAL LIST of FAX-720M)
Page 79

iNÄlli:.?
Wmmmmmmm
wsrnmmmmm
..
.
■i*"
.......
: PRINTING REPORTS AND
■ "l- ■■■■■■
!■
Transmission Verification (Xmif) Report
Set the Transmission Verification Report to ON or OFF. The initial setting is OFF.
OFF: Report will be printed if the errors occur.
ON; Report will be printed every time a fax message is sent correctly or an error occurs.
KEYS TO BE PRESSED
_______________________
STATUS OF LCD DISPLAY
(09/12/1994 1'5?2S 1
1. Press FUNCTION.
2. Press 3.
3. Press 6.
(
......
................... 5-ETTi'MgS: --,,1
('"'a 'JRIlTk REPOBlVn
(::;¡,6 • XM ir ¡.Rggoyr' ':, i
[ ; XWtf-fcR E-'P O'ftt'rO rF^
c
(- SFl. FC I <- -> 8. SL 1 :
4. Press (left arrow) or (right
arrow) to choose the setting.
Example: ON.
5. Press SET.
6. Press STOP to exit.
[ XMIT 'report:
3
D
TRANSMISSION VERIFICATION REPORT
DATE, TIME
FAX NO./NAHE
DURATION
PAGE(S)
RESULT
MODE
^FOM ia avaiahle only on the FAX-72 OM.
TIME
NAME
FAX
TEL
09/12 15;24
NJ UEMCb
00:00:45
01
COVERPAGE
OK
STANDARD
ECM=^
09/12/1994 15:25
BROTHER
: 4155554445
4155554444
10-4
Page 80

1 iiM^z7 KtKLJklb AND LISTS
Memory Status List
The MEMORY STATUS LIST will show you the addressee and amount of occupied memory for
items stored in the memory such as delayed transmissions and polled waiting.
MEMORY STATUS LIST
TIME; 09/12/1994 15:25
NAME: BROTHER
FAX : 4155554444
TEL ; 4155554445
MEMORY USED FOR FAX FEATURES
TIMER
POLLING WAITING
REDIAL WAITING
ECM
MEMORY AVAILABLE
FREE
TIMF
18:00 14155551212
1)
2)
1)
(BROADCAST)
23:45
BROTHER BOSTON 01
DESTINATION
# OF PAGES
01 10%
02 20%
01 12%
(MEMORY STATUS LIST of FAX-720M)
05%
24%
29%
10-5
Page 81
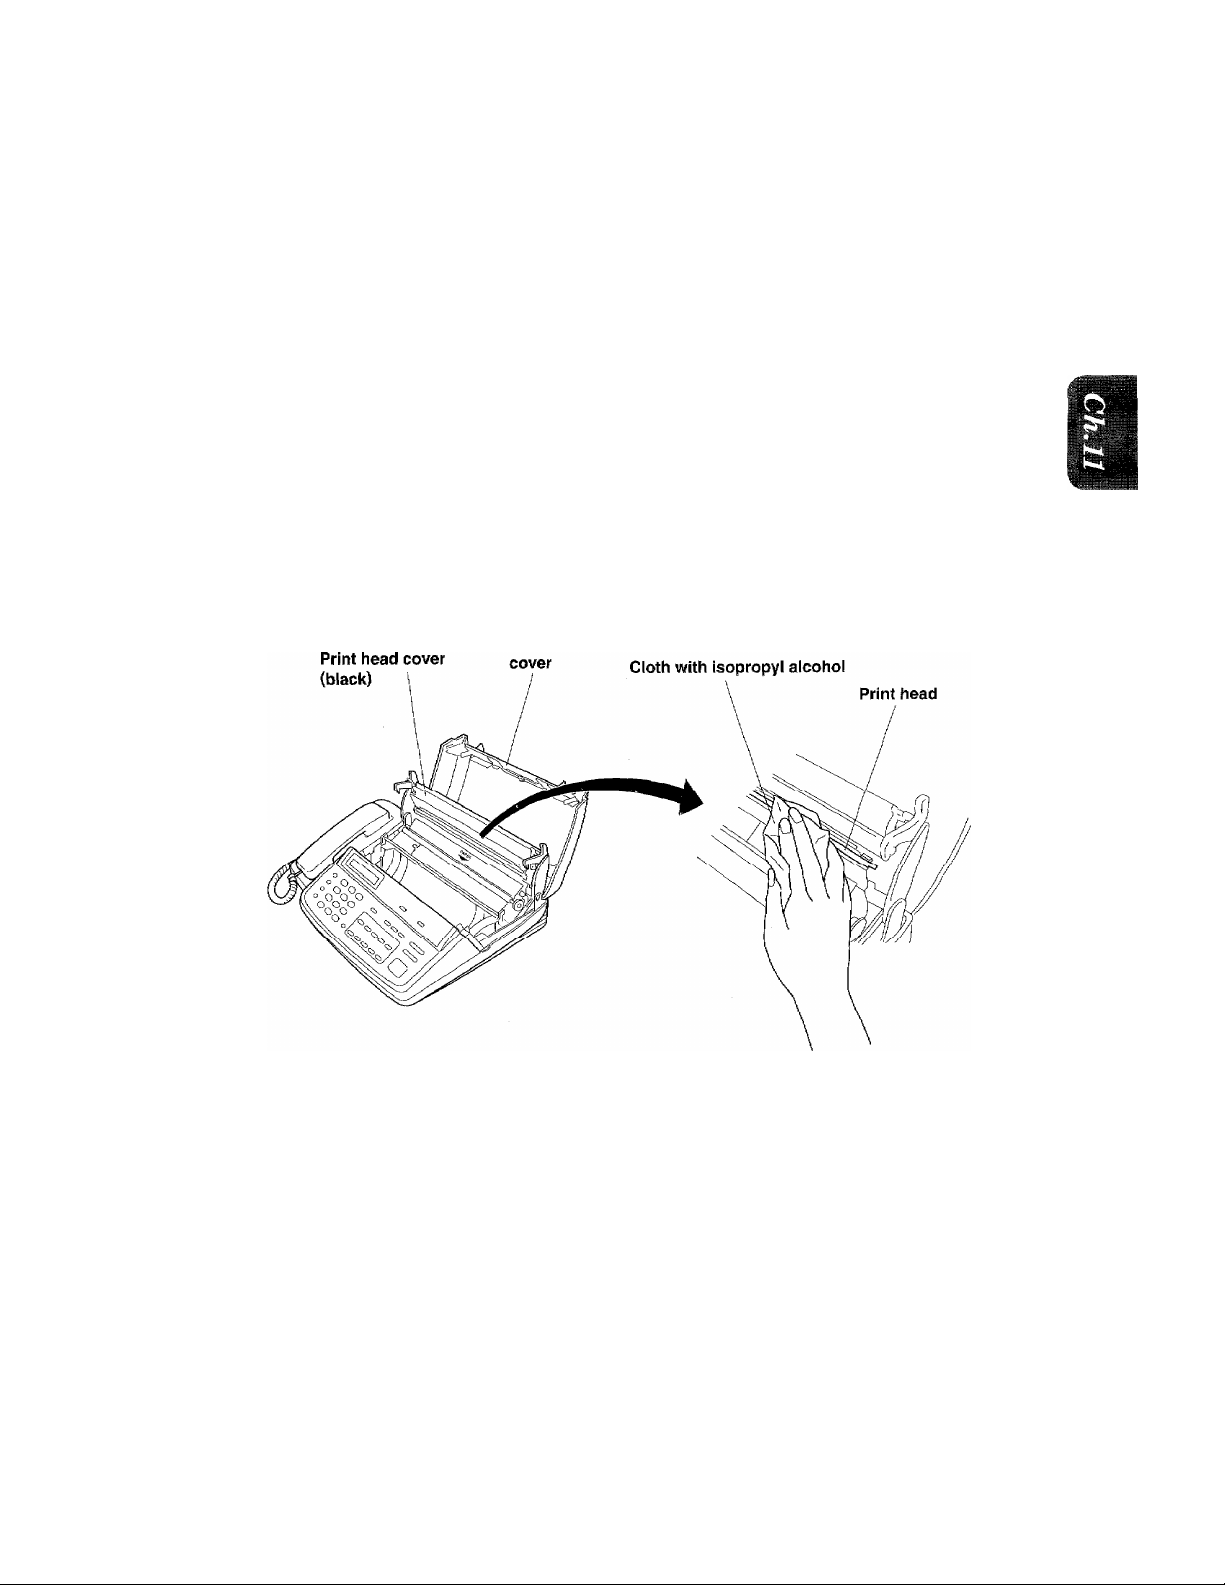
KttpiULAk MAINIbNANCE AND TROUBLESHOOTING
7 7. REGULAR MAINTENANCE AND TROUBLESHOOTING ■■
Regular Maintenance
You can keep your fax machine in optimum condition by cleaning it on a regular basis. Avoi d using
thinners or other organic solvents to clean the machine and do not use any water.
Follow the five steps below;
1. Unplug the telephone line and then the power cord.
When you reconnect these lines later, make sure to connect the power cord first, then the
telephone line.
2. Remove the paper roll.
3. Wipe any dirt off the machine using a slightly damp cloth.
4. Clean the print head.
Moisten a small piece of soft, lint-free cloth with isopropyl alcohol and keep wiping the edge
of the print head until all dirt is removed.
Machine top
11-1
Page 82
inuv^ui_/ak iviaiim I tiMANUt AND TROUBLESHOOTING
5. Clean the scanner glass cover and the white tape above.
1) Put your finger under the 3™ mark where there is a groove and lift up the front cover. It
should “lock^’ into an open position.
2) Moisten a small piece of soft, lint-free cloth with isopropyl alcohol and carefully remove any
dirt from the glass cover and from the white tape of the scanner.
Front cover
Helpful Hints It is a good idea to follow these five simple steps everytime you change the
recording paper.
Paper Jams__________________________________________________________________
Your fax machine will sound an alarm if the documents jam while going through the feeder or if
the fax paper becomes stuck. The display will show “DOCUMENT JAM”, “CUTTER JAM”, or
“PRINTER JAM”.
Fixing a Document Jam
1. Open the front cover.
2. Turn the document release knob (blue) in the direction of the arrow and pull the documents
toward the front of the fax machine.
3. Close the front cover.
Front cover
11-2
Page 83

ktGULAR MAINTENANCE AND TROUBLESHOOTING
NOTICE
When you have a document jam, do not try to pull the documents back out. The
documents should be pulled from the front so that they can go through the fax
machine. Remember; Push your way out, donT back up!
Fixing a Cutter dam or Frinter dam
1. Unplug the power cord and open the ma-
4, Plug in the fox machine.
5. Re-insert the fax paper and close the print head cover and the machine top cover.
11-3
Page 84

i\i_v^wL-/-M\ ivi/AIIM I HINAINH^t AINJD
Troubleshooting
You may occasionally encounter a problem with your fax machine or telephone line. If this
happens, your fax machine often identifies the problem and displays an error message. Refer to
the following list when you see an error message on the display. If additional help is needed,
please contact the following Customer Service numbers :
U.S.A 1-800-284-4FAX (4329)
1-908-356-8880 (Extension 7920)
Canada 1-514-685-0600 (Montreal)
1-604-278-8466 (Vancouver)
Error Messages
COMM.ERROR XX YY
You encountered a communications error that resulted from a poor quality phone line. Try the
call again.
Error Codes
20 XX This Error Code is usually caused by poor telephone line,
80 01 or having a special telephone feature such as “Call
90 01 Waiting” assigned to this line.
74 00 Their machine sent a disconnect command from their location. This could be
caused by a document jam, a recording paper empty, or mechanical problems on
their unit, or there may be problems on the telephone line.
AO 11 Remote side disconnected the transmission. This could be caused by them
stopping the transmission before completion.
FF XX This is a mechanical error on your fax machine. For example : FF EA “Document
Jam”. Please clear the jam and try to send again.
fg«p5x|
CONNECTION FAIL
You have requested a polling call from another party, but the remote station is not in polled
waiting mode.
COVER OPEN
The machine top cover is not completely closed. Make sure that it is closed.
CUTTER JAM
The fax paper ie jammed in the cutter. Remove the jammed paper. (See page 11-3.) Then re-insert
the fax paper. (See page 1-2.)
DISCONNECTED
The telephone line was disconnected by the other party during the communication. Try calling
the other party to see what happened.
DOCUMENT JAM
The documents were not inserted properly, the documents were not fed properly, or documents
were too long. Open the front cover and remove the documents. (See page 11-2.) Close the front
cover and re-insert the documents and adjust the guides on either side of the document, and try
sending the fax again.
ID MISMATCH
You may have the wrong ID for the secure polling function. Try calling the other party to check
the ID.
11-4
Page 85

l^tC^ULAR MAINTENANCE AND TROUBLESHOOTING
MACHINE ERROR XX and PRESS STOP KEY
Contact the Customer Service number listed on page 11-4.
NO RESPONSE/BUSY
The number you called does not answer or is busy. You may also have reached a number that is
not connected to a fax. Check the number and try again.
NOT REGISTERED
The One-Touch key or Speed-Dial number has no number assigned to it. You need to register a
phone number. (See page 4-4~7.)
PAPER ROLL EMPTY
The paper roll is empty. You need to replace it. (See page 1-2.)
PAPER SET ERROR
The paper roll is not set correctly. Try re-inserting it,
PRINTER FAULT
The recording head has overheated. Unplug the power cord and wait for 30 minutes.
PRINTER JAM
The faxpaper is jammed in the printer. Remove the jammed paper. (See page 11-3.) Thenre-insert
the fax paper. (See page 1-2.)
CLEAN UP SCANNER
The scanner is dirty. Clean the sranner. (See page 11-2.)
SCANNER ERROR
Try to clean scanner and white tape. (See page 11-2.)
If you still get the scanner error, please contact the customer service numbers listed on page 11-
4.
Other Problems
When Dialing Doesn’t Work...
Yuu may have the wrong dialing mode. Change the TONE/PULSE setting . (See page 4-1.) You
may also want to check all the telephone line connections, such as to the handset and to the wall
jack. Check also that the power cord is connected. (See page 1-3.) Check by pressing HOOK to
see if dial tone is heard. Also try sending by using HOOK or the handset. Wait to hear fax tones
then press START.
Pool* Transmitting Quality
Someone may complain that faxes they receive from you are hard to read. Your resolution setting
may be inappropriate. Try the FINE or SUPERFINE settings and try the call again. Also, it is
possible that your scanner glass cover is dirty. (See page 11-2.)
Vertical Streaks When Receiving
You may get faxes with vertical streaks. The recording head on your machine may be dirty, or the
sender’s scanner may be dirty. Try cleaning the Print Head. (See page 11-1.) This can also be
checked by making a copy.
Horizontal Streaks
You may get a fax with horizontal streaks or with missing lines. This normally results from apoor
telephone connection. Ask the other party to send the fax again.
11-5
Page 86

Iivn wr\irM\/i (IMr^KIVIAll
12. IMPORTANT INFORMATION
iSiiii
Standard Telephone and FCC Notices
These notices are in effect on modeis sold and used in the U.S.A.
This equipment is hearing-aid compatible.
When programming emergency numbers and/or making test calls to emergency numbers:
• Remain on the line and briefly explain to the dispatcher the reason for the call
before hanging up.
• Perform such activities in the off-peak hours, such as early morning or late evening.
This equipment complies with Part 68 of FCC Rules. On the rear panel of this equipment is a label
that contains, among other information, the FCC Registration Number and Ringer equivalence
Number (REN) for this equipment. You must, upon request, provide this information to your
telephone company.
You may safely connect this equipment to the telephone network by means of a standard modular
jack, USOC RJllC.
An FCC compliant telephone cord and modular plug is provided with this equipment. This
equipment is designed to be connected to the telephone network or premises wiring using a
compatible modular jack which is Part 68 compliant.
See 1-3 for details.
The REN is useful to determine the quantity of devices you may connect to your telephone line
and still have those devices ring when your telephone number is called. In most, but not all areas,
the sum of the RENs of all devices connected to one line should not exceed five (5). To be certain
of the number of devices you may connect to your line, as determined by the REN, you should
contact your local telephone company to determine the maximum REN for your calling area.
If your IntelliFAX-710M/720M damages the telephone network, the telephone company may
discontinue your service temporarily. If possible, they will notify you in advance. But if advanced
notice is not practical, you will be notified as soon as possible. You will be informed of your right
to file a complaint with the FCC.
Your telephone company may make changes to its facilities, equipment, operations or procedures
that could affect the proper functioning of your equipment. If they do, you will be notified in
advance to give you an opportunity to maintain uninterrupted telephone service.
If you experience trouble with this IntelliFAX-710M/720M, please contact the manufacture’s
authorized seiwice agency for information on obtaining service or repair. The telephone company
may ask that you disconnect this equipment from the network until the problem has been
corrected or until you are sure that the equipment Is not nialfunctioihiig.
If you are not able to solve a problem with your fax machine, contact Brother service personnel
atl-800-284-4FAX (U.S.A. Only).
1-800-284-4329
(Only applies to 120V model)
Warning
For protection against the risk of electrical shock, always disconnect all cables from the wall outlet
before seiwicing, modifying or installing the equipment.
Page 87

^BIIn
This equipment may not be used on coin service lines provided by the telephone company nor
connected to party lines.
This equipment has been tested and found to comply with the limits for a Class B digital device,
pursuant to Part 15 of the FCC Rules. These limits are designed to provide reasonable protection
against harmful interference in a residential installation. This equipment generates, uses, and
can radiate radio frequency energy and, if not installed and used in accordance with the
instructions, may cause harmful interference to radio communications. However, there is no
guarantee that interference will not occur in a particular installation. If this equipment does
cause harmful interference to radio or television reception, which can be determined by turning
the equipment off and on, the user is encouraged to try to correct the interference by one or more
of the following measures:
• Re-orient or relocate the receiving antenna.
• Increase the separation between the fax equipment and the receiver.
• Connect the fax equipment on a separate circuit.
• Consult the dealer or an experienced radio/TV technician for help.
Brother cannot accept any financial or other responsibilities that may be the result of
your use of this information, including direct, special or consequential damages.
There are no warranties extended or granted by this document.
IMPORTANT INFORMATION
The serial number may be found on the label affixed to the back of the unit. For your convenience,
note the number below and retain this owner's manual to serve as a permanent record of your
purchase, in the event of a theft or fire, or for future reference,
MODEL NO. IntelliFAX-710M/720M SERIAL NO..
NAME OF DEALER
DATE OF PURCHASE
12-2
Page 88

Important Safety Instructions
1.
Read all of these instructions
2.
Save them for later reference.
3.
Follow all warnings and instructions marked on the product.
4.
Unplug this pi oduct fi om the wall outlet before cleaning. Do not use liquid or aerosol cleaners.
Use a damp cloth for cleaning.
5.
Do not use this product near water.
fi.
Do not place this product on an unsuitable cart, stand, or table. The product may fall, causing
serious damage to the product.
7.
Slots and openings in the cabinet and the back or bottom are provided of ventilation; to ensure
reliable operation of the product and to protect it from overheatings these openings must not
be blocked or covered. The openings should never be blocked by placing the product on a bed,
sofa, rug, or other similar surface. This product should never be placed nearer over a radiator
or heater. This product should not be placed in a built-in installation unless proper
ventilation is provided.
This product should be operated from the type of power source indicated on the label. If you
are not sure of the type of power available, consult your dealer or local power company.
9.
This product is equipped with a 3-wire grounding type plug, a plug having a third (grounding)
pin. This plug will only fit into a grounding-type power outlet. This is a safety feature. If you
are unable to insert the plug into the outlet, contact your electrician to replace your obsolete
outlet. Do not defeat the purpose of the grounding-type plug.
10.
Do not allow anything to rest on the power cord. Do not locate this product where persons will
walk on the cord.
If an extension cord is use with this product, make sure that the total ampere ratings on the
11.
products plugged into the extension cord do not exceed the extension cord ampere rating.
Also, make sure that the total of all products plugged into the wall outlet does not exceed 15
amperes (U.S.A. only).
Never push objects of any kind into this product through cabinet slots as they may touch
12.
dangerous voltage points or short out parts resulting in a risk of fire or electric shock. Never
spill liquid of any kind on the product.
Do not attempt to service this product yourself, as opening or removing covers may expose
13.
you to dangerous voltage points or other risks. Refer all servicing to service personal at 1-800-
284-4FAX (4329).
Unplug this product from the wall outlet and refer servicing to qualified service personnel
14.
under the following conditions:
A. When the power cord or plug is damaged or frayed.
B. If liquid has been spilled into the product.
C. If the product has been exposed to rain or water.
D. If the product does not operate normally when the operating instructions are followed.
Adjust only those controls that are covered by the operating instructions since improper
adjustment of other controls may result in damage and will often require extensive work
by a qualified technician to restore the product to normal operation.
E. If the product has been dropped or the cabinet has been damaged.
F. If the product exhibits a distinct change in performance, indicating a need for service.
12-3
Page 89

13. INDEX
INDEX
ACS Check Sheet
Activity Report
ADF
...........................................................
All Dial List
Answer Mode
Auto Mode........................................... 7-1-2
....................................
....................................
....................................
....................................
10-1
10-1 ~3
6-2
10-1, 10-3
2-4, 7-1
B
Battery (See memory storage)
Beeper
....................................................
Broadcasting (FAX-720M)
Call Back Message
Call Reservation
Canceling
Chain Dialing
Cleaning................................................11-1-2
Connecting..
Contrast
Control Panel Keys
Copy
Cover Page
.................................................
..............................................
................................................
...........
..................
................................
.............................................
...............................
................................
2-4, 3-2-3, 6-15-19, lO-l
................
...................
6-19-20, 10-1
6-19-20
1-3, 7-6, 7-8
2-3, 8-1-2
4-7
4-1-2
6-8-9
6-12
4-5
.....6-3
2-1-4
Fine
.............
F/T Mode ............................................ 7-1, 7-3
F/T Ring Time
Function..........................................2-4, 3-1-4
Gray Scale (FAX-720M)
Group (FAX-720M)
.......................................6-2, 6-14
........................................7-3-4
......................... 6-15
....................................
4-8
H
HELP....................................
Hook....................................................2-2, 5-1
Hold
................
................................
....2-4, 3-1,3-5-6
...2-2, 5-1
I
Interrupting .................................. 3-4,6-11
Jacks.............................................1-3, 7-6, 7-8
Jam
........................................................11-2-5
Loading Paper
............................................
1 -2
Daily Timer................................................6-8
Date and Time
Delayed Transmission
Delayed Polling....................................... 9-5
Distinctive Ringing
Document
ECM (FAX-720M)
Error Re-Transmission
Error Message/Codes
External Telephone
Extension Telephone ..............................
........
................................
..............................
.........................
..............................................
....................................
...........................
...........................
............................
7-10-13
4-2
6-7
6-1-2
6-22
6-22
11-4
7-6, 7-8
7-6
M
Manual Mode.........................................7-1-2
Manual Dial
Memory.................................................. 4-7
Memory transmission....
MEMORY FULL.................................8-2, 10-5
Memory Usage
Multiple Resolution Transmission
..............................................
.....................
........................................
6-6-10
........
5-1
10-5
6-14
N
Next-FAX Reservation
...........................
6-21
o
One-touch Dial
On-Screen Programming
On Hook Dial.............................................5-1
.......
2-3,4-4-5, 4-7, 5-1,6-4
..............
3-1,3-4-5
15-1
Page 90

m-XL/X
Overseas Mode
........................................
6-13
p
Packing List..........
Pause
...................................
PBXs
...................................................
Photo
.................................................
Polling
..................................................
Power............................................... 1-3, 14-1
Printing
Quick-Scan
....... 3-5, 6-6, 6-17, 6-20, 10-1,10-3
...................
...................................
........
2-2.4-5, 5-1
]-4^4.7
6-2, 6-14
9-1-6
Q
2-4, 6-6, 6-8-10, 9-S
1-2
R
Redial
.......
....................................
Remote Activation............................. 7-6~7
Remote Code
Remote Deactivation............................7-6-7
Reports............................................... 10-1-5
Resolution
Ring Delay ................................................
Ring Time
Ring Volume
.........................................
........................
........................................... 7-3-4
..........................................
......
2-2, 6-5
7-6-7
2-4, 6-2, 6-14, 8-1
7-2
7-5-6
s
Secure Polling
Setting Up
SHIFT (FAX-720M)
Smoothing..
Speaker Volume
Speed Dial
Station ID
Standard Mod©
Super Dark Mode.................................... 6-3
Super Fine Mode
Super Light Mode
TAD Mode
Timer.......................................................6-6-7
Transmission Verification Report 10-1,10-4
Tone/Pulse.................................................4-1
13-2
.................................
..............................................
..........
...2-3, 4-4, 6-9-10
...............................................
....................................
..........
............
2-2,4-6-7, 5-1,6-4
.................................
.............................
............
................
...................................
.....9-3-4
4-3, 6-6, 6-15
6-2, 6-14
6-2, 6-14
T
......................................
7-1.7-8-9
1-2-3
7-4
7-4-5
6-3
Page 91

14
. SPECiFiCATiONS
bKbi..lML.AliUINb
m
Type
Compatibility
Coding system
Modem speed
Document input width
Scanning/Printing width
Paper roll size
Printer type
Gray scale
Paper cutter
Display
Polling types
Contrast control
Resolution
One-touch dial
Speed-dial
Automatic redial
Speaker type
Auto answer
Communication source
Operating environment
Power source
Power consumption
Dimensions
Weight
Desktop facsimile transceiver
ITU-TS Group 3
Modified Huffman (MH)
9600/7200/4800/2400; Automatic Fallback
148 mm to 216 mm
(6.8
inches to 8.5
inches)
208 mm (8.2 inches)
216 mm (8.5 inches)
50 m (164 feet) with standard thermal paper
50 m (164 feet) with Therma PLUS paper
Line thermal
16 level (for FAX-710M)
16/32 levels (for FAX-720M)
Automatic
LCD, 16 characters
Standard, Secure, Delay
Automatic/Super Light/Super Dark (manual setting)
• Horizontal 8 dot/ram (203 dot/inch)
• Vertical Standard 3.85 line/mm (98 line/inch)
Fine, Photo (16 levels transmission)
7-7 line/mm (196 line/inch)
Superfine, Photo (copy/32 levels transmission)
15.4 line/mm (392 line/inch)
10 stations (for FAX-710M)/20 stations (for FAX-72 OM)
20 stations (for FAX-710M)/40 stations (for FAX-720M)
3 times at 5 minute intervals
Monitor
0, 1, 2, 3 or 4 rings
Public switched telephone network
41 - 95°P
120V AC 50/60Hz (U.S.A., Canadian Version Only)
Standby: under 10 watts
Peak: under 110 watts
376 X 311 X 127 (mm)/14.8 x 12.2 x 5 (inches)
4.2 kg/9.3 lbs
Specifications are subject to change for improvement without prior notice.
14-1
Page 92

brother.
Brother International Corporation
200 Cottontail Lane,
Somerset, NJ 08875-6714, U.S.A.
Brother International Corporation (Canada) Ltd.
1 rue Hôtel de Ville,
Dollard-des-Ormeaux, QC, CANADA H9B 3H6
UF4562001
Printed in Japan
 Loading...