

Page 1

OWNER'S M/^||^^|;|;
si/п гл РКК1*лкл'|'10\ liH'OHi-; usi;
l’HK Ì^ON Ì'ROI. PANKL KEsYS
ш>wтols^;í)^■s('Hl-:к^PK()í;l^\м^и.^l(;
l’KIJ-lMIONi; Mi\< 'l'iON Sl/n iNCS
l SINU niK UNI I AS Л l’KUiiMIONI';
si-:ni)in(; r.\xi-;s
KKUÌIVINI; l AXKS ANI) Oì’lllik ( AI.LS
How то USE ì:;oi’V idnchons
I*K1NTIM. OUT REPOK'IS ЛМ) ElSI S
KKOIJLAU MAIN TENANU-; AM)
TKouHEESiiomiNi;
IMl'OR I ANT iM'OKMM lOS
: уу-i-: -. y^Fii-- : ; |л^ :{у-- ■■:"■ ■ '■ ■-'■■■■■
I n t e l l i F A X
SPECII'TCAITONS
Page 2

IMPORTANT NOTICE
INCLUDES
A Starter Roll
OF OUR NEW
TuERMAr^
piUSpAKR
ALSO USES STANDARD
FAX PAPER
This is to remind you that your
new Fax unit includes a starter roll
of our new Therma PLUS Fax paper.
* feels like plain paper
* reduces print fading
(under normal filing conditions)
* easy to write on
* you can even use a highlighter
Remember, it is your choice to either use
Therma PLUS paper (Brother reorder #6890 or #6840)
or to use standard Fax paper (Brother reorder #6865).
Page 3

How to Use This Owner’s Manual
Thank you for purchasing a Brother fax machine. This fax machine has been designed to
be simple to use, but you can utilize it to its fullest potential by taking some time to read
this owner’s manual. You will be ready to use the fax machine as soon as you read the first
four chapters. Then you can refer to topics in the remaining chapters, as needed.
Structure of the Manual
■ Chapters 1-4
How to set up the ftix machine and what you need to know before you use it.
■ Chapters 5-7
Basic operations, how to send and receive faxes.
■ Chapters 8-10
Advanced operations.
Finding Information in the Owner’s Manual
• Use the table of contents. This side of the manual is coded so you can find topics
easily.
• If there is a key on the fax machine you are not familiar with, refer to chapter 2.
• To find out information about a function, refer to the ‘Tunction Selection Chart” in
chapter 3.
• If you have trouble, refer to chapter 11 on how to troubleshoot.
• Use the chapter 13 index.
Test Sheet Procedure
Please fill out the TEST SHEET and fax it to 1-908-469-4547 as your first transmission.
This will verify that your fax machine is properly installed.
When this document is received at Brother Diagnostic Center, a confirmation sheet will be
sent back to your machine from Brother Automatic Fax Back Response System. Be sure to
set up your “Station ID” . (See page 4-3.)
FAX NO. : 1-908-469-4547 (Fax Transmission Only)
TEL NO. : 1-800-284-4FAX (Voice Phone Only)
Page 4

Jlllli;::;;:- i|
iliiiiiiiSil
CONTENTS
❖ SETUP & PREPARATION BEFORE USE ,1-1
Choosing a Suitable Place to Put Your Fax Machine ,1-1
The Good Places... ,1-1
And the Bad Places... ,1-1
Packing List ,1-2
F.Y.I. Setting up Your Fax Machine ,1-2
F.Y.I. Jacks, 1-4
F.Y.I. Multi Line Connections (PBXs) ,1-4
Connecting to a Private Branch Exchange ,1-4
Cfiapter
WuSiWimiSM
0iapter 5.
IMiiaiiM
liiil
■lililill:
iillil
THE CONTROL PANEL KEYS ,2-1
TELEPHONE AREA ,2-2
ONE-TOUCH AREA ,2-3
FUNCTION AREA ,2-4
USER SETTING AREA ,2-5
❖ HOW TO USE ON-SCREEN PROGRAMMING (OSP) ,3-1
What Is On-Screen Programming ,3-1
Function Selection Chart ,3-1
Using the Function Mode to Access OSP ,3-4
Alternating Displays for OSP ,3-5
How to Enter Text in the Function Mode ,3-5
How to Enter Special Characters, Symbols and Punctuation Marks in the Function
Mode ,3-6
Chapter 4, ❖ TELEPHONE FUNCTION SETTINGS ,4-1
Setting the Dialing Mode (Tone/Pulse) ,4-1
Setting the Beeper Sound Level .4-1
Setting the Date and Time ,4-2
Setting the Station ID .4-3
Storing One-Touch Dial Numbers ,4-4
F.Y.I. Types of Numbers ,4-5
F.Y.L Chain Dialing ,4-5
....
;; Storing Speed-Dial Numbers ,4-6
F.Y.I. When You Wish to Change to the Store One-Touch and Speed Dial
Numbers (During Step 4 on Page 4-4, 6) ,4-7
F.Y.L Memory Storage ,4-7
ChaptmMf using the unit as a telephone ,s-i
Manual Dialing ,5-1
One-Touch Dialing ,5-1
Speed Dialing ,5-1
F.Y.I. Using Keys with the Telephone ,5-1
F.Y.I. On Hook DiaUng ,5-1
Page 5

Telephone Index (Only for FAX-680) ,5-2
Chapter 4. ❖ SENDING FAXES ,6-1
A) BASIC FAX TRANSMISSIONS ,6-1
The Size of Your Documents ,6-1
How to Set the Document ,6-1
The Auto Document Feeder (ADF) ,6-2
Getting Ready to Send Faxes ,6-2
Resolution ,6-2
Contrast ,6-3
Sending a Fax Automatically ,6-3
Sending a Fax Manually ,6-4
F.Y.I. Dialing a Number ,6-4
F.Y.I. Talking to the Other Party When Sending a Fax ,6-4
Automatic and Manual Re-dialing ,6-5
Setting the Auto Re-dial ,6-5
F.Y.I. Possible Settings When You Send a Fax Manually ,6-5
F.Y.I. Printing Page Headers ,6-5
Delayed Transmission ,6-6
.
...
Setting the Daily Timer (for Delayed Transmissions) ,6-6
Interrupting the Timer and Polled Job ,6-7
Canceling the Job ,6-8
B) FAX TRANSMISSION OPTIONS ,6-9
Setting the Overseas Mode ,6-9
Setting Your Fax Machine for Multiple Resolution Transmission ,6-10
Gray Scale (Only for FAX-680) ,6-11
F.Y.I. About Resolutions... ,6-11
Sending a Fax with a Cover Page .6-12
F.Y.I. The Comments Section on the Cover Page ,6-12
Setting Coverpage ON/OFF ,6-13
Sending an Automatic Cover Page ,6-14
Customizing Your Cover Page Comment (Only for FAX-680) ,6-14
Sending a Fax with Call Reservation ,6-15
F.Y.I. Using the Call Reservation Function ,6-15
CONTENTS
Chapter 7,
❖ RECEIVING FAXES AND OTHER CALLS ,7-1
Selecting an Answer Mode ,7-1
Manual Reception (MANUAL mode) ,7-2
Automatic Fax Reception (AUTO mode) ,7-2
Setting the Ring Delay ,7-2
The F/T Switch (FÎT Mode) ,7-3
Setting the F/T Ring Time ,7-3
Remote Activation ,7-4
Connecting an External or Extension Telephone to the Unit ,7-4
Using Remote Codes ,7-5
F.Y.I. Limitation of LTsing External (or Extension) Phones ,7-5
Registering Remote Codes ,7-5
Page 6

The TAD Mode ,7-6
Connecting an External TAD to the Unit ,7-6
Smoothing ,7-8
Speaker Volume ,7-8
Ring Volume ,7-9
jChapter 8,
Chapter 9.
iiliiilllii
❖ HOW TO USE COPY FUNCTIONS ,8-1
Making a Copy ,8-1
❖ POLLING ,9-1
F.Y.I. What Is Polling? ,9-1
F.Y.I. How Docs It Work? ,9-1
. F.Y.I. When to Use Polhng? ,9-1
Polling Another Fax Machine ,9-2
Setting up for Polled Waiting ,9-2
Secure Polhng ,9-3
Polling Another Fax Machine with Secure Code ,9-3
Setting up for Polled Waiting with Secure Polhng ,9-4
Delayed Polling (Only for FAX-680) ,9-4
❖ PRINTING OUT REPORTS AND LISTS ,10-1
Printing the All Dial List ,10-2
Activity Report Interval ,10-3
Transmission Verification (Xmit) Report, 10-4
❖ REGULAR MAINTENANCE AND TROUBLESHOOTING ,11-1
Regular Maintenance ,11-1
Paper Jams ,11-2
Fixing a Document Jam ,11-2
Fixing a Cutter Jam or Printer Jam ,11-2
Troubleshooting ,11-3
Error Messages ,11-3
Other Problems ,11-4
(Chapterl2,
ChapterlBi
❖ IMPORTANT INFORMATION,12-1
Standard Telephone And FCC Notices (Only applies to 120V model) ,12-1
Important Safety Instructions ,12 3
❖ INDEX,13-1
❖ SPECIFICATIONS ,14-1
F.Y.I. ............For Your Information
Page 7

SETUP & PREPARATION BEFORE USE
7. SETUP & PREPARATION BEFORE USE
Choosing a Suitable Place to Put Your Fax Machine
Use the following list as a guide to find a suitable place for your fax machine.
The Good Pleices...
Place your fax machine on a flat, stable surface, such as a desk.
Select a place that is free of vibration and shocks.
Locate it near a telephone jack and a standard, grounded power outlet.
And the Bad Places..
Avoid setting it up in a high-traffic area.
Avoid setting up the machine near heaters, air conditioners, water, chemicals, or refrigerators.
Do not select a place that exposes your fax machine to direct sunlight, excessive heat, moisture,
or dust.
Do not connect your fax machine to electrical outlets controlled by wall switches or automatic
timers. Disruption of power can wipe out information in the unit’s memory.
Do not connect your fax machine to electrical outlets on the same circuit as large appliances or
other equipment that might disturb the power supply.
Avoid interference .sources, such as speakers or the base units of cordless phones.
1-1
Page 8
SETUP & PREPARATION BEFORE USE
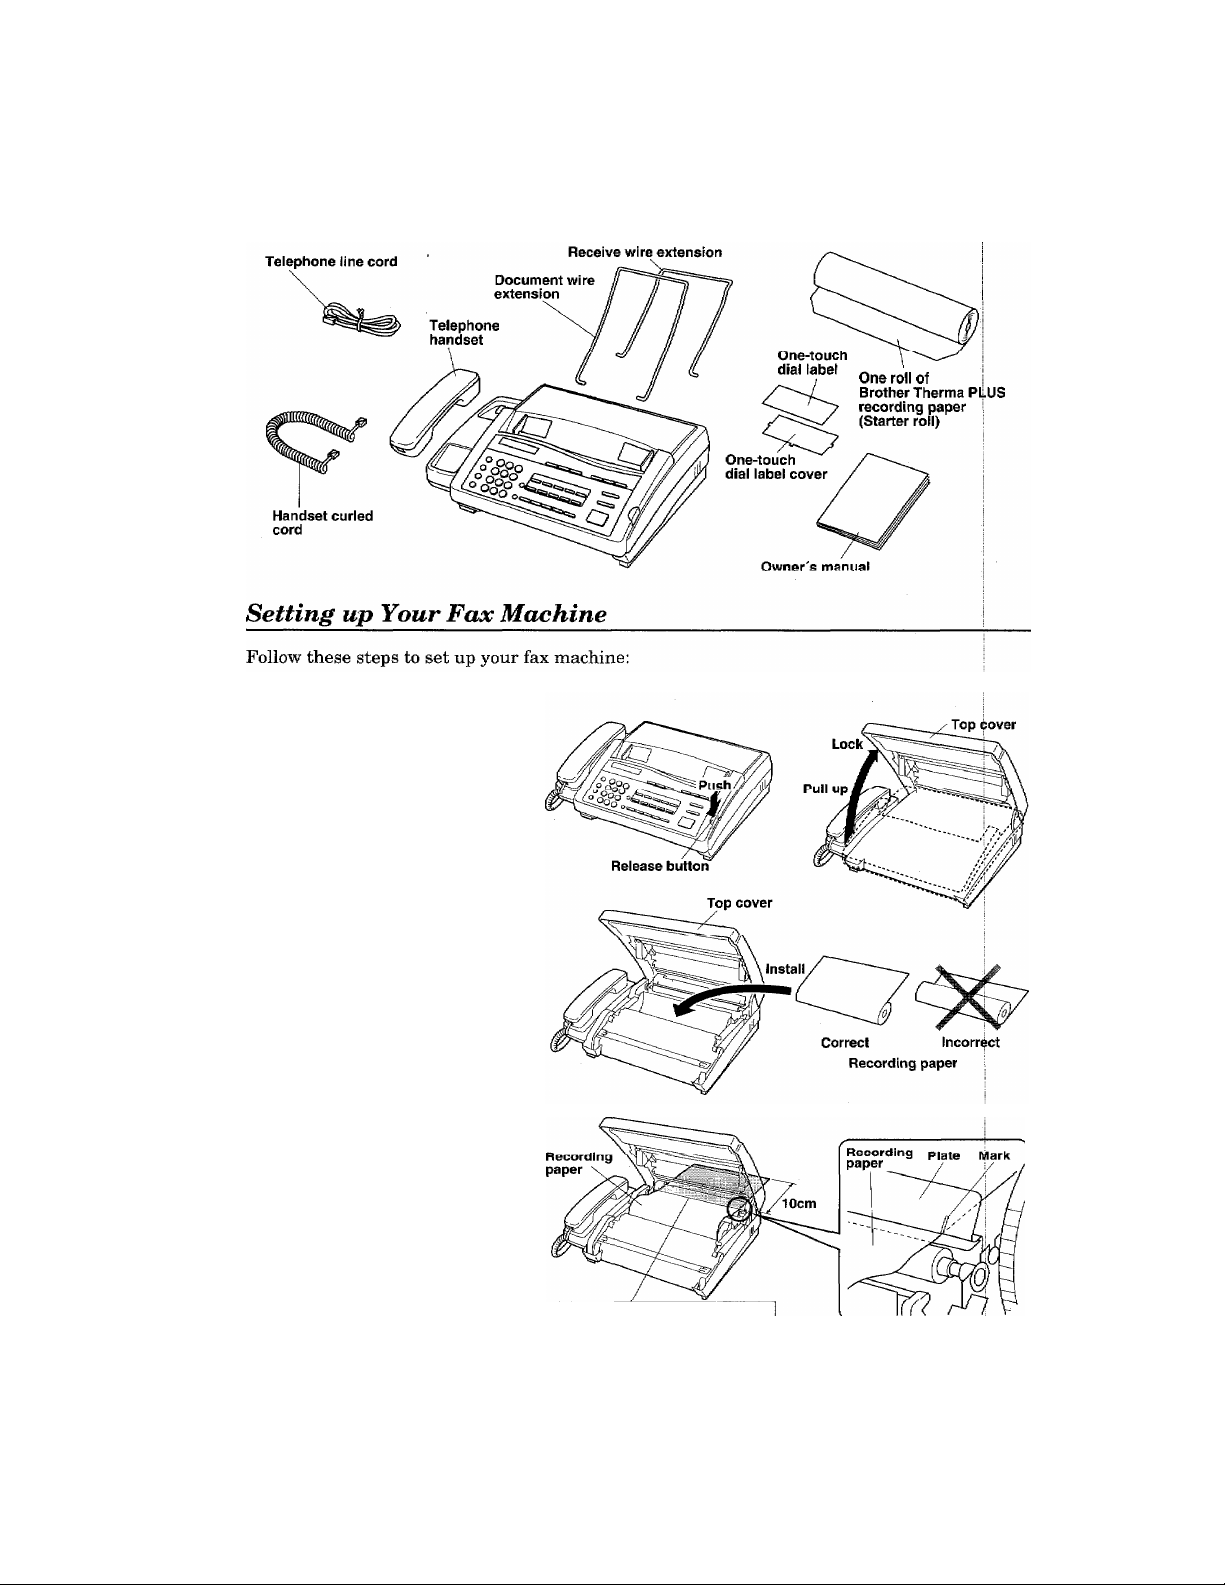
Packing List
Please check Lu see Lhat you have the following Items:
1. Load the recording paper.
1) Push the release button to
open the top cover.
2) Take the roll of recording
paper out of the wrapper. If
you are replacing a roll, you
need to remove any remain
ing paper still in the ma
chine.
3) Insert the recording paper
into the paper bin, with the
paper coming off the top
of the roll.
4) Inse rt the edge of the paper
into the slot which reads
“PASS THE RECORDING
PAPER UNDER THIS
GUIDE.” and pull the paper
out about 10cm (4 inches)
from the back side.
Adjust the recording paper
so that it is between the
marks.
5) Close the top cover and press
firmly until you can hear
the latches “click.”
12
! PASS THE RECORDING PAPER
I
UNDER THIS QUID
Page 9
SETUP & PREPARATION BEFORE USE
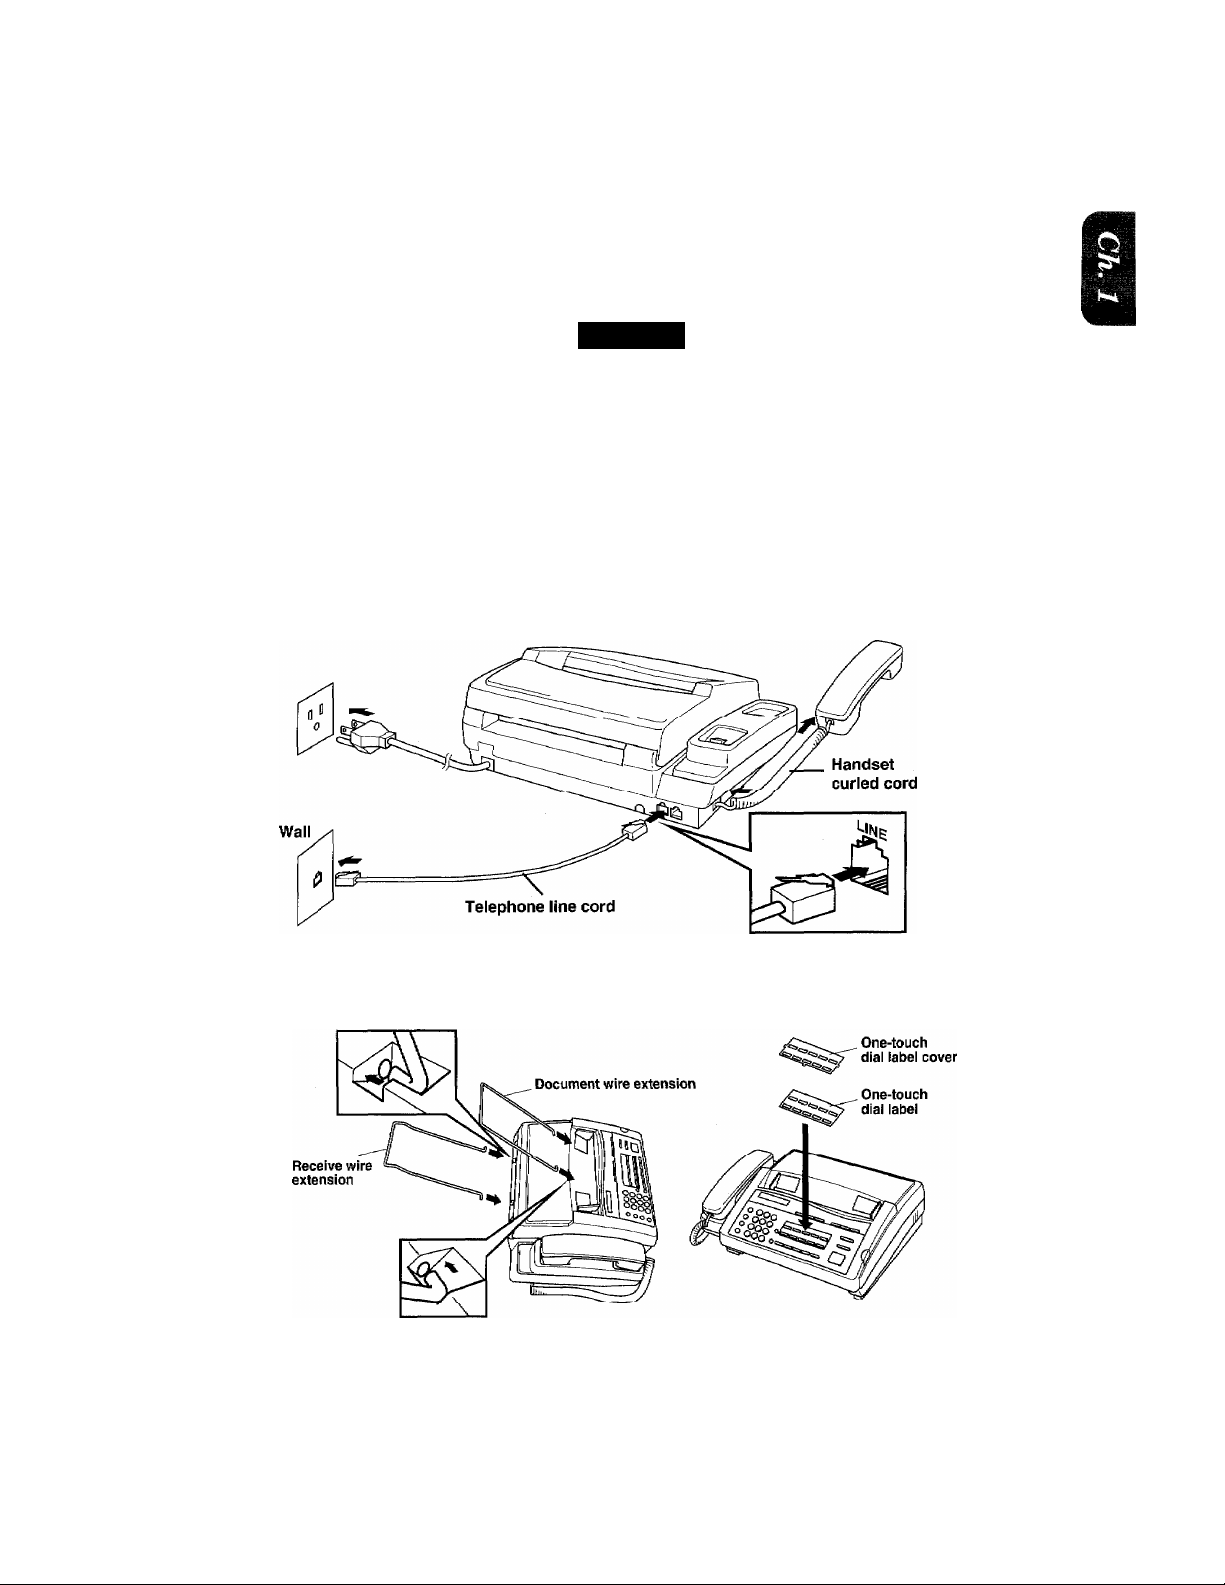
2. Connect the handset.
3. Connect the power cord.
When you connect the power, your fax machine will automatically cut the fax paper, and the
display will read: “01/01/1994 00:00”.
NOTICE
1. This fax machine must be grounded using a 3-prong plug.
2. Since the machine is grounded through the power outlet, you can protect yourself
from potentially hazardous electrical conditions on the telephone network by
keeping the power to your fax machine on before you connect it to a telephone line.
Similarly, you can protect yourself when you want to move your machine, by
disconnecting the telephone line first, and then the power cord.
4. Connect the telephone line.
5. Attach the wire extensions and One-touch dial label.
1-3
Page 10

SETUP & PREPARATION BEFORE USE
FOR YOUR INFORMATION
Jacks
If you have the older 4-prong telephone wall jack, you must use a modular 4-prong
adapterCUSOC RJAIX). Plug the adapter into the wall jack and then plug the
telephone line cord into the adapter, as shown in the illustration below.
Multi Line Connections (PBXs)
Most offices use a central telephone system. While it is often relatively simple to
connect the machine to a key system or a PBX (private branch exchange), we suggest
that you contact the company which installed your telephone system and ask them
to connect the fax machine for you.
It is advisable to have a separate line for the fax machine. You can then leave the
machine in AUTO Answer Mode to receive faxes at any time of the day or night.
If the fax machines is to be connected to a multi-line system, ask your installer to
connect the unit to the last line on the system. This will prevent the unit from being
activated each time a telephone call is received. But proper connection can not be
made.
• As with all fax units this machine must be connected to a two wire system. If your
line has more than two wires proper connection of the fax machine can not be
made.
Connecting to a Private Branch Exchange
The following points should be kept in mind if you are installing the machine to work
with a private branch exchange{PBX).
1) It is not guaranteed that the unit will operate correctly under all circumstances
with PBXs. Any cases of difficulty should be reported first to the company that
handles your PBX.
2) If all incoming calls will be answered by a switchboard operator, it is recom
mended that the Answer Mode be set to be MANUAL.(See page 7-2.) All incoming
calls should initially be regarded as telephone calls.
3) The unit may be used with either the pulse or tone dialing telephone types.
1-4
Page 11
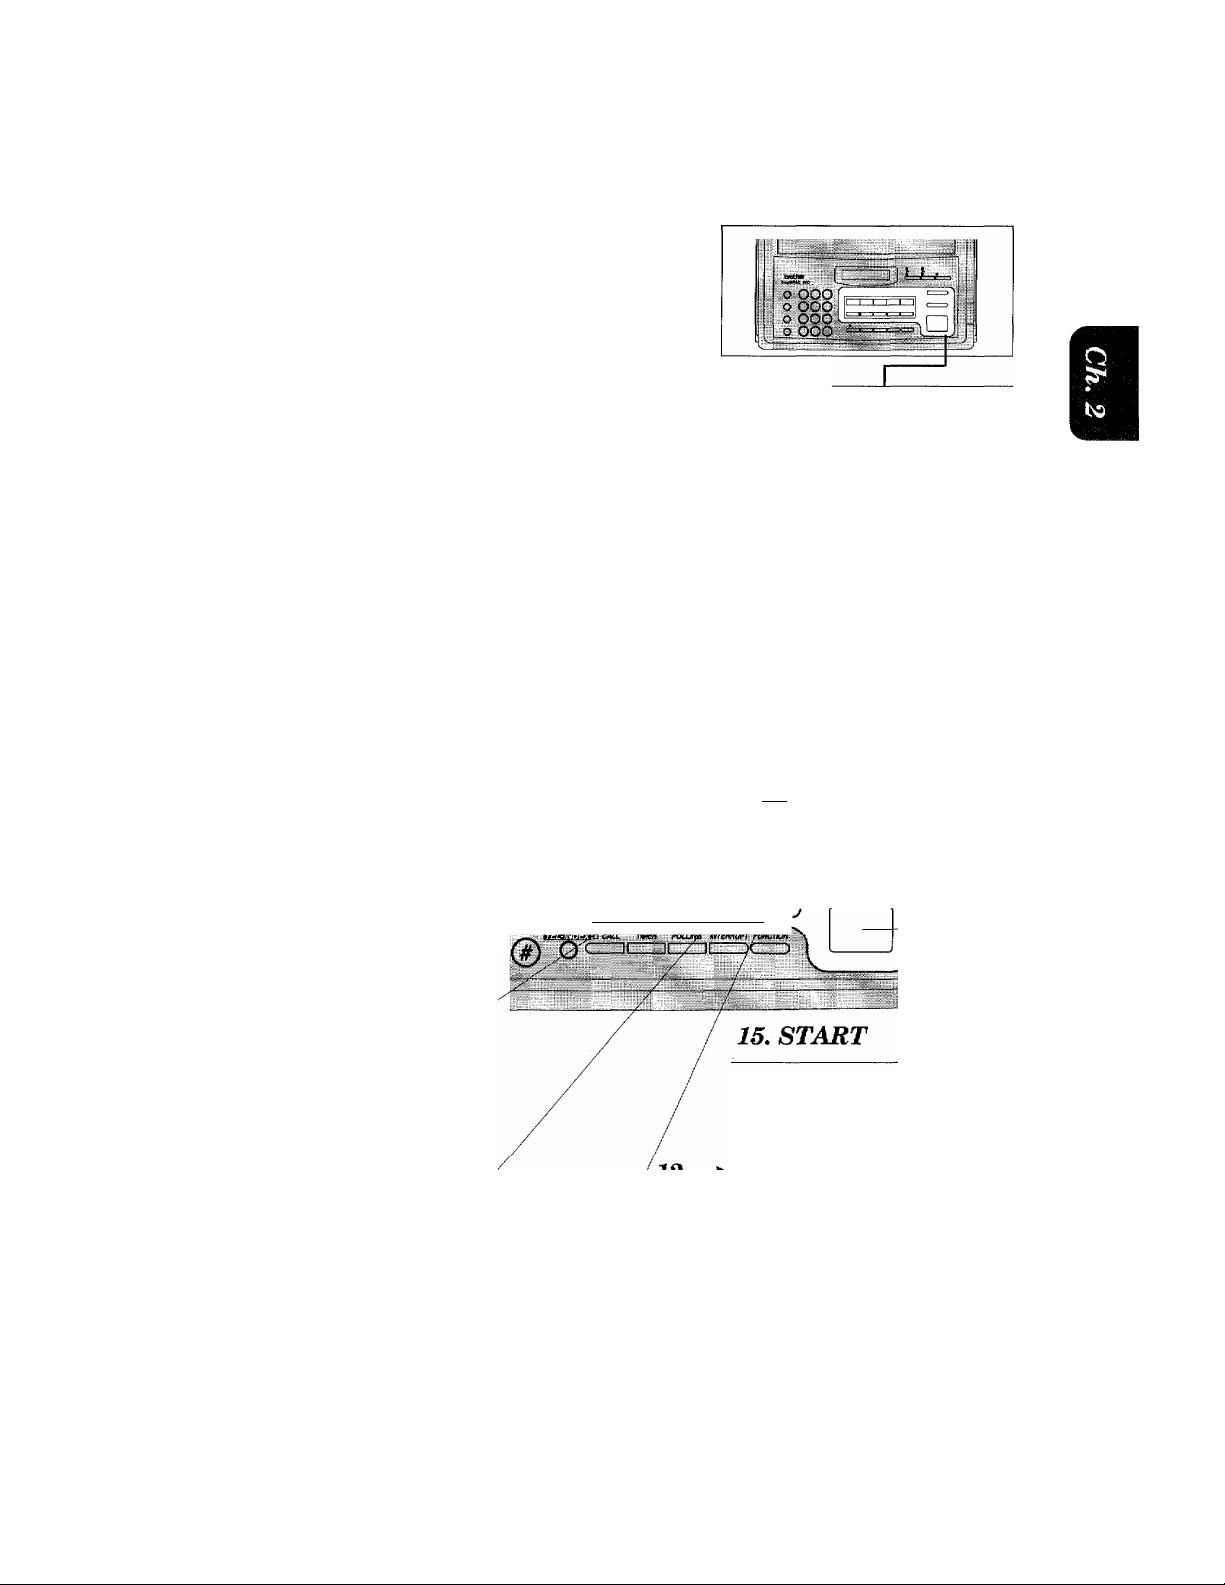
2. THE CONTROL PANEL KEYS
FAX-600
THE CONTROL PANEL KEYS
FAX680
OTel ephone Area ® User Sett
Tzzrd
brother
IntefliFAX 600
o ©®®
HOLD
o @®©
OtAÜPAÜSE
o TE)®®
PEED DIAL 05^
O ®@®
'■ 1'
_________
o CAU mteft poLim ¡//jE/tm/pr pvncwn
I c
ZZZICZZ=3CZZZ1I=)'
ing Area
--—:rd
O FINE O AUTOANS
_ nnu: M AUfi
I
I y-PHOTO \-TAD
I O S.RNE O F/T
TAD
F/T o œvEmtsE
4QE I
) I
_
/
ri
>1
I
(BFunction Area iBOne-Touch Area
® Telephone Area
fe
brother InteltlFAX 680
o ®®®
I o a>(5)(6)
I'O"'®"®'®
I SPEJDDMt --
I o ®®@
v_
® User Setting Area
I
ITSHffT
'o
___EEagn MU 7MEH KÎUJWG miERRm FUNCTION
I o t—II—II—II—if—^
(BFunction Area tB One-Touch Area
□
FINE
□
AUTOANS
\-PHOTO
□ s.me □ F/T ° coKEHWGf I
I
t II If
h
TAD
.............................. "J f
ll
I
1
2-1
Page 12
Hb CONIKOL PANEL KEYS
© TELEPHONEAREA
r.
o OOO
o OOO,
o OOO'
^ o OOO
< ■ -S-
i. Liquid Crystal Display
i-_-i I-,
“ a
Intelli FAX-680 Intelli FAX-600
The LCD displays messages that will
help you set up and operate your fax
machine (On-Screen Programming).
(See page 3-1.)
2. HOOK
This key lets you dial telephone \
and fax numbers without lifting ^
the handset. (See page 5-1.)
3. HOLD
o OOO '
o OOO ■
o OOO
q OOO
LJ l.i
LJ
6. Number Keys
These twelve keys are used to
dial phone and fax nmnbers (see
page 5-1), and can also be used
as an alphanumeric keyboard
for enteringinformationinto the
fax machine (see page 3-5).
You can use this key to put a call on
hold. (See page 5-1.)
4, REDIALfPAUSE
This key re-dials the last number
called. (See page 6-5.) This key is
also used to insert a pause in
autodial numbers. (See page 4-5,
5-1.)
5. SPEED DIAL
This key lets you access previously
stored speed dial phone numbers
with a two digit number. (See page
4-6, 5-1.)
2-2
c
^ {mr®
noi@®®
iswr
int
Page 13
© ONE-TOUCHAREA
br-
1
bfOOWjtfMi w
o OOO'^
o ooq
o ooa-^
o 000 O'
THE CONTROL PANEL KEYS
Intelli FAX-680
7. One-Touch Dial Keys
These keys give you instant access to
previously stored phone numbers. (See
page 4-4, 5-1.)
8,
(Left Arrowy
This key moves the LCD cursor to
the left. It also allows you to back
up one step when you are in func
tion mode (see page 3-4) or Tel
ephone Index.
9. SHIFT
(Only for FAX-680)
This key is used to access
the extra ten One-Touch
keys. (See page 4-4.)
....
] J
□ \
{ 680
----------
-----------------
Intelli FAX-600
13, COPY
Use this key to indicate your
fax machine to make a copy.
(See page 8-1.)
14, STOP
This key stops a fax, cancels
an operation, or exits from
function mode. (See page 3-4.)
□ fi№ q dUTOAMS
■. hworo h TAO
^&RHB □ F/T ° CCVSPFMS
t ---.II
______
ZJ\
______
3
--¿LDAIt- —
...y
i
10. SET*
This key is used for storing
a function setting into the
fax machine. (See page 3-4.)
Use this key to start an
operation, such as send
ing a fax. (See page 6-3.)
11, CLEARS
This key deletes entered
data or backs up one step in
a function mode procedure.
(See page 3-4.)
L
This key moves the LCD cursor to the
right, and it also lets you advance one
step when you are in a function mode
(see page 3-4) or Telephone Index.
The Left and Right Arrow keys, SET and CLEAR keys are also shared with one-touch keys,
(Right Arrowf'
2-3
Page 14
^MECONTROtm KEYS
liiliiii
® FUNCTION AREA
. J'i'i
Intelli FAX-680
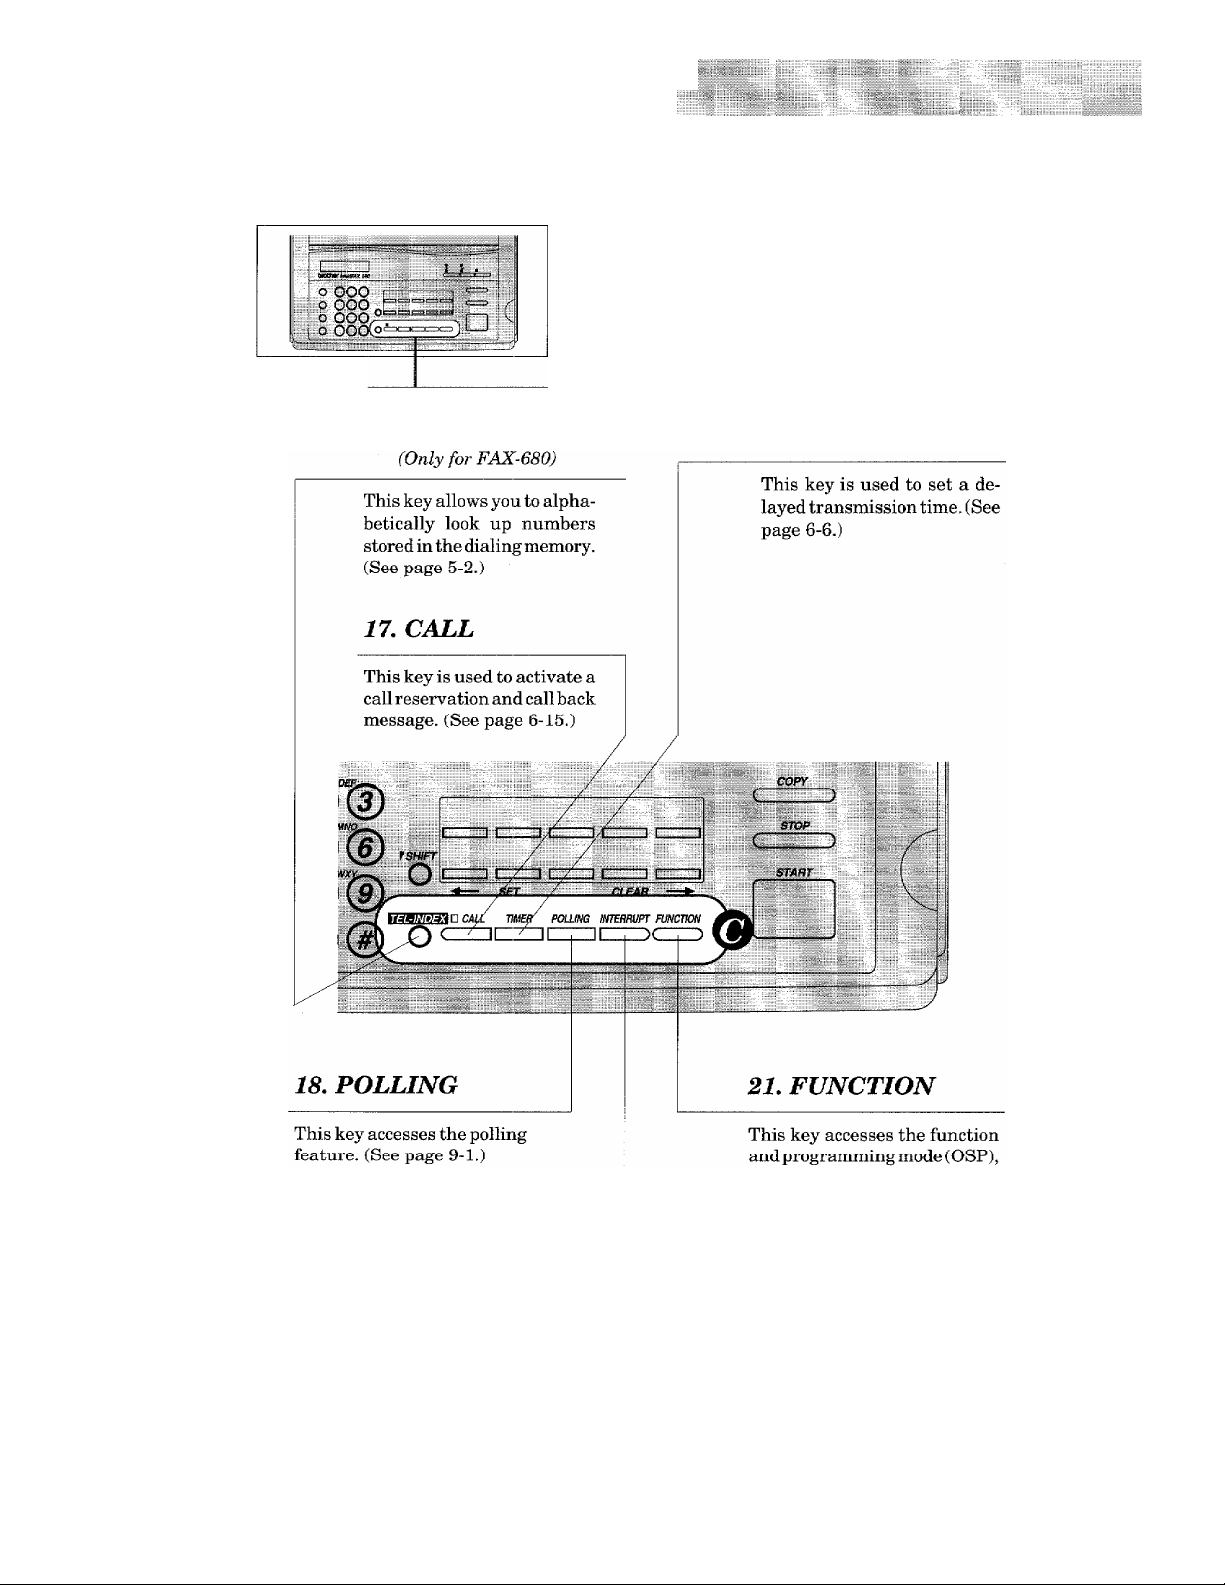
16. TEL -INDEX
o OOO
o OOO
o OOO .
o OOO ■.
Intelli FAX-600
20. TIMER
i-.-. I
r.-zrr f 1—T";
19. INTERRUPT
It is used to temporarily interrupt
the timer job. (See page 6-7.)
2-4
where you can alter v£
settings. (See page 3-1.)
Page 15
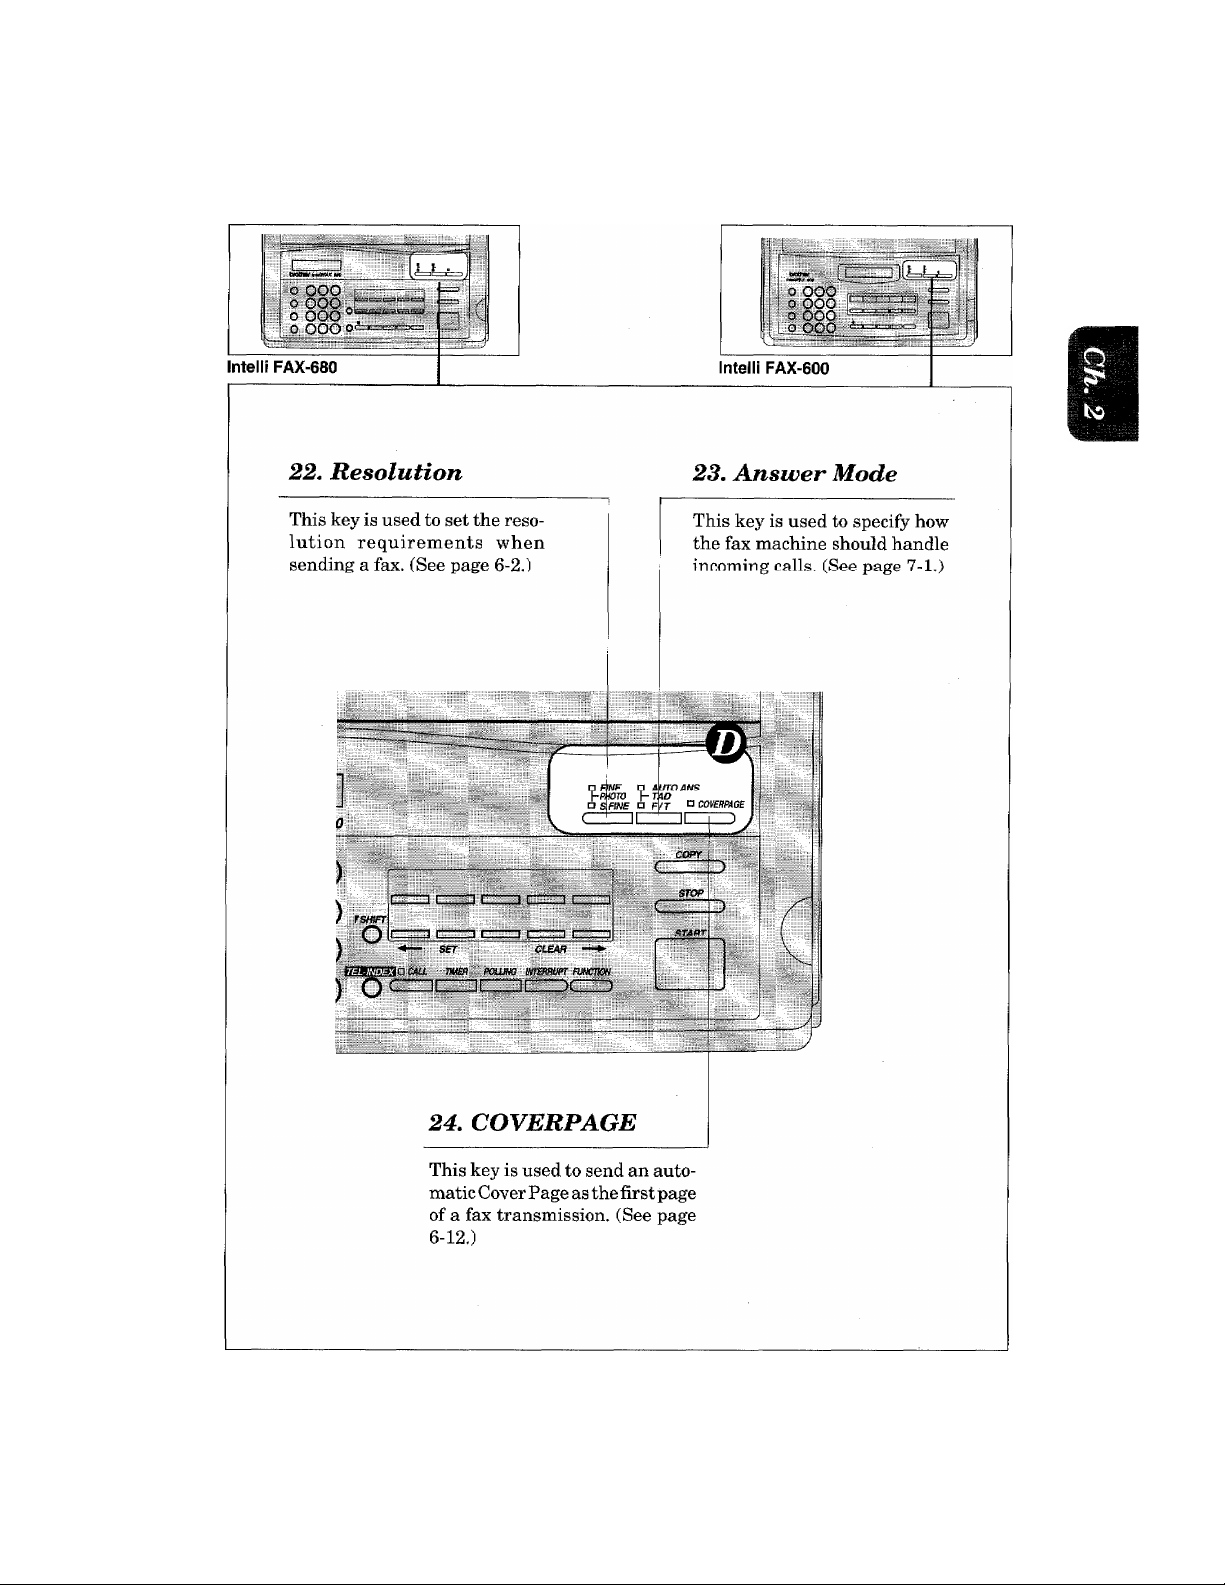
© USER SETTING AREA
THE CONTROL PANEL KEYS
2-5
Page 16

liiseiEiHi^^^ (osp)
3. HOW TO USE ON-SCREEN PROGRAMMING (OSP)
What Is On-Screen Programming
Since your fax programming is done on our LCD display, we created step by step On-Screen
prompt messages to help you program your fax. All you need to do is follow the prompt
instructions as it guides you through the function menu selections and programming options and
settings.
If you have a basic understanding of the options and settings that are found in the programming
function, you could perform most of the programming settings without the owner’s manual.
To help you understand what function selections, options, and settings are found in your fax
program, we have the following Function Selection Chart.
Read through this Chart to gain a basic imderstanding of what your new fax model can do, and
then the next section will begin instructing you How to Use On-Screen Programming.
Function Selection Chart
Level one
function
1.TEMP.
SETTINGS
2. CANCEL
JOB
3. PRINT
REPORTS
Level two
function
1. CONTRAST
2. RESOLUTION
3. OVERSEAS
MODE
Explanation of Options
There are three types of contrast settings.
Usually the AUTO setting is aeceptahle. Put
if you want to send an especially light or dark
document, please change the setting.
AUTO: Default setting is AUTO. Contrast
setting always reverts to AUTO after
one transmission.
S. LIGHT: To send very light documents.
S. DARK: To send very dark documents.
If you need to send a set of originals at various
resolutions, this function will allow you to
send your required resolution by page, (If all
documents are the same resolution, use the
Resolution key. See page 2-5 #22.)
STANDARD/FINE/S. FINE/PHOTO
If you have trouble when sending overseas, you
may want to use set OVERSEAS MODE to ON.
ON/OFF
If you wish to cancel a job that has been set
with the timer, a polled job etc., use this
function.
You can print several different lists and
reports, which are available under function
item 3. PRINT REPORTS.
Factory
setting
AUTO
RTAN
DARD
OFF
Page
6-3
6-10
6-9
6-8
10-1
4. SET AUTO
DIAL
3-1
TONE-TOUCH
DIAL
If you register names and numbers to onetouch dial keys, you can dial a number auto
matically just by pressing a one-touch key.
(20 locations for FAX-680, 5 locations for
FAX-600)
4-4
Page 17

HUW lU USb ON-SCREEN PR
Level one
function
4. SET AUTO
DIAL
5. USER
OPTIONS
Level two
function
2. SPEED-DIAL
1. SMOOTHING
2. BEEPER
3. COVERPAGE
4. GRAY SCALE
(Only for FAX-
680)
Explanation of Options
If you register names and numbers as SpeedDial numbers, you can dial a number auto
matically just by pressing SPEED DIAL and
a two-digit number. (40 locations for FAX680, 10 locations for FAX-600)
Smoothing enhances the appearance of
incoming faxes.
If you set SMOOTHING to ON, you can
receive messages with smoothing.
ON/OFF
You can adjust the volume of the beeper with
this fimction.
OFF/LOW/HIGH
If you set COVERPAGE to ON, you can send
your documents with a Cover Page generated
by your machine. When the COVERPAGE
setting is ON, you can select a Cover Page
comment.
ON/OFF
You can select a GRAY SCALE level.
16/32 level
Factory
setting
ON
LOW 4-1
OFF
32 6-11
Page
4-6
7-8
6-13
6. TEL
OPTIONS
7. SETUP
SYSTEM
There are two different dial types and you
1. TONE/PULSE
must select the type of signal suitable for your
telephone.
TONE/PULSE
The number of rings that will occur before F/
2. RING DELAY
T or AUTO Answer Mode selections are acti
vated.
0/1/2/3/4 rings
If you set AUTO REDIAL to ON, your ma
chine will automatically re-dial the last
3. AUTO REDIAL
number called in the event the number was
busy or the call failed for some other reason.
ON/OFF
4. SPEAKER
VOLUME
You can set the speaker volume.
OFF/LOW/HIGH
F/T RING TIME sets the time for simulated
5. F/T RING TIME
ringing in F/T mode.
10/20/30/60 seconds
6. RING VOLUME The settings are OFF/LOW/HIGH:.
If you enter the date and time in 24-hour
1. DATE/TIME
format, the LCD will display the date and
time and will also be printed on outgoing
faxes.
TONE 4-1
2
ON
LOW
20
HIGH 7-9
01/01/1994
00:00
7-2
6-5
7-8
7-3
4-2
3-2
Page 18

HOWTO USE ON-SCRIEN liQBRAMMING
:::::::::: !i ¿i::
Level one
function
7. SETUP
SYSTEM
Level two
function
2. DAILY TIMER
1 INTERVAL
4. STATION ID
5. REMOTE CODE
6. SETCOVERPAGE
(Only for FAX-
680)
Explanation of Options
If you frequently have delayed jobs, all for
execution at a certain time, you can program
that time. Once you register it, you do not
need to enter that time, just press TIMER.
You can select the interval at which the
antivity report, is printed out.
6/12/24 hours, 2/4/7 days, OFF
You can enter your name or company name,
fax number and telephone number in STA
TION ID.
It is printed at the top of each page of every
outgoing fax. It is also printed on the
automatic Cover Page.
If you enter REMOTE CODE, you can activate
or deactivate the fax machine from a remote
telephone.
ON/OFF
#51(DEACT.)
You can register your own two programma
ble comments on the Cover Page.
Factory
setting
00:00
OFF 10-3
ON
*51 (ACT.)
Page
6-6
4-3
7-5
6-14
3-5
Page 19
HOW TO USE ON-SCREEN PROGRAMMING (OSP)
Using the Function Mode to Access OSP
You can access the function mode by pressing FUNCTION found in the Function Area of your
fax Control Panel. (See page 2-4.)
When you enter the function mode, your fax machine will display a list of Level One Functions
to choose from (see pages 3-1 through 3-3 for these Level One Functions), as seen below.
( EN TER N O. & SET }
T
Left arrow
sequence
; 1 .TE^
( 2.CAf JC EL
i 3.PR] :n t i ^EP ORTS
( 4.SE1
i 6.USER Of ^ TIO
IP.S I
I
t
t
■ AU"
ETT I
ro D
JOB
NGS
1
\
lAL
1
NS
'j
..
1
;
.
Right arrow or
auto scroll
sequence
\
ft.TEC OP TIONS )
t
[7.S ETUP SY STEM j
These function options will appear one after the other on the display. You can then choose one of
these options by pressing SET when your desired option appears on the LCD.
You can also move through the function menu options at a faster rate by pressing —► (right arrow).
(See page 2-3 to locate this key on your Control Panel.) When you find the option you want, press
SET.
You can simply press the Level One Function number associated with each option (again refer
to page 3-1 through 3-3).
Helpful Hints If you want to exit the function mode, simply press STOP. Also, if you select the
wrong menu, and to return to the previous step, press CLEAR.
3-4
Page 20

HOW TO USE ON-SCREEN PROGRAMMING (OSP)
Alternating Displays for OSP
I. SPEAKER:HIGH
--------------------------- -------
C
t SELECT
ALTERNATE
......^ & SET) example shows the current speaker volume is high and
* alternate between the currently selected option, and a help
, ^ message giving brief instructions on how to proceed. The
When you see alternating displays, the LCD will usually
prompts you to use <— (left arrow) and —► (right arrow) to
alter the setting, and then to press SET to store it.
How to Enter Text in the Function Mode
Each number key has two or three letters printed by the side of it. The “1” key and the key and
the key have no printed letters because they have special characters.
ABC ^DEF ^—..
(D (D (3)
(4) (D (6)
TUV . WXY
@ (D (9
QZ
*) 0
By pressing the appropriate number key the correct number of times, you can get the
character you want. When you are making certain settings, such as the Station ID settings,
you need to enter text into your fax machine.
Key
2
3
4 G
5
6
7
8
9 w
0
once
A
D
J
M
P R
T U
Q
twice
three times
B C
E
H
K
N 0
F
I
L 5
s
V
X Y 9
z 0
four times
2
3
4
6
7
8
Q
Let's say that you want to enter the initials “BR.” Follow the example of next page.
3-5
Page 21

liwitaiiiiii
HOW TO USE ON-SCREEN PROGRAMI
KEYS TO BE pressed
1. Press 2 twice to enter the letter B.
2. Press 7 twice to enter the letter R.
3. Press SET.
1. If you want to enter a blank space, press —*■ (right arrow) twice.
2. If you entered a letter incorrectly and want to chan ge i t, yon ca m i rp ^— (left arrow)
to move the cursor back to where it is, When you reach the letter, you can enter
anew one in it's place. You can only overwrite letters, not insert them, so you may
have to go back and overwrite a lot of letters if you forget to enter a letter.
3. If you enter a character which is assigned in the same number, press ■
to move the cursor to the right.
STATUS OF LCD DISPLAY
(NAME; »
C
(EiTER & SET
f NAME:B
f NAME:BR
(right arrow)
.
■ ■ ■ 1
)
How to Enter Special Characters^ Symbols and Punctuation
Marks in the Function Mode______________________________________________
1 key
----------------
Mi key
------
-----
# key
-----------
The “1” key contains all the accented characters. The and the key are used for punctuation
marks and symbols. Let's say that you want to enter the Symbol Follow the example below.
AEOUACEEl
—- (space) !”#$%&’()*-e,-./
-----
— :;<=>?@[]'^_
KEYS TO BE PRESSED
( tW kME: JAMES ^ 1
1. Press* to show a list of characters. rMARK- ! ”#$% & -( y®: ^
2. Press *,*,*,*,*,* (6 times). fMA R K - ! ”#!%& ) * a]
3. Press “► (right arrow). 1
3-6
Page 22

' TELEPHONE IWilWW SEW GS
......................................
4. TELEPHONE FUNCTION SETTINGS
............
.
There are some settings, such as the date and time, you should make to your fax machine before
you begin using it. Once entered, these settings will remain in the machine until you change them.
You can begin customizing the settings by pressing FUNCTION on the control panel. This ac
tivates the function mode and On - Screen Programming prompts. You can complete a variety of
settings in this mode.
Setting the Dialing Mode (TonefPulse)
_____________________________
Your fax machine supports both tone (or multi-frequency) and pulse (or rotary) dialing. It is
initially set to TONE, so you do not need to change the setting if you use that kind of line. If you
are using a pulse dial line, you can change the setting to PULSE by following the steps below:
KEYS TO BE PRESSED
1. Press FUNCTION.
STATUS OF LCD DISPLAY
f 01 /01/1994 00:00 I
I
1.TEMP.S ETTIN GS
You will see scrolling options on the dis
play. You can choose one.
2. Press 6.
3. Presa 1.
After two seconds you will be automati
cally prompted to select pulse or tone.
4. Press <— (left arrow) or —► (right
6.TEL OP TIONS
1.TONE/PULSE
DIALING:TONE
c
f SEL ECT < > & SET I
( DIAL ING:PULSE d
:i
........
•• ••
;
:)
arrow) to find the dialing mode
that matches your telephone line.
Example: PULSE
5. Press SET.
1.TONE/P ULSE
6. Press STOP to return to date and
time.
Setting the Beeper Sound Level
If the beeper setting is LOW or HIGH, it will “beep” every time you press a key, make an error,
or at the end of sending or receiving a fax.
The initial setting on your fax machine for the beeper is LOW. If you do not want the beeper on,
select OFF, and if you want it loud, select HIGH.
4-1
Page 23

TELEPHONE FUNCTION SETTINGS
KiYS TO BE PRESSID
1. Press FUNCTION.
2. Press 5.
3. Press 2.
4. Press ◄ — (left arrow) or —► (right
STATUS OF IGD DISPLAY
( 01/01/1994 0О:О(П1
( l.TFMP.SE.iTINGS 1
L ....
..............
( 2.BEEPER
[ BEEPER:L OW
c
PSELE CT < >
[ BEEPERtO FF
DHlONS П
:)
arrow) until you get the setting you
want.
Example :OFF.
5. Press SET.
2.BEEPER
6. Press STOP to return to date and
time.
Setting the Date and Time
Your fax machine shows the date and time on the display and prints the date and time on every
fax pages you send. You can set the date and time in function mode.
KEYS TO BE PRESSED
1. Press FUNCTION.
2. Press 7.
3. Press 1.
4. Enter the last two digits of the
year.
Example: 93.
5. Enter two digits for the month.
(JAN = 01, OCT = 10, etc.)
Example: 09.
6. Enter two digits for the day.
Example: 12.
7. Enter the time in 24-hour format.
Example: 15:25. (3:25 P.M.)
8. Wait for two seconds.
9. Press STOP to exit and view the
new date and time.
STATUS OF IOD DISPLAY
r0l7 01/199 4 OOiOin
( l.T EMP.S ETTU
PafeSETU P SYSTE M
1.nATF/TTMF
ENTER YEAR:X X
i EN TER Y EAR:93’
[ EN TER M0NTH:XX)
rEN TEp~M 0NTH :d'9 )
( EN TE~PdAY : XX )
ENTER DAY:12________
ENTER TIME:XX :XX
1 ENTER TIME :15:25
i.UAIЕ/IIME
[09/12/1993 15:25 ;
Э
4-2
Page 24

TELEPHONE FUNCTION SETTINGS
Setting the Station ID
Tht; SLaLiuj;! ID is for identiflcation purposes. Here you can store your name, fax number, and
telephone number. Your machine then prints this information on the electronic Cover Page and
every fax page you send.
KEYS TO BE PRESSED
1. Press FUNCTION.
2. Press 7.
3. Press 4.
You will then be prompted to enter your
fax number.
4. Euler yuur fax number (up to 20
digits).
Example: 4155554444.
5. Press SET.
You will now be prompted to enter your
telephone number.
6. Enter your telephone number (up
to 20 digits).
If your telephone number and fax number
share the same line, enter the same
number again.
Example: 4155554445.
OF LCD DISPLAY
■ 00/12/1093 15:25 ;
r1-T EMP.SETTINGS ) fTT 'S ET U P SYS TEM )
i 4.STA TION ID 1
|_FAX^
C
[ EN TER & SET
FAX:4155554444
r tel":
C
( EN TER & S ET
CiilEL:4l'^554445_ J
___
1
:)
J
:)
7. Press SET.
Yon will he prompted to enter name or
company's name.
[ NAME:
c
C
ENTER & SET
[ NAME:B ROTH ER
1
“3
8. Enter the name by using the
number keys (up to 20 characters).
Example: BROTHER.
Refer to the section “How to Enter Text
in the Function Mode” on the page 3-5,6.
9. Press SET to confirm the entry.
[4.STATION ID
3
10. Press STOP to return to date and
time.
Helpful Hints 1. The telephone number which you stored above is only used for the Call Back
Message and the Cover Page features.
2. If you do not enter a fax number, no additional information can be entered.
3. When you enter a space, use —► (right arrow). Then it will be registered as a
blank space,
4-3
')
)
Page 25

¡^■ 1
NOTICE
TELEPHONE FUNCTION SETTINGS
The Telephone Consumer Protection Act. of 1991 makes it unlawful for any person
to use a computer or electronic device to send any message via a telephone fax
machine unless such massage clearly contains in a margin at the top or bottom of
each transmitted page or on the first page of the transmission, the date and time it
is sent and an identification of the business or other entity, or other individual
sending the message and the telephone number of the sending machines or such
business, other entity, or individual.
In order program this information into your fax machine, you should complete the
steps of the previous page.
Storing One-Touch Dial Numbers
You can dial numbers automatically by storing telephone or fax numbers as One-Touch dial
numbers. You can also store names with the numbers so that when you call, you can verify the
destination on the display. You can store a maximum of 20 phone numbers for FAX-680 (01-20)
and 5 phone numbers for FAX-600 (1-5). To use 11 to 20 One - Touch number locations (only for
FAX-680) , you need to press SHIFT. For example, One - Touch location "11" is accessed by
pressing SHIFT + One-Touch “01” simultaneously. Here is how to store a telephone number as
a One-Touch dial number:
KEYS TO BE PRESSED
1. Press FUNCTION.
2. Press 4.
3. Press 1.
4. Press one of the One-Touch keys,
you want to use to store a number.
Example: One - Touch 05.
5. Enter a number (up to 20 digits).
Example; 4155551212.
6. Press SET.
You then will be prompt to enter the
name or company associated with this
number.
7. Enter the name by using the
number keys (up to 17 characters).
Example: NJ OFFICE.
(See pages 3-5 and 3-6 for how to enter
text.)
OF LCD DISPLAY
f 09/12/199 3 15 : 2 5 ^1
fl. rEHi^Erxiigira)
r~4."SEf AUTO DIAL~~1
GiYoNFYbucH ‘ DIA Q
1 SELECT O NE-TO UCH 1
r*05 ¿i
c
( EN TER & S E
[ *0574155551212 „ J
NAMF :
Ch
ENTER & SE T
l l|: AM E :N J OFFICE
3
J
4-4
Page 26

9. Select the type of number (FAX,
TEL, F/T, CHAIN)by using the ^
(left arrow) or —► (right arrow) to
display the type you want.
(See For Your Information of below.)
Example:FAX
r'TYPE'VFAT
______
.
10. Press SET.
( SELECT ONE-TOUCH]
11. Return to step 4 to enter another
number, or press STOP to return to
date and time.
Helpful Hints If you have to wait for a dial tone when you get access to the outside line, you
should use REDIAL/PAUSE.When you press REDIAL/PAUSE, a dash
will appear on the display. By storing the numbers with a pause, you can create
a delay of 3.5 seconds.
FOR YOUR INFORMATION
Types of Numbers
When you store a number as a One-Touch or as a Speed-Dial number, you have a
choice of choosing what type of number it is. There are 4 options:
1. FAX (A fax number).
2. TEL (A telephone number).
3. F/T (Both a fax number and a telephone number)
4. CHAIN (A number, usually an access code, for chain dialing).
Chain Dialing
Sometimes you may want to choose from among several long-distance carriers when
you make a call. This is because rates may vary depending on the time and
destination. To take advantage of low rates, you can register the access code of a long
distance carrier as a One-Touch or a Speed-Dial number for chain dialing. To do this,
you store the access code as you would a regular number and register it as a “chain”
number. (See the step 9 of this page.) Then, when you want to make a call, you use
this number in combination with the regular number, which also may be a OneTouch or a Speed-Dial number.
You can start a chain dialing call by pressing a One-Touch key or SPEED DIAL and
the two digits that has an access code. Next you press another One-Touch key or
SPEED DIAL and the two digits which has the regular phone number or press the
number manually, and then press START to begin calling.
4-5
Page 27

ililiii
TELEPHONE FUNCTION SETTINGS
Storing Speed-Dial Numbers
When you store a phone or fax number as a Speed-Dial number, you need to enter a two-digit
number, from 01 to 40 for FAX-680 and from 01 to 10 for FAX-600 using the number keys. For
example, you cannot enter “5”. You need to enter “0”, “5”. You can store as many as 40 numbers
(FAX-680) or 10 numbers (FAX-600) as Speed-Dial numbers.
KEYS TO BE PRESSED
1. Press FUNCTION.
2. Press 4.
3. Press 2.
4. Use the number keys to enter two
digits number.
Example:05.
5. Enter the number (up to 20 digits).
Example: 5555151.
6. Press SET.
You then will be prompted to enter the
name or company associated with this
number.
7. Use the number keys to enter a
name (up to 15 characters).
Example; MANCHESTER.
(See pages 3-5 and 3-6 for how to enter
text.)
STATUS OF LCD DISPLAY
( 1)9/12/1993 l5 : 25^1
f l.TEMP . S ETT I’Slg g a
( 4. S ET a IJ T O Pj A L
2 .SPEED-DIAL SPEED-DIAL? #_ SPEED-DIAL? #05
#05:
c
1 ENTER & SET n#0 5 : 5 55 5 15 "!
( NAME:
c
i ENTER &SE
EiMANCHESTE
________
)
i
:)
8. Press SET.
9. Select the type of number (FAX,
TEL, F/T, CHATN)by msing^ (left
arrow) or ► (right arrow) to display
the type you want.
Example: TEL.
10. Press SET.
11. You are ready to enter another
Speed-Dial number, or press STOP
to return to date and time.
( TYPE:FAX
C
SELECT < > & SET 1
TYPE:TEL
SPEED-DIAL? #.
:)
J
4-6
Page 28

TELEPHONE FUNCTION SETTINGS
Helpful Hints 1. Print out the All Dial List to make sure you have stored the correct numbers.
(See page 10-2.) This list will contain the type of number: FAX or TEL.
2. Even if there should be a loss of electrical power to your fax machine, the
telephone and fax numbers you have stored will not be lost.
Hr liUR INFORMATlGill
When You Wish to Change to the Store One-Touch and Speed Dial
Numbers (During Step 4 on Page 4-4, 6)
When you press the One-Touch key or Speed-Dial number, if it is already in use, you
will be asked if you wish to change it or exit and select a different One-Touch or
Speed-Dial number. This display does not appear if the One-Touch key or Speed-Dial
you chose is not assigned.
1. Press 1 to assign a new number to the One-Touch key or Speed-Dial, or press 2 to
choose a different One-Touch key or Speed-Dial.
*05:NJ oFFICSf
^ fTTCHANGE 2. EX IT.,!
......
.
:)
2. If you are replacing an existing number with a new one, the old number and name
will appear in the display. Press CLEAR to erase the old number and name. Then,
enter the new number and name and press SET to store the entry.
Memory Storage
Your fax machine is equipped with an internal battery that will keep it working for
up to two hours after power has been cut off. After that time, the date and time will
be lost and you will have to re-enter the information. All other settings in the USERS
OPTIONS and SETUP SYSTEM functions are stored permanently and will be
retained even in the event of a power failure.
Helpful Hints 1. If your fax machine is connected to a PBX, you may need to insert an additional
number before each fax or telephone number to get access to the outside line.
4-7
Page 29

'l i fe
I:..
feillllilii
5. USING THE UNIT AS A TELEPHONE
...
iilili
USING THE UNIT AS A TELEPHONE
Your fax machine can be used to make regular telephone calls. You can dial numbers manually,
by pressing the number keys, or by using One-Touch or Speed-Dialing.
Manual Dialing
1. Pick up the handset, or press HOOK.
2. When you hear the dial tone, you can begin dialing by pressing the number keys.
3. If you used HOOK, pick up the handset when the call is answered.
One-Touch Dialing
1. Pick up the handset, or press HOOK.
2. When you hear the dial tone, press the desired One-Touch key.
3. If you used HOOK, pick up the handset when the call is answered.
If you try to use a One-T ouch number that has not been registered, you will hear a warning sound
and the display will carry a message reading,“NOT REGISTERED”. The display will return to
normal after 2 seconds.
Speed Dialing
1. Pick up the handset or press HOOK.
2. When you hear the dial tone, press SPEED DIAL and then the 2-digit Speed-Dial number.
3. If you used HOOK, pick up the handset when the call is answered.
FOR YOUR INFORMATION
Using Keys with the Telephone
- Use REDIAL / PAUSE for putting a pause between numbers.
- Use HOLD to put a call on hold. You can put down the handset without
disconnecting the call
- Use # to switch the dialing type to “tone” from “pulse.” This key is also used for push
button services, such as those offered by banks, credit card companies, or paging
services.
On Hook Dialing
When you make a call using HOOK, you can listen to the other end of the line, but
they can’t hear you unless you pick up the handset. Also, if you press HOOK a second
time, the call will be disconnected.
5-1
Page 30

Telephone Index (Only for FAX-680)
Once you have registered a name and number as a One-Touch number or as a Speed Dial number,
you can alphabetically find where things are with the Telephone Index. You can also dial a
number directly from the Telephone Index.
STATUS OF LCD DISPLAY
i 09/12/1993 15:2^
1. Press TEL-INDEX.
2. Press <— (left arrow) or —► (right
arrow) or use the number keys to
input the first character of the
stored name, to find the name.
3. Pick up the handset, or press
HOOK.
4. Press START to begin dialing.
Return the handset to its cradle or
press HOOK to cancel the call.
[ TEL.INDEX
[= NJ OFFICE
3
5-2
Page 31

BASIC FAX TRANSMISSIONS SENDING FAXES
6. SENDING FAXES
A) BASIC FAX TRANSMISSIONS
The Size of Your Documents
216mm (8.5")
The size of the documents you want to send by fax should not be larger (or smaller) than what your
fax machine can accommodate. The documents should each be between 148 and 216 mm (5.8 and
8.5 inches) wide and between 100 and 900 mm (3.9 and 35.4 inches) long.
The maximum width of the scanned area is 208 mm (8.2 inch).
How to Set the Document
To send a fax, first insert the document you wish to send, face down, in the
document feeder. The top edge of the document should go in first, or the fax will
be received up side-down.
To prevent the document from skewing at it is fed, adjust the paper guides to
fit the width of the document.
NOTICE
V
dOl
Page 32

SENDING FAXES BASIC FAX TRANSMISSIONS
The Auto Document Feeder (ADF)
The Auto Document Feeder (ADF) automatically feeds documents (up to 15 pages for FAX-680
and 10 pages for FAX-600) into the fax machine, one at a time. The thickness and weight of the
documents should fall into the following categories:
Thickness: For one sheet: 0.07 to 0.12 mm (2.8 x 10'^ to 4.7 x 10'® inches).
For multiple sheets: 0.07 to 0.10 mm (2.8 x 10 ^ to 3.9 x 10® inches).
Weight: For one sheet: 52 to 85 g/m^ (0.07 x 10'® to 0.121 x 10'® Ibs/inch^).
For multiple sheets: 52 to 80 g/m^ (0.07 x 10’® to 0.114 x 10’® Ibs/inch^).
As a reference, please note that the paper on which this is printed has the following thickness and
weight:
Thickness: 0.10mm
Weight: 80g/m^
Before inserting documents into the document feeder, make sure the documents are not stuck to
each other, and fan the sheets of paper before you put them in. Make sure you always put the
documents in face down.
Getting Ready to Send Faxes
Resolution
You can choose a setting (STANDARD, FINE, SUPERFINE, or PHOTO) for the resolution any
time before you press START or COPY. You can choose a setting by pressing the Resolution key.
( □ means light off.
STANDARD
FINE
□ FtNE
PHOTO
□ s.mE
i
.........
■ FINE
PHOTO
□ S.RNE
c
SUPERFINE □ f>ne
\- PHOTO
■ S.FINE
means light on.)
The STANDARD resolution can be used for most typewritten
text. When the STANDARD setting is on, both lights are off.
Transmission speed is normal.
~l
The FINE resolution is an ideal setting to use if you want to send
documents that have small print. When the FINE setting is on,
the FINE light will be lit.
Transmission speed is slower than STANDARD.
The SUPERFINE resolution is a good setting to use for documents
with very small print or artwork. When the SUPERFINE setting
is on, the S. FINE light will be lit.
Transmission speed is slower than FINE.
PHOTO ■
\\
|—
PHQTO
■ S.FINE
___
The PHOTO resolution is ideal for sending documents that have
varying shades of gray, such as photographs. The PHOTO setting
is on when both lights are lit.
_
Transmission speed is slower than FINE.
To set resolution par page, refer to Multiple Resolution Transmission on page. 6-10.
6-2
Page 33

BASIC FAX TRANSMISSIONS SENDING FAXES
Contrast
The fax machine has automatic contrast control, but if you need to send a document that is very
light or very dark, you may want to set the contrast yourself.
Use SUPER LIGHT to send a very light document.
Use SUPER DARK to send a very dark document.
KEYS to BE PRESSED
1. Place the documents face down in ^ ^ FAX : N0 & START
the feeder. ( a
2. Press FUNCTION. p.j ■ TEMP , $::gTTI NGS R
3. Press 1. pegygHP . SltTlMgSU^
Pre ss I. i 1, CONTRAST
The display will alternate messages. i TRAST : AUTO
STATUS OF LCD DISPLAY
( 09/ 11/lyffe£5-»:2.5.- ]
I
...
^ (. COPYl: iKESi& °C0PYn
^ ^
J
.
.
5. Use <— (left arrow) or —► (right i aiNTRAST:$.LIGHT J
arrow) to select one of the settings,
AUTO, S.LIGHT, or S. DARK
Example: S.LIGHT
6. Press SET. [ 1 . C0NTRAST
7. Press STOP to exit.
^
[ FAXT «N0. & START '
^ fCOPY: PRESS "COPY
____________
....
:)
3
1
:)
J
Then start fax sending operation (page 6-3) or copy (page 8-1).
Sending a Fax Automatically
KEYS TO BE PRESSED
1. Insert the documents face down in
the feeder.
2. Enter a fax number.
Example: One-Touch dialing
3. Press START.
STATUS OF LCD DISPLAY
[09/12/1993 15:25 .1
1 FAX: N07~& STARTI
C
rCOPY: PRESS COP^
r NJ OFFICE
DIAL!
SENDING P.Oll
:)
j
6-3
Page 34

SENDING FAXES BASIC fj\x transmissions
Sending a Fax Manually
KEYS TO BE PRESSED
1. Insert the documents face down in
the feeder.
2. Lift the handset or press HOOK
and listen for the dial tone.
3. Dial the fax number
You can use manual dialing, One-Touch
dialing, or Speed Dialing, or Tel-Index
(only for FAX-680).
4. When you hear a fax tone, press
START.
Your fax machine will begin sending the
documents.
5. Return the handset to its cradle, if
you did not use HOOK.
FOR YOUR INFORMATION
TUS OF LCD DISPLAY
[ 09/12/1993
fTAX: N0. &
C
COPY: PRES
8
.
ENTER FAX N0. 1
i
c
jftfiESS STAR
NJ OFFICE
[
SENDING
:
S COPY .1
15:25j
STARfJ
T KEY 1
:)
3
)
)
Dialing a Number
There are several ways to dial a number. When you dial, you can check the display
to see who you are calling. Choose one of the following dialing methods:
1) Manual Dialing
Dial the fax number by pressing the number keys, then press START.
2) One-Touch Dialing
Press one of the One-Touch keys. (The numbers must be stored beforehand. See
page 4-4.) Then press START.
3} Speed-Dialing
Press SPEED DIAL, then use the number keys to enter a two-digit code.
For example, press “0”, “5” for 05. (The numbers must be stored beforehand. See
page 4-6.) Then press START.
4} Telephone Index (Only for FAX-680)
You can use the Tel-Index to make telephone or fax calls. (See page 5-2.)
Talking to the Other Party When Sending a Fax
When you are sending a fax manually and you hear recipient's voice instead of fax
tones, you can use the handset to have a conversation. When or if you want to then
send a fax, ask the person on the other line to press START on his/her fax machine
and when you hear fax tones you can press START to begin sending your fax.
6’4
Page 35

MM^jWfTRANSMissioNs SENDING FAXES
3111
:
Automatic and Manual Re-dialing
If a number you have dialed is busy or your call did not go through for some other reason, you can
re-dial that number. There are two ways for re-dialing, “automatic” and “manual.” Automatic
redialing can only be used for faxes that were sent using automatic transmission — not for
telephone calls. The factory setting is “auto re-dial on”, but you can change it to “auto re-dial off’,
if needed. If the re-dial function is set on “auto re-dial on”, it will automatically re-dial the number
3 times at 5 minute intervals before giving up. Whether the setting is on or off, the fax machine
will re-dial the last dialed number when you press REDIAL/PAUSE (manual re-dialing).
Setting the Auto Re-dial
immmùmpiAY
I 09/12/19m 15:251
1. Press FUNCTION.
2. Press 6.
E .SETTINGS )
; 6. TEC OP TI DN S
3. Press 3.
4. Use <— (left arrow) or —► (right
arrow) to turn the auto re-dial
function ON or OFF.
Example: OFF
5. Press SET.
( A U TO Reb lM |0 N ^3
C
! SELECT < "" >
[ AUTO REDIAL OFFlTj
E33ÁÜT 0~ RB DIA L 1
6. Press STOP to exit.
FOR YOUR INFORMATION
Possible Settings When You Send a Fax Manually
• Resolution (See page 6-2, 6-10.)
• Cover Page (See page 6-12.)
Contrast (See page 6-3.)
Overseas Mode (See page 6-19.)
• Call Reservation (See page 6-15.)
Printing Page Headers
Your fax machine can print a page header on top of every document you send. It is
printed on the receiving party’s fax paper. It contains the date and time of
transmission, your fax number and name (Station ID), and page number. Of course
you need to register your Station ID beforehand for that information to be available.
:)
Transmission Date and Time Station ID
09/12/1993 15:25 4155554444 BROTHER PAGE 01
Page Number
6-5
Page 36

SENDING FAXES basic fax transmissions
Delayed Transmission
You can set the timer to send documents at a later time (up to 24 hours later). Your fax machine
will also produce a report the “Delayed Sending Report”, after the fax is sent.
KEYS TO BE PRESSED
1. Insert the documents into the feeder.
2. Press TIMER.
3. Enter the time in 24-hour format
STATUS OF LCD DISPLAY
..09/12/1993 15:2^
r FFAX: no. & ST AW D -s ^
'v r r n n \/ - nnr-C'C' r- n n V 'i
COPY: PRESS COPY j
( SET TIiiE=fl0:00
1^'e'T TIHE=19:45
y
1
using the number keys.
Example: 19:45 (7:45 P.M.)
4. Enter the fax number.
5. Press START.
ENTER FAX N0.
c
1 PRESS START KEfe
r~NJ~ office" ^
TIMER WAITING
3
\
The fax machine waits until the specified
time to call.
Setting the Daily Timer (for Delayed Transmissions)
The Daily Timer function lets you send a fax at a set time every day. This is handy for sending
delayed jobs that must go out at the same time daily. Once you make this setting, you don’t have
to enter the time everyday. You just press TIMER, the number and SET if you want to send.
KEYS TO BE PRESSED
1. Press FUNCTION.
2. Press 7.
3. Press 2.
4. Enter the time in 24-hour format
using the number keys.
Example: 19:45 (7:45 P.M.)
5. Wait for two seconds.
6. Press STOP to exit.
6-6
STATUS OF LCD DISPLAY
f 09/12/1.993 15:S~]
rr. TEMPJSETTINGSJ
( 7. SETUP SYSTEM^!]
2.DAILY TIMER
C ENTER TIMEiQOi-DCJ
(ENTER TIME 19:45 ] ( 2.DAILY TIMER .
J
Page 37

BASIC FAX TRANSMISSIONS SENDING FAXES
Interrupting the Timer and Polled Job
You can send a fax without canceling the timer (see page 6-6) or polled waiting (see page 9-2) with
document in the feeder hy “interrupting” it. When you interrupt the timer to send a “new” set of
documents, the fax machine does not automatically re-dial the number if it is busy. Also, you
cannot use the function mode when you are interrupting the timer.
Example; TIMER WAITING with Document in the feeder.
KEYS TO BE PRESSED
1. Press INTERRUPT.
2. Remove documents from the fax
machine.
3. Place “new” documents into the
feeder.
4. Enter the new number to send the
documents then press START.
5. After the transmission is finished,
place the “old” documents back into
the feeder.
6. Press INTERRUPT to restore the
timer.
STATUS OF LCD DISPLAY
( fiMER WAITING J
DO CU M E NT J
r "i N S Eir ili an i M E N f~ ^
[ FAX OR COPY
c
[ INT TO RESET I
i DIALING
: INSERT DOCEMENT '
'“'f a x or copy
c
piLglTT
I TIMER WAITING
TO RESET
1
J
3
3
e-7
Page 38

SEliPING Fy^ffiS BASIC FAX TRANSMISSIONS
Canceling the Job
Use the cancel job function to permanently remove scheduled tasks such as polling or polled job
(see page 9-1) and timer job (see page 6-6) from your fax machine.
Example: TIMER WAITING with document in the feeder.
STATUS OF LCD DISPLAY
1. Press FUNCTION.
2. Press 2.
Any waiting jobs that have been setup
will appear in the display.
3. Use ◄ — (left arrow) or —► (right
arrow) to select the job you wish to
cancel.
4. Press SET.
5. Press 1 to cancel the selected job, or
2 to exit without canceling.
If 1 is selected, the job will be canceled
and the next job in the queue will appear
in the display.
6. Tocancelthenextjobjpressi again.
To exit, simply press 2.
In the event that no jobs are waiting to be
processed, a “NO JOB WAITING”
message will appear in the display.
[ TIKER WAITING
r1■T EM P VS ETTINGS .
f 2. CANCEL JOB 4
j:
.
...............
c
[PSELECT < > &
19:45 NJ OF F IC U
c
TTCLEAR 2. EX IT- )
NJ 0F F IC ~1
NJ OFFIC 1
J
:)
D
:)
6-8
Page 39

FAX TRANSMISSION OPTIONS SENDING FAXES
B) FAX TRANSMISSION OPTIONS
Setting the Overseas Mode
Using the Overseas mode is an efficient way to send faxes overseas. If you experience difficulty
with sending faxes overseas, you may want to use the overseas mode.
KEYS TO BE PRESSED
1 09/1271993 15:25 ]
1. Insert the documents into the
feeder.
2. Press FUNCTION.
3. Press 1.
4. Press 3.
5. Press <— (left arrow) or —► (right
arrow) to switch to ON.
6. Press SET.
7. Press STOP to exit.
8. Then start the fax sending
operation. (See page 6-3.)
After sending your fax, the machine will
revert to OFF.
r
c
feieg'l: PRESSiXOPY )
( i.t e mp ,, ^e tt iw s s :)
( 1 . TC M P.S n
C 3\0Vgi5E^ M:0DT 1
^ fWERSE^: OFF ^
C ffl ““
(-OVERSEAS : ON
( ENIEK FAX~NO~
c
( PRESS^- START KBf3a
------------------
f 3. OVERSEAS M0D_E~1
& START’]
^
:)
:)
:)
6-9
Page 40

S||M SÌNSfF FAX TRANSMISSION OPTIONS
issi
Setting Your Fax Machine for Multiple Resolution Transmission
You can set the resolution of the documents you send by pressing the Resolution key. Once you
set the resolution, all the pages will be sent with the same resolution. However, there may be
times when you want to send some pages with one type of resolution, such as “standard”, and other
pages in another resolution, such as “photo.” If you send all pages in photo resolution, for instance,
it would take a great deal of time. It would be nice if you could specify what pages are to be sent
with what resolution to minimize transmission time. You are in luck because you can make such
a BtiLLixig utthig the l.TEMP. SETTINGS function.
KEYS TO BE «iSSED STATUS OF LCD DISPLAY
.
........................................
...
)
1. Place the documents into the feeder.
2 Press FUNCTION
3. Press 1.
4. Press 2,
5. Press ◄ — (left arrow) or —► (right
arrow) to find the resolution you
want for the page in your
documents.
Example: FINE.
6. Press SET.
Return to step 5 for setting the resolution
for page 2 and the following pages.
7. When you finished setting the
resolution for all your pages, press
STOP.
8. Enter the fax number.
^1 FAX: N0. & ST AR T )
COPY: PRESS COPY^
' 1 . TEMP . SETTI NGS vi
; 1.TEMP.SETTINGS )
f 2.RESOLUTION )
^ r pa g e" 01 ^STANDARD ]
^ I SELECT < T &
PTO E
e
TpAGE 02:FINE
FAX: N0, & START
^ r' cE P Y~ PRESS COPY 1
......
........................
3
9. Press START.
The resolution will revert to STANDARD
after the documenta have been sent.
6-10
Page 41

....
FAX TRANSMISSION OPTIONS SENDING FAXES
Gray Scale (Only for FAX-680)
You can set initial gray scale level either 16 or 32. The initial setting is 32. This is the initial level
of photo mode which is effective to sending photographs. Even if you want to send a document with
32 level photo mode, if the receiving machine does not have super fine mode, the machine will fall
back to 16 level automatically.
KEYS TO BE PRESSED
1. Press FUNCTION.
2. Press 5.
3. Press 4.
4. Press <— (left arrow) or —► (right
STATUS OF LCD DISPLAY
( 097lgyf993 15725”!
ГТТтEMP .‘SETTI NSS
( 5.USER OPTIONS ;i
[ 4.GRAY SCALE
r?l, RA Y SCALE: 32 П
c
fYlL E CT ''i ^: & set":
laRAY SCALE:16 ~'l
arrow) to choose either 16 or 32.
Example: 16.
6. Press SET.
( 4.GRAY SCALE
6. Press STOP to exit.
POR»W INFORMATION :
About Resolutions...
Your fax machine can вое only in black and white, во when you send a color
photograph, even with photo resolution, different colors may appear as the same
shade of gray on the receiving fax.
■iiiSlJiii:
...
- Л
J
D
ill:
6-11
Page 42

SENDING FAXES FAX TRAMMIS^ION OP
Sending a Fax with a Cover Page
An automatic Cover Page will allow you to send details of who the fax is going to, who it is from
and when if it was sent. This what the Cover Page looks like:
09/12/1993 15:25
=== COVER PAGE ===
NNNNNiiiiiNiiipNV:
:iiirHi::h:v •
TO
FAX: 4155551212
FROM: BROTHER
EAX: 4155554444
TEE: 4155554445
COMMENT: PLEASE CALL
NJ OFFICE
00 PAGELS] TO FOLEOW
0)
(2)
(3)
{1) The “TO” information comes from the One-Touch or the Speed-Dial memory. If you are
dialing manually, the name of the destination will be left blank.
(2) The “FROM” information comes from the Station ID.
(3) The number of pages you are sending.
(4) Your comments. You may customize comments (Only for FAX-680).
FOiyOUilNRDRMATION ^ 1
The Comments Section on the Cover Page
You can choose from among 6 options for FAX-680 and 4 options for FAX-600. The
first option is to send no comment at all. The next 3 are built-in comments, and the
last two (Only for FAX-680) are ones you can set yourself. (For more information see
page 6-14.)
1. COMMENT OFF
2. PLEASE CALL
3. URGENT
4. CONFIDENTIAL
*5. (Your own customized comment).
*6. (Your own customized comment). *Only for FAX-680
6-12
Page 43

fj\xTRANSMISSION OPTIONS SENDING FAXES
ilRRESSED
1. Insert the documents into the
feeder.
2. Press COVERPAGE.
3. Use <— (left arrow) or —► (right
arrow) to select the comment you
want.
Example: 2.PLEASE CALL.
4. Press SET.
5. Enter the number of pages you are
sending. (Enter “O’V'O” to leave the
number of pages blank.)
The Cover Page light should come on.
6. Enter the fax number and press
START.
STATUS OF LCD DISPLAY
15:25 I
FAX :| NCrV& START I
C
Г COPY: PRESS COPY 1
( 1 .comment'OFF l)
c
(2.PLEASE CALL j
TOTAL PAGES? :00
ENTER fax“NO.
PRESS START KEY
DIALING
CT <■ .> & S ET i
3
!)
:)
Setting Cover Page ONfOFF
If you often send an automatic Cover Page, you can set it to ON to avoid having to set up the details
of the Cover Page each time. Here is how you can switch the setting for the automatic Cover Page
to ON or OFF:
KEYS TO BE PRESSED
1. Press FUNCTION.
2. Press 5.
3. Press 3.
4. Press (left arrow) or —► (right
arrow) to choose ON or OFF.
Example: ON.
5. Press SET.
STATUS OF LCD DISPLAY
09/12/1993 15:25
l.TEMP.SETTIN G S
5.USER OPTIONS
3.COVERPAGE
r I COVERPAGE:OFF ^ f SELECT '< > & SET
COVERPAGE:ON
[ 1.COMMENT OFF
c
gliiECT < > ^ sefj
3
3
3
6-13
Page 44

F'AK TRANSMISSION OPTIONS
6. If you selected ON, you need to
2.PLEASE CALL
select a comment, by pressing <—
(left arrow) or —► (right arrow).
Example: 2.PLEASE CALL
[SI.Eo verpa
7. Press SET.
The Cover Page light should come on.
8. Press STOP to exit.
FOR YOUR INFORMATION
Sending an Automatic Cover Page
If you have the Cover Page ON/OFF setting to ON, the total number of pages will not
be printed on the Cover Page. Also, the comment you selected when you set it to ON
Tvill be printed on all the Cover Pages you send.
Helpful Hints Even if the Cover Page ON/OFF setting is ON, you can avoid sending an
electrical Cover Page by pressing COVERPAGE once.
You can turn off the Cover Page light by pressing COVERPAGE.
Customizing Your Cover Puge Comment
(Only fur FAX-680)
iniBans!
BE PR
1. Press FUNCTION.
2. Press 7.
3. Press 6.
4. Press <— (left arrow) or —► (right
arrow) to select 5 or 6 where you
wish to store a comment.
Example: 5.
5. Press SET.
6. Enter your customized comment
by using the number keys(up to 27
characters).
(See page 3-5 for more details.)
Example: TOP SECRET.
7. Press SET.
STATUS OF LCD DISPIAY
09/12/1993 15:25
1.TEMP.SETTINGS
/.SETUP SYSTEM
[ 6. SET COVERPAGE
5 .
C
I SELECT < > & SET :)
C 5.
[5
[ 5.TOP SECREI
1^; 6 . SET COVERPAGE ]
.....
)
o
8. Press STOP to exit.
6-14
Page 45

FAX TRANSMISSION OPTIONS SENDING FAXES
Sending a Fcix with Call Reservation
You can send a fax and then talk to the recipient using the Call Reservation feature. When your
fax has been printed on the receiving end, the receiving fax machine will ring as if it were receiving
a telephone call. If the recipient picks up the handset, your fax machine will ring. Then you can
pick up your handset and start a conversation. If the recipient does not pick up the handset when
the Call Reservation function is ON, your fax machine will leave a fax message to have them call
you back if you have the CALL BACK MESSAGE set to ON.
KWS TO iii PRESSED
09/12/1993 15:25 I
1. Insert the documents into the
feeder, then press CA LL .
2. Use <— (left arrow) or —► (right
arrow) to select Call Back Message
ON or OFF.
Example: Call Back Message ON.
C
c:
f FAX:N0. & START ]
L.COPY: PRESS COPY ) fcALL BACK:0N )
SELECT < > & SET
CALL BACKrON
:)
:)
3. Press S E T.
The call light should come on.
4. Enter the fax number, then press
STA R T .
( ENTER FAX N0. '
c
f~P R ES S START KEY
r D IA LI N G
5. Pick up your handset if it rings.
09/12/1993 15:25
=== CALL BACK MESSAGE ===
TO:
FROM: BROTHER
PLEASE CALL AT [TEL] 4155554445
NJ OFFICE
FAX: 4155551212
[FAX] 4155554444
IBRlpURINFORMATION
Using the Call Reservation Function
1. There are some fax machines that will not respond to this function.
:)
.......;
2. When it is auto re-dialing, you cannot use the Call Reservation function, but if
Call Back Message is ON, your fax machine will leave a Call Back Message to have
the other party call you back.
3. You cannot use Call Reservation with the timer or with the polling function.
6-15
Page 46

RhCblVING FAXES AND OTHER CALLS
7. RECEIVING FAXES AND OTHER CALLSl
Selecting an Answer Mode
There are 4 answer modes for your fax machine. You can choose one by pressing the Answer Mode
key repeatedly until you find the mode you want. Choose one that suits your needs. If you need
more information about a particular mode, refer to the page number given.
(, □ means light off. means light on.)
Answer Mode For
1. MANUAL
□ AUTOANS
\- TAD
□ F/T
Answers each call manually.
Mainly use for telephone.
See Page
If you want to answer each incoming call, choose MANUAL mode.
2. AUTO
sw^
■ AUTOANS
\- TAD
□ F/T
Dedicated fax use. Telephone line and fax
line are separate.
If you use your telephone line exclusively for sending and receiving faxes, you may want to use
AUTO mode. In this mode, you can receive all your incoming faxes automatically.
3. F/T
□ AUTOANS
|- TAD
■ F/T
Both fax and telephone use. When you
share one line for your telephone and
fax machine.
If you want to use your telephone line for both fax and telephone, you may want to choose F/
T mode. In F/T mode, your fax machine will answer incoming faxes automatically.
4. TAD
■ AUTOANS
|- TAD
■ F/T
^i\''
Use with external TAD (Telephone
Answering Device). When you are not at
home.
7-2
7-2
7-3
7-6
When you want to use your fax machine together with your telephone answering machine,
choose TAD mode.
7-1
Page 47

RECEIVING FAXES AND OTHER CALLS
Manual Reception (MANUAL mode)
_________________________________
When you set the Answer Mode to manual, you can answer each incoming call yourself. Here is
what you should do when using MANUAL Mode:
If You Get a...
1. Regular phone call
2. Phone call and request
to send a fax
3. Fax tone...
Then You Should...
Talk as you normally would.
Press START after finishing talking, and replace the handset.
Note ; Sender must also press START.
Press START, and replace the handset.
Automatic jFoa: Reception (AUTO mode)
You can automatically receive all your faxes in Automatic Fax Reception mode (AUTO mode).
Select this mode by pressing the Answer Mode key.
Setting the Ring Delay
You can set up the number of rings before the fax machine will receive automatically in AUTO
mode and F/T mode.
KEYS TO BE PRESSED
1. Press FUNCTION.
2. Press 6.
3. Press 2.
4. Press <— (left arrow) or —► (right
arrow) repeatedly until you find
the number of rings you want.
Example: 00.
When you set 00, you can receive your
incoming faxes without any ring delays.
5. Press SET.
6. Press STOP to exit.
STATUS OF LCD DISPLAY
i 09/12/1993 15:25
( 1.TEMP■SETTINGS J
■; ~6~.TE L~~0 P f I 0 N S
i 2.RING DELAY 1
( RING DELAY:02
c
I SELECT < >, a SET)
RING DELAY:00
( 2.RING PE LAY
J
:)
3
7-2
Page 48

■
RECEIVING FAXES AND OTHER CALLS
The FIT Switch (FIT Mode)
Incoming Call
The fax machine
picks up after ring
time elapses.
The fax machine picks up
the call and automatically
detects whether a fax
or voice call.
Fax call
Fax reception is
automatically
activated.
The fax message
is received.
The caller may
hang up.
Only the fax handset
rings, thus signaling
you to pick up.
The handset will ring
between 10-60
seconds
( user selectable).
The Caller stays
on the line through
the entire 10-60 second
ring delay.
All extensions in the home
will ring for 1-4 rings
(user selectable).
Voice call
A) If you are at the
fax machine, press
START.
B) If you are at an
extension phone,
you can transfer
the fax call to the fax
unit by pressing your
remote activation code
(three digits).
You pick up
the fax handset.
You pick up any
extension within ring
time selection.
You must manualiy
determined if it is
a voice or fax call.
Fax call
Voice call
Talk as
normal.
Talk as normal.
The fax mode
is activated.
The caller may hang up.
Setting the FIT Ring Time
You can specify the maximum time you want the fax machine to ring in case of telephone. There
are four predefined settings; 10, 20, 30 or 60 seconds.
STATUS OF LCD DISPLAY
1. Press FUNCTION.
2. Press 6.
t; 09/12/1993
CTTtemp jSETTINGS 1
r^TEL OPTIONS
J
7-3
Page 49

RECEIVING FAXES AND OTHER CALLS
3. P]-esi:i 5.
4. Press <— (left arrow) or —► (right
[ 5 . F/T RING TIME
( RING I 1Mb: Z[) SLC J
■ SELECT < > & SET ;
IM E : 10
arrow) repeatedly until you find
the setting you want.
Example: lOsec.
5. Press SET.
i 5.F/T~ RING TIMt
....
I
6. Press STOP to exit.
Remote Activation
If you are using a tone dialing line, you can remotely activate or deactivate your fax machine from
an external phone (a phone connected to your fax machine) or from an extension phone (a phone
connected to the same line as your fax machine).
Connecting an External or Extension Telephone to the Unit
You may connect an external or extension telephone to your fax machine, as shown below. Use
the '‘EXT.” jack on your fax machine.
Alternatively, you may wish to use this “EXT.” jack to connect a telephone answering device
(TAD).
When the external telephone is in use, if the handset on the fax machine is picked up, an alarm
will sound and the warning message “EXT. TEL IN USE” will be displayed. You can disconnect
the external phone and switch to fax machine by pressing HOOK.
7-4
Page 50

RECEIVING FAXES AND OTHER CALLS
Using Remote Codes
If you are on an external phone (or extension phone), and you get an incoming fax call, you can
transfer the call back to your fax machine by entering a remote activation code. In the same
situation, if you get a telephone call from someone who requests that you switch on your fax, you
can transfer the call back to your fax machine with this code. Also, you can deactivate the fax
machine with another remote code during the F/T ringing from extension phone. In essence you
have one remote code to activate your fax machine and one remote code to deactivate it. The remote
code to activate is and the remote code to deactivate is Ifyuu waiitto set your
own code, see the following section, “Registering Remote Codes”,
FOR YOUR INFORMATION
Limitation of Using External (or Extension) Phones
1. If you accidentally pick up an extension phone when a fax is coming in, you may
disrupt the transmission or render some portions unreadable.
2. The remote activation and deactivation code may not work with some telephone
systems or telephone sets.
Registering Remote Codes
1. Press FUNCTION.
2. Press 7.
3. Pres.s 5.
4. Press -4— (left arrow) or —► (right
arrow) to choose ON or OFF.
Example: ON.
5. Press SET.
6. Enter new remote code to activate.
(Factory setting is
7. Enter new remote code to deacti
vate. (Factory setting is
8. Press STOP to exit.
{ 09/12/1993 15:25 1
1 .TEMP.SETTINGS!
rT7SETUP~"SYSfEH )
r 5,REMOTE CODE
REMOTE ACT.:0N
c
( SELECT < > & SET ]
REMOTE ACT,«
:=K 51
DEACT . CODE :£S1 )
f
5: REMOTE CODE )
:)
7-5
Page 51

ER CALLS
The TAD Mode
When you leave your fax machine set in TAD mode, phone calls will be forwarded to the externally
connected telephone answering device, and your fax calls will be received automatically.
Connecting an External TAD to the Unit
You may connect an external TAD to your fax machine, as shown below. Use the “EXT.” jack on
your fax machine.
Helpful Hints When You Use TAD Mode
1. You can inform callers beforehand that if they call manually and get your
telephone answering device when they want to send a fax, all they have to do
is press your remote code to activate (>K51 unless you have changed it) your fax
machine.
2. Another alternative is to record a TAD message that says, for example, “This
answering machine is connected to a fax unit. If you may leave a voice message,
please speak after beep. If you may send a fax message, please press (your
remote activation code) after beep. Thank you.”
3. You need to erase the incoming messages on your external telephone answering
device when it’s full, or TAD mode will not answer any calls, faxes or otherwise.
I
7-6
Page 52

RECEIVING FAXES AND OTHER CALLS
Incoming Call
The call is picked up
by the external TAD.
(Recommended short
ring delay such as 1
ring or 2 rings.)
Fax reception is
automatically
activated by
fax tone.
The fax message
is received on voice message on the
paper. external TAD.
Auto dial
fax call
The external TAD
outgoing message
begins (recommended
length of less than
20 seconds).
Voice call
The caller leaves a
Manual
fax call
The caller
can also
send a fax message.
The caller must
press your remote
activation code
to activate the
fax machine.
The fax message Is
received on paper.
Telephone Answering Device
1. Set the telephone answering device so that it is ready to record incoming telephone calls.
2. Set the number of rings to one or two on your telephone answering device.
3. Try to record the shortest possible message on your telephone answering device (up to
20 seconds).
Please note that some faxes that are sent manually cannot be received automatically because
some fax machines do not send a fax tone in manual mode.
So you must indicate a remote activation code for the caller to enter. (See page 7-5.)
7-7
Page 53

lili
■iiiisiiiia
RECEIVING FAXES AND OTHER CALLS
Smoothing
The smoothing feature enhances the appearance of incoming faxes by making the lines smooth
and takes no additional time. This'function does not apply to outgoing faxes, or to lists or reports
you print. The initial setting is ON.
STATUS OF LCD DISPLAY
oy / i'¿/ iyy¿ ib : '¿b 1
1. Press FUNCTION.
2. Press 5.
3. Press 1.
4. Press <— (left arrow) or —► (right
1.TEMP.SETTINGS J
5.USER OPTIONS . SMOOTHING
L_SMOOTHING
c
SELECT < > & SET
[ SMOOTHINGiOFF
arrow) to choose ON or OFF,
ExamplerOFF
5. Press SET.
1 .SMOOTHING
6. Press STOP to exit.
Speciher Volume
There are three settings available for the speaker volume, OFF, LOW or HIGH. This setting
controls the loudness of the fax machine’s speaker, which is connected to the phone line. The
initial setting is LOW.
KEYS TO BE PRESSED
STATUS OF leo DISPLAY
[i 09/12/1993 15:2b 1
3
1. Press FUNCTION.
2. Press 6.
3. Press 4.
4. Press <— (left sirrow) or —► (right
arrow) to choose a setting either
OFF, LOW or HIGH.
Example :HIGH.
5. Press SET.
6. Press STOP to exit.
f r.TEMP . SETTINGS C e.t'EL op tio n 's ) L 4.SPEAKER VOLUME J
SPEAKER:LOW
c
SELE
: SPEAKER:HIGH
(-4 .SPEAKER VO LU M pn
< > & SET
______
O
J
7-8
Page 54

lili
RECEIVING FAXES AND OTHER
Ring Volume
You can set the ring volume to either OFF, LOW or HIGH. The initial setting is HIGH.
KEYS TP BE PRESSED
1. Press FUNCTION.
2. Press 6.
3. Press 6.
4. Press <— (left arrow) or —► (right
STATUS OFiCD DISPLAY
09/12/1993 15:25~1
[ 1.TEMP.SLI I 1NGb
f
6.TEL OPTIONS
fTT Fr i~N G ~V ^ LU M E " h
f
RIIT g volume : HI GH ~ 1
C
' SELECT < > & SET )
r^NG VUT U M E: L0W~~1
arrow) to choose either OFF, LOW
or HIGH.
Example: LOW
5. Press SET.
[ 6.RING VOLUME
6. Press STOP to exit.
Helpful Hints Even if you select OFF, the ring volume during F/T ringing and Call Reservation
ringing is LOW.
:)
7-9
Page 55

HOW TO USE COPY FUNCTIONS
8. HOW TO USE COPYFUNCTIONSl
Making a Copy
These are the steps for making one copy each of your original documents:
KEYS TO BE PRESSED
1. Place the documents face down into
the feeder.
2. Press COPY.
STATUS OF LCD DISPLAY
i. 09/12/1993 ]
FAX: NO. & i
COPY: PRESS
L;B:25 )
i COPYING
stART )
; COPYING
f COPYING
Helpful Hints 1. When you want to make a copy, make sure the text or image on the
P . 02 J
original document is not too close to the edge. Your fax machine cannot
read anything closer than 4 min (1/8 inch) from the edge.
Change the resolution to one you like. If you do not set the resolution,
the fax machine automatically makes a copy in the SUPERFINE setting.
For example, if your original is a photo, you may select the PHOTO
resolution. (To get the PHOTO resolution, press the Resolution key
repeatedly until both lights are lit.) You can also set the resolution page
by page using the 1.TEMP.SETTINGS function. (See page 6-10.)
:)
]
p
3. Do not pull on the paper while copying is in progress. This may ruin the
copied image.
8-1
Page 56

POLLING
9. POLLING
r
jFQRYOUR INFORMATION
'What Is Polling?
Polling is the process of retrieving faxes from another fax machine. You may use
your machine to “poll” other machines, or you may ask someone to poll your machine.
The party who polls pays for the cost of the call.
How Does It Work?
First two parties set up their fax machines so that they can accommodate polling.
Then one party leaves documents in the fax machine so that the other party can call
up and have the documents sent.
When to Use Polling?
Use polling to control the cost of sending a fax.
1. If you want to pay for the cost of the call: Send out faxes to other parties as you
normally would, and if another party has documents to send you, ask them if you
can poll for it.
2. If you want others to pay for the cost of the call; Ask them to poll your fax machine
for documents they want, and if they want to send you documents, tell them you
do not wish to poll their machine for it, (if they ask).
* There are some fax machine that will not respond to this function.
Helpful Hints Using Polling Effectively (Examples)
Problem No. 1; You want another party to send you a long fax, but they do
not want to pay for the call.
Solution: Ask them to leave the document in their fax machine so you
can poll for it.
Problem No. 2; Sales representatives have difficulty sending in faxes to the
head office’s fax machine because it is busy so much of the
time.
Solution: Head office can poll the sales representatives’ fax machine.
Problem No. 3: Because of the time or location, it is cheaper for someone else
to call you than it is for you to make the call.
Solution: Ask the other party to poll for the documents and offer to pay
for the call at their lower rate.
9-1
Page 57

Polling Another Fax Machine
Once you have set up polling, as described below, and the other party has set their fax machine
to “POLLED WAITING”, you can automatically receive their documents.
KEYS TO BE PRESSED
Make sure no documents in the feeder.
1. Press POLLING.
2. Press SET.
3. Enter the fax number.
4. Press START.
STATUS OF LCD DISPLAY
( ‘lj9/12/1993 15:25T)
' POLLING:STANDARD '
C
CSETlH3iBEI
Renter fax
c
f PRESS START KEY ( NJ OFFICE
r DIALING
( rece'iving P.Ol )
Setting up for Polled Waiting
When a call comes in to retrieve documents you have placed in the fax machine for polled
waiting, and your machine starts to send the documents. Your fax machine prints out a polled
report when the transmission is completed.
KEYS TO BE PRESSED
STATUS
DISPLAY
3
:)
s
1. Place the documents into the feeder.
2. Press POLLING.
3. Press SET.
4. Press START and wait for the
polling call to come in.
[ 09/12/1993 15:25]
[,
.
PAX : "no . _ & ■■ START )
c
COPY: PRESS COPY
POLLING:STANDARD
c
SELECT < > & SET
: PRESS STAR T KEY
r"^LED WAITING
:)
:)
9-2
Page 58

POLLING
Secure Polling
Secure Polling is a way to keep your documents and others’ from falling into the wrong hands
while the fax machines are set up for polling. You can use Secure Polling only with another
Brother fax machine. With the other party, you should use the same four-digit ID number.
Polling Another Fax Machine with Secure Code
You can poll another fax machine that has Secure Polling by following the steps below;
You need to make sure you are using the same ID number as the other party.
KEYS TO BE FRESSED
Make sure no documents in the feeder.
1. Press POLLING.
2. Press ◄ — (left arrow) or —► (right
arrow) to find the POLLING
SECURE setting.
3. Press SET.
4. Enter a four-digit code.
Example: 1234,
5. Enter the fax number,
6. Press START.
STATUS OF Ki DISPLAY
i 09/12/1993 15:25 )
I POLLING:STANDARD I
c
( SELECT <‘
r>OLLINGVSEiURE ]
I POLLING IDiXXXX J
fTb L LI N”G ID: 1234 J
i ENTER FAX NO.
c
PRESS START KEY ]
T'nj office
r DIALING
.............
(f'RECEIVfNG P.Ol I
>ii& :^^:s
:)
:)
1
9-3
Page 59

POLLING
Setting up for Polled Waiting with Secure Polling
When someone polls for your documenta, you can secure them by using the Secure Polling feature.
KEYSTOBEPRÈSSfD
.....
15:?5 )
1. Place the documents into the feeder.
2. Press POLLING.
3. Press <— (left arrow) or —► (right
arrow) to find the POLLING
SECURE setting,
4. Press SET.
5. Enter a four-digit code.
Example: 1234.
6. Press START and wait for the poll
ing call to come in.
e
c
I COPY: PRESS C0PY~]
[ POLLING:STA№DARDn
c
rSELECT <• > r"SET 1
L Polling:sicurF 1
: POLLING 10iii.XXX I
f polling 10 :1234 ~1
r~PRESS star! kly' '
( POLLED WAITING 1
_________________________
OF LCD DISPLAY
N0 ■ & SIART )
1)
:)
Delayed Polling (Only for fax-680)
After you select STANDARD or SECURE, press SET, then press TIMER and use the
number keys to enter the time at which you want polling to take place.
9-4
Page 60

PRINTING OUT REPORTS ANOilS
10. PRINTING OUT REPORTS AND LISTS
You can print out the following lists and reports under function item 3. PRINT REPORTS.
Level one
function
3. PRINT REPORTS
Level two
function
1. ACT. REPORT
2. ALL DiAL
3. TEL. INDEX
(only for FAX-680)
4. COVERPAGE
(3. for FAX-600)
5. CALL BACK MSG
(4. for FAX 600}
6. USER OPTIONS
(5. tor FAX-600)
7. XMIT REPORT
(6. for FAX-600)
Content Page
The Activity Report lets you know
whether transmissions and incoming
faxes were received.
This is a list of the names and numbers
which are stored in One-Touch and
Speed-Dial memory. Printed in OneTouch and Speed-Dial number order.
The same as the All Dial list but printed
in alphabetical order.
This allows you to check the Cover Page
format.
Used to check the Call Back message
format.
The settings for FUNCTION 3-7 (3-6
for FAX-600) and 5 to 7 (Cover Page,
Tone/Pulse, Ring Delay, etc.) are printed
here.
You can set up whether the transmission
verification report will be printed after
all sending fax, or not.
ON/OFF
10-3
10-2
6-12
6-15
10-4
Other Reports
The following reports are printed out automatically, for your information.
Power Failure Report
Pulled Report
Delayed Sending Report
Anti-Curl System (ACS) Check Sheet
Helpful Hints • If you do not need ACS check sheet, press <— (left arrow) and —► (right arrow)
simultaneously.
• If you press <— (left arrow) and —► (right arrow) simultaneously again, ACS
check sheet will be printed out automatically.
10-1
Page 61

PRINTING OUT REPORTS AND LISTS
All of reports and lists can printout as below.
KEYS TO BE TOSSED
1. Press FUNCTION.
2. Press 3.
3. Press the number of the level two
function you wish to print.
Example:l.ACT.REPORT.
4. Press START.
STATUS OF LCD DISPLAY
i 09 /12/1993 15: 25
1.TEMP.S ETTIN GS 1
[ 3. PRINT "reports ]
f iTactT^port 1
PRESS START KE Y ]
I PR INTING
Printing the All Dial List
You can print out a list of all One-Touch numbers and Speed-Dial numbers.
ALL DIAL LIST
TIME : 09/12/1993 15:25
NAME ; BROTHER
FAX : 4155554444
TEL : 4155554445
I
ONE-TOUCH DIAL
NUMBER FAX/TEL NUMBER
*1
*2 234-5678
*3 334-5566 FAX HEAD OEFICE
>K4
*5
SPEED-DIAL
NUMBER FAX/TEL NUMBER
#01 5892786 E/T
#02@
#03
#04
#05
#06
#07
#08
#09
#10
61-2018285881
4155551212
1234567
03-256-1121
5555151 ■ FAX MANCHESTER
@:CHAIN
FAX AUSTRALIA OEFICE
TEL ABC COMPANY
FAX
FAX
DESTINATION
NJ OFEICE
DESTINATION
PTWMJG M.
N. COMPANY
OSAKA OFFICE
10-2
Page 62

PRINTING Oyi REPOBIS AND LISIS
Activity Report Interval
An activity report can be printed at certain intervals that you specify. You have a choice of setting
the journal interval period to “OFF”, “6 hours”, “12 hours”, “24 hours”, “2 days”, “4 days”, or “7
days”. The activity report will provide a list of all outgoing and incoming faxes (up to 30) during
the period. The initial setting is “OFF”.
If you wish to print out the activity report manually, please take the same way as others. (See page
10-2.)
KEYS TO BE PRESSED
1. Press FUNCTION.
2. Press 7.
3. Press 3.
4. Press <— (left arrow) or —► (right
arrow) to choose the setting.
Example: 12HOURS.
If you select sex^en days, you should choose
the base day of the week.
5. Press SET.
6. Enter the time to print out in 24-
hour format using the number keys.
Example:19:45 (7:45p.m.)
7. Wait for two seconds.
8. Press STOP to exit.
STATUS OF
("09/12/1993 15:25 |
1 .TEMP .SEWINGS )
[¡ill
......
¡/.'Setup system i
: 3.INTERVAL
[ ACT.RPT.:OFF
c
[ SELECT < > & SET
(EVERY 12 POURS J
(-START |:T:'00:00 )
(START AT:19:45 1
I 3.INTERVAL
:)
DATE
09/12 10:00
09/12 10:10
09/12 14:53
10-3
TIME
ACTIVITY REPORT
FAX NO./NAME DURATION
BROTHER BOSTON 04:23
NO OFFICE 00 00
BROTHER BOSTON 48
CV : COVERPAGE
CA : CALL BACK MSG
POL : POLLING
PAGE(S)
20 CV CA OK
01 CV CA OK
TIME : 09/12/1993 19:45
NAME : BROTHER
FAX : 4155554444
TEL : 4155554445
RESULT
BUSY TX
COMMENT
TX
TX
Page 63

■IB
!|^B
.
..............
...
PRINTING OUT REPORTS AND LISTS
Transmission Verification (Xmit) Report
Set the Transmission Verification Report to ON or OFF. The initial setting is OFF.
OFF: Report will be printed if the transmission errors occur.
ON: Report will be printed every time a fax message sent completely or an error occurs.
KEYS TO BE PRESSED
1. Press FUNCTION.
2. Press 3.
3. Press 7 for FAX-680.
(Press 6 for FAX-600.)
4. Press <— (left arrow) or —► (right
arrow) to choose the setting.
Example: ON
5. Press SET.
6. Press STOP to exit.
TRANSMISSION VERIFICATION REPORT
STATUS OF LCD DISPLAY
[ 1 .TEliP.^ETTtiGS ;i
1 3.PRINT REPO
( 7.XMIT REPOST ]
XMIT REPORT
SELECT=:^ >
.
'';:Xaill!--RePORTfO№, )
fe: K:XM IT R EPO RT
TIME : 09/12/1993 15:25
NAME : BROTHER
FAX : 4155554444
TEE : 4155554445
.............r.....
SlPFl
DATE, TIME 09/12 15:24
FAX NO./NAME NJ OFFICE
DURATION
PAGE(S)
RESUET
MODE STANDARD
00:00:45
01
COVERPAGE
OK
10 4
Page 64

REGULAR MAINTENANCE AND TROUBLESHOOTING
11. REGULAR MAINTENANCE AND TROUBLESHOOTING
Regular Maintenance
You can keep your fax machine in optimum condition by cleaning it on a regular basis. Avoid using
thinners or other organic solvents to clean the machine and do not any water.
Follow the five steps below:
1. Unplug the telephone line and then the power cord.
When you reconnect these lines later, make sure to connect the power cord first, then the
telephone line.
2. Remove the paper roll.
3. Wipe any dirt off the machine using a slightly damp cloth.
4. Clean the scanner.
Moisten a small piece of soft, lint-free cloth
with isopropyl alcohol and carefully remove
any dirt from the glass cover and from the
white tape of the scanner.
5. Clean the printer.
Moisten a small piece of soft, lint-free cloth with isopropyl alcohol and keep wiping the edge
of the print head until all dirt is removed.
Helpful Hints It is a good idea to follow these five simple steps everytime you change the
paper.
11-1
Page 65

US
REGULAR MAINTENANCE AND TROUBLESHOOTING
Paper Jams
Your fax machine will sound an alarm if the documents jam while going through the feeder or if
the fax paper becomes stuck. The display will show “DOCUMENT JAM”, “CUTTER JAM”, or
“PRINTER JAM”.
Fixing a Document Jam
1. Open the top cover and remove the documents.
2. Close the top cover, and check to make sure the fax paper is in place.
Fixing a Cutter Jam or Printer Jam
1. Unplug the fax machine and open the top cover.
11-2
Page 66

RiSttAR MAINTENANCE AND TROUBLESHOOTING
Troubleshooting
You may occasionally encounter a problem with your fax machine or telephone line. If this
happens, your fax machine often identifies the problem and displays an error message. Refer to
the following list when you see an error message on the display. If additional help is needed,
please contact our 1-800-284-4FAX for service.
Error Messages
COMM.ERROR XX YY and PRESS STOP KEY
You encountered a communications error that resulted from a poor quality phone line. Try the
call again.
CONNECTION FAIL and PRESS STOP KEY
You may request Polling function to other party even if remote station does not have polling
furture.
COVER OPEN
The top cover is not completely closed. Push it down until you hear a “click.”
CUTTER JAM
The fax paper is jammed in the cutter. Remove the jammed paper. (See page 11-2.) Then re-insert
the fax paper. (See page 1-2.)
DISCONNECTED and PRESS STOP KEY
The telephone line was disconnected by other party during the communication. Try calling the
other party to see what happened.
DOCUMENT JAM
The documents were not inserted properly. Open the top cover and remove the documents. Close
the cover and re-insert the documents and adjust the guides on either side of the document, and
try sending the fax again.
ID MISMATCH and PRESS STOP KEY
You may have the wrong ID for secure polling function. Try calling the other party to meet the
ID.
MACHINE ERROR XX and PRESS STOP KEY
Contact 1-800-284-4FAX for service center.
NO RESPONSE/BUSY and PRESS STOP KEY
The number you called does not answer or is busy. You may also have reached a number that is
not connected to a fax. Check the number and try again.
NOT REGISTERED
The One-Touch key or Speed-Dial number has no number assigned to it. You need to register a
phone number. (See page 4-4, 6.)
11-S
Page 67

REGULAR MAINTENANCE AND TROUBLESHOOTING
PAPER ROLL EMPTY
The paper roll is empty. You need to replace it. (See page 1-2.)
PAPER SET ERROR
The paper roll is not sitting correctly. Try re-inserting it.
PRINTER FAULT
The recording head has overheated. Then unplug the power cord and wait for SO mimites.
PRINTER JAM
The fax paper isjammed in the printer. Remove the jammed paper. (Seepage 11-2.) Then re-insert
the fax paper. (See page 1-2.)
SCANNER ERROR
The scanner is dirty. (See page 11-1.)
Other Problems
When Dialing Doesn^t Work...
You may have the wrong dialing mode. Change the TONE/PULSE setting . (See page 4-1.) You
may also want to check all the telephone line connections, such as to the handset and to the wall
jack. Check also that the power cord is connected. Check by pressing HOOK to see if dial tone is
heard. (See page 1-3.)
Poor Copy Quality
Someone may complain that fax as they have received from you are faded. Your resolution setting
may be inappropriate. Try the FINE or SUPERFINE settings and try to call again. Also, it is
possible that your scanner is dirty. So, you should clean it. (See page 11-1.)
Vertical Streaks
You may get faxes with vertical streaks. The recording head on your machine may be dirty, or the
sender’s scanner may be dirty. Try cleaning the recording head. (See page 11-1.)
Horizontal Streaks
You may get a fax with horizontal streaks or with missing lines. This normally results from a poor
telephone connection. Ask the other party to send the fax again.
11-4
Page 68

IMPORTANT INFORMATION
12. IMPORTANT INFORMATION
Standard Telephone and FCC Notices (Only applies to 120V model)
These notices are in effect on models sold and used in U.S.A,
This equipment is hearing-aid compatible.
When programming emergency numbers and/or making test calls to emergency numbers:
* Remain on the line and briefly explain to the dispatcher the reason for the call before hanging
up.
• Perform such activities in the off-peak hours, such as early morning or late evening.
This equipment complies with Part 68 of FCC Rules. On the rear panel of this equipment is a label
that contains, among other information, the FCC Registration Number and Ringer equivalence
Number (REN) for this equipment. You must, upon request, provide this information to your
telephone company.
You may safely connect this equipment to the telephone network by means of standard modular
jack, USOCRJllC.
The REN is useful to determine the quantity of devices you may connect to your telephone line
and still have those devices ring when your telephone number is called. In most, but not all areas,
the sum of the RENs of all devices connected to one line should not exceed £Lve(5). To be certain
of the number of devices you may connect to your line, as determined by the REN, you should
contact your local telephone company to determine the maximum REN for your calling area.
If your IntelliFAX600/680 causes harm to the telephone network, the telephone company may
discontinue your service temporarily. If possible, they will notify you in advance. But in advanced
notice is not practical, you will be notified as soon as possible. You will be informed of your right
to file a complaint with the FCC.
Your telephone company may make changes in its facilities, equipment, operations or procedures
that could affect the proper functioning of your equipment. If they do, you will be notified in
advance to give you an opportunity to maintain uninterrupted telephone service.
If you experience trouble with this IntelliFAX600/680, please contact the mauufactuie’s authorised
service agency for information on obtaining service or repair. The telephone company may ask
that you disconnect this equipment from the network until the problem has been corrected or until
you are sure that the equipment is not malfunctioning.
If you are not able to solve a problem with your fax machine, contact Brother service personnel
at l-800-284-4FAX(U.S.A. Only).
Warning
For protection against the risk of electrical shock, always disconnect all cables from the wall outlet
before servicing, modifying or installing the equipment.
This equipment may not be used on coin service provided by the telephone company nor connected
to party lines.
12-1
Page 69

IMPORTANT INFORMATION
This equipment has been tested and found to comply with the limits for a Class B digital device,
pursuant to Part 15 of the FCC Rules. These limits are designed to provide reasonable protection
against harmful interference in a residential installation. This equipment generates, uses, and
can radiate radio frequency energy and, if not installed and used in accordance with the
instructions, may cause harmful interference to radio communications. However, there is no
guarantee that interference will not occur in a particular installation. If this equipment does
cause harmful interference to radio or television reception, which can be determined by turning
the equipment off and on, the user is encouraged to try to correct the interference by one or more
of the following measures;
• Re-orient or relocate the receiving antenna.
• Increase the separation between the equipment and receiver.
• Connect the equipment into an outlet on a circuit different from that to which the receiver
is connected.
• Consult the dealer or an experienced radio/TV technician for help.
Brother cannot accept any financial or other responsibilities that may be the result of
your use of this information, including direct, special or consequential damages.
There are no warranties extended or granted by this document.
This serial number may be found on the label affixed to the back of the unit. For your convenience,
note the number below and retain this owner’s rnanual to serve as a permanent record of your
purchase, in the event of a theft or fire, or for future reference.
MODEL NO. IntelliFAX600/680 SERIAL NO.
NAME OF DEALER
_____________________
DATE OF PURCHASE
12-2
Page 70

IMPORTANT INFORMATION
Important Safety Instructions
1. Read all of these instructions
2. Save them for later reference.
3. Follow all warnings and instructions marked on the product.
4. Unplugthis product from the wall outlet before cleaning. Do not use liquid or aerosol cleaners.
Use a damp cloth for cleaning.
5. Do not use this product near water.
6. Do not place this product on an unsuitable cart, stand, or table. The product may tall, causing
serious damage to the product.
7. Slots and openings in the cabinet and the back or bottom are provided of ventilation; to ensure
reliable operation of the product and to protect it from overheating, these openings must not
be blocked or covered. The openings should never be blocked by placing the product on a bed,
sofa, rug, or other similar surface. This product should never be placed near or over a radiator
or heat register. This product should not be placed in a built-in installation unless proper
ventilation is provided.
8. This products should be operated from the type of power source indicated on the marking
label. If you are not sure of the type of power available, consult your dealer or local power
company.
9. This product is equipped with a 3-wire grounding type plug, a plug having a third (grounding)
pin. This plug will only fit into a grounding-type power outlet, This is a safety feature. If you
are unable to insert the plug into the outlet, contact your electrician to replace your obsolete
outlet. Do not defeat the purpose of the grounding-type plug.
10. Do not allow anything to rest on the power cord. Do not locate this product where persons will
walk on the cord
11. If an extension cord is use with this product, make sure that the total of the ampere ratings
on the products plugged into the extension cord do not exceed the extension cord ampere
rating. Also, make sure that the total of all products plugged into the wall outlet does not
exceed 15 amperes (U.S.A. only).
12. Never push objects of any kind into this product through cabinet slots as they may touch
dangerous voltage points or short out parts that could result in a risk of fire or electric shock.
Never spill liquid of any kind on the product.
13. Do not attempt to service this product yourself, as opening or removing covers may expose
you to dangerous voltage points or other risks. Refers all servicing to service personal at 1800-284-4FAX.
14. Unplug this product from the wall outlet and refer servicing to qualified service personnel
under the following conditions:
A. When the power cord or plug is damaged or frayed.
B. If liquid has been spilled into the product.
C. If the product has been exposed to rain or water.
D. If the product does not operate normally when the operating instructions are followed.
Adjust only those controls that are covered by the operating instructions since improper
adjustment of other controls may result in damage and will often require extensive work
by a qualified technician to restore the product to normal operation,
E. If the product has been dropped or the cabinet has been damaged.
F. If the product exhibits a distinct change in performance, indicating a need for service.
12 3
Page 71

ilihitilliiliigí
■■*1111
13. INDEX
■ HI
ActivityReport
ADF..............................................................................6-2
All Dial List
Answer Mode
Auto Mode...........................................................
...........
.....................................................
...................... ...............
.......................................
...............
10-1,10-3
10-1, 10-2
2-5, 7-1
7-1, 7-2
B
Beeper
Call Back Message.........................................6-15, 10-1
Call Reservation...............................................
Canceling
Chain Dialling ......................................................... 4-5
Cleaning.............................................................11-1
Connecting
Contrast................................................................. 6-3
Control Panel Keys
Copy
Cover Page
..........
.
................................................................................. ......6-8
.................................................
..............
....................................................................
..........................
.............................2-1-2-5
2-5. 6-12. 6-13, 6-14. 10-1
1-3, 7-4, 7-6
.4-1
2-4,6-15
2-3, 8-1
Daily Timer
Date and Time ..........................................................4-2
Delayed Transmission
Document............................................................6-1, 6-2
Error Message .........................................................
External Telephone
Extention Telephone....................
Fine
............................................................................
F/T Mode
F/T Ring Time
Function
................................................................
............................................
.............
.............................................................
.............................................................7-3
..................................
..............................
..........................
2-4, 3-1-3-6, 10-1-10-4
6-6
6-6
11 -3
7-4, 7-6
...7-4
6-2
7-1, 7-3
13-1
Page 72

INDEX
¡■■I
Gray Scale
...............................................................6-11
H
Hook
..................................................................
Hold
...................................................................
2-2, 5-1
2-2,5-1
I
Interruptting
Jacks
Jam...
Loading Paper...................................................... 1-2
......................................................
1-4, 7-4, 7-6
............
2-4, 6-7
11-2
M
Manual Mode.....................................................7-1, 7-2
Manual Dial
Memory................................................................. 4-7
Multiple Resolution Transmission
.......................................................
.......
............
5-1, 6-4
...6-10
13-2
One-touch Dial
On Hook Dial...
Overseas Mode
Packing List
Pause.................................................................
PBXs...................................................................1-4, 4-7
Photo
.......
Polling
Power
.......................................................
.............................................................
....................
..........................................................
......................................................
..............................................................
.................... ...................................
2-3, 4-4, 4-5,4-7, 5-1,6-4
2-4, 9-l~9-4
5-1
..6-9
1-2
2-2, 5-1
6-2, 6-11
1-3, 14-1
Page 73

!■
■ II
■ ill
R
Redial
Remote Activation
Remote Code.............................................
Remote Deactivation
Reports
Resolution...................................
Ring Delay
Ring Volume
...............................................................
................................
.......................................
...............
..........................................
...................................................
.............................................................
....7-4, 7-6, 7-6
7-4, 7-5, 7-6
...2-5, 6-2, 6-10, 6-11
.............
2-2, 6-5
7-4, 7-5
10-1-10-4
7-2
7-9
s
Secure Polling...................................................9-3, 9-4
Setting Up..................................................................1-2
SHIFT............................................................... 2-4, 4-4
Smoothing................................................................
Speaker Volume
Speed Dial..................................
Station ID........................................
Standard Mode..........................................................6-2
Super Dark
Superfine Mode
Super Light...
.......................................................
2-2,4-6, 4-7, 5-1,6-4
4-3, 6-5, 6-12, 6-15
................................................................
......................
............................................................
......................
............6-2
7-8
7-8
6-3
6-3
INDEX
T
TAD Mode...................................................
Telephone Index
TIMER.........................................................
Transmission Verification Report
Tone/Pulse
..............................
................................................................
2-4, 5-2, 6-4, 10-1
..............
7-1,7-6, 7-7
2-4, 6-6, 9-4
10-1, 10-4
4-1
13-5
Page 74

brtUIMUAI lUINb
14. SPECIFICATIONS
Type
Compatibility
Coding system
Modem speed
Document input width
Scanning/Printing width
Paper roll size
Printer type
Gray scale
Paper cutter
Display
Polling types
Contrast control
Resolution
One-touch dial
Speed-dial
Automatic redial
Speaker type
Auto answer
Communication source
Operating environment
Power source
Power consumption
Dimensions
Weight
Specifications are subject to
Desktop facsimile transceiver
CCITT Group 3
Modified Huffman (MH)
9600/7200/4800/2400; Automatic Fallback
148mm to 216mm (5.8 inches to 8.5 inches)
208mm (8.2 inches)
216mm (8,5 inches) 50m (164 feet) for FAX-680
30m (98 feet) for FAX-600
(30m (98 feet) with therma plus)
Line thermal
32/16 level for FAX-680, 16 level for FAX-600
Automatic
LCD, 16 characters
Standard, Secure, Delay for FAX-680, Standard, Secure
for FAX-600
Automatic/Super Light/Super Dark (manual setting)
• Horizontal Spcls/mm (203 pela/inch)
• Vertical Standard 3,85 lines/mm (98 lines/inch)
• Fine/Photo (16 level) 7.7 lines/mm (196 lines/inch)
• Superfine/Photo (32 level) (only for FAX-680)
15.4 lines/mm (392 lines/inch)
20 stations for FAX-680, 5 stations for FAX-600
40 stations for FAX-680, 10 stations for FAX-600
3 times at 5 minute intervals
Monitor
0, 1, 2, 3 or 4 rings
Public switched telephone network
41-95°F
120V AC 50/60Hz (U.S.A., Canadian Version Only)
Standby: under 15 watts
Peak: under 150 watts
378 x303x 125 (mm)/14.9x 11,9x4.9 (inches) for FAX-680
378 X 303 X113 (mm)/14.9 x 11.9 x 4.4 (inches) for FAX-600
5.0 kg/11.0 lbs
change for improvement without prior notice.
14-1
Page 75

Page 76

ViM Vi^LJI P^51e
UF3404U01®
Printed in Japan
 Loading...