

Page 1
Reference Guide
Brief explanations for routine operations
DCP-L3510CDW
DCP-L3517CDW
DCP-L3550CDW
MFC-L3710CW
MFC-L3730CDN
MFC-L3750CDW
MFC-L3770CDW
Brother recommends keeping this guide next to your Brother machine for quick reference.
Online User's Guide
For more advanced instructions, information, and
product specifications, see the Online User's
Guide at support.brother.com/manuals
Page 2

User's Guides and Where to Find Them
Which Guide? What's in It? Where Is It?
Product Safety Guide Read this Guide first. Please read the Safety
Instructions before you set up your machine.
See this Guide for trademarks and legal
limitations.
Quick Setup Guide Follow the instructions for setting up your
machine, and installing the Full Driver &
Software Package for the operating system
and connection type you are using.
Reference Guide Learn the basic Fax, Copy and Scan
operations and basic machine maintenance.
See troubleshooting tips.
Online User's Guide This guide includes the additional contents of
the Reference Guide.
In addition to information about the Print,
Scan, Copy, Fax, mobile device functions,
Brother ControlCenter operations and
troubleshooting, other useful information is
included about using the machine on a
network.
1
Visit support.brother.com/manuals.
Printed / In the box
Printed / In the box
Printed or on Brother
Installation Disc / In
the Box
Brother Solutions
Center
1
1
Page 3
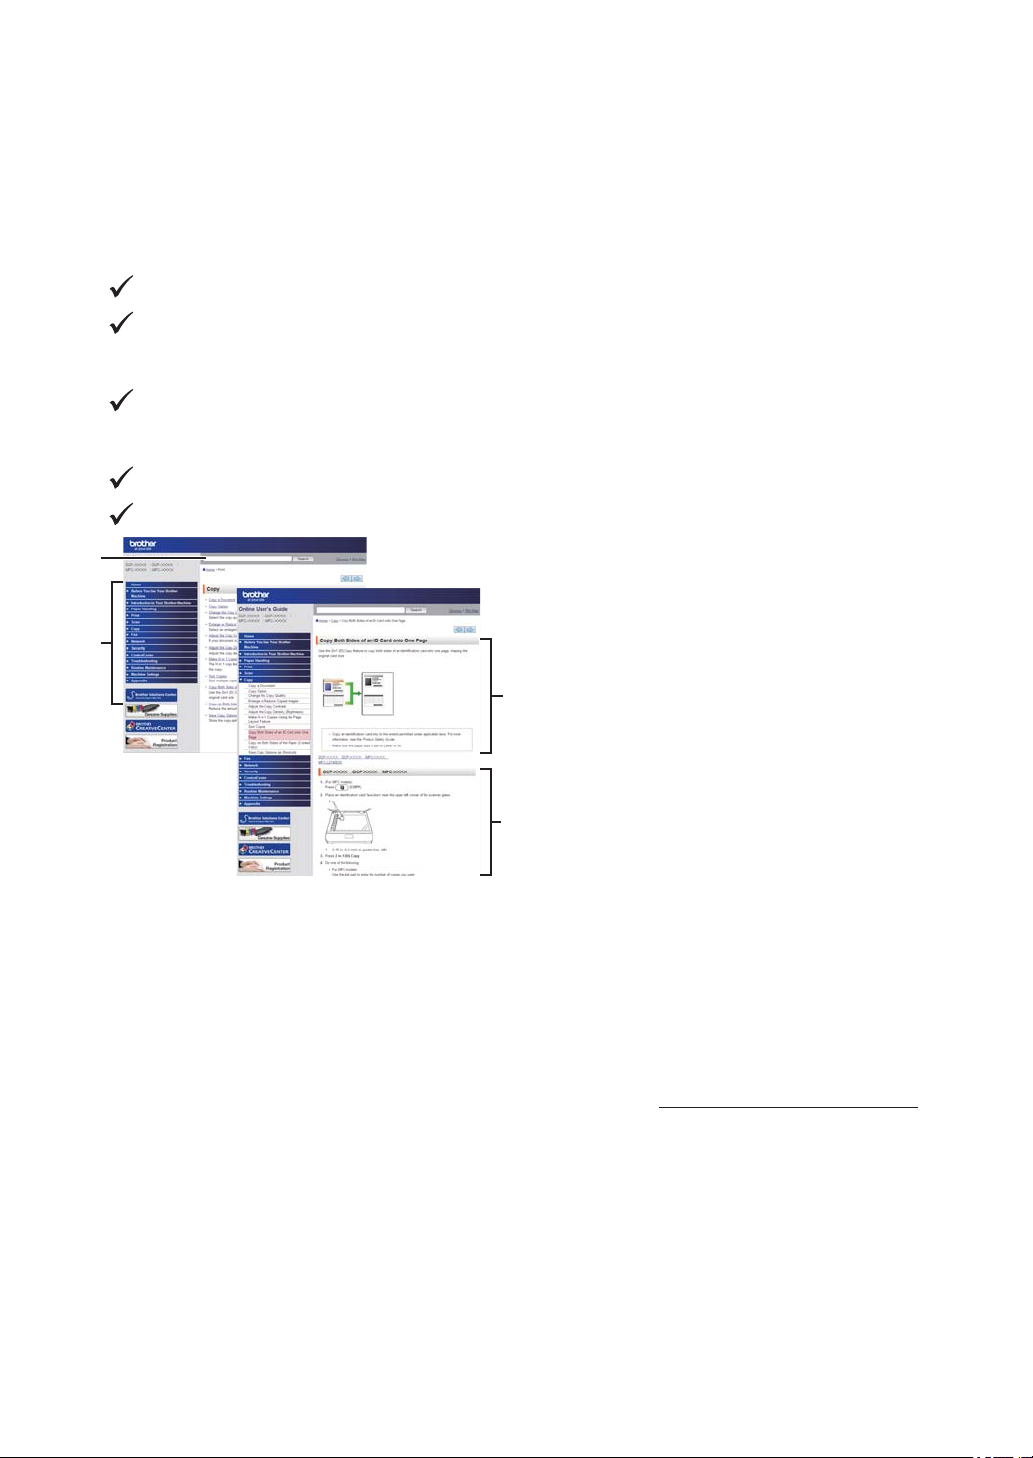
The Online User's Guide Helps You Get the Most
1
2
3
4
Out of Your Machine
We hope that you find this guide helpful. To learn more about your machine's features, please
take a look at our Online User's Guide. It offers:
Quicker Navigation!
Search box
Navigation index in a separate panel
Comprehensive Format!
Every topic in one guide
Simplified Layout!
Step-by-step instructions
Feature summary at the top of the page
1. Search Box
2. Navigation
3. Summary
4. Step-by-Step Instructions
To View Online User's Guides
To view the Online User's Guide and other available guides, visit support.brother.com/manuals.
(Windows®)
You can also access your machine's guides using Brother Utilities. The Brother Utilities tool is
included in the standard installation and, when installed, you can find it either as a shortcut on
your desktop, or from the Windows® Start menu.
2
Page 4

Questions or Problems? Take a Look at our FAQs, Solutions, and Videos Online.
Go to your model's FAQs & Troubleshooting page on the Brother Solutions Center at
support.brother.com.
• Provides several ways to search
• Displays related questions for more information
• Receives regular updates based on customer feedback
©2018 Brother Industries, Ltd. All rights reserved.
3
Page 5
1 52 3 4
6
General Information
1
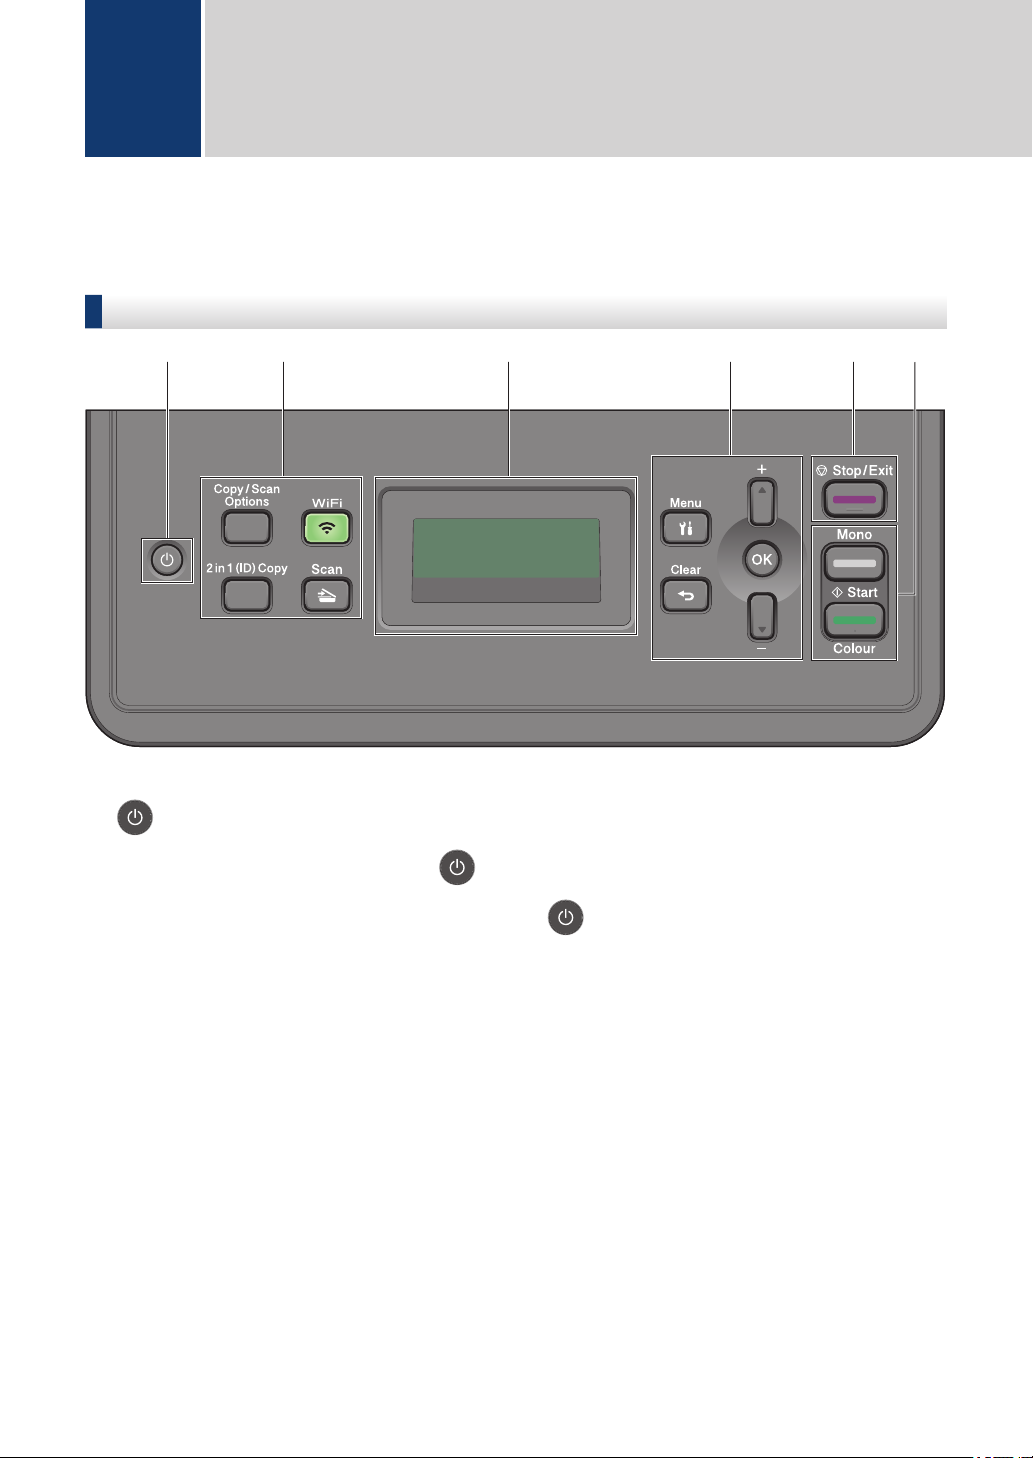
Control Panel Overview
The control panel may vary depending on your model.
DCP-L3510CDW/DCP-L3517CDW
1. Power On/Off
• Turn the machine on by pressing .
• Turn the machine off by pressing and holding . The LCD displays [Shutting Down]
and stays on for a few seconds before turning off.
2. Function Buttons
Copy/Scan Options
Press to access temporary settings for scanning or copying.
WiFi (for wireless models)
Press the WiFi button and launch the wireless installer on your computer. Follow the onscreen instructions to set up a wireless connection between your machine and your
network.
When the WiFi light is on, your Brother machine is connected to a wireless access point.
When the WiFi light blinks, the wireless connection is down, or your machine is in the
process of connecting to a wireless access point.
Scan
Press to switch the machine to Scan Mode.
4
Page 6

2 in 1 (ID) Copy
□□■□□
ba
c
d
e
100% Auto
Stack Copies:01
Press to copy both sides of an identification card onto a single page.
3. Liquid Crystal Display (LCD)
Displays messages to help you set up and use the machine.
If the machine is in Ready Mode or Copy Mode, the LCD displays:
a. Type of copy
b. Number of copies
c. Quality
d. Contrast
e. Copy ratio
4. Menu Buttons
Menu
Press to access the Menu for programming your machine settings.
1
General Information
Clear
• Press to delete entered data.
• Press to cancel the current setting.
OK
Press to store your machine settings.
a or b
Press to scroll up or down through menus and options.
5. Stop/Exit
• Press to stop an operation.
• Press to exit from a menu.
6. Start buttons
• Mono Start
- Press to start making copies in monochrome.
- Press to start scanning documents (in colour, grey, or monochrome depending on the
scan setting).
• Colour Start
- Press to start making copies in full colour.
- Press to start scanning documents (in colour, grey, or monochrome depending on the
scan setting).
5
Page 7

DCP-L3550CDW/MFC-L3710CW/MFC-L3730CDN/
41 2 3
5
MFC-L3750CDW/MFC-L3770CDW
1. Touchscreen Liquid Crystal Display (LCD)
Access menus and options by pressing them on the touchscreen.
2. Menu Buttons
(Back)
Press to go back to the previous menu.
(Home)
Press to return to the Main Home screen.
(Cancel)
Press to cancel an operation.
3. Dial Pad (Numerical buttons)
Press the Numerical buttons to dial telephone or fax numbers and to enter the number of
copies.
4. LED Power Indicator
The LED lights up depending on the machine’s power status.
5. Power On/Off
• Turn the machine on by pressing .
• Turn the machine off by pressing and holding down . The LCD displays [Shutting
Down] for a few seconds before going off. If you have an external telephone or TAD
connected, it is always available.
6
Page 8

Near Field Communication (NFC) (MFC-L3770CDW)
If your Android™ device supports the NFC feature, you can print from your device or scan
documents to your device by touching it to the NFC symbol.
How to Navigate the Touchscreen LCD
Related Models:
DCP-L3550CDW/MFC-L3710CW/MFC-L3730CDN/MFC-L3750CDW/MFC-L3770CDW
Press your finger on the LCD to operate it. To display and access all the options, swipe left, right,
up, down or press d c or a b on the LCD to scroll through them.
1
General Information
IMPORTANT
DO NOT press the LCD with a sharp object, such as a pen or stylus. It may damage the
machine.
NOTE
DO NOT touch the LCD immediately after plugging in the power cord or turning on the machine.
Doing this may cause an error.
7
Page 9

Touchscreen LCD Overview
Related Models:
DCP-L3550CDW/MFC-L3710CW/MFC-L3730CDN/
MFC-L3750CDW/MFC-L3770CDW
You can select from two types of screens to
set as the Main Home screen: Home screens
and Shortcuts screens. When a Home screen
is displayed, swipe left or right or press d or c
to display the other Home screens.
The Main Home screen displays the
machine's status when the machine is idle.
When displayed, this screen indicates that
your machine is ready for the next command.
The available features vary depending on
your model.
Home screen: Screen 1
The Home screens provide access to
features, such as Fax, Copy and Scan.
Shortcuts screen
Create Shortcuts for frequently-used
operations, such as sending a fax, copying,
scanning and using Web Connect.
Three Shortcuts tabs are available with
six Shortcuts on each Shortcuts tab. A
total of 18 Shortcuts are available.
Home screen: Screen 2
Home screen: Screen 3
1. Date & Time
Displays the date and time set on the
machine.
2. Modes
• [Fax]
Press to access Fax mode.
• [Copy]
Press to access Copy mode.
• [Scan]
Press to access Scan mode.
• [Secure Print]
Press to access the [Secure Print]
option.
8
Page 10

• [Web]
0 Max
Press to connect the Brother machine
to an Internet service.
5. Wired LAN Status or Wireless Status
• Wired Network Models:
(Wired LAN Status)
• [Apps]
Press to connect the Brother machine
to the Brother Apps service.
• [USB]
Press to access the USB menu and
select [Scan to USB] or [Direct
Print] options.
3.
Displays the remaining toner life. Press to
access the [Toner] menu.
4. (Settings)
Press to access the [Settings] menu.
If Setting Lock has been turned on, a lock
unlock the machine to change settings.
(Toner)
icon appears on the LCD. You must
Press to configure the Wired LAN
settings.
The icon displays the current wired
network status.
Network cable is connected
No cable connection
• Wireless Network Models:
or (Wireless Status)
Press to configure wireless settings.
If you are using a wireless connection,
a four-level indicator displays the
current wireless signal strength.
Wireless LAN Disabled
1
General Information
6. [Shortcuts]
Press to access the [Shortcuts]
screen.
7. (Home screen)
Press to access the Home screens.
New Fax (MFC models)
When [Fax Preview] is set to [On], the
number of new faxes you received into the
memory appears at the top of the screen.
9
Page 11

Warning icon
The warning icon appears when there
is an error or maintenance message. Press
the message area to view it, and then
press to return to the Main Home
screen.
NOTE
This product adopts the font of ARPHIC
TECHNOLOGY CO.,LTD.
10
Page 12

2
Load Paper
Load Paper in the Paper Tray
Use the paper tray when printing on the
following media:
Plain paper
Thin paper
Recycled paper
Thick paper
• Adjust the guides
• Fan the paper
• Do not exceed this
mark
Load Paper in the Multipurpose Tray (MP Tray)
Related Models:
MFC-L3770CDW
Use the MP tray when printing on the
following media:
Plain paper
Thin paper
Recycled paper
Bond paper
Thick paper
1
Labels
Envelopes
Glossy paper
1
2
• Adjust the guides
• Fan the paper
• Do not exceed this
mark
2
Load Paper
For more detailed information, see the Online
User's Guide: Load Paper in the Paper Tray.
1
Open the back cover (face up output tray) before
printing to let the printed paper exit onto the face up
output tray.
2
When you print on glossy paper, set only a single
sheet on the MP tray.
For more detailed information, see the Online
User's Guide: Load and Print Using the
‑
purpose Tray (MP Tray).
Multi
11
Page 13

Load Paper in the Manual Feed Slot
Related Models:
DCP-L3510CDW/DCP-L3517CDW/DCP-L3550CDW/
MFC-L3710CW/MFC-L3730CDN/MFC-L3750CDW
Use the Manual Feed Slot when printing on
the following media:
Plain paper
Thin paper
Recycled paper
Bond paper
Thick paper
1
Labels
Envelopes
Glossy paper
1
• Adjust the guides
• Use both hands to
insert one sheet of
paper
• Continue pressing
the paper against
the rollers for
about two
seconds, or until
the machine grabs
the paper and
pulls it in further
1
Open the back cover (face up output tray) before
printing to let the printed paper exit onto the face up
output tray.
For more detailed information, see the Online
User's Guide: Load and Print Paper in the
Manual Feed Slot.
12
Page 14

Troubleshooting
A
Use this section to resolve problems you may encounter when using your Brother machine.
Identify the Problem
Even if there seems to be a problem with your machine, you can correct most problems yourself.
First, check the following:
• The machine's power cord is connected correctly and the machine's power is on.
• All of the machine's orange protective parts have been removed.
• (For network models) The access point (for wireless network), router, or hub is turned on and
its link indicator is blinking.
• Paper is inserted correctly in the paper tray.
• The interface cables are securely connected to the machine and the computer.
• Check the machine's status on your machine or in Brother Status Monitor on your computer.
Find the Error Find the Solution
A
Troubleshooting
Using the Status Monitor
• Double-click the icon in the task tray.
• (Windows®) If you select the Load Status
Monitor on Startup check box, the Status
Monitor will launch automatically each time
you start your computer.
• A green icon indicates the normal stand-by
condition.
• A yellow icon indicates a warning.
• A red icon indicates an error has occurred.
• A grey icon indicates the machine is
offline.
• Click the Troubleshooting button to
access Brother's troubleshooting website.
13
Page 15

Find the Error Find the Solution
Cover is Open
Using the LCD
1. Follow the messages on the LCD.
2. If you cannot resolve the error, refer to the
following:
Online User's Guide: Error and
Maintenance Messages
FAQs & Troubleshooting page at
support.brother.com
Error and Maintenance Messages
For information on the most common error and maintenance messages, see the Online User's
Guide.
To view the Online User's Guide and other available guides, visit support.brother.com/manuals.
14
Page 16

Document and Paper Jams
1
2,3
3
4
5
An error message indicates where the paper is stuck in your machine.
Error messages:
1. Document Jam
2. Jam Rear
3. Jam 2-sided
4. Jam Tray
5. Jam Inside
See the messages in Brother Status Monitor on your computer.
A
Troubleshooting
Solutions for Wireless Connection
If you cannot connect your Brother machine to the wireless network, see the following:
• Online User's Guide: Print the WLAN Report
• Quick Setup Guide: Alternative wireless setup
To view the Online User's Guide and other available guides, visit support.brother.com/manuals.
15
Page 17

Appendix
B
Supplies
When the time comes to replace supplies, such as the toner or drum, an error message will
appear on your machine's control panel or in the Status Monitor. For more information about the
supplies for your machine, visit www.brother.com/original/index.html or contact your local Brother
dealer.
The Supply Model Name will vary depending on your country and region.
Supply Items Supply Model Name Approximate Life
(Page Yield)
Toner Cartridge Standard Toner:
TN-243
High Yield Toner:
TN-247
Inbox Toner:
(Supplied with your machine)
Drum Unit
DR-243CL
DR-243CL-BK
DR-243CL-CMY
3
• Black:
Approximately 1,000 pages
• Cyan / Magenta / Yellow:
Approximately 1,000 pages
• Black:
Approximately 3,000 pages
• Cyan / Magenta / Yellow:
Approximately 2,300 pages
• Black:
Approximately 1,000 pages
• Cyan / Magenta / Yellow:
Approximately 1,000 pages
Approximately 18,000 pages
4
5
1 2
1 2
1 2
1 2
1 2
1 2
6
Belt Unit BU-223CL
Approximately 50,000 pages
7
16
Page 18

Supply Items Supply Model Name Approximate Life
(Page Yield)
Waste Toner Box WT-223CL
1
Approximate cartridge yield is declared in accordance with ISO/IEC 19798.
2
A4 or Letter size single-sided pages
3
Contains four drum units; one black and three colours.
4
Contains one black drum unit.
5
Contains one colour drum unit.
6
Approximately 18,000 pages based on one page per job [A4/Letter single-sided pages]. The number of pages may be
affected due to a variety of factors including but not limited to media type and media size.
7
Approximately 50,000 pages based on two pages per job [A4/Letter single-sided pages]. The number of pages may be
affected due to a variety of factors including but not limited to media type and media size.
Approximately 50,000 pages
2
If you are using Windows®, double-click the Brother Creative Center icon on your
desktop to access our FREE website designed as a resource to help you easily create and print
customised materials for business and home use with photos, text and creativity.
Mac users can access Brother CreativeCenter at this web address:
www.brother.com/creativecenter
B
Appendix
Information for Compliance with Commission Regulation 801/2013
Model name
DCP-L3510CDW Approximately 1.4 W
DCP-L3517CDW Approximately 1.4 W
DCP-L3550CDW Approximately 8.0 W
MFC-L3710CW Approximately 1.5 W
MFC-L3730CDN Approximately 1.3 W
MFC-L3750CDW Approximately 8.1 W
MFC-L3770CDW Approximately 8.1 W
1
All network ports activated and connected
How to enable/disable Wireless LAN
Power consumption
Networked Standby
1
17
Page 19

(DCP-L3510CDW/DCP-L3517CDW)
To turn the wireless network connection on or off, press a or b to select [Network] > [WLAN]
> [WLAN Enable] > [On] or [Off].
(DCP-L3550CDW/MFC-L3710CW/MFC-L3750CDW/MFC-L3770CDW)
To turn the wireless network connection on or off, press
Settings] > [Network] > [WLAN] > [WLAN Enable] > [On] or [Off].
If your machine displays the [All Settings] menu on the Home screen, skip the
[Settings] menu.
[Settings] > [All
18
Page 20

Visit us on the World Wide Web
www.brother.com
D00X0L001-00
UK
Version 0
 Loading...