

Brother DCP-1601, DCP-1616NW, DCP-1610W, MFC-1900, DCP-1610NW User Manual
...
User’s Guide
DCP-1600
DCP-1601
DCP-1610W
DCP-1615NW
DCP-1616NW
MFC-1900
MFC-1901
MFC-1905
MFC-1910W
MFC-1911NW
MFC-1916NW
Not all models are available in all countries.
Version 0
OCE/ASA

Brother numbers
IMPORTANT
For technical help, you must call Brother customer service or your local Brother dealer.
Register your product
Please complete the Brother Warranty Registration or, for your convenience and most efficient
way to register your new product, register on-line at
http://www.brother.com/registration
Frequently asked questions (FAQs)
The Brother Solutions Center is our one-stop resource for all your machine needs. You can
download the latest drivers, software and utilities, read FAQs and troubleshooting tips to learn
how to get the most from your Brother product.
http://support.brother.com
You can check here for Brother driver updates.
Customer Service
Visit http://www.brother.com for contact information on your local Brother office.
Service center locations
For service centres in Asia and Oceania, contact your local Brother Office. Address and telephone
contact information for Asian and Oceanian offices can be found at http://www.brother.com
selecting your country.
Internet Addresses
Brother Global website: http://www.brother.com
For Frequently Asked Questions (FAQs), Product Support and Technical Questions, and Driver Updates
and Utilities: http://support.brother.com
©2014 Brother Industries, Ltd. All rights reserved.
by
i

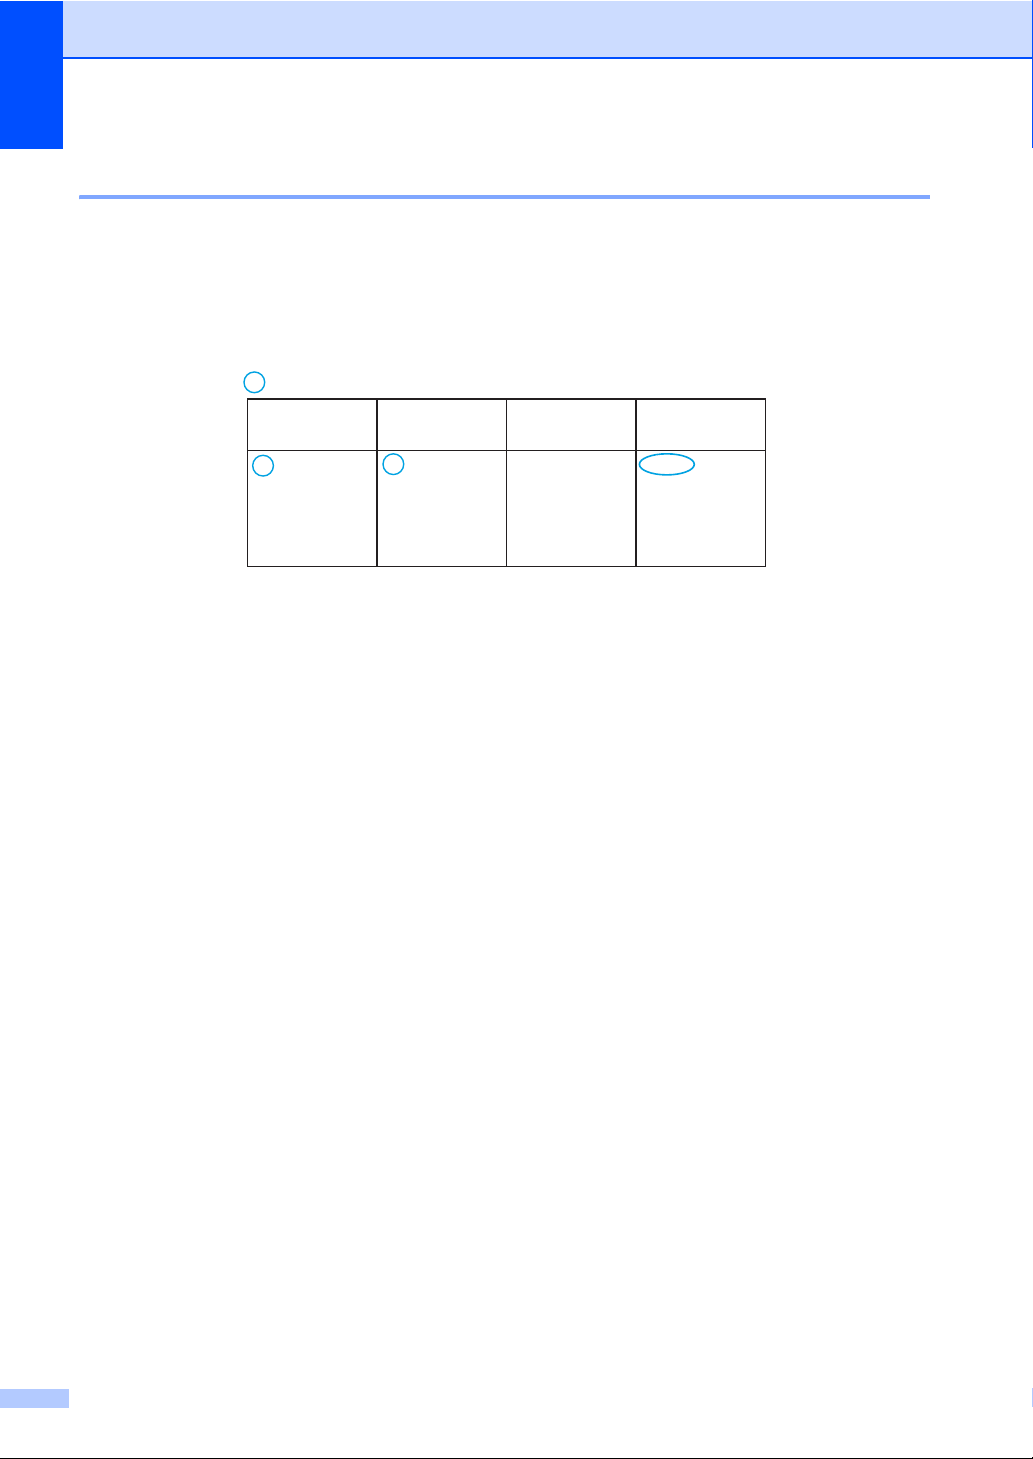
User's Guides and where do I find them?
Which Guide? What's in it? Where is it?
Product Safety
Guide
Quick Setup Guide Follow the instructions for setting up your
User’s Guide Learn the Fax (MFC models), Scan and
Software and
Network User’s
Guide
Mobile Print/Scan
Guide for Brother
iPrint&Scan
(For network models)
Read this Guide first. Read the Safety
Instructions before you set up your machine.
See this Guide for trademarks and legal
limitations.
machine and installing the drivers and
software for the operating system and
connection type you are using.
Copy operations. See troubleshooting tips
and machine specifications.
This Guide provides instructions for
Scanning, Printing, PC-FAX and other
operations that can be performed by
connecting your Brother machine to a
computer. You can also find useful
information about using the Brother
ControlCenter utility, using your machine in
a network environment, and frequently used
terms.
This Guide provides useful information
about printing from your mobile device and
scanning from your Brother machine to your
mobile device when connected on a Wi-Fi
network.
Printed / In the Box
Printed / In the Box
Printed / In the Box
(Windows®)
HTML file / CD-ROM / In the Box
(Macintosh)
HTML file / Brother Solutions
1
Center
PDF file / Brother Solutions
1
Center
®
1
Visit us at http://support.brother.com.
ii

Table of Contents
1 General information 1
Using the documentation.......................................................................................1
Symbols and conventions used in the documentation .................................... 1
Accessing Brother Utilities (Windows
Accessing the Software and Network User’s Guide ..............................................3
Viewing Documentation...................................................................................3
Control panel overview ..........................................................................................6
Menu and features for MFC models ......................................................................9
On-screen programming..................................................................................9
Menu table.....................................................................................................10
0.Initial Setup.................................................................................................11
1.General Setup ............................................................................................16
2.Fax..............................................................................................................20
3.Copy ...........................................................................................................33
4.Printer .........................................................................................................34
5.Print Reports...............................................................................................35
6.Network (For MFC-1910W, MFC-1911NW and MFC-1916NW) ................37
7.Machine Info.
Menu and features for DCP models ....................................................................46
On-screen programming................................................................................46
Menu table.....................................................................................................47
1.General Setup ............................................................................................48
2.Copy ...........................................................................................................50
3.Printer .........................................................................................................51
4.Network (For DCP-1610W, DCP-1615NW and DCP-1616NW).................52
5.Machine Info
Entering text ........................................................................................................61
MFC models ..................................................................................................61
DCP models ..................................................................................................62
Ecology features..................................................................................................63
Deep Sleep mode..........................................................................................63
Auto Power Off (For DCP models) ................................................................63
Toner Settings .....................................................................................................63
Toner Setting (Continue mode) .....................................................................63
Receiving faxes in Continue Mode (For MFC models)..................................64
1
............................................................................................45
1
.............................................................................................60
®
).................................................................2
2 Paper Setting 65
Paper settings......................................................................................................65
Paper Type ....................................................................................................65
Paper Size .....................................................................................................65
Acceptable paper.................................................................................................66
Paper capacity of the paper tray....................................................................66
iii

3 Loading documents 67
How to load documents .......................................................................................67
Using the automatic document feeder (ADF) (For ADF models)...................67
Using the scanner glass ................................................................................67
4 Sending a fax (MFC models) 69
How to send a fax................................................................................................69
Cancelling a fax in progress ..........................................................................69
Broadcasting..................................................................................................70
5 Receiving a fax (MFC models) 71
Receive modes ....................................................................................................71
Choosing the receive mode...........................................................................71
Receive Mode settings ........................................................................................72
Ring Delay.....................................................................................................72
F/T Ring Time (Fax/Tel mode only)...............................................................72
Fax Detect .....................................................................................................72
6 Dialling and storing numbers (MFC models) 74
Storing numbers ..................................................................................................74
Storing Speed Dial numbers..........................................................................74
Changing or Deleting Speed Dial numbers ...................................................74
How to dial...........................................................................................................75
Manual dialling...............................................................................................75
Speed dialling ................................................................................................75
Search ...........................................................................................................75
Redial ............................................................................................................75
Caller ID (except India and Vietnam).............................................................76
7 Using PC-FAX (MFC models) 77
PC-FAX Receive (For Windows® only) ...............................................................77
PC-FAX sending..................................................................................................79
Sending a file as a PC-FAX...........................................................................79
iv

8 Telephone and external devices (MFC models) 81
Voice operations (MFC-1905 and MFC-1916NW)...............................................81
Making a telephone call.................................................................................81
Hold ...............................................................................................................81
Connecting an external TAD (MFC-1900,
MFC-1901, MFC-1910W and MFC-1911NW) ..................................................81
Connections...................................................................................................82
Recording an outgoing message (OGM).......................................................82
Multi-line connections (PABX) .......................................................................82
External and extension telephones......................................................................83
Connecting an external or extension telephone ............................................83
For Fax/Tel mode only...................................................................................83
Using a non-Brother cordless external handset ............................................83
9 Making copies 84
How to copy.........................................................................................................84
ID COPY .............................................................................................................85
Double-sided ID copy ....................................................................................85
One-sided ID copy.........................................................................................86
Other copies .......................................................................................................87
10 How to scan to a computer 89
Scanning a document as a PDF file using ControlCenter4 .................................89
Scanning using the SCAN key.............................................................................92
SCAN key settings.........................................................................................92
A Troubleshooting and other information 94
Consumable items...............................................................................................94
Identifying your problem ......................................................................................96
Error and maintenance messages.......................................................................97
If you are having difficulty with your machine ......................................................99
Telephone and Fax problems (MFC models) ................................................99
Improving the print quality..................................................................................101
Document Jams (ADF models).........................................................................106
Paper Jams........................................................................................................107
Transferring your faxes or Fax Journal report (MFC models)............................109
Transferring faxes to another fax machine ..................................................109
Transferring faxes to your PC......................................................................109
Transferring the Fax Journal report to another fax machine .......................110
Cleaning and Checking the machine .................................................................110
v

B Specifications 111
DCP-1600, DCP-1601, MFC-1900, MFC-1901 and MFC-1905 ........................111
General........................................................................................................111
Document Size ............................................................................................114
Print media ..................................................................................................114
Fax...............................................................................................................115
Copy ............................................................................................................115
Scanner .......................................................................................................116
Printer..........................................................................................................116
DCP-1610W, DCP-1615NW, DCP-1616NW,
MFC-1910W, MFC-1911NW and MFC-1916NW ...........................................117
General........................................................................................................117
Document Size ............................................................................................121
Print media ..................................................................................................121
Fax...............................................................................................................122
Copy ............................................................................................................122
Scanner .......................................................................................................123
Printer..........................................................................................................123
Network (LAN).............................................................................................124
CIndex 125
vi

NOTE
General information 1
WARNING
1
Using the documentation
Thank you for buying a Brother machine!
Reading the documentation will help you
make the most of your machine.
Symbols and conventions used in the documentation 1
The following symbols and conventions are
used throughout the documentation.
1
Bold Bold style identifies keys on the
1
Italics Italicized style emphasizes an
Courier
New
Follow all warnings and instructions marked
on the product.
machine's control panel or on
the computer screen.
important point or refers you to
a related topic.
Courier New font identifies the
messages shown on the LCD
of the machine.
WARNING indicates a potentially
hazardous situation which, if not avoided,
could result in death or serious injuries.
IMPORTANT
IMPORTANT indicates a potentially
hazardous situation which, if not avoided,
may result in damage to property or loss of
product functionality.
NOTE
NOTE specifies the operating environment,
conditions for installation, or special
conditions of use.
Prohibition icons indicate actions
that must not be performed.
Electrical Hazard icons alert you to a
possible electrical shock.
Hot Surface icons warn you not to
touch machine parts that are hot.
Fire hazard icons alert you to the
possibility of fire.
• Most of the illustrations in this User's
Guide show the MFC-1910W.
• This User's Guide uses the following
model group identification names:
• For network models:
DCP-1610W, DCP-1615NW,
DCP-1616NW, MFC-1910W,
MFC-1911NW, MFC-1916NW
• For ADF models:
DCP-1615NW, DCP-1616NW,
MFC-1900, MFC-1901, MFC-1905,
MFC-1910W, MFC-1911W,
MFC-1916NW
1

Chapter 1
Accessing Brother Utilities (Windows®) 1
Brother Utilities is an application launcher that offers convenient access to all Brother
applications installed on your device.
a (Windows
2008 and Windows Server
Click (Start) > All Programs > Brother > Brother Utilities.
(Windows
Tap or double-click (Brother Utilities) either on the Start screen or the desktop.
(Windows
Move your mouse to the lower left corner of the Start screen and click (if you are using
a touchbased device, swipe up from the bottom of the Start screen to display the Apps
screen). When the Apps screen appears, tap or click (Brother Utilities).
b Select your machine.
®
XP, Windows Vista®, Windows® 7, Windows Server® 2003, Windows Server®
®
8 and Windows Server® 2012)
®
8.1 and Windows Server® 2012 R2)
®
2008 R2)
c Choose the function you want to use.
2
General information
NOTE
Accessing the Software and Network User’s Guide
This User’s Guide does not contain all the
information about the machine such as how
to use the advanced features for Printer,
Scanner, PC-Fax
are ready to learn detailed information about
these operations, read the Software and
Network User’s Guide that is on the installer
CD-ROM for Windows
Macintosh users can read the Software and
Network User’s Guide by downloading it from
the Brother Solutions Center
(http://support.brother.com
1
MFC models
2
Network models
Viewing Documentation 1
1
and Network2. When you
®
users.
).
If you have not installed the software, you can
find the documentation on the installer
CD-ROM by following the instructions below:
1
a Turn on your computer. Insert the
installer CD-ROM into your CD-ROM
drive.
If the Brother screen does not appear, go
to Computer (My Computer).
(For Windows
Explorer) icon on the taskbar, and then
go to Computer (This PC).
Double-click the CD-ROM icon, and then
double-click start.exe.
®
8: Click the (File
1
b If the model name screen appears, click
your model name.
c If the language screen appears, click
your language. The CD-ROM Top Menu
will appear.
Viewing Documentation (Windows®) 1
(Windows® 7/Windows Vista®/
®
Windows
Click (Start) > All Programs>
Brother > Brother Utilities, and then click
the drop-down list and select your model
name (if not already selected). Click Support
in the left navigation bar, and then click
User’s Guides.
(Windows
Click (Brother Utilities), and then
click the drop-down list and select your model
name (if not already selected). Click Support
in the left navigation bar, and then click
User’s Guides.
XP)
®
8)
d Click User’s Guides.
e Click User’s guides on the CD-ROM.
If the country screen appears, choose
your country, and then click the
document you want to read.
3

Chapter 1
How to find Network setup instructions (For network models) 1
Your machine can be connected to a
network.
Basic setup instructions, see Quick Setup
Guide.
If your wireless access point or router
supports Wi-Fi Protected Setup or AOSS™,
see Quick Setup Guide.
For more information about network setup,
see Software and Network User’s Guide.
Accessing Brother CreativeCenter 1
If you are using Windows®, double-click the
(Brother CreativeCenter) icon on your
desktop to access our FREE website
designed as a resource to help you easily
create and print customized materials for
business and home use with photos, text and
creative touch.
Mac users can access Brother
CreativeCenter at this web address:
http://www.brother.com/creativecenter
.
4

General information
1
5
Chapter 1
1 2 4
6 5
3
01/01 10:00
Fax Only
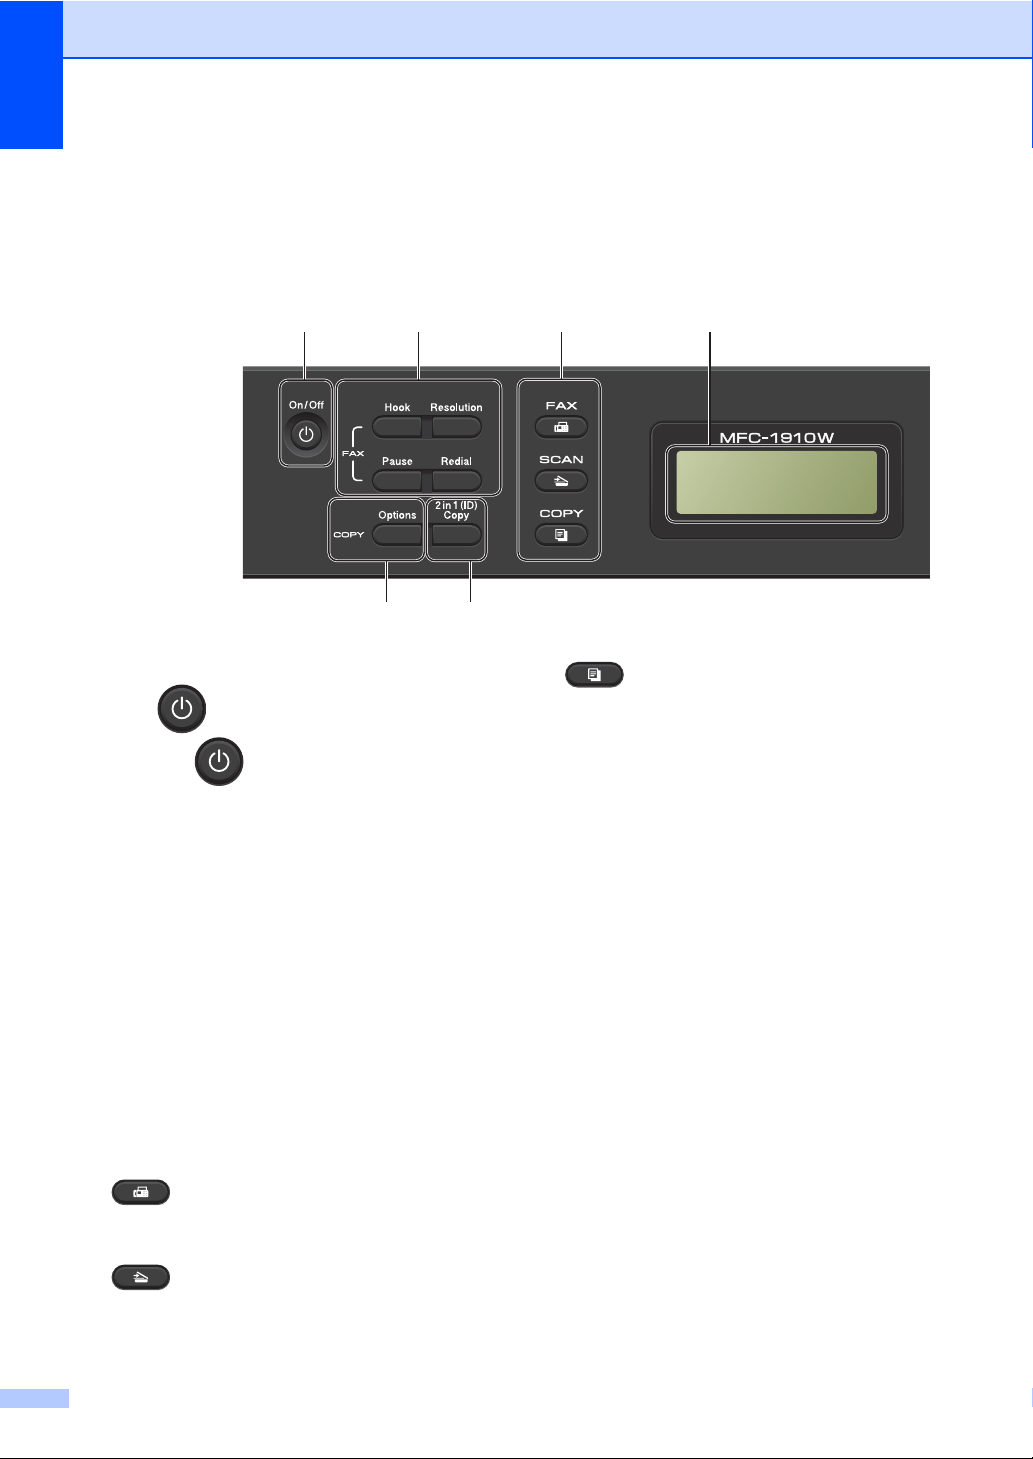
Control panel overview 1
The illustrations of the control panel in this User’s Guide show the MFC-1910W and DCP-1610W.
MFC models
1On/Off
Press to turn the machine on. Press and
hold down to turn the machine off.
2 Hook or Hook/Hold
Press before dialling if you want to make sure
a fax machine will answer, and then press
Start.
(MFC-1905 and MFC-1916NW)
Lets you place telephone calls on hold.
Redial
You can redial the last 20 numbers called.
Pause
Inserts a 3.5 second pause when programming
speed dial numbers or when dialling a number
manually.
Resolution
Sets the resolution when sending a fax.
3 Mode keys:
FAX
Puts the machine in FAX mode. Fax mode is
the default mode.
SCAN
Puts the machine in SCAN mode.
COPY
Puts the machine in COPY mode.
4LCD
Displays messages to help you set up and use
your machine.
5 2 in 1 (ID) Copy
You can copy your Identification card both
sides onto one page with the original size.
6 Options
You can quickly and easily choose temporary
settings for copying.
6
General information
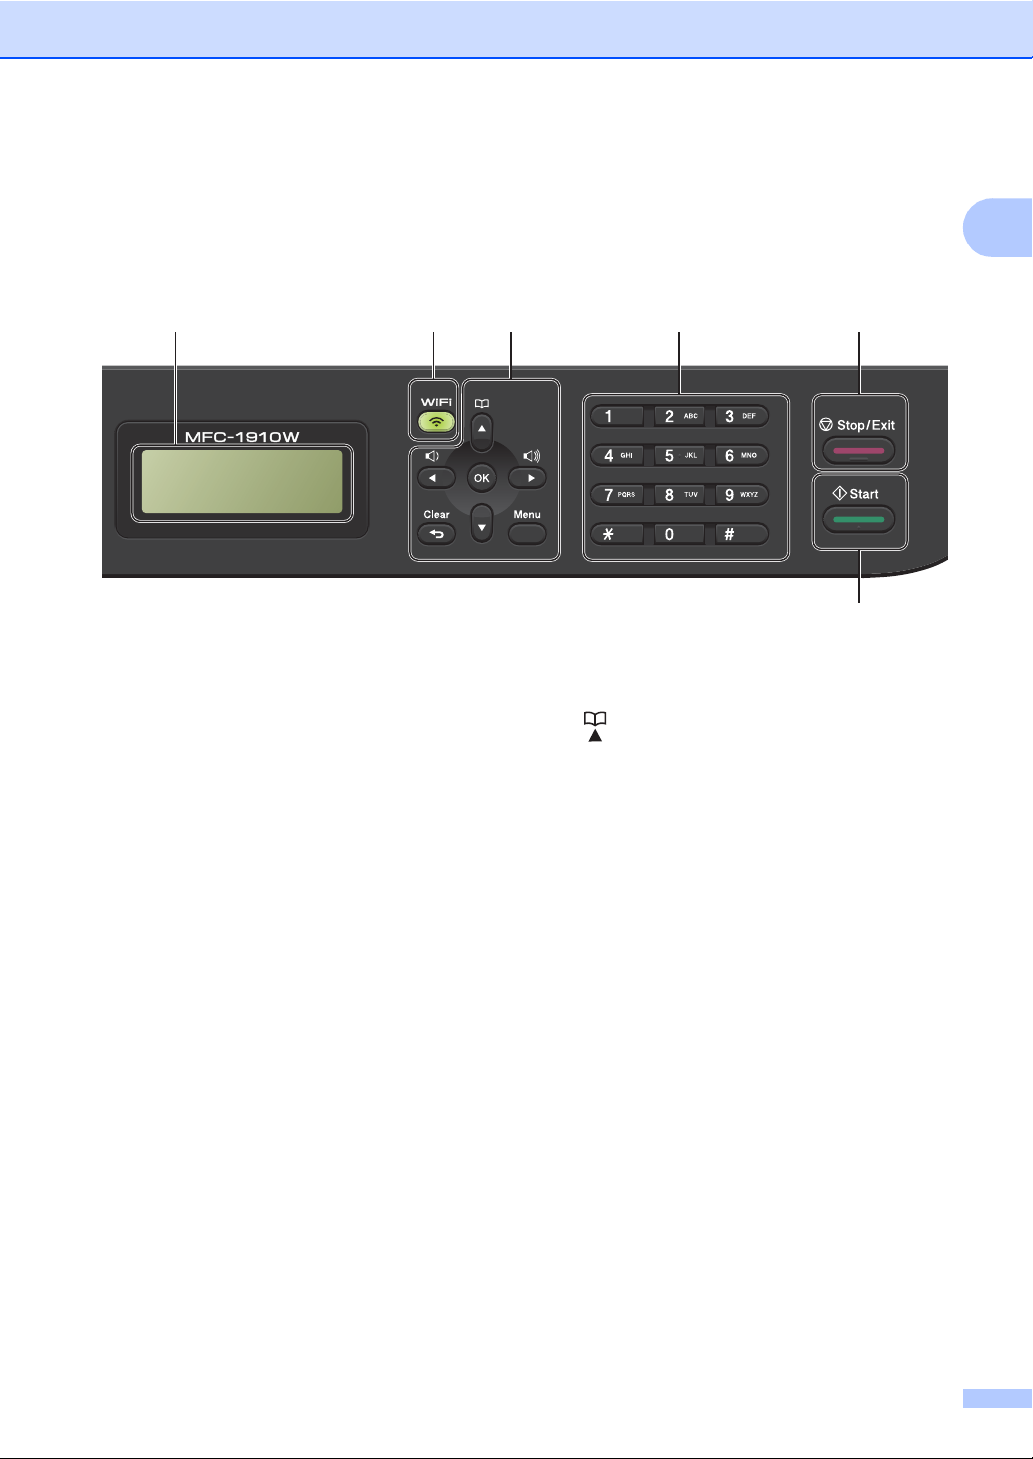
87 9 10
11
4
01/01 10:00
Fax Only
1
7 WiFi (MFC-1910W, MFC-1911NW and
MFC-1916NW)
Press the WiFi button and launch the wireless
installer on your computer. Follow the onscreen instructions to set up a wireless
connection between your machine and your
network.
When the WiFi light is on, your Brother
machine is connected to a wireless access
point. When the WiFi light blinks, the wireless
connection is down, or your machine is in the
process of connecting to a wireless access
point.
8 Menu keys:
Clear
Deletes entered data or lets you cancel the
current setting.
Menu
Lets you access the Menu to program your
settings in the machine.
OK
Lets you store your settings and confirm LCD
messages on the machine.
Volume keys:
d or c
Press to scroll backwards or forwards through
menu selections. Press to change the volume
when in fax or standby mode.
a or b
Press to scroll through the menus and options.
Address Book
Lets you access speed dial numbers directly.
9Dialpad
Use these keys to dial telephone and fax
numbers and as a keyboard for entering
information into the machine.
(MFC-1905 and MFC-1916NW)
The # key temporarily switches the dialling
mode from Pulse to Tone during a telephone
call (not available in New Zealand).
10 Stop/Exit
Stops an operation or exits from a menu. Press
this key to cancel the print job.
11 Start
Lets you start sending faxes, scanning or
making copies.
7
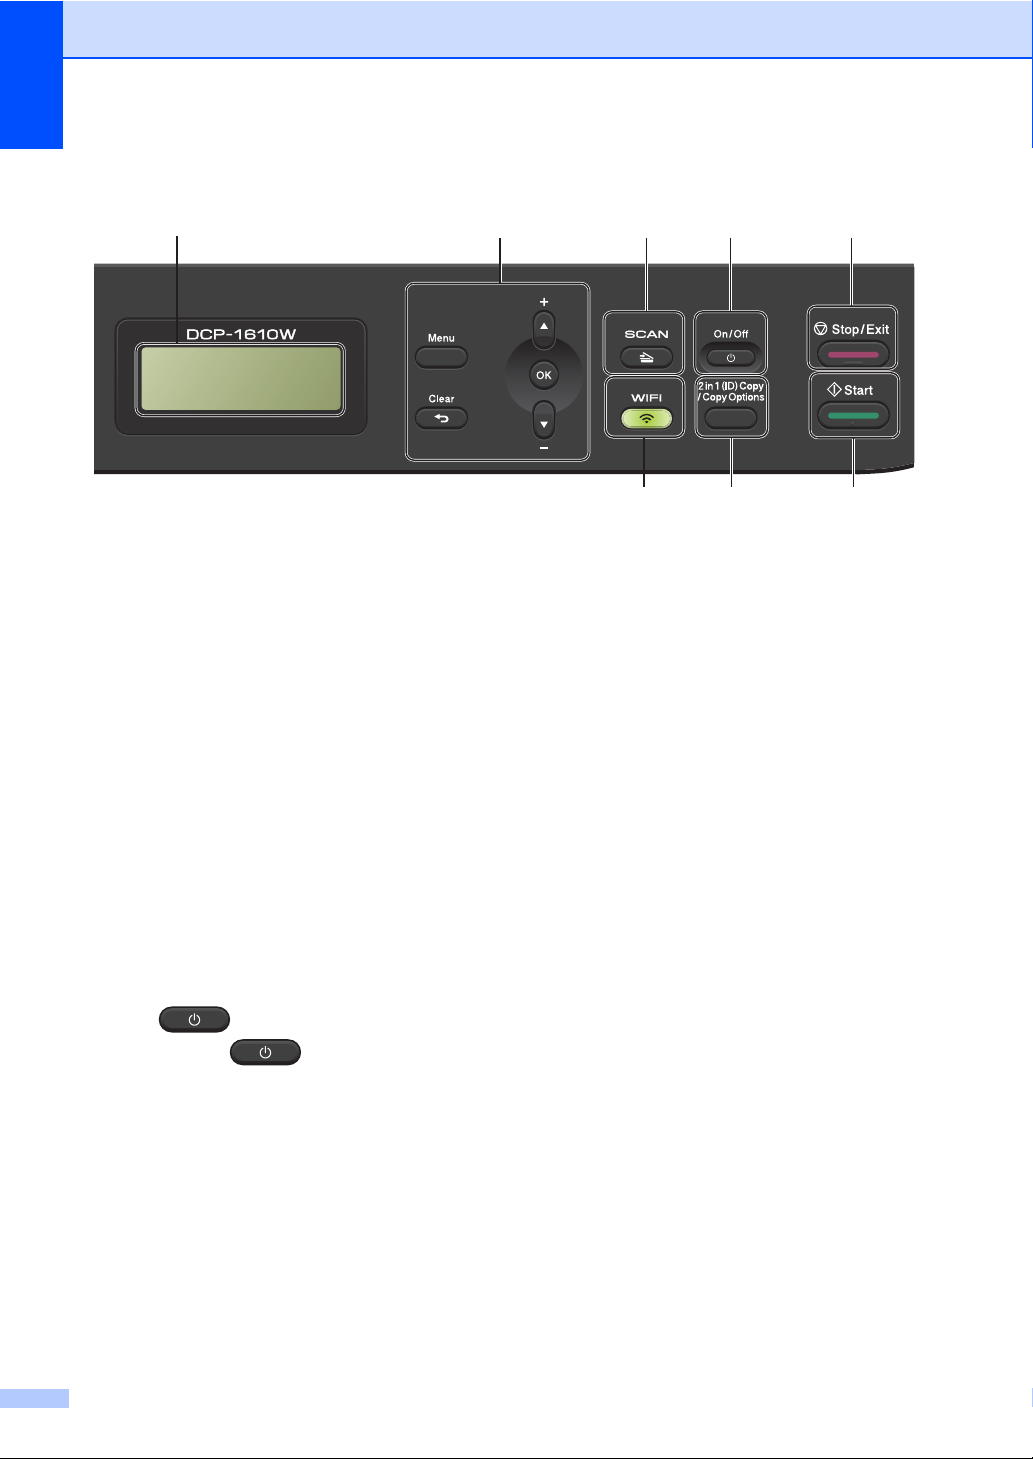
Chapter 1
2 3 4 5
6
1
8 7
Stack Copies:01
100% nnonn Auto
DCP models
1LCD
Displays messages to help you set up and use
your machine.
2 Menu keys:
Menu
Lets you access the Menu to program your
settings in the machine.
Clear
Deletes entered data or lets you cancel the
current setting.
OK
Lets you store your settings and confirm LCD
messages on the machine.
b or a
Press to scroll through the menus and options.
3 SCAN
Puts the machine in SCAN mode.
4On/Off
Press to turn the machine on. Press
and hold down to turn the machine
off.
5Stop/Exit
Stops an operation or exits from a menu. Press
this key to cancel the print job.
6Start
Lets you start making copies or scanning.
7 2 in 1 (ID) Copy/Copy Options (DCP-1610W,
DCP-1615NW and DCP-1616NW)
You can copy both sides of your Identification
card onto one page with the original size.
You can quickly and easily choose temporary
settings for copying.
Copy Options (DCP-1600 and DCP-1601)
You can quickly and easily choose temporary
settings for copying.
8 WiFi (DCP-1610W, DCP-1615NW and DCP-
1616NW)
Press the WiFi button and launch the wireless
installer on your computer. Follow the onscreen instructions to set up a wireless
connection between your machine and your
network.
When the WiFi light is on, your Brother
machine is connected to a wireless access
point. When the WiFi light blinks, the wireless
connection is down, or your machine is in the
process of connecting to a wireless access
point.
2 in 1 (ID) Copy (DCP-1600 and DCP-1601)
You can copy both sides of your Identification
card onto one page with the original size.
8

Menu and features for
General information
MFC models 1
On-screen programming 1
Your machine has been designed to be easy
to use. The LCD provides on-screen
programming using the menu keys.
How to access the menu mode 1
(Example: MFC-1910W)
a Press Menu.
b Choose an option.
Press 0 for Initial Setup menu.
Press 1 for General Setup menu.
Press 2 for Fax menu.
Press 3 for Copy menu.
Press 4 for Printer menu.
Press 5 for Print Reports menu.
Press 6 for Network menu.
1
Press 7 for Machine Info. menu.
Press 9 for Service menu.
1
This will appear only when the LCD shows an
error message.
You can also scroll through each menu
level by pressing a or b.
1
c Press OK when the option you want
appears on the LCD.
The LCD will then show the next menu
level.
d Press a or b to scroll to your next menu
selection, and then press OK.
e Press a or b to display the option you
want, and then press OK.
When you have finished setting an
option, the LCD will show Accepted.
f Press Stop/Exit to exit Menu mode.
9
Chapter 1
3.Copy
Level 2
1.Quality - Auto*
Text
Photo
Receipt
Level 3 Descriptions 1 Options
You can
choose the
Copy resolution
for your type of
document.
Menu table 1
Using the menu table, you can change the settings in your machine by pressing the number keys
or a and b and OK.
Press Menu, and then according to what is shown on the LCD, press the number keys or a and b
to display different menu options. Press OK to select an option.
In the below example, the copy quality setting is changed from Auto to Text.
a Press Menu.
b Press 3 to choose Copy.
c Press 1 to choose Quality.
d Press a or b to display Text.
e Press OK.
f Press Stop/Exit.
10

General information
0.Initial Setup 1
0.Initial Setup (For MFC-1900, MFC-1901 and MFC-1905)
Level 2 Level 3 Descriptions 1 Options Descriptions 2 Page
1.Receive
Mode
The factory settings are shown in Bold with an asterisk.
— You can choose the
receive mode that
best suits your
needs.
Fax Only* Your machine
Fax/Tel Your machine
External TAD
(MFC-1900,
MFC-1901)
Manual You control the
automatically
answers every call as
a fax. Fax Only is
displayed on the LCD
when set.
controls the line and
automatically
answers every call. If
the call is not a fax,
the phone will ring for
you to pick up the
call. Fax/Tel is
displayed on the LCD
when set.
Your external
telephone answering
device (TAD)
automatically
answers every call.
Voice messages are
stored on the
external TAD. Fax
messages are
automatic ally printed.
External TAD is
displayed on the LCD
when set.
phone line and must
answer every call
yourself. Manual is
displayed on the LCD
when set.
1
71
11

Chapter 1
0.Initial Setup (For MFC-1900, MFC-1901 and MFC-1905) (continued)
Level 2 Level 3 Descriptions 1 Options Descriptions 2 Page
2.Date&Time 1.Date&Time Puts the date and
time on the LCD and
in headings of faxes
you send if yo u set up
the station ID.
2.Daylight Save
3.Station ID — Sets up your name
4.Tone/Pulse
(not available in
New Zealand)
5.Dial Tone
4.Dial Tone
(for New
Zealand)
The factory settings are shown in Bold with an asterisk.
— Chooses the dialling
— You can shorten the
Set the machine to
change for Daylight
Saving Time.
and fax number to
appear on each page
you fax.
mode.
dial tone detect
pause.
Year: Enter the last two
digits of the year.
(e.g. Enter 1, 3 for
2013.)
Month: Enter the two digits
for the month. (e.g.
Enter 0, 1 for
January.)
Day: Enter the two digits
for the day. (e.g.
Enter 0, 1 for 1st.)
Time: Enter the time in 24-
hour format. (e.g.
Enter 1, 5, 2, 5 for
15:25.)
On It will reset the time
forward one hour.
Off It will reset the time
backward one hour.
Fax: Enter your fax
number (up to 20
digits).
Tel: Enter your telephone
number (up to 20
digits). If your
telephone number
and fax number are
the same, enter the
same number again.
Name: Enter your name (up
to 20 characters).
Tone* Your machine comes
set for Tone dialling
service.
Pulse If you have Pulse
dialling service
(rotary), you need to
change the dialling
mode.
Detection Your machine will
dial as soon as it
detects a dial tone.
No Detection* When you send a fax
automatically, by
default your machine
will wait for a fixed
amount of time
before it starts to dial
the number.
61
12

General information
0.Initial Setup (For MFC-1900, MFC-1901 and MFC-1905) (continued)
Level 2 Level 3 Descriptions 1 Options Descriptions 2 Page
6.Dial Prefix
5.Dial Prefix
(for New
Zealand)
7.Reset
6.Reset
(for New
Zealand)
The factory settings are shown in Bold with an asterisk.
— Sets a prefix number
that will always be
added before the fax
number every time
you dial.
1.Address &
Fax
2.All
Settings
Restores all stored
phone numbers and
fax settings.
Restores all the
machine settings to
factory default.
— Enter the prefix
number (up to 5
digits) on the dial
pad, and then press
OK.
The dial prefix setting
will automatically dial
a predefined number
before every fax
number you dial. For
example: If your
phone system
requires a 9 to dial an
outside number this
setting will
automatically dial 9
for every fax you
send.
1.Reset
2.Exit Cancel restore and
exit the menu.
1.Reset
2.Exit Cancel restore and
exit the menu.
1
13

Chapter 1
0.Initial Setup (For MFC-1910W, MFC-1911NW and MFC-1916NW)
Level 2 Level 3 Descriptions 1 Options Descriptions 2 Page
1.Date&Time 1.Date&Time Puts the date and
time on the LCD and
in headings of faxes
you send if yo u set up
the station ID.
2.Daylight
Save
3.Time Zone Sets the time zone for
2.Station ID — Sets up your name
3.Tone/Pulse
(not available in
New Zealand)
The factory settings are shown in Bold with an asterisk.
— Chooses the dialling
Set the machine to
change for Daylight
Saving Time.
your country.
and fax number to
appear on each page
you fax.
mode.
Year: Enter the last two
digits of the year.
(e.g. Enter 1, 3 for
2013.)
Month: Enter the two digits
for the month. (e.g.
Enter 0, 1 for
January.)
Day: Enter the two digits
for the day. (e.g.
Enter 0, 1 for 1st.)
Time: Enter the time in 24-
hour format. (e.g.
Enter 1, 5, 2, 5 for
15:25.)
On It will reset the time
forward one hour.
Off It will reset the time
backward one hour.
UTCXXX:XX
Fax: Enter your fax
number (up to 20
digits).
Tel: Enter your telephone
number (up to 20
digits). If your
telephone number
and fax number are
the same, enter the
same number again.
Name: Enter your name (up
to 20 characters).
Tone* Your machine comes
set for Tone dialling
service.
Pulse If you have Pulse
dialling service
(rotary), you need to
change the dialling
mode.
61
14

General information
0.Initial Setup (For MFC-1910W, MFC-1911NW and MFC-1916NW) (continued)
Level 2 Level 3 Descriptions 1 Options Descriptions 2 Page
4.Dial Tone
3.Dial Tone
(for New
Zealand)
5.Dial Prefix
4.Dial Prefix
(for New
Zealand)
6.Reset
5.Reset
(for New
Zealand)
The factory settings are shown in Bold with an asterisk.
— You can shorten the
dial tone detect
pause.
— Sets a prefix number
that will always be
added before the fax
number every time
you dial.
1.Machine
Reset
2.Network Restores all network
3.Address &
Fax
4.All
Settings
Restores all the
function settings to
factory default.
settings to the factory
default.
Restores all stored
phone numbers and
fax settings.
Restores all the
machine settings to
factory default.
All Settings takes
less time than
Factory Reset.
Detection Your machine will
dial as soon as it
detects a dial tone.
No Detection* When you send a fax
automatically, by
default your machine
will wait for a fixed
amount of time
before it starts to dial
the number.
— Enter the prefix
number (up to 5
digits) on the dial
pad, and then press
OK.
The dial prefix setting
will automatically dial
a predefined number
before every fax
number you dial. For
example: If your
phone system
requires a 9 to dial an
outside number this
setting will
automatically dial 9
for every fax you
send.
1.Reset
2.Exit Cancel restore and
exit the menu.
1.Reset
2.Exit Cancel restore and
exit the menu.
1.Reset
2.Exit Cancel restore and
exit the menu.
1.Reset
2.Exit Cancel restore and
exit the menu.
1
15

Chapter 1
1.General Setup 1
1.General Setup (For MFC-1900, MFC-1901 and MFC-1905)
Level 2 Level 3 Descriptions 1 Options Descriptions 2 Page
1.Mode Timer — You can set how
much time the
machine takes after
the last Copy or Scan
operation to return to
Fax mode.
2.Paper 1.Paper Type Plain*
2.Paper Size Sets the size of the
paper in the paper
tray.
3.Volume 1.Ring Adjusts the ring
volume.
2.Beeper When the beeper is
on, the machine will
beep wh en you press
a key, make a
mistake, or after you
send or receive a fax.
3.Speaker Adjusts the speaker
volume.
The factory settings are shown in Bold with an asterisk.
0 Sec Return to the fax
30 Secs Return to the fax
1 Min
2 Mins*
5 Mins
Off The machine will stay
Recycled Paper
A4*
Letter
Legal
Folio
A5
A5 L
B5
Executive
(For Philippines:
Letter*)
Low
Med*
High
Off
Low
Med*
High
Off
Low
Med*
High
Off
mode at once.
mode after the time
you choose.
in the mode you used
last.
65
65
16

General information
1.General Setup (For MFC-1900, MFC-1901 and MFC-1905) (continued)
Level 2 Level 3 Descriptions 1 Options Descriptions 2 Page
4.Ecology 1.Toner Save You can save toner
using this feature.
5.LCD
Contrast
6.Scan Size — Adjusts the scan area
7.Replace
Toner
The factory settings are shown in Bold with an asterisk.
— Adjusts the contrast
of the LCD.
to the size of the
document.
— Sets the machine to
continue or stop
printing after the LCD
shows Replace
Toner.
On Increases the page
yield of the toner
cartridge. When you
set Toner Save to
On, print appears
lighter.
Off*
-nnnno+
-nnnon+
-nnonn+*
-nonnn+
-onnnn+
A4*
Letter
(For Philippines:
Letter*)
Continue The machine will
Stop* The machine will stop
Press c to make the
LCD darker. Or press
d to make the LCD
lighter.
continue printing.
Replace the toner
cartridge with a new
one after the LCD
shows Toner
Ended.
printing. Replace the
toner cartridge with a
new one.
1
63
17
Chapter 1
1.General Setup (For MFC-1910W, MFC-1911NW and MFC-1916NW)
Level 2 Level 3 Descriptions 1 Options Descriptions 2 Page
1.Default
Mode
2.Mode Timer — You can set how
3.Paper 1.Paper Type Plain*
4.Volume 1.Ring Adjusts the ring
The factory settings are shown in Bold with an asterisk.
— Select the default
mode.
much time the
machine takes after
the last operation to
return to the default
mode.
2.Paper Size Sets the size of the
paper in the paper
tray.
volume.
2.Beeper When the beeper is
on, the machine will
beep wh en you press
a key, make a
mistake, or after you
send or receive a fax.
3.Speaker Adjusts the speaker
volume.
Fax*
Copy
Scan
0 Sec Return to the default
mode at once.
30 Secs Return to the default
1 Min
2 Mins*
5 Mins
Off The machine will stay
Recycled Paper
A4*
Letter
Legal
Folio
A5
A5 L
B5
Executive
(For Philippines:
Letter*)
Low
Med*
High
Off
Low
Med*
High
Off
Low
Med*
High
Off
mode after the time
you choose.
in the mode you used
last.
65
65
18

General information
1.General Setup (For MFC-1910W, MFC-1911NW and MFC-1916NW) (continued)
Level 2 Level 3 Descriptions 1 Options Descriptions 2 Page
5.Ecology 1.Toner Save You can save toner
using this feature.
6.LCD
Contrast
7.Scan Size — Adjusts the scan area
8.Replace
Toner
The factory settings are shown in Bold with an asterisk.
— Adjusts the contrast
of the LCD.
to the size of the
document.
— Sets the machine to
continue or stop
printing after the LCD
shows Replace
Toner.
On Increases the page
yield of the toner
cartridge. When you
set Toner Save to
On, print appears
lighter.
Off*
-nnnno+
-nnnon+
-nnonn+*
-nonnn+
-onnnn+
A4*
Letter
(For Philippines:
Letter*)
Continue The machine will
Stop* The machine will stop
Press c to make the
LCD darker. Or press
d to make the LCD
lighter.
continue printing.
Replace the toner
cartridge with a new
one after the LCD
shows Toner
Ended.
printing. Replace the
toner cartridge with a
new one.
1
63
19

Chapter 1
2.Fax 1
2.Fax (For MFC-1900, MFC-1901 and MFC-1905)
Level 2 Level 3 Descriptions 1 Options Descriptions 2 Page
1.Setup
Receive
(In FAX mode
only)
The factory settings are shown in Bold with an asterisk.
1.Ring Delay The Ring Delay
2.F/T Ring
Time
3.Fax Detect Receives fax
setting sets the
number of times the
machine rings before
it answers in Fax
Only and Fax/Tel
modes.
Sets the length of the
fast double-ring time
in Fax/Tel mode.
messages without
pressing Start. When
Fax Detect is On, you
can receive fax
messages without
pressing Start.
(02 - 10)
02*
(Example for
Australia)
20 Secs
30 Secs*
40 Secs
70 Secs
(For New Zealand)
20 Secs
30 Secs*
40 Secs
55 Secs
On* The machine can
Semi (MFC-1905) The machine will only
Off If you are at the
If you have external
or extension
telephones on the
same line as the
machine, choose the
maximum number of
rings.
If the call is a fax,
then your machine
will receive it;
however, if it is a
voice call the
machine will sound
the F/T ring (a fast
double-ring) for the
time you have set in
the F/T Ring Time
setting. If you hear
the F/T ring it means
that you have a voice
caller on the line.
receive a fax
automatically, even if
you answer the call.
receive a fax call
automatically if you
answered it using the
machine's handset.
machine and answer
a fax call first by lifting
the handset of an
external telephone
(For MFC-1900 and
MFC-1901) or the
machine (For MFC-
1905), press Start.
72
72
72
20

2.Fax (For MFC-1900, MFC-1901 and MFC-1905) (continued)
General information
Level 2 Level 3 Descriptions 1 Options Descriptions 2 Page
1.Setup
Receive
(In FAX mode
only)
(Continued)
The factory settings are shown in Bold with an asterisk.
4.Auto
Reduction
5.Memory
Receive
6.Print
Density
The machine
calculates the
reduction ratio by
using th e page size of
the fax and your
Paper Size setting
(Menu, 1, 2, 2).
Automatically stores
any incoming faxes in
its memory if it runs
out of paper.
The machine will
carry on receiving the
current fax, with the
remaining pages
being stored in
memory, if enough
memory is available.
You can adjust the
Print Density setting
to make your printed
pages darker or
lighter.
On* If you choose On, the
machine
automatically
reduce s each page of
an incoming fax to fit
on one page of A4,
Letter, Legal, or Folio
size paper.
Off
On* Further incoming
Off Further incoming
-nnnno+
-nnnon+
-nnonn+*
-nonnn+
-onnnn+
faxes will also be
stored into memory
until the memory is
full. When the
memory is full the
machine will stop
automatically
answering calls. To
print the faxes, put
fresh paper in the tray
and press Start.
faxes will not be
stored in memory.
The machine will
then stop
automatically
answering calls until
fresh paper is put in
the paper tray. To
print the last fax you
received, put fresh
paper in the tray and
press Start.
Press c to make
darker, press d to
make lighter.
1
21

Chapter 1
2.Fax (For MFC-1900, MFC-1901 and MFC-1905) (continued)
Level 2 Level 3 Descriptions 1 Options Descriptions 2 Page
2.Setup Send 1.Contrast Changes the
lightne ss or darkness
of faxes you send.
2.Fax
Resolution
3.Overseas
Mode
The factory settings are shown in Bold with an asterisk.
Sets the default
resolution for
outgoing faxes.
The quality of an
outgoing fax can be
improved by
changing the Fax
Resolution.
If you are having
difficulty sending a
fax overseas due to a
bad connection, then
turning on Overseas
Mode may help.
Auto* Auto will give the
best results. It
automatically
chooses a suitable
contrast for your
document.
Light If your document is
too light, choose
Light.
Dark If your document is
too dark, choose
Dark.
Standard* Suitable for most
typed documents.
Fine Good for small print
and transmits a little
slower than Standard
resolution.
S.Fine Good for small print
or artwork and
transm its slower than
Fine resolution.
Photo Use when the
document has
varying shades of
grey or is a
photograph. This has
the slowest
transmission time.
On Turn this feature on if
you are having
difficulties sending
faxes overseas. This
feature will stay on for
the next fax only.
Off* Keep this setting Off
when the network
connection is good
and you can send an
overseas fax
sucessfully.
22
2.Fax (For MFC-1900, MFC-1901 and MFC-1905) (continued)
General information
Level 2 Level 3 Descriptions 1 Options Descriptions 2 Page
3.Anti-Junk
Fax
(Except India and
Vietnam)
4.Address
Book
(For India and
Vietnam)
3.Address
Book
The factory settings are shown in Bold with an asterisk.
1.Register If you do not want to
receive a fax/call
from specific
numbers, you can
register the numbers
up to 100 to the Anti-
2.Delete — Choose the number
3.Print
Report
1.Speed Dial Stores up to 99
Junk Fax list.
You need to apply for
the Caller ID service
at your local
telephone company.
You can not choose
the numbers that is
not stored in the
Caller ID memory.
Speed Dial numbers.
Press (Address
Book) twice and
enter the two digit
Speed Dial number.
— Choose the number
you want to register
to the Anti-Junk
Faxlist by pressing
a and b. Press OK
and then press 1.
you want to delete
from the Anti-Junk
Fax list by pressing
a and b. Press OK
and then press 1.
— You can print a list of
registered
fax/telephone
numbers in the AntiJunk Fax list.
—
1
23
 Loading...