

Page 1

®
User’s Guide
User’s Guide
Safety and Legal
Basic User’s Guide
Page 2
Note
Safety and Legal A
WARNING
CAUTION
IMPORTANT
(HL-4150CDN / 4570CDW(T))
Please read this booklet before attempting to operate the product, or before attempting any
maintenance. Failure to follow these instructions may result in an increased risk of personal injury
or damage to property, including through fire, electrical shock, burns or suffocation.
Symbols and
conventions used in
the documentation
The following symbols and conventions are
used throughout the documentation.
Bold Bold typeface id entifies specific
keys on the product’s control
panel, on the computer screen.
Italics Italicized typeface emphasizes
an important point or refers you
to a related topic.
Courier
New
WARNING indicates a potentially
hazardous situation which, if not avoided,
could result in death or serious injuries.
Text in Courier New font
identifies messages on the
LCD of the product.
Notes tell you how you should
respond to a situation that may arise
or give tips about how the operation
A
works with other features.
Electrical Hazard icons alert you to
possible electrical shock.
Improper Setup icons alert you to
devices and operations that are not
compatible with the product.
Hot Surface icons warn you not to
touch product parts that are hot.
Follow all warnings and instructions marked
on the product.
The illustrations in this guide show the
HL-4150CDN.
(HL-4150CDN) In USA:
Please go to the Brother Solutions Center at
http://solutions.brother.com/
and click
Manuals on your model page to download
the other manuals.
CAUTION indicates a potentially hazardous
situation which, if not avoided, may result in
minor or moderate injuries.
IMPORTANT indicates a potentially
hazardous situation which, if not avoided,
may result in damage to property or loss of
product functionality.
Version 0
USA/CAN
1
Page 3
Compilation and Publication A
WARNING
Under the supervision of Brother Industries, Ltd., this manual has been compiled and published,
covering the latest product descriptions and specifications.
The contents of this manual and the specifications of this product are subject to change without
notice.
Brother reserves the right to make changes without notice in the specifications and materials
contained herein and shall not be responsible for any damages (including consequential) caused
by reliance on the materials presented, including but not limited to typographical and other errors
relating to the publication.
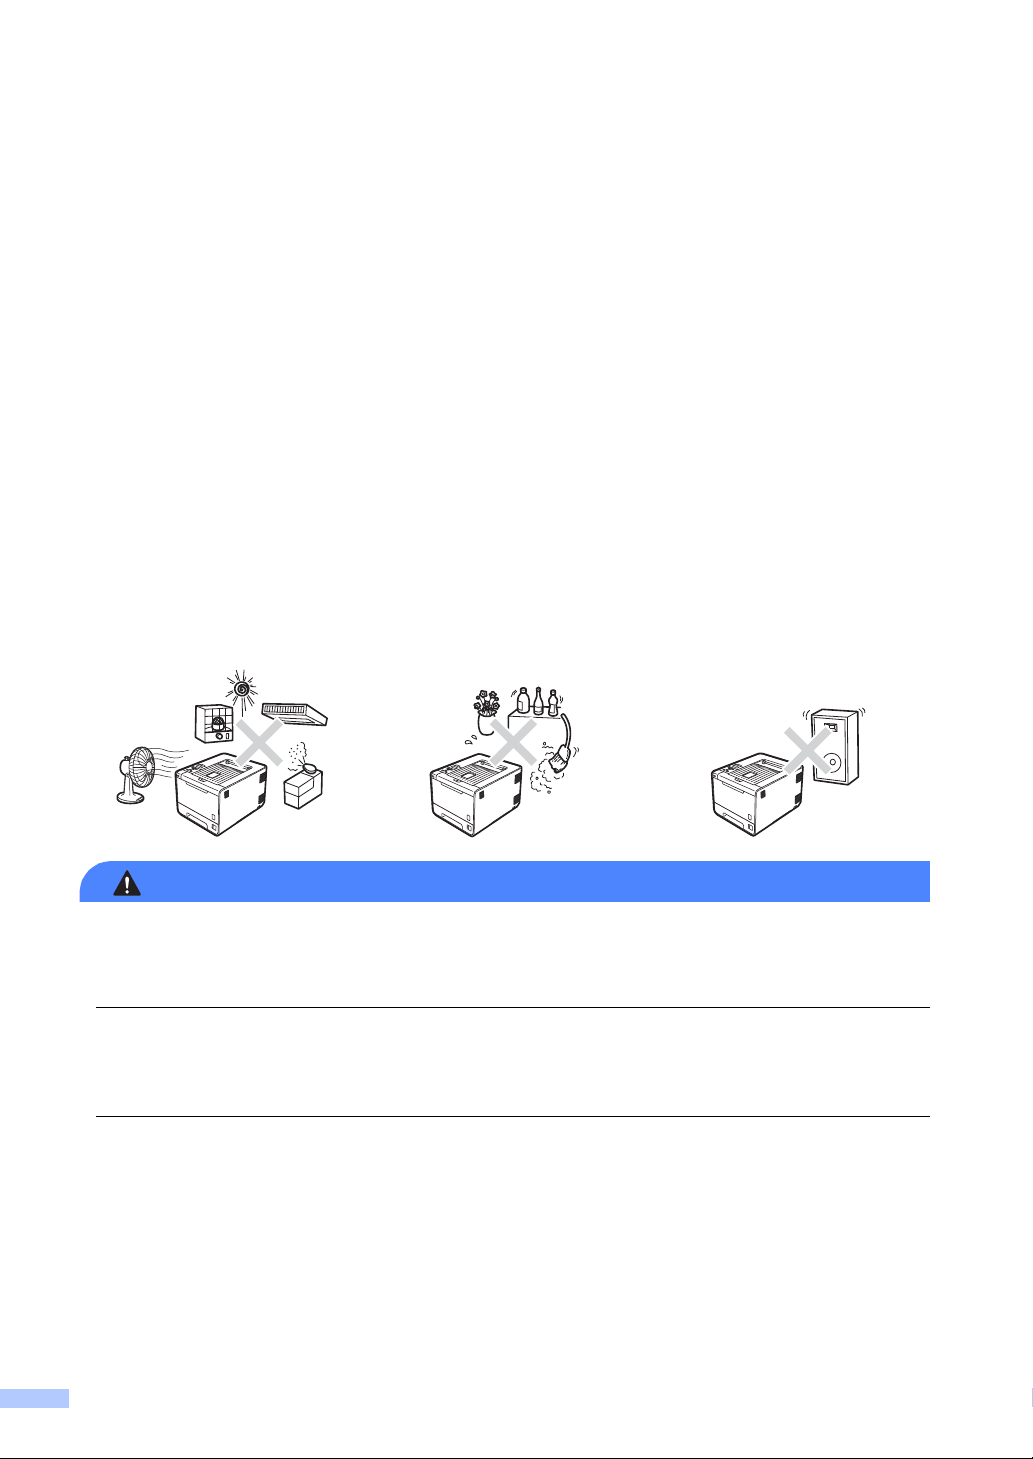
Choosing a location A
Put your product on a flat, level, stable surface that is free of vibration and shocks, such as a desk.
Put the product near a standard grounded AC power outlet. Choose a location where the
temperature remains between 50°F and 90.5°F (10°C and 32.5°C) and the humidity is between
20% to 80% (without condensation).
DO NOT expose the product to direct sunlight, excessive heat, open flames, salty or corrosive
gasses, moisture or dust. Doing so may create a risk of an electrical short or fire. It may also
damage the product and/or render it inoperable.
DO NOT place the product near heaters, air conditioners, electrical fan, refrigerators, or water.
Doing so may create the risk of a short circuit or fire, should water come into contact with the
product (including condensation caused by heating/air conditioning/ventilation equipment).
DO NOT place the product near chemicals. Should the chemicals come into contact with the
product, there may be a risk of fire. The chemicals may also cause the product to malfunction
or become discolored.
2
Page 4

DO NOT put the product in a location where any slot or opening in the product is obstructed or
blocked. These slots and openings are provided for ventilation. Blocking the product’s
ventilation could create a risk of overheating and/or fire.
Instead:
• Keep a gap of roughly 4 in. (100 mm) between the ventilation hole and the wall.
• Place the product on a solid surface, never on a bed, sofa, rug, or other similar soft surface.
• Do not place this product near or over a radiator or heater.
• Do not place this product in a “built-in” installation unless adequate ventilation is provided.
DO NOT put objects on top of the product. Doing so could increase the risk of overheating
and/or fire should the product malfunction.
DO install your product near an AC power outlet that is easily accessible. In the event of an
emergency, easy access to the plug and outlet will allow you to shut off power to the product
quickly and completely.
Plastic bags are used in the packing of your product and drum unit. Plastic bags are not toys.
To avoid the danger of suffocation, keep these bags away from babies and children and dispose
of them properly.
3
Page 5

CAUTION
IMPORTANT
Avoid placing your product in a high-traffic area. If you must place it in a high-traffic area, ensure
that the product is in a safe location where it cannot be accidentally knocked-over, which could
cause injury to you and serious damage to the product. Also ensure that cords are secured so
as not to pose a tripping hazard. DO NOT place this product on an unstable cart, stand, or table.
The product is heavy and may fall, causing injury to you, and serious damage to the product.
• DO NOT place your product next to devices that contain magnets or generate magnetic fields.
Doing so may interfere with the operation of the product, causing print quality problems.
• DO NOT place your product next to sources of interference, such as speakers or the base units
of non Brother cordless telephones. Doing so may interfere with the operation of the product's
electronic components.
• DO NOT connect your product to an AC power outlet controlled by wall switches or automatic
timers. Disruption of power can delete information from the product's memory.
• DO NOT connect your product to an AC power outlet on the same circuit as large appliances
or other equipment that requires a significant amount of electricity to operate. Operating this
product in conjunction with the other product(s) could create an overvoltage, tripping your
circuit breaker or blowing your fuse.
4
Page 6
To use the product safely A
WARNING
Please keep these instructions for later reference and read them before attempting any
maintenance. If you do not follow these safety instructions, there is a possibility of a fire, electrical
shock, burn or suffocation.
ELECTRICAL HAZARDS
Failure to follow the warnings in this section may create the risk of an electrical shock. In
addition, you could create an electrical short, which may create the risk of a fire.
There are high voltage electrodes inside the product. Before you access the inside of the
product, including for routine maintenance such as cleaning, make sure you have unplugged the
power cord from the AC power outlet, as well as Ethernet (RJ-45) cables (Network models only)
from the product. Never push objects of any kind into this product through cabinet slots, since
they may touch dangerous voltage points or short out parts.
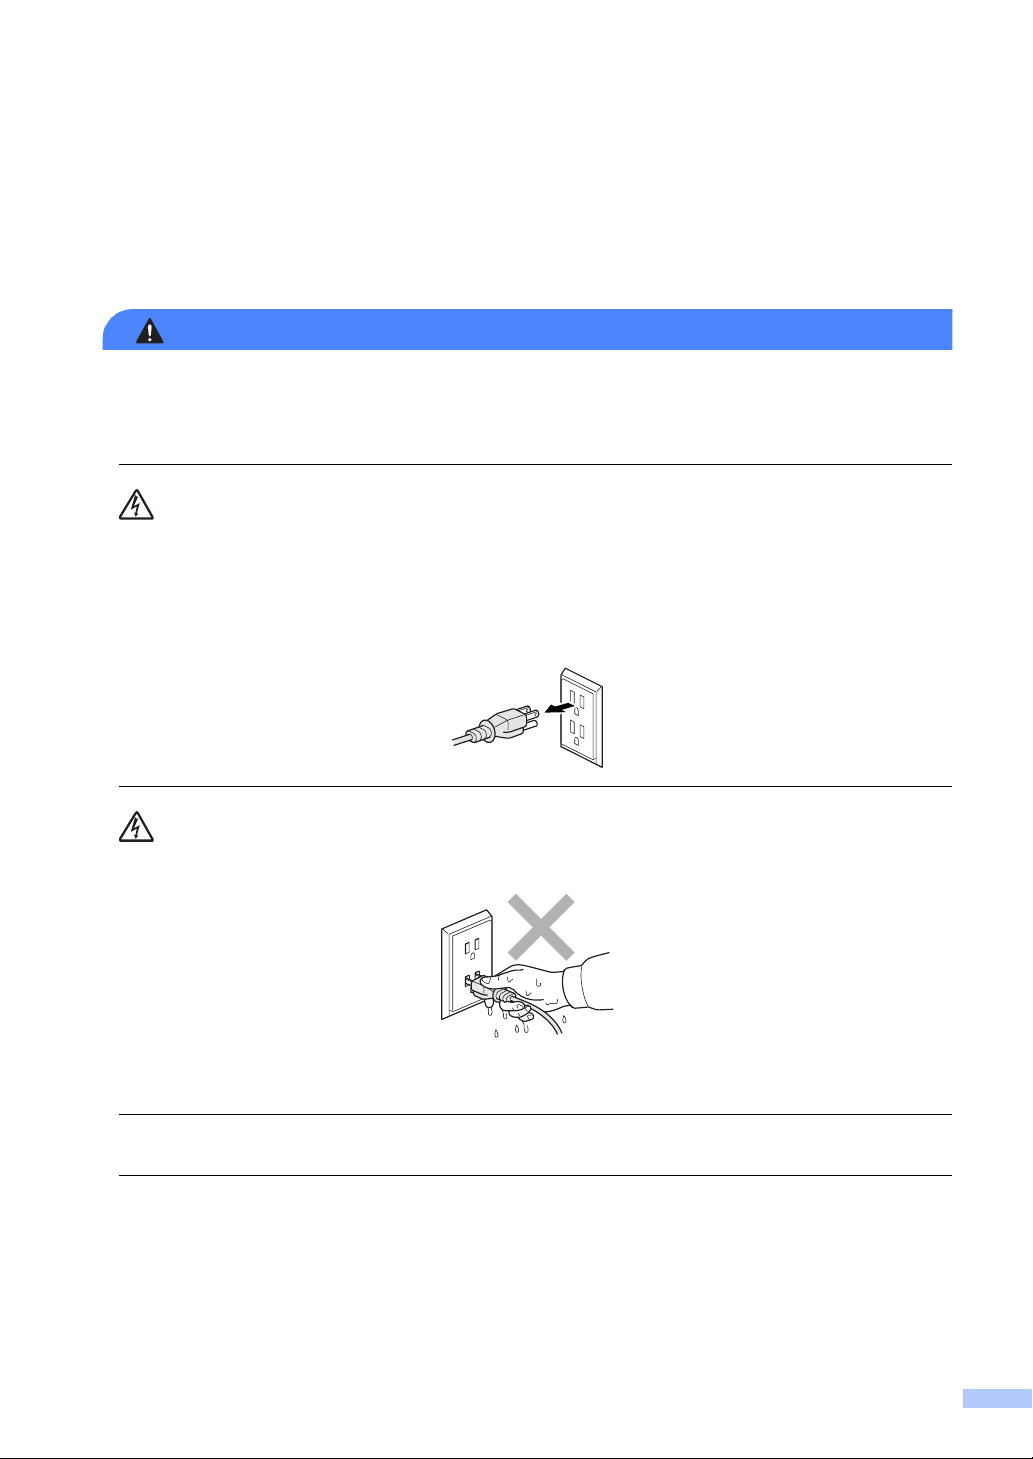
DO NOT handle the plug with wet hands.
Always make sure the plug is fully inserted. Do not use the product or handle the cord if the cord
has become worn or frayed.
DO NOT use this product during an electrical storm.
DO NOT allow this product to come into contact with water. This product should not be used
around standing water including a bathtub, sink, or swimming pool, around appliances
containing water including a refrigerator, or in a wet basement.
5
Page 7
This product should be connected to an AC power source within the range indicated on the
rating label. DO NOT connect it to a DC power source or inverter. If you are not sure what kind
of power source you have, contact a qualified electrician.
Power Cord Safety:
• This product is equipped with a 3-wire grounded plug. This plug will only fit into a grounded
power outlet. This is a safety feature. If you are unable to insert the plug into the outlet, call
your electrician to replace your obsolete outlet. DO NOT defeat the purpose of the grounded
plug.
• Use only the power cord supplied with this product.
• DO NOT allow anything to rest on the power cord. DO NOT place this product where people
can walk on the cord. Do not place this product in a position where the cord is stretched or
strain is otherwise put on the cord. Doing so may cause the cord to become worn or fray.
• If an extension cord is used with this product, make sure that the total ampere ratings on the
products plugged into the extension cord. DO NOT exceed the extension cord ampere rating.
Also, make sure that the total of all products plugged into the AC power outlet does not
exceed 15 amperes.
• The power cord, including extensions, should be no longer than 16.5 feet (5 meters).
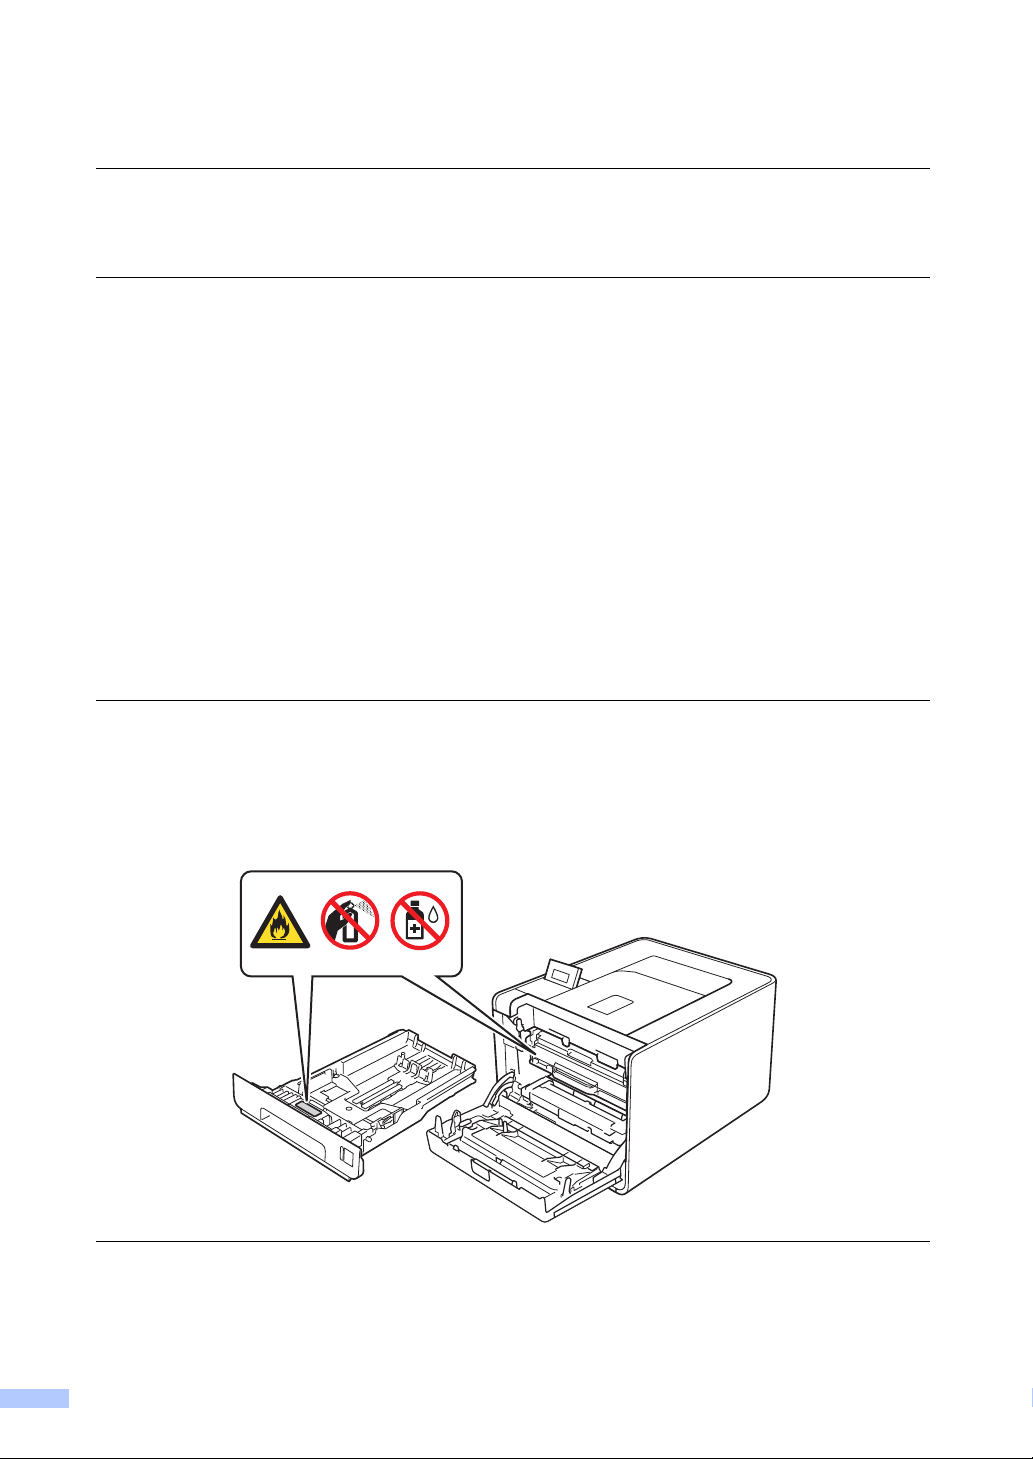
FIRE HAZARDS
DO NOT use flammable substances, any type of spray, or an organic solvent/liquid containing
alcohol or ammonia to clean the inside or outside of the product. Doing so could cause a fire.
Instead, use only a dry, lint-free cloth. See Routine Maintenance in the User's Guide for more
information on how to clean the product.
DO NOT attempt to operate this product with a paper jam or with stray pieces of paper inside
the product. Prolonged contact of the paper with the drum unit could cause a fire.
6
Page 8
DO NOT use a vacuum cleaner to clean up scattered toner. Doing this might cause the toner
dust to ignite inside the vacuum cleaner, potentially starting a fire. Please carefully clean the
toner dust with a dry, lint-free soft cloth and dispose of it according to local regulations.
DO NOT use this product in the vicinity of a gas leak or combustible dust.
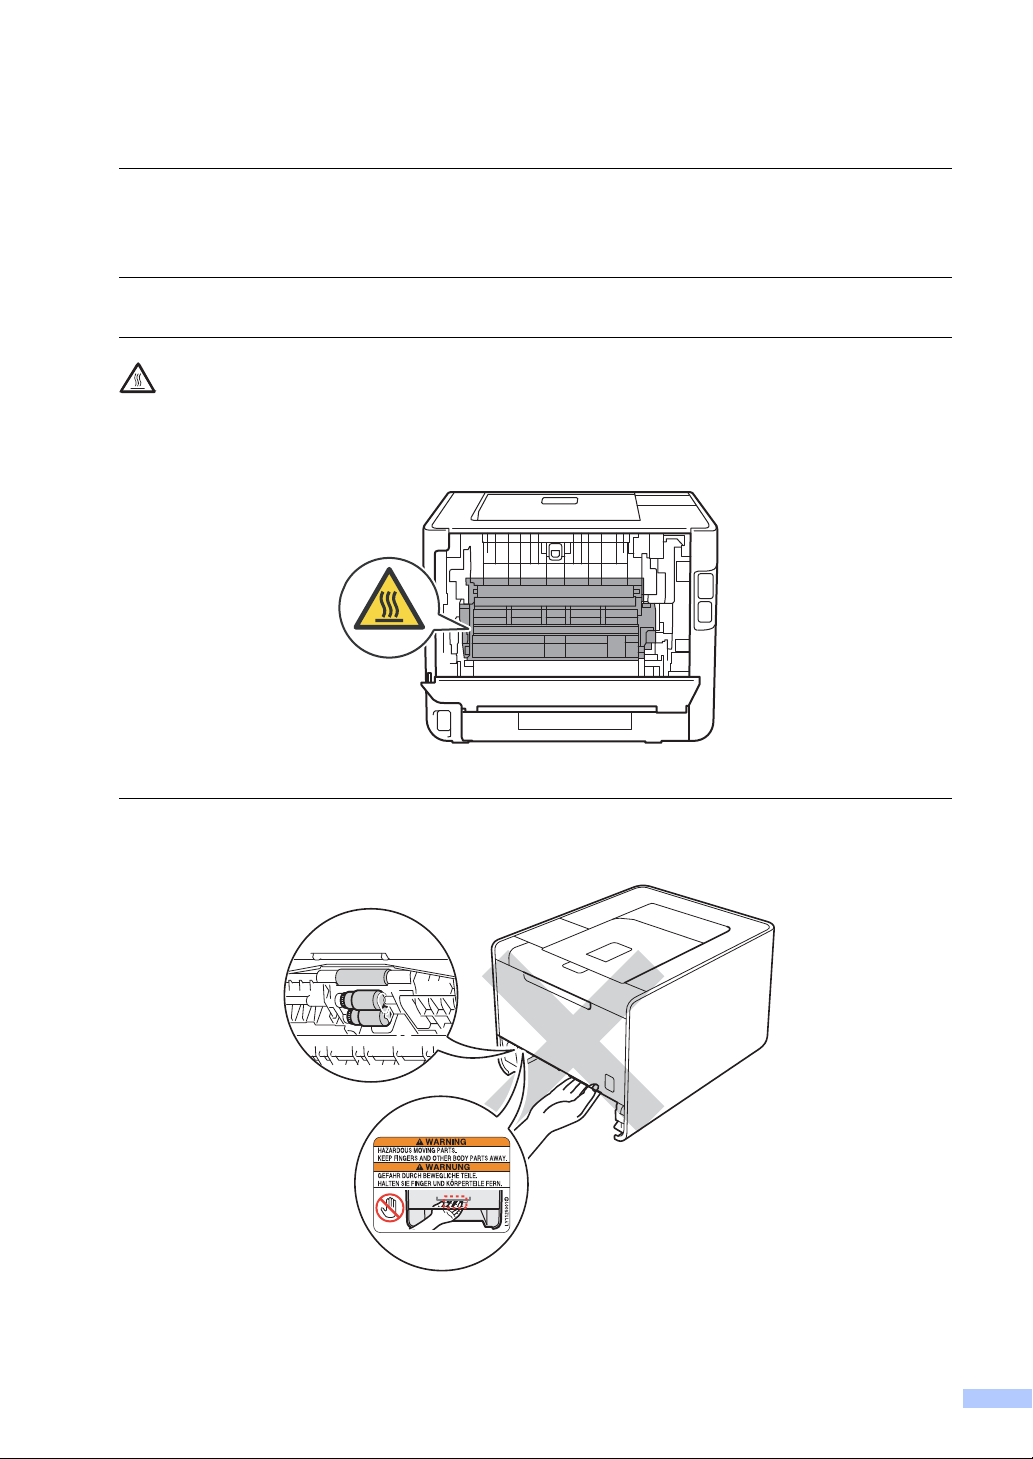
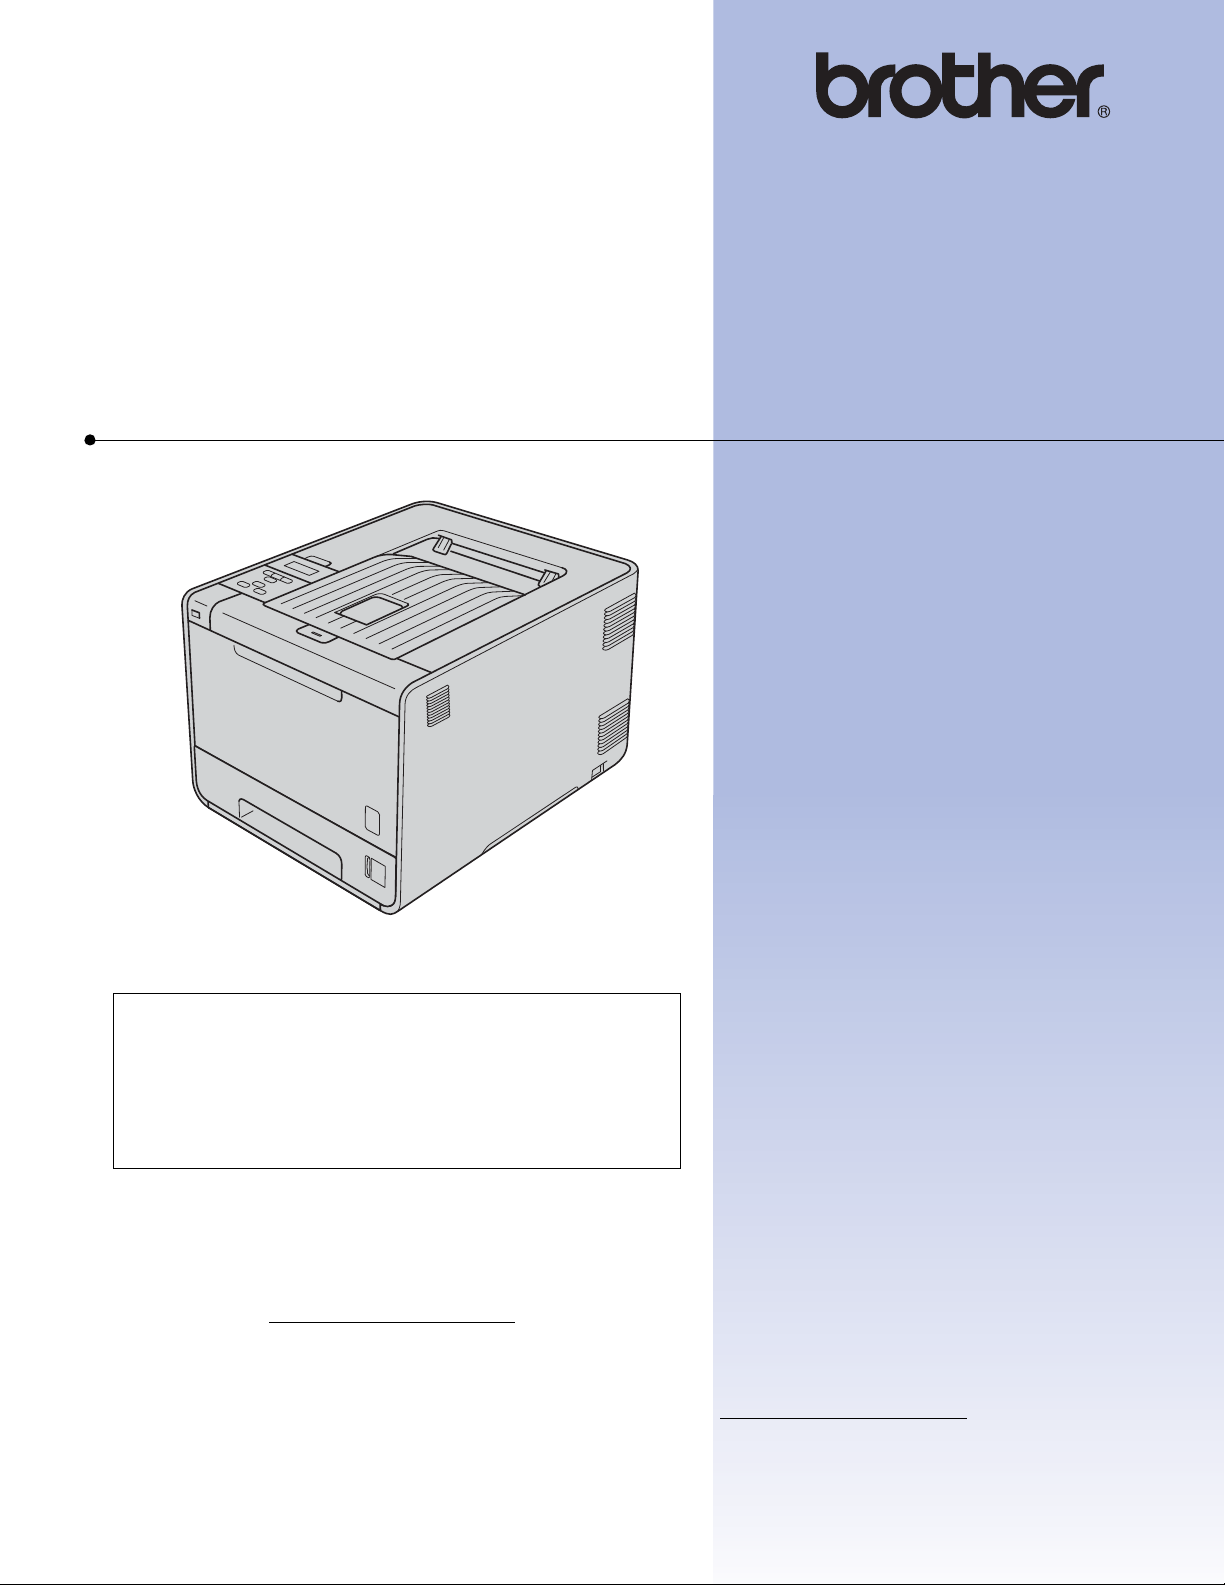
HOT SURFACE
After you have just used the product, some internal parts of the product will be extremely hot.
Wait for the product to cool down before you touch the internal parts of the product.
DO NOT touch the shaded parts shown in the illustration. These rollers may be rotating at high
speed and can pinch or entrap your hand.
Languages on the label may vary depending on your country.
7
Page 9
IMPORTANT
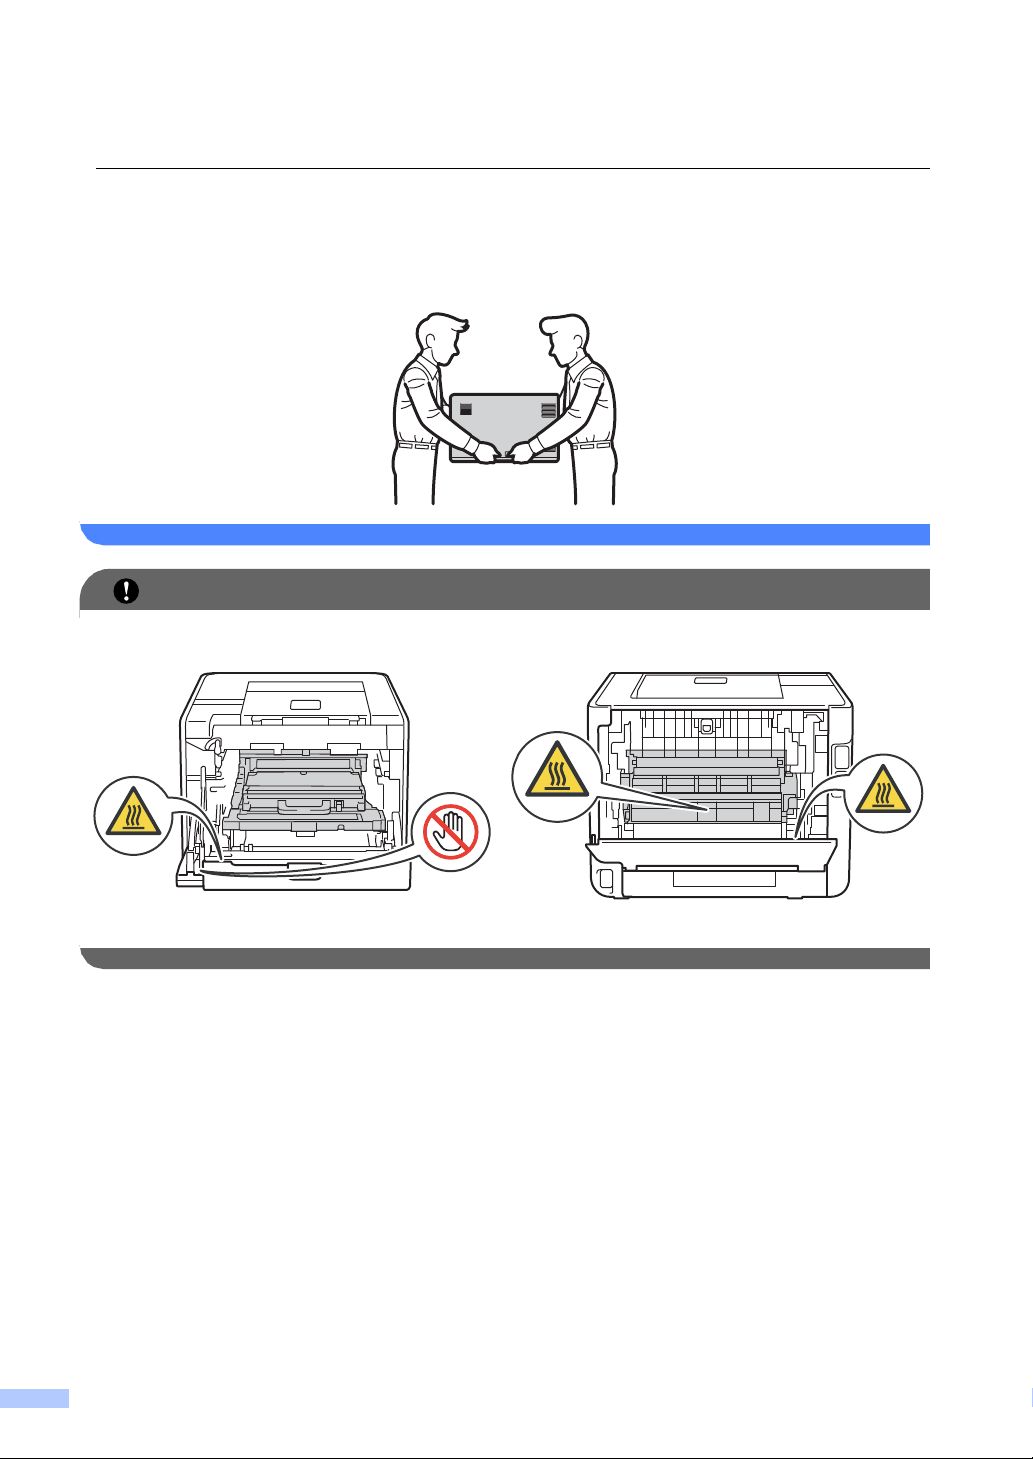
• This product is heavy and weighs more than 46.3 lb (21.0 kg) for Printer. To prevent injuries
when moving or lifting this product, make sure to use at least two people. Be careful not to
pinch your fingers when you set the product back down.
• If you use a Lower Tray, carry it separately from your product.
DO NOT remove or damage the caution labels located on or around the fuser.
Lightning and power surges can damage this product! We recommend that you use a quality
surge protection device on the AC power line or Ethernet (RJ-45) cable (Network models only)
plugged into the product, or that you unplug the cords during a lightning storm.
8
Page 10

Important safety instructions A
1 Read all of these instructions.
2 Save them for later reference.
3 Follow all warnings and instructions marked on the product.
4 Be careful not to inhale toner.
5 DO NOT place anything in front of the product that will block printed pages. DO NOT place
anything in the path of printed pages.
6 Wait until pages have exited the product before picking them up.
7 DO NOT attempt to service this product yourself because opening or removing covers may
expose you to dangerous voltage points and other risks and may void your warranty. Refer all
servicing to a Brother Authorized Service Center. For the location of your nearest Brother
Authorized Service Center, please call:
In USA: 1-877-BROTHER (1-877-276-8437)
In Canada: 1-877-BROTHER
8 Unplug this product from the AC power outlet and refer all servicing to Brother Authorized
Service Personnel under the following conditions:
When the power cord is damaged or frayed. (Do not touch the damaged/frayed part while
unplugging your product.)
If liquid has been spilled into the product.
If the product has been exposed to rain or water.
If the product does not operate normally when the operating instructions are followed.
Adjust only those controls that are covered by the operating instructions. Improper
adjustment of other controls may result in damage and will often require extensive work by
a qualified technician to restore the product to normal operation.
If the product has been dropped or the casing has been damaged.
If the product exhibits a distinct change in performance, indicating a need for service.
9 For Material Safety Date Sheet for applicable accessories, visit http://www.brother.com/
only)
. (USA
9
Page 11

Regulation A
Federal Communications Commission (FCC) Declaration of
Conformity (USA only) A
Responsible Party: Brother International Corporation
100 Somerset Corporate Boulevard
Bridgewater, NJ 08807-0911 USA
TEL: (908) 704-1700
declares, that the products
Product Name: HL-4150CDN/HL-4570CDW/HL-4570CDWT
Model Numbers: HL-41/HL-45
Product Options: LT-300CL
comply with Part 15 of the FCC Rules. Operation is subject to the following two conditions: (1) This
device may not cause harmful interference, and (2) this device must accept any interference
received, including interference that may cause undesired operation.
This equipment has been tested and found to comply with the limits for a Class B digital device,
pursuant to Part 15 of the FCC Rules. These limits are designed to provide reasonable protection
against harmful interference in a residential installation. This equipment generates, uses, and can
radiate radio frequency energy and, if not installed and used in accordance with the instructions,
may cause harmful interference to radio communications. However, there is no guarantee that
interference will not occur in a particular installation. If this equipment does cause harmful
interference to radio or television reception, which can be determined by turning the equipment
off and on, the user is encouraged to try to correct the interference by one or more of the following
measures:
Reorient or relocate the receiving antenna.
Increase the separation between the equipment and receiver.
Connect the equipment into an outlet on a circuit different from that to which the receiver is
connected.
Call the dealer or an experienced radio/TV technician for help.
(Wireless network models only)
This transmitter must not be co-located or operated in conjunction with any other antenna or
transmitter.
10
Page 12

IMPORTANT
• Changes or modifications not expressly approved by Brother Industries, Ltd. could void the
user’s authority to operate the equipment.
• A shielded interface cable should be used to ensure compliance with the limits for a Class B
digital device.
Industry Canada Compliance Statement (Canada only) A
This Class B digital apparatus complies with Canadian ICES–003.
Cet appareil numérique de la classe B est conforme à la norme NMB–003 du Canada.
Operation is subject to the following two conditions: (1) this device may not cause interference,
and (2) this device must accept any interference, including interference that may cause undesired
operation of this device.
L’utilisation de ce dispositif est autorisée seulement aux conditions suivantes:
(1) il ne doit pas produire de brouillage et (2) l’utilisateur du dispositif doit être prêt à accepter tout
brouillage radioélectrique reçu, même si ce brouillage est susceptible de compromettre le
fonctionnement du dispositif.
Laser safety (For 110-120V Models Only) A
This equipment is certified as a Class 1 laser product as defined in IEC60825-1:2007
specifications under the U.S. Department of Health and Human Services (DHHS) Radiation
Performance Standard according to the Radiation Control for Health and Safety Act of 1968. This
means that the equipment does not produce hazardous laser radiation.
Since radiation emitted inside the equipment is completely confined within protective housings
and external covers, the laser beam cannot escape from the product during any phase of user
operation.
11
Page 13

FDA regulations (For 110-120V Models Only) A
WARNING
U.S. Food and Drug Administration (FDA) has implemented regulations for laser products
manufactured on and after August 2, 1976. Compliance is mandatory for products marketed in the
United States. One of the following labels on the back of the product indicates compliance with
the FDA regulations and must be attached to laser products marketed in the United States.
Manufactured:
BROTHER TECHNOLOGY (SHENZHEN) LTD.
NO6 Gold Garden Ind., Nanling Buji, Longgang, Shenzhen, China
This product complies with FDA performance standards for laser products except for deviations pursuant
to Laser Notice No. 50, dated June 24, 2007.
Use of controls, adjustments or performance of procedures other than those specified in this
manual may result in hazardous invisible radiation exposure.
Internal laser radiation
Max. Radiation Power: 20 mW
Wave Length: 770 - 800 nm
Laser Class: Class 3B
12
Page 14

Disconnect device A
CAUTION
This product must be installed near an AC power outlet that is easily accessible. In case of
emergencies, you must disconnect the power cord from the AC power outlet to shut off power
completely.
LAN connection (Network models only) A
DO NOT connect this product to a LAN connection that is subject to over-voltages.
International ENERGY STAR® Qualification Statement A
The purpose of the International ENERGY STAR® Program is to promote the development and
popularization of energy-efficient office equipment.
As an ENERGY STAR
the ENERGY STAR
®
Partner, Brother Industries, Ltd. has determined that this product meets
®
specifications for energy efficiency.
13
Page 15

Trademarks A
The Brother logo is a registered trademark of Brother Industries, Ltd.
Brother is a registered trademark of Brother Industries, Ltd.
Microsoft, Windows, Windows Server and Internet Explorer are registered trademarks of Microsoft
Corporation in the United States and/or other countries.
Windows Vista is either a registered trademark or a trademark of Microsoft Corporation in the
United States and other countries.
Apple, Macintosh, Safari and TrueType are trademarks of Apple Inc., registered in the United
States and other countries.
Linux is the registered trademark of Linus Torvalds in the U.S. and other countries.
UNIX is a registered trademark of The Open Group in the United States and other countries.
Intel, Intel Core and Pentium are trademarks of Intel Corporation in the U.S. and other countries.
AMD is a trademark of Advanced Micro Devices, Inc.
PowerPC is a registered trademark of IBM in the United States and/or other countries.
PostScript and PostScript 3 are either registered trademarks or trademarks of Adobe Systems
Incorporated in the United States and/or other countries.
Wi-Fi and Wi-Fi Alliance are registered trademarks of the Wi-Fi Alliance.
AOSS is a trademark of Buffalo Inc.
Any trade names and product names of companies appearing on Brother products, related
documents and any other materials are all trademarks or registered trademarks of those
respective companies.
14
Page 16

Open Source Licensing Remarks A
This product includes open-source software.
Please see Open Source Licensing Remarks and Copyright information on the supplied CD-ROM.
(For Windows
(For Macintosh) Double-click the CD-ROM icon on your desktop. Then double-click the Utilities
icon. License.rtf will appear.
®
) “X:\\License.txt” (where X is your drive letter).
Copyright and License A
©2010 Brother Industries, Ltd.
This product includes software developed by the following vendors:
©1983-1998 PACIFIC SOFTWORKS, INC.
©2010 Devicescape Software, Inc.
This product includes the “KASAGO TCP/IP” software developed by ZUKEN ELMIC, Inc.
15
Page 17

Page 18
Brother Laser Printer
USER’S GUIDE
HL-4150CDN
HL-4570CDW
HL-4570CDWT
For visually-impaired users
You can read this manual with Screen
Reader ‘text-to-speech’ software.
You must set up the hardware and install the driver before you can use the machine.
Please use the Quick Setup Guide to set up the machine. You can find a printed copy in the box.
Please read this User’s Guide thoroughly before you use the machine.
Please visit us at http://solutions.brother.com/
utilities, and answers to frequently asked questions (FAQs) and technical questions.
Note: Not all models are available in all countries.
(HL-4150CDN) In USA: Please go to the Brother Solutions Center at http://solutions.brother.com/
on your model page to download the other manuals.
where you can get product support, the latest driver updates and
and click Manuals
Version B
USA/CAN
Page 19
User's Guides and where do I find it?
Which manual? What's in it? Where is it?
Safety and Legal Read this Guide first. Please read the Safety
Instructions before you set up your machine. See this
Guide for trademarks and legal limitations.
Quick Setup Guide Follow the instructions for setting up your machine
and installing the drivers and software for the
operating system and connection type you are using.
User’s Guide Learn the print operations, how to replace
consumables, and performing routine maintenance.
See troubleshooting tips.
Network Glossary This Guide provides basic information about
advanced network features of Brother machines
along general networking and common terms.
Network User's Guide This Guide provides useful information of wired and
wireless network settings and security settings using
Brother machine. You can also find supported
protocol information for your machine and the
detailed troubleshooting tips.
Printed / In the Box
Printed / In the Box
For USA:
(HL-4150CDN)
PDF file / Brother Solutions Center
at http://solutions.brother.com/
(HL-4570CDW(T))
PDF file / CD-ROM / In the Box
For Other Countries:
PDF file / CD-ROM / In the Box
i
Page 20
Using this guide
WARNING
CAUTION
IMPORTANT
Symbols used in this guide
The following symbols and conventions are used throughout the documentation.
WARNING
could result in death or serious injuries.
CAUTION
may result in minor or moderate injuries.
IMPORTANT
may result in damage to property or loss of product functionality.
Hot Surface icons warn you not to touch machine parts that are hot.
Note
Notes tell you how you should respond to a situation that may arise or give tips
about how the operation works with other features.
indicates a potentially hazardous situation which, if not avoided,
indicates a potentially hazardous situation which, if not avoided,
indicates a potentially hazardous situation which, if not avoided,
ii
Page 21

Table of Contents
1 Printing Methods 1
About this Machine ....................................................................................................................................1
Front view and Back view....................................................................................................................1
Acceptable paper and other print media....................................................................................................2
Recommended paper and print media ................................................................................................2
Type and size of paper........................................................................................................................2
Handling and using special paper .......................................................................................................5
Unprintable area..................................................................................................................................8
Printing methods........................................................................................................................................9
Printing on plain paper.........................................................................................................................9
Printing on envelopes and thick paper ..............................................................................................15
Duplex printing.........................................................................................................................................19
Guidelines for printing on both sides of the paper .............................................................................19
Automatic duplex printing .................................................................................................................20
Manual duplex printing ......................................................................................................................22
Printing data from a USB flash memory drive with direct print ................................................................23
Supported file formats .......................................................................................................................23
Direct Print default settings................................................................................................................23
Creating a PRN or PostScript
Printing data directly from the USB flash memory drive ....................................................................25
®
3™ file for direct printing..................................................................24
2 Driver and Software 27
Printer driver ............................................................................................................................................27
Features in the printer driver (for Windows
Using the BR-Script3 printer driver (PostScript
Features in the printer driver (for Macintosh) ....................................................................................50
Uninstalling the printer driver...................................................................................................................62
Printer driver for Windows
Printer driver for Macintosh ...............................................................................................................62
Software ..................................................................................................................................................62
Software for networks .......................................................................................................................62
®
...............................................................................................................62
®
) ....................................................................................29
®
3™ language emulation for Windows®) ................43
3 Control Panel 63
Control panel ...........................................................................................................................................63
Buttons ...................................................................................................................................................64
Go......................................................................................................................................................64
Cancel ...............................................................................................................................................65
Secure ...............................................................................................................................................65
+ or - button .......................................................................................................................................65
Back...................................................................................................................................................65
OK .....................................................................................................................................................65
iii
Page 22

LEDs........................................................................................................................................................66
LCD .........................................................................................................................................................67
Back light...........................................................................................................................................67
LCD messages..................................................................................................................................67
Reprinting documents........................................................................................................................69
Printing Secure data..........................................................................................................................70
Menu table.........................................................................................................................................71
Default settings..................................................................................................................................82
Color Calibration................................................................................................................................83
Auto Registration ...............................................................................................................................83
Manual Registration...........................................................................................................................84
Frequency..........................................................................................................................................84
4Option 85
Lower tray (LT-300CL).............................................................................................................................85
SO-DIMM.................................................................................................................................................86
SO-DIMM types .................................................................................................................................86
Installing extra memory .....................................................................................................................87
5 Routine Maintenance 89
Replacing consumable items...................................................................................................................89
Before replacing the consumable items ............................................................................................93
Toner cartridges ................................................................................................................................96
Drum unit.........................................................................................................................................101
Belt unit............................................................................................................................................106
Waste toner box ..............................................................................................................................110
Cleaning ................................................................................................................................................115
Cleaning the outside of the machine...............................................................................................115
Cleaning the inside of the machine .................................................................................................117
Cleaning the corona wires...............................................................................................................121
Cleaning the drum unit ....................................................................................................................125
Cleaning the paper pick-up roller.....................................................................................................131
Shipment of the machine.......................................................................................................................132
6 Troubleshooting 140
Identifying your problem ........................................................................................................................140
LCD messages ......................................................................................................................................141
Paper handling ......................................................................................................................................145
Paper jams and how to clear them ........................................................................................................146
Jam MP Tray (paper jam in the MP tray).........................................................................................147
Jam Tray 1 / Jam Tray 2 (Paper jam inside the paper tray) ............................................................147
Jam Duplex (paper jam underneath the standard paper tray (tray 1) or in the fuser unit)...............150
Jam Rear (Paper jam behind the back cover) .................................................................................153
Jam Inside (Paper jam inside the machine) ....................................................................................156
Improving the print quality......................................................................................................................160
Solving print problems ...........................................................................................................................166
Network problems..................................................................................................................................166
Other problems......................................................................................................................................167
For Macintosh with USB ..................................................................................................................167
BR-Script 3 ......................................................................................................................................167
iv
Page 23

AAppendix 168
Machine specifications...........................................................................................................................168
Engine .............................................................................................................................................168
Controller.........................................................................................................................................169
Software ..........................................................................................................................................170
Direct Print feature...........................................................................................................................171
Control panel ...................................................................................................................................171
Paper handling ................................................................................................................................171
Media specifications ........................................................................................................................172
Supplies...........................................................................................................................................173
Dimensions / weights.......................................................................................................................174
Other................................................................................................................................................174
Computer requirements...................................................................................................................175
Important information for choosing your paper................................................................................176
Symbol and character sets ....................................................................................................................179
How to use Web Based Management (Web browser) ....................................................................179
Symbol and character sets list.........................................................................................................180
Quick reference for bar code control commands...................................................................................181
Print bar codes or expanded characters..........................................................................................181
B Appendix (for Europe and Other Countries) 189
Brother numbers....................................................................................................................................189
C Appendix (for USA and Canada) 190
Brother numbers....................................................................................................................................190
DIndex 193
v
Page 24

1
1
1
2
11
3
4
5
8
6
7
9
10
12
13
Printing Methods 1
About this Machine 1
Front view and Back view 1
1 Face-down output tray support flap (support flap)
2 Control panel with a tiltable Liquid Crystal Display (LCD)
3 USB direct print interface
4 Front cover release button
5 Front cover
6 Paper tray
7 Power switch
8 Face-down output tray
9 Multi-purpose tray (MP tray)
10 Back cover (Face-up output tray when open)
11 AC power connector
12 USB connector
13 10BASE-T/100BASE-TX port
1
Page 25
Printing Methods
1
Acceptable paper and other print media 1
Print quality may vary according to the type of paper you are using.
You can use the following types of print media: thin paper, plain paper, thick paper, bond paper, recycled
paper, glossy paper, labels or envelopes.
For best results, follow the instructions below:
DO NOT put different types of paper in the paper tray at the same time because it may cause paper jams
or misfeeds.
For proper printing, you must choose the same paper size from your software application as the paper in
the tray.
Avoid touching the printed surface of the paper immediately after printing.
Before you buy a lot of paper, test a small quantity to make sure that the paper is suitable.
Recommended paper and print media 1
Europe USA
Plain paper
Recycled paper
Labels Avery laser label L7163 Avery laser labels white #5160
Envelope Antalis River series (DL) (No specific brand recommended)
Glossy paper International Paper Rey Color Laser Gloss
Xerox Premier TCF 80 g/m
Xerox Business 80 g/m
Xerox Recycled Supreme 80 g/m
140 g/m
2
A4
2
2
2
Xerox 4200 20 lb
Hammermill Laser Print 24 lb (90 g/m2)
(No specific brand recommended)
Glossy Laser Paper
Type and size of paper 1
The machine feeds paper from the installed paper trays.
The names for the paper trays in the printer driver and this guide are as follows:
Paper tray Tray 1
Optional lower tray unit (Standard
equipment for HL-4570CDWT)
Multi-purpose tray MP Tray
Duplex unit for automatic duplex
printing
Tray 2
DX
2
Page 26
Printing Methods
1
When looking at this page, you can jump to the page for each printing method by clicking p in the table.
Media type Tray 1 Tray 2 MP Tray DX Choose the media type
from the printer driver
Plain paper
75 g/m
2
to 105 g/m2 (20 to 28 lb)
pppp
Recycled paper ppppRecycled Paper
Bond paper
Rough paper– 60 g/m
2
163 g/m
(16 to 43 lb)
2
to
p
60 g/m
163 g/m
2
to
2
(16 to 43 lb)
Thin paper
60 g/m
2
to 75 g/m2 (16 to 20 lb)
pppp
Thick paper
105 g/m
2
to 163 g/m
2
p
(28 to 43 lb)
Labels p
Plain Paper
Bond Paper
Thin Paper
Thick Paper or
Thicker Paper
Label
A4 or Letter
Envelopes
p
Envelopes
Env. Thin
Env. Thick
Glossy paper ppGlossy Paper
Tray 1 Tray 2 MP Tray DX
Paper size A4, Letter, Legal,
B5 (ISO/JIS),
Executive, A5,
A5 (Long Edge),
A6, B6 (ISO), Folio
A4, Letter, Legal,
B5 (ISO/JIS),
Executive, A5,
B6 (ISO), Folio
Width:
69.8 to 216 mm
(2.75 to 8.5 in.)
Length:
116 to 406.4 mm
Letter, Legal, Folio
(4.57 to 16 in.)
Number of sheets
(80 g/m
2
/ 20 lb)
250 sheets 500 sheets 50 sheets
3
Page 27
Printing Methods
1
Recommended paper specifications 1
The following paper specifications are suitable for this machine.
Basis weight
Thickness 80-110 μm
Roughness Higher than 20 sec.
Stiffness
Grain direction Long grain
Volume resistivity
Surface resistivity
Filler
Ash content Below 23 wt%
Brightness Higher than 80%
Opacity Higher than 85%
75-90 g/m
90-150 cm
10e
10e
CaCO
2
(20-24 lb)
3
/100
9
-10e11 ohm
9
-10e12 ohm-cm
(Neutral)
3
Use paper that is made for plain-paper copying.
Use paper that is 75 to 90 g/m
2
(20 to 24 lb).
Use long grain paper with a neutral Ph value, and a moisture content of approx. 5%.
This machine can use recycled paper that meets DIN 19309 specifications.
(To help you choose which paper to use with this machine, see Important information for choosing your paper
on page 176.)
4
Page 28
Printing Methods
1
IMPORTANT
1
1
Handling and using special paper 1
The machine is designed to work well with most types of xerographic and bond paper. However, some paper
variables may have an effect on print quality or handling reliability. Always test samples of paper before
purchasing to ensure desirable performance. Store paper in its original packaging and keep it sealed. Keep
the paper flat and away from moisture, direct sunlight and heat.
Some important guidelines when selecting paper are:
DO NOT use inkjet paper because it may cause a paper jam or damage your machine.
Preprinted paper must use ink that can withstand the temperature of the machine’s fusing process
200 degrees centigrade (392 degrees Fahrenheit).
If you use bond paper, paper having a rough surface or paper that is wrinkled or creased, the paper may
exhibit degraded performance.
When you are using glossy paper, put only one sheet at a time in the MP tray to avoid a paper jam.
Types of paper to avoid 1
Some types of paper may not perform well or may cause damage to your machine.
DO NOT use paper:
• that is highly textured
• that is extremely smooth or shiny
• that is curled or warped
1 A curl of 2 mm (0.08 in.) or greater may cause jams to occur.
• that is coated or has a chemical finish
• that is damaged, creased or folded
• that exceeds the recommended weight specification in this guide
• with tabs and staples
• with letterheads using low temperature dyes or thermography
• that is multipart or carbonless
• that is designed for inkjet printing
If you use any of the types of paper listed above, they may damage your machine. This damage is not
covered under any Brother warranty or service agreement.
5
Page 29
Printing Methods
1
IMPORTANT
Envelopes 1
Most envelopes designed for laser printers will be suitable for your machine. However, some envelopes may
have feed and print-quality problems because of the way they have been made. A suitable envelope should
have edges with straight, well-creased folds and the leading edge should not be thicker than two sheets of
paper. The envelope should lie flat and not be of baggy or flimsy construction. You should buy quality
envelopes from a supplier who understands that you will be using the envelopes in a laser machine.
We recommend that you print a test envelope to make sure the print results are what you want.
Types of envelopes to avoid 1
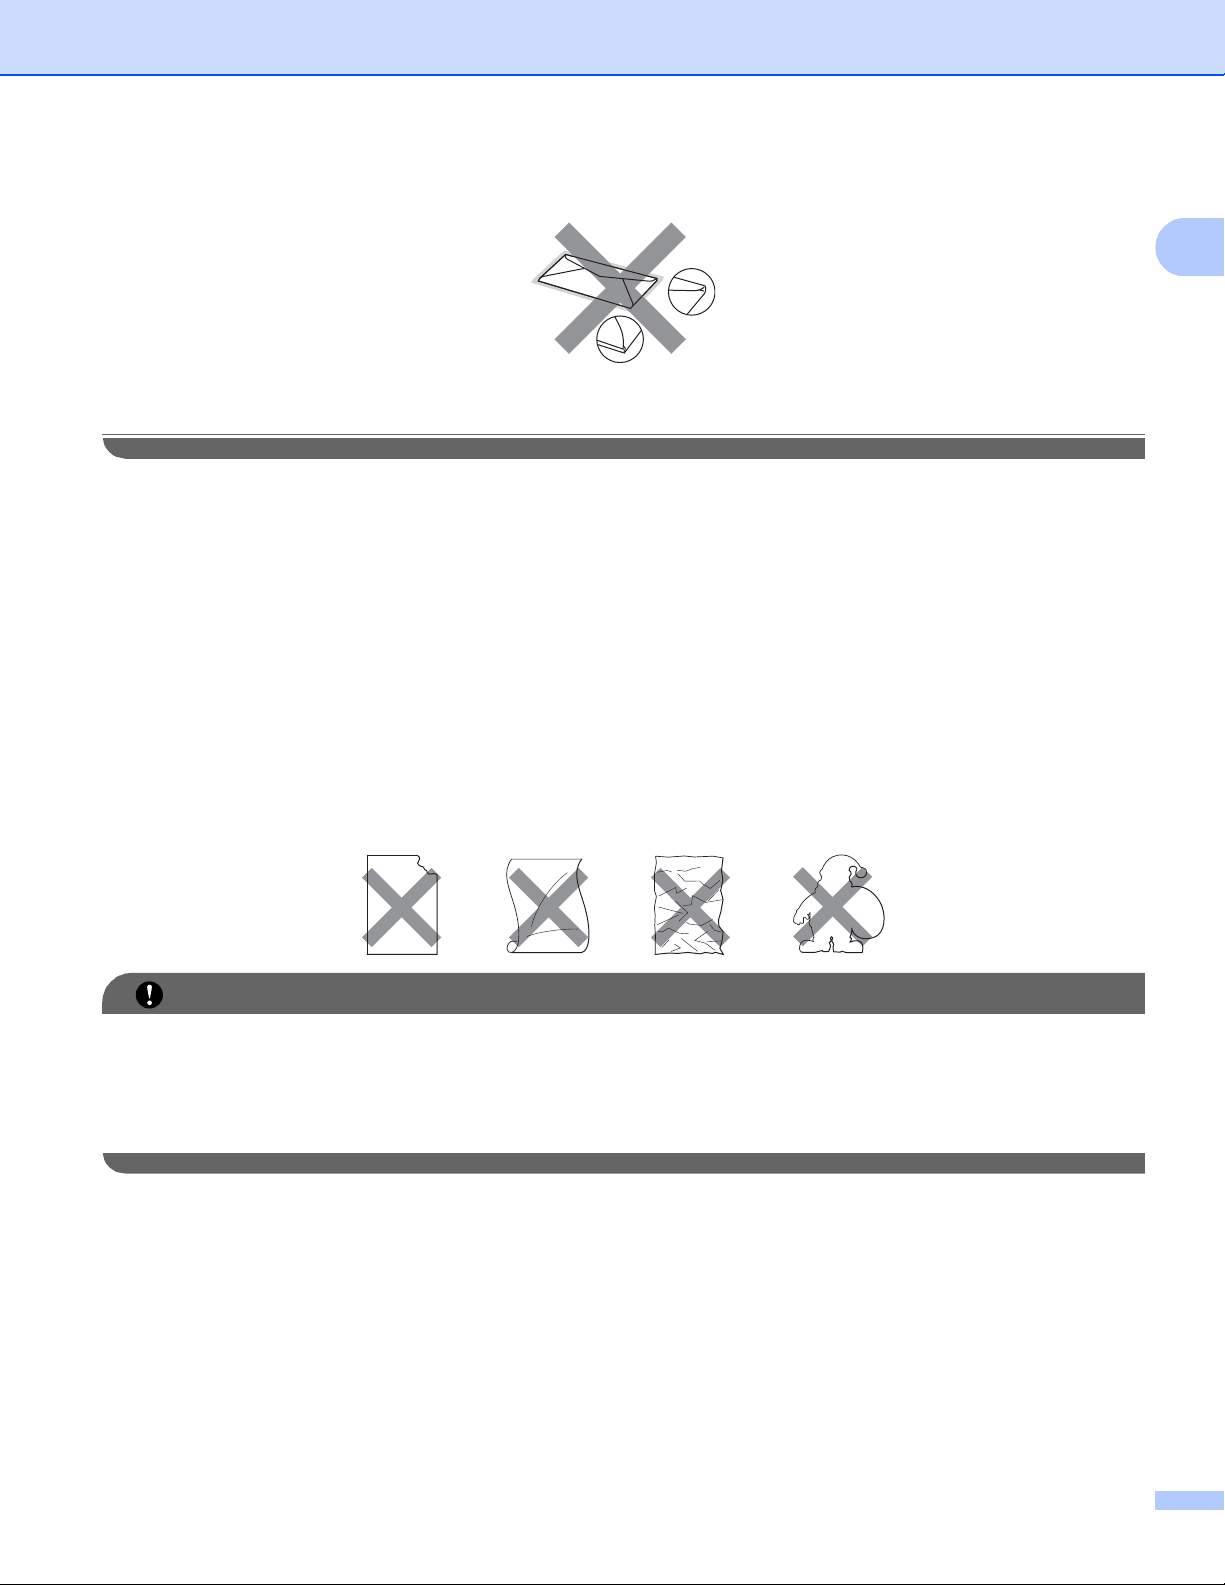
DO NOT use envelopes:
• that are damaged, curled, wrinkled, irregularly shaped, extremely shiny or textured envelopes.
• with clasps, staples, snaps, tie strings, self-adhesive components, windows, holes, cutouts or
perforations.
• that are of a baggy construction, not sharply creased, embossed (have raised writing on them) or
pre-printed on the inside.
• that were previously printed by a laser / LED printer.
• that cannot be arranged when put in a pile.
• that are made of paper that weighs more than the paper weight specifications for the machine.
• with edges that are not straight or consistently square.
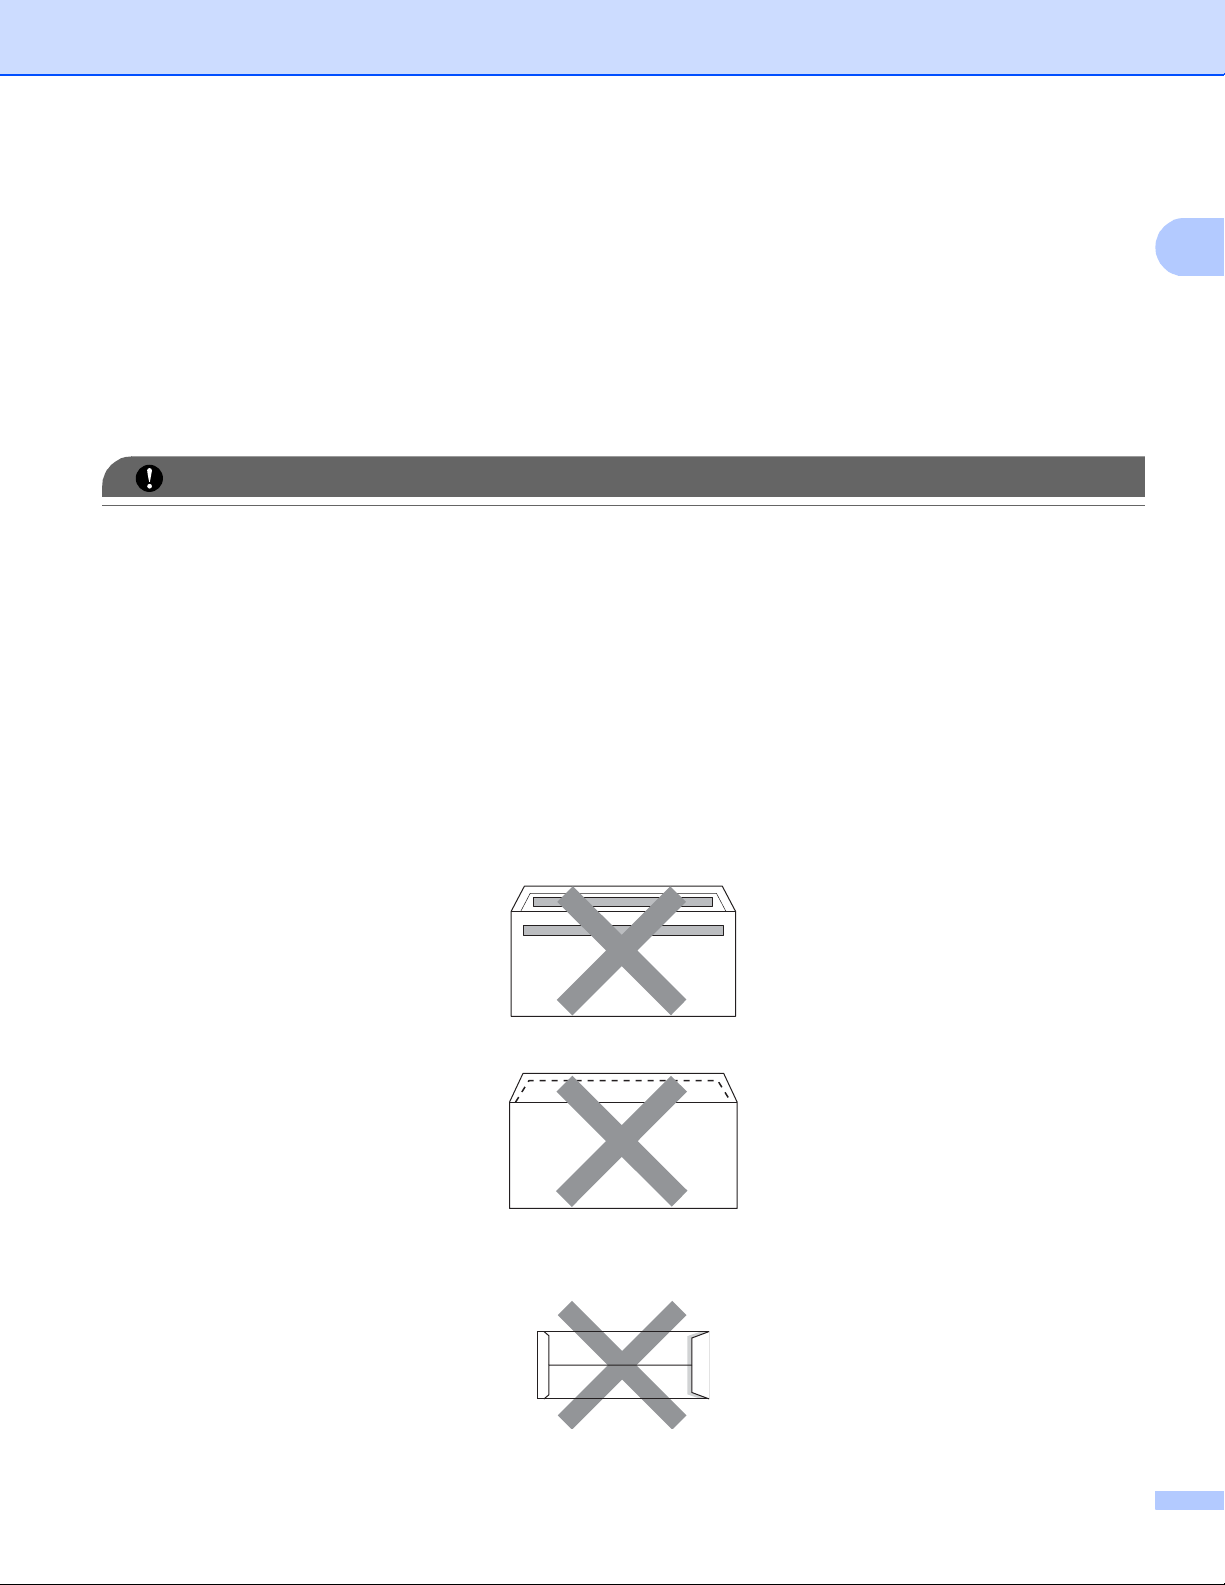
• with glue on surface as shown in figure below
• with double flaps as shown in figure below
• with sealing flaps that are not folded down when purchased
• with sealing flaps as shown in figure below
6
Page 30
Printing Methods
1
IMPORTANT
• with each side folded as shown in figure below
If you use any of the types of envelopes listed above, they may damage your machine. This damage may
not be covered under any Brother warranty or service agreement.
Labels 1
The machine will print on most types of labels designed for use with a laser machine. Labels should have an
adhesive that is acrylic-based since this material is more stable at the high temperatures in the fuser unit.
Adhesives should not come in contact with any part of the machine, because the label stock may stick to the
drum unit or rollers and cause jams and print quality problems. No adhesive should be exposed between the
labels. Labels should be arranged so that they cover the entire length and width of the sheet. Using labels
with spaces may result in labels peeling off and causing serious jams or print problems.
All labels used in this machine must be able to withstand a temperature of 200 degrees centigrade
(392 degrees Fahrenheit) for a period of 0.1 seconds.
Types of labels to avoid 1
Do not use labels that are damaged, curled, wrinkled or an unusual shape.
• Avoid feeding labels with the carrier sheet exposed because your machine will be damaged.
• Label sheets should not exceed the paper weight specifications described in this User’s Guide. Labels
exceeding this specification may not feed or print properly and may cause damage to your machine.
• DO NOT reuse or insert labels that have previously been used or is missing few labels on the sheet.
7
Page 31

Printing Methods
1
Note
Unprintable area 1
The area of the paper that cannot be printed on is shown in the table below:
The area that cannot be printed on may vary depending on the paper size and the printer driver you are
using. The unprintable area shown below is for A4 / Letter size paper.
Portrait Landscape
1
24
24
1
3
3
Windows® Printer Driver and Macintosh printer driver
BRScript Printer Driver for Windows® and Macintosh
1 4.23 mm (0.16 in.)
2 4.23 mm (0.16 in.)
3 4.23 mm (0.16 in.)
4 4.23 mm (0.16 in.)
8
Page 32

Printing Methods
1
WARNING
Printing methods 1
Printing on plain paper 1
Printing on plain paper from the Tray 1 and Tray 2 1
(For the recommended paper to use, see Type and size of paper on page 2.)
a Pull the paper tray completely out of the machine.
DO NOT touch the shaded parts shown in the illustration. These rollers may be rotating at high speed and
can pinch or entrap your hand.
9
Page 33

Printing Methods
1
1
b While pressing the green paper-guide release lever, slide the paper guides to fit the paper size. Make
sure that the guides are firmly in the slots.
c Put paper in the tray and make sure:
The paper is below the maximum paper mark (bbb) (1).
Overfilling the paper tray will cause paper jams.
The side to be printed on must be face down.
The paper guides touch the sides of the paper so it will feed properly.
d Put the paper tray firmly back in the machine. Make sure that it is completely inserted into the machine.
10
Page 34

Printing Methods
1
e Lift up the support flap to prevent paper from sliding off the face-down output tray, or remove each page
as soon as it comes out of the machine.
f Choose the following settings from each drop-down list of the printer driver.
Paper Size
A4 Letter Legal Executive A5
B5 B6 Folio JIS B5 A5 Long Edge
(Tray 1 only)
A6
(Tray 1 only)
For the acceptable paper sizes, see Type and size of paper on page 2.
Media Type
Plain Paper Thin Paper Recycled Paper
Paper Source
Tray1 Tray2 (if available)
For any other settings, see Driver and Software in Chapter 2.
g Send the print data to the machine.
11
Page 35

Printing Methods
1
1
Printing on plain paper, bond paper, labels or glossy paper from the MP tray 1
(For the recommended paper to use, see Type and size of paper on page 2.)
a Open the MP tray and lower it gently.
b Pull out the MP tray support and unfold the flap (1).
c Lift up the support flap to prevent paper from sliding off the face-down output tray, or remove each page
as soon as it comes out of the machine.
12
Page 36

Printing Methods
1
Note
1
2
d Put paper in the MP tray and make sure:
The paper stays under the maximum paper mark (1).
The paper edge positions between the arrows (2).
The side to be printed on must be face up with the leading edge (top of the paper) in first.
When you are using glossy paper, put only one sheet at a time in the MP tray to avoid a paper jam.
e While pressing the paper-guide release lever, slide the paper guide to fit the paper size.
f Choose the following settings from each drop-down list of the printer driver.
Paper Size
A4 Letter Legal Executive A5
A5 Long Edge A6 B5 B6 3 x 5
JIS B5 Folio
1
You can define your original paper size by choosing User Defined... in Windows® printer driver, PostScript Custom Page Size in
BR-Script printer driver for Windows
®
, or Custom Page Sizes in Macintosh printer drivers.
Customized paper size
For the acceptable paper sizes, see Type and size of paper on page 2 and Paper size on page 178.
1
13
Page 37

Printing Methods
1
Media Type
Plain Paper Thin Paper Recycled Paper Bond Paper Label
Glossy Paper
Paper Source
MP Tray
For any other settings, see Driver and Software in Chapter 2.
g Send the print data to the machine.
14
Page 38

Printing Methods
1
1
Printing on envelopes and thick paper 1
(For the recommended paper to use, see Type and size of paper on page 2.)
a Open the MP tray and lower it gently.
b Pull out the MP tray support and unfold the flap (1).
c Lift up the support flap to prevent envelopes or thick sheets of paper from sliding off the face-down output
tray. If the support flap is closed you should remove each envelope as soon as it comes out of the
machine.
15
Page 39

Printing Methods
1
d Put up to 3 envelopes or up to 25 sheets of thick paper (163 g/m
add more envelopes or paper it may cause a jam. Make sure:
The top of envelope edge is positioned between the arrows (1).
The side to be printed on must be face up.
e Open the back cover (face-up output tray).
2
/ 43 lb paper) in the MP tray. If you
1
f Pull down the two gray levers, one on the left-hand side and one on the right-hand side, to the envelope
position as shown in the illustration below.
g Close the back cover.
16
Page 40

Printing Methods
1
Note
h Choose the following settings from each drop-down list of the printer driver.
Paper Size
<For printing envelopes>
Com-10 DL C5 Monarch DL Long Edge
Customized paper size
<For printing thick paper>
A4 Letter Legal Executive A5
A5 Long Edge A6 B5 B6 3 x 5
JIS B5 Folio
1
You can define your original paper size by choosing User Defined... in Windows® printer driver, PostScript Custom Page Size in
BR-Script printer driver for Windows
For the acceptable paper sizes, see Type and size of paper on page 2 and Paper size on page 178.
Media Type
1
Customized paper size
®
, or Custom Page Sizes in Macintosh printer drivers.
1
<For printing envelopes>
Envelopes Env. Thin Env. Thick
<For printing thick paper>
Thick Paper Thicker Paper
Paper Source
MP Tray
For any other settings, see Driver and Software in Chapter 2.
• When you use Envelope #10, choose Com-10 for the Paper Size.
• For other envelopes that are not listed in the printer driver, such as Envelope #9 or Envelope C6,
®
choose User Defined... (for Windows
®
printer driver for Windows
) or Custom Page Sizes (for Macintosh printer driver). For more information
printer driver), PostScript Custom Page Size (for BR-Script
on envelope sizes, see Paper size on page 178.
i Send the print data to the machine.
17
Page 41

Printing Methods
1
Note
j When you have finished printing, open the back cover and reset the two gray levers their original
position.
• Remove each envelope as soon as it has been printed. Stacking the envelopes may cause them to jam
or curl.
• If envelopes or thick paper gets smudged during printing set the Media Type to Env. Thick or Thicker
Paper to increase the fixing temperature.
• If the envelopes are creased after they are printed, see Improving the print quality on page 160.
• If your thick paper curls during printing, put only one sheet at a time in the MP tray and open the back cover
(back output tray) to let the printed pages exit to the back output tray.
®
• (For Windows
in Paper Size, from the Basic tab. Put a new DL size double-flap envelope in the MP tray with the longest
edge of the envelope in first, then print again.
• Envelope joints that are sealed by the manufacturer should be secure.
• All sides of the envelope should be properly folded without wrinkles or creases.
users) If DL size double flap envelopes are creased after printing, choose DL Long Edge
18
Page 42

Printing Methods
1
Note
Duplex printing 1
The supplied printer drivers for Windows® 2000 or greater and Mac OS X 10.4.11 or greater all enable duplex
printing. For more information about how to choose the settings, see the Help text in the printer driver.
Guidelines for printing on both sides of the paper 1
If the paper is thin, it may wrinkle.
If paper is curled, straighten it and put it back in the paper tray. If the paper continues to curl, replace the
paper.
If the paper is not feeding properly, it may be curled. Remove the paper and straighten it. If the paper
continues to curl, replace the paper.
When you use the manual duplex function, it is possible that there may be paper jams or poor print quality.
(If there is a paper jam, see Paper jams and how to clear them on page 146. If you have a print quality
problem, see Improving the print quality on page 160.)
Make sure that the paper tray is completely inserted in the machine.
19
Page 43

Printing Methods
1
Note
Automatic duplex printing 1
If you are using the Macintosh Printer Driver, see Automatic Duplex Printing on page 59.
®
Automatic duplex printing with the Windows
printer driver 1
a Choose the following settings from each menu of the printer driver.
Paper Size
Letter Legal Folio
Media Type
Plain Paper Recycled Paper Thin Paper Glossy Paper
(MP Tray only)
Paper Source
Tray 1 MP Tray Tray 2 (if available)
Duplex / Booklet
Duplex
Duplex Type in Duplex Settings
There are four options for each orientation. (See Duplex / Booklet on page 33.)
Binding Offset in Duplex Settings
You can specify the offset for binding. (See Duplex / Booklet on page 33.)
• You should use plain paper, recycled paper, thin paper or glossy paper. Do not use bond paper.
• When you are using glossy paper, put only one sheet at a time in the MP tray to avoid a paper jam.
For any other settings, see Driver and Software in Chapter 2.
b Send the print data to the machine. The machine will print on both sides of the paper automatically.
20
Page 44

Printing Methods
1
Note
Automatic duplex printing with the BR-Script printer driver for Windows
a Choose the following settings from each menu of the printer driver.
Paper Size
Letter Legal Folio
Media Type
Plain Paper Recycled Paper Thin Paper Glossy Paper
(MP Tray only)
Paper Source
Tray 1 MP Tray Tray 2 (if available)
Print on Both sides
Flip on Short Edge Flip on Long Edge
Page Order
Front to Back Back to Front
®
1
• You should use plain paper, recycled paper, thin paper or glossy paper. Do not use bond paper.
• When you are using glossy paper, put only one sheet at a time in the MP tray to avoid a paper jam.
For any other settings, see Driver and Software in Chapter 2.
b Send the print data to the machine. The machine will print on both sides of the paper automatically.
21
Page 45

Printing Methods
1
Note
Note
Manual duplex printing 1
The BR-Script printer driver for Windows® does not support manual duplex printing.
If you are using the Macintosh Printer Driver, see Manual Duplex Printing on page 58.
®
Manual duplex printing with the Windows
printer driver 1
a Choose the following settings from each drop-down list of the printer driver.
Paper Size
You can use all the paper sizes specified for the tray you are using.
Media Type
You can use all the media types that are specified for the tray you are using, except envelopes and
labels which have only one print side.
Paper Source
Tray 1 MP Tray Tray 2 (if available)
Duplex / Booklet
Duplex (Manual)
Duplex Type in Duplex Settings...
There are four options for each orientation. (See Duplex / Booklet on page 33.)
Binding Offset in Duplex Settings
You can specify the offset for binding. (See Duplex / Booklet on page 33.)
When you are using glossy paper, put only one sheet at a time in the MP tray to avoid a paper jam.
For any other settings, see Driver and Software in Chapter 2.
b Send the print data to the machine. The machine will print all the even-numbered pages on one side of
®
the paper first. Then, the Windows
to print the odd-numbered pages.
Before reinserting the paper, straighten it well, or you may get a paper jam. Very thin or thick paper is not
recommended.
driver instructs you (with a pop-up message) to reinsert the paper
22
Page 46

Printing Methods
1
Printing data from a USB flash memory drive with direct print1
With the Direct Print feature, you do not need a computer to print data. You can print by just plugging your
USB flash memory drive into the machine's USB direct interface.
There might be some USB flash memory drives that will not work with the machine.
Supported file formats 1
Direct print supports the following file formats:
PDF version 1.7
JPEG
Exif+JPEG
PRN (created by HL-4150CDN or HL-4570CDW(T) printer driver)
TIFF (scanned by all MFC or DCP Brother models)
PostScript
®
1
3™ (created by the BRScript3 printer driver for HL-4150CDN or HL-4570CDW(T))
XPS version 1.0
1
Data including a JBIG2 image file, JPEG2000 image file, or a transparency files is not supported.
Direct Print default settings 1
You can set the direct Print settings by using the control panel. See Direct Print on page 81.
23
Page 47

Printing Methods
1
1
2
Creating a PRN or PostScript® 3™ file for direct printing 1
a From the menu bar of an application, click File, then Print.
b Choose your machine model name (1) and check the Print to file box (2). Click Print.
c Choose the folder you want to save the file to and enter the file name if you are prompted to. If you are
prompted for a file name only, you can also specify the folder you want to save the file in by entering the
directory name. For example:
C:\Temp\FileName.prn
If you have a USB flash memory drive connected to your computer, you can save the file directly to the
USB flash memory drive.
24
Page 48

Printing Methods
1
Note
Note
1
Printing data directly from the USB flash memory drive 1
If you print data from the USB flash memory drive with Secure Function Lock 2.0 enabled, see Chapter 6 of
the Network User's Guide for more information about Secure Function Lock 2.0.
a Connect your USB flash memory drive to the USB Direct Interface (1) on the front of the machine.
b <Secure Function Lock enabled> Confirm the LCD shows the following message. Press OK.
Function Lock
Press OK and sel
<Secure Function Lock disabled> Confirm the LCD shows the following message. Then go to Step e.
Checking Device
• When the machine is in the Deep Sleep mode, the LCD does not show any information even if you connect
a USB flash memory to the USB direct interface connector. Press Go to wake up the machine, and the
LCD will show the Direct Print menu.
• If the USB flash memory drive provides a high speed access, it make be difficult to confirm the
Checking Device message, which may appear for only a few seconds. The time taken to show
Checking Device on the LCD depends on the communication speed between the machine and the
USB flash memory device and the amount of content in the USB memory.
c Press + or - to choose ID. Press OK. If you chose Public, go to Step e.
Select ID
Public
d Enter the four-digit password. Press OK.
Select ID
PIN:XXXX
If your ID has been restricted, the following messages may appear on the LCD.
Message Meaning
Mono Print Only Printing color documents is restricted. You can only print monochrome documents.
Remaining Pages The number of pages you are allowed to print is restricted. The second line of the LCD
shows the number of remaining pages you can print.
25
Page 49

Printing Methods
1
Note
IMPORTANT
e Confirm the LCD shows a folder name or a file name in the USB flash memory drive.
Direct Print
1./XXXX.FOLDER1
f Press + or - to choose the folder name or file name you want to print. Press OK.
If you have chosen a folder name, repeat this Step until you reach the file name you want to print.
g Press + or - to choose a default printing option and press OK,
make the necessary changes to the printing options and press Go,
then press + or - to enter the number of copies you want, then press Go.
Printing Default settings
Print File Set
Paper Size
Print File Set
Output Color
Print File Set
PDF Option
Print File Set
Media Type
Print File Set
Print Quality
Print File Set
Multiple Page
Print File Set
Tray Use
Print File Set
Orientation
Print File Set
Duplex
Print File Set
Collate
If your ID has been restricted, the following messages may appear on the LCD.
Message Meaning
Access Denied Your ID does not allow you to Print documents directly from the USB flash memory
drive to the Brother machine.
Limit Exceeded The number of pages you are allowed to print has been exceeded. The print job will be
canceled.
No Permission Printing color documents is restricted. The print job will be canceled.
Not Available Printing documents directly from the USB flash memory drive is restricted.
1
DO NOT remove the USB flash memory drive from the USB direct interface until the machine has finished
printing.
26
Page 50

2
2
Note
Driver and Software 2
Printer driver 2
A printer driver is software that translates data from the format used by a computer to the format that a
particular printer needs. Typically, this format is page description language (PDL).
®
The printer drivers for the supported versions of Windows
supplied or on the Brother Solutions Center at http://solutions.brother.com/. Install the drivers by following the
Quick Setup Guide. The latest printer driver can be downloaded from the Brother Solutions Center at
http://solutions.brother.com/.
(If you want to uninstall the printer driver, see Uninstalling the printer driver on page 62.)
®
For Windows
2
Windows® printer driver (the most suitable printer driver for this product)
®
BR-Script printer driver (PostScript
1
Install the driver using the Custom Install from the CD-ROM.
3™ language emulation)
and Macintosh are on the CD-ROM we have
1
For Macintosh 2
Macintosh printer driver (the most suitable printer driver for this product)
BR-Script printer driver (PostScript
1
For the installation instruction of the driver, visit us at http://solutions.brother.com/.
For Linux
®12
®
3™ language emulation)
1
LPR printer driver
CUPS printer driver
1
Download the printer driver for Linux from http://solutions.brother.com/ or a link on the CD-ROM we have supplied.
2
Depending on Linux distributions, the driver may not be available.
• For more information about Linux printer driver, visit us at http://solutions.brother.com/.
• The printer driver for Linux may be released after the initial release of this product.
2
27
Page 51

Driver and Software
2
You can change the following printer settings when you print from your computer:
Paper Size
Orientation
Copies
Media Type
Print Quality
Color / Mono
Multiple Page
Duplex
4
/ Booklet
24
Paper Source
Scaling
Reverse Print
Use Watermark
Header-Footer Print
12
12
Toner Save Mode
Secure Print
Administrator
User Authentication
Color Calibration
Use Reprint
12
12
13
13
Sleep Time
Improve Print Output
Skip Blank Page
1
These settings are not available with the BR-script printer driver for Windows®.
2
These settings are not available with the Macintosh printer driver and the BR-Script printer driver for Macintosh.
3
These settings are not available with the BR-Script printer driver for Macintosh.
4
Manual duplex printing / Manual booklet printing are not available with the BR-script printer driver for Windows®.
13
28
Page 52

Driver and Software
2
Note
Note
Features in the printer driver (for Windows®) 2
(For more information, see the Help text in the printer driver.)
• The screens in this section are from Windows® XP. The screens on your computer will vary depending on
your operating system.
• You can access the Printing Preferences dialog box by clicking Printing Preferences... in the General
tab of the Printer Properties dialog box.
• For HL-4570CDWT users, please read HL-4570CDW as HL-4570CDWT.
Basic tab 2
You can also change Page Layout settings by clicking the illustration on the left side of the Basic tab.
1
4
2
3
a Choose the Paper Size, Orientation, Copies, Media Type, Print Quality and Color / Mono (1).
b Choose Multiple Page and Duplex / Booklet (2).
c Choose the Paper Source (3).
d Click OK to apply your chosen settings.
To return to the default settings, click Default, then OK.
This area (4) shows the current settings.
29
Page 53

Driver and Software
2
Note
Paper Size 2
From the drop-down list choose the Paper Size you are using.
Orientation 2
Orientation selects the position of how your document will be printed (Portrait or Landscape).
Portrait
Landscape
Copies 2
The copies selection sets the number of copies that will be printed.
Collate
With the Collate check box selected, one complete copy of your document will be printed and then
repeated for the number of copies you selected. If the Collate check box is not selected, then each page
will be printed for all the copies selected before the next page of the document is printed.
Collate checked
Collate non-checked
Media Type 2
You can use the following types of media in your machine. For the best print quality, select the type of media
that you wish to use.
Plain Paper Thin Paper Thick Paper Thicker Paper
Bond Paper Envelopes Env. Thick Env. Thin
Recycled Paper Label Glossy Paper
• When using ordinary plain paper (60 to 105 g/m2, 16 to 28 lb) choose Plain Paper. When using heavier
weight paper or rough paper choose Thick Paper or Thicker Paper. For bond paper, choose
Bond Paper.
• When you use envelopes, choose Envelopes. If the toner is not fixed to the envelope correctly when
Envelopes has been selected, choose Env. Thick. If the envelope is crumpled when Envelopes has
been selected, choose Env. Thin.
• If you are using glossy paper, choose Glossy Paper. Put only one sheet at a time in the MP tray to avoid
a paper jam.
30
Page 54

Driver and Software
2
Note
Note
Print Quality 2
You can choose the following print quality settings.
Normal (600 x 600 dpi)
600×600 dpi. Recommended for ordinary printing. Good print quality with reasonable print speeds.
Fine (2400 dpi class)
2400 dpi class. The finest print mode. Use this mode to print precise images such as photographs. Since
the print data is much larger than in normal mode, processing time / data transfer time and printing time
will be longer.
The print speed will change depending on what print quality setting you choose. Higher print quality takes
longer to print, while lower print quality takes less time to print.
Color/Mono 2
You can change the Color/Mono settings as follows:
Auto
The machine checks the content of your documents for color. If color is detected, it prints in color. If no
color content is detected, it prints in monochrome. The total printing speed may become slower.
Color
When your document contains color and you want to print it in color, select this mode.
Mono
Select this mode if your document has only black and gray scale text and/or objects. If your document
contains color, selecting Mono mode prints your document in 256 levels of gray.
• Sometimes a document can contain color information even if it appears to be monochrome (for example,
gray areas can actually be made from a combination of colors).
• If either the Cyan, Magenta or Yellow toner reaches the end of its life while printing a color document, the
print job cannot be completed. You can choose to start the print job again in Mono mode, as long as black
toner is available.
31
Page 55

Driver and Software
2
Settings Dialog 2
You can change the following setting by clicking Settings... from the Basic tab.
Color Mode
The following options are available in color Matching mode:
• Normal
This is the default color mode.
• Vivid
The color of all elements are adjusted to become a more vivid color.
• Auto
The printer driver automatically selects the Color Mode type.
• None
Import
You can adjust the print configuration of a particular image by clicking Settings. When you have finished
adjusting the image parameters, such as brightness and contrast, you can import those settings as a print
configuration file. Use the Export function to create a print configuration file from the current settings.
Export
You can adjust the print configuration of a particular image by clicking Settings. When you have finished
adjusting the image parameters, such as brightness and contrast, you can export those settings as a print
configuration file. Use the Import function to load a previously exported configuration file.
Improve Gray Color
You can improve the image quality of a shaded area.
Enhance Black Printing
If a black graphic cannot be printed correctly, choose this setting.
Improve Thin Line
You can improve the image quality of thin lines.
Improve Pattern Printing
Select this option if printed fills and patterns are different from the patterns and fills you see on your
computer.
32
Page 56

Driver and Software
2
Multiple Page 2
The Multiple Page selection can reduce the image size of a page allowing multiple pages to be printed on
one sheet of paper or enlarging the image size for printing one page on multiple sheets of paper.
Page Order
When N in 1 option is selected, the page order can be selected from the drop-down list.
Border Line
When printing multiple pages onto one sheet, with the Multiple Page feature, you can choose to have a
solid border, dash border or no border around each page on the sheet.
Print cut-out line
When 1 in NxN pages option is selected, the Print cut-out line option can be selected. This option allows
you to print a faint cut-out line around the printable area.
Duplex / Booklet 2
When you want to print a booklet or do duplex printing, use this function.
None
Disable duplex printing.
Duplex / Duplex (Manual)
When you want to do duplex printing, use these options.
• Duplex
The machine prints on both sides of the paper automatically.
• Duplex (Manual)
The machine prints all the even numbered pages first. Then the printer driver will stop and show the
instructions required to re-install the paper. When you click OK the odd numbered pages will be printed.
When you choose Duplex or Duplex (Manual), the Duplex Settings... button becomes available to
choose. You can set following settings in the Duplex Settings... dialog box.
33
Page 57

Driver and Software
2
• Duplex Type
There are four types of duplex binding direction available for each orientation.
Portrait
Long Edge (Left)
Landscape
Long Edge (Top)
Long Edge (Right)
Long Edge (Bottom)
Short Edge (Top)
Short Edge (Right)
Short Edge (Bottom)
Short Edge (Left)
• Binding Offset
When you check Binding Offset, you can also specify the offset for binding in inches or millimeters.
Booklet / Booklet (Manual)
Use this option to print a document in booklet format using duplex printing; it will arrange the document
according to the correct page number and allows you to fold at the center of the print output without having
to change the order of the page number.
• Booklet
The machine prints on both sides of the paper automatically.
• Booklet (Manual)
The machine prints all the even numbered sides first. Then the printer driver will stop and show the
instructions required to re-install the paper. When you click OK the odd numbered sides will be printed.
When you choose Booklet or Booklet (Manual), the Duplex Settings... button becomes available to
choose. You can set following settings in the Duplex Settings dialog box.
34
Page 58

Driver and Software
2
• Duplex Type
There are two types of duplex binding direction available for each orientation.
Portrait Landscape
Left Binding
Right Binding
Top Binding
Bottom Binding
• Booklet Printing Method
When Divide into Sets is selected: This option allows you to print the whole booklet into smaller
individual booklet sets, it still allows you to fold at the center of the smaller individual booklet sets without
having to change the order of the page number. You can specify the number of sheets in each smaller
booklet set, from 1 to 15. This option can help when folding the printed booklet that has a large number
of pages.
• Binding Offset
When you check Binding Offset, you can also specify the offset for binding in inches or millimeters.
Paper Source 2
You can choose Auto Select, Tray1, Tray2, MP Tray or Manual and specify separate trays for printing the
first page and for printing from the second page onwards.
35
Page 59

Driver and Software
2
1
2
3
4
5
6
7
8
9
Advanced tab 2
Change the tab settings by clicking one of the following icons:
Scaling (1)
Reverse Print (2)
Use Watermark (3)
Header-Footer Print (4)
Toner Save Mode (5)
Secure Print (6)
Administrator (7)
User Authentication (8)
Other Print Options... (9)
Scaling 2
You can change the print image scaling.
Reverse Print 2
Check Reverse Print to rotate the print result by 180 degrees.
36
Page 60

Driver and Software
2
Note
Note
Use Watermark 2
You can put a logo or text into your documents as a watermark.
You can choose one of the preset watermarks, or you can use a bitmap file or text that you have created.
When you use a bitmap file as a watermark, you can change the size of the watermark and put it anywhere
you like on the page.
When you use text as a watermark, you can change the font, color and angle settings.
Header-Footer Print 2
When this feature is enabled, it will print the date and time on your document from your computer’s system
clock and the PC login user name or the text you entered. By clicking Settings..., you can customize the
information.
ID Print
If you select Login User Name, your PC login user name will print. If you select Custom and enter the
text in the Custom edit box, the text you entered will print.
Toner Save Mode 2
You can conserve toner use with this feature. When you set Toner Save Mode to On, print appears lighter.
The default setting is Off.
We do not recommend Toner Save Mode for printing photo or gray scale images.
Secure Print 2
Secure documents are documents that are password protected when they are sent to the machine. Only the
people who know the password will be able to print them. Since the documents are secured at the machine,
you must enter the password using the control panel of the machine to print them.
If you want to create a secure print job, click Settings... and then check the Secure Print check box. Enter
a password in the Password box and click OK. (For more information about the secure print function, see
Printing Secure data on page 70.)
Check the Secure Print check box if you want to prevent other people from printing your data.
37
Page 61

Driver and Software
2
Note
Administrator 2
Administrators have the authority to limit access to functions such as scaling and watermark.
Copies Lock
Lock the copy pages selection to prevent multiple copy printing.
Multiple Page & Scaling Lock
Lock the scaling setting and multiple page setting.
Color / Mono Lock
Lock the Color/Mono settings as Mono to prevent color printing.
Watermark Lock
Lock the current settings of the Watermark option to prevent changes being made.
Header-Footer Print Lock
Lock the current settings of the Header-Footer Print option to prevent changes being made.
Set Password...
Click here to change the password.
User Authentication 2
If you are restricted from PC Print by the Secure Function Lock feature, you need to set your ID and PIN in
the User Authentication Settings dialog. Click Settings... of the User Authentication and enter your ID
and PIN. If your PC login name is registered to Secure Function Lock, you can check the
Use PC Login Name box instead of entering your ID and PIN.
For more information about Secure Function Lock 2.0, see Chapter 6 of the Network User's Guide.
• When you use the machine on a network, you can see your ID information and the restrictions applied to
you by clicking Check Print Status. The Authentication result dialog will appear.
• When you use the machine on a network, you can make the Authentication result dialog appear each
time you print by checking Show print status before printing.
• If you want to enter your ID and PIN each time you print, check the
Enter ID Name/PIN for each print job.
38
Page 62

Driver and Software
2
Note
Note
Other Print Options 2
You can set the following in Printer Function:
Color Calibration
Use Reprint
Sleep Time
Improve Print Output
Skip Blank Page
Color Calibration 2
The output density of each color may vary depending on the temperature and humidity of the environment
the machine is in. This setting helps you to improve color density by letting the printer driver use the color
calibration data stored in your machine.
Use Calibration Data
If you check this box, the printer driver will use the calibration data retrieved from the machine to set color
matching in the printer driver to ensure consistent print quality.
Start Color Calibration...
If you click this button, your machine will start color calibration and then the printer driver will attempt to
get the calibration data from your machine.
Get Device Data Automatically
If you check this box, the printer driver will automatically get the color calibration data from your machine.
If you print by using the Direct Print feature or BR-Script printer driver, you need to perform the calibration
from the control panel. See Color Calibration on page 83.
Use Reprint 2
The machine keeps the print job sent to it in memory.
You can reprint the last job without sending the data again from your computer. For more information about
the Reprint function, see Reprinting documents on page 69.
If you want to prevent other people from printing your data using the reprint function, uncheck the
Use Reprint check box.
39
Page 63

Driver and Software
2
Note
Note
Note
Sleep Time 2
When the machine does not receive data for a certain period of time, it enters sleep mode. In sleep mode,
the machine acts as though it were turned off. When you choose Printer Default, the timeout setting will be
reset to the specific time set at the factory; this can be altered in the driver or at the machine.
Intelligent Sleep Mode automatically adjusts to the most suitable timeout setting depending on the frequency
of your machine use.
While the machine is in sleep mode, the Back light is off and the LCD shows Sleep, but the machine can still
receive data. Receiving a print file or document or pressing Go will automatically wake up the machine to start
printing.
Improve Print Output 2
This feature allows you to improve a print quality problem.
Reduce Paper Curl
If you choose this setting, the paper curl may be reduced.
If you are printing only a few pages, you do not need to choose this setting. We recommend that you
change the printer driver setting in Media Type to a thin setting.
This operation makes the temperature of the machine’s fusing process lower.
Improve Toner Fixing
If you choose this setting, the toner fixing on paper may be improved. If this selection does not provide
enough improvement, change the printer driver setting in Media Type to a thick setting.
This operation makes the temperature of the machine’s fusing process higher.
Skip Blank Page 2
If Skip Blank Page is checked, the printer driver automatically detects blank pages and excludes them from
printing.
This option does not work when you choose the following options:
• Use Watermark
• Header-Footer Print
• Nin1 and 1 in NxN pages in Multiple Page
• Duplex (Manual), Booklet, Booklet (Manual) and Duplex with Binding Offset in Duplex / Booklet
40
Page 64

Driver and Software
2
Note
Accessories tab 2
From the Start menu, select Control Panel and then Printers and Faxes1. Right-click the Brother
HL-4570CDW (HL-4150CDN) Series icon and select Properties to access the Accessories tab.
1
Printers for Windows® 2000 users.
You can define the paper size for each paper tray and auto detect the serial number in the Accessories tab
as follows.
1
2
3
4
Available Options / Installed Options (1)
You can manually add and remove the options that are installed on the machine. Tray settings will match
the installed options.
Paper Source Setting (2)
This feature recognizes the paper size set from the control panel menu for each paper tray.
Serial No. (3)
By clicking Auto Detect, the printer driver will probe the machine and display its serial number. If it fails to
receive the information, the screen will display "---------------".
Auto Detect (4)
The Auto Detect function finds the currently installed optional devices and shows the available settings in
the printer driver. When you click Auto Detect, options that are installed on the machine will be listed in
Installed Options (1). You can manually add or remove the options by choosing an optional device you
want to add or remove, and then clicking Add or Remove.
41
Page 65

Driver and Software
2
Note
Note
The Auto Detect (4) function is not available under the following machine conditions:
• The machine power switch is off.
• The machine is in an error state.
• The machine is in a network shared environment.
• The cable is not connected to the machine correctly.
Support 2
You can access the Support dialog box by clicking Support in the Printing Preferences dialog box.
1
2
3
4
5
6
Brother Solutions Center... (1)
The Brother Solutions Center (http://solutions.brother.com/
) is a Web site offering information about your
Brother product including FAQs (Frequently Asked Questions), User’s Guides, driver updates and tips for
using your machine.
Genuine Supplies Website... (2)
You can visit our Web site for genuine Brother supplies by clicking this button.
Brother CreativeCenter... (3)
You can visit our Web site for a free and easy online solution for business and home uses by clicking this
button.
Print Settings (4)
This will print the pages that show how the internal settings of the machine have been configured.
Check Setting... (5)
You can check the current driver settings.
About... (6)
This will show the list of the printer driver files and version information.
42
Page 66

Driver and Software
2
Note
Note
Using the BR-Script3 printer driver
(PostScript® 3™ language emulation for Windows®) 2
(For more information, see the Help text in the printer driver.)
• To use the BR-Script3 printer driver you must install the driver using the Custom Install from the CD-ROM.
®
• The screens in this section are from Windows
on your operating system.
Printing Preferences 2
You can access the Printing Preferences dialog box by clicking Printing Preferences... in the General
tab of the Brother HL-4570CDW (HL-4150CDN) BR-Script3 Properties dialog box.
Layout tab
You can change the layout setting by choosing the settings for Orientation, PrintonBothSides,
Page Order and Page Per Sheet.
XP. The screens on your computer may vary depending
• Orientation
Orientation selects the position of how your document will be printed. (Portrait, Landscape or
Rotated Landscape)
• Print on Both Sides
If you want to do duplex printing, choose Flip on short Edge or Flip on Long Edge.
• Page Order
Specifies the order in which the pages of your document will be printed. Front to Back prints the
document so that page 1 is on top of the stack. Back to Front prints the document so that page 1 is on
the bottom of the stack.
43
Page 67

Driver and Software
2
• Page Per Sheet
The Page Per Sheet selection can reduce the image size of a page by allowing multiple pages to be
printed on one sheet of paper. Also, you can print a document in the booklet style automatically when
you choose Booklet.
Paper/Quality tab
Choose the Paper Source and Color.
• Paper Source
You can choose Automatically Select, Auto Select, Tray1, Tray2, MP Tray or Manual Feed.
• Color
Choose how to print color graphics either in Black & White or Color.
44
Page 68

Driver and Software
2
Advanced options 2
1
2
a Choose the Paper Size and Copy Count (1).
Paper Size
From the drop-down box choose the Paper Size you are using.
Copy Count
The copy selection sets the number of copies that will be printed.
b Set the Image Color Management, Scaling and TrueType Font settings (2).
Image Color Management
Specifies how to print your color graphics.
• If you don’t want to enable Image Color Management, click ICM Disabled.
• If you want the calculations for color matching to be performed on the host computer before it
sends the document to the machine, click ICM Handled by Host System.
• If you want the calculations for color matching to be performed on your machine, click ICM
Handled by Printer using printer calibration.
Scaling
Specifies whether to reduce or enlarge documents, and by what percentage.
TrueType Font
Specifies the TrueType font options. Click Substitute with Device Font (the default) to use
equivalent printer fonts for printing documents that contain TrueType fonts. This will permit faster
printing; however, you might lose special characters not supported by the printer font. Click
Download as Softfont to download TrueType fonts for printing instead of using printer fonts.
45
Page 69

Driver and Software
2
Note
Note
c You can change settings by choosing a setting in the Printer Features list (3):
3
Print Quality
You can choose the following print quality settings.
• Normal (600 x 600 dpi)
600×600 dpi. Recommended for ordinary printing. Good print quality with reasonable print speeds.
• Fine (2400 dpi class)
2400 dpi class. The finest print mode. Use this mode to print precise images such as photographs.
Since the print data is much larger than in normal mode, processing time / data transfer time, and
printing time will be longer.
The print speed will change depending on what print quality setting you choose. Higher print quality takes
longer to print, while lower print quality takes less time to print.
Media Type
You can use the following types of media in your machine. For the best print quality, select the type
of media that you wish to use.
Plain Paper Thin Paper Thick Paper Thicker Paper
Bond Paper Envelopes Env. Thick Env. Thin
Recycled Paper Label Glossy Paper
If you are using glossy paper, choose Glossy Paper. Put only one sheet at a time in the MP tray to avoid
a paper jam.
46
Page 70

Driver and Software
2
Note
Note
Secure Print
Secure Print allows you to secure documents that are password protected when they are sent to the
machine. Only the people who know the password will be able to print them. Since the documents are
secured at the machine, you must enter the password using the control panel of the machine. The
secured document must have a Password and Job Name.
(For more information about the secure print function, see Printing Secure data on page 70.)
Password
Choose the password for your secured document that you send to the machine from the drop-down
box.
Job Name
Choose the Job name from the drop-down list for your secured document.
Toner Save
You can conserve toner use with this feature. When you set Toner Save Mode to On, print appears
lighter. The default setting is Off.
We do not recommend Toner Save for printing Photo or gray scale images.
Sleep Time [Min.]
When the machine does not receive data for a certain period of time, it enters sleep mode. In sleep
mode, the machine acts as though it were turned off. When you choose Printer Default, the timeout
setting will be reset to the specific time set at the factory; this can be altered in the driver or at the
machine. While the machine is in sleep mode, the LCD shows Sleep, but the machine can still
receive data. Receiving a print file or document or pressing Go will automatically wake up the
machine to start printing.
Color / Mono
You can choose the following color mode:
• Auto
The machine checks the content of your documents for color. If color is detected, it prints in color.
If no color content is detected, it prints in monochrome. The total printing speed may become
slower.
• Color
The device will print all pages in full color mode.
• Mono
Selecting Mono mode prints your documents in gray scale.
• Sometimes a document can contain color information even if it appears to be monochrome (for example,
gray areas can actually be made from a combination of colors).
• If either the Cyan, Magenta or Yellow toner reaches the end of its life while printing a color document, the
print job cannot be completed. You can choose to start the print job again in Mono mode, as long as black
toner is available.
47
Page 71

Driver and Software
2
Note
Note
Color Mode
The following options are available in Color Matching mode:
• Normal
This is the Default color mode.
• Vivid
The color of all elements are adjusted to become a more vivid color.
• None
Improve Gray Color
You can improve the image of a shaded area.
Enhance Black Printing
If a black graphic cannot print correctly, choose this setting.
Halftone Screen Lock
Stops other applications from modifying the Halftone settings. The default setting is On.
High Quality Image Printing
You can get high quality image printing. If you set High Quality Image Printing to On, the printing
speed will be slower.
Improve Print Output
This feature allows you to improve a print quality problem.
• Reduce Paper Curl
If you choose this setting, the paper curl may be reduced. If you are printing only a few pages, you
do not need to choose this setting. We recommend that you change the printer driver setting in
Media Type to a thin setting.
This operation makes the temperature of the machine’s fusing process lower.
• Improve Toner Fixing
If you choose this setting, the toner fixing on paper may be improved. If this selection does not
provide enough improvement, change the printer driver setting in Media Type to a thick setting.
This operation makes the temperature of the machine’s fusing process higher.
48
Page 72

Driver and Software
2
Ports tab 2
Choose the port where your machine is connected or the path to the network machine you are using.
49
Page 73

Driver and Software
2
Note
Features in the printer driver (for Macintosh) 2
This machine supports Mac OS X 10.4.11, 10.5.x and 10.6.x.
• The screens in this section are basically from Mac OS X 10.5.x. The screens on your Macintosh will vary
depending on your operating system.
• For HL-4570CDWT users, please read HL-4570CDW as HL-4570CDWT.
Choosing page setup options 2
a From an application such as Apple TextEdit, click File, then Page Setup. Make sure HL-XXXX (where
XXXX is your model name) is chosen in the Format for pop-up menu. You can change the settings for
Paper Size, Orientation and Scale, then click OK.
b From an application such as Apple TextEdit, click File, then Print to start printing.
For Mac OS X 10.4.11
50
Page 74

Driver and Software
2
For Mac OS X 10.5.x and 10.6.x
For more page setup options, click the disclosure triangle beside the Printer pop-up menu.
Choosing printing options 2
To control special printing features, choose the options in the Print dialog box. For the details of available
options, see the following descriptions of each option.
51
Page 75

Driver and Software
2
Cover Page 2
You can make the following cover page settings:
Print Cover Page
If you want to add a cover page to your document, use this function.
Cover Page Type
Choose a template for the cover page.
Billing Info
If you want to add the billing information to the cover page, enter text in the Billing Info box.
Layout 2
Pages per Sheet
Choose how many pages will appear on each side of the paper.
Layout Direction
When you specify the pages per sheet, you can also specify the direction of the layout.
52
Page 76

Driver and Software
2
Note
Border
If you want to add a border, use this function.
Two-Sided
If you want to do duplex printing, choose Long-edge binding or Short-edge binding.
Reverse Page Orientation (Mac OS X 10.5.x and 10.6.x only)
Check Reverse Page Orientation to reverse the data from up to down.
Flip Horizontally (Mac OS X 10.6.x only)
Check Flip Horizontally to print as a reflection flipped left-to-right.
Secure Print 2
Secure Print: Secure documents are documents that are password protected when they are sent to the
machine. Only the people who know the password will be able to print them. Since the documents are
secured at the machine, you must enter the password using the control panel of the machine to print them.
If you want to create a secure print job, check the Secure Print box. Enter a user name, job name and
password, then click Print. (For more information about the secure print function, see Printing Secure data
on page 70.)
Check the Secure Print check box if you want to prevent other people from printing your data.
53
Page 77

Driver and Software
2
Note
Print Settings 2
You can change settings by choosing a setting in the Print Settings list:
Basic tab
Media Type
You can change the media type to one of the following:
• Plain Paper
• Thin Paper
• Thick Paper
• Thicker Paper
• Bond Paper
• Envelopes
• Env. Thick
• Env. Thin
• Recycled Paper
• Label
• Glossy Paper
If you are using glossy paper, choose Glossy Paper. Put only one sheet at a time in the MP tray to avoid
a paper jam.
54
Page 78

Driver and Software
2
Note
Note
Note
Print Quality
You can choose the following print quality settings.
• Normal (600 x 600 dpi)
600 dpi class. Recommended for ordinary printing. Good print quality with good print speed.
• Fine (2400 dpi class)
2400 dpi class. The finest print mode. Use this mode to print precise images such as photographs.
Since the print data is much larger than in normal mode, processing time, data transfer time, and
printing time will be longer.
The print speed will change depending on what print quality setting you choose. Higher print quality takes
longer to print, while lower print quality takes less time to print.
Color / Mono
You can change the Color/Mono settings as follows:
• Auto
The machine checks the content of your documents for color. If color is detected, it prints in color. If no
color content is detected, it prints in monochrome. The total printing speed may become slower.
• Color
When your document contains color and you want to print it in color, select this mode.
• Mono
Select this mode if your document has only black and gray scale text and/or objects. Mono mode makes
the print processing speed faster than color mode. If your document contains color, selecting Mono
mode prints your document in 256 levels of gray.
• Sometimes a document can contain color information even if it appears to be monochrome (for example,
gray areas can actually be made from a combination of colors).
• If either the Cyan, Magenta or Yellow toner reaches the end of its life while printing a color document, the
print job cannot be completed. You can choose to start the print job again in Mono mode, as long as black
toner is available.
Toner Save Mode
You can conserve toner use with this feature. When you set Toner Save Mode to On, print appears lighter.
The default setting is Off.
We do not recommend Toner Save for printing Photo or gray scale images.
Paper Source
You can choose Auto Select, Tray 1, Tray 2, MP Tray or Manual.
55
Page 79

Driver and Software
2
Reverse Print (Mac OS X 10.4.11 only)
Check Reverse Print to rotate the data by 180 degrees.
Advanced tab
Color Mode
You can change the color mode as follows:
• Normal
This is the Default color mode.
• Vivid
The color of all elements are adjusted to become a more vivid color.
• None
Enhance Black Printing
If a black graphic cannot be printed correctly, choose this setting.
Improve Gray Color
You can improve the image quality of shaded areas by checking the Improve Gray Color check box.
Skip Blank Page
If Skip Blank Page is checked, the printer driver automatically detects blank pages and excludes them
from printing.
Improve Print Output...
This feature allows you to improve a print quality problem.
• Reduce Paper Curl
If you choose this setting, the paper curl may be reduced.
56
Page 80

Driver and Software
2
Note
Note
If you are printing only a few pages, you do not need to choose this setting. We recommend that you
change the printer driver setting in Media Type to a thin setting.
This operation makes the temperature of the machine’s fusing process lower.
• Improve Toner Fixing
If you choose this setting, the toner fixing on paper may be improved. If this selection does not provide
enough improvement, change the printer driver setting in Media type to a thick setting.
This operation makes the temperature of the machine’s fusing process higher.
Sleep Time
When the machine does not receive data for a certain period of time, it enters sleep mode. In sleep mode,
the machine acts as though it were turned off. When you choose Printer Default, the timeout setting will
be reset to the specific time set at the factory; this can be altered in the driver or at the machine. If you
want to change the sleep time, choose Manual and then enter the time in the text box on the driver.
While the machine is in sleep mode, the LCD shows Sleep, but the machine can still receive data.
Receiving a print file or document or pressing Go will automatically wake up the machine to start printing.
57
Page 81

Driver and Software
2
Manual Duplex Printing 2
For Mac OS X 10.4.11
a Select Paper Handling.
b Choose Reverse (for MP tray) or Normal (for Tray 1 and Tray 2) in Page Order. Then choose
Even numbered pages and click Print.
c Reload printed paper into the tray with the blank side facing up (for MP tray) or facing down (for Tray
1 and Tray 2).
d Choose Normal in Page Order. Then choose Odd numbered pages and click Print.
For Mac OS X 10.5.x and 10.6.x
a Select Paper Handling.
b Choose Reverse (for MP tray) or Normal (for Tray 1 and Tray 2) in Page Order. Then choose
Even Only in Pages To Print and click Print.
c Reload printed paper into the tray with the blank side facing up (for MP tray) or facing down (for Tray
1 and Tray 2).
d Choose Normal in Page Order. Then choose Odd Only in Pages To Print and click Print.
58
Page 82

Driver and Software
2
Automatic Duplex Printing 2
For Mac OS X 10.4.11
a Select Layout.
b Choose Long-edged binding or Short-edged binding in Two-Sided.
c Select Paper Handling.
d Choose All Pages and click Print.
59
Page 83

Driver and Software
2
For Mac OS X 10.5.x and 10.6.x
a Select Layout.
b Choose Long-edge binding or Short-edge binding in Two-Sided. Automatically the Two-Sided
check box is checked.
c Select Paper Handling.
d Choose All pages in Pages To Print and click Print. You can print pages on both sides of the paper.
60
Page 84

Driver and Software
2
Status Monitor 2
This reports the machine status (any errors that may happen with the machine) when printing. If you would
like to turn Status Monitor on, follow these steps:
For Mac OS X 10.4.11
a Run the Printer Setup Utility (from the Go menu, choose Applications, Utilities), then choose the
machine.
b Click the Utility, then Status Monitor will start up.
For Mac OS X 10.5.x
a Run the System Preferences, select Print & Fax, then choose the machine.
b Click the Open Print Queue..., then click Utility. Status Monitor will start up.
For Mac OS X 10.6.x
a Run the System Preferences, select Print & Fax, then choose the machine.
b Click the Open Print Queue..., then click Printer Setup. Select the Utility tab then click Open
Printer Utility. Status Monitor will start up.
61
Page 85

Driver and Software
2
Note
Uninstalling the printer driver 2
You can uninstall the printer driver that you have installed with the following steps.
• This is not available if you installed the printer driver from the Windows Add printer1 function.
• After uninstalling, we recommend that you restart your computer to remove files that were in use during
the uninstall.
1
Add a printer for Windows® 7 and Windows Server® 2008 R2 users
Printer driver for Windows
a Click the Start button, point to All Programs
®
1
, Brother, and then to your machine name.
b Click UnInstall.
c Follow the instructions on the screen.
1
Program for Windows® 2000 users
Printer driver for Macintosh 2
For Mac OS X 10.4.11 2
a Log in as an ‘Administrator’.
b Run the Printer Setup Utility (from the Go menu, choose Applications, Utilities), then choose the
printer you want to remove and remove it by clicking the Delete button.
For Mac OS X 10.5.x and 10.6.x
a Log in as an ‘Administrator’.
2
2
b From the Apple menu, choose System Preferences. Click Print & Fax, then choose the printer you
want to remove and remove it by clicking the - button.
c Click OK
1
Delete Printer for Mac OS X 10.6.x users
1
.
Software 2
Software for networks 2
For the information about network utility software, see Chapter 1 of the Network User's Guide.
62
Page 86

3
3
Control Panel 3
Control panel 3
This machine has one back lit Liquid Crystal Display (LCD), seven buttons and two Light Emitting Diodes
(LEDs) on the control panel. The LCD is a two-line, 16 characters per line display and can be tilted up to a
vertical position. You can adjust the angle of the LCD by tilting it up or down.
The illustration is based on HL-4570CDW.
63
Page 87

Control Panel
3
Note
Buttons 3
You can control the basic machine operations and change various printer settings with seven buttons (Go,
Cancel, Secure, +, -, Back, OK).
button Operations
Go Clear error messages.
Pause and continue printing.
Switch to Reprint mode.
Cancel Stop and cancel the printing job in progress.
Exit from the control panel menu, Reprint menu, Secure Print menu, or Direct Print
menu.
Secure Choose the Secure Print menu.
+ Scroll backward through menus and the available options.
Enter numbers and increase the number.
- Scroll forward through menus and the available options.
Enter numbers and decrease the number.
Back Go back one level in the menu structure.
OK Choose the control panel menu.
Set the chosen menus and settings.
Go 3
You can pause printing by pressing Go. Pressing Go again restarts the print job. During a pause, the machine
is offline.
Pressing Go allows you to choose the displayed option in the last menu level. After changing a setting, the
machine returns to the Ready state.
If Data remains in the machine memory, pressing Go will print that remaining data.
You can clear some error indications by pressing Go. Follow the control panel instructions or see
Troubleshooting on page 140 to clear all other errors.
You can switch to Reprint mode by pressing Go and holding it down for about 4 seconds. (For details, see
Reprinting documents on page 69.)
• The options you have chosen are shown with an asterisk at the end of the display. Since the asterisk
shows what you have chosen, you can easily see the current settings as you look through the LCD.
• If the machine is in Pause mode and you do not want to print the data left, press Cancel. Once the job has
been canceled, the machine will return to the Ready state.
64
Page 88

Control Panel
3
Note
Cancel 3
You can cancel the processing or printing of data by pressing Cancel. The LCD shows Cancel printing.
until the job is canceled. To delete all jobs, press Cancel for about 4 seconds until the LCD shows
Job Cancel (All) and then release it.
After canceling the job, the machine returns to the Ready state.
Pressing Cancel will exit the control panel menu and return the machine to the Ready state.
Secure 3
If you want to print secure data protected by a password, press Secure. For details, see Printing Secure data
on page 70.
+ or - button 3
Moving through menus on the LCD 3
Pressing + or - when the machine is in the Ready state, takes it offline and the LCD will show the control panel
menu.
Press to scroll through the menus and options. Press the button until you see the setting you want.
Entering numbers 3
You can enter numbers in two ways. You can press + or - to move up or down one number at a time, or you
can hold down + or - to move faster. When you see the number you want, press OK.
Back 3
Pressing Back when the machine is in the Ready state takes it offline, and the LCD will show the control panel
menu.
Pressing Back allows you to return to the previous level from the current menu level.
Back also allows you to choose the previous digit while setting numbers.
When you choose a setting and it does not have an asterisk (OK was not pressed), Back allows you to return
to the previous menu level with the original setting unchanged.
OK 3
Pressing OK when the machine is in the Ready state takes it offline, and the LCD will show the control panel
menu.
Pressing OK allows you to choose the displayed menu or option. After changing a setting, the LCD shows
Accepted and then the machine returns to the previous menu level.
The options you have chosen are shown with an asterisk at the end of the display. Since the asterisk
shows what you have chosen, you can easily see the current settings as you look through the LCD.
65
Page 89

Control Panel
3
LEDs 3
The LEDs are lights which show the machine status.
Data LED (Green)
LED indication Meaning
On Data is in the machine memory.
Blinking Receiving or processing data.
Off No remaining data in the memory.
Error LED (Orange) 3
LED indication Meaning
Blinking There is a problem with the machine.
Off There is no problem with the machine.
3
66
Page 90

Control Panel
3
LCD 3
The LCD shows the current machine status. When you use the buttons on the control panel, the LCD will
change.
If there are any problems, the LCD will show the error message, maintenance message, or call service
message so you will know that you need to take action. (For more information about these messages, see
LCD messages on page 141.)
Back light 3
Light Meaning
Off The machine is off or in sleep status.
Green (General, Error, Setting) Ready to print
Printing
Warming up
There is a problem with the machine.
Choosing a menu, (Control panel menu, Reprint menu, or Direct Print menu)
Canceling the job
Pause
LCD messages 3
The message on the LCD shows the current machine status during normal operation.
Ready
Ko Yo Mn Co
The o and n marks indicate the status of each toner cartridge, Black (K), Yellow (Y), Magenta (M) and Cyan
(C) (where the n means blinking). When a mark blinks (n), the indicated toner cartridge is near the end of its
life. When the replacement of a toner cartridge becomes necessary, corresponding o mark disappears.
The mark indicates the wireless signal strength with four levels. ( means no signal, means weak,
means middle, and means strong.) (HL-4570CDW(T) only)
When an error has occurred, the type of error is displayed on the first line of the LCD message at first as
shown below.
The message on the second line shows information for clearing the error.
Cover is Open
Close the Front
67
Page 91

Control Panel
3
Machine status messages 3
The following table shows the machine status messages during normal operation:
Machine Status Message Meaning
Cooling Down The machine is cooling down.
Job Cancel
Job Cancel (All)
Ignore Data Machine is ignoring data processed using the PS driver.
Pause The machine has suspended its operations. Press Go to start the machine
Please Wait The machine is warming up.
Printing Printing.
Ready Ready to print.
Sleep In sleep mode (power save mode). The machine acts as though it were
Deep Sleep
1
Canceling the job.
again.
The machine is carrying out the calibration process.
turned off.
In Deep Sleep mode (reducing more power consumption than Sleep mode).
The machine acts as though it were turned off. If the machine does not
receive data for a certain length of time while it is in Sleep mode, it enters
Deep Sleep mode automatically.
1
(HL-4570CDW(T) only) When the Wireless Network is enabled the machine does not transfer to Deep Sleep mode. If you want to disable the
Wireless Network, change setting of the WLAN Enable to Off. (See Network for HL-4570CDW(T) users on page 77.)
68
Page 92

Control Panel
3
Note
Note
Reprinting documents 3
Reprinting the last job 3
You can reprint the data from the last print job without sending it from the computer again.
• The Reprint function is not available when Secure Function Lock 2.0 is On. For more information about
Secure Function Lock 2.0, see the Chapter 6 of the Network User's Guide.
• If the machine does not have enough memory to spool the print job data, it will not print the document.
• If you wait 30 seconds to continue the control panel operation, the LCD leaves the Reprint setting
automatically.
• For more information about the settings in the printer driver, see Advanced tab on page 36.
• After turning the power switch off, the last job data will be deleted.
How to reprint the last job 3
If you print with the Windows® printer driver we have supplied with the machine, the settings for
Use Reprint in the printer driver will take priority over the settings made on the control panel. (For more
information, see Use Reprint on page 39.)
a Make sure that the Reprint setting is On by using the buttons on the control panel to enter the
General Setup menu.
b Press Go for about 4 seconds and release it. Make sure that the LCD shows Reprint.
c Press + or - to choose Print. Press OK.
d Press + to enter the number of copies you want. You can choose between 1 and 999 Copies.
e Press OK or Go.
69
Page 93

Control Panel
3
Note
Printing Secure data 3
Secure data 3
Secure documents are protected by a password and only those people who know the password will be able
to print the document. The machine will not print the document when you send it for printing. To print the
document, you must use the control panel of the machine (with the password). Secure data will be deleted
after it is printed once.
When the area to spool data is full, the LCD shows Out of Memory. Press Cancel to return to the Ready
state.
If you want to delete the spooled data, you can carry out this operation using the control panel or the
Web based management application.
• Secure data will be deleted when the machine is turned off.
• If you wait 30 seconds to continue the control panel operation, the LCD leaves the Secure Print setting
automatically.
• For more information about the settings in the printer driver and how to create secure data, see
®
Secure Print on page 37 (For Windows
BR-Script printer driver) or Secure Print on page 53 (For Macintosh printer driver).
printer driver), Advanced options on page 45 (For Windows®
How to print Secure data 3
a Press Secure.
b Press + or - to choose the user name. Press OK.
c Press + or - to choose the job. Press OK.
d Press + or - to enter your password. Press OK.
e Press + or - to choose Print. Press OK.
f Press + or - to enter the number of copies you want.
g Press OK or Go.
70
Page 94

Control Panel
3
Note
Menu table 3
There are eight menus. For more information about the selections available in each menu, see the tables
below.
If no control panel operations are performed for 30 seconds, the LCD automatically returns to Ready.
The control panel LCD names for the paper trays are as follows.
• Standard paper tray: Tray1
• Multi-purpose tray: MP
• Optional lower tray: Tray2
Machine Info.
Submenu Menu Selections Options Descriptions
Print Settings Prints the Printer Settings page.
Print NetSetting Prints the Network Configuration List.
Print WLANReport
(HL-4570CDW(T) only)
Test Print Prints the test page.
Demo Print Prints the demonstration sheet.
Drum Dot Print Prints the drum dot check sheet.
Print Font HP LaserJet Prints the font list and samples of HP LaserJet.
BR-Script 3 Prints the font list and samples of BR-Script.
Serial No. Shows the machine serial number.
Version Main Version Shows the main firmware version.
Sub Version Shows the sub firmware version.
RAM Size Shows the size of memory in this machine.
Page Count Total Shows the current total printed pages.
Color Shows the current total color printed pages.
Monochrome Shows the current total monochrome printed pages.
Image Count Black(K) Shows the amount of images produced by the black
Cyan(C) Shows the amount of images produced by the cyan
Magenta(M) Shows the amount of images produced by the
Yellow(Y) Shows the amount of images produced by the yellow
Prints the result of wireless LAN connectivity
diagnosis.
color.
color.
magenta color.
color.
The factory settings are shown in Bold with an asterisk.
71
Page 95

Control Panel
3
Machine Info. (continued)
Submenu Menu Selections Options Descriptions
Drum Count Shows the current total pages printed for the drum
unit.
Parts Life Drum Life Shows the remaining life for the drum unit.
Belt Life Shows the remaining life for the belt unit.
PF KitMP Life Shows the pages left to print with the PF kit MP.
PF Kit1 Life Shows the pages left to print with the PF kit 1.
PF Kit2 Life Shows the pages left to print with the PF kit 2.
Fuser Life Shows the pages left to print with the fuser unit.
Laser Life Shows the pages left to print with the laser unit.
Reset Parts Life
(Appears only when the
drum unit or belt unit
has exceeded its rated
life.)
The factory settings are shown in Bold with an asterisk.
Drum Unit Resets the drum unit life. Appears when you replace
the drum unit.
Belt Unit Resets the belt unit life. Appears when you replace
the belt unit.
Paper Tray 3
Submenu Options Descriptions
Tray Use Auto*/MP Only/Tray1 Only/
Tray2 Only
Manual Feed Off*/On Chooses whether to feed paper manually.
Priority (Without Tray2 installed)
MP>T1*/T1>MP
(With Tray2 installed)
MP>T1>T2*/MP>T2>T1/
T1>T2>MP/T2>T1>MP/T1>T2/
T2>T1/T1>MP>T2/T2>MP>T1
MP First Off*/On Chooses whether to feed paper from the MP tray as
Duplex Off*/On(Long Bind)/
On(Short Bind)
MP Size Any*/Letter/Legal/A4... Chooses the size of paper you put in the MP tray.
Tray1 Size Any*/Letter/Legal/A4... Chooses the size of paper you loaded in the
Tray2 Size Any*/Letter/Legal/A4... Chooses the size of paper you loaded in the
Chooses the tray which you use.
When Auto is chosen in Tray Use: Chooses the
order in which the machine uses the paper trays
that contain paper of the same size.
a priority.
Chooses whether you want to automatically print
on both sides of the paper.
standard paper tray.
optional lower tray.
The factory settings are shown in Bold with an asterisk.
72
Page 96

Control Panel
3
General Setup 3
Submenu Menu Selections Options Descriptions
Local Language English*/Français... Changes the LCD language for your
country.
Ecology Sleep Time 0/1/2/3*/4/5...Min Sets the time to return to Power Save
mode.
Toner Save Off*/On Increases the page yield of the toner
cartridge.
Panel Control Button Repeat 0.1*/0.4/0.6/0.8/1.0/
1.4/1.8/2.0 Sec
Message Scroll
LCD Contrast -nnonn+ Adjusts the contrast of the LCD.
Auto Online On*/Off Sets the machine to the mode which
Setting Lock Off*/On Turns the lock panel settings On or
Reprint Off*/On Turns the reprint settings On or Off.
Interface Select Auto*/USB/Network Chooses the interface you use.
Level 1*/
Level 2
.../
Level 10
Sets the time for the LCD message to
change when holding + or - at
intervals.
Sets the time in seconds that an LCD
message will scroll across the LCD.
From Level 1=0.2 sec to Level
10=2.0 sec.
automatically returns to Ready state.
Off using the password.
Auto IF Time 1/2/3/4/5*.../99 (Sec) You need to set the time-out period
Input Buffer Level 1/2/3/4*.../7 Increases or decreases the input
The factory settings are shown in Bold with an asterisk.
If you choose Auto, the machine
automatically changes the interface
to USB or Ethernet depending on
which interface is receiving data.
for the auto interface selection.
buffer capacity.
73
Page 97

Control Panel
3
Print Menu
Submenu Menu Selections Options Descriptions
Emulation Auto*/HP LaserJet/
BR-Script 3
Auto Continue Off*/On Chooses whether to automatically
Output Color Auto*/Color/Mono Sets the output color.
Media Type Plain Paper*/
Thick Paper/
Thicker Paper/
Thin Paper/
Recycled Paper/
Bond Paper/
Envelopes/
Env. Thick/Env. Thin/
Hagaki/Label/
Glossy Paper
Paper Letter*/Legal/A4/
Executive/Com-10/DL/
JIS B5/B5/A5/A5 L/
JIS B6/B6/A6/Monarch/
C5/Folio/DL L/Hagaki
Copies
Orientation Portrait*/Landscape This machine can print pages in
Print Position X Offset -500/-499.../0*.../499/
Y Offset -500/-499.../0*.../499/
Auto FF Off*/On Allows you to print the remaining
1*/2.../999 Sets the number of printed pages.
500Dots
500Dots
Chooses the emulation mode you
use.
If you choose Auto, the machine can
change the emulation mode
automatically.
If you choose an option other than
Auto, each emulation mode will be
fixed.
clear the removable error.
Sets the type of paper.
Sets the size of paper.
portrait or landscape orientation.
Moves the print start position (at the
top-left corner of pages) horizontally
up to -500 (left) to +500 (right) dots in
300 dpi.
Moves the print start position (at the
top-left corner of pages) vertically up
to -500 (up) to +500 (down) dots in
300 dpi.
data without pressing Go.
The factory settings are shown in Bold with an asterisk.
74
Page 98

Control Panel
3
Print Menu (continued)
Submenu Menu Selections Options Descriptions
HP LaserJet Font No. I000.../I059*.../I071
Font Pitch 0.44/10*.../99.99
Font Point 4.00/12*.../999.75
Symbol Set PC-8*... Sets the symbol set or the character
set.
Table Print Prints code table.
If Change Emulation appears on
the LCD, choose Auto or
HP LaserJet in Emulation of
Print Menu.
(See page 74.)
Auto LF Off*/On ON: CR i CR+LF, OFF: CR i CR
Auto CR Off*/On ON: LF i LF+CR, FF i FF+CR, or
VT i VT+CR
OFF: LF i LF, FF i FF, or VT i VT
Auto WRAP Off*/On Chooses whether a line feed and
carriage return will happen when the
machine reaches the right margin.
Auto SKIP On*/Off Chooses whether a line feed and
carriage return will happen when the
machine position reaches the bottom
margin.
Left Margin ## Sets the left margin at column 0 to 70
columns at 10 cpi.
Right Margin ## Sets the right margin at column 10 to
80 columns at 10 cpi.
Top Margin #.## Sets the top margin at a distance
from the top edge of the paper: 0,
0.33, 0.5, 1.0, 1.5 or 2.0 inches. The
default setting is 0.5 inches.
Bottom Margin #.## Sets the bottom margin at a distance
from the bottom edge of the paper: 0,
0.33, 0.5, 1.0, 1.5 or 2.0 inches. The
default setting is 0.5 inches.
Lines ###
BR-Script 3 Error Print On*/Off
CAPT Off*/On
Sets the number of lines on each
page from 5 to 128 lines.
The factory settings are shown in Bold with an asterisk.
75
Page 99

Control Panel
3
Network for HL-4150CDN users 3
Submenu Menu Selections Options Descriptions
TCP/IP Boot Method Auto*/Static/RARP/
BOOTP/DHCP
IP Address ###.###.###.###
(000.000.000.000)*
Subnet Mask ###.###.###.###
(000.000.000.000)*
Gateway ###.###.###.###
(000.000.000.000)*
IP Boot Tries 0/1/2/3*.../32767 Specifies the number of setting trials
APIPA On*/Off Automatically allocates the IP
IPv6 Off*/On Sets use of IPv6 protocol.
Ethernet Auto*/100B-FD/100B-HD/
10B-FD/10B-HD
Status Active 100B-FD/
Active 100B-HD/
Active 10B-FD/
Active 10B-HD/
Inactive
MAC Address Shows MAC address of the machine.
Network Reset Restores all network settings of the internal print server to the factory default.
Chooses the IP method that best
suits your needs.
Enter the IP address.
1
Enter the Subnet mask.
1
Enter the Gateway address.
1
when the Boot Method allows
automatic IP setting.
address from the link-local address
range.
1
Chooses Ethernet link mode.
Shows Ethernet link status.
The factory settings are shown in Bold with an asterisk.
1
### means a number within the range of 000 to 255. On connection to the network, if the machine's 'Boot Method' is 'Auto' the machine will attempt
to automatically set the IP address and Subnet Mask from a boot server such as DHCP or BOOTP. If a boot server cannot be found, an APIPA
IP address will be allocated, such as 169. 254. [001-254]. [000-255]. If the 'Boot Method' of the machine is set to 'Static' you will need to manually
enter an IP address from the machine's control panel.
76
Page 100

Control Panel
3
Network for HL-4570CDW(T) users
Submenu 1 Submenu 2 Menu Selections Options Descriptions
Wired LAN TCP/IP Boot Method Auto*/Static/RARP/
BOOTP/DHCP
IP Address ###.###.###.###
(000.000.000.000)*
Subnet Mask ###.###.###.###
(000.000.000.000)*
Gateway ###.###.###.###
(000.000.000.000)*
IP Boot Tries 0/1/2/3*.../32767 Specifies the number of setting
APIPA On*/Off Automatically allocates the IP
IPv6 Off*/On Sets use of IPv6 protocol.
Ethernet Auto*/100B-FD/100B-HD/
10B-FD/10B-HD
Wired Status
Active 100B-FD/
Active 100B-HD/
Active 10B-FD/
Active 10B-HD/
Inactive/Wired OFF
MAC Address
Set to Default
Wired Enable
Restores wired network settings of the internal print server to the factory default.
On*/Off Chooses Ethernet link mode.
Chooses the IP method that best
suits your needs.
Enter the IP address.
1
Enter the Subnet mask.
1
Enter the Gateway address.
1
trials when the Boot Method
allows automatic IP setting.
address from the link-local
address range.
Chooses Ethernet link mode.
Shows Ethernet link status.
Shows MAC address of the
machine.
1
The factory settings are shown in Bold with an asterisk.
77
 Loading...