

Breville BES500 Instruction Book
the Bambino
Instruction Book - BES500
™
Plus

Contents
IMPORTANT
SAFEGUARDS
2 Breville Recommends
Safety First
7 Components
8 Features
9 Assembly
10 Functions
16 Care & Cleaning
19 Troubleshooting
BREVILLE
RECOMMENDS
SAFETY FIRST
At Breville we are very safety
conscious. We design and
manufacture consumer
products with the safety of you,
our valued customer, foremost
in mind. In addition we ask
that you exercise a degree of
care when using any electrical
appliance and adhere to the
following precautions.
READ ALL INSTRUCTIONS
BEFORE USE AND SAVE
FOR FUTURE REFERENCE
• Carefully read all instructions
instructions before operating
and save for future reference.
• Do not touch hot surfaces. Use
handles or knobs as advised in
this instruction book.
• To protect against fire, electric
shock and injury to persons do
not immerse the power cord,
plug, or appliance itself in
water or other liquids.
• Close supervision is necessary
when any appliance is used by
or near children.
• Always allow the appliance to
cool before cleaning, moving
or storing.
• It is recommended to regularly
inspect the appliance and
power cord. Do not use the
appliance if there is damage to
the power cord or plug, or after
the appliance malfunctions or
has been damaged in any way.
2

Immediately stop use and call
Breville Consumer Support.
• The use of accessory
attachments not
recommended by Breville
may result in fire, electric
shock or injury to persons.
• Do not let the power
cord hang over the edge
of a table or counter-top,
or touch hot surfaces.
• Do not place the appliance
near the edge of a table
or counter-top. Ensure the
surface is level, clean and
free of water and other
substances.
SPECIFIC
INSTRUCTIONS
FOR BES500
• This appliance is
recommended for
household use only. Do not
use this appliance for other
than its intended use. Do
not use in moving vehicles
or boats. Do not use
outdoors. Misuse may
cause injury.
• If the appliance is to be:
− left unattended
− cleaned
− moved
• Do not place the appliance
on or near a hot gas
or electric burner.
Do not place it in, or allow
it to come in contact with
a heated oven.
• This appliance is
recommended for household
use only. Do not use this
appliance for anything other
than its intended use. Do not
use outdoors. Do not use in
moving vehicles or boats.
− assembled; or
− stored,
always switch Off the
espresso machine by
simultaneously pressing
the 1 CUP and STEAM
buttons. Unplug from the
power outlet.
• Ensure the product is
properly assembled before
first use.
3

• Do not use any other liquid
apart form cold mains/ tap
water. We do not recommend
the use of highly filtered,
de-mineralized or distilled
water as this may affect the
taste of the coffee and how
the espresso machine
is designed to function.
• Ensure the portafilter is
firmly inserted and secured
into the group head before
starting the extraction.
Never remove the portafilter
during the brewing process.
• Do not leave the product
unattended when in use.
• Do not touch hot surfaces.
Allow the product to cool
down before moving or
cleaning any parts.
WARNING
Do not immerse power cord,
power plug or appliance in
water or any other liquid.
WARNING
Misuse may cause injury.
• Use caution when operating
the machine, as metal
surfaces are liable to get hot
during use.
• Use caution when descaling
as hot steam may be released.
Before descaling, ensure drip
tray is inserted. Refer to ‘Care
& Cleaning’ for further
instructions.
4

SHORT CORD
INSTRUCTIONS
Your Breville appliance
is fitted with a short power
cord to reduce personal
injury or property damage
resulting from pulling,
tripping or becoming
entangled with a longer cord.
Longer detachable power
cords or extension cords
are available and may be
used if care is exercised. If
an extension cord is used,
(1) the marked electrical
rating of the cord set or
extension cord should be at
least as great as the electrical
rating of the appliance,
(2) the cord should be
arranged so that it will not
drape over the counter-top or
table where it can be pulled
on by children or tripped
over unintentionally and
(3) the extension cord must
include a 3-prong
grounding plug.
BREVILLE ASSIST™ PLUG
Your Breville appliance comes
with a unique Assist™ Plug,
conveniently designed with
a finger hole to ease removal
from the power outlet.
CSA DUTY CYCLE
MARKING
The Canadian Standards
Authority requires any
appliances capable of drawing
over 1500W to be marked
with a ‘duty cycle’ in minutes.
For the BES500, this ‘duty
cycle’ represents the
maximum time for which the
appliance will draw over
1500W during any 2 hour
period of use. It does not
indicate the appliance is
unsafe for continuous use
or is required to be switched
off at certain intervals during
normal use.
FOR HOUSEHOLD USE ONLY
SAVE THESE INSTRUCTIONS
5
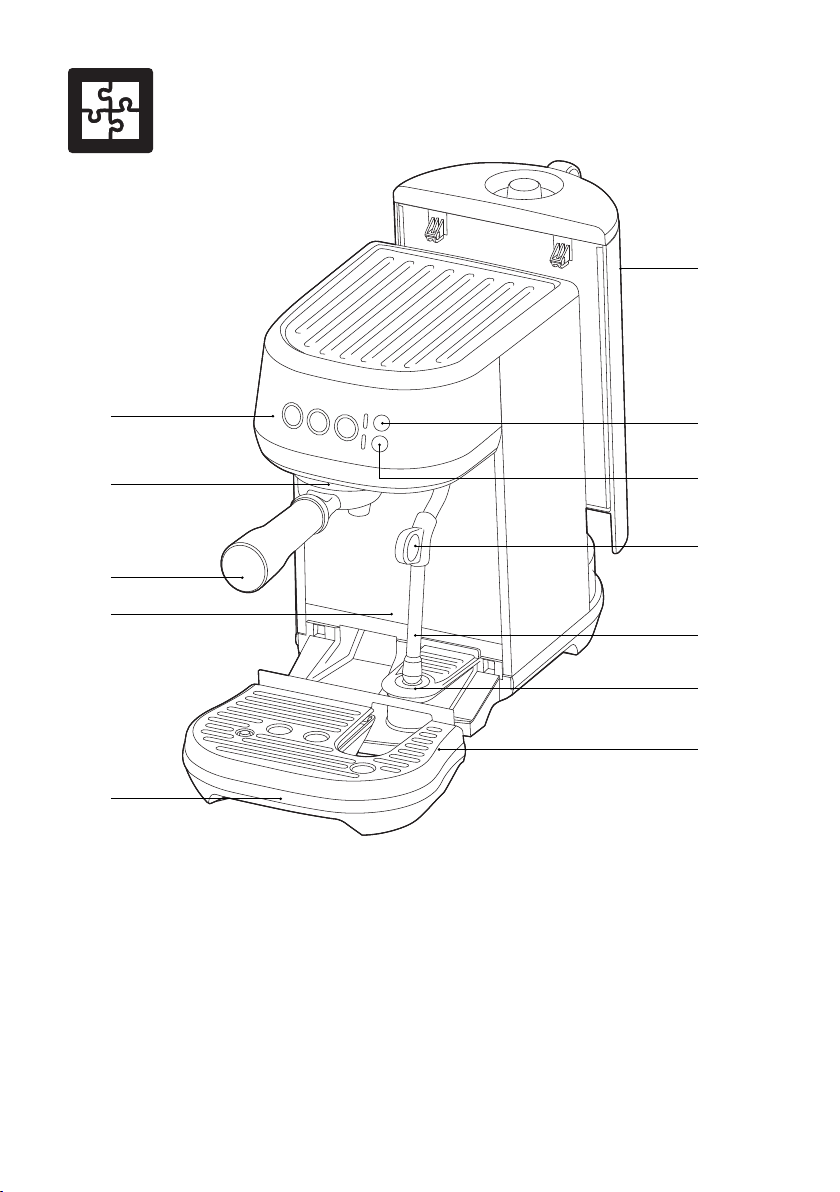
Components
A
B
E
F
H
L
A. 64 fl.oz (1.9L) removable water tank
B. Control panel
1 CUP, 2 CUP and STEAM buttons
With preset shot durations or
programmable durations and volumes
C. MILK TEMP settings
Select from Warm, Ideal and Hot
D. MILK FOAM settings
Select from Low, Medium and High
E. Group head
C
D
G
I
J
K
F. 54mm stainless steel portafilter
G. Steam wand grip
H. Extra-tall cup clearance for tall mugs
I. Steam wand
With automatic milk texturing
J. Milk jug temperature sensor
K. Removable drip tray grid
L. Removable drip tray
With full indicator
6
A
B
C
D
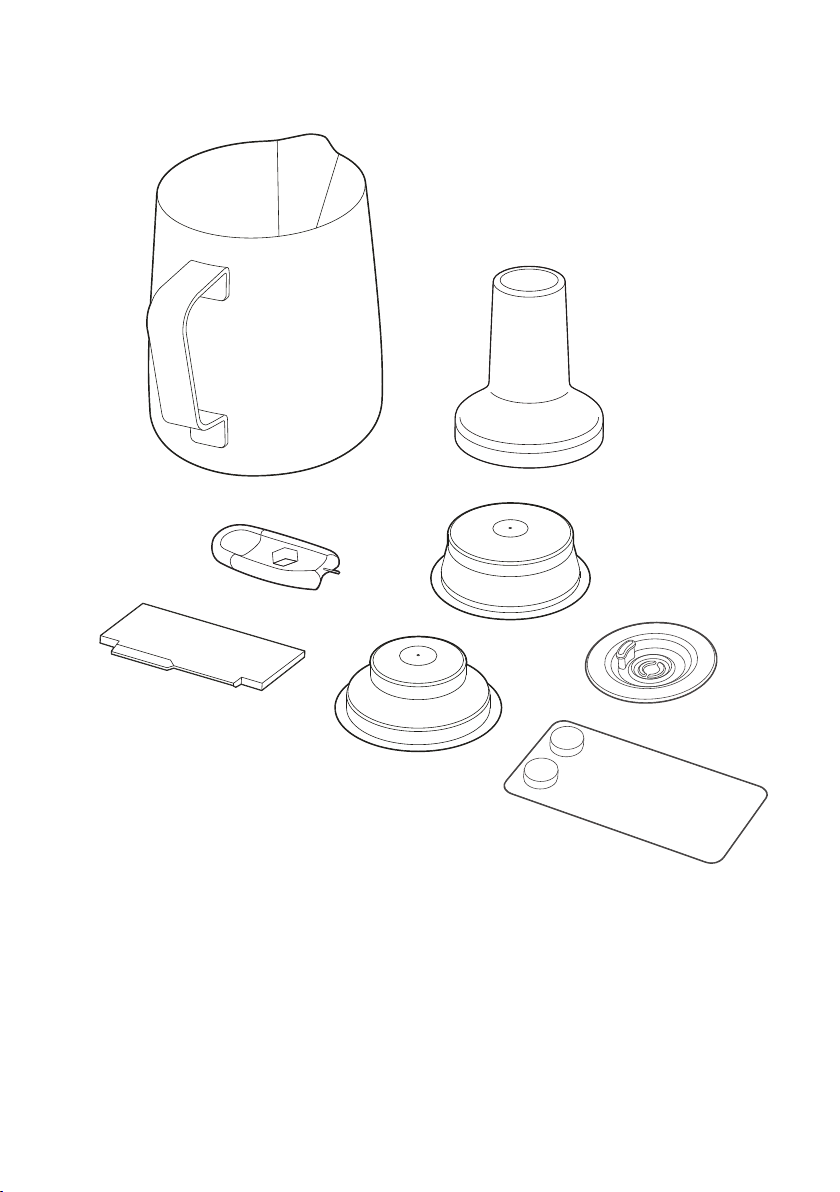
ACCESSORIES
A. Stainless steel milk jug
With MIN and MAX markings
B. 54mm tamper
C. Steam tip cleaning tool
E
G
D. The Razor™ precision trimming tool
E. Dual wall filter baskets (1 cup & 2 cup)
F. Cleaning disc
G. Espresso cleaning tablets
F
7

Bambino™ Plus
Features
Assembly
COMPACT FOOTPRINT
Cafe quality coffee in a compact machine.
AUTOMATIC HANDS FREE MILK
TEXTURING
Automatically textures milk to the selected
temperature and style from silky smooth latté to
creamy cappuccino. Automatic purge removes
residual milk from the steam wand when
returned to the downward position.
THERMOJET ™ TECHNOLOGY
Innovative heating system achieves ideal
extraction temperature in 3 seconds.
PID TEMPERATURE CONTROL
Electronic PID temperature control for
increased temperature stability.
LOW PRESSURE PRE-INFUSION
Applies low water pressure at the start
of the extraction to gently expand grinds
for an even extraction.
VOLUMETRIC CONTROL
Preset 1 & 2 cup volumes, manual over-ride
or programmable shot volumes.
BEFORE FIRST USE
Machine Preparation
Remove and discard all labels and packaging
materials attached to your machine. Ensure you
have removed all parts and accessories before
discarding the packaging.
Clean the drip tray, drip tray grid, portafilter,
filter baskets and milk jugs using warm water
and a gentle dish washing liquid. Rinse well and
dry thoroughly before use.
THE RAZOR™ DOSE TRIMMING TOOL
Patented twist blade trims down the puck
to the right level for precision dosing and
a consistent extraction.
8
Functions
2s
+
2s
+
+
OFF
2s
+
+
OFF
FIRST USE
1. Remove the water tank and fill with potable
water to the indicated MAX line. Replace
the water tank onto the machine.
2. Ensure that the drip tray is correctly
positioned on the machine.
3. Plug the power cord into the power outlet.
4. Press the 1 CUP, 2 CUP or STEAM buttons
to turn the machine on.
5. Press the 1 CUP button and the machine
will commence its first use cycle.
6. Once complete, the machine will go
into ready mode and all lights will be
illuminated.
NOTE
The first use cycle is to rinse the machine and
prime the heating system.
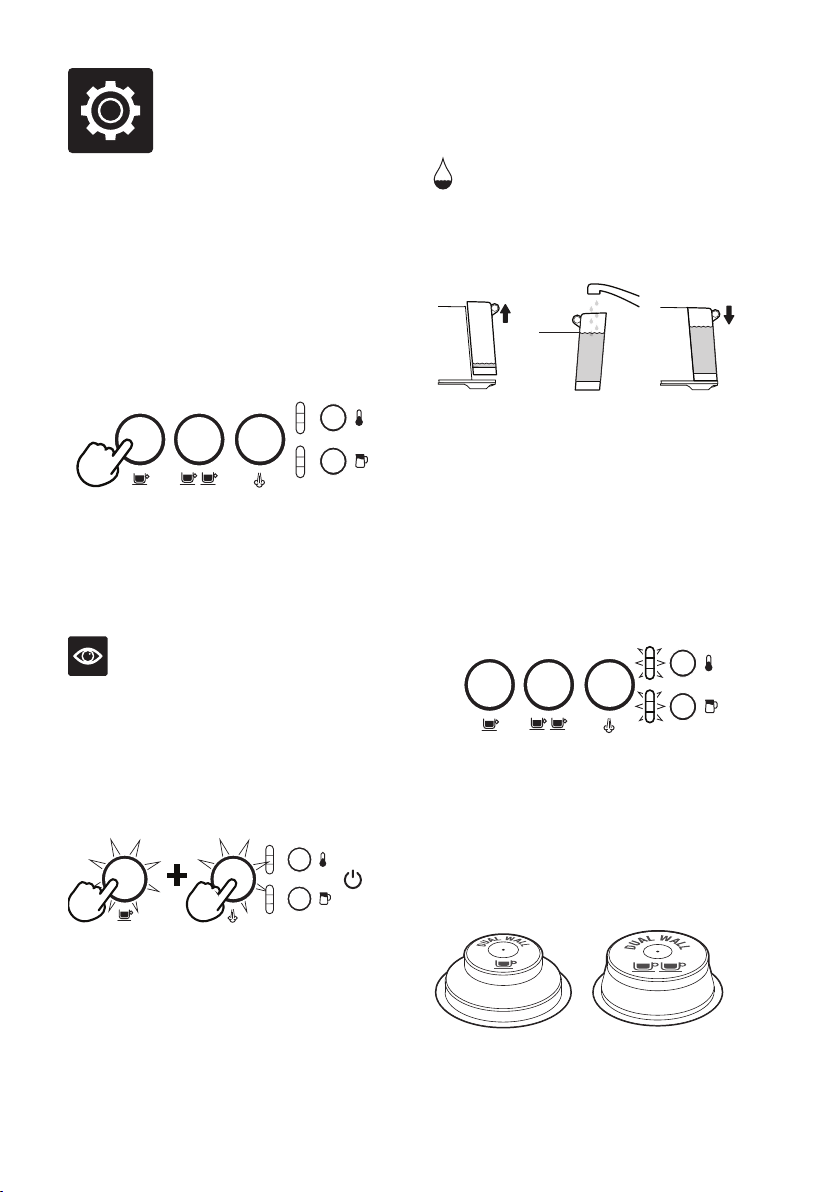
FILLING THE WATER TANK
Lift the water tank from the machine. Remove the
water tank lid and add potable water to the water
tank, filling to the MAX marking indicated.
MAX
Replace the water tank onto the machine,
ensuring it is properly attached and sitting
flush against the back of the machine.
If the 1 CUP, 2 CUP and STEAM buttons
illuminate, the water tank has been correct
attached.
The machine will detect when the water level is
low. The 1 CUP, 2 CUP and STEAM buttons will
not be illuminated.
TURNING OFF MACHINE
To turn the machine off, press the 1 CUP and
STEAM button simultaneously.
When this occurs, add water to the water tank.
Once there is sufficient water, all buttons will be
illuminated and the machine can be used.
FILTER BASKETS
This machine includes dual wall 1 Cup and
2 Cup filter baskets.
1 CUP 2 CUP
9
Use the 1 cup filter basket when brewing
a single cup and the 2 cup filter baskets
when brewing 2 cups or a stronger single
cup or mug.
You will need to adjust the grind amount
and size if switching from a single basket
to a double basket, or vice versa.
The provided filter baskets are designed for:
1 Cup filter basket = 8-10g.
2 Cup filter basket = 16-19g
NOTE
Use Razor™ dose trimming tool to precisely
control the dose of ground coffee AFTER
you tamp.
THE GRIND
When grinding coffee beans, the grind size
should be fine but not too fine. The grind size
will affect the rate at which the water flows
through the ground coffee in the filter basket
and the taste of the espresso.
If the grind is too fine (looks like powder
and feels like flour when rubbed between the
fingers), the water will not flow through the
coffee even when under pressure. The resulting
espresso will be OVER EXTRACTED, dark in
color and bitter in flavor.
If the grind is too course, the water will flow
through the ground coffee in the filter basket
too quickly. The resulting espresso will be
UNDER EXTRACTED and lacking in color
and flavor.
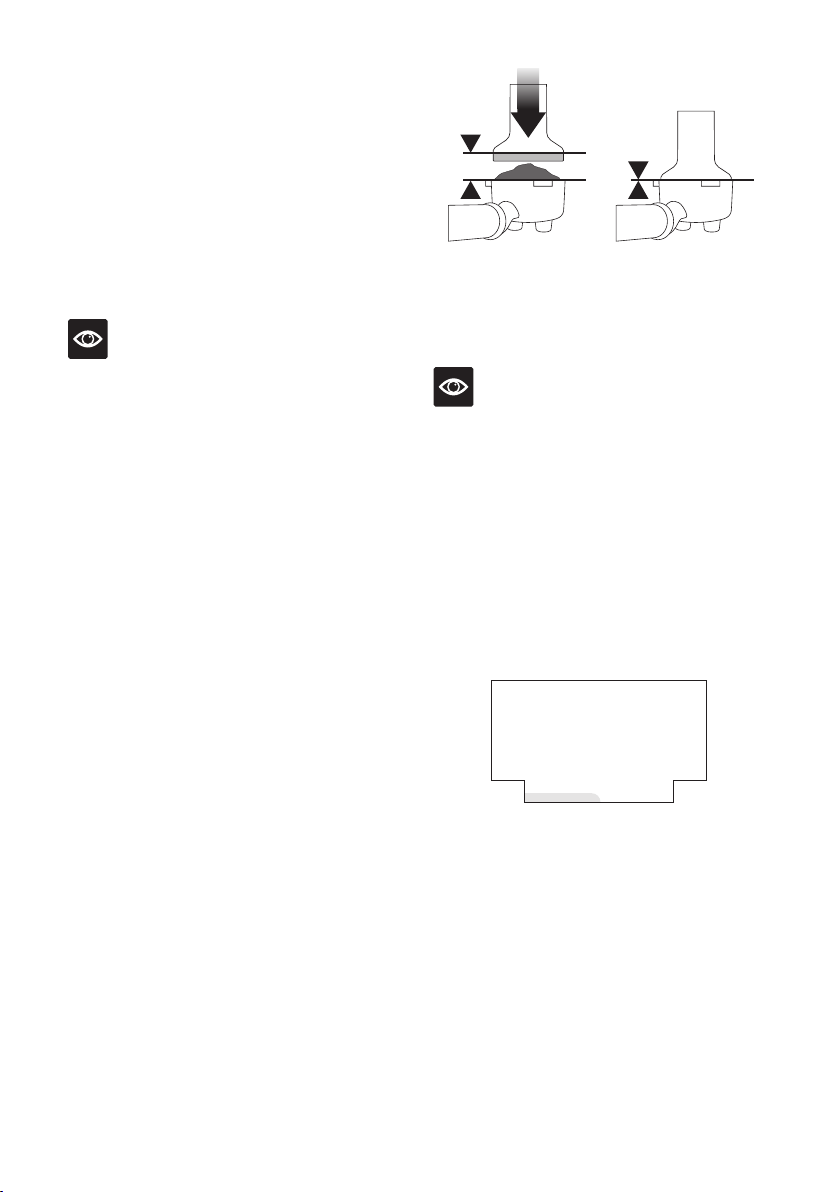
COFFEE DOSE AND TAMPING
• Insert the filter basket into the portafilter.
• Grind enough coffee to fill the filter basket.
• Tap the portafilter several times to collapse and
distribute the coffee evenly in the filter basket.
• Using the tamper, tamp down firmly (approx.
30-40 lbs (15-20kgs) of pressure). The
amount of pressure is not as important as the
consistent pressure every time.
• As a guide, the top edge of the cap on the
tamper should be level with the top of the
filter basket AFTER the coffee has been
tamped.
NOTE
We recommend quality 100% Arabica beans
with a ‘Roasted On’ date stamped on the bag,
not a ‘Best Before’ or ‘Use By’ date. Coffee beans
are best consumed between 5–20 days after the
‘Roasted On’ date. Stale coffee may pour too
quickly from the portafilter spouts and taste
bitter and watery.
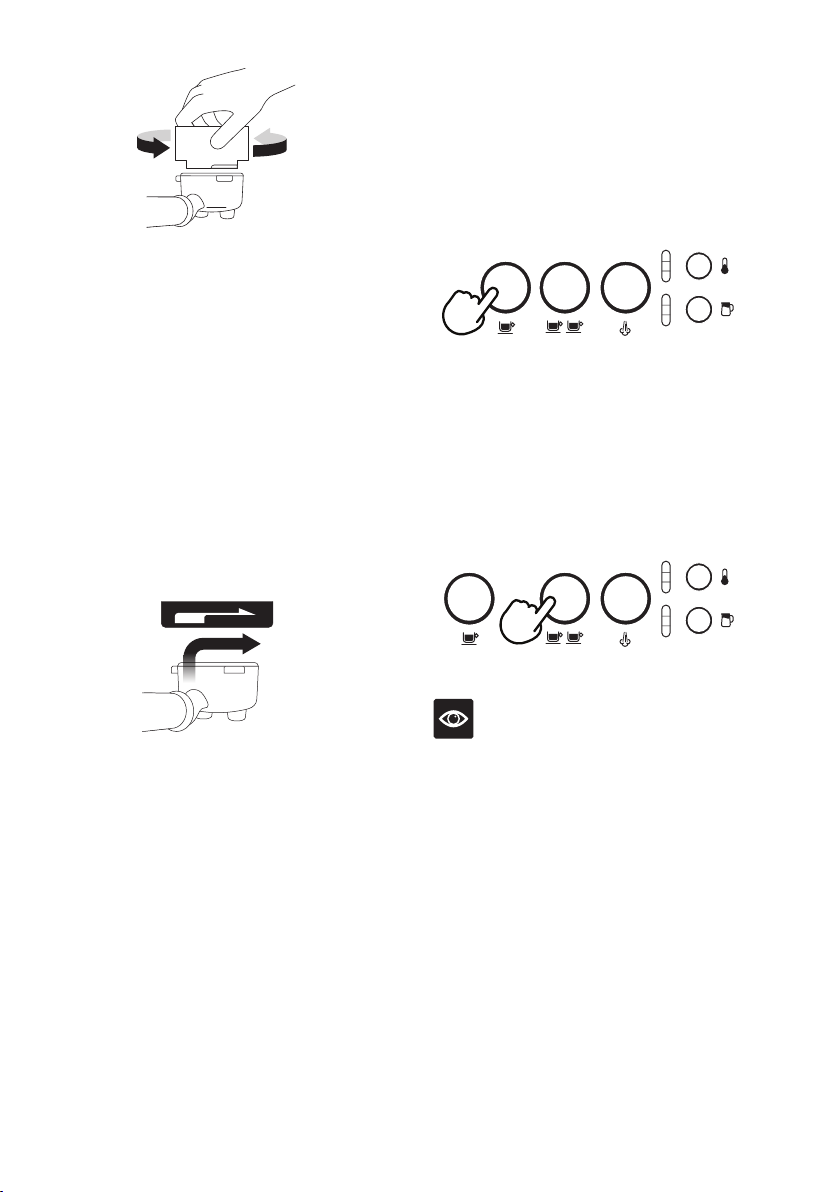
TRIMMING THE DOSE
The Razor™ precision dose trimming tool
allows you to trim the puck to the right
level for a consistent extraction.
the Razor
Precision dose trimming tool
• Insert the Razor™ tool into the coffee basket
until the shoulders of the tool rest on the rim of
the basket. The blade of the dosing tool should
penetrate the surface of the tamped coffee.
• Rotate the Razor™ dosing tool back and forth
while holding the portafilter on an angle
over the knock box to trim off excess coffee
grinds. Your coffee filter is now dosed with
the correct amount of coffee.
™
10
2s
+
2s
+
• Wipe excess coffee from the rim of the filter
basket to ensure a proper seal is achieved in
the group head.
PURGING THE GROUP HEAD
Before placing the portafilter into the group head,
run a short flow of water through the group head
by pressing the 1 CUP button. This will stabilize
the temperature prior to extraction.
INSERTING THE PORTAFILTER
Place the portafilter underneath the group head
so that the handle is aligned with the INSERT
position. Insert the portafilter into the group
head and rotate the handle towards the centre
until resistance is felt.
PRE-PROGRAMED SHOT VOLUME
– 1 CUP
Press the 1 CUP button once, the button will flash
indicating that it has been selected. A preset single
espresso volume of approximately 1oz / 30mls will
be extracted. The machine will automatically stop
once the pre-set volume has been extracted.
PRE-PROGRAMED SHOT VOLUME
– 2 CUP
Press the 2 CUP button once, the button will flash
indicating that is has been selected. A preset double
espresso volume of approximately 2oz / 60mls will
be extracted. The machine will automatically stop
once the pre-set volume has been extracted.
INSERT
Place your cup/s under the portafilter on the
drip tray.
EXTRACTING ESPRESSO
• As a guide the espresso will start to flow after
8–10 seconds (infusion time) and should be
the consistency of dripping honey.
• If the espresso starts to flow after less than 6
seconds, you have either under dosed the filter
basket and /or the grind is too coarse. This is
an UNDER EXTRACTED shot.
• If the espresso starts to drip but doesn’t flow
after 15 seconds, the grind is too fine.
This is an OVER EXTRACTED shot.
LOCK
NOTE
Pressing the 1 CUP or 2 CUP buttons during
a programmed espresso will immediately
stop the extraction.
MANUAL PRE-INFUSION AND SHOT
VOLUME
Press and hold the 1 CUP or 2 CUP button for
the desired pre-infusion time. Release the button
to start the extraction. Press the flashing button
again to stop the extraction.
11
PROGRAMMING SHOT VOLUME
2s
+
1
2
3
Press and hold the 1 CUP and 2 CUP buttons
for 2 seconds, the buttons will illuminate
and flash.
To set the 1 CUP volume:
• Press the 1 CUP button to start the extraction.
• Press the 1 CUP button again to stop the
extraction. The modified volume will be saved.
To set the 2 CUP volume, follow the above
steps but select the 2 CUP button to start and
stop the extraction.
SETTING THE MILK TEMPERATURE
The machine has 3 milk temperature settings;
1 – Warm
2 – Ideal
3
2
1
3 – Hot
When turning on the espresso machine, the
milk temperature setting will default to the last
chosen setting. Press the MILK TEMP button
until the desired temperature is illuminated.
SETTING THE MILK FOAM
The machine has 3 milk foam settings;
1 – Low
2 – Medium
3
2
1
3 – High
When turning on the machine, the milk foam
setting will default to the last chosen setting.
Press the MILK FOAM button until the desired
foam setting is illuminated.
TEXTURING MILK
Different brands and types of milk and milk
alternatives will texture differently. You may
need to adjust the foam level according.
NOTE
Prior to texturing milk, it is recommended to
momentarily purge the steam wand. To do this
press the STEAM button to start purging and
press it again to stop.
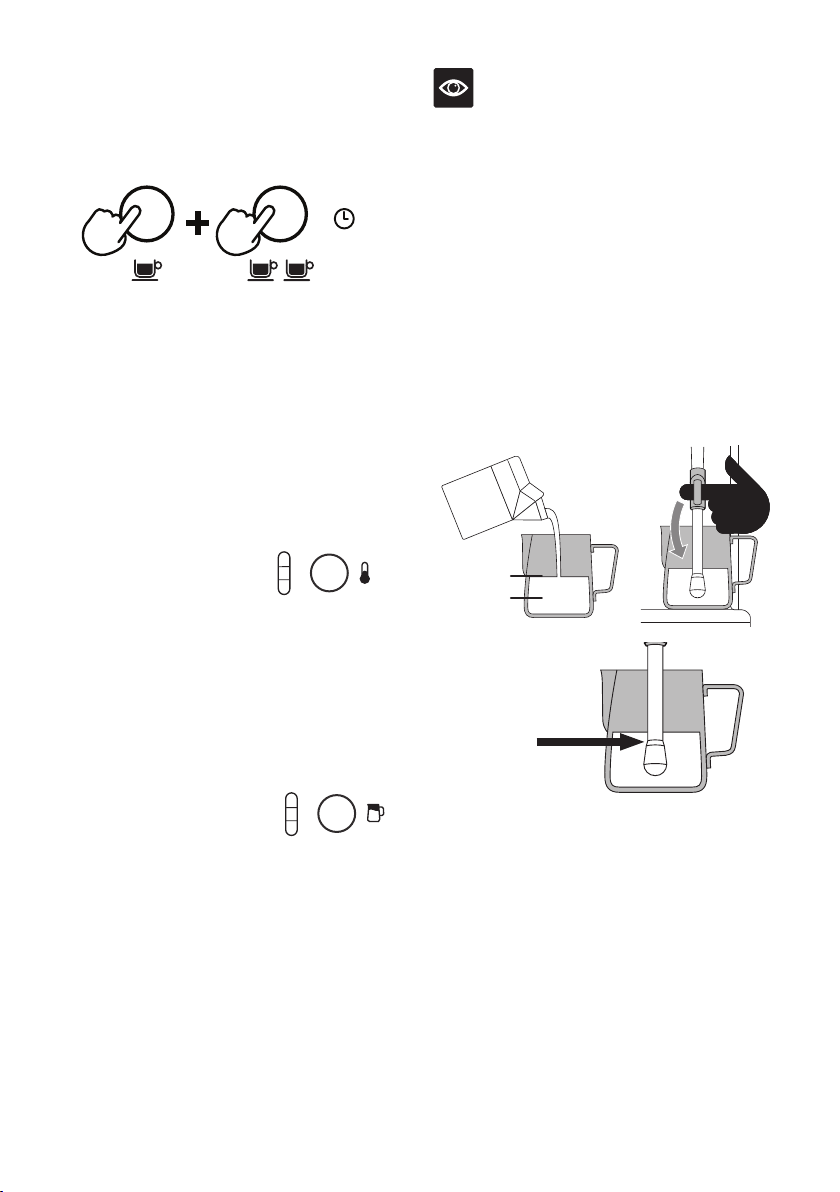
TO TEXTURE MILK
• Start with fresh cold milk.
• Fill the milk jug to between the min
and max position.
• Lift the steam wand and insert into the milk jug.
• Lower the steam wand, ensuring it is fully down.
• The milk jug must rest on the milk temperature
sensor located on the drip tray and the milk
should cover the steam wand tip.
MAX
MIN
MILK
SHOULD
COVER
THIS PART
• Press the MILK TEMP and MILK FOAM
buttons to select the desired settings.
• Press the STEAM button, the button will flash
while texturing.
• The milk texturing will stop automatically
when the selected milk temperature is reached.
• Lift the steam wand to remove the milk jug.
• Wipe the wand and tip with a clean damp cloth.
• Lower the steam wand to the down position
and the steam wand will automatically purge.
12
CAUTION: BURN HAZARD
2s
+
Pressurized steam can still be released, even
after the machine has been switched off.
Children must always be supervised.
NOTE
When the machine creates steam, a pumping
noise can be heard. This is normal operation.
• Lift the jug to lower the tip beneath the surface
but keep the vortex spinning. The milk is at
the correct temperature (60-65°C) when the
jug is hot to touch.
NOTE
Use only the supplied stainless steel milk jug to
froth milk using this machine. The use of other
containers may lead to dangerous conditions.
MANUAL MILK TEXTURING
Auto milk texturing and auto shut-off are
disabled during manual milk texturing.
• Fill the milk jug to between the MIN and
MAX markings.
• Lift the steam wand and insert into the milk
jug with the steam wand tip 3/4 inch (1-2cm)
below the surface of the milk, close to the righthand side of the jug at a 3 o’clock position.
• Press the STEAM button to begin texturing
• Keep the steam wand tip just under
the surface of the milk until the milk is
spinning clockwise, producing a vortex
(whirlpool effect).
• With the milk spinning, slowly lower the jug.
This will bring the steam wand tip to the
surface of the milk and start to introduce air
into the milk.
• Gently break the surface of the milk with the
tip to get the milk spinning fast enough.
• Keep the steam wand tip at or slightly
below the surface, continuing to maintain
the vortex. Texture the milk until sufficient
volume is obtained.
• When texturing is complete, press the
STEAM button.
• Remove the steam wand from the milk jug.
• Wipe the wand and tip with a clean
damp cloth.
• Lower the steam wand to the down position
and the steam wand will automatically purge.
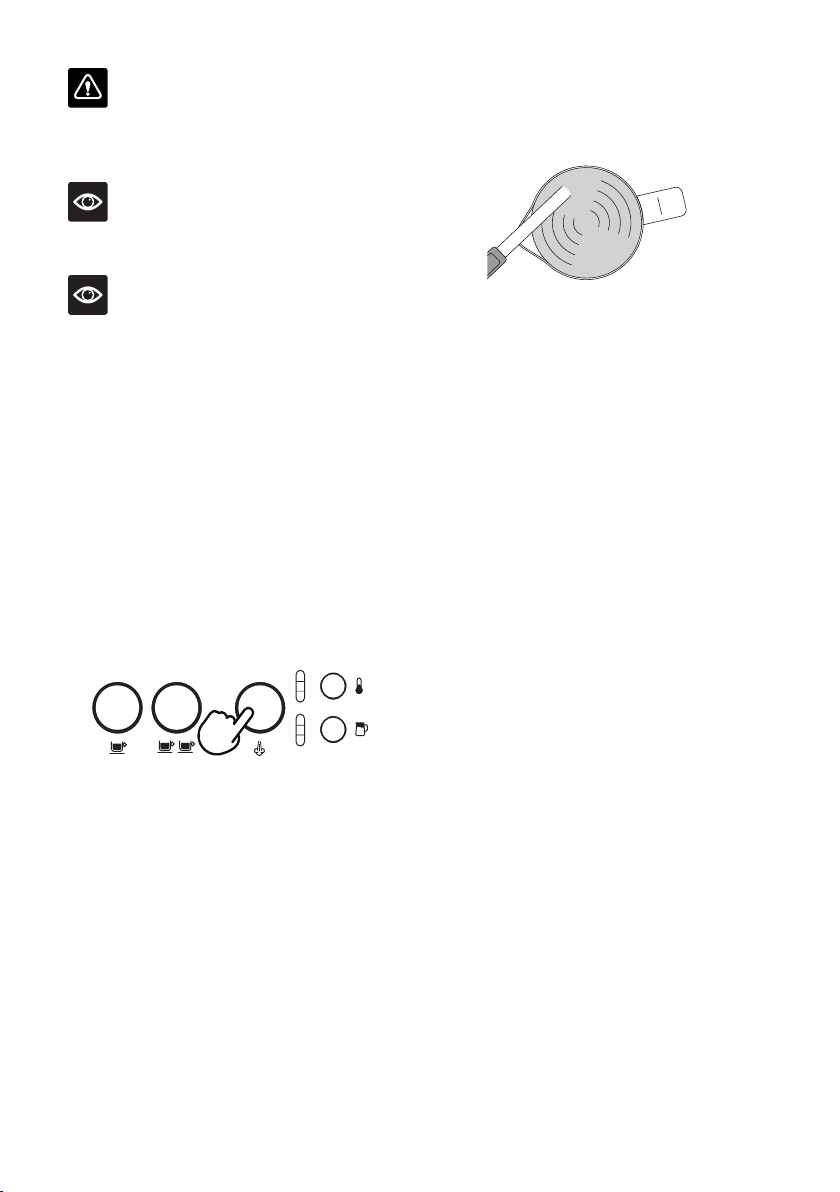
STEAM WAND PURGING
After texturing milk, the steam wand must be
returned to the lowered position and allowed
to automatically purge. Not doing so, could
result in the steam wand blocking.
If the steam wand remains in the raised
position, the machine will display a lower
steam wand alert; illuminating the MILK
TEMP and MILK FOAM lights in a downwards
pattern, identifying that the steam wand needs
to be lowered.
To manually commence the steam wand purge,
with the steam wand lowered, press and hold
the STEAM button for 5 seconds.
STEAM WAND BLOCKED
During milk texturing, if the machine detects that
the steam wand is blocked, it will immediately
stop operating and the STEAM button light will
be off. Both the MILK TEMP and MILK FOAM
lights will fully illuminate and flash. These lights
will flash until a steam tip clean cycle has been
complete, see 'Cleaning the Steam Wand' for
further instructions.
13
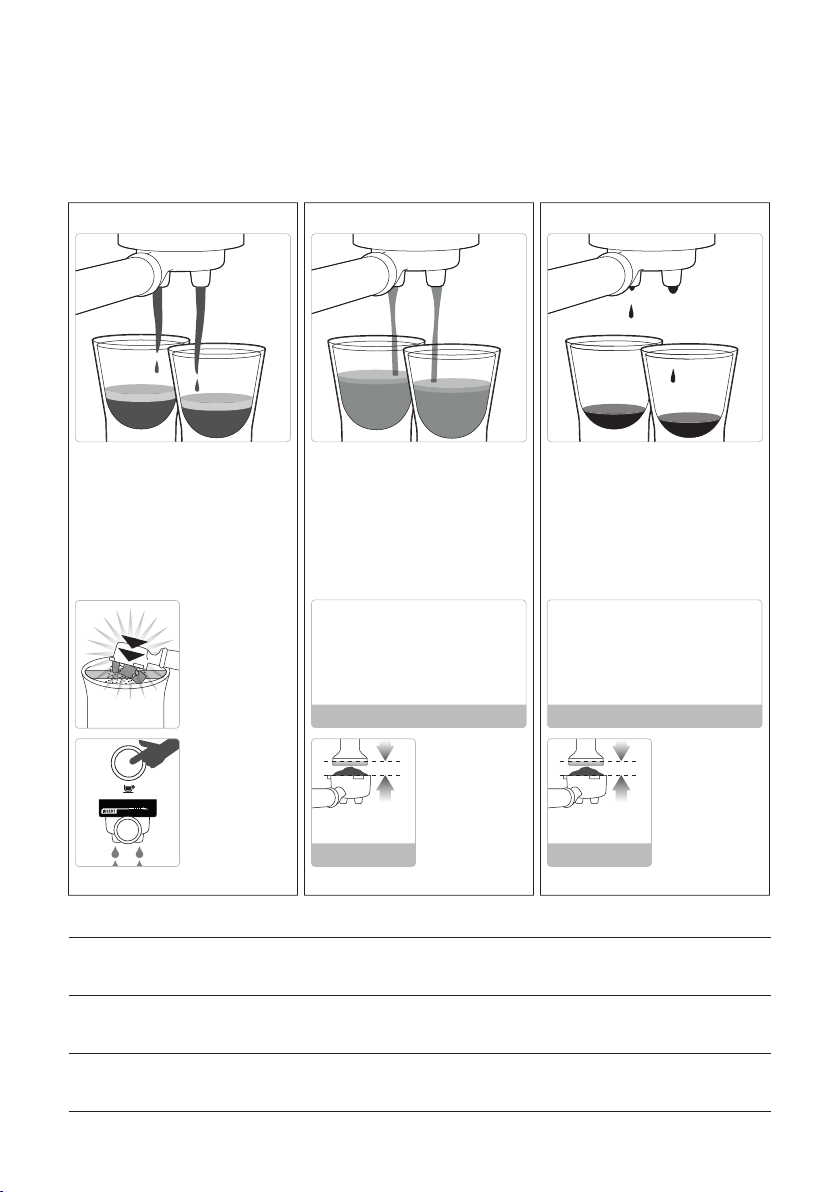
EXTRACTION TIPS
LOCK TIGHT
A great espresso is about achieving the perfect balance between sweetness, acidity, and bitterness.
The flavor of your coffee will depend on many factors, such as the type of coffee beans, degree of
roast freshness, coarseness or fineness of the grind, dose of ground coffee and tamping pressure.
Experiment by adjusting these factors just one at a time to achieve the taste of your preference.
CORRECT EXTRACTION UNDER EXTRACTION OVER EXTRACTION
• Flow starts after 8–12 secs
• Flow slow like warm honey
• Crema is golden brown with a ne
mousse texture
• Espresso is dark brown
AFTER EXTRACTION
REMOVE USED
GRINDS
Used grinds will form
a coffee 'puck'. If the
puck is wet, refer to
the 'Under Extraction'
section.
RINSE FILTER
BASKET
Keep the lter basket
clean to prevent
blockages. Without
ground coffee in the lter
basket, lock the
portalter into the
machine and run hot
water through.
OVER EXTRATED
BITTER • ASTRINGENT
BALANCED
• Flow starts after 1–7 secs
• Flow fast like water
• Crema is thin and pale
• Espresso is pale brown
• Tastes bitter/sharp, weak and watery
• Flow starts after 13 secs
• Flow drips or not at all
• Crema is dark and spotty
• Espresso is very dark brown
• Tastes bitter and burnt
SOLUTIONS SOLUTIONS
EXPERIMENT WITH GRIND:
• Grind needs to be ner
for a slower extraction.
• Ensure you are controlling dose
with the Razor™.
Adjust & re-test
Tamp using 30-40 lbs
(15-20kgs) of pressure.
The top edge of metal
cap on the tamper should
be level with the top of
the lter basket AFTER
ALWAYS TAMP TO LINE
Adjust & re-test
tamping. Trim the puck
to the right level using the
™
precision dose
Razor
trimming tool.
EXPERIMENT WITH GRIND:
• Grind needs to be coarser
for a faster extraction.
• Ensure you are controlling dose
with the Razor™.
Adjust & re-test
Tamp using 30-40 lbs
(15-20kgs) of pressure.
The top edge of metal
cap on the tamper should
be level with the top of
the lter basket AFTER
ALWAYS TAMP TO LINE
Adjust & re-test
tamping. Trim the puck
to theright level using the
Razor
trimming tool.
GRIND GRIND DOSE TAMP
Too fine Too much
Use RazorTM to trim
Optimum 8–10g (1 cup)
16–19g (2 cup)
Too heavy
30-40 lbs
(15-20kgs)
™
precision dose
UNDER EXTRACTED
UNDERDEVELOPED • SOUR
14
Too coarse Too little
Increase dose & use RazorTM to trim
Too light
 Loading...