

Page 1
the Baby Banquet
Instruction Booklet
™
BBY400
BBY400_IB_A12_FA.indd 2 9/05/12 5:40 PM
Page 2

CONGRATULATIONS
on the purchase of your new
Breville Baby Banquet
™
BBY400_IB_A12_FA.indd 2 9/05/12 5:40 PM
Page 3

CONTENTS
4 Breville recommends safety first
7 Know your
Breville Baby Banquet™
9 Operating your
Breville Baby Banquet™
11 Assembling your
Breville Baby Banquet™
19 Hints & tips
22 Care & cleaning
24 Recipes
3
BBY400_IB_A12_FA.indd 3 9/05/12 5:40 PM
Page 4

BREVILLE RECOMMENDS SAFETY FIRST
At Breville we are very safety conscious. We design and manufacture consumer products with
the safety of you, our valued customer, foremost in mind. In addition we ask that you exercise
a degree of care when using any electrical appliance and adhere to the following precautions.
IMPORTANT SAFEGUARDS
READ ALL INSTRUCTIONS
BEFORE USE AND SAVE FOR
FUTURE REFERENCE
• Carefully read all instructions before
operating the Baby Banquet™ for the
first time and save for future reference.
• Remove any packaging material and
promotional stickers before using the
Breville baby food processor for the
first time.
• To eliminate a choking hazard for young
children, remove and safely discard the
protective cover fitted to the power plug
of this appliance.
• Do not place the Baby Banquet™ near
the edge of a bench or table during
operation. Ensure that the surface is
level, clean and free of water, flour, etc.
Vibration during operation may cause
the appliance to move.
• Do not place the Baby Banquet™ on
or near a hot gas or electric burner, or
where it could touch a heated oven.
• Do not place any part of the baby food
maker in a gas, electric or microwave
oven or on a hot gas or electric burner.
• Do not use baby food maker on a sink
drain board.
• Keep the Baby Banquet™ clear of
walls, curtains and other heat or steam
sensitive materials. Minimum
20cm distance.
• Always ensure the Baby Banquet™ is
properly assembled before use. Refer to
assembly and operation instructions.
• Use only the blender jar and lid supplied
with the Baby Banquet™.
• Always ensure the blender is firmly in
position before operating.
• Always ensure the Baby Banquet™ is
turned off by pressing the POWER
button. Then switch the appliance off at
the power outlet and unplug the cord.
Make sure the motor and blades have
completely stopped before attempting
to move the appliance, or when the
Baby Banquet™ is not in use and before
disassembling, cleaning and storing.
• Do not operate the appliance
continuously with heavy loads for more
than 10 seconds. Allow the motor to rest
for 1 minute between each use.
• Do not operate the PULSE setting
continuously for longer than 20 seconds.
• None of the recipes in this instruction
book is considered a heavy load.
• Do not leave the Breville baby food
processor unattended when in use.
• If food becomes lodged around the
blending blade, turn the Baby Banquet™
off by pressing the power button. Then
switch the appliance off at the power
outlet and unplug the cord. Make sure
the motor and blades have completely
stopped before removing the jar from
the motor base. Use a spatula to dislodge
or stir the food before continuing. Do not
use fingers as the blades are sharp.
• Keep hands, fingers, hair, clothing as
well as spatulas and other utensils away
from the blender jar during operation.
Never place your fingers, hands or
utensils inside the blender jar without
unplugging the appliance from the
power outlet.
• Be careful when handling the jar as the
blades are very sharp. Be careful when
emptying the blender jar and during
cleaning. Mishandling of the blades may
cause injury.
4
BBY400_IB_A12_FA.indd 4 9/05/12 5:40 PM
Page 5

BREVILLE RECOMMENDS SAFETY FIRST
• Do not remove the blender jar from the
motor base while in operation.
• Do not use the Baby Banquet™ for
anything other than food and/or
beverage preparation.
• Do not operate the Baby Banquet™
without food or liquid in the blender jar.
• Do not process hot or boiling liquids.
allow to cool slightly before placing into
the Blender jar.
• Do not subject the blender jar to
extremes of hot or cold, for example,
placing a cold jar in hot water or
vice versa.
• Do not put any food or liquid other than
water into the water reservoir in the
steamer base. Only the steam basket and
cooking containers are designed to
cook food
• Do not move the Baby Banquet™
during operation.
• Do not touch hot surfaces. Use the
handles to remove the lid, steamer
baskets and cooking container. Take care
to avoid any steam escaping from the
steam outlet holes on the steamer cover.
Use dry oven mitts to protect hands.
• Always lift the steamer cover away from
you, when removing from the steamer
basket, to avoid steam escaping from
under the cover. Carefully lift and
remove the steamer baskets and cooking
container by the handles to avoid
scalding from escaping steam. Use dry
oven mitts to protect hands.
• Always ensure the Baby Banquet™ is
switched off at the power outlet and the
power plug is removed from the power
outlet before attempting to move the
appliance, when the appliance is not in
use and before cleaning or storing. Allow
the steamer base and accessories to cool
before disassembling for cleaning and
discarding liquid.
• Keep the appliance clean. Refer to care
and cleaning instructions in this manual.
• Do not use harsh abrasives or caustic
cleaners when cleaning this appliance.
To prevent damage to the appliance, do
not use alkaline cleaning agents when
cleaning. Use a soft cloth and
mild detergent.
• Do not place any part of the baby food
maker in any dishwasher or
microwave oven.
• Do not fill the Baby Banquet™ above the
maximum (MAX) marking with water in
the steaming water reservoir.
IMPORTANT SAFEGUARDS FOR
ALL ELECTRICAL APPLIANCES
• Fully unwind the cord before use.
• To protect against electric shock, do not
immerse the cord, plug or motor base in
water or any other liquid.
• Do not allow the cord to hang over the
edge of a table or bench, touch hot
surfaces or become knotted.
• This appliance is not intended for use
by persons (including children) with
reduced physical, sensory or mental
capabilities, or lack of experience and
knowledge, unless they have been given
supervision or instruction concerning
use of the appliance by a person
responsible for their safety.
• Children should be supervised to ensure
that they do not play with the appliance.
• It is recommended to regularly inspect
the appliance. Do not use the appliance
if the power supply cord, plug or
appliance becomes damaged in any
way. Return the entire appliance to the
nearest authorised Breville Service
Centre for examination and/or repair.
• Any maintenance other than cleaning
should be performed at an authorised
Breville Service Centre.
SAVE THESE
INSTRUCTIONS
5
5
BBY400_IB_A12_FA.indd 5 9/05/12 5:40 PM
Page 6

BREVILLE RECOMMENDS SAFETY FIRST
• This appliance is for household use only.
Do not use in moving vehicles or boats.
Do not use outdoors. Do not use this
appliance for anything other than its
intended use. Misuse may cause injury
• The installation of a residual current
device (safety switch) is recommended
to provide additional safety protection
when using electrical appliances. It
is advisable that a safety switch with
a rated residual operating current
not exceeding 30mA be installed in
the electrical circuit supplying the
appliance. See your electrician for
professional advice
• The appliance is not intended to be
operated by means of an external timer
or separate remote control system.
• Always turn the appliance to the OFF
position, switch off at the power outlet
and unplug at the power outlet when the
appliance is not in use.
• Before cleaning, always turn the
appliance to the OFF position, switch
off at the power outlet and unplug at the
power outlet and allow all parts to cool.
• Do not place this appliance on or near
a heat source, such as hot plate, oven or
heaters.
• Position the appliance at a minimum
distance of 20cm away from walls,
curtains and other heat or steam
sensitive materials and provide adequate
space above and on all sides for air
circulation.
• To protect against electric shock, do not
immerse the power cord, power plug or
appliance in water or any other liquid to
allow moisture to come in contact with
the part unless it is recommended.
6
BBY400_IB_A12_FA.indd 6 9/05/12 5:40 PM
Page 7

KNOW
your Breville Baby Banquet
™
BBY400_IB_A12_FA.indd 7 9/05/12 5:40 PM
Page 8
PAGE HEADERKNOW YOUR BREVILLE BABY BANQUET™
A
B
C
D
E
F
G
H
I
I
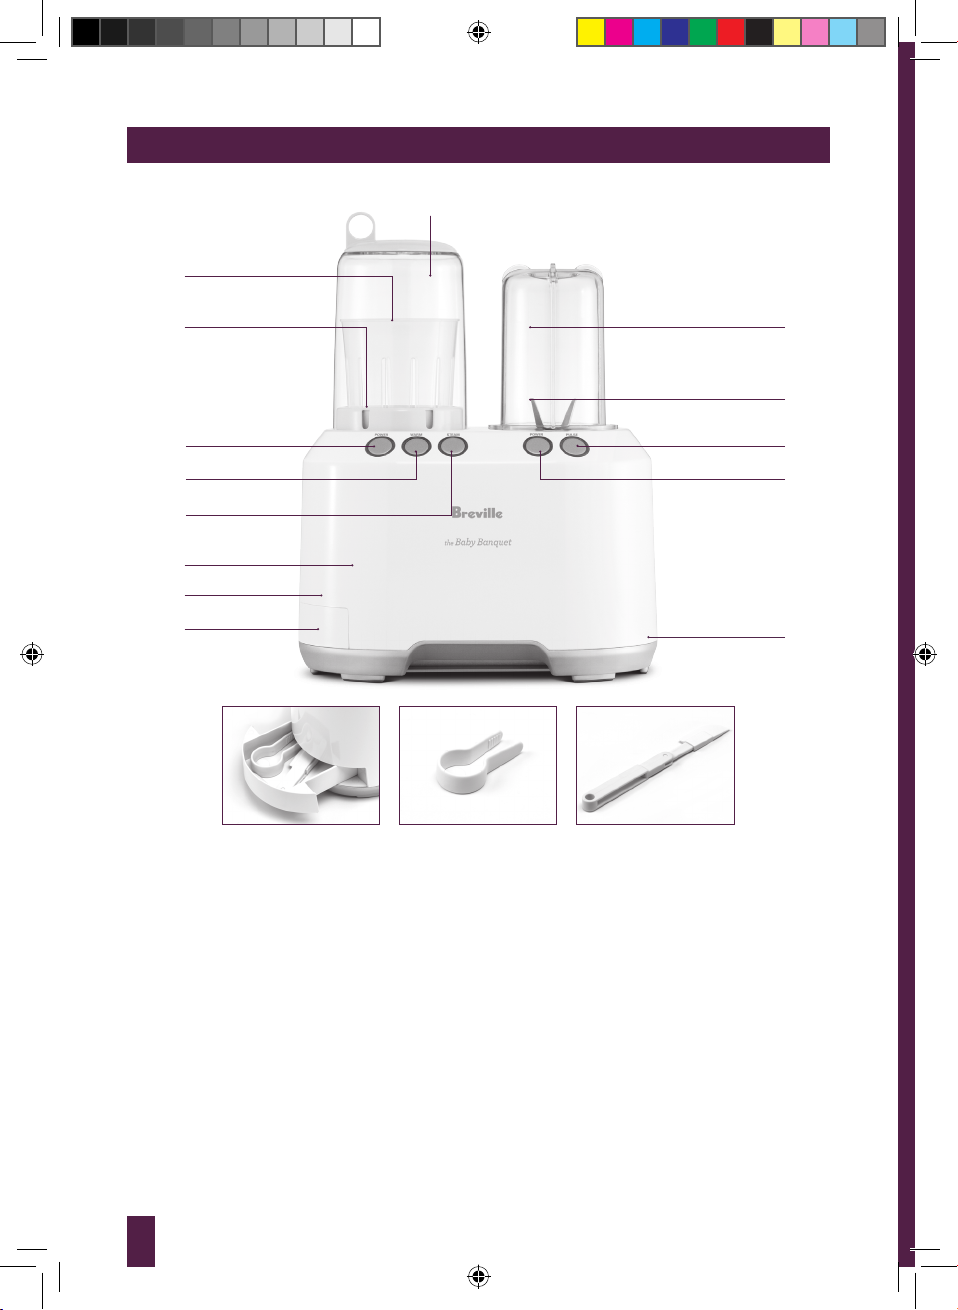
A. Steamer cover
B. Steamer basket
C. Steamer base
D. Steamer POWER button
E. WARM button
F. STEAM button
G. Heater
H. Motor base
I. Storage drawer
J. Cord wrap
N
M
L
K
J
P O
K. Blender POWER button
L. PULSE button
M. Blender
N. Blender jar
O. Spatula
P. Tongs
Not Shown
Insulation spacer
Measuring cup
Storage Lid
8
BBY400_IB_A12_FA.indd 8 9/05/12 5:40 PM
Page 9

OPERATING
your Breville Baby Banquet
™
BBY400_IB_A12_FA.indd 9 9/05/12 5:40 PM
Page 10

PAGE HEADEROPERATING YOUR BREVILLE BABY BANQUET™
BEFORE FIRST USE
Before using your Breville Baby Banquet™
for the first time, remove any packaging
material and promotional labels. Ensure the
appliance is switched off at the power outlet
and the power cord is unplugged.
Wash the lid, steamer cover, steamer basket,
blender jar and blender blades in warm,
soapy water with a soft cloth. Rinse and
dry thoroughly. Do not place parts in the
dishwasher.
The motor base can be wiped with a damp
cloth and dry thoroughly.
NOTE
The blending blades are extremely
sharp. Avoid any contact with fingers
and hands.
10
BBY400_IB_A12_FA.indd 10 9/05/12 5:40 PM
Page 11

PAGE HEADER
ASSEMBLING
your Breville Baby Banquet
™
11
BBY400_IB_A12_FA.indd 11 9/05/12 5:40 PM
Page 12
PAGE HEADER
ASSEMBLING YOUR BREVILLE BABY BANQUET™
ASSEMBLING THE BABY MAKER
BLENDER
1. Place the motor base on a flat, dry
surface such as a bench top. Ensure that
the motor base is switched off at the
power outlet and the power cord
is unplugged.
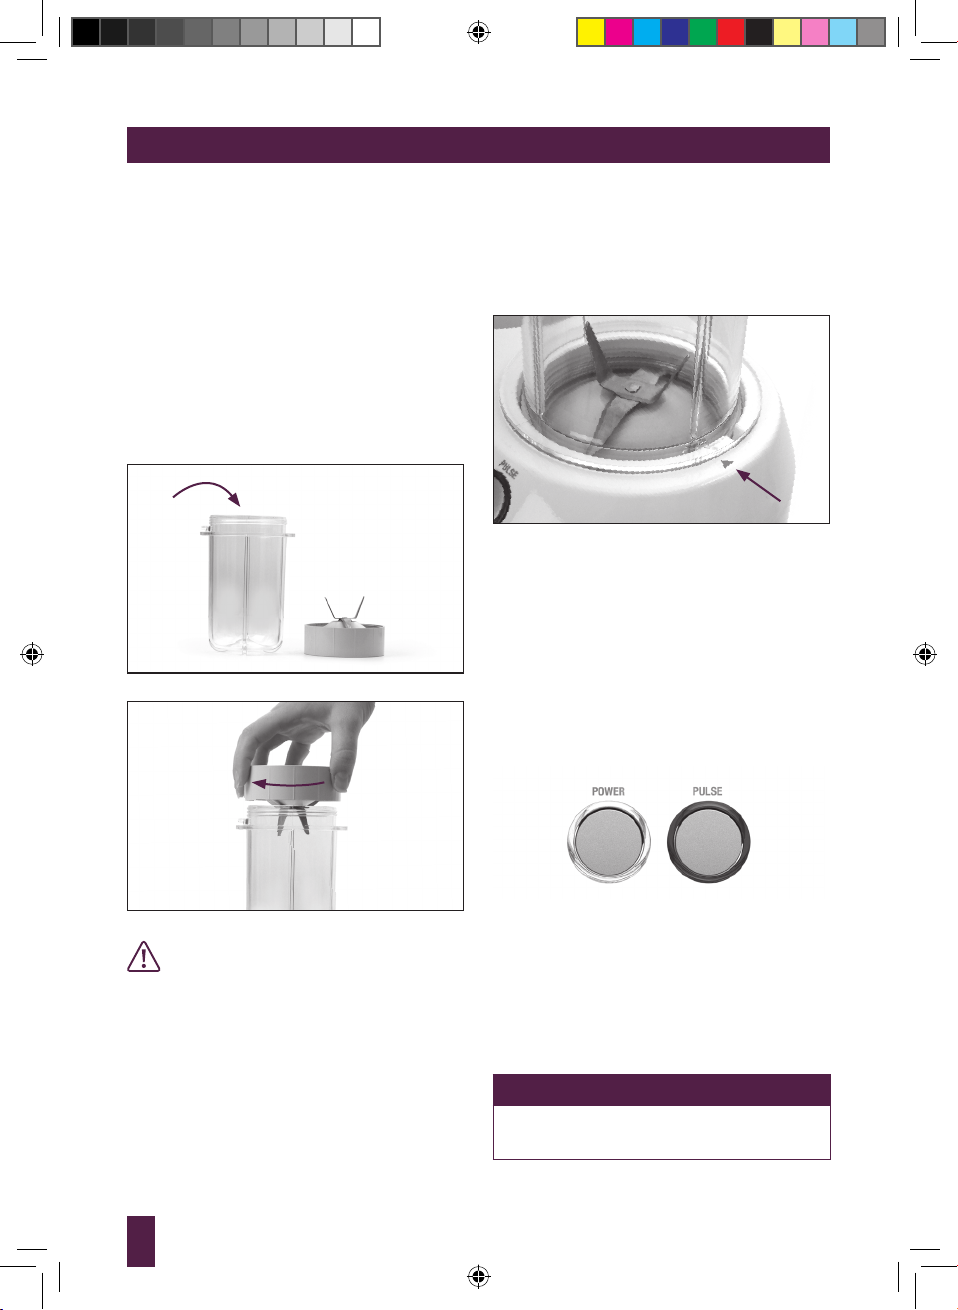
2. Place the food to be blended into the
blender jar. Place the blending blades on
to the blender jar by screwing the blades
into place.
3. Align the arrow on the blender jar with
the UNLOCK symbol on the motor base
and turn to the locked position. The tab
on the blender jar should lock into the
motor base.
4. Plug the power cord into a 230/240V
power outlet and switch on.
5. Press the POWER button for a constant
blend. The surrounding button light will
turn blue to indicate that the blender
is on. If you would like to have control
over your blending or for quick burst
of blending press and hold the PULSE
button for the blending time required.
6. For best blending results food quantity
CAUTION
Blender blades are extremely sharp;
please take caution when handling the
blades.
12
BBY400_IB_A12_FA.indd 12 9/05/12 5:40 PM
should not exceed half of the blender
jar volume.
7. Use the spatula provided in the storage
drawer to scrape food out of the
blender jar.
NOTE
Please do not blend continuously for
longer than 2 minutes.
Page 13

PAGE HEADER
ASSEMBLING YOUR BREVILLE BABY BANQUET™
8. The left over food can be stored in the
fridge for consumption in the blender
jar. Place the blender lid on the blender
jar (after removing blades) and store in
the fridge.
CAUTION
Always check the temperature of the
food before serving to a baby. Food is
extremely HOT when being steamed.
Please avoid burn.
ASSEMBLING THE BABY MAKER
STEAMER
1. Place the motor base on a flat, dry
surface such as a bench top. Ensure
that the motor base is switched off at
the power outlet and the power cord is
unplugged.
2. Place 100ml of water into the base of the
steamer, or fill to the MAX line.
NOTE
The insulation plate is not needed
when steaming food.
3. Place the steamer base into the
steamer.
4. Place the steamer basket with cut food
into the steamer base.
5. Place the steamer cover over the basket
and into position.
MAX
13
BBY400_IB_A12_FA.indd 13 9/05/12 5:40 PM
Page 14

PAGE HEADER
ASSEMBLING YOUR BREVILLE BABY BANQUET™
6. Plug the power cord into a 230/240V
power outlet and switch on.
7. Press the POWER button on the far left
of the unit to turn the steamer on. The
power button will illuminate red.
8. Press the STEAM button. This will
illuminate blue to indicate that you have
pressed that function.
NOTE
The red surrounding the POWER
button will turn off when either the
WARM or STEAM button has been
pressed.
WARMING BOTTLES FOR FEEDING
1. Place the motor base on a flat, dry
surface such as a bench top. Ensure
that the motor base is switched off at
the power outlet and the power cord is
unplugged.
2. Place the insulation spacer in the base of
the steamer chamber.
3. Place the bottle with milk into the
steamer.
CAUTION
Always check the temperature of the
food before serving to a baby. Food is
extremely hot when being steamed.
Please avoid burn.
14
BBY400_IB_A12_FA.indd 14 9/05/12 5:40 PM
4. Fill the steamer with enough water to
15mm below the top of the bottle. For
taller bottles, fill to 20mm below the top
of the steamer.
5. The steamer can be covered or left
opened.
6. Plug the power cord into a 230/240V
power outlet and switch on.
Page 15

PAGE HEADER
ASSEMBLING YOUR BREVILLE BABY BANQUET™
7. Press the POWER button on the far left
of the unit to turn the steamer on. The
power button will illuminate red.
8. Press the WARM button. The button
that has been pressed will illuminate
blue to indicate that you have pressed
that function.
NOTE
The red surrounding the POWER
button will turn off when either the
WARM or STEAM button has been
pressed.
WARMING BABY FOOD JARS AND
TINS
1. Place the motor base on a flat, dry
surface such as a bench top. Ensure
that the motor base is switched off at
the power outlet and the power cord is
unplugged.
2. Place the insulation spacer in the base of
the steamer chamber.
3. Remove the lid of the jar or tin and place
into the steamer.
9. Once the steamer has reached the
optimum warming temperature the
WARM light will flash until the unit is
switched off.
NOTE
Bottles should be shaken once or twice
during heating to ensure even heating
throughout milk.
4. Fill the steamer with enough water to
15mm below the top of the jar or tin. For
taller jars, fill to 20mm below the top of
the steamer.
5. The steamer can be covered or left
opened.
6. Plug the power cord into a 230/240V
power outlet and switch on.
15
BBY400_IB_A12_FA.indd 15 9/05/12 5:40 PM
Page 16

PAGE HEADER
ASSEMBLING YOUR BREVILLE BABY BANQUET™
7. Press the POWER button on the far left
of the unit to turn the steamer on. The
POWER button will illuminate red.
8. Press the WARM button. The button
that has been pressed will illuminate
blue to indicate that you have pressed
that function.
NOTE
The red surrounding the POWER
button will turn off when either the
WARM or STEAM button has been
pressed.
9. Once the steamer has reached the
optimum warming temperature the
WARM button will flash until the unit is
switched off.
NOTE
Jars of food should be stirred once or
twice during heating to ensure even
heating throughout food.
NOTE
Baby food should not be cooked in the
WARM setting mode. This mode is not
hot enough to cook food, only use to
warm already cooked food.
CAUTION
Baby food should not be over heated.
Take it out when it reaches the desired
temperature.
WARNING
There will be steam coming from the
steamer cover during this process.
Please keep clear from steam to
NOTE
Never let the water level rise above
the neck of the bottle or spill over the
edge of the warmer.
avoid burn.
WARNING
The surface of the steamer is very hot
during this process.
Please handle with care.
16
BBY400_IB_A12_FA.indd 16 9/05/12 5:40 PM
Page 17

PAGE HEADER
ASSEMBLING YOUR BREVILLE BABY BANQUET™
BOTTLE STERILISATION
1. Place the motor base on a flat, dry
surface such as a bench top. Ensure
that the motor base is switched off at
the power outlet and the power cord is
unplugged.
2. Fill the steamer chamber with water to
the MAX line.
MAX
3. Place the steamer base into the steamer
chamber.
5. Place the steamer cover over the top.
6. Plug the power cord into a 230/240V
power outlet and switch on.
7. Press the POWER button on the far left
of the unit to turn the steamer on. The
power button will illuminate red.
8. Press the STEAM button. The button
that has been pressed will illuminate
blue to indicate that you have pressed
that function.
4. Place the washed empty bottle and
accessories into the steamer basket up
side down.
17
BBY400_IB_A12_FA.indd 17 9/05/12 5:40 PM
Page 18

PAGE HEADER
ASSEMBLING YOUR BREVILLE BABY BANQUET™
NOTE
The red surrounding the POWER
button will turn off when either the
WARM or STEAM button has been
pressed.
WARNING
There will be steam coming from the
steamer cover during this operation.
Please take caution to avoid burn.
WARNING
The surface of the steamer is very HOT
during operation. Please handle with
care.
9. The sterilisation process takes about ten
(10) minutes. Press the POWER button
once to stop working.
10. Please allow the steamer to cool for at
least 5 minutes before removing the
cover from the steamer.
NOTE
You can press the POWER button at
any stage during this process.
NOTE
Once all the water has evaporated
from the steamer, the Baby Banquet™
will switch off as a protection mode.
If further steaming is required then
additional water must be placed into
the steamer the steaming button
pressed again. A minimum of 100ml
must be added to the steamer.
18
BBY400_IB_A12_FA.indd 18 9/05/12 5:40 PM
Page 19

PAGE HEADER
HINTS & TIPS
19
BBY400_IB_A12_FA.indd 19 9/05/12 5:40 PM
Page 20

PAGE HEADER
HINTS & TIPS
HEATING SETTING INITIAL TEMP AND TIME
VOLUME SETTING 3-5°C (AVERAGE REFRIGERATOR
TEMPERATURE)
125ml bottle WARM 8 mins
260ml bottle WARM 16 mins
330ml bottle WARM 20 mins
130g food jar WARM 10 mins (from room temperature)
190g food jar WARM 18 mins (from room temperature)
120g food pouches WARM 10 mins (from room temperature)
NOTE
Heating times may vary depending on
the shape of the bottle or jar. Test milk
and foods before giving to baby.
FRUIT
FOOD TYPE FOOD
QUANTITY
Apple 1 large (190g) 150ml Peeled, cored, cut
Pear 2 small ripe
(300g)
Peaches 1 large (250g) 200ml Peel, remove seed,
Nectarines 2 medium
(300g)
LIQUID
PREPARATION APPROXIMATE
QUANITY
into 1.5 cm pieces
100ml*
*Extra if firm
250ml Peel, remove seed,
Peeled, cored, cut
into 1.5 cm pieces
cut into 2.5 cm
pieces
cut into 2.5 cm
pieces
STEAMING TIME
9 minutes
6 ½ minutes
12 minutes
15 minutes
MEAT & SEAFOOD
FOOD TYPE FOOD
QUANTITY
Chicken Breast 100g 150ml Cut into 4 cm
White Fish
fillets
Trout, Salmon 100g 150ml Single piece 9 minutes
20
100g 100ml Single piece 6 ½ minutes
LIQUID
QUANITY
PREPARATION APPROXIMATE
STEAMING TIME
9 minutes
cubes
Rest for 5 minutes
Rest for 5 minutes
BBY400_IB_A12_FA.indd 20 9/05/12 5:40 PM
Page 21

HINTS & TIPS
VEGETABLES
FOOD TYPE FOOD
QUANTITY
Carrots 1 medium
(150g)
Potato 1 large (340g) 250ml Peeled, cut into
Sweet potato ½ medium
(200g)
Broccoli 100g 150ml Cut into medium
Pumpkin 250g 150ml Remove skin, cut
Cauliflower 150g 200ml Cut into medium
Corn 1 trimmed cob
(200g)
Peas 400g in pods 150ml Shell peas (approx
Zucchini 2 small
(190g)
Parsnip 1 medium
(150g)
LIQUID
PREPARATION APPROXIMATE
QUANTITY
250ml Peeled and
200ml Peeled, cut into
250ml Remove husk 15 minutes
150ml Peeled and
200ml Peeled and
trimmed, cut into
1 cm pieces
3 cm pieces
2.5 cm pieces
size florets
into 2.5 cm pieces
size florets
1 cup shelled)
trimmed, cut into
1 cm rounds
trimmed, cut into
2 cm pieces
STEAMING TIME
15 minutes
15 minutes
10 minutes
9 ½ minutes
9 minutes
12 minutes
9 ½ minutes
9 minutes
11 minutes
21
BBY400_IB_A12_FA.indd 21 9/05/12 5:40 PM
Page 22

CARE & CLEANING
BBY400_IB_A12_FA.indd 22 9/05/12 5:40 PM
Page 23

CARE & CLEANING
DISASSEMBLING YOUR BABY
MAKER
BLENDER JAR
1. Always ensure the Breville Baby
Banquet™ is off by pressing the POWER
button. Then switch off at the power
outlet and unplug the power cord.
2. Remove the blender jar from the motor
base by grasping the jar and twisting to
the UNLOCK symbol and lifting in an
upward direction.
3. Remove the blade assembly by turning
in an anti-clockwise direction.
4. When cleaning the blender jar it is
always a good idea to clean straight
away to avoid food sticking to the blades
and jar. Placing about 100ml within the
blender jar, you can blend the water for
about 5-10 seconds which will help clean
the blades and jar. Then rinse in cold
water and dry thoroughly. Alternatively
wash the parts in warm soapy water, then
rinse in cold water and dry thoroughly.
Use a bottle brush to dislodge stubborn
foods around the blade assembly.
CAUTION
Blade assembly is extremely sharp
STEAMER
1. Always ensure the steamer is off by
pressing the POWER button. Then
switch off at the power outlet and unplug
the power cord.
2. Remove the steamer cover, steamer
basket and steamer base.
3. Wash the parts in warm soapy water,
then rinse in cold water and dry
thoroughly.
CLEANING THE MOTOR BASE
1. Wipe the motor base with a soft, damp
cloth then dry thoroughly.
2. Wipe any excess food particles from the
power cord.
NOTE
Do not use abrasive scouring pads
or cleaners when cleaning the motor
base as they may scratch the surface.
REMOVING STUBBORN OR STRONG
FOOD STAINS AND ODOURS
Strong smelling foods such as garlic, fish
and some vegetables such as carrots may
leave an odour or stain on the blender jar.
To remove, soak blender jar for 5 minutes in
warm soapy water. Then wash with a mild
detergent and warm water, rinse well and
dry thoroughly.
STORAGE
Store your Breville Baby Banquet™ upright
with the blender jar and steam cover
assembled on the motor base. Do not place
anything on top.
WARNING
The blending blades are extremely
sharp. Avoid any contact with fingers
and hands. Use caution when handling
and storing.
23
BBY400_IB_A12_FA.indd 23 9/05/12 5:40 PM
Page 24

RECIPES
BBY400_IB_A12_FA.indd 24 9/05/12 5:40 PM
Page 25

SAVOURY RECIPES
CARROT & PUMPKIN
Makes approximately ½ cup
INGREDIENTS
1 small (75g) carrot, peeled and cut into 1 cm
pieces
100g pumpkin, peeled and cut into 3 cm pieces
METHOD
1. Combine carrot and pumpkin into
steamer basket. Add 250ml water into
steamer chamber.
2. Place steamer base into steamer with the
steamer basket and cover with lid.
3. Press the STEAM button to start
steaming process.
4. Once vegetables have finished steaming
allow to cool for 3-4 minutes then place
into blender jar with 1-2 tablespoons of
liquid from the steamer base or cooled
boiled water. Blend until the desired
texture is achieved; adding more water if
necessary.
5. Use within 1 day or freeze until needed.
NOTE
Do not use insulation spacer for
steaming foods.
SWEET POTATO AND BROCCOLI
Makes approximately ½ cup
INGREDIENTS
100g sweet potato, peeled, cut into 2.5 cm pieces
1 large floret (50g) broccoli
METHOD
1. Combine sweet potato and broccoli into
steamer basket. Add 150ml water into
steamer.
2. Place steamer base into steamer with the
steamer basket and cover with lid.
3. Press the STEAM button to start
steaming process.
4. Once vegetables have finished steaming
allow to cool for 3-4 minutes then place
into blender jar with 1-2 tablespoons of
liquid from the steamer base or cooled
boiled water. Blend until the desired
texture is achieved; adding more water if
necessary.
5. Use within 1 day or freeze until needed.
TIP
Serve with tiny pasta and cheese for
older babies
NOTE
Do not use insulation spacer for
steaming foods.
25
BBY400_IB_A12_FA.indd 25 9/05/12 5:40 PM
Page 26

SAVOURY RECIPES
SWEET POTATO, CARROTS
AND PARSNIP
Makes approximately ½ cup
INGREDIENTS
80g sweet potato, peeled, cut into 2.5 cm pieces
1 small (75g) carrot, peeled and cut into 1 cm
pieces
½ small (60g) parsnip, peeled and cut into 2 cm
pieces
2 teaspoons (10g) butter
METHOD
1. Combine sweet potato, carrot and
parsnip into steamer basket. Add 250ml
water into steamer chamber.
2. Place steamer base into steamer with the
steamer basket and cover with lid.
3. Press the STEAM button to start
steaming process.
4. Once vegetables have finished steaming
allow to cool for 3-4 minutes then place
into blender jar with butter and 1-2
tablespoons of liquid from the steamer
base or cooled boiled water. Blend until
the desired texture is achieved; adding
more water if necessary.
5. Use within 1 day or freeze until needed.
NOTE
Do not use insulation spacer for
steaming foods.
PUMPKIN, ZUCCHINI AND
SWEET POTATO
Makes approximately ¾ cup
INGREDIENTS
100g pumpkin, peeled and cut into 2 cm pieces
1 small (100g) zucchini, peeled , cut into 2 cm
rounds
100g sweet potato, peeled, cut into 2 cm pieces
2 teaspoons (10g) butter
METHOD
1. Combine pumpkin, zucchini and sweet
potato into steamer basket. Add 200ml
water into steamer chamber.
2. Place steamer base into steamer with the
steamer basket and cover with lid.
3. Press the STEAM button to start
steaming process.
4. Once vegetables have finished steaming
allow to cool for 3-4 minutes then place
into blender jar with butter and 1-2
tablespoons of liquid from the steamer
base or cooled boiled water. Blend until
the desired texture is achieved; adding
more water if necessary.
5. Use within 1 day or freeze until needed.
NOTE
Do not use insulation spacer for
steaming foods.
26
BBY400_IB_A12_FA.indd 26 9/05/12 5:40 PM
Page 27

SAVOURY RECIPES
SWEET CORN AND AVOCADO
Makes approximately 1 cup
INGREDIENTS
1 trimmed (200g) corn cob
½ small (100g) avocado, flesh only, cut into
chunks
METHOD
1. Place corn cob into steamer basket. Add
250ml water into steamer chamber.
2. Place steamer base into steamer with the
steamer basket and cover with lid.
3. Press the STEAM button to start
steaming process.
4. Once corn has finished steaming allow
to cool then cut corn kernels from cob.
Place kernels into blender jar with
avocado. Blend until the desired texture
is achieved; adding cooled boiled water
if necessary.
5. Use within 1 day or freeze until needed.
NOTE
Do not use insulation spacer for
steaming foods.
APPLE AND MANGO CHICKEN
WITH PEAS AND RISONI PASTA
Makes approximately 1 cup
INGREDIENTS
100g chicken breast fillet, cut into 1.5 cm pieces
½ large (95g) apple, peeled, cored and cut into
1.5 cm cubes
2 tablespoons fresh peas
2 tablespoons mango nectar
2 tablespoons cooked risoni pasta
METHOD
1. Combine chicken, apple and peas in a
small bowl and stir to combine; spoon
into steamer basket. Add 200ml water
into steamer chamber.
2. Place steamer base into steamer with the
steamer basket and cover with lid.
3. Press the STEAM button to start
steaming process. Once foods have
finished steaming pour into a bowl and
check chicken is cooked completely.
4. Place chicken mixture into blender
jug with mango nectar and blend until
the desired texture is achieved; adding
cooled boiled water if necessary.
5. Stir through risoni pasta for older babies
or can also be pureed with chicken and
apple.
6. Use within 1 day or freeze until needed.
NOTE
Do not use insulation spacer for
steaming foods.
27
BBY400_IB_A12_FA.indd 27 9/05/12 5:40 PM
Page 28

SAVOURY RECIPES
VEGETABLES WITH CHEESY SAUCE
Makes approximately 1 cup
INGREDIENTS
50g pumpkin , peeled and cut into 2 cm pieces
50g potato, peeled and cut into 2 cm pieces
50g sweet potato , peeled and cut into 2 cm
pieces
1 medium floret (30g) broccoli
Cheesy sauce
1 teaspoon (5g) butter
1 ½ teaspoons plain flour
¼ cup milk, warmed
1-2 tablespoon grated cheese
METHOD
1. Combine pumpkin, potato, sweet potato
and broccoli into steamer basket. Add
200ml water into steamer chamber.
2. Place steamer base into steamer with the
steamer basket and cover with lid.
3. Press the STEAM button to start
steaming process.
4. Once vegetables have finished steaming
cool for 3-4 minutes then place into
blender jar with 1-2 tablespoons of
liquid from the steamer base or cooled
boiled water. Blend until the desired
texture is achieved; adding more water if
necessary.
5. Stir through desired amount of Cheesy
sauce.
6. Use within 1 day or freeze until needed.
TO MAKE CHEESY SAUCE
1. Heat butter in a small saucepan over
a medium heat until butter melts and
starts to bubble.
2. Remove from heat and stir through flour
with a wooden spoon.
3. Return to a low heat and cook flour and
butter mixture for 1-2 minutes. Add milk
and whisk until combined.
4. Stir until sauce has thickened. Stir
through cheese.
5. Transfer to a heatproof bowl and cover
with plastic wrap until needed.
NOTE
Do not use insulation spacer for
steaming foods.
28
BBY400_IB_A12_FA.indd 28 9/05/12 5:40 PM
Page 29

SAVOURY RECIPES
STEAMED SALMON WITH SPINACH
Makes approximately ½ cup
INGREDIENTS
100g salmon in one piece
½ cup (10g) baby spinach
2 tablespoons creme friache or natural yogurt
METHOD
1. Place steamer base into steamer with the
steamer basket and cover with lid.
2. Press the STEAM button to start
steaming process.
3. After approximately 8 minutes carefully
lift lid and add spinach on top of salmon;
replace lid. Once finished cooking allow
salmon to rest for 5 minutes before
removing then place into a bowl with
creme friache or yogurt. Mash with fork.
4. Use within 1 day or freeze until needed.
POTATO, PUMPKIN, CAULIFLOWER
WITH CHEESE
Makes approximately ¾ cup
INGREDIENTS
50g potato, peeled and cut into 2 cm pieces
80g pumpkin , peeled and cut into 2 cm pieces
1 large floret (50g) cauliflower
1-2 tablespoons grated cheese
METHOD
1. Combine potato, pumpkin and
cauliflower into steamer basket. Add
200ml water into steamer.
2. Place steamer base into steamer with the
steamer basket and cover with lid.
3. Press the STEAM button to start
steaming process.
4. Once vegetables have finished steaming
cool for 3-4 minutes then place into
blender jar with 1-2 tablespoons of
liquid from the steamer base or cooled
boiled water. Blend until the desired
texture is achieved; adding more water if
necessary.
5. Stir through grated cheese.
6. Use within 1 day or freeze until needed.
NOTE
Do not use insulation spacer for
steaming foods.
29
BBY400_IB_A12_FA.indd 29 9/05/12 5:40 PM
Page 30

SWEET RECIPES
WHITE FISH WITH POTATO AND
CHEESY SAUCE
Makes approximately ¾ cup
INGREDIENTS
1 small (120g) potato, cut into 1 cm cubes
100g piece white fish in one piece
Cheesy sauce
1 teaspoon (5g) butter
1 ½ teaspoons plain flour
¼ cup milk, warmed
1-2 tablespoon grated cheese
METHOD
1. To make cheesy sauce, heat butter in
a small saucepan over a medium heat
until butter melts and starts to bubble.
Remove from heat and stir through flour
with a wooden spoon. Return to a low
heat and cook flour and butter mixture
for 1-2 minutes. Add milk and whisk
until combined. Stir until sauce has
thickened. Stir through cheese. Transfer
to a heatproof bowl and cover with
plastic wrap until needed.
2. Place potato first into steamer basket
then top with fish. Add 150ml water into
steamer.
3. Place steamer base into steamer with the
steamer basket and cover with lid.
4. Press the STEAM button to start
steaming process.
5. Once finished cooking allow fish to
rest for 5 minutes before removing then
place into a bowl and mash with fork.
Stir through desired amount of
cheesy sauce
6. Use within 1 day or freeze until needed.
APPLE, PEAR & CINNAMON
Makes approximately 1 cup
INGREDIENTS
1 large (190g) apple, peeled, cored and cut into
1.5 cm cubes
1 medium (200g) pear, peeled, cored and cut into
1.5 cm cubes
Pinch cinnamon
METHOD
1. Combine apple and pear into steamer
basket. Add 150ml water into steamer.
2. Place steamer base into steamer with the
steamer basket and cover with lid.
3. Press the STEAM button to start
steaming process.
4. Once fruits have finished steaming
allow to cool for 3-4 minutes then place
fruit into blender jar with cinnamon
and 1-2 tablespoons of liquid from
the steamer base or cooled boiled
water. PULSE until the desired texture
is achieved; adding more water if
necessary.
5. Use within 1 day or freeze until needed.
NOTE
Do not use insulation spacer for
steaming foods.
NOTE
Do not use insulation spacer for
steaming foods.
30
BBY400_IB_A12_FA.indd 30 9/05/12 5:40 PM
Page 31

SWEET RECIPES
PEARS, NECTARINES AND
BLUEBERRIES
Makes approximately ½ cup
INGREDIENTS
1 small (150g) pear, peeled, cored and cut into
1 cm cubes
1 medium (150g) nectarine, peeled, seed
removed, cut into 2 cm pieces
2 tablespoons blueberries
METHOD
1. Combine pear and nectarine into
steamer basket. Add 200ml water into
steamer.
2. Place steamer base into steamer with the
steamer basket and cover with lid.
3. Press STEAM button to start steaming
process.
4. Once fruits have finished steaming
allow to completely then place pear
and nectarine into blender jar with
blueberries. PULSE until the desired
texture is achieved.
5. Use within 1 day or freeze until needed.
NOTE
Do not use insulation spacer for
steaming foods.
PEACH, BANANA AND PRUNES
Makes approximately ¾ cup
INGREDIENTS
1 large (250g) peach, peeled, seed removed, cut
into 2.5 cm pieces
2-3 seedless prunes
1 small (130g) ripe banana, peeled, cut into
chunks
METHOD
1. Place peach and prunes into steamer
basket. Add 200ml water into steamer.
2. Place steamer base into steamer with the
steamer basket and cover with lid.
3. Press the STEAM button to start
steaming process.
4. Once fruit has finished steaming allow
to completely then place into blender
jar with banana. PULSE until the desired
texture is achieved adding liquid from
the steamer base or cooled boiled water
as needed.
5. Use within 1 day or freeze until needed.
NOTE
Do not use insulation spacer for
steaming foods.
NOTE
Strawberries are only recommended
for babies over 12 months
31
BBY400_IB_A12_FA.indd 31 9/05/12 5:40 PM
Page 32

SWEET RECIPES
PEAR, BANANA AND PAPAYA
Makes approximately 1 cup
INGREDIENTS
1 small (150g) pear, peeled, cored and cut into
1 cm cubes
½ small (65g) ripe banana, peeled, cut into
chunks
100g ripe papaya, peeled, seeds removed and cut
into chunks
METHOD
1. Place pear into steamer basket. Add
100ml water into steamer.
2. Place steamer base into steamer with the
steamer basket and cover with lid.
3. Press the STEAM button to start
steaming process.
4. Once pear has finished steaming allow
to completely then place pear into
blender jar with banana and papaya.
PULSE until the desired texture is
achieved adding liquid from the steamer
base or cooled boiled water as needed.
5. Use within 1 day or freeze until needed.
NOTE
Do not use insulation spacer for
steaming foods.
32
BBY400_IB_A12_FA.indd 32 9/05/12 5:40 PM
Page 33

SWEET RECIPES
NECTARINE, BANANA AND YOGURT
Makes approximately ¾ cup
INGREDIENTS
1 medium (150g) nectarine, peeled, seed
removed, cut into 2 cm pieces
½ small (65g) ripe banana, peeled, cut into
chunks
1 tablespoon natural yogurt
METHOD
1. Place nectarine into steamer basket. Add
200ml water into steamer.
2. Place steamer base into steamer with the
steamer basket and cover with lid.
3. Press the STEAM button to start
steaming process.
4. Once nectarine has finished steaming
allow to completely then place nectarine
into blender jar with banana and yogurt.
PULSE until the desired texture is
achieved adding liquid from the steamer
base or cooled boiled water as needed.
5. Use within 1 day or freeze until needed.
NOTE
Do not use insulation spacer for
steaming foods.
33
BBY400_IB_A12_FA.indd 33 9/05/12 5:40 PM
Page 34

NO COOK PUREES
BANANA, AVOCADO AND YOGURT
Makes approximately ½ cup
INGREDIENTS
1 small (130g) ripe banana, peeled, cut into
chunks
½ small (100g) avocado, flesh only, cut into
chunks
1 tablespoon natural yogurt
METHOD
1. Combine all ingredients into blender
jug. PULSE until desired texture is
achieved.
2. Use within 1 day or freeze until needed.
BANANA AND BLUEBERRY
Makes approximately ½ cup
INGREDIENTS
1 small (130g) ripe banana, peeled, cut into
chunks
¼ cup blueberries
METHOD
1. Combine ingredients into blender jug.
PULSE until desired texture is achieved.
2. Use within 1 day or freeze until needed.
PAPAYA AND YOGURT
Makes approximately ½ cup
INGREDIENTS
150g ripe papaya, peeled, seeds removed and cut
into chunks
2 tablespoons thick vanilla yogurt
METHOD
1. Combine ingredients into blender jug.
PULSE until desired texture is achieved.
2. Use within 1 day or freeze until needed.
TIP
For babies over 12 months add ½
teaspoon honey
34
BBY400_IB_A12_FA.indd 34 9/05/12 5:40 PM
Page 35

SMOOTHIES
BANANA SMOOTHIE
Makes approximately 1 cup
INGREDIENTS
1 small (130g) ripe banana, peeled, cut into
chunks
½ cup (125ml) milk
1
⁄3 cup (80ml) thick vanilla yogurt
½ teaspoon honey (over 12 months only)
Pinch cinnamon
METHOD
1. Combine ingredients into blender jug.
Blend until smooth.
Serve immediately.
STRAWBERRY SMOOTHIE
Makes approximately 1 cup
INGREDIENTS
4 medium strawberries, hulled, cut into quarters
½ cup (125ml) milk
1
⁄3 cup (80ml) thick vanilla yogurt
1 teaspoon honey (over 12 months only)
METHOD
1. Combine ingredients into blender jug.
Blend until smooth.
Serve immediately.
MANGO SMOOTHIE
Makes approximately 1 cup
INGREDIENTS
1 mango cheek, flesh only, cut into chunks
¼ cup (60ml) milk
1 tablespoon thick vanilla yogurt
1-2 ice cubes
METHOD
1. Combine ingredients into blender jug.
Blend until smooth.
Serve immediately.
35
BBY400_IB_A12_FA.indd 35 9/05/12 5:40 PM
Page 36

PAGE HEADER
NOTES
36
BBY400_IB_A12_FA.indd 36 9/05/12 5:40 PM
Page 37

PAGE HEADER
NOTES
37
BBY400_IB_A12_FA.indd 37 9/05/12 5:40 PM
Page 38

Breville Customer Service Centre
Australian Customers
Mail: PO Box 22
Botany NSW 2019
AUSTRALIA
Phone: 1300 139 798
Fax: (02) 9384 9601
Customer Service:
Email:
askus@breville.com.au
www.breville.com.au
Breville is a registered trademark of Breville Pty. Ltd. A.B.N. 98 000 092 928.
Due to continued product improvement, the products illustrated/photographed
in this brochure may vary slightly from the actual product.
Copyright Breville Pty. Ltd. 2012.
New Zealand Customers
Mail: Private Bag 94411
Botany Manukau 2163
Auckland NEW ZEALAND
Phone:
0800 273 845
Fax: 0800 288 513
Customer Service:
Email:
askus@breville.com.au
BBY400 Issue - A12
BBY400_IB_A12_FA.indd 1 9/05/12 5:40 PM
 Loading...