


 Loading...
english |
12 |
deutsch |
30 |
nederlands |
49 |
français |
67 |
español |
85 |
italiano |
103 |
svensk |
121 |
suomi |
138 |
CR7

EN
2 |
CR7 |
|
|
EN |
8 |
3 |
|
|
|
|
|
4 |
9 |
|
5 |
|
4 |
|
|
|
|
|
5 |
|
|
3 |
|
|
|
1 |
|
7 |
|
|
6 |
2 |
|
A |
|
6 |
CR7 |
|
3 |
EN |
|
|
B |
4 |
CR7 |

EN
|
10 (4x) |
|
11 (8x) |
12 (4x) |
13 (7x) |
|
|
|
M8*55 |
D8*19 |
M8 |
|
M8*16 |
|
|
|
14 (6x) |
|
16 (2x) |
17 (3x) |
18 (4x) |
|
|
|
D8.1*12.9 |
|
D8*19 |
M5*12 |
|
M4*12 |
|
19 (3x) |
20 (1x) |
21 (1x) |
22 (8x) |
23 (8x) |
|||
D8*25 |
D8*14 |
|
|
M5*12 |
D6*16 |
||
24 (2x) |
25 (2x) |
26 (2x) |
27 (2x) |
28 (2x) |
|||
M8*20 |
D17.5*25 |
D17.5*25 |
D10*25 |
M8*55 |
|||
|
29 (2x) |
|
30 (2x) |
31 (8x) |
32 (3x) |
|
|
|
D8*16 |
|
M8 |
M8*12 |
|
M5*14 |
|
C
CR7 |
5 |

EN |
|
|
|
100 CM |
100 CM |
|
|
100 CM |
|
|
|
|
|
|
100 CM |
D0 |
|
|
|
|
10 |
|
10 |
|
11 |
11 |
|
11 |
12 |
12 |
11 |
12 |
|
|
12 |
D1 |
|
|
D2 |
6 |
|
|
CR7 |

|
EN |
13 14 16 |
11 14 13 |
D3 |
|
|
17 |
|
18 |
18 |
|
D4 |
|
CR7 |
7 |
EN |
|
|
19 |
|
20 |
|
13 |
|
21 |
D5 |
|
|
23 |
|
22 |
D6 |
|
8 |
CR7 |
|
|
EN |
|
|
|
23 |
|
|
|
22 |
|
D7 |
|
|
|
|
26 |
25 |
|
24 19 |
27 |
22 |
|
28 |
|||
|
|
||
|
|
29 |
|
|
|
30 |
|
|
|
22 |
|
D8 |
|
D9 |
|
CR7 |
|
9 |

EN |
|
|
|
|
|
|
|
25 |
26 |
|
22 |
28 |
|
|
|
27 |
19 24 |
|
|
|
|
|
|
|
|
|
29 |
|
|
|
|
|
|
30 |
|
|
|
|
|
|
22 |
D10 |
|
|
|
|
|
D11 |
17 |
31 |
|
|
|
31 |
17 |
|
|
|
31 |
31 |
|
|
|
|
|
17 |
17 |
|
|
D12 |
|
|
|
|
|
D13 |
10 |
|
|
|
|
|
CR7 |
EN |
32 |
D14 |
CR7 |
11 |
EN
CROSSTRAINER
Welcome to the world of Bremshey Sport!
Thank you for purchasing this piece of Bremshey equipment. Bremshey offers a wide range of home fitness equipment, including crosstrainers, treadmills, exercise bikes, rowers and vibration plates. The Bremshey equipment is suitable for the entire family, no matter what fitness level. For more information, please visit our website www.bremshey.com
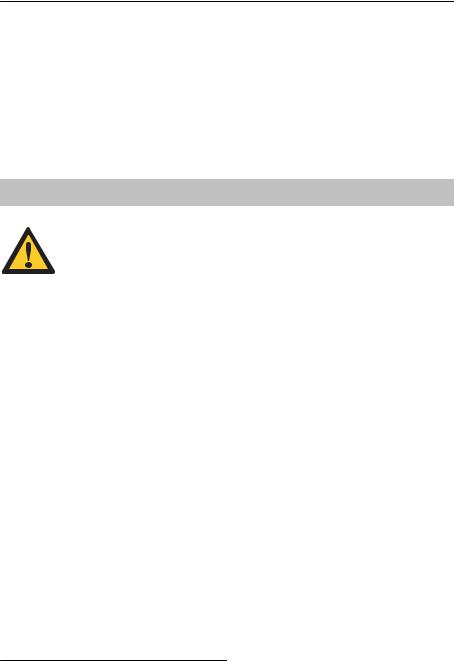
Safety warnings
WARNING
–Read the safety warnings and the instructions. Failure to follow the safety warnings and the instructions can cause personal injury or damage to the equipment. Keep the safety warnings and the instructions for future reference.
▪The equipment is suitable for domestic use only. The equipment is not suitable for commercial use.
▪The use of this equipment by children or persons with a physical, sensory, mental or motorial disability, or lack of experience and knowledge can give cause to hazards. Persons responsible for their safety must give explicit instructions or supervise the use of the equipment.
▪Before starting your workout, consult a physician to check your health.
▪If you experience nausea, dizziness or other abnormal symptoms, immediately stop your workout and consult a physician.
▪To avoid muscular pain and strain, start each workout by warming up and finish each workout by cooling down. Remember to stretch at the end of the workout.
▪The equipment is suitable for indoor use only. The equipment is not suitable for outdoor use.
▪Only use the equipment in environments with adequate ventilation. Do not use the equipment in draughty environments in order not to catch a cold.
▪Only use the equipment in environments with ambient temperatures between 10 °C and 35 °C. Only store the equipment in environments with ambient temperatures between 5 °C and 45 °C.
12 |
CR7 |

EN
▪Do not use or store the equipment in humid surroundings. The air humidity must never be more than 80%.
▪Only use the equipment for its intended purpose. Do not use the equipment for other purposes than described in the manual.
▪Do not use the equipment if any part is damaged or defective. If a part is damaged or defective, contact your dealer.
▪Keep your hands, feet and other body parts away from the moving parts.
▪Keep your hair away from the moving parts.
▪Wear appropriate clothing and shoes.
▪Keep clothing, jewelry and other objects away from the moving parts.
▪Make sure that only one person uses the equipment at a time. The equipment must not be used by persons weighing more than 135 kg (300 lbs).
▪Do not open equipment without consulting your dealer.
Electrical safety (only applicable for equipment with electric power)
▪Before use, always check that the mains voltage is the same as the voltage on the rating plate of the equipment.
▪Do not use an extension cable.
▪Keep the mains cable away from heat, oil and sharp edges.
▪Do not alter or modify the mains cable or the mains plug.
▪Do not use the equipment if the mains cable or the mains plug is damaged or defective. If the mains cable or the mains plug is damaged or defective, contact your dealer.
▪Always fully unwind the mains cable.
▪Do not run the mains cable underneath the equipment. Do not run the mains cable underneath a carpet. Do not place any objects on the mains cable.
▪Make sure that the mains cable does not hang over the edge of a table. Make sure that the mains cable cannot be caught accidentally or tripped over.
▪Do not leave the equipment unattended when the mains plug is inserted into the wall socket.
▪Do not pull the mains cable to remove the mains plug from the wall socket.
▪Remove the mains plug from the wall socket when the equipment is not in use, before assembly or disassembly and before cleaning and maintenance.
CR7 |
13 |

EN
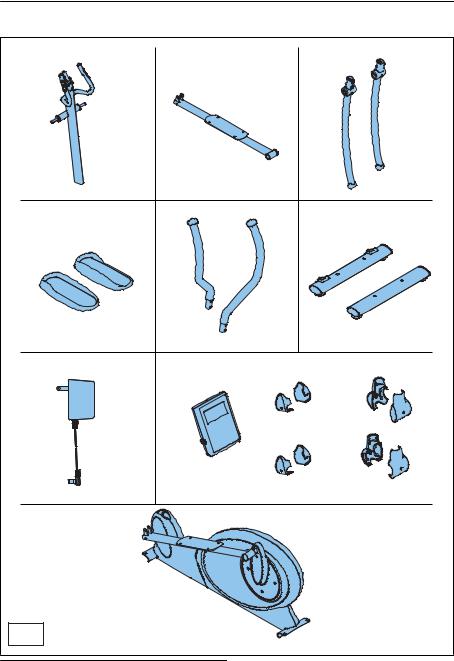
Package contents (fig. B & C)
▪The package contains the parts as shown in fig. B.
▪The package contains the fasteners as shown in fig. C. Refer to the section “Description”.
NOTE
– If a part is missing, contact your dealer.
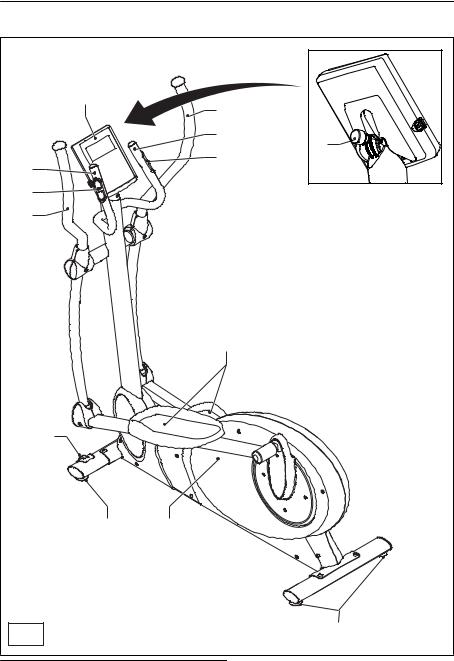
Description (fig. A)
Your crosstrainer is a piece of stationary fitness equipment used to simulate walking or running without causing excessive pressure to the joints.
1 |
Pedal |
6 |
Support foot |
2 |
Main housing |
7 |
Transport wheel |
3 |
Swivel handlebar |
8 |
Console |
4 |
Fixed handlebar |
9 |
Console adjustment knob |
5Hand pulse sensor
14 |
CR7 |
EN
Fasteners (fig. C)
10 |
Carriage bolt (M8*55) |
22 |
Screw (M5*12) |
11 |
Washer (D8*19) |
23 |
Washer (D6*16) |
12 |
Locknut (M8) |
24 |
Hex bolt (M8*20) |
13 |
Allen bolt (M8*16) |
25 |
Washer (D17.5*25) |
14 |
Spring washer (D8.1*12.9) |
26 |
Curved washer (D17.5*25) |
16 |
Curved washer (D8*19) |
27 |
Teflon washer (D10*25) |
17 |
Cross-head screw (M5*12) |
28 |
Allen bolt (M8*55) |
18 |
Screw (M4*12) |
29 |
Washer (D8*16) |
19 |
Washer (D8*25) |
30 |
Locknut (M8) |
20 |
Spring washer (D8*14) |
31 |
Screw (M8*12) |
21 |
End cap |
32 |
Cross-head screw (M5*14) |
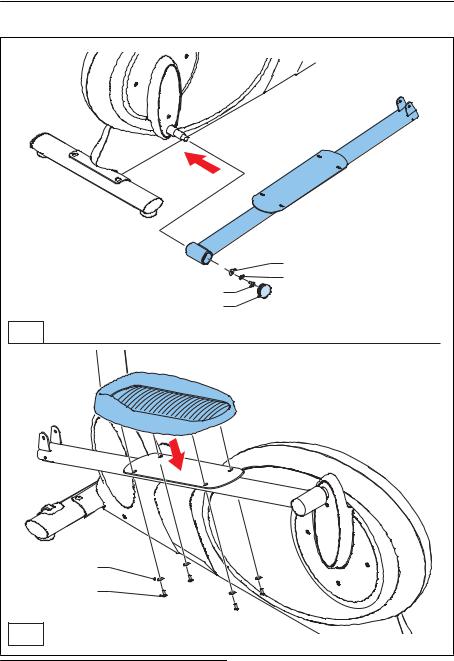
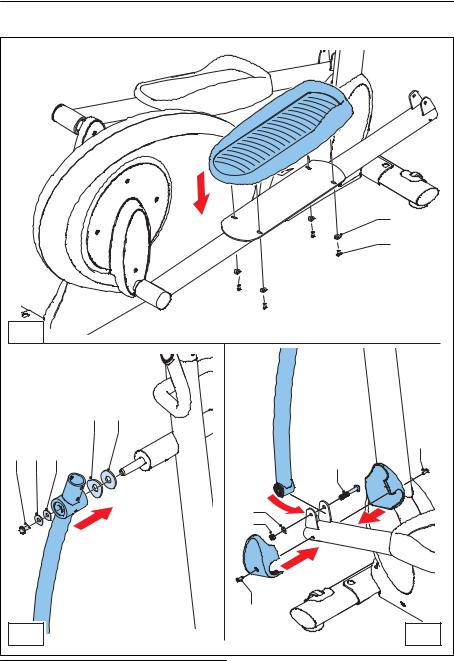
Assembly (fig. D)
WARNING
–Assemble the equipment in the given order.
–Carry and move the equipment with at least two persons.
CAUTION
–Place the equipment on a firm, level surface.
–Place the equipment on a protective base to prevent damage to the floor surface.
–Allow at least 100 cm of clearance around the equipment.
▪Refer to the illustrations for the correct assembly of the equipment.
CR7 |
15 |

EN
Workouts
The workout must be suitably light, but of long duration. Aerobic exercise is based on improving the body’s maximum oxygen uptake, which in turn improves endurance and fitness. You should perspire, but you should not get out of breath during the workout.
To reach and maintain a basic fitness level, exercise at least three times a week, 30 minutes at a time. Increase the number of exercise sessions to improve your fitness level. It is worthwhile to combine regular exercise with a healthy diet. A person committed to dieting should exercise daily, at first 30 minutes or less at a time, gradually increasing the daily workout time to one hour. Start your workout at low speed and low resistance to prevent the cardiovascular system from being subjected to excessive strain. As the fitness level improves, speed and resistance can be increased gradually. The efficiency of your exercise can be measured by monitoring your heart rate and your pulse rate.
Gradually increase speed and resistance according to your own condition. Keep your head up and neck long in order to avoid stress on your neck, shoulders and back. Keep your back straight. Make sure that your feet are centered on the foot pedals and that your hips, knees, ankles and toes are facing forward. Keep your body weight centered over your lower body regardless of whether you lean forward or stand upright. Stop your workout by gradually decreasing speed and resistance. Remember to stretch at the end of the workout.
Pulse rate measurement (hand pulse sensors)
The pulse rate is measured by sensors in the handlebars when the user is touching both sensors at the same time. Accurate pulse measurement requires that the skin is slightly moist and constantly touching the hand pulse sensors. If the skin is too dry or too moist, the pulse rate measurement will become less accurate.
NOTE
–Do not use the hand pulse sensors in combination with a heart rate chest belt.
–If you set a heart rate limit for your workout, an alarm will sound when it is exceeded.
16 |
CR7 |
EN
Heart rate measurement (heart rate chest belt)
The most accurate heart rate measurement is achieved with a heart rate chest belt. The heart rate is measured by a heart rate receiver in combination with a heart rate transmitter belt. Accurate heart measurement requires that the electrodes on the transmitter belt are slight moist and constantly touching the skin. If the electrodes are too dry or too moist, the heart rate measurement will become less accurate.
WARNING
–If you have a pacemaker, consult a physician before using a heart rate chest belt.
CAUTION
–If there are several heart rate measurement devices next to each other, make sure that the distance between them is at least 1.5 metres.
–If there is only one heart rate receiver and several heart rate transmitters, make sure that only one person with a transmitter is within transmission range.
CR7 |
17 |

EN
NOTE
–Do not use a heart rate chest belt in combination with the hand pulse sensors.
–Always wear the heart rate chest belt under your clothes directly in contact with your skin. Do not wear the heart rate chest belt above your clothes. If you wear the heart rate chest belt above your clothes, there will be no signal.
–If you set a heart rate limit for your workout, an alarm will sound when it is exceeded.
–The transmitter transmits the heart rate to the console up to a distance of 1 metre. If the electrodes are not moist, the heart rate will not appear on the display.
–Some fibers in clothes (e.g. polyester, polyamide) create static electricity which can prevent accurate heart rate measurement.
–Mobile phones, televisions and other electrical appliances create an electromagnetic field which can prevent accurate heart rate measurement.
Maximum heart rate (during training)
The maximum heart rate is the highest heart rate a person can safely achieve through exercise stress. The following formula is used to calculate the average maximum heart rate: 220 - AGE. The maximum heart rate varies from person to person.
WARNING
–Make sure that you do not exceed your maximum heart rate during your workout. If you belong to a risk group, consult a physician.
18 |
CR7 |

|
|
EN |
|
|
|
|
|
|
Category |
Heart rate zone |
Explanation |
|
|
|
Beginner |
50-60% of maximum heart |
Suitable for beginners, weight-watchers, |
|
rate |
convalescents and persons who have |
|
|
not exercised for a long time. Exercise at |
|
|
least three times a week, 30 minutes at a |
|
|
time. |
|
|
|
Advanced |
60-70% of maximum heart |
Suitable for persons who want to |
|
rate |
improve and maintain fitness. Exercise |
|
|
at least three times a week, 30 minutes |
|
|
at a time. |
|
|
|
Expert |
70-80% of maximum heart |
Suitable for the fittest of persons who are |
|
rate |
used to long-endurance workouts. |
|
|
|
Use
Adjusting the support feet
The equipment is equipped with 4 support feet. If the equipment is not stable, the support feet can be adjusted.
1.Turn the support feet as required to put the equipment in a stable position.
2.Tighten the locknuts to lock the support feet.
Adjusting the console
The console can be adjusted according to the height and the exercise position of the user.
1.Loosen the console adjustment knob.
2.Move the console to the required position.
3.Tighten the console adjustment knob.
CR7 |
19 |
EN
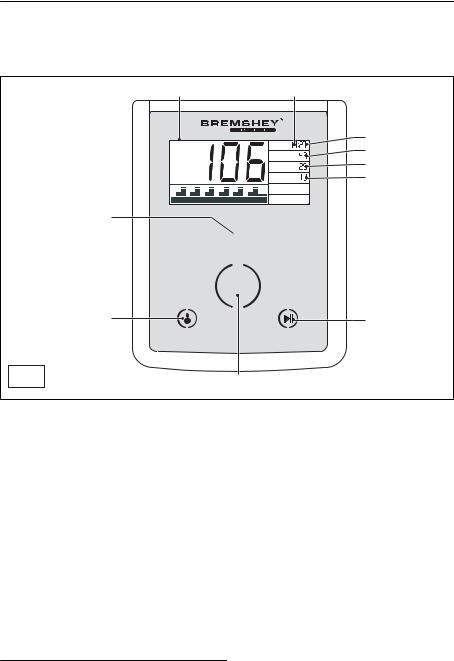
Console (fig. E)
33 |
40 |
TIME |
41 |
|
42 |
||
RPM |
||
DISTANCE K |
43 |
|
CALORIES |
44 |
PULSE 

 45
45
WATT 
 46
46
35
38


 37
37
E
RECOVERY |
MODE |
RESET |
|
|
START |
BODYFAT |
|
STOP |
39 |
|
36 |
34
33 |
Display |
40 |
Menu |
34 |
SELECTION dial |
41 |
Menu item: TIME |
35 |
MODE button |
42 |
Menu item: SPEED/RPM |
36 |
START/STOP button |
43 |
Menu item: DISTANCE |
37 |
RESET button |
44 |
Menu item: CALORIES |
38 |
RECOVERY button |
45 |
Menu item: PULSE |
39 |
BODYFAT button |
46 |
Menu item: LOAD WATT |
20 |
CR7 |
EN
CAUTION
–Keep the console away from direct sunlight.
–Dry the surface of the console when it is covered with drops of sweat.
–Do not lean on the console.
–Only touch the display with the tip of your finger. Make sure that your nails or sharp objects do not touch the display.
NOTE
–The console switches to standby mode when the equipment is not used for 90 seconds.
Explanation of buttons
Button |
Explanation |
|
|
MODE |
Touch the button to confirm your selection. |
|
|
START/STOP |
Touch the button to start the training. Touch the button |
|
again to pause the training (max. 4 minutes). Touch |
|
the button again to continue the training. Touch and |
|
hold the button to stop the training. |
|
|
RECOVERY |
Touch the button to calculate your recovery heart rate |
|
after a workout. |
|
|
BODYFAT |
Touch the button to calculate your body mass index |
|
(BMI) and your body fat percentage. |
|
|
RESET |
Touch the button to return to the menu. Touch and |
|
hold the button to reset the meter. |
|
|
CR7 |
21 |

EN
Explanation of menu items
Menu item |
Explanation |
|
|
TIME |
Select the menu item to set and show the duration |
|
(mm:ss) for the workout. |
|
|
SPEED/RPM |
Select the menu item to set and show the speed (km/h |
|
or mph) or the RPM (rev/min) for the workout. |
|
|
DISTANCE |
Select the menu item to set and show the distance (km |
|
or ml) for the workout. |
|
|
CALORIES |
Select the menu item to set and show the energy |
|
consumption (kcal) for the workout. |
|
|
PULSE |
Select the menu item to set and show the heart rate |
|
limit (bpm) for the workout. |
|
|
LOAD WATT |
Select the menu item to set and show the resistance |
|
(W) for the workout. |
|
|
Before use
1.Turn the SELECTION dial to select a menu item.
2.Touch the MODE button to confirm.
3.Turn the SELECTION dial to change the value for the selected menu item.
4.Touch the MODE button to confirm.
During use
The menu constantly shows the values for the menu items. The different values flash on the display one after another every 6 seconds.
1.Touch the MODE button to stop automatic scanning of the values for the different menu items.
2.Touch the MODE button as many times as required to show information for a specific menu item.
22 |
CR7 |

EN
Selecting a user
If you use the equipment for the first time or after you reset the meter, the user menu is shown on the display. Personal training data - time, distance, energy consumption and heart rate limit - are memorized and recalled when the user is selected. Modified personal training data are memorized automatically.
1.Turn the SELECTION dial to select a user. Touch the MODE button to confirm.
2.Turn the SELECTION dial to set your sex. Touch the MODE button to confirm.
3.Turn the SELECTION dial to set your age. Touch the MODE button to confirm.
4.Turn the SELECTION dial to set your height. Touch the MODE button to confirm.
5.Turn the SELECTION dial to set your weight. Touch the MODE button to confirm.
NOTE
–If you set target values, an alarm will sound and the training stops automatically when a specific target value reaches zero. You can restart the training by touching the START/STOP button.
Program menu
A program menu is shown on the display after selection of a user. ▪ Turn the SELECTION dial to select one of the programs.
Manual Program (MAN)
1.Turn the SELECTION dial to set the time. Touch the MODE button to confirm.
2.Turn the SELECTION dial to set the distance. Touch the MODE button to confirm.
3.Turn the SELECTION dial to set the energy consumption. Touch the MODE button to confirm.
4.Turn the SELECTION dial to set the heart rate limit. Touch the MODE button to confirm.
5.Touch the START/STOP button to start the workout. If you have set target values, the values start to count down.
6.Manually change the resistance during the workout: Turn the SELECTION dial to set the resistance. Touch the MODE button to confirm.
Preset Programs (PROG)
The user can select one of the preset programs on the display.
1.Turn the SELECTION dial to select the required preset program.
CR7 |
23 |

EN
2.Set the time, the distance, the energy consumption and the heart rate limit as described in the section “Manual program”.
3.Touch the START/STOP button to start the workout. If you have set target values, the values start to count down.
4.Manually change the resistance during the workout: Turn the SELECTION dial to set the resistance. Touch the MODE button to confirm.
User Program (USER)
The last used program profile is shown on the display.
1.Touch the START/STOP button to start the workout with your memorized personal training data.
2.Set the time, the distance, the energy consumption and the heart rate limit as described in the section “Manual program”.
3.Touch the START/STOP button to start the workout. If you have set target values, the values start to count down.
4.Manually change the resistance during the workout: Turn the SELECTION dial to set the resistance. Touch the MODE button to confirm.
To modify a program:
1.Turn the SELECTION dial to select a bar in the program profile. Touch the MODE button to confirm. The bar starts to flash.
2.Turn the SELECTION dial to change the value. Touch the MODE button to confirm.
3.Repeat the above steps for other bars in the program profile.
4.Touch and hold the MODE button for 2 seconds to complete the modification of the program.
Heart Rate Control Program (H.R.C.)
1.Turn the SELECTION dial to select one of the workout intensities: (55%, 75%, 90% or TARGET).
2.If you select TARGET, insert the target heart rate.
3.Touch the START/STOP button to start the workout. If you have set target values, the values start to count down.
4.The resistance is adjusted automatically, so that your heart rate target will be reached and maintained.
24 |
CR7 |

EN
Constant Watt Program (WATT)
1.Turn the SELECTION dial to set the target resistance. Touch the MODE button to confirm.
2.Set the time, the distance, the energy consumption and the heart rate limit as described in the section “Manual program”.
3.Touch the START/STOP button to start the workout. If you have set target values, the values start to count down.
4.The resistance is adjusted depending on your speed, so that your target resistance will be reached and maintained.
5.Manually change the target resistance during the workout: Turn the SELECTION dial to set the resistance. Touch the MODE button to confirm.
Recovery
The recovery heart rate can be calculated after a workout. The recovery heart rate can only be calculated if the heart rate measurement is activated and the heart rate is shown on the display. The recovery heart rate can range from F1 to F6. F1 is the best recovery heart rate.
1.Touch the RECOVERY button. After 60 seconds, the display shows the recovery heart rate.
2.Touch the RECOVERY button again to go back to the main menu.
Body fat
1.Touch the BODY FAT button.
2.Hold both hands on the handgrips for 8 seconds. Make sure that your hands are constantly touching the hand pulse sensors. The display shows the body mass index (BMI) and the body fat percentage.
3.Touch the BODY FAT button again to go back to the main menu.
Metric system ~ Imperial system
For speed and distance, metric units or imperial units can be used as default units of measurement.
1.Locate the KM/ML switch on the rear of the console.
2.Move the KM/ML switch to “KM” to use the metric system as the default system of measurement.
3.Move the KM/ML switch to “ML” to use the imperial system as the default system of measurement.
CR7 |
25 |

EN
4.Wait until the display switches off and put the equipment in motion to apply the changes.
Cleaning and maintenance
The equipment does not require special maintenance. The equipment does not require recalibration when it is assembled, used and serviced according to the instructions.
WARNING
–Before cleaning and maintenance, remove the adapter.
–Do not use solvents to clean the equipment.
▪Clean the equipment with a soft, absorbent cloth after each use.
▪Regularly check that all screws and nuts are tight.
▪If necessary, lubricate the joints.
Generator
The equipment is equipped with a generator. You do not need to plug in an adapter, but generate your own power by operating the equipment. A back-up battery pack supports the generator to keep the console activated if the equipment is operated very slowly or not at all. The display will remain on for 90 seconds.
If the RPM is more than 45, the battery pack will be recharged. If the battery pack is empty, use the supplied adapter (6V, 500 mA) to recharge the battery pack. To save battery lifetime, the maximum charging time is 6 hours. If the battery pack must be replaced, contact your dealer for a replacement battery pack.
Replacing the battery pack
1.Locate the battery pack compartment on the underside of the equipment.
2.Remove the cover.
3.Remove the old battery pack.
4.Insert the new battery pack.
5.Mount the cover.
26 |
CR7 |
EN
Defects and malfunctions
Despite continuous quality control, defects and malfunctions caused by individual parts can occur in the equipment. In most cases, it will be sufficient to replace the defective part.
1.If the equipment does not function properly, immediately contact the dealer.
2.Provide the model number and the serial number of the equipment to the dealer. State the nature of the problem, conditions of use and purchase date.
Transport and storage
WARNING
–Before transport and storage, remove the adapter.
–Carry and move the equipment with at least two persons.
1.Remain standing in front of the equipment on each side and take a sturdy grip at the handlebars. Lift the front of the equipment so as to lift the rear of the equipment on the wheels. Move the equipment and carefully put the equipment down. Place the equipment on a protective base to prevent damage to the floor surface.
2.Move the equipment carefully over uneven surfaces. Do not move the equipment upstairs using the wheels, but carry the equipment by the handlebars.
3.Store the equipment in a dry place with as little temperature variation as possible.
CR7 |
27 |

EN
Technical data
Parameter |
Unit of |
Value |
|
measurement |
|
|
|
|
Length |
cm |
166 |
|
inch |
66 |
|
|
|
Width |
cm |
69 |
|
inch |
27 |
|
|
|
Height |
cm |
164 |
|
inch |
65 |
|
|
|
Weight |
kg |
65.5 |
|
lbs |
145 |
|
|
|
Max. user weight |
kg |
135 |
|
lbs |
300 |
|
|
|
Adapter |
|
|
Voltage |
V |
6 |
Current |
mA |
500 |
|
|
|
Warranty
The product has a warranty from the date of delivery (to be documented by invoice or delivery note). Further information on warranty terms can be obtained from your local dealer. The warranty terms may vary from one country to another. Damages caused by normal wear, overloading or improper handling are excluded from the warranty.
Damages caused by material or manufacturing faults are covered by the warranty and will repaired or replaced at no cost.
Declaration of the manufacturer
Accell Fitness Division BV declares that the product is in conformity with the following standards and directives: EN 957 (HA), 73/23/EEC, 89/336/EEC. The product therefore carries the CE label.
28 |
CR7 |

EN
04-2011
Accell Fitness Division BV
Purmerweg 1
1311 XE Almere
The Netherlands
Disclaimer
© 2011 Accell Fitness Division BV All rights reserved.
The product and the manual are subject to change. Specifications can be changed without further notice.
CR7 |
29 |

DE
CROSSTRAINER
Willkommen in der Welt von Bremshey Sport!
Danke, dass Sie dieses Gerät von Bremshey erworben haben. Bremshey bietet eine breite Palette an Heim-Fitnessgeräten wie beispielsweise Crosstrainer, Laufbänder, Trainingsfahrräder, Rudergeräte und Vibrationsplatten an. Die Bremshey Geräte sind für die ganze Familie geeignet - ganz egal, wie fit man ist. Weitere Informationen finden Sie auf unserer Website unter www.bremshey.com
Warnhinweise zur Sicherheit
WARNUNG
–Lesen Sie die Warnhinweise zur Sicherheit und die Anweisungen. Werden die Warnhinweise zur Sicherheit und die Anweisungen nicht befolgt, kann dies zu Personenverletzungen und Schäden am Gerät führen. Bewahren Sie die Warnhinweise zur Sicherheit und die Anweisungen zur künftigen Bezugnahme auf.
▪Das Gerät ist nur für den Hausgebrauch geeignet. Das Gerät ist nicht für den gewerblichen Gebrauch geeignet.
▪Wenn dieses Gerät von Kindern oder Personen mit körperlicher, sensorischer, geistiger oder motorischer Behinderung verwendet wird, oder wenn nicht genügend Erfahrung und Kenntnisse vorhanden sind, kann dies zu Gefahrensituationen führen. Personen, die für deren Sicherheit verantwortlich sind, müssen klare Anweisungen geben oder den Gebrauch des Geräts beaufsichtigen.
▪Bevor Sie Ihr Training starten, nehmen Sie Kontakt mit einem Arzt auf, um Ihre Gesundheit kontrollieren zu lassen.
▪Falls Sie Übelkeit, ein Schwindelgefühl oder andere anormale Symptome verspüren, hören Sie unverzüglich mit Ihrem Training auf und wenden Sie sich an einen Arzt.
▪Um einen Muskelkater zu vermeiden, starten Sie jedes Training mit Aufwärmen und beenden Sie es mit Abkühlen. Denken Sie daran, sich am Ende des Trainings zu dehnen.
▪Das Gerät ist nur für den Gebrauch in geschlossenen Räumen geeignet. Das Gerät ist nicht für den Gebrauch im Freien geeignet.
30 |
CR7 |
Loading...