

Page 1
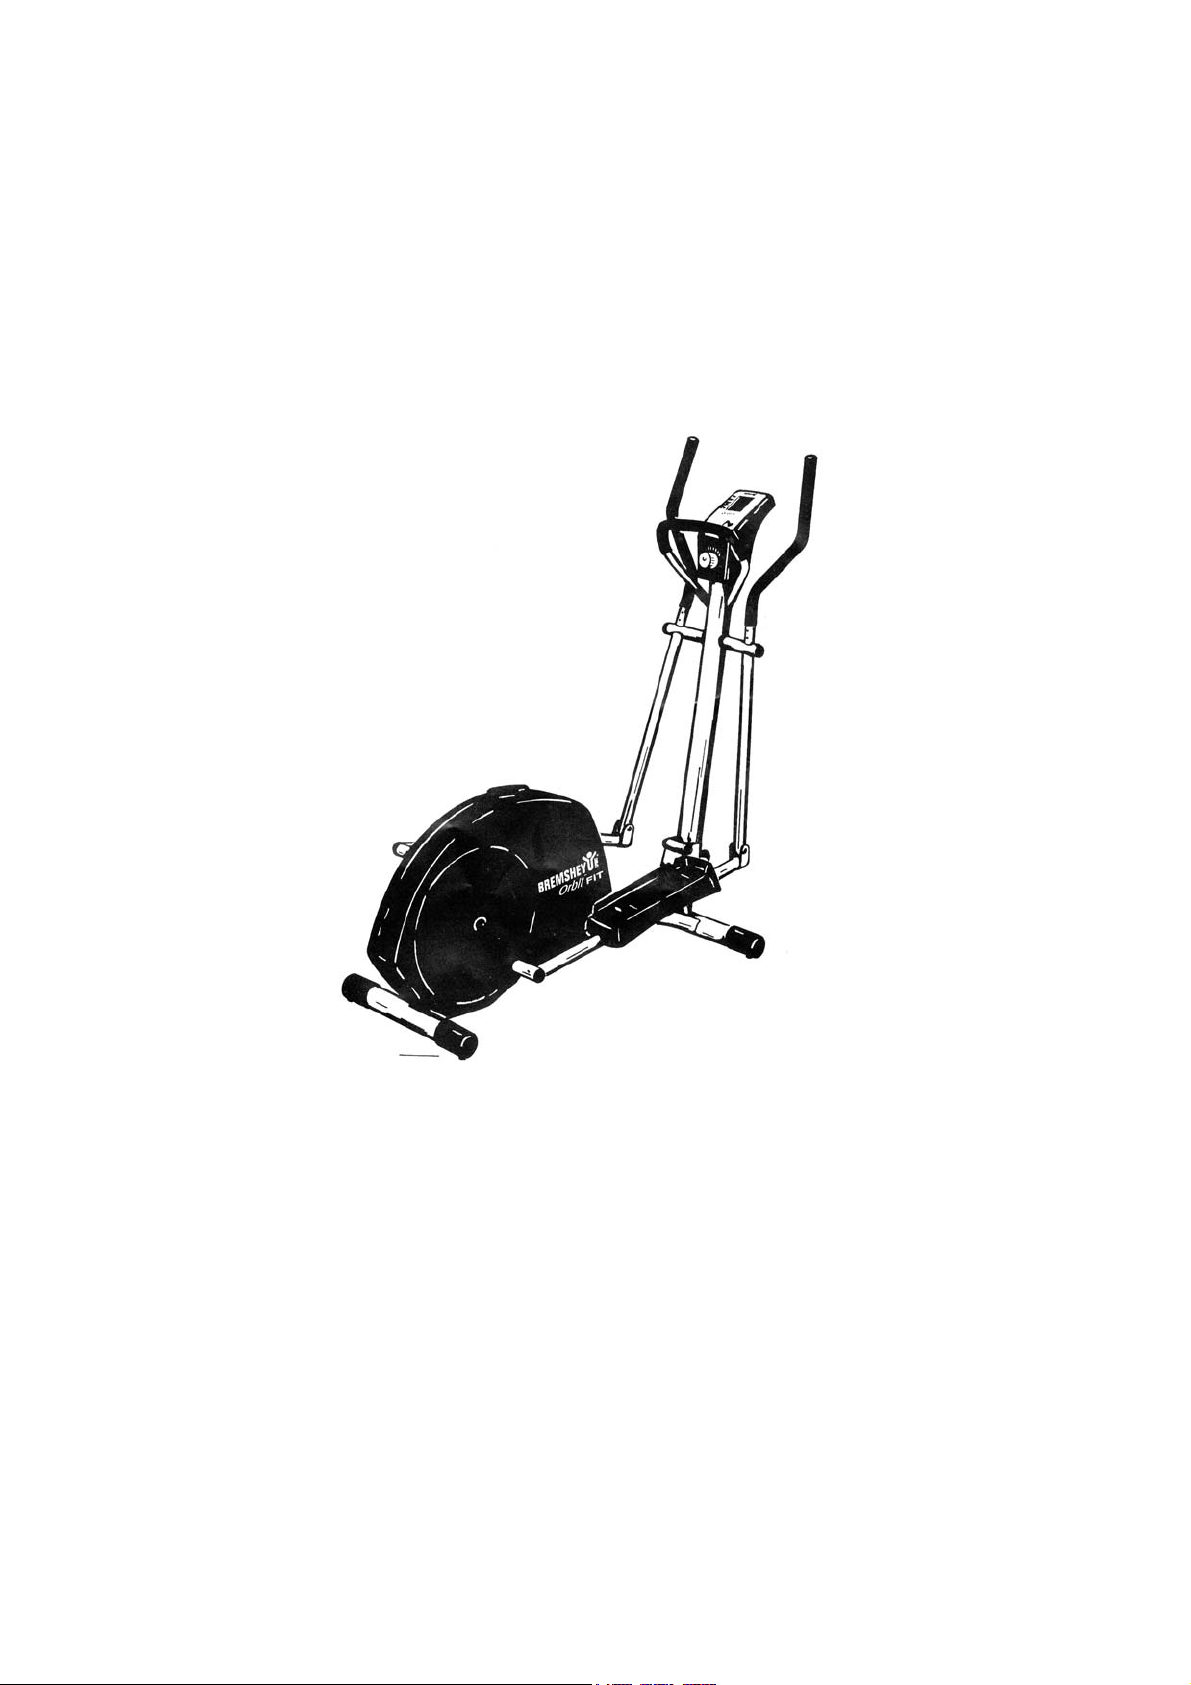
Orbit® FIT
Assembly and Operating Instructions
Article Number : 4182/B
Your new home trainer from Bremshey-Sport was developed specifically for training at
home. Bremshey-Sport and its international agents accept no liability for injury or damage
to equipment, caused as a result of prolonged use in commercial fitness centres, sports
clubs or similar venues.
BREMSHEY SPORT
1
Page 2
2
Page 3
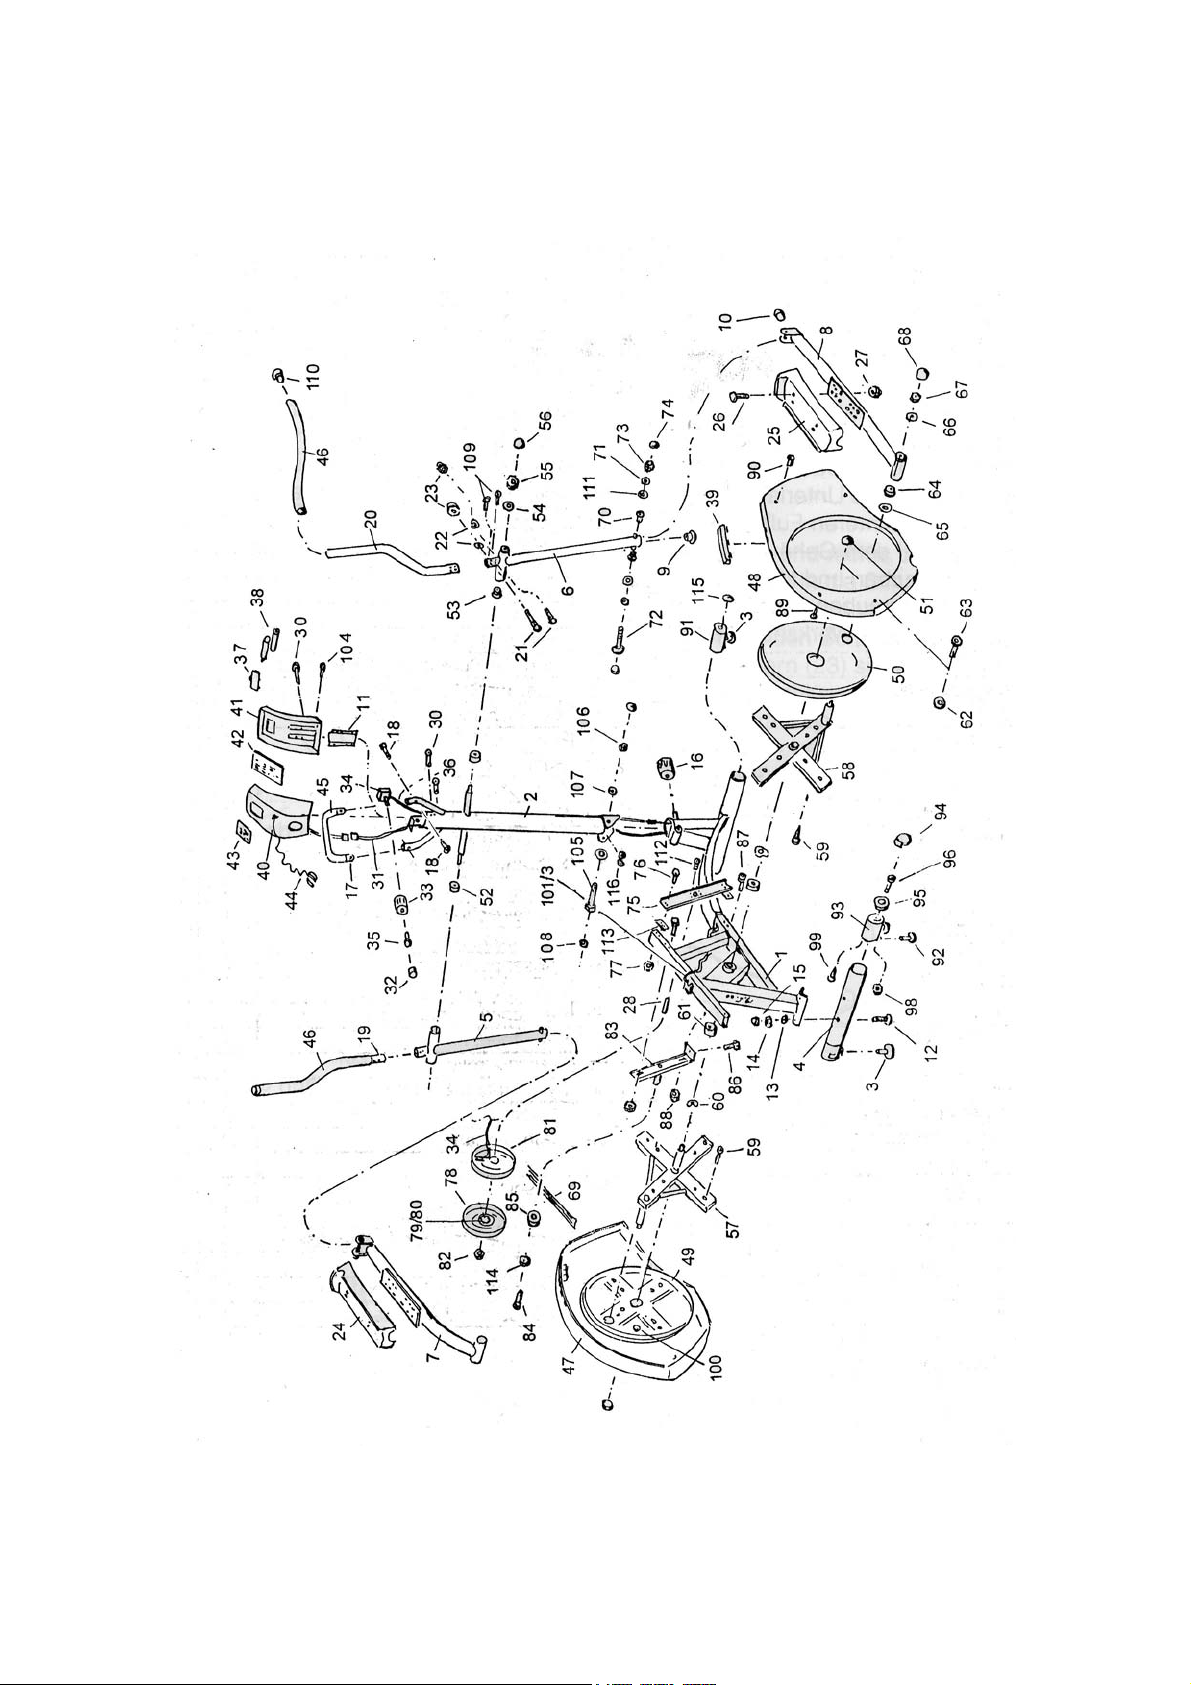
EXPLODED DRAWING
A
rticle Number 4182/B
3
Page 4

Index for disposal of materials Packaging
a = synthetic material, thermoplastics g = rubber Outer carton e
b = synthetic material, thermosetting plastics h = electronics Cardboard insert e
c = synthetic material, polyethylene j = batteries Polystyrene insert d
d = polystyrene k = glass Foil bag c
e = paper / cardboard l = others Foam insert c
f = metal
ASSEMBLY INSTRUCTIONS
Firstly, please take all the parts out of the packaging. Get to know all the individual parts, such as screws and tools. Screws,
washers, etc, are shown full size. This will make it easier for you to allocate them correctly. When assembling, place the unit
on a soft surface (eg rug or corrugated cardboard). Do not remove the cardboard packaging for the rear stabiliser mounting
until you are ready to assemble the stabiliser. You should not stand the unit on the housing. Please follow these instructionsfor
assembly. Tighten screws and nuts loosely to start with. Only when you have finished assembling the unit should you tighten
all the screws fully. CAUTION : Do not overtighten in the case of plastic parts. The tools required (socket wrench and cross
head screwdriver) are provided.
1) First fix the rear stabiliser (4.1), with the
adjustable feet attached. To the rear of the base
frame (1.3) with rollers (4.2), using screws (12),
washers (13) and locking nuts (14). Ensure that
the rollers are facing forwards downwards when
assembling. Place caps (15) on the nuts. Use the
socket wrench with the screwdriver inserted in it.
2) Loosen the adjusting handwheel (16)
until you can fold the handlebar support
pipe (2) upwards. Then tighten the
adjusting handwheel.
IMPORTANT NOTE: Ensure that the
curved washer (135) is placed between
the handwheel (16) and the cover plate
before the machine is used.
4
Page 5
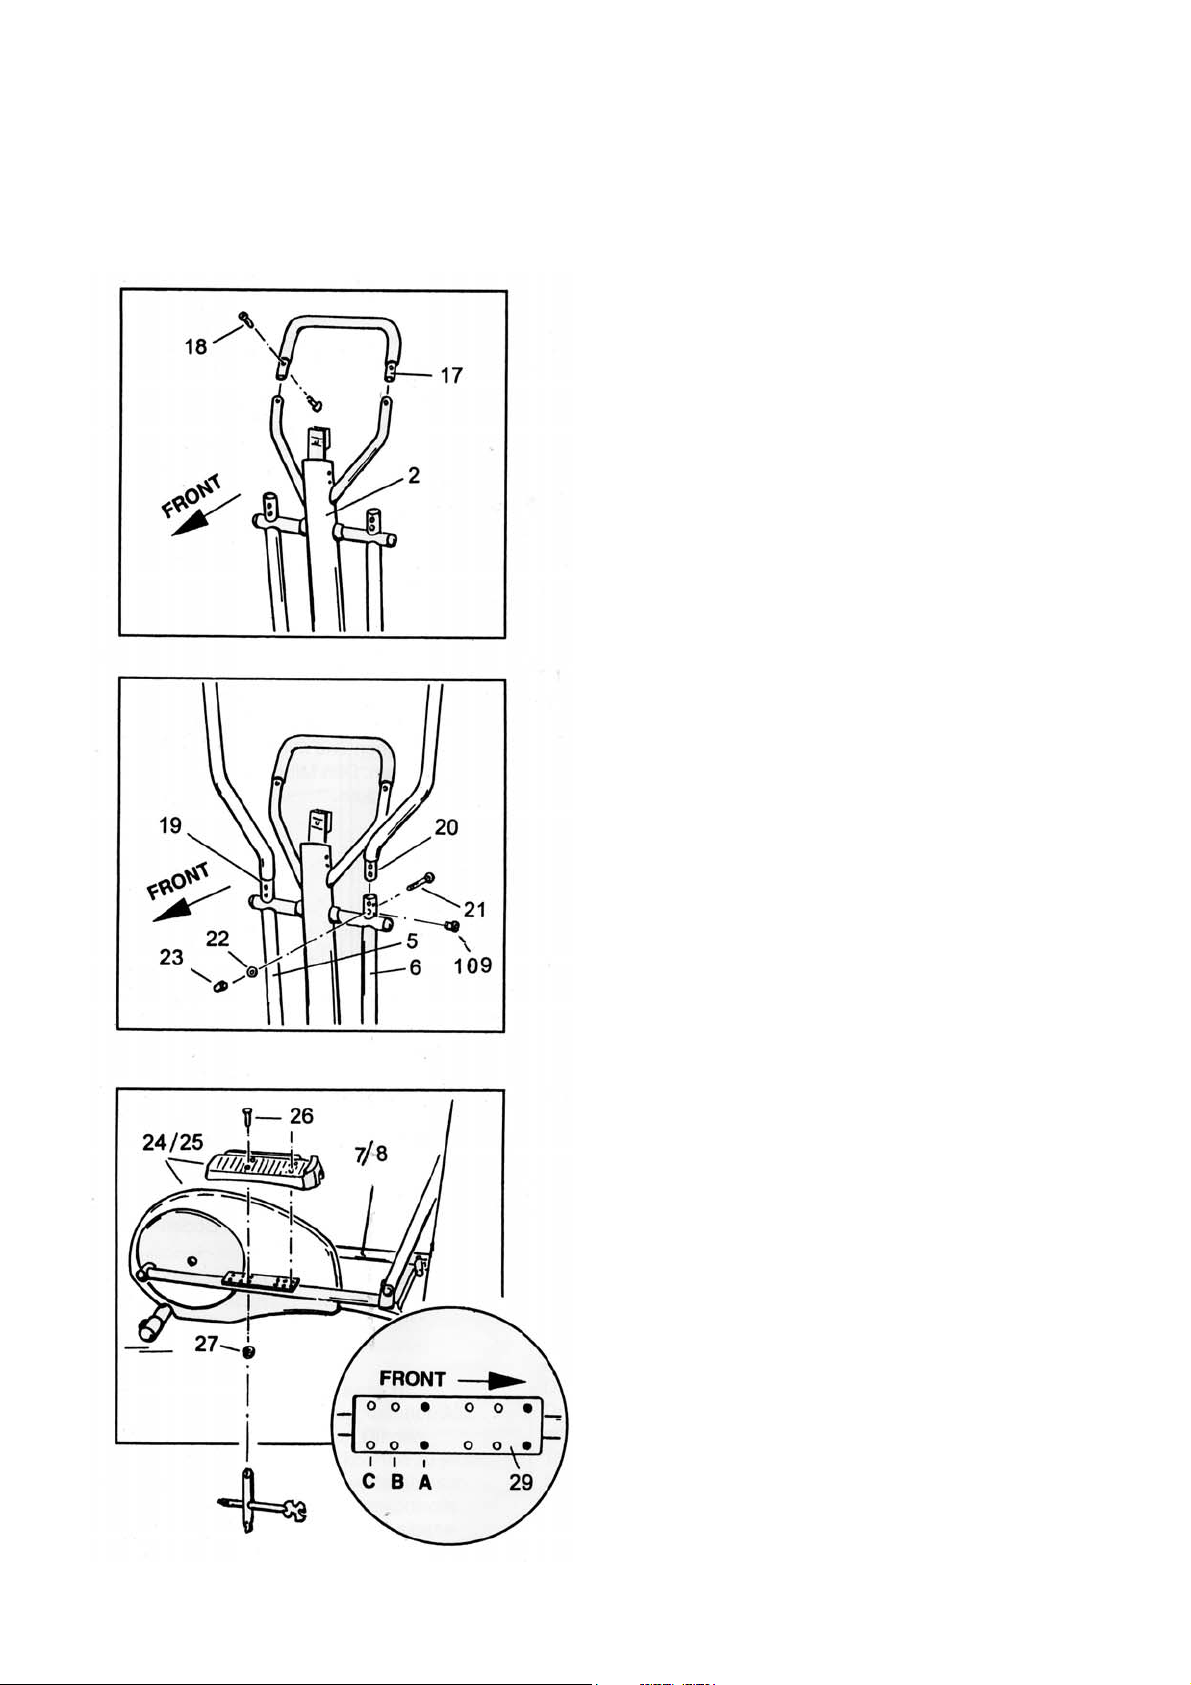
3) Screw the rigid handlebar pipe
(145) onto the cover plate on the
handlebar support tube and fix it with 2
screws (130). Use the Allen key
provided.
4) Insert the left and right moving
handlebars (20.1) into the swing arms
(5.1/6.1) and secure with the
handwheel (134)
5) Attach the footboards (24, left / 25,
right) to the pedal arm plates (7.2, left /
8.2, right) with the round head screws
(26) and the 4 locking nuts (27). To
start with, select the front, lowest
position (A). Please also refer to page
19. Use the socket wrench with the
screwdriver inserted in it.
5
Page 6
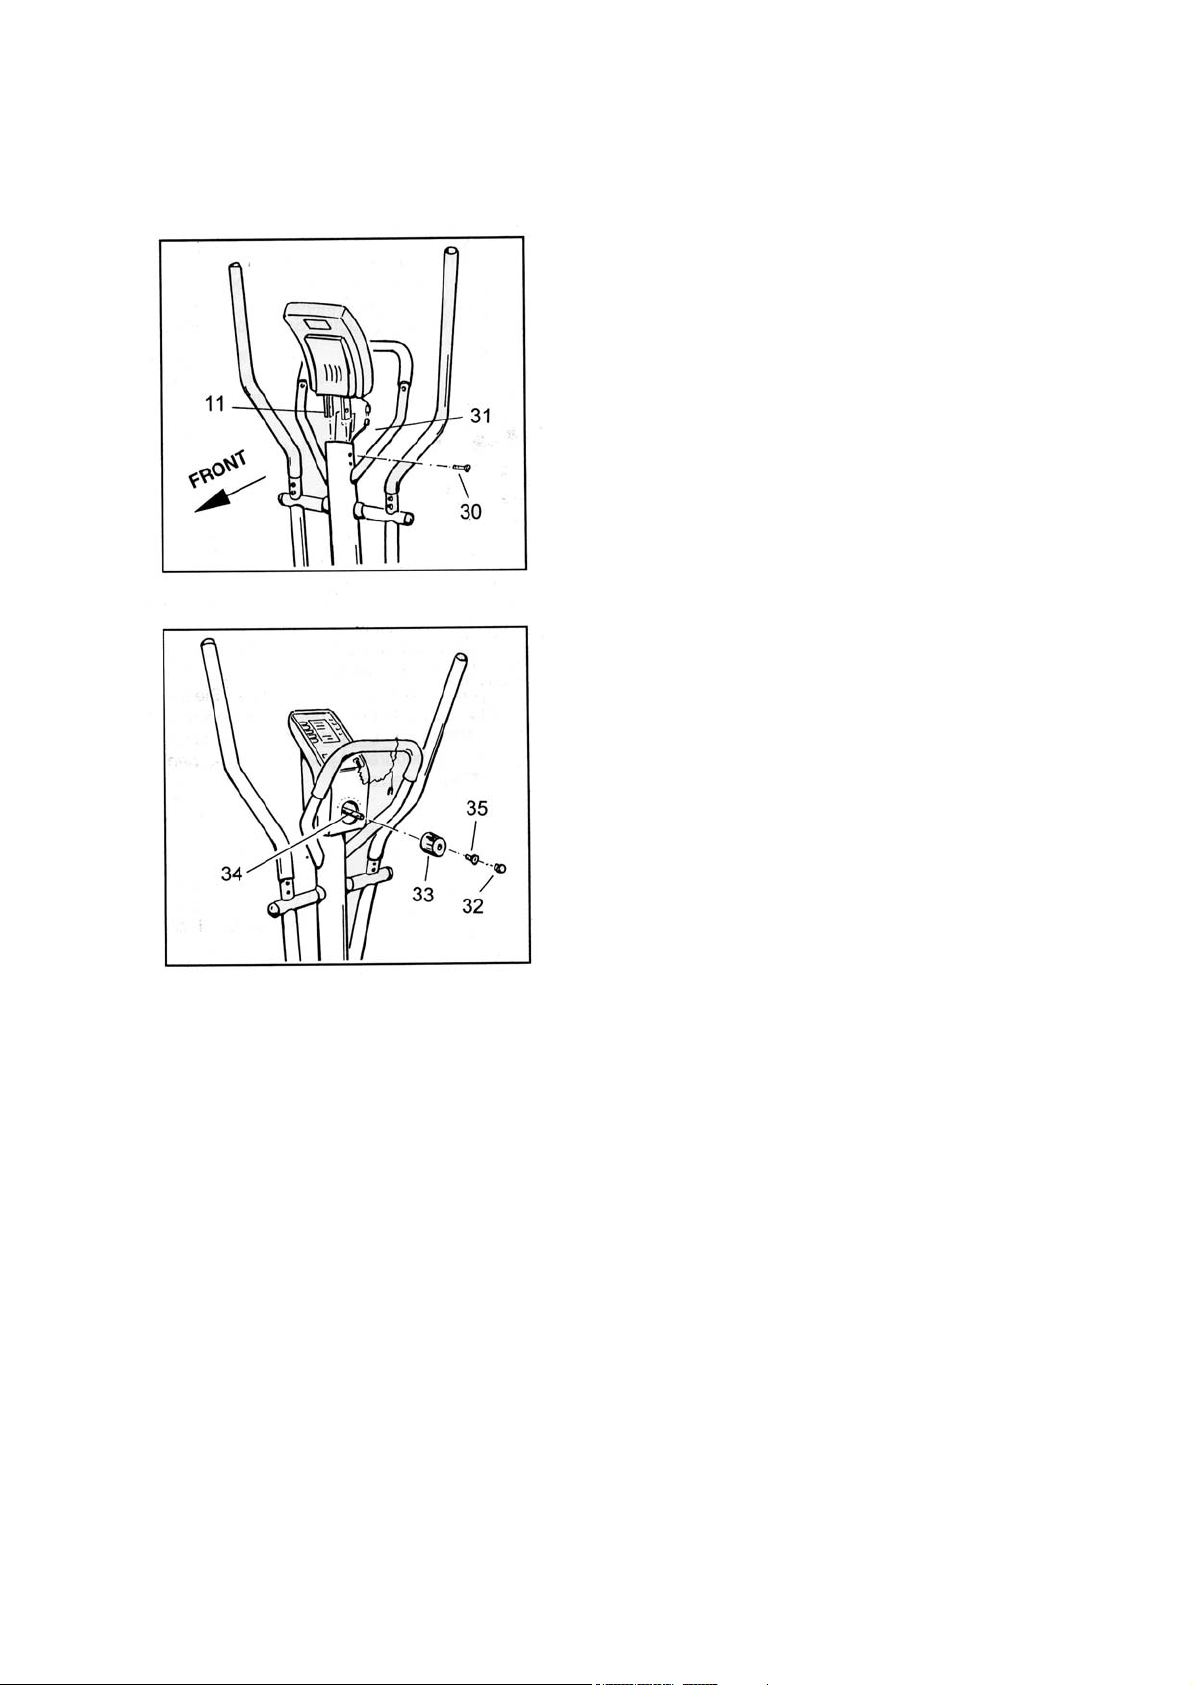
6) In order to assemble the cockpit, you
will need screws (30). First plug the
cockpit cable securely into the
connection cable (31), and only then
remove the sticky tape. Push the
cockpit bracket (11) into the handlebar
support pipe and screw it on. Caution :
do not get the cable caught.
7) Push the setting handwheel (33)
onto the adjusting unit shaft (34) and
secure with screw (35). Push on the
centre stopper (32).
CHECK
1. Check again that all the screws and nuts are secure.
2. Take special care that the fixing handwheel is securely tightened.
3. Ensure that the equipment is positioned on a flat surface, and you have enough room for your exercises.
4. If the equipment wobbles on an uneven surface, you can rectify this using the floor balancing screws (3).
5. The equipment is now ready for your training session.
6
Page 7
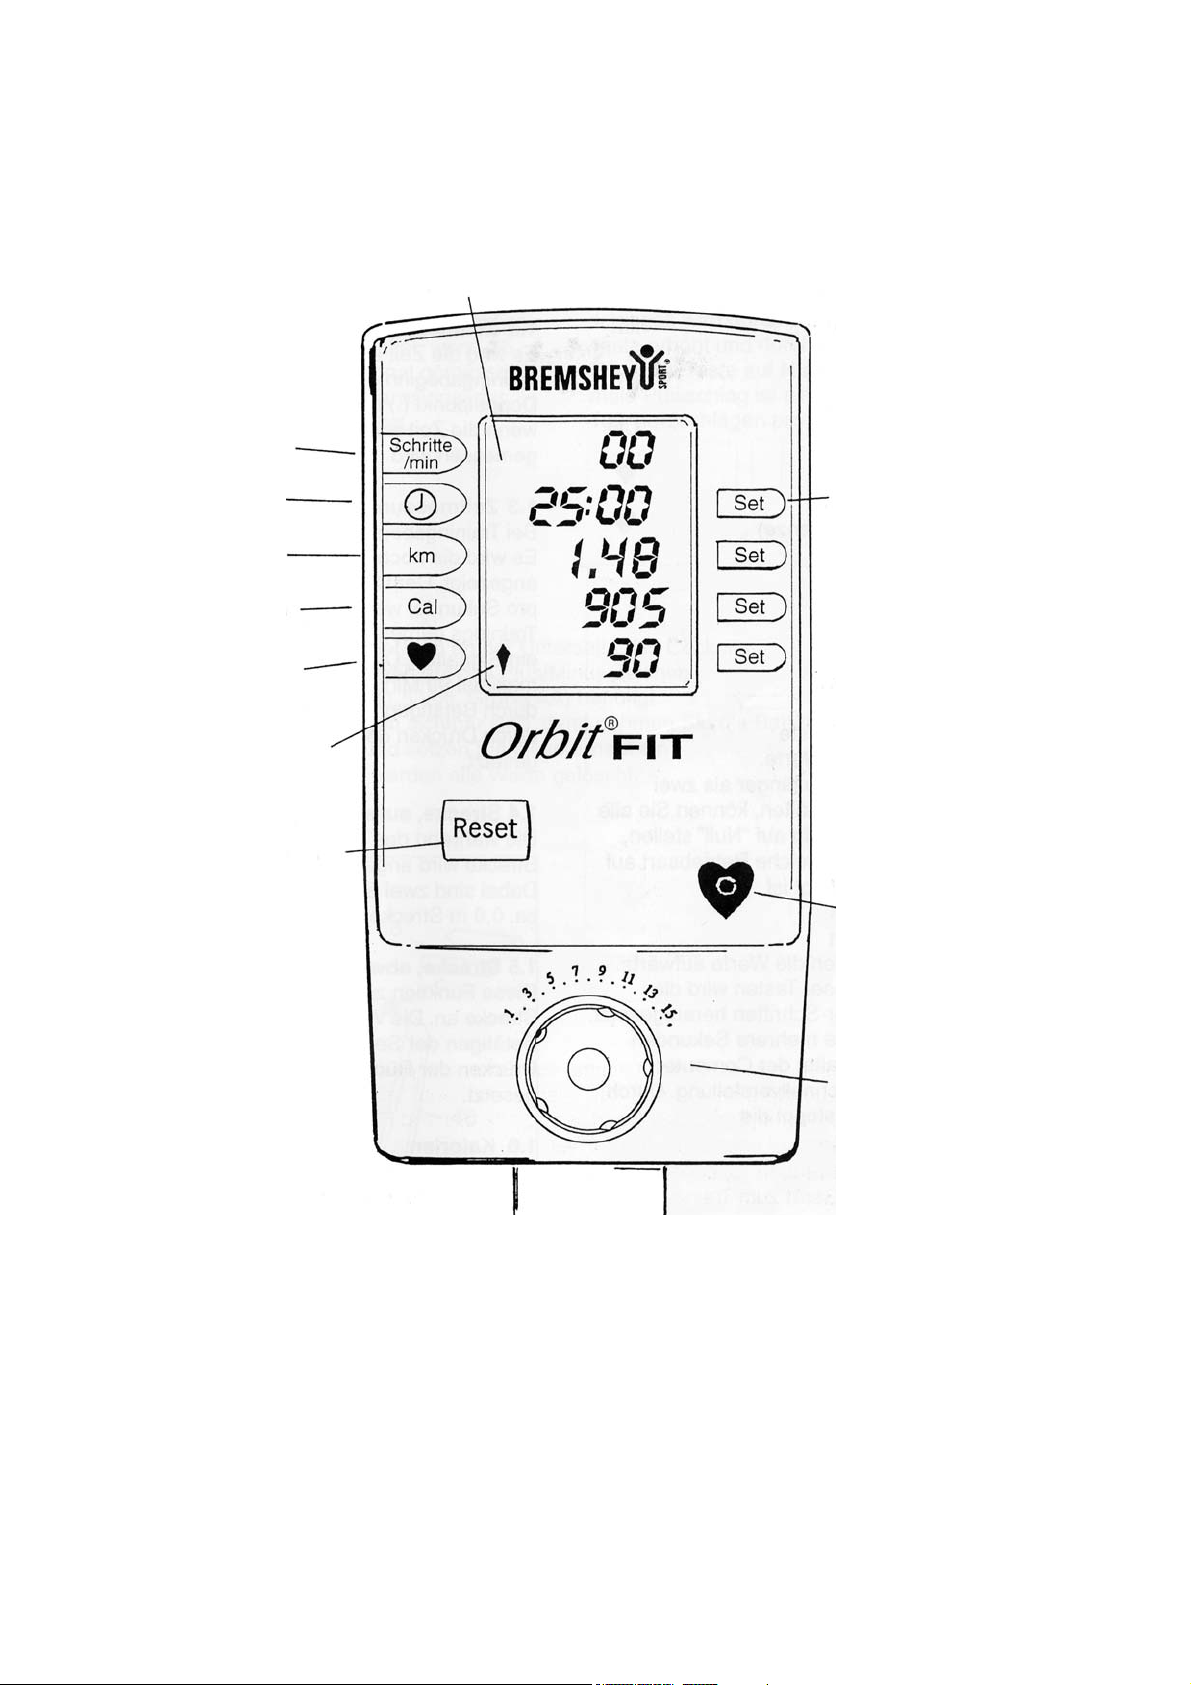
COMPUTER OPERATING INSTRUCTIONS ORBIT FIT
COCKPIT VIEW
Display
Speed
Time
Distance
Calories
Pulse/upper limit
Selected function
Adjust values
Reset
Socket for ear clip
INTRODUCTION
Your Orbit Fit is equipped with an easyto-operate computer. All the functions
are shown on the display at the same
time. You can read off the current
training values at any time. This enables
you to control your training session
precisely. Each function has its own key.
Setting handwheel
AUTOMATIC ON/OFF
The computer is switched on
automatically by touching the footboards
or by pressing a key on the computer.
After around 4 minutes without any
motion, or without pressing a key, the
computer switches off automatically.
7
Page 8

FUNCTIONS
USING THE COMPUTER
1.1 Step-speed Steps/min
1.2 Time measurement, increasing
1.3 Time measurement, decreasing
1.4 Distance, increasing km
1.5 Distance, decreasing km
1.6 Calories Cal
1.7 Pulse measurement
1.8 Pulse limit (upper limit)
Key functions :
Reset Reset key
Deletes the current values.
If you keep this key pressed for more than
2 seconds, you can set all the functions to
"zero" at the same time, irrespective of
which type of operation is currently being
displayed.
1.1 Speed
During your training session, the step speed
is counted continuously. The values are
displayed in steps per minute.
1.2 Time measurement (increasing)
The time passed since starting the training
session is displayed. The colon (:) flashes
once per second, if the time is being
measured during the training session.
1.3 Time measurement (decreasing)
When the training session starts, the time is
measured. The time remaining in the
training session is displayed. The colon (:)
flashes once per second, if the time is being
measured during the training session. The
time can be set to a maximum of 99
minutes. The values are increased by
pressing the set key, and reset to zero by
pressing the reset key.
1.4 Distance (increasing)
The distance covered during the training
session is displayed (0 - 999.9 km). Two
steps (one revolution) cover a distance of
0.8 m.
Set Set keys
Set keys adjust the values upwards.
By pressing these keys, the setting is
increased in single steps. If the set key is
pressed for several seconds, the computer
automatically switches over to fast
adjustment. By pressing the key again,
the fast adjustment stops.
1.5 Distance (decreasing)
This function displays the distance still
remaining. The values are increased by
pressing the set key, and reset to zero by
pressing the reset key.
1.6 Calories
Approximate energy consumption during the
training session is displayed.
Notes relating to calorie measurement :
This equipment calculates energy
consumption based on average values.
However, as everyone has different
capabilities for producing energy (the
so-called degree of effectiveness), the
energy consumption displayed can
inevitably only be an approximation of the
actual consumption.
8
Page 9

1.7 Pulse measurement
The pulse rate is obtained using the ear
sensor. The heart symbol flashes in time
with the heartbeat (from 40 - 239 beats per
minute). The display only flashes if a
measurement is being taken. Please note
that the pulse measurement needs a few
seconds to obtain a precise average value.
The pulse function switches off
automatically, if no heart signal is
measured for 16 seconds. In addition, the
warning signal for the pulse upper limit is
also switched off.
Changing the batteries
1) The battery compartment is located on the bottom of the cockpit.
2) Take care to follow the plus/minus polarity symbols when inserting the batteries.
3) 2 batteries (1.5 Volts, Size AA) are required.
4) If you find that not all the displays are visible, take the batteries out again for 15 seconds and then
re-insert them.
5) All the values are erased when batteries are changed.
1.8 Pulse limit (upper limit)
The pulse upper limit set is displayed.
The desired pulse upper limit is adjusted
using the set key. By pressing the set
key, the pulse limit function is switched
on. If an upper limit has been set, a
signal will sound where this is exceeded.
The value for the maximum pulse rate is
increased by pressing the set key, and
reset to zero by pressing the reset key.
The maximum pulse rate can be set
between 40 and 239 heartbeats per
minute.
Caution : In order to avoid damage to the liquid crystal display, please protect the equipment from
direct sunlight or impacts and knocks. Ensure that the electronic display does not get damp.
9
Page 10

Notes relating to pulse measurement with the ear clip :
Please push the plug on the end of the ear clip cable into the socket on the computer. Ensure
that the plug has engaged fully. The pulse measurement occurs when the ear clap is attached
to the earlobe. When blood flows into the small artery in the ear, the lighting current emitted
from the ear clip is interrupted by each beat. The signal obtained in this way is displayed as a
pulse frequency. The computer needs around 4 seconds to display the rate for the first time.
The pulse measurement starts immediately the electronic display is switched on by pressing a
key, and remains active while the ear clip is securely attached to the earlobe. Above all in the
case of high pulse frequencies, measuring the pulse with an ear clip is not always very reliable.
The accuracy of the measurement can be affected by any possible interference, which can be
caused by the movement of the ear clip during the training session. In some cases, even a
slight movement can affect the stability of the pulse value displayed. For this reason it is
recommended that the ear clip cable is fixed with the clasp provided (eg to your collar). If the
electronic display does not react to the pulse of the person training, please rub your earlobe a
little with your fingertip, in order to improve the blood supply. The pulse measurement can also
be affected by the physiological characteristics of the person training, such as poor blood supply
to the earlobe.
Collar Clasp
Wireless heartbeat measurement
Wireless heartbeat recording has proven to be a reliable method of heartbeat measurement,
whereby the heartbeats are recorded directly from the chest using an electrode belt. The
impulses are transferred from the belt via an electro-magnetic field to an additional receiver in
the cockpit.
The chest belt and receiver adapter can be obtained as accessories from specialist shops.
Determining the maximum pulse frequency
The effectiveness of the training session on the body depends on the pulse frequency during
the training session. For example, a long training session, at a pulse rate of 50 - 60% of the
maximum pulse rate, encourages the body to change fat into muscle. This means that fat
reserves are broken down. During a training session at a pulse rate of 70 - 85% of the
maximum value, the breathing organs and general endurance levels, in other words your
"condition", are developed further, in addition to the heart activity.
If you do not know your maximum pulse rate (upper limit), then you can determine this
approximately using the following diagram. However it is recommended that you get a doctor
to check this value.
10
Page 11

READING YOUR OWN HEART FREQUENCY RANGE
Heart frequency in beats/minute
Maximum
85%
70%
Recovery
level
Age
Control your training success
Record your bodily development regularly in a checklist, which should contain the following details :
at the start after after
6 months 12 months
Height
Weight
Circumference of : chest, breathing out
chest, breathing in
upper arm, right/left
waist
thigh, right/left
lower leg, right/left
Using the example of a
40-year old, this diagram
shows that the vertical line
above the age 40 cuts through
the grey area at around 128
and 154. The training session
pulse rate should therefore lie
between 128 and 154 beats
per minute (= 70 - 85% of the
maximum pulse frequency).
A table like this is extremely useful! It serves to control success and is also very motivating!
The time taken to regenerate the pulse applies as a measurement of your condition. Check the time it takes for your
pulse to return to normal after the same exercise programme. The shorter the time, the better your condition.
TECHNICAL DATA :
Equipment characteristics
Drive : Grooved belt
Brake : Permanent magnets
Braking system : Dependent on number
of revolutions (step
dependent)
Operating temperature : approx 10° to 40°C
Storage temperature : approx -20° to 50°C
Size : approx L 146 / W 55 /
H 162 cm
Weight : approx 45 kg
Loading : 120 kg maximum
Brake value setting : By handwheel
(15 settings)
Computer functions
Time 00:00 - 99:00
Steps/min 1 - 999
Distance, km 1 - 99
Calories 0 - 999
Pulse/upper limit up to 239
11
Page 12

IMPORTANT SAFETY INFORMATION
Please use the training equipment only as shown and described in the exercise instructions. Incorrect use can lead to
injury and may damage your health.
-If you feel ill, dizzy or have any other abnormal symptoms, the training session should be stopped
immediately and you should consult a doctor.
-The equipment should basically only be used by one person.
-The equipment should be placed where possible on a flat surface. Any unevenness in the surface
should be balanced out.
-When setting up the equipment, please ensure that there is enough space in all directions. For the
Orbit Fit you need an area of around 110 x 150 cm.
-Before starting the training session, please ensure that the equipment is completely intact. Never
train on faulty equipment.
-Levers and other setting mechanisms should not disturb the training session.
-This home trainer is not a ladder. Please do not stand, for example, on the housing.
-Never put your hands near any moving parts.
-Always wear suitable clothing and shoes to use the equipment.
-In order to avoid aching muscles, do not forget your warm up and cool down exercises.
This equipment was designed according to the latest knowledge with respect to technical safety. Any sources of
danger, which could cause injury, have been avoided as far as possible, or secured appropriately. The equipment
should be used exclusively by adults. Incorrect or excessive training can damage your health!
This equipment is a training unit for use in the home sector, according to EN 957-1 (Class BH), and is not for
professional use (eg in fitness studios) or for a sector with uncontrolled access to anyone (eg public baths,
etc). This equipment is not suitable for therapeutic purposes. This equipment was checked with a dummy
weight of 100 kg, taking the safety factors of the European standard into consideration. No liability is
accepted for injury or damage to equipment, which results from use outside the home sector.
The training equipment is a sports unit and not a toy for children. Due to the natural instinct of children for play and
their eagerness to experiment, situations and occasions can occur, for which the training equipment was not built, nor
is it secured against such situations, and responsibility for this on the part of the manufacturer is excluded in these
cases.
If, nevertheless, you let children use the training equipment, you must take into consideration their mental and bodily
development, and above all their temperament, supervise them if appropriate, and above all instruct them in the
correct use of the equipment.
The equipment must be assembled carefully by an adult. Training must never commence before the assembly
procedure has been completed correctly. If training is carried out regularly, the whole unit should be checked every
one to two months. This applies in particular with respect to the fixing elements, such as screws, nuts and bolts. So
that the safety of the equipment is guaranteed, parts damaged through wear and tear should be replaced immediately.
The unit should not be used again until safety levels have been reinstated. Solely those maintenance measures and
settings described in these assembly and operating instructions should be carried out. The maintenance instructions
stated must be followed.
12
Page 13

INFORMATION
Maintenance :
This equipment is robust and suitable for long periods of use. Maintenance is not required in the case
of normal use. However, if it is used a great deal, the upper and lower friction bearings on the moving
arms should be re-greased after about 500 km has been completed. Please check regularly that all
screws are seated securely.
Cleaning :
Please do not use any caustic substances when cleaning the equipment. Use a damp cloth for
cleaning and ensure that the cockpit and drive do not get wet.
TROUBLESHOOTING
PROBLEM :
No display after switching on.
Display unreadable
No reaction after pressing a key.
No speed display.
No pulse frequency display or incorrect
measurement.
RECTIFICATION :
Remove batteries and re-insert them
correctly after more than 5 seconds.
If necessary, check with new
batteries.
Check that the cable connection is
inserted correctly. You will find the
plug in the handlebar support pipe
(unscrew the cockpit).
Has the plug from the ear clip cable
been inserted correctly into the
cockpit? Is the clip located correctly
on your ear?
Read operating instructions.
13
Page 14

GENERAL TRAINING TIPS
With the ORBIT FIT, you now have the optimal home sports unit for effective and healthy body training.
However, please consider : Your health is the first consideration when training! For this reason, you
should take note of the following comments without fail :
Increase your condition!
Your general condition has, above all, to
do with the capability of your heart
circulation system, which supplies your
muscles with oxygen with the aid of your
blood. The oxygen is ultimately
combusted in your muscles with other
materials and changed into energy, which
is required for daily life (aerobic condition).
Being fit means that your heart and lungs
work effectively. A capable heart does not
need to beat as frequently, in order to
meet the requirement for oxygen, and is
thus put under less stress. A good
condition protects the heart and makes it
less likely to suffer from illness or other
bodily impairments.
Before starting training, please note :
If you have not exercised for a long time,
or if your condition is not at its best, then
you should ask your doctor as a
precaution, before starting training. A visit
to the doctor is particularly advisable, if
you have one of the following symptoms
* Heart and circulatory problems
* High blood pressure
* Diabetes
* Increased cholesterol level
* Back, muscle or joint disease
* Circulatory disturbance
Move correctly :
Ensure that you always move evenly.
Never carry out an exercise jerkily. Also
ensure that you maintain the correct body
position in all training exercises. Your back
must always be flat; a hollow back or round
shoulders must be avoided!
Do not forget to drink liquids!
The human body loses more fluid,
especially when training. It is therefore
particularly important to keep the water
balance by drinking enough liquids, and to
supply the body with the minerals lost
through sweating. Drink at least 1 litre up to
1 hour before the training session.
Warm up correctly :
In order to prevent torn muscles, you should
never do without this kind of training! Even
10 minutes means that you will not only
avoid aching muscles, but greatly reduce
the risk of injury! Warm up in the way you
like most : walk on the spot, run on the spot
and in so doing move your arms in different
directions (up to the side, down to the side,
etc), jump or run on a trampoline and - very
important - do some of the following
stretching exercises!
A doctor's examination at regular intervals
is also recommended for advanced
athletes. Always follow your doctor's
advice and construct your training
programme in line with your personal
constitution and capabilities. Never
overstretch yourself. In most cases, less
is more.
Breathe correctly :
Breathe correctly right from the start :
Breathe out when putting strain on the
body, and breathe in deeply when relieving
the strain on the body. This strengthens
and trains the diaphragm, expands your
ribcage and supplies your muscles with
fresh oxygen. Avoid taking quick breaths.
14
Page 15

WARM UP PROGRAMME
Only a few stretching exercises are shown here. There are many more. Which exercises you
prefer to do is of secondary importance. The main thing is that you bring your body up to
"operating temperature".
When carrying out the stretching exercises, please :
-move into the stretch slowly
-be aware that you have reached the maximum stretch position, as soon as you
notice a slight pull in the muscle
remain in the stretch position for 10 - 20 seconds and do not bounce!
Stretching the back muscles
Support yourself with outstretched arms
against a wall, with the arms at a maximum
of shoulder width apart. Place your feet
slightly apart, parallel to each other. Now
lower the upper body slowly forwards, while
keeping the head between the outstretched
arms.
Stretching the calf muscles
Stretching the leg muscles/hip flexing
Take up a straddle position. The right leg
is turned in slightly, while the left leg is
pushed out to the side. Now lower the
upper body to the left leg. Afterwards
change the leg positions.
Lunge
Move into the stride position and bend the
front leg. The heel of the other leg points
backwards. Stretch the upper body and
bend yourself as far forwards as possible,
until you notice a slight pull in the calf.
From standing, take a large stride
forwards. Remain in this position and
ensure that the rear leg is stretched
straight back, while the front leg is bent at
a 90° angle.
15
Page 16

FINISHING THE TRAINING SESSION CORRECTLY
The "cool down" after training is just as important as warming up before the training session.
This is achieved by means of stretching. With the aid of the stretching programme, the
muscles are relaxed and this leads to an improved ability for your body to recover.
A few examples are given below :
Stretching the gluteal muscle
Lie on your back. Bend one leg and bring
it up towards your chest. Clasp the back
of the thigh with both hands. The lower leg
is then stretched towards the pelvis.
Stretching the hip flexing muscle and
the straight thigh muscle
Stretching the chest muscles
Kneel down and place both arms as far
forward as possible on the floor, while
forming a right angle with the thigh and
lower leg. Now move the shoulders
towards the floor.
Stretching the front thigh muscles
Make a lunge forwards onto a raised
object. The "Aerobic Step" from
Bremshey-Sport is excellent for this. The
rear leg is stretched out backwards. The
front leg is angled to a maximum of 90°.
Now move the hips backwards and
forwards.
Lie on your side on the floor. Support
yourself on the floor with one hand, and
use the other hand to pull on the top of
the foot. Pull your heel towards your
bottom.
16
Page 17

PLAN YOUR OWN PERSONAL TRAINING GOAL!
Even before starting the actual training session, you should be completely clear about your individual
goals. Preferably you should note down what you want to achieve :
-General wellbeing
-Improving your metabolism
-Bodily fitness
-Building up muscles
-Weight reduction
You can achieve your desired goals with the Orbit FIT, if you are motivated and carry out your exercise
programme regularly and consequentially. A healthy diet also contributes to your success : Avoid
stimulants such as coffee, nicotine and alcohol. Eat wholesome, high vitamin foods and ensure that you
get enough sleep. Muscular build-up is supported by a protein-rich diet. A balanced diet will lead to
weight reduction. Being overweight occurs if you consume more energy than you burn off.
Please note!
Not only your own organism needs certain rest periods; your newly-acquired fitness trainer will also thank
you. As a result you will avoid causing damage, which could occur due to overheating the material, for
example. Please certainly avoid using the equipment for more than 45 minutes without any breaks.
Training programme for beginners
Training frequency : 2 - 4 times per week
Training duration : 10 - 20 minutes
Training intensity : 60 - 70% of the individual maximum pulse rate
This training session should be used during the first 6 - 8 weeks.
Training programme for advanced athletes
Training frequency : 3 - 5 times per week
Training duration : 20 - 30 minutes
Training intensity : 80 - 90% of the individual maximum pulse rate
Training programme for experts and those in superb condition
Training frequency : 4 - 6 times per week
Training duration : approximately 30 minutes
Training intensity : 80 - 90% of the individual maximum pulse rate
This training programme should be selected by completely fit people, who are striving towards a very high
level of training.
17
Page 18

TRAINING INSTRUCTIONS
During the training session with the Orbit Fit, the legs move in an elliptical movement. This greatly minimises
the strain on the joints.
The following equipment characteristics of the Orbit Fit guarantee an even and easy individual training
session :
-the easily adjustable training resistance level
-two moving handlebars for effective upper body training at the same time
-a fixed handlebar for a secure hold and for a targeted training of the gluteal muscles
pedals for different foot positions and different training intensities
Cockpit
Fixing handlebar
Moving handlebar
Setting handwheel
Housing
Rear foot
stand
Handlebar support pipe
Folding joint
Stopper
Footboard
Pedal arm
Upper pivot
Swing arm
Fixing handwheel
Lower pivot
Front foot stand with
roller and floor
balancing screw
18
Page 19

Adjusting the training resistance
The correct position for the
footboards
The training resistance on the Orbit Fit is
controlled by turning the setting handwheel
on the cockpit. Turn the setting handwheel
counter-clockwise, in order to reduce the
resistance, and clockwise, in order to
increase the resistance. We recommend that
you start with a very low resistance level.
The footboards on the Orbit Fit can be placed
in 3 different positions.
As your training progresses, you will
automatically find out which position is the
most comfortable and most effective for you.
Start with the front footboard position.
(Please also refer to Page 5).
As the footboard is positioned further back,
the elliptical movement becomes steeper,
and thus the training becomes more
intensive.
19
Page 20

The handlebars on the Orbit Fit
The training equipment is equipped with
two moving pendulum handlebars and
one fixed handlebar.
Important
When climbing onto the equipment, you
should always hold onto the fixed
handlebar. Beginners should continue
to train with the fixed handlebar, until
they feel completely secure.
As soon as you are familiar with the use
of the equipment, you can move over to
start training with the two pendulum
handlebars, in order to strengthen the
upper body muscles as well. Clasp the
handlebars at the height most
comfortable for you.
Starting and finishing the
training session
As in the case of every piece of training
equipment, you should be very careful
when getting on and off the equipment.
Please follow the safety measures
below precisely :
Before climbing on, please make sure
that the left pedal is located in the
lowest possible position, and hold on to
the fixed handlebar with both hands.
Place your foot on the left footboard and
ensure that you are standing securely.
20
Page 21

Now place your right foot on the right footboard.
Are you standing properly and securely?
Is the fixing handwheel securely tightened?
Now you can start your training session.
Important
- When training, always wear shoes with rubber
soles, eg training shoes
- We would recommend that you hold onto the
handlebar with at least one hand when getting on
and off the equipment, and during any short
pauses in training. If you want to, or are able to,
do without the stabilising function of the
handlebars, once you are advanced (eg in order
to let the arms swing in a "running rhythm", or in
order to carry out exercises to strengthen the
upper body muscles at the same time), then you
should always ensure that you are standing
securely.
- When training, ensure that the equipment is
located on a solid, flat surface and that you have
enough room for your exercises.
Training with the Orbit Fit
- Before you get off, bring the pedals to a
complete stop and carry out the above-mentioned
procedure in the reverse sequence.
Move as rhythmically and evenly as possible
when training with the Orbit Fit. If the equipment
does not run "round", or you get the feeling that it
is moving falteringly, jerkily, or in an interrupted
"up and down movement", then the resistance
has probably been set to high, or your training
speed is too low.
It is possible to move in both directions (forwards
and backwards) on the Orbit Fit. Bend your knee
a bit more when moving backwards. This is
especially good for training the buttocks and the
rear thigh muscles.
When training with the Orbit Fit, you can either
hold onto the fixed handlebar, or onto the two
moving handlebars. With 3 different basic
positions, you can strengthen the major muscles
in your lower body.
21
Page 22

Upright basic position :
Stand upright. Hold your head
straight, in order to avoid any
unnecessary strain on the neck or
shoulders.
In this position, all the major muscle
cords are strengthened.
Body position to strengthen the thigh and lower leg muscles :
If you lean forward while training, in
particular your thigh and lower leg
muscles will be strengthened.
Body position to strengthen the rear thigh and gluteal muscles :
If you lean back into a sitting position
while training, your rear thigh
muscles and the gluteal muscle will
be strengthened in particular.
22
Page 23

Folding together, transport
The Orbit Fit can be folded together.
1. Stand in front of the unit and ensure that
the swing arms are in the parallel position
as shown (one pedal up and one pedal
down).
2. Turn the fixing handwheel a number of
times to the left, until the cover plate on the
support pipe has enough room to fold.
3. Now you can fold down the handlebar
support pipe. Never let the pipe fall, but
hold it tightly, until the handlebar support
pipe is folded and lies on the stopper on the
top of the housing.
4. If you want to transport the Orbit Fit, then
lift the unit until the transport rollers on the
front foot pipe come in contact with the floor.
Now you can roll the unit to the desired
position.
Please note :
First turn the handwheel at least half way
onto the screw, if you want to use this to lift
the unit.
23
Page 24

The Orbit Fit is distributed in the UK by Bolton Stirland International Ltd.
Even with intensive quality controls, by which we place great store, it is possible for individual faults to
occur. Exchanging spare parts can normally rectify these faults, so that it is not necessary to return the
complete unit.
Warranty Terms
This product carries a 36-month warranty covering parts and manufacturing defects where the item is
used in a normal domestic environment and in line with the Important Safety Information outlined on page
12 of this manual. The warranty does cover damage or failure where the product is used in a commercial
or institutional setting or if the product has been subject to misuse, abuse or neglect. The product must be
used in a dry, dust free atmosphere with as little temperature variation as possible. The product must not
be used outside. The warranty is available only to the original purchaser and it is not transferable through
re-sale, lending or hire.
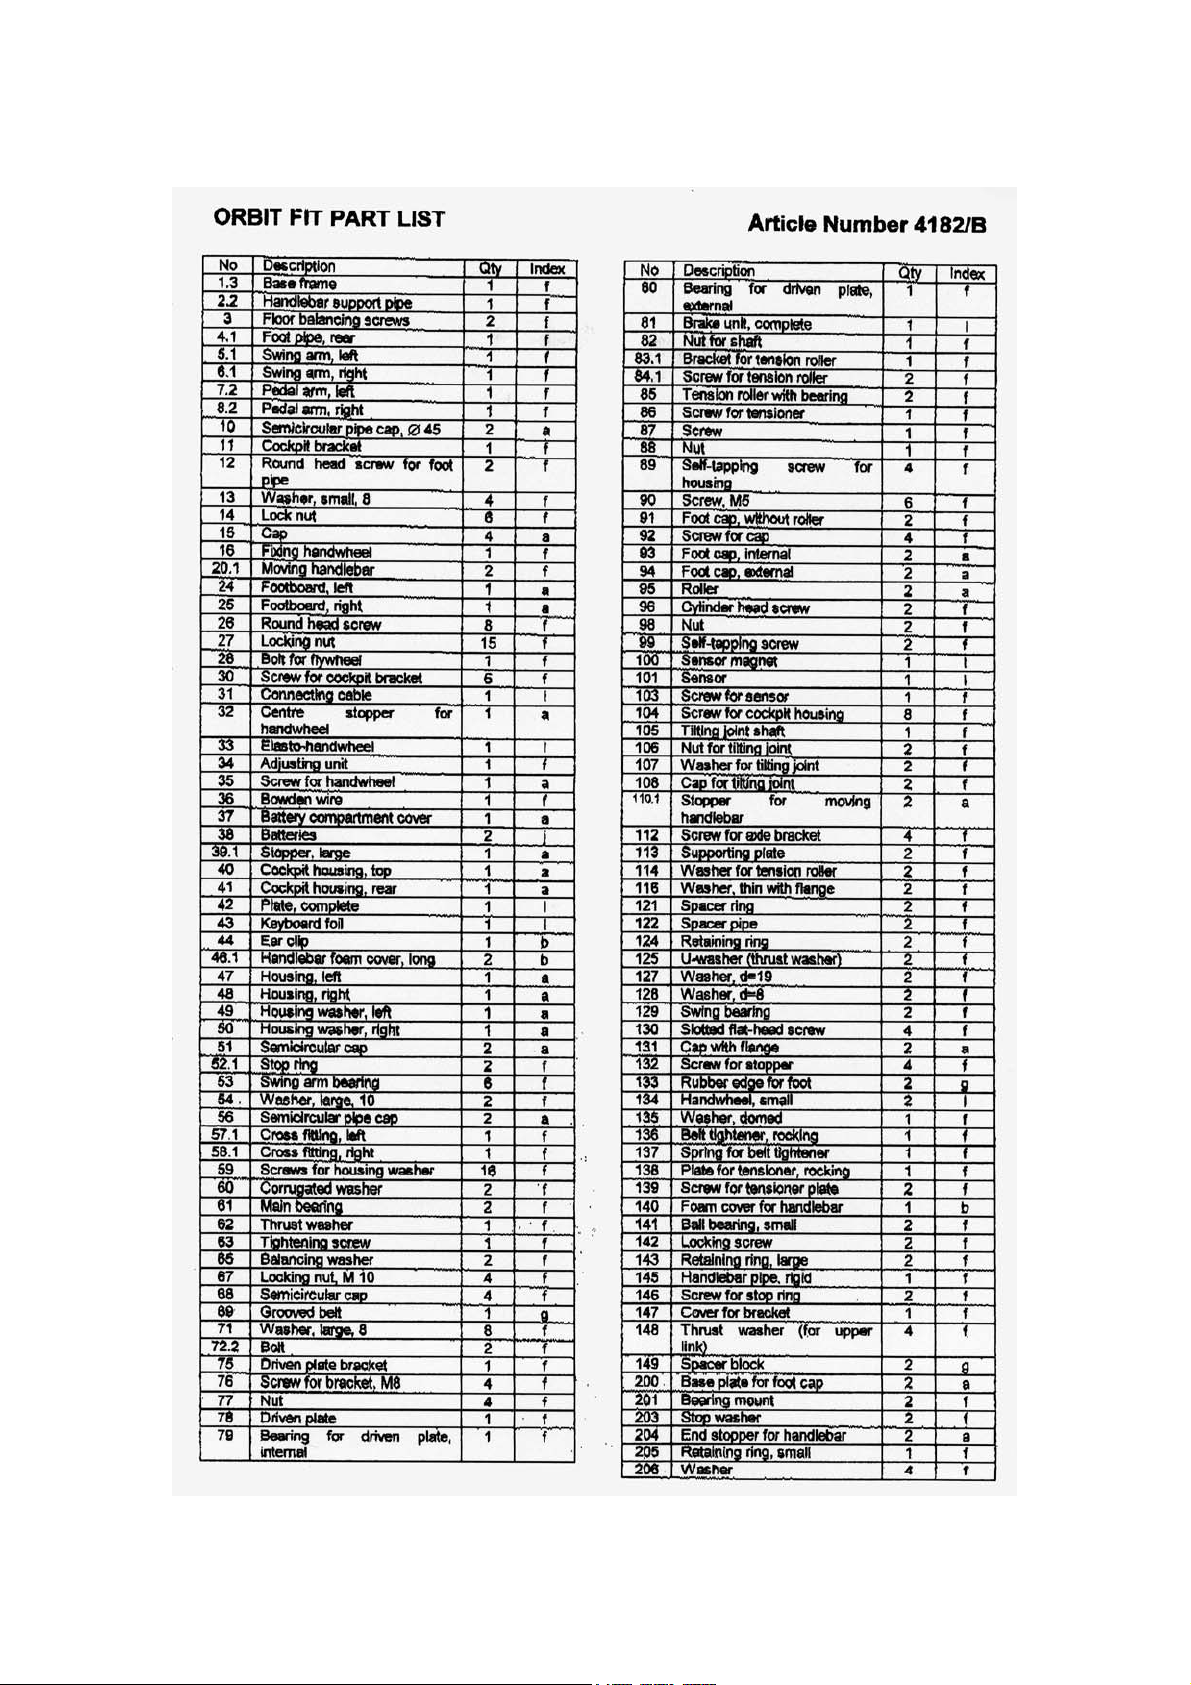
If you wish to order spare parts, please always use the part description and the part number, which can
be found on the explosion diagram.
Any enquiries regarding service or spare parts should be made to our Customer Service Department:
Telephone
.
: 0115 9820 122 Fax: 0115 981 7784 E-mail: service@bsfitness.co.uk
Bolton Stirland International Limited,
Boland House,
Wilford,
Nottingham.
NG11 7EP
Manufacturer:
BREMSHEY SPORT
… Preferably every day
BREMSHEY SPORT GmbH, PO Box 17 01 26, D-42623 Solingen
Tel : +49(0)212/24 81 50, Fax : +49-(0)212/810193
E-Mail : info@bremshey.de or on the Internet at http://www.bremshey.de
24
 Loading...