

BRANT RADIANT DET3 User Manual

DET3 Series
!
Insert Manual
For complete installation instructions, see the Tube Heater General Manual
that accompanies this Series Insert Manual.
The DET3 Series Infrared Tube Heater is a positive pressure, two-stage radiant heater system. This insert
manual is a supplement to the Tube Heater General Manual and provides specific information related to
the DET3 Series model. All persons involved with the installation, operation and maintenance of the
heater system must read and understand the information in this insert manual and the accompanying
Tube Heater General Manual.
For Your Safety
If you smell gas:
WARNING
Improper installation, adjustment, alteration, service or maintenance can cause
property damage, injury or death. Read the installation, operation and maintenance
instructions thoroughly before installing or servicing this equipment.
This heater must be installed and serviced by trained gas installation and service
personnel only. Failure to comply could result in personal injury, asphyxiation, death,
fire or property damage.
In locations used for the storage of combustible materials, signs must be posted to
specify the maximum permissible stacking height to maintain the required clearances
from the heater to the combustibles. Signs must either be posted adjacent to the
heater thermostats or in the absence of such thermostats, in a conspicuous location.
Not for residential use! Do not use this heater in the home, sleeping quarters,
attached garages, etc. Installation of a commercial tube heater system in
residential indoor spaces may result in property damage, serious injury,
asphyxiation or death.
• Do not try to light any appliance. • Immediately call your gas supplier from a neighbor’s phone.
• Do not touch any electrical switch. • Follow the gas supplier’s instructions.
• Do not use any phone in your building. • If you cannot reach your gas supplier, call the fire department.
Keep these instructions for future reference.
LIODET3-Rev. 27512
Print: Rev.21511_2M-8/11-r5_5/14(CDS)
Replaces: LIODET3-2M-7/09(CDS)

DET3 Series
Contents
1.0 Safety...................................................................3
Safety Labels and Locations ............................................3
Clearances to Combustibles ............................................4
2.0 Installation . . . . . . . . . . . . . . . . . . . . . . . . . . . . . . . . . . . . . . . . . . . . . . . . . . . . . . . . . . . . . . 6
Gas Requirements ...................................................6
Electrical Requirements................................................6
Wiring . . . . . . . . . . . . . . . . . . . . . . . . . . . . . . . . . . . . . . . . . . . . . . . . . . . . . . . . . . . . . 7
Specifications ......................................................10
Tube Installation Sequence ............................................11
3.0 Op eration ..............................................................12
Sequence of Operation ...............................................12
Thermostat . . . . . . . . . . . . . . . . . . . . . . . . . . . . . . . . . . . . . . . . . . . . . . . . . . . . . . . . 13
4.0 Troubleshooting Guide . . . . . . . . . . . . . . . . . . . . . . . . . . . . . . . . . . . . . . . . . . . . . . . . . . . 14
5.0 Parts ..................................................................18
Burner Assembly Components .........................................18
Tube and Reflector Components . . . . . . . . . . . . . . . . . . . . . . . . . . . . . . . . . . . . . . . 19
Kit Contents Check List ...............................................20
Approvals..........................................................20
Limited Warranty ....................................................20
NOTE: See page 10 for a list of available models and specifications.
2

Air Metering Orifice
DO NOT REMOVE
TP-114
TP-3014
3”
SAMPLE
DET3 Series
- 120V HEATER INPUT -
1.0 Safety • Safety Labels and Locations
1.0 Safety
Read and understand all safety information and warnings in this Insert Manual and the
Tube Heater General Manual before installation, operation and maintenance of the
radiant tube heater system.
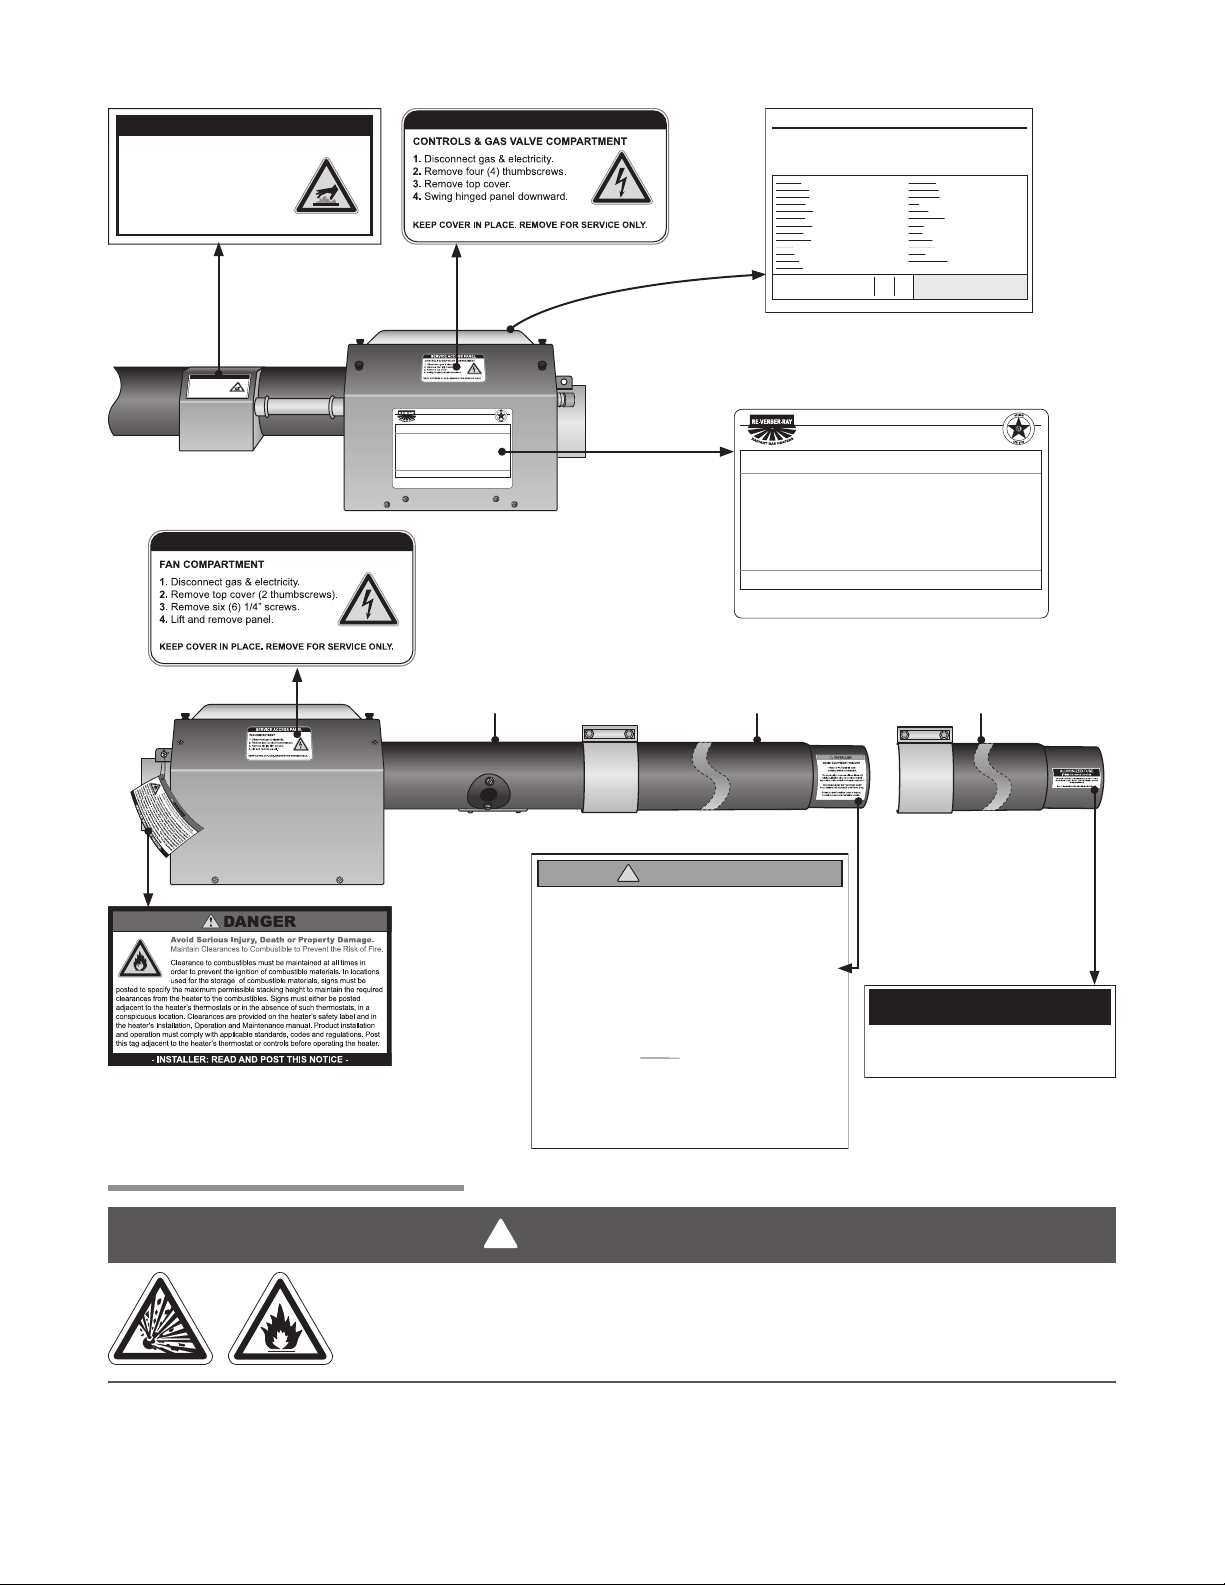
Safety Labels and Their Locations
Product safety signs or labels should be replaced by the product user when they no longer are legible.
Contact either your local distributor or the product manufacturer for obtaining replacement signs or labels.
F/N : LLV3 EP1
120V Inp ut
F/N : LLV3 EP2
24V Input
F/N : LLV3 EP7
High Fire Light
Top Panel
120V
2. Remove top cover (2 thumbscrews).
3. Remove tsix (6) 1/4” screws.
4. Lift and remove panel.
KEEP COVER IN PLACE. REMOVE FOR SERVICE ONLY.
HOT
NEUTRAL
EARTH
HOT
NEUTRAL
120V
EARTH
- 120V HEATER INPUT -
HIGH
LOW
24V
NEUTRAL
- 24V HEATER INPUT -
H
HIGH
FIRE
F/N: LLAC
Air Metering Orifice
Rear Panel
F/N: LLTB018 (Natural Gas)
F/N: LLTB019 (LP Gas)
FAN COMPARTMENT
1. Disconnect gas & electricity.
SERVICE ACCESS PANEL
SERVICE ACCESS PANEL
KEEP COVER IN PLACE. REMOVE FOR SERVICE ONLY.
4. Swing hinged panel downward.
3. Remove top cover.
2. Remove four (4) thumbscrews.
1. Disconnect gas & electricity.
CONTROLS & GAS VALVE COMPARTMENT
Bottom Panel
F/N: LLTCL001L, C, R
Clearance to Combustibles Labels
F/N: LLLOGO4
Logo Label
3
1.0 Safety • Safety Labels and Locations • Clearance to Combustibles
!
ALUMINIZED TUBE
(This is the Second Chamber)
This tube is constructed of aluminized coated steel and must be
placed directly after the titanium coated “Combustion Chamber”
(orange labeled tube).
DET3 Series
SERVICE ACCESS PANEL
IGNITER & FLAME SENSE COMPARTMENT
1. Turn off gas & electricity.
2. Remove cover by lifting top
cover upward and outward.
CAUTION: HOT SURFACE.
KEEP COVER IN PLACE. REMOVE FOR SERVICE ONLY.
F/N: LLTB026 F/N: LLTB024R
SERVICE ACCESS PANEL
IGNITER & FLAME SENSE COMPARTMENT
1. Disconnect gas & electricity.
2. Remove cover by lifting top
cover upward and outward.
CAUTION: HOT SURFACE.
KEEP COVER IN PLACE. REMOVE FOR SERVICE ONLY.
SERVICE ACCESS PANEL
F/N: LLTB025L
SERVICE ACCESS PANEL
RE-VERBER-RAY INFRA-RED RADIANT TUBE HEATER
®
FOR INDOOR (Non-Residential) INSTALLATION ONLY.
Class IIIA Permanent Label
MODEL NO.
INPUT BTU/H
125,000 / 95,000
Manifold Pressure:
3.5 in.
Maximum Inlet Pressure:
14 in.
Minimum Inlet Pressure:
5.0 in.
Inches W.C.P.
Inches W.C.P.
Inches W.C.P.
FOR USE WITH
Natural Gas
Heater Type
C1
Minimum Mounting Angle:
045DEGREES
Maximum Mounting Angle:
DEGREES
Serial No.: 1208XXXXXXXXXX 0001
DET-40-125N(-3)
Volts AC:
120VAC - 60Hz
AMPS - Starting:
1.7
AMPS - Running:
1.1
Combustion Chamber:
4” Black Coated Aluminized
DESIGN COMPLIES WITH:
ANSI Z83.20b-2004-GAS FIRED LOW INTENSITY INFRA-RED HTR.
DETROIT RADIANT PRODUCTS COMPANY
21400 HOOVER ROAD - WARREN, MI
(586) 756-0950 - www.drp-co.com
16” Burner
Tube
Controls
Compartment
DET-40-125N(-3)
DET3-125
Production Code:
7.08
Version:
Data on this label is for the model shown on this label. If your heater has been converted,
this information is not accurate. Please contact the factory for assistance.
BURNER COMPONENTS:
Gas Valve:
Circuit Board:
Wire Harness:
N.O. Switch:
N.O. VL Orifice:
N.C. Switch:
N.C. VL Orifice:
Diff Switch:
Diff VL Orifice:
Igniter:
Burner:
16” Tube:
Ind. Lights:
HEATER
TYPE:
C1
For parts replacement information, contact factory at 586-756-0950 or visit www.drp-co.com/parts.
(Specify TP-#’s)
36G54-224-N
840
MARK10DX-117
851
3 PCS Harness
852
None
N/A
None
None
N/A
None
IS22010051F5166
264E
Grey (+ / -)
Norton
50
Mid
201B
SAMPLE
4” Gen.
380
Yellow - 24V
828
C1 C2 C3
Orifice Type:
Gas:
19
TP-204#
Air:
1 5/16”
TP-44#191 7/16”
Burner Control Box Component Label
(affixed to center valve compartment lid)
RE-VERBER-RAY INFRA-RED RADIANT TUBE HEATER
®
FOR OUTDOOR USE AND INDOOR (Non-Residential) INSTALLATION ONLY.
Class IIIA Permanent Label
MODEL NO.
DET-40-125N(-3)
Volts AC:
120V - 60Hz
AMPS - Starting:
1.7
AMPS - Running:
1.1
Combustion Chamber:
4” Black Coated Aluminized
DESIGN COMPLIES WITH:
ANSI Z83.20b-2004-GAS FIRED LOW INTENSITY INFRA-RED HTR.
DETROIT RADIANT PRODUCTS COMPANY
21400 HOOVER ROAD - WARREN, MI
(586) 756-0950 - www.drp-co.com
INPUT BTU/H
125,000 / 95,000
Manifold Pressure:
3.5 in.
Maximum Inlet Pressure:
14 in.
Minimum Inlet Pressure:
5.0 in.
SAMPLE
Primary Combustion
Chamber
Serial No.: 0804XXXXXXXXXX 0001
None
Stock:
Add-On:
N/A
On Circuit Board
Diag. Light:
None
40 VA
Fasco Lg.
50Hz - 120V
When Specified
None
None
3 T-plug
6’ Blk. Cord
7/8” FC
None
Special 1:
Special 2:
N/A
826
55A
55B
N/A
N/A
832
333
83
17
1 7/16”
19
1 5/16”
Term. Block:
Transformer:
Fan:
Alt. Fan:
Alt. Fan Usage:
Relay:
Filter:
24 Volt In:
120 Volt In:
Gas In:
Extra VL Orifice:
Internal Use Only:
Electric:
Tag:
LLWT038
None
Rating
Plate
W.C.P.
W.C.P.
W.C.P.
FOR USE WITH
Natural Gas
Heater Type
C1
Minimum Mounting Angle:
045DEGREES
Maximum Mounting Angle:
DEGREES
Serial No.: 0807XXXXXXXXXX 0001
Secondary Combustion
Chamber (if applicable)
Fan
!
Compartment
INSTALLER
AVOID EQUIPMENT FAILURE
THIS 10 FT. TUBE IS THE
COMBUSTION CHAMBER.
The combustion chamber utilizes either 409
stainless, titanium alloy or aluminized steel -
depending on the model number of your heater.
THIS TUBE MUST BE THE FIRST TUBE
F/N: LL01 - Clearance Safety Tag
(Affix adjacent to heater’s thermostat)
Clearance to Combustibles
FOLLOWING THE BURNER CONTROL BOX.
Rotate the tube’s welded seam to bottom.
Consult the manual(s) for further details.
F/N: LLTB004 (orange)
150,000-200,000 Btu/h
models only
WARNING
Placement of explosive objects, flammable objects, liquids and vapors close to
the heater may result in explosion, fire, property damage, serious injury or death.
Do not store, or use, explosive objects, liquids and vapor in the vicinity the heater.
Clearance to Combustibles is defined as the minimum distance that must exist between the tube surface,
or reflector, and any combustible items (see Figure 1.1). It also pertains to the distance that must be
maintained from moving objects around the tube heater.
4
DET3 Series
1.0 Safety • Clearance to Combustibles
When installing the tube heater system, clearances to combustibles for the model tube heater and
configuration must be maintained. Refer to Chart 1.1 below to determine the required distances for your model.
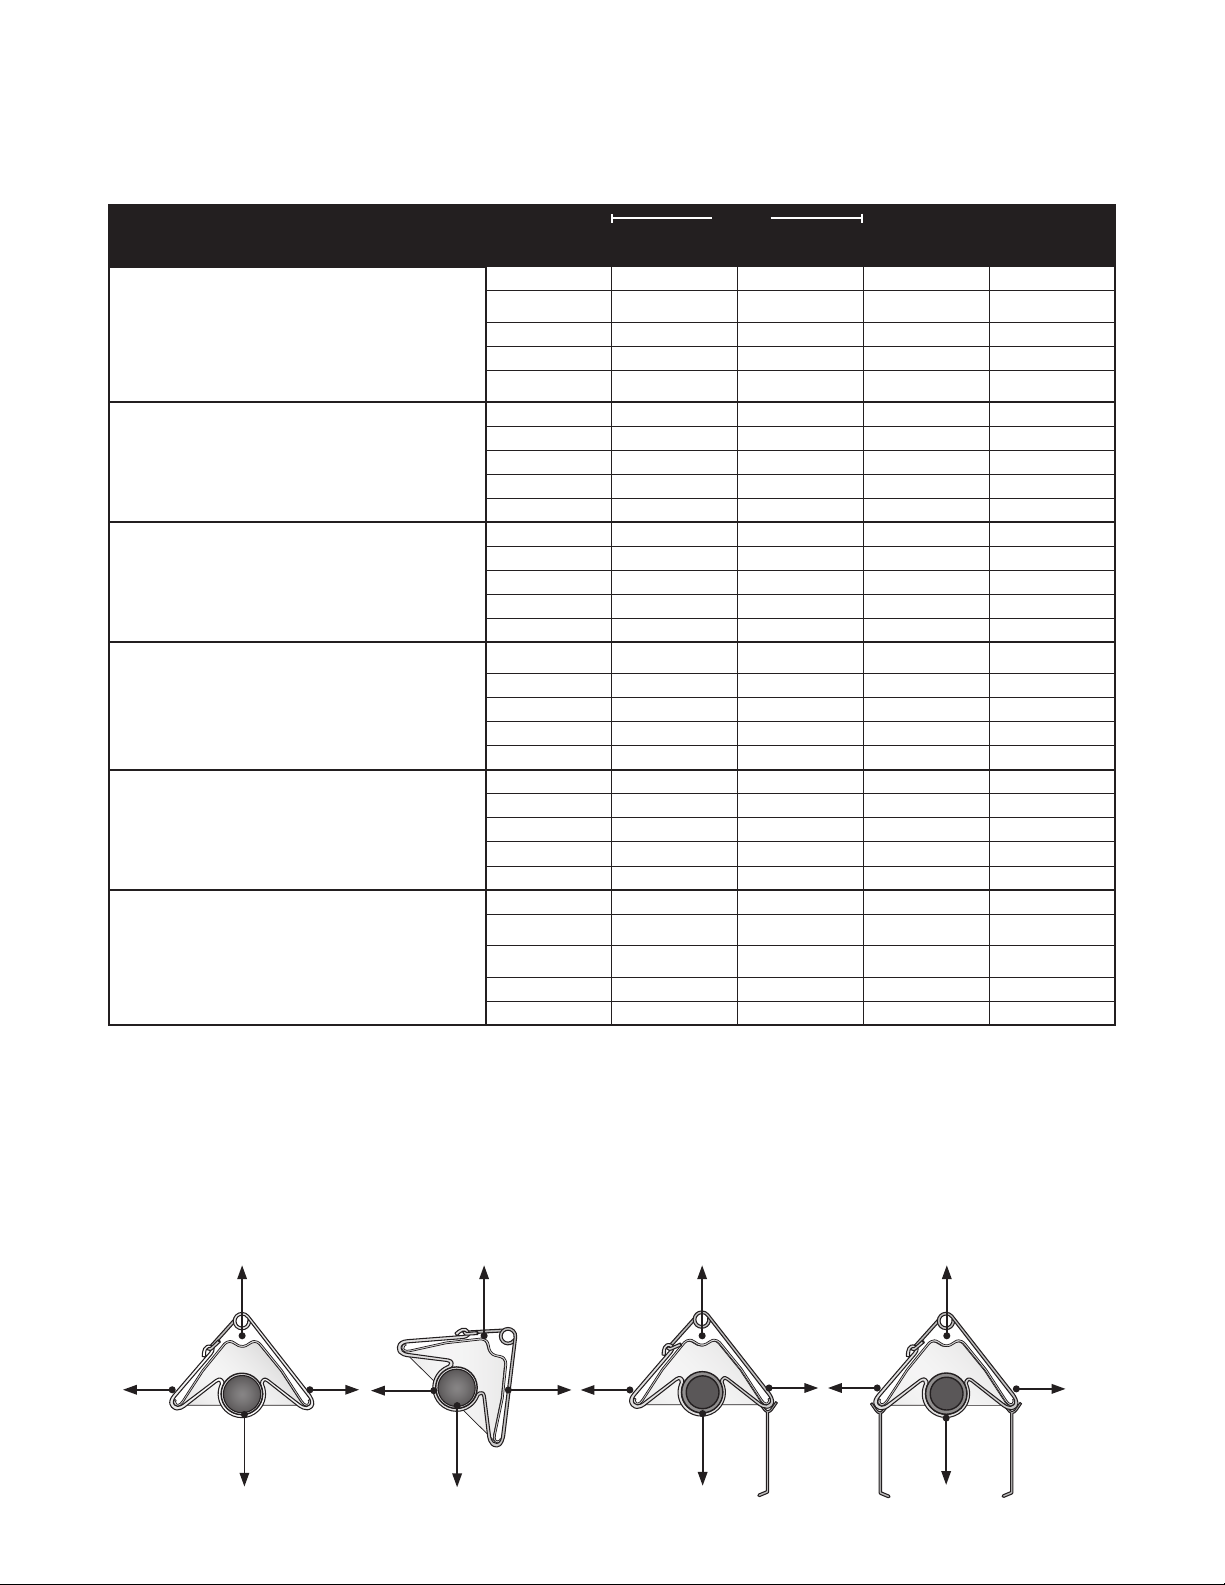
Chart 1.1 • Clearance to Combustibles in Inches (see Figure 1.1 for Mounting Angles)
Mounting
Model Number
DET (20, 30, 40) - (65, 75) [N, P] (-3)
with 1 side shield 0° 29 8 6 60
with 2 side shields 0° 9 9 6 60
20 ft. from burner 0° 7 7 6 30
DET (30, 40) - 100 [N, P] (-3)
with 1 side shield
with 2 side shields
20 ft. from burner
DET (40, 50) - 125 [N, P] (-3)
with 1 side shield 0° 42 8 6 76
with 2 side shields 0° 20 20 6 76
20 ft. from burner 0° 7 7 6 30
DET (40, 50, 60) - 150 [N, P] (-3)
with 1 side shield 0° 42 8 6 81
with 2 side shields 0° 23 23 6 81
20 ft. from burner 0° 11 11 6 44
DET (50, 60) - 175 [N, P] (-3)
with 1 side shield 0° 50 8 6 92
with 2 side shields 0° 30 30 6 92
20 ft. from burner 0° 11 11 6 44
DET (50, 60) - 200 [N, P] (-3)
with 1 side shield 0° 54 8 6 94
with 2 side shields 0° 30 30 6 94
20 ft. from burner 0° 11 11 6 44
Heaters mounted on an angle between 0° to 45° must maintain clearances posted for 0° or 45°; whichever is greater.
*
Angle*
0° 9 9 6 60
45° 39 8 10 60
0° 14 14 6 66
45° 39 8 10 66
0° 29 8 6 66
0° 16 16 6 66
0° 7 7 6 30
0° 20 20 6 76
45° 58 8 10 76
0° 24 24 6 81
45° 58 8 10 81
0° 34 34 6 92
45° 63 8 10 92
0° 41 41 6 94
45° 63 8 10 94
Side
Top BelowFront Behind
The stated clearance to combustibles represents a surface temperature of 90ºF (32ºC) above room
temperature. Building materials with a low heat tolerance (such as plastics, vinyl siding, canvas,
tri-ply, etc.) may be subject to degradation at lower temperatures. It is the installer’s responsibility to
assure that adjacent materials are protected from degradation.
Figure 1.1 • Mounting Angles
0° Mounting Angle
Top
45° Mounting Angle
Top
0° Mounting Angle
with 1 Side Shield
(P/N: SSE)
Top
0° Mounting Angle
with 2 Side Shields
(P/N: SSE)
Top
Side
Below
Side
Front
Below
Behind
Front Behind
Below
5
Side Side
Below

2.0 Installation • Gas and Electrical Requirements
!
2.0 Installation
WARNING
Improper installation, adjustment, alteration, service or maintenance can cause property
damage, serious injury or death. Read and understand, the installation, operating and
maintenance instructions thoroughly before installing or servicing this equipment. Only
trained, qualified gas installation and service personnel may install or service this equipment.
Not for residential use! Do not use this heater in the home, sleeping quarters, attached
garages, etc. Installation of a commercial tube heater system in residential indoor
spaces may result in property damage, serious injury or death.
Instructions for the following are detailed in the Tube Heater General Manual:
• Design considerations
• Hanger suspension and placement
• Tube layout and assembly
• Burner control box suspension
• Reflectors (and accessories)
• Venting and combustion air intake
• Gas requirements
• Baffle assembly
DET3 Series
NOTE: Electronic versions of all manuals are available at www.detroitradiant.com
Gas Requirements
Type of Gas
Natural 3.5 inches W.C. 5.0 inches W.C. 14.0 inches W.C.
Liquefied Petroleum 10.0 inches W.C. 11. 0 inches W.C. 14.0 inches W.C.
IMPORTANT: Consult the Tube Heater General Manual for gas connection requirements.
Required Manifold
Pressure
Minimum Inlet
Pressure
Maximum Inlet
Pressure
Electrical Requirements
• 120VAC-60 Hz., single-phase, 3-wire.
• 24VAC thermostat connection.
• Starting current 1.7 amps
• Running current 1.1 amps
NOTICE
Connecting the thermostat with a voltage other than 24VAC may damage the heater. The DET3 Series
requires a 24VAC connection to the thermostat. The DET3 Series is equipped with an internal relay
board. A field supplied external transformer must be installed, see wiring diagram (Figures 2.1A-B).
NOTE: A yellow control wire replaces the external terminal plug on stainless steel models or models with
water resistant upgrades.
6
 Loading...