

Page 1

Operator’s Manual
DHA-1000
Tabletop
Ultrasonic Cleaner
CPN-214-160
Page 2

Warranty
This ultrasonic Cleaner, when used in accordance with manufacturer’s
instructions and under normal use, is guaranteed for two years after
date of shipment. Within the period guaranteed, we will repair or
replace free of charge, at our sole discretion, all parts that are defective
because of material or workmanship, not including costs for removing or
installing parts.
Liability, whether based on warranty, negligence or other cause, arising
out of and/or incidental to sale, use or operation of the transducer
elements, or any part thereof, shall not in any case exceed the cost of
repair or replacement of the defective equipment, and such repair or
replacement shall be the exclusive remedy of the purchaser, and in no
case will we be responsible for any and/or all consequential or incidental
damages including without limitation, and/or all consequential damages
arising out of commercial losses.
CAUTION
• Do not place parts or containers directly on the bottom of the
cleaning tank; use a basket or other device to suspend items.
• Do not allow the cleaning solution level to drop more than four
inches below the top of the tank.
• Do not ever use alcohol, gasoline or flammable solutions. Doing so
could cause a fire or explosion. Use only water-based solutions.
• Do not ever use mineral acids. These could damage the tank.
Failure to comply with these cautions will void your warranty.
Page 3

Contents
Front Warranty
Cover
1 Safety Precautions
3 Introduction
3 DHA-1000 General Information
4 Accessories
4 Unpacking Your Cleaner
4 Installing Your Cleaner
5 Equipment Specifications
6 How Ultrasonic Cleaning Works
7 Operating Your Cleaner
7 Before You Start
7 Explanation of Controls
8 Getting Ready
8 Cleaning Items
9 Optimizing Your Cleaner
10 Application Hints
11 Cleaning Solutions
13 Troubleshooting
14 Performance
15 Service
Page 4

Safety Precautions
Before using your Ultrasonic Cleaner, please read and thoroughly
understand these safety precautions. Failure to follow them may result
in serious personal injury or property damage.
To avoid electrical shock:
• Do unplug from power source before filling or emptying the tank.
• Do keep the area around the cleaner clean and dry -- wipe up solution
which spills over the tank brim. Water and high voltage can cause
electrical shock.
• Do not operate the cleaner without proper grounding.
• Do not remove the grounding prong on the line cord plug.
• Do not disassemble your cleaner -- high voltage inside the cleaner is
dangerous.
• Do not immerse the cleaner in water.
To prevent personal and/or property damage:
• Do use water-based solutions.
• Do not ever use alcohol, gasoline or flammable solutions. Doing so
could cause a fire, explosion, or serious personal injury and will void
your warranty. Use only water-based solutions.
• Do not ever use mineral acids. These could damage the tank.
• Do not touch the stainless steel tank or cleaning solution -- they may
be hot.
• Do not allow fluid temperature to exceed 80ºC (175ºF).
• Do not place your fingers or hands into the tank while the cleaner is
operating. Doing so may cause discomfort and possible skin irritation.
Avoid contact with solutions and provide adequate ventilation.
• Do not use solutions containing chlorine bleach.
1
Page 5

To prevent damage to the cleaner:
• Do change your solution regularly.
• Do not operate the cleaner dry.
• Do not place parts or containers directly on the bottom of the cleaning
tank; use a basket or other device to suspend items. Failure to
comply may cause transducer damage and will void your warranty.
• Do not allow the cleaning solution level to drop more than four inches
below the top of the tank with heat or ultrasonics on. Failure to
comply may cause transducer and/or heater damage and will void
your warranty.
2
Page 6

Introduction
DHA-1000 General Information
This DHA-1000 ultrasonic cleaner is a self-contained unit which consists
of a powerful ultrasonic generator, a stainless steel cleaning tank and an
array of durable industrial style 44 kHz transducers. These transducers
provide increased cleaning power and ensure uniform cleaning activity
throughout the bath. The unit includes heaters and controls to raise the
bath temperature for improved cleaning activity. The DHA-1000
incorporates a drain and is available in three voltages to meet
requirements around the world. Be sure the unit you have purchased is
correct for your area.
3
Page 7

Accessories For Your Cleaner
A stainless steel cover and a parts cleaning basket are available for your
DHA-1000.
Description Part Number
Stainless Steel Cover 100-246-802
Stainless Steel Parts Basket CPN-916-032
Consult your distributor for price and delivery.
Unpacking Your Cleaner
Please check your cleaner and its carton carefully for any external or
internal damage. If you find damage, contact your shipping carrier
immediately, before contacting your distributor. Please retain your
packaging for future use.
Installing Your Cleaner
Check the label on the back of the cleaner for correct input power
requirements. Position your cleaner within easy reach of a standard
grounded electrical outlet and a drain facility. Do not place the cleaner
on a circuit which could become overloaded. Allow at least 6” (15cm) on
all sides of the cleaner for air circulation.
If you believe your cleaner is not operating correctly, first refer to the
troubleshooting section for possible causes, or contact an authorized
service center listed at the back of this manual for additional information.
4
Page 8
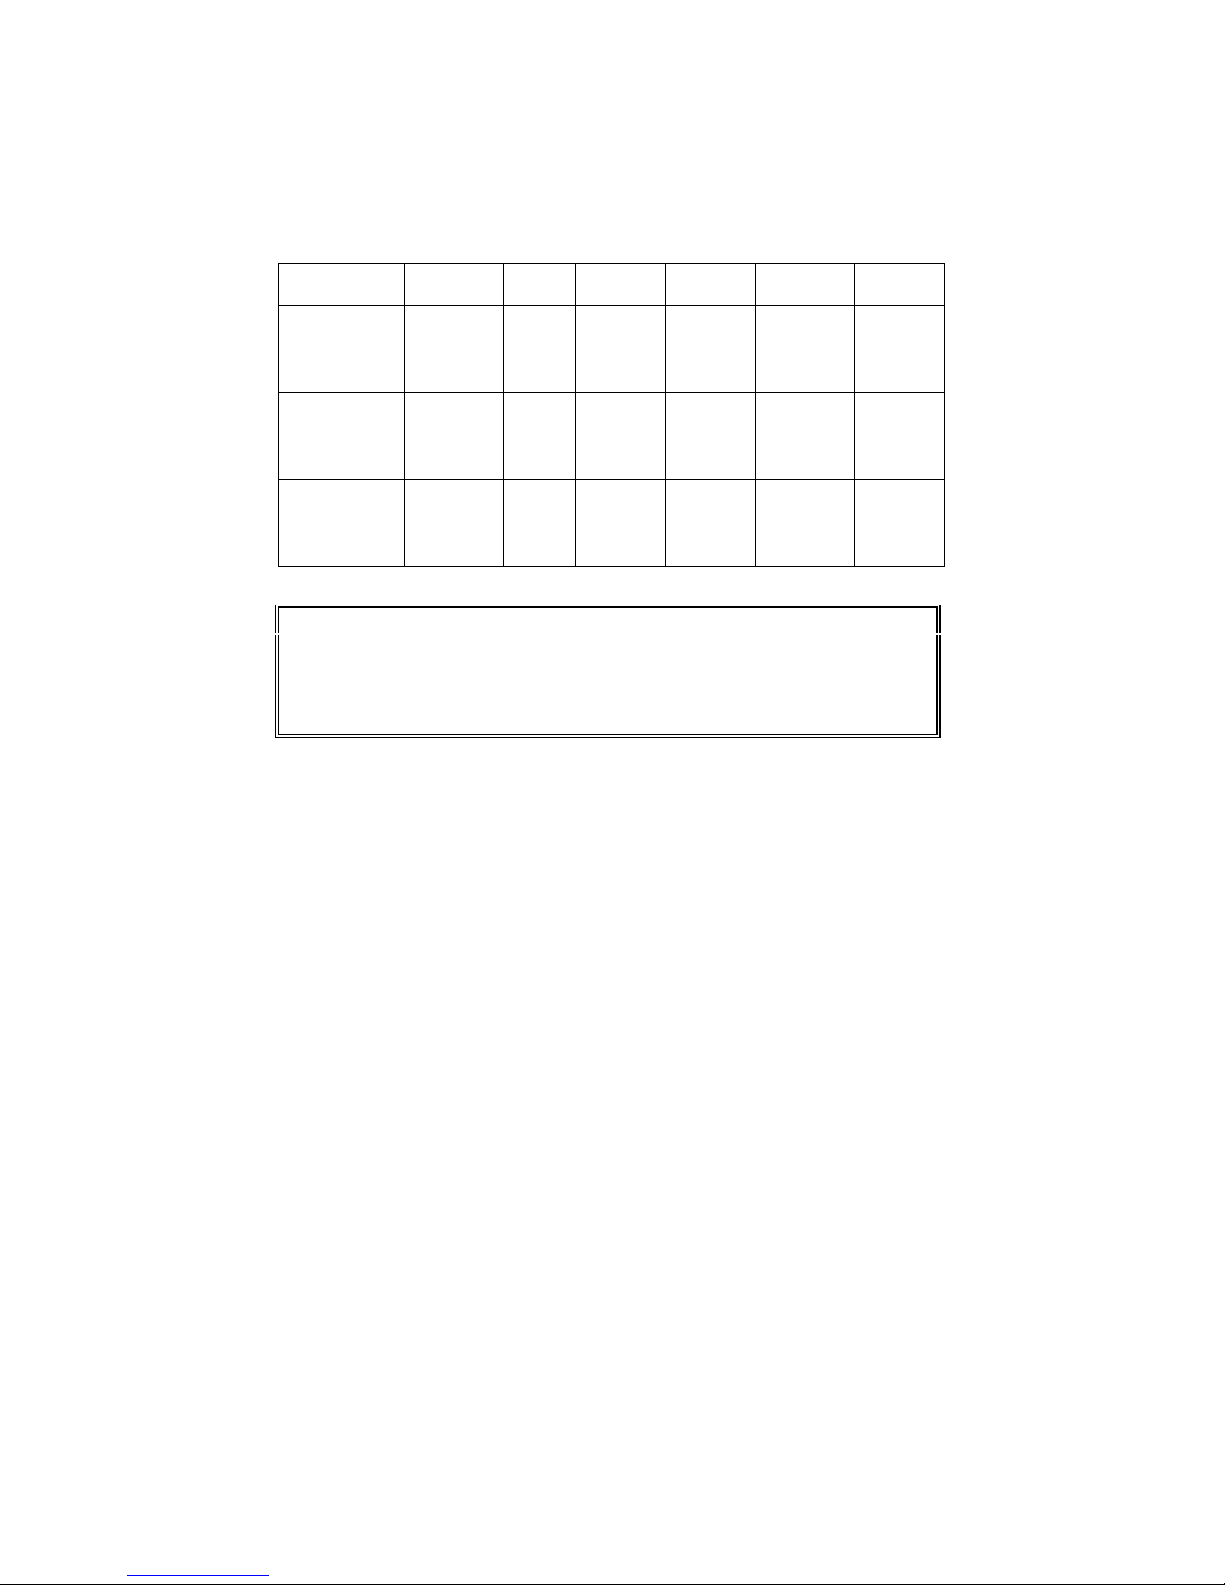
Equipment Specifications
1000 watts
1000 watts
Model Tank
DHA-1000R
000-914-506
DHA-1000J
CPN-914-005
DHA-1000E
000-914-606
Capacity
10.0 gal.
(38 l))
10.0 gal.
(38 l))
10.0 gal.
(38 l))
Tank
Size
L: 16”
W: 14”
D:
10.5”
L: 16”
W: 14”
D:
10.5”
L: 16”
W: 14”
D:
10.5”
Overall
Size
L: 19”
W: 19”
H: 17”
L: 19”
W: 19”
H: 17”
L: 19”
W: 19”
H: 17”
Weight Heater
Power
46 lbs.
(20.9Kg)
46 lbs.
(20.9Kg)
46 lbs.
(20.9Kg)
800 watts
Input
Power
117 V
60 Hz
11.5 A
100 V
60 Hz
10.5 A
230 V
50/60 Hz
NOTE:
• All models have a nominal frequency of 44 kHz.
• All cleaners have CSA approval and comply with FCC regulations.
• Units may cause GFI outlets to trip.
• All units have a ground leakage current less than .50ma.
5.7 A
5
Page 9
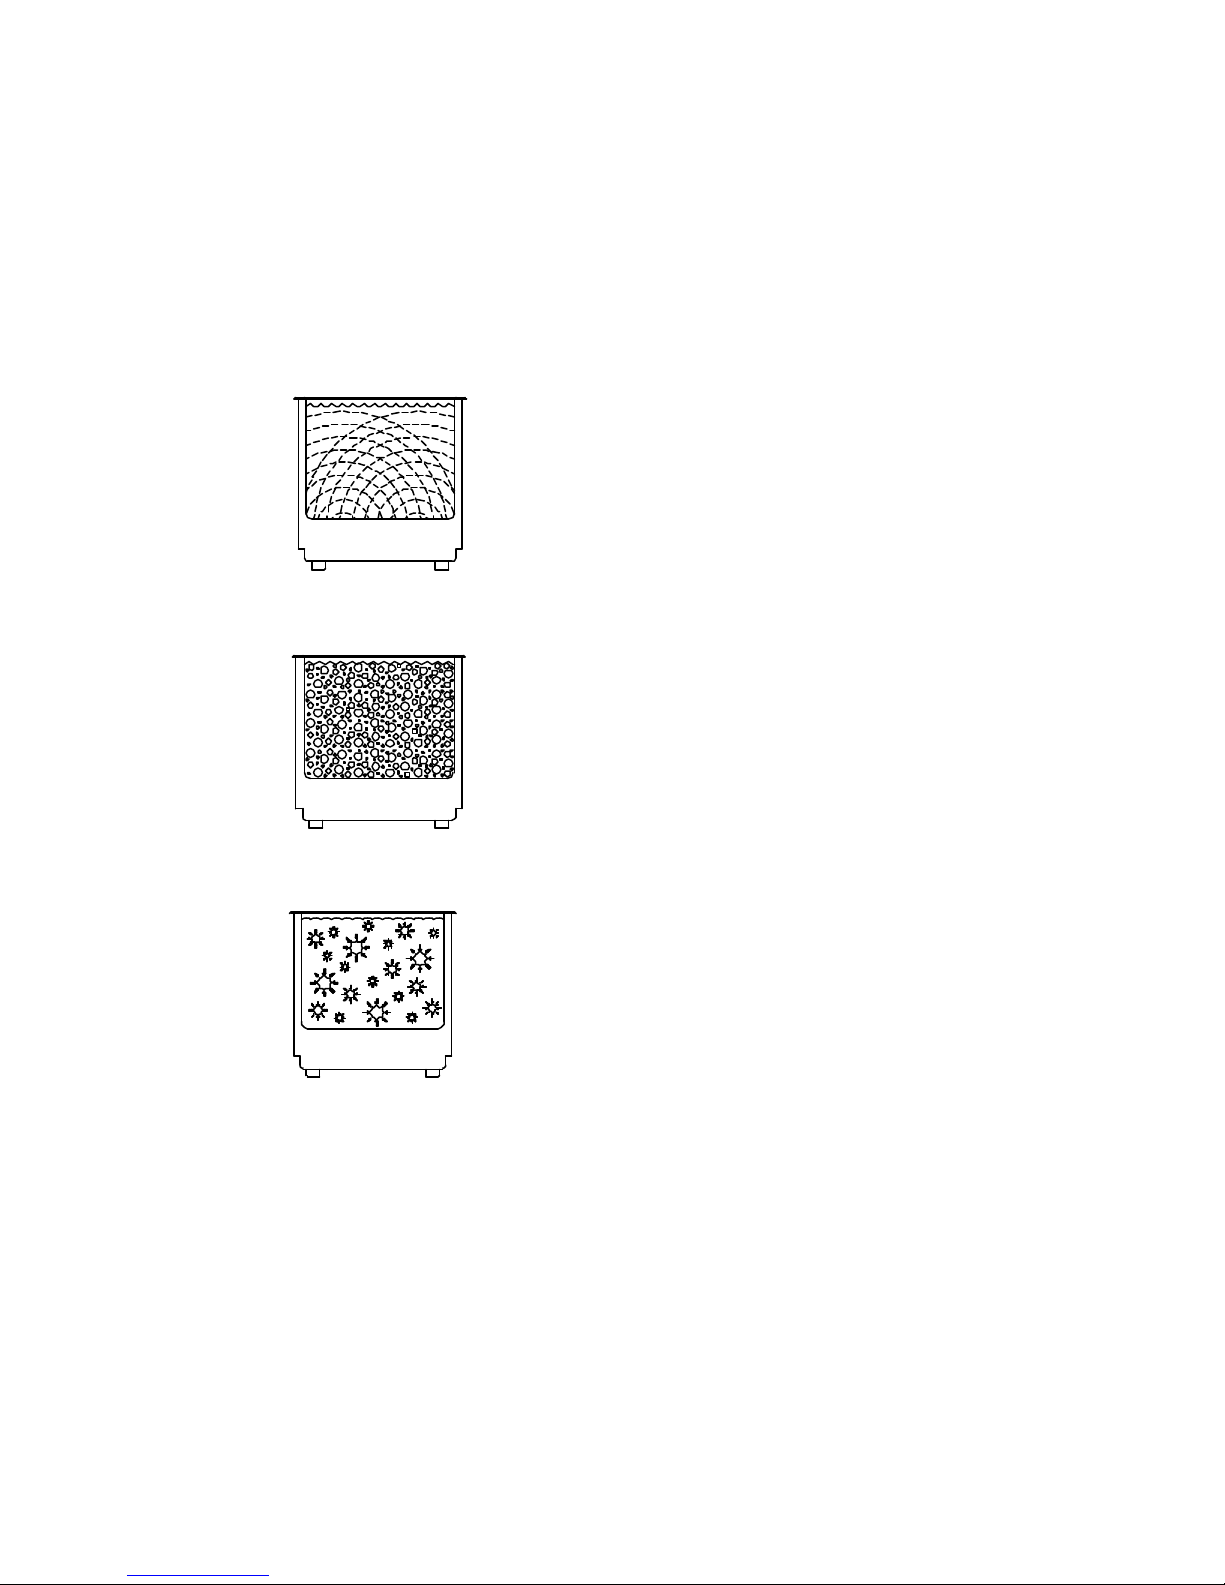
How Ultrasonic Cleaning Works
As the sound waves from the
During the low pressure stage,
During the high pressure stage,
Ultrasonic sound is sound transmitted at frequencies generally beyond
the range of human hearing. In your ultrasonic cleaner, ultrasonic sound
(sonics) is used for cleaning materials and parts. This is how it works:
transducer radiate through the
solution in the tank, they cause
alternating high and low pressure
areas in the solution.
millions of microscopic bubbles
form and grow. This process is
called CAVITATION.
the bubbles collapse or “implode”
releasing enormous amounts of
energy. These implosions act like
scrub brushes, eroding soils,
away. They work in all directions
attacking every surface and
invading all recesses and openings .
6
Page 10
Operating Your Cleaner
If this is the first time you are using the cleaner, please read this whole
section before proceeding.
Before You Start Cleaning
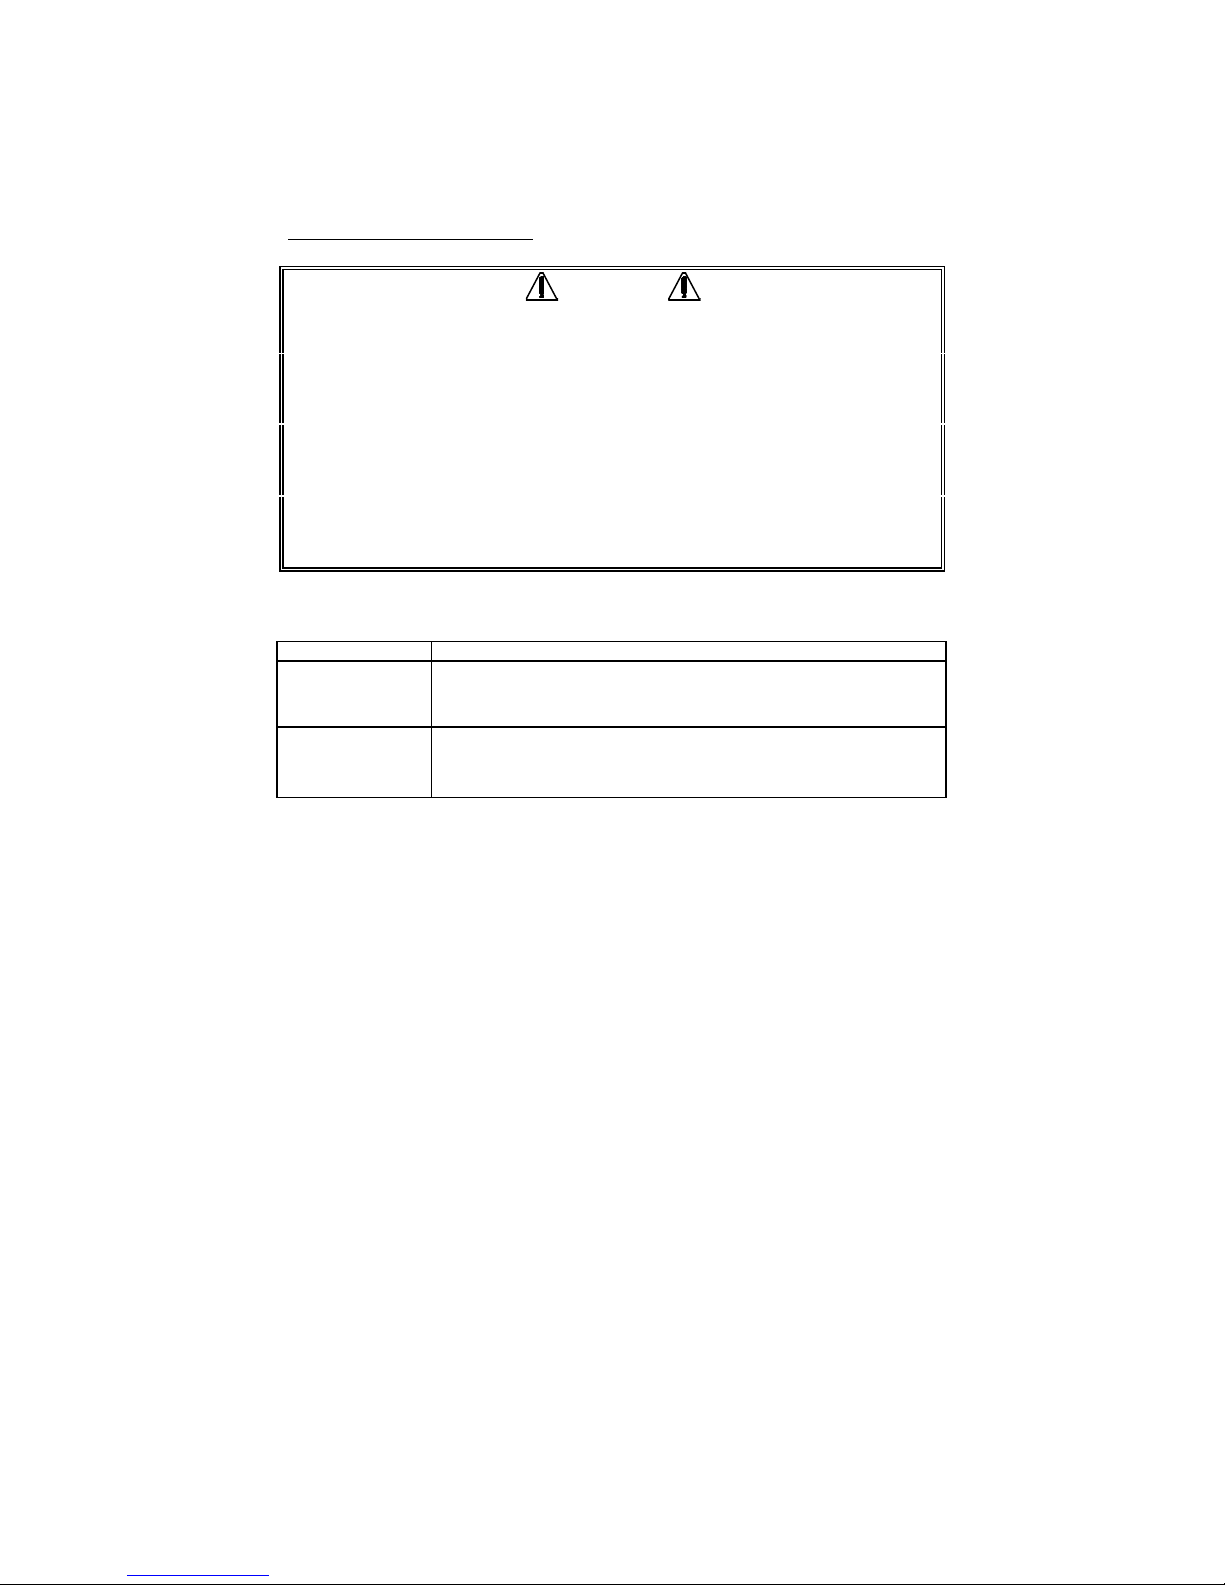
CAUTION
• Do not place parts or containers directly on the bottom of the cleaning
tanks; use a basket or other device to suspend items.
• Do not allow the cleaning solution level to drop more than four inches
below the top of the tank with the cleaner on.
• Do not ever use alcohol, gasoline or flammable solutions. Doing so
could cause a fire or explosion. Use only water-based solutions.
• Do not ever use mineral acids. These could damage the tank.
Failure to comply with these cautions can cause injury or damage to
your cleaner and will void your warranty.
Explanation of Controls
Control Function
Ultrasonic
Power Switch
Activates and de-activates ultrasonic cavitation in the
tank
Heater
Power Switch
Activates the external heater on the cleaning tank. The
heater power has been selected to provide the
optimum temperature for most cleaning applications.
7
Page 11
Getting Ready
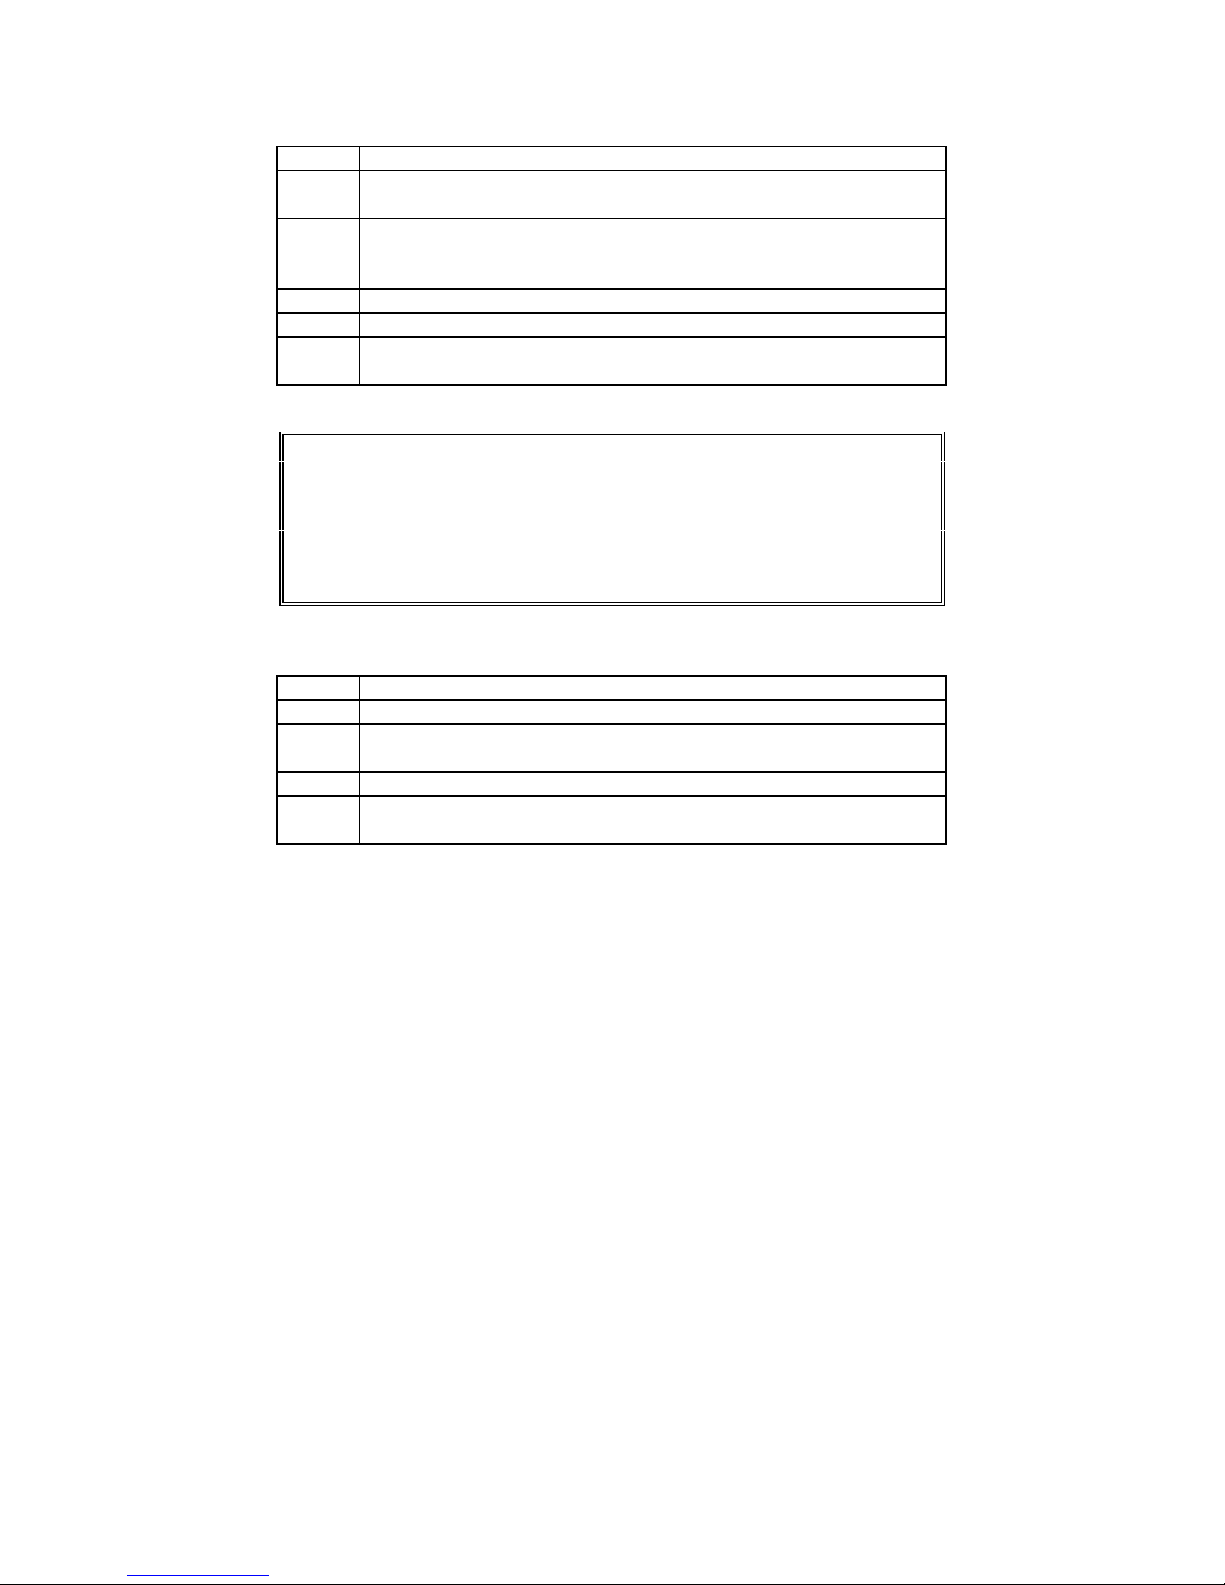
Step Action
1 Select your cleaning chemistry (check with your chemical
supplier for solution effects on metals).
2 Allowing for the volume of the parts you will be cleaning and
cleaning chemistry, fill the tank with warm tap water to the
operating level (two to four inches from the top).
3 Add cleaning chemistry to the tank water.
4 Plug the cleaner into a grounded outlet.
5 For maximum efficiency, refer to page 9, “Optimizing Your
Cleaner” before proceeding.
NOTE:
If this is the first time you are running the cleaner, or if you have changed
cleaning solution, you must degas the solution. This is done by setting
the cleaner up for operation and allowing the ultrasonics to drive the
warm solution for 5-10 minutes This will force out excess gas and assure
optimum cleaning. You will likely notice a change in the sound of the unit
as is degasses.
Cleaning Items
Step Action
1 Place the items to be cleaned into a basket or other carrier.
2 Slowly lower the basket into the tank. Do not allow items to
contact the tank bottom. Do not stir the solution.
3 When items are clean, slowly remove them from the cleaner.
4 Rinse the clean items with fresh water and dry them, if
necessary.
8
Page 12

Optimizing Your Cleaner
Tanks
Cleaning - check the tank for contamination whenever you change
solution. If necessary, remove contaminants with a nonabrasive cloth
and water.
Emptying - always unplug the cleaner before emptying the tank. Empty
the solution into a proper waste disposal unit.
Filling - always unplug the line cord before filling the tank. Fill the
cleaner to the operating level (1-2 inches from the top) using warm tap
water.
Low solution level - will cause the cleaner to fail. When you remove
heavy or bulky loads from the cleaner, the solution level may drop below
the operating level. If so, be sure to replace lost solution and degas, if
necessary, depending on the amount used.
Overload - do not rest any items on the tank bottom. Weight on the tank
bottom dampens sound energy and will cause damage to the transducer.
Instead, use a basket or other method to support all items. Allow at least
one inch between the tank bottom and the parts or receptacle for
adequate cavitation.
Covers - allow the cleaner to heat up faster, to a higher temperature,
and avoid excessive liquid evaporation. However, leaving the cover on
with heat and ultrasonics can cause the solution to boil, diminishing
effectiveness.
Temperature
Heater - the heater may cause some discoloration of the tank wall. This
is normal and will not affect the performance of the unit.
Solution - the fastest method to get your cleaner to the best operating
temperature is to fill it with warm solution, turn on both the heat and
ultrasonics, and use a cover.
9
Page 13

Application Hints
First time cleaning - first experiment with one piece, then proceed with
the remainder.
Solution level - Be sure to maintain solution level within one or two
inches of the tank top. Surface activity can vary with liquid level.
Load size - It is faster and more efficient to run several small loads
rather than a few big loads.
Placing items - Never allow items to sit on the bottom of the tank.
Always place them in a basket or suspend in the solution.
Rinsing items - After cleaning, use clean water to rinse away chemicals
adhering to items.
Lubricating items - When necessary, re-lubricate items immediately
after cleaning.
Drying items - Air drying at room temperature works for some items.
Place parts requiring faster drying time under hot air blowers or in ovens.
Please call your local distributor if you have application questions.
10
Page 14
Cleaning Solutions
CAUTION
Do not use alcohol, gasoline, bleach, mineral acids, solutions with a flash
point, semi-aqueous or combustible liquids in ultrasonic tanks, or you will
void the warranty. Only use non-flammable and water-based solutions.
Solution Types
Water-based solutions are either slightly acidic or alkaline. They include
detergents, soaps and industrial cleaners designed to remove specific
soils.
Acidic water-based solutions: remove rust, tarnish or scale. They
range from mild solutions that remove tarnish, to concentrated, inhibited
acidic solutions that remove investment plaster, milk-stone, zinc oxide
and rust from steel and cast iron as well as smut and heat-treat scale
from hardened steel.
Alkaline water-based solutions: include carbonates, silicates and
caustics. These cause emulsifying action, which keeps soil from
redepositing on the cleaned surface, and improves cleaning action in
hard water.
Alkaline strength Removes:
Mild Light oils and greases, cutting oils and coolant
compounds.
Mild to strong Heavy grease and oil, waxes, vegetable oils, inks,
wax or fat-base buffing and polishing compounds,
milk residues and carbohydrates.
Heavy-duty Mill scale, heat-treat scale, corrosion or oxides.
11
Page 15

Change the cleaning solution periodically. Cleaning solutions can
become contaminated with soil particles which coat the tank bottom.
This coating dampens the ultrasonic action and reduces cleaning
efficiency. Certain solutions will cavitate better than others . Contact
your local distributor for further information.
Heat and cavitation: increase the chemical activity of cleaning
solutions. Some materials may be damaged by this stronger chemical
action. When in doubt, test run samples of items to be cleaned.
Chemistry Concentrations
Chemistry concentrations may vary. The amount you use depends on
the detergent and the type of soil to be removed. Follow instructions on
the chemistry container and refer to the table below for the effects of
chemistry on metals.
Chemicals Harmful to Your Tank
The following chemicals will harm your ultrasonic tank and the action of
ultrasonics and higher operating temperatures will increase their
chemical activity. Do not use these or similar chemicals directly or in
dilution in your ultrasonic tank or you will void your warranty.
Acetophenone Chloracetic Acid Hydrocyanic Acid
Aluminum Chloride Chloric Acid Hydrofluoric Acid
Aluminum Fluoride Chlorine, Anhydrous Hydrofluosilicic Acid
Aluminum Sulphate Chromic Acid Iodoform
Ammonium Bifluoride Copper Chloride Mercuric Chloride
Ammonium Chloride Copper Fluoborate Muriatic Acid
Ammonium Hydroxide Ethyl Chloride Phosphoric (crude)
Amyl Chloride Ferric Chloride Sodium Hypochlorite
Antimony Trichloride Ferrous Chloride Potassium Chloride
Aqua Regia Ferris Sulfate Stannic Chloride
Bromine Fluoboric Acid Stannous Chloride
Calcium Bisulfate Fluorine Sulfur chloride
Calcium Bisulfite Hydrobromic Acid Sulfuric Acid
Calcium Hypochloride Hydrochloric Acid Zinc Chloride
12
Page 16
Troubleshooting
If your cleaner does not operate satisfactorily, please check the tables
below for possible causes before calling your authorized service center.
WARNING
High voltage inside - dangerous shock hazard.
DO NOT attempt to disassemble or repair the cleaner.
Problem Cause What to do
Cleaner
will not
start.
Cleaner
operates
but does
not heat
solution
Decreased
ultrasonic
activity.
Cleaner not plugged in
properly.
Circuit board fuse blown
Heater malfunctions. Call nearest authorized
Solution is not degassed.
Solution is spent.
Plug into functioning
electrical outlet.
.
Call nearest authorized
service center.
service center.
Make sure that tank was
filled with warm tap water
plus cleaning chemistry and
has run 5-10 minutes.
Change solution.
Solution level is incorrect
for load.
Tank bottom is covered with
soil particles.
Using deionized water in
the tank.
13
Adjust solution +/- 3/8 inch
from current level.
Empty, then clean tank with
warm water. Wipe with a
nonabrasive cloth.
Deionized water does not
cavitate as actively as soapy
tap water.
Page 17
Performance
Check your cleaner periodically to test the level of activity of the
ultrasonic cavitation. Frequency of testing will depend on your use of the
cleaner, however, we suggest running this test monthly.
Glass Slide Test
You will need the following equipment:
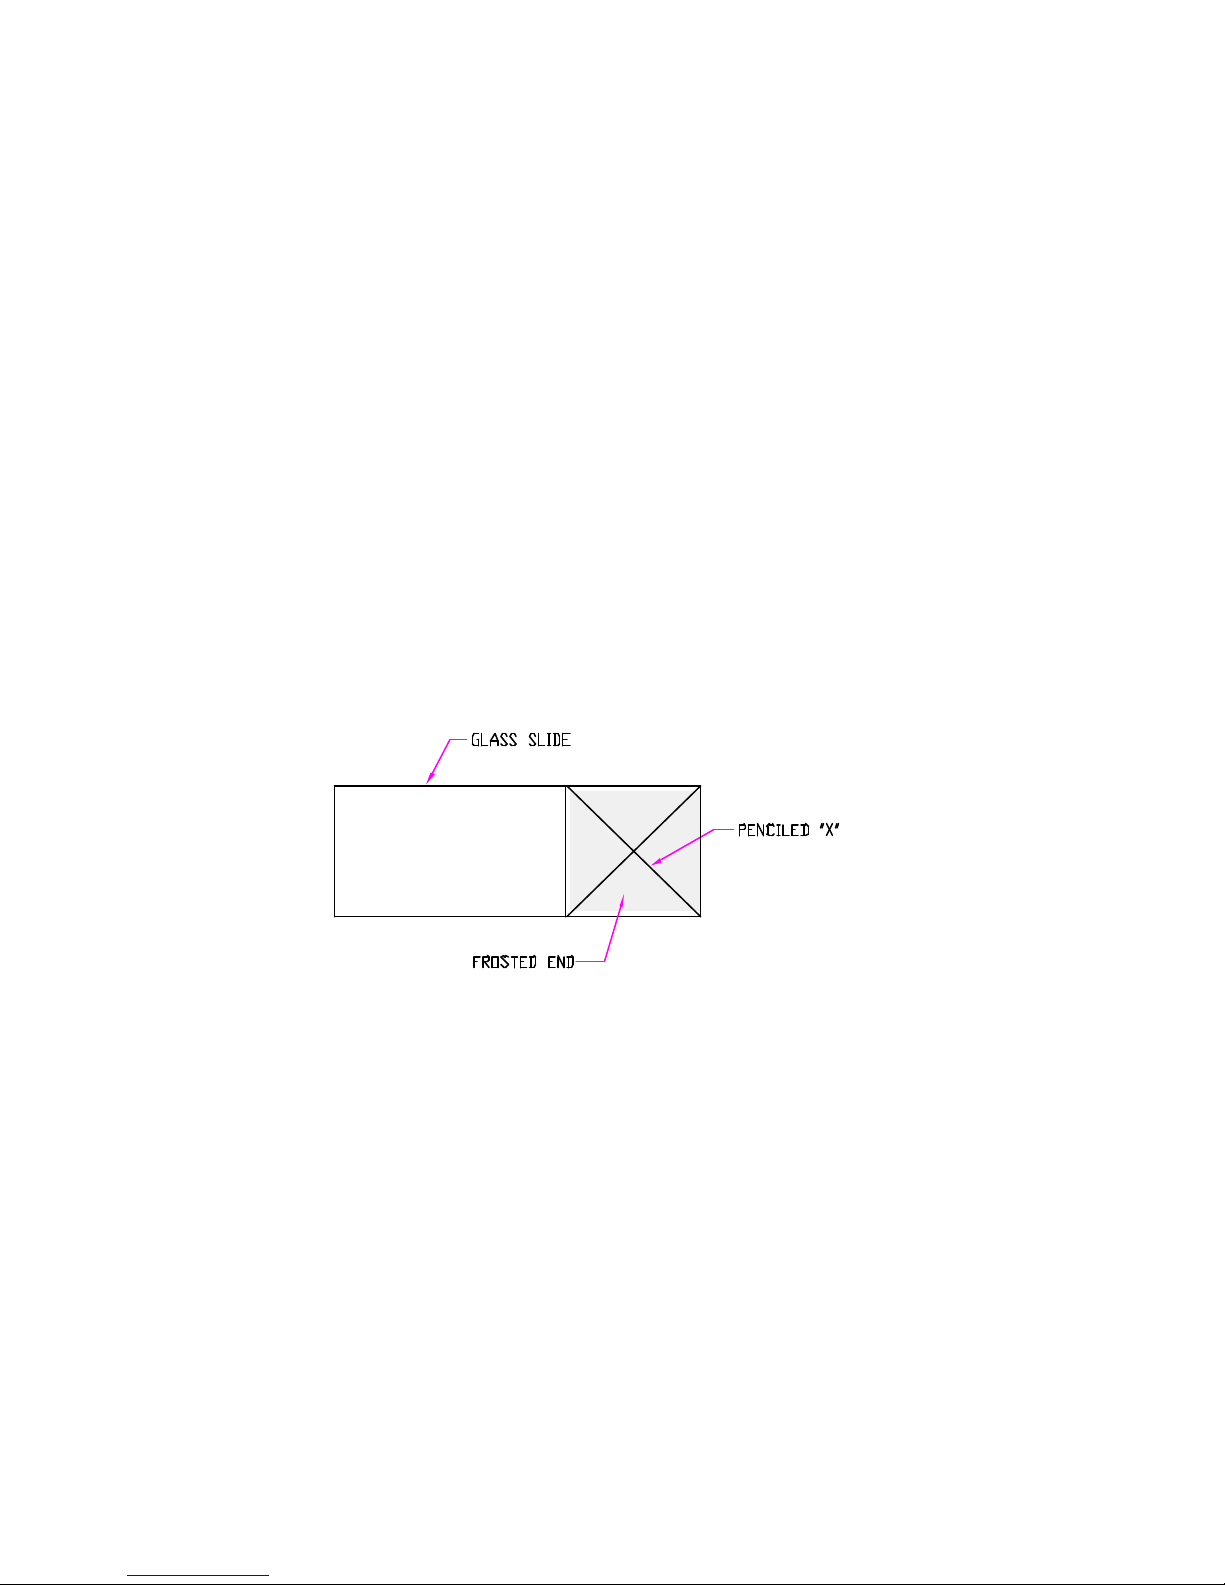
• Frosted microscope glass slide (1” x 3”), such as ESCO #2951F, or
equivalent;
• No. 2 lead pencil; and
• General purpose dish det ergent or liquid soap.
Test procedure:
1. Prepare a fresh solution with general purpose dish detergent
(concentration 1%) and warm tap water (120º - 140ºF).
2. Fill the cleaner to within 2-4 inches of the tank top.
3. Turn the ultrasonics on for at least five minutes to allow for degassing.
4. Prepare the glass slide by first wetting the frosted portion with tap
water.
5. With the No. 2 pencil, on the frosted portion make an “X” from corner
to corner.
6. Immerse the frosted end of the slide into the solution. Hold the slide
vertically and center it in the solution.
7. Turn the ultrasonic switch to “On”
.
14
Page 18

The ultrasonics will begin immediately to remove the lead from the slide.
All lead should be removed within 10 seconds. If your cleaner passes
this test, its ultrasonic cavitation is acceptable.
NOTE:
To ensure consistency from test to test, be sure to repeat
test conditions - use the same solution concentration, liquid level,
temperature, type of pencil, length of degassing, etc.
Service
With normal use, your Ultrasonic Cleaner should not require servicing.
However, if it fails to operate satisfactorily, first try to diagnose the
problem by following the suggestions in the Troubleshooting Guide.
If you find that your cleaner needs repair, carefully pack and return it to
your local distributor. If under warranty, remember to include proof of
purchase. Your cleaner will be returned by ground service unless you
specify otherwise.
15
Page 19

BRANSON ULTRASONICS CORPORATION
41 Eagle Road, Danbury, CT 06813-1961 • (203) 796-0400 • FAX (203) 796-2240
Branson Southeast Asia Branson Europe Branson Japan
Hong Kong Geneva, Switzerland Tokyo, Japan
Branson United Kingdom Branson Canada Branson de Mexico
London, England Markham, Ontario Nuevo Laredo, Mexico
Branson Ultrasonics Corporation Printed in U.S.A. 6/01
 Loading...