

Brandt WTE1573D User Manual

FR GUIDE D’INSTALLATION & D’UTILISATION
EN INSTRUCTIONS FOR USE
NL HANDLEIDING VOOR HET INSTALLEREN EN HET GEBRUIK
Lave-Linge
Washing machine
Wasmachine

2
FR Page 3
Page 15
Pagina 27
EN
NL
Important :
Avant de mettre votre appareil en route, veuillez lire attentivement ce guide
d’installation et d’utilisation afin de vous familiariser plus rapidement avec
son fonctionnement
Dans le souci d’une amélioration constante de nos produits, nous nous
réservons le droit d’apporter à leurs caractéristiques techniques,
fonctionnelles ou esthétiques toutes modifications liées à leur évolution.
Warning :
Before installing and using your appliance, please carefully read this Guide
to Installation and Use, which will allow you to quickly familiarise yourself
with its operation.
As part of our commitment to constantly improving our products, we reserve
the right to make changes to them based on technical advances to their
technical and functional features and appearance.
Belangrijk:
Vóór installatie en gebruik van uw apparaat deze installatie- en
gebruiksgids aandachtig lezen. U zult snel gewend raken aan de werking.
Wij streven voortdurend naar verbetering van onze producten. Daarom behouden
we ons het recht voor om aan de technische, functionele of esthetische
kenmerken van onze producten wijzigingen aan te brengen die in verband staan
met technische ontwikkelingen.
15
EN
Dear Customer,
You have just acquired a BRANDT washing machine and we would like to thank you.
We have invested all our dedication and know-how in this appliance so that it would best meet
your needs. With innovation and performance, we designed it to be always easy to use.
In the BRANDT product range, you will also find a wide choice of ovens, microwaves, cooking
hobs, ventilation hoods, cookers, dishwashers, driers, fridges and freezers, that you can
coordinate with your new BRANDT washing machine.
Visit our website www.brandt.com where you will find all of our products, as well as useful and
complementary information.
BRANDT
This machine is only designed for domestic use and to wash, rinse, spin and, depending on the model,
dry machine-washable textiles.
In this manual, you will find the instructions
required for the safety, installation and use of
your machine and the relevant guarantees.
Please keep these and pass them on if you
sell the machine.
•
Dispose of the packaging and of your wornout machine (after rendering it unusable by
removing the hoses, cutting the power
cable and breaking the lock on the lid) in
accordance with the prevailing regulations.
•
For a new installation, the machine must be
connected to the water supply with a new
hose: the old hose must not be re-used.
•
Do not let children play with the machine or
the cleaning and maintenance products
(water unsuitable for drinking, ingestion of
the products, risk of physical harm, etc.).
Keep pets away from the machine.
•
Protect your property and your machine by
checking the condition of the hoses
regularly. Never use solvents, inflammable
products, explosive products or aerosols
near to or in your machine. Use the machine
in a well-ventilated, frost-free area and do
not use an extension lead or a multiple
adapter.
•
Switch off the power supply to your
machine after use.
•
If your machine should break down, call a
qualified washing machine engineer.
•
Only use your machine in accordance with
the instructions in this manual. Only use
washing and maintenance products
approved for domestic machines.
For washer-dryers:
•
Before drying, remove the detergent
dispensers placed in the drum with your
washing. Their plastic material cannot
withstand the drying temperatures.
Contents
Safety advice
Safety instructions (for your machine
and your washing), which must be
observed
An electrical risk,
Important advice and information
Safety /environment and savings ..............15 - 16
Releasing, moving and levelling ................16 - 17
Connecting to the cold water supply ................17
Draining away the waste water ..........................17
Connecting to the electricity supply..................17
Sorting and checking your washing ..................17
Access to the machine’s drum ..........................18
Inserting your washing ........................................18
Closing the drum ..................................................18
Textile care codes ................................................18
Cleaning products ................................................18
Programming..................................................19 - 21
Details of the functions and the options............21
Changing a programme ......................................23
Automatic safety systems ..................................23
EEC/95/12 programme – characteristics..........23
Running maintenance / messages
......24
Cleaning the pump and drying filters ................24
Incidents that may occur......................................25
Automatic fault diagnostics ................................26
16
EN
4
➀➁
1 2
➀
➀
➁
➁
➂
➂
➃
➃
➄
•
Fill your machine to the maximum. You
thereby optimise your water and electricity
consumption.
•
Only programme a pre-wash when
absolutely necessary: e.g. for heavily soiled
sports or working clothes, etc.
•
A programme with no pre-wash is sufficient
for slightly or moderately soiled clothes.
•
For slightly soiled clothes, select a short
washing cycle (or an «Express» cycle,
depending on the model).
•
Gauge the amount of detergent according
to the water hardness, the degree of soiling
and the amount of washing. Always follow
the manufacturer’s instructions on the
detergent packets.
For washer-dryers:
•
If you spin at high speed, little dampness
will remain and you will therefore consume
little electricity. Even synthetic textiles can
be spun before drying.
•
Choosing your drying time well also helps to
save water and electricity.
•
Avoid wasting water and electricity by not
over-drying your laundry.
Environment and savings
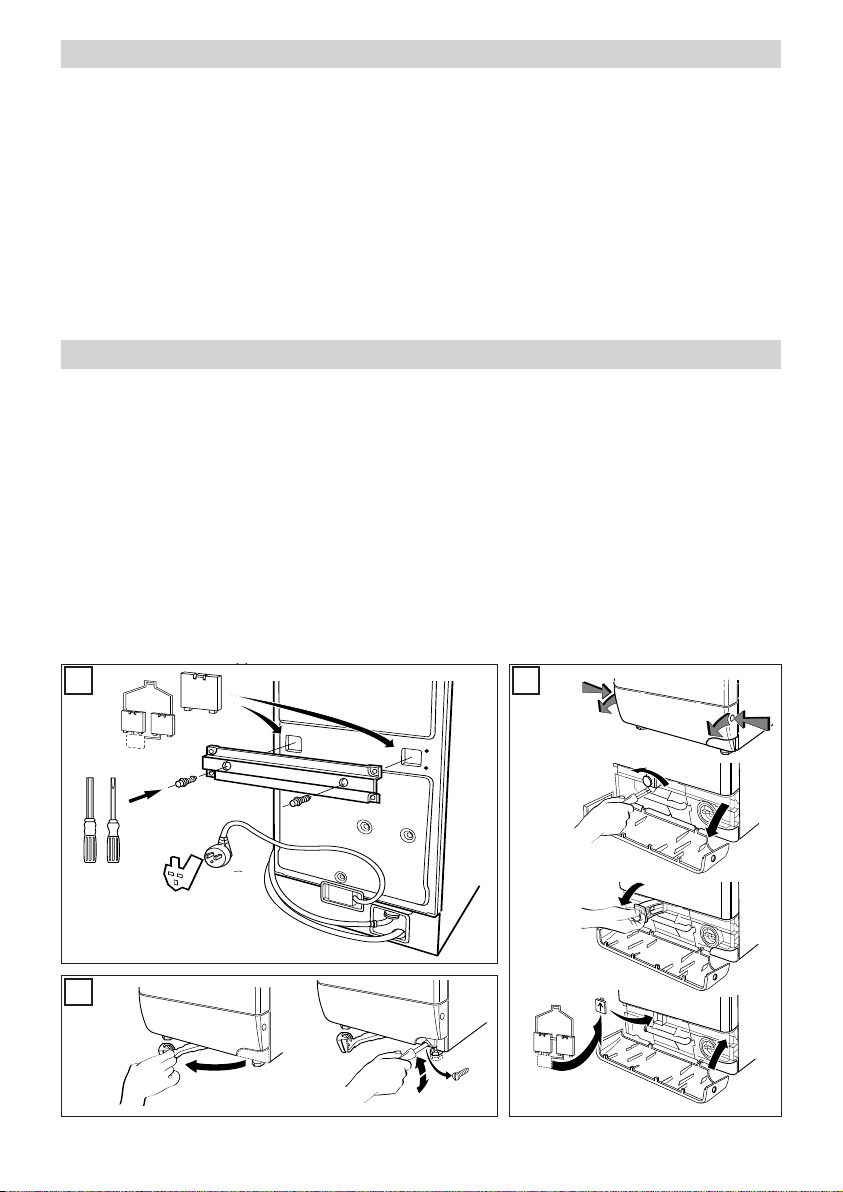
THE FOLLOWING OPERATIONS MUST BE
PERFORMED BEFORE YOU USE THE
MACHINE. Figs 1 & 2
First of all remove the piece of expanded
polystyrene from under the lid. (Keep the
transport material: you will need it if you move).
Rear transport clamp Fig. 1 ➀ to ➃
➀ Unscrew the 6 screws using a No. 10 tube
spanner or a straight-edged screwdriver.
➁ Remove the clamp.
➂ Free the power cable from the plastic
holder clipping it to the transport clamp.
➃ Plug the holes left by the clamp using the
plugs supplied and re-screw the 4 external
screws into the casing.
Rear transport clamp Fig. 2 ➀ to ➄
➀ Unclip the plinth by pressing simultaneously
on the side knobs and pulling them towards
you.
➁ Unscrew the screw holding the red plastic
«front» clamp.
➂ Remove the front clamp.
➃ Plug the hole left by the clamp with the
remaining plug.
➄ Clip the plinth on again.
Releasing your machine

17
EN
3
0,80 m. min.
1,10 m. max.
230 V - 50 Hz - 10 A.
1 ➞ 10 kg/cm
2
10 ➞ 100 N/cm
2
Preparing your washing
Connecting your machine
Failure to observe the following advice
can cause severe and even irremediable
damage (damage to the drum, torn
washing, etc.) and rescinds the guarantee.
Sorting your washing
•Ensure that all your washing is machinewashable: check the labels on your washing
(type, temperature, type of cleaning, etc.).
•Ensure that your coloureds do not run.
•When washing a mixed load, use the
washing programme for the most delicate
textiles in the mix.
Checking your washing
•Empty the pockets and close any zips and
press-studs.
•Remove any curtain hooks or place your
curtains and any small items of laundry
(ribbons, handkerchiefs, etc.) in a net bag.
Button up pillowcases, etc.
•Remove any poorly attached buttons, pins
and hooks.
Setting on castors, moving
To move your machine, unclip and slide the
castor release handle from right to left.
Your machine must not still be on its
castors when in operation.
Check that it is plumb and stable to avoid
vibration during spinning.
Levelling Fig. 4 ➀ ➁
- Set your machine on its castors.
- Unscrew the two screws with a straightedged screwdriver.
- Level the machine by adjusting the two feet
using a flat spanner or a pair of pliers.
- Set the machine back on the floor by sliding
the castor release lever to check the
chocking.
- If the machine is correctly level, retighten the
two locking screws.
To align your machine with your units, you can
break off the fixing hooks for the hoses.
Take care not to squash the hoses!
If you cannot avoid installing the machine on a
carpeted floor, adjust the feet so as to leave a
large gap for ventilation.
Moving and levelling
Connecting to the cold water supply (Fig. 3)
Your washing machine can be connected to
any cold water pipe. Connect the supply hose
provided to a threaded 20x27 Ø tap (3/4 BSP)
not forgetting to insert the seal supplied
(depending on the model, the hose may
already be fitted with a seal).
Water pressure may vary from 10 to 100
N/cm
2
(1 – 10 bars).
Draining away the waste water (Fig. 3)
NB: Ensure that the drain hose is tied firmly in
place with cord, etc. to avoid a possible flood.
In all cases, the height of the drain hose
bracket must be between 0.80m minimum and
1.10m maximum above the floor. The hose
must be fastened to avoid it breaking and its
opening must be above the surface of the
water being drained away.
Connecting to the electrical supply (Fig. 3)
Please refer to the «Characteristics» section.
The socket must be easily accessible but out
of children’s reach.
The installation must conform to the country’s
regulations, in particular as regards earthing
requirements and installation in showerrooms. The machine must be earthed.
Never use an extension lead or a multiple
adapter for connecting to the socket.
* We cannot be held responsible for any
incident caused by poor earthing of the
machine or poor electrical installation.
The machine must be switched off (in the
«Stop» position) when connecting to the
electrical supply.
Replacing the power cable:
For your safety, the power cable and,
depending on the model, the complete
electric box and its associated cable must
only be replaced by the manufacturer’s AfterSales Service or a qualified electrician.
 Loading...